Set up a cluster on AIX
- Horizontal cluster
- Vertical cluster
- Prepare the AIX OS
- Install WebSphere Portal on AIX on the primary node
- Install with GUI
- IBM Installation Manager
- Install with response file
- Post-installation tasks
- Install DB2
- Create groups and assign users
- Create DB2 databases
- Set up DB2 using ConfigEngine
- Set up DB2 manually
- Create DB2 database schemas
- Grant privileges to DB2 database users
- Assign custom DB2 table spaces
- Configure JCR collation support
- Manual DB2 transfer - Derby to DB2
- Configure DB2 for large file handling in WCM
- Change DB2 driver types
- Remove search collection
- Augment dmgr profile with Portal
- Prepare to create the cluster
- Create a static cluster
- Create a dynamic cluster
- Configure the Web server
- Prepare a Tivoli Directory Server
- Add an LDAP user registry
- Add a database user registry
- Add realm support
- Adapt the attribute configuration
- Query the defined attributes
- Add attributes
- Configure Portal to use dynamic groups
- Enable referrals for your LDAP user registry
- Configure the portal to use LDAP referrals
- Prepare additional cluster members
- Tune the servers
- Configure search
- Set up multiple clusters
- Install Web Content Manager into an existing Server installation
Horizontal cluster

Horizontal cluster

Prepare the AIX OS
- Set file descriptor limit...
-
ulimit -n 10240
- For IBM GPFS file sharing, set inodes limit...
-
mmchfs /dev/gpfs1nsd -F 250000
/dev/gpfs1nsd is the portal installation file system.
- Set maximum file size. Set higher than largest anticipated upload to WCM.
- ulimit -f max_file_size
- To use install GUI tool, configure X server on AIX (for example X-Windows or GNOME). Not required if installing with a response file.
Install WebSphere Portal on AIX on the primary node
Install with GUI
The bit architecture of the installation program uses:
- The bit architecture of the operating system
- The bit architecture of the existing WAS
When you install onto a 64-bit operating system, WebSphere Portal installs as a 64-bit version. We can force a 32-bit application installation onto a 64-bit operating system.
IBM Installation Manager
- Verify the fully qualified host name...
- ping myserver.myco.com
- Verify network configuration...
- ping localhost
- For servers with a firewall, antivirus, screen saver, and/or desktop search engine enabled, disable them before installing.
- Install IBM Installation Manager:
- Using GUI...
- ./install
From command line:
-
./userinstc -acceptLicense -log /tmp/install.log
- From Portal Setup disk...
- ./setup.sh
To change display language, add the LaunchPadLocale language code.
To search for IBM Installation Manager updates, navigate to...
- File > Update
- Using GUI...
- Add the repositories where the installation media exists:
- Open Installation Manager...
-
imcl -c
- Navigate to...
- File | Preferences | Repositories | Add Repositories | Browse | IBM WAS service repository | OK
- Ensure all required repositories are checked.
- To verify successful access to service repositories, click
-
Test Connections
- Select Apply.
- Select OK.
- Open Installation Manager...
- Select Install to begin the installation process.
On the Select the features to install panel, keep the default selection checked to create a new Portal server profile. This profile is used as the primary node for the cluster. There is also an option to create a local dmgr profile. Only select this option in a test environment where to automate the process of creating a local dmgr profile. Expand the WebSphere Portal package and select the dmgr Profile augmented with WebSphere Portal check box. Then on the Install Packages panel: Configuration details panel, click Dmgr Profile configuration details and enter the appropriate information for the dmgr.
- On the Select packages to install panel, select both the WAS and WebSphere Portal packages.
- Click Next.
- Accept the license agreement and then click Next.
- Select shared resources directory and then click Next.
- Set Installation Directory:
The installation directory must be empty and must not contain any of the following characters: ~ ! @ # $ % ^ & * ( ) _ + { } | < > ? ` = [ ] ; ' , . "
- Select the WAS Package Group Name and then select the installation directory path.
- Select the WebSphere Portal Package Group Name and then select the installation directory path.
- Click Next.
- Select the translations to install and then click Next.
- On the panel...
- Select the features to install
...expand the WAS and WebSphere Portal packages
To force a 32-bit installation on the 64-bit operating system, expand the IBM WAS Network Deployment feature. Then expand IBM Software Development Kit. Under IBM Software Development Kit, select 32-bit SDK for Java.
- On the Configuration panel, select the type of profile template to install: Full, Base, or Custom.
- Click Profile configuration details.
- Select either the Standard or Advanced configuration mode.
Select Advanced to specify URI information.
- Click Next.
- Confirm the information on the Summary panel and then click Install.
- After a successful installation, the summary panel displays. Choose the radio button...
- Portal First Steps
...and then click Finish to start the servers and begin configuring WebSphere Portal.
To access the First Steps panels later, we can either select First Steps from the Start menu or we can run...
- WP_PROFILE/PortalServer/firststeps/firststeps.bat
Add the LaunchPadLocale language_code to the firststeps task to change the display to the user locale or to another language.
- If you changed the context root on the panel...
- Configuration for IBM WebSphere Portal: Profile configuration details: Advanced panel
Install with response file
First install IBM Installation Manager. Then use a response file to install IBM WebSphere Portal and IBM WAS in a clustered environment. Record response files on the same OS you plan for the installation. For multiple operating systems, record a response file for each operating system.
The bit architecture of the installation program uses:
- The bit architecture of the operating system
- The bit architecture of the existing WAS
When you install onto a 64-bit operating system, WebSphere Portal installs as a 64-bit version. We can force a 32-bit application installation onto a 64-bit operating system.
There are sample response files, located in...
- $SETUP_ROOT/responsefiles
Manually update these files based on the environment. Also replace the following lines in the sample response files if you installed WAS and WebSphere Portal from the live repository (Passport Advantage):
- Existing lines in the response file
-
- <offering id='8.0.0.3-WS-WAS-TFPM59935' version='8.0.3.20120309_1201' profile='IBM WAS Network Deployment V8.0' features='-'/>
- <offering id='8.0.0.3-WS-WAS-TFPM60670' version='8.0.3.20120319_1949' profile='IBM WAS Network Deployment V8.0' features='-'/>
- <offering id='8.0.0.3-WS-WASProd-TFPM60134' version='8.0.3.20120312_1656' profile='IBM WAS Network Deployment V8.0' features='-'/>
- <offering id='8.0.0.3-WS-WAS-TFPM61934' version='8.0.3.20120409_1230' profile='IBM WAS Network Deployment V8.0' features='-'/>
- Replace with
-
- <offering id='8.0.0.3-WS-WAS-IFPM59935' version='8.0.3.20120424_1630' profile='IBM WAS Network Deployment V8.0' features='-'/>
- <offering id='8.0.0.3-WS-WAS-IFPM60670' version='8.0.3.20120428_0856' profile='IBM WAS Network Deployment V8.0' features='-'/>
- <offering id='8.0.0.3-WS-WASProd-IFPM60134' version='8.0.3.20120425_1032' profile='IBM WAS Network Deployment V8.0' features='-'/>
- <offering id='8.0.0.3-WS-WAS-IFPM61934' version='8.0.3.20120417_1256' profile='IBM WAS Network Deployment V8.0' features='-'/>
Record response file interactively using Installation Manager menus
This step does not install WebSphere Portal. You are only recording the response file used to install portal later.
- Run...
-
./IBMIM -record responsefile.xml -skipInstall /path/to/install/directory
- On the panel...
- Select the features to install
...keep the default selection, create a new Portal server profile.
- On the panel...
-
Select packages to install panel
...select both the WAS and WebSphere Portal packages.
- Accept the license agreement and then click Next.
- Select directory for shared resources and then click Next.
- Set Installation Directory:
The installation directory must be empty and must not contain any of the following characters: ~ ! @ # $ % ^ & * ( ) _ + { } | < > ? ` = [ ] ; ' , . "
- Select the WAS Package Group Name and then select the installation directory path.
- Select the WebSphere Portal Package Group Name and then select the installation directory path.
- Click Next.
- Select the translations to install and then click Next.
- On the panel...
- Select the features to install
...expand the WAS and WebSphere Portal packages
To force a 32-bit installation on the 64-bit operating system, expand the IBM WAS Network Deployment feature. Then expand IBM Software Development Kit. Under IBM Software Development Kit, select 32-bit SDK for Java.
- On the Configuration panel, select the type of profile template to install: Full, Base, or Custom.
- Click Profile configuration details.
- Select either the Standard or Advanced configuration mode.
Select Advanced to specify URI information.
- Click Next.
- Confirm the information on the Summary panel and then click Install.
- After the Installation Manager finishes creating the response file, click Finish and then close the Installation Manager to complete the response file recording.
- If installing on a different computer, copy the response file to the response file directory on that computer.
- If the repository URL requires authentication, create a keyring file store for credentials...
cd IM_HOME/tools
./imutilsc saveCredential
           -url repository_URL \
           -userName credential_userName \
           -userPassword password  \
           -keyring keyring_file  \
         [ -password keyringfile_password ] \
         [ -proxyHost proxy_host -proxyPort proxy_port \
         [ -proxyUsername proxy_username -proxyUserPassword proxyuser_password ] \
         [ -useSocks ] ] \
         [ -verbose ]
If installing on a different computer, copy the keyring file to that computer.
- Install WebSphere Portal and IBM WAS...
- ./imcl -acceptLicense -input /path/to/response.xml -log /path/to/log/files
To use your repository keyring file...
- -keyring /path/to/keyring -password keyringfile_password
- Verify the installation was successful;
- http://myserver:myport/wps/portal
Post-installation tasks
- Enable the sample WCM content...
- ./ConfigEngine.sh configure-express -DPortalAdminPwd=foo -DWasPassword=foo
Run configure-express before configuring the database, user registry, context root, security, etc. If you ran any tasks other than the install task, do not run this task.
The configure-express task...
- Creates two new Web Content Manager Libraries:
-
Internet Web Content 8.0.0
Intranet Web Content 8.0.0To view...
- Administration | Portal Content | Web Content Libraries
- Creates a group called contentAuthors. To add members to this group...
- Administration | Access | Users and Groups
- Adds a portlet filter and applies the filter to various portlets in the sample Internet and intranet sites. We can see the definition of the filter in the WAS admin console and examining the custom resources under the Environment area.
- Creates two new theme policies:
- InternetStyle
- IntranetStyle
These styles are applied to sample Internet and intranet sites. Navigate to Theme Customizer and then select the style.
- Creates several portlet clones of the Web Content Manager rendering portlet.
These portlet clones are used on sample Internet and intranet sites.
- Creates two virtual portals with context roots of...
- wps/portal/intranet
- wps/portal/internet
To access...
- http://myserver:myport/wps/portal/internet
- http://myserver:myport/wps/portal/intranet
- Creates several sample credential slots, including...
- Default slot for Email
- Default slot for Feeds
- Default slot for Miscellaneous
- Default slot for Web Clipping
- Default slot for Web Content Management
To view...
- Administration | Access | Credential Vault
- Creates two new Web Content Manager Libraries:
- If you ran configure-express, the owner of the items in the Web content libraries containing the Internet and Intranet Site Template content will be listed as...
- uid=wpsadmin,o=defaultWIMFileBasedRealm
To update owner information for these items to correspond to the portal admin ID edit...
- WP_PROFILE/PortalServer/wcm/shared/app/config/wcmservices/MemberFixerModule.properties
...and add the following lines to the file:
-
uid=wpsadmin,o=defaultWIMFileBasedRealm -> portal_admin_DN
cn=contentauthors,o=defaultWIMFileBasedRealm -> content_authors_group_DN...then run...
- ./ConfigEngine.sh express-memberfixer -DPortalAdminPwd=foo -DWasPassword=foo
Install DB2
- On the DB host, update OS kernel parameters based on recommendations in the DB2 Quick Beginnings guide.
- When you install DB2 it automatically creates a DB2 administrative user with the correct operating system rights.
- Verify sufficient disk space for the DB2 instance home directory to be able to create the required databases.
- If the DB2 instance that maintains the databases for WebSphere Portal is used by other applications, for example, another portal, accessing databases on the same DB2 instance, it maybe necessary to increase the value of NUMDB.
To set NUMDB to 30:
UPDATE DATABASE MANAGER CONFIGURATION USING NUMDB 30
- Install DB2 or DB2 client.
- If DB2 is installed on another system than WebSphere Portal, copy the driver jar files from the DB2 server to the Portal server. The typical location for these files on the DB2 server is in
DB2_HOME/java
Place these driver files under WP_PROFILE;- WP_PROFILE/PortalServer/dbdrivers/db2jcc4.jar
- WP_PROFILE/PortalServer/dbdrivers/db2jcc_license_cu.jar
- On the DB2 system, verify the DB2 instance port was added to services during the DB2 installation.
- Edit /etc/services and ensure that the following is set...
-
DB2_db2inst1 50000/tcp
...where db2inst1 is the DB2 instance name, is in the services file. If you do not see DB2_db2inst1 50000/tcp in the services file, add this entry to the services file. Ensure that the port number used is not in use. If the port number is already in use, select a different port number.
- Edit /etc/services and ensure that the following is set...
- Modify the approriate properties files before transferring the data from the default database to the DB2 database. Property files are read by ConfigEngine when tasks are executed. They are not read during Portal appserver startup.
Multiple databases can be used to hold information for applications such as Feedback and LikeMinds.
- release.DbName=reldb
- jcr.DbName=jcrdb
- feedback.DbName=fdbkdb
- likeminds.DbName=lmdb
- community.DbName=commdb
- customization.DbName=custdb
For a remote database, enter values for the remote server. Regardless of the operating system, use a forward slash (/) instead of a backslash (\) in the property files for file system paths. Only change the properties within this task and skip all other properties.
Depending on which database domain has to be configured, replace dbdomain with:
- release
- customization
- community
- jcr
- feedback
- likeminds
The values for at least one of the following properties must be unique for the release, customization, community, and JCR domains:
- dbdomain.DbName
- dbdomain.DbUrl
- dbdomain.DbSchema
If we use the same values for all three properties across the release, customization, community, and JCR domains, the database-transfer task fails due to ambiguous database object names. If DbUser, DbUrl, and DbPassword are not the same across domains, the value for DataSourceName must differ from the DataSourceName of the other domains. In other words, this value must be unique for the database domain.
- Make backup copies of the following files:
- WP_PROFILE/ConfigEngine/properties/wkplc.properties
- WP_PROFILE/ConfigEngine/properties/wkplc_dbdomain.properties
- WP_PROFILE/ConfigEngine/properties/wkplc_dbtype.properties
- For DB transfers other than Derby: WP_PROFILE/ConfigEngine/properties/wkplc_sourceDb.properties
Default values are listed in these files. Unless otherwise noted, all values are of type alphanumeric text string. Set the appropriate values for each instance of each property. In wkplc_dbdomain.properties, most properties are repeated for each domain.
- Set properties in wkplc_dbdomain.properties
dbdomain.DbType=db2
dbdomain.DbName=domain_db_name DB2 database names cannot exceed eight (8) characters. This value is also the database element in dbdomain.DbUrl. TCP-IP alias for the database. dbdomain.DbSchema=domain_schema_name Some database management systems have schema name restrictions. dbdomain.DataSourceName=data_source_name Do not use the following reserved words: releaseDS communityDS customizationDS jcrDS lmdbDS feedback dbdomain.DbUrl=JDBC_DB_URL Value must conform to the JDBC URL syntax specified by the database. Database element should match the value of DbName. dbdomain.DbUser User ID for the database configuration user. dbdomain.DbPassword password for the database configuration user. dbdomain.DbConfigRoleName Name of the group for database configuration users. Database rights are granted to this group instead of individuals. The user specified for dbdomain.DbUser must be assigned to this group. Optional: dbdomain.DbRuntimeUser User ID of the database user that should be used by WebSphere Portal to connect to the database at runtime. If no value is specified for this setting, the database configuration user will be used to connect to the databases at runtime. If dbdomain.DbRuntimeUser is specified, set dbdomain.DbRuntimePassword to be the password of the runtime database user. dbdomain.DbRuntimeRoleName Name of the group for database runtime users. Database rights are granted to this group instead of individuals. The user specified for dbdomain.DbRuntimeUser must be assigned to this group. dbdomain.DBA.DbUser Optional. DB administrator user ID for privileged access operations during database creation and setup. Required.if you run the create-database and setup-database ConfigEngine tasks. If you do not need this parameter, we can either accept the default value or leave blank. dbdomain.DBA.DbPassword Optional. Database administrator password for privileged access operations during database creation. If you do not need this parameter, we can either accept the default value or leave blank. dbdomain.DbNode Value for the database node name. Set this value to call create-database. Required only for local databases. - Save and close the file.
- Update the following properties in wkplc_dbtype.properties.
db2.DbDriver Name of the JDBC driver class. db2.DbLibrary .zip or .jar file containing the JDBC driver class. db2.JdbcProviderName Name of the JDBC provided that WebSphere Portal uses to communicate with its databases. - Save and close the file.
- Update the WasPassword value in wkplc.properties. This value is the password for the WAS security authentication used in the environment.
- Save and close the file.
Create groups and assign users
Before transferring the databases to DB2 , create the users and groups specified in wkplc_dbdomain.properties and assign the users to their corresponding group. The user and group names must comply with both the database management system software requirements and WebSphere Portal requirements.
- If you have provided a value in wkplc_dbdomain.properties indicating that a runtime user should be used to connect to the database at runtime, create a user for...
- dbdomain.DbRuntimeUser
When creating these users, use the same user ids and passwords entered in wkplc_dbdomain.properties.
-
If you have provided a value in wkplc_dbdomain.properties for dbdomain.DbRuntimeRoleName, create a group for...
- dbdomain.DbRuntimeRoleName
- Assign the created user for dbdomain.DbUser to the created group for dbdomain.DbConfigRoleName.
- If dbdomain.DbRuntimeUser is specified, assign the created user for dbdomain.DbRuntimeUser to the created group for dbdomain.DbRuntimeRoleName.
Create DB2 databases
When created DB2 databases locally, we can create these databases using a configuration task or we can create these databases manually. When created the DB2 databases remotely, we can only create the databases manually.
Create a local DB2 database automatically using ConfigEngine
We can use ConfigEngine tasks to create databases on a local DB2 installation. If we are using a remote DB2 installation, we cannot create databases using ConfigEngine. Create the databases manually. The create-database task cannot be run by a non-root user.
-
cd WP_PROFILE/ConfigEngine
./ConfigEngine.sh create-database -DWasPassword=foo
After completion, check the services file on the DB2 server system. If it does not specify DB2 connection and interrupt service ports, specify the ports for the operating system. Edit /etc/services and add the text...
-
db2c_db2 50000/tcp
...where db2 is the default instance. Ensure the port number used is not already in use. If 50000 is already is use, select a different port number.
Create a remote or local DB2 database manually
When we use a remote DB2 server, manually create the required databases.
If we are using DB2 JDBC Type 4 driver you do not need to install the DB2 client software. Copy the Type 4 jar files from the remote DB2 server to the WebSphere Portal server.
- db2_home/java
For Type 2 drivers, configure DB2 client to connect to the remote DB2 server instance, for example, db2inst1. To create a database, you must be a DB2 System Administrator with sufficient database privileges (SYSADM or at a minimum SYSCTRL).
Create a remote or local DB2 database manually
- Log in as a DB2 instance system authority.
For example, we can log in as db2inst1 as the DB2 instance owner.
- Initialize a DB2 command environment.
For example, execute...
- . /home/db2inst1/sqllib/db2profile
db2inst1 is the DB2 instance owner of the DB2 instance.
-
db2set DB2COMM=TCPIP
db2set DB2_EVALUNCOMMITTED=YES
db2set DB2_INLIST_TO_NLJN=YES
db2 "UPDATE DBM CFG USING query_heap_sz 32768"
db2 "UPDATE DBM CFG USING sheapthres 0" -
Create databases:
- Replace dbname with the actual name of the database. Run the commands and each time replace dbname with the actual values for release, community, customization, Java Content Repository, Feedback, and Likeminds. You will need to run the commands once for each database for a total of six times.
DB2 database names cannot exceed eight characters. Therefore, consider using these database names: release, commun, custom, jcrdb, fdbkdb, and lmdb.
db2 "CREATE DB dbname using codeset UTF-8 territory us PAGESIZE 8192"
db2 "UPDATE DB CFG FOR dbname USING applheapsz 4096"
db2 "UPDATE DB CFG FOR dbname USING app_ctl_heap_sz 1024"
db2 "UPDATE DB CFG FOR dbname USING stmtheap 32768"
db2 "UPDATE DB CFG FOR dbname USING dbheap 2400"
db2 "UPDATE DB CFG FOR dbname USING locklist 1000"
db2 "UPDATE DB CFG FOR dbname USING logfilsiz 4000"
db2 "UPDATE DB CFG FOR dbname USING logprimary 12"
db2 "UPDATE DB CFG FOR dbname USING logsecond 20"
db2 "UPDATE DB CFG FOR dbname USING logbufsz 32"
db2 "UPDATE DB CFG FOR dbname USING avg_appls 5"
db2 "UPDATE DB CFG FOR dbname USING locktimeout 30"
db2 "UPDATE DB CFG FOR dbname using AUTO_MAINT off"
- Replace dbname with the actual name of the database. Run the commands and each time replace dbname with the actual values for release, community, customization, Java Content Repository, Feedback, and Likeminds. You will need to run the commands once for each database for a total of six times.
- On the DB2 server systems to create bufferpools and table spaces for the IBM Java Content Repository database (jcrdb). This step is only required for the IBM Java Content Repository database.
jcrdb name of the database used to store user data and objects jcr jcr user for jcrdb dbpassword password for the jcr user for the jcrdb Run...
db2 "CONNECT TO jcrdb USER jcr USING dbpassword" db2 "CREATE BUFFERPOOL ICMLSFREQBP4 SIZE 1000 PAGESIZE 4 K" db2 "CREATE BUFFERPOOL ICMLSVOLATILEBP4 SIZE 16000 PAGESIZE 4 K" db2 "CREATE BUFFERPOOL ICMLSMAINBP32 SIZE 16000 PAGESIZE 32 K" db2 "CREATE BUFFERPOOL CMBMAIN4 SIZE 1000 PAGESIZE 4 K" db2 "CREATE REGULAR TABLESPACE ICMLFQ32 PAGESIZE 32 K MANAGED BY SYSTEM USING ('ICMLFQ32') BUFFERPOOL ICMLSMAINBP32" db2 "CREATE REGULAR TABLESPACE ICMLNF32 PAGESIZE 32 K MANAGED BY SYSTEM USING ('ICMLNF32') BUFFERPOOL ICMLSMAINBP32" db2 "CREATE REGULAR TABLESPACE ICMVFQ04 PAGESIZE 4 K MANAGED BY SYSTEM USING ('ICMVFQ04') BUFFERPOOL ICMLSVOLATILEBP4" db2 "CREATE REGULAR TABLESPACE ICMSFQ04 PAGESIZE 4 K MANAGED BY SYSTEM USING ('ICMSFQ04') BUFFERPOOL ICMLSFREQBP4" db2 "CREATE REGULAR TABLESPACE CMBINV04 PAGESIZE 4 K MANAGED BY SYSTEM USING ('CMBINV04') BUFFERPOOL CMBMAIN4" db2 "CREATE SYSTEM TEMPORARY TABLESPACE ICMLSSYSTSPACE32 PAGESIZE 32 K MANAGED BY SYSTEM USING ('icmlssystspace32') BUFFERPOOL ICMLSMAINBP32" db2 "CREATE SYSTEM TEMPORARY TABLESPACE ICMLSSYSTSPACE4 PAGESIZE 4 K MANAGED BY SYSTEM USING ('icmlssystspace4') BUFFERPOOL ICMLSVOLATILEBP4" db2 "CREATE USER TEMPORARY TABLESPACE ICMLSUSRTSPACE4 PAGESIZE 4 K MANAGED BY SYSTEM USING ('icmlsusrtspace4') BUFFERPOOL ICMLSVOLATILEBP4" db2 "UPDATE DB CFG FOR jcrdb USING DFT_QUERYOPT 2" db2 "UPDATE DB CFG FOR jcrdb USING PCKCACHESZ 16384" db2 "DISCONNECT jcrdb" db2 "TERMINATE" - For JDBC Type 2 drivers...
Set up DB2 using ConfigEngine
Create the database users, permissions, and table spaces:
-
cd WP_PROFILE/ConfigEngine
./ConfigEngine.sh setup-database -DWasPassword=foo
Set up DB2 manually
If you have configured the database automatically by running ConfigEngine, you do not need to run manual tasks for granting privileges or creating table spaces, but you may decide to perform additional manual configuration for items that are not provided to you when you automatically when you run ConfigEngine.
Create DB2 database schemas
One way to create database schemas is to use SQL script templates...
| Database domain | Location of template |
|---|---|
| Release | PORTAL_HOME/base/wp.db.impl/config/templates/setupdb/db2/release/createSchema.sql |
| Community | PORTAL_HOME/base/wp.db.impl/config/templates/setupdb/db2/community/createSchema.sql |
| Customization | PORTAL_HOME/base/wp.db.impl/config/templates/setupdb/db2/customization/createSchema.sql |
| JCR | PORTAL_HOME/base/wp.db.impl/config/templates/setupdb/db2/jcr/createSchema.sql |
| Feedback | PORTAL_HOME/pzn/prereq.pzn/config/templates/setupdb/db2/feedback/createSchema.sql |
| Likeminds | PORTAL_HOME/pzn/prereq.pzn/config/templates/setupdb/db2/likeminds/createSchema.sql |
Execute commands as a user that has admin rights on both the operating system (root) and the DB2 installation (SYSADM). You only need to manually create an administrator ID when you do not want to use an DB2 administrator ID created automatically by the DB2 installation program (db2inst1). Do not change the user name after creating it. The user and group names must comply with both the database management system software requirements and WebSphere Portal requirements. The limitations on user names are:
User names can contain one to eight characters. Group and instance names can contain one to eight characters. Names cannot be: users admins guests public local. Names cannot begin with: IBM SQL SYS. Names cannot include accented characters. Create users in an environment that has the same settings as the actual runtime environment. For example, avoid creating a user in an English environment if you plan to use that user in a Turkish environment.
Grant privileges to DB2 database users
Configuration and runtime database users are granted a different set of privileges, depending on whether these users are schema owners or not. We can create a copy of the SQL scripts and edit this copy to manually grant permissions to configuration and runtime database users.
Required privileges of the configuration database user
When a configuration database user is a schema owner, the property...
- domain.DbUser
...is assigned the same value as the property...
- domain.DbSchema
...and a role is created for a configuration user in each database domain.
This role is created and assigned automatically when you run...
- ConfigEngine.sh setup-database
As an alternative to creating and assigning this role automatically, we can create a copy of the SQL scripts templates located in the installation directory of IBM WebSphere Portal to use as a guide for creating executable scripts for manually granting permissions. These read-only templates should not be modified and contain invalid SQL syntax. Create our own version of these files to create runnable scripts.
Permissions granted to the schema-owning configuration database user
| Database domain | Location of template |
|---|---|
| Release | PORTAL_HOME/base/wp.db.impl/config/templates/setupdb/db2/release/createConfigRoleForSameSchema.sql
PORTAL_HOME/base/wp.db.impl/config/templates/setupdb/db2/release/grantRoleToConfigUser.sql |
| Community | PORTAL_HOME/base/wp.db.impl/config/templates/setupdb/db2/community/createConfigRoleForSameSchema.sql
PORTAL_HOME/base/wp.db.impl/config/templates/setupdb/db2/community/grantRoleToConfigUser.sql |
| Customization | PORTAL_HOME/base/wp.db.impl/config/templates/setupdb/db2/customization/createConfigRoleForSameSchema.sql
PORTAL_HOME/base/wp.db.impl/config/templates/setupdb/db2/customization/grantRoleToConfigUser.sql |
| JCR | PORTAL_HOME/base/wp.db.impl/config/templates/setupdb/db2/jcr/createConfigRoleForSameSchema.sql
PORTAL_HOME/base/wp.db.impl/config/templates/setupdb/db2/jcr/grantRoleToConfigUser.sql |
| Feedback | PORTAL_HOME/pzn/prereq.pzn/config/templates/setupdb/db2/feedback/createConfigRoleForSameSchema.sql
PORTAL_HOME/pzn/prereq.pzn/config/templates/setupdb/db2/feedback/grantRoleToConfigUser.sql |
| Likeminds | PORTAL_HOME/pzn/prereq.pzn/config/templates/setupdb/db2/likeminds/createConfigRoleForSameSchema.sql
PORTAL_HOME/pzn/prereq.pzn/config/templates/setupdb/db2/likeminds/grantRoleToConfigUser.sql |
Non-schema-owning configuration database user:
| Database domain | Location of template |
|---|---|
| Release | PORTAL_HOME/base/wp.db.impl/config/templates/setupdb/db2/release/createConfigRoleForDifferentSchema.sql
PORTAL_HOME/base/wp.db.impl/config/templates/setupdb/db2/release/grantRoleToConfigUser.sql |
| Community | PORTAL_HOME/base/wp.db.impl/config/templates/setupdb/db2/community/createConfigRoleForDifferentSchema.sql
PORTAL_HOME/base/wp.db.impl/config/templates/setupdb/db2/community/grantRoleToConfigUser.sql |
| Customization | PORTAL_HOME/base/wp.db.impl/config/templates/setupdb/db2/customization/createConfigRoleForDifferentSchema.sql
PORTAL_HOME/base/wp.db.impl/config/templates/setupdb/db2/customization/grantRoleToConfigUser.sql |
| JCR | PORTAL_HOME/base/wp.db.impl/config/templates/setupdb/db2/jcr/createConfigRoleForDifferentSchema.sql
PORTAL_HOME/base/wp.db.impl/config/templates/setupdb/db2/jcr/grantRoleToConfigUser.sql |
| Feedback | PORTAL_HOME/pzn/prereq.pzn/config/templates/setupdb/db2/feedback/createConfigRoleForDifferentSchema.sql
PORTAL_HOME/pzn/prereq.pzn/config/templates/setupdb/db2/feedback/grantRoleToConfigUser.sql |
| Likeminds | PORTAL_HOME/pzn/prereq.pzn/config/templates/setupdb/db2/likeminds/createConfigRoleForDifferentSchema.sql
PORTAL_HOME/pzn/prereq.pzn/config/templates/setupdb/db2/likeminds/grantRoleToConfigUser.sql |
Required privileges for the runtime database user
When the runtime database user is a schema owner, the property...
- domain.DbUser
...is assigned the same value as the properties domain.DbRuntimeUser and domain.DbSchema. The runtime database user typically does not create tables used to query and manipulate data and does not by default have access to these tables. To grant minimum privileges to a runtime database user to work with these tables, access needs to be provided for the objects individually. A role is created for runtime database users in each database domain. These roles are created and assigned automatically when you run...
- ConfigEngine.sh setup-database
before database transfer and later run grant-runtime-db-user-privileges configuration after database transfer. Before you run these configuration tasks, the runtime database user can only access the database to validate configurations. As an alternative to creating and assigning this role automatically, we can create a copy of the SQL scripts templates located in the installation directory of IBM WebSphere Portal to use as a guide for creating executable scripts for manually granting permissions. These read-only templates should not be modified and contain invalid SQL syntax. Create our own version of these files to create runnable scripts.
Permissions granted to the schema-owning runtime database user
| Database domain | Location of template |
|---|---|
| Release | PORTAL_HOME/base/wp.db.impl/config/templates/setupdb/db2/release/createInitialRuntimeRole.sql
PORTAL_HOME/base/wp.db.impl/config/templates/setupdb/db2/release/createRuntimeRoleForSameSchema.sql PORTAL_HOME/base/wp.db.impl/config/templates/setupdb/db2/release/grantRoleToRuntimeUser.sql |
| Community | PORTAL_HOME/base/wp.db.impl/config/templates/setupdb/db2/community/createInitialRuntimeRole.sql
PORTAL_HOME/base/wp.db.impl/config/templates/setupdb/db2/community/createRuntimeRoleForSameSchema.sql PORTAL_HOME/base/wp.db.impl/config/templates/setupdb/db2/community/grantRoleToRuntimeUser.sql |
| Customization | PORTAL_HOME/base/wp.db.impl/config/templates/setupdb/db2/customization/createInitialRuntimeRole.sql
PORTAL_HOME/base/wp.db.impl/config/templates/setupdb/db2/customization/createRuntimeRoleForSameSchema.sql PORTAL_HOME/base/wp.db.impl/config/templates/setupdb/db2/customization/grantRoleToRuntimeUser.sql |
| JCR | PORTAL_HOME/base/wp.db.impl/config/templates/setupdb/db2/jcr/createInitialRuntimeRole.sql
PORTAL_HOME/base/wp.db.impl/config/templates/setupdb/db2/jcr/createRuntimeRoleForSameSchema.sql PORTAL_HOME/jcr/wp.content.repository.install/config/templates/setupdb/db2/jcr/grantPermissionsToRuntimeRoleStatic.sql PORTAL_HOME/base/wp.db.impl/config/templates/setupdb/db2/jcr/grantRoleToRuntimeUser.sql |
| Feedback | PORTAL_HOME/pzn/prereq.pzn/config/templates/setupdb/db2/feedback/createInitialRuntimeRole.sql
PORTAL_HOME/pzn/prereq.pzn/config/templates/setupdb/db2/feedback/createRuntimeRoleForSameSchema.sql PORTAL_HOME/pzn/prereq.pzn/config/templates/setupdb/db2/feedback/grantRoleToRuntimeUser.sql |
| Likeminds | PORTAL_HOME/pzn/prereq.pzn/config/templates/setupdb/db2/likeminds/createInitialRuntimeRole.sql
PORTAL_HOME/pzn/prereq.pzn/config/templates/setupdb/db2/likeminds/createRuntimeRoleForSameSchema.sql PORTAL_HOME/pzn/prereq.pzn/config/templates/setupdb/db2/likeminds/grantRoleToRuntimeUser.sql |
Permissions granted to the non-schema-owning runtime database user
| Database domain | Location of template |
|---|---|
| Release | PORTAL_HOME/base/wp.db.impl/config/templates/setupdb/db2/release/createInitialRuntimeRole.sql
PORTAL_HOME/base/wp.db.impl/config/templates/setupdb/db2/release/createRuntimeRoleForDifferentSchema.sql PORTAL_HOME/base/wp.db.impl/config/templates/setupdb/db2/release/grantRoleToRuntimeUser.sql |
| Community | PORTAL_HOME/base/wp.db.impl/config/templates/setupdb/db2/community/createInitialRuntimeRole.sql
PORTAL_HOME/base/wp.db.impl/config/templates/setupdb/db2/community/createRuntimeRoleForDifferentSchema.sql PORTAL_HOME/base/wp.db.impl/config/templates/setupdb/db2/community/grantRoleToRuntimeUser.sql |
| Customization | PORTAL_HOME/base/wp.db.impl/config/templates/setupdb/db2/customization/createInitialRuntimeRole.sql
PORTAL_HOME/base/wp.db.impl/config/templates/setupdb/db2/customization/createRuntimeRoleForDifferentSchema.sql PORTAL_HOME/base/wp.db.impl/config/templates/setupdb/db2/customization/grantRoleToRuntimeUser.sql |
| JCR | PORTAL_HOME/base/wp.db.impl/config/templates/setupdb/db2/jcr/createInitialRuntimeRole.sql
PORTAL_HOME/base/wp.db.impl/config/templates/setupdb/db2/jcr/createRuntimeRoleForDifferentSchema.sql PORTAL_HOME/jcr/wp.content.repository.install/config/templates/setupdb/db2/jcr/grantPermissionsToRuntimeRoleStatic.sql PORTAL_HOME/base/wp.db.impl/config/templates/setupdb/db2/jcr/grantRoleToRuntimeUser.sql |
| Feedback | PORTAL_HOME/pzn/prereq.pzn/config/templates/setupdb/db2/feedback/createInitialRuntimeRole.sql
PORTAL_HOME/pzn/prereq.pzn/config/templates/setupdb/db2/feedback/createRuntimeRoleForDifferentSchema.sql PORTAL_HOME/pzn/prereq.pzn/config/templates/setupdb/db2/feedback/grantRoleToRuntimeUser.sql |
| Likeminds | PORTAL_HOME/pzn/prereq.pzn/config/templates/setupdb/db2/likeminds/createInitialRuntimeRole.sql
PORTAL_HOME/pzn/prereq.pzn/config/templates/setupdb/db2/likeminds/createRuntimeRoleForDifferentSchema.sql PORTAL_HOME/pzn/prereq.pzn/config/templates/setupdb/db2/likeminds/grantRoleToRuntimeUser.sql |
Assign custom DB2 table spaces
The repository of WebSphere Portal consists of many tables and indicecreated in default table spaces. When using an existing set of table spaces for the objects of the repository, specify this when executing the database transfer to the target database system.
The custom table spaces must exist prior to the execution of database transfer.
To see which table spaces can be customized in each domain, reference...
- WP_PROFILE/PortalServer/config/tablespaces/dbdomain.space_mapping.properties
The page size of table spaces used by WebSphere Portal must be 8192 bytes.
If custom table spaces are assigned, each must be assigned explicitly. The default table spaces can be used to contain database objects; however the name of the default table space must be specified in the corresponding mapping files. This applies to all database domains that are transferred in a single database transfer.
Configure custom table space assignments
- Determine the names of the custom table spaces.
Open the mapping file...
- WP_PROFILE/PortalServer/config/tablespaces/dbdomain.space_mapping.properties
...and review table space and index space property pairs for each database table...
- dbdomain.table_name.tablespace
- dbdomain.table_name.index_name.indexspace
dbdomain can be any one of the following values:
- release
- community
- customization
- jcr
- feedback
- likeminds
For jcr, edit mapping file:
- WP_PROFILE/PortalServer/jcr/config/jcr.space_mapping.properties
...which contains additional table space and index space property pairs for each jcr.table_name.tablespace database table.
- Assign a table space to each entry in the mapping file. The table space name must be prepended by the keyword IN and a space. For example:
- community.COMP_INST.tablespace=IN COMM8KSPACE
- Save and close dbdomain.space_mapping.properties
- From a command prompt, specify the option...
- -DuseCustomTablespaceMapping=true
...when starting the database transfer. For example,
-
./ConfigEngine.sh database-transfer -DuseCustomTablespaceMapping=true
Configure JCR collation support
JCR collation is recommended when the language locales of the users do not natively collate correctly in the DB2 database and when language locale correct ordering is important.
- Stop the WebSphere Portal server.
- Copy the following files from the WebSphere Portal server to a temporary directory on the DB2 server:
-
PortalServer/jcr/wp.content.repository.install/lib/wp.content.repository.install.jar
wp_profile/PortalServer/jcr/config/registerCollationUDFTemplate.sql - Set up collation on the database where the JCR domain is located.
-
cd db2_instance_owner_home/sqllib/function
db2home/sqllib/java/jdk/bin/jar -xvf temporary location/wp.content.repository.install.jar icm/CollationUDF.class - Change to the temporary directory where you copied the files in a previous step.
- Edit registerCollationUDFTemplate.sql and change all SCHEMA references to the JCR schema; for example, JCR.
The value set for SCHEMA should match the value set for jcr.DbSchema in wkplc_dbdomain.properties .
- Run...
-
db2 connect to jcrdb user user_ID using password
db2 -tvf temporary location/registerCollationUDFTemplate.sql - Disconnect from the JCR database.
- Restart the DB2 instance.
- Verify the UDF is registered properly.
Log in as the db2instanceID, open a DB2 terminal window and run...
- db2 connect to jcrdb user user_ID using password
Connect to the JCR database as a database runtime user with the user ID and password for the WebSphere Portal JCR data source.
Register the UDF: values schema.sortkeyj('abc','en')
- Edit...
- WP_PROFILE/PortalServer/jcr/lib/com/ibm/icm/icm.properties
Add the following section to the end of the file:
# Enable/Disable collation support for all DB2 platforms # Disabled by default   jcr.query.collation.db2.enabled = true
# Database specific collation mappings

# These mappings apply map a Java locale name into a collation name
# supported by the underlying database.
# Example mappings for DB2 platform
# English   jcr.query.collation.en = en
# Swedish   jcr.query.collation.sv = sv

jcr.query.collation.zh = zh
jcr.query.collation.de = de
jcr.query.collation.da = da
jcr.query.collation.hu = hu
jcr.query.collation.jp = jp
- Start the WebSphere Portal server.
Manual DB2 transfer - Derby to DB2
- To run tasks as a non-root user...
- chown -R non-root_user /path/to/my/WebSphere/AppServer
- If there are a lot of tables in JCR schema, increase open_cursors from default of 1500.
- There are additional steps for JDBC Type 2 drivers
- For multiple instances of WebSphere Portal, increase default configured number of databases...
- set client MAX_NETBIOS_CONNECTIONS 254
A message indicates success if the number was increased.
- Validate database configuration properties...
-
cd WP_PROFILE/ConfigEngine
./ConfigEngine.sh validate-database -DWasPassword=fooAdd -DTransferDomainList to the validating task to specify the domains to validate. For example...
- -DTransferDomainList=jcr
To validate all domains, do not specify this parameter.
- Stop the WebSphere_Portal server:
-
cd WP_PROFILE/bin
./stopServer.sh WebSphere_Portal -username wpadmin -password foo - Transfer the database:
Do not execute the database-transfer task as a background process. This might cause the task to stall.
-
cd WP_PROFILE/ConfigEngine
./ConfigEngine.sh database-transfer -DWasPassword=fooSet -DTransferDomainList to include only the domains to transfer. For example, to transfer only the JCR domain...
- ./ConfigEngine.sh database-transfer -DTransferDomainList=jcr -DWasPassword=foo
- If you have been storing data in Apache Derby for a long time, database transfer could fail with OutOfMemory exceptions. To fix:
- ConfigEngine.bat database-transfer -DDbtJavaMaxMemory=1536M -DWasPassword=foo
- Log output is written to:
- WP_PROFILE/ConfigEngine/log/ConfigTrace.log
If the configuration fails, verify the values in the wkplc.properties, wkplc_dbdomain.properties, and wkplc_dbtype.properties files and then repeat this step.
- If dbdomain.DbRuntimeUser is set, for the user...
- Grant database user privileges manually:
- Copy SQL template files in...
- PORTAL_HOME/base/wp.db.impl/config/templates/setupdb/dbms/domain
- PORTAL_HOME/pzn/prereq.pzn/config/templates/setupdb/dbms/domain
...to a working directory.
If the name of the database user and the schema name are not the same, copy...
- createRuntimeRoleForDifferentSchema.sql
If the name of the database user and the schema name are the same, copy...
- createRuntimeRoleForSameSchema.sql
...where dbms is the database system, and domain is database domains (release, customization, community, jcr, feedback, and likeminds).
For the JCR database domain, copy grantPermissionsToRuntimeRoleStatic.sql from...
- PORTAL_HOME/jcr/wp.content.repository.install/config/templates/setupdb/dbms/jcr/
- Replace all placeholder values with the values as defined in wkplc_dbdomain.properties. Placeholder values are surrounded by the character @.
- Execute the SQL statements.
- Copy SQL template files in...
- Grant database user privileges automatically:
- Set domain.DBA.DbUser in...
- WP_PROFILE/ConfigEngine/properties/wkplc_dbdomain.properties
For example...
-
domain.DBA.DbUser=dbadmin
- Grant privileges...
- ./ConfigEngine.sh grant-runtime-db-user-privileges -DTransferDomainList=release,customization,community,etc...
You only need to add -DTransferDomainList when granting privileges across specific domains.
- Set domain.DBA.DbUser in...
- Grant database user privileges manually:
- For each database, to improve performance...
-
db2 connect to dbName user db2wpadmin using password
db2 reorgchk update statistics on table all > xyz.outLook in the reorg column for entries marked with a star or asterisk * in the file xyz.out.
- For each line with *, note the tablename and run the following command for each tablename:
- db2 reorg table tablename
- After you have run the reorg command for each tablenames:
-
db2 terminate
db2rbind database_name -l db2rbind.out -u db2_admin -p passwordThe file db2rbind.out is created when there is an error.
- For each line with *, note the tablename and run the following command for each tablename:
- Start the WebSphere Portal server.
-
cd WP_PROFILE/bin
./StartServer.sh WebSphere_Portal - On each configured node, make sure the following file is identical to the same file on the primary node...
- WP_PROFILE/PortalServer/jcr/lib/com/ibm/icm/icm.properties
If the files are not identical, copy icm.properties from the primary node, the one one which you ran the database-transfer, to the node(s) with the obsolete icm.properties file..
- Stop the portal server on the secondary nodes.
- From the primary node...
- scp /path/to/PortalServer/jcr/lib/com/ibm/icm/icm.properties user@secondary_node:/path/to/PortalServer/jcr/lib/com/ibm/icm/
- Start the portal server on the secondary nodes.
Configure DB2 for large file handling in WCM
If we are using Web Content Manager, update the database configuration to support large files. We can update the fullyMaterializeLobData property by running a configuration task.
You only need to perform these steps if we are using Web Content Manager.
-
cd WP_PROFILE/ConfigEngine
./ConfigEngine.sh datasource-enable-fully-materialize-lob-data -DWasPassword=foo
Change DB2 driver types
WebSphere Portal requires the use of either the IBM DB2 Legacy JDBC driver in type 2 mode or the IBM DB2 Universal JDBC driver in type 4 mode when connecting to DB2.
Prerequisites...
- The WebSphere Portal database has been successfully transferred to DB2 using the database-transfer configuration task.
- The files wkplc_dbdomain.properties and wkplc_dbtype.properties have been modified to set the correct values for the DB2 drivers that we are switching to:
In the file wkplc_dbdomain.properties set each <Domain>.DbUrl property...
# db2 (type 2):  { jdbc:db2:wpsdb }
# db2 (type 4):  { jdbc:db2://<YourDatabaseServer>:50000/wpsdb:returnAlias=0; }
In the file wkplc_dbtype.properties set the db2.DbLibrary property using the following format:
# For DB2 Type 2 driver use <SQLLIB>/java/db2jcc4.jar
# For DB2 Type 4 driver use <SQLLIB>/java/db2jcc4.jar:<SQLLIB>/java/db2jcc_license_cu.jar
In the file wkplc_dbtype.properties set the db2.DbDriver property using the following format:
# For DB2 Type 2 driver use com.ibm.db2.jcc.DB2Driver
# For DB2 Type 4 driver use com.ibm.db2.jcc.DB2Driver
If WebSphere Portal is installed on the same machine as the DB2 server and you switch from a JDBC Type 4 connection to a JDBC Type 2 connection, verify that you have created the alias names for the DB2 databases as described in Create remote databases and that the alias names are specified for the databases in the file wkplc_dbdomain.properties.
When switching from a JDBC Type 2 connection to a JDBC Type 4 connection, remove the database alias names and refer to the databases directly. This is required because of a limitation in the DB2 Universal JDBC driver.
- Export the DB2 user profile that created when installing DB2 onto the administrative user . This command exports the DB2 user's profile onto the administrative user so that they can access the DB2 utilities.
-
cd WP_PROFILE/ConfigEngine
. /home/db2inst1/sqllib/db2profile...where db2inst1 represents the database instance
Complete this step before running database tasks and before enabling security.
- Validate configuration properties...
- ./ConfigEngine.sh validate-database -DWasPassword=foo
Add -DTransferDomainList to the validating task to specify the domains to validate; for example...
- -DTransferDomainList=jcr
To validate all domains, do not specify this parameter.
- cd WP_PROFILE/bin
- Stop the WebSphere_Portal server:
./stopServer.sh WebSphere_Portal -username wpadmin -password foo
- cd WP_PROFILE/ConfigEngine
- To change from one supported driver to the other, run the following task to connect the database, including only the domains that require the switch.
./ConfigEngine.sh connect-database \ -Drelease.DbPassword=foo \ -Dcustomization.DbPassword=foo \ -Dcommunity.DbPassword=foo \ -Djcr.DbPassword=foo \ -Dfeedback.DbPassword=foo \ -Dlikeminds.DbPassword=foo \ -DWasPassword=foo - cd WP_PROFILE/bin
- Start the WebSphere Portal server.
- Export the DB2 user profile that created when installing DB2 onto the administrative user . This command exports the DB2 user's profile onto the administrative user so that they can access the DB2 utilities.
Remove search collection
- Edit...
-
WP_PROFILE/PortalServer/jcr/lib/com/ibm/icm/icm.properties
...and set...
-
jcr.textsearch.enabled = false
- Restart the WebSphere_Portal server.
- Log on to WebSphere Portal and navigate to...
-
Administration | Manage Search | Search Collections
- Click the Delete Collection icon for each search collection and then click OK until they are all deleted.
- Restart the WebSphere_Portal server and then navigate back to the Search Collections page to verify that all search collections have been deleted.
Augment dmgr profile with Portal
- Install portal on the primary node
- Install Installation Manager on the dmgr host.
- Add WebSphere Portal repositories to IM on the dmgr host.
- Install WAS ND on the dmgr
- Create a dmgr profile using the Management profile template
Make sure that cell name and node name are different than the cell and node name used in portal. If they are the same, federation will fail. There is a way to change the dmgr cell name after creation of dmgr.
- Using manageprofiles.sh...
./manageprofiles.sh -create
                    -templatePath WAS_HOME/profileTemplates/management
                    -hostName hostname
                    -cellName cellname
                    -nodeName nodename
                    -profileName Dmgr01
                    -profilePath WAS_HOME/Dmgr01
                    -enableAdminSecurity true
                    -adminUserName dmgradmin
                    -adminPassword dmgrpass
- Using Profile Management Tool (pmt.sh)
- Run...
- cd WAS_HOME/bin/ProfileManagement
./pmt.sh...and select...
-
Profile Management Tool | Create | Environment Selection | Management | Next | dmgr | Next | Advanced profile creation
- Check the box...
- Deploy the administrative console
- On the panel...
- Profile Name and Location
...provide the name for the new profile and its location in the file system.
- Select...
- Make this profile the default
- On the Node, Host Names, and Cell Names panel, provide the node name and TCP/IP host name for the new profile.
- On the Administrative Security panel, check the box...
- Enable administrative security
Enter values for the User name, Password, and Confirm password fields.
- On the Port Values Assignment panel, change any necessary port values and then click Next.
- On the panel...
- Profile Creation Summary
...review the information collected by the wizard, and then click Create to create the new profile based on the supplied information.
The port values presented in the summary value are overridden by the port values used by the servers present in the configuration archive provided as part of the portal profile template. These port values need to be adjusted after profile creation if they are in conflict with other ports on the local system.
- Click Finish to exit PMT.
- Run...
- Using manageprofiles.sh...
- Stop the deployment manager.
If installing on dmgr co-located with portal, stop WebSphere_Portal as well.
- From portal host, scp...
- PORTAL_HOME/filesForDmgr/filesForDmgr.zip
...to the remote dmgr server.
- Expand the filesForDmgr.zip file into the installation root directory of the dmgr; for example in directory...
- /opt/IBM/WebSphere/AppServer
If the dmgr profile was not created in the default Appserver/profiles/Dmgr01 directory, then copy...
- Appserver/profiles/Dmgr01/config/.repository/metadata_wkplc.xml
...to...
- DMGR_PROFILE/config/.repository
- Start the deployment manager.
- Review dmgr logs
- Augment the dmgr profile:
- Using manageprofiles.sh...
cd WAS_HOME/bin ./manageprofiles.sh -augment \ -templatePath WAS_HOME/profileTemplates/management.portal.augment \ -profileName Dmgr01 - Run...
- cd WAS_HOME/bin/ProfileManagement
./pmt.sh - Click Launch Profile Management Tool
- Select the dmgr profile and then click Augment.
- On the Augment Selection panel, select dmgr for Portal, and then click Next.
- On the Profile Augmentation Summary panel, review the information collected by the wizard, and then click Augment.
- Click Finish to exit PMT.
- Using manageprofiles.sh...
- Log on to the dmgr console.
- Navigate to Security > Global security.
- Under User account repository, click Configure.
- In the Primary administrative user name field, alter the user ID so that is using the full distinguished user name. For the default file user registry, the syntax is...
- uid=userID,o=defaultWIMFileBasedRealm
for example: uid=wpadmin,o=defaultWIMFileBasedRealm.
- Click Apply.
- Enter the password for the user and then confirm the password.
- Save all changes.
- Log out of the WAS admin console.
- Configuration for IBM WebSphere Portal: Profile configuration details: Advanced
...during installation:
- Log on to the dmgr console and go to...
-
Security | Global security | Web and SIP security | Trust association | Additional Properties | Interceptors | com.ibm.portal.auth.tai.HTTPBasicAuthTAI
- Edit urlBlackList and urlWhiteList with the new context path. For example...
- urlBlackList: /wpsmodified/myportal*
- urlWhiteList: /wpsmodified/mycontenthandler*
- Click Apply | Save
- Log out of the dmgr console.
Prepare to create the cluster
- To create a dynamic cluster:
- Install WebSphere Virtual Enterprise and augment the dmgr profile.
- On the WebSphere Portal primary node, install WebSphere Virtual Enterprise and augment the wp_profile profile.
When using the GUI for profile augmentation, select type of augmentation..
- Operations Optimization
Use manageprofiles.sh to augment a stand-alone application server profile from the command-line
- Federate the primary node:
-
cd WP_PROFILE/bin
./addNode.sh dmgr_hostname dmgr_port -includeapps -username wasadmin -password fooIf the WAS administrator user ID and password for the local node are different from the dmgr, add the following parameters:
- -localusername local_wasadmin
- -localpassword local_foo
If addNode.sh fails for any reason, before rerunning the task:
- If federation succeeded, run removeNode.sh
- If items exist, log on to the dmgr and...
- Remove all enterprise applications.
- Remove the WebSphere_Portal server definition.
- Remove the WebSphere Portal JDBC Provider.
- Stop the WebSphere_Portal server on the primary node and verify the following parameters are set correctly in wkplc.properties:
Although we can add these parameters (particularly passwords) directly to any task while creating the cluster, we might want to temporarily add them to the properties file. We can then remove them when we are finished to keep the environment secure.
- Set WasSoapPort to the port used to connect remotely to the dmgr.
- Set WasRemoteHostName to the full host name of the server used to remotely connect to the dmgr.
- Verify that WasUserid is set to the dmgr administrator user ID.
- Verify that WasPassword is set to the dmgr administrator password.
- Verify that PortalAdminPwd is set to the WebSphere Portal administrator password.
- Verify that ClusterName is set.
- Verify that PrimaryNode is set to true.
- If we configured a database user registry or a property extension database on the dmgr, set up access to the database drivers:
- Set the property value for federated.db.DbType if using a database user registry or set the property value for la.DbType if using a property extension database in wkplc.properties.
If you migrated the primary node from a version prior to Version 6.1.0 and we are not using a database user registry or a property extension database, set the property value for federated.db.DbType to the same value that is in wkplc.properties on the primary node.
- To add the library paths to the VMM_JDBC_CLASSPATH variable:
- Log on to the WAS WAS admin console.
- Click Environment > WebSphere Variables.
- Select scope: cell.
- Select the VMM_JDBC_CLASSPATH variable.
If this variable does not exist, click New to create the variable.
- Enter the complete paths to the library files in Value. Separate multiple files with a colon (:); for example, enter...
- SQLLIB/java/db2jcc4.jar:SQLLIB/java/db2jcc_license_cu.jar
- Copy files set for the VMM_JDBC_CLASSPATH variable into the appserver/lib directory.
- Stop and restart the appropriate servers to propagate the changes.
- Create the local dmgr WebSphere variable used to access the database jars...
./ConfigEngine.sh wp-prep-vmm-db-secured-environment \
                  -DWasPassword=foo\
                  -DDbDomain=la|federated.db \
                  -Ddb_type.NodeDbLibrary=/path/to/dmgr/jars \
                  -DDmgrNodeName=dmgr_node_name
Set db_type to your database type, for example db2. The /path/to/db/jars should be one of the following options:
DB2 Type 2 driver db2java.zip DB2 Type 4 driver db2jcc4.jar;db2jcc_license_cu.jar DB2 for z/OS Type 2 driver db2java.zip DB2 for z/OS Type 4 driver db2jcc4.jar;db2jcc_license_cisuz.jar Oracle ojdbc14.jar SQL Server JDBC driver sqljdbc.jar - Create the variable used to access the VMM database jars...
./ConfigEngine.sh wp-node-prep-vmm-db-secured-environment \
                  -DWasPassword=dmgr_password \
                  -DDbDomain=la|federated.db \
                  -DVmmNodeName=node_name \
                  -Ddb_type.NodeDbLibrary=/path/to/db/jars
VmmNodeName is a list of one or more nodes names in the cell which share the same database driver paths. The db_type in db_type.NodeDbLibrary should be set to the type of database we are using, for example db2.
- Set the property value for federated.db.DbType if using a database user registry or set the property value for la.DbType if using a property extension database in wkplc.properties.
Set WasUserid and WasPassword to the dmgr user ID and password.
Create a static cluster
After installing IBM WebSphere Portal on the primary node, configuring a remote database, and preparing the primary node to communicate with the dmgr, we can create the static cluster to handle failover requests.
- Run cluster node configuration task...
-
./ConfigEngine.sh cluster-node-config-post-federation -DWasPassword=dmgr_password
- If the admin user ID and group name are different in the WebSphere Portal and dmgr configurations, choose one of the following options depending on the security policies:
- Add the existing admin user ID and group to the dmgr security configuration
- To change the values in the WebSphere Portal configuration to match the dmgr values:
If the dmgr cell is using a stand-alone LDAP user registry, complete these steps after the cluster-node-config-cluster-setup (static cluster) or cluster-node-config-dynamic-cluster-setup (dynamic cluster) task completes.
- Start the WebSphere_Portal server.
- Verify the required WebSphere Portal admin user ID and group ID are defined in the dmgr user registry that provides security for the cell.
- Run...
cd WP_PROFILE/ConfigEngine
./ConfigEngine.sh wp-change-portal-admin-user  \
                  -DWasPassword=foo  \
                  -DnewAdminId=newadminid  \
                  -DnewAdminPw=newpassword  \
                  -DnewAdminGroupId=newadmingroupid
...where...
WasPassword administrative password for the dmgr cell newAdminId fully qualified DN of the WebSphere Portal admin user ID in the cell newAdminGroupId fully qualified DN of the group for the WebSphere Portal admin user ID in the cell If the value for newAdminGroupId contains a space; for example Software Group, edit wkplc.properties file and add the values for newAdminId, newAdminPw, and newAdminGroupId.
Save the changes and then run...
-
./ConfigEngine.sh wp-change-portal-admin-user -DWasPassword=dmgr_password
- After the task completes, stop the WebSphere_Portal server.
- Run...
-
./ConfigEngine.sh cluster-node-config-cluster-setup -DWasPassword=dmgr_password
- If you entered passwords in any of the properties files while creating the cluster, you should remove them for security purposes.
Create a dynamic cluster on AIX using WebSphere Virtual Enterprise
After installing and configuring IBM WebSphere Portal on the primary node and all horizontal nodes, we can create a new dynamic cluster. A dynamic cluster monitors performance and load information and is able to dynamically create and remove cluster members based on the workload.
Before creating your dynamic cluster, you should have already installed and configured the dmgr and completed all the tasks under “Preparing the primary node.” On the dmgr system, install WebSphere Virtual Enterprise, apply all required ifixes, and augment the dmgr profile to make it compatible with WebSphere Portal. On the WebSphere Portal primary node, install WebSphere Virtual Enterprise, apply all required ifixes, and augment the wp_profile profile to make it compatible with WebSphere Portal.
Profile augmentation is completed using the pmt.sh GUI on systems that support it or through manageprofiles.sh available on all systems. When using the GUI, select...
- Operations Optimization
...when choosing the type of augmentation to complete. Use manageprofiles.sh to augment a stand-alone application server profile from the command-line
- Complete the following steps for on the primary node of the dynamic cluster:
- Run...
- ./ConfigEngine.sh cluster-node-config-post-federation -DWasPassword=dmgr_password
- The node is federated and using the dmgr cell and its user registry. If the admin user ID and group name are different in the WebSphere Portal and dmgr configurations, choose one of the following options depending on your security policies:
- Add the existing admin user ID and group to the dmgr security configuration
- To change the values in the WebSphere Portal configuration to match the dmgr values:
If the dmgr cell is using a stand-alone LDAP user registry, complete these steps after the cluster-node-config-cluster-setup (static cluster) or cluster-node-config-dynamic-cluster-setup (dynamic cluster) task completes.
- Start the WebSphere_Portal server.
- Verify the required WebSphere Portal admin user ID and group ID are defined in the dmgr user registry that provides security for the cell.
- Run...
- ./ConfigEngine.sh wp-change-portal-admin-user -DWasPassword=foo -DnewAdminId=newadminid -DnewAdminPw=newpassword -DnewAdminGroupId=newadmingroupid
If the value for newAdminGroupId contains a space; for example Software Group, open wkplc.properties and add the values for newAdminId, newAdminPw, and newAdminGroupId. Save the changes and then run...
- ./ConfigEngine.sh wp-change-portal-admin-user -DWasPassword=dmgr_password
- WasPassword is set to the administrative password for the dmgr cell
- newAdminId is set to the fully qualified DN of the WebSphere Portal admin user ID in the cell
- newAdminGroupId is set to the fully qualified DN of the group for the WebSphere Portal admin user ID in the cell
- After the task completes, stop the WebSphere_Portal server.
- Run...
- Log on to the dmgr console.
- To create a node group:
- Click System administration > Node groups.
- Click New.
- Type the node group Name.
- Optional: Type any information about the node group in the Description text box.
- Click OK.
- Click the Save link to save the changes to the master configuration.
- To add members to the node group:
- Click System administration > Node groups.
- Click the name of the node group to add members to.
- Click Node group members under Additional Properties.
- Click Add.
- Select the primary node and then click Add.
- Click the Save link to save the changes to the master configuration.
- To create a dynamic cluster in the node group:
- Click Servers > Clusters > Dynamic clusters.
- Click New.
- Select WAS from the Server Type pull-down menu and then click Next.
- Select the Automatically define cluster members with rules radio button.
- Type the cluster name in the Dynamic cluster name text box and then click Next. Type the same value that you provided for the ClusterName parameter in wkplc.properties of the primary node.
- Remove all default membership policies and then click Subexpression builder.
- Enter the following information in the Subexpression builder window:
- Select and from the Logical operator pull-down menu.
- Select Nodegroup from the Select operand pull-down menu.
- Select Equals (=) from the Operator pull-down menu.
- Type the nodegroup name created in the previous step in the Value text box.
- Click Generate subexpression.
- Click Append.
- Click Preview membership to verify that all nodes included in the nodegroup display and then click Next.
- Click the Create the cluster member using an existing server as a template radio button and then select the WebSphere_Portal server for the primary node from the pull-down menu.
- Click Next.
- Specify the required dynamic cluster properties for minimum and maximum number of server instances.
T configure vertical stacking to allow multiple server instances on a single node, see Adding vertical cluster members to a dynamic cluster for information on additional required configurations.
- When we are done configuring the dynamic cluster properties, click Next.
- Review the summary page to verify your actions and then click Finish.
- Click the Save link to save the changes to the master configuration.
- Define or verify the following parameters in wkplc.properties:
- Verify that CellName is set to the dmgr cell.
- Verify that NodeName is set to the local node.
- Set ServerName to the server used for the dynamic cluster member on this node.
To find the name of the server used for the dynamic cluster...
- Servers | Clusters | Dynamic Clusters | PortalCluster | Dynamic cluster members
- Verify that PrimaryNode is set to true.
- Create the dynamic cluster...
- ./ConfigEngine.sh cluster-node-config-dynamic-cluster-setup -DWasPassword=dmgr_password
This task may display a warning message since the cluster already exists. The task proceeds to create the new dynamic cluster. Therefore, the warning can be ignored.
- Run the following tasks to pick up the configuration changes:
WebSphere_Portal is the name of the node's WebSphere Portal server; but if you customized the server name, the default name changes. If we are uncertain of the server name, run the task...
- serverstatus -all
...to get a list of the server names and their status.
./stopServer.sh WebSphere_Portal -username wpadmin -password foo
./startServer.sh WebSphere_Portal
Configure the Web server
- Install and configure the Web server;
- For Lotus Domino...
- Edit notes.ini on the Web server
- Set HTTPEnableConnectorHeaders and HTTPAllowDecodedUrlPercent to 1
If we are using WebDav, enable it in the Lotus Domino Webserver Administrative Console.
- For IHS or Apache Server, edit httpd.conf and set AllowEncodedSlashes to On;
the directive should be added at the root level as a global directive.
HTTP server type Documentation link HTTP Server IBM HTTP Server Apache Server AllowEncodedSlashes directives - Stop the Web server.
- Install and configure the Web server plug-in
If using WebDAV with mashups: After installing the Web server plug-in, edit plugin-cfg.xml and set AcceptAllContent to true.
You may need to adjust the ServerIOTimeout value, which defines how long the plug-in should wait for a response from the application. The recommended minimum value is 60. Adjust higher if we are retrieving data from a database. To update, edit plugin-cfg.xml and set ServerIOTimeout . See Common questions about the Web server plug-in.
- If we are using a Oracle iPlanet Web Server, some portlets require disabling the unix-uri-clean or nt-uri-clean directives
to operate properly. We can enable/disable these directives by editing obj.conf.
If we are using Oracle iPlanet Web Server v7, disable uri-clean.
- If we are using Oracle iPlanet Web Server v7 update 8, read Technote 1448262 and complete the steps to resolve the HTTP 408/409 error.
- Some features, such as portal mashups and change layout for pages with the Page Builder theme using an IIS web server, require an enabled PUT and DELETE method. If the Web server has these methods disabled:
- Enable HTTP tunneling to simulate PUT and DELETE requests, which means that POST requests are used instead.
See the "Switch for tunneling of HTTP methods" link for information.
- Enable PUT and DELETE requests.
- Enable HTTP tunneling to simulate PUT and DELETE requests, which means that POST requests are used instead.
- Start the Web server.
- To use the Web application bridge feature, from the WAS admin console select...
-
Applications | Application Types | WebSphere enterprise applications | wp.vwat.servlet.ear | Web Module Properties | Context Root For Web Modules
...and change the context root to /. Save changes and then restart wp.vwat.servlet.ear.
- To access WCM content through an external web server:
- Log on to the dmgr console and select...
-
Environment | WebSphere Variables | Scope drop-down menu | Node=nodename, Server=servername
- Update the WCM_HOST variable with the fully qualified host name used to access the portal server through the web server or On Demand Router.
- Update the WCM_PORT variable with the port number used to access the portal server through the web server or On Demand Router.
- Update the WCM_HOST and WCM_PORT variable for each additional portal server that already exists in the cluster.
- Synchronize the node with the dmgr:
-
System Administration | Nodes | node | Full Resynchronize
- Log off of the dmgr console.
- Log on to the dmgr console and select...
- If you have a dynamic cluster and we are using a web server to connect to the On Demand Router (ODR), configure the web server as a trusted proxy on the ODR.
We can also configure the ODR to dynamically update the web server configuration when changes occur.
Prepare a Tivoli Directory Server
- Install Tivoli Directory Server
- Create a directory suffix.
From the TDS Web Administration Tool, go to...
-
Server Administration folder | Manage Server Properties | Suffix
...and set the Base DN name for the suffix; for example...
- dc=myco,dc=com
- Create custom LDIF files in...
-
PORTAL_HOME/installer/wp.iim/ldif
For templates, we can use PortalUsers.ldif and ContentUsers.ldif for groups and user IDs. Replace dc=myco,dc=com with your suffix. Replace any prefixes and suffixes that are unique to your LDAP server. Specify user names other than wpsadmin and wpsbind
- Import the LDIF files into Tivoli Directory Server.
Add an LDAP user registry
We can add multiple LDAP user registries to the default federated repository although we can only add one LDAP server at a time.
The flat-naming convention is...
- cn=groupName
...the hierarchical format is...
- cn=groupName,o=root
Ensure IDs are unique between the default federated repository and the LDAP we are adding. For example, if the default federated repository contains an ID such as wpsadmin, this ID cannot exist in the LDAP we are adding.
In a clustered environment, start the dmgr and nodeagent and verify they are able to synchronize.
Complete these steps on the primary node only.
Use the helper file...
- WP_PROFILE/ConfigEngine/config/helpers/wp_add_federated_xxx.properties
Add an LDAP user registry to the default federated repository
Repeat these steps for each additional LDAP user registry to add:- Run backupConfig
- Edit wkplc.properties
- Set parameters under the VMM Federated LDAP Properties heading:
-
federated.ldap.id
federated.ldap.host
federated.ldap.port
federated.ldap.bindDN
federated.ldap.bindPassword
federated.ldap.ldapServerType
federated.ldap.baseDNFor example...
-
federated.ldap.baseDN=dc=myco,dc=com
- Set entity types parameters...
- Set group member parameters...
federated.ldap.gm.groupMemberName
federated.ldap.gm.objectClass
federated.ldap.gm.scope
federated.ldap.gm.dummyMember - Save changes to wkplc.properties.
- Validate the LDAP server settings...
- ./ConfigEngine.sh validate-federated-ldap -DWasPassword=foo
In an environment configured with an LDAP with SSL, during the validation task, you will be prompted to add a signer to the truststore.
For example...
- Add signer to the truststore now?
If you do, press y then Enter.
- Add the LDAP user registry to the default federated repository...
- ./ConfigEngine.sh wp-create-ldap -DWasPassword=foo
Users who are not in an LDAP do not have awareness and cannot see if other users are online. This can happen if you install WebSphere Portal and then enable a Federated LDAP or Federated database user repository that does not contain that user. Also, users who sign up using the Self Care portlet do not have awareness.
- Stop and restart servers, dmgrs, and node agents.
- To create additional base entries within the LDAP user registry; repeat these steps for each base entry:
- Edit wkplc.properties
- To create additional base entries within the LDAP user registry to use when creating realms, set parameters.
For example...
-
id=MyCo_LDAP1
baseDN=ou=admins,dc=myco,dc=com
nameInRepository=ou=admins,dc=myco,dc=com - Save changes to wkplc.properties.
- To create a base entry in a repository...
- ./ConfigEngine.sh wp-create-base-entry -DWasPassword=foo
- Stop and restart all necessary servers to propagate the changes.
- List the names and types of configured repositories...
- ./ConfigEngine.sh wp-query-repository
- To check that all defined attributes are available in the configured LDAP user registry...
- ./ConfigEngine.sh wp-validate-federated-ldap-attribute-config
- To update the user registry where new users and groups are stored:
If we are using multiple LDAP user registries and/or a database user registry, only run this task for the user registry to define as the default user registry where new users and groups are stored.
- Edit wkplc.properties
- Set the following required parameters under the VMM supported entity types configuration heading:
The parameters groupParent and personAccountParent must be set to the same value.
For example:
- personAccountParent=dc=myco,dc=com
- groupParent=dc=myco,dc=com
- Save changes to wkplc.properties.
- To delete the old attributes before adding the new attributes...
- ./ConfigEngine.sh wp-set-entitytypes -DWasPassword=foo
- Stop and restart all necessary servers to propagate the changes.
To enable the full distinguished name login if the short names are not unique for the realm:
Run this task if the administrator name is in conflict with another user name in the attached repository. This command allows the Administrator to log in using the fully distinguished name instead of the short name.
- Edit wkplc.properties
- Enter a value for realmName or leave blank to update the default realm.
- Save changes to wkplc.properties.
- To enable the distinguished name login...
- ./ConfigEngine.sh wp-modify-realm-enable-dn-login -DWasPassword=foo
To disable this feature...
- ./ConfigEngine.sh wp-modify-realm-disable-dn-login -DWasPassword=foo
- Stop and restart all necessary servers to propagate the changes.
- Optional: Update the member names used by WCM with the corresponding members in the LDAP directory.
This step is only needed if you have installed the portal with WCM and intend to use the Intranet and Internet Site Templates that were optionally installed with the product by running configure-express.
- Edit...
- WP_PROFILE/PortalServer/wcm/shared/app/config/wcmservices/MemberFixerModule.properties
- Add the following lines to the file:
-
uid=wpsadmin,o=defaultWIMFileBasedRealm -> portal_admin_DN
cn=contentauthors,o=defaultWIMFileBasedRealm -> content_authors_group_DNThe MemberFixerModule.properties file already contains lines for xyzadmin. We can ignore this line.
- Save the changes and close the file.
- Run...
./ConfigEngine.sh run-wcm-admin-task-member-fixer  \
                  -DallLibraries=true  \
                  -Dfix=true  \
                  -DaltDn=update  \
                  -DmismatchedId=update  \
                  -DinvalidDn=update  \
                  -DnoRealmDn=true  \
                  -DPortalAdminPwd=wpsadmin
realm_name should match the value for federated.realm in wkplc.properties. If value is empty, use defaultWIMFileBasedRealm.
- Edit...
- Optional: Assign access to the Web content libraries.
- Log in as a portal administrator and navigate to...
-
Administration | Portal Content | Web Content Libraries
| web_library | Set permissions
- Click the Edit Role icon for Editor.
- Add the group specified for content_authors_group_DN as an Editor for the Intranet and Internet libraries.
- Click Apply then Done.
- Log in as a portal administrator and navigate to...
- If you have created any additional WCM libraries, run the Web content member fixer task to update the member names used by the libraries.
- Optional. Replace the WAS and portal administrator user and group IDs with users and groups that exist in the LDAP user registry.
Ensure the new user ID of the WAS administrator is not identical to the one that we are replacing.
This step is required in a production environment.
If you run these tasks after created the cluster, run them on all nodes in the cluster.
- Run...
./ConfigEngine.sh wp-change-was-admin-user  \
                  -DWasUser=adminid  \
                  -DWasPassword=foo  \
                  -DnewAdminId=newadminid  \
                  -DnewAdminPw=newpassword
Provide the full DN for the newAdminId parameter.
- Verify the task completed successfully. Stop and restart all required servers.
- Run...
./ConfigEngine.sh wp-change-portal-admin-user  \
                  -DWasPassword=foo  \
                  -DnewAdminId=newadminid  \
                  -DnewAdminPw=newpassword  \
                  -DnewAdminGroupId=newadmingroupid
Provide the full DN for the newAdminId and newAdminGroupId parameters.
This task verifies the user against a running server instance. If the server is stopped, to skip the validation...
- -Dskip.ldap.validation=true
- Update the SearchAdminUser alias to match the WebSphere Portal administrator information.
- Verify the task completed successfully. Stop and restart all required servers.
- Run...
- This step is required in a production environment. Remove the file system repository if you do not use it. The federated file system user repository that was the default security setting might not be required after federating the user repository. If the file system repository is no longer needed, removing it can help prevent conflicts created by duplicate user identities existing in multiple repositories.
See the following topic under Related for instructions: Delete the repository, which is listed with the appropriate operating system.
If created a cluster, including additional nodes, and then completed the steps in this task, run update-jcr-admin on the secondary nodes.
How to fix Portal Access Control settings after user/group external identifiers have changed
Add an LDAP user registry over SSL
Add an LDAP user registry over SSL to the default federated repository to store user account information for secure authorization. We can add multiple LDAP user registries to the default federated repository although we can only add one LDAP server at a time.
In a clustered environment, start the dmgr and nodeagent and verify they are able to synchronize.
Use the helper file...
- WP_PROFILE/ConfigEngine/config/helpers/wp_add_federated_xxx.properties
Add an LDAP user registry over SSL to the default federated repository
Repeat these steps for each additional LDAP user registry to add:
Complete these steps on the primary node only.
- Run backupConfig
- Retrieve the WAS SSL certificate
- Log in to the WAS admin console and go to...
- Security | SSL certificate and key management | SSL configurations
- Click the appropriate SSL configuration from the list.
for example...
- CellDefaultSSLSettings
Ensure the setting for SSL configuration for outbound connection matches the SSL settings.
- Click Key stores and certificates.
- Click the appropriate truststore from the list; for example...
- CellDefaultSSLSettings
- Click...
- Signer certificates | Retrieve from port
...and then enter the following information:
- Host name used when attempting to retrieve the signer certificate from the SSL port.
- SSL Port used when attempting to retrieve the signer certificate.
- Alias the key store uses for the signer certificate.
- Click Retrieve signer information to retrieve the certificate from the port.
- Click OK and then click Save to save the changes to the master configuration.
- Log in to the WAS admin console and go to...
- Edit wkplc.properties
- Set parameters under the VMM Federated LDAP Properties heading:
-
federated.ldap.id
federated.ldap.host
federated.ldap.port
federated.ldap.bindDN
federated.ldap.bindPassword
federated.ldap.ldapServerType
federated.ldap.baseDN - Set entity types parameters...
- Set group member parameters...
federated.ldap.gm.groupMemberName
federated.ldap.gm.objectClass
federated.ldap.gm.scope
federated.ldap.gm.dummyMember - Set advanced parameters for SSL:
Required...
To enable the SSL configuration for the LDAP user registry, set federated.ldap.sslEnabled=true.
Optional...
- Save changes to wkplc.properties.
- Validate the LDAP server settings...
- ./ConfigEngine.sh validate-federated-ldap -DWasPassword=foo
In an environment configured with an LDAP with SSL, during the validation task, you will be prompted to add a signer to the truststore.
For example...
- Add signer to the truststore now?
If you do, press y then Enter.
- To add an LDAP user registry to the default federated repository...
- ./ConfigEngine.sh wp-create-ldap -DWasPassword=foo
Users who are not in an LDAP do not have awareness and cannot see if other users are online. This can happen if you install WebSphere Portal and then enable a Federated LDAP or Federated database user repository that does not contain that user. Also, users who sign up using the Self Care portlet do not have awareness.
- Stop and restart servers, dmgrs, and node agents.
- To create additional base entries within the LDAP user registry; repeat these steps for each base entry:
- Edit wkplc.properties
- To create additional base entries within the LDAP user registry to use when creating realms, set parameters.
- Save changes to wkplc.properties.
- To create a base entry in a repository...
- ./ConfigEngine.sh wp-create-base-entry -DWasPassword=foo
- Stop and restart all necessary servers to propagate the changes.
- List the names and types of configured repositories...
- ./ConfigEngine.sh wp-query-repository
- To check that all defined attributes are available in the configured LDAP user registry...
- ./ConfigEngine.sh wp-validate-federated-ldap-attribute-config
- To update the user registry where new users and groups are stored:
If we are using multiple LDAP user registries and/or a database user registry, only run this task for the user registry to define as the default user registry where new users and groups are stored.
- Edit wkplc.properties
- Set the following required parameters under the VMM supported entity types configuration heading:
The parameters groupParent and personAccountParent must be set to the same value.
For example:
- personAccountParent=dc=myco,dc=com
- groupParent=dc=myco,dc=com
- Save changes to wkplc.properties.
- To delete the old attributes before adding the new attributes...
- ./ConfigEngine.sh wp-set-entitytypes -DWasPassword=foo
- Stop and restart all necessary servers to propagate the changes.
To enable the full distinguished name login if the short names are not unique for the realm:
Run this task if the administrator name is in conflict with another user name in the attached repository. This command allows the Administrator to log in using the fully distinguished name instead of the short name.
- Edit wkplc.properties
- Enter a value for realmName or leave blank to update the default realm.
- Save changes to wkplc.properties.
- To enable the distinguished name login...
- ./ConfigEngine.sh wp-modify-realm-enable-dn-login -DWasPassword=foo
To disable this feature...
- ./ConfigEngine.sh wp-modify-realm-disable-dn-login -DWasPassword=foo
- Stop and restart all necessary servers to propagate the changes.
- Optional: Update the member names used by WCM with the corresponding members in the LDAP directory.
This step is only needed if you have installed the portal with WCM and intend to use the Intranet and Internet Site Templates that were optionally installed with the product by running configure-express.
- Edit...
- WP_PROFILE/PortalServer/wcm/shared/app/config/wcmservices/MemberFixerModule.properties
- Add the following lines to the file:
uid=wpsadmin,o=defaultWIMFileBasedRealm -> portal_admin_DN
cn=contentauthors,o=defaultWIMFileBasedRealm -> content_authors_group_DN
The MemberFixerModule.properties file already contains lines for xyzadmin. We can ignore this line.
- Save the changes and close the file.
- Run...
./ConfigEngine.sh run-wcm-admin-task-member-fixer  \
                  -DallLibraries=true  \
                  -Dfix=true  \
                  -DaltDn=update  \
                  -DmismatchedId=update  \
                  -DinvalidDn=update  \
                  -DnoRealmDn=true  \
                  -DPortalAdminPwd=wpsadmin
realm_name should match the value for federated.realm in wkplc.properties. If value is empty, use defaultWIMFileBasedRealm.
- Edit...
- Optional: Assign access to the Web content libraries.
- Log in as a portal administrator and navigate to...
-
Administration | Portal Content | Web Content Libraries
| web_library | Set permissions
- Click the Edit Role icon for Editor.
- Add the group specified for content_authors_group_DN as an Editor for the Intranet and Internet libraries.
- Click Apply then Done.
- Log in as a portal administrator and navigate to...
- If you have created any additional WCM libraries, run the Web content member fixer task to update the member names used by the libraries.
- Optional. Replace the WAS and portal administrator user and group IDs with users and groups that exist in the LDAP user registry.
Before starting...
- Review Special characters in user ID and passwords located under Planning for WebSphere Portal.
- Ensure the new user ID of the WAS administrator is not identical to the one that we are replacing.
This step is required in a production environment.
If you run these tasks after created the cluster, run them on all nodes in the cluster.
- Run...
- ./ConfigEngine.sh wp-change-was-admin-user -DWasUser=adminid -DWasPassword=foo -DnewAdminId=newadminid -DnewAdminPw=newpassword
Provide the full DN for the newAdminId parameter.
- Verify the task completed successfully. Stop and restart all required servers.
- Run...
- ./ConfigEngine.sh wp-change-portal-admin-user -DWasPassword=foo -DnewAdminId=newadminid -DnewAdminPw=newpassword -DnewAdminGroupId=newadmingroupid
Provide the full DN for the newAdminId and newAdminGroupId parameters.
This task verifies the user against a running server instance. If the server is stopped, to skip the validation...
- -Dskip.ldap.validation=true
- Update the SearchAdminUser alias to match the WebSphere Portal administrator information.
- Verify the task completed successfully. Stop and restart all required servers.
- This step is required in a production environment. Remove the file system repository if you do not use it. The federated file system user repository that was the default security setting might not be required after federating the user repository. If the file system repository is no longer needed, removing it can help prevent conflicts created by duplicate user identities existing in multiple repositories.
See the following topic under Related for instructions: Delete the repository, which is listed with the appropriate operating system.
If created a cluster, including additional nodes, and then completed the steps in this task, run update-jcr-admin on the secondary nodes.
Add a database user registry
Add a database user registry to the default federated repository to store user account information for authentication and authorization. We can add multiple database user registries to the default federated repository although we can only add one database user registry at a time.
In a clustered environment, start the dmgr and nodeagent and verify they are able to synchronize.
Add a database user registry to the default federated repository
Repeat these steps for each additional database user registry to add.
Complete these steps on the primary node only.
To help ensure correct properties, we can use...
- WP_PROFILE/ConfigEngine/config/helpers/wp_add_DB.properties
- Run backupConfig
- Set up a new database, including creating a new user with appropriate database privileges:
Database Steps DB2 Create a DB2 database: - Install DB2.
- Enter the following database tuning commands:
db2 "CREATE DB dbname using codeset UTF-8 territory us PAGESIZE 8192"
db2 "UPDATE DB CFG FOR dbname USING applheapsz 4096"
db2 "UPDATE DB CFG FOR dbname USING app_ctl_heap_sz 1024"
db2 "UPDATE DB CFG FOR dbname USING stmtheap 32768"
db2 "UPDATE DB CFG FOR dbname USING dbheap 2400"
db2 "UPDATE DB CFG FOR dbname USING locklist 1000"
db2 "UPDATE DB CFG FOR dbname USING logfilsiz 4000"
db2 "UPDATE DB CFG FOR dbname USING logprimary 12"
db2 "UPDATE DB CFG FOR dbname USING logsecond 20"
db2 "UPDATE DB CFG FOR dbname USING logbufsz 32"
db2 "UPDATE DB CFG FOR dbname USING avg_appls 5"
db2 "UPDATE DB CFG FOR dbname USING locktimeout 30"
db2 "UPDATE DB CFG FOR dbname using AUTO_MAINT off"
Oracle Create an Oracle database: - Install Oracle using UNICODE Database and National character sets such as UTF8, AL32UTF8, or AL16UTF16.
- Configure the database in Dedicated Server Mode.
- Enter the recommended initial buffer pool sizes or set them according to the business needs:
- db_block_size = 8192
- db_cache_size = 300M
- db_files = 1024
- log_buffer = 65536
- open_cursors = 1500
- pga_aggregate_target = 200M
- pre_page_sga = true
- processes = 300
- shared_pool_size = 200M
SQL Server Create an SQL Server database: - Install SQL Server.
- Set Collation to case-sensitive.
Install SQL Server with the appropriate portal database collation so that your tempdb collation setting matches the collation we use for the property extension database. The tempdb collation is inherited from the master database, which you set when you install SQL Server.
- Define the DbDriver and DbLibrary parameter values:
- cd WP_PROFILE/ConfigEngine/properties
- Edit wkplc_dbtype.properties
- Set the following parameters under the appropriate database type properties heading:
- db_type.DbDriver
- db_type.DbLibrary
- Save the changes.
- Edit wkplc.properties
- Set parameters under the VMM Federated Database Properties heading:
federated.db.DataSourceName
federated.db.DbType
federated.db.DbUrl
federated.db.id
federated.db.baseDN
federated.db.DbUser
federated.db.DbPassword
federated.db.DbName - Set SOAP request timeout...
- cd WP_PROFILE/properties
- Edit soap.client.props
- Locate com.ibm.SOAP.requestTimeout and ensure the value is greater than 1000.
- Save and close soap.client.props.
- Complete the following steps:
- Create the local dmgr WebSphere variable used to access the database jars...
- ./ConfigEngine.sh wp-prep-vmm-db-secured-environment -DWasPassword=foo -DDbDomain=federated.db -Ddb_type.DmgrDbLibrary=/path/to/db/jars -DDmgrNodeName=dmgr_node_name
Set db_type to your database type, for example db2.
Set path to DB jar files on the dmgr host:
- DB2 Type 2 driver: db2java.zip
- DB2 Type 4 driver: db2jcc4.jar;db2jcc_license_cu.jar
- DB2 for z/OS Type 2 driver: db2java.zip
- DB2 for z/OS Type 4 driver: db2jcc4.jar;db2jcc_license_cisuz.jar
- Oracle: ojdbc14.jar
- SQL Server JDBC driver: sqljdbc.jar
- Include each node name as a comma separated list in the command:
Run the task: You do not have to run this task more than once. We can run this task from any node in the cluster.
- Set the property value for federated.db.DbType in wkplc.properties if using a database user registry or if the cell is migrated from a previous version.
- To create the variable used to access the VMM database jars...
- ./ConfigEngine.sh wp-node-prep-vmm-db-secured-environment -DWasPassword=foo -DDbDomain=federated.db -DVmmNodeName=node_name -Ddb_type.NodeDbLibrary=/path/to/db/jars
VmmNodeName is a list of one or more nodes names in the cell which share the same database driver paths. The db_type in db_type.NodeDbLibrary should be set to the type of database we are using, for example db2.
- Stop and restart all necessary servers to propagate the changes.
- Create the local dmgr WebSphere variable used to access the database jars...
- To add a database user registry to the default federated repository...
- ./ConfigEngine.sh wp-create-db -DWasPassword=foo
Users who are not in an LDAP do not have awareness and cannot see if other users are online. This can happen if you install WebSphere Portal and then enable a Federated LDAP or Federated database user repository that does not contain that user. Also, users who sign up using the Self Care portlet do not have awareness.
- Stop and restart servers, dmgrs, and node agents.
- To update the user registry where new users and groups are stored:
If we are using multiple LDAP user registries and/or a database user registry, only run this task for the user registry to define as the default user registry where new users and groups are stored.
- Edit wkplc.properties
- Set the following required parameters under the VMM supported entity types configuration heading:
The parameters groupParent and personAccountParent must be set to the same value.
For example:
- personAccountParent=dc=myco,dc=com
- groupParent=dc=myco,dc=com
- Save changes to wkplc.properties.
- To delete the old attributes before adding the new attributes...
- ./ConfigEngine.sh wp-set-entitytypes -DWasPassword=foo
- Stop and restart all necessary servers to propagate the changes.
- List the names and types of configured repositories...
- ./ConfigEngine.sh wp-query-repository
If created a cluster, including additional nodes, and then completed the steps in this task, run update-jcr-admin on the secondary nodes.
Add realm support
A realm is a group of users from one or more user registries that form a coherent group within IBM WebSphere Portal. A realm must be mapped to a Virtual Portal to allow the defined users to log in to the Virtual Portal. When configuring realm support, complete these steps for each base entry that exists in the LDAP and/or database user registry to create multiple realm support.
Before configuring realm support, add all LDAP user registries and/or database user registries that you will use to create a single realm or multiple realms, to the federated repository. If we are going to create multiple realms, create all required base entries within the LDAP user registries and/or database user registries. All base entry names must be unique within the federated repository.
In a clustered environment, start the dmgr and nodeagent and verify they are able to synchronize.
Add realm support to the user registry model:
- Run backupConfig.sh
- Edit wkplc.properties
- Create a new realm with default base entry.
Set the following required parameters under the VMM realm configuration heading:
- Save changes to wkplc.properties.
- Add your new realm to the Virtual Member Manager configuration...
- ./ConfigEngine.sh wp-create-realm -DWasPassword=foo
To create multiple realms, ensure that the federated repository contains the required unique base entries. Stop and restart the appropriate servers for the installation environment, and then update wkplc.properties with the base entry information and rerun the wp-create-realm task. Repeat these steps until all realms are created.
- Stop and restart servers, dmgrs, and node agents.
- Set the parent person, parent group, and parent organization values for your new realm...
- Update the default parents per entity type and realm...
- ./ConfigEngine.sh wp-modify-realm-defaultparents -DWasPassword=foo
If you have to re-run this task to add additional entity types and realms, first stop and restart the appropriate appservers
- Stop and restart servers, dmgrs, and node agents.
- Query realm for a list of base entries:
- Edit wkplc.properties
- For realmName, set the name of the realm to query.
- Save changes to wkplc.properties.
- List the base entries for a specific realm...
- ./ConfigEngine.sh wp-query-realm-baseentry
- Add any additional base entries to the realm configuration.
For example, if you have two additional base entries (base entry 1 and base entry 2) to add to the realm you just created, update wkplc.properties with the information from base entry 1 and then run this task. Then update the properties file with the information for base entry 2 and then run this task:
- Edit wkplc.properties
- Set value for new base entry under VMM realm configuration heading:
- Save changes to wkplc.properties.
- Add your LDAP base entry to the realm configuration...
-
WP_PROFILE/ConfigEngine,
./ConfigEngine.sh wp-add-realm-baseentry -DWasPassword=foo - Stop and restart all necessary servers to propagate the changes.
- Optional: Set the realm created as the default realm:
Only users defined in base entries that exist in the default realm are able to log into WebSphere Portal. If you find that a user cannot log in to WebSphere Portal, check to see if the base entry containing the user exists in the default realm. To see what base entries are part of the default realm...
- wp-query-realm-baseentry
If the default realm is missing the base entry, run the wp-add-realm-baseentry task to add the base entry to the default realm.
- Edit wkplc.properties
- For defaultRealmName, type the realmName property value to use as the default realm.
- Save changes to wkplc.properties.
- Set this realm as the default realm...
- ./ConfigEngine.sh wp-default-realm -DWasPassword=foo
- Stop and restart all necessary servers to propagate the changes.
- If you change the default realm, replace the WAS and WebSphere Portal administrator user ID to reflect the new realm:
- Create a new user in the Manage Users and Groups portlet to replace the current WAS administrative user.
- Create a new user in the Manage Users and Groups portlet to replace the current WebSphere Portal administrative user.
- Create a new group in the Manage Users and Groups portlet to replace the current group.
- Replace the old WAS admin user ID and group ID with the new user and group...
- ./ConfigEngine.sh wp-change-was-admin-user -DWasUser=adminid -DWasPassword=foo -DnewAdminId=newadminid -DnewAdminPw=newpassword -DnewAdminGroupId=newadmingroupid
Provide the full DN for the newAdminId and newAdminGroupId parameters.
To verify the user against a running server instance, run add...
- -Dskip.ldap.validation=true
- Verify the task completed successfully. Stop and restart all required servers.
- Replace the old WebSphere Portal admin user ID and group ID with the new user and group...
- ./ConfigEngine.sh wp-change-portal-admin-user -DWasPassword=foo -DnewAdminId=newadminid -DnewAdminPw=newpassword -DnewAdminGroupId=newadmingroupid
Provide the full DN for the newAdminId and newAdminGroupId parameters.
This task verifies the user against a running server instance. If the server is stopped, to skip the validation...
- -Dskip.ldap.validation=true
- Verify the task completed successfully. Stop and restart all required servers.
- If the short names are not unique for the realm, enable the full distinguished name login
Run this task if the administrator name is in conflict with another user name in the attached repository. This command allows the Administrator to log in using the fully distinguished name instead of the short name.
- Edit wkplc.properties
- Enter a value for realmName or leave blank to update the default realm.
- Save changes to wkplc.properties.
- To enable the distinguished name login...
- ./ConfigEngine.sh wp-modify-realm-enable-dn-login -DWasPassword=foo
To disable this feature...
- ./ConfigEngine.sh wp-modify-realm-disable-dn-login -DWasPassword=foo
- Stop and restart all necessary servers to propagate the changes.
If created a cluster, including additional nodes, and then completed the steps in this task, run update-jcr-admin on the secondary nodes.
Adapt the attribute configuration
After installing IBM WebSphere Portal and configuring the LDAP user registries, adapt the attribute configuration to match the configured LDAP server(s) and the business needs.
You do not need to perform these steps if we are using either...
- database user registry
- default federated file-based repository for out-of-box installations
After installation, IBM WebSphere Portal has a predefined set of attributes for users and groups. Your LDAP server may have a different set of predefined user and group attributes. To ensure proper communication between WebSphere Portal and the LDAP server, we can configure additional attributes and flag existing attributes as required or unsupported on a per repository basis or for all configure repositories.
LDAP servers can only handle attributes that are explicitly defined in their schema. The LDAP server's schema is different from the WebSphere Portal schema but the two schemas should match for proper communication between WebSphere Portal and the LDAP server. The task to add the LDAP user registry does some basic attribute configurations depending on the type of LDAP server that you choose. You may, however, still need to adapt the WebSphere Portal configuration to match the LDAP schema; for example, if an attribute is defined in WebSphere Portal but not in the LDAP server, you will need to perform one of the following tasks to resolve this mismatch
- Flag the attribute as unsupported for the LDAP server
- Introduce an attribute mapping that maps the WebSphere Portal attribute to an attribute defined in the LDAP schema
Query the defined attributes
After installing IBM WebSphere Portal and configuring the LDAP user registries, we can query the defined attributes to see what attributes are flagged as unsupported or if the attribute is mapped to a different LDAP attribute.
To query an overview of the currently defined attributes...
- ./ConfigEngine.sh wp-query-attribute-config -DWasPassword=foo
This task creates the availableAttributes.html report, located in
- WP_PROFILE/ConfigEngine/log
The report contains one table that lists the available attributes for Users (PersonAccount) and one table that lists the available attributes for Groups. For each configured repository there is a column that indicates if the attribute is flagged as unsupported or if the attribute is mapped to a different LDAP attribute.
This task does not validate the existence of attributes in the LDAP schema.
Add attributes
The VMM is configured with a default attribute scheme that might not be compatible with the LDAP server. If this is the case, extend the VMM attribute schema by adding new attributes that we can map between IBM WebSphere Portal and the user registry.
Add new attributes to the user registry
- Run backupConfig.sh
- Log on to the primary node and run...
cd WP_PROFILE\ConfigEngine ./ConfigEngine.sh wp-la-install-ear \ -DWasPassword=dmgr_password \ -DServerName=dmgr_server \ -DNodeName=node_name - Edit wkplc.properties
- Set parameters under the VMM Property Extension Properties heading:
- Save changes to wkplc.properties.
- Add the attribute to the user registry...
- ./ConfigEngine.sh wp-add-property -DWasPassword=foo
This task calls an EJB to WAS, which must authenticate against WAS. Depending on the configuration in the sas.client.props file, you may receive a popup window or a command line prompt asking for user identity and password. Enter the WAS user ID and password.
Remember: For multiple properties to add, repeat all steps, except for the wp-la-install-ear task, until all new attributes are added.
- Stop and restart servers, dmgrs, and node agents.
If created a cluster, including additional nodes, and then completed the steps in this task, run update-jcr-admin on the secondary nodes.
Mapping attributes
After configuring the LDAP user registry and querying the defined attributes, map attributes between portal and the LDAP server; for multiple LDAP servers, complete these steps for each LDAP server:
- Edit wkplc.properties
- Identify the LDAP server:
- Check that all defined attributes are available in the configured LDAP user registry:
-
cd WP_PROFILE/ConfigEngine
./ConfigEngine.sh wp-validate-federated-ldap-attribute-config -DWasPassword=foo - Edit...
- WP_PROFILE/ConfigEngine/log/ConfigTrace.log
......and review the following output for the PersonAccount and Group entity type:
- The following attributes are defined in WebSphere Portal but not in the LDAP server
- This list contains attributes defined in WebSphere Portal but not available in the LDAP. Flag attributes that you do not plan to use in WebSphere Portal as unsupported. Map the attributes to use to the attributes that exist in the LDAP; map the uid, cn, firstName, sn, preferredLanguage, and ibm-primaryEmail attributes if they are contained in the list.
- The following attributes are flagged as required in the LDAP server but not in WebSphere Portal
- This list contains attributes defined as "MUST" in the LDAP server but not as required in WebSphere Portal. You should flag these attributes as required within WebSphere Portal;
- The following attributes have a different type in WebSphere Portal and in the LDAP server
- This list contains all attributes that WebSphere Portal might ignore because the data type within WebSphere Portal and within the LDAP server do not match.
- Edit wkplc.properties
- Enter a value for one of the following sets of parameters in wkplc.properties to correct any issues found in the config trace file:
-
federated.ldap.attributes.nonSupported
federated.ldap.attributes.nonSupported.delete
federated.ldap.attributes.mapping.ldapName
federated.ldap.attributes.mapping.portalName
federated.ldap.attributes.mapping.entityTypesFor example, the following values flag certificate and members as unsupported attributes and map ibm-primaryEmail to mail and ibm-jobTitle to title for both the PersonAccount and Group entityTypes:
-
federated.ldap.attributes.nonSupported=certificate, members
federated.ldap.attributes.nonSupported.delete=
federated.ldap.attributes.mapping.ldapName=mail, title
federated.ldap.attributes.mapping.portalName=ibm-primaryEmail, ibm-jobTitle
federated.ldap.attributes.mapping.entityTypes=PersonAccount, Group - Save changes to wkplc.properties.
- Update the LDAP user registry configuration with the list of unsupported attributes and the proper mapping between WebSphere Portal and the LDAP user registry:
-
cd WP_PROFILE/ConfigEngine
./ConfigEngine.sh wp-update-federated-ldap-attribute-config -DWasPassword=foo - Stop and restart servers, dmgrs, and node agents.
- Optional: Flag an attribute as either unsupported or required for the entire WebSphere Portal environment instead of just for the specified LDAP:
- Set parameters in wkplc.properties:
- user.attributes. required
- user.attributes.nonsupported
- Save changes to wkplc.properties.
- cd WP_PROFILE/ConfigEngine
./ConfigEngine.sh wp-update-attribute-config -DWasPassword=foo - Stop and restart all necessary servers to propagate the changes.
- Set parameters in wkplc.properties:
If created a cluster, including additional nodes, and then completed the steps in this task, run update-jcr-admin on the secondary nodes.
Remove attributes
Due to a Virtual Member Manager (VMM) limitation, there is currently no task to update an attribute. If we added an attribute to the property extension database or when adapting attributes to match the LDAP server that were spelled incorrectly or already added due to migration, remove the attribute from the database. Use caution when performing these steps.
To remove an attribute from the database:
Do not remove attributes that have already been populated with user values because this can cause database inconsistencies.
Cluster note: In a clustered environment on the dmgr and then resynch the nodes.
- Run backupConfig
- To remove an attribute stored in a property extension database:
- Open the tool we use to edit the database.
- Verify the attribute name is available in the LAPROP table.
- Delete the required attributes from the LAPROP table.
- Edit WP_PROFILE/config/cells/cellname/wim/model/wimxmlextension.xml
- Delete the propertySchema definition for the attributes deleted from the LAPROP table; for example:
<wim:propertySchema nsURI="http://www.ibm.com/websphere/wim" dataType="String" multiValued="true" propertyName="attribute_name"> <wim:applicableEntityTypeNames>PersonAccount</wim:applicableEntityTypeNames> </wim:propertySchema> - Save the changes to wimxmlextension.xml.
- Edit WP_PROFILE/config/cells/cellname/wim/config/wimconfig.xml
- Delete the attributes or propertiesNotSupported definitions for the attributes deleted from the LAPROP table.
For example:
<config:attributes name="attribute_name" propertyName="attribute_name">
<config:entityTypes> PersonAccount </config:entityTypes>
<config:entityTypes> Group </config:entityTypes>
</config:attributes>
or<config:propertiesNotSupported name="attribute_name">
- Save the changes to wimconfig.xml.
- Stop and restart the WebSphere_Portal server
- To remove an attribute that is not stored in a property extension database:
- Open wimxmlextension.xml.
- Delete the propertySchema definition for the attributes you previously added:
<wim:propertySchema nsURI="http://www.ibm.com/websphere/wim" dataType="String" multiValued="true" propertyName="attribute_name"> <wim:applicableEntityTypeNames>PersonAccount</wim:applicableEntityTypeNames> </wim:propertySchema> - Save the changes to wimxmlextension.xml.
- Edit wimconfig.xml
- Delete the stanza that corresponds to the custom attribute you deleted from wimextension.xml;
for example:
<config:attributes name="attribute_name" propertyName="property_name"> <config:entityTypes>PersonAccount</config:entityTypes> </config:attributes> - Save the changes to wimconfig.xml.
- Stop and restart the WebSphere_Portal server.
Configure Portal to use dynamic groups
By default, WebSphere Portal is enabled for static groups. However, the Virtual Member Manager (VMM) allows users to be members of either static or dynamic groups. Static groups are those where a persistent binding exists between a group and its members. Dynamic groups are those where a search query is defined to retrieve the members of a group. If you have the LDAP server configured to use dynamic groups, complete the steps in this task for WebSphere Portal to use dynamic group queries when you setup the LDAP server.
Perform the required tasks to configure either a stand-alone or federated LDAPserver security.
The steps in this task use groupOfURLs as the object class for dynamic groups and memberURL as the dynamic membership attribute. The actual values for object classes and dynamic membership attributes can vary depending on the LDAP server. For this reason, you should export an LDIF file to verify the object classes and dynamic membership attributes.
Perform the following steps on the dmgr then synchronize the nodes.
- Log in to the WAS admin console.
- Select Security > Global security.
- In Available realm definitions, select Federated repositories and click Configure.
- In Related Items, click Manage repositories.
- Select the appropriate repository from the list.
- In Additional Properties, click Group attribute definition then click Dynamic member attributes.
- Click New and specify values for the Name and Object class fields as appropriate.
For example,
- Name: memberurl
- Object class: groupofurls
- Click OK and save the changes to the master configuration.
- Stop and restart servers, dmgrs, and node agents.
Enable referrals for your LDAP user registry
Referrals redirect object requests from one LDAP server to another when objects do not exist or cannot be located in a particular directory tree. You should enable referrals if the environment has more than one user registry existing on multiple servers or domains.
Configure the portal to use LDAP referrals
- Run backupConfig
- Open a UNIX System Services (USS) command prompt.
- Edit wkplc.properties
- Specify values for the following parameters:
- et.ldap.id=ID_of_your_LDAP_server
- et.ldap.host=hostname_of_your_LDAP_server
- et.ldap.referral=follow
- Save and close wkplc.properties.
- Create an LDAP entity type:
-
./ConfigEngine.sh wp-update-et-ldap -DWasPassword=foo
- Stop and restart servers, dmgrs, and node agents.
Prepare additional cluster members
After installing and configuring the primary node, we can create the additional cluster nodes. Install IBM WebSphere Portal on each node and then configure the node to access the database and user registry before adding it to the cluster.
Install WebSphere Portal on AIX for the horizontal cluster nodes
Install IBM WebSphere Portal on the additional cluster nodes to create a highly available and scalable environment. On additional nodes, you only need to install the WebSphere Portal product binary files. The WebSphere Portal application server and applications are added after the node is federated and a new cluster member is created.
Review the System requirements for the operating system and ensure that all hardware and software matches the minimum product level before installing WebSphere Portal.
Additional node: Install with GUI
We can use the Installation Manager to help install IBM WebSphere Portal and IBM WAS on your additional nodes. The Installation Manager gathers essential information, such as host name and node, verifies the operating system and its prerequisites, available disk space, and any required software prerequisites, and then performs the installation.
The main difference when installing additional nodes, select option: Product binaries only
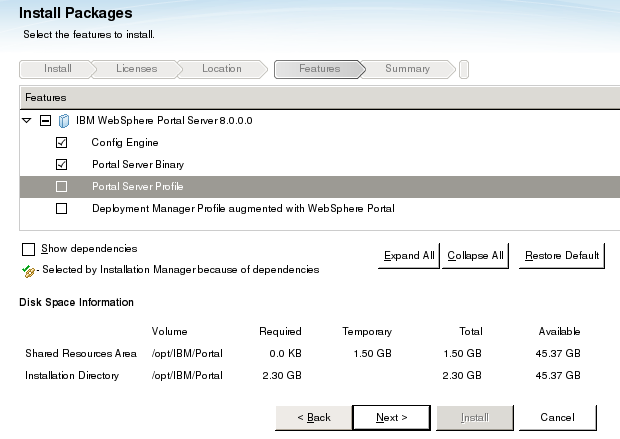
The bit architecture of the installation program uses:
- The bit architecture of the operating system
- The bit architecture of the existing WAS
When you install onto a 64-bit operating system, WebSphere Portal installs as a 64-bit version. We can force a 32-bit application installation onto a 64-bit operating system.
IBM Installation Manager
- Verify the fully qualified host name...
- ping myserver.myco.com
- Verify network configuration...
- ping localhost
- For servers with a firewall, antivirus, screen saver, and/or desktop search engine enabled, disable them before installing.
- Install IBM Installation Manager:
- GUI...
- ./install
- Silently...
-
./userinstc -acceptLicense \
-log /tmp/install.log
- From Portal Setup disk...
- ./setup.sh
To change display language, add the LaunchPadLocale language code.
To search for IBM Installation Manager updates, navigate to...
- File > Update
- GUI...
- Add the repositories where the installation media exists:
- Open the IBM Installation Manager and navigate to...
- File > Preferences > Repositories > Add Repositories > Browse > IBM WebSphere Application service repository > OK
- Ensure all required repositories are checked.
- Click Test Connections.
- Select Apply.
- Select OK.
- Open the IBM Installation Manager and navigate to...
- On the main IBM Installation Manager panel, select Install to begin the installation process.
- On the panel...
- Select packages to install
...select both the WAS and WebSphere Portal packages.
- Click Next.
- Accept the license agreement and then click Next.
- Select shared resources directory and then click Next.
- Set Installation Directory:
- Select the WAS Package Group Name and then select the installation directory path.
- Select the WebSphere Portal Package Group Name and then select the installation directory path.
- Click Next.
- Select the translations to install and then click Next.
- On the panel...
- Select the features to install
...expand the WAS and WebSphere Portal packages
Expand the WebSphere Portal package and deselect the feature...
- Create a new Portal Server Profile
A full WebSphere Portal server is not currently required. We create the custom profile later.
- Confirm the information on the Summary panel and then click Install.
- On the panel...
- Verify the installation successfully created the WebSphere Portal file system.
Because the WebSphere Portal profile was not created, the WebSphere_Portal server does not exist. We create the server when adding the node to the cluster.
Additional node: Install with response file
First install IBM Installation Manager. Then use a response file to install IBM WebSphere Portal and IBM WAS on your additional nodes.
Install type should be Portal Server Binary.
Record response files on the same OS you plan for the installation. For multiple operating systems, record a response file for each operating system.
The bit architecture of the installation program uses:
- The bit architecture of the operating system
- The bit architecture of the existing WAS
When you install onto a 64-bit operating system, WebSphere Portal installs as a 64-bit version. We can force a 32-bit application installation onto a 64-bit operating system.
Use a response file for installation
- Verify the fully qualified host name...
- ping myserver.myco.com
- Verify network configuration...
- ping localhost
- For servers with a firewall, antivirus, screen saver, and/or desktop search engine enabled, disable them before installing.
- Install IBM Installation Manager:
- GUI...
- ./install
- Silently...
-
./userinstc -acceptLicense -log /tmp/install.log
- From Portal Setup disk...
- ./setup.sh
To change display language, add the LaunchPadLocale language code.
To search for IBM Installation Manager updates, navigate to...
- File > Update
- GUI...
Record a response file using Installation Manager menu
To record our own reponse file using Installation Manager menus...
- Launch installation manager with -record option...
- ./IBMIM -record responsefile.xml -skipInstall /path/to/install/directory
This step does not install WebSphere Portal. You are only recording the response file used to install portal later.
- Navigate through the IBM Installation Manager panels and set values for the environment.
Before adding the repositories, make sure they are located in a directory accessible to all required computers.
On the panel...
- Select the features to install
...keep the default selection checked to create a new Portal server profile.
- On the panel...
- Select packages to install
...select both the WAS and WebSphere Portal packages.
- Click Next.
- Accept the license agreement and then click Next.
- Select shared resources directory and then click Next.
- Set Installation Directory:
- Select the WAS Package Group Name and then select the installation directory path.
- Select the WebSphere Portal Package Group Name and then select the installation directory path.
- Click Next.
- Select the translations to install and then click Next.
- On the panel...
- Select the features to install
...expand the WAS and WebSphere Portal packages
Expand the WebSphere Portal package and deselect the feature...
- Create a new Portal Server Profile
A full WebSphere Portal server is not currently required. We create the custom profile later.
- Confirm the information on the Summary panel and then click Install.
- After the Installation Manager finishes creating the response file, click Finish and then close the Installation Manager to complete the response file recording.
- If installing on a different computer, copy the response file to the response file directory on that computer.
- If the repository URL requires authentication, use imutilsc.sh to create a keyring file store for credentials.
The keyring file stores the credentials required for the repositories. The IBM Installation Manager command-line tool imutilsc is available from the installation tools directory.
./imutilsc saveCredential  \
           -url repository_URL  \
           -userName credential_userName \
           -userPassword password  \
           -keyring keyring_file  \
           [ -password keyringfile_password ] \
           [ -proxyHost proxy_host -proxyPort proxy_port \
           [ -proxyUsername proxy_username -proxyUserPassword proxyuser_password ] \
           [ -useSocks ] ] \
           [ -verbose ]
If installing on a different computer, copy the keyring file to that computer.
- Install WebSphere Portal and IBM WAS...
- ./imcl -acceptLicense -input /path/to/response.xml -log /path/to/log/files
To use your repository keyring file...
- -keyring /path/to/keyring -password keyringfile_password
- Verify the installation successfully created the WebSphere Portal file system.
Because the WebSphere Portal profile was not created, the WebSphere_Portal server does not exist. We create the server when adding the node to the cluster.
Sample response files are in SETUP_ROOT/responsefiles.
Add the horizontal cluster node to the cluster
- Log on to primary node and copy profileTemplates.zip to secondary node...
-
cd $PORTAL_HOME/profileTemplates/
scp profileTemplates.zip addtl_host:$PORTAL_HOME/profileTemplates - Extract the profileTemplates.zip file in the same location.
If any of the templates already exist in the profileTemplates directory, overwrite them.
- Because some files are set to read-only after the copy operation, open permissions...
- chmod -R 755 PORTAL_HOME/profileTemplates
- Install the copied profile template...
- cd PORTAL_HOME/profileTemplates
./installPortalTemplates.shThis task localizes the profile templates to the current environment
- Create a profile wp_profile...
cd WAS_HOME/bin
./manageprofiles.sh -create  \
                    -templatePath /usr/IBM/WebSphere/PortalServer/profileTemplates/managed.portal \
                    -profileName testManagedPortal1 \
                    -profilePath /usr/IBM/WebSphere/PortalServer/profiles/testManagedPortal1 \
                    -cellName testCell \
                    -nodeName testNode02 \
                    -hostName myportal.myco.com
We use a Node Name that is different than what was used for primary node.
Ensure wkplc_dbdomain.properties and wkplc_dbtype.properties files have correct database information. These files should match the database information defined in the primary node. Copy the database drivers on the primary node to the same location on the additional cluster node. We can find the location of the database drivers in wkplc_dbtype.properties.
- Validate the database settings...
- ./ConfigEngine.sh validate-database -DWasPassword=foo
- Edit...
- WP_PROFILE/PortalServer/jcr/lib/com/ibm/icm/icm.properties
...and set...
- jcr.textsearch.enabled = false
- Federate the additional cluster node:
- ./addNode.sh dmgr_hostname dmgr_port -username wasadmin -password foo
If the WAS administrator user ID and password for the local node are different from the dmgr, add the following parameters:
- -localusername local_wasadmin
- -localpassword local_foo
- Ensure the following parameters are set correctly in wkplc.properties:
-
WasUserid = dmgr administrator ID.
WasPassword = dmgr administrator password.
WasRemoteHostName = fully qualified host name of the dmgr.
WasSoapPort = SOAP port that the dmgr is using; the default value is 8879.
ServerName = Default is WebSphere_Portal. We can change this on additional nodes.
PrimaryNode = false
ClusterName = primary node's ClusterName. - Add the node to your cluster...
- ./ConfigEngine.sh cluster-node-config-cluster-setup-additional -DWasPassword=dmgr_password
- To access the WCM content through an external web server:
- Log on to the dmgr console and select...
-
Environment | WebSphere Variables | Scope drop-down menu | Node=nodename, Server=servername
Set variables...
-
WCM_HOST - fully qualified host name used to access the portal server through the web server or On Demand Router.
WCM_PORT - port number used to access the portal server through the web server or On Demand Router.
WCM_HOST and WCM_PORT - for each additional portal server that already exists in the cluster. - Synchronize the node with the dmgr:
-
System Administration | Nodes | node | Full Resynchronize
- Log off of the dmgr console.
- Log on to the dmgr console and select...
- Propagate changes:
WebSphere_Portal is the name of the node's WebSphere Portal server; but if you customized the server name, the default name changes. If we are uncertain of the server name, run the task...
- serverstatus -all
...to get a list of the server names and their status.
./stopServer.sh WebSphere_Portal -username wpadmin -password foo
./startServer.sh WebSphere_Portal
Add a horizontal node to the dynamic cluster
After creating the dynamic cluster, we can add horizontal nodes to expand the capacity of the dynamic cluster. Install and configure the horizontal node, then add it to the existing dynamic cluster node group, and then add it to the existing IBM WebSphere Virtual Enterprise dynamic cluster.
Add an horizontal node to the WebSphere Virtual Enterprise dynamic cluster
- To create a directory to store templates:
- Copy...
- PORTAL_HOME/profileTemplates/profileTemplates.zip
...on the primary node to the same location on the additional cluster node.
- Extract the profileTemplates.zip file in the same location. If any of the templates already exist in the profileTemplates directory, overwrite them.
- Because some files are set to read-only after the copy operation, open permissions...
- chmod -R 755 PORTAL_HOME/profileTemplates
- To install the copied profile template...
- cd PORTAL_HOME/profileTemplates
./installPortalTemplates.shThis task localizes the profile templates to the current environment and registers them with the pmt.sh if it exists on the server.
- Copy...
- Create a profile used for additional cluster members:
Choose a Node Name that is different from what you entered for the primary node.
- pmt.sh
- Run...
- cd WAS_HOME/bin/ProfileManagement
./pmt.sh - Click Launch Profile Management Tool
- Click Create to create a profile.
- On the Environment Selection panel, select the...
- WebSphere Portal 8.0.0 | Custom Portal profile
- Select the button...
- Advanced profile creation
- On the panel...
- Profile Name and Location
...provide the name for the new profile and its location in the file system. The name and location must be unique from other existing profiles. Click Next to continue.
- On the panel...
- Node and Host Names
...provide the node name and TCP/IP host name for the new profile.
To federate this profile, the node name must be unique from other profiles in the same management cell (under dmgr control). The host name must be valid and reachable over the network. Click Next to continue.
- On the Federation panel to federate the node in the future, check the check box...
- Federate this node later
Do not enter the values for the dmgr to federate now as this will cause an unusable portal node.
- On the panel...
- Profile Creation Summary
...review the information collected by the wizard, and then click Create to create the profile with WebSphere Portal.
- Click Finish to exit PMT.
- Run...
- manageprofiles.sh
cd WAS_HOME/bin
./manageprofiles.sh -create  \
                    -templatePath /usr/IBM/WebSphere/PortalServer/profileTemplates/managed.portal \
                    -profileName testManagedPortal1 \
                    -profilePath /usr/IBM/WebSphere/PortalServer/profiles/testManagedPortal1 \
                    -cellName testCell \
                    -nodeName testNode \
                    -hostName myportal.myco.com \
- pmt.sh
- Install WebSphere Virtual Enterprise and augment the newly created profile.
See the "Planning the product installation" link in the Related section for information about installing WebSphere Virtual Enterprise. Profile augmentation is performed using the pmt.sh GUI on systems that support it or through manageprofiles.sh available on all systems. When using the GUI select type of augmentation..
- Operations Optimization
Use manageprofiles.sh to augment a stand-alone application server profile from the command-line
- To ensure that the database information is correct and to ensure a successful additional node:
- Ensure that the wkplc_dbdomain.properties and wkplc_dbtype.properties files have the correct database information in them.
The wkplc_dbdomain.properties and wkplc_dbtype.properties files should match the database information defined in the primary node.
- Copy the database drivers on the primary node to the same location on the additional cluster node. We can find the location of the database drivers in wkplc_dbtype.properties.
- Ensure that the wkplc_dbdomain.properties and wkplc_dbtype.properties files have the correct database information in them.
- Validate the database settings...
- ./ConfigEngine.sh validate-database -DWasPassword=foo
Add -DTransferDomainList to the validate-database task to specify the domains to validate; for example...
- -DTransferDomainList=jcr
To validate all domains, you do not need to specify this parameter on the command line.
- Federate the additional cluster node:
- ./addNode.sh dmgr_hostname dmgr_port -username wasadmin -password foo
- Ensure the following parameters are set correctly in wkplc.properties:
Although we can add these parameters (particularly passwords) directly to any task while creating the cluster, we might want to temporarily add them to the properties file. We can then remove them when we are finished to keep the environment secure.
- WasUserid is set to the dmgr administrator ID.
- WasPassword is set to the dmgr administrator password.
- WasRemoteHostName is set to the fully qualified host name of the dmgr.
- WasSoapPort is set to the SOAP port that the dmgr is using; the default value is 8879.
- ServerName is set to the correct server name. The default is WebSphere_Portal but we can change this on the additional nodes.
- PrimaryNode is set to false.
- ClusterName is set to the primary node's ClusterName.
- If we configured a database user registry or a property extension database on the dmgr, set up access to the database drivers:
- Set the property value for federated.db.DbType if using a database user registry or set the property value for la.DbType if using a property extension database in wkplc.properties.
If you migrated the primary node from a version prior to Version 6.1.0 and we are not using a database user registry or a property extension database, set the property value for federated.db.DbType to the same value that is in wkplc.properties on the primary node.
- To add the library paths to the VMM_JDBC_CLASSPATH variable:
- Log on to the WAS WAS admin console.
- Click Environment > WebSphere Variables.
- Select scope: cell.
- Select the VMM_JDBC_CLASSPATH variable.
If this variable does not exist, click New to create the variable.
- Enter the complete paths to the library files in Value. Separate multiple files with a colon (:); for example, enter...
- SQLLIB/java/db2jcc4.jar:SQLLIB/java/db2jcc_license_cu.jar
- Copy files set for the VMM_JDBC_CLASSPATH variable into the appserver/lib directory.
- Stop and restart the appropriate servers to propagate the changes.
- Create the local dmgr WebSphere variable used to access the database jars...
- ./ConfigEngine.sh wp-prep-vmm-db-secured-environment -DWasPassword=foo -DDbDomain=la|federated.db -Ddb_type.NodeDbLibrary=/path/to/dmgr/jars -DDmgrNodeName=dmgr_node_name
Set db_type to your database type, for example db2. The /path/to/db/jars should be one of the following options:
- DB2 Type 2 driver: db2java.zip
- DB2 Type 4 driver: db2jcc4.jar;db2jcc_license_cu.jar
- DB2 for z/OS Type 2 driver: db2java.zip
- DB2 for z/OS Type 4 driver: db2jcc4.jar;db2jcc_license_cisuz.jar
- Oracle: ojdbc14.jar
- SQL Server JDBC driver: sqljdbc.jar
- Create the variable used to access the VMM database jars...
- ./ConfigEngine.sh wp-node-prep-vmm-db-secured-environment -DWasPassword=dmgr_password -DDbDomain=la|federated.db -DVmmNodeName=node_name -Ddb_type.NodeDbLibrary=/path/to/db/jars
VmmNodeName is a list of one or more nodes names in the cell which share the same database driver paths. The db_type in db_type.NodeDbLibrary should be set to the type of database we are using, for example db2.
- Set the property value for federated.db.DbType if using a database user registry or set the property value for la.DbType if using a property extension database in wkplc.properties.
- The node is federated and using the dmgr cell and its user registry. If the admin user ID and group name are different in the WebSphere Portal and dmgr configurations, choose one of the following options depending on your security policies:
- Add the existing admin user ID and group to the dmgr security configuration
- To change the values in the WebSphere Portal configuration to match the dmgr values:
If the dmgr cell is using a stand-alone LDAP user registry, complete these steps after the cluster-node-config-cluster-setup-additional (static cluster) or cluster-node-config-dynamic-cluster-setup-additional (dynamic cluster) task completes.
- Start the WebSphere_Portal server.
- Verify the required WebSphere Portal admin user ID and group ID are defined in the dmgr user registry that provides security for the cell.
- Run...
- ./ConfigEngine.sh wp-change-portal-admin-user -DWasPassword=foo -DnewAdminId=newadminid -DnewAdminPw=newpassword -DnewAdminGroupId=newadmingroupid
If the value for newAdminGroupId contains a space; for example Software Group, open wkplc.properties and add the values for newAdminId, newAdminPw, and newAdminGroupId. Save the changes and then run...
- ./ConfigEngine.sh wp-change-portal-admin-user -DWasPassword=dmgr_password
- WasPassword is set to the administrative password for the dmgr cell
- newAdminId is set to the fully qualified DN of the WebSphere Portal admin user ID in the cell
- newAdminGroupId is set to the fully qualified DN of the group for the WebSphere Portal admin user ID in the cell
- After the task completes, stop the WebSphere_Portal server.
- Run...
- ./ConfigEngine.sh cluster-node-config-post-federation -DWasPassword=dmgr_password
- Log on to the dmgr console.
- To add members to the node group:
- Click System administration > Node groups.
- Click the name of the node group to add members to.
- Click Node group members under Additional Properties.
- Click Add.
- Select the additional node to add into the node group and then click Add.
- Click the Save link to save the changes to the master configuration.
- Set the following parameters in wkplc.properties:
- Verify that ClusterName is set to the name of the existing dynamic cluster.
- Verify that CellName is set to the dmgr cell.
- Verify that NodeName is set to the local node.
- Set ServerName to the server used for the dynamic cluster member on this node.
Log on to the dmgr console find the name of the server used for the dynamic cluster...
-
Servers | Clusters | Dynamic Clusters | PortalCluster | Dynamic cluster members
- Verify that PrimaryNode is set to false because this is an additional node.
- Tune the additional cluster resources...
- ./ConfigEngine.sh dynamic-cluster-setup-additional -DWasPassword=dmgr_password
- To start the cluster member:
- Log on to the dmgr console.
- Navigate to Servers > Dynamic clusters > cluster name > Dynamic cluster members.
- Select the cluster member and click Start.
- Log off of the dmgr console.
- To access the WCM content through an external web server:
- Log on to the dmgr console.
- Select Environment > WebSphere Variables.
- From the Scope drop-down menu, select the option...
- Node=nodename, Server=servername
...where Node=nodename is the node containing the portal application server.
- Update the WCM_HOST variable with the fully qualified host name used to access the portal server through the web server or On Demand Router.
- Update the WCM_PORT variable with the port number used to access the portal server through the web server or On Demand Router.
- Update the WCM_HOST and WCM_PORT variable for each additional portal server that already exists in the cluster.
- Synchronize the node with the dmgr:
- Select System Administration > Nodes.
- Select the node to synchronize from the list.
- Click Full Resynchronize.
- Log off of the dmgr console.
- Propagate changes:
WebSphere_Portal is the name of the node's WebSphere Portal server; but if you customized the server name, the default name changes. If we are uncertain of the server name, run the task...
- serverstatus -all
...to get a list of the server names and their status.
./stopServer.sh WebSphere_Portal -username wpadmin -password foo
./startServer.sh WebSphere_Portal - If you entered passwords in any of the properties files while creating the cluster, you should remove them for security purposes. See "Deleting passwords from properties files" under Related for information.
Add vertical cluster members to a static cluster
We can add vertical cluster members to share the workload demands of the cluster across multiple members running on the same physical machine.
- Log into the dmgr console.
- Click...
- Servers > Clusters > WebSphere appserver clusters > cluster_name > Cluster members
- Click New to create the cluster member.
- Define the name of cluster member.
Do not use spaces in the cluster member name.
- Select an existing node where IBM WebSphere Portal is installed.
- Check the box...
- Generate Unique HTTP Ports
- Click Add Member and then click Next to view the summary.
Update the virtual host entries for the new port created when adding a cluster member. We can do this by updating the default_host virtual host in the WAS admin console and adding a new alias entry for the port number (use an "*" wildcard character for the host name). See Configure virtual hosts for information.
- Define the name of cluster member.
- Click Finish, and save the changes.
- The new cluster topology can be viewed from the Servers > Clusters > Cluster Topology view.
- The Servers > Server Types > WebSphere appservers view lists the new server cluster members.
- To enable cache replication:
- From the dmgr console, go to Servers > Server Types > WebSphere appservers and then click the new vertical cluster member(s).
- Click Dynamic cache service under Container services.
- Change Cache size to 3000 entries.
- Check the Enable cache replication check box.
- Select NOT_SHARED from the Replication type drop-down menu.
- Click OK.
- Click Save to save the changes to the master configuration.
- Complete the following steps on each vertical cluster member to clean up the server-scoped resources, caches, and resource providers:
- On the node where created the vertical cluster...
- ./ConfigEngine.sh cluster-node-config-vertical-cluster-setup -DServerName=unique vertical cluster servername -DWasPassword=foo
unique vertical cluster servername is the name you specified when created the cluster member.
- Restart the vertical cluster member referenced in the cluster-node-config-vertical-cluster-setup task.
- On the node where created the vertical cluster...
- Save the changes and resynchronize the nodes.
- In the dmgr console, click Save on the task bar, and save the administrative configuration.
- Select System Administration > Nodes, select the node from the list, and click Full Resynchronize.
- Regenerate the web server plug-in.
- Regenerate the web server plug-in using the dmgr console.
- If we are using a remote web server, copy the updated plug-in configuration file (plugin-cfg.xml) to the web server's plug-in configuration directory.
- Stop and start the web server.
Add a vertical cluster member to the clustered environment
- Open a browser and enter http://DM01:9060/ibm/console in the address bar to access the dmgr console, where DM01 is the dmgr node or host name. The port number might differ based on the installation.
- To allow vertical clusters on the dynamic cluster:
- Navigate to Servers > Clusters > Dynamic clusters and select the appropriate dynamic cluster.
- Select the Allow more than one instance to start on the same node check box under Vertical stacking of instances on node.
- Enter a new value in the Number of instances text box to determine the number of vertical cluster members allowed on each node.
- Click Apply and then click Save to save the changes to the master configuration.
- Optional: Navigate to Servers > Clusters > Dynamic Clusters > clustername > Cluster Members view to view the list of new cluster members.
- The new cluster topology can be viewed from the Servers > Clusters > Cluster Topology view.
- The Servers > Server Types > WebSphere appservers view lists the new server cluster members.
Update the virtual host entries for the new port created when adding a cluster member. We can do this by updating the default_host virtual host in the WAS admin console and adding a new alias entry for the port number (use an "*" wildcard character for the host name). See Configure virtual hosts for information.
- To enable cache replication:
- From the dmgr console, go to Servers > Server Types > WebSphere appservers and then click the new vertical cluster member(s).
- Click Dynamic cache service under Container services.
- Change Cache size to 3000 entries.
- Check the Enable cache replication check box.
- Select NOT_SHARED from the Replication type drop-down menu.
- Click OK.
- Click Save to save the changes to the master configuration.
- Complete the following steps on each vertical cluster member to clean up the server-scoped resources, caches, and resource providers:
- On the node where created the vertical cluster...
- ./ConfigEngine.sh cluster-node-config-vertical-cluster-setup -DServerName=unique vertical cluster servername -DWasPassword=foo
unique vertical cluster servername is the name you specified when created the cluster member.
- Restart the vertical cluster member referenced in the cluster-node-config-vertical-cluster-setup task.
- On the node where created the vertical cluster...
- Save the changes and resynchronize the nodes.
- In the dmgr console, click Save on the task bar, and save the administrative configuration.
- Select System Administration > Nodes, select the node from the list, and click Full Resynchronize.
- Stop and start the web server.
Tune the servers
WebSphere Portal is not tuned for a production environment out of the box. To ensure optimal performance, review and complete the steps in the Portal Tuning Guide. If a tuning guide is not available for the current release, the tuning guide for the previous product version should be used.
The tuning guide will help you to:
- Configure the application server and the resources defined for that application server
- Determine the cloning strategy for expanding or extending the environment
- Tune the database
- Tune the directory server and its database
- Tune the Web server
- Tune the operating system and network
- Tune the WebSphere Portal services
Configure search in a cluster
IBM WebSphere Portal provides two distinct search capabilities. We can use both types of search capabilities .
Configure remote search
- Install and configure the search service to work remotely, that is, on a remote WAS node which is not part of the portal cluster. We can provide the remote search service either as an EJB or as a web service via SOAP. Deploy the appropriate EJB or SOAP EAR file on the remote WAS node.
- Configure the search portlets for remote search service so that they access the remote server accordingly.
- If you have configured a remote search service for a portal cluster, configure the default location for search collections to a directory on the remote server that has write access.
- The portal site default search collection is created only once at the first time when an administrator selects the search administration portlet Manage Search. If this occurred before configuring the portlet for remote search, then the default portal site search collection is only available on the primary node of the cluster, but not on the remote server. In this case you need to re-create the portal site collection to make it available for search on all nodes of the cluster.
Configure JCR search in a cluster
To enable search in a cluster for content stored in the JCR database, configure each server in the cluster to access a shared directory. JCR-based content includes content created with Web Content Manager or Personalization.
Create a shared directory called jcr/search on a server in the network and ensure that each node in the cluster and the dmgr has network access to the directory.
Set up the remote search service on the primary node of the cluster; refer to Configuring a remote search service for information.
Perform the following steps on each server in the cluster to configure Search in a clustered environment:
- Edit...
- WP_PROFILE/PortalServer/jcr/lib/com/ibm/icm/icm.properties
- Change the value of the property...
- jcr.textsearch.indexdirectory
...to the shared directory; for example...
jcr.textsearch.indexdirectory=\\\\your_server\\your_share\\jcr\\search. We can specify the shared directory value in one of the following formats:
Format Shared directory UNC \\\\your_server\\your_share\\jcr\\search Example: \\\\hostname.example.com\\share\\jcr\\search
Mounted resource /your_share/jcr/search For example: /mnt/jcr/search
This format requires that you mount the shared directory to the local server (for example, through a mapped network drive or a mounted directory). When using the mounted resource format, always use forward slashes instead of back slashes, regardless of the native operating system path format.
- Based on the configuration of the remote search service, change the property...
- jcr.textsearch.PSE.type
...to either EJB or SOAP; then choose the appropriate additional steps:
Value Additional steps EJB - Change property...
- jcr.textsearch.EJB.IIOP.URL
...to the URL of the naming service used to access the WebScanner EJB; for example...
- iiop://localhost:2811
- Change property...
- jcr.textsearch.EJB.EJBName
...to the name of the WebScanner EJB; for example...
- ejb/com/ibm/hrl/portlets/WsPse/WebScannerLiteEJBHome
SOAP Change the property... - jcr.textsearch.SOAP.url
...to the SOAP URL of the WebScanner for the search service.
- Change property...
- Change the jcr.textsearch.enabled value in the icm.properties file to true.
- Required: To delete the default search collections from the Manage Search portlet:
- Log on to WebSphere Portal as an administrator.
- Click...
-
Administration > Search Administration > Manage Search | Search Collections
| Portal Content search collection | Delete Collection icon | OK
- Restart the WebSphere_Portal server.
- Go to the Manage Search portlet and confirm that the Portal Content search collection was deleted.
- Manually create a JCR Collection called JCRCollection1; refer to Setting up JCR Search Collection for information.
Set up multiple clusters
The majority of the steps to build another cluster are the same as when building the first cluster in the same cell, with a few exceptions. Basically, the new profile will be designated as the primary profile, using IBM WebSphere Portal clustering terminology, and will then be used as the basis for the new cluster definition. This duplicates the build process of the first cluster in the cell. During the federation process, if any applications on this new node already exist in the cell (because they are in use by the first cluster), then dmgr will not allow them to be added. After federation, the applications that already exist in the cell are not mapped to the WebSphere_Portal server on the newly federated node, and thus the existing applications must be remapped to this newly federated server to restore its application list. Therefore, depending on the configuration of the new profile, there will likely be some combination of applications shared with the other existing cluster, and some applications unique to this new profile.
Install multiple clusters in a single cell - multiple clusters
Create a new, independent IBM WebSphere Portal cluster in a cell where a WebSphere Portal cluster already exists.
In the following steps, Cluster A is used to describe the existing cluster. Portal B is used to describe the new server profile that is the basis for the new cluster definition, Cluster B.
To install multiple clusters in a single cell:
- If necessary, upgrade Cluster A, including the dmgr node, to the current, supported hardware and software levels and to the current version of IBM WebSphere Portal. Only upgrade if Cluster B is at a higher version than the existing Cluster A.
- Complete the following tasks to install and configure Portal B; see the links in Related:
Important: Maintain the same number of data sources with identical names to the Cluster A data sources so that data source bindings in the applications can be resolved on every cluster in which they run. If implementing database sharing across the clusters, the previous statement refers to both the shared and non-shared domains; all domains should use the same names.
- Install WebSphere Portal on the primary node
- Configure Portal to use a database
- Optional: Use the same database user ID and password for each identically named domain/data
source will allow the existing JAAS Authentication Aliases to be functional.
If unique database user ID and password are required, additional manual
configuration is needed to create new JAAS Authentication Aliases
for each data source and map these accordingly. On the primary node of Cluster A, run the ./ConfigEngine.sh create-alias-multiple-cluster
-DauthDomainList=release,jcr -DWasPassword=dmgr_password to create the new JAAS Authentication Aliases.
...where... authDomainList is set to a list of domains which use unique database user ID and passwords and those domain properties are set correctly in wkplc_comp.properties, including user ID and password.
- If necessary, upgrade Portal B to the current cumulative fix.
- If we are adding a dynamic cluster and IBM WebSphere Virtual Enterprise is not already installed on Portal B, install it, apply all required ifixes, and augment the wp_profile profile to make it compatible with WebSphere Extended Deployment Operations Optimization.
See the "Planning the product installation" link in Related section for information about installing WebSphere Virtual Enterprise. Profile augmentation is completed using the pmt.sh (PMT) GUI on systems that support it or through manageprofiles.sh available on all systems. When using the GUI, make sure we select type of augmentation..
- Operations Optimization
When using manageprofiles.sh, be sure to follow the instructions to augment a stand-alone application server profile.
- To build an inventory list of Portal B enterprise applications and portlets...
-
./ConfigEngine.sh mapped-app-list-create -DWasPassword=foo
- If the dmgr is configured to use a stand-alone LDAP user registry, update wkplc.properties, located in...
- WP_PROFILE/ConfigEngine/properties
on the primary node with the stand-alone LDAP user registry property values from the dmgr.
Set WasUserid and WasPassword to the dmgr user ID and password.
- Federate Portal B...
cd WP_PROFILE/bin
,/addNode.sh dmgr_hostname  \
           dmgr_port  \
           -includeapps \
           -username wasadmin   \
           -password foo
dmgr_hostname is the TCP/IP host name of the dmgr server. dmgr_port is the SOAP port number of the dmgr server. wasadmin and foo are the user ID and password for the dmgr administratorIf the WAS administrator user ID and password for the local node are different than the dmgr administrator user ID and password, add the following parameters:
- -localusername local_wasadmin
- -localpassword local_foo
See the addNode command file for more information about the addNode command and other optional parameters.
If addNode.sh fails for any reason before rerunning the task:
- Remove the node if the AddNode task succeeded in creating the node.
- If items exist, log on to the dmgr and...
- Remove all enterprise applications.
- Remove the WebSphere_Portal server definition.
- Remove the WebSphere Portal JDBC Provider.
- Stop the WebSphere_Portal server on the primary node and verify the following parameters are set correctly in wkplc.properties:
Although we can add these parameters (particularly passwords) directly to any task while creating the cluster, we might want to temporarily add them to the properties file. We can then remove them when we are finished to keep the environment secure.
- Set WasSoapPort to the port used to connect remotely to the dmgr.
- Set WasRemoteHostName to the full host name of the server used to remotely connect to the dmgr.
- Verify that WasUserid is set to the dmgr administrator user ID.
- Verify that WasPassword is set to the dmgr administrator password.
- Verify that PortalAdminPwd is set to the WebSphere Portal administrator password.
- Verify that ClusterName is set.
- Verify that PrimaryNode is set to true.
- ./ConfigEngine.sh map-apps-to-server -DWasPassword=foo task to determine which applications from the inventory list are no longer mapped to Portal B. The task uses the application profiles already in the cell to restore the mappings. Wait 30 minutes after running this task to allow all EAR files to expand before proceeding to the next step.
- Complete the following post-federation
configuration steps for Portal B:
- Ensure all database parameters are correctly set, including passwords, in the wkplc_comp.properties and wkplc_dbtype.properties files.
- Run...
- ./ConfigEngine.sh cluster-node-config-post-federation -DWasPassword=dmgr_password
- The node is federated and using the dmgr cell and its user registry. If the admin user ID and group name are different in the WebSphere Portal and dmgr configurations, choose one of the following options depending on your security policies:
If the dmgr cell is using a stand-alone LDAP user registry, complete these steps after the cluster-node-config-cluster-setup (static cluster) or cluster-node-config-dynamic-cluster-setup (dynamic cluster) task completes.
- Start the WebSphere_Portal server.
- Verify the required WebSphere Portal admin user ID and group ID are defined in the dmgr user registry that provides security for the cell.
- Run...
- ./ConfigEngine.sh wp-change-portal-admin-user -DWasPassword=foo -DnewAdminId=newadminid -DnewAdminPw=newpassword -DnewAdminGroupId=newadmingroupid
If the value for newAdminGroupId contains a space; for example Software Group, open wkplc.properties and add the values for newAdminId, newAdminPw, and newAdminGroupId. Save the changes and then run...
- ./ConfigEngine.sh wp-change-portal-admin-user -DWasPassword=dmgr_password
- WasPassword is set to the administrative password for the dmgr cell
- newAdminId is set to the fully qualified DN of the WebSphere Portal admin user ID in the cell
- newAdminGroupId is set to the fully qualified DN of the group for the WebSphere Portal admin user ID in the cell
- After the task completes, stop the WebSphere_Portal server.
- From the WAS admin console, click System Administration > Node Agents.
- Check the box next to the required node agent and then click Restart.
- Stop and restart the dmgr.
- Stop and restart the WebSphere_Portal server on Portal B
- Restart the WebSphere_Portal server.
on Cluster A. Verify that Cluster A is functionally intact by spot checking pages and portlets and then verify that Portal B is functionally intact by spot checking pages and portlets that you deployed into Portal B before it was federated. Any discrepancies or errors should be corrected now before continuing.
If Portal B is using a nondefault Portal server administrative ID, not wpsadmin, the server will not be functional until the cluster configuration is complete and the Portal administrative ID has been configured to match the Cells security settings.
- Choose one of the following options to define a cluster using Portal B as the basis:
- To define a static cluster using Portal
B as the basis:
- ./ConfigEngine.sh cluster-node-config-cluster-setup -DWasPassword=dmgr_password task.
- Configure the cluster to use an external web server to take advantage of features such as workload management. Choose one of the following options:
- Configure a web server and an application server on separate machines (remote)
- Configure a web server and an application server profile on the same machine
- Configure a web server and a dmgr profile on the same machine
Start with the step about launching the Plug-ins installation wizard.
- To access the WCM content through an external web server:
- Log on to the dmgr console.
- Select Environment > WebSphere Variables.
- From the Scope drop-down menu, select the option...
- Node=nodename, Server=servername
...where Node=nodename is the node containing the portal application server.
- Update the WCM_HOST variable with the fully qualified host name used to access the portal server through the web server or On Demand Router.
- Update the WCM_PORT variable with the port number used to access the portal server through the web server or On Demand Router.
- Save the changes and then restart the dmgr, the node agent(s), and the WebSphere_Portal servers.
- To define a dynamic cluster using Portal
B as the basis:
- Log on to the dmgr console.
- To create a node group:
- Click New.
- Type the node group Name.
- Type any information about the node group in the Description text box.
- Click OK.
- Click the Save link to save the changes to the master configuration.
- To add members to the node group:
- Click System administration > Node groups.
- Click the name of the node group to add members to.
- Click Node group members under Additional Properties.
- Click Add.
- Select the primary node and then click Add.
- Click the Save link to save the changes to the master configuration.
- To create a dynamic cluster in the node group:
- Click Servers > Clusters > Dynamic clusters.
- Click New.
- Select WAS from the Server Type pull-down menu and then click Next.
- Type the cluster name in the Dynamic cluster name text box and then click Next. Type the same value that you provided for the ClusterName parameter in wkplc.properties of the primary node.
- Remove all default membership policies and then click Subexpression builder.
- Enter the following information in the Subexpression builder window:
- Select and from the Logical operator pull-down menu.
- Select Nodegroup from the Select operand pull-down menu.
- Select Equals (=) from the Operator pull-down menu.
- Type the nodegroup name created in the previous step in the Value text box.
- Click Generate subexpression.
- Click Append.
- Click Preview membership to verify that all nodes included in the nodegroup display and then click Next.
- Click the Create the cluster member using an existing server as a template radio button and then select the WebSphere_Portal server for the primary node from the pull-down menu.
- Click Next.
- Specify the required dynamic cluster properties for minimum and maximum number of server instances.
- Review the summary page to verify your actions and then click Finish.
- Set the following parameters in wkplc.properties:
- Verify that CellName is set to the dmgr cell.
- Verify that NodeName is set to the local node.
- Set ServerName to the server used for the dynamic cluster member on this node.
- Verify that PrimaryNode is set to true.
- Create the dynamic cluster...
- ./ConfigEngine.sh cluster-node-config-dynamic-cluster-setup -DWasPassword=dmgr_password
- To access the WCM content through an external web server:
- Log on to the dmgr console.
- Select Environment > WebSphere Variables.
- From the Scope drop-down menu, select the option...
- Node=nodename, Server=servername
...where Node=nodename is the node containing the portal application server.
- Update the WCM_HOST variable with the fully qualified host name used to access the portal server through the web server or On Demand Router.
- Update the WCM_PORT variable with the port number used to access the portal server through the web server or On Demand Router.
- Save the changes and then restart the dmgr, the node agent(s), and the WebSphere_Portal servers.
- To define a static cluster using Portal
B as the basis:
- Install any additional nodes to the cell to support additional cluster members for Cluster B identically to the primary node, and then federate as them as secondary nodes and define as cluster members on these nodes. For information about adding additional nodes navigate to Installing WebSphere Portal > Setting up a cluster. Select the appropriate operating system and navigate to Prepare additional nodes. We can add additional nodes to a static or dynamic cluster, and we can also add additional vertical cluster members to an existing node in a static or dynamic cluster to provide vertical scaling.
Remember: If we are creating a multiple, dynamic cluster, remember to install WebSphere Virtual Enterprise on the additional node and augment the Portal profile with WebSphere Virtual Enterprise.
- Restart the WebSphere_Portal server.
on Cluster A and Cluster B.
- After setting up the multiple clusters, there are additional tasks that we can complete to ensure a balanced
workload and failover support.
- Update the web server configuration to enable user requests to be routed to the new cluster. Refer "Routing requests across clusters" for information about using a web server with multiple clusters in a cell.
- Update the database configuration to share database domains between clusters. Refer to "Sharing database domains between clusters for information about redundancy and failover support.
- If you entered passwords in any of the properties files while creating the cluster, you should remove them for security purposes. See "Deleting passwords from properties files" under Related for information.
Installation of Cluster B is complete. It is now an independent cluster from Cluster A, which means that Cluster B can have its own configuration, set of user portlets, and target community. Any applications that are common between Cluster A and Cluster B are most likely infrastructure or related to administration, and special care needs to be taken to preserve their commonality between clusters and correct maintenance levels.
Route requests across clusters - multiple clusters
The HTTP Server plug-is that comes with IBM WebSphere Application Server is typically used to balance requests for applications across members of the cluster. We can also use the ODR in dynamic, multicluster environments for routing. While an application can be mapped to more than one cluster, automatic plug-in generation does not provide routing or balancing traffic for the same application across multiple clusters. Multiple cluster environments with shared applications therefore cannot rely solely on WAS automatic plug-in generation to be able to route requests using a web server. One option in this scenario is developing a customized method for defining and maintaining the plug-in configuration file used by the web server to provide for the required routing of user requests.
An important consideration in a multiple cluster environment is ensuring that all subsequent HTTP requests for a user are routed to the same cluster that processed the first HTTP request. The WebSphere Portal login processing depends upon preserving this cluster affinity during this initial time until the user has successfully logged in and session cookies maintain affinity. To guarantee that affinity is preserved during login, set the Navigator Service public.session parameter to a value of true; you should also set this parameter to true if we are using an ODR. Refer to "Portal Configuration Services" for information on how to configure this parameter.
Review the following considerations before configuring the ODR to route traffic to Portal clusters:
- Internal users can send requests directly to the ODR instead of through a front-end web server. When sending direct requests, configure the ODR to append a via header to the HTTP requests.
Set the value of the ODR custom property http.compliance.via to true;
see the "On demand router settings" link in the Related section for information.
This step is not required when sending user traffic through the web server to the ODR because the web server appends the via header to the HTTP request.
- The ODR can selectively route traffic to clusters based on the incoming URL. Configure IP alias values for the ODR and then define routing rules to associate user traffic for each IP alias to the appropriate WebSphere Portal cluster.
- We can use the ODR to load balance traffic among identical portal clusters. Configure a Multicluster Routing Policy (MCRP) for the ODR to identify the destination clusters and the type of load balancing; see the "Configuring the on demand router for multi-cluster failover and load balancing routing" link in the Related section for information.
If we are configuring the ODR to route traffic to remote portal static clusters using Generic Server Cluster definitions, the cell_name value used by the MCRP policy needs to be the local cellname where the ODR resides and not the remote cell where the portal cluster resides.
- We can also use the ODR to route traffic to remote portal clusters, both static and dynamic, by defining a generic server cluster for each target portal cluster; see the "Defining generic server clusters for remote ODR cells" link in the Related section for information.
If we are routing to remote static clusterm that use vertical cluster members, perform the optional step at the end to define a server custom property for each port in the generic server cluster.
Share database domains between clusters on AIX - multiple clusters
To help provide redundancy and failover support in production environments composed of multiple clusters in a single cell and multiple clusters in different cells, we can share database domains between those clusters. IBM WebSphere Portal data is organized into different database domains, with different availability requirements depending on how the production environment is set up. When multiple lines of production are involved and each line of production is implemented as a cluster of servers, sharing database domains ensures that the data is automatically synchronized across the lines of production.
JCR domains and release domains cannot be shared between different clusters or servers. Each distinct cluster or server in the environment must use a separate JCR domain and a separate release domain.
For example:
| Development Server | Authoring Cluster | Staging Server | Delivery Cluster |
|---|---|---|---|
| JCR Domain 1 | JCR Domain 2 | JCR Domain 3 | JCR Domain 4 |
| Release Domain 1 | Release Domain 2 | Release Domain 3 | Release Domain 4 |
- Set up the first cluster (referred to as Cluster A in these instructions).
- Determine which database domains to share with any other clusters in the environment.
- Install the primary node of the next cluster (Cluster B), and complete the following steps to configure the node to use the shared database domains.
- Complete a partial database transfer of the database domains that we are not sharing.
For example, if we are sharing only the Customization and Community domains, you would transfer the remaining domains to the database we are using for Cluster B.
- Re-configure the shared database domains on the node to connect to the shared database domains we are using for Cluster A.
For example, to connect to the Customization and Community domains for Cluster A, you would connect to those domains from Cluster B.
- Complete a partial database transfer of the database domains that we are not sharing.
- Continue setting up the primary node as described in the cluster instructions.
- Install the secondary node of Cluster B, and complete the following steps to configure the node to use the shared database domains.
- For those database domains that we are not sharing between clusters, re-configure the domains to connect to the database domains we are using for Cluster B.
As in the example for the primary node, if we are sharing only the Customization and Community domains, re-configure the remaining domains on the secondary node to use the domains of the primary node for Cluster B.
- Re-configure the shared database domains on the node to connect to the shared database domains we are using for Cluster A.
For example, to connect to the Customization and Community domains for Cluster A, you would connect to those domains from Cluster B.
- For those database domains that we are not sharing between clusters, re-configure the domains to connect to the database domains we are using for Cluster B.
- Continue setting up the secondary node as described in the cluster instructions.
Install Web Content Manager into an existing Server installation
If you initially installed the IBM WebSphere Portal Server installation, we can purchase the Content license agreement and install the IBM Web Content Manager features into your existing installation.
To install Web Content Manager into an existing Server installation:
Cluster note: In a clustered environment, complete these steps on all the nodes.
Response file note: We can record and run a response file to install Web Content Manager features on the existing Server installation. See Use response files to install for information.
Use the following steps when recording the response file. Exit from the IBM Installation Manager program to complete the recording.
- Stop all the appservers.
- Open the IBM Installation Manager and complete the following steps to add the content repository:
- Go to File > Preferences > Repositories.
- Select Add Repositories.
- Select Browse and navigate to the WebSphere Portal content repository.
- Select the content repository file.
- Click OK.
- Ensure all required repositories are checked.
- Ensure that the content repository is after the Server repository in the list.
- Click Test Connections to ensure that the IBM Installation Manager can successfully access the directory where the repository is stored.
- Select Apply.
- Select OK.
- On the main IBM Installation Manager panel, select Install to begin the installation process.
- On the Install Package: Select packages to install panel, check the box for the additional package that you purchased. Then click Next.
- Accept the license agreement and then click Next.
- On the Location panel, select the Use the existing package group radio button. Select the IBM WebSphere Portal V8 package group name and then click Next.
- On the Features panel, check the box for the additional feature that you purchased. Then click Next.
- Verify the information on the Summary panel and then click Install.
- After the installation successfully completes, stop and restart the appropriate servers to propagate the changes. For specific instructions, see Start and stop servers, dmgrs, and node agents.
- Complete the following steps if created multiple profiles outside of the IBM Installation Manager:
- For each profile...
-
cd WP_PROFILE/ConfigEngine
./ConfigEngine.sh enable-wcm -DWasPassword=fooStop and restart the appropriate servers to propagate the changes.