Virtual portals
Scenarios for virtual portals
Scenario 1: Multi-Portal Enterprise
A single enterprise operates multiple different virtual portals on a single portal installation...
- Development, production, and marketing
- Organizations or branches in different locations and foreign countries
- Affiliate or franchise business models
- Different branding.
Typical features...
- The portal installation is operated by the company itself.
- A common group of administrators is responsible for the administration of all the virtual portals in the installation.
- The pages and the look and feel are customized individually for each virtual portal.
- The portlet applications are shared between the virtual portals.
- All virtual portals share the same single user population.
- The portal installation might typically have between ten and thirty virtual portals.
Scenario 2: Workgroup Service Provider
One central organization provides virtual portals for a large number of small, decentralized, and independent teams.
- Supports a large number of individual virtual portals on a single portal installation. This can be more than a hundred virtual portals.
- Individual logical Portals are intended for small user groups, projects or departments.
- Owning enterprise operates this installation like an IT service provider.
- The virtual portal administrators can create additional virtual portals with predefined default content using portal templates.
- Share content and applications.
- Administration of each virtual portal and its users and resources is independent and self-contained.
Scenario 3: Hosted Enterprises
In this scenario a service provider hosts and operates independent enterprises on the same portal installation.
For example, this scenario can support virtual portals for different tenants or service customers, such as:
- A service provider who supports services for small businesses of the same type.
- A provider who offers services for medical doctor practices.
- A central banking service provider who offers services to different branches of banks.
The requirements for this scenario include...
- The tenants need to be able to administer their virtual portals themselves.
- The portal installation might typically have between ten and thirty virtual portals.
- This type of scenario requires the following features:
- Strong isolation of the applications, users, and data.
- High quality of the provided service
- Reliability, availability, and failure protection.
- Strong isolation of the applications, users, and data.
For this scenario it is worth while to consider the alternative of setting up true portals rather than virtual portals.
Plan for virtual portals
Overview
A single portal installation can support up to 150 virtual portals.
If the portal administrative user is not the same as the WAS administrative user, then assign the portal administrator the monitor role.
- Login to the WebSphere Administrative Server console
- Click...
-
Users and Groups | Administrative user roles | portal_admin user
If the portal administrator user is not displayed, click Add and enter the administrator id in the User field.
- Select Monitor in the roles text box.
- Apply the changes and save.
Separate and share resources between virtual portals
A portal resource scoped for virtual portals exists individually for each virtual portal wth an identification unique within the entire portal installation. The resource is available only in one particular virtual portal. For example, the resource ResA is scoped for virtual portals VP1, VP2, and VP3 as...
- ResA_VP1
- ResA_VP2
- ResA_VP3
Customizing ResA_VP1 does not affect ResA_VP2 and ResA_VP3.
Portal resources scoped for virtual portals
Portal resources scoped internally for virtual portals include pages, instances, search services, collections, and content sources
Scoping of these resources is managed by internal portal mechanisms. Scoped resources are only available for the virtual portal for which they are defined. They are well isolated from other virtual portals. Scoped resources cannot be shared with other virtual portals. They are not visible or accessible outside of the virtual portal for which they have been created. This behavior cannot be changed by any portal access control settings.
Within each virtual portal you or a sub-administrator can use Portal Access Control to grant individual users on that virtual portal specific access permissions to the scoped portal resources. This works just like under a single portal installation. An administrator can give access permissions to users who are members of the user population of a virtual portal only on the scoped resources on that same virtual portal. This implies that, vice versa, we can give access permissions on the resources of a virtual portal only to those users who are members of the user population on that virtual portal. Users can only use these access permissions when they access the specific virtual portal under which they have the access permissions on the scoped resources. The same users cannot access the resources when logging in to a different virtual portal.
Portal resources that we can separate for virtual portals using Portal Access Control
There are some portal resources that are not scoped internally for a particular virtual portal. These resources are shared among all virtual portals of the entire installation. However, as a master administrator we can yourself separate such portal resources for the virtual portals. To do this, use Portal Access Control and the access permissions portlets to set up the appropriate access permissions for users on the resources of each virtual portal as required.
We can separate the following portal resources using Portal Access Control to give users of an individual virtual portal access permission to the resources:
- Portlets
- Portlet applications
- Web modules
- URL mapping contexts
- Users and groups
We can separate these resources for individual virtual portals using Portal Access Control. When you do this, apply special care. It can be of benefit to document the relationships between the users and the virtual portals.
Portal resources that cannot be separated for virtual portals
There are some types of portal resources that are not scoped to a particular virtual portal, and we cannot separate them yourself using Portal Access Control. The following list shows portal resources that we cannot separate for virtual portals:
| Themes and skins | If you do not want sub-administrators to be able to manage themes and skins, restrict their access permissions on them. |
| Vault segments
Vault slots | To avoid security problems, use private credentials only. They can be used by only one specific user. |
| Supported clients and markups | Settings are configured in corresponding portlets, therefore, they apply to the entire portal installation. |
| Policies | Policy resources are not scoped to virtual portals. Users see the policy resources to which they have access, regardless of the virtual portal assignments. |
Separate portlets and portlet applications
Portlet applications are not scoped for virtual portals. Therefore, the configuration settings set for a portlet application using the Manage Applications portlet apply to that portlet application in all virtual portals. If you need different configurations for a portlet application between virtual portals, create a copy of the portlet application, and configure the copied portlet application as required.
Portlets are separate portal resources, but they are not scoped for each separate virtual portal. However, each portlet in a virtual portal shares its portlet application on the initial portal installation with its siblings on the other virtual portals. Therefore the following configuration settings set for a portlet apply to that portlet in all virtual portals:
- The configuration settings set for a portlet using the Manage Portlets portlet
- The configuration settings set for a portlet using the Configure mode of the portlet.
If you need different configurations for a portlet between virtual portals, create a copy of the portlet, and configure the copied portlet as required.
Scoping portlet instances
Portlet instances are scoped to the virtual portals. The configuration settings set for a portlet using the Personalize or Edit shared settings mode of the portlet apply only to that individual portlet instance on that individual page.
Special case: Scoping unique names
Unique names that you apply to portal resources represent a special case with regards to scoping. Unique names are attributes to portal resources. Therefore, whether a unique name is scoped to a virtual portal or not is determined by whether the portal resource to which the unique name applies is scoped or not:
- Unique names for scoped portal resources are themselves also scoped.
- Unique names for resources that are not scoped are themselves not scoped.
Example for a scoped unique name:
Each virtual portal has its own separate login page. Therefore we can assign the same identical unique name to all login pages for all virtual portals.
The unique name that you give to the login page of a specific virtual portal applies only withis that portal. It cannot be administered in a different virtual portal that has the same unique name for its login page.
Example for a unique name that is not scoped:
Portlet applications are not scoped but shared between all virtual portals.
We can assign a unique name to the portlet application. We can reference that portlet application bthat unique name throughout the portal installation with all virtual portals.
Manage the user population for virtual portals
There are two basic options for the management of user populations for the virtual portals:
- Use the Virtual Member Manager (Federated Repository). We can use the Federated Repository to set up both types of configuration:
- Configure separate user populations for each of the virtual portals. This option offers a high flexibility for the user management of the virtual portals. With this configuration we can define an individual user population for each virtual portal.
- Use a common user population with the Virtual Member Manager for all the virtual portals. In this case all users on that user population can access all virtual portals, unless their access permissions are explicitly restricted by portal access control settings. To achieve this restriction, define the access permissions manually using the Portal Access Control portlets.
A user registry can be based on a LDAP or on a database.
- Configure separate user populations for each of the virtual portals. This option offers a high flexibility for the user management of the virtual portals. With this configuration we can define an individual user population for each virtual portal.
- Use the LDAP
If a single common user repository is sufficient for all virtual portals within the installation, we can continue to use an LDAP in the virtual portal setup. This is the simpler one of the two options.
With this configuration the entire portal installation and all virtual portals share a common user population, which is defined in a single user repository. In this case all users on that user population can access all virtual portals, unless their access permissions are explicitly restricted by portal access control settings. To achieve access restrictions for specific virtual portals, we can use the Portal Access Control portlets. You define user groups and assign to them the access permissions to the resources of each virtual portal.
For WebSphere Portal installations, the Federated Repository option offers us more flexibility for the user management of virtual portals than a WAS Standalone LDAP. By using the Virtual Member Manager we can limit the usage of a particular virtual portal to a specific user population. This is achieved by introducing the concept of realms.
A virtual portal can only be accessed by members of its associated user population. By using Portal Access Control we can assign and restrict access permissions within the user population of a virtual portal to the resources on that virtual portal. However, Portal Access Control cannot overwrite the predefined assignment of a particular user population to their virtual portal. Consequently, we cannot use Portal Access Control to assign access permissione that cross the separation between virtual portals.
For example, we cannot use the Portal Access Control of a virtual portal VP_A to give a user User_A_1 on that portal access to resources of another virtual portal VP_B. The following conditions apply:
- A realm contains the entire user population of one virtual portal.
- Each virtual portal can have its own realm of users associated, but it is also possible that multiple virtual portals can share their user population using the same realm in parallel.
- To be able to log in to a particular virtual portal, a user must be a member of the realm associated wito that virtual portal.
Preparing the user populations for the virtual portals
To use realms for the virtual portals, configure Virtual Member Manager and the realms before creating the virtual portals. Each realm must specify the repository nodes (base entries) that belong to the user population represented by this realm.
In addition to the realms that you create to define the user populations of the individual virtual portals, create a super realm. This super realm spans all other realms and contains all the users of those other realms; it is also known as the default realm.
By default WebSphere Portal is configured with Federated Repositories as User Registry provider. By default only the super realm, or default realm, is configured. After you have configured the portal instance against the user backend repositories we can use tasks provided by the portal to configure the realms that the Virtual Member Manager provides.
If you assign a non-default realm to the default virtual portal, ensure that all administrative accounts are available within the non-default realm.
Configuring a common user population for all virtual portals
In a simple setup we can use the Virtual Member Manager together with a common user repository. This user repository is represented by a single realm, and used by all virtual portals. In this case, all virtual portals use a common realm and a common user repository. This configuration provides no separation between the users of the different virtual portals.
WebSphere Portal still supports the WAS LDAP custom user registry that previous versions of WebSphere Portal used. Configure it as alternative. Again, this configuration uses a common user repository for all virtual portals without separation between the users of the different virtual portals.
Configuring separate user populations for the individual virtual portals
To have the users of the virtual portals separated, you have to apply the more advanced setup using Federated Repositories and configuring separate realms for the virtual portals. When users access a virtual portal, the portal installation selects the appropriate realm based on the current virtual portal context. Within a virtual portal, only users on that corresponding realm are "visible". The administrator of a particular virtual portal can only give access permissions to users and groups in the population on that virtual portal. Therefore, when you create a virtual portal, the realm that represents the population of the new virtual portal must be a subset of the realm used by the portal installation.
This separation of user populations between virtual portals works only with Federated Repositories. The portal supports separate realms and user repositories for virtual portals only when we use the Federated Repositories.
When we use the Federated Repositories, we can separate user groups and administrative users by configuring your virtual portals according to the business requirements. You do this based on the following relationships between user repositories, realms, and virtual portals:
- We can aggregate users and groups from one user registry in one realm, and thereby expose them as one coherent user population to the portal installation. We can separate the user population of each virtual portal by assigning different LDAP suffixes to the different realms. The LDAP suffixes are called base entries. This way the concept of realms allows you various flexible configuration options.
- A realm can aggregate one or more base entries in a user registry.
- A realm can combine multiple base entries of one user repository.
A suffix of a user repository can belong to one or more realms. Consequently, the LDAP suffixes of the individual users must match the suffixes of the groups to which they belong.
- A virtual portal is associated with one realm. Each virtual portal uses exactly one realm, but a realm can be used by multiple virtual portals.
- A virtual portal can also be associated with no realm. If no realm is assigned for a virtual portal, the user population that was defined for the super realm can log on to the virtual portal.
- When we use Federated Repositories, the initial portal installation has no realm associated by default. The user population of the initial portal installation spans the entire user registry that you configured in the Virtual Member Manager.
- The individual user IDs must be unique across all realms.
- To log in to a virtual portal, the virtual portal administrator and all users must be a member of the realm for that virtual portal.
To allow a user access to more than one virtual portals that user (and thereby the Virtual Member Manager node to which the user belongs in the hierarchy of the user directory) must be a member of all the realms associated with these virtual portals.
For example, this applies to a super administrator who is responsible for all virtual portals within an entire Portal installation.
- To administer the virtual portals, the master administrator must be a member of the realms of these virtual portals.
- User populations of realms can overlap. In other words, users can be members of multiple realms. If realms overlapthat is if some users are in different realms for different virtual portals, then these users can work in all the virtual portals which are associated with these realms.
Important: The administrator unique ID for the Java Content Repository (JCR) must be an DN for a super administrator. You specify the administrator unique ID as the value for jcr.admin.uniqueName in:
-
PROFILE_ROOT/PortalServer/jcr/lib/com/ibm/icm.properties
For example, we can set up the following configurations:
- Configure one LDAP suffix with all administrative users, for example...
-
dc=administrators,dc=ibm,dc=com
...and a separate LDAP suffix with the users, for example...
-
dc=users,dc=ibm,dc=com
- Configure separate LDAP suffixes containing different user populations, for example...
- dc=bank1,dc=com for Bank_1
- dc=bank2,dc=com for Bank_2
- Considerations for deleting resources in virtual portals:
The Portal Access Control administration in the Resource Permissions portlet shows users from different realms who have role mappings on shared resources by their object IDs. Therefore, apply special care and consideration when deleting such portal resources: Do not delete resources on which users from other realms have role mappings, if they are required in other virtual portals. This applies to members of roles on portal resources that cannot be scoped and are therefore shared between the virtual portals. Role members who belong to the realm of the local virtual portal are displayed as usual, but role members who belong to different realms are displayed in a different manner:
- Role members for shared resources who belong to the realm of the virtual portal under which we are currently working are listed by their actual names under which they were created.
- Role members for shared resources that do not belong to the realm of the current portal are listed by their portal object IDs.
For example, a role member from a different realm might be represented as 8_0_B.
You find the list of role members in the portal information center under...
-
Administration | Access | Resource Permissions | Select Resource Type | Assigning Access for a resource | Edit Role
...under the first column Members in the Role.
- Role members for shared resources who belong to the realm of the virtual portal under which we are currently working are listed by their actual names under which they were created.
- How to grant virtual portal administrators access to web content libraries: Virtual portal administrators do not automatically have access to work with web content libraries when using the administration portlet. To enable a virtual portal administrator to work with web content libraries you will need to assign them access to either the JCR content root node or individual web content libraries:
- We can assign virtual portal administrators access to the JCR content root node using the Set access on root button in the Web Content Library view of the Administration portlet. For more information see the portlet online help.
- Assign virtual portal administrators administrator access to the JCR content root node to enable them to create new libraries and view, edit and delete all existing libraries.
- Assign virtual portal administrators contributor access to the JCR content root node to enable them to create new libraries and view, edit and delete libraries they have created.
- Assign virtual portal administrators administrator access to the JCR content root node to enable them to create new libraries and view, edit and delete all existing libraries.
- We can also assign virtual portal administrators access to libraries they have not created by editing the access settings of individual libraries.
- We can assign virtual portal administrators access to the JCR content root node using the Set access on root button in the Web Content Library view of the Administration portlet. For more information see the portlet online help.
Depending on the option selected during the portal installation, you create virtual portals and their content by different ways:
- If during the portal installation we selected the option to install a portal that includes the administration portlets, we can use the Virtual Portal Manager portlet to create virtual portals.
- If we selected the option to install a full portal, we can use the Virtual Portal Manager portlet to create virtual portals. In this case you have the choice between different sets of content for the virtual portal.
- If we selected the option to install an empty portal without content, the portal does not include the Virtual Portal Manager portlet. In this case you have the following options for creating virtual portals:
- Deploy the Virtual Portal Manager portlet and use it to create virtual portals. In this case preconfigure the virtual portal and its content.
- Use the configuration task create-virtual-portal to create a virtual portal.
If we use create-virtual-portal, the virtual portal is created without content. We can use xmlaccess.sh to fill the virtual portal with content.
- Deploy the Virtual Portal Manager portlet and use it to create virtual portals. In this case preconfigure the virtual portal and its content.
Portal Access Control with virtual portals
We can scope some portal resources for the virtual portals using portal administration and Portal Access Control.
For example, this applies to portlet applications.
These resources are available to all virtual portals. We can scope these resources to specific virtual portals by limiting their accessibility to the user populations of the required virtual portals. To do this, we use Portal Access Control. Resources that you scoped this way for one virtual portal cannot be accessed from other virtual portals.
Portal Access Control provides a flexible concept to grant certain users or user groups access privileges to specific pages and other resources of a portal. A super administrator can delegate a subset of the administration privileges to other administrative users. We can use this flexibility to enable separation between different virtual portals in the following ways:
- Use the delegated administration model to set up individual partitions in the portal for the virtual portals.
- Define separate sub-administrator users who administer the individual virtual portals and give each of the sub-administrators the access permissions for their virtual portals.
- Define separate user populations who can access the individual virtual portals.
The inheritance concept of Portal Access Control allows this setup. The combination of access permissione that a sub-administrator has on portal resources and on users and groups defines the scope of the virtual portal on that sub-administrator:
- By inheritance, sub-administrators of virtual portals implicitly have the administrative access permissions for all the child pages of their respective root content nodes, and thereby of the content of their virtual portals. The sub-administrator of a virtual portal cannot assign any access permission on resources scoped for other virtual portals.
- Depending on the access permissions to users and groups that the master administrator gives the sub-administrators, they can grant access to users who belong to the user population of their virtual portals. The sub-administrator of a virtual portal cannot assign any access permissions to users or groups of other virtual portals.
This way, each virtual portal represents a certain sub area of the main portal and can be managed individually.
The master administrator
This user ID is created during the initial installation of WebSphere Portal with the role@resource:
-
admin@portal
This administrator is also the master administrator of the initial portal installation and all virtual portals created. This master administrator is created with all necessary access permissions for administering tasks related to the initial portal and the virtual portals. The master administrator has the necessary privileges to perform the tasks related to managing virtual portals. These tasks can be performed using either the Virtual Portal Manager portlet or the provided configuration tasks.
The Virtual Portal Manager portlet is installed as part of the initial portal installation. We can use this portlet to create, modify and delete virtual portals.
The master administrator defines the user population of each virtual portal. To separate the user populations of the individual virtual portals, the master administrator can either use the User and Group Permissions portlet of Portal Access Control or can define realms in the Virtual Member Manager configuration files. Before you create a virtual portal, we define a group of sub-administrators.
When you create the virtual portal, a default set of roles and access permissions is assigned to this group. As the master administrator we can change these default assignments and delegate administration of individual virtual portals to sub-administrators using the Resource Permissions portlet that is part of the Portal Access Control. When creating a virtual portal, it is filled with a default set of portal pages and resources. Content of a virtual portal can be further enhanced by either of the following ways:
- By the master administrator using xmlaccess.sh.
- By the sub-administrators using the Manage Pages portlet.
Typically, only the master administrator should have the access permissions for performing the following tasks:
- Use the Virtual Portal Manager portlet
- Use xmlaccess.sh to perform tasks related to one of the virtual portals
- Install portlets, themes, and skins.
Do not grant the sub-administrators of virtual portals the access permissions to perform any installation related tasks, such as installation of portlets or themes. All virtual portals share a common JVM. Therefore it is important to restrict the administration privileges of the virtual portal sub-administrators and prevent them from installing their own code artefacts, such as themes or portlets.
Unstable or malicious code that is introduced on one virtual portal can destabilize the entire portal installation and thereby all other virtual portals. A flexible way to introduce virtual portal specific portlets without impacting any other virtual portal is to use webservices for remote portlets (WSRP). By using WSRP we can provide portlets on a remote machine and then have the virtual portals consume those portlets so that users can access them remotely.
sub-administrators of a virtual portal and their access roles and permissions
When you create the virtual portal using the Virtual Portal Manager portlet, we select a user group of sub-administrators to be responsible for the administration of the new virtual portal. During creation of the new virtual portal the Virtual Portal Manager portlet assigns the following default set of necessary access permissions on the virtual portal to the sub-administrator group specified:
- Administrator role access permission on the root label of the virtual portal. We cannot change this access permission.
- Administrator role access permission on the virtual portal URL context. We cannot change this access permission.
- Editor role access permission on the administration portlets that are part of the virtual portal. You can change this access permission.
As the sub-administrators have the Editor role access permissions on the administration portlets of their virtual portal, they can use these administration portlets to perform administrative tasks on the virtual portal. To change the default Editor access permission for the sub-administrators on the administrative portlets or the list of portlets globally and before you create virtual portals, configure the Virtual Portal Manager portlet accordingly.
We can also assign additional access permissions on portal resources to the virtual portal sub-administrators.
For example, we might want to add the following access permissions:
- Access permissions to perform portal user and group management tasks related to the user population of the virtual portal.
- Access permissions to grant permissions to users and groups of the virtual portal.
- Access permissions to manage WSRP, URL mappings, or Portal Search Engine search collections.
- All other access permissione available by the Portal Access Control.
To assign additional access permissions to the sub-administrators after creating a virtual portal, use the master administrator user ID of the portal installation and modify those access permissions for them manually in Portal Access Control. To do this, we can use the User and Group Permissions portlet, the Resource Permissions portlet, xmlaccess.sh, or the Portal Scripting Interface. The consequences differ, depending on where you make the updates:
- If you do this in the initial portal installation, we can change the access permissions for the sub-administrators on the virtual portal as a whole.
- If you do this in the virtual portal itself, we can change the access permissions for the sub-administrators on the individual resources of the virtual portal.
Users of a virtual portal and their access roles and permissions
When creating a virtual portal, be aware of the following implications:
- The All Authenticated Users group is common across all virtual portals that share the same realm. When you create virtual portals, this group is given the Privileged User role on resources of all those virtual portals, independent of the role assignmento that its users have on the initial portal installation. Restrict role assignments and thereby access permissions for the All Authenticated Users group, and assign access to user groups or users as required.
- The All Authenticated Users group is valid over all virtual portals that share the same realm. This means that users who are in a realm that belongs to more than one virtual portal, these users have the assigned roles on all virtual portals to which they have access by membership to that realm.
To change these default roles and the access permissions for the users:
- To configure the scope of access permissions for users before creating a virtual portal, configure the realms and user groups accordingly.
- To change the access permissions of users of a virtual portal after creating a virtual portal, use the Portal Access Control portlets is that virtual portal. We can have the sub-administrators of the virtual portal perform this task.
Content of a virtual portal
When you create the virtual portal using the Virtual Portal Manager portlet, the portlet invokes an XML configuration interface script that creates the initial content of the new virtual portal. The content of a virtual portal is similar to that of a full portal installation, but some administration portlets that manage global portal settings are not included in the default content of virtual portals.
For example, the administration portlet Virtual Portal Manager is installed as part of the initial portal installation only. It is not part of the default content of virtual portals that you create. We can only use it in the initial portal installation.
Once the content has been created, the Virtual Portal Manager portlet grants the following set of default roles and access permissions to the sub-administrators of the virtual portal:
- Administrator to the content root (Administrator@content root)
of the virtual portal
- Editor to portlet instances
Editor@portlet entities created for the new virtual portal.
We can modify the roles and access permissions for the sub-administrators of a virtual portal manually according to your business needs:
- To change the roles and access permissions for sub-administrators on the portlets globally and before you create a virtual portal, configure the Virtual Portal Manager portlet accordingly.
- To change the roles and access permissions specifically and after creating a virtual portal, use the Portal Access Control portlets. If you do this in the initial portal installation, we can change the access permissions on the virtual portal as a whole. If you do this in the virtual portal itself, we can change the access permissions on the individual resources of the virtual portal.
For virtual portal administrators to be able to use the Manage Search portlet within the virtual portal, assign these virtual portal administrators the role...
-
Editor@Virtual Resource PSE_SOURCES
...where PSE_SOURCES is a virtual resource.
To change the content of virtual portals:
- To change the content globally and before creating a virtual portal, advanced master administrators can re-configure the XML script that specifies the initial content for virtual portals.
When you modify or replace this XML script, plan well ahead and apply special care. We can add or remove some content in order to enhance or reduce the functionality of a virtual portal to a certain extent. The following portal resources are mandatary content of a virtual portal and must be included in a customized XML initialization script for virtual portals:
Content Root wps.content.root Login wps.Login Administration ibm.portal.Administration Depending on the functionality to make available, more content is required.
For example, in order to allow templating. include Application Root (wps.application.root) and Templates (ibm.portal.Templates).
- To change the content specifically and after creating a virtual portal, use either of the following portal tools:
- Use the Manage Pages portlet of the virtual portal. We can have the sub-administrator of the virtual portal do this.
- Use xmlaccess.sh to import content into the virtual portal. This can only be done from the initial portal installation.
- Use the Manage Pages portlet of the virtual portal. We can have the sub-administrator of the virtual portal do this.
If we use the configuration task create-virtual-portal of the Customization Dialog (z/OS) to create a virtual portal, the new virtual portal that you create is empty. Create the content for the virtual portal.
For example, we can do this using xmlaccess.sh.
Human readable URL mappings for virtual portals
We can provide human readable URLs for the users to access their virtual portals.
For example, we can give each virtual portal a human readable URL, such as...
-
http://www.ibm.com:10040/wps/portal/tivoli
We can pass the human readable URL of a virtual portal to its users. They can then use it to access their virtual portal.
When creating a virtual portal, we specify the human readable URL as required by the business environment. The URL mapping that we specify is assigned to the virtual portal during its initialization. The URL mapping points to the content root of the virtual portal.
Internally, this URL mapping corresponds to a unique name wps.vp.internal_ID_of_the_virtual_portal.
The portal installation uses this unique name to identify and access the virtual portal unambiguously. xmlaccess.sh and the Portal Scripting Interface also use this URL mapping to identify the virtual portal.
We can also specify additional URL mappings for a virtual portal, both for the content root or for other content of the virtual portal, for example, a page in the navigation of the virtual portal.
All URL mappings use the same context root and servlet name in the URL. This applies to both the initial URL mapping of a virtual portal and any additional URL mappings that we might create for it.
- There is a 1:1 relation between a virtual portal and its initial URL Mapping. Each mapped URL points to the root content node of one virtual portal. We cannot use the same URL Mapping
for two different virtual portals.
- You must not delete or modify the initial URL Mapping for a virtual portal or modify its unique name. Deleting this URL Mapping or modifying its unique name makes the virtual portal unusable. This is independent of whether we use the administration portlets URL Mapping or Custom Unique Names or xmlaccess.sh to make the change.
- If we use an external security manager, such as Tivoli Access Manager (TAM), we can restrict the usage of virtual portals by means of the URL Mappings. To do this, we base the URL filtering rules of a security proxy on the URL Mappings definedd. If you do this, block all URLs by default and explicitly enable the defined URL Mappings only.
- A URL mapping defined for a resource in a particular virtual portal must use the same URL context as the human readable URL context for that virtual portal itself.
For example, in a virtual portal that uses the human readable URL mapping...
-
wps/portal/vp_1
...all URL mappings for portal resources must start with...
-
wps/portal/vp_1
...for example...
- wps/portal/vp_1/url_1
- wps/portal/vp_1/url_2
Within this virtual portal a URL mapping such as...
-
wps/portal/url_1
...is not valid, as the portion vp_1 of the URL Context is missing.
- There are some strings which we cannot use as URL mappings for virtual portals, for example vp. These are strings that are reserved names and correspond with URL codec names. They are listed in the following:
- cxml
- cxml_1
- cxml_2
- kcxml
- cxmld
- wml
- vp
- base64xml
- delta
- c0
- c0_1
- c0_2
- c1
- c2
- c3
- d0
- dl2
Individual themes and skins for each virtual portal
If you expose multiple virtual portals on a single portal installation, we can give each virtual portal its own look and feel for the user experience. When you create virtual portals, the portal creates parallel root content nodes for each virtual portal. We can apply separate themes and skins for each content root and its child pages without impacting the representation of other content in the parallel trees for the other virtual portals. Each virtual portal will look like its own portal to its users. Users will not be aware that there are two or more different content nodes on the same physical portal installation.
We can apply the specific look and feel of each virtual portal to both the (unauthenticated) Welcome page and the authenticated pages of the virtual portal. This means that each virtual portal can have its own look and feel even before the user logs in to the portal. Users can switch between the unauthenticated pages of different virtual portals by simply entering the different URL to get to the other portal.
We can also provide specific login, and self-enrollment pages for each virtual portal. Once users log out, they are redirected to the specific unauthenticated page of the virtual portal that they had accessed.
Alternative concepts for virtual portals on WebSphere Portal
Besides virtual portals, another possible configuration may be an alternative for you, depending on the business needs. This setup is referred to as true portals. This setup allows the re-use of a single hardware, with multiple complete portal installationso that is, one dedicated software profile for each portal. Each portal installation requires its own complete WAS installation. These are the main advantages of true portals:
- The strong isolation of the configuration data due to separate configuration databases
- The full isolation of applications, due to a separate JVM for each true portal. This allows better quality of service.
To implement this solution, be aware of the following limitations:
- We can run only a limited number of true portals on a single hardware machine. This is due to the memory volume required by the JVM.
- We cannot share applications or data between true portals.
Parent: Virtual portals
Administer virtual portals
Tasks
| Task | Portlet | ConfigEngine | xmlaccess.sh |
|---|---|---|---|
| Configure sub-administrators | Access control portlets | --- | X |
| Create a virtual portal | Virtual Portal Manager | X | --- |
| Fill with initial content | Virtual Portal Manager | --- | X |
| List all virtual portals | Virtual Portal Manager | X | --- |
| Modify | Virtual Portal Manager | X | --- |
| Delete | Virtual Portal Manager | X | --- |
Create a virtual portal
Create virtual portals using the Virtual Portal Manager portlet and specifying...
| Virtual portal title | |
| Virtual portal description | |
| URL Context | This URL is mapped to the actual internal URL of the virtual portal. Do not specify a context URL that matches the name of a library on the server. Used as the last part of the URL of the virtual portal. For example...
|
| Virtual portal hostname | Allows one to to access virtual portal using hostname instead of URL Context:
|
| User realm | The VMM realm that represents the user population for the virtual portal. Only shown if the portal installation supports realms. If left blank, the user population will be the same as for the default realm. If we use a single common user repository for all virtual portals, for example the WAS LDAP custom user registry, this entry field is not shown. |
| Initial admin user group | The user group of sub-administrators who will be able to administer the virtual portal. The portal gives this group Administrator access rights on the new root content node and all its child pages. This group must be within the realm specified for the virtual portal. |
| Default theme | You select the default theme from a pull-down list. Subadministrators cannot change the default theme, unless you grant them roles and change the roles and access rights. |
If we use the configuration task create-virtual-portal to create a virtual portal, the virtual portal is created without content.
The virtual portal creation process includes...
- Creating a new root content node for the virtual portal.
- Create the new URL mapping to point to the new root content node.
- Assigning the selected theme to the new root content node.
- Granting the specified administrator group the action set for the Administrator role on the new root content node and thereby on the new virtual portal.
- Creating initial content tree that includes virtual portal specific instances of the following portal resources: Favorites, Administration, Home, Manage Portlets, and Page Customizer with the corresponding concrete portlets.
- Assigning default roles and access rights to sub-administrators and users on the created resources.
Besides creating a virtual portal, we can also use the Virtual Portal Manager portlet to
- Create virtual portals
- List all virtual portals
- Modify a virtual portal
- Delete a virtual portal.
| Edit | Modify title and description. Set locale-specific titles and descriptions. |
| Re-initialize | Applies the InitVirtualPortal.xml script again and re-creates the default content of a virtual portal. If you replaced the default XML script with our own and configured the Virtual Portal Manager portlet accordingly, the custom script is reapplied. Resources removed from the default content are re-created. Resources added to the default content remain in the virtual portal. |
| Delete | Delete the virtual portal, its initial URL mapping, and all the corresponding scoped resources. Does not delete the unscoped resources from the initial portal installation or additional URL mappings that administrators might have created. |
Use configuration tasks for administering virtual portals
WebSphere Portal provides the following configuration tasks that we can use perform the following work with virtual portals:
Use xmlaccess.sh to work with virtual portals
We can export and import the contents of individual virtual portals using xmlaccess.sh. Each virtual portal has its own globally unique portal ID, so all resources associated with that virtual portal can be clearly determined.
If you created the virtual portal by specifying a URL context, use syntax...
xmlaccess.sh -user user \
             -password password \
             -url my_host:port_number/wps/config/vp_url_context \
             -in XML_file \
             -out result.xml
If you created the virtual portal by specifying a host name, use syntax...
xmlaccess.sh -user user   \
             -password password   \
             -url host_name:port_number/wps/config   \
             -in XML_file   \
             -out result.xml
To transfer a virtual portal from a source server to a target server:
- Create the virtual portal on the target server.
- Export the contents of the virtual portal from the source server.
- Import the XML result output to the target server.
The access rights for xmlaccess.sh are limited to the master administrator of the portal installation as a whole. sub-administrators for the virtual portals cannot use xmlaccess.sh to export or import the virtual portal which they administer.
Apply special care when you configure unscoped resources using xmlaccess.sh. Unscoped resources are shared between all virtual portals across the entire portal installation. A change of unscoped resources by xmlaccess.sh affects all other virtual portals.
When exporting content from one virtual portal, and importing it into a different virtual portal, do NOT include the URL mappings of virtual portal URL contexts in the XML script. A URL mapping of a URL context in one virtual portal can be unintentionally updated by XML import into another virtual portal. If the source virtual portal and the target virtual portal are on the same portal server, the URL mappings of the source virtual portal are updated to point to resources in the target virtual portal into which you imported the content. We can no longer use such a URL context to access the resource in the source virtual portal. If the source virtual portal and the target virtual portal are not on the same portal server, but there is another virtual portal on the target portal server that has the same URL context as that of the source virtual portal. The URL mappings of this virtual portal will be updated to point to resources in the target virtual portal into which you imported the content. And we can no longer use such a URL context to access the resource in this virtual portal. This is particularly critical for the URL mapping of a URL context created for a virtual portal during its creation. Updating this initial URL mapping of a virtual portal URL context make that virtual portal unusable.
If you deploy a portlet, this makes that portlet available to all virtual portals in the portal installation, unless you restrict this using Portal Access Control. If that portlet has already been deployed in other virtual portals, errors can occur during the execution of the XML request.
Always make backups of your system before executing imports.
Virtual Portals and Search
If you do not specify a virtual portal title in the language which is either defined as the user-preferred language or defined in the user's browser, the display fallback uses the unique name if present, or a string version of the ObjectID. So, to display the virtual portal title and content root correctly, the administrator must select the preferred language for the portal user, or define the display language in the user's browser, according to the language in which the title is set.
When creating a virtual portal, the creation of the JCR search collection depends on whether you create the virtual portal with or without content:
- If you create the virtual portal with content, the portal creates the JCR collection for the virtual portal by default.
- If you create only the virtual portal and add no content to it, the portal creates no JCR collection with it. It will get created only when content is added to the virtual portal.
We can view the URL of the JCR collection in the search administration portlet Manage Search of the virtual portal. The URL looks as follows:
-
http://host:port/seedlist/server?Action=GetDocuments&Format=ATOM&Locale=en_US&Range=100&Source=com.ibm.lotus.search.plugins.seedlist.retriever.jcr.JCRRetrieverFactory&Start=0&SeedlistId=wsid@ootb_crawlerwsid
where wsid is the actual workspace ID of the virtual portal. The workspace ID is the identifier of the workspace in which the content item is created, stored and maintained.
For example, if the workspace ID of the virtual portal is 10, then the URL looks as follows:
http://host_name:port_number/seedlist/server?Action=GetDocuments&Format=ATOM&Locale=en_US&Range=100&Source=com.ibm.lotus.search.plugins.seedlist.retriever.jcr.JCRRetrieverFactory&Start=0&SeedlistId=10@ootb_crawler10
Configuring the sub-administrators for virtual portals
The Virtual Portal Manager portlet creates has a set of necessary access rights on the virtual portal for the sub-administrator group specified. This includes EDITOR role access rights on the administration portlets that are part of a virtual portal.
To change the access rights for sub-administrators, use the Portal Access Control portlets:
To delegate Portal Access Control administration within the virtual portal to sub-administrators of the portal, the main portal administrator must assign those sub-administrators additional permissions in the main portal to the virtual resources USERS and USER GROUPS by the following procedure:
- Log into the main portal as a main portal administrator and navigate to...
-
Portal Administration | Resource Permissions Portlet | Virtual Resources | USERS | Delegator Role | Edit Role button
...and add the virtual portal administrative users or user groups to the role
- Go back to the Virtual Resources list and click...
-
USER GROUPS | Delegator Role | Edit Role button
- Add the virtual portal administrative users or user groups to the role and click OK.
- Save your changes.
The Manage Search portlet requires that you assign the following additional role and access rights on it to the virtual portal administrators so that they can use the full functionality of the portlet:
-
Editor@Virtual Resource PSE_SOURCES
Do not grant the sub-administrators of virtual portals the access rights to perform any installation related tasks, such as installation of portlets or themes. An unstable or malicious portlet that is installed in one virtual portal can destabilize the entire portal installation, as all virtual portals share the same Java Virtual Machine. Typically, installation related tasks should only be done by the master administrator of the portal installation.
The configuration task create-virtual-portal does not assign roles to the sub-administrators of the virtual portal. In this case assign the required roles manually or using xmlaccess.sh
Grant virtual portal administrators access to web content libraries
Virtual portal administrators do not automatically have access to work with web content libraries when using the administration portlet. To enable a virtual portal administrator to work with web content libraries you must assign them access to either the JCR content root node or individual web content libraries:
- We can assign virtual portal administrators access to the JCR content root node using the button...
-
Set access on root
...in the Web Content Library view of the Administration portlet. Set root access for all web content libraries.
- Assign virtual portal administrators administrator access to the JCR content root node to enable them to create new libraries and view, edit and delete all existing libraries.
- Assign virtual portal administrators contributor access to the JCR content root node to enable them to create new libraries and view, edit and delete libraries they have created.
- Assign virtual portal administrators administrator access to the JCR content root node to enable them to create new libraries and view, edit and delete all existing libraries.
- We can also assign virtual portal administrators access to libraries they have not created by editing the access settings of individual libraries.
Templating sample content is provided by default with WebSphere Portal. This sample content is available from the Web Content category of the site toolbar. To use the sample content with a specific virtual portal, you must syndicate the following web content libraries to the virtual portal:
- Template Page Content
- Web Content Templates
If you fail to syndicate these libraries, an error is displayed when we add the sample content to a page.
Listing all virtual portals
We can list all virtual portals using either the Virtual Portal Manager portlet or using a configuration task.
Modify a virtual portal
We can use the Virtual Portal Manager portlet to change the following settings of an existing virtual portal:
- The title of the virtual portal.
- The description of the virtual portal.
- The realm of the virtual portal.
- The theme of the virtual portal.
Changing the realm of a virtual portal might change the users and groups who have access to the virtual portal and to resources on that virtual portal, including the possibilito that the subadministrator of the virtual portal can lose the rights to administer the portal. If this happens, change the realm back to the original realm using the initial portal installation as an administrative interface.
Delete a virtual portal
Delete virtual portals using the Virtual Portal Manager portlet or configuration tasks. We cannot delete the initial portal installation. After the virtual portal resource has been deleted, the scoped resources on that particular virtual portal are deleted at a later time by a scheduled cleanup service. The URL mapping that was created when the virtual portal was created is also deleted. Unscoped resources that were available in the virtual portal, and additional URL mappings which administrators might have created manually are not deleted.
If you delete a virtual portal and to create a new virtual portal immediately after the deletion using the same URL context, you do not have to wait for the scheduled cleanup service. Run the cleanup task manually using Task.xml with xmlaccess.sh. Once complete, we can create the new virtual portal.
Prepare for the deletion of virtual portals:
Virtual portals can be created in environments where multiple portal installations share database domains, such as Community or Customization.
This can be in a staging environment or for different lines of production. In this case some portal resources, such as page customization within a virtual portal, can be visible in several of these installations. If you delete a virtual portal, then this portal installation cannot determine if the corresponding resources can be deleted or if they are still valid in the context of other portal installations and need to be preserved. It is the responsibility of the portal administrator to decide whether clean up of related resources that reside in shareable database domains is required before deleting a virtual portal. The administrator needs to decide whether these resources are obsolete or still in use. We can perform the cleanup in two ways:
- Manual cleanup of virtual portal resources in shared database domains:
- Connect to the virtual portal to delete.
- Clean up the two database domains Community and Customization. To do this, run the XML configuration scripts...
- DeleteSharedCommunityContent.xml
- DeleteSharedCustomizationContent.xml
- Delete the virtual portal.
- Connect to the virtual portal to delete.
- Automated cleanup of virtual portal resources in shared database domains. To do this, run
- ConfigEngine delete-virtual-portal -DremoveResourcesInSharedDomains=true
Cleaning up remaining resources if a virtual portal has been deleted already: If a virtual portal has been deleted already without prior cleanup of resources in shareable database domains, and if these resources cannot be accessed by any other portal installation that shares the database domains... to remove the remaining resources:
- Run the cleanup task for deleting resources by running the XML script Task.xml of xmlaccess.sh.
- Re-create the virtual portal that has been deleted using the identical URL mapping.
- Follow the instructions to delete a virtual portal including cleanup of resources in shareable database domains as described in the preceding section about Preparing for the deletion of virtual portals.
Administer the portal content and resources for virtual portals
When creating a virtual portal using the Virtual Portal Manager portlet, the portlet also creates default portal content and resources for the virtual portal. This default content is determined by the default XML script file for initializing virtual portals. The default content of a virtual portal is listed under Multiple virtual portlets. In general, we can administer portal resources for a virtual portal just like you do for a normal portal installation.
You need to be aware that some resource types are scoped to a particular virtual portal and cannot be accessed from outside on that virtual portal. Such scoped portal resource types are assigned to only that one portal. Sharing of these resource types between virtual portals is not possible. This restriction is imposed by the portal system and provides a secure isolation between virtual portals. We cannot change this behavior.
Other resource types are not scoped. They are shared among all virtual portals of the same installation. To restrict such resource types to particular virtual portals, we can define their visibility using Portal Access Control. These access restrictions should usually be defined by the master administrator of the portal installation.
To change the content of virtual portals:
- To change the content globally and before creating a virtual portal, modify the default XML script that specifies the initial content for virtual portals.
- To change the content specifically and after creating a virtual portal, use either of the following portal tools:
- Use the Manage Pages portlet of the virtual portal. We can have the subadministrator of the virtual portal do this.
- Use xmlaccess.sh to import content into the virtual portal. This can only be done from the initial portal installation.
- Use the Manage Pages portlet of the virtual portal. We can have the subadministrator of the virtual portal do this.
Add authoring portlet to a virtual portal
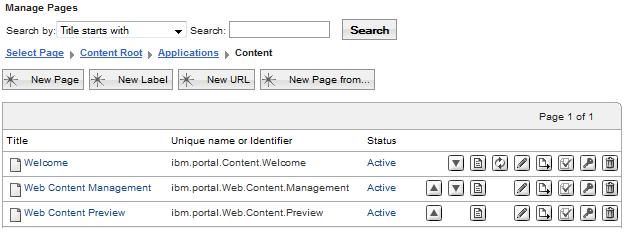
When creating a virtual portal, the portlets associated with IBM Web Content Manager are not included in the virtual portal, even if you have deployed these portlets as part of the original portal installation. To use any of these portlets in a virtual portal, manually create a page and add the portlets.
- Log on to virtual portal and go to...
-
Manage Pages | Content Root
- Create label "Applications" with unique name ibm.portal.page.Applications
- Create label "Content" under label "Applications" with unique name
- Under label "Applications", create pages, and add relevant portlets ...
Page title Unique name Portlet Web Content Management ibm.portal.Web.Content.Management Web Content Authoring Web Content Preview ibm.portal.Web.Content.Preview Web Content Viewer (JSR 286) When creating page, set Type of Page to be Standard Portal Layout.
Administer the users for virtual portals
As the master administrator of the portal installation you assign administrative users for the virtual portals. These virtual portal sub-administrators can manage the access rights of the user population of the virtual portal for which they are responsible. When we use realms to separate the user populations of the virtual portals from each other, configure the realms manually in a Virtual Member Manager configuration file. This is typically done by the master administrator of the portal installation.
When creating a virtual portal, be aware of the following implications:
- For scoped resources: Access rights that you configured for users on scoped resources of the initial portal installation are not passed on to similar resources of a virtual portal. This statement
applies only to resources scoped for each virtual portal, such as pages or portlet instances, but not for shared resources.
For example, if you restricted access rights to some pages or portlet instances for users on the initial portal installation, these restrictions do not apply for the users of the virtual portal.
- The All Authenticated Portal Users group and the All Portal User Groups are valid over all portals that share the same realm. This means that users who are in a realm or user group that belongs to more than one virtual portal, these users have the assigned access rights on all virtual portals to which they have access.
To change these default access rights for the users, we can do one of the following:
- To configure the scope of access rights for users before creating a virtual portal, configure the realms and user groups accordingly.
- To change the access rights of users of a virtual portal after creating a virtual portal, use the Portal Access Control portlets is that virtual portal. We can have the sub-administrators of the virtual portal perform this task.
Administer content and search with virtual portals
Personalization is not aware of virtual portals. A document library that is available in the initial portal installation is available in each virtual portal, if Personalization is available is that virtual portal and is configured to use that document library. Searching for a document in a document library will produce a document reference (URLs that is different in each virtual portal, but points to the same document in the document library. To provide separation of content within virtual portals, use separate document libraries for each virtual portal. To provide content collaboration between virtual portals, use the same document libraries between virtual portals.
Preconfigure the Virtual Portal Manager portlet
When we use the Virtual Portal Manager portlet to create a virtual portal, the portlet creates the new virtual portal with default portal content and resources. It also creates default access rights for the virtual portal sub-administrators on those resources. We can change both the default portal content and the default access rights for the sub-administrators globally and before creating a virtual portal. To do this, you configure the Virtual Portal Manager portlet and the default XML script:
Preconfigure virtual portals
We can set default content and sub-administrator access rights for virtual portals, before you create virtual portals by configuring the Virtual Portal Manager portlet.
When you create the virtual portal using the Virtual Portal Manager portlet, the virtual portal is pre-filled with default content. This default content is determined by the default XML script file for initializing virtual portals. This file can have different names, for example...
- InitVirtualPortal.xml
- InitVirtualContentPortal.xml
- InitAdminVirtualPortal.xml
These files are located in VirtualPortal.zip, which be retrieved by going to...
-
Applications | Application Types | Assets | file
To find out which of the above xml files is used for creating virtual portals in the installation, select Manage Virtual Portals and select the option Edit Shared Settings from the portlet menu. This shows the WAS asset name and the XML file name inside that asset. To find out which content virtual portals have that you create, review the XML script file. Advanced master administrators can customize the default content for virtual portals as required by modifying or replacing the XML script that specifies the initial content for virtual portals.
Plan well ahead and apply special care. We can add or remove some content in order to enhance or reduce the functionality of a virtual portal to a certain extent. The following portal resources are mandatary content of a virtual portal and must be included in a customized XML initialization script for virtual portals:
| Content Root | wps.content.root |
| Login | wps.Login |
| Administration | ibm.portal.Administration |
Depending on the functionality to make available, more content is required. For example, in order to allow templating, include...
| Application Root | wps.application.root |
| Templates | ibm.portal.Templates |
To replace the default XML script by our own custom XML script:
- Add the custom XML script to a WAS asset:
- Export the file VirtualPortal.zip from the portal server
- Log in to the WAS admin console and select...
-
Applications | Application Types | Assets | VirtualPortal.zip | Export
- Make a copy of this .zip file, and name the copy my_VirtualPortal.zip or similar.
- Add the custom virtual portal script to the copy of the .zip file.
For example, the script file can be my_InitVirtualPortal.xml . To add the script, use a utility program for .zip files.
- Log in to the WAS admin console and click...
-
Applications | Application Types | Assets | Import | my_VirtualPortal.zip | Next | Next | Finish
- Save the changes to the master configuration.
- Export the file VirtualPortal.zip from the portal server
- Go to...
-
Administration | Portlet Management | Portlets
- In the list of portlets locate the Virtual Portal Manager portlet.
- Click the Configure Portlet (wrench) icon of the Virtual Portal Manager portlet.
- Edit the SCRIPT_INIT_VP parameter of the portlet. Replace the value InitVirtualPortal.xml with the name of the custom XML script and custom asset zip file. This can be specified as a file inside a WAS asset using a syntax such as this:
- WebSphere:assetname=my_VirtualPortal.zip:my_InitVirtualPortalScript.xml
where my_VirtualPortal.zip is the name of the asset and my_InitVirtualPortalScript.xml is the name of a file inside the asset. Do not update the default asset VirtualPortal.zip installed with WebSphere Portal. Instead, create and maintain a separate second asset independent of the default asset VirtualPortal.zip .
- Optional. To create only an empty virtual portal with no content, we can specify the value for this parameter as follows: WebSphere:assetname=VirtualPortal.zip:InitEmptyVirtualPortal.xml .
- Click OK twice to save the changes.
Preconfiguring the sub-administrators for virtual portals
To configure the roles and access rights that are assigned to sub-administrators on portlets of a virtual portal globally and before you create a virtual portal... on the initial portal installation:
- Open the Manage Portlets portlet by clicking Administration > Portlet Management > Portlets.
- In the list of portlets locate the Virtual
Portal Manager portlet.
- Click the Configure Portlet (wrench) icon of the Virtual
Portal Manager portlet.
- Perform the following steps, depending on the requirements for your virtual portals:
- To change the list of portlets to which the sub-administrators have access:
- Edit the portletListNeedAccess parameter of the portlet. Remove those portlets for which you want the sub-administrators of the virtual portals to have no access rights.
- Add portlets as required by adding the unique names of the portlets to the list. You might have to take a note of the list and remove the parameter, and then enter the parameter with the updated list.
- Edit the portletListNeedAccess parameter of the portlet. Remove those portlets for which you want the sub-administrators of the virtual portals to have no access rights.
- To change the access rights that are granted to the sub-administrators on the portlets of virtual portals, edit the actionSetName parameter of the portlet and change the role to assign to the sub-administrators to the role that fits the requirements. The default role is EDITOR. You might have to take a note of the parameter and remove it, and then re-enter the parameter with the updated value.
We can enter the following values: Administrator, Security Administrator, Delegator, Manager, Privileged User, User.
sub-administrators have the roles that you assign to them on all the portlets that are listed under the portletListNeedAccess parameter of the Virtual Portal Manager portlet (see the previous step).
- To change the list of portlets to which the sub-administrators have access:
- Click OK to save the changes.
- Assign the virtual portal sub-administrators administrator rights on the JCR root as required.
Parent: Virtual portals
ConfigEngine uses wkplc.properties for inputs before executing the tasks below.
Note that wkplc.properties is not read during portal appserver startup, only by ConfigEngine during configuration changes. The contents of wkplc.properties do not necessarily correspond to the values instantiated by portal. To obtain actual portal configuration settings, check the WAS admin console, or generate reports using wsadmin.
The property file must be encoded in the ISO 8859-1 character encoding format.
Task: create-virtual-portal
Portal ConfigEngine task that creates a new virtual portal.
Use this task to create the virtual portal. This task creates the virtual portal itself, but it does not create any default content for the virtual portal or grant any access permissions to the virtual portal administrators. You need to perform these tasks separately after creating the virtual portal. We can use xmlaccess.sh create content and grant access permissions.
Parameters
| VirtualPortalTitle | The title of the virtual portal. Required. |
| VirtualPortalRealm | The realm of the virtual portal. Required if you have realms enabled in the portal installation. If you do not have realms enabled, do not specify a value for the realm. |
| VirtualPortalHostName | The host name of the virtual portal. If we specify the host name, the portal sets the host name, and the portal parameter context is ignored. We cannot use the same virtual portal host name twice in the same portal installation. After creating the virtual portal, we cannot change the host name that you have specified for the virtual portal. Either the host name or the context option is required. |
| VirtualPortalContext | The portal context of the virtual portal. The context must be unique. If set the host name parameter earlier, the portal context is ignored. Either the host name or the context option is required. |
| VirtualPortalNlsFile | The NLS file for the virtual portal. Provide the path and file name of the national language support file. We can create our own national language support file to specify additional titles and descriptions in other languages for the virtual portal. If you do not specify an NLS file, the virtual portal is created with the title that you give as the value to the VirtualPortalTitle parameter only, but without titles in other languages and without descriptions. If we specify no NLS file, the value that we specify by the VirtualPortalTitle input parameter will show to users as the title of the virtual portal in all language environments, independent of the system and browser locale and the user preferences. If we specify an NLS file, the value given for the virtual portal title is that NLS file overrides the title that we specify by the VirtualPortalTitle input parameter. If we specify an NLS file, do not use prefixes is that NLS file. To pass a description for the virtual portal to the configuration task, you have to specify this in the NLS file. |
Syntax...
./ConfigEngine.sh create-virtual-portal -DPortalAdminPwd=foo -DWasPassword=foo
Task: list-all-virtual-portals
Use this ConfigEngine task to get info about virtual portals, including...
- Title
- Description
- Realm
- Object ID
We cannot use the configuration task list-all-virtual-portals to show the context of a virtual portal as specified using the configuration task create-virtual-portal with the input parameter VirtualPortalContext .
Syntax...
- ./ConfigEngine.sh list-all-virtual-portals -DPortalAdminPwd=foo -DWasPassword=foo
On z/OS, the list option is not available as a configuration task in the Customization Dialog. The Customization Dialog calls this task directly.
Task: modify-virtual-portal
Portal ConfigEngine task that modifies a virtual portal.
Parameters
Use this task to modify a virtual portal using its object ID. To determine the correct object ID of the virtual portal, use the task list-all-virtual-portals ..
For z/OS : The z/OS Customization Dialog uses this task to modify a virtual portal using its object ID. To determine the correct object ID of the virtual portal, use the job EJPSMVP that the Customization Dialog created in the target control data set.
- VirtualPortalObjectId
- The object ID of the virtual portal. This input is mandatary for identification of the virtual portal to modify.
- VirtualPortalRealm
- The realm of the virtual portal. We can only specify a realm if you have realms enabled in the portal installation.
- VirtualPortalNlsFile
- The National Language Support file of the virtual portal. To modify the title or description of the virtual portal, you have to specify this in the NLS file accordingly. Specify the path and file name of the national language support file. We can create our own national language support file to specify additional titles
and descriptions in other languages for the virtual portal. For more details about the format of this file refer to the section Property
file format under the Command reference for Portal Scripting Interface .
If we specify an NLS file, do not use prefixes is that NLS file.
Syntax
- AIX
- ./ConfigEngine.sh modify-virtual-portal -DPortalAdminPwd=foo -DWasPassword=foo
- IBM i
- ConfigEngine.sh modify-virtual-portal -DPortalAdminPwd=foo -DWasPassword=foo
- Linux
- ./ConfigEngine.sh modify-virtual-portal -DPortalAdminPwd=foo -DWasPassword=foo
- Solaris
- ./ConfigEngine.sh modify-virtual-portal -DPortalAdminPwd=foo -DWasPassword=foo
- Windows
- ConfigEngine.bat modify-virtual-portal -DPortalAdminPwd=foo -DWasPassword=foo
- z/OS
- No syntax. The Customization Dialog calls this task directly.
Task: delete-virtual-portal
Portal ConfigEngine task that deletes a virtual portal.
Parameters
Use this task to delete a virtual portal using its object ID. To determine the correct object ID of the virtual portal, use the task list-all-virtual-portals ..
For z/OS : The z/OS Customization Dialog uses this task to delete a virtual portal using its object ID. To determine the correct object ID of the virtual portal, use the job EJPSMVP that the Customization Dialog created in the target control data set.
- VirtualPortalObjectId
- The object ID of the virtual portal. This input is mandatary for identification of the virtual portal to delete.
Syntax
- AIX
- ./ConfigEngine.sh delete-virtual-portal -DPortalAdminPwd=foo -DWasPassword=foo
- IBM i
- ConfigEngine.sh delete-virtual-portal -DPortalAdminPwd=foo -DWasPassword=foo
- Linux
- ./ConfigEngine.sh delete-virtual-portal -DPortalAdminPwd=foo -DWasPassword=foo
- Solaris
- ./ConfigEngine.sh delete-virtual-portal -DPortalAdminPwd=foo -DWasPassword=foo
- Windows
- ConfigEngine.bat delete-virtual-portal -DPortalAdminPwd=foo -DWasPassword=foo
- z/OS
- No syntax. The Customization Dialog calls this task directly.
Administering multiple virtual portals by a single configuration task
We can administer multiple virtual portals by running a single configuration command.
The following configuration tasks support working with virtual portals: create-virtual-portal, delete-virtual-portal, and modify-virtual-portal. You specify the virtual portal property sets in the file wkplc.properties used with the configuration tasks. When you run, you pass the list of virtual portals using the parameter -DvirtualPortalList.
Here is an example for creating two virtual portals:
- Two virtual portal property sets in the file wkplc.properties as follows:
vp1.VirtualPortalTitle=vp1
vp1.VirtualPortalRealm=vp1realm
vp1.VirtualPortalHostName=vp1host
vp1.VirtualPortalContext=vp1
vp1.VirtualPortalNlsFile=

vp2.VirtualPortalTitle=vp2
vp2.VirtualPortalRealm=vp2realm
vp2.VirtualPortalHostName=vp2host
vp2.VirtualPortalContext=vp2
vp2.VirtualPortalNlsFile=
- To create both virtual portals using a single configuration command, use the parameter -DvirtualPortalList to specify the two portals vp1 and vp2:
ConfigEngine create-virtual-portal -DvirtualPortalList=vp1,vp2
Tips for working with virtual portals
View information about configuring virtual portals, hints and tips, and known limitations.
The following hints and tips apply to virtual portals in WebSphere Portal v8.0:
- Do not grant the subadministrators of virtual portals the access permissions to perform any installation related tasks, such as installation of portlets or themes. The isolation between the different virtual portals as provided by WebSphere Portal v8.0 is limited to some extent. All virtual portals share a common JVM. Therefore it is important to restrict the administration privileges of the virtual portal subadministrators and prevent them from installing their own code artefacts, such as themes or portlets. Unstable or malicious code that is introduced on one virtual portal can destabilize the entire portal installation and thereby all other virtual portals. A flexible way to introduce virtual portal specific portlets without impacting any other virtual portals is to use Use WSRP servicesWSRP.
- Not all resources can be scoped to individual virtual portals.
For example, all themes and skins are available to all virtual portals without restrictions. Credential vault, portlet services, and portal services are also common for an entire portal installation. They cannot be scoped to an individual virtual portal.
- The settings which are defined in the portal property files apply for the entire portal installation. We cannot specify separate settings for individual virtual portals.
- To make use of the single signon feature that is provided by WAS, you have to use the same common domain suffix for all virtual portals.
- Portal search, personalization, and templates, are not aware of virtual portals.
- There are no virtual portal specific enhancements to the published portal commands and application programming interfaces.
- A URL mapping defined for a resource in a particular virtual portal must use the same URL context as the human readable URL context for that virtual portal itself. Example:
In a virtual portal that uses the human readable URL mapping wps/portal/vp_1, all URL mappings for portal resources must start with wps/portal/vp_1, for example wps/portal/vp_1/url_1 and wps/portal/vp_1/url_2.
Within this virtual portal a URL mapping such as wps/portal/url_1 is not valid, as the portion vp_1 of the URL Context is missing.
- The administration portlet Virtual Portal Manager cannot delete all resources associated with a virtual portal.
For example, it does not delete additional URL mappings that administrators might have created for the virtual portal. We can use xmlaccess.sh to do this.
- All virtual portals on a portal installation share a common logging and tracing.
- When you re-initialize a virtual portal using the Virtual Portal Manager portlet, this applies the XML script for the default virtual portal content (or the custom script) again and re-creates the default content of the virtual portal. Resources that we removed from the default content are re-created. Resources that we added to the default content remain in the virtual portal.
- You have to run the wp-create-realm task to create realms for the Virtual Portal.
See the Adding realm support file for the operating system.
- The context of a virtual portal as specified by the configuration task create-virtual-portal and the input parameter VirtualPortalContext cannot be shown using the configuration task list-all-virtual-portals.
- For z/OS :
The context of a virtual portal, as specified by the configuration task Create a virtual portal and the input parameter VirtualPortalContext, cannot be shown using the job EJPSMVPL.
- The Portal Access Control administration in the Resource Permissions portlet shows users from different realms who have role mappings on shared resources by their object IDs. Therefore, apply special care and consideration when deleting such portal resources: Do not delete resources on which users from other realms have role mappings, if they are required in other virtual portals. This applies to members of roles on portal resources that cannot be scoped and are therefore shared between the virtual portals. Role members who belong to the realm of the local virtual portal are displayed as usual, but role members who belong to different realms are displayed in a different manner:
- Role members for shared resources who belong to the realm of the virtual portal under which we are currently working are listed by their actual names under which they were created.
- Role members for shared resources that do not belong to the realm of the current portal are listed by their portal object IDs.
For example, a role member from a different realm might be represented as 8_0_B.
You find the list of role members under...
-
Administration | Access | Resource Permissions | Select Resource Type | Assigning Access for a resource | Edit Role | Members in the Role.
- Role members for shared resources who belong to the realm of the virtual portal under which we are currently working are listed by their actual names under which they were created.
- We cannot create custom URLs in one virtual portal that address portal resource in another virtual portal. The reason is that both object IDs and unique names relate to resources of the local virtual portal. For details about how to create URLs refer to Create custom links to portlets and pages.
Known limitations
Change of theme for virtual portal might not take effect
If you change the theme for a virtual portal by editing the virtual portal in the Virtual Portals portlet, the following problems might occur:
- The selected theme might not show the next time you go into the Edit mode for the virtual portal.
- The selected theme might not be applied to the virtual portal, and the virtual portal might still be displayed with the original theme.
Use a new host name for an existing virtual portal
To use a new host name for an existing virtual portal...
- Export the contents of the virtual portal using xmlaccess.sh.
- Delete the virtual portal.
- Clean up references to the deleted virtual portal using the Task.xml of xmlaccess.sh..
- Create a new empty virtual portal using the configuration task create-virtual-portal.
Use the context of the deleted virtual portal, and specify the new host name as required.
- Import the contents to the new virtual portal using xmlaccess.sh.
Portal supports up to 150 virtual portals
A single portal installation can support up to 150 virtual portals.
Create the portal site search collection fails
Problem: If the file path length for the location of search collections exceeds its limit, the collection cannot be created. This can occur particularly when the portal site collection is created under UNIX operating systems.
Cause: The file path length for the portal search collection is limited to 118 characters. If this limit is exceeded, the default collection cannot be created. The following items contribute to the length of the file path:
- The installation directory path. Under UNIX operating systems the installation directory path name can be longer than under other operating systems.
- By default, the search collection for the portal site content is created under the path your_portal_install_directory/PortalServer/collections.
- The name of the virtual portal.
- The name of the search collection.
Solution: Proceed as follows:
- Change the default directory location for the portal site search collection to a shorter path, so that the complete path and file name does not exceed a length of 118 characters. For details about how to do this refer to Configure the default location for search collections.
- Re-create the portal site search collection. For details about how to do this refer to Reset the default search collection.
Parent: Administering
Related:
Set up a virtual portal in a portal farm
Use WSRP services
Control access
xmlaccess.sh
Virtual portals and managed pages
Configure a virtual portal for z/OS
Worksheets for configuring portal for z/OS
Technotes for virtual portals