IBM Management Center for WebSphere Commerce


Each tool displays in its own tab within the Management Center:
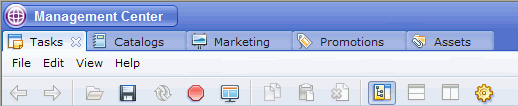
To switch between each tool, click the appropriate tab. A site administrator has access to all the tools; however, depending on your business role, from the Management Center menu, you can see and use the tools to which you have access.
If change your access, contact your Site Administrator.
Business Role Menu Account Representative
Catalogs
Promotions
MarketingCatalogs
Promotions
MarketingMarketing Marketing Manager Catalogs
Promotions
Marketing
AssetsSeller Catalogs
Promotions
MarketingSite Administrator Catalogs
Promotions
Marketing
AssetsProduct Manager Catalogs
Promotions
Marketing
AssetsCategory Manager Catalogs
Promotions
AssetsBuyer (seller side) Catalogs
Promotions
AssetsContinue to use the WebSphere Commerce Accelerator to perform other business operations, such as managing stores, inventory, fulfillment, orders, returns, payments, auctions, customer segments, and e-Marketing Spots. Developers familiar with the Management Center framework can also customize it further to suit their business needs.
Management Center tools
The Management Center offers tools to support merchandising and marketing tasks:
If you are ... Use the Management Center to ... Use the WebSphere Commerce Accelerator to ... Manage catalogs and merchandise
- Create and manage master and sales catalogs, including defining categories, creating products and SKUs, categorizing SKUs, and bundling SKUs
- Enrich and manage product content, and create merchandising associations
- Import catalog data from a CSV file
- Search and replace across multiple catalog entries, such as changing the description of multiple products at once
- Assign tax codes
If your business requires these features, continue to use the WebSphere Commerce Accelerator and do not enable the Catalogs tool in the Management Center.
For more information, see Mapping between the catalogs tool in the WebSphere Commerce Accelerator and the Management Center.
Manage promotions
- Create and manage promotions for your merchandise
- Review and manage promotions using the promotions calendar view
Promotions created in the WebSphere Commerce Accelerator are not displayed and are not searchable in the Management Center Promotions tool. To enable such promotions in the Management Center Promotions tool, migrate the promotions. After the migration is complete, the promotions remain listed in WebSphere Commerce Accelerator, but you cannot update, delete, activate, or deactivate the promotions.
For information on the mapping between promotions in the WebSphere Commerce Accelerator and the Management Center, see Promotions.
Manage marketing campaigns
- Design creative marketing campaigns containing Web and e-mail activities
- Create experiments to test your campaign activities' effectiveness
- Create and manage marketing content
- Define the flow of marketing activities using activity templates and change marketing activities through the marketing activity builder
- Review and manage marketing activities using the activities calendar view
- Create and manage e-Marketing Spots
- Create and manage customer segments
- Manage experiments as a separate marketing asset.
Campaign activities created in the WebSphere Commerce Accelerator are not migrated to the Management Center. You must recreate these activities in the Management Center.
For more information on the mapping between marketing campaigns in the WebSphere Commerce Accelerator and the Management Center, see Marketing tool.
- Browse attachments, managed files, and managed directories
- Create, change, and delete attachments
- Create, change, and delete managed files
- Create and delete managed directories
- Upload files, such as product images and marketing content.
Use the Assets tool in the Management Center to manage attachments that were created in the WebSphere Commerce Accelerator. You can also use the Assets tool to manage files that were uploaded using the WebSphere Commerce Accelerator, such as product images and marketing content.
For more information on the mapping between attachments in the WebSphere Commerce Accelerator and the Management Center, see Attachments.
- Manage content within a workspace by selecting tasks, managing content within tasks, adding comments, and approving or rejecting tasks
- Work on assigned tasks, complete tasks, and submit tasks for approval
For more information on which workspaces tasks can be managed in the Tasks tool within the Management Center, see Use workspaces in the Management Center.
- Create new workspaces or task groups through the Workspace Administration tool
- Administer workspaces through the Workspace Administration tool
- Choose to work on tasks that are inside a workspace.
- Choose to work on approved content.
The Tasks tool is only visible if workspaces are enabled and is open by default to display your assigned tasks.
Starter store enhancements
Feature Pack 3 includes enhancements for the WebSphere Commerce consumer direct, B2B direct, advanced B2B direct, and Web 2.0 starter stores. These enhancements include a sample catalog and new JSP snippets for e-Marketing Spots with Web activities that can be managed only through the Management Center.
Management Center usability features
If you are familiar with the WebSphere Commerce Accelerator, the Management Center is a different and more usable, intuitive, and efficient way to complete your tasks.Management Center user interface
Here is the Management Center at a glance:
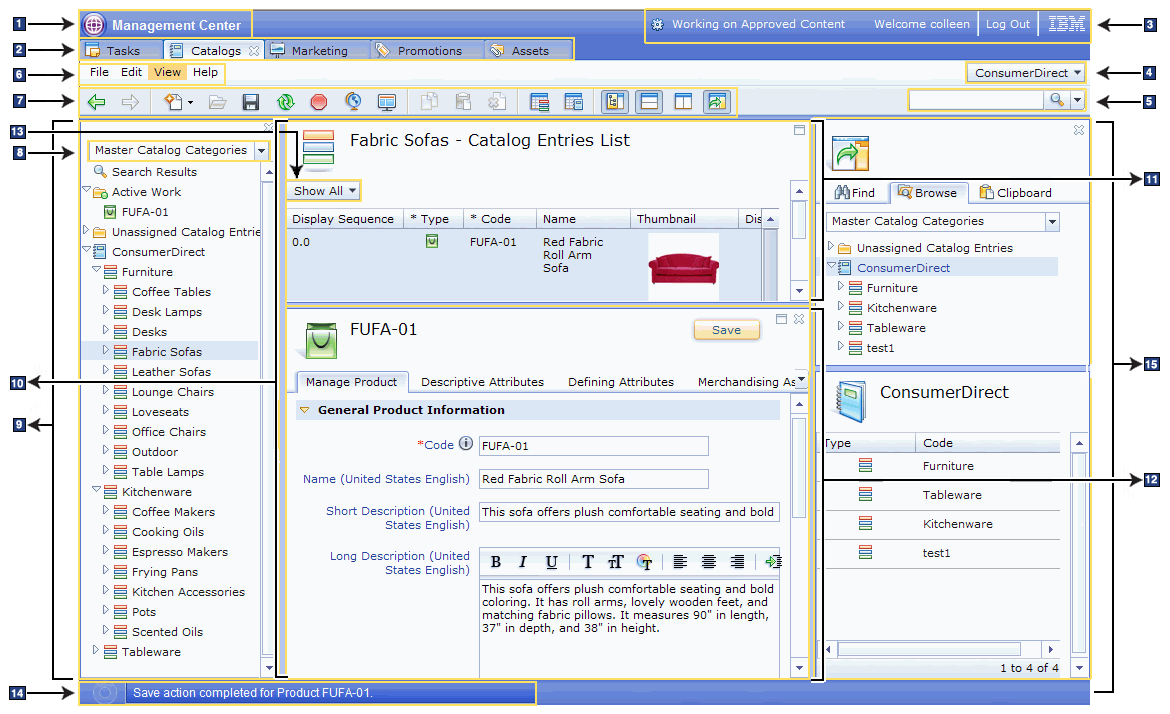
Each part of the Management Center interface is defined below:
- Management Center menu. Use this menu to open the Management Center Catalogs, Promotions, Marketing, Assets, and Tasks tools. You can also open the Preferences dialog and access the Getting Started from here.
- Tool tabs. Each Management Center tool opens in a separate tab; that is, if you have all five tools open, you would see five tabs: Catalogs, Promotions, Marketing, Assets, and Tasks.
- Store list. Switch to another store by selecting the down arrow next to your current store name. This list also contains a search option, which use to find a store.
- Find area. Search for objects by typing a keyword and selecting a search object type from a list. You can also select the advanced search option to refine your search.
- Menu bar. The Management Center includes four menus within the menu bar: File, Edit, View, and Help. All actions supported by the Management Center are within the menu bar.
- Toolbar. Click a button on the toolbar to quickly perform a task. The toolbar actions are a subset of the most common tasks you can perform using the Management Center.
- Explorer filter. Within the Catalogs tool, you can filter the explorer view to display your top-level object.
- Explorer view. The explorer view allows you to navigate through the objects with which you want to work. The entire frame is the explorer view. You can expand and collapse the nodes in the explorer tree to view and work with objects. For example, you can expand a catalog until you reach the catalog SKU level. The explorer view always includes the Search Results node (to allow you to return to a list of results at any time) and Active Work node (to show the objects you currently have open).
- Main work area. The Management Center main work area is controlled by what you have selected in the explorer view and is displayed in the middle (largest) area of the user interface. The main work area can display information in three views: list view, properties view, or calendar view. You can also split the main work area (horizontally or vertically) so that you can see two views at once.
- List view. One of the three views displayed in the main work area. A list view lists objects in the form of a table. You can view the list and select a specific row to see more details. You can also reorder, hide, or show columns. If information is editable, you can click the cell and edit on the spot.
- Properties view. One of the three views displayed in the main work area. A properties view shows details about an object and is where you can edit the object. The properties view can contain entry fields, check boxes, radio buttons, lists, tables, pull-down sections, and tabs. You access the properties view from either selecting to create a new instance of an object, or by selecting an existing object from a list view.
- List view filter. You can filter a list view to display only specific information. For example, list only SKUs, or list everything but SKUs for the catalog.
- Status bar. The status bar is the bottom area or footer of the user interface, and includes messages, access to the messages console (by clicking the actual message), and progress indicator.
- Utilities view. The utilities view allows you to locate and use objects that you want to reference or use with your current object, without navigating away from the current view. For example, while editing a product, you want to include a reference to another product as a cross-sell item. Use the utilities view to search for merchandising association items, and then drag an item from the utilities view to the merchandising association tab of the source product. The utilities view includes three functions: search (to find objects by a system search), browse (to find objects by looking through a directory structure or hierarchy), and clipboard (a container to hold objects for later use).
Button Description Available in these tools 
Move back to the previous view. Tasks
Catalogs
Promotions
Marketing
Assets
Move forward to return to the last view. 
Open the properties view for the currently selected object. 
Save the selected object. If no object is selected, this saves all objects with unsaved changes. 
Reload the selected object. 
Stop pending actions for the selected object. 
Open the Store Preview Options dialog to specify preview options before launching the store preview. 
Copy the selected object. 
Copy and paste the selected object to the clipboard in the utilities view, where it is available for later use. 
Delete the currently selected object. 
Toggle to either hide or show the explorer view. 
Split the main work area horizontally so that you can see two views at once. 
Split the main work area vertically so that you can see two views at once. 
Create a new object. Catalogs
Promotions
Marketing
Assets
Select the language to use to input information for language-sensitive content, such as descriptions. 
Open the utilities view to locate objects you require to complete a task, without navigating away from the current view. 
Display the Categories list view. Catalogs

Display the Catalog Entries list view. 
Display the Promotions calendar view. Promotions

Display the Promotions list view. Display the Activity calendar view. Marketing
Display the Activity list view. 
Read and update content that is approved and ready to deploy to the production server. Tasks
Management Center user interface usability highlights
Here are some highlights of the Management Center interface:
- Complete the same tasks in various ways
- Use the Management Center the way you work best: by menu, by toolbar, by right-clicking, or by keyboard shortcut.
- Navigate using the explorer view
- Expand and collapse the explorer tree within the Management Center to work with various objects. In addition, the explorer view lists all the active work or items you have currently open, and allows you to return to a list of search results if you have navigated away from the list.
- Drag and drop elements
- Quickly drag elements from one area to another. For example, in the Catalogs tool, drag a product from a search results list into the catalog you are building. Likewise, when using the activity builder in the Marketing tool, drag elements from a toolbar to a flow connector. You can drag objects to and from a variety of places within the Management Center. Visual indicators denote whether you can drag the element: an + icon indicates that you can drag the element, and an X icon indicates an invalid move.
- Format rich text
- Edit text using formatting such as font type, style, color; text alignment and indentation; and bulleted lists. The rich text editor is embedded into the Management Center properties view so that you can enter formatted text within the Management Center, and also display the same text on your storefront (for example, use it for a description of a product).
- List only the information you need
- Edit in place
- Makes changes on the spot: either click an editable cell within a table, and press Enter; or place your mouse over the cell and click the edit (pencil) icon:
Edit in place is a quick way to make simple changes, without having to go into the properties view of an object. For instance, within a table that lists products, change the price of the product to reflect a new price or to correct an error in a product description.
- Locate objects to complete the current task
- Locate objects you require to complete a task, without navigating away from the current view. Search is available within each tool. You can also search or browse for objects from a utilities view, which you can display and use at any time. For example, while editing a product, you want to include a reference to another product as a cross-sell item. Obtain a list of products to use for the merchandising associations by clicking the utilities view icon (
- Personalize your Management Center
- Define your user preferences
- Set global user preferences that become your default preferences for the Management Center. At any time, you can change these settings by using the Management Center menu > Preferences option. From the preferences, you can set:
- Name of the store you want to manage by default
- Language for the Management Center user interface
- Number format for the Management Center user interface
- Detailed tooltips to provide additional help information about a Management Center user interface element (for instance, how to use a specific field)
- Define your work area
- The Management Center work area can display a list of items (for example, a list of promotions for your store), a properties view to work with details for individual items (such as a specific promotion, from your list), or a calendar view for scheduling purposes. The calendar view is offered in the Promotions and Marketing tools.
You can also configure your work area to show two views. For example, show the list and the properties views in one view: select
For a list view, if the Management Center cannot display the list (for example, there are too many objects to list), then you will see a message to indicate this and the list view will not list any objects. If you create new instances of an object for that list, only the new objects are listed. For example, if you attempted to list all products, but the number of products is too many to list, then you will see an empty list. Within the same session, if you create new products, only the new products (not the total products for the store) will display on the list.
- Define your table views
Related concepts
Starter store enhancementsRelated tasks
Enabling the Management CenterDisable the Management CenterEnabling the Marketing tool inside the Management CenterUse the Management CenterOpening the Management CenterOpening WebSphere Commerce Accelerator from the Management CenterChange your Management Center logon password