Install and configure WebSphere Portal v6
Installation scenarios
- Windows and UNIX installation scenarios
- WebSphere Portal with WAS and Cloudscape database installed locally
- Install WebSphere Portal into an existing environment with WAS
- WebSphere Portal with a more robust database
- WebSphere Portal with a more robust database and extended security using an LDAP directory
- WebSphere Portal with IBM Lotus Domino Integration
- WebSphere Portal with extended security using an external security manager
- WebSphere Portal in a cluster environment
- WebSphere Portal with Web Content Management
- Local debug portlet development environment
- Remote server attach portlet development environment
- Custom installation scenario
- i5/OS installation scenarios
- Install and configure WebSphere Portal for iSeries
- Install only and configure WebSphere Portal later
- Optional components
Windows and UNIX installation scenarios
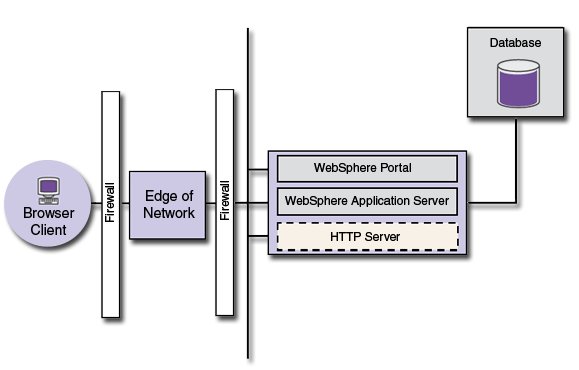
WebSphere Portal with WAS and Cloudscape database installed locally
This scenario focuses on installing and configuring WebSphere Portal only with no options. After you have successfully installed and configured WebSphere Portal we can add on to it.

Install WebSphere Portal into an existing environment without WAS
This scenario focuses on installing and configuring WebSphere Portal in an environment where an existing WAS is running without security enabled. After you have successfully installed and configured WebSphere Portal in this environment we can add on to it.

- WebSphere Portal
- Prepare the operating system [ AIX |HP-UX |Linux | Solaris | Windows ]
- Plan for WebSphere Portal
- Install WebSphere Portal to an existing environment with WebSphere Application Server :
After you complete installation, you will be guided to the following configuration steps, which have specific properties and tasks that apply to an environment where WebSphere Application Server security has not been enabled.
- Configure WebSphere Portal security. Choose the method of security that matches the environment.
- Configure a database user registry
- Tivoli Directory Server | Domino Directory | Novell eDirectory | Sun Java System Directory Server | Active Directory Application Mode ]
- Verify WebSphere Portal
WebSphere Portal with a more robust database
This scenario focuses on using WebSphere Portal with a more robust database to replace the default Cloudscape database. WebSphere Portal uses a database to store configuration and user information.
- WebSphere Portal
- Prepare the operating system [ AIX |HP-UX |Linux | Solaris | Windows ]
- Plan for WebSphere Portal
- Install WebSphere Portal
- Verify WebSphere Portal
- Configure databases
- Plan for databases [ DB2 | DB2 for z/OS | Oracle | SQL Server ]
- Install databases [ DB2 | DB2 for z/OS | Oracle | SQL Server ]
- Create databases and users [ DB2 | DB2 for z/OS | Oracle | SQL Server ]
- Transferring all domains [ DB2 | DB2 for z/OS | Oracle | SQL Server ]
- Verify database connections
WebSphere Portal with a more robust database and extended security using an LDAP directory
This scenario focuses on using WebSphere Portal with a more robust database and an LDAP directory.
- WebSphere Portal
- Prepare the operating system [ AIX |HP-UX |Linux | Solaris | Windows ]
- Plan for WebSphere Portal
- Install WebSphere Portal
- Verify WebSphere Portal
- Configure databases
- Plan for databases [ DB2 | DB2 for z/OS | Oracle | SQL Server ]
- Install databases [ DB2 | DB2 for z/OS | Oracle | SQL Server ]
- Create databases and users [ DB2 | DB2 for z/OS | Oracle | SQL Server ]
- Transferring all domains [ DB2 | DB2 for z/OS | Oracle | SQL Server ]
- Verify database connections
- LDAP user registry
- Install LDAP [ Tivoli Directory Server | Domino Directory | Novell eDirectory | Sun Java System Directory Server | Active Directory Application Mode]
- Tivoli Directory Server | Domino Directory | Active Directory | Novell eDirectory | Sun Java System Directory Server | Active Directory Application Mode]
- Tivoli Directory Server | Domino Directory | Novell eDirectory | Sun Java System Directory Server | Active Directory Application Mode]
- Tivoli Directory Server | Domino Directory | Active Directory | Novell eDirectory | Sun Java System Directory Server | Active Directory Application Mode]
- Verify LDAP
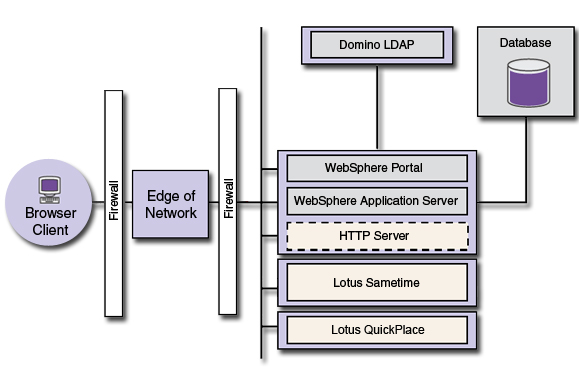
WebSphere Portal with Lotus Domino Integration
This scenario focuses on the products and components that are important for setting up a collaborative portal environment. Also, if you already have WebSphere Portal installed, we can enable collaboration by installing and configuring the required products.
- WebSphere Portal
- Prepare the operating system [ AIX |HP-UX |Linux | Solaris | Windows ]
- Plan for WebSphere Portal
- Install WebSphere Portal
- Verify WebSphere Portal
- Configure databases
- Plan for databases [ DB2 | DB2 for z/OS | Oracle | SQL Server ]
- Install databases [ DB2 | DB2 for z/OS | Oracle | SQL Server ]
- Create databases and users [ DB2 | DB2 for z/OS | Oracle | SQL Server ]
- Transferring all domains [ DB2 | DB2 for z/OS | Oracle | SQL Server ]
- Verify database connections
- LDAP user registry
- Install LDAP [ Tivoli Directory Server | Domino Directory | Novell eDirectory | Sun Java System Directory Server | Active Directory Application Mode]
- Tivoli Directory Server | Domino Directory | Active Directory | Novell eDirectory | Sun Java System Directory Server | Active Directory Application Mode]
- Tivoli Directory Server | Domino Directory | Novell eDirectory | Sun Java System Directory Server | Active Directory Application Mode]
- Tivoli Directory Server | Domino Directory | Active Directory | Novell eDirectory | Sun Java System Directory Server | Active Directory Application Mode]
- Verify LDAP
- Lotus Domino Integration
- Plan a portal with Domino Integration
- Lotus QuickPlace | Lotus Sametime ]
- Lotus QuickPlace | Lotus Sametime ]
- Confirming installation of Domino and Extended Products Portlets components
WebSphere Portal with extended security using an external security manager
This scenario focuses on using WebSphere Portal with an external security manager, such as IBM Tivoli Access Manager for e-business, to extend authentication or add authorization.

- WebSphere Portal
- Prepare the operating system [ AIX |HP-UX |Linux | Solaris | Windows ]
- Plan for WebSphere Portal
- Install WebSphere Portal
- Verify WebSphere Portal
- Configure databases
- Plan for databases [ DB2 | DB2 for z/OS | Oracle | SQL Server ]
- Install databases [ DB2 | DB2 for z/OS | Oracle | SQL Server ]
- Create databases and users [ DB2 | DB2 for z/OS | Oracle | SQL Server ]
- Transferring all domains [ DB2 | DB2 for z/OS | Oracle | SQL Server ]
- Verify database connections
- LDAP user registry
- Install LDAP [ Tivoli Directory Server | Domino Directory | Novell eDirectory | Sun Java System Directory Server | Active Directory Application Mode]
- Tivoli Directory Server | Domino Directory | Active Directory | Novell eDirectory | Sun Java System Directory Server | Active Directory Application Mode]
- Tivoli Directory Server | Domino Directory | Novell eDirectory | Sun Java System Directory Server | Active Directory Application Mode]
- Tivoli Directory Server | Domino Directory | Active Directory | Novell eDirectory | Sun Java System Directory Server | Active Directory Application Mode]
- Verify LDAP
- External security managers (Choose either Tivoli Access Manager or Computer Associates eTrust SiteMinder)
- Use Tivoli Access Manager with WebSphere Portal
- Configure Tivoli Access Manager to perform authentication only
- Configure Tivoli Access Manager to perform authorization
- Configure the Credential Vault adapter for Tivoli Access Manager
- Use eTrust SiteMinder with WebSphere Portal
- Configure eTrust SiteMinder to perform authentication for WebSphere Portal
- Configure eTrust SiteMinder to perform authorization for WebSphere Portal
WebSphere Portal in a cluster environment
This scenario focuses on installing WebSphere Portal in a cluster environment.

- Prepare the operating system [ AIX |HP-UX |Linux | Solaris | Windows ]
- Clustering and WebSphere Portal
WebSphere Portal and Web Content Management
This scenario focuses on using Web Content Management with WebSphere Portal to create and manage Web content.

Web Content Management technology is included with WebSphere Portal by default. With Web Content Management we can manage the creation and design of Web pages, including a site's framework and navigation, and oversee the entire Web content lifecycle from creation to publication.
To use the authoring capability of Web Content Management, manually install the Authoring portlet. For more information, refer to Install the Authoring portlet.
[Back to installation scenarios]
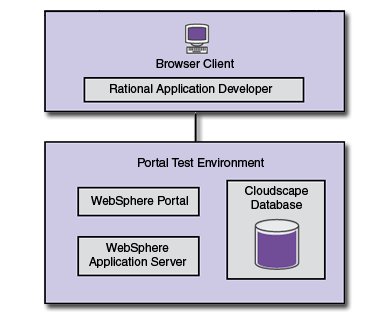
Local debug portlet development environment
This scenario focuses on installing Rational Application Developer and WebSphere Portal for portlet development.

Rational Application Developer is installed, go to...
RAD_HOME\rad_prod\install.htmlFor example...
C:\Program Files\IBM\Rational\SDP\6.0\rad_prod\install.htmlIf Rational Application Developer is not installed go to http://www.elink.ibmlink.ibm.com/public/applications/publications/cgibin/pbi.cgi and search on "Rational Application Developer "
For more information, see...
http://www.ibm.com/software/awdtools/developer/application/[Back to installation scenarios]
Remote server attach portlet development environment
This scenario focuses on installing Rational Application Developer and WebSphere Portal for portlet development.
Install WebSphere Portal on the server using one of the following installation paths:
Custom installation
This scenario focuses on allowing you to create a scenario that suits your specific business needs. After you have become familiar with the other scenarios on this page, we can create your own custom scenario. Choose from the following components to get started.
Refer to the following instructions for each component:
- WebSphere Portal
- Configure databases
- LDAP user registry
- Lotus Domino Integration
- External security managers
- Rational Application Developer
i5/OS installation scenarios
To install WebSphere Portal for iSeries with WAS v6.0.2.7 or higher, WAS must be installed into the default installation directory. If WAS is not installed in the default installation directory, WebSphere Portal cannot be installed.
Install and configure WebSphere Portal for iSeries
This scenario focuses on locally or remotely installing WebSphere Portal and performing a basic configuration using the Install and configure option of the installation program. This scenario results in a functional portal configuration that might require manual adjustments through the use of configuration tasks.
Refer to the following instructions:
- Make the plans
- Verify that the system meets all hardware and software requirements.
- Prepare the iSeries machine
- Install WebSphere Portal
Installing and configuring will...
- Copy install image files
- Create a WAS profile (wp_profile)
- Add files into the WAS profile.
- Perform a basic configuration of WebSphere Portal on the profile
- Launch a configuration wizard to complete database and security configuration tasks.
If an installation has already been completed, running the installation program again presents the default option of Config only. This option allows the addition of more than one portal on the same iSeries server where WebSphere Portal was installed. This option has the identical functions as the Install and configure option.
- Install IBM Tivoli License Compliance Manager.
While it is installable, IBM Tivoli License Compliance Manager is not supported at this time on i5/OS.
- Verify and launch WebSphere Portal .
- Add any optional WebSphere Portal components not included in this installation scenario.
- To install more than one copy of WebSphere Portal on the same machine, repeat this installation scenario, starting with this step.
Install only. Configure WebSphere Portal later
- Make the plans
- Verify that the system meets all hardware and software requirements.
- Prepare the iSeries machine
- Install WebSphere Portal
- When the Install only option finishes, the install image files are merely copied from the Setup CD to the hard drive. At this point the CD is no longer required, and we can continue installation remotely by starting install400.bat from a mapped drive on a Windows PC, or locally by starting the install.sh file on the iSeries machine. You must choose the Install and configure option of installation scenario 1 to complete the installation of WebSphere Portal.
- At the completion of the installation program, the Cloudscape database is installed and can be used if you are installing a test environment. But for a production environment, use the DB2 for iSeries database, which is native to iSeries. We can start with this file to complete the modification and configuration steps to set up WebSphere Portal to work with DB2 for iSeries, see Configure databases.
- Database configuring is not required when installing on a secondary node in a cluster.
- If you choose to transfer from Cloudscape to DB2 for iSeries, there is no option to transfer back to Cloudscape.
- Configure WebSphere Portal for use with the HTTP server
- Document Rendering on i5/OS
- Add any optional WebSphere Portal components not included in this installation scenario.
- Install IBM Tivoli License Compliance Manager.
While it is installable, IBM Tivoli License Compliance Manager is not supported at this time on i5/OS.
- Verify and launch WebSphere Portal .
Optional components
The following components are optional, and can be added after completing one of the previous installation scenarios.
Refer to the following instructions for each component:
- Security is enabled on an LDAP server when the installation program installs and configuresWebSphere Portal. If you wish to use another type of server for security, please review the Database user registry overview. If you wish to use an external security manager, review the section on External security managers.
- OS/400 - Additional Fonts (5722SS1, Option 43)
- Here is the LDAP section.
- Set up the Tivoli Directory Server, and configure an -i5/OS Tivoli Directory Server over SSL.
- Lotus Collaborative Services
- About the Domino and Extended Products Portlets
- http://www.ibm.com/software/awdtools/developer/application/ Rational Application Developer
- To optimize the WebSphere Portal software and create portlets , install IBM WebSphere Portlet Factory. IBM WebSphere Portlet Factory provides a way to build portlets. This Eclipse-based development tool speeds and simplifies portlet construction by making it easy to create complex portlets without coding.