OpenShift Applications
- Projects
- Create a project as another user
- Configure project creation
- Operators
- Operator Lifecycle Manager
- ClusterServiceVersions (CSVs)
- Operator Lifecycle Manager architecture
- Operator Lifecycle Manager Operator
- Catalog Operator
- Catalog Registry
- OperatorGroups
- OperatorGroup membership
- Troubleshoot OperatorGroup membership
- Target namespace selection
- OperatorGroup ClusterServiceVersion annotations
- Provided APIs annotation
- Role-based access control
- Copied ClusterServiceVersions
- Static OperatorGroups
- OperatorGroup intersection
- Rules for intersection
- OperatorHub
- Add Operators to a cluster
- Delete Operators from a cluster
- Create applications from installed Operators
- Manage resources from Custom Resource Definitions
- Create applications
- Create an application using the CLI
- Create an application from source code
- Local
- Remote
- Build strategy detection
- Language Detection
- Create an application from an image
- DockerHub MySQL image
- Image in a private registry
- Existing imagestream and optional imagestreamtag
- Create an application from a template
- Template Parameters
- Modify application creation
- Specify environment variables
- Specify build environment variables
- Searching for images, templates, and other inputs
- Install the service catalog
- Provision template applications
- Uninstall the Template Service Broker
- Install the OpenShift Ansible Broker
- Configure the OpenShift Ansible Broker
- Provision service bundles
- Uninstall the OpenShift Ansible Broker
- Understanding Deployments and DeploymentConfigs
- Manage deployment processes
- Manage DeploymentConfigs
- Starting a deployment
- View a deployment
- Retrying a deployment
- Rolling back a deployment
- Execute commands inside a container
- View deployment logs
- Deployment triggers
- Set deployment triggers
- Set deployment resources
- Scaling manually
- Access private repositories from DeploymentConfigs
- Assign pods to specific nodes
- Run a Pod with a different service account
- Use DeploymentConfig strategies
- Use route-based deployment strategies
- Extend the Kubernetes API with Custom Resource Definitions
- Manage resources from Custom Resource Definitions
- Resource quotas per project
- Resource quotas across multiple projects
- Idling applications
- Unidling applications
- Hard pruning the registry
- Operator SDK
- Architecture of the Operator SDK
- Workflow
- Manager file
- Prometheus Operator support
- Install the Operator SDK CLI
- Install from GitHub release
- Install from Homebrew
- Compile and install from source
- Build a Go-based Memcached Operator using the Operator SDK
- Manage a Memcached Operator using the Operator Lifecycle Manager
- Additional resources
- Create Ansible-based Operators
- Ansible support in the Operator SDK
- Custom Resource files
- Watches file
- Advanced options
- Extra variables sent to Ansible
- Ansible Runner directory
- Install the Operator SDK CLI
- Install from GitHub release
- Install from Homebrew
- Compile and install from source
- Build an Ansible-based Operator using the Operator SDK
- Manage application lifecycle using the k8s Ansible module
- Install the k8s Ansible module
- Test the k8s Ansible module locally
- Test the k8s Ansible module inside an Operator
- Testing an Ansible-based Operator locally
- Testing an Ansible-based Operator on a cluster
- Manage Custom Resource status using the k8s_status Ansible module
- Use the k8s_status Ansible module when testing locally
- Additional resources
- Create Helm-based Operators
- Generate a ClusterServiceVersion (CSV)
- How ClusterServiceVersion generation works
- ClusterServiceVersion composition configuration
- Manually-defined ClusterServiceVersion fields
- Generate a CSV
- Custom Resource Definitions (CRDs)
- Owned Custom Resource Definitions
- Required Custom Resource Definitions
- Custom Resource Definition templates
- Understanding your API services
- Owned APIServices
- Required APIServices
- Configure built-in monitoring with Prometheus
- Configure leader election
- Operator SDK CLI reference
- Appendices
Projects
Projects allow user communities to organize and manage content in isolation from other communities.
If allowed by the cluster administrator, we can create a new project.
For example:
The number of projects we can create may be limited by the system administrator. After our limit is reached, we might have to delete an existing project in order to create a new one. Click the Resources button to see workloads in the project. Click the Dashboard button to see metrics and details about the project.
When viewing projects, we are restricted to seeing only the projects we have access to view based on the authorization policy.
Run:
This command provides a high-level overview of the current project, with its components and their relationships.
When we delete a project, the server updates the project status to Terminating from Active. Then, the server clears all content from a project in the Terminating state before finally removing the project. While a project is in Terminating status, we cannot add new content to the project. Projects can be deleted from the CLI or the web console.
Impersonation allows us to create a project as a different user.
Requests to the OpenShift API can include an Impersonate-User header, which indicates that the requester wants the request handled as though it came from the specified user.
Before User A can impersonate User B, User A is authenticated. Then, an authorization check occurs to ensure that User A is allowed to impersonate the user named User B. If User A is requesting to impersonate a service account, system:serviceaccount:namespace:name, OpenShift confirms that User A can impersonate the serviceaccount named name in namespace. If the check fails, the request fails with a 403 (Forbidden) error code.
By default, project administrators and editors can impersonate service accounts in their namespace. The sudoers role allows a user to impersonate system:admin, which in turn has cluster administrator permissions. The ability to impersonate system:admin grants some protection against typos, but not security, for someone administering the cluster. For example, running oc delete nodes --all fails, but running oc delete nodes --all --as=system:admin succeeds.
We can impersonate a different user when creating a project request. Because system:authenticated:oauth is the only bootstrap group that can create project requests, we must impersonate that group.
In OpenShift, projects are used to group and isolate related objects. When requests are made to create a new project using the web console or oc new-project command, an endpoint in OpenShift is used to provision the project according to a template, which can be customized.
We can allow and configure how developers and service accounts can create, or self-provision, their own projects.
The OpenShift API server automatically provisions new projects based on the project template identified by the projectRequestTemplate parameter in the cluster's project configuration resource. If the parameter is not defined, the API server creates a default template that creates a project with the requested name, and assigns the requesting user to the admin role for that project.
When a project request is submitted, the API substitutes the following parameters into the template:
Default project template parameters
Access to the API is granted to developers with the self-provisioner role and the self-provisioners cluster role binding. This role is available to all authenticated developers by default.
We can modify the default project template so that new projects are created using our custom requirements.
To create our own custom project template:
Project configuration resource with custom project template
We can prevent an authenticated user group from self-provisioning new projects.
Review the subjects in the self-provisioners section.
Consider customizing this project request message to provide more helpful instructions specific to our organization.
When a developer or a service account that is unable to self-provision projects makes a project creation request using the web console or CLI, the following error message is returned by default:
Cluster administrators can customize this message. Consider updating it to provide further instructions on how to request a new project specific to our organization. For example:
To customize the project request message:
Project configuration resource with custom project request message
For example:
Operators monitor a Kubernetes environment (such as OpenShift), using the current state to make decisions in real time, including upgrades and failures. Operators package, deploy, and manage Kubernetes applications.
Operators provide:
Kubernetes (and by extension, OpenShift) contains all of the primitives needed to build complex distributed systems....
An Operator uses the Kubernetes' extension mechanism, Custom Resource Definitions (CRDs), so a custom object, for example MongoDB, looks and acts just like the built-in, native Kubernetes objects.
A Service Broker is a step towards programmatic discovery and deployment of an app. However, because it is not a long running process, it cannot execute Day 2 operations like upgrade, failover, or scaling. Customizations and parameterization of tunables are provided at install time, versus an Operator that is constantly watching the cluster's current state. Off-cluster services continue to be a good match for a Service Broker, although Operators exist for these as well.
The Operator Framework is a family of open source tools used for testing, delivering, and updating Operators.
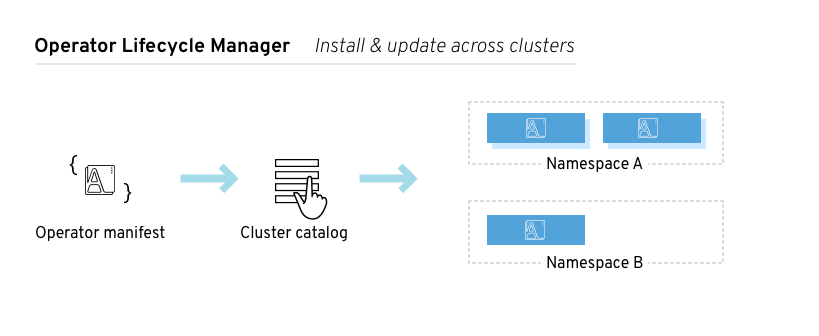
The Operator Lifecycle Manager (OLM) manages the lifecycle of all Operators and their associated services. Operator Lifecycle Manager is part of the Operator Framework used to manage Kubernetes native applications (Operators).
The Operator Lifecycle Manager runs by default in OpenShift 4.1, and is used in installing, upgrading, and granting access to Operators running on the cluster. The OpenShift web console provides management screens for cluster administrators to install Operators, as well as grant specific projects access to use the catalog of Operators available on the cluster.
Developers can provision databases instances, monitoring, and big data services.
A ClusterServiceVersion (CSV) is a YAML manifest created from Operator metadata that assists the Operator Lifecycle Manager (OLM) in running the Operator in a cluster. ClusterServiceVersions are the metadata that accompany an Operator container image, and are used to populate user interfaces with information like logo, description, and version. ClusterServiceVersions are also a source of technical information needed to run the Operator, like the required RBAC rules and which Custom Resources (CRs) it manages or depends on.
A ClusterServiceVersion is composed of:
The Operator Lifecycle Manager (OLM) is composed of two Operators:
Each of these Operators are responsible for managing the Custom Resource Definitions (CRDs) that are the basis for the Operator Lifecycle Manager framework:
Custom Resource Definitions are managed by Operator Lifecycle Manager and Catalog Operators
Each of these Operators are also responsible for creating resources:
The Operator Lifecycle Manager Operator deploys applications defined by ClusterServiceVersion resources after the required resources specified in the ClusterServiceVersion are present in the cluster.
The Operator Lifecycle Manager Operator is not concerned with the creation of the required resources; users can choose to manually create these resources using the CLI, or users can choose to create these resources using the Catalog Operator. This separation of concern enables users incremental buy-in in terms of how much of the Operator Lifecycle Manager framework they choose to leverage for their application.
While the Operator Lifecycle Manager Operator is often configured to watch all namespaces, it can also be operated alongside other Operator Lifecycle Manager Operators so long as they all manage separate namespaces.
OLM Operator workflow
A ClusterServiceVersion must be an active member of an OperatorGroup in order for the install strategy to be run.
The Catalog Operator resolves and installs ClusterServiceVersions and their specified resources. It is also responsible for watching CatalogSources for updates to packages in channels and upgrading them (optionally automatically) to the latest available versions.
To track a package in a channel create a Subscription resource configuring the desired package, channel, and the CatalogSource from which to pull updates. When updates are found, an appropriate InstallPlan is written into the namespace on behalf of the user.
We can also create an InstallPlan resource directly, containing the names of the desired ClusterServiceVersion and an approval strategy, and the Catalog Operator creates an execution plan for the creation of all of the required resources. After approval, the Catalog Operator creates all of the resources in an InstallPlan; this then independently satisfies the Operator Lifecycle Manager Operator, which proceeds to install the ClusterServiceVersions.
Catalog Operator workflow
The Catalog Registry stores Custom Resource Definitions and ClusterServiceVersions for creation in a cluster and stores metadata about packages and channels.
A package manifest is an entry in the Catalog Registry that associates a package identity with sets of ClusterServiceVersions. Within a package, channels point to a particular CSV. Because ClusterServiceVersions explicitly reference the ClusterServiceVersion that they replace, a package manifest provides the Catalog Operator all of the information that is required to update a ClusterServiceVersion to the latest version in a channel (stepping through each intermediate version).
An OperatorGroup is an Operator Lifecycle Manager resource that provides multitenant configuration to Operator Lifecycle Manager-installed Operators. An OperatorGroup selects a set of target namespaces in which to generate required RBAC access for its member Operators. The set of target namespaces is provided by a comma-delimited string stored in the CSV's olm.targetNamespaces annotation. This annotation is applied to member Operator's ClusterServiceVersion instances and is projected into their deployments.
An Operator is considered a member of an OperatorGroup if the following conditions are true:
An InstallMode consists of an InstallModeType field and a boolean Supported field. A CSV's spec can contain a set of InstallModes of four distinct InstallModeTypes:
If a CSV's spec omits an entry of InstallModeType, then that type is considered unsupported unless support can be inferred by an existing entry that implicitly supports it.
Specify the set of namespaces for the OperatorGroup using a label selector with the spec.selector field:
We can also explicitly name the target namespaces using the spec.targetNamespaces field:
If both spec.targetNamespaces and spec.selector are defined, spec.selector is ignored.
Alternatively, we can omit both spec.selector and spec.targetNamespaces to specify a global OperatorGroup, which selects all namespaces:
The resolved set of selected namespaces is shown in an OperatorGroup's status.namespaces field. A global OperatorGroup's status.namespace contains the empty string (""), which signals to a consuming Operator that it should watch all namespaces.
Member ClusterServiceVersions of an OperatorGroup have the following annotations:
All annotations except olm.targetNamespaces are included with copied ClusterServiceVersions. Omitting the olm.targetNamespaces annotation on copied ClusterServiceVersions prevents the duplication of target namespaces between tenants.
Information about what GroupVersionKinds (GVKs) are provided by an OperatorGroup are shown in an olm.providedAPIs annotation. The annotation's value is a string consisting of <kind>.<version>.<group> delimited with commas. The GVKs of Custom Resource Definitions and APIServices provided by all active member ClusterServiceVersions of an OperatorGroup are included.
Review the following example of an OperatorGroup with a single active member CSV that provides the PackageManifest resource:
When an OperatorGroup is created, three ClusterRoles are generated. Each contains a single AggregationRule with a ClusterRoleSelector set to match a label, as shown below:
The following RBAC resources are generated when a CSV becomes an active member of an OperatorGroup, as long as the ClusterServiceVersion is watching all namespaces with the AllNamespaces InstallMode and is not in a failed state with reason InterOperatorGroupOwnerConflict.
ClusterRoles generated for each API resource from a Custom Resource Definition
Aggregation labels:
Aggregation labels:
Aggregation labels:
Aggregation labels:
ClusterRoles generated for each API resource from an APIService
Aggregation labels:
Aggregation labels:
Aggregation labels:
Additional Roles and RoleBindings
Operator Lifecycle Manager creates copies of all active member ClusterServiceVersions of an OperatorGroup in each of that OperatorGroup's target namespaces. The purpose of a copied ClusterServiceVersion is to tell users of a target namespace that a specific Operator is configured to watch resources created there. Copied ClusterServiceVersions have a status reason Copied and are updated to match the status of their source CSV. The olm.targetNamespaces annotation is stripped from copied ClusterServiceVersions before they are created on the cluster. Omitting the target namespace selection avoids the duplication of target namespaces between tenants. Copied ClusterServiceVersions are deleted when their source ClusterServiceVersion no longer exists or the OperatorGroup that their source ClusterServiceVersion belongs to no longer targets the copied CSV's namespace.
An OperatorGroup is static if its spec.staticProvidedAPIs field is set to true. As a result, Operator Lifecycle Manager does not modify the OperatorGroup's olm.providedAPIs annotation, which means that it can be set in advance. This is useful when a user wants to use an OperatorGroup to prevent resource contention in a set of namespaces but does not have active member ClusterServiceVersions that provide the APIs for those resources.
Below is an example of an OperatorGroup that protects Prometheus resources in all namespaces with the something.cool.io/cluster-monitoring: "true" annotation:
Two OperatorGroups are said to have intersecting provided APIs if the intersection of their target namespace sets is not an empty set and the intersection of their provided API sets, defined by olm.providedAPIs annotations, is not an empty set.
A potential issue is that OperatorGroups with intersecting provided APIs can compete for the same resources in the set of intersecting namespaces.
When checking intersection rules, an OperatorGroup's namespace is always included as part of its selected target namespaces.
Each time an active member ClusterServiceVersion synchronizes, Operator Lifecycle Manager queries the cluster for the set of intersecting provided APIs between the ClusterServiceVersion's OperatorGroup and all others. Operator Lifecycle Manager then checks if that set is an empty set:
Failure states caused by OperatorGroups are non-terminal.
The following actions are performed each time an OperatorGroup synchronizes:
The Operator Lifecycle Manager exposes certain Operator Lifecycle Manager-specific resources for use by the Prometheus-based OpenShift cluster monitoring stack.
Metrics exposed by Operator Lifecycle Manager
The OperatorHub interface is used to discover and install Operators. With one click, an Operator...
Cluster administrators can choose from OperatorSource grouped into the following categories:
The OperatorHub component is installed and run as an Operator by default on OpenShift in the openshift-marketplace namespace.
The OperatorHub component's Operator manages two Custom Resource Definitions (CRDs): an operatorsource_crd.yaml and a CatalogSourceConfig.
Although some OperatorSource and CatalogSourceConfig information is exposed through the OperatorHub user interface, those files are only used directly by those who are creating their own Operators.
An OperatorSource defines the external data store for Operator bundles. A basic OperatorSource includes:
An Operator's CatalogSourceConfig enables Operators present in the OperatorSource on the cluster.
A basic CatalogSourceConfig yaml file identifies:
We can install an Operator from the OperatorHub using the OpenShift web console or the CLI. We can then subscribe the Operator to one or more namespaces to make it available for developers on the cluster.
During installation, determine the following initial settings for the Operator:
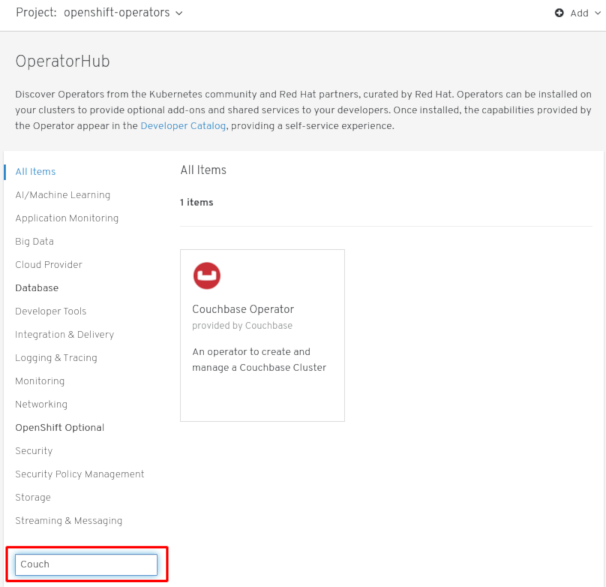
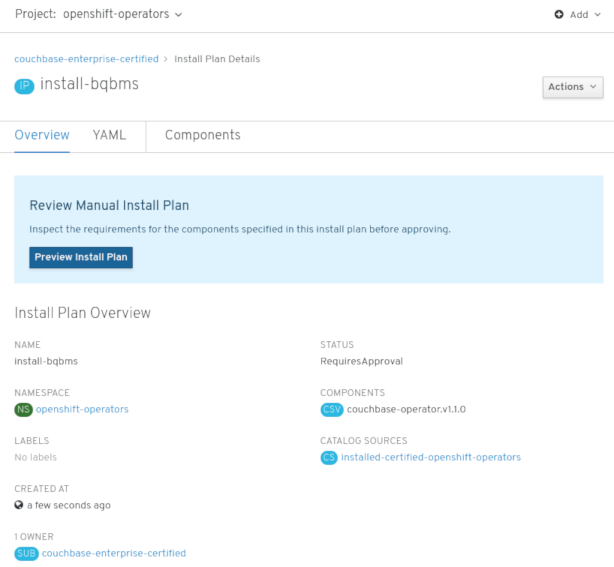
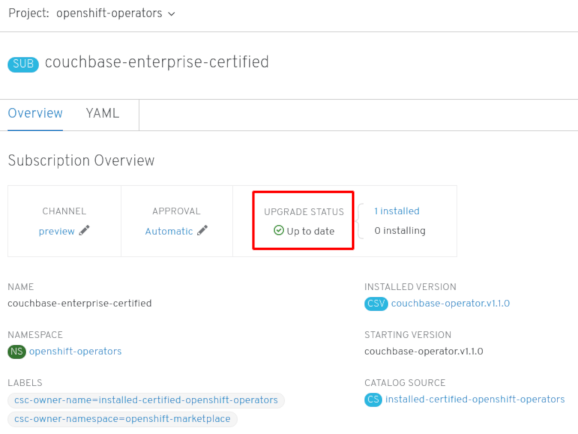
This procedure uses the Couchbase Operator as an example to install and subscribe to an Operator from the OperatorHub using the OpenShift web console.
Prerequisites
Procedure
For a Community Operator, we are warned that Red Hat does not certify those Operators. Acknowledge the warning before continuing. Information about the Operator is displayed.
After approving on the Install Plan page, the Subscription upgrade status moves to Up to date.
For the All namespaces Installation Mode, the status resolves to InstallSucceeded in the openshift-operators namespace, but the status is Copied if you check in other namespaces.
If it does not:
We can install an Operator from the OperatorHub using the CLI with the oc command to create or update a CatalogSourceConfig object, then add a Subscription object.
The web console version of this procedure handles the creation of the CatalogSourceConfig and Subscription objects behind the scenes, appearing as if it was one step.
Prerequisites
Procedure
Example CatalogSourceConfig
The Operator generates a CatalogSource from the CatalogSourceConfig in the namespace specified in targetNamespace.
Example Subscription yaml file
At this point, the OLM is now aware of the selected Operator. A ClusterServiceVersion (CSV) for the Operator should appear in the target namespace, and APIs provided by the Operator should be available for creation.
Example updated CatalogSourceConfig
Additional resources
To delete (uninstall) an Operator from the cluster, we can simply delete the subscription to remove it from the subscribed namespace. If we want a clean slate, we can also remove the operator ClusterServiceVersion and deployment, then delete Operator's entry in the CatalogSourceConfig. The following text describes how to delete Operators from a cluster using either the web console or the command line.
To delete an installed Operator from the selected namespace through the web console:
Although the Operator is no longer installed or receiving updates, that Operator will still appear on the Operator Catalogs list, ready to re-subscribe. To remove the Operator from that listing, we can delete the Operator's entry in the CatalogSourceConfig from the command line (as shown in last step of "Deleting operators from a cluster using the CLI").
Instead of using the OpenShift web console, we can delete an Operator from the cluster using the CLI to delete the Subscription and ClusterServiceVersion from the targetNamespace, then editing the CatalogSourceConfig to remove the Operator's package name.
Prerequisites
In this example, there are two Operators (Jaeger and Descheduler) installed in the openshift-operators namespace. The goal is to remove Jaeger without removing Descheduler.
Procedure
For example, the spec section might appear as follows:
Example of CatalogSourceConfig
Remove the package from the packages line, as shown:
Save the change and the marketplace-operator will reconcile the CatalogSourceConfig.
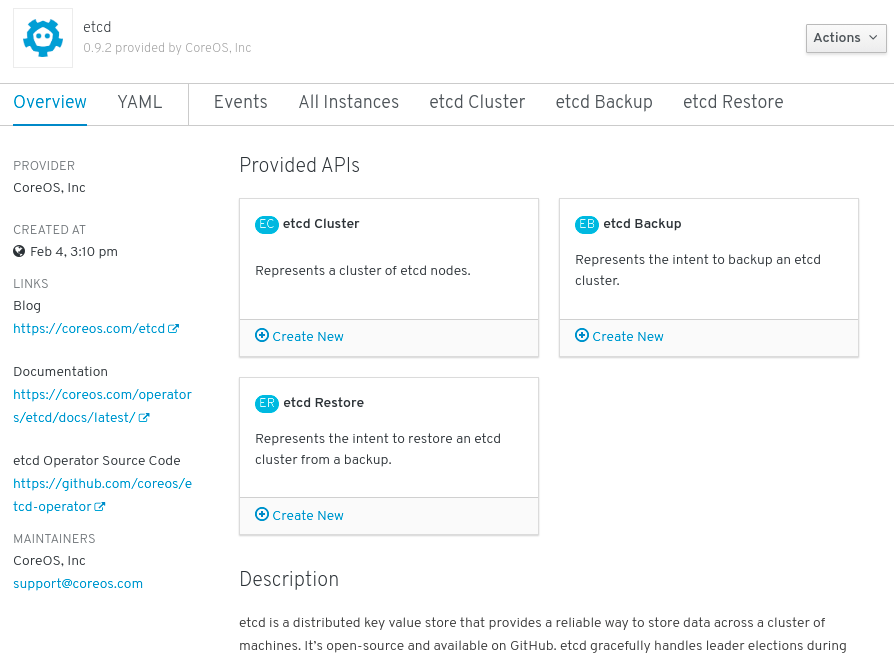
This procedure walks through creating a new etcd using the etcd Operator, managed by the Operator Lifecycle Manager (OLM).
Prerequisites
We can get this list from the CLI using:
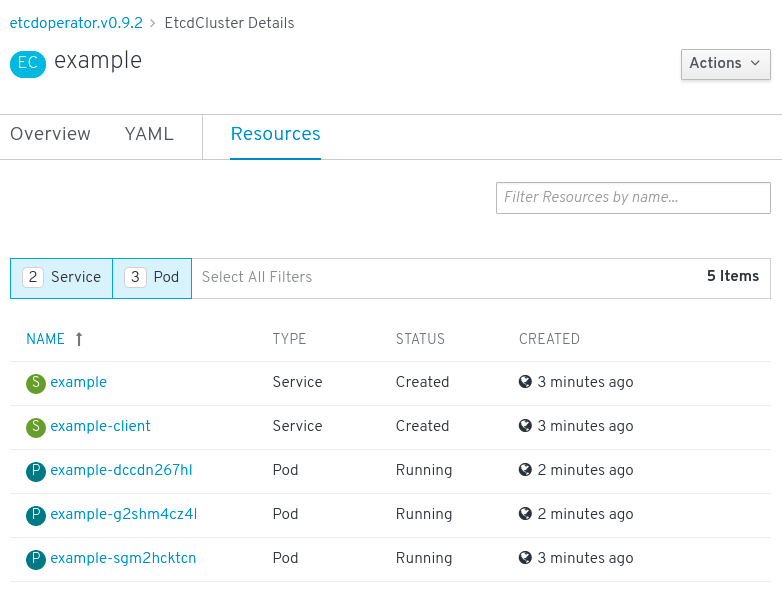
As shown under Provided APIs, this Operator makes available three new resource types, including one for an etcd Cluster (the EtcdCluster resource). These objects work similar to the built-in native Kubernetes ones, such as Deployments or ReplicaSets, but contain logic specific to managing etcd.
Verify that a Kubernetes service has been created that allows us to access the database from other Pods in our project.
You now have an etcd cluster that will react to failures and rebalance data as Pods become unhealthy or are migrated between nodes in the cluster. Most importantly, cluster administrators or developers with proper access can now use the database with their applications.
In the Kubernetes API, a resource is an endpoint that stores a collection of API objects of a certain kind. For example, the built-in Pods resource contains a collection of Pod objects.
A Custom Resource Definition (CRD) object defines a new, unique object Kind in the cluster and lets the Kubernetes API server handle its entire lifecycle.
Custom Resource (CR) objects are created from Custom Resource Definitions that have been added to the cluster by a cluster administrator, allowing all cluster users to add the new resource type into projects.
Operators in particular make use of Custom Resource Definitions by packaging them with any required RBAC policy and other software-specific logic. Cluster administrators can also add Custom Resource Definitions manually to the cluster outside of an Operator's lifecycle, making them available to all users.
While only cluster administrators can create Custom Resource Definitions, developers can create the CR from an existing Custom Resource Definition if they have read and write permission to it.
After a Custom Resource Definition (CRD) has been added to the cluster, Custom Resources (CRs) can be created with the CLI from a file using the CR specification.
Prerequisites
Example YAML file for a CR
We can inspect Custom Resource (CR) objects that exist in the cluster using the CLI.
Prerequisites
For example:
Resource names are not case-sensitive, and we can use either the singular or plural forms defined in the Custom Resource Definition, as well as any short name. For example:
We can create an OpenShift application from components that include source or binary code, images, and templates using the OpenShift CLI. The set of objects created by new-app depends on the artifacts passed as input:
With the new-app command we can create applications from source code in a local or remote Git repository.
The new-app command creates a build configuration, which itself creates a new application image from your source code. The new-app command typically also creates a deployment configuration to deploy the new image, and a service to provide load-balanced access to the deployment running the image.
OpenShift automatically detects whether the Pipeline or Source build strategy should be used, and in the case of Source builds, detects an appropriate language builder image.
To create an application from a Git repository in a local directory:
For a local Git repository, the repository must have a remote named origin that points to a URL that is accessible by the OpenShift cluster. If there is no recognized remote, running the new-app command will create a binary build.
To create an application from a remote Git repository:
To create an application from a private remote Git repository:
For a private remote Git repository, we can use the --source-secret flag to specify an existing source clone secret that will get injected into the BuildConfig to access the repository.
We can use a subdirectory of the source code repository by specifying a --context-dir flag. To create an application from a remote Git repository and a context subdirectory:
Also, when specifying a remote URL, we can specify a Git branch to use by appending #<branch_name> to the end of the URL:
If a Jenkinsfile exists in the root or specified context directory of the source repository when creating a new application, OpenShift generates a Pipeline build strategy.
Otherwise, it generates a Source build strategy.
Override the build strategy by setting the --strategy flag to either pipeline or source.
The oc command requires that files containing build sources are available in a remote Git repository. For all source builds, use git remote -v.
If we use the Source build strategy, new-app attempts to determine the language builder to use by the presence of certain files in the root or specified context directory of the repository:
Languages Detected by new-app
After a language is detected, new-app searches the OpenShift server for imagestreamtags that have a supports annotation matching the detected language, or an imagestream that matches the name of the detected language. If a match is not found, new-app searches the Docker Hub registry for an image that matches the detected language based on name.
We can override the image the builder uses for a particular source repository by specifying the image, either an imagestream or container specification, and the repository with a ~ as a separator. Note that if this is done, build strategy detection and language detection are not carried out.
For example, to use the myproject/my-ruby imagestream with the source in a remote repository:
To use the `openshift/ruby-20-centos7:latest `container imagestream with the source in a local repository:
Language detection requires the Git client to be locally installed so that the repository can be cloned and inspected. If Git is not available, we can avoid the language detection step by specifying the builder image to use with the repository with the <image>~<repository> syntax.
The -i <image> <repository> invocation requires that new-app attempt to clone repository in order to determine what type of artifact it is, so this will fail if Git is not available.
The -i <image> --code <repository> invocation requires new-app clone repository in order to determine whether image should be used as a builder for the source code, or deployed separately, as in the case of a database image.
We can deploy an application from an existing image. Images can come from imagestreams in the OpenShift server, images in a specific registry, or images in the local Docker server.
The new-app command attempts to determine the type of image specified in the arguments passed to it. However, we can explicitly tell new-app whether the image is a container image using the --docker-image argument or an imagestream using the -i|--image argument.
If we specify an image from the local Docker repository, we must ensure that the same image is available to the OpenShift cluster nodes.
Create an application from the DockerHub MySQL image, for example:
Create an application using an image in a private registry, specify the full container image specification:
Create an application from an existing imagestream and optional imagestreamtag:
We can create an application from a previously stored template or from a template file, by specifying the name of the template as an argument. For example, we can store a sample application template and use it to create an application.
Create an application from a stored template, for example:
To directly use a template in the local file system, without first storing it in OpenShift, use the -f|--file argument. For example:
When creating an application based on a template, use the -p|--param argument to set parameter values defined by the template:
We can store parameters in a file, then use that file with --param-file when instantiating a template. To read the parameters from standard input, use --param-file=-:
The new-app command generates OpenShift objects that build, deploy, and run the application that is created. Normally, these objects are created in the current project and assigned names that are derived from the input source repositories or the input images. However, with new-app we can modify this behavior.
new-app output objects
When generating applications from a template, source, or an image, we can use the -e|--env argument to pass environment variables to the application container at run time:
The variables can also be read from file using the --env-file argument:
Additionally, environment variables can be given on standard input by using --env-file=-:
Any BuildConfig objects created as part of new-app processing are not updated with environment variables passed with the -e|--env or --env-file argument.
When generating applications from a template, source, or an image, we can use the --build-env argument to pass environment variables to the build container at run time:
The variables can also be read from a file using the --build-env-file argument:
Additionally, environment variables can be given on standard input by using --build-env-file=-:
When generating applications from source, images, or templates, we can use the -l|--label argument to add labels to the created objects. Labels make it easy to collectively select, configure, and delete objects associated with the application.
To see a dry-run of running the new-app command, we can use the -o|--output argument with a yaml or json value. We can then use the output to preview the objects that are created or redirect it to a file that we can edit. After we are satisfied, we can use oc create to create the OpenShift objects.
To output new-app artifacts to a file, edit them, then create them:
Objects created by new-app are normally named after the source repository, or the image used to generate them. We can set the name of the objects produced by adding a --name flag to the command:
Normally, new-app creates objects in the current project. However, we can create objects in a different project using the -n|--namespace argument:
The new-app command allows creating multiple applications specifying multiple parameters to new-app. Labels specified in the command line apply to all objects created by the single command. Environment variables apply to all components created from source or images.
To create an application from a source repository and a Docker Hub image:
If a source code repository and a builder image are specified as separate arguments, new-app uses the builder image as the builder for the source code repository. If this is not the intent, specify the required builder image for the source using the ~ separator.
The new-app command allows deploying multiple images together in a single Pod. In order to specify which images to group together, use the + separator. The --group command line argument can also be used to specify the images that should be grouped together. To group the image built from a source repository with other images, specify its builder image in the group:
To deploy an image built from source and an external image together:
To search for images, templates, and other inputs for the oc new-app command, add the --search and --list flags. For example, to find all of the images or templates that include PHP:
Create projects using the web console
Create projects using the CLI
$ oc new-project <project_name> --description="<description>" --display-name="<display_name>"
$ oc new-project hello-openshift --description="My example project" --display-name="Hello OpenShift"
View projects using the web console
View projects using the CLI
$ oc get projects
$ oc project <project_name>
Add to a project
Check project status using the web console
Check project status using the CLI
$ oc status
Delete a project using the web console
Delete a project using the CLI
$ oc delete project <project_name>
Create a project as another user
API impersonation
Impersonate a user when creating a project
$ oc new-project <project> --as=<user> --as-group=system:authenticated --as-group=system:authenticated:oauth
Configure project creation
About project creation
Parameter
Description
PROJECT_NAME
The name of the project. Required.
PROJECT_DISPLAYNAME
The display name of the project. May be empty.
PROJECT_DESCRIPTION
The description of the project. May be empty.
PROJECT_ADMIN_USER
The user name of the administrating user.
PROJECT_REQUESTING_USER
The user name of the requesting user.
Modify the template for new projects
$ oc adm create-bootstrap-project-template -o yaml > template.yaml
$ oc create -f template.yaml -n openshift-config
$ oc edit project.config.openshift.io/cluster
apiVersion: config.openshift.io/v1
kind: Project
metadata:
  ...
spec:
  projectRequestTemplate:
    name: <template_name>
Disable project self-provisioning
$ oc describe clusterrolebinding.rbac self-provisioners

Name:           self-provisioners
Labels:         <none>
Annotations:    rbac.authorization.kubernetes.io/autoupdate=true
Role:
  Kind: ClusterRole
  Name: self-provisioner
Subjects:
  Kind  Name                Namespace
  ----  ----                ---------
  Group system:authenticated:oauth
$ oc patch clusterrolebinding.rbac self-provisioners -p '{"subjects": null}'
$ oc adm policy remove-cluster-role-from-group self-provisioner system:authenticated:oauth
$ oc edit clusterrolebinding.rbac self-provisioners
apiVersion: authorization.openshift.io/v1
kind: ClusterRoleBinding
metadata:
  annotations:
    rbac.authorization.kubernetes.io/autoupdate: "false"
...$ oc patch clusterrolebinding.rbac self-provisioners -p '{ "metadata": { "annotations": { "rbac.authorization.kubernetes.io/autoupdate": "false" } } }'
$ oc new-project test

Error from server (Forbidden): You may not request a new project via this API.
Customize the project request message
You may not request a new project via this API.
$ oc edit project.config.openshift.io/cluster
apiVersion: config.openshift.io/v1
kind: Project
metadata:
  ...
spec:
  projectRequestMessage: <message_string>
apiVersion: config.openshift.io/v1
kind: Project
metadata:
  ...
spec:
  projectRequestMessage: To request a project, contact your system administrator at projectname@example.com.
Operators
Operator Framework
Operator Lifecycle Manager
ClusterServiceVersions (CSVs)
Operator Lifecycle Manager architecture
Resource
Short name
Owner
Description
ClusterServiceVersion
csv
Operator Lifecycle Manager
Application metadata: name, version, icon, required resources, installation, etc.
InstallPlan
ip
Catalog
Calculated list of resources to be created in order to automatically install or upgrade a CSV.
CatalogSource
catsrc
Catalog
A repository of ClusterServiceVersions, Custom Resource Definitions, and packages that define an application.
Subscription
sub
Catalog
Keeps ClusterServiceVersions up to date by tracking a channel in a package.
OperatorGroup
og
Operator Lifecycle Manager
Configures all Operators deployed in the same namespace as the OperatorGroup object to watch for their Custom Resource (CR) in a list of namespaces or cluster-wide.
Resource
Owner
Deployments
Operator Lifecycle Manager
ServiceAccounts
(Cluster)Roles
(Cluster)RoleBindings
Custom Resource Definitions (CRDs)
Catalog
ClusterServiceVersions (CSVs)
Operator Lifecycle Manager Operator
Catalog Operator
Catalog Registry
OperatorGroups
OperatorGroup membership
InstallModeType
Description
OwnNamespace
The Operator can be a member of an OperatorGroup that selects its own namespace.
SingleNamespace
The Operator can be a member of an OperatorGroup that selects one namespace.
MultiNamespace
The Operator can be a member of an OperatorGroup that selects more than one namespace.
AllNamespaces
The Operator can be a member of an OperatorGroup that selects all namespaces (target namespace set is the empty string "").
Troubleshoot OperatorGroup membership
Target namespace selection
apiVersion: operators.coreos.com/v1
kind: OperatorGroup
metadata:
  name: my-group
  namespace: my-namespace
  spec:
    selector:
      matchLabels:
cool.io/prod: "true"
apiVersion: operators.coreos.com/v1
kind: OperatorGroup
metadata:
  name: my-group
  namespace: my-namespace
spec:
  targetNamespaces:
  - my-namespace
  - my-other-namespace
  - my-other-other-namespace
apiVersion: operators.coreos.com/v1
kind: OperatorGroup
metadata:
  name: my-group
  namespace: my-namespace
OperatorGroup ClusterServiceVersion annotations
Annotation
Description
olm.operatorGroup=<group_name>
Contains the name of the OperatorGroup.
olm.operatorGroupNamespace=<group_namespace>
Contains the namespace of the OperatorGroup.
olm.targetNamespaces=<target_namespaces>
Contains a comma-delimited string that lists the OperatorGroup's target namespace selection.
Provided APIs annotation
apiVersion: operators.coreos.com/v1
kind: OperatorGroup
metadata:
  annotations:
    olm.providedAPIs: PackageManifest.v1alpha1.packages.apps.redhat.com
  name: olm-operators
  namespace: local
  ...
spec:
  selector: {}
  serviceAccount:
    metadata:
      creationTimestamp: null
  targetNamespaces:
  - local
status:
  lastUpdated: 2019-02-19T16:18:28Z
  namespaces:
  - local
Role-based access control
ClusterRole
Label to match
<operatorgroup_name>-admin
olm.opgroup.permissions/aggregate-to-admin: <operatorgroup_name>
<operatorgroup_name>-edit
olm.opgroup.permissions/aggregate-to-edit: <operatorgroup_name>
<operatorgroup_name>-view
olm.opgroup.permissions/aggregate-to-view: <operatorgroup_name>
ClusterRole
Sets
<kind>.<group>-<version>-admin
Verbs on <kind>:
<kind>.<group>-<version>-edit
Verbs on <kind>:
<kind>.<group>-<version>-view
Verbs on <kind>:
<kind>.<group>-<version>-view-crdview
Verbs on apiextensions.k8s.io customresourcedefinitions <crd-name>:
ClusterRole
Sets
<kind>.<group>-<version>-admin
Verbs on <kind>:
<kind>.<group>-<version>-edit
Verbs on <kind>:
<kind>.<group>-<version>-view
Verbs on <kind>:
Copied ClusterServiceVersions
Static OperatorGroups
apiVersion: operators.coreos.com/v1
kind: OperatorGroup
metadata:
  name: cluster-monitoring
  namespace: cluster-monitoring
  annotations:
    olm.providedAPIs: Alertmanager.v1.monitoring.coreos.com,Prometheus.v1.monitoring.coreos.com,PrometheusRule.v1.monitoring.coreos.com,ServiceMonitor.v1.monitoring.coreos.com
spec:
  staticProvidedAPIs: true
  selector:
    matchLabels:
      something.cool.io/cluster-monitoring: "true"
OperatorGroup intersection
Rules for intersection
Metrics
Name
Description
csv_count
Number of ClusterServiceVersions successfully registered.
install_plan_count
Number of InstallPlans.
subscription_count
Number of Subscriptions.
csv_upgrade_count
Monotonic count of CatalogSources.
OperatorHub
Category
Description
Red Hat Operators
Red Hat products packaged and shipped by Red Hat. Supported by Red Hat.
Certified Operators
Products from leading independent software vendors (ISVs). Red Hat partners with ISVs to package and ship. Supported by the ISV.
Community Operators
Optionally-visible software maintained by relevant representatives in the operator-framework/community-operators GitHub repository. No official support.
Custom Operators
Operators we add to the cluster. If we have not added any Custom Operators, the Custom category does not appear in the Web console on the OperatorHub.
OperatorHub architecture
OperatorSource
Field
Description
type
To identify the data store as an application registry, set type to appregistry.
endpoint
Currently, Quay is the external data store used by the OperatorHub, so the endpoint is set to https://quay.io/cnr for the Quay.io appregistry.
registryNamespace
For a Community Operator, this is set to community-operator.
displayName
Optionally set to a name that appears in the OperatorHub user interface for the Operator.
publisher
Optionally set to the person or organization publishing the Operator, so it can be displayed on the OperatorHub.
CatalogSourceConfig
Field
Description
targetNamespace
Location where the Operator will be deployed and updated, such as openshift-operators. This namespace is watched by the Operator Lifecycle Manager.
packages
Comma-separated list of packages in the Operator.
Add Operators to a cluster
Install Operators from the OperatorHub
Install from the OperatorHub using the web console
Install from the OperatorHub using the CLI
$ oc get packagemanifests -n openshift-marketplace
NAME                     AGE
amq-streams              14h
packageserver            15h
couchbase-enterprise     14h
mongodb-enterprise       14h
etcd                     14h
myoperator               14h
...
apiVersion: operators.coreos.com/v1
kind: CatalogSourceConfig
metadata:
  name: example
  namespace: openshift-marketplace
spec:
  targetNamespace: openshift-operators 1
  packages: myoperator 2
$ oc apply -f csc.cr.yaml
apiVersion: operators.coreos.com/v1alpha1
kind: Subscription
metadata:
  name: myoperator
  namespace: openshift-operators
spec:
  channel: alpha
  name: myoperator 1
  source: example 2
  sourceNamespace: openshift-operators
$ oc apply -f myoperator-sub.yaml
apiVersion: operators.coreos.com/v1
kind: CatalogSourceConfig
metadata:
  name: example
  namespace: openshift-marketplace
spec:
  targetNamespace: global
  packages: myoperator,another-operator 1
$ oc apply -f csc.cr.yaml
Delete Operators from a cluster
Delete Operators from a cluster using the web console


Delete Operators from a cluster using the CLI
$ oc get subscription jaeger -n openshift-operators -o yaml | grep currentCSV
currentCSV: jaeger-operator.v1.8.2
$ oc delete subscription jaeger -n openshift-operators
subscription.operators.coreos.com "jaeger" deleted
$ oc delete clusterserviceversion jaeger-operator.v1.8.2 -n openshift-operators
clusterserviceversion.operators.coreos.com "jaeger-operator.v1.8.2" deleted
$ oc get catalogsourceconfig -n openshift-marketplace \
    installed-community-openshift-operators -o yaml
spec:
  csDisplayName: Community Operators
  csPublisher: Community
  packages: jaeger,descheduler
  targetNamespace: openshift-operators
$ oc edit catalogsourceconfig -n openshift-marketplace installed-community-openshift-operators
packages: descheduler
$ oc delete catalogsourceconfig -n openshift-marketplace installed-community-openshift-operators
Create applications from installed Operators
Create an etcd cluster using an Operator
$ oc get csv
$ oc policy add-role-to-user edit <user> -n <target_project>
Manage resources from Custom Resource Definitions
Create Custom Resources from a file
apiVersion: "stable.example.com/v1" 1
kind: CronTab 2
metadata:
  name: my-new-cron-object 3
  finalizers: 4
  - finalizer.stable.example.com
spec: 5
  cronSpec: "* * * * /5"
  image: my-cron-image
$ oc create -f <file_name>.yaml
Inspect Custom Resources
$ oc get <kind>
$ oc get crontab
NAME KIND
my-new-cron-object CronTab.v1.stable.example.com$ oc get crontabs
$ oc get crontab
$ oc get ct$ oc get <kind> -o yaml
$ oc get ct -o yaml

apiVersion: v1
items:
- apiVersion: stable.example.com/v1
  kind: CronTab
  metadata:
    clusterName: ""
    creationTimestamp: 2017-05-31T12:56:35Z
    deletionGracePeriodSeconds: null
    deletionTimestamp: null
    name: my-new-cron-object
    namespace: default
    resourceVersion: "285"
    selfLink: /apis/stable.example.com/v1/namespaces/default/crontabs/my-new-cron-object
    uid: 9423255b-4600-11e7-af6a-28d2447dc82b
  spec:
    cronSpec: '* * * * /5' 1
    image: my-cron-image 2
Create applications
Create an application using the CLI
Create an application from source code
Local
$ oc new-app /<path to source code>
Remote
$ oc new-app https://github.com/sclorg/cakephp-ex
$ oc new https://github.com/youruser/yourprivaterepo --source-secret=yoursecret
$ oc new-app https://github.com/sclorg/s2i-ruby-container.git
--context-dir=2.0/test/puma-test-app
$ oc new-app https://github.com/openshift/ruby-hello-world.git#beta4
Build strategy detection
$ oc new-app /home/user/code/myapp --strategy=docker
Language Detection
Language
Files
dotnet
project.json, *.csproj
jee
pom.xml
nodejs
app.json, package.json
perl
cpanfile, index.pl
php
composer.json, index.php
python
requirements.txt, setup.py
ruby
Gemfile, Rakefile, config.ru
scala
build.sbt
golang
Godeps, main.go
$ oc new-app myproject/my-ruby~https://github.com/openshift/ruby-hello-world.git
$ oc new-app openshift/ruby-20-centos7:latest~/home/user/code/my-ruby-app
Create an application from an image
DockerHub MySQL image
$ oc new-app mysql
Image in a private registry
$ oc new-app myregistry:5000/example/myimage
Existing imagestream and optional imagestreamtag
$ oc new-app my-stream:v1
Create an application from a template
$ oc create -f examples/sample-app/application-template-stibuild.json
$ oc new-app ruby-helloworld-sample
$ oc new-app -f examples/sample-app/application-template-stibuild.json
Template Parameters
$ oc new-app ruby-helloworld-sample -p ADMIN_USERNAME=admin -p ADMIN_PASSWORD=mypassword
$ cat helloworld.params
ADMIN_USERNAME=admin
ADMIN_PASSWORD=mypassword
$ oc new-app ruby-helloworld-sample --param-file=helloworld.params
$ cat helloworld.params | oc new-app ruby-helloworld-sample --param-file=-
Modify application creation
Object
Description
BuildConfig
A BuildConfig is created for each source repository that is specified in the command line. The BuildConfig specifies the strategy to use, the source location, and the build output location.
ImageStreams
For BuildConfig, two ImageStreams are usually created. One represents the input image. With Source builds, this is the builder image. With Docker builds, this is the FROM image. The second one represents the output image. If a container image was specified as input to new-app, then an imagestream is created for that image as well.
DeploymentConfig
A DeploymentConfig is created either to deploy the output of a build, or a specified image. The new-app command creates emptyDir volumes for all Docker volumes that are specified in containers included in the resulting DeploymentConfig.
Service
The new-app command attempts to detect exposed ports in input images. It uses the lowest numeric exposed port to generate a service that exposes that port. In order to expose a different port, after new-app has completed, simply use the oc expose command to generate additional services.
Other
Other objects can be generated when instantiating templates, according to the template.
Specify environment variables
$ oc new-app openshift/postgresql-92-centos7 \
    -e POSTGRESQL_USER=user \
    -e POSTGRESQL_DATABASE=db \
    -e POSTGRESQL_PASSWORD=password
$ cat postgresql.env
POSTGRESQL_USER=user
POSTGRESQL_DATABASE=db
POSTGRESQL_PASSWORD=password
$ oc new-app openshift/postgresql-92-centos7 --env-file=postgresql.env
$ cat postgresql.env | oc new-app openshift/postgresql-92-centos7 --env-file=-
Specify build environment variables
$ oc new-app openshift/ruby-23-centos7 --build-env HTTP_PROXY=http://myproxy.net:1337/ --build-env GEM_HOME=~/.gem
$ cat ruby.env
HTTP_PROXY=http://myproxy.net:1337/
GEM_HOME=~/.gem
$ oc new-app openshift/ruby-23-centos7 --build-env-file=ruby.env
$ cat ruby.env | oc new-app openshift/ruby-23-centos7 --build-env-file=-
Specify labels
$ oc new-app https://github.com/openshift/ruby-hello-world -l name=hello-world
View the output without creation
$ oc new-app https://github.com/openshift/ruby-hello-world \
    -o yaml > myapp.yaml
$ vi myapp.yaml
$ oc create -f myapp.yaml
Create objects with different names
$ oc new-app https://github.com/openshift/ruby-hello-world --name=myapp
Create objects in a different project
$ oc new-app https://github.com/openshift/ruby-hello-world -n myproject
Create multiple objects
$ oc new-app https://github.com/openshift/ruby-hello-world mysql
Grouping images and source in a single Pod
$ oc new-app ruby+mysql
$ oc new-app \
    ruby~https://github.com/openshift/ruby-hello-world \
    mysql \
    --group=ruby+mysql
Searching for images, templates, and other inputs
$ oc new-app --search php
Install the service catalog
The service catalog is deprecated in OpenShift 4. Equivalent and better functionality is present in the Operator Framework and Operator Lifecycle Manager (OLM).
When developing microservices-based applications to run on cloud native platforms, there are many ways to provision different resources and share their coordinates, credentials, and configuration, depending on the service provider and the platform.
To give developers a more seamless experience, OpenShift includes a service catalog, an implementation of the Open Service Broker API (OSB API) for Kubernetes. This allows users to connect any of their applications deployed in OpenShift to a wide variety of service brokers.
The service catalog allows cluster administrators to integrate multiple platforms using a single API specification. The OpenShift web console displays the cluster service classes offered by service brokers in the service catalog, allowing users to discover and instantiate those services for use with their applications.
As a result, service users benefit from ease and consistency of use across different types of services from different providers, while service providers benefit from having one integration point that gives them access to multiple platforms.
The service catalog is not installed by default in OpenShift 4.
Install service catalog
If you plan on using any of the services from the OpenShift Ansible Broker or Template Service Broker, we must install the service catalog by completing the following steps.
The custom resources for the service catalog's API server and controller manager are created by default in OpenShift, but initially have a managementState of Removed. To install the service catalog, we must change the managementState for these resources to Managed.
- Enable the service catalog API server.
- Edit the service catalog API server resource.
- $ oc edit servicecatalogapiservers
- Under spec, set the managementState field to Managed:
spec:
  logLevel: Normal
  managementState: Managed
- Save the file to apply the changes.
The Operator installs the service catalog API server component. As of OpenShift 4, this component is installed into the openshift-service-catalog-apiserver namespace.
- Edit the service catalog API server resource.
- Enable the service catalog controller manager.
- Edit the service catalog controller manager resource.
- $ oc edit servicecatalogcontrollermanagers
- Under spec, set the managementState field to Managed:
spec:
  logLevel: Normal
  managementState: Managed
- Save the file to apply the changes.
The Operator installs the service catalog controller manager component. As of OpenShift 4, this component is installed into the openshift-service-catalog-controller-manager namespace.
- Edit the service catalog controller manager resource.
Install the Template Service Broker
We can install the Template Service Broker to gain access to the template applications that it provides.
The Template Service Broker is deprecated in OpenShift 4. Equivalent and better functionality is present in the Operator Framework and Operator Lifecycle Manager (OLM).
Prerequisites
About the Template Service Broker
The Template Service Broker gives the service catalog visibility into the default Instant App and Quickstart templates that have shipped with OpenShift since its initial release. The Template Service Broker can also make available as a service anything for which an OpenShift template has been written, whether provided by Red Hat, a cluster administrator or user, or a third-party vendor.
By default, the Template Service Broker shows objects that are globally available from the openshift project. It can also be configured to watch any other project that a cluster administrator chooses.
The Template Service Broker is not installed by default in OpenShift 4.
Install the Template Service Broker Operator
Prerequisites
- You have installed the service catalog.
The following procedure installs the Template Service Broker Operator using the web console.
- Create a namespace.
- Navigate in the web console to Administration - Namespaces and click Create Namespace.
- Enter openshift-template-service-broker in the Name field and click Create.
The namespace must start with openshift-.
- From the web console navigate to the Catalog - OperatorHub page. Verify that the openshift-template-service-broker project is selected.
- Select Template Service Broker Operator.
- Read the information about the Operator and click Install.
- Review the default selections and click Subscribe.
Next, we must start the Template Service Broker in order to access the template applications it provides.
Starting the Template Service Broker
After we have installed the Template Service Broker Operator, we can start the Template Service Broker using the following procedure.
Prerequisites
- You have installed the service catalog.
- You have installed the Template Service Broker Operator.
- Navigate in the web console to Catalog - Installed Operators and select the openshift-template-service-broker project.
- Select the Template Service Broker Operator.
- Under Provided APIs, click Create New for Template Service Broker.
- Review the default YAML and click Create.
- Verify that the Template Service Broker has started.
After the Template Service Broker has started, we can view the available template applications by navigating to Catalog - Developer Catalog and selecting the Service Class checkbox. Note that it may take a few minutes for the Template Service Broker to start and the template applications to be available.
If we do not yet see these Service classes, we can check the status of the following items:
- Template Service Broker Pod status
- From the Workloads - Pods page for the openshift-template-service-broker project, verify that the Pod that starts with apiserver- has a status of Running and readiness of Ready.
- Cluster service broker status
- From the Catalog - Broker Management - Service Brokers page, verify that the template-service-broker service broker has a status of Ready.
- Service catalog controller manager Pod logs
- From the Workloads - Pods page for the openshift-service-catalog-controller-manager project, review the logs for each of the Pods and verify that you see a log entry with the message Successfully fetched catalog entries from broker.
- Template Service Broker Pod status
Provision template applications
Provision template applications
The following procedure provisions an example PostgreSQL template application that was made available by the Template Service Broker.
Prerequisites
- The service catalog is installed.
- The Template Service Broker is installed.
- Create a project.
- Navigate in the web console to Home - Projects and click Create Project.
- Enter test-postgresql in the Name field and click Create.
- Create a service instance.
- From the web console navigate to the Catalog - Developer Catalog page.
- Select the PostgreSQL (Ephemeral) template application and click Create Service Instance.
- Review the default selections and set any other required fields, and click Create.
- Go to Catalog - Provisioned Services and verify that the postgresql-ephemeral service instance is created and has a status of Ready.
We can check the progress on the Home - Events page. After a few moments, you should see an event for postgresql-ephemeral with the message "The instance was provisioned successfully".
- Create a service binding.
- From the Provisioned Services page, click postgresql-ephemeral and click Create Service Binding.
- Review the default service binding name and click Create.
This creates a new secret for binding using the name provided.
- Review the secret that was created.
- From the web console navigate to Workloads - Secrets and verify that a secret named postgresql-ephemeral was created.
- Click postgresql-ephemeral and review the key-value pairs in the Data section, which are used for binding to other apps.
Uninstall the Template Service Broker
We can uninstall the Template Service Broker if you no longer require access to the template applications that it provides.
The Template Service Broker is deprecated in OpenShift 4. Equivalent and better functionality is present in the Operator Framework and Operator Lifecycle Manager (OLM).
The following procedure uninstalls the Template Service Broker and its Operator using the web console.
Do not uninstall the Template Service Broker if there are any provisioned services from it in the cluster, otherwise we might encounter errors when trying to manage the services.
Prerequisites
This procedure assumes that we installed the Template Service Broker into the openshift-template-service-broker project.
The Template Service Broker is now uninstalled, and template applications will soon be removed from the Developer Catalog.
The Template Service Broker Operator is no longer installed in the cluster.
After the Template Service Broker is uninstalled, users will no longer have access to the template applications provided by the Template Service Broker.
Uninstall the Template Service Broker
Install the OpenShift Ansible Broker
We can install the OpenShift Ansible Broker to gain access to the service bundles that it provides.
The OpenShift Ansible Broker is deprecated in OpenShift 4. Equivalent and better functionality is present in the Operator Framework and Operator Lifecycle Manager (OLM).
Prerequisites
About the OpenShift Ansible Broker
The OpenShift Ansible Broker is an implementation of the Open Service Broker (OSB) API that manages applications defined by Ansible playbook bundles (APBs). APBs provide a method for defining and distributing container applications in OpenShift, and consist of a bundle of Ansible playbooks built into a container image with an Ansible runtime. APBs leverage Ansible to create a standard mechanism to automate complex deployments.
The OpenShift Ansible Broker follows this basic workflow:
- A user requests the list of available applications from the service catalog using the OpenShift web console.
- The service catalog requests the list of available applications from the OpenShift Ansible Broker.
- The OpenShift Ansible Broker communicates with a defined container image registry to learn which APBs are available.
- The user issues a request to provision a specific APB.
- The OpenShift Ansible Broker fulfills the user's provision request by invoking the provision method on the APB.
The OpenShift Ansible Broker is not installed by default in OpenShift 4.
An Ansible playbook bundle (APB) is a lightweight application definition that allows us to leverage existing investment in Ansible roles and playbooks.
APBs use a simple directory with named playbooks to perform OSB API actions, such as provision and bind. Metadata defined in the apb.yml file contains a list of required and optional parameters for use during deployment.
Additional resources
Ansible playbook bundles
Install the OpenShift Ansible Service Broker Operator
Prerequisites
- You have installed the service catalog.
The following procedure installs the OpenShift Ansible Service Broker Operator using the web console.
- Create a namespace.
- Navigate in the web console to Administration - Namespaces and click Create Namespace.
- Enter openshift-ansible-service-broker in the Name field and openshift.io/cluster-monitoring=true in the Labels field and click Create.
The namespace must start with openshift-.
- Create a cluster role binding.
- From the web console navigate to Administration - Role Bindings and click Create Binding.
- For the Binding Type, select Cluster-wide Role Binding (ClusterRoleBinding).
- For the Role Binding, enter ansible-service-broker in the Name field.
- For the Role, select admin.
- For the Subject, choose the Service Account option, select the openshift-ansible-service-broker namespace, and enter openshift-ansible-service-broker-operator in the Subject Name field.
- Click Create.
- Create a secret to connect to the Red Hat Container Catalog.
- From the web console navigate to Workloads - Secrets. Verify that the openshift-ansible-service-broker project is selected.
- Click Create - Key/Value Secret.
- Enter asb-registry-auth as the Secret Name.
- Add a Key of username and a Value of the Red Hat Container Catalog user name.
- Click Add Key/Value and add a Key of password and a Value of the Red Hat Container Catalog password.
- Click Create.
- From the web console navigate to the Catalog - OperatorHub page. Verify that the openshift-ansible-service-broker project is selected.
- Select OpenShift Ansible Service Broker Operator.
- Read the information about the Operator and click Install.
- Review the default selections and click Subscribe.
Next, we must start the OpenShift Ansible Broker in order to access the service bundles it provides.
Starting the OpenShift Ansible Broker
After we have installed the OpenShift Ansible Service Broker Operator, we can start the OpenShift Ansible Broker using the following procedure.
Prerequisites
- You have installed the service catalog.
- You have installed the OpenShift Ansible Service Broker Operator.
- Navigate in the web console to Catalog - Installed Operators and select the openshift-ansible-service-broker project.
- Select the OpenShift Ansible Service Broker Operator.
- Under Provided APIs, click Create New for Automation Broker.
- Add the following to the spec field in the default YAML provided:
registry:
  - name: rhcc
    type: rhcc
    url: https://registry.redhat.io
    auth_type: secret
    auth_name: asb-registry-auth
This references the secret that was created when installing the OpenShift Ansible Service Broker Operator, which allows us to connect to the Red Hat Container Catalog.
- Set any additional OpenShift Ansible Broker configuration options and click Create.
- Verify that the OpenShift Ansible Broker has started.
After the OpenShift Ansible Broker has started, we can view the available service bundles by navigating to Catalog - Developer Catalog and selecting the Service Class checkbox. Note that it may take a few minutes for the OpenShift Ansible Broker to start and the service bundles to be available.
If we do not yet see these Service classes, we can check the status of the following items:
- OpenShift Ansible Broker Pod status
- From the Workloads - Pods page for the openshift-ansible-service-broker project, verify that the Pod that starts with asb- has a status of Running and readiness of Ready.
- Cluster service broker status
- From the Catalog - Broker Management - Service Brokers page, verify that the ansible-service-broker service broker has a status of Ready.
- Service catalog controller manager Pod logs
- From the Workloads - Pods page for the openshift-service-catalog-controller-manager project, review the logs for each of the Pods and verify that you see a log entry with the message Successfully fetched catalog entries from broker.
- OpenShift Ansible Broker Pod status
OpenShift Ansible Broker configuration options
We can set the following options for the OpenShift Ansible Broker.
OpenShift Ansible Broker configuration options
| YAML key | Description | Default value |
|---|---|---|
| brokerName | The name used to identify the broker instance. | ansible-service-broker |
| brokerNamespace | The namespace where the broker resides. | openshift-ansible-service-broker |
| brokerImage | The fully qualified image used for the broker. | docker.io/ansibleplaybookbundle/origin-ansible-service-broker:v4.0 |
| brokerImagePullPolicy | The pull policy used for the broker image itself. | IfNotPresent |
| brokerNodeSelector | The node selector string used for the broker's deployment. | '' |
| registries | Expressed as a yaml list of broker registry configs, allowing the user to configure the image registries the broker will discover and source its APBs from. | See the default registries array. |
| logLevel | The log level used for the broker's logs. | info |
| apbPullPolicy | The pull policy used for APB Pods. | IfNotPresent |
| sandboxRole | The role granted to the service account used to execute APBs. | edit |
| keepNamespace | Whether the transient namespace created to run the APB is deleted after the conclusion of the APB, regardless of the result. | false |
| keepNamespaceOnError | Whether the transient namespace created to run the APB is deleted after the conclusion of the APB, only in the event of an error result. | false |
| bootstrapOnStartup | Whether or not the broker should run its bootstrap routine on startup. | true |
| refreshInterval | The interval of time between broker bootstraps, refreshing its inventory of APBs. | 600s |
| launchApbOnBind | Experimental: Toggles the broker executing APBs on bind operations. | false |
| autoEscalate | Whether the broker should escalate the permissions of a user while running the APB. This should typically remain false since the broker performs originating user authorization to ensure that the user has permissions granted to the APB sandbox. | false |
| outputRequest | Whether to output the low level HTTP requests that the broker receives. | false |
Default array for registries
- type: rhcc
  name: rhcc
  url: https://registry.redhat.io
  white_list:
  - ".*-apb$"
  auth_type: secret
  auth_name: asb-registry-auth
Configure the OpenShift Ansible Broker
The OpenShift Ansible Broker is deprecated in OpenShift 4. Equivalent and better functionality is present in the Operator Framework and Operator Lifecycle Manager (OLM).
The following procedure customizes the settings for the OpenShift Ansible Broker.
Prerequisites
This procedure assumes that you used ansible-service-broker both as the OpenShift Ansible Broker name and the project that it was installed into.
For example:
We can set the following options for the OpenShift Ansible Broker.
OpenShift Ansible Broker configuration options
Default array for registries
In order for Prometheus to monitor the OpenShift Ansible Broker, create the following resources to grant Prometheus permission to access the namespace where the OpenShift Ansible Broker was installed.
Prerequisites
This procedure assumes that we installed the OpenShift Ansible Broker into the openshift-ansible-service-broker namespace.
Prometheus will now have access to OpenShift Ansible Broker metrics.
Configure the OpenShift Ansible Broker
spec:
  keepNamespace: true
  sandboxRole: edit
OpenShift Ansible Broker configuration options
YAML key
Description
Default value
brokerName
The name used to identify the broker instance.
ansible-service-broker
brokerNamespace
The namespace where the broker resides.
openshift-ansible-service-broker
brokerImage
The fully qualified image used for the broker.
docker.io/ansibleplaybookbundle/origin-ansible-service-broker:v4.0
brokerImagePullPolicy
The pull policy used for the broker image itself.
IfNotPresent
brokerNodeSelector
The node selector string used for the broker's deployment.
''
registries
Expressed as a yaml list of broker registry configs, allowing the user to configure the image registries the broker will discover and source its APBs from.
See the default registries array.
logLevel
The log level used for the broker's logs.
info
apbPullPolicy
The pull policy used for APB Pods.
IfNotPresent
sandboxRole
The role granted to the service account used to execute APBs.
edit
keepNamespace
Whether the transient namespace created to run the APB is deleted after the conclusion of the APB, regardless of the result.
false
keepNamespaceOnError
Whether the transient namespace created to run the APB is deleted after the conclusion of the APB, only in the event of an error result.
false
bootstrapOnStartup
Whether or not the broker should run its bootstrap routine on startup.
true
refreshInterval
The interval of time between broker bootstraps, refreshing its inventory of APBs.
600s
launchApbOnBind
Experimental: Toggles the broker executing APBs on bind operations.
false
autoEscalate
Whether the broker should escalate the permissions of a user while running the APB. This should typically remain false since the broker performs originating user authorization to ensure that the user has permissions granted to the APB sandbox.
false
outputRequest
Whether to output the low level HTTP requests that the broker receives.
false
- type: rhcc
  name: rhcc
  url: https://registry.redhat.io
  white_list:
  - ".*-apb$"
  auth_type: secret
  auth_name: asb-registry-auth
Configure monitoring for the OpenShift Ansible Broker
apiVersion: rbac.authorization.k8s.io/v1
kind: Role
metadata:
  name: prometheus-k8s
  namespace: openshift-ansible-service-broker
rules:
- apiGroups:
  - ""
  resources:
  - services
  - endpoints
  - pods
  verbs:
  - get
  - list
  - watch
Provision service bundles
Provision service bundles
The following procedure provisions an example PostgreSQL service bundle (APB) that was made available by the OpenShift Ansible Broker.
Prerequisites
- The service catalog is installed.
- The OpenShift Ansible Broker is installed.
- Create a project.
- Navigate in the web console to Home - Projects and click Create Project.
- Enter test-postgresql-apb in the Name field and click Create.
- Create a service instance.
- From the web console navigate to the Catalog - Developer Catalog page.
- Select the PostgreSQL (APB) service bundle and click Create Service Instance.
- Review the default selections and set any other required fields, and click Create.
- Go to Catalog - Provisioned Services and verify that the dh-postgresql-apb service instance is created and has a status of Ready.
We can check the progress on the Home - Events page. After a few moments, you should see an event for dh-postgresql-apb with the message "The instance was provisioned successfully".
- Create a service binding.
- From the Provisioned Services page, click dh-postgresql-apb and click Create Service Binding.
- Review the default service binding name and click Create.
This creates a new secret for binding using the name provided.
- Review the secret that was created.
- From the web console navigate to Workloads - Secrets and verify that a secret named dh-postgresql-apb was created.
- Click dh-postgresql-apb and review the key-value pairs in the Data section, which are used for binding to other apps.
Uninstall the OpenShift Ansible Broker
We can uninstall the OpenShift Ansible Broker if you no longer require access to the service bundles that it provides.
The OpenShift Ansible Broker is deprecated in OpenShift 4. Equivalent and better functionality is present in the Operator Framework and Operator Lifecycle Manager (OLM).
The following procedure uninstalls the OpenShift Ansible Broker and its Operator using the web console.
Do not uninstall the OpenShift Ansible Broker if there are any provisioned services from it in the cluster, otherwise we might encounter errors when trying to manage the services.
Prerequisites
This procedure assumes that we installed the OpenShift Ansible Broker into the openshift-ansible-service-broker project.
The OpenShift Ansible Broker is now uninstalled, and service bundles will soon be removed from the Developer Catalog.
The OpenShift Ansible Service Broker Operator is no longer installed in the cluster.
After the OpenShift Ansible Broker is uninstalled, users will no longer have access to the service bundles provided by the OpenShift Ansible Broker.
Uninstall the OpenShift Ansible Broker
Deployments
Understand Deployments and DeploymentConfigs
Deployments and DeploymentConfigs in OpenShift are API objects that provide two similar but different methods for fine-grained management over common user applications. They are composed of the following separate API objects:
- A DeploymentConfig or a Deployment, either of which describes the desired state of a particular component of the application as a Pod template.
- DeploymentConfigs involve one or more ReplicationControllers, which contain a point-in-time record of the state of a DeploymentConfig as a Pod template. Similarly, Deployments involve one or more ReplicaSets, a successor of ReplicationControllers.
- One or more Pods, which represent an instance of a particular version of an application.
Build blocks of a deployment
Deployments and DeploymentConfigs are enabled by the use of native Kubernetes API objects ReplicationControllers and ReplicaSets, respectively, as their building blocks.
Users do not have to manipulate ReplicationControllers, ReplicaSets, or Pods owned by DeploymentConfigs or Deployments. The deployment systems ensures changes are propagated appropriately.
If the existing deployment strategies are not suited for your use case and we must run manual steps during the lifecycle of the deployment, then you should consider creating a Custom deployment strategy.
The following sections provide further details on these objects.
A ReplicationController ensures that a specified number of replicas of a Pod are running at all times. If Pods exit or are deleted, the ReplicationController acts to instantiate more up to the defined number. Likewise, if there are more running than desired, it deletes as many as necessary to match the defined amount.
A ReplicationController configuration consists of:
A selector is a set of labels assigned to the Pods managed by the ReplicationController. These labels are included in the Pod definition that the ReplicationController instantiates. The ReplicationController uses the selector to determine how many instances of the Pod are already running in order to adjust as needed.
The ReplicationController does not perform auto-scaling based on load or traffic, as it does not track either. Rather, this requires its replica count to be adjusted by an external auto-scaler.
The following is an example definition of a ReplicationController:
Similar to a ReplicationController, a ReplicaSet is a native Kubernetes API object that ensures a specified number of pod replicas are running at any given time. The difference between a ReplicaSet and a ReplicationController is that a ReplicaSet supports set-based selector requirements whereas a replication controller only supports equality-based selector requirements.
Only use ReplicaSets if we require custom update orchestration or do not require updates at all. Otherwise, use Deployments. ReplicaSets can be used independently, but are used by deployments to orchestrate pod creation, deletion, and updates. Deployments manage their ReplicaSets automatically, provide declarative updates to pods, and do not have to manually manage the ReplicaSets that they create.
The following is an example ReplicaSet definition:
ReplicationControllers
apiVersion: v1
kind: ReplicationController
metadata:
  name: frontend-1
spec:
  replicas: 1  1
  selector:    2
    name: frontend
  template:    3
    metadata:
      labels:  4
name: frontend 5
    spec:
      containers:
      - image: openshift/hello-openshift
name: helloworld
ports:
- containerPort: 8080
  protocol: TCP
      restartPolicy: Always
ReplicaSets
apiVersion: apps/v1
kind: ReplicaSet
metadata:
  name: frontend-1
  labels:
    tier: frontend
spec:
  replicas: 3
  selector: 1
    matchLabels: 2
      tier: frontend
    matchExpressions: 3
      - {key: tier, operator: In, values: [frontend]}
  template:
    metadata:
      labels:
tier: frontend
    spec:
      containers:
      - image: openshift/hello-openshift
name: helloworld
ports:
- containerPort: 8080
  protocol: TCP
      restartPolicy: Always
DeploymentConfigs
Build on ReplicationControllers, OpenShift adds expanded support for the software development and deployment lifecycle with the concept of DeploymentConfigs. In the simplest case, a DeploymentConfig creates a new ReplicationController and lets it start up Pods.
However, OpenShift deployments from DeploymentConfigs also provide the ability to transition from an existing deployment of an image to a new one and also define hooks to be run before or after creating the ReplicationController.
The DeploymentConfig deployment system provides the following capabilities:
- A DeploymentConfig, which is a template for running applications.
- Triggers that drive automated deployments in response to events.
- User-customizable deployment strategies to transition from the previous version to the new version. A strategy runs inside a Pod commonly referred as the deployment process.
- A set of hooks (lifecycle hooks) for executing custom behavior in different points during the lifecycle of a deployment.
- Versioning of our application in order to support rollbacks either manually or automatically in case of deployment failure.
- Manual replication scaling and autoscaling.
When creating a DeploymentConfig, a ReplicationController is created representing the DeploymentConfig's Pod template. If the DeploymentConfig changes, a new ReplicationController is created with the latest Pod template, and a deployment process runs to scale down the old ReplicationController and scale up the new one.
Instances of our application are automatically added and removed from both service load balancers and routers as they are created. As long as our application supports graceful shutdown when it receives the TERM signal, we can ensure that running user connections are given a chance to complete normally.
The OpenShift DeploymentConfig object defines the following details:
- The elements of a ReplicationController definition.
- Triggers for creating a new deployment automatically.
- The strategy for transitioning between deployments.
- Lifecycle hooks.
Each time a deployment is triggered, whether manually or automatically, a deployer Pod manages the deployment (including scaling down the old ReplicationController, scaling up the new one, and running hooks). The deployment pod remains for an indefinite amount of time after it completes the Deployment in order to retain its logs of the Deployment. When a deployment is superseded by another, the previous ReplicationController is retained to enable easy rollback if needed.
Example DeploymentConfig definition
apiVersion: v1
kind: DeploymentConfig
metadata:
  name: frontend
spec:
  replicas: 5
  selector:
    name: frontend
  template: { ... }
  triggers:
  - type: ConfigChange 1
  - imageChangeParams:
      automatic: true
      containerNames:
      - helloworld
      from:
kind: ImageStreamTag
name: hello-openshift:latest
    type: ImageChange  2
  strategy:
    type: Rolling      3
- 1
A ConfigChange trigger causes a new Deployment to be created any time the ReplicationController template changes.
- 2 An ImageChange trigger causes a new Deployment to be created each time a new version of the backing image is available in the named imagestream.
- 3 The default Rolling strategy makes a downtime-free transition between Deployments.
- 2 An ImageChange trigger causes a new Deployment to be created each time a new version of the backing image is available in the named imagestream.
Deployments
Kubernetes provides a first-class, native API object type in OpenShift called Deployments. Deployments serve as a descendant of the OpenShift-specific DeploymentConfig.
Like DeploymentConfigs, Deployments describe the desired state of a particular component of an application as a Pod template. Deployments create ReplicaSets, which orchestrate Pod lifecycles.
For example, the following Deployment definition creates a ReplicaSet to bring up one hello-openshift Pod:
Deployment definition
apiVersion: apps/v1
kind: Deployment
metadata:
  name: hello-openshift
spec:
  replicas: 1
  selector:
    matchLabels:
      app: hello-openshift
  template:
    metadata:
      labels:
app: hello-openshift
    spec:
      containers:
      - name: hello-openshift
image: openshift/hello-openshift:latest
ports:
- containerPort: 80
Compare Deployments and DeploymentConfigs
Both Kubernetes Deployments and OpenShift-provided DeploymentConfigs are supported in OpenShift; however, it is recommended to use Deployments unless you need a specific feature or behavior provided by DeploymentConfigs.
The following sections go into more detail on the differences between the two object types to further help you decide which type to use.
One important difference between Deployments and DeploymentConfigs is the properties of the CAP theorem that each design has chosen for the rollout process. DeploymentConfigs prefer consistency, whereas Deployments take availability over consistency.
For DeploymentConfigs, if a node running a deployer Pod goes down, it will not get replaced. The process waits until the node comes back online or is manually deleted. Manually deleting the node also deletes the corresponding Pod. This means that we can not delete the Pod to unstick the rollout, as the kubelet is responsible for deleting the associated Pod.
However, Deployments rollouts are driven from a controller manager. The controller manager runs in high availability mode on masters and uses leader election algorithms to value availability over consistency. During a failure it is possible for other masters to act on the same Deployment at the same time, but this issue will be reconciled shortly after the failure occurs.
Currently, Deployments do not support automatically rolling back to the last successfully deployed ReplicaSet in case of a failure.
Deployments have an implicit ConfigChange trigger in that every change in the pod template of a deployment automatically triggers a new rollout. If we do not want new rollouts on pod template changes, pause the deployment:
Deployments do not yet support any lifecycle hooks.
Deployments do not support user-specified Custom deployment strategies yet.
The deployment process for Deployments is driven by a controller loop, in contrast to DeploymentConfigs which use deployer pods for every new rollout. This means that a Deployment can have as many active ReplicaSets as possible, and eventually the deployment controller will scale down all old ReplicaSets and scale up the newest one.
DeploymentConfigs can have at most one deployer pod running, otherwise multiple deployers end up conflicting while trying to scale up what they think should be the newest ReplicationController. Because of this, only two ReplicationControllers can be active at any point in time. Ultimately, this translates to faster rapid rollouts for Deployments.
Because the Deployment controller is the sole source of truth for the sizes of new and old ReplicaSets owned by a Deployment, it is able to scale ongoing rollouts. Additional replicas are distributed proportionally based on the size of each ReplicaSet.
DeploymentConfigs cannot be scaled when a rollout is ongoing because the DeploymentConfig controller will end up having issues with the deployer process about the size of the new ReplicationController.
Deployments can be paused at any point in time, meaning we can also pause ongoing rollouts. On the other hand, we cannot pause deployer pods currently, so if you try to pause a DeploymentConfig in the middle of a rollout, the deployer process will not be affected and will continue until it finishes.
Design
DeploymentConfigs-specific features
Automatic rollbacks
Triggers
$ oc rollout pause deployments/<name>
Lifecycle hooks
Custom strategies
Deployments-specific features
Rollover
Proportional scaling
Pausing mid-rollout
Manage deployment processes
Manage DeploymentConfigs
DeploymentConfigs can be managed from the OpenShift web console's Workloads page or using the oc CLI. The following procedures show CLI usage unless otherwise stated.
We can start a rollout to begin the deployment process of our application.
If a deployment process is already in progress, the command displays a message and a new ReplicationController will not be deployed.
We can view a deployment to get basic information about all the available revisions of our application.
If the current revision of the DeploymentConfig failed to deploy, we can restart the deployment process.
If the latest revision of it was deployed successfully, the command displays a message and the deployment process is not be retried.
Retrying a deployment restarts the deployment process and does not create a new deployment revision. The restarted ReplicationController has the same configuration it had when it failed.
Rollbacks revert an application back to a previous revision and can be performed using the REST API, the CLI, or the web console.
The DeploymentConfig's template is reverted to match the deployment revision specified in the undo command, and a new ReplicationController is started. If no revision is specified with --to-revision, then the last successfully deployed revision is used.
To re-enable the image change triggers:
DeploymentConfigs also support automatically rolling back to the last successful revision of the configuration in case the latest deployment process fails. In that case, the latest template that failed to deploy stays intact by the system and it is up to users to fix their configurations.
We can add a command to a container, which modifies the container's startup behavior by overruling the image’s ENTRYPOINT. This is different from a lifecycle hook, which instead can be run once per deployment at a specified time.
For example, to execute the java command with the -jar and /opt/app-root/springboots2idemo.jar arguments:
If the latest revision is running or failed, the command returns the logs of the process that deploys your pods. If it is successful, it returns the logs from a Pod of our application.
A DeploymentConfig can contain triggers, which drive the creation of new deployment processes in response to events inside the cluster.
If no triggers are defined on a DeploymentConfig, a ConfigChange trigger is added by default. If triggers are defined as an empty field, deployments must be started manually.
The ConfigChange trigger results in a new ReplicationController whenever configuration changes are detected in the Pod template of the DeploymentConfig.
If a ConfigChange trigger is defined on a DeploymentConfig, the first ReplicationController is automatically created soon after the DeploymentConfig itself is created and it is not paused.
ConfigChange deployment trigger
The ImageChange trigger results in a new ReplicationController whenever the content of an imagestreamtag changes (when a new version of the image is pushed).
ImageChange deployment trigger
With the above example, when the latest tag value of the origin-ruby-sample imagestream changes and the new image value differs from the current image specified in the DeploymentConfig's helloworld container, a new ReplicationController is created using the new image for the helloworld container.
If an ImageChange trigger is defined on a DeploymentConfig (with a ConfigChange trigger and automatic=false, or with automatic=true) and the ImageStreamTag pointed by the ImageChange trigger does not exist yet, then the initial deployment process will automatically start as soon as an image is imported or pushed by a build to the ImageStreamTag.
This resource is available only if a cluster administrator has enabled the ephemeral storage technology preview. This feature is disabled by default.
A deployment is completed by a Pod that consumes resources (memory, CPU, and ephemeral storage) on a node. By default, Pods consume unbounded node resources. However, if a project specifies default container limits, then Pods consume resources up to those limits.
We can also limit resource use by specifying resource limits as part of the deployment strategy. Deployment resources can be used with the Recreate, Rolling, or Custom deployment strategies.
However, if a quota has been defined for our project, one of the following two items is required:
To set deployment resources, choose one of the above options. Otherwise, deploy Pod creation fails, citing a failure to satisfy quota.
In addition to rollbacks, we can exercise fine-grained control over the number of replicas by manually scaling them.
Pods can also be autoscaled using the oc autoscale command.
The number of replicas eventually propagates to the desired and current state of the deployment configured by the DeploymentConfig frontend.
We can add a Secret to your DeploymentConfig so that it can access images from a private repository. This procedure shows the OpenShift web console method.
We can use node selectors in conjunction with labeled nodes to control Pod placement.
Cluster administrators can set the default node selector for a project in order to restrict Pod placement to specific nodes. As a developer, we can set a node selector on a Pod configuration to restrict nodes even further.
Pods created when the node selector is in place are assigned to nodes with the specified labels. The labels specified here are used in conjunction with the labels added by a cluster administrator.
For example, if a project has the type=user-node and region=east labels added to a project by the cluster administrator, and you add the above disktype: ssd label to a Pod, the Pod is only ever scheduled on nodes that have all three labels.
Labels can only be set to one value, so setting a node selector of region=west in a Pod configuration that has region=east as the administrator-set default, results in a Pod that will never be scheduled.
We can run a Pod with a service account other than the default.
Starting a deployment
$ oc rollout latest dc/<name>
View a deployment
$ oc rollout history dc/<name>
$ oc rollout history dc/<name> --revision=1
$ oc describe dc <name>
Retrying a deployment
$ oc rollout retry dc/<name>>
Rolling back a deployment
$ oc rollout undo dc/<name>
$ oc set triggers dc/<name> --auto
Execute commands inside a container
spec:
  containers:
    -
    name: <container_name>
    image: 'image'
    command:
      - '<command>'
    args:
      - '<argument_1>'
      - '<argument_2>'
      - '<argument_3>'
spec:
  containers:
    -
    name: example-spring-boot
    image: 'image'
    command:
      - java
    args:
      - '-jar'
      - /opt/app-root/springboots2idemo.jar
View deployment logs
$ oc logs -f dc/<name>
$ oc logs --version=1 dc/<name>
Deployment triggers
ConfigChange deployment triggers
triggers:
  - type: "ConfigChange"
ImageChange deployment triggers
triggers:
  - type: "ImageChange"
    imageChangeParams:
      automatic: true 1
      from:
kind: "ImageStreamTag"
name: "origin-ruby-sample:latest"
namespace: "myproject"
      containerNames:
- "helloworld"
Set deployment triggers
$ oc set triggers dc/<dc_name> \
--from-image=<project>/<image>:<tag> -c <container_name>Set deployment resources
type: "Recreate"
resources:
  limits:
    cpu: "100m" 1
    memory: "256Mi" 2
    ephemeral-storage: "1Gi" 3
 type: "Recreate"
  resources:
    requests: 1
      cpu: "100m"
      memory: "256Mi"
      ephemeral-storage: "1Gi"
Scaling manually
$ oc scale dc frontend --replicas=3
Access private repositories from DeploymentConfigs
Assign pods to specific nodes
apiVersion: v1
kind: Pod
spec:
  nodeSelector:
    disktype: ssd
...
Run a Pod with a different service account
$ oc edit dc/<deployment_config>
spec:
  securityContext: {}
  serviceAccount: <service_account>
  serviceAccountName: <service_account>
Use DeploymentConfig strategies
A deployment strategy is a way to change or upgrade an application. The aim is to make the change without downtime in a way that the user barely notices the improvements.
Because the end user usually accesses the application through a route handled by a router, the deployment strategy can focus on DeploymentConfig features or routing features. Strategies that focus on the DeploymentConfig impact all routes that use the application. Strategies that use router features target individual routes.
Many deployment strategies are supported through the DeploymentConfig, and some additional strategies are supported through router features. DeploymentConfig strategies are discussed in this section.
Choosing a deployment strategy
Consider the following when choosing a deployment strategy:
- Long-running connections must be handled gracefully.
- Database conversions can be complex and must be done and rolled back along with the application.
- If the application is a hybrid of microservices and traditional components, downtime might be required to complete the transition.
- We must have the infrastructure to do this.
- If we have a non-isolated test environment, we can break both new and old versions.
A deployment strategy uses readiness checks to determine if a new Pod is ready for use. If a readiness check fails, the DeploymentConfig retries to run the Pod until it times out. The default timeout is 10m, a value set in TimeoutSeconds in dc.spec.strategy.*params.
A rolling deployment slowly replaces instances of the previous version of an application with instances of the new version of the application. The Rolling strategy is the default deployment strategy used if no strategy is specified on a DeploymentConfig.
A rolling deployment typically waits for new pods to become ready via a readiness check before scaling down the old components. If a significant issue occurs, the rolling deployment can be aborted.
When to use a Rolling deployment:
A Rolling deployment means you to have both old and new versions of the code running at the same time. This typically requires that our application handle N-1 compatibility.
Example Rolling strategy definition
The Rolling strategy:
When scaling down, the Rolling strategy waits for Pods to become ready so it can decide whether further scaling would affect availability. If scaled up Pods never become ready, the deployment process will eventually time out and result in a deployment failure.
The maxUnavailable parameter is the maximum number of Pods that can be unavailable during the update. The maxSurge parameter is the maximum number of Pods that can be scheduled above the original number of Pods. Both parameters can be set to either a percentage (e.g., 10%) or an absolute value (e.g., 2). The default value for both is 25%.
These parameters allow the deployment to be tuned for availability and speed. For example:
Generally, if we want fast rollouts, use maxSurge. If we have to take into account resource quota and can accept partial unavailability, use maxUnavailable.
All Rolling deployments in OpenShift are canary deployments; a new version (the canary) is tested before all of the old instances are replaced. If the readiness check never succeeds, the canary instance is removed and the DeploymentConfig will be automatically rolled back.
The readiness check is part of the application code and can be as sophisticated as necessary to ensure the new instance is ready to be used. If we must implement more complex checks of the application (such as sending real user workloads to the new instance), consider implementing a Custom deployment or using a blue-green deployment strategy.
Rolling deployments are the default type in OpenShift. We can create a Rolling deployment using the CLI.
During the deployment process, the new ReplicationController is incrementally scaled up. After the new Pods are marked as ready (by passing their readiness check), the deployment process continues.
If the Pods do not become ready, the process aborts, and the DeploymentConfig rolls back to its previous version.
The Recreate strategy has basic rollout behavior and supports lifecycle hooks for injecting code into the deployment process.
Example Recreate strategy definition
The Recreate strategy:
During scale up, if the replica count of the deployment is greater than one, the first replica of the deployment will be validated for readiness before fully scaling up the deployment. If the validation of the first replica fails, the deployment will be considered a failure.
When to use a Recreate deployment:
A Recreate deployment incurs downtime because, for a brief period, no instances of our application are running. However, your old code and new code do not run at the same time.
The Custom strategy allows us to provide our own deployment behavior.
Example Custom strategy definition
In the above example, the organization/strategy container image provides the deployment behavior. The optional command array overrides any CMD directive specified in the image's Dockerfile. The optional environment variables provided are added to the execution environment of the strategy process.
Additionally, OpenShift provides the following environment variables to the deployment process:
OPENSHIFT_DEPLOYMENT_NAME
OPENSHIFT_DEPLOYMENT_NAMESPACE
The replica count of the new deployment will initially be zero. The responsibility of the strategy is to make the new deployment active using the logic that best serves the needs of the user.
Alternatively, use customParams to inject the custom deployment logic into the existing deployment strategies. Provide a custom shell script logic and call the openshift-deploy binary. Users do not have to supply their custom deployer container image; in this case, the default OpenShift deployer image is used instead:
This results in following deployment:
If the custom deployment strategy process requires access to the OpenShift API or the Kubernetes API the container that executes the strategy can use the service account token available inside the container for authentication.
The Rolling and Recreate strategies support lifecycle hooks, or deployment hooks, which allow behavior to be injected into the deployment process at predefined points within the strategy:
Example pre lifecycle hook
Every hook has a failurePolicy, which defines the action the strategy should take when a hook failure is encountered:
Abort
The deployment process will be considered a failure if the hook fails.
Retry
The hook execution should be retried until it succeeds.
Ignore
Any hook failure should be ignored and the deployment should proceed.
Hooks have a type-specific field that describes how to execute the hook. Currently, Pod-based hooks are the only supported hook type, specified by the execNewPod field.
Pod-based lifecycle hooks execute hook code in a new Pod derived from the template in a DeploymentConfig.
The following simplified example DeploymentConfig uses the Rolling strategy. Triggers and some other minor details are omitted for brevity:
In this example, the pre hook will be executed in a new Pod using the openshift/origin-ruby-sample image from the helloworld container. The hook Pod has the following properties:
We can set lifecycle hooks, or deployment hooks, for a DeploymentConfig using the CLI.
Rolling strategy
strategy:
  type: Rolling
  rollingParams:
    updatePeriodSeconds: 1 1
    intervalSeconds: 1 2
    timeoutSeconds: 120 3
    maxSurge: "20%" 4
    maxUnavailable: "10%" 5
    pre: {} 6
    post: {}
Canary deployments
Create a Rolling deployment
$ oc new-app openshift/deployment-example
$ oc expose svc/deployment-example
$ oc scale dc/deployment-example --replicas=3
$ oc tag deployment-example:v2 deployment-example:latest
$ oc describe dc deployment-example
Recreate strategy
strategy:
  type: Recreate
  recreateParams: 1
    pre: {} 2
    mid: {}
    post: {}
Custom strategy
strategy:
  type: Custom
  customParams:
    image: organization/strategy
    command: [ "command", "arg1" ]
    environment:
      - name: ENV_1
value: VALUE_1
Environment variable
Description
The name of the new deployment (a ReplicationController).
The name space of the new deployment.
strategy:
  type: Rolling
  customParams:
    command:
    - /bin/sh
    - -c
    - |
      set -e
      openshift-deploy --until=50%
      echo Halfway there
      openshift-deploy
      echo Complete
Started deployment #2
--> Scaling up custom-deployment-2 from 0 to 2, scaling down custom-deployment-1 from 2 to 0 (keep 2 pods available, don't exceed 3 pods)
    Scaling custom-deployment-2 up to 1
--> Reached 50% (currently 50%)
Halfway there
--> Scaling up custom-deployment-2 from 1 to 2, scaling down custom-deployment-1 from 2 to 0 (keep 2 pods available, don't exceed 3 pods)
    Scaling custom-deployment-1 down to 1
    Scaling custom-deployment-2 up to 2
    Scaling custom-deployment-1 down to 0
--> Success
Complete
Lifecycle hooks
pre:
  failurePolicy: Abort
  execNewPod: {} 1
Pod-based lifecycle hook
kind: DeploymentConfig
apiVersion: v1
metadata:
  name: frontend
spec:
  template:
    metadata:
      labels:
name: frontend
    spec:
      containers:
- name: helloworld
  image: openshift/origin-ruby-sample
  replicas: 5
  selector:
    name: frontend
  strategy:
    type: Rolling
    rollingParams:
      pre:
failurePolicy: Abort
execNewPod:
  containerName: helloworld 1
  command: [ "/usr/bin/command", "arg1", "arg2" ] 2
  env: 3
- name: CUSTOM_VAR1
  value: custom_value1
  volumes:
- data 4
Set lifecycle hooks
$ oc set deployment-hook dc/frontend \
    --pre -c helloworld -e CUSTOM_VAR1=custom_value1 \
    -v data --failure-policy=abort -- /usr/bin/command arg1 arg2
Use route-based deployment strategies
Deployment strategies provide a way for the application to evolve. Some strategies use DeploymentConfigs to make changes that are seen by users of all routes that resolve to the application. Other advanced strategies, such as the ones described in this section, use router features in conjunction with DeploymentConfigs to impact specific routes.
The most common route-based strategy is to use a blue-green deployment. The new version (the blue version) is brought up for testing and evaluation, while the users still use the stable version (the green version). When ready, the users are switched to the blue version. If a problem arises, we can switch back to the green version.
A common alternative strategy is to use A/B versions that are both active at the same time and some users use one version, and some users use the other version. This can be used for experimenting with user interface changes and other features to get user feedback. It can also be used to verify proper operation in a production context where problems impact a limited number of users.
A canary deployment tests the new version but when a problem is detected it quickly falls back to the previous version. This can be done with both of the above strategies.
The route-based deployment strategies do not scale the number of Pods in the services. To maintain desired performance characteristics the deployment configurations might have to be scaled.
In production environments, we can precisely control the distribution of traffic that lands on a particular shard. When dealing with large numbers of instances, we can use the relative scale of individual shards to implement percentage based traffic. That combines well with a proxy shard, which forwards or splits the traffic it receives to a separate service or application running elsewhere.
In the simplest configuration, the proxy forwards requests unchanged. In more complex setups, we can duplicate the incoming requests and send to both a separate cluster as well as to a local instance of the application, and compare the result. Other patterns include keeping the caches of a DR installation warm, or sampling incoming traffic for analysis purposes.
Any TCP (or UDP) proxy could be run under the desired shard. Use the oc scale command to alter the relative number of instances serving requests under the proxy shard. For more complex traffic management, consider customizing the OpenShift router with proportional balancing capabilities.
Applications that have new code and old code running at the same time must be careful to ensure that data written by the new code can be read and handled (or gracefully ignored) by the old version of the code. This is sometimes called schema evolution and is a complex problem.
This can take many forms: data stored on disk, in a database, in a temporary cache, or that is part of a user's browser session. While most web applications can support rolling deployments, it is important to test and design our application to handle it.
For some applications, the period of time that old code and new code is running side by side is short, so bugs or some failed user transactions are acceptable. For others, the failure pattern may result in the entire application becoming non-functional.
One way to validate N-1 compatibility is to use an A/B deployment: run the old code and new code at the same time in a controlled way in a test environment, and verify that traffic that flows to the new deployment does not cause failures in the old deployment.
OpenShift and Kubernetes give application instances time to shut down before removing them from load balancing rotations. However, applications must ensure they cleanly terminate user connections as well before they exit.
On shutdown, OpenShift sends a TERM signal to the processes in the container. Application code, on receiving SIGTERM, stop accepting new connections. This ensures that load balancers route traffic to other active instances. The application code then waits until all open connections are closed (or gracefully terminate individual connections at the next opportunity) before exiting.
After the graceful termination period expires, a process that has not exited is sent the KILL signal, which immediately ends the process. The terminationGracePeriodSeconds attribute of a Pod or Pod template controls the graceful termination period (default 30 seconds) and may be customized per application as necessary.
Blue-green deployments involve running two versions of an application at the same time and moving traffic from the in-production version (the green version) to the newer version (the blue version). We can use a Rolling strategy or switch services in a route.
Because many applications depend on persistent data, have an application that supports N-1 compatibility, which means it shares data and implements live migration between the database, store, or disk by creating two copies of the data layer.
Consider the data used in testing the new version. If it is the production data, a bug in the new version can break the production version.
Blue-green deployments use two DeploymentConfigs. Both are running, and the one in production depends on the service the route specifies, with each DeploymentConfig exposed to a different service.
Routes are intended for web (HTTP and HTTPS) traffic, so this technique is best suited for web applications.
We can create a new route to the new version and test it. When ready, change the service in the production route to point to the new service and the new (blue) version is live.
If necessary, we can roll back to the older (green) version by switching the service back to the previous version.
This creates two independent application components: one running the v1 image under the example-green service, and one using the v2 image under the example-blue service.
The A/B deployment strategy lets you try a new version of the application in a limited way in the production environment. We can specify that the production version gets most of the user requests while a limited fraction of requests go to the new version.
Because you control the portion of requests to each version, as testing progresses we can increase the fraction of requests to the new version and ultimately stop using the previous version. As you adjust the request load on each version, the number of Pods in each service might have to be scaled as well to provide the expected performance.
In addition to upgrading software, we can use this feature to experiment with versions of the user interface. Since some users get the old version and some the new, we can evaluate the user's reaction to the different versions to inform design decisions.
For this to be effective, both the old and new versions must be similar enough that both can run at the same time. This is common with bug fix releases and when new features do not interfere with the old. The versions require N-1 compatibility to properly work together.
OpenShift supports N-1 compatibility through the web console as well as the CLI.
The user sets up a route with multiple services. Each service handles a version of the application.
Each service is assigned a weight and the portion of requests to each service is the service_weight divided by the sum_of_weights. The weight for each service is distributed to the service's endpoints so that the sum of the endpoint weights is the service weight.
The route can have up to four services. The weight for the service can be between 0 and 256. When the weight is 0, the service does not participate in load-balancing but continues to serve existing persistent connections. When the service weight is not 0, each endpoint has a minimum weight of 1. Because of this, a service with a lot of endpoints can end up with higher weight than desired. In this case, reduce the number of Pods to get the desired load balance weight.
To set up the A/B environment:
Both applications are deployed and services are created.
Browse to the application at ab-example-<project>.<router_domain> to verify that you see the desired version.
Set the oc set route-backend to 0 means the service does not participate in load-balancing, but continues to serve existing persistent connections.
Changes to the route just change the portion of traffic to the various services. You might have to scale the DeploymentConfigs to adjust the number of Pods to handle the anticipated loads.
To edit the route, run:
For traffic split between more than two services, the relative weights are specified by integers between 0 and 256 for each service.
Traffic weightings are shown on the Overview in the expanded rows of the applications between which traffic is split.
For example, the following sets ab-example-a as the primary service with weight=198 and ab-example-b as the first alternate service with a weight=2:
This means 99% of traffic is sent to service ab-example-a and 1% to service ab-example-b.
This command does not scale the DeploymentConfigs. You might be required to do so to have enough Pods to handle the request load.
For example:
The --equal flag sets the weight of all services to 100:
The --zero flag sets the weight of all services to 0. All requests then return with a 503 error.
Not all routers may support multiple or weighted backends.
The application is deployed and a service is created. This is the first shard.
To force your browser to one or the other shard:
Refresh your browser to show v2 and shard B (in red).
Refresh your browser to show v1 and shard A (in blue).
or
Proxy shards and traffic splitting
N-1 compatibility
Graceful termination
Blue-green deployments
Set up a blue-green deployment
$ oc new-app openshift/deployment-example:v1 --name=example-green
$ oc new-app openshift/deployment-example:v2 --name=example-blue
$ oc expose svc/example-green --name=bluegreen-example
$ oc patch route/bluegreen-example -p '{"spec":{"to":{"name":"example-blue"}}}'
A/B deployments
Load balancing for A/B testing
$ oc new-app openshift/deployment-example --name=ab-example-a
$ oc new-app openshift/deployment-example --name=ab-example-b
$ oc expose svc/ab-example-a
$ oc edit route <route_name>
...
metadata:
  name: route-alternate-service
  annotations:
    haproxy.router.openshift.io/balance: roundrobin
spec:
  host: ab-example.my-project.my-domain
  to:
    kind: Service
    name: ab-example-a
    weight: 10
  alternateBackends:
  - kind: Service
    name: ab-example-b
    weight: 15
...
Manage weights using the web console
Manage weights using the CLI
$ oc set route-backends ROUTENAME \
    [--zero|--equal] [--adjust] SERVICE=WEIGHT[%] [...] [options]
$ oc set route-backends ab-example ab-example-a=198 ab-example-b=2
$ oc set route-backends ab-example
NAME                    KIND     TO           WEIGHT
routes/ab-example       Service  ab-example-a 198 (99%)
routes/ab-example       Service  ab-example-b 2   (1%)
$ oc set route-backends ab-example --adjust ab-example-a=200 ab-example-b=10
$ oc set route-backends ab-example --adjust ab-example-b=5%
$ oc set route-backends ab-example --adjust ab-example-b=+15%
$ oc set route-backends ab-example --equal
One service, multiple DeploymentConfigs
$ oc new-app openshift/deployment-example --name=ab-example-a
$ oc expose svc/ab-example-a --name=ab-example
$ oc new-app openshift/deployment-example:v2 \
    --name=ab-example-b --labels=ab-example=true \
    SUBTITLE="shard B" COLOR="red"
$ oc scale dc/ab-example-a --replicas=0
$ oc scale dc/ab-example-a --replicas=1; oc scale dc/ab-example-b --replicas=0
$ oc edit dc/ab-example-a
$ oc edit dc/ab-example-b
Extend the Kubernetes API with Custom Resource Definitions
In the Kubernetes API, a resource is an endpoint that stores a collection of API objects of a certain kind. For example, the built-in Pods resource contains a collection of Pod objects. A Custom Resource Definition (CRD) object defines a new, unique object Kind in the cluster and lets the Kubernetes API server handle its entire lifecycle. Custom Resource (CR) objects are created from Custom Resource Definitions that have been added to the cluster by a cluster administrator, allowing all cluster users to add the new resource type into projects.
When a cluster administrator adds a new Custom Resource Definition to the cluster, the Kubernetes API server reacts by creating a new RESTful resource path that can be accessed by the entire cluster or a single project (namespace) and begins serving the specified CR.
Cluster administrators that want to grant access to the Custom Resource Definition to other users can use cluster role aggregation to grant access to users with the admin, edit, or view default cluster roles. Cluster role aggregation allows the insertion of custom policy rules into these cluster roles. This behavior integrates the new resource into the cluster's RBAC policy as if it was a built-in resource.
Operators in particular make use of Custom Resource Definitions by packaging them with any required RBAC policy and other software-specific logic. Cluster administrators can also add Custom Resource Definitions manually to the cluster outside of an Operator's lifecycle, making them available to all users.
While only cluster administrators can create Custom Resource Definitions, developers can create the CR from an existing Custom Resource Definition if they have read and write permission to it.
Create a Custom Resource Definition
First create a Custom Resource Definition (CRD).
- Create a YAML file containing the following field types:
Example YAML file for a Custom Resource Definition
apiVersion: apiextensions.k8s.io/v1beta1 1 kind: CustomResourceDefinition metadata: name: crontabs.stable.example.com 2 spec: group: stable.example.com 3 version: v1 4 scope: Namespaced 5 names: plural: crontabs 6 singular: crontab 7 kind: CronTab 8 shortNames: - ct 9- 1
Use the apiextensions.k8s.io/v1beta1 API.
- 2 Specify a name for the definition. This must be in the <plural-name>.<group> format using the values from the group and plural fields.
- 3 Specify a group name for the API. An API group is a collection of objects that are logically related. For example, all batch objects like Job or ScheduledJob could be in the batch API Group (such as batch.api.example.com). A good practice is to use a fully-qualified-domain name of our organization.
- 4 Specify a version name to be used in the URL. Each API Group can exist in multiple versions. For example: v1alpha, v1beta, v1.
- 5 Specify whether the custom objects are available to a project (Namespaced) or all projects in the cluster (Cluster).
- 6 Plural name to use in the URL. The plural field is the same as a resource in an API URL.
- 7 Specify a singular name to use as an alias on the CLI and for display.
- 8 Kind of objects that can be created. The type can be in CamelCase.
- 9 Specify a shorter string to match your resource on the CLI.
- 2 Specify a name for the definition. This must be in the <plural-name>.<group> format using the values from the group and plural fields.
By default, a Custom Resource Definition is cluster-scoped and available to all projects.
- 1
Use the apiextensions.k8s.io/v1beta1 API.
- Create the Custom Resource Definition object:
- $ oc create -f <file_name>.yaml
A new RESTful API endpoint is created at:
- /apis/<spec:group>/<spec:version>/<scope>/*/<names-plural>/...
For example, using the example file, the following endpoint is created:
- /apis/stable.example.com/v1/namespaces/*/crontabs/...
We can now use this endpoint URL to create and manage CRs. The object Kind is based on the spec.kind field of the Custom Resource Definition object createdd.
Create cluster roles for Custom Resource Definitions
Cluster administrators can grant permissions to existing cluster-scoped Custom Resource Definitions (CRDs). If we use the admin, edit, and view default cluster roles, take advantage of cluster role aggregation for their rules.
We must explicitly assign permissions to each of these roles. The roles with more permissions do not inherit rules from roles with fewer permissions. If you assign a rule to a role, we must also assign that verb to roles that have more permissions. For example, if you grant the get crontabs permission to the view role, we must also grant it to the edit and admin roles. The admin or edit role is usually assigned to the user that created a project through the project template.
Prerequisites
- Create a Custom Resource Definition.
- Create a cluster role definition file for the Custom Resource Definition. The cluster role definition is a YAML file containing the rules that apply to each cluster role. The OpenShift controller adds the rules specified to the default cluster roles.
Example YAML file for a cluster role definition
kind: ClusterRole apiVersion: rbac.authorization.k8s.io/v1 1 metadata: name: aggregate-cron-tabs-admin-edit 2 labels: rbac.authorization.k8s.io/aggregate-to-admin: "true" 3 rbac.authorization.k8s.io/aggregate-to-edit: "true" 4 rules: - apiGroups: ["stable.example.com"] 5 resources: ["crontabs"] 6 verbs: ["get", "list", "watch", "create", "update", "patch", "delete", "deletecollection"] 7 --- kind: ClusterRole apiVersion: rbac.authorization.k8s.io/v1 metadata: name: aggregate-cron-tabs-view 8 labels: # Add these permissions to the "view" default role. rbac.authorization.k8s.io/aggregate-to-view: "true" 9 rbac.authorization.k8s.io/aggregate-to-cluster-reader: "true" 10 rules: - apiGroups: ["stable.example.com"] 11 resources: ["crontabs"] 12 verbs: ["get", "list", "watch"] 13- 1
Use the rbac.authorization.k8s.io/v1 API.
- 2 8 Specify a name for the definition.
- 3 Specify this label to grant permissions to the admin default role.
- 4 Specify this label to grant permissions to the edit default role.
- 5 11 Group name of the Custom Resource Definition.
- 6 12 Plural name of the Custom Resource Definition that these rules apply to.
- 7 13 Specify the verbs that represent the permissions that are granted to the role. For example, apply read and write permissions to the admin and edit roles and only read permission to the view role.
- 9 Specify this label to grant permissions to the view default role.
- 10 Specify this label to grant permissions to the cluster-reader default role. >
- 2 8 Specify a name for the definition.
- 1
Use the rbac.authorization.k8s.io/v1 API.
- Create the cluster role:
- $ oc create -f <file_name>.yaml
Create Custom Resources from a file
After a Custom Resource Definition (CRD) has been added to the cluster, Custom Resources (CRs) can be created with the CLI from a file using the CR specification.
Prerequisites
- Custom Resource Definition added to the cluster by a cluster administrator.
- Create a YAML file for the CR. In the following example definition, the cronSpec and image custom fields are set in a CR of Kind: CronTab. The Kind comes from the spec.kind field of the Custom Resource Definition object.
Example YAML file for a CR
apiVersion: "stable.example.com/v1" 1
kind: CronTab 2
metadata:
  name: my-new-cron-object 3
  finalizers: 4
  - finalizer.stable.example.com
spec: 5
  cronSpec: "* * * * /5"
  image: my-cron-image
- 1 Group name and API version (name/version) from the Custom Resource Definition.
- 2 Type in the Custom Resource Definition.
- 3 Name for the object.
- 4 Finalizers for the object, if any. Finalizers allow controllers to implement conditions that must be completed before the object can be deleted.
- 5 Conditions specific to the type of object.
- After creating the file, create the object:
$ oc create -f <file_name>.yaml
- 1 Group name and API version (name/version) from the Custom Resource Definition.
Inspect Custom Resources
We can inspect Custom Resource (CR) objects that exist in the cluster using the CLI.
Prerequisites
- A CR object exists in a namespace to which we have access.
- To get information on a specific Kind of a CR, run:
- $ oc get <kind>
For example:
$ oc get crontab

NAME                 KIND
my-new-cron-object   CronTab.v1.stable.example.com
Resource names are not case-sensitive, and we can use either the singular or plural forms defined in the Custom Resource Definition, as well as any short name. For example:
$ oc get crontabs
$ oc get crontab
$ oc get ct
- We can also view the raw YAML data for a CR:
$ oc get <kind> -o yaml
$ oc get ct -o yaml

apiVersion: v1
items:
- apiVersion: stable.example.com/v1
  kind: CronTab
  metadata:
    clusterName: ""
    creationTimestamp: 2017-05-31T12:56:35Z
    deletionGracePeriodSeconds: null
    deletionTimestamp: null
    name: my-new-cron-object
    namespace: default
    resourceVersion: "285"
    selfLink: /apis/stable.example.com/v1/namespaces/default/crontabs/my-new-cron-object
    uid: 9423255b-4600-11e7-af6a-28d2447dc82b
  spec:
    cronSpec: '* * * * /5' 1
    image: my-cron-image 2
Manage resources from Custom Resource Definitions
Developers can manage Custom Resources (CRs) that come from Custom Resource Definitions (CRDs).
In the Kubernetes API, a resource is an endpoint that stores a collection of API objects of a certain kind. For example, the built-in Pods resource contains a collection of Pod objects.
A Custom Resource Definition (CRD) object defines a new, unique object Kind in the cluster and lets the Kubernetes API server handle its entire lifecycle.
Custom Resource (CR) objects are created from Custom Resource Definitions that have been added to the cluster by a cluster administrator, allowing all cluster users to add the new resource type into projects.
Operators in particular make use of Custom Resource Definitions by packaging them with any required RBAC policy and other software-specific logic. Cluster administrators can also add Custom Resource Definitions manually to the cluster outside of an Operator's lifecycle, making them available to all users.
While only cluster administrators can create Custom Resource Definitions, developers can create the CR from an existing Custom Resource Definition if they have read and write permission to it.
After a Custom Resource Definition (CRD) has been added to the cluster, Custom Resources (CRs) can be created with the CLI from a file using the CR specification.
Prerequisites
Example YAML file for a CR
We can inspect Custom Resource (CR) objects that exist in the cluster using the CLI.
Prerequisites
For example:
Resource names are not case-sensitive, and we can use either the singular or plural forms defined in the Custom Resource Definition, as well as any short name. For example:
Custom Resource Definitions
Create Custom Resources from a file
apiVersion: "stable.example.com/v1" 1
kind: CronTab 2
metadata:
  name: my-new-cron-object 3
  finalizers: 4
  - finalizer.stable.example.com
spec: 5
  cronSpec: "* * * * /5"
  image: my-cron-image
$ oc create -f <file_name>.yaml
Inspect Custom Resources
$ oc get <kind>
$ oc get crontab

NAME                 KIND
my-new-cron-object   CronTab.v1.stable.example.com
$ oc get crontabs
$ oc get crontab
$ oc get ct
$ oc get <kind> -o yaml
$ oc get ct -o yaml

apiVersion: v1
items:
- apiVersion: stable.example.com/v1
  kind: CronTab
  metadata:
    clusterName: ""
    creationTimestamp: 2017-05-31T12:56:35Z
    deletionGracePeriodSeconds: null
    deletionTimestamp: null
    name: my-new-cron-object
    namespace: default
    resourceVersion: "285"
    selfLink: /apis/stable.example.com/v1/namespaces/default/crontabs/my-new-cron-object
    uid: 9423255b-4600-11e7-af6a-28d2447dc82b
  spec:
    cronSpec: '* * * * /5' 1
    image: my-cron-image 2
Resource quotas per project
A resource quota, defined by a ResourceQuota object, provides constraints that limit aggregate resource consumption per project. It can limit the quantity of objects that can be created in a project by type, as well as the total amount of compute resources and storage that may be consumed by resources in that project.
This guide describes how resource quotas work, how cluster administrators can set and manage resource quotas on a per project basis, and how developers and cluster administrators can view them.
The following describes the set of compute resources and object types that can be managed by a quota.
A pod is in a terminal state if status.phase in (Failed, Succeeded) is true.
Compute resources managed by quota
Storage resources managed by quota
Each quota can have an associated set of scopes. A quota only measures usage for a resource if it matches the intersection of enumerated scopes.
Add a scope to a quota restricts the set of resources to which that quota can apply. Specifying a resource outside of the allowed set results in a validation error.
Scope
Description
Terminating
Match pods where spec.activeDeadlineSeconds >= 0.
NotTerminating
Match pods where spec.activeDeadlineSeconds is nil.
BestEffort
Match pods that have best effort quality of service for either cpu or memory.
NotBestEffort
Match pods that do not have best effort quality of service for cpu and memory.
A BestEffort scope restricts a quota to limiting the following resources:
A Terminating, NotTerminating, and NotBestEffort scope restricts a quota to tracking the following resources:
Ephemeral storage requests and limits apply only if you enabled the ephemeral storage technology preview. This feature is disabled by default.
After a resource quota for a project is first created, the project restricts the ability to create any new resources that may violate a quota constraint until it has calculated updated usage statistics.
After a quota is created and usage statistics are updated, the project accepts the creation of new content. When creating or modify resources, your quota usage is incremented immediately upon the request to create or modify the resource.
When you delete a resource, your quota use is decremented during the next full recalculation of quota statistics for the project. A configurable amount of time determines how long it takes to reduce quota usage statistics to their current observed system value.
If project modifications exceed a quota usage limit, the server denies the action, and an appropriate error message is returned to the user explaining the quota constraint violated, and what their currently observed usage statistics are in the system.
When allocating compute resources, each container might specify a request and a limit value each for CPU, memory, and ephemeral storage. Quotas can restrict any of these values.
If the quota has a value specified for requests.cpu or requests.memory, then it requires that every incoming container make an explicit request for those resources. If the quota has a value specified for limits.cpu or limits.memory, then it requires that every incoming container specify an explicit limit for those resources.
core-object-counts.yaml
openshift-object-counts.yaml
compute-resources.yaml
besteffort.yaml
compute-resources-long-running.yaml
compute-resources-time-bound.yaml
storage-consumption.yaml
We can create a quota to constrain resource usage in a given project.
For example:
We can create an object count quota for all OpenShift standard namespaced resource types, such as BuildConfig, and DeploymentConfig. An object quota count places a defined quota on all standard namespaced resource types.
When using a resource quota, an object is charged against the quota if it exists in server storage. These types of quotas are useful to protect against exhaustion of storage resources.
To configure an object count quota for a resource:
For example:
This example limits the listed resources to the hard limit in each project in the cluster.
Overcommitment of resources is not allowed for extended resources, so specify requests and limits for the same extended resource in a quota. Currently, only quota items with the prefix requests. is allowed for extended resources. The following is an example scenario of how to set resource quota for the GPU resource nvidia.com/gpu.
In this example, 2 GPUs are available.
This Forbidden error message is expected because we have a quota of 1 GPU and this pod tried to allocate a second GPU, which exceeds its quota.
We can view usage statistics related to any hard limits defined in a project's quota by navigating in the web console to the project’s Quota page.
We can also use the CLI to view quota details.
When a set of resources are deleted, but before quota usage is restored, a user might encounter problems when attempting to reuse the resources. The synchronization time frame of resources is determined by the resource-quota-sync-period setting, which can be configured by a cluster administrator.
Adjusting the regeneration time can be helpful for creating resources and determining resource usage when automation is used.
The resource-quota-sync-period setting is designed to balance system performance. Reducing the sync period can result in a heavy load on the master.
To configure the quota synchronization period:
Resources managed by quotas
Resource Name
Description
cpu
The sum of CPU requests across all pods in a non-terminal state cannot exceed this value. cpu and requests.cpu are the same value and can be used interchangeably.
memory
The sum of memory requests across all pods in a non-terminal state cannot exceed this value. memory and requests.memory are the same value and can be used interchangeably.
ephemeral-storage
The sum of local ephemeral storage requests across all pods in a non-terminal state cannot exceed this value. ephemeral-storage and requests.ephemeral-storage are the same value and can be used interchangeably. This resource is available only if you enabled the ephemeral storage technology preview. This feature is disabled by default.
requests.cpu
The sum of CPU requests across all pods in a non-terminal state cannot exceed this value. cpu and requests.cpu are the same value and can be used interchangeably.
requests.memory
The sum of memory requests across all pods in a non-terminal state cannot exceed this value. memory and requests.memory are the same value and can be used interchangeably.
requests.ephemeral-storage
The sum of ephemeral storage requests across all pods in a non-terminal state cannot exceed this value. ephemeral-storage and requests.ephemeral-storage are the same value and can be used interchangeably. This resource is available only if you enabled the ephemeral storage technology preview. This feature is disabled by default.
limits.cpu
The sum of CPU limits across all pods in a non-terminal state cannot exceed this value.
limits.memory
The sum of memory limits across all pods in a non-terminal state cannot exceed this value.
limits.ephemeral-storage
The sum of ephemeral storage limits across all pods in a non-terminal state cannot exceed this value. This resource is available only if you enabled the ephemeral storage technology preview. This feature is disabled by default.
Resource Name
Description
requests.storage
The sum of storage requests across all persistent volume claims in any state cannot exceed this value.
persistentvolumeclaims
The total number of persistent volume claims that can exist in the project.
<storage-class-name>.storageclass.storage.k8s.io/requests.storage
The sum of storage requests across all persistent volume claims in any state that have a matching storage class, cannot exceed this value.
<storage-class-name>.storageclass.storage.k8s.io/persistentvolumeclaims
The total number of persistent volume claims with a matching storage class that can exist in the project.
Resource Name
Description
pods
The total number of pods in a non-terminal state that can exist in the project.
replicationcontrollers
The total number of ReplicationControllers that can exist in the project.
resourcequotas
The total number of resource quotas that can exist in the project.
services
The total number of services that can exist in the project.
services.loadbalancers
The total number of services of type LoadBalancer that can exist in the project.
services.nodeports
The total number of services of type NodePort that can exist in the project.
secrets
The total number of secrets that can exist in the project.
configmaps
The total number of ConfigMap objects that can exist in the project.
persistentvolumeclaims
The total number of persistent volume claims that can exist in the project.
openshift.io/imagestreams
The total number of imagestreams that can exist in the project.
Quota scopes
Quota enforcement
Requests versus limits
Sample resource quota definitions
apiVersion: v1
kind: ResourceQuota
metadata:
  name: core-object-counts
spec:
  hard:
    configmaps: "10" 1
    persistentvolumeclaims: "4" 2
    replicationcontrollers: "20" 3
    secrets: "10" 4
    services: "10" 5
    services.loadbalancers: "2" 6
apiVersion: v1
kind: ResourceQuota
metadata:
  name: openshift-object-counts
spec:
  hard:
    openshift.io/imagestreams: "10" 1
apiVersion: v1
kind: ResourceQuota
metadata:
  name: compute-resources
spec:
  hard:
    pods: "4" 1
    requests.cpu: "1" 2
    requests.memory: 1Gi 3
    requests.ephemeral-storage: 2Gi 4
    limits.cpu: "2" 5
    limits.memory: 2Gi 6
    limits.ephemeral-storage: 4Gi 7
apiVersion: v1
kind: ResourceQuota
metadata:
  name: besteffort
spec:
  hard:
    pods: "1" 1
  scopes:
  - BestEffort 2
apiVersion: v1
kind: ResourceQuota
metadata:
  name: compute-resources-long-running
spec:
  hard:
    pods: "4" 1
    limits.cpu: "4" 2
    limits.memory: "2Gi" 3
    limits.ephemeral-storage: "4Gi" 4
  scopes:
  - NotTerminating 5
apiVersion: v1
kind: ResourceQuota
metadata:
  name: compute-resources-time-bound
spec:
  hard:
    pods: "2" 1
    limits.cpu: "1" 2
    limits.memory: "1Gi" 3
    limits.ephemeral-storage: "1Gi" 4
  scopes:
  - Terminating 5
apiVersion: v1
kind: ResourceQuota
metadata:
  name: storage-consumption
spec:
  hard:
    persistentvolumeclaims: "10" 1
    requests.storage: "50Gi" 2
    gold.storageclass.storage.k8s.io/requests.storage: "10Gi" 3
    silver.storageclass.storage.k8s.io/requests.storage: "20Gi" 4
    silver.storageclass.storage.k8s.io/persistentvolumeclaims: "5" 5
    bronze.storageclass.storage.k8s.io/requests.storage: "0" 6
    bronze.storageclass.storage.k8s.io/persistentvolumeclaims: "0" 7
Create a quota
$ oc create -f <file> [-n <project_name>]
$ oc create -f core-object-counts.yaml -n demoproject
Create object count quotas
$ oc create quota <name> \
    --hard=count/<resource>.<group>=<quota>,count/<resource>.<group>=<quota> 1
$ oc create quota test \
    --hard=count/deployments.extensions=2,count/replicasets.extensions=4,count/pods=3,count/secrets=4
resourcequota "test" created
$ oc describe quota test
Name:                         test
Namespace:                    quota
Resource                      Used  Hard
--------                      ----  ----
count/deployments.extensions  0     2
count/pods                    0     3
count/replicasets.extensions  0     4
count/secrets                 0     4
Set resource quota for extended resources
# oc describe node ip-172-31-27-209.us-west-2.compute.internal | egrep 'Capacity|Allocatable|gpu'
openshift.com/gpu-accelerator=true
Capacity:
 nvidia.com/gpu:  2
Allocatable:
 nvidia.com/gpu:  2
  nvidia.com/gpu  0           0
# cat gpu-quota.yaml
apiVersion: v1
kind: ResourceQuota
metadata:
  name: gpu-quota
  namespace: nvidia
spec:
  hard:
    requests.nvidia.com/gpu: 1
# oc create -f gpu-quota.yaml
resourcequota/gpu-quota created
# oc describe quota gpu-quota -n nvidia
Name:                    gpu-quota
Namespace:               nvidia
Resource                 Used  Hard
--------                 ----  ----
requests.nvidia.com/gpu  0     1
# oc create -f gpu-pod.yaml
apiVersion: v1
kind: Pod
metadata:
  generateName: gpu-pod-
  namespace: nvidia
spec:
  restartPolicy: OnFailure
  containers:
  - name: rhel7-gpu-pod
    image: rhel7
    env:
      - name: NVIDIA_VISIBLE_DEVICES
value: all
      - name: NVIDIA_DRIVER_CAPABILITIES
value: "compute,utility"
      - name: NVIDIA_REQUIRE_CUDA
value: "cuda>=5.0"
    command: ["sleep"]
    args: ["infinity"]
    resources:
      limits:
nvidia.com/gpu: 1
# oc get pods
NAME              READY     STATUS      RESTARTS   AGE
gpu-pod-s46h7     1/1       Running     0          1m
# oc describe quota gpu-quota -n nvidia
Name:                    gpu-quota
Namespace:               nvidia
Resource                 Used  Hard
--------                 ----  ----
requests.nvidia.com/gpu  1     1
# oc create -f gpu-pod.yaml
Error from server (Forbidden): error when creating "gpu-pod.yaml": pods "gpu-pod-f7z2w" is forbidden: exceeded quota: gpu-quota, requested: requests.nvidia.com/gpu=1, used: requests.nvidia.com/gpu=1, limited: requests.nvidia.com/gpu=1
View a quota
$ oc get quota -n demoproject
NAME                AGE
besteffort          11m
compute-resources   2m
core-object-counts  29m
$ oc describe quota core-object-counts -n demoproject
Name:           core-object-counts
Namespace:      demoproject
Resource        Used    Hard
--------        ----    ----
configmaps      3   10
persistentvolumeclaims  0   4
replicationcontrollers  3   20
secrets        9   10
services        2   10
Configure quota synchronization period
$ oc edit kubecontrollermanager cluster
 unsupportedConfigOverrides:
    extendedArguments:
      resource-quota-sync-period:
      - 60s
Resource quotas across multiple projects
A multi-project quota, defined by a ClusterResourceQuota object, allows quotas to be shared across multiple projects. Resources used in each selected project are aggregated and that aggregate is used to limit resources across all the selected projects.
This guide describes how cluster administrators can set and manage resource quotas across multiple projects.
When creating quotas, we can select multiple projects based on annotation selection, label selection, or both.
This creates the following ClusterResourceQuota object:
This multi-project quota document controls all projects requested by <user_name> using the default project request endpoint. You are limited to 10 pods and 20 secrets.
This creates the following ClusterResourceQuota object definition:
A project administrator is not allowed to create or modify the multi-project quota that limits his or her project, but the administrator is allowed to view the multi-project quota documents that are applied to his or her project. The project administrator can do this via the AppliedClusterResourceQuota resource.
For example:
Because of the locking consideration when claiming quota allocations, the number of active projects selected by a multi-project quota is an important consideration. Selecting more than 100 projects under a single multi-project quota can have detrimental effects on API server responsiveness in those projects.
Select multiple projects during quota creation
$ oc create clusterquota for-user \
     --project-annotation-selector openshift.io/requester=<user_name> \
     --hard pods=10 \
     --hard secrets=20
apiVersion: v1
kind: ClusterResourceQuota
metadata:
  name: for-user
spec:
  quota: 1
    hard:
      pods: "10"
      secrets: "20"
  selector:
    annotations: 2
      openshift.io/requester: <user_name>
    labels: null 3
status:
  namespaces: 4
  - namespace: ns-one
    status:
      hard:
pods: "10"
secrets: "20"
      used:
pods: "1"
secrets: "9"
  total: 5
    hard:
      pods: "10"
      secrets: "20"
    used:
      pods: "1"
      secrets: "9"
$  oc create clusterresourcequota for-name \ 1
    --project-label-selector=name=frontend \ 2
    --hard=pods=10 --hard=secrets=20
apiVersion: v1
kind: ClusterResourceQuota
metadata:
  creationTimestamp: null
  name: for-name
spec:
  quota:
    hard:
      pods: "10"
      secrets: "20"
  selector:
    annotations: null
    labels:
      matchLabels:
name: frontend
View applicable ClusterResourceQuotas
$ oc describe AppliedClusterResourceQuota
Name:   for-user
Namespace:  <none>
Created:  19 hours ago
Labels:   <none>
Annotations:  <none>
Label Selector: <null>
AnnotationSelector: map[openshift.io/requester:<user-name>]
Resource  Used  Hard
--------  ----  ----
pods        1     10
secrets    9     20
Selection granularity
Cluster administrators can idle applications to reduce resource consumption. This is useful when the cluster is deployed on a public cloud where cost is related to resource consumption.
If any scalable resources are not in use, OpenShift discovers and idles them by scaling their replicas to 0. The next time network traffic is directed to the resources, the resources are unidled by scaling up the replicas, and normal operation continues.
Applications are made of services, as well as other scalable resources, such as DeploymentConfigs. The action of idling an application involves idling all associated resources.
Idling an application involves finding the scalable resources (deployment configurations, replication controllers, and others) associated with a service. Idling an application finds the service and marks it as idled, scaling down the resources to zero replicas.
We can use the oc idle command to idle a single service, or use the --resource-names-file option to idle multiple services.
Idling multiple services is helpful if an application spans across a set of services within a project, or when idling multiple services in conjunction with a script in order to idle multiple applications in bulk within the same project.
The idle command is limited to a single project. For idling applications across a cluster, run the idle command for each project individually.
Application services become active again when they receive network traffic and are scaled back up their previous state. This includes both traffic to the services and traffic passing through routes.
Applications can also be manually unidled by scaling up the resources.
Automatic unidling by a router is currently only supported by the default HAProxy router.
Idling applications
Idling a single service
$ oc idle <service>
Idling multiple services
$ oc idle --resource-names-file <filename>
Unidling applications
$ oc scale --replicas=1 dc <dc_name>
Over time, API objects created in OpenShift can accumulate in the cluster's etcd data store through normal user operations, such as when building and deploying applications.
Cluster administrators can periodically prune older versions of objects from the cluster that are no longer required. For example, by pruning images we can delete older images and layers that are no longer in use, but are still taking up disk space.
The CLI groups prune operations under a common parent command:
This specifies:
To prune groups records from an external provider, administrators can run the following command:
--confirm
--blacklist
--whitelist
--sync-config
To see the groups that the prune command deletes:
To perform the prune operation:
In order to prune deployments that are no longer required by the system due to age and status, administrators can run the following command:
--confirm
--orphans
--keep-complete=<N>
--keep-failed=<N>
--keep-younger-than=<duration>
To see what a pruning operation would delete:
To actually perform the prune operation:
In order to prune builds that are no longer required by the system due to age and status, administrators can run the following command:
--confirm
--orphans
--keep-complete=<N>
--keep-failed=<N>
--keep-younger-than=<duration>
To see what a pruning operation would delete:
To actually perform the prune operation:
Developers can enable automatic build pruning by modifying their Build Configuration.
Additional resources
In order to prune images that are no longer required by the system due to age, status, or exceed limits, administrators can run the following command:
Currently, to prune images we must first log in to the CLI as a user with an access token. The user must also have the cluster role system:image-pruner or greater (for example, cluster-admin).
Pruning images removes data from the integrated registry unless --prune-registry=false is used. For this operation to work properly, the registry must be configured with storage:delete:enabled set to true.
Pruning images with the --namespace flag does not remove images, only image streams. Images are non-namespaced resources. Therefore, limiting pruning to a particular namespace makes it impossible to calculate their current usage.
By default, the integrated registry caches blobs metadata to reduce the number of requests to storage, and increase the speed of processing the request. Pruning does not update the integrated registry cache. Images pushed after pruning that contain pruned layers will be broken, because the pruned layers that have metadata in the cache will not be pushed. Therefore, it is necessary to clear the cache after pruning. This can be accomplished by redeploying the registry:
If the integrated registry uses a Redis cache, we must clean the database manually.
If redeploying the registry after pruning is not an option, then we must permanently disable the cache.
oc adm prune images operations require a route for the registry. Registry routes are not created by default. See Image Registry Operator for information on how to create a registry route and see Expose the registry for details on how to expose the registry service.
--all
--certificate-authority
--confirm
--force-insecure
--keep-tag-revisions=<N>
--keep-younger-than=<duration>
--prune-over-size-limit
--registry-url
--prune-registry
The --prune-over-size-limit flag cannot be combined with --keep-tag-revisions nor --keep-younger-than flags. Doing so returns information that this operation is not allowed.
Separating the removal of OpenShift image API objects and image data from the Registry by using --prune-registry=false followed by hard pruning the registry narrows some timing windows and is safer when compared to trying to prune both through one command. However, timing windows are not completely removed.
For example, we can still create a Pod referencing an image as pruning identifies that image for pruning. You should still keep track of an API Object created during the pruning operations that might reference images, so we can mitigate any references to deleted content.
Also, keep in mind that re-doing the pruning without the --prune-registry option or with --prune-registry=true does not lead to pruning the associated storage in the image registry for images previously pruned by --prune-registry=false. Any images that were pruned with --prune-registry=false can only be deleted from registry storage by hard pruning the registry.
The secure connection is the preferred and recommended approach. It is done over HTTPS protocol with a mandatory certificate verification. The prune command always attempts to use it if possible. If it is not possible, in some cases it can fall-back to insecure connection, which is dangerous. In this case, either certificate verification is skipped or plain HTTP protocol is used.
The fall-back to insecure connection is allowed in the following cases unless --certificate-authority is specified:
If the registry is secured by a certificate authority different from the one used by OpenShift, it must be specified using the --certificate-authority flag. Otherwise, the prune command fails with an error.
If the images keep accumulating and the prune command removes just a small portion of what you expect, ensure that you understand the image prune conditions that must apply for an image to be considered a candidate for pruning.
Ensure that images we want removed occur at higher positions in each tag history than your chosen tag revisions threshold. For example, consider an old and obsolete image named sha:abz. By running the following command in namespace N, where the image is tagged, the image is tagged three times in a single imagestream named myapp:
When default options are used, the image is never pruned because it occurs at position 0 in a history of myapp:v2.1-may-2016 tag. For an image to be considered for pruning, the administrator must either:
This action effectively removes all the tags from all the namespaces with underlying images, unless they are younger or they are referenced by objects younger than the specified threshold.
Tags having a date or time of a particular image's Build in their names should be avoided, unless the image must be preserved for an undefined amount of time. Such tags tend to have just one image in its history, which effectively prevents them from ever being pruned.
If you see a message similar to the following in the output of the oadm prune images command, then the registry is not secured and the oadm prune images client attempts to use a secure connection:
If you see one of the following errors in the output of the oadm prune images command, it means that the registry is secured using a certificate signed by a certificate authority other than the one used by oadm prune images client for connection verification:
By default, the certificate authority data stored in the user's configuration file are used; the same is true for communication with the master API.
Use the --certificate-authority option to provide the right certificate authority for the container image registry server.
The following error means that the certificate authority used to sign the certificate of the secured container image registry is different than the authority used by the client:
Make sure to provide the right one with the flag --certificate-authority.
As a workaround, the --force-insecure flag can be added instead. However, this is not recommended.
Additional resources
The OpenShift Container Registry can accumulate blobs that are not referenced by the OpenShift cluster's etcd. The basic pruning images procedure, therefore, is unable to operate on them. These are called orphaned blobs.
Orphaned blobs can occur from the following scenarios:
Hard pruning the registry, a separate procedure from basic image pruning, allows cluster administrators to remove orphaned blobs. You should hard prune if we are running out of storage space in the OpenShift Container Registry and believe we have orphaned blobs.
This should be an infrequent operation and is necessary only when we have evidence that significant numbers of new orphans have been created. Otherwise, we can perform standard image pruning at regular intervals, for example, once a day (depending on the number of images being created).
To hard prune orphaned blobs from the registry:
Log in to the cluster with the CLI as a user with an access token.
Basic image pruning removes additional images that are no longer needed. The hard prune does not remove images on its own. It only removes blobs stored in the registry storage. Therefore, you should run this just before the hard prune.
If the registry is not running in read-only mode, any pushes happening at the same time as the prune will either:
Pushes will not succeed until the registry is switched back to read-write mode. Therefore, the hard prune must be carefully scheduled.
To switch the registry to read-only mode:
The service account used to run the registry instances requires additional permissions in order to list some resources.
To see how many blobs would be removed, run the hard pruner in dry-run mode. No changes are actually made:
Alternatively, to get the exact paths for the prune candidates, increase the logging level:
Truncated sample output
Execute the following command inside one running instance of a docker-registry pod to run the hard prune:
Sample output
After the prune is finished, the registry can be switched back to read-write mode by executing:
Cron jobs can perform pruning of successful jobs, but might not properly handle failed jobs. Therefore, the cluster administrator should perform regular cleanup of jobs manually. They should also restrict the access to cron jobs to a small group of trusted users and set appropriate quota to prevent the cron job from creating too many jobs and pods.
Additional resources
This guide outlines the basics of the Operator SDK and walks Operator authors with cluster administrator access to a Kubernetes-based cluster (such as OpenShift) through an example of building a simple Go-based Memcached Operator and managing its lifecycle from installation to upgrade.
This is accomplished using two centerpieces of the Operator Framework: the Operator SDK (the operator-sdk CLI tool and controller-runtime library API) and the Operator Lifecycle Manager (OLM).
OpenShift 4 supports Operator SDK v0.7.0 or later.
The Operator Framework is an open source toolkit to manage Kubernetes native applications, called Operators. Operators take advantage of Kubernetes' extensibility to deliver the automation advantages of cloud services like provisioning, scaling, and backup and restore, while being able to run anywhere that Kubernetes can run.
Operators make it easy to manage complex, stateful applications on top of Kubernetes. However, writing an Operator today can be difficult because of challenges such as using low-level APIs, writing boilerplate, and a lack of modularity, which leads to duplication.
The Operator SDK is a framework designed to make writing Operators easier by providing:
The Operator SDK provides the following workflow to develop a new Operator:
At a high level, an Operator using the Operator SDK processes events for watched resources in an Operator author-defined handler and takes actions to reconcile the state of the application.
The main program for the Operator is the manager file at cmd/manager/main.go. The manager automatically registers the scheme for all Custom Resources (CRs) defined under pkg/apis/ and runs all controllers under pkg/controller/.
The manager can restrict the namespace that all controllers watch for resources:
By default, this is the namespace that the Operator is running in. To watch all namespaces, we can leave the namespace option empty:
Prometheus is an open-source systems monitoring and alerting toolkit. The Prometheus Operator creates, configures, and manages Prometheus clusters running on Kubernetes-based clusters, such as OpenShift.
Helper functions exist in the Operator SDK by default to automatically set up metrics in any generated Go-based Operator for use on clusters where the Prometheus Operator is deployed.
The Operator SDK has a CLI tool that assists developers in creating, building, and deploying a new Operator project. We can install the SDK CLI on your workstation so we are prepared to start authoring our own Operators.
This guide uses minikube v0.25.0+ as the local Kubernetes cluster and quay.io for the public registry.
We can download and install a pre-built release binary of the SDK CLI from the project on GitHub.
Prerequisites
If we do not have the maintainer's public key on your workstation, you will get the following error:
To download the key, run, replacing <key_id> with the RSA key string provided in the output of the previous command:
We can install the SDK CLI using Homebrew.
Prerequisites
We can obtain the Operator SDK source code to compile and install the SDK CLI.
Prerequisites
This installs the CLI binary operator-sdk at $GOPATH/bin.
The Operator SDK makes it easier to build Kubernetes native applications, a process that can require deep, application-specific operational knowledge. The SDK not only lowers that barrier, but it also helps reduce the amount of boilerplate code needed for many common management capabilities, such as metering or monitoring.
This procedure walks through an example of building a simple Memcached Operator using tools and libraries provided by the SDK.
Prerequisites
Use the CLI to create a new memcached-operator project:
This scaffolds the Memcached resource API under pkg/apis/cache/v1alpha1/.
This scaffolds a new Controller implementation under pkg/controller/memcached/.
The example controller executes the following reconciliation logic for each Memcached CR:
The next two sub-steps inspect how the Controller watches resources and how the reconcile loop is triggered. We can skip these steps to go directly to building and running the Operator.
The first watch is for the Memcached type as the primary resource. For each Add, Update, or Delete event, the reconcile loop is sent a reconcile Request (a <namespace>:<name> key) for that Memcached object:
The next watch is for Deployments, but the event handler maps each event to a reconcile Request for the owner of the Deployment. In this case, this is the Memcached object for which the Deployment was created. This allows the controller to watch Deployments as a secondary resource:
Based on the return value of Reconcile() the reconcile Request may be requeued and the loop may be triggered again:
Choose one of the following methods.
This method is preferred during development cycle to deploy and test faster.
Run the Operator locally with the default Kubernetes configuration file present at $HOME/.kube/config:
We can use a specific kubeconfig using the flag --kubeconfig=<path/to/kubeconfig>.
The previous section has covered manually running an Operator. In the next sections, we will explore using the Operator Lifecycle Manager (OLM), which is what enables a more robust deployment model for Operators being run in production environments.
The Operator Lifecycle Manager helps you to install, update, and generally manage the lifecycle of all of the Operators (and their associated services) on a Kubernetes cluster. It runs as an Kubernetes extension and lets you use oc for all the lifecycle management functions without any additional tools.
Prerequisites
An Operator manifest describes how to display, create, and manage the application, in this case Memcached, as a whole. It is defined by a ClusterServiceVersion (CSV) object and is required for the Operator Lifecycle Manager to function.
We can use the following command to generate CSV manifests:
This command is run from the memcached-operator/ directory that was created when you built the Memcached Operator.
For the purpose of this guide, we will continue with this predefined manifest file for the next steps. We can alter the image field within this manifest to reflect the image you built in previous steps, but it is unnecessary.
See Building a ClusterServiceVersion for the Operator Framework for more information on manually defining a manifest file.
When you apply this manifest, the cluster does not immediately update because it does not yet meet the requirements specified in the manifest.
These files were generated into the deploy/ directory by the Operator SDK when you built the Memcached Operator.
Because the Operator Lifecycle Manager creates Operators in a particular namespace when a manifest is applied, administrators can leverage the native Kubernetes RBAC permission model to restrict which users are allowed to install Operators.
The Memcached Operator is now running in the default namespace. Users interact with Operators via instances of CustomResources; in this case, the resource has the kind Memcached. Native Kubernetes RBAC also applies to CustomResources, providing administrators control over who can interact with each Operator.
Creating instances of Memcached in this namespace will now trigger the Memcached Operator to instantiate pods running the memcached server managed by the Operator. The more CustomResources created, the more unique instances of Memcached are managed by the Memcached Operator running in this namespace.
Manually apply an update to the Operator by creating a new Operator manifest with a replaces field that references the old Operator manifest. The Operator Lifecycle Manager ensures that all resources being managed by the old Operator have their ownership moved to the new Operator without fear of any programs stopping execution. It is up to the Operators themselves to execute any data migrations required to upgrade resources to run under a new version of the Operator.
The following command demonstrates applying a new Operator manifest file using a new version of the Operator and shows that the pods remain executing:
This guide outlines Ansible support in the Operator SDK and walks Operator authors through examples building and running Ansible-based Operators with the operator-sdk CLI tool that use Ansible playbooks and modules.
The Operator Framework is an open source toolkit to manage Kubernetes native applications, called Operators. This framework includes the Operator SDK, which assists developers in bootstrapping and building an Operator based on their expertise without requiring knowledge of Kubernetes API complexities.
One of the Operator SDK's options for generating an Operator project includes leveraging existing Ansible playbooks and modules to deploy Kubernetes resources as a unified application, without having to write any Go code.
Operators use the Kubernetes' extension mechanism, Custom Resource Definitions (CRDs), so your Custom Resource (CR) looks and acts just like the built-in, native Kubernetes objects.
The CR file format is a Kubernetes resource file. The object has mandatory and optional fields:
The following list of CR annotations modify the behavior of the Operator:
Example Ansible-based Operator annotation
The Watches file contains a list of mappings from Custom Resources (CRs), identified by its Group, Version, and Kind, to an Ansible role or playbook. The Operator expects this mapping file in a predefined location, /opt/ansible/watches.yaml.
Example Watches file
Advanced features can be enabled by adding them to your Watches file per GVK (group, version, and kind). They can go below the group, version, kind and playbook or role fields.
Some features can be overridden per resource using an annotation on that Custom Resource (CR). The options that can be overridden have the annotation specified below.
Example Watches file with advanced options
Extra variables can be sent to Ansible, which are then managed by the Operator. The spec section of the Custom Resource (CR) passes along the key-value pairs as extra variables. This is equivalent to extra variables passed in to the ansible-playbook command.
The Operator also passes along additional variables under the meta field for the name of the CR and the namespace of the CR.
For the following CR example:
The structure passed to Ansible as extra variables is:
The message and newParameter fields are set in the top level as extra variables, and meta provides the relevant metadata for the CR as defined in the Operator. The meta fields can be accessed using dot notation in Ansible, for example:
Ansible Runner keeps information about Ansible runs in the container. This is located at /tmp/ansible-operator/runner/<group>/<version>/<kind>/<namespace>/<name>.
Additional resources
The Operator SDK has a CLI tool that assists developers in creating, building, and deploying a new Operator project. We can install the SDK CLI on your workstation so we are prepared to start authoring our own Operators.
This guide uses minikube v0.25.0+ as the local Kubernetes cluster and quay.io for the public registry.
We can download and install a pre-built release binary of the SDK CLI from the project on GitHub.
Prerequisites
If we do not have the maintainer's public key on your workstation, you will get the following error:
To download the key, run, replacing <key_id> with the RSA key string provided in the output of the previous command:
We can install the SDK CLI using Homebrew.
Prerequisites
We can obtain the Operator SDK source code to compile and install the SDK CLI.
Prerequisites
This installs the CLI binary operator-sdk at $GOPATH/bin.
This procedure walks through an example of building a simple Memcached Operator powered by Ansible playbooks and modules using tools and libraries provided by the Operator SDK.
Prerequisites
To create a new Ansible-based, namespace-scoped memcached-operator project and change to its directory, use the following commands:
This creates the memcached-operator project specifically for watching the Memcached resource with APIVersion example.com/v1apha1 and Kind Memcached.
To create your memcached-operator project to be cluster-scoped and change to its directory, use the following commands:
Using the --cluster-scoped flag scaffolds the new Operator with the following modifications:
For this example, the memcached-operator executes the following reconciliation logic for each Memcached Custom Resource (CR):
By default, the memcached-operator watches Memcached resource events as shown in the watches.yaml file and executes the Ansible role Memcached:
We can optionally customize the following logic in the watches.yaml file:
Modify the generated Ansible role under the roles/memcached/ directory. This Ansible role controls the logic that is executed when a resource is modified.
Defining the spec for an Ansible-based Operator can be done entirely in Ansible. The Ansible Operator passes all key-value pairs listed in the CR spec field along to Ansible as variables. The names of all variables in the spec field are converted to snake case (lowercase with an underscore) by the Operator before running Ansible. For example, serviceAccount in the spec becomes service_account in Ansible.
You should perform some type validation in Ansible on the variables to ensure that our application is receiving expected input.
In case the user does not set the spec field, set a default by modifying the roles/memcached/defaults/main.yml file:
With the Memcached spec now defined, we can define what Ansible is actually executed on resource changes. Because this is an Ansible role, the default behavior executes the tasks in the roles/memcached/tasks/main.yml file.
The goal is for Ansible to create a Deployment if it does not exist, which runs the memcached:1.4.36-alpine image. Ansible 2.7+ supports the k8s Ansible module, which this example leverages to control the Deployment definition.
Modify the roles/memcached/tasks/main.yml to match the following:
This example used the size variable to control the number of replicas of the Memcached Deployment. This example sets the default to 1, but any user can create a CR that overwrites the default.
Before running the Operator, Kubernetes needs to know about the new Custom Resource Definition (CRD) the Operator will be watching. Deploy the Memcached Custom Resource Definition:
There are two ways to build and run the Operator:
Choose one of the following methods:
If we are performing these steps on OSX, use the following commands instead:
Ensure that Ansible Runner and Ansible Runner HTTP Plug-in are installed or else you will see unexpected errors from Ansible Runner when a CR is created.
It is also important that the role path referenced in the watches.yaml file exists on your machine. Because normally a container is used where the role is put on disk, the role must be manually copied to the configured Ansible roles path (for example /etc/ansible/roles).
To run the Operator locally with a provided Kubernetes configuration file:
To manage the lifecycle of our application on Kubernetes using Ansible, we can use the k8s Ansible module. This Ansible module allows a developer to either leverage their existing Kubernetes resource files (written in YAML) or express the lifecycle management in native Ansible.
One of the biggest benefits of using Ansible in conjunction with existing Kubernetes resource files is the ability to use Jinja templating so that we can customize resources with the simplicity of a few variables in Ansible.
This section goes into detail on usage of the k8s Ansible module. To get started, install the module on the local workstation and test it using a playbook before moving on to using it within an Operator.
To install the k8s Ansible module on the local workstation:
Sometimes, it is beneficial for a developer to run the Ansible code from their local machine as opposed to running and rebuilding the Operator each time.
After we are familiar using the k8s Ansible module locally, we can trigger the same Ansible logic inside of an Operator when a Custom Resource (CR) changes. This example maps an Ansible role to a specific Kubernetes resource that the Operator watches. This mapping is done in the Watches file.
After getting comfortable testing Ansible workflows locally, we can test the logic inside of an Ansible-based Operator running locally.
To do so, use the operator-sdk up local command from the top-level directory of the Operator project. This command reads from the ./watches.yaml file and uses the ~/.kube/config file to communicate with a Kubernetes cluster just as the k8s Ansible module does.
This is cumbersome because changes are not reflected from the current directory. Instead, change the role field to point to the current directory and comment out the existing line:
Because the spec field is not set, Ansible is invoked with no extra variables. The next section covers how extra variables are passed from a CR to Ansible. This is why it is important to set sane defaults for the Operator.
After getting familiar running Ansible logic inside of an Ansible-based Operator locally, we can test the Operator inside of a Pod on a Kubernetes cluster, such as OpenShift. Running as a Pod on a cluster is preferred for production use.
If we are performing these steps on OSX, use the following command instead:
Ansible-based Operators automatically update Custom Resource (CR) status subresources with generic information about the previous Ansible run. This includes the number of successful and failed tasks and relevant error messages as shown:
Ansible-based Operators also allow Operator authors to supply custom status values with the k8s_status Ansible module. This allows the author to update the status from within Ansible with any key-value pair as desired.
By default, Ansible-based Operators always include the generic Ansible run output as shown above. If you would prefer our application did not update the status with Ansible output, we can track the status manually from our application.
Additional resources
If your Operator takes advantage of the k8s_status Ansible module and we want to test the Operator locally with the operator-sdk up local command, we must install the module in a location that Ansible expects. This is done with the library configuration option for Ansible.
For this example, assume the user is placing third-party Ansible modules in the /usr/share/ansible/library/ directory.
This guide outlines Helm chart support in the Operator SDK and walks Operator authors through an example of building and running an Nginx Operator with the operator-sdk CLI tool that uses an existing Helm chart.
The Operator Framework is an open source toolkit to manage Kubernetes native applications, called Operators. This framework includes the Operator SDK, which assists developers in bootstrapping and building an Operator based on their expertise without requiring knowledge of Kubernetes API complexities.
One of the Operator SDK's options for generating an Operator project includes leveraging an existing Helm chart to deploy Kubernetes resources as a unified application, without having to write any Go code. Such Helm-based Operators are designed to excel at stateless applications that require very little logic when rolled out, because changes should be applied to the Kubernetes objects that are generated as part of the chart. This may sound limiting, but can be sufficient for a surprising amount of use-cases as shown by the proliferation of Helm charts built by the Kubernetes community.
The main function of an Operator is to read from a custom object that represents our application instance and have its desired state match what is running. In the case of a Helm-based Operator, the object's spec field is a list of configuration options that are typically described in Helm's values.yaml file. Instead of setting these values with flags using the Helm CLI (for example, helm install -f values.yaml), we can express them within a Custom Resource (CR), which, as a native Kubernetes object, enables the benefits of RBAC applied to it and an audit trail.
For an example of a simple CR called Tomcat:
The replicaCount value, 2 in this case, is propagated into the chart's templates where following is used:
After an Operator is built and deployed, we can deploy a new instance of an app by creating a new instance of a CR, or list the different instances running in all environments using the oc command:
There is no requirement use the Helm CLI or install Tiller; Helm-based Operators import code from the Helm project. All we have to do is have an instance of the Operator running and register the CR with a Custom Resource Definition (CRD). And because it obeys RBAC, we can more easily prevent production changes.
The Operator SDK has a CLI tool that assists developers in creating, building, and deploying a new Operator project. We can install the SDK CLI on your workstation so we are prepared to start authoring our own Operators.
This guide uses minikube v0.25.0+ as the local Kubernetes cluster and quay.io for the public registry.
We can download and install a pre-built release binary of the SDK CLI from the project on GitHub.
Prerequisites
If we do not have the maintainer's public key on your workstation, you will get the following error:
To download the key, run, replacing <key_id> with the RSA key string provided in the output of the previous command:
We can install the SDK CLI using Homebrew.
Prerequisites
We can obtain the Operator SDK source code to compile and install the SDK CLI.
Prerequisites
This installs the CLI binary operator-sdk at $GOPATH/bin.
This procedure walks through an example of building a simple Nginx Operator powered by a Helm chart using tools and libraries provided by the Operator SDK.
It is best practice to build a new Operator for each chart. This can allow for more native-behaving Kubernetes APIs (for example, oc get Nginx) and flexibility if you ever want to write a fully-fledged Operator in Go, migrating away from a Helm-based Operator.
Prerequisites
To create a new Helm-based, namespace-scoped nginx-operator project, use the following command:
This creates the nginx-operator project specifically for watching the Nginx resource with APIVersion example.com/v1apha1 and Kind Nginx.
To create the nginx-operator project to be cluster-scoped, use the following command:
Using the --cluster-scoped flag scaffolds the new Operator with the following modifications:
For this example, the nginx-operator executes the following reconciliation logic for each Nginx Custom Resource (CR):
By default, the nginx-operator watches Nginx resource events as shown in the watches.yaml file and executes Helm releases using the specified chart:
When a Helm Operator project is created, the Operator SDK creates an example Helm chart that contains a set of templates for a simple Nginx release.
For this example, templates are available for Deployment, Service, and Ingress resources, along with a NOTES.txt template, which Helm chart developers use to convey helpful information about a release.
If we are not already familiar with Helm Charts, take a moment to review the Helm Chart developer documentation.
Helm uses a concept called values to provide customizations to a Helm chart's defaults, which are defined in the Helm chart's values.yaml file.
Override these defaults by setting the desired values in the CR spec. We can use the number of replicas as an example:
Update the deploy/crds/example_v1alpha1_nginx_cr.yaml file to look like the following:
The Helm Operator applies the entire spec as if it was the contents of a values file, just like the helm install -f ./overrides.yaml command works.
Before running the Operator, Kubernetes needs to know about the new custom resource definition (CRD) the operator will be watching. Deploy the following Custom Resource Definition:
There are two ways to build and run the Operator:
Choose one of the following methods:
If we are performing these steps on OSX, use the following commands instead:
It is important that the chart path referenced in the watches.yaml file exists on your machine. By default, the watches.yaml file is scaffolded to work with an Operator image built with the operator-sdk build command. When developing and testing your operator with the operator-sdk up local command, the SDK looks in the local file system for this path.
To run the Operator locally with a provided Kubernetes configuration file:
Apply the Nginx CR that you modified earlier:
Ensure that the nginx-operator creates the Deployment for the CR:
Check the Pods to confirm two replicas were created:
Check that the Service port is set to 8080:
Change the spec.replicaCount field from 2 to 3, remove the spec.service field, and apply the change:
Confirm that the Operator changes the Deployment size:
Check that the Service port is set to the default 80:
A ClusterServiceVersion (CSV) is a YAML manifest created from Operator metadata that assists the Operator Lifecycle Manager (OLM) in running the Operator in a cluster. ClusterServiceVersions are the metadata that accompany an Operator container image, and are used to populate user interfaces with information like logo, description, and version. A ClusterServiceVersion is also a source of technical information that is required to run the Operator, like the RBAC rules it requires and which Custom Resources (CRs) it manages or depends on.
The Operator SDK includes the olm-catalog gen-csv subcommand to generate a ClusterServiceVersion (CSV) for the current Operator project customized using information contained in manually-defined YAML manifests and Operator source files.
A CSV-generating command removes the responsibility of Operator authors having in-depth Operator Lifecycle Manager (OLM) knowledge in order for their Operator to interact with Operator Lifecycle Manager or publish metadata to the Catalog Registry. Further, because the ClusterServiceVersion spec will likely change over time as new Kubernetes and Operator Lifecycle Manager features are implemented, the Operator SDK is equipped to easily extend its update system to handle new ClusterServiceVersion features going forward.
The ClusterServiceVersion version is the same as the Operator's, and a new ClusterServiceVersion is generated when upgrading Operator versions. Operator authors can use the --csv-version flag to have their Operators' state encapsulated in a ClusterServiceVersion with the supplied semantic version:
This action is idempotent and only updates the ClusterServiceVersion file when a new version is supplied, or a YAML manifest or source file is changed. Operator authors should not have to directly modify most fields in a ClusterServiceVersion manifest. Those that require modification are defined in this guide. For example, the ClusterServiceVersion version must be included in metadata.name.
An Operator project's deploy/ directory is the standard location for all manifests required to deploy an Operator. The Operator SDK can use data from manifests in deploy/ to write a CSV. The following command:
writes a ClusterServiceVersion YAML file to the deploy/olm-catalog/ directory by default.
Exactly three types of manifests are required to generate a CSV:
Operator authors may have different versioning requirements for these files and can configure which specific files are included in the deploy/olm-catalog/csv-config.yaml file.
Depending on whether an existing ClusterServiceVersion is detected, and assuming all configuration defaults are used, the olm-catalog gen-csv subcommand either:
or:
Individual YAML fields are overwritten and not the entire file, as descriptions and other non-generated parts of a ClusterServiceVersion should be preserved.
Operator authors can configure ClusterServiceVersion composition by populating several fields in the deploy/olm-catalog/csv-config.yaml file:
Many ClusterServiceVersion fields cannot be populated using generated, non-SDK-specific manifests. These fields are mostly human-written, English metadata about the Operator and various Custom Resource Definitions (CRDs).
Operator authors must directly modify their ClusterServiceVersion YAML file, adding personalized data to the following required fields. The Operator SDK gives a warning ClusterServiceVersion generation when a lack of data in any of the required fields is detected.
Table Required
Table Optional
Further details on what data each field above should hold are found in the CSV spec.
Several YAML fields currently requiring user intervention can potentially be parsed from Operator code; such Operator SDK functionality will be addressed in a future design document.
Prerequisites
There are two types of Custom Resource Definitions (CRDs) that your Operator may use: ones that are owned by it and ones that it depends on, which are required.
The Custom Resource Definitions owned by your Operator are the most important part of the CSV. This establishes the link between your Operator and the required RBAC rules, dependency management, and other Kubernetes concepts. It is common for your Operator to use multiple Custom Resource Definitions to link together concepts, such as top-level database configuration in one object and a representation of ReplicaSets in another. Each one should be listed out in the ClusterServiceVersion file.
Owned Custom Resource Definition fields
It is recommended to only list out the objects that are important to a human, not an exhaustive list of everything you orchestrate. For example, ConfigMaps that store internal state that should not be modified by a user should not appear here.
There are three types of descriptors:
All Descriptors accept the following fields:
Also see the openshift/console project for more information on Descriptors in general.
The following example depicts a MongoDB Standalone Custom Resource Definition that requires some user input in the form of a Secret and ConfigMap, and orchestrates Services, StatefulSets, Pods and ConfigMaps:
Example owned Custom Resource Definition
Relying on other required Custom Resource Definitions is completely optional and only exists to reduce the scope of individual Operators and provide a way to compose multiple Operators together to solve an end-to-end use case.
An example of this is an Operator that might set up an application and install an etcd cluster (from an etcd Operator) to use for distributed locking and a Postgres database (from a Postgres Operator) for data storage.
The Operator Lifecycle Manager (OLM) checks against the available Custom Resource Definitions and Operators in the cluster to fulfill these requirements. If suitable versions are found, the Operators are started within the desired namespace and a Service Account created for each Operator to create, watch, and modify the Kubernetes resources required.
Required Custom Resource Definition fields
Example required Custom Resource Definition
Users of the Operator will need to be aware of which options are required versus optional. We can provide templates for each of the Custom Resource Definitions with a minimum set of configuration as an annotation named alm-examples. Compatible UIs will pre-fill this template for users to further customize.
The annotation consists of a list of the kind, for example, the Custom Resource Definition name and the corresponding metadata and spec of the Kubernetes object.
The following full example provides templates for EtcdCluster, EtcdBackup and EtcdRestore:
As with Custom Resource Definitions, there are two types of APIServices that your Operator may use: owned and required.
When a ClusterServiceVersion owns an APIService, it is responsible for describing the deployment of the extension api-server that backs it and the group-version-kinds it provides.
An APIService is uniquely identified by the group-version it provides and can be listed multiple times to denote the different kinds it is expected to provide.
Owned APIService fields
It is recommended to only list out the objects that are important to a human, not an exhaustive list of everything you orchestrate. For example, ConfigMaps that store internal state that should not be modified by a user should not appear here.
The Operator Lifecycle Manager (OLM) is responsible for creating or replacing the Service and APIService resources for each unique owned APIService:
The Operator Lifecycle Manager handles generating a serving key/cert pair whenever an owned APIService is being installed. The serving certificate has a CN containing the host name of the generated Service resource and is signed by the private key of the CA bundle embedded in the corresponding APIService resource.
The cert is stored as a type kubernetes.io/tls Secret in the deployment namespace, and a Volume named apiservice-cert is automatically appended to the Volumes section of the deployment in the ClusterServiceVersion matching the APIServiceDescription's DeploymentName field.
If one does not already exist, a VolumeMount with a matching name is also appended to all containers of that deployment. This allows users to define a VolumeMount with the expected name to accommodate any custom path requirements. The generated VolumeMount's path defaults to /apiserver.local.config/certificates and any existing VolumeMounts with the same path are replaced.
The Operator Lifecycle Manager ensures all required ClusterServiceVersions have an APIService that is available and all expected group-version-kinds are discoverable before attempting installation. This allows a ClusterServiceVersion to rely on specific kinds provided by APIServices it does not own.
Required APIService fields
This guide describes the built-in monitoring support provided by the Operator SDK using the Prometheus Operator and details usage for Operator authors.
Prometheus is an open-source systems monitoring and alerting toolkit. The Prometheus Operator creates, configures, and manages Prometheus clusters running on Kubernetes-based clusters, such as OpenShift.
Helper functions exist in the Operator SDK by default to automatically set up metrics in any generated Go-based Operator for use on clusters where the Prometheus Operator is deployed.
In Go-based Operators generated using the Operator SDK, the following function exposes general metrics about the running program:
These metrics are inherited from the controller-runtime library API. By default, the metrics are served on 0.0.0.0:8383/metrics.
A Service object is created with the metrics port exposed, which can be then accessed by Prometheus. The Service object is garbage collected when the leader Pod's root owner is deleted.
The following example is present in the cmd/manager/main.go file in all Operators generated using the Operator SDK:
Operator authors can modify the port that metrics are exposed on.
Prerequisites
A ServiceMonitor is a Custom Resource Definition (CRD) provided by the Prometheus Operator that discovers the Endpoints in Service objects and configures Prometheus to monitor those Pods.
In Go-based Operators generated using the Operator SDK, the GenerateServiceMonitor() helper function can take a Service object and generate a ServiceMonitor Custom Resource (CR) based on it.
Additional resources
Operator authors can add Service target discovery of created monitoring Services using the metrics.CreateServiceMonitor() helper function, which accepts the newly created Service.
Prerequisites
During the lifecycle of an Operator, it is possible that there may be more than one instance running at any given time, for example when rolling out an upgrade for the Operator. In such a scenario, it is necessary to avoid contention between multiple Operator instances using leader election. This ensures only one leader instance handles the reconciliation while the other instances are inactive but ready to take over when the leader steps down.
There are two different leader election implementations to choose from, each with its own trade-off:
By default, the Operator SDK enables the Leader-for-life implementation. Consult the related Go documentation for both approaches to consider the trade-offs that make sense for your use case,
The following examples illustrate how to use the two options.
With the Leader-for-life election implementation, a call to leader.Become() blocks the Operator as it retries until it can become the leader by creating the ConfigMap named memcached-operator-lock:
If the Operator is not running inside a cluster, leader.Become() simply returns without error to skip the leader election since it cannot detect the Operator's namespace.
The Leader-with-lease implementation can be enabled using the Manager Options for leader election:
When the Operator is not running in a cluster, the Manager returns an error when starting since it cannot detect the Operator's namespace in order to create the ConfigMap for leader election. We can override this namespace by setting the Manager’s LeaderElectionNamespace option.
This guide documents the Operator SDK CLI commands and their syntax:
The operator-sdk build command compiles the code and builds the executables. After build completes, the image is built locally in docker. It must then be pushed to a remote registry.
build arguments
build flags
If --enable-tests is set, the build command also builds the testing binary, adds it to the container image, and generates a deploy/test-pod.yaml file that allows a user to run the tests as a Pod on a cluster.
Example output
The operator-sdk completion command generates shell completions to make issuing CLI commands quicker and easier.
completion subcommands
completion flags
Example output
The operator-sdk print-deps command prints the most recent Golang packages and versions required by Operators. It prints in columnar format by default.
print-deps flags
Example output
The operator-sdk generate command invokes a specific generator to generate code as needed.
generate subcommands
This command must be run every time the API (spec and status) for a custom resource type is updated.
Example output
The operator-sdk olm-catalog is the parent command for all Operator Lifecycle Manager (OLM) Catalog-related commands.
The gen-csv subcommand writes a Cluster Service Version (CSV) manifest and optionally Custom Resource Definition (CRD) files to deploy/olm-catalog/<operator_name>/<csv_version>.
olm-catalog gen-csv flags
Example output
The operator-sdk new command creates a new Operator application and generates (or scaffolds) a default project directory layout based on the input <project_name>.
new arguments
new flags
Example usage for Go project
Example usage for Ansible project
The operator-sdk add command adds a controller or resource to the project. The command must be run from the Operator project root directory.
add subcommands
add api flags
Example add api output
Example add controller output
Example add crd output
The operator-sdk test command can test the Operator locally.
The local subcommand runs Go tests built using the Operator SDK's test framework locally.
test local arguments
test local flags
Example output
The operator-sdk up command has subcommands that can launch the Operator in various ways.
The local subcommand launches the Operator on the local machine by building the Operator binary with the ability to access a Kubernetes cluster using a kubeconfig file.
up local arguments
Example output
The following example uses the default kubeconfig, the default namespace environment variable, and passes in flags for the Operator. To use the Operator flags, your Operator must know how to handle the option. For example, for an Operator that understands the resync-interval flag:
If we are planning on using a different namespace than the default, use the --namespace flag to change where the Operator is watching for Custom Resources (CRs) to be created:
For this to work, your Operator must handle the WATCH_NAMESPACE environment variable. This can be accomplished using the utility functionk8sutil.GetWatchNamespace in your Operator.
The operator-sdk CLI generates a number of packages for each Operator project. The following sections describes a basic rundown of each generated file and directory.
Go-based Operator projects (the default type) generated using the operator-sdk new command contain the following directories and files:
Helm-based Operator projects generated using the operator-sdk new --type helm command contain the following directories and files:
Basic pruning operations
$ oc adm prune <object_type> <options>
Pruning groups
$ oc adm prune groups \
    --sync-config=path/to/sync/config [<options>]
Options
Description
Indicate that pruning should occur, instead of performing a dry-run.
Path to the group blacklist file.
Path to the group whitelist file.
Path to the synchronization configuration file.
$ oc adm prune groups --sync-file=ldap-sync-config.yaml
$ oc adm prune groups --sync-file=ldap-sync-config.yaml --confirm
Pruning deployments
$ oc adm prune deployments [<options>]
Option
Description
Indicate that pruning should occur, instead of performing a dry-run.
Prune all deployments that no longer have a DeploymentConfig, has status is Complete or Failed, and has a replica count of zero.
Per DeploymentConfig, keep the last N deployments that have a status of Complete and replica count of zero. (default 5)
Per DeploymentConfig, keep the last N deployments that have a status of Failed and replica count of zero. (default 1)
Do not prune any object that is younger than <duration> relative to the current time. (default 60m) Valid units of measurement include nanoseconds (ns), microseconds (us), milliseconds (ms), seconds (s), minutes (m), and hours (h).
$ oc adm prune deployments --orphans --keep-complete=5 --keep-failed=1 \
    --keep-younger-than=60m
$ oc adm prune deployments --orphans --keep-complete=5 --keep-failed=1 \
    --keep-younger-than=60m --confirm
Pruning builds
$ oc adm prune builds [<options>]
Option
Description
Indicate that pruning should occur, instead of performing a dry-run.
Prune all builds whose Build Configuration no longer exists, status is complete, failed, error, or canceled.
Per Build Configuration, keep the last N builds whose status is complete (default 5).
Per Build Configuration, keep the last N builds whose status is failed, error, or canceled (default 1).
Do not prune any object that is younger than <duration> relative to the current time (default 60m).
$ oc adm prune builds --orphans --keep-complete=5 --keep-failed=1 \
    --keep-younger-than=60m
$ oc adm prune builds --orphans --keep-complete=5 --keep-failed=1 \
    --keep-younger-than=60m --confirm
Pruning images
$ oc adm prune images [<options>]
$ oc rollout latest dc/docker-registry
Option
Description
Include images that were not pushed to the registry, but have been mirrored by pullthrough. This is on by default. To limit the pruning to images that were pushed to the integrated registry, pass --all=false.
The path to a certificate authority file to use when communicating with the OpenShift-managed registries. Defaults to the certificate authority data from the current user's configuration file. If provided, a secure connection is initiated.
Indicate that pruning should occur, instead of performing a dry-run. This requires a valid route to the integrated container image registry. If this command is run outside of the cluster network, the route must be provided using --registry-url.
Use caution with this option. Allow an insecure connection to the container registry that is hosted via HTTP or has an invalid HTTPS certificate.
For each imagestream, keep up to at most N image revisions per tag (default 3).
Do not prune any image that is younger than <duration> relative to the current time. Do not prune any image that is referenced by any other object that is younger than <duration> relative to the current time (default 60m).
Prune each image that exceeds the smallest limit defined in the same project. This flag cannot be combined with --keep-tag-revisions nor --keep-younger-than.
The address to use when contacting the registry. The command attempts to use a cluster-internal URL determined from managed images and imagestreams. In case it fails (the registry cannot be resolved or reached), an alternative route that works needs to be provided using this flag. The registry host name can be prefixed by https:// or http:// which enforces particular connection protocol.
In conjunction with the conditions stipulated by the other options, this option controls whether the data in the registry corresponding to the OpenShift image API object is pruned. By default, image pruning processes both the image API objects and corresponding data in the registry. This options is useful when we are only concerned with removing etcd content, possibly to reduce the number of image objects (but are not concerned with cleaning up registry storage) or intend to do that separately by hard pruning the registry, possibly during an appropriate maintenance window for the registry.
Image prune conditions
Run the image prune operation
$ oc adm prune images --keep-tag-revisions=3 --keep-younger-than=60m
$ oc adm prune images --prune-over-size-limit
$ oc adm prune images --keep-tag-revisions=3 --keep-younger-than=60m --confirm
$ oc adm prune images --prune-over-size-limit --confirm
Use secure or insecure connections
Image pruning problems
Images not being pruned
$ image_name="sha:abz"
$ oc get is -n N -o go-template='{{range $isi, $is := .items}}{{range $ti, $tag := $is.status.tags}}'\
  '{{range $ii, $item := $tag.items}}{{if eq $item.image "'"${image_name}"\
  $'"}}{{$is.metadata.name}}:{{$tag.tag}} at position {{$ii}} out of {{len $tag.items}}\n'\
  '{{end}}{{end}}{{end}}{{end}}'
myapp:v2 at position 4 out of 5
myapp:v2.1 at position 2 out of 2
myapp:v2.1-may-2016 at position 0 out of 1
Use a secure connection against insecure registry
error: error communicating with registry: Get https://172.30.30.30:5000/healthz: http: server gave HTTP response to HTTPS client
Use an insecure connection against a secured registry
error: error communicating with registry: Get http://172.30.30.30:5000/healthz: malformed HTTP response "\x15\x03\x01\x00\x02\x02"
error: error communicating with registry: [Get https://172.30.30.30:5000/healthz: x509: certificate signed by unknown authority, Get http://172.30.30.30:5000/healthz: malformed HTTP response "\x15\x03\x01\x00\x02\x02"]
Use the wrong certificate authority
error: error communicating with registry: Get https://172.30.30.30:5000/: x509: certificate signed by unknown authority
Hard pruning the registry
$ oc set env -n default \
    dc/docker-registry \
    'REGISTRY_STORAGE_MAINTENANCE_READONLY={"enabled":true}'
$ oc rollout -n default \
    latest dc/docker-registry
$ service_account=$(oc get -n default \
    -o jsonpath=$'system:serviceaccount:{.metadata.namespace}:{.spec.template.spec.serviceAccountName}\n' \
    dc/docker-registry)
$ oc adm policy add-cluster-role-to-user \
    system:image-pruner \
${service_account}$ oc -n default \
exec -i -t "$(oc -n default get pods -l deploymentconfig=docker-registry \
-o jsonpath=$'{.items[0].metadata.name}\n')" \
-- /usr/bin/dockerregistry -prune=check
$ oc -n default \
    exec "$(oc -n default get pods -l deploymentconfig=docker-registry \
      -o jsonpath=$'{.items[0].metadata.name}\n')" \
    -- /bin/sh \
    -c 'REGISTRY_LOG_LEVEL=info /usr/bin/dockerregistry -prune=check'
$ oc exec docker-registry-3-vhndw \
    -- /bin/sh -c 'REGISTRY_LOG_LEVEL=info /usr/bin/dockerregistry -prune=check'

time="2017-06-22T11:50:25.066156047Z" level=info msg="start prune (dry-run mode)" distribution_version="v2.4.1+unknown" kubernetes_version=v1.6.1+$Format:%h$ openshift_version=unknown
time="2017-06-22T11:50:25.092257421Z" level=info msg="Would delete blob: sha256:00043a2a5e384f6b59ab17e2c3d3a3d0a7de01b2cabeb606243e468acc663fa5" go.version=go1.7.5 instance.id=b097121c-a864-4e0c-ad6c-cc25f8fdf5a6
time="2017-06-22T11:50:25.092395621Z" level=info msg="Would delete blob: sha256:0022d49612807cb348cabc562c072ef34d756adfe0100a61952cbcb87ee6578a" go.version=go1.7.5 instance.id=b097121c-a864-4e0c-ad6c-cc25f8fdf5a6
time="2017-06-22T11:50:25.092492183Z" level=info msg="Would delete blob: sha256:0029dd4228961086707e53b881e25eba0564fa80033fbbb2e27847a28d16a37c" go.version=go1.7.5 instance.id=b097121c-a864-4e0c-ad6c-cc25f8fdf5a6
time="2017-06-22T11:50:26.673946639Z" level=info msg="Would delete blob: sha256:ff7664dfc213d6cc60fd5c5f5bb00a7bf4a687e18e1df12d349a1d07b2cf7663" go.version=go1.7.5 instance.id=b097121c-a864-4e0c-ad6c-cc25f8fdf5a6
time="2017-06-22T11:50:26.674024531Z" level=info msg="Would delete blob: sha256:ff7a933178ccd931f4b5f40f9f19a65be5eeeec207e4fad2a5bafd28afbef57e" go.version=go1.7.5 instance.id=b097121c-a864-4e0c-ad6c-cc25f8fdf5a6
time="2017-06-22T11:50:26.674675469Z" level=info msg="Would delete blob: sha256:ff9b8956794b426cc80bb49a604a0b24a1553aae96b930c6919a6675db3d5e06" go.version=go1.7.5 instance.id=b097121c-a864-4e0c-ad6c-cc25f8fdf5a6
...
Would delete 13374 blobs
Would free up 2.835 GiB of disk space
Use -prune=delete to actually delete the data
$ oc -n default \
    exec -i -t "$(oc -n default get pods -l deploymentconfig=docker-registry -o jsonpath=$'{.items[0].metadata.name}\n')" \
    -- /usr/bin/dockerregistry -prune=delete
$ oc exec docker-registry-3-vhndw \
    -- /usr/bin/dockerregistry -prune=delete

Deleted 13374 blobs
Freed up 2.835 GiB of disk space
$ oc set env -n default dc/docker-registry REGISTRY_STORAGE_MAINTENANCE_READONLY-
Pruning cron jobs
Operator SDK
Architecture of the Operator SDK
Workflow

Manager file
mgr, err := manager.New(cfg, manager.Options{Namespace: namespace})
mgr, err := manager.New(cfg, manager.Options{Namespace: ""}) Prometheus Operator support
Install the Operator SDK CLI
Install from GitHub release
RELEASE_VERSION=v0.8.0
$ curl -OJL https://github.com/operator-framework/operator-sdk/releases/download/${RELEASE_VERSION}/operator-sdk-${RELEASE_VERSION}-x86_64-linux-gnu
$ curl -OJL https://github.com/operator-framework/operator-sdk/releases/download/${RELEASE_VERSION}/operator-sdk-${RELEASE_VERSION}-x86_64-apple-darwin
$ curl -OJL https://github.com/operator-framework/operator-sdk/releases/download/${RELEASE_VERSION}/operator-sdk-${RELEASE_VERSION}-x86_64-linux-gnu.asc
$ curl -OJL https://github.com/operator-framework/operator-sdk/releases/download/${RELEASE_VERSION}/operator-sdk-${RELEASE_VERSION}-x86_64-apple-darwin.asc
gpg --verify operator-sdk-${RELEASE_VERSION}-x86_64-linux-gnu.asc
gpg --verify operator-sdk-${RELEASE_VERSION}-x86_64-apple-darwin.asc
$ gpg --verify operator-sdk-${RELEASE_VERSION}-x86_64-apple-darwin.asc
$ gpg: assuming signed data in 'operator-sdk-${RELEASE_VERSION}-x86_64-apple-darwin'
$ gpg: Signature made Fri Apr  5 20:03:22 2019 CEST
$ gpg:                using RSA key <key_id> 1
$ gpg: Can't check signature: No public key
$ gpg [--keyserver keys.gnupg.net] --recv-key "<key_id>" 1
$ chmod +x operator-sdk-${RELEASE_VERSION}-x86_64-linux-gnu
$ sudo cp operator-sdk-${RELEASE_VERSION}-x86_64-linux-gnu /usr/local/bin/operator-sdk
$ rm operator-sdk-${RELEASE_VERSION}-x86_64-linux-gnu$ chmod +x operator-sdk-${RELEASE_VERSION}-x86_64-apple-darwin
$ sudo cp operator-sdk-${RELEASE_VERSION}-x86_64-apple-darwin /usr/local/bin/operator-sdk
$ rm operator-sdk-${RELEASE_VERSION}-x86_64-apple-darwin
$ operator-sdk version
Install from Homebrew
$ brew install operator-sdk
$ operator-sdk version
Compile and install from source
$ mkdir -p $GOPATH/src/github.com/operator-framework
$ cd $GOPATH/src/github.com/operator-framework
$ git clone https://github.com/operator-framework/operator-sdk
$ cd operator-sdk
$ git checkout master
$ make dep
$ make install
$ operator-sdk version
Build a Go-based Memcached Operator using the Operator SDK
$ mkdir -p $GOPATH/src/github.com/example-inc/
$ cd $GOPATH/src/github.com/example-inc/
$ operator-sdk new memcached-operator --dep-manager dep
$ cd memcached-operator
$ operator-sdk add api \
    --api-version=cache.example.com/v1alpha1 \
    --kind=Memcached
type MemcachedSpec struct {
    // Size is the size of the memcached deployment
    Size int32 `json:"size"`
}
type MemcachedStatus struct {
    // Nodes are the names of the memcached pods
    Nodes []string `json:"nodes"`
}
$ operator-sdk generate k8s
$ operator-sdk add controller \
    --api-version=cache.example.com/v1alpha1 \
    --kind=Memcached
err := c.Watch(
  &source.Kind{Type: &cachev1alpha1.Memcached{}}, &handler.EnqueueRequestForObject{})
err := c.Watch(&source.Kind{Type: &appsv1.Deployment{}}, &handler.EnqueueRequestForOwner{
IsController: true,
OwnerType:    &cachev1alpha1.Memcached{},
    })
func (r *ReconcileMemcached) Reconcile(request reconcile.Request) (reconcile.Result, error) {
  // Lookup the Memcached instance for this reconcile request
  memcached := &cachev1alpha1.Memcached{}
  err := r.client.Get(context.TODO(), request.NamespacedName, memcached)
  ...
}
// Reconcile successful - don't requeue
return reconcile.Result{}, nil
// Reconcile failed due to error - requeue
return reconcile.Result{}, err
// Requeue for any reason other than error
return reconcile.Result{Requeue: true}, nil
$ oc create \
    -f deploy/crds/cache_v1alpha1_memcached_crd.yaml
$ operator-sdk build quay.io/example/memcached-operator:v0.0.1
$ sed -i 's|REPLACE_IMAGE|quay.io/example/memcached-operator:v0.0.1|g' deploy/operator.yaml
$ docker push quay.io/example/memcached-operator:v0.0.1
$ oc create -f deploy/role.yaml
$ oc create -f deploy/role_binding.yaml
$ oc create -f deploy/service_account.yaml
$ oc create -f deploy/operator.yaml
$ oc get deployment
NAME                     DESIRED   CURRENT   UP-TO-DATE   AVAILABLE   AGE
memcached-operator       1         1         1            1           1m
$ operator-sdk up local --namespace=default
$ cat deploy/crds/cache_v1alpha1_memcached_cr.yaml
apiVersion: "cache.example.com/v1alpha1"
kind: "Memcached"
metadata:
  name: "example-memcached"
spec:
  size: 3

$ oc apply -f deploy/crds/cache_v1alpha1_memcached_cr.yaml
$ oc get deployment
NAME                     DESIRED   CURRENT   UP-TO-DATE   AVAILABLE   AGE
memcached-operator       1         1         1            1           2m
example-memcached        3         3         3            3           1m
$ oc get pods
NAME                                  READY     STATUS    RESTARTS   AGE
example-memcached-6fd7c98d8-7dqdr     1/1       Running   0          1m
example-memcached-6fd7c98d8-g5k7v     1/1       Running   0          1m
example-memcached-6fd7c98d8-m7vn7     1/1       Running   0          1m
memcached-operator-7cc7cfdf86-vvjqk   1/1       Running   0          2m

$ oc get memcached/example-memcached -o yaml
apiVersion: cache.example.com/v1alpha1
kind: Memcached
metadata:
  clusterName: ""
  creationTimestamp: 2018-03-31T22:51:08Z
  generation: 0
  name: example-memcached
  namespace: default
  resourceVersion: "245453"
  selfLink: /apis/cache.example.com/v1alpha1/namespaces/default/memcacheds/example-memcached
  uid: 0026cc97-3536-11e8-bd83-0800274106a1
spec:
  size: 3
status:
  nodes:
  - example-memcached-6fd7c98d8-7dqdr
  - example-memcached-6fd7c98d8-g5k7v
  - example-memcached-6fd7c98d8-m7vn7
$ cat deploy/crds/cache_v1alpha1_memcached_cr.yaml
apiVersion: "cache.example.com/v1alpha1"
kind: "Memcached"
metadata:
  name: "example-memcached"
spec:
  size: 4
$ oc apply -f deploy/crds/cache_v1alpha1_memcached_cr.yaml
$ oc get deployment
NAME                 DESIRED   CURRENT   UP-TO-DATE   AVAILABLE   AGE
example-memcached    4         4         4            4           5m
$ oc delete -f deploy/crds/cache_v1alpha1_memcached_cr.yaml
$ oc delete -f deploy/crds/cache_v1alpha1_memcached_crd.yaml
$ oc delete -f deploy/operator.yaml
$ oc delete -f deploy/role.yaml
$ oc delete -f deploy/role_binding.yaml
$ oc delete -f deploy/service_account.yaml
Manage a Memcached Operator using the Operator Lifecycle Manager
$ operator-sdk olm-catalog gen-csv --csv-version 0.0.1
apiVersion: operators.coreos.com/v1
kind: OperatorGroup
metadata:
  name: memcached-operator-group
  namespace: default
spec:
  targetNamespaces:
  - default
$ curl -Lo memcachedoperator.0.0.1.csv.yaml https://raw.githubusercontent.com/operator-framework/getting-started/master/memcachedoperator.0.0.1.csv.yaml
$ oc apply -f memcachedoperator.0.0.1.csv.yaml
$ oc get csv memcachedoperator.v0.0.1 -n default -o json | jq '.status'
$ oc create -f deploy/crds/cache_v1alpha1_memcached_crd.yaml
$ oc create -f deploy/service_account.yaml
$ oc create -f deploy/role.yaml
$ oc create -f deploy/role_binding.yaml$ cat <<EOF | oc apply -f -
apiVersion: "cache.example.com/v1alpha1"
kind: "Memcached"
metadata:
name: "memcached-for-wordpress"
spec:
size: 1
EOF
$ cat <<EOF | oc apply -f -
apiVersion: "cache.example.com/v1alpha1"
kind: "Memcached"
metadata:
name: "memcached-for-drupal"
spec:
size: 1
EOF
$ oc get Memcached
NAME AGE
memcached-for-drupal 22s
memcached-for-wordpress 27s
$ oc get pods
NAME READY STATUS RESTARTS AGE
memcached-app-operator-66b5777b79-pnsfj 1/1 Running 0 14m
memcached-for-drupal-5476487c46-qbd66 1/1 Running 0 3s
memcached-for-wordpress-65b75fd8c9-7b9x7 1/1 Running 0 8s
$ curl -Lo memcachedoperator.0.0.2.csv.yaml https://raw.githubusercontent.com/operator-framework/getting-started/master/memcachedoperator.0.0.2.csv.yaml
$ oc apply -f memcachedoperator.0.0.2.csv.yaml
$ oc get pods
NAME                                       READY     STATUS    RESTARTS   AGE
memcached-app-operator-66b5777b79-pnsfj    1/1       Running   0          3s
memcached-for-drupal-5476487c46-qbd66      1/1       Running   0          14m
memcached-for-wordpress-65b75fd8c9-7b9x7   1/1       Running   0          14m
Additional resources
Create Ansible-based Operators
Ansible support in the Operator SDK
Custom Resource files
Field
Description
apiVersion
Version of the CR to be created.
kind
Kind of the CR to be created.
metadata
Kubernetes-specific metadata to be created.
spec (optional)
Key-value list of variables which are passed to Ansible. This field is empty by default.
status
Summarizes the current state of the object. For Ansible-based Operators, the status subresource is enabled for Custom Resource Definitions and managed by the k8s_status Ansible module by default, which includes condition information to the CR's status.
annotations
Kubernetes-specific annotations to be appended to the CR.
Annotation
Description
ansible.operator-sdk/reconcile-period
The reconciliation interval for the CR. This value is parsed using the standard Golang package time. Specifically, ParseDuration is used which applies the default suffix of s, giving the value in seconds.
apiVersion: "foo.example.com/v1alpha1"
kind: "Foo"
metadata:
  name: "example"
annotations:
  ansible.operator-sdk/reconcile-period: "30s"
Watches file
Field
Description
group
Group of CR to watch.
version
Version of CR to watch.
kind
Kind of CR to watch
role (default)
Path to the Ansible role added to the container. For example, if your roles directory is at /opt/ansible/roles/ and your role is named busybox, this value would be /opt/ansible/roles/busybox. This field is mutually exclusive with the playbook field.
playbook
Path to the Ansible playbook added to the container. This playbook is expected to be simply a way to call roles. This field is mutually exclusive with the role field.
reconcilePeriod (optional)
The reconciliation interval, how often the role or playbook is run, for a given CR.
manageStatus (optional)
When set to true (default), the Operator manages the status of the CR generically. When set to false, the status of the CR is managed elsewhere, by the specified role or playbook or in a separate controller.
- version: v1alpha1 1
  group: foo.example.com
  kind: Foo
  role: /opt/ansible/roles/Foo

- version: v1alpha1 2
  group: bar.example.com
  kind: Bar
  playbook: /opt/ansible/playbook.yml

- version: v1alpha1 3
  group: baz.example.com
  kind: Baz
  playbook: /opt/ansible/baz.yml
  reconcilePeriod: 0
  manageStatus: false
Advanced options
Feature
YAML key
Description
Annotation for override
Default value
Reconcile period
reconcilePeriod
Time between reconcile runs for a particular CR.
ansbile.operator-sdk/reconcile-period
1m
Manage status
manageStatus
Allows the Operator to manage the conditions section of each CR's status section.
true
Watch dependent resources
watchDependentResources
Allows the Operator to dynamically watch resources that are created by Ansible.
true
Watch cluster-scoped resources
watchClusterScopedResources
Allows the Operator to watch cluster-scoped resources that are created by Ansible.
false
Max runner artifacts
maxRunnerArtifacts
Manages the number of artifact directories that Ansible Runner keeps in the Operator container for each individual resource.
ansible.operator-sdk/max-runner-artifacts
20
- version: v1alpha1
  group: app.example.com
  kind: AppService
  playbook: /opt/ansible/playbook.yml
  maxRunnerArtifacts: 30
  reconcilePeriod: 5s
  manageStatus: False
  watchDependentResources: False
Extra variables sent to Ansible
apiVersion: "app.example.com/v1alpha1"
kind: "Database"
metadata:
  name: "example"
spec:
  message:"Hello world 2"
  newParameter: "newParam"
{ "meta": {
"name": "<cr_name>",
"namespace": "<cr_namespace>",
  },
  "message": "Hello world 2",
  "new_parameter": "newParam",
  "_app_example_com_database": {
     <full_crd>
   },
}
- debug:
    msg: "name: {{ meta.name }}, {{ meta.namespace }}"
Ansible Runner directory
Install the Operator SDK CLI
Install from GitHub release
RELEASE_VERSION=v0.8.0
$ curl -OJL https://github.com/operator-framework/operator-sdk/releases/download/${RELEASE_VERSION}/operator-sdk-${RELEASE_VERSION}-x86_64-linux-gnu
$ curl -OJL https://github.com/operator-framework/operator-sdk/releases/download/${RELEASE_VERSION}/operator-sdk-${RELEASE_VERSION}-x86_64-apple-darwin
$ curl -OJL https://github.com/operator-framework/operator-sdk/releases/download/${RELEASE_VERSION}/operator-sdk-${RELEASE_VERSION}-x86_64-linux-gnu.asc
$ curl -OJL https://github.com/operator-framework/operator-sdk/releases/download/${RELEASE_VERSION}/operator-sdk-${RELEASE_VERSION}-x86_64-apple-darwin.asc
$ gpg --verify operator-sdk-${RELEASE_VERSION}-x86_64-linux-gnu.asc
$ gpg --verify operator-sdk-${RELEASE_VERSION}-x86_64-apple-darwin.asc
$ gpg --verify operator-sdk-${RELEASE_VERSION}-x86_64-apple-darwin.asc
$ gpg: assuming signed data in 'operator-sdk-${RELEASE_VERSION}-x86_64-apple-darwin'
$ gpg: Signature made Fri Apr  5 20:03:22 2019 CEST
$ gpg:                using RSA key <key_id> 1
$ gpg: Can't check signature: No public key
$ gpg [--keyserver keys.gnupg.net] --recv-key "<key_id>" 1
$ chmod +x operator-sdk-${RELEASE_VERSION}-x86_64-linux-gnu
$ sudo cp operator-sdk-${RELEASE_VERSION}-x86_64-linux-gnu /usr/local/bin/operator-sdk
$ rm operator-sdk-${RELEASE_VERSION}-x86_64-linux-gnu$ chmod +x operator-sdk-${RELEASE_VERSION}-x86_64-apple-darwin
$ sudo cp operator-sdk-${RELEASE_VERSION}-x86_64-apple-darwin /usr/local/bin/operator-sdk
$ rm operator-sdk-${RELEASE_VERSION}-x86_64-apple-darwin
$ operator-sdk version
Install from Homebrew
$ brew install operator-sdk
$ operator-sdk version
Compile and install from source
$ mkdir -p $GOPATH/src/github.com/operator-framework
$ cd $GOPATH/src/github.com/operator-framework
$ git clone https://github.com/operator-framework/operator-sdk
$ cd operator-sdk
$ git checkout master
$ make dep
$ make install
$ operator-sdk version
Build an Ansible-based Operator using the Operator SDK
$ operator-sdk new memcached-operator \
    --api-version=cache.example.com/v1alpha1 \
    --kind=Memcached \
    --type=ansible
$ cd memcached-operator
$ operator-sdk new memcached-operator \
    --cluster-scoped \
    --api-version=cache.example.com/v1alpha1 \
    --kind=Memcached \
    --type=ansible
$ cd memcached-operator
- version: v1alpha1
  group: cache.example.com
  kind: Memcached
- version: v1alpha1
  group: cache.example.com
  kind: Memcached
  role: /opt/ansible/roles/memcached
- version: v1alpha1
  group: cache.example.com
  kind: Memcached
  playbook: /opt/ansible/playbook.yaml
size: 1
- name: start memcached
  k8s:
    definition:
      kind: Deployment
      apiVersion: apps/v1
      metadata:
name: '{{ meta.name }}-memcached'
namespace: '{{ meta.namespace }}'
      spec:
replicas: "{{size}}"
selector:
  matchLabels:
app: memcached
template:
  metadata:
labels:
  app: memcached
  spec:
containers:
- name: memcached
  command:
  - memcached
  - -m=64
  - -o
  - modern
  - -v
  image: "docker.io/memcached:1.4.36-alpine"
  ports:
    - containerPort: 11211
$ oc create -f deploy/crds/cache_v1alpha1_memcached_crd.yaml
$ operator-sdk build quay.io/example/memcached-operator:v0.0.1
$ podman push quay.io/example/memcached-operator:v0.0.1
$ sed -i 's|REPLACE_IMAGE|quay.io/example/memcached-operator:v0.0.1|g' deploy/operator.yaml
$ export OPERATOR_NAMESPACE=$(oc config view --minify -o jsonpath='{.contexts[0].context.namespace}')
$ sed -i "s|REPLACE_NAMESPACE|$OPERATOR_NAMESPACE|g" deploy/role_binding.yaml
$ sed -i "" 's|REPLACE_IMAGE|quay.io/example/memcached-operator:v0.0.1|g' deploy/operator.yaml
$ sed -i "" "s|REPLACE_NAMESPACE|$OPERATOR_NAMESPACE|g" deploy/role_binding.yaml
$ oc create -f deploy/service_account.yaml
$ oc create -f deploy/role.yaml
$ oc create -f deploy/role_binding.yaml
$ oc create -f deploy/operator.yaml
$ oc get deployment
NAME                     DESIRED   CURRENT   UP-TO-DATE   AVAILABLE   AGE
memcached-operator       1         1         1            1           1m
$ operator-sdk up local
$ operator-sdk up local --kubeconfig=config
$ cat deploy/crds/cache_v1alpha1_memcached_cr.yaml
apiVersion: "cache.example.com/v1alpha1"
kind: "Memcached"
metadata:
  name: "example-memcached"
spec:
  size: 3

$ oc apply -f deploy/crds/cache_v1alpha1_memcached_cr.yaml
$ oc get deployment
NAME                     DESIRED   CURRENT   UP-TO-DATE   AVAILABLE   AGE
memcached-operator       1         1         1            1           2m
example-memcached        3         3         3            3           1m
$ oc get pods
NAME                                  READY     STATUS    RESTARTS   AGE
example-memcached-6fd7c98d8-7dqdr     1/1       Running   0          1m
example-memcached-6fd7c98d8-g5k7v     1/1       Running   0          1m
example-memcached-6fd7c98d8-m7vn7     1/1       Running   0          1m
memcached-operator-7cc7cfdf86-vvjqk   1/1       Running   0          2m
$ cat deploy/crds/cache_v1alpha1_memcached_cr.yaml
apiVersion: "cache.example.com/v1alpha1"
kind: "Memcached"
metadata:
  name: "example-memcached"
spec:
  size: 4

$ oc apply -f deploy/crds/cache_v1alpha1_memcached_cr.yaml
$ oc get deployment
NAME                 DESIRED   CURRENT   UP-TO-DATE   AVAILABLE   AGE
example-memcached    4         4         4            4           5m
$ oc delete -f deploy/crds/cache_v1alpha1_memcached_cr.yaml
$ oc delete -f deploy/operator.yaml
$ oc delete -f deploy/role_binding.yaml
$ oc delete -f deploy/role.yaml
$ oc delete -f deploy/service_account.yaml
$ oc delete -f deploy/crds/cache_v1alpha1_memcached_crd.yaml
Manage application lifecycle using the k8s Ansible module
Install the k8s Ansible module
$ sudo yum install ansible
$ pip install openshift
Test the k8s Ansible module locally
$ operator-sdk new --type ansible --kind Foo --api-version foo.example.com/v1alpha1 foo-operator
Create foo-operator/tmp/init/galaxy-init.sh
Create foo-operator/tmp/build/Dockerfile
Create foo-operator/tmp/build/test-framework/Dockerfile
Create foo-operator/tmp/build/go-test.sh
Rendering Ansible Galaxy role [foo-operator/roles/Foo]...
Cleaning up foo-operator/tmp/init
Create foo-operator/watches.yaml
Create foo-operator/deploy/rbac.yaml
Create foo-operator/deploy/crd.yaml
Create foo-operator/deploy/cr.yaml
Create foo-operator/deploy/operator.yaml
Run git init ...
Initialized empty Git repository in /home/dymurray/go/src/github.com/dymurray/opsdk/foo-operator/.git/
Run git init done
$ cd foo-operator
- name: set test namespace to {{ state }}
  k8s:
    api_version: v1
    kind: Namespace
    state: "{{ state }}"
  ignore_errors: true 1
state: present
- hosts: localhost
  roles:
    - Foo
$ ansible-playbook playbook.yml
 [WARNING]: provided hosts list is empty, only localhost is available. The implicit localhost does not match 'all'

PLAY [localhost] ***************************************************************************

TASK [Gathering Facts] *********************************************************************
ok: [localhost]

Task [Foo : set test namespace to present]
changed: [localhost]

PLAY RECAP *********************************************************************************
localhost                  : ok=2    changed=1    unreachable=0    failed=0
$ oc get namespace
NAME          STATUS    AGE
default       Active    28d
kube-public   Active    28d
kube-system   Active    28d
test          Active    3s
$ ansible-playbook playbook.yml --extra-vars state=absent
 [WARNING]: provided hosts list is empty, only localhost is available. Note that the implicit localhost does not match 'all'

PLAY [localhost] ***************************************************************************

TASK [Gathering Facts] *********************************************************************
ok: [localhost]

Task [Foo : set test namespace to absent]
changed: [localhost]

PLAY RECAP *********************************************************************************
localhost                  : ok=2    changed=1    unreachable=0    failed=0
$ oc get namespace
NAME          STATUS    AGE
default       Active    28d
kube-public   Active    28d
kube-system   Active    28d
Test the k8s Ansible module inside an Operator
Testing an Ansible-based Operator locally
- version: v1alpha1
  group: foo.example.com
  kind: Foo
  #  role: /opt/ansible/roles/Foo
  role: /home/user/foo-operator/Foo
$ oc create -f deploy/crds/foo_v1alpha1_foo_crd.yaml
$ oc create -f deploy/service_account.yaml
$ oc create -f deploy/role.yaml
$ oc create -f deploy/role_binding.yaml
$ operator-sdk up local
[...]
INFO[0000] Starting to serve on 127.0.0.1:8888
INFO[0000] Watching foo.example.com/v1alpha1, Foo, default
apiVersion: "foo.example.com/v1alpha1"
kind: "Foo"
metadata:
  name: "example"
$ oc create -f deploy/cr.yaml
$ oc get namespace
NAME          STATUS    AGE
default       Active    28d
kube-public   Active    28d
kube-system   Active    28d
test          Active    3s
apiVersion: "foo.example.com/v1alpha1"
kind: "Foo"
metadata:
  name: "example"
spec:
  state: "absent"
$ oc apply -f deploy/cr.yaml

$ oc get namespace
NAME          STATUS    AGE
default       Active    28d
kube-public   Active    28d
kube-system   Active    28d
Testing an Ansible-based Operator on a cluster
$ operator-sdk build quay.io/example/foo-operator:v0.0.1
$ podman push quay.io/example/foo-operator:v0.0.1
$ sed -i 's|REPLACE_IMAGE|quay.io/example/foo-operator:v0.0.1|g' deploy/operator.yaml
$ sed -i "" 's|REPLACE_IMAGE|quay.io/example/foo-operator:v0.0.1|g' deploy/operator.yaml
$ oc create -f deploy/crds/foo_v1alpha1_foo_crd.yaml # if Custom Resource Definition doesn't exist already
$ oc create -f deploy/service_account.yaml
$ oc create -f deploy/role.yaml
$ oc create -f deploy/role_binding.yaml
$ oc create -f deploy/operator.yaml
$ oc get deployment
NAME                     DESIRED   CURRENT   UP-TO-DATE   AVAILABLE   AGE
foo-operator       1         1         1            1           1m
Manage Custom Resource status using the k8s_status Ansible module
status:
  conditions:
    - ansibleResult:
      changed: 3
      completion: 2018-12-03T13:45:57.13329
      failures: 1
      ok: 6
      skipped: 0
    lastTransitionTime: 2018-12-03T13:45:57Z
    message: 'Status code was -1 and not [200]: Request failed: <urlopen error [Errno
      113] No route to host>'
    reason: Failed
    status: "True"
    type: Failure
  - lastTransitionTime: 2018-12-03T13:46:13Z
    message: Running reconciliation
    reason: Running
    status: "True"
    type: Running
- version: v1
  group: api.example.com
  kind: Foo
  role: /opt/ansible/roles/Foo
  manageStatus: false
- k8s_status:
  api_version: app.example.com/v1
  kind: Foo
  name: "{{ meta.name }}"
  namespace: "{{ meta.namespace }}"
  status:
    foo: bar
Use the k8s_status Ansible module when testing locally
$ echo "library=/usr/share/ansible/library/" >> /etc/ansible/ansible.cfg
$ wget https://raw.githubusercontent.com/openshift/ocp-release-operator-sdk/master/library/k8s_status.py -O /usr/share/ansible/library/k8s_status.py
Additional resources
Create Helm-based Operators
Helm chart support in the Operator SDK
apiVersion: apache.org/v1alpha1
kind: Tomcat
metadata:
  name: example-app
spec:
  replicaCount: 2
{{ .Values.replicaCount }}
$ oc get Tomcats --all-namespaces
Install the Operator SDK CLI
Install from GitHub release
RELEASE_VERSION=v0.8.0
$ curl -OJL https://github.com/operator-framework/operator-sdk/releases/download/${RELEASE_VERSION}/operator-sdk-${RELEASE_VERSION}-x86_64-linux-gnu
$ curl -OJL https://github.com/operator-framework/operator-sdk/releases/download/${RELEASE_VERSION}/operator-sdk-${RELEASE_VERSION}-x86_64-apple-darwin
$ curl -OJL https://github.com/operator-framework/operator-sdk/releases/download/${RELEASE_VERSION}/operator-sdk-${RELEASE_VERSION}-x86_64-linux-gnu.asc
$ curl -OJL https://github.com/operator-framework/operator-sdk/releases/download/${RELEASE_VERSION}/operator-sdk-${RELEASE_VERSION}-x86_64-apple-darwin.asc
$ gpg --verify operator-sdk-${RELEASE_VERSION}-x86_64-linux-gnu.asc
$ gpg --verify operator-sdk-${RELEASE_VERSION}-x86_64-apple-darwin.asc
$ gpg --verify operator-sdk-${RELEASE_VERSION}-x86_64-apple-darwin.asc
$ gpg: assuming signed data in 'operator-sdk-${RELEASE_VERSION}-x86_64-apple-darwin'
$ gpg: Signature made Fri Apr  5 20:03:22 2019 CEST
$ gpg:                using RSA key <key_id> 1
$ gpg: Can't check signature: No public key
$ gpg [--keyserver keys.gnupg.net] --recv-key "<key_id>" 1
$ chmod +x operator-sdk-${RELEASE_VERSION}-x86_64-linux-gnu
$ sudo cp operator-sdk-${RELEASE_VERSION}-x86_64-linux-gnu /usr/local/bin/operator-sdk
$ rm operator-sdk-${RELEASE_VERSION}-x86_64-linux-gnu$ chmod +x operator-sdk-${RELEASE_VERSION}-x86_64-apple-darwin
$ sudo cp operator-sdk-${RELEASE_VERSION}-x86_64-apple-darwin /usr/local/bin/operator-sdk
$ rm operator-sdk-${RELEASE_VERSION}-x86_64-apple-darwin
$ operator-sdk version
Install from Homebrew
$ brew install operator-sdk
$ operator-sdk version
Compile and install from source
$ mkdir -p $GOPATH/src/github.com/operator-framework
$ cd $GOPATH/src/github.com/operator-framework
$ git clone https://github.com/operator-framework/operator-sdk
$ cd operator-sdk
$ git checkout master
$ make dep
$ make install
$ operator-sdk version
Build a Helm-based Operator using the Operator SDK
$ operator-sdk new nginx-operator \
  --api-version=example.com/v1alpha1 \
  --kind=Nginx \
  --type=helm
$ cd nginx-operator
$ operator-sdk new nginx-operator \
    --cluster-scoped \
    --api-version=example.com/v1alpha1 \
    --kind=Nginx \
    --type=helm
- version: v1alpha1
  group: example.com
  kind: Nginx
  chart: /opt/helm/helm-charts/nginx
apiVersion: example.com/v1alpha1
kind: Nginx
metadata:
  name: example-nginx
spec:
  replicaCount: 2
apiVersion: example.com/v1alpha1
kind: Nginx
metadata:
  name: example-nginx
spec:
  replicaCount: 2
  service:
    port: 8080
$ oc create -f deploy/crds/example_v1alpha1_nginx_crd.yaml
$ operator-sdk build quay.io/example/nginx-operator:v0.0.1
$ docker push quay.io/example/nginx-operator:v0.0.1
$ sed -i 's|REPLACE_IMAGE|quay.io/example/nginx-operator:v0.0.1|g' deploy/operator.yaml
$ export OPERATOR_NAMESPACE=$(oc config view --minify -o jsonpath='{.contexts[0].context.namespace}')
$ sed -i "s|REPLACE_NAMESPACE|$OPERATOR_NAMESPACE|g" deploy/role_binding.yaml
$ sed -i "" 's|REPLACE_IMAGE|quay.io/example/nginx-operator:v0.0.1|g' deploy/operator.yaml
$ sed -i "" "s|REPLACE_NAMESPACE|$OPERATOR_NAMESPACE|g" deploy/role_binding.yaml
$ oc create -f deploy/service_account.yaml
$ oc create -f deploy/role.yaml
$ oc create -f deploy/role_binding.yaml
$ oc create -f deploy/operator.yaml
$ oc get deployment
NAME DESIRED CURRENT UP-TO-DATE AVAILABLE AGE
nginx-operator 1 1 1 1 1m
$ sudo mkdir -p /opt/helm/helm-charts
$ sudo ln -s $PWD/helm-charts/nginx /opt/helm/helm-charts/nginx
$ operator-sdk up local
$ operator-sdk up local --kubeconfig=<path_to_config>
$ oc apply -f deploy/crds/example_v1alpha1_nginx_cr.yaml
$ oc get deployment
NAME DESIRED CURRENT UP-TO-DATE AVAILABLE AGE
example-nginx-b9phnoz9spckcrua7ihrbkrt1 2 2 2 2 1m
$ oc get pods
NAME READY STATUS RESTARTS AGE
example-nginx-b9phnoz9spckcrua7ihrbkrt1-f8f9c875d-fjcr9 1/1 Running 0 1m
example-nginx-b9phnoz9spckcrua7ihrbkrt1-f8f9c875d-ljbzl 1/1 Running 0 1m
$ oc get service
NAME TYPE CLUSTER-IP EXTERNAL-IP PORT(S) AGE
example-nginx-b9phnoz9spckcrua7ihrbkrt1 ClusterIP 10.96.26.3 <none> 8080/TCP 1m
$ cat deploy/crds/example_v1alpha1_nginx_cr.yaml
apiVersion: "example.com/v1alpha1"
kind: "Nginx"
metadata:
name: "example-nginx"
spec:
replicaCount: 3
$ oc apply -f deploy/crds/example_v1alpha1_nginx_cr.yaml
$ oc get deployment
NAME DESIRED CURRENT UP-TO-DATE AVAILABLE AGE
example-nginx-b9phnoz9spckcrua7ihrbkrt1 3 3 3 3 1m
$ oc get service
NAME TYPE CLUSTER-IP EXTERNAL-IP PORT(S) AGE
example-nginx-b9phnoz9spckcrua7ihrbkrt1 ClusterIP 10.96.26.3 <none> 80/TCP 1m
$ oc delete -f deploy/crds/example_v1alpha1_nginx_cr.yaml
$ oc delete -f deploy/operator.yaml
$ oc delete -f deploy/role_binding.yaml
$ oc delete -f deploy/role.yaml
$ oc delete -f deploy/service_account.yaml
$ oc delete -f deploy/crds/example_v1alpha1_nginx_crd.yaml
Additional resources
Generate a ClusterServiceVersion (CSV)
$ operator-sdk olm-catalog gen-csv --csv-version <version>
How ClusterServiceVersion generation works
$ operator-sdk olm-catalog gen-csv --csv-version <version>
Workflow
ClusterServiceVersion composition configuration
Field
Description
operator-path (string)
The Operator resource manifest file path. Defaults to deploy/operator.yaml.
crd-cr-path-list (string(, string)*)
A list of Custom Resource Definition and CR manifest file paths. Defaults to [deploy/crds/*_{crd,cr}.yaml].
rbac-path-list (string(, string)*)
A list of RBAC role manifest file paths. Defaults to [deploy/role.yaml].
Manually-defined ClusterServiceVersion fields
Field
Description
metadata.name
A unique name for this CSV. Operator version should be included in the name to ensure uniqueness, for example app-operator.v0.1.1.
spec.displayName
A public name to identify the Operator.
spec.description
A short description of the Operator's functionality.
spec.keywords
Keywords describing the operator.
spec.maintainers
Human or organizational entities maintaining the Operator, with a name and email.
spec.provider
The Operators' provider (usually an organization), with a name.
spec.labels
Key-value pairs to be used by Operator internals.
spec.version
Semantic version of the Operator, for example 0.1.1.
spec.customresourcedefinitions
Any Custom Resource Definitions the Operator uses. This field is populated automatically by the Operator SDK if any Custom Resource Definition YAML files are present in deploy/. However, several fields not in the Custom Resource Definition manifest spec require user input:
Field
Description
spec.replaces
The name of the ClusterServiceVersion being replaced by this CSV.
spec.links
URLs (for example, websites and documentation) pertaining to the Operator or application being managed, each with a name and url.
spec.selector
Selectors by which the Operator can pair resources in a cluster.
spec.icon
A base64-encoded icon unique to the Operator, set in a base64data field with a mediatype.
spec.maturity
The Operator's capability level, for example Seamless Upgrades.
Generate a CSV
$ operator-sdk olm-catalog gen-csv --csv-version <version>
Custom Resource Definitions (CRDs)
Owned Custom Resource Definitions
Field
Description
Required/Optional
Name
The full name of the Custom Resource Definition.
Required
Version
The version of that object API.
Required
Kind
The machine readable name of the Custom Resource Definition.
Required
DisplayName
A human readable version of the Custom Resource Definition name, for example MongoDB Standalone.
Required
Description
A short description of how this Custom Resource Definition is used by the Operator or a description of the functionality provided by the Custom Resource Definition.
Required
Group
The API group that this Custom Resource Definition belongs to, for example database.example.com.
Optional
Resources
Your Custom Resource Definitions own one or more types of Kubernetes objects. These are listed in the resources section to inform your users of the objects they might need to troubleshoot or how to connect to the application, such as the Service or Ingress rule that exposes a database.
Optional
SpecDescriptors, StatusDescriptors, and ActionDescriptors
These Descriptors are a way to hint UIs with certain inputs or outputs of the Operator that are most important to an end user. If your Custom Resource Definition contains the name of a Secret or ConfigMap that the user must provide, we can specify that here. These items are linked and highlighted in compatible UIs.
DisplayName
A human readable name for the Spec, Status, or Action.
Description
A short description of the Spec, Status, or Action and how it is used by the Operator.
Path
A dot-delimited path of the field on the object that this descriptor describes.
X-Descriptors
Used to determine which "capabilities" this descriptor has and which UI component to use. See the openshift/console project for a canonical list of React UI X-Descriptors for OpenShift.
Optional
- displayName: MongoDB Standalone
group: mongodb.com
kind: MongoDbStandalone
name: mongodbstandalones.mongodb.com
resources:
- kind: Service
name: ''
version: v1
- kind: StatefulSet
name: ''
version: v1beta2
- kind: Pod
name: ''
version: v1
- kind: ConfigMap
name: ''
version: v1
specDescriptors:
- description: Credentials for Ops Manager or Cloud Manager.
displayName: Credentials
path: credentials
x-descriptors:
- 'urn:alm:descriptor:com.tectonic.ui:selector:core:v1:Secret'
- description: Project this deployment belongs to.
displayName: Project
path: project
x-descriptors:
- 'urn:alm:descriptor:com.tectonic.ui:selector:core:v1:ConfigMap'
- description: MongoDB version to be installed.
displayName: Version
path: version
x-descriptors:
- 'urn:alm:descriptor:com.tectonic.ui:label'
statusDescriptors:
- description: The status of each of the Pods for the MongoDB cluster.
displayName: Pod Status
path: pods
x-descriptors:
- 'urn:alm:descriptor:com.tectonic.ui:podStatuses'
version: v1
description: >-
MongoDB Deployment consisting of only one host. No replication of
data.
Required Custom Resource Definitions
Field
Description
Required/Optional
Name
The full name of the Custom Resource Definition we require.
Required
Version
The version of that object API.
Required
Kind
The Kubernetes object kind.
Required
DisplayName
A human readable version of the Custom Resource Definition.
Required
Description
A summary of how the component fits in your larger architecture.
Required
required:
- name: etcdclusters.etcd.database.coreos.com
version: v1beta2
kind: EtcdCluster
displayName: etcd Cluster
description: Represents a cluster of etcd nodes.
Custom Resource Definition templates
metadata:
annotations:
alm-examples: >-
[{"apiVersion":"etcd.database.coreos.com/v1beta2","kind":"EtcdCluster","metadata":{"name":"example","namespace":"default"},"spec":{"size":3,"version":"3.2.13"}},{"apiVersion":"etcd.database.coreos.com/v1beta2","kind":"EtcdRestore","metadata":{"name":"example-etcd-cluster"},"spec":{"etcdCluster":{"name":"example-etcd-cluster"},"backupStorageType":"S3","s3":{"path":"<full-s3-path>","awsSecret":"<aws-secret>"}}},{"apiVersion":"etcd.database.coreos.com/v1beta2","kind":"EtcdBackup","metadata":{"name":"example-etcd-cluster-backup"},"spec":{"etcdEndpoints":["<etcd-cluster-endpoints>"],"storageType":"S3","s3":{"path":"<full-s3-path>","awsSecret":"<aws-secret>"}}}] Understanding your API services
Owned APIServices
Field
Description
Required/Optional
Group
Group that the APIService provides, for example database.example.com.
Required
Version
Version of the APIService, for example v1alpha1.
Required
Kind
A kind that the APIService is expected to provide.
Required
Name
The plural name for the APIService provided
Required
DeploymentName
Name of the deployment defined by your ClusterServiceVersion that corresponds to your APIService (required for owned APIServices). During the ClusterServiceVersion pending phase, the OLM Operator searches your CSV's InstallStrategy for a deployment spec with a matching name, and if not found, does not transition the ClusterServiceVersion to the install ready phase.
Required
DisplayName
A human readable version of the APIService name, for example MongoDB Standalone.
Required
Description
A short description of how this APIService is used by the Operator or a description of the functionality provided by the APIService.
Required
Resources
Your APIServices own one or more types of Kubernetes objects. These are listed in the resources section to inform your users of the objects they might need to troubleshoot or how to connect to the application, such as the Service or Ingress rule that exposes a database.
Optional
SpecDescriptors, StatusDescriptors, and ActionDescriptors
Essentially the same as for owned Custom Resource Definitions.
Optional
10.4.6.1.1. APIService Resource Creation
10.4.6.1.2. APIService Serving Certs
Required APIServices
Field
Description
Required/Optional
Group
Group that the APIService provides, for example database.example.com.
Required
Version
Version of the APIService, for example v1alpha1.
Required
Kind
A kind that the APIService is expected to provide.
Required
DisplayName
A human readable version of the APIService name, for example MongoDB Standalone.
Required
Description
A short description of how this APIService is used by the Operator or a description of the functionality provided by the APIService.
Required
Configure built-in monitoring with Prometheus
Prometheus Operator support
Metrics helper
func ExposeMetricsPort(ctx context.Context, port int32) (*v1.Service, error)
import(
"github.com/operator-framework/operator-sdk/pkg/metrics"
"machine.openshift.io/controller-runtime/pkg/manager"
)
var (
// Change the below variables to serve metrics on a different host or port.
metricsHost = "0.0.0.0" 1
metricsPort int32 = 8383 2
)
...
func main() {
...
// Pass metrics address to controller-runtime manager
mgr, err := manager.New(cfg, manager.Options{
Namespace: namespace,
MetricsBindAddress: fmt.Sprintf("%s:%d", metricsHost, metricsPort),
})
...
// Create Service object to expose the metrics port.
_, err = metrics.ExposeMetricsPort(ctx, metricsPort)
if err != nil {
// handle error
log.Info(err.Error())
}
...
}
Modify the metrics port
ServiceMonitor resources
Create ServiceMonitor resources
import(
"k8s.io/api/core/v1"
"github.com/operator-framework/operator-sdk/pkg/metrics"
"machine.openshift.io/controller-runtime/pkg/client/config"
)
func main() {
...
// Populate below with the Service(s) for which we want to create ServiceMonitors.
services := []*v1.Service{}
// Create one ServiceMonitor per application per namespace.
// Change the below value to name of the Namespace we want the ServiceMonitor to be created in.
ns := "default"
// restConfig is used for talking to the Kubernetes apiserver
restConfig := config.GetConfig()
// Pass the Service(s) to the helper function, which in turn returns the array of ServiceMonitor objects.
serviceMonitors, err := metrics.CreateServiceMonitors(restConfig, ns, services)
if err != nil {
// Handle errors here.
}
...
}Configure leader election
Use Leader-for-life election
import (
...
"github.com/operator-framework/operator-sdk/pkg/leader"
)
func main() {
...
err = leader.Become(context.TODO(), "memcached-operator-lock")
if err != nil {
log.Error(err, "Failed to retry for leader lock")
os.Exit(1)
}
...
}
Use Leader-with-lease election
import (
...
"sigs.k8s.io/controller-runtime/pkg/manager"
)
func main() {
...
opts := manager.Options{
...
LeaderElection: true,
LeaderElectionID: "memcached-operator-lock"
}
mgr, err := manager.New(cfg, opts)
...
}
Operator SDK CLI reference
$ operator-sdk <command> [<subcommand>] [<argument>] [<flags>]
build
Argument
Description
<image>
The container image to be built, e.g., quay.io/example/operator:v0.0.1.
Flag
Description
--enable-tests (bool)
Enable in-cluster testing by adding test binary to the image.
--namespaced-manifest (string)
Path of namespaced resources manifest for tests. Default: deploy/operator.yaml.
--test-location (string)
Location of tests. Default: ./test/e2e
-h, --help
Usage help output.
$ operator-sdk build quay.io/example/operator:v0.0.1
building example-operator...
building container quay.io/example/operator:v0.0.1...
Sending build context to Docker daemon 163.9MB
Step 1/4 : FROM alpine:3.6
---> 77144d8c6bdc
Step 2/4 : ADD tmp/_output/bin/example-operator /usr/local/bin/example-operator
---> 2ada0d6ca93c
Step 3/4 : RUN adduser -D example-operator
---> Running in 34b4bb507c14
Removing intermediate container 34b4bb507c14
---> c671ec1cff03
Step 4/4 : USER example-operator
---> Running in bd336926317c
Removing intermediate container bd336926317c
---> d6b58a0fcb8c
Successfully built d6b58a0fcb8c
Successfully tagged quay.io/example/operator:v0.0.1
completion
Subcommand
Description
bash
Generate bash completions.
zsh
Generate zsh completions.
Flag
Description
-h, --help
Usage help output.
$ operator-sdk completion bash
# bash completion for operator-sdk -*- shell-script -*-
...
# ex: ts=4 sw=4 et filetype=sh
print-deps
Flag
Description
--as-file
Print packages and versions in Gopkg.toml format.
$ operator-sdk print-deps --as-file
required = [
"k8s.io/code-generator/cmd/defaulter-gen",
"k8s.io/code-generator/cmd/deepcopy-gen",
"k8s.io/code-generator/cmd/conversion-gen",
"k8s.io/code-generator/cmd/client-gen",
"k8s.io/code-generator/cmd/lister-gen",
"k8s.io/code-generator/cmd/informer-gen",
"k8s.io/code-generator/cmd/openapi-gen",
"k8s.io/gengo/args",
]
[[override]]
name = "k8s.io/code-generator"
revision = "6702109cc68eb6fe6350b83e14407c8d7309fd1a"
...
generate
Subcommand
Description
k8s
Runs the Kubernetes code-generators for all Custom Resource Definition APIs under pkg/apis/. Currently, k8s only runs deepcopy-gen to generate the required DeepCopy() functions for all Custom Resource (CR) types.
$ tree pkg/apis/app/v1alpha1/
pkg/apis/app/v1alpha1/
├── appservice_types.go
├── doc.go
├── register.go
$ operator-sdk generate k8s
Running code-generation for Custom Resource (CR) group versions: [app:v1alpha1]
Generating deepcopy funcs
$ tree pkg/apis/app/v1alpha1/
pkg/apis/app/v1alpha1/
├── appservice_types.go
├── doc.go
├── register.go
└── zz_generated.deepcopy.go
olm-catalog
gen-csv
Flag
Description
--csv-version (string)
Semantic version of the ClusterServiceVersion manifest. Required.
--from-version (string)
Semantic version of ClusterServiceVersion manifest to use as a base for a new version.
--csv-config (string)
Path to ClusterServiceVersion configuration file. Default: deploy/olm-catalog/csv-config.yaml.
--update-crds
Updates Custom Resource Definition manifests in deploy/<operator_name>/<csv_version> using the latest Custom Resource Definition manifests.
$ operator-sdk olm-catalog gen-csv --csv-version 0.1.0 --update-crds
INFO[0000] Generating ClusterServiceVersion manifest version 0.1.0
INFO[0000] Fill in the following required fields in file deploy/olm-catalog/operator-name/0.1.0/operator-name.v0.1.0.clusterserviceversion.yaml:
spec.keywords
spec.maintainers
spec.provider
spec.labels
INFO[0000] Created deploy/olm-catalog/operator-name/0.1.0/operator-name.v0.1.0.clusterserviceversion.yaml
new
Argument
Description
<project_name>
Name of the new project.
Flag
Description
--api-version
Custom Resource Definition APIVersion in the format $GROUP_NAME/$VERSION, for example app.example.com/v1alpha1. Used with ansible or helm types.
--dep-manager [dep|modules]
Dependency manager the new project will use. Used with go type. (Default: modules)
--generate-playbook
Generate an Ansible playbook skeleton. Used with ansible type.
--header-file <string>
Path to file containing headers for generated Go files. Copied to hack/boilerplate.go.txt.
--helm-chart <string>
Initialize Helm operator with existing Helm chart: <url>, <repo>/<name>, or local path.
--helm-chart-repo <string>
Chart repository URL for the requested Helm chart.
--helm-chart-version <string>
Specific version of the Helm chart. (Default: latest version)
--help, -h
Usage and help output.
--kind <string>
Custom Resource Definition Kind, for example AppService. Used with ansible or helm types.
--skip-git-init
Do not initialize the directory as a Git repository.
--type
Type of Operator to initialize: go, ansible or helm. (Default: go)
$ mkdir $GOPATH/src/github.com/example.com/
$ cd $GOPATH/src/github.com/example.com/
$ operator-sdk new app-operator
$ operator-sdk new app-operator \
--type=ansible \
--api-version=app.example.com/v1alpha1 \
--kind=AppService
add
Subcommand
Description
api
Adds a new API definition for a new Custom Resource (CR) under pkg/apis and generates the Customer Resource Definition (CRD) and Custom Resource (CR) files under deploy/crds/. If the API already exists at pkg/apis/<group>/<version>, then the command does not overwrite and returns an error.
controller
Adds a new controller under pkg/controller/<kind>/. The controller expects to use the CR type that should already be defined under pkg/apis/<group>/<version> via the operator-sdk add api --kind=<kind> --api-version=<group/version> command. If the controller package for that Kind already exists at pkg/controller/<kind>, then the command does not overwrite and returns an error.
crd
Adds a Custom Resource Definition and the CR files. The <project-name>/deploy path must already exist. The --api-version and --kind flags are required to generate the new Operator application.
Flag
Description
--api-version (string)
Custom Resource Definition APIVersion in the format $GROUP_NAME/$VERSION (e.g., app.example.com/v1alpha1).
--kind (string)
Custom Resource Definition Kind (e.g., AppService).
$ operator-sdk add api --api-version app.example.com/v1alpha1 --kind AppService
Create pkg/apis/app/v1alpha1/appservice_types.go
Create pkg/apis/addtoscheme_app_v1alpha1.go
Create pkg/apis/app/v1alpha1/register.go
Create pkg/apis/app/v1alpha1/doc.go
Create deploy/crds/app_v1alpha1_appservice_cr.yaml
Create deploy/crds/app_v1alpha1_appservice_crd.yaml
Running code-generation for Custom Resource (CR) group versions: [app:v1alpha1]
Generating deepcopy funcs
$ tree pkg/apis
pkg/apis/
├── addtoscheme_app_appservice.go
├── apis.go
└── app
└── v1alpha1
├── doc.go
├── register.go
├── types.go
$ operator-sdk add controller --api-version app.example.com/v1alpha1 --kind AppService
Create pkg/controller/appservice/appservice_controller.go
Create pkg/controller/add_appservice.go
$ tree pkg/controller
pkg/controller/
├── add_appservice.go
├── appservice
│ └── appservice_controller.go
└── controller.go
$ operator-sdk add crd --api-version app.example.com/v1alpha1 --kind AppService
Generating Custom Resource Definition (CRD) files
Create deploy/crds/app_v1alpha1_appservice_crd.yaml
Create deploy/crds/app_v1alpha1_appservice_cr.yaml
test
local
Arguments
Description
<test_location> (string)
Location of e2e test files (e.g., ./test/e2e/).
Flags
Description
--kubeconfig (string)
Location of kubeconfig for a cluster. Default: ~/.kube/config.
--global-manifest (string)
Path to manifest for global resources. Default: deploy/crd.yaml.
--namespaced-manifest (string)
Path to manifest for per-test, namespaced resources. Default: combines deploy/service_account.yaml, deploy/rbac.yaml, and deploy/operator.yaml.
--namespace (string)
If non-empty, a single namespace to run tests in (e.g., operator-test). Default: ""
--go-test-flags (string)
Extra arguments to pass to go test (e.g., -f "-v -parallel=2").
--up-local
Enable running the Operator locally with go run instead of as an image in the cluster.
--no-setup
Disable test resource creation.
--image (string)
Use a different Operator image from the one specified in the namespaced manifest.
-h, --help
Usage help output.
$ operator-sdk test local ./test/e2e/
# Output:
ok github.com/operator-framework/operator-sdk-samples/memcached-operator/test/e2e 20.410s
up
local
Arguments
Description
--kubeconfig (string)
The file path to a Kubernetes configuration file. Defaults: $HOME/.kube/config
--namespace (string)
The namespace where the Operator watches for changes. Default: default
--operator-flags
Flags that the local Operator may need. Example: --flag1 value1 --flag2=value2
-h, --help
Usage help output.
$ operator-sdk up local \
--kubeconfig "mycluster.kubecfg" \
--namespace "default" \
--operator-flags "--flag1 value1 --flag2=value2"
$ operator-sdk up local --operator-flags "--resync-interval 10"
$ operator-sdk up local --namespace "testing"
Appendices
Operator project scaffolding layout
Go-based projects
File/folders
Purpose
cmd/
Contains manager/main.go file, which is the main program of the Operator. This instantiates a new manager which registers all Custom Resource Definitions under pkg/apis/ and starts all controllers under pkg/controllers/.
pkg/apis/
Contains the directory tree that defines the APIs of the Custom Resource Definitions (CRDs). Users are expected to edit the pkg/apis/<group>/<version>/<kind>_types.go files to define the API for each resource type and import these packages in their controllers to watch for these resource types.
pkg/controller
This pkg contains the controller implementations. Users are expected to edit the pkg/controller/<kind>/<kind>_controller.go files to define the controller's reconcile logic for handling a resource type of the specified kind.
build/
Contains the Dockerfile and build scripts used to build the Operator.
deploy/
Contains various YAML manifests for registering Custom Resource Definitions, setting up RBAC, and deploying the Operator as a Deployment.
Gopkg.toml
Gopkg.lock
The Go Dep manifests that describe the external dependencies of this Operator.
vendor/
The golang vendor folder that contains the local copies of the external dependencies that satisfy the imports of this project. Go Dep manages the vendor directly.
Helm-based projects
File/folders
Purpose
deploy/
Contains various YAML manifests for registering Custom Resource Definitions, setting up RBAC, and deploying the Operator as a Deployment.
helm-charts/<kind>
Contains a Helm chart initialized using the equivalent of the helm create command.
build/
Contains the Dockerfile and build scripts used to build the Operator.
watches.yaml
Contains Group, Version, Kind, and Helm chart location.
Quick Links
Help
Site Info
Related Sites
About