Nodes
- Work with pods
- Example pod configurations
- View pods in a project
- View pod usage statistics
- Configure an OpenShift cluster for pods
- Automatically scale pods
- Provide sensitive data to pods
- Secrets
- Use device plug-ins to access external resouces with pods
- Include pod priority in pod scheduling decisions
- Place pods on specific nodes using node selectors
- Control pod placement onto nodes (scheduling)
- Control pod placement using the scheduler
- Configure the default scheduler to control pod placement
- Default scheduling
- Scheduler Policy
- Scheduler Use Cases
- Infrastructure Topological Levels
- Affinity
- Anti-Affinity
- Create a scheduler policy file
- Modify scheduler policies
- Scheduler predicates
- Static Predicates
- General Predicates
- Configurable Predicates
- Scheduler priorities
- Static Priorities
- Configurable Priorities
- Sample Policy Configurations
- Place pods relative to other pods using affinity and anti-affinity rules
- Control pod placement on nodes using node affinity rules
- Place pods onto overcommited nodes
- Control pod placement using node taints
- Taints and tolerations
- Use toleration seconds to delay pod evictions
- Use multiple taints
- Preventing pod eviction for node problems
- Pod scheduling and node conditions (Taint Node by Condition)
- Evict pods by condition (Taint-Based Evictions)
- Add taints and tolerations
- Dedicating a Node for a User using taints and tolerations
- Binding a user to a Node using taints and tolerations
- Control Nodes with special hardware using taints and tolerations
- Remove taints and tolerations
- Place pods on specific nodes using node selectors
- Control pod placement using the scheduler
- Use Jobs and DaemonSets
- Work with nodes
- List nodes in the cluster
- Work with nodes
- Understand how to evacuate pods on nodes
- Update labels on nodes
- Mark nodes as unschedulable or schedulable
- Delete nodes from a cluster
- Manage Nodes
- Manage the maximum number of Pods per Node
- Use the Node Tuning Operator
- Node rebooting
- Free node resources using garbage collection
- Allocate resources for nodes in an OpenShift cluster
- Advertising hidden resources for nodes in an OpenShift cluster
- View node audit logs
- Work with containers
- Init Containers
- Use volumes to persist container data
- Map volumes using projected volumes
- Allow containers to consume API objects
- Expose Pod information to Containers using the Downward API
- How to consume container values using the downward API
- Consume container values using environment variables
- Consume container values using a volume plug-in
- Consume container resources using the downward API
- Consume container resources using environment variables
- Consume container resources using a volume plug-in
- Consume secrets using the downward API
- Consume configuration maps using the downward API
- Reference environment variables
- Escaping environment variable references
- Copy files to or from an OpenShift container
- Execute remote commands in an OpenShift container
- Use port forwarding to access applications in a container
- Monitor container health
- Work with clusters
- View system event information in an OpenShift cluster
- Estimate the number of pods the OpenShift nodes can hold
- Configure cluster memory to meet container memory and risk requirements
- Manage application memory
- Manage application memory strategy
- OpenJDK settings
- Override the JVM maximum heap size
- Release unused memory to the operating system
- Ensure JVM processes within a container are appropriately configured
- Find the memory request and limit from within a pod
- OOM kill policy
- Pod eviction
- Configure the cluster to place pods on overcommited nodes
- Overcommitment
- Resource requests and overcommitment
- Buffer Chunk Limiting for Fluentd
- Compute resources and containers
- Container memory requests
- Overcomitment and quality of service classes
- Reserve memory across quality of service tiers
- Swap memory and QOS
- Nodes overcommitment
- Disable or enforcing CPU limits using CPU CFS quotas
- Reserving resources for system processes
- Disable overcommitment for a node
- Disable overcommitment for a project
- Enable features using feature gates
Work with pods
A pod is one or more containers deployed together on one host, and the smallest compute unit that can be defined.
Each pod is allocated its own internal IP address, therefore owning its entire port space. Containers within pods can share their local storage and networking.
Lifecycle...
- Pods are defined
- Pods are assigned to run on a node
- Pods run until their Container(s) exit or they are removed for some other reason
Pods are largely immutable; changes cannot be made to a pod definition while it is running. Changes are implemented by terminating an existing pod and recreating it with modified configuration, base image(s), or both. Pods do not maintain state when recreated. Pods should usually be managed by higher-level controllers, rather than directly by users.
For the maximum number of pods per OpenShift node host, see the Cluster Limits.
Bare pods that are not managed by a replication controller will be not rescheduled upon node disruption.
Example pod configurations
The following pod object definition (YAML) provides a long-running service. The integrated Container image registry.
kind:                      Pod
apiVersion:                v1
metadata:
  name:                    example
  namespace:               default
  selfLink:                /api/v1/namespaces/default/pods/example
  uid:                     5cc30063-0265780783bc
  resourceVersion:         '165032'
  creationTimestamp:       '2019-02-13T20:31:37Z'
  labels:                  1
    app:                   hello-openshift
  annotations:             openshift.io/scc: anyuid
spec:
  restartPolicy:           Always  2
  serviceAccountName:      default
  imagePullSecrets:
    - name:                default-dockercfg-5zrhb
  priority:                0
  schedulerName:           default-scheduler
  terminationGracePeriodSeconds: 30
  nodeName:                ip-10-0-140-16.us-east-2.compute.internal
  securityContext:         3
    seLinuxOptions:
      level:                  's0:c11,c10'
  containers:                 4
    - resources:              {}
      terminationMessagePath: /dev/termination-log
      name:                   hello-openshift
      securityContext:
capabilities:
  drop:
- MKNOD
procMount:             Default
      ports:
- containerPort:       8080
  protocol:            TCP
      imagePullPolicy: Always
      volumeMounts:    5
- name:                default-token-wbqsl
  readOnly:            true
  mountPath:           /var/run/secrets/kubernetes.io/serviceaccount
      terminationMessagePolicy: File
      image: registry.redhat.io/openshift4/ose-ogging-eventrouter:v4.1  6
  serviceAccount: default      7
  volumes:                     8
    - name: default-token-wbqsl
      secret:
secretName: default-token-wbqsl
defaultMode: 420
  dnsPolicy: ClusterFirst
status:
  phase: Pending
  conditions:
    - type: Initialized
      status: 'True'
      lastProbeTime: null
      lastTransitionTime: '2019-02-13T20:31:37Z'
    - type: Ready
      status: 'False'
      lastProbeTime: null
      lastTransitionTime: '2019-02-13T20:31:37Z'
      reason: ContainersNotReady
      message: 'containers with unready status: [hello-openshift]'
    - type: ContainersReady
      status: 'False'
      lastProbeTime: null
      lastTransitionTime: '2019-02-13T20:31:37Z'
      reason: ContainersNotReady
      message: 'containers with unready status: [hello-openshift]'
    - type: PodScheduled
      status: 'True'
      lastProbeTime: null
      lastTransitionTime: '2019-02-13T20:31:37Z'
  hostIP: 10.0.140.16
  startTime: '2019-02-13T20:31:37Z'
  containerStatuses:
    - name: hello-openshift
      state:
waiting:
  reason: ContainerCreating
      lastState: {}
      ready: false
      restartCount: 0
      image: openshift/hello-openshift
      imageID: ''
  qosClass: BestEffort
- 1
- Pods can be "tagged" with one or more labels, which can then be used to select and manage groups of pods in a single operation. The labels are stored in key/value format in the metadata hash. One label in this example is registry=default.
- 2
- The pod restart policy with possible values Always, OnFailure, and Never. The default value is Always.
- 3
- OpenShift defines a security context for Containers which specifies whether they are allowed to run as privileged Containers, run as a user of their choice, and more. The default context is very restrictive but administrators can modify this as needed.
- 4
- containers specifies an array of Container definitions; in this case (as with most), just one.
- 5
- The Container specifies where external storage volumes should be mounted within the Container. In this case, there is a volume for storing the registry's data, and one for access to credentials the registry needs for making requests against the OpenShift API.
- 6
- Each Container in the pod is instantiated from its own Container image.
- 7
- Pods making requests against the OpenShift API is a common enough pattern that there is a serviceAccount field for specifying which service account user the pod should authenticate as when making the requests. This enables fine-grained access control for custom infrastructure components.
- 8
- The pod defines storage volumes that are available to its Container(s) to use. In this case, it provides an ephemeral volume for the registry storage and a secret volume containing the service account credentials.
This pod definition does not include attributes that are filled by OpenShift automatically after the pod is created and its lifecycle begins. The Kubernetes pod documentation has details about the functionality and purpose of pods.
View pods in a project
To view the pods in a project:
- Change to the project:
- $ oc project <project-name>
- Run the following command:
- $ oc get pods
For example:
$ oc get pods -n openshift-console
NAME                       READY   STATUS    RESTARTS   AGE
console-698d866b78-bnshf   1/1     Running   2          165m
console-698d866b78-m87pm   1/1     Running   2          165m
Add the -o wide flags to view the pod IP address and the node where the pod is located.
$ oc get pods -o wide

NAME                       READY   STATUS    RESTARTS   AGE    IP            NODE                           NOMINATED NODE
console-698d866b78-bnshf   1/1     Running   2          166m   10.128.0.24   ip-10-0-152-71.ec2.internal    <none>
console-698d866b78-m87pm   1/1     Running   2          166m   10.129.0.23   ip-10-0-173-237.ec2.internal   <none>
View pod usage statistics
We can display usage statistics about pods, which provide the runtime environments for Containers. These usage statistics include CPU, memory, and storage consumption.
Prerequisites
- We must have cluster-reader permission to view the usage statistics.
- Metrics must be installed to view the usage statistics.
Procedure
To view the usage statistics:
- Run the following command:
- $ oc adm top pods
For example:
$ oc adm top pods -n openshift-console
NAME                         CPU(cores)   MEMORY(bytes)
console-7f58c69899-q8c8k     0m           22Mi
console-7f58c69899-xhbgg     0m           25Mi
downloads-594fcccf94-bcxk8   3m           18Mi
downloads-594fcccf94-kv4p6   2m           15Mi
- View the usage statistics for pods with labels:
- $ oc adm top pod --selector=''
We must choose the selector (label query) to filter on. Supports =, ==, and !=.
Configure an OpenShift cluster for pods
Configure how pods behave after restart
A pod restart policy determines how OpenShift responds when Containers in that pod exit. The policy applies to all Containers in that pod.
RestartPolicy values:
| Always | Tries restarting a successfully exited Container on the pod continuously, with an exponential back-off delay (10s, 20s, 40s) until the pod is restarted. The default is Always. |
| OnFailure | Tries restarting a failed Container on the pod with an exponential back-off delay (10s, 20s, 40s) capped at 5 minutes. |
| Never | Does not try to restart exited or failed Containers on the pod. Pods immediately fail and exit. |
After the pod is bound to a node, the pod will never be bound to another node. This means that a controller is necessary in order for a pod to survive node failure:
| Condition | Controller Type | Restart Policy |
|---|---|---|
| Pods that are expected to terminate (such as batch computations) | Job | OnFailure or Never |
| Pods that are expected to not terminate (such as web servers) | Replication Controller | Always. |
| Pods that must run one-per-machine | Daemonset | Any |
If a Container on a pod fails and the restart policy is set to OnFailure, the pod stays on the node and the Container is restarted. If we do not want the Container to restart, use a restart policy of Never.
If an entire pod fails, OpenShift starts a new pod. Developers must address the possibility that applications might be restarted in a new pod. In particular, applications must handle temporary files, locks, incomplete output, and so forth caused by previous runs.
Kubernetes architecture expects reliable endpoints from cloud providers. When a cloud provider is down, the kubelet prevents OpenShift from restarting.
If the underlying cloud provider endpoints are not reliable, do not install a cluster using cloud provider integration. Install the cluster as if it was in a no-cloud environment. It is not recommended to toggle cloud provider integration on or off in an installed cluster.
For details on how OpenShift uses restart policy with failed Containers, see the Example States in the Kubernetes documentation.
Limit the duration of run-once pods
Run-once pods deploy pods or perform a build. Run-once pods are pods that have a RestartPolicy of Never or OnFailure.
The cluster administrator can use the RunOnceDuration admission control plug-in to force a limit on the time that those run-once pods can be active. Once the time limit expires, the cluster will try to actively terminate those pods. The main reason to have such a limit is to prevent tasks such as builds to run for an excessive amount of time.
The plug-in configuration should include the default active deadline for run-once pods. This deadline is enforced globally, but can be superseded on a per-project basis.
Procedure
To install the RunOnceDuration admission controller:
- Create an AdmissionConfiguration object that references the file:
kind:       AdmissionConfiguration
apiVersion: apiserver.k8s.io/v1alpha1
plugins:
- name:     RunOnceDurationConfig
  activeDeadlineSecondsOverride: 3600  1
- 1
- Global default for run-once pods in seconds.
Limit the bandwidth available to pods
We can apply quality-of-service traffic shaping to a pod, limiting available bandwidth. Egress traffic (from the pod) is handled by policing, which drops packets in excess of the configured rate. Ingress traffic (to the pod) is handled by shaping queued packets to effectively handle data. The limits placed on a pod do not affect the bandwidth of other pods.
Procedure
To limit the bandwidth on a pod:
- Write an object definition JSON file, and specify the data traffic speed using kubernetes.io/ingress-bandwidth and kubernetes.io/egress-bandwidth annotations. For example, to limit both pod egress and ingress bandwidth to 10M/s:
{ "kind": "Pod", "spec": { "containers": [ { "image": "openshift/hello-openshift", "name": "hello-openshift" } ] }, "apiVersion": "v1", "metadata": { "name": "iperf-slow", "annotations": { "kubernetes.io/ingress-bandwidth": "10M", "kubernetes.io/egress-bandwidth": "10M" } } } - Create the pod using the object definition:
- $ oc create -f <file_or_dir_path>
Pod disruption budget
A pod disruption budget allows the specification of safety constraints on pods during operations, such as draining a node for maintenance.
The PodDisruptionBudget API object specifies the minimum number or percentage of replicas that must be up at a time. Setting these in projects can be helpful during node maintenance (such as scaling a cluster down or a cluster upgrade) and is only honored on voluntary evictions (not on node failures).
A PodDisruptionBudget object's configuration consists of the following key parts:
- A label selector, which is a label query over a set of pods.
- An availability level, which specifies the minimum number of pods that must be available simultaneously.
To check for pod disruption budgets across all projects...
$ oc get poddisruptionbudget --all-namespaces

NAMESPACE         NAME          MIN-AVAILABLE   SELECTOR
another-project   another-pdb   4               bar=foo
test-project      my-pdb        2               foo=bar
The PodDisruptionBudget is considered healthy when there are at least minAvailable pods running in the system. Every pod above that limit can be evicted.
Depending on your pod priority and preemption settings, lower-priority pods might be removed despite their pod disruption budget requirements.
Use a PodDisruptionBudget object to specify the minimum number or percentage of replicas that must be up at a time.
To configure a pod disruption budget:
Number of pods that must be up with pod disruption budgets
apiVersion: policy/v1beta1 1
kind:       PodDisruptionBudget
metadata:
  name:     my-pdb
spec:
  selector:  2
    matchLabels:
      foo: bar
  minAvailable: 2  3
$ oc create -f </path/to/file> -n <project_name>
Prevent pod removal using critical pods
There are a number of core components that are critical to a fully functional cluster, but, run on a regular cluster node rather than the master. A cluster might stop working properly if a critical add-on is evicted.
Pods marked as critical are not allowed to be evicted.
To make a pod critical:
- Create a pod specification or edit existing pods to include the system-cluster-critical priority class:
spec:
  template:
    metadata:
      name: critical-pod
    priorityClassName: system-cluster-critical 1
1 Default priority class for pods that should never be evicted from a node.
Alternatively, we can specify system-node-critical for pods that are important to the cluster but can be removed if necessary.
- Create the pod:
- $ oc create -f <file-name>.yaml
Automatically scale pods
As a developer, we can use a horizontal pod autoscaler (HPA) to specify how OpenShift should automatically increase or decrease the scale of a replication controller or deployment configuration, based on metrics collected from the pods that belong to that replication controller or deployment configuration.
We can create a horizontal pod autoscaler to specify the minimum and maximum number of pods we want to run, as well as the CPU utilization or memory utilization our pods should target.
Autoscaling for Memory Utilization is a Technology Preview feature only.
After creating a horizontal pod autoscaler, OpenShift begins to query the CPU and/or memory resource metrics on the pods. This query can take one to two minutes before obtaining the initial metrics.
After these metrics are available, the horizontal pod autoscaler computes the ratio of the current metric utilization with the desired metric utilization, and scales up or down accordingly. The scaling occurs at a regular interval, but can take one to two minutes before metrics become available.
For replication controllers, this scaling corresponds directly to the replicas of the replication controller. For deployment configurations, scaling corresponds directly to the replica count of the deployment configuration. Note that autoscaling applies only to the latest deployment in the Complete phase.
OpenShift automatically accounts for resources and prevents unnecessary autoscaling during resource spikes, such as during start up. Pods in the unready state have 0 CPU usage when scaling up and the autoscaler ignores the pods when scaling down. Pods without known metrics have 0% CPU usage when scaling up and 100% CPU when scaling down. This allows for more stability during the HPA decision. To use this feature, configure readiness checks to determine if a new pod is ready for use.
To use horizontal pod autoscalers, the cluster administrator must have properly configured cluster metrics.
| Metric | Description | API version |
|---|---|---|
| CPU utilization | Number of CPU cores used. Can be used to calculate a percentage of the pod's requested CPU. | autoscaling/v1, autoscaling/v2beta2 |
| Memory utilization | Amount of memory used. Can be used to calculate a percentage of the pod's requested memory. | autoscaling/v2beta2 |
For memory-based autoscaling, memory usage must increase and decrease proportionally to the replica count. On average:
- An increase in replica count must lead to an overall decrease in memory (working set) usage per-pod.
- A decrease in replica count must lead to an overall increase in per-pod memory usage.
Use the web console to check the memory behavior of our application and ensure that our application meets these requirements before using memory-based autoscaling.
Create a horizontal pod autoscaler
The horizontal pod autoscaler (HPA) can scale for either CPU or memory utilization.
For CPU utilization create a horizontal pod autoscaler using the command line or by creating a HorizontalPodAutoscaler object.
When creating an HPA to control pod scaling based on CPU utilization, we specify the maximum number of pods we want to run at any given time. We can also specify a minimum number of pods.
The following command creates a Horizontal Pod Autoscaler that maintains between 1 and 10 replicas of the Pods controlled by the image-registry DeploymentConfig to maintain an average CPU utilization of 50% across all Pods.
- $ oc autoscale dc/image-registry --min 1 --max 10 --cpu-percent=50
The command creates the following Horizontal Pod Autoscaler object definition for CPU utilization...
- $ oc edit hpa image-registry
apiVersion: autoscaling/v1
kind:       HorizontalPodAutoscaler
metadata:
  annotations:
    autoscaling.alpha.kubernetes.io/conditions:
      '[{"type":"AbleToScale",
         "status":"True",
         "lastTransitionTime":"2019-05-22T20:49:57Z",
         "reason":"SucceededGetScale",
         "message":"the HPA controller was able to get the target''s current scale"},
         {
             "type":"ScalingActive",
             "status":"False",
             "lastTransitionTime":"2019-05-22T20:49:57Z",
             "reason":"FailedGetResourceMetric",
             "message":"the HPA was unable to compute the replica count: missing request for cpu"}]'
  creationTimestamp: 2019-05-22T20:49:42Z
  name:              image-registry  1
  namespace:         default
  resourceVersion:   "325215"
  selfLink: /apis/autoscaling/v1/namespaces/default/horizontalpodautoscalers/image-registry
  uid: 1fd7585a-7cd3-11e9-9d00-0e2a93384702
spec:
  maxReplicas: 10  2
  minReplicas: 1  3
  scaleTargetRef:
    apiVersion: apps.openshift.io/v1
    kind: DeploymentConfig  4
    name: image-registry   5
  targetCPUUtilizationPercentage: 50  6
status:
  currentReplicas: 3
  desiredReplicas: 0
- 1
- The name of this horizontal pod autoscaler object.
- 2
- The lower limit for the number of pods that can be set by the autoscaler. If not specified or negative, the server will apply a default value.
- 3
- The upper limit for the number of pods that can be set by the autoscaler. This value is required.
- 4
- The kind of object to scale, DeploymentConfig or ReplicationController.
- 5
- The name of the object to scale.
- 6
The percentage of the requested CPU that each pod should ideally be using.
- Memory utilization
- For memory utilization, we can specify the minimum number of pods and the average memory utilization our pods should target as well, otherwise those are given default values from the OpenShift server.
We can specify resource metrics in terms of direct values, instead of as percentages of the requested value, by using a target type of AverageValue instead of AverageUtilization, and setting the corresponding target.averageValue field instead of the target.averageUtilization.
Horizontal Pod Autoscaler Object Definition for memory utilization...
apiVersion:  autoscaling/v2beta2
kind:        HorizontalPodAutoscaler
metadata:
  name:      memory-autoscale  1
  namespace: default
spec:
  scaleTargetRef:
    apiVersion: apps/v1  2
    name:       example  3
    kind:       DeploymentConfig  4
  minReplicas:  1  5
  maxReplicas:  10  6
  metrics:
  - type: Resource
    resource:
      name: cpu
      target:
type: Utilizationc  7
averageUtilization: 50
- 1
- The name of this horizontal pod autoscaler object.
- 2
- The API version of the object to scale.
- 3
- The name of the object to scale.
- 4
- The kind of object to scale.
- 5
- The lower limit for the number of pods that can be set by the autoscaler. If not specified or negative, the server will apply a default value.
- 6
- The upper limit for the number of pods that can be set by the autoscaler. This value is required.
- 7
- The type of must be either Utilization, Value, or AverageValue.
Create a horizontal pod autoscaler for CPU utilization
Horizontal pod autoscalers (HPAs) automatically scale pods when CPU usage exceeds a specified percentage. We create the HPA for a replication controller or deployment controller, based on how our pods were created.
Prerequisites
To use horizontal pod autoscalers, the cluster administrator must have properly configured cluster metrics. We can use the oc describe PodMetrics <pod-name> command to determine if metrics are configured. If metrics are configured, the output appears similar to the following, with Cpu and Memory displayed under Usage.
$ oc describe PodMetrics openshift-kube-scheduler-ip-10-0-135-131.ec2.internal

Name:         openshift-kube-scheduler-ip-10-0-135-131.ec2.internal
Namespace:    openshift-kube-scheduler
Labels:       <none>
Annotations:  <none>
API Version:  metrics.k8s.io/v1beta1
Containers:
  Name:  wait-for-host-port
  Usage:
    Memory:  0
  Name:      scheduler
  Usage:
    Cpu:     8m
    Memory:  45440Ki
Kind:        PodMetrics
Metadata:
  Creation Timestamp:  2019-05-23T18:47:56Z
  Self Link:           /apis/metrics.k8s.io/v1beta1/namespaces/openshift-kube-scheduler/pods/openshift-kube-scheduler-ip-10-0-135-131.ec2.internal
Timestamp:             2019-05-23T18:47:56Z
Window:                1m0s
Events:                <none>
Procedure
Use one of the following commands to create a horizontal pod autoscaler for CPU utilization for a deployment controller or a replication controller:
oc autoscale dc/<deployment-name> \ 1
  --min <number> \ 2
  --max <number> \ 3
  --cpu-percent=<percent>  4

oc autoscale rc/<file-name> --min <number> --max <number> --cpu-percent=<percent>
- 1
- Deployment object or replica file.
- 2
- Minimum number of replicas when scaling down.
- 3
- Maximum number of replicas when scaling up.
- 4
- Specify the target average CPU utilization, represented as a percent of requested CPU, over all the pods. If not specified or negative, a default autoscaling policy will be used.
For example:
- oc autoscale dc/example --min=5 --max=7 --cpu-percent=75
The following example shows autoscaling for the example deployment configuration. The initial deployment requires 3 pods. The HPA object increased that minumum to 5 and will increase the pods up to 7 if CPU usage on the pods reaches 75%:
$ oc get dc example
NAME      REVISION   DESIRED   CURRENT   TRIGGERED BY
example   1          3         3         config

$ oc autoscale dc/example --min=5 --max=7 --cpu-percent=75
horizontalpodautoscaler.autoscaling/example autoscaled

$ oc get dc
NAME      REVISION   DESIRED   CURRENT   TRIGGERED BY
example   1          5         5         config
Create a horizontal pod autoscaler object for memory utilization
We can create a horizontal pod autoscaler to automatically scale pods in a Deployment when memory usage exceeds a specified limit.
Autoscaling for memory utilization is a Technology Preview feature only. Technology Preview features are not supported with Red Hat production service level agreements (SLAs), might not be functionally complete, and Red Hat does not recommend to use them for production. These features provide early access to upcoming product features, enabling customers to test functionality and provide feedback during the development process.
For more information on Red Hat Technology Preview features support scope, see https://access.redhat.com/support/offerings/techpreview/.
Prerequisites
To use horizontal pod autoscalers, the cluster administrator must have properly configured cluster metrics. We can use the oc describe PodMetrics <pod-name> command to determine if metrics are configured. If metrics are configured, the output appears similar to the following, with Cpu and Memory displayed under Usage.
$ oc describe PodMetrics openshift-kube-scheduler-ip-10-0-135-131.ec2.internal

Name:         openshift-kube-scheduler-ip-10-0-135-131.ec2.internal
Namespace:    openshift-kube-scheduler
Labels:       <none>
Annotations:  <none>
API Version:  metrics.k8s.io/v1beta1
Containers:
  Name:  wait-for-host-port
  Usage:
    Memory:  0
  Name:      scheduler
  Usage:
    Cpu:     8m
    Memory:  45440Ki
Kind:        PodMetrics
Metadata:
  Creation Timestamp:  2019-05-23T18:47:56Z
  Self Link:           /apis/metrics.k8s.io/v1beta1/namespaces/openshift-kube-scheduler/pods/openshift-kube-scheduler-ip-10-0-135-131.ec2.internal
Timestamp:             2019-05-23T18:47:56Z
Window:                1m0s
Events:                <none>
Procedure
To create a horizontal pod autoscaler for memory utilization:
- Create a YAML file that contains one of the following:
Sample HPA object for an absolute value
apiVersion: autoscaling/v2beta2 kind: HorizontalPodAutoscaler metadata: name: memory-autoscale 1 namespace: default spec: scaleTargetRef: apiVersion: apps/v1 2 name: example 3 kind: DeploymentConfig 4 minReplicas: 1 5 maxReplicas: 10 6 metrics: - type: Resource resource: name: memory target: name: memory-absolute targetAverageValue: 500Mi 7- 1
- Name of this horizontal pod autoscaler object.
- 2
- Specify apps/v1 as the API version of the object to scale.
- 3
- Name of the object to scale.
- 4
- Kind of object to scale.
- 5
- Minimum number of replicas when scaling down.
- 6
- Maximum number of replicas when scaling up.
- 7
- Average amount of memory used per pod.
Sample HPA object for a percentage
apiVersion: autoscaling/v2beta2
kind: HorizontalPodAutoscaler
metadata:
  name: memory-autoscale  1
  namespace: default
spec:
  scaleTargetRef:
    apiVersion: apps/v1  2
    name: example  3
    kind: DeploymentConfig  4
  minReplicas: 1  5
  maxReplicas: 10  6
  metrics:
  - type: Resource
    resource:
      name: memory
      target:
name: memory-percent
type: Utilization
averageUtilization: 50  7
- 1
- Name of this horizontal pod autoscaler object.
- 2
- Specify apps/v1 as the API version of the object to scale.
- 3
- Name of the object to scale.
- 4
- Kind of object to scale.
- 5
- Minimum number of replicas when scaling down.
- 6
- Maximum number of replicas when scaling up.
- 7
The average percentage of the requested memory that each pod should be using.
- Create the autoscaler from the above file:
- $ oc create -f <file-name>.yaml
For example:
$ oc create -f hpa.yaml

horizontalpodautoscaler.autoscaling/hpa-resource-metrics-memory created
- Create the autoscaler from the above file:
$ oc get hpa memory-autoscale

NAME               REFERENCE                  TARGETS           MINPODS   MAXPODS   REPLICAS   AGE
memory-autoscale   DeploymentConfig/example   <unknown>/500Mi   1         10        0          56s
$ oc describe hpa memory-autoscale

Name:                                                  memory-autoscale
Namespace:                                             default
Labels:                                                <none>
Annotations:                                           <none>
CreationTimestamp:                                     Wed, 22 May 2019 20:56:35 -0400
Reference:                                             DeploymentConfig/example
Metrics:                                               ( current / target )
  resource cpu on pods  (as a percentage of request):  <unknown>/500Mi
Min replicas:                                          1
Max replicas:                                          10
DeploymentConfig pods:                                 0 current / 0 desired
Events:                                                <none>
Horizontal pod autoscaler status conditions
Use the status conditions set to determine whether or not the horizontal pod autoscaler (HPA) is able to scale and whether or not it is currently restricted in any way.
The HPA status conditions are available with the v2beta1 version of the autoscaling API.
The HPA responds with the following status conditions:
- A True condition indicates scaling is allowed.
- A False condition indicates scaling is not allowed for the reason specified.
- A True condition indicates metrics is working properly.
- A False condition generally indicates a problem with fetching metrics.
$ oc describe hpa cm-test
Name:                           cm-test
Namespace:                      prom
Labels:                         <none>
Annotations:                    <none>
CreationTimestamp:              Fri, 16 Jun 2017 18:09:22 +0000
Reference:                      ReplicationController/cm-test
Metrics:                        ( current / target )
  "http_requests" on pods:      66m / 500m
Min replicas:                   1
Max replicas:                   4
ReplicationController pods:     1 current / 1 desired
Conditions:  1
  Type              Status    Reason              Message
  ----              ------    ------              -------
  AbleToScale       True      ReadyForNewScale    the last scale time was sufficiently old as to warrant a new scale
  ScalingActive     True      ValidMetricFound    the HPA was able to successfully calculate a replica count from pods metric http_request
  ScalingLimited    False     DesiredWithinRange  the desired replica count is within the acceptable range
Events:
- 1 The horizontal pod autoscaler status messages.
The following is an example of a pod that is unable to scale:
Conditions:
  Type         Status  Reason          Message
  ----         ------  ------          -------
  AbleToScale  False   FailedGetScale  the HPA controller was unable to get the target's current scale: no matches for kind "ReplicationController" in group "apps"
Events:
  Type     Reason          Age               From                       Message
  ----     ------          ----              ----                       -------
  Warning  FailedGetScale  6s (x3 over 36s)  horizontal-pod-autoscaler  no matches for kind "ReplicationController" in group "apps"
The following is an example of a pod that could not obtain the needed metrics for scaling:
Conditions:
  Type                  Status    Reason                    Message
  ----                  ------    ------                    -------
  AbleToScale           True     SucceededGetScale          the HPA controller was able to get the target's current scale
  ScalingActive         False    FailedGetResourceMetric    the HPA was unable to compute the replica count: unable to get metrics for resource cpu: no metrics returned from heapster
The following is an example of a pod where the requested autoscaling was less than the required minimums:
Conditions:
  Type              Status    Reason              Message
  ----              ------    ------              -------
  AbleToScale       True      ReadyForNewScale    the last scale time was sufficiently old as to warrant a new scale
  ScalingActive     True      ValidMetricFound    the HPA was able to successfully calculate a replica count from pods metric http_request
  ScalingLimited    False     DesiredWithinRange  the desired replica count is within the acceptable range
View horizontal pod autoscaler status conditions
We can view the status conditions set on a pod by the horizontal pod autoscaler (HPA).
The horizontal pod autoscaler status conditions are available with the v2beta1 version of the autoscaling API.
Prerequisites
To use horizontal pod autoscalers, the cluster administrator must have properly configured cluster metrics. We can use the oc describe PodMetrics <pod-name> command to determine if metrics are configured. If metrics are configured, the output appears similar to the following, with Cpu and Memory displayed under Usage.
$ oc describe PodMetrics openshift-kube-scheduler-ip-10-0-135-131.ec2.internal

Name:         openshift-kube-scheduler-ip-10-0-135-131.ec2.internal
Namespace:    openshift-kube-scheduler
Labels:       <none>
Annotations:  <none>
API Version:  metrics.k8s.io/v1beta1
Containers:
  Name:  wait-for-host-port
  Usage:
    Memory:  0
  Name:      scheduler
  Usage:
    Cpu:     8m
    Memory:  45440Ki
Kind:        PodMetrics
Metadata:
  Creation Timestamp:  2019-05-23T18:47:56Z
  Self Link:           /apis/metrics.k8s.io/v1beta1/namespaces/openshift-kube-scheduler/pods/openshift-kube-scheduler-ip-10-0-135-131.ec2.internal
Timestamp:             2019-05-23T18:47:56Z
Window:                1m0s
Events:                <none>
Procedure
To view the status conditions on a pod, use the following command with the name of the pod:
$ oc describe hpa <pod-name>
For example:
$ oc describe hpa cm-test
The conditions appear in the Conditions field in the output.
Name:                           cm-test
Namespace:                      prom
Labels:                         <none>
Annotations:                    <none>
CreationTimestamp:              Fri, 16 Jun 2017 18:09:22 +0000
Reference:                      ReplicationController/cm-test
Metrics:                        ( current / target )
  "http_requests" on pods:      66m / 500m
Min replicas:                   1
Max replicas:                   4
ReplicationController pods:     1 current / 1 desired
Conditions:  1
  Type              Status    Reason              Message
  ----              ------    ------              -------
  AbleToScale       True      ReadyForNewScale    the last scale time was sufficiently old as to warrant a new scale
  ScalingActive     True      ValidMetricFound    the HPA was able to successfully calculate a replica count from pods metric http_request
  ScalingLimited    False     DesiredWithinRange  the desired replica count is within the acceptable range
For more information on replication controllers and deployment controllers, see Deployments and DeploymentConfigs.
Use Secret objects to provide passwords and user names to applcations without exposing that information in clear text.
The Secret object type provides a mechanism to hold sensitive information such as passwords, configuration files, private source repository credentials, and so on. Secrets decouple sensitive content from the pods. We can mount secrets into Containers using a volume plug-in or the system can use secrets to perform actions on behalf of a pod.
Key properties include:
YAML Secret Object Definition...
We must create a secret before creating the pods that depend on that secret.
When creating secrets:
The value in the type field indicates the structure of the secret's key names and values. The type can be used to enforce the presence of user names and keys in the secret object. If we do not want validation, use the opaque type, which is the default.
Specify one of the following types to trigger minimal server-side validation to ensure the presence of specific key names in the secret data:
The following are sample secret configuration files.
YAML Secret That Will Create Four Files...
YAML of a Pod Populating Files in a Volume with Secret Data...
YAML of a Pod Populating Environment Variables with Secret Data...
YAML of a Build Config Populating Environment Variables with Secret Data...
Secret keys must be in a DNS subdomain.
As an administrator create a secret before developers can create the pods that depend on that secret.
When creating secrets:
To use a secret, a pod needs to reference the secret. A secret can be used with a pod in three ways:
Volume type secrets write data into the Container as a file using the volume mechanism. Image pull secrets use service accounts for the automatic injection of the secret into all pods in a namespaces.
When a template contains a secret definition, the only way for the template to use the provided secret is to ensure that the secret volume sources are validated and that the specified object reference actually points to an object of type Secret. Therefore, a secret needs to be created before any pods that depend on it. The most effective way to ensure this is to have it get injected automatically through the use of a service account.
Secret API objects reside in a namespace. They can only be referenced by pods in that same namespace.
Individual secrets are limited to 1MB in size. This is to discourage the creation of large secrets that could exhaust apiserver and kubelet memory. However, creation of a number of smaller secrets could also exhaust memory.
As an administrator, we can create a opaque secret, which allows for unstructured key:value pairs that can contain arbitrary values.
Procedure
For example:
Then:
When you modify the value of a secret, the value (used by an already running pod) will not dynamically change. To change a secret, we must delete the original pod and create a new pod (perhaps with an identical PodSpec).
Update a secret follows the same workflow as deploying a new Container image. We can use the kubectl rolling-update command.
The resourceVersion value in a secret is not specified when it is referenced. Therefore, if a secret is updated at the same time as pods are starting, then the version of the secret will be used for the pod will not be defined.
Currently, it is not possible to check the resource version of a secret object that was used when a pod was created. It is planned that pods will report this information, so that a controller could restart ones using a old resourceVersion. In the interim, do not update the data of existing secrets, but create new ones with distinct names.
We can configure OpenShift to generate a signed serving certificate/key pair that we can add into a secret in a project.
A service serving certificate secret is intended to support complex middleware applications that need out-of-the-box certificates. It has the same settings as the server certificates generated by the administrator tooling for nodes and masters.
Service pod specification configured for a service serving certificates secret.
Other pods can trust cluster-created certificates (which are only signed for internal DNS names), using the CA bundle in the /var/run/secrets/kubernetes.io/serviceaccount/service-ca.crt file that is automatically mounted in their pod.
The signature algorithm for this feature is x509.SHA256WithRSA. To manually rotate, delete the generated secret. A new certificate is created.
To use a signed serving certificate/key pair with a pod, create or edit the service to add the service.alpha.openshift.io/serving-cert-secret-name annotation, then add the secret to the pod.
Procedure
To create a service serving certificate secret:
The certificate and key are in PEM format, stored in tls.crt and tls.key respectively.
When it is available, your pod will run. The certificate will be good for the internal service DNS name, <service.name>.<service.namespace>.svc.
The certificate/key pair is automatically replaced when it gets close to expiration. View the expiration date in the service.alpha.openshift.io/expiry annotation on the secret, which is in RFC3339 format.
In most cases, the service DNS name <service.name>.<service.namespace>.svc is not externally routable. The primary use of <service.name>.<service.namespace>.svc is for intracluster or intraservice communication, and with re-encrypt routes.
If a service certificate generation fails with (service's service.alpha.openshift.io/serving-cert-generation-error annotation contains):
The service that generated the certificate no longer exists, or has a different serviceUID. Force certificates regeneration by removing the old secret, and clearing the following annotations on the service service.alpha.openshift.io/serving-cert-generation-error, service.alpha.openshift.io/serving-cert-generation-error-num:
The command removing annotation has a - after the annotation name to be removed.
Device plug-ins allow you to use a particular device type (GPU, InfiniBand, or other similar computing resources that require vendor-specific initialization and setup) in the OpenShift pod without needing to write custom code.
The device plug-in provides a consistent and portable solution to consume hardware devices across clusters. The device plug-in provides support for these devices through an extension mechanism, which makes these devices available to Containers, provides health checks of these devices, and securely shares them.
OpenShift supports the device plug-in API, but the device plug-in Containers are supported by individual vendors.
A device plug-in is a gRPC service running on the nodes (external to the kubelet) that is responsible for managing specific hardware resources. Any device plug-in must support following remote procedure calls (RPCs):
There is a stub device plug-in in the Device Manager code:
Daemonsets are the recommended approach for device plug-in deployments. Upon start, the device plug-in will try to create a UNIX domain socket at...
Device Manager can advertise specialized node hardware resources with the help of device plug-ins. No upstream code are required. Device Manager advertises devices as Extended Resources. User pods can consume devices advertised by Device Manager.
Upon start, the device plug-in registers itself with Device Manager invoking Register on the...
...and starts a gRPC service at...
...for serving Device Manager requests.
Device Manager, while processing a new registration request, invokes ListAndWatch remote procedure call (RPC) at the device plug-in service. In response, Device Manger gets a list of Device objects from the plug-in over a gRPC stream. Device Manager will keep watching on the stream for new updates from the plug-in. On the plug-in side, the plug-in will also keep the stream open and whenever there is a change in the state of any of the devices, a new device list is sent to the Device Manager over the same streaming connection.
While handling a new pod admission request, Kubelet passes requested Extended Resources to the Device Manager for device allocation. Device Manager checks in its database to verify if a corresponding plug-in exists or not. If the plug-in exists and there are free allocatable devices as well as per local cache, Allocate RPC is invoked at that particular device plug-in.
Additionally, device plug-ins can also perform several other device-specific operations, such as driver installation, device initialization, and device resets. These functionalities vary from implementation to implementation.
For example:
1 Label required for the device manager.
Sample configuration for a Device Manager CR
...is created on the node. This is the UNIX domain socket on which the Device Manager gRPC server listens for new plug-in registrations. This sock file is created when the Kubelet is started only if Device Manager is enabled.
We can enable pod priority and preemption in the cluster.
To use priority and preemption, created priority classes that define the relative weight of our pods. Then, reference a priority class in the pod specification to apply that weight for scheduling.
Preemption is controlled by the disablePreemption parameter in the scheduler configuration file, which is set to false by default.
When we use the Pod Priority and Preemption feature, the scheduler orders pending pods by their priority, and a pending pod is placed ahead of other pending pods with lower priority in the scheduling queue. As a result, the higher priority pod might be scheduled sooner than pods with lower priority if its scheduling requirements are met. If a pod cannot be scheduled, scheduler continues to schedule other lower priority pods.
We can assign pods a priority class, which is a non-namespaced object that defines a mapping from a name to the integer value of the priority. The higher the value, the higher the priority.
A priority class object can take any 32-bit integer value smaller than or equal to 1000000000 (one billion). Reserve numbers larger than one billion for critical pods that should not be preempted or evicted. By default, OpenShift has two reserved priority classes for critical system pods to have guaranteed scheduling.
Priority classes...
If existing cluster is upgraded, priority of the existing pods is effectively zero. However, existing pods with the annotations...
...are automatically converted to system-cluster-critical class. Fluentd cluster logging pods with the annotation are converted to the cluster-logging priority class.
After we have one or more priority classes, we can create pods that specify a priority class name in a pod specification. The priority admission controller uses the priority class name field to populate the integer value of the priority. If the named priority class is not found, the pod is rejected.
When a developer creates a pod, the pod goes into a queue. If the developer configured the pod for pod priority or preemption, the scheduler picks a pod from the queue and tries to schedule the pod on a node. If the scheduler cannot find space on an appropriate node that satisfies all the specified requirements of the pod, preemption logic is triggered for the pending pod.
When the scheduler preempts one or more pods on a node, the nominatedNodeName field of higher-priority pod specification is set to the name of the node, along with the nodename field. The scheduler uses the nominatedNodeName field to keep track of the resources reserved for pods and also provides information to the user about preemptions in the clusters.
After the scheduler preempts a lower-priority pod, the scheduler honors the graceful termination period of the pod. If another node becomes available while scheduler is waiting for the lower-priority pod to terminate, the scheduler can schedule the higher-priority pod on that node. As a result, the nominatedNodeName field and nodeName field of the pod specification might be different.
Also, if the scheduler preempts pods on a node and is waiting for termination, and a pod with a higher-priority pod than the pending pod needs to be scheduled, the scheduler can schedule the higher-priority pod instead. In such a case, the scheduler clears the nominatedNodeName of the pending pod, making the pod eligible for another node.
Preemption does not necessarily remove all lower-priority pods from a node. The scheduler can schedule a pending pod by removing a portion of the lower-priority pods.
The scheduler considers a node for pod preemption only if the pending pod can be scheduled on the node.
If you enable pod priority and preemption, consider your other scheduler settings:
If a pending pod has inter-pod affinity with one or more of the lower-priority pods on a node, the scheduler cannot preempt the lower-priority pods without violating the affinity requirements. In this case, the scheduler looks for another node to schedule the pending pod. However, there is no guarantee that the scheduler can find an appropriate node and pending pod might not be scheduled.
To prevent this situation, carefully configure pod affinity with equal-priority pods.
When preempting a pod, the scheduler waits for the pod graceful termination period to expire, allowing the pod to finish working and exit. If the pod does not exit after the period, the scheduler kills the pod. This graceful termination period creates a time gap between the point that the scheduler preempts the pod and the time when the pending pod can be scheduled on the node.
To minimize this gap, configure a small graceful termination period for lower-priority pods.
You apply pod priority and preemption by creating a priority class object and associating pods to the priority using the priorityClassName in your pod specifications.
Sample priority class object...
Procedure
To configure the cluster to use priority and preemption:
We can add the priority name directly to the pod configuration or to a pod template.
We can disable the pod priority and preemption feature.
After the feature is disabled, the existing pods keep their priority fields, but preemption is disabled, and priority fields are ignored. If the feature is disabled, we cannot set a priority class name in new pods.
Critical pods rely on scheduler preemption to be scheduled when a cluster is under resource pressure. For this reason, Red Hat recommends not disabling preemption. DaemonSet pods are scheduled by the DaemonSet controller and not affected by disabling preemption.
Procedure
To disable the preemption for the cluster:
A node selector specifies a map of key-value pairs. The rules are defined using custom labels on nodes and selectors specified in pods.
For the pod to be eligible to run on a node, the pod must have the indicated key-value pairs as the label on the node.
If we are using node affinity and node selectors in the same pod configuration, see the important considerations below.
Use node selector labels on pods to control where the pod is scheduled.
You then add labels to a specific nodes where we want the pods scheduled or to the MachineSet that controls the nodes.
We can add labels to a node or MachineConfig, but the labels will not persist if the node or machine goes down. Adding the label to the MachineSet ensures that new nodes or machines will have the label.
Procedure
For example, make sure that your pod configuration features the nodeSelector value indicating the desired label:
For example:
For example, to label a node:
To label a MachineSet:
The label is applied to the node:
If we are using node selectors and node affinity in the same pod configuration, note the following:
Pod scheduling is an internal process that determines placement of new pods onto nodes within the cluster.
The scheduler code has a clean separation that watches new pods as they get created and identifies the most suitable node to host them. It then creates bindings (pod to node bindings) for the pods using the master API.
The default pod scheduler determines placement of new pods onto nodes within the cluster, reading data from the pod and finding a good fit node based on configured policies. It is completely independent and exists as a standalone/pluggable solution. It does not modify the pod and just creates a binding for the pod that ties the pod to the particular node.
Sample default scheduler object...
The existing generic scheduler is the default platform-provided scheduler engine that selects a node to host the pod in a three-step operation:
The selection of the predicate and priorities defines the policy for the scheduler.
The scheduler configuration file is a JSON file that specifies the predicates and priorities the scheduler will consider.
In the absence of the scheduler policy file, the default scheduler behavior is used.
The predicates and priorities defined in the scheduler configuration file completely override the default scheduler policy. If any of the default predicates and priorities are required, we must explicitly specify the functions in the policy configuration.
Sample scheduler configuration file
One of the important use cases for scheduling within OpenShift is to support flexible affinity and anti-affinity policies.
Administrators can define multiple topological levels for their infrastructure (nodes) by specifying labels on nodes. For example: region=r1, zone=z1, rack=s1.
These label names have no particular meaning and administrators are free to name their infrastructure levels anything, such as city/building/room. Also, administrators can define any number of levels for their infrastructure topology, with three levels usually being adequate (such as: regions -zones -racks). Administrators can specify affinity and anti-affinity rules at each of these levels in any combination.
Administrators should be able to configure the scheduler to specify affinity at any topological level, or even at multiple levels. Affinity at a particular level indicates that all pods that belong to the same service are scheduled onto nodes that belong to the same level. This handles any latency requirements of applications by allowing administrators to ensure that peer pods do not end up being too geographically separated. If no node is available within the same affinity group to host the pod, then the pod is not scheduled.
If you need greater control over where the pods are scheduled, see Control pod placement on nodes using node affinity rules and Place pods relative to other pods using affinity and anti-affinity rules.
These advanced scheduling features allow administrators to specify which node a pod can be scheduled on and to force or reject scheduling relative to other pods.
Administrators should be able to configure the scheduler to specify anti-affinity at any topological level, or even at multiple levels. Anti-affinity (or 'spread') at a particular level indicates that all pods that belong to the same service are spread across nodes that belong to that level. This ensures that the application is well spread for high availability purposes. The scheduler tries to balance the service pods across all applicable nodes as evenly as possible.
If you need greater control over where the pods are scheduled, see Control pod placement on nodes using node affinity rules and Place pods relative to other pods using affinity and anti-affinity rules.
These advanced scheduling features allow administrators to specify which node a pod can be scheduled on and to force or reject scheduling relative to other pods.
We can control change the default scheduling behavior using a ConfigMap in the openshift-config project. Add and remove predicates and priorities to the ConfigMap to create a scheduler policy.
Sample scheduler configuration map
Procedure
To create the scheduler policy:
Sample scheduler JSON file
For example:
You change scheduling behavior by creating or editing your scheduler policy ConfigMap in the openshift-config project. Add and remove predicates and priorities to the ConfigMap to create a scheduler policy.
Typical predicate string...
...where...
Typical priority string...
...where...
To modify the scheduler policy:
Edit the scheduler configuration file to configure the desired predicates and priorities.
Sample modified scheduler configuration map...
For example, the following strings add the labelpresence predicate requiring the rack label on the nodes and the labelPreference priority giving a weight of 2 to the rack label:
The ConfigMap appears as following with the new priority:
Predicates are rules that filter out unqualified nodes.
There are several predicates provided by default in OpenShift. Some of these predicates can be customized by providing certain parameters. Multiple predicates can be combined to provide additional filtering of nodes.
These predicates do not take any configuration parameters or inputs from the user. These are specified in the scheduler configuration using their exact name.
The default scheduler policy includes the following predicates:
NoVolumeZoneConflict checks that the volumes a pod requests are available in the zone.
MaxEBSVolumeCount checks the maximum number of volumes that can be attached to an AWS instance.
MaxGCEPDVolumeCount checks the maximum number of Google Compute Engine (GCE) Persistent Disks (PD).
MatchInterPodAffinity checks if the pod affinity/anti-affinity rules permit the pod.
NoDiskConflict checks if the volume requested by a pod is available.
PodToleratesNodeTaints checks if a pod can tolerate the node taints.
CheckNodeMemoryPressure checks if a pod can be scheduled on a node with a memory pressure condition.
OpenShift also supports the following predicates:
CheckNodeDiskPressure checks if a pod can be scheduled on a node with a disk pressure condition.
CheckVolumeBinding evaluates if a pod can fit based on the volumes, it requests, for both bound and unbound PVCs. * For PVCs that are bound, the predicate checks that the corresponding PV's node affinity is satisfied by the given node. * For PVCs that are unbound, the predicate searched for available PVs that can satisfy the PVC requirements and that the PV node affinity is satisfied by the given node.
The predicate returns true if all bound PVCs have compatible PVs with the node, and if all unbound PVCs can be matched with an available and node-compatible PV.
The CheckVolumeBinding predicate must be enabled in non-default schedulers.
CheckNodeCondition checks if a pod can be scheduled on a node reporting out of disk, network unavailable, or not ready conditions.
PodToleratesNodeNoExecuteTaints checks if a pod tolerations can tolerate a node NoExecute taints.
CheckNodeLabelPresence checks if all of the specified labels exist on a node, regardless of their value.
checkServiceAffinity checks that ServiceAffinity labels are homogeneous for pods that are scheduled on a node.
MaxAzureDiskVolumeCount checks the maximum number of Azure Disk Volumes.
The following general predicates check whether non-critical predicates and essential predicates pass. Non-critical predicates are the predicates that only non-critical pods must pass and essential predicates are the predicates that all pods must pass.
The default scheduler policy includes the general predicates.
PodFitsResources determines a fit based on resource availability (CPU, memory, GPU, and so forth). The nodes can declare their resource capacities and then pods can specify what resources they require. Fit is based on requested, rather than used resources.
PodFitsHostPorts determines if a node has free ports for the requested pod ports (absence of port conflicts).
HostName determines fit based on the presence of the Host parameter and a string match with the name of the host.
MatchNodeSelector determines fit based on node selector (nodeSelector) queries defined in the pod.
We can configure these predicates in the scheduler policy Configmap, policy-configmap in the openshift-config project, to add labels to affect how the predicate functions.
Since these are configurable, multiple predicates of the same type (but different configuration parameters) can be combined as long as their user-defined names are different.
For information on using these priorities, see Modify Scheduler Policy.
ServiceAffinity places pods on nodes based on the service running on that pod. Placing pods of the same service on the same or co-located nodes can lead to higher efficiency.
This predicate attempts to place pods with specific labels in its node selector on nodes that have the same label.
If the pod does not specify the labels in its node selector, then the first pod is placed on any node based on availability and all subsequent pods of the service are scheduled on nodes that have the same label values as that node.
For example:
For example. if the first pod of a service had a node selector rack was scheduled to a node with label region=rack, all the other subsequent pods belonging to the same service will be scheduled on nodes with the same region=rack label.
Multiple-level labels are also supported. Users can also specify all pods for a service to be scheduled on nodes within the same region and within the same zone (under the region).
The labelsPresence parameter checks whether a particular node has a specific label. The labels create node groups that the LabelPreference priority uses. Matching by label can be useful, for example, where nodes have their physical location or status defined by labels.
For example:
Priorities are rules that rank nodes according to preferences.
A custom set of priorities can be specified to configure the scheduler. There are several priorities provided by default in OpenShift. Other priorities can be customized by providing certain parameters. Multiple priorities can be combined and different weights can be given to each in order to impact the prioritization.
Static priorities do not take any configuration parameters from the user, except weight. A weight is required to be specified and cannot be 0 or negative.
These are specified in the scheduler policy Configmap, policy-configmap in the openshift-config project.
The default scheduler policy includes the following priorities. Each of the priority function has a weight of 1 except NodePreferAvoidPodsPriority, which has a weight of 10000.
SelectorSpreadPriority looks for services, replication controllers (RC), replication sets (RS), and stateful sets that match the pod, then finds existing pods that match those selectors. The scheduler favors nodes that have fewer existing matching pods. Then, it schedules the pod on a node with the smallest number of pods that match those selectors as the pod being scheduled.
InterPodAffinityPriority computes a sum by iterating through the elements of weightedPodAffinityTerm and adding weight to the sum if the corresponding PodAffinityTerm is satisfied for that node. The node(s) with the highest sum are the most preferred.
LeastRequestedPriority favors nodes with fewer requested resources. It calculates the percentage of memory and CPU requested by pods scheduled on the node, and prioritizes nodes that have the highest available/remaining capacity.
BalancedResourceAllocation favors nodes with balanced resource usage rate. It calculates the difference between the consumed CPU and memory as a fraction of capacity, and prioritizes the nodes based on how close the two metrics are to each other. This should always be used together with LeastRequestedPriority.
NodePreferAvoidPodsPriority ignores pods that are owned by a controller other than a replication controller.
NodeAffinityPriority prioritizes nodes according to node affinity scheduling preferences
TaintTolerationPriority prioritizes nodes that have a fewer number of intolerable taints on them for a pod. An intolerable taint is one which has key PreferNoSchedule.
OpenShift also supports the following priorities:
EqualPriority gives an equal weight of 1 to all nodes, if no priority configurations are provided. We recommend using this priority only for testing environments.
MostRequestedPriority prioritizes nodes with most requested resources. It calculates the percentage of memory and CPU requested by pods scheduled on the node, and prioritizes based on the maximum of the average of the fraction of requested to capacity.
ImageLocalityPriority prioritizes nodes that already have requested pod container's images.
ServiceSpreadingPriority spreads pods by minimizing the number of pods belonging to the same service onto the same machine.
We can configure these priorities in the scheduler policy Configmap, policy-configmap in the openshift-config project, to add labels to affect how the priorities.
The type of the priority function is identified by the argument that they take. Since these are configurable, multiple priorities of the same type (but different configuration parameters) can be combined as long as their user-defined names are different.
For information on using these priorities, see Modify Scheduler Policy.
ServiceAntiAffinity takes a label and ensures a good spread of the pods belonging to the same service across the group of nodes based on the label values. It gives the same score to all nodes that have the same value for the specified label. It gives a higher score to nodes within a group with the least concentration of pods.
For example:
In some situations using ServiceAntiAffinity based on custom labels does not spread pod as expected. See this Red Hat Solution.
*The labelPreference parameter gives priority based on the specified label. If the label is present on a node, that node is given priority. If no label is specified, priority is given to nodes that do not have a label.
The configuration below specifies the default scheduler configuration, if it were to be specified using the scheduler policy file.
In all of the sample configurations below, the list of predicates and priority functions is truncated to include only the ones that pertain to the use case specified. In practice, a complete/meaningful scheduler policy should include most, if not all, of the default predicates and priorities listed above.
The following example defines three topological levels, region (affinity) -zone (affinity) -rack (anti-affinity):
The following example defines three topological levels, city (affinity) -building (anti-affinity) -room (anti-affinity):
The following example defines a policy to only use nodes with the 'region' label defined and prefer nodes with the 'zone' label defined:
The following example combines both static and configurable predicates and also priorities:
Affinity is a property of pods that controls the nodes on which they prefer to be scheduled. Anti-affinity is a property of pods that prevents a pod from being scheduled on a node.
In OpenShift pod affinity and pod anti-affinity allow you to constrain which nodes your pod is eligible to be scheduled on based on the key/value labels on other pods.
Pod affinity and pod anti-affinity allow you to constrain which nodes your pod is eligible to be scheduled on based on the key/value labels on other pods.
For example, using affinity rules, you could spread or pack pods within a service or relative to pods in other services. Anti-affinity rules allow you to prevent pods of a particular service from scheduling on the same nodes as pods of another service that are known to interfere with the performance of the pods of the first service. Or, you could spread the pods of a service across nodes or availability zones to reduce correlated failures.
There are two types of pod affinity rules: required and preferred.
Required rules must be met before a pod can be scheduled on a node. Preferred rules specify that, if the rule is met, the scheduler tries to enforce the rules, but does not guarantee enforcement.
Depending on your pod priority and preemption settings, the scheduler might not be able to find an appropriate node for a pod without violating affinity requirements. If so, a pod might not be scheduled.
To prevent this situation, carefully configure pod affinity with equal-priority pods.
We configure pod affinity/anti-affinity through the pod specification files. We can specify a required rule, a preferred rule, or both. If we specify both, the node must first meet the required rule, then attempts to meet the preferred rule.
The following example shows a pod specification configured for pod affinity and anti-affinity.
In this example, the pod affinity rule indicates that the pod can schedule onto a node only if that node has at least one already-running pod with a label that has the key security and value S1. The pod anti-affinity rule says that the pod prefers to not schedule onto a node if that node is already running a pod with label having key security and value S2.
Sample pod config file with pod affinity...
Sample pod config file with pod anti-affinity...
If labels on a node change at runtime such that the affinity rules on a pod are no longer met, the pod continues to run on the node.
The following steps demonstrate a simple two-pod configuration that creates pod with a label and a pod that uses affinity to allow scheduling with that pod.
Procedure
The following steps demonstrate a simple two-pod configuration that creates pod with a label and a pod that uses an anti-affinity preferred rule to attempt to prevent scheduling with that pod.
Procedure
The following examples demonstrate pod affinity and pod anti-affinity.
The following example demonstrates pod affinity for pods with matching labels and label selectors.
The following example demonstrates pod anti-affinity for pods with matching labels and label selectors.
The following example demonstrates pod affinity for pods without matching labels and label selectors.
Affinity is a property of pods that controls the nodes on which they prefer to be scheduled.
In OpenShiftnode affinity is a set of rules used by the scheduler to determine where a pod can be placed. The rules are defined using custom labels on the nodes and label selectors specified in pods.
Node affinity allows a pod to specify an affinity towards a group of nodes it can be placed on. The node does not have control over the placement.
For example, you could configure a pod to only run on a node with a specific CPU or in a specific availability zone.
There are two types of node affinity rules: required and preferred.
Required rules must be met before a pod can be scheduled on a node. Preferred rules specify that, if the rule is met, the scheduler tries to enforce the rules, but does not guarantee enforcement.
If labels on a node change at runtime that results in an node affinity rule on a pod no longer being met, the pod continues to run on the node.
We configure node affinity through the pod specification file. We can specify a required rule, a preferred rule, or both. If we specify both, the node must first meet the required rule, then attempts to meet the preferred rule.
The following example is a pod specification with a rule that requires the pod be placed on a node with a label whose key is e2e-az-NorthSouth and whose value is either e2e-az-North or e2e-az-South:
Sample pod configuration file with a node affinity required rule
The following example is a node specification with a preferred rule that a node with a label whose key is e2e-az-EastWest and whose value is either e2e-az-East or e2e-az-West is preferred for the pod:
Sample pod configuration file with a node affinity preferred rule
There is no explicit node anti-affinity concept, but using the NotIn or DoesNotExist operator replicates that behavior.
If we are using node affinity and node selectors in the same pod configuration, note the following:
Required rules must be met before a pod can be scheduled on a node.
Procedure
The following steps demonstrate a simple configuration that creates a node and a pod that the scheduler is required to place on the node.
Preferred rules specify that, if the rule is met, the scheduler tries to enforce the rules, but does not guarantee enforcement.
Procedure
The following steps demonstrate a simple configuration that creates a node and a pod that the scheduler tries to place on the node.
The following examples demonstrate node affinity.
The following example demonstrates node affinity for a node and pod with matching labels:
The following example demonstrates node affinity for a node and pod without matching labels:
For information about changing node labels, see Update labels on nodes.
In an overcommited state, the sum of the container compute resource requests and limits exceeds the resources available on the system. Overcommitment might be desirable in development environments where a trade-off of guaranteed performance for capacity is acceptable.
Requests and limits enable administrators to allow and manage the overcommitment of resources on a node. The scheduler uses requests for scheduling the container and providing a minimum service guarantee. Limits constrain the amount of compute resource that may be consumed on your node.
Requests and limits enable administrators to allow and manage the overcommitment of resources on a node. The scheduler uses requests for scheduling the container and providing a minimum service guarantee. Limits constrain the amount of compute resource that may be consumed on your node.
OpenShift administrators can control the level of overcommit and manage container density on nodes by configuring masters to override the ratio between request and limit set on developer containers. In conjunction with a per-project LimitRange specifying limits and defaults, this adjusts the container limit and request to achieve the desired level of overcommit.
That these overrides have no effect if no limits have been set on containers. Create a LimitRange object with default limits (per individual project, or in the project template) in order to ensure that the overrides apply.
After these overrides, the container limits and requests must still be validated by any LimitRange objects in the project. It is possible, for example, for developers to specify a limit close to the minimum limit, and have the request then be overridden below the minimum limit, causing the pod to be forbidden. This unfortunate user experience should be addressed with future work, but for now, configure this capability and LimitRanges with caution.
In an overcommitted environment, it is important to properly configure your node to provide best system behavior.
When the node starts, it ensures that the kernel tunable flags for memory management are set properly. The kernel should never fail memory allocations unless it runs out of physical memory.
To ensure this behavior, OpenShift configures the kernel to always overcommit memory by setting the vm.overcommit_memory parameter to 1, overriding the default operating system setting.
OpenShift also configures the kernel not to panic when it runs out of memory by setting the vm.panic_on_oom parameter to 0. A setting of 0 instructs the kernel to call oom_killer in an Out of Memory (OOM) condition, which kills processes based on priority
We can view the current setting by running the following commands on your nodes:
The above flags should already be set on nodes, and no further action is required.
We can also perform the following configurations for each node:
Taints and tolerations allow the Node to control which Pods should (or should not) be scheduled on them.
A taint allows a node to refuse pod to be scheduled unless that pod has a matching toleration.
You apply taints to a node through the node specification (NodeSpec) and apply tolerations to a pod through the pod specification (PodSpec). A taint on a node instructs the node to repel all pods that do not tolerate the taint.
Taints and tolerations consist of a key, value, and effect. An operator allows us to leave one of these parameters empty.
Table 2.1. Taint and toleration components
A toleration matches a taint:
The following taints are built into kubernetes:
We can specify how long a pod can remain bound to a node before being evicted by specifying the tolerationSeconds parameter in the pod specification. If a taint with the NoExecute effect is added to a node, any pods that do not tolerate the taint are evicted immediately (pods that do tolerate the taint are not evicted). However, if a pod that to be evicted has the tolerationSeconds parameter, the pod is not evicted until that time period expires.
For example:
Here, if this pod is running but does not have a matching taint, the pod stays bound to the node for 3,600 seconds and then be evicted. If the taint is removed before that time, the pod is not evicted.
We can put multiple taints on the same node and multiple tolerations on the same pod. OpenShift processes multiple taints and tolerations as follows:
For example:
In this case, the pod cannot be scheduled onto the node, because there is no toleration matching the third taint. The pod continues running if it is already running on the node when the taint is added, because the third taint is the only one of the three that is not tolerated by the pod.
OpenShift can be configured to represent node unreachable and node not ready conditions as taints. This allows per-pod specification of how long to remain bound to a node that becomes unreachable or not ready, rather than using the default of five minutes.
The Taint-Based Evictions feature is enabled by default. The taints are automatically added by the node controller and the normal logic for evicting pods from Ready nodes is disabled.
This feature, in combination with tolerationSeconds, allows a pod to specify how long it should stay bound to a node that has one or both of these problems.
OpenShift automatically taints nodes that report conditions such as memory pressure and disk pressure. If a node reports a condition, a taint is added until the condition clears. The taints have the NoSchedule effect, which means no pod can be scheduled on the node, unless the pod has a matching toleration. This feature, Taint Nodes By Condition, is enabled by default.
The scheduler checks for these taints on nodes before scheduling pods. If the taint is present, the pod is scheduled on a different node. Because the scheduler checks for taints and not the actual Node conditions, you configure the scheduler to ignore some of these node conditions by adding appropriate Pod tolerations.
The DaemonSet controller automatically adds the following tolerations to all daemons, to ensure backward compatibility:
We can also add arbitrary tolerations to DaemonSets.
The Taint-Based Evictions feature, enabled by default, evicts pods from a node that experiences specific conditions, such as not-ready and unreachable. When a node experiences one of these conditions, OpenShift automatically adds taints to the node, and starts evicting and rescheduling the pods on different nodes.
Taint Based Evictions has a NoExecute effect, where any pod that does not tolerate the taint will be evicted immediately and any pod that does tolerate the taint will never be evicted.
OpenShift evicts pods in a rate-limited way to prevent massive pod evictions in scenarios such as the master becoming partitioned from the nodes.
This feature, in combination with tolerationSeconds, allows us to specify how long a pod should stay bound to a node that has a node condition. If the condition still exists after the tolerationSections period, the taint remains on the node and the pods are evicted in a rate-limited manner. If the condition clears before the tolerationSeconds period, pods are not removed.
OpenShift automatically adds a toleration for node.kubernetes.io/not-ready and node.kubernetes.io/unreachable with tolerationSeconds=300, unless the pod configuration specifies either toleration.
These tolerations ensure that the default pod behavior is to remain bound for 5 minutes after one of these node conditions problems is detected.
We can configure these tolerations as needed. For example, if we have an application with a lot of local state we might want to keep the pods bound to node for a longer time in the event of network partition, allowing for the partition to recover and avoiding pod eviction.
DaemonSet pods are created with NoExecute tolerations for the following taints with no tolerationSeconds:
This ensures that DaemonSet pods are never evicted due to these node conditions, even if the DefaultTolerationSeconds admission controller is disabled.
You add taints to nodes and tolerations to pods allow the node to control which pods should (or should not) be scheduled on them.
Procedure
For example:
This example places a taint on node1 that has key key1, value value1, and taint effect NoSchedule.
Sample pod configuration file with Equal operator
For example:
Sample pod configuration file with Exists operator
Both of these tolerations match the taint created by the oc adm taint command above. A pod with either toleration would be able to schedule onto node1.
We can specify a set of nodes for exclusive use by a particular set of users.
Procedure
To specify dedicated nodes:
We can configure a node so that particular users can use only the dedicated nodes.
Procedure
To configure a node so that users can use only that node:
For example:
The admission controller should add a node affinity to require that the pods can only schedule onto nodes labeled with the key:value label (dedicated=groupName).
In a cluster where a small subset of nodes have specialized hardware (for example GPUs), we can use taints and tolerations to keep pods that do not need the specialized hardware off of those nodes, leaving the nodes for pods that do need the specialized hardware. We can also require pods that need specialized hardware to use specific nodes.
Procedure
To ensure pods are blocked from the specialized hardware:
For example, the admission controller could use some characteristic(s) of the pod to determine that the pod should be allowed to use the special nodes by adding a toleration.
To ensure pods can only use the specialized hardware, you need some additional mechanism. For example, you could label the nodes that have the special hardware and use node affinity on the pods that need the hardware.
We can remove taints from nodes and tolerations from pods as needed.
Procedure
To remove taints and tolerations:
For example:
A node selector specifies a map of key-value pairs. The rules are defined using custom labels on nodes and selectors specified in pods. We can use node selectors to place specific pods on specofic nodes, all pods in a project on specific nodes, or create a default node selector to schedule pods that do not have a defined node selector or project selector.
For the pod to be eligible to run on a node, the pod must have the indicated key-value pairs as the label on the node.
If we are using node affinity and node selectors in the same pod configuration, see the important considerations below.
Use node selector labels on pods to control where the pod is scheduled.
You then add labels to a specific nodes where we want the pods scheduled or to the MachineSet that controls the nodes.
We can add labels to a node or MachineConfig, but the labels will not persist if the node or machine goes down. Adding the label to the MachineSet ensures that new nodes or machines will have the label.
Procedure
For example, make sure that your pod configuration features the nodeSelector value indicating the desired label:
For example:
For example, to label a node:
To label a MachineSet:
The label is applied to the node:
If we are using node selectors and node affinity in the same pod configuration, note the following:
We can use default node selectors on pods together with labels on nodes to constrain all pods created in a cluster to specific nodes.
With cluster node selectors, when creating a pod in that cluster, OpenShift adds the appropriate <key>:<value> and schedules the pod on nodes with matching labels.
We can add additional <key>:<value> pairs for the pod. But we cannot add a different <value> for a default <key>.
For example, if the cluster node selector is region: east the following pod spec adds a new pair and is allowed:
The following pod spec uses a different value for region and is not allowed:
If the project where we are creating the pod has a project node selector, that selector takes preference over a cluster node selector.
Procedure
To add a default cluster node selector:
After making this change, wait for the pods in the openshift-kube-apiserver project to redeploy. This can take several minutes. The default cluster node selector does not take effect until the pods redeploy.
For example, to label a node:
To label a MachineSet:
When creating a pod, OpenShift adds the appropriate <key>:<value> and schedules the pod on the labeled node.
For example:
We can use node selectors on a project together with labels on nodes to constrain all pods created in a namespace to the labeled nodes.
With project node selectors, when creating a pod in the namespace, OpenShift adds the appropriate <key>:<value> and schedules the pod on nodes with matching labels.
We can add labels to a node or MachineConfig, but the labels will not persist if the node or machine goes down. Adding the label to the MachineSet ensures that new nodes or machines will have the label.
We can add additional <key>:<value> pairs for the pod. But we cannot add a different <value> for a default <key>.
For example, if the project node selector is region: east the following pod spec adds a new pair and is allowed:
The following pod spec uses a different value for region and is not allowed:
If there is a cluster-wide default node selector, a project node selector takes preference.
Procedure
To add a default project node selector:
For example, to label a node:
To label a MachineSet:
When creating a pod in the namespace, OpenShift adds the appropriate <key>:<value> and schedules the pod on the labeled node.
For example:
As an administrator, we can create and use DaemonSets to run replicas of a pod on specific or all nodes in an OpenShift cluster.
A DaemonSet ensures that all (or some) nodes run a copy of a pod. As nodes are added to the cluster, pods are added to the cluster. As nodes are removed from the cluster, those pods are removed through garbage collection. Deleting a DaemonSet will clean up the Pods it created.
We can use daemonsets to create shared storage, run a logging pod on every node in the cluster, or deploy a monitoring agent on every node.
For security reasons, only cluster administrators can create daemonsets.
For more information on daemonsets, see the Kubernetes documentation.
Daemonset scheduling is incompatible with project's default node selector. If you fail to disable it, the daemonset gets restricted by merging with the default node selector. This results in frequent pod recreates on the nodes that got unselected by the merged node selector, which in turn puts unwanted load on the cluster.
A DaemonSet ensures that all eligible nodes run a copy of a Pod. Normally, the node that a Pod runs on is selected by the Kubernetes scheduler. However, previously daemonSet pods are created and scheduled by the DaemonSet controller. That introduces the following issues:
ScheduleDaemonSetPods is enabled by default in OpenShift which lets you to schedule DaemonSets using the default scheduler instead of the DaemonSet controller, by adding the NodeAffinity term to the DaemonSet pods, instead of the .spec.nodeName term. The default scheduler is then used to bind the pod to the target host. If node affinity of the DaemonSet pod already exists, it is replaced. The DaemonSet controller only performs these operations when creating or modifying DaemonSet pods, and no changes are made to the spec.template of the DaemonSet.
nodeAffinity: requiredDuringSchedulingIgnoredDuringExecution: nodeSelectorTerms: - matchFields: - key: metadata.name operator: In values: - target-host-name
In addition, node.kubernetes.io/unschedulable:NoSchedule toleration is added automatically to DaemonSet Pods. The default scheduler ignores unschedulable Nodes when scheduling DaemonSet Pods.
When creating daemonsets, the nodeSelector field is used to indicate the nodes on which the daemonset should deploy replicas.
Prerequisites
Procedure
To create a daemonset:
To update a daemonset, force new pod replicas to be created by deleting the old replicas or nodes.
A job executes a task in the OpenShift cluster.
A job tracks the overall progress of a task and updates its status with information about active, succeeded, and failed pods. Deleting a job will clean up any pod replicas it created. Jobs are part of the Kubernetes API, which can be managed with oc commands like other object types.
See the Kubernetes documentation for more information about jobs.
A job tracks the overall progress of a task and updates its status with information about active, succeeded, and failed pods. Deleting a job will clean up any pods it created. Jobs are part of the Kubernetes API, which can be managed with oc commands like other object types.
There are two possible resource types that allow creating run-once objects in OpenShift:
A CronJob builds on a regular job by allowing you to specify how the job should be run. CronJobs are part of the Kubernetes API, which can be managed with oc commands like other object types.
CronJobs are useful for creating periodic and recurring tasks, like running backups or sending emails. CronJobs can also schedule individual tasks for a specific time, such as to schedule a job for a low activity period.
A CronJob creates a job object approximately once per execution time of its schedule, but there are circumstances in which it fails to create a job or two jobs might be created. Therefore, jobs must be idempotent and configure history limits.
Both resource types require a job configuration that consists of the following key parts:
When defining a job, we can define its maximum duration by setting the activeDeadlineSeconds field. It is specified in seconds and is not set by default. When not set, there is no maximum duration enforced.
The maximum duration is counted from the time when a first pod gets scheduled in the system, and defines how long a job can be active. It tracks overall time of an execution. After reaching the specified timeout, the job is terminated by OpenShift.
A Job can be considered failed, after a set amount of retries due to a logical error in configuration or other similar reasons. Failed Pods associated with the Job are recreated by the controller with an exponential back off delay (10s, 20s, 40s …) capped at six minutes. The limit is reset if no new failed pods appear between controller checks.
Use the spec.backoffLimit parameter to set the number of retries for a job.
CronJobs can leave behind artifact resources such as jobs or pods. As a user it is important to configure history limits so that old jobs and their pods are properly cleaned. There are two fields within CronJob's spec responsible for that:
Doing this prevents them from generating unnecessary artifacts.
The job specification restart policy only applies to the pods, and not the job controller. However, the job controller is hard-coded to keep retrying jobs to completion.
As such, restartPolicy: Never or --restart=Never results in the same behavior as restartPolicy: OnFailure or --restart=OnFailure. That is, when a job fails it is restarted automatically until it succeeds (or is manually discarded). The policy only sets which subsystem performs the restart.
With the Never policy, the job controller performs the restart. With each attempt, the job controller increments the number of failures in the job status and create new pods. This means that with each failed attempt, the number of pods increases.
With the OnFailure policy, kubelet performs the restart. Each attempt does not increment the number of failures in the job status. In addition, kubelet will retry failed jobs starting pods on the same nodes.
We create a job in OpenShift by creating a job object.
Procedure
To create a job:
We can also create and launch a job from a single command using oc run. The following command creates and launches the same job as specified in the previous example:
We create a CronJob in OpenShift by creating a job object.
Procedure
To create a CronJob:
The .spec.successfulJobsHistoryLimit and .spec.failedJobsHistoryLimit fields are optional. These fields specify how many completed and failed jobs should be kept. By default, they are set to 3 and 1 respectively. Setting a limit to 0 corresponds to keeping none of the corresponding kind of jobs after they finish.
We can also create and launch a CronJob from a single command using oc run. The following command creates and launches the same CronJob as specified in the previous example:
With oc run, the --schedule option accepts schedules in cron format.
When creating a CronJob, oc run only supports the Never or OnFailure restart policies (--restart).
When performing node management operations, the CLI interacts with node objects that are representations of actual node hosts. The master uses the information from node objects to validate nodes with health checks.
The STATUS column in the output of these commands can show nodes with the following conditions:
Table 4.1. Node Conditions
For example:
We can list all the pods on a specific node.
Procedure
For example:
For example:
We can display usage statistics about nodes, which provide the runtime environments for containers. These usage statistics include CPU, memory, and storage consumption.
Prerequisites
Procedure
Choose the selector (label query) to filter on. Supports =, ==, and !=.
As an administrator, we can perform a number of tasks to make the clusters more efficient.
Evacuating pods allows us to migrate all or selected pods from a given node or nodes.
We can only evacuate pods backed by a replication controller. The replication controllers create new pods on other nodes and removes the existing pods from the specified node(s).
Bare pods, meaning those not backed by a replication controller, are unaffected by default. We can evacuate a subset of pods by specifying a pod-selector. Pod selectors are based on labels, so all the pods with the specified label will be evacuated.
Nodes must first be marked unschedulable to perform pod evacuation.
Use oc adm uncordon to mark the node as schedulable when done.
Instead of specifying specific node names (for example, <node1> <node2>), we can use the --selector=<node_selector> option to evacuate pods on selected nodes.
We can update any label on a node.
Node labels are not persisted after a node is deleted even if the node is backed up by a Machine.
Any change to a MachineSet is not applied to existing machines owned by the MachineSet. For example, labels edited or added to an existing MachineSet are not propagated to existing machines and Nodes associated with the MachineSet.
For example:
For example:
By default, healthy nodes with a Ready status are marked as schedulable, meaning that new pods are allowed for placement on the node. Manually marking a node as unschedulable blocks any new pods from being scheduled on the node. Existing pods on the node are not affected.
For example:
Alternatively, instead of specifying specific node names (for example, <node>), we can use the --selector=<node_selector> option to mark selected nodes as schedulable or unschedulable.
When you delete a node using the CLI, the node object is deleted in Kubernetes, but the pods that exist on the node are not deleted. Any bare pods not backed by a replication controller become inaccessible to OpenShift. Pods backed by replication controllers are rescheduled to other available nodes. We must delete local manifest pods.
Procedure
To delete a node from the OpenShift cluster edit the appropriate MachineSet:
The MachineSets are listed in the form of <clusterid>-worker-<aws-region-az>.
For more information on scaling the cluster using a MachineSet, see Manually scaling a MachineSet.
For more information on scaling the cluster using a MachineSet, see Manually scaling a MachineSet.
OpenShift uses a KubeletConfig Custom Resource to manage the configuration of nodes. By creating an instance of a KubeletConfig, a managed MachineConfig is created to override setting on the node.
Log on to remote machines for the purpose of changing their configuration is not supported.
To make configuration changes to a cluster, or MachinePool, create a Custom Resource Definition, or KubeletConfig instance. OpenShift uses the Machine Config Controller to watch for changes introduced through the CRD applies the changes to the cluster.
Procedure
For example:
For example:
For example:
Sample configuration for a custom-config CR
For example:
Most KubeletConfig Options may be set by the user. The following options are not allowed to be overwritten:
In OpenShift, we can configure the number of pods that can run on a node based on the number of processor cores on the node, a hard limit or both. If you use both options, the lower of the two limits the number of pods on a node.
Exceeding these values can result in:
A pod that is holding a single container actually uses two containers. The second container sets up networking prior to the actual container starting. As a result, a node running 10 pods actually has 20 containers running.
The podsPerCore parameter limits the number of pods the node can run based on the number of processor cores on the node. For example, if podsPerCore is set to 10 on a node with 4 processor cores, the maximum number of pods allowed on the node is 40.
The maxPods parameter limits the number of pods the node can run to a fixed value, regardless of the properties of the node.
Two parameters control the maximum number of pods that can be scheduled to a node: podsPerCore and maxPods. If you use both options, the lower of the two limits the number of pods on a node.
For example, if podsPerCore is set to 10 on a node with 4 processor cores, the maximum number of pods allowed on the node will be 40.
Prerequisite
For example:
Procedure
Sample configuration for a max-pods CR
Set podsPerCore to 0 disables this limit.
In the above example, the default value for podsPerCore is 10 and the default value for maxPods is 250. This means that unless the node has 25 cores or more, by default, podsPerCore will be the limiting factor.
Once the change is complete, the UPDATED column reports True.
Learn about the Node Tuning Operator and how we can use it to manage node-level tuning by orchestrating the tuned daemon.
The Node Tuning Operator helps you manage node-level tuning by orchestrating the tuned daemon. The majority of high-performance applications require some level of kernel tuning. The Node Tuning Operator provides a unified management interface to users of node-level sysctls and more flexibility to add custom tuning, which is currently a Technology Preview feature, specified by user needs. The Operator manages the containerized tuned daemon for OpenShift as a Kubernetes DaemonSet. It ensures the custom tuning specification is passed to all containerized tuned daemons running in the cluster in the format that the daemons understand. The daemons run on all nodes in the cluster, one per node.
The Node Tuning Operator is part of a standard OpenShift installation in version 4.1 and later.
Use this process to access an example Node Tuning Operator specification.
Procedure
The custom resource (CR) for the operator has two major sections. The first section, profile:, is a list of tuned profiles and their names. The second, recommend:, defines the profile selection logic.
Multiple custom tuning specifications can co-exist as multiple CRs in the operator's namespace. The existence of new CRs or the deletion of old CRs is detected by the Operator. All existing custom tuning specifications are merged and appropriate objects for the containerized tuned daemons are updated.
Profile data
The profile: section lists tuned profiles and their names.
Recommended profiles
The profile: selection logic is defined by the recommend: section of the CR:
If <match> is omitted, a profile match (for example, true) is assumed.
<match> is an optional array recursively defined as follows:
If <match> is not omitted, all nested <match> sections must also evaluate to true. Otherwise, false is assumed and the profile with the respective <match> section will not be applied or recommended. Therefore, the nesting (child <match> sections) works as logical AND operator. Conversely, if any item of the <match> array matches, the entire <match> array evaluates to true. Therefore, the array acts as logical OR operator.
Example
The CR above is translated for the containerized tuned daemon into its recommend.conf file based on the profile priorities. The profile with the highest priority (10) is openshift-control-plane-es and, therefore, it is considered first. The containerized tuned daemon running on a given node looks to see if there is a pod running on the same node with the tuned.openshift.io/elasticsearch label set. If not, the entire <match> section evaluates as false. If there is such a pod with the label, in order for the <match> section to evaluate to true, the node label also needs to be node-role.kubernetes.io/master or node-role.kubernetes.io/infra.
If the labels for the profile with priority 10 matched, openshift-control-plane-es profile is applied and no other profile is considered. If the node/pod label combination did not match, the second highest priority profile (openshift-control-plane) is considered. This profile is applied if the containerized tuned pod runs on a node with labels node-role.kubernetes.io/master or node-role.kubernetes.io/infra.
Finally, the profile openshift-node has the lowest priority of 30. It lacks the <match> section and, therefore, will always match. It acts as a profile catch-all to set openshift-node profile, if no other profile with higher priority matches on a given node.
The following are the default profiles set on a cluster.
Excluding the [main] section, the following Tuned plug-ins are supported when using custom profiles defined in the profile: section of the Tuned CR:
There is some dynamic tuning functionality provided by some of these plug-ins that is not supported. The following Tuned plug-ins are currently not supported:
See Available Tuned Plug-ins and Get Started with Tuned for more information.
To reboot a node without causing an outage for applications running on the platform, it is important to first evacuate the pods. For pods that are made highly available by the routing tier, nothing else needs to be done. For other pods needing storage, typically databases, it is critical to ensure that they can remain in operation with one pod temporarily going offline. While implementing resiliency for stateful pods is different for each application, in all cases it is important to configure the scheduler to use node anti-affinity to ensure that the pods are properly spread across available nodes.
Another challenge is how to handle nodes that are running critical infrastructure such as the router or the registry. The same node evacuation process applies, though it is important to understand certain edge cases.
Infrastructure nodes are nodes that are labeled to run pieces of the OpenShift environment. Currently, the easiest way to manage node reboots is to ensure that there are at least three nodes available to run infrastructure. The nodes to run the infrastructure are called master nodes.
The scenario below demonstrates a common mistake that can lead to service interruptions for the applications running on OpenShift when only two nodes are available.
The same process using three master nodes for infrastructure does not result in a service disruption. However, due to pod scheduling, the last node that is evacuated and brought back in to rotation is left running zero registries. The other two nodes will run two and one registries respectively. The best solution is to rely on pod anti-affinity.
Pod anti-affinity is slightly different than node anti-affinity. Node anti-affinity can be violated if there are no other suitable locations to deploy a pod. Pod anti-affinity can be set to either required or preferred.
With this in place, if only two infrastructure nodes are available and one is rebooted, the container image registry pod is prevented from running on the other node. oc get pods reports the pod as unready until a suitable node is available. Once a node is available and all pods are back in ready state, the next node can be restarted.
Procedure
To reboot a node using pod anti-affinity:
This example assumes the container image registry pod has a label of registry=default. Pod anti-affinity can use any Kubernetes match expression.
In most cases, a pod running an OpenShift router exposes a host port.
The PodFitsPorts scheduler predicate ensures that no router pods using the same port can run on the same node, and pod anti-affinity is achieved. If the routers are relying on IP failover for high availability, there is nothing else that is needed.
For router pods relying on an external service such as AWS Elastic Load Balancing for high availability, it is that service's responsibility to react to router pod restarts.
In rare cases, a router pod may not have a host port configured. In those cases, it is important to follow the recommended restart process for infrastructure nodes.
As an administrator, we can use OpenShift to ensure that your nodes are running efficiently by freeing up resources through garbage collection.
The OpenShift node performs two types of garbage collection:
Container garbage collection can be performed using eviction thresholds.
When eviction thresholds are set for garbage collection, the node tries to keep any container for any pod accessible from the API. If the pod has been deleted, the containers will be as well. Containers are preserved as long the pod is not deleted and the eviction threshold is not reached. If the node is under disk pressure, it will remove containers and their logs will no longer be accessible using oc logs.
If a node is oscillating above and below a soft eviction threshold, but not exceeding its associated grace period, the corresponding node would constantly oscillate between true and false. As a consequence, the scheduler could make poor scheduling decisions.
To protect against this oscillation, use the eviction-pressure-transition-period flag to control how long OpenShift must wait before transitioning out of a pressure condition. OpenShift will not set an eviction threshold as being met for the specified pressure condition for the period specified before toggling the condition back to false.
Image garbage collection relies on disk usage as reported by cAdvisor on the node to decide which images to remove from the node.
The policy for image garbage collection is based on two conditions:
For image garbage collection, we can modify any of the following variables using a Custom Resource.
Table 4.2. Variables for configuring image garbage collection
Two lists of images are retrieved in each garbage collector run:
As new containers are run, new images appear. All images are marked with a time stamp. If the image is running (the first list above) or is newly detected (the second list above), it is marked with the current time. The remaining images are already marked from the previous spins. All images are then sorted by the time stamp.
Once the collection starts, the oldest images get deleted first until the stopping criterion is met.
As an administrator, we can configure how OpenShift performs garbage collection by creating a kubeletConfig object for each Machine Config Pool.
OpenShift supports only one kubeletConfig object for each Machine Config Pool.
We can configure any combination of the following:
For soft container eviction we can also configure a grace period before eviction.
Prerequisites
For example:
Procedure
Sample configuration for a container garbage collection CR:
For example:
To provide more reliable scheduling and minimize node resource overcommitment, each node can reserve a portion of its resources for use by all underlying node components (such as kubelet, kube-proxy) and the remaining system components (such as sshd, NetworkManager) on the host. Once specified, the scheduler has more information about the resources (e.g., memory, CPU) a node has allocated for pods.
CPU and memory resources reserved for node components in OpenShift are based on two node settings:
If a flag is not set, it defaults to 0. If none of the flags are set, the allocated resource is set to the node's capacity as it was before the introduction of allocatable resources.
An allocated amount of a resource is computed based on the following formula:
The withholding of Hard-Eviction-Thresholds from allocatable is a change in behavior to improve system reliability now that allocatable is enforced for end-user pods at the node level. The experimental-allocatable-ignore-eviction setting is available to preserve legacy behavior, but it will be deprecated in a future release.
If [Allocatable] is negative, it is set to 0.
Each node reports system resources utilized by the container runtime and kubelet. To better aid your ability to configure --system-reserved and --kube-reserved, we can introspect corresponding node's resource usage using the node summary API, which is accessible at <master>/api/v1/nodes/<node>/proxy/stats/summary.
The node is able to limit the total amount of resources that pods may consume based on the configured allocatable value. This feature significantly improves the reliability of the node by preventing pods from starving system services (for example: container runtime, node agent, etc.) for resources. It is strongly encouraged that administrators reserve resources based on the desired node utilization target in order to improve node reliability.
The node enforces resource constraints using a new cgroup hierarchy that enforces quality of service. All pods are launched in a dedicated cgroup hierarchy separate from system daemons.
Optionally, the node can be made to enforce kube-reserved and system-reserved by specifying those tokens in the enforce-node-allocatable flag. If specified, the corresponding --kube-reserved-cgroup or --system-reserved-cgroup needs to be provided. In future releases, the node and container runtime will be packaged in a common cgroup separate from system.slice. Until that time, we do not recommend users change the default value of enforce-node-allocatable flag.
Administrators should treat system daemons similar to Guaranteed pods. System daemons can burst within their bounding control groups and this behavior needs to be managed as part of cluster deployments. Enforcing system-reserved limits can lead to critical system services being CPU starved or OOM killed on the node. The recommendation is to enforce system-reserved only if operators have profiled their nodes exhaustively to determine precise estimates and are confident in their ability to recover if any process in that group is OOM killed.
As a result, we strongly recommended that users only enforce node allocatable for pods by default, and set aside appropriate reservations for system daemons to maintain overall node reliability.
If a node is under memory pressure, it can impact the entire node and all pods running on it. If a system daemon is using more than its reserved amount of memory, an OOM event may occur that can impact the entire node and all pods running on it. To avoid (or reduce the probability of) system OOMs the node provides out-of-resource handling.
We can reserve some memory using the --eviction-hard flag. The node attempts to evict pods whenever memory availability on the node drops below the absolute value or percentage. If system daemons do not exist on a node, pods are limited to the memory capacity - eviction-hard. For this reason, resources set aside as a buffer for eviction before reaching out of memory conditions are not available for pods.
The following is an example to illustrate the impact of node allocatable for memory:
For this node, the effective node allocatable value is 28.9Gi. If the node and system components use up all their reservation, the memory available for pods is 28.9Gi, and kubelet will evict pods when it exceeds this usage.
If you enforce node allocatable (28.9Gi) via top level cgroups, then pods can never exceed 28.9Gi. Evictions would not be performed unless system daemons are consuming more than 3.1Gi of memory.
If system daemons do not use up all their reservation, with the above example, pods would face memcg OOM kills from their bounding cgroup before node evictions kick in. To better enforce QoS under this situation, the node applies the hard eviction thresholds to the top-level cgroup for all pods to be Node Allocatable + Eviction Hard Thresholds.
If system daemons do not use up all their reservation, the node will evict pods whenever they consume more than 28.9Gi of memory. If eviction does not occur in time, a pod will be OOM killed if pods consume 29Gi of memory.
The scheduler uses the value of node.Status.Allocatable instead of node.Status.Capacity to decide if a node will become a candidate for pod scheduling.
By default, the node will report its machine capacity as fully schedulable by the cluster.
OpenShift supports the CPU and memory resource types for allocation. If your administrator enabled the ephemeral storage technology preview, the ephemeral-resource resource type is supported as well. For the cpu type, the resource quantity is specified in units of cores, such as 200m, 0.5, or 1. For memory and ephemeral-storage, it is specified in units of bytes, such as 200Ki, 50Mi, or 5Gi.
As an administrator, we can set these using a Custom Resource (CR) through a set of <resource_type>=<resource_quantity> pairs (e.g., cpu=200m,memory=512Mi).
Prerequisites
The REST API Overview has details about certificate details.
For example, to access the resources from cluster.node22 node, we can run:
For example:
Procedure
Sample configuration for a resource allocation CR
Opaque integer resources allow cluster operators to provide new node-level resources that would be otherwise unknown to the system. Users can consume these resources in pod specifications, similar to CPU and memory. The scheduler performs resource accounting so that no more than the available amount is simultaneously allocated to pods.
Opaque integer resources are Alpha currently, and only resource accounting is implemented. There is no resource quota or limit range support for these resources, and they have no impact on QoS.
Opaque integer resources are called opaque because OpenShift does not know what the resource is, but will schedule a pod on a node only if enough of that resource is available. They are called integer resources because they must be available, or advertised, in integer amounts. The API server restricts quantities of these resources to whole numbers. Examples of valid quantities are 3, 3000m, and 3Ki.
Opaque integer resources can be used to allocate:
For example, if a node has 800 GiB of a special kind of disk storage, you could create a name for the special storage, such as opaque-int-resource-special-storage. You could advertise it in chunks of a certain size, such as 100 GiB. In that case, your node would advertise that it has eight resources of type opaque-int-resource-special-storage.
Opaque integer resource names must begin with the prefix pod.alpha.kubernetes.io/opaque-int-resource-.
There are two steps required to use opaque integer resources. First, the cluster operator must name and advertise a per-node opaque resource on one or more nodes. Second, application developer must request the opaque resource in pods.
To make opaque integer resources available:
Procedure
For example, the following HTTP request advertises five foo resources on the openshift-node-1 node.
The ~1 in the path is the encoding for the character /. The operation path value in the JSON-Patch is interpreted as a JSON-Pointer. For more details, refer to IETF RFC 6901, section 3.
After this operation, the node status.capacity includes a new resource. The status.allocatable field is updated automatically with the new resource asynchronously.
Since the scheduler uses the node status.allocatable value when evaluating pod fitness, there might be a short delay between patching the node capacity with a new resource and the first pod that requests the resource to be scheduled on that node.
An application developer can consume the opaque resources by editing the pod configuration.
Procedure
Edit the pod configuration to include the name of the opaque resource as a key in the spec.containers[].resources.requests field.
For example:
The following pod requests two CPUs and one foo (an opaque resource).
The pod will be scheduled only if all of the resource requests are satisfied (including CPU, memory, and any opaque resources). The pod will remain in the PENDING state while the resource request cannot be met by any node.
Audit provides a security-relevant chronological set of records documenting the sequence of activities that have affected system by individual users, administrators, or other components of the system.
Audit works at the API server level, logging all requests coming to the server. Each audit log contains two entries:
We can view logs for the master nodes for the OpenShift API server or the Kubernetes API server.
Example output for the Kubelet API server:
We can configure the the audit feature to set log level, retention policy, and the type of events to log.
Procedure
We can set the log level for both settings to one of the following. The setting can be different for each setting:
We can view the basic audit log.
Procedure
To view the basic audit log:
For example:
The output appears...
For example:
The output appears...
Linux container technologies isolate running processes, limiting interactions with only designated resources.
Many application instances can be running in containers on a single host without visibility into each others' processes, files, network, and so on. Typically, each container provides a single service (often called a "micro-service"), such as a web server or a database, though containers can be used for arbitrary workloads.
The Linux kernel has long incorporated capabilities for container technologies. OpenShift and Kubernetes add the ability to orchestrate containers across multi-host installations.
Init Containers run before application containers and can contain utilities or setup scripts not present in an app image.
We can use an Init Container resource to perform tasks before the rest of a pod is deployed.
A pod can have Init Containers in addition to application containers. Init containers allow you to reorganize setup scripts and binding code.
An Init Container can:
Each Init Container must complete successfully before the next one is started. So, Init Containers provide a way to block or delay the startup of app containers until some set of preconditions are met.
Some ways we can use Init Containers:
See the Kubernetes documentation.
The following example outlines a simple Pod which has two Init Containers. The first waits for myservice and the second waits for mydb. Once both containers complete, the Pod begins.
Procedure
Note that the pod status indicates it is waiting
Files in a container are ephemeral. As such, when a container crashes or stops, the data is lost. We can use volumes to persist the data used by the containers in a pod. A volume is directory, accessible to the Containers in a Pod, where data is stored for the life of the pod.
Volumes are mounted file systems available to pods and their containers which may be backed by a number of host-local or network attached storage endpoints. Containers are not persistent by default; on restart, their contents are cleared.
To ensure that the file system on the volume contains no errors and, if errors are present, to repair them when possible, OpenShift invokes the fsck utility prior to the mount utility. This occurs when either adding a volume or updating an existing volume.
The simplest volume type is emptyDir, which is a temporary directory on a single machine. Administrators may also allow you to request a persistent volume that is automatically attached to our pods.
emptyDir volume storage may be restricted by a quota based on the pod's FSGroup, if the FSGroup parameter is enabled by the cluster administrator.
We can use the CLI command oc set volume to add and remove volumes and volume mounts for any object that has a pod template like replication controllers or DeploymentConfigs. We can also list volumes in pods or any object that has a pod template.
The oc set volume command uses the following general syntax:
Table 5.1. Object Selection
We can list volumes and volume mounts in pods or pod templates:
Procedure
To list volumes:
List volume supported options:
For example:
We can add volumes and volume mounts to a pod.
Procedure
To add a volume, a volume mount, or both to pod templates:
Table 5.2. Supported Options for Adding Volumes
For example:
We can modify the volumes and volume mounts in a pod.
Procedure
Updating existing volumes using the --overwrite option:
For example:
We can remove a volume or volume mount from a pod.
Procedure
To remove a volume from pod templates:
Table 5.3. Supported Options for Removing Volumes
For example:
We can configure a volume to allows us to share one volume for multiple uses in a single pod using the volumeMounts.subPath property to specify a subPath inside a volume instead of the volume's root. `` .Procedure
Example subPath Usage
A projected volume maps several existing volume sources into the same directory.
The following types of volume sources can be projected:
All sources are required to be in the same namespace as the pod.
Projected volumes can map any combination of these volume sources into a single directory, allowing the user to:
The following general scenarios show how we can use projected volumes.
The following are examples of pod specifications for creating projected volumes.
Pod with a secret, a downward API, and a configmap
If there are multiple containers in the pod, each container needs a volumeMounts section, but only one volumes section is needed.
Pod with multiple secrets with a non-default permission mode set
The defaultMode can only be specified at the projected level and not for each volume source. However, as illustrated above, we can explicitly set the mode for each individual projection.
If you configure any keys with the same path, the pod spec will not be accepted as valid. In the following example, the specified path for mysecret and myconfigmap are the same:
Consider the following situations related to the volume file paths.
When creating projected volumes, consider the volume file path situations described in Projected volumes.
The following example shows how to use a projected volume to mount an existing Secret volume source. The steps can be used to create a user name and password Secrets from local files. You then create a pod that runs one container, using a projected volume to mount the Secrets into the same shared directory.
Procedure
To use a projected volume to mount an existing Secret volume source.
The user and pass values can be any valid string that is base64 encoded. The examples used here are base64 encoded values user: admin, pass:1f2d1e2e67df.
For example:
For example:
For example:
The output should appear...
For example:
The Downward API is a mechanism that allows containers to consume information about API objects without coupling to OpenShift. Such information includes the pod's name, namespace, and resource values. Containers can consume information from the downward API using environment variables or a volume plug-in.
The Downward API contains such information as the pod's name, project, and resource values. Containers can consume information from the downward API using environment variables or a volume plug-in.
Fields within the pod are selected using the FieldRef API type. FieldRef has two fields:
Currently, the valid selectors in the v1 API include:
The apiVersion field, if not specified, defaults to the API version of the enclosing pod template.
You containers can consume API values using environment variables or a volume plug-in. Depending on the method we choose, containers can consume:
Annotations and labels are available using only a volume plug-in.
When using a container's environment variables, use the EnvVar type’s valueFrom field (of type EnvVarSource) to specify that the variable’s value should come from a FieldRef source instead of the literal value specified by the value field.
Only constant attributes of the pod can be consumed this way, as environment variables cannot be updated once a process is started in a way that allows the process to be notified that the value of a variable has changed. The fields supported using environment variables are:
Procedure
To use environment variables
You containers can consume API values using a volume plug-in.
Containers can consume:
Procedure
To use the volume plug-in:
When creating pods, we can use the downward API to inject information about computing resource requests and limits so that image and application authors can correctly create an image for specific environments.
We can do this using environment variable or a volume plug-in.
When creating pods, we can use the downward API to inject information about computing resource requests and limits using environment variables.
Procedure
To use environment variables:
If the resource limits are not included in the container configuration, the downward API defaults to the node's CPU and memory allocatable values.
When creating pods, we can use the downward API to inject information about computing resource requests and limits using a volume plug-in.
Procedure
To use the Volume Plug-in:
If the resource limits are not included in the container configuration, the downward API defaults to the node's CPU and memory allocatable values.
When creating pods, we can use the downward API to inject Secrets so image and application authors can create an image for specific environments.
Procedure
When creating pods, we can use the downward API to inject configuration map values so image and application authors can create an image for specific environments.
Procedure
When creating pods, we can reference the value of a previously defined environment variable using the $() syntax. If the environment variable reference can not be resolved, the value will be left as the provided string.
Procedure
When creating a pod, we can escape an environment variable reference by using a double dollar sign. The value will then be set to a single dollar sign version of the provided value.
Procedure
We can use the CLI to copy local files to or from a remote directory in a container using the rsync command.
Use oc rsync (remote sync) to copy database archives to and from pods for backup and restore purposes. We can also use oc rsync to copy source code changes into a running pod for development debugging, when the running pod supports hot reload of source files.
Requirements...
When specifying a pod directory, prefix the directory name with the pod name:
If the directory name ends in a path separator (/), only the contents of the directory are copied to the destination. Otherwise, the directory and its contents are copied to the destination. Synchronization occurs after short quiet periods to ensure a rapidly changing file system does not result in continuous synchronization calls.
When using the --watch option, the behavior is effectively the same as manually invoking oc rsync repeatedly, including any arguments normally passed to oc rsync. Therefore, we can control the behavior via the same flags used with manual invocations of oc rsync, such as --delete.
Support for copying local files to or from a container is built into the CLI.
Prerequisites
When working with oc sync, note the following:
If rsync is not found locally or in the remote container, a tar archive is created locally and sent to the container where the tar utility is used to extract the files. If tar is not available in the remote container, the copy will fail.
The tar copy method does not provide the same functionality as oc rsync. For example, oc rsync creates the destination directory if it does not exist and only sends files that are different between the source and the destination.
In Windows, the cwRsync client should be installed and added to the PATH for use with the oc rsync command.
Procedure
For example:
The oc rsync command exposes fewer command line options than standard rsync. In the case that you wish to use a standard rsync command line option which is not available in oc rsync (for example the --exclude-from=FILE option), it may be possible to use standard rsync 's --rsh (-e) option or RSYNC_RSH environment variable as a workaround, as follows:
or:
Both of the above examples configure standard rsync to use oc rsh as its remote shell program to enable it to connect to the remote pod, and are an alternative to running oc rsync.
We can use the CLI to execute remote commands in an OpenShift container.
Support for remote container command execution is built into the CLI.
Procedure
To run a command in a container:
For example:
For security purposes, the oc exec command does not work when accessing privileged containers except when the command is executed by a cluster-admin user.
Clients initiate the execution of a remote command in a container by issuing a request to the Kubernetes API server:
In the above URL:
For example:
The client can add parameters to the request to indicate if:
After sending an exec request to the API server, the client upgrades the connection to one that supports multiplexed streams; the current implementation uses SPDY.
The client creates one stream each for stdin, stdout, and stderr. To distinguish among the streams, the client sets the streamType header on the stream to one of stdin, stdout, or stderr.
The client closes all streams, the upgraded connection, and the underlying connection when it is finished with the remote command execution request.
OpenShift supports port forwarding to pods.
We can use the CLI to forward one or more local ports to a pod. This allows us to listen on a given or random port locally, and have data forwarded to and from given ports in the pod.
Support for port forwarding is built into the CLI:
The CLI listens on each local port specified by the user, forwarding via the protocol described below.
Ports may be specified using the following formats:
5000
The client listens on port 5000 locally and forwards to 5000 in the pod.
6000:5000
The client listens on port 6000 locally and forwards to 5000 in the pod.
:5000 or 0:5000
The client selects a free local port and forwards to 5000 in the pod.
OpenShift handles port-forward requests from clients. Upon receiving a request, OpenShift upgrades the response and waits for the client to create port-forwarding streams. When OpenShift receives a new stream, it copies data between the stream and the pod's port.
Architecturally, there are options for forwarding to a pod's port. The supported OpenShift implementation invokes nsenter directly on the node host to enter the pod’s network namespace, then invokes socat to copy data between the stream and the pod’s port. However, a custom implementation could include running a helper pod that then runs nsenter and socat, so that those binaries are not required to be installed on the host.
We can use the CLI to port-forward one or more local ports to a pod.
Procedure
Listen on the specified port in a pod:
For example:
Or:
Clients initiate port forwarding to a pod by issuing a request to the Kubernetes API server:
In the above URL:
For example:
After sending a port forward request to the API server, the client upgrades the connection to one that supports multiplexed streams; the current implementation uses SPDY.
The client creates a stream with the port header containing the target port in the pod. All data written to the stream is delivered via the Kubelet to the target pod and port. Similarly, all data sent from the pod for that forwarded connection is delivered back to the same stream in the client.
The client closes all streams, the upgraded connection, and the underlying connection when it is finished with the port forwarding request.
In software systems, components can become unhealthy due to transient issues such as temporary connectivity loss, configuration errors, or problems with external dependencies. OpenShift applications have a number of options to detect and handle unhealthy containers.
A probe is a Kubernetes action that periodically performs diagnostics on a running container. Currently, two types of probes exist, each serving a different purpose.
For example, a Readiness check can control which Pods are used. When a Pod is not ready, it is removed.
For example, a liveness probe on a node with a restartPolicy of Always or OnFailure kills and restarts the Container on the node.
Sample Liveness Check
Sample Liveness check output wth unhealthy container
Liveness checks and Readiness checks can be configured in three ways:
A HTTP check is ideal for applications that return HTTP status codes when completely initialized.
To configure health checks, create a pod for each type of check we want.
Procedure
To create health checks:
The timeoutSeconds parameter has no effect on the Readiness and Liveness probes for Container Execution Checks. We can implement a timeout inside the probe itself, as OpenShift cannot time out on an exec call into the container. One way to implement a timeout in a probe is using the timeout parameter to run your liveness or readiness probe:
Events in OpenShift are modeled based on events that happen to API objects in an OpenShift cluster.
Events allow OpenShift to record information about real-world events in a resource-agnostic manner. They also allow developers and administrators to consume information about system components in a unified way.
We can get a list of events in a given project using the CLI.
Procedure
For example:
Many objects, such as pods and deployments, have their own Events tab as well, which shows events related to that object.
This section describes the events of OpenShift.
Table 6.1. Configuration Events
Table 6.2. Container Events
Table 6.3. Health Events
Table 6.4. Image Events
Table 6.5. Image Manager Events
Table 6.6. Node Events
Table 6.7. Pod Worker Events
Table 6.8. System Events
Table 6.9. Pod Events
Table 6.10. Horizontal Pod AutoScaler Events
Table 6.11. Network Events (openshift-sdn)
Table 6.12. Network Events (kube-proxy)
Table 6.13. Volume Events
Table 6.14. Lifecycle hooks
Table 6.15. Deployments
Table 6.16. Scheduler Events
Table 6.17. DaemonSet Events
Table 6.18. LoadBalancer Service Events
We can use the cluster capacity tool to view the number of pods that can be scheduled to increase the current resources before they become exhausted, and to ensure any future pods can be scheduled. This capacity comes from an individual node host in a cluster, and includes CPU, memory, disk space, and others.
The cluster capacity tool simulates a sequence of scheduling decisions to determine how many instances of an input pod can be scheduled on the cluster before it is exhausted of resources to provide a more accurate estimation.
The remaining allocatable capacity is a rough estimation, because it does not count all of the resources being distributed among nodes. It analyzes only the remaining resources and estimates the available capacity that is still consumable in terms of a number of instances of a pod with given requirements that can be scheduled in a cluster.
Also, pods might only have scheduling support on particular sets of nodes based on its selection and affinity criteria. As a result, the estimation of which remaining pods a cluster can schedule can be difficult.
We can run the cluster capacity analysis tool as a stand-alone utility from the command line, or as a job in a pod inside an OpenShift cluster. Running it as job inside of a pod enables you to run it multiple times without intervention.
We can run the OpenShift cluster capacity tool from the command line to estimate the number of pods that can be scheduled onto the cluster.
Prerequisites
An example of the pod specification input is:
Procedure
To run the tool on the command line:
We can also add the --verbose option to output a detailed description of how many pods can be scheduled on each node in the cluster:
In the above example, the number of estimated pods that can be scheduled onto the cluster is 52.
Run the cluster capacity tool as a job inside of a pod has the advantage of being able to be run multiple times without needing user intervention. Running the cluster capacity tool as a job involves using a ConfigMap.
Prerequisites
Download and install the cluster-capacity tool.
Procedure
To run the cluster capacity tool:
If we haven't created a ConfigMap, create one before creating the job:
We can help the clusters operate efficiently through managing application memory by:
It is recommended to read fully the overview of how OpenShift manages Compute Resources before proceeding.
For each kind of resource (memory, CPU, storage), OpenShift allows optional request and limit values to be placed on each container in a pod.
Note the following about memory requests and memory limits:
The steps for sizing application memory on OpenShift are as follows:
Determine expected mean and peak container memory usage, empirically if necessary (for example, by separate load testing). Remember to consider all the processes that may potentially run in parallel in the container: for example, does the main application spawn any ancillary scripts?
Determine risk appetite for eviction. If the risk appetite is low, the container should request memory according to the expected peak usage plus a percentage safety margin. If the risk appetite is higher, it may be more appropriate to request memory according to the expected mean usage.
Set container memory request based on the above. The more accurately the request represents the application memory usage, the better. If the request is too high, cluster and quota usage will be inefficient. If the request is too low, the chances of application eviction increase.
Set container memory limit, if required. Setting a limit has the effect of immediately killing a container process if the combined memory usage of all processes in the container exceeds the limit, and is therefore a mixed blessing. On the one hand, it may make unanticipated excess memory usage obvious early ("fail fast"); on the other hand it also terminates processes abruptly.
Note that some OpenShift clusters may require a limit value to be set; some may override the request based on the limit; and some application images rely on a limit value being set as this is easier to detect than a request value.
If the memory limit is set, it should not be set to less than the expected peak container memory usage plus a percentage safety margin.
Ensure application is tuned with respect to configured request and limit values, if appropriate. This step is particularly relevant to applications which pool memory, such as the JVM. The rest of this page discusses this.
The default OpenJDK settings do not work well with containerized environments. As a result, some additional Java memory settings must always be provided whenever running the OpenJDK in a container.
The JVM memory layout is complex, version dependent, and describing it in detail is beyond the scope of this documentation. However, as a starting point for running OpenJDK in a container, at least the following three memory-related tasks are key:
Optimally tuning JVM workloads for running in a container is beyond the scope of this documentation, and may involve setting multiple additional JVM options.
For many Java workloads, the JVM heap is the largest single consumer of memory. Currently, the OpenJDK defaults to allowing up to 1/4 (1/-XX:MaxRAMFraction) of the compute node's memory to be used for the heap, regardless of whether the OpenJDK is running in a container or not. It is therefore essential to override this behavior, especially if a container memory limit is also set.
There are at least two ways the above can be achieved:
This sets -XX:MaxRAM to the container memory limit, and the maximum heap size (-XX:MaxHeapSize / -Xmx) to 1/-XX:MaxRAMFraction (1/4 by default).
This option involves hard-coding a value, but has the advantage of allowing a safety margin to be calculated.
By default, the OpenJDK does not aggressively return unused memory to the operating system. This may be appropriate for many containerized Java workloads, but notable exceptions include workloads where additional active processes co-exist with a JVM within a container, whether those additional processes are native, additional JVMs, or a combination of the two.
The OpenShift Jenkins maven slave image uses the following JVM arguments to encourage the JVM to release unused memory to the operating system:
These arguments are intended to return heap memory to the operating system whenever allocated memory exceeds 110% of in-use memory (-XX:MaxHeapFreeRatio), spending up to 20% of CPU time in the garbage collector (-XX:GCTimeRatio). At no time will the application heap allocation be less than the initial heap allocation (overridden by -XX:InitialHeapSize / -Xms). Detailed additional information is available Tuning Java's footprint in OpenShift (Part 1), Tuning Java’s footprint in OpenShift (Part 2), and at OpenJDK and Containers.
In the case that multiple JVMs run in the same container, it is essential to ensure that they are all configured appropriately. For many workloads it will be necessary to grant each JVM a percentage memory budget, leaving a perhaps substantial additional safety margin.
Many Java tools use different environment variables (JAVA_OPTS, GRADLE_OPTS, MAVEN_OPTS, and so on) to configure their JVMs and it can be challenging to ensure that the right settings are being passed to the right JVM.
The JAVA_TOOL_OPTIONS environment variable is always respected by the OpenJDK, and values specified in JAVA_TOOL_OPTIONS will be overridden by other options specified on the JVM command line. By default, to ensure that these options are used by default for all JVM workloads run in the slave image, the OpenShift Jenkins maven slave image sets:
This does not guarantee that additional options are not required, but is intended to be a helpful starting point.
An application wishing to dynamically discover its memory request and limit from within a pod should use the Downward API.
Procedure
The memory limit value can also be read from inside the container by the /sys/fs/cgroup/memory/memory.limit_in_bytes file.
OpenShift may kill a process in a container if the total memory usage of all the processes in the container exceeds the memory limit, or in serious cases of node memory exhaustion.
When a process is OOM killed, this may or may not result in the container exiting immediately. If the container PID 1 process receives the SIGKILL, the container will exit immediately. Otherwise, the container behavior is dependent on the behavior of the other processes.
For example, a container process exited with code 137, indicating it received a SIGKILL signal.
If the container does not exit immediately, an OOM kill is detectable as follows:
If one or more processes in a pod are OOM killed, when the pod subsequently exits, whether immediately or not, it will have phase Failed and reason OOMKilled. An OOM killed pod may be restarted depending on the value of restartPolicy. If not restarted, controllers such as the ReplicationController will notice the pod's failed status and create a new pod to replace the old one.
If not restarted, the pod status is as follows:
If restarted, its status is as follows:
OpenShift may evict a pod from its node when the node's memory is exhausted. Depending on the extent of memory exhaustion, the eviction may or may not be graceful. Graceful eviction implies the main process (PID 1) of each container receiving a SIGTERM signal, then some time later a SIGKILL signal if the process has not exited already. Non-graceful eviction implies the main process of each container immediately receiving a SIGKILL signal.
An evicted pod will have phase Failed and reason Evicted. It will not be restarted, regardless of the value of restartPolicy. However, controllers such as the ReplicationController will notice the pod's failed status and create a new pod to replace the old one.
In an overcommited state, the sum of the container compute resource requests and limits exceeds the resources available on the system. Overcommitment might be desirable in development environments where a tradeoff of guaranteed performance for capacity is acceptable.
In OpenShift overcommittment is enabled by default. See Disabling overcommitment for a node.
Requests and limits enable administrators to allow and manage the overcommitment of resources on a node. The scheduler uses requests for scheduling the container and providing a minimum service guarantee. Limits constrain the amount of compute resource that may be consumed on your node.
OpenShift administrators can control the level of overcommit and manage container density on nodes by configuring masters to override the ratio between request and limit set on developer containers. In conjunction with a per-project LimitRange specifying limits and defaults, this adjusts the container limit and request to achieve the desired level of overcommit.
That these overrides have no effect if no limits have been set on containers. Create a LimitRange object with default limits (per individual project, or in the project template) in order to ensure that the overrides apply.
After these overrides, the container limits and requests must still be validated by any LimitRange objects in the project. It is possible, for example, for developers to specify a limit close to the minimum limit, and have the request then be overridden below the minimum limit, causing the pod to be forbidden. This unfortunate user experience should be addressed with future work, but for now, configure this capability and LimitRanges with caution.
For each compute resource, a container may specify a resource request and limit. Scheduling decisions are made based on the request to ensure that a node has enough capacity available to meet the requested value. If a container specifies limits, but omits requests, the requests are defaulted to the limits. A container is not able to exceed the specified limit on the node.
The enforcement of limits is dependent upon the compute resource type. If a container makes no request or limit, the container is scheduled to a node with no resource guarantees. In practice, the container is able to consume as much of the specified resource as is available with the lowest local priority. In low resource situations, containers that specify no resource requests are given the lowest quality of service.
Scheduling is based on resources requested, while quota and hard limits refer to resource limits, which can be set higher than requested resources. The difference between request and limit determines the level of overcommit; for instance, if a container is given a memory request of 1Gi and a memory limit of 2Gi, it is scheduled based on the 1Gi request being available on the node, but could use up to 2Gi; so it is 200% overcommitted.
If the fluentd logger is unable to keep up with a high number of logs, it will need to switch to file buffering to reduce memory usage and prevent data loss.
Fluentd file buffering stores records in chunks. Chunks are stored in buffers.
The Fluentd buffer_chunk_limit is determined by the environment variable BUFFER_SIZE_LIMIT, which has the default value 8m. The file buffer size per output is determined by the environment variable FILE_BUFFER_LIMIT, which has the default value 256Mi. The permanent volume size must be larger than FILE_BUFFER_LIMIT multiplied by the output.
On the Fluentd pods, permanent volume /var/lib/fluentd should be prepared by the PVC or hostmount, for example. That area is then used for the file buffers.
The buffer_type and buffer_path are configured in the Fluentd configuration files as follows:
The Fluentd buffer_queue_limit is the value of the variable BUFFER_QUEUE_LIMIT. This value is 32 by default.
The environment variable BUFFER_QUEUE_LIMIT is calculated as (FILE_BUFFER_LIMIT / (number_of_outputs * BUFFER_SIZE_LIMIT)).
If the BUFFER_QUEUE_LIMIT variable has the default set of values:
The value of buffer_queue_limit will be 32. To change the buffer_queue_limit, we must change the value of FILE_BUFFER_LIMIT.
In this formula, number_of_outputs is 1 if all the logs are sent to a single resource, and it is incremented by 1 for each additional resource. For example, the value of number_of_outputs is:
The node-enforced behavior for compute resources is specific to the resource type.
A container is guaranteed the amount of CPU it requests and is additionally able to consume excess CPU available on the node, up to any limit specified by the container. If multiple containers are attempting to use excess CPU, CPU time is distributed based on the amount of CPU requested by each container.
For example, if one container requested 500m of CPU time and another container requested 250m of CPU time, then any extra CPU time available on the node is distributed among the containers in a 2:1 ratio. If a container specified a limit, it will be throttled not to use more CPU than the specified limit. CPU requests are enforced using the CFS shares support in the Linux kernel. By default, CPU limits are enforced using the CFS quota support in the Linux kernel over a 100ms measuring interval, though this can be disabled.
A container is guaranteed the amount of memory it requests. A container can use more memory than requested, but once it exceeds its requested amount, it could be terminated in a low memory situation on the node. If a container uses less memory than requested, it will not be terminated unless system tasks or daemons need more memory than was accounted for in the node's resource reservation. If a container specifies a limit on memory, it is immediately terminated if it exceeds the limit amount.
A node is overcommitted when it has a pod scheduled that makes no request, or when the sum of limits across all pods on that node exceeds available machine capacity.
In an overcommitted environment, it is possible that the pods on the node will attempt to use more compute resource than is available at any given point in time. When this occurs, the node must give priority to one pod over another. The facility used to make this decision is referred to as a Quality of Service (QoS) Class.
For each compute resource, a container is divided into one of three QoS classes with decreasing order of priority:
Table 6.19. Quality of Service Classes
Memory is an incompressible resource, so in low memory situations, containers that have the lowest priority are terminated first:
We can use the qos-reserved parameter to specify a percentage of memory to be reserved by a pod in a particular QoS level. This feature attempts to reserve requested resources to exclude pods from lower OoS classes from using resources requested by pods in higher QoS classes.
OpenShift uses the qos-reserved parameter as follows:
We can disable swap by default on your nodes in order to preserve quality of service (QOS) guarantees. Otherwise, physical resources on a node can oversubscribe, affecting the resource guarantees the Kubernetes scheduler makes during pod placement.
For example, if two guaranteed pods have reached their memory limit, each container could start using swap memory. Eventually, if there is not enough swap space, processes in the pods can be terminated due to the system being oversubscribed.
Failing to disable swap results in nodes not recognizing that they are experiencing MemoryPressure, resulting in pods not receiving the memory they made in their scheduling request. As a result, additional pods are placed on the node to further increase memory pressure, ultimately increasing your risk of experiencing a system out of memory (OOM) event.
If swap is enabled, any out-of-resource handling eviction thresholds for available memory will not work as expected. Take advantage of out-of-resource handling to allow pods to be evicted from a node when it is under memory pressure, and rescheduled on an alternative node that has no such pressure.
In an overcommitted environment, it is important to properly configure your node to provide best system behavior.
When the node starts, it ensures that the kernel tunable flags for memory management are set properly. The kernel should never fail memory allocations unless it runs out of physical memory.
To ensure this behavior, OpenShift configures the kernel to always overcommit memory by setting the vm.overcommit_memory parameter to 1, overriding the default operating system setting.
OpenShift also configures the kernel not to panic when it runs out of memory by setting the vm.panic_on_oom parameter to 0. A setting of 0 instructs the kernel to call oom_killer in an Out of Memory (OOM) condition, which kills processes based on priority
We can view the current setting by running the following commands on your nodes:
The above flags should already be set on nodes, and no further action is required.
We can also perform the following configurations for each node:
Nodes by default enforce specified CPU limits using the Completely Fair Scheduler (CFS) quota support in the Linux kernel.
Prerequisites
For example:
Procedure
Sample configuration for a disabling CPU limits
If CPU limit enforcement is disabled, it is important to understand the impact that will have on your node:
To provide more reliable scheduling and minimize node resource overcommitment, each node can reserve a portion of its resources for use by system daemons required to run on your node for the cluster to function (sshd, etc.). In particular, it is recommended that you reserve resources for incompressible resources such as memory.
Procedure
To explicitly reserve resources for non-pod processes, allocate node resources by specifying resources available for scheduling. For more details, see Allocating Resources for Nodes.
When enabled, overcommitment can be disabled on each node.
Procedure
To disable overcommitment in a node run the following command on that node:
When enabled, overcommitment can be disabled per-project. For example, we can allow infrastructure components to be configured independently of overcommitment.
Procedure
To disable overcommitment in a project:
As an administrator, we can turn on features that are in Technology Preview status.
We can use the Feature Gate Custom Resource to enable Technology Preview features throughout the cluster. This allows you, for example, to enable Technology Preview features on test clusters where we can fully test them while ensuring they are disabled on production clusters.
After turning Technology Preview features on using feature gates, they cannot be turned off and cluster upgrades are prevented.
The following Technology Preview features included in OpenShift:
We can enable the MachineHealthCheck and CSIBlockVolume features by editing the Feature Gate Custom Resource. Turning on these features cannot be undone and prevents the ability to upgrade the cluster.
The LocalStorageCapacityIsolation cannot be enabled.
We can turn on the MachineHealthCheck and CSIBlockVolume Technology Preview features on for all nodes in the cluster by editing the Feature Gate Custom Resource, named cluster, in the openshift-config project.
Turning on Technology Preview features using the Feature Gate Custom Resource cannot be undone and prevents upgrades.
Procedure
To turn on the Technology Preview features for the entire cluster:
Provide sensitive data to pods
Secrets
apiVersion: v1
kind:       Secret
metadata:
  name:      test-secret
  namespace: my-namespace
type:        Opaque  1
data:  2
  username:  dmFsdWUtMQ0K  3
  password:  dmFsdWUtMg0KDQo=
stringData:   4
  hostname:  myapp.mydomain.com  5
1 Structure of the secret's key names and values.
2 Allowable format for the keys in the data field must meet the guidelines in the DNS_SUBDOMAIN value in the Kubernetes identifiers glossary.
3 The value associated with keys in the data map must be base64 encoded.
4 Entries in the stringData map are converted to base64 and the entry will then be moved to the data map automatically. This field is write-only; the value will only be returned via the data field.
5 The value associated with keys in the stringData map is made up of plain text strings.
Types of secrets
Secret type
Uses
kubernetes.io/service-account-token
Service account token
kubernetes.io/basic-auth
Basic Authentication
kubernetes.io/ssh-auth
SSH Key Authentication
kubernetes.io/tls.
TLS certificate authorities
Opaque
No validation. The secret does not claim to conform to any convention for key names or values. An opaque secret, allows for unstructured key:value pairs that can contain arbitrary values. We can specify other arbitrary types, such as example.com/my-secret-type. These types are not enforced server-side, but indicate that the creator of the secret intended to conform to the key/value requirements of that type.
Example secret configurations
apiVersion: v1
kind:       Secret
metadata:
  name: test-secret
data:
  username: dmFsdWUtMQ0K      1
  password: dmFsdWUtMQ0KDQo=  2
stringData:
  hostname: myapp.mydomain.com  3
  secret.properties: |-      4
    property1=valueA
    property2=valueB
apiVersion: v1
kind:       Pod
metadata:
  name: secret-example-pod
spec:
  containers:
    - name:  secret-test-container
      image: busybox
      command: [ "/bin/sh", "-c", "cat /etc/secret-volume/*" ]
      volumeMounts:
  # name must match the volume name below
  - name: secret-volume
mountPath: /etc/secret-volume
readOnly: true
  volumes:
    - name: secret-volume
      secret:
secretName: test-secret
  restartPolicy: Never
apiVersion: v1
kind:   Pod
        metadata:
  name: secret-example-pod
spec:
  containers:
    - name: secret-test-container
      image: busybox
      command: [ "/bin/sh", "-c", "export" ]
      env:
- name: TEST_SECRET_USERNAME_ENV_VAR
  valueFrom:
secretKeyRef:
  name: test-secret
  key: username
  restartPolicy: Never
apiVersion: v1
kind:       BuildConfig
metadata:
  name: secret-example-bc
spec:
  strategy:
    sourceStrategy:
      env:
      - name: TEST_SECRET_USERNAME_ENV_VAR
valueFrom:
  secretKeyRef:
name: test-secret
key: username
Secret data keys
Create secrets
Secret creation restrictions
Create an opaque secret
apiVersion: v1
kind:       Secret
metadata:
  name:     mysecret
type:       Opaque  1
data:
  username: dXNlci1uYW1l
  password: cGFzc3dvcmQ=
$ oc create -f <filename>
Update secrets
Use signed certificates with secrets
apiVersion: v1
  kind:     Service
  metadata:
    name: registry
    annotations:
      service.alpha.openshift.io/serving-cert-secret-name: registry-cert 1
....
Generate signed certificates for use with secrets
kind:       Service
apiVersion: v1
metadata:
  name: my-service
  annotations:
      service.alpha.openshift.io/serving-cert-secret-name: my-cert  1
spec:
  selector:
    app: MyApp
  ports:
  - protocol: TCP
    port: 80
    targetPort: 9376
$ oc create -f <file-name>.yaml
$ oc get secrets

NAME       TYPE                 DATA      AGE
my-cert    kubernetes.io/tls    2         9m

$ oc describe secret my-service-pod
Name:         my-service-pod
Namespace:    openshift-console
Labels:       <none>
Annotations:  kubernetes.io/service-account.name: builder
  kubernetes.io/service-account.uid: ab-11e9-988a-0eb4e1b4a396

Type:  kubernetes.io/service-account-token

Data

ca.crt:     5802 bytes
namespace:  17 bytes
token:      eyJhbGciOiJSUzI1NiIsImtpZCI6IiJ9.eyJpc3MiOiJrdWJlcm5ldGVzL3NlcnZpY2VhY2NvdW50Ii
wia3ViZXJuZXRlcy5pby9zZXJ2aWNlYWNjb3VudC9uYW1lc3BhY2UiOiJvcGVuc2hpZnQtY29uc29sZSIsImt1YmVyb
cnZpY2VhY2NvdW50L3NlcnZpY2UtYWNjb3VudC51aWQiOiJhYmE4Y2UyZC00MzVlLTExZTktOTg4YS0wZWI0ZTFiNGEz
OTYiLCJzdWIiOiJzeXN0ZW06c2VydmljZWFjY291bnQ6b3BlbnNoaWZ
apiVersion: v1
kind:       Pod
metadata:
  name: my-service-pod
spec:
  containers:
  - name: mypod
    image: redis
    volumeMounts:
    - name: foo
      mountPath: "/etc/foo"
  volumes:
  - name: foo
    secret:
      secretName: my-cert
      items:
      - key: username
path: my-group/my-username
mode: 511
Troubleshoot secrets
secret/ssl-key references serviceUID 62ad25ca-d703-11e6-9d6f-0e9c0057b608, which does not match 77b6dd80-d716-11e6-9d6f-0e9c0057b60
$ oc delete secret <secret_name>
$ oc annotate service <service_name> service.alpha.openshift.io/serving-cert-generation-error-1
$ oc annotate service <service_name> service.alpha.openshift.io/serving-cert-generation-error-num-1
Use device plug-ins to access external resouces with pods
Device plug-ins
service DevicePlugin {
      // GetDevicePluginOptions returns options to be communicated with Device
      // Manager
      rpc GetDevicePluginOptions(Empty) returns (DevicePluginOptions) {}

      // ListAndWatch returns a stream of List of Devices
      // Whenever a Device state change or a Device disappears, ListAndWatch
      // returns the new list
      rpc ListAndWatch(Empty) returns (stream ListAndWatchResponse) {}

      // Allocate is called during container creation so that the Device
      // Plug-in can run device specific operations and instruct Kubelet
      // of the steps to make the Device available in the container
      rpc Allocate(AllocateRequest) returns (AllocateResponse) {}

      // PreStartcontainer is called, if indicated by Device Plug-in during
      // registration phase, before each container start. Device plug-in
      // can run device specific operations such as reseting the device
      // before making devices available to the container
      rpc PreStartcontainer(PreStartcontainerRequest) returns (PreStartcontainerResponse) {}
}
Example device plug-ins
vendor/k8s.io/kubernetes/pkg/kubelet/cm/deviceplugin/device_plugin_stub.go
Deploy a device plug-in
/var/lib/kubelet/device-plugin/
Since device plug-ins must manage hardware resources, access to the host file system, as well as socket creation, they must be run in a privileged security context. More specific details regarding deployment steps can be found with each device plug-in implementation.
Device Manager
/var/lib/kubelet/device-plugins/kubelet.sock
/var/lib/kubelet/device-plugins/<plugin>.sock
Enable Device Manager
# oc describe machineconfig <name>
# oc describe machineconfig 00-worker

oc describe machineconfig 00-worker
Name:         00-worker
Namespace:
Labels:       machineconfiguration.openshift.io/role=worker  1
apiVersion: machineconfiguration.openshift.io/v1
kind:       KubeletConfig
metadata:
  name: devicemgr  1
spec:
  machineConfigPoolSelector:
    matchLabels:
       machineconfiguration.openshift.io: devicemgr  2
  kubeletConfig:
    feature-gates:
      - DevicePlugins=true  3
$ oc create -f devicemgr.yaml

kube
letconfig.machineconfiguration.openshift.io/devicemgr created
/var/lib/kubelet/device-plugins/kubelet.sock
Include pod priority in pod scheduling decisions
Pod priority
Pod priority classes
$ oc get priorityclasses
NAME                      CREATED AT
cluster-logging           2019-03-13T14:45:12Z
system-cluster-critical   2019-03-13T14:01:10Z
system-node-critical      2019-03-13T14:01:10Z
system-node-critical
Has a value of 2000001000. Used for all pods that should never be evicted from a node. Examples of pods that have this priority class are sdn-ovs, sdn, and so forth. A number of critical components include the system-node-critical priority class by default, for example:
system-cluster-critical
Has a value of 2000000000 (two billion). Used with pods that are important for the cluster. Pods with this priority class can be evicted from a node in certain circumstances. For example, pods configured with the system-node-critical priority class can take priority. However, this priority class does ensure guaranteed scheduling. Examples of pods that can have this priority class are fluentd, add-on components like descheduler, and so forth. A number of critical components include the system-cluster-critical priority class by default, for example:
cluster-logging
Used by Fluentd to make sure Fluentd pods are scheduled to nodes over other apps.
scheduler.alpha.kubernetes.io/critical-pod
Pod priority names
Pod preemption
Pod preemption and other scheduler settings
Pod priority and pod disruption budget
A pod disruption budget specifies the minimum number or percentage of replicas that must be up at a time. If we specify pod disruption budgets, OpenShift respects them when preempting pods at a best effort level. The scheduler attempts to preempt pods without violating the pod disruption budget. If no such pods are found, lower-priority pods might be preempted despite their pod disruption budget requirements.
Pod priority and pod affinity
Pod affinity requires a new pod to be scheduled on the same node as other pods with the same label.
Graceful termination of preempted pods
Configure priority and preemption
apiVersion: scheduling.k8s.io/v1beta1
kind:       PriorityClass
metadata:
  name: high-priority 1
value: 1000000 2
globalDefault: false 3
description: "This priority class should be used for XYZ service pods only." 4
apiVersion: v1
kind:       Pod
metadata:
  name: nginx
  labels:
    env: test
spec:
  containers:
  - name: nginx
    image: nginx
    imagePullPolicy: IfNotPresent
  priorityClassName: high-priority 1
$ oc create -f <file-name>.yaml
Disable priority and preemption
oc edit scheduler cluster
apiVersion: config.openshift.io/v1
kind:       Scheduler
metadata:
  creationTimestamp: '2019-03-12T01:45:02Z'
  generation: 1
  name: example
  resourceVersion: '1882034'
  selfLink: /apis/config.openshift.io/v1/schedulers/example
  uid: 743701e9-4468-11e9-bd34-02a7fe1bf828
spec:
  disablePreemption: true
Place pods on specific nodes using node selectors
Use node selectors to control pod placement
apiVersion: v1
kind:       Pod
spec:
  nodeSelector:
    <key>: <value>
...
apiVersion: v1
kind:       Pod

....

spec:
  nodeSelector:
    region: east
    type: user-node
$ oc label <resource> <name> <key>=<value>
$ oc label nodes ip-10-0-142-25.ec2.internal type=user-node region=east
$ oc label MachineSet abc612-msrtw-worker-us-east-1c type=user-node region=east
kind: Node
apiVersion: v1
metadata:
  name: ip-10-0-131-14.ec2.internal
  selfLink: /api/v1/nodes/ip-10-0-131-14.ec2.internal
  uid: 7bc2580a-8b8e-11e9-8e01-021ab4174c74
  resourceVersion: '478704'
  creationTimestamp: '2019-06-10T14:46:08Z'
  labels:
    beta.kubernetes.io/os: linux
    failure-domain.beta.kubernetes.io/zone: us-east-1a
    node.openshift.io/os_version: '4.1'
    node-role.kubernetes.io/worker: ''
    failure-domain.beta.kubernetes.io/region: us-east-1
    node.openshift.io/os_id: rhcos
    beta.kubernetes.io/instance-type: m4.large
    kubernetes.io/hostname: ip-10-0-131-14
    region: east 1
    beta.kubernetes.io/arch: amd64
    type: user-node 2
....
Control pod placement onto nodes (scheduling)
Control pod placement using the scheduler
Default pod scheduling
Serves the needs of most users. Uses both inherent and customization tools to determine the best fit for a pod.
Advanced pod scheduling
Allows more control over where new pods are placed. Configure a pod to be required or with a preference to run on a particular node.
Configure the default scheduler to control pod placement
apiVersion: config.openshift.io/v1
kind:       Scheduler
metadata:
  annotations:
                     release.openshift.io/create-only: "true"
  creationTimestamp: 2019-05-20T15:39:01Z
  generation:        1
  name:              cluster
  resourceVersion:   "1491"
  selfLink:          /apis/config.openshift.io/v1/schedulers/cluster
  uid:               6435dd99-7b15-11e9-bd48-0aec821b8e34
spec:
  policy:               1
    name:              scheduler-policy
  defaultNodeSelector: type=user-node,region=east 2
Default scheduling
Filters the Nodes
The available nodes are filtered based on the constraints or requirements specified. This is done by running each node through the list of filter functions called predicates.
Prioritize the Filtered List of Nodes
This is achieved by passing each node through a series of priority_ functions that assign it a score between 0 - 10, with 0 indicating a bad fit and 10 indicating a good fit to host the pod. The scheduler configuration can also take in a simple weight (positive numeric value) for each priority function. The node score provided by each priority function is multiplied by the weight (default weight for most priorities is 1) and then combined by adding the scores for each node provided by all the priorities. This weight attribute can be used by administrators to give higher importance to some priorities.
Select the Best Fit Node
The nodes are sorted based on their scores and the node with the highest score is selected to host the pod. If multiple nodes have the same high score, then one of them is selected at random.
Scheduler Policy
{
"kind" : "Policy",
"apiVersion" : "v1",
"predicates" : [
    {"name" : "PodFitsHostPorts"},
    {"name" : "PodFitsResources"},
    {"name" : "NoDiskConflict"},
    {"name" : "NoVolumeZoneConflict"},
    {"name" : "MatchNodeSelector"},
    {"name" : "HostName"}
    ],
"priorities" : [
    {"name" : "LeastRequestedPriority", "weight" : 1},
    {"name" : "BalancedResourceAllocation", "weight" : 1},
    {"name" : "ServiceSpreadingPriority", "weight" : 1},
    {"name" : "EqualPriority", "weight" : 1}
    ]
}
Scheduler Use Cases
Infrastructure Topological Levels
Affinity
Anti-Affinity
Create a scheduler policy file
kind:       ConfigMap
apiVersion: v1
metadata:
  name: scheduler-policy
  namespace: openshift-config
  selfLink: /api/v1/namespaces/openshift-config/configmaps/mypolicy
  uid: 83917dfb-4422-11e9-b2c9-0a5e37b2b12e
  resourceVersion: '1049773'
  creationTimestamp: '2019-03-11T17:24:23Z'
data:
  policy.cfg: |
    {
    "kind" : "Policy",
    "apiVersion" : "v1",
    "predicates" : [
{"name" : "MaxGCEPDVolumeCount"},
{"name" : "GeneralPredicates"},
{"name" : "MaxAzureDiskVolumeCount"},
{"name" : "MaxCSIVolumeCountPred"},
{"name" : "CheckVolumeBinding"},
{"name" : "MaxEBSVolumeCount"},
{"name" : "PodFitsResources"},
{"name" : "MatchInterPodAffinity"},
{"name" : "CheckNodeUnschedulable"},
{"name" : "NoDiskConflict"},
{"name" : "CheckServiceAffinity"},
{"name" : "NoVolumeZoneConflict"},
{"name" : "MatchNodeSelector"},
{"name" : "PodToleratesNodeNoExecuteTaints"},
{"name" : "HostName"},
{"name" : "PodToleratesNodeTaints"}
],
    "priorities" : [
{"name" : "LeastRequestedPriority", "weight" : 1},
{"name" : "BalancedResourceAllocation", "weight" : 1},
{"name" : "ServiceSpreadingPriority", "weight" : 1},
{"name" : "NodePreferAvoidPodsPriority", "weight" : 1},
{"name" : "NodeAffinityPriority", "weight" : 1},
{"name" : "TaintTolerationPriority", "weight" : 1},
{"name" : "ImageLocalityPriority", "weight" : 1},
{"name" : "SelectorSpreadPriority", "weight" : 1},
{"name" : "InterPodAffinityPriority", "weight" : 1},
{"name" : "EqualPriority", "weight" : 1}
]
    }
{
"kind" : "Policy",
"apiVersion" : "v1",
"predicates" : [      1
    {"name" : "PodFitsHostPorts"},
    {"name" : "PodFitsResources"},
    {"name" : "NoDiskConflict"},
    {"name" : "NoVolumeZoneConflict"},
    {"name" : "MatchNodeSelector"},
    {"name" : "HostName"}
    ],
"priorities" : [     2
    {"name" : "LeastRequestedPriority", "weight" : 1},
    {"name" : "BalancedResourceAllocation", "weight" : 1},
    {"name" : "ServiceSpreadingPriority", "weight" : 1},
    {"name" : "EqualPriority", "weight" : 1}
    ]
}
$ oc create configmap -n openshift-config --from-file=policy.cfg <configmap-name>
$ oc create configmap -n openshift-config --from-file=policy.cfg scheduler-policy

configmap/scheduler-policy created
$ oc edit scheduler cluster
apiVersion: config.openshift.io/v1
kind:       Scheduler
metadata:
  name: cluster
spec: {}
  policy:
    name: scheduler-policy
Modify scheduler policies
\n\t{\"name\" : \"<PredicateName>\", \"label\" : \"<label>\", \"<condition>\" : \"<state>\"},
\n\t{\"name\" : \"<PredicateName>\", \"label\" : \"<label>\", \"<condition>\" : \"<state>\", \"weight\" : <weight>},
kind:       ConfigMap
apiVersion: v1
metadata:
  name: scheduler-policy
  namespace: openshift-config
  selfLink: /api/v1/namespaces/openshift-config/configmaps/mypolicy
  uid: 83917dfb-4422-11e9-b2c9-0a5e37b2b12e
  resourceVersion: '1049773'
  creationTimestamp: '2019-03-11T17:24:23Z'
data:
  policy.cfg: "{\n\"kind\" : \"Policy\",
               \n\"apiVersion\" : \"v1\",
               \n\"predicates\" : [\n\t{\"name\" : \"PodFitsHostPorts\"},
               \n\t{\"name\" : \"PodFitsResources\"},
               \n\t{\"name\" : \"NoDiskConflict\"},
               \n\t{\"name\" : \"NoVolumeZoneConflict\"},
               \n\t{\"name\" : \"MatchNodeSelector\"},
               \n\t{\"name\" : \"HostName\"}\n\t],
               \n\"priorities\" : [\n\t{\"name\" : \"LeastRequestedPriority\",
                \"weight\" : 10},
               \n\t{\"name\" : \"BalancedResourceAllocation\",
                \"weight\" : 1},
               \n\t{\"name\" : \"ServiceSpreadingPriority\",
                \"weight\" : 1},
               \n\t{\"name\" : \"EqualPriority\",
                \"weight\" : 1}\n\t]\n}\n"
\n\t{\"name\" :
             \"labelPresence\", \"label\" :
             \"rack\",  \"presence\" :
             \"true\"},
\n\t{\"name\" :
             \"labelPreference\", \"label\" :
             \"rack\", \"presence\" :
             \"true\", \"weight\" :
             2},\n\t
policy.cfg:
             "{\n\"kind\" : \"Policy\",
               \n\"apiVersion\" : \"v1\",
               \n\"predicates\" : [\n\t{\"name\" : \"PodFitsHostPorts\"},
               \n\t{\"name\" : \"PodFitsResources\"},
               \n\t{\"name\" : \"NoDiskConflict\"},
               \n\t{\"name\" : \"NoVolumeZoneConflict\"},
               \n\t{\"name\" : \"MatchNodeSelector\"},
               \n\t{\"name\" : \"HostName\"},
               \n\t{\"name\" : \"labelPresence\",
               \"label\" : \"rack\",
               \"presence\" : \"true\"}\n\t],
               \n\"priorities\" : [\n\t{\"name\" : \"LeastRequestedPriority\",
               \"weight\" : 10},
               \n\t{\"name\" : \"BalancedResourceAllocation\",
               \"weight\" : 1},
               \n\t{\"name\" : \"ServiceSpreadingPriority\",
               \"weight\" : 1},
               \n\t{\"name\" : \"EqualPriority\",
               \"weight\" : 1},
               \n\t{\"name\" : \"labelPreference\",
               \"label\" : \"rack\",
               \"presence\" : \"true\",
               \"weight\" : 2},
               \n\t]\n}\n "
Scheduler predicates
Static Predicates
Default Predicates
{"name" : "NoVolumeZoneConflict"}
{"name" : "MaxEBSVolumeCount"}
{"name" : "MaxGCEPDVolumeCount"}
{"name" : "MatchInterPodAffinity"}
{"name" : "NoDiskConflict"}
{"name" : "PodToleratesNodeTaints"}
{"name" : "CheckNodeMemoryPressure"}Other Static Predicates
{"name" : "CheckNodeDiskPressure"}
{"name" : "CheckVolumeBinding"}
{"name" : "CheckNodeCondition"}
{"name" : "PodToleratesNodeNoExecuteTaints"}
{"name" : "CheckNodeLabelPresence"}
{"name" : "checkServiceAffinity"}
{"name" : "MaxAzureDiskVolumeCount"}General Predicates
Non-critical general predicates
{"name" : "PodFitsResources"}Essential general predicates
{"name" : "PodFitsHostPorts"}
{"name" : "HostName"}
{"name" : "MatchNodeSelector"}Configurable Predicates
"predicates":[
      {
 "name":"<name>", 1
 "argument":{
"serviceAffinity":{
   "labels":[
      "<label>" 2
   ]
}
 }
      }
   ],
        "name":"ZoneAffinity",
"argument":{
"serviceAffinity":{
    "labels":[
"rack"
    ]
}
}
"predicates":[
      {
 "name":"<name>", 1
 "argument":{
"labelsPresence":{
   "labels":[
      "<label>" 2
    ],
    "presence": true 3
}
 }
      }
   ],
        "name":"RackPreferred",
"argument":{
"labelsPresence":{
    "labels":[
"rack",
"region"
    ],
    "presence": true
}
}
Scheduler priorities
Static Priorities
Default Priorities
{"name" : "SelectorSpreadPriority", "weight" : 1}
{"name" : "InterPodAffinityPriority", "weight" : 1}
{"name" : "LeastRequestedPriority", "weight" : 1}
{"name" : "BalancedResourceAllocation", "weight" : 1}
{"name" : "NodePreferAvoidPodsPriority", "weight" : 10000}
{"name" : "NodeAffinityPriority", "weight" : 1}
{"name" : "TaintTolerationPriority", "weight" : 1}Other Static Priorities
{"name" : "EqualPriority", "weight" : 1}
{"name" : "MostRequestedPriority", "weight" : 1}
{"name" : "ImageLocalityPriority", "weight" : 1}
{"name" : "ServiceSpreadingPriority", "weight" : 1}Configurable Priorities
"priorities":[
    {
"name":"<name>", 1
"weight" : 1 2
"argument":{
"serviceAntiAffinity":{
    "label":[
"<label>" 3
    ]
}
}
    }
]
        "name":"RackSpread", 1
"weight" : 1 2
"argument":{
"serviceAntiAffinity":{
    "label": "rack" 3
}
}
"priorities":[
    {
"name":"<name>", 1
"weight" : 1 2
"argument":{
"labelPreference":{
    "label": "<label>", 3
    "presence": true 4
}
}
    }
]
Sample Policy Configurations
kind:       ConfigMap
apiVersion: v1
metadata:
  name: mypolicy
  namespace: openshift-config
  selfLink: /api/v1/namespaces/openshift-config/configmaps/mypolicy
  uid: 83917dfb-4422-11e9-b2c9-0a5e37b2b12e
  resourceVersion: '1100851'
  creationTimestamp: '2019-03-11T17:24:23Z'
data:
  policy.cfg:
             "{\n\"kind\" : \"Policy\",
       \n\"apiVersion\" : \"v1\",
       \n\"predicates\" : [\n\t{\"name\" : \"PodFitsHostPorts\"},
       \n\t{\"name\" : \"PodFitsResources\"},
       \n\t{\"name\" : \"NoDiskConflict\"},
       \n\t{\"name\" : \"NoVolumeZoneConflict\"},
       \n\t{\"name\" : \"MatchNodeSelector\"},
       \n\t{\"name\" : \"HostName\"}\n\t],
       \n\"priorities\" : [\n\t{\"name\" : \"LeastRequestedPriority\",
       \"weight\" : 10},
      \n\t{\"name\" : \"BalancedResourceAllocation\",
       \"weight\" : 1},
      \n\t{\"name\" : \"ServiceSpreadingPriority\",
       \"weight\" : 1},
      \n\t{\"name\" : \"EqualPriority\",
       \"weight\" : 1},
      \n\t{\"name\" : \"labelPreference\",
       \"label\" : \"rack\",
       \"presence\" : \"true\",
       \"weight\" : 2},
      \n\t]\n}\n "
"{\n\"kind\" : \"Policy\",
     \n\"apiVersion\" : \"v1\",
     \n\"predicates\" : [\n\t{\"name\" : \"RegionZoneAffinity\",
      \"label\" : \"region\",
      \"label\" : \"zone\"}\n\t],
     \n\"priorities\" : [\n\t{\"name\" : \"serviceAntiAffinity\",
      \"label\" : \"rack\",
      \"weight\" : 1},
     \n\t]\n}\n"
"{\n\"kind\" : \"Policy\",
     \n\"apiVersion\" : \"v1\",
     \n\"predicates\" : [\n\t{\"name\" : \"serviceAffinityy\",
      \"label\" : \"city\"},
     \n\t],
     \n\"priorities\" : [\n\t{\"name\" : \"serviceAntiAffinity\",
      \"label\" : \"building\" \"weight\" : 1},
      \n\t{\"name\" : \"serviceAntiAffinity\",
      \"label\" : \"room\" \"weight\" : 1},
     \n\t]\n}\n"
"{\n\"kind\" : \"Policy\",
     \n\"apiVersion\" : \"v1\",
     \n\"predicates\" : [\n\t{\"name\" : \"labelsPresence\",
      \"label\" : \"region\",
      \"presence\" : \"true\"},
     \n\t],
     \n\"priorities\" : [\n\t{\"name\" : \"ZonePreferred\",
      \"label\" : \"zone\",
      \"presence\" : \"true\",
      \"weight\" : 1},
     \n\t]\n}\n"
"{\n\"kind\" : \"Policy\",
     \n\"apiVersion\" : \"v1\",
     \n\"predicates\" : [\n\t{\"name\" : \"labelsPresence\",
      \"label\" : \"building\",
      \"presence\" : \"true\"},
      \n\t{\"name\" : \"PodFitsHostPorts\"},
     \n\t{\"name\" : \"MatchNodeSelector\"},
     \n\t],
     \n\"priorities\" : [\n\t{\"name\" : \"ZonePreferred\",
      \"label\" : \"zone\",
      \"presence\" : \"true\",
      \"weight\" : 1},
     \n\t]\n}\n \"
Place pods relative to other pods using affinity and anti-affinity rules
Pod affinity
apiVersion: v1
kind: Pod
metadata:
  name: with-pod-affinity
spec:
  affinity:
    podAffinity: 1
      requiredDuringSchedulingIgnoredDuringExecution: 2
      - labelSelector:
  matchExpressions:
  - key: security 3
operator: In 4
values:
- S1 5
topologyKey: failure-domain.beta.kubernetes.io/zone
  containers:
  - name: with-pod-affinity
    image: docker.io/ocpqe/hello-pod
apiVersion: v1
kind: Pod
metadata:
  name: with-pod-antiaffinity
spec:
  affinity:
    podAntiAffinity: 1
      preferredDuringSchedulingIgnoredDuringExecution: 2
      - weight: 100  3
podAffinityTerm:
  labelSelector:
matchExpressions:
- key: security 4
  operator: In 5
  values:
  - S2
  topologyKey: kubernetes.io/hostname
  containers:
  - name: with-pod-affinity
    image: docker.io/ocpqe/hello-pod
Configure a pod affinity rule
$ cat team4.yaml
apiVersion: v1
kind:       Pod
metadata:
  name: security-s1
  labels:
    security: S1
spec:
  containers:
  - name: security-s1
    image: docker.io/ocpqe/hello-pod
    podAffinity:
      requiredDuringSchedulingIgnoredDuringExecution:
      - labelSelector:
  matchExpressions:
  - key: security
operator: In
values:
- S1
topologyKey: failure-domain.beta.kubernetes.io/zone
$ oc create -f <pod-spec>.yaml
Configure a pod anti-affinity rule
$ cat team4.yaml
apiVersion: v1
kind: Pod
metadata:
  name: security-s2
  labels:
    security: S2
spec:
  containers:
  - name: security-s2
    image: docker.io/ocpqe/hello-pod
    podAntiAffinity:
      preferredDuringSchedulingIgnoredDuringExecution:
      - weight: 100
podAffinityTerm:
  labelSelector:
matchExpressions:
- key: security
  operator: In
  values:
  - S2
  topologyKey: kubernetes.io/hostname
$ oc create -f <pod-spec>.yaml
Sample pod affinity and anti-affinity rules
Pod Affinity
$ cat team4.yaml
apiVersion: v1
kind: Pod
metadata:
  name: team4
  labels:
     team: "4"
spec:
  containers:
  - name: ocp
    image: docker.io/ocpqe/hello-pod
$ cat pod-team4a.yaml
apiVersion: v1
kind: Pod
metadata:
  name: team4a
spec:
  affinity:
    podAffinity:
      requiredDuringSchedulingIgnoredDuringExecution:
      - labelSelector:
  matchExpressions:
  - key: team
operator: In
values:
- "4"
topologyKey: kubernetes.io/hostname
  containers:
  - name: pod-affinity
    image: docker.io/ocpqe/hello-pod
Pod Anti-affinity
cat pod-s1.yaml
apiVersion: v1
kind: Pod
metadata:
  name: s1
  labels:
    security: s1
spec:
  containers:
  - name: ocp
    image: docker.io/ocpqe/hello-pod
cat pod-s2.yaml
apiVersion: v1
kind: Pod
metadata:
  name: pod-s2
spec:
  affinity:
    podAntiAffinity:
      requiredDuringSchedulingIgnoredDuringExecution:
      - labelSelector:
  matchExpressions:
  - key: security
operator: In
values:
- s1
topologyKey: kubernetes.io/hostname
  containers:
  - name: pod-antiaffinity
    image: docker.io/ocpqe/hello-pod
NAME      READY     STATUS    RESTARTS   AGE       IP        NODE
pod-s2    0/1       Pending   0          32s       <none>
Pod Affinity with no Matching Labels
$ cat pod-s1.yaml
apiVersion: v1
kind: Pod
metadata:
  name: pod-s1
  labels:
    security: s1
spec:
  containers:
  - name: ocp
    image: docker.io/ocpqe/hello-pod
$ cat pod-s2.yaml
apiVersion: v1
kind: Pod
metadata:
  name: pod-s2
spec:
  affinity:
    podAffinity:
      requiredDuringSchedulingIgnoredDuringExecution:
      - labelSelector:
  matchExpressions:
  - key: security
operator: In
values:
- s2
topologyKey: kubernetes.io/hostname
  containers:
  - name: pod-affinity
    image: docker.io/ocpqe/hello-pod
Control pod placement on nodes using node affinity rules
Node affinity
apiVersion: v1
kind: Pod
metadata:
  name: with-node-affinity
spec:
  affinity:
    nodeAffinity: 1
      requiredDuringSchedulingIgnoredDuringExecution: 2
nodeSelectorTerms:
- matchExpressions:
  - key: e2e-az-NorthSouth 3
operator: In 4
values:
- e2e-az-North 5
- e2e-az-South 6
  containers:
  - name: with-node-affinity
    image: docker.io/ocpqe/hello-pod
apiVersion: v1
kind: Pod
metadata:
  name: with-node-affinity
spec:
  affinity:
    nodeAffinity: 1
      preferredDuringSchedulingIgnoredDuringExecution: 2
      - weight: 1 3
preference:
  matchExpressions:
  - key: e2e-az-EastWest 4
operator: In 5
values:
- e2e-az-East 6
- e2e-az-West 7
  containers:
  - name: with-node-affinity
    image: docker.io/ocpqe/hello-pod
Configure a required node affinity rule
$ oc label node node1 e2e-az-name=e2e-az1
spec:
  affinity:
    nodeAffinity:
      requiredDuringSchedulingIgnoredDuringExecution:
nodeSelectorTerms:
- matchExpressions:
  - key: e2e-az-name
operator: In
values:
- e2e-az1
- e2e-az2$ oc create -f e2e-az2.yaml
Configure a Preferred Node Affinity Rule
$ oc label node node1 e2e-az-name=e2e-az3
spec:
  affinity:
    nodeAffinity:
      preferredDuringSchedulingIgnoredDuringExecution:
      - weight: 1
preference:
  matchExpressions:
  - key: e2e-az-name
operator: In
values:
- e2e-az3
$ oc create -f e2e-az3.yaml
Sample node affinity rules
Node Affinity with Matching Labels
$ oc label node node1 zone=us
$ cat pod-s1.yaml
apiVersion: v1
kind: Pod
metadata:
  name: pod-s1
spec:
  containers:
    - image: "docker.io/ocpqe/hello-pod"
      name: hello-pod
  affinity:
    nodeAffinity:
      requiredDuringSchedulingIgnoredDuringExecution:
nodeSelectorTerms:
  - matchExpressions:
- key: "zone"
  operator: In
  values:
  - us
$ oc get pod -o wide
NAME     READY     STATUS       RESTARTS   AGE      IP      NODE
pod-s1   1/1       Running      0          4m       IP1     node1
Node Affinity with No Matching Labels
$ oc label node node1 zone=emea
$ cat pod-s1.yaml
apiVersion: v1
kind: Pod
metadata:
  name: pod-s1
spec:
  containers:
    - image: "docker.io/ocpqe/hello-pod"
      name: hello-pod
  affinity:
    nodeAffinity:
      requiredDuringSchedulingIgnoredDuringExecution:
nodeSelectorTerms:
  - matchExpressions:
- key: "zone"
  operator: In
  values:
  - us
$ oc describe pod pod-s1
<---snip--->
Events:
 FirstSeen LastSeen Count From              SubObjectPath  Type                Reason
 --------- -------- ----- ----              -------------  --------            ------
 1m        33s      8     default-scheduler Warning        FailedScheduling    No nodes are available that match all of the following predicates:: MatchNodeSelector (1).
Place pods onto overcommited nodes
Overcommitment
Nodes overcommitment
$ sysctl -a |grep commit

vm.overcommit_memory = 1
$ sysctl -a |grep panic
vm.panic_on_oom = 0
Control pod placement using node taints
Taints and tolerations
Parameter
Description
key
The key is any string, up to 253 characters. The key must begin with a letter or number, and may contain letters, numbers, hyphens, dots, and underscores.
value
The value is any string, up to 63 characters. The value must begin with a letter or number, and may contain letters, numbers, hyphens, dots, and underscores.
effect
The effect is one of the following:
NoSchedule
PreferNoSchedule
NoExecute
operator
Equal
The key/value/effect parameters must match. This is the default.
Exists
The key/effect parameters must match. Leave a blank value parameter, which matches any.
Use toleration seconds to delay pod evictions
tolerations:
- key: "key1"
  operator: "Equal"
  value: "value1"
  effect: "NoExecute"
  tolerationSeconds: 3600
Use multiple taints
$ oc adm taint nodes node1 key1=value1:NoSchedule
$ oc adm taint nodes node1 key1=value1:NoExecute
$ oc adm taint nodes node1 key2=value2:NoSchedule
tolerations:
- key: "key1"
  operator: "Equal"
  value: "value1"
  effect: "NoSchedule"
- key: "key1"
  operator: "Equal"
  value: "value1"
  effect: "NoExecute"
Preventing pod eviction for node problems
Pod scheduling and node conditions (Taint Node by Condition)
Evict pods by condition (Taint-Based Evictions)
spec
  tolerations:
    - key: node.kubernetes.io/not-ready
      operator: Exists
      effect: NoExecute
      tolerationSeconds: 300
    - key: node.kubernetes.io/unreachable
      operator: Exists
      effect: NoExecute
      tolerationSeconds: 300
Add taints and tolerations
$ oc adm taint nodes <node-name> <key>=<value>:<effect>
$ oc adm taint nodes node1 key1=value1:NoSchedule
tolerations:
- key: "key1" 1
  operator: "Equal" 2
  value: "value1" 3
  effect: "NoExecute" 4
  tolerationSeconds: 3600 5
tolerations:
- key: "key1"
  operator: "Exists"
  effect: "NoExecute"
  tolerationSeconds: 3600
Dedicating a Node for a User using taints and tolerations
Binding a user to a Node using taints and tolerations
$ oc adm taint nodes node1 dedicated=groupName:NoSchedule
Control Nodes with special hardware using taints and tolerations
$ oc adm taint nodes <node-name> disktype=ssd:NoSchedule
$ oc adm taint nodes <node-name> disktype=ssd:PreferNoSchedule
Remove taints and tolerations
$ oc adm taint nodes <node-name> <key>-
$ oc adm taint nodes ip-10-0-132-248.ec2.internal key1-

node/ip-10-0-132-248.ec2.internal untainted
tolerations:
- key: "key2"
  operator: "Exists"
  effect: "NoExecute"
  tolerationSeconds: 3600
Place pods on specific nodes using node selectors
Use node selectors to control pod placement
apiVersion: v1
kind: Pod
spec:
  nodeSelector:
    <key>: <value>
...
apiVersion: v1
kind: Pod

....

spec:
  nodeSelector:
    region: east
    type: user-node
$ oc label <resource> <name> <key>=<value>
$ oc label nodes ip-10-0-142-25.ec2.internal type=user-node region=east
$ oc label MachineSet abc612-msrtw-worker-us-east-1c type=user-node region=east
kind: Node
apiVersion: v1
metadata:
  name: ip-10-0-131-14.ec2.internal
  selfLink: /api/v1/nodes/ip-10-0-131-14.ec2.internal
  uid: 7bc2580a-8b8e-11e9-8e01-021ab4174c74
  resourceVersion: '478704'
  creationTimestamp: '2019-06-10T14:46:08Z'
  labels:
    beta.kubernetes.io/os: linux
    failure-domain.beta.kubernetes.io/zone: us-east-1a
    node.openshift.io/os_version: '4.1'
    node-role.kubernetes.io/worker: ''
    failure-domain.beta.kubernetes.io/region: us-east-1
    node.openshift.io/os_id: rhcos
    beta.kubernetes.io/instance-type: m4.large
    kubernetes.io/hostname: ip-10-0-131-14
    region: east 1
    beta.kubernetes.io/arch: amd64
    type: user-node 2
....
Create default cluster-wide node selectors
spec:
  nodeSelector:
    region: east
    type: user-node
spec:
  nodeSelector:
    region: west
$ oc edit scheduler cluster
apiVersion: config.openshift.io/v1
kind: Scheduler
metadata:
  name: cluster
spec: {}
  policy:
spec:
  defaultNodeSelector: type=user-node,region=east 1
$ oc label <resource> <name> <key>=<value>
$ oc label nodes ip-10-0-142-25.ec2.internal type=user-node region=east
$ oc label MachineSet abc612-msrtw-worker-us-east-1c type=user-node region=east
spec:
  nodeSelector:
    region: east
    type: user-node
Create project-wide node selectors
spec:
  nodeSelector:
    region: east
    type: user-node
spec:
  nodeSelector:
    region: west
$ oc edit namespace <name>
apiVersion: v1
kind: Namespace
metadata:
  annotations:
    openshift.io/node-selector: "type=user-node,region=east" 1
    openshift.io/sa.scc.mcs: s0:c17,c14
    openshift.io/sa.scc.supplemental-groups: 1000300000/10000
    openshift.io/sa.scc.uid-range: 1000300000/10000
  creationTimestamp: 2019-06-10T14:39:45Z
  labels:
    openshift.io/run-level: "0"
  name: demo
  resourceVersion: "401885"
  selfLink: /api/v1/namespaces/openshift-kube-apiserver
  uid: 96ecc54b-8b8d-11e9-9f54-0a9ae641edd0
spec:
  finalizers:
  - kubernetes
status:
  phase: Active
$ oc label <resource> <name> <key>=<value>
$ oc label nodes ip-10-0-142-25.ec2.internal type=user-node region=east
$ oc label MachineSet abc612-msrtw-worker-us-east-1c type=user-node region=east
spec:
  nodeSelector:
    region: east
    type: user-node
Use Jobs and DaemonSets
Run background tasks on nodes automatically with daemonsets
Scheduled by default scheduler
Create daemonsets
$ oc patch namespace myproject -p \
    '{"metadata": {"annotations": {"openshift.io/node-selector": ""}}}'
apiVersion: extensions/v1beta1
kind: DaemonSet
metadata:
  name: hello-daemonset
spec:
  selector:
      matchLabels:
name: hello-daemonset 1
  template:
    metadata:
      labels:
name: hello-daemonset 2
    spec:
      nodeSelector: 3
role: worker
      containers:
      - image: openshift/hello-openshift
imagePullPolicy: Always
name: registry
ports:
- containerPort: 80
  protocol: TCP
resources: {}
terminationMessagePath: /dev/termination-log
      serviceAccount: default
      terminationGracePeriodSeconds: 10
$ oc create -f daemonset.yaml
$ oc get pods
hello-daemonset-cx6md   1/1       Running   0          2m
hello-daemonset-e3md9   1/1       Running   0          2m
$ oc describe pod/hello-daemonset-cx6md|grep Node
Node:        openshift-node01.hostname.com/10.14.20.134
$ oc describe pod/hello-daemonset-e3md9|grep Node
Node:        openshift-node02.hostname.com/10.14.20.137
Running tasks in pods using jobs
Jobs and CronJobs
Create jobs
Set a maximum duration for jobs
Set a job back off policy for pod failure
Configure a CronJob to remove artifacts
$ oc delete cronjob/<cron_job_name>
Known limitations
Create jobs
apiVersion: batch/v1
kind: Job
metadata:
  name: pi
spec:
  parallelism: 1    1
  completions: 1    2
  activeDeadlineSeconds: 1800 3
  backoffLimit: 6   4
  template:         5
    metadata:
      name: pi
    spec:
      containers:
      - name: pi
image: perl
command: ["perl",  "-Mbignum=bpi", "-wle", "print bpi(2000)"]
      restartPolicy: OnFailure    6
$ oc create -f <file-name>.yaml
$ oc run pi --image=perl --replicas=1  --restart=OnFailure \
    --command -- perl -Mbignum=bpi -wle 'print bpi(2000)'
Create CronJobs
apiVersion: batch/v1beta1
kind: CronJob
metadata:
  name: pi
spec:
  schedule: "*/1 * * * *"  1
  concurrencyPolicy: "Replace" 2
  startingDeadlineSeconds: 200 3
  suspend: true            4
  successfulJobsHistoryLimit: 3 5
  failedJobsHistoryLimit: 1     6
  jobTemplate:             7
    spec:
      template:
metadata:
  labels:          8
parent: "cronjobpi"
spec:
  containers:
  - name: pi
image: perl
command: ["perl",  "-Mbignum=bpi", "-wle", "print bpi(2000)"]
  restartPolicy: OnFailure 9
$ oc create -f <file-name>.yaml
$ oc run pi --image=perl --schedule='*/1 * * * *' \
    --restart=OnFailure --labels parent="cronjobpi" \
    --command -- perl -Mbignum=bpi -wle 'print bpi(2000)'
Work with nodes
List nodes in the cluster
$ oc get nodes

NAME                   STATUS    ROLES     AGE       VERSION
master.example.com     Ready     master    7h        v1.13.4+b626c2fe1
node1.example.com      Ready     worker    7h        v1.13.4+b626c2fe1
node2.example.com      Ready     worker    7h        v1.13.4+b626c2fe1
$ oc get nodes -o wide
$ oc get node <node>
Condition
Description
Ready
The node reports its own readiness to the apiserver by returning True.
NotReady
One of the underlying components, such as the container runtime or network, is experiencing issues or is not yet configured.
SchedulingDisabled
Pods cannot be scheduled for placement on the node.
$ oc describe node <node>
$ oc describe node node1.example.com

Name:               node1.example.com 1
Roles:              worker 2
Labels:             beta.kubernetes.io/arch=amd64   3
beta.kubernetes.io/instance-type=m4.large
beta.kubernetes.io/os=linux
failure-domain.beta.kubernetes.io/region=us-east-2
failure-domain.beta.kubernetes.io/zone=us-east-2a
kubernetes.io/hostname=ip-10-0-140-16
node-role.kubernetes.io/worker=
Annotations:        cluster.k8s.io/machine: openshift-machine-api/ahardin-worker-us-east-2a-q5dzc  4
machineconfiguration.openshift.io/currentConfig: worker-309c228e8b3a92e2235edd544c62fea8
machineconfiguration.openshift.io/desiredConfig: worker-309c228e8b3a92e2235edd544c62fea8
machineconfiguration.openshift.io/state: Done
volumes.kubernetes.io/controller-managed-attach-detach: true
CreationTimestamp:  Wed, 13 Feb 2019 11:05:57 -0500
Taints:             <none>  5
Unschedulable:      false
Conditions:                 6
  Type             Status  LastHeartbeatTime                 LastTransitionTime                Reason                       Message
  ----             ------  -----------------                 ------------------                ------                       -------
  OutOfDisk        False   Wed, 13 Feb 2019 15:09:42 -0500   Wed, 13 Feb 2019 11:05:57 -0500   KubeletHasSufficientDisk     kubelet has sufficient disk space available
  MemoryPressure   False   Wed, 13 Feb 2019 15:09:42 -0500   Wed, 13 Feb 2019 11:05:57 -0500   KubeletHasSufficientMemory   kubelet has sufficient memory available
  DiskPressure     False   Wed, 13 Feb 2019 15:09:42 -0500   Wed, 13 Feb 2019 11:05:57 -0500   KubeletHasNoDiskPressure     kubelet has no disk pressure
  PIDPressure      False   Wed, 13 Feb 2019 15:09:42 -0500   Wed, 13 Feb 2019 11:05:57 -0500   KubeletHasSufficientPID      kubelet has sufficient PID available
  Ready            True    Wed, 13 Feb 2019 15:09:42 -0500   Wed, 13 Feb 2019 11:07:09 -0500   KubeletReady                 kubelet is posting ready status
Addresses:   7
  InternalIP:   10.0.140.16
  InternalDNS:  ip-10-0-140-16.us-east-2.compute.internal
  Hostname:     ip-10-0-140-16.us-east-2.compute.internal
Capacity:    8
 attachable-volumes-aws-ebs:  39
 cpu:                         2
 hugepages-1Gi:               0
 hugepages-2Mi:               0
 memory:                      8172516Ki
 pods:                        250
Allocatable:
 attachable-volumes-aws-ebs:  39
 cpu:                         1500m
 hugepages-1Gi:               0
 hugepages-2Mi:               0
 memory:                      7558116Ki
 pods:                        250
System Info:    9
 Machine ID:                              63787c9534c24fde9a0cde35c13f1f66
 System UUID:                             EC22BF97-A006-4A58-6AF8-0A38DEEA122A
 Boot ID:                                 f24ad37d-2594-46b4-8830-7f7555918325
 Kernel Version:                          3.10.0-957.5.1.el7.x86_64
 OS Image:                                Red Hat Enterprise Linux CoreOS 410.8.20190520.0 (Ootpa)
 Operating System:                        linux
 Architecture:                            amd64
 Container Runtime Version:               cri-o://1.13.9-1.rhaos4.1.gitd70609a.el8
 Kubelet Version:                         v1.13.4+b626c2fe1
 Kube-Proxy Version:                      v1.13.4+b626c2fe1
PodCIDR:                                  10.128.4.0/24
ProviderID:                               aws:///us-east-2a/i-04e87b31dc6b3e171
Non-terminated Pods:                      (13 in total)  10
  Namespace                               Name                                   CPU Requests  CPU Limits  Memory Requests  Memory Limits
  ---------                               ----                                   ------------  ----------  ---------------  -------------
  openshift-cluster-node-tuning-operator  tuned-hdl5q                            0 (0%)        0 (0%)      0 (0%)           0 (0%)
  openshift-dns                           dns-default-l69zr                      0 (0%)        0 (0%)      0 (0%)           0 (0%)
  openshift-image-registry                node-ca-9hmcg                          0 (0%)        0 (0%)      0 (0%)           0 (0%)
  openshift-ingress                       router-default-76455c45c-c5ptv         0 (0%)        0 (0%)      0 (0%)           0 (0%)
  openshift-machine-config-operator       machine-config-daemon-cvqw9            20m (1%)      0 (0%)      50Mi (0%)        0 (0%)
  openshift-marketplace                   community-operators-f67fh              0 (0%)        0 (0%)      0 (0%)           0 (0%)
  openshift-monitoring                    alertmanager-main-0                    50m (3%)      50m (3%)    210Mi (2%)       10Mi (0%)
  openshift-monitoring                    grafana-78765ddcc7-hnjmm               100m (6%)     200m (13%)  100Mi (1%)       200Mi (2%)
  openshift-monitoring                    node-exporter-l7q8d                    10m (0%)      20m (1%)    20Mi (0%)        40Mi (0%)
  openshift-monitoring                    prometheus-adapter-75d769c874-hvb85    0 (0%)        0 (0%)      0 (0%)           0 (0%)
  openshift-multus                        multus-kw8w5                           0 (0%)        0 (0%)      0 (0%)           0 (0%)
  openshift-sdn                           ovs-t4dsn                              100m (6%)     0 (0%)      300Mi (4%)       0 (0%)
  openshift-sdn                           sdn-g79hg                              100m (6%)     0 (0%)      200Mi (2%)       0 (0%)
Allocated resources:
  (Total limits may be over 100 percent, i.e., overcommitted.)
  Resource                    Requests     Limits
  --------                    --------     ------
  cpu                         380m (25%)   270m (18%)
  memory                      880Mi (11%)  250Mi (3%)
  attachable-volumes-aws-ebs  0            0
Events:     11
  Type     Reason                   Age                From                      Message
  ----     ------                   ----               ----                      -------
  Normal   NodeHasSufficientPID     6d (x5 over 6d)    kubelet, m01.example.com  Node m01.example.com status is now: NodeHasSufficientPID
  Normal   NodeAllocatableEnforced  6d                 kubelet, m01.example.com  Updated Node Allocatable limit across pods
  Normal   NodeHasSufficientMemory  6d (x6 over 6d)    kubelet, m01.example.com  Node m01.example.com status is now: NodeHasSufficientMemory
  Normal   NodeHasNoDiskPressure    6d (x6 over 6d)    kubelet, m01.example.com  Node m01.example.com status is now: NodeHasNoDiskPressure
  Normal   NodeHasSufficientDisk    6d (x6 over 6d)    kubelet, m01.example.com  Node m01.example.com status is now: NodeHasSufficientDisk
  Normal   NodeHasSufficientPID     6d                 kubelet, m01.example.com  Node m01.example.com status is now: NodeHasSufficientPID
  Normal   Starting                 6d                 kubelet, m01.example.com  Starting kubelet.
 ...
List pods on a node in the cluster
$ oc describe node <node1> <node2>
$ oc describe node ip-10-0-128-218.ec2.internal
$ oc describe --selector=<node_selector>
$ oc describe -l=<pod_selector>
$ oc describe node  --selector=beta.kubernetes.io/os
$ oc describe node -l node-role.kubernetes.io/worker
View memory and CPU usage statistics on your nodes
$ oc adm top nodes

NAME                                   CPU(cores)   CPU%      MEMORY(bytes)   MEMORY%
ip-10-0-12-143.ec2.compute.internal    1503m        100%      4533Mi          61%
ip-10-0-132-16.ec2.compute.internal    76m          5%        1391Mi          18%
ip-10-0-140-137.ec2.compute.internal   398m         26%       2473Mi          33%
ip-10-0-142-44.ec2.compute.internal    656m         43%       6119Mi          82%
ip-10-0-146-165.ec2.compute.internal   188m         12%       3367Mi          45%
ip-10-0-19-62.ec2.compute.internal     896m         59%       5754Mi          77%
ip-10-0-44-193.ec2.compute.internal    632m         42%       5349Mi          72%
$ oc adm top node --selector=''
Work with nodes
Understand how to evacuate pods on nodes
$ oc adm cordon <node1>
NAME        STATUS                        ROLES     AGE       VERSION
<node1>     NotReady,SchedulingDisabled   worker   1d        v1.13.4+b626c2fe1
$ oc adm uncordon <node1>
$ oc adm drain <node1> <node2> [--pod-selector=<pod_selector>]
$ oc adm drain <node1> <node2> --force=true
$ oc adm drain <node1> <node2> --grace-period=-1
$ oc adm drain <node1> <node2> --ignore-daemonsets=true
$ oc adm drain <node1> <node2> --timeout=5s
$ oc adm drain <node1> <node2> --delete-local-data=true
$ oc adm drain <node1> <node2> --dry-run=true
Update labels on nodes
$ oc label node <node> <key_1>=<value_1> ... <key_n>=<value_n>
$ oc label nodes webconsole-7f7f6 unhealthy=true
$ oc label pods --all <key_1>=<value_1>
$ oc label pods --all status=unhealthy
Mark nodes as unschedulable or schedulable
$ oc adm cordon <node>
$ oc adm cordon node1.example.com
node/node1.example.com cordoned

NAME                 LABELS                                        STATUS
node1.example.com    kubernetes.io/hostname=node1.example.com      Ready,SchedulingDisabled
$ oc adm uncordon <node1>
Delete nodes from a cluster
$ oc get machinesets -n openshift-machine-api
$ oc scale --replicas=2 machineset <machineset> -n openshift-machine-api
Manage Nodes
Modify Nodes
$  oc get machineconfigpool  --show-labels
NAME      CONFIG                                             UPDATED   UPDATING   DEGRADED   LABELS
master    rendered-master-e05b81f5ca4db1d249a1bf32f9ec24fd   True      False      False      operator.machineconfiguration.openshift.io/required-for-upgrade=
worker    rendered-worker-f50e78e1bc06d8e82327763145bfcf62   True      False      False
$ oc label machineconfigpool worker custom-kubelet=enabled
apiVersion: machineconfiguration.openshift.io/v1
kind: KubeletConfig
metadata:
  name: custom-config 1
spec:
  machineConfigPoolSelector:
    matchLabels:
      custom-kubelet: enabled 2
  kubeletConfig: 3
    podsPerCore: 10
    maxPods: 250
    systemReserved:
      cpu: 1000m
      memory: 500Mi
    kubeReserved:
      cpu: 1000m
      memory: 500Mi
$ oc create -f <file-name>
$ oc create -f master-kube-config.yaml
Manage the maximum number of Pods per Node
Configure the maximum number of Pods per Node
$ oc describe machineconfigpool <name>
$ oc describe machineconfigpool worker

apiVersion: machineconfiguration.openshift.io/v1
kind: MachineConfigPool
metadata:
  creationTimestamp: 2019-02-08T14:52:39Z
  generation: 1
  labels:
    custom-kubelet: small-pods 1
$ oc label machineconfigpool worker custom-kubelet=small-pods
apiVersion: machineconfiguration.openshift.io/v1
kind: KubeletConfig
metadata:
  name: set-max-pods 1
spec:
  machineConfigPoolSelector:
    matchLabels:
      custom-kubelet: small-pods 2
  kubeletConfig:
    podsPerCore: 10 3
    maxPods: 250 4
$ oc get machineconfigpools
NAME     CONFIG                        UPDATED   UPDATING   DEGRADED
master   master-9cc2c72f205e103bb534   False     False      False
worker   worker-8cecd1236b33ee3f8a5e   False     True       False
$ oc get machineconfigpools
NAME     CONFIG                        UPDATED   UPDATING   DEGRADED
master   master-9cc2c72f205e103bb534   False     True       False
worker   worker-8cecd1236b33ee3f8a5e   True      False      False
Use the Node Tuning Operator
About the Node Tuning Operator
Access an example Node Tuning Operator specification
$ oc get Tuned/default -o yaml -n openshift-cluster-node-tuning-operator
Custom tuning specification
profile:
- name: tuned_profile_1
  data: |
    # Tuned profile specification
    [main]
    summary=Description of tuned_profile_1 profile

    [sysctl]
    net.ipv4.ip_forward=1
    # ... other sysctl's or other tuned daemon plugins supported by the containerized tuned

# ...

- name: tuned_profile_n
  data: |
    # Tuned profile specification
    [main]
    summary=Description of tuned_profile_n profile

    # tuned_profile_n profile settings
recommend:
- match:                              # optional; if omitted, profile match is assumed unless a profile with a higher matches first
  <match>                             # an optional array
  priority: <priority>                # profile ordering priority, lower numbers mean higher priority (0 is the highest priority)
  profile: <tuned_profile_name>       # e.g. tuned_profile_1

# ...

- match:
  <match>
  priority: <priority>
  profile: <tuned_profile_name>       # e.g. tuned_profile_n
- label: <label_name>     # node or pod label name
  value: <label_value>    # optional node or pod label value; if omitted, the presence of <label_name> is enough to match
  type: <label_type>      # optional node or pod type ("node" or "pod"); if omitted, "node" is assumed
  <match>                 # an optional <match> array
- match:
  - label: tuned.openshift.io/elasticsearch
    match:
    - label: node-role.kubernetes.io/master
    - label: node-role.kubernetes.io/infra
    type: pod
  priority: 10
  profile: openshift-control-plane-es
- match:
  - label: node-role.kubernetes.io/master
  - label: node-role.kubernetes.io/infra
  priority: 20
  profile: openshift-control-plane
- priority: 30
  profile: openshift-node
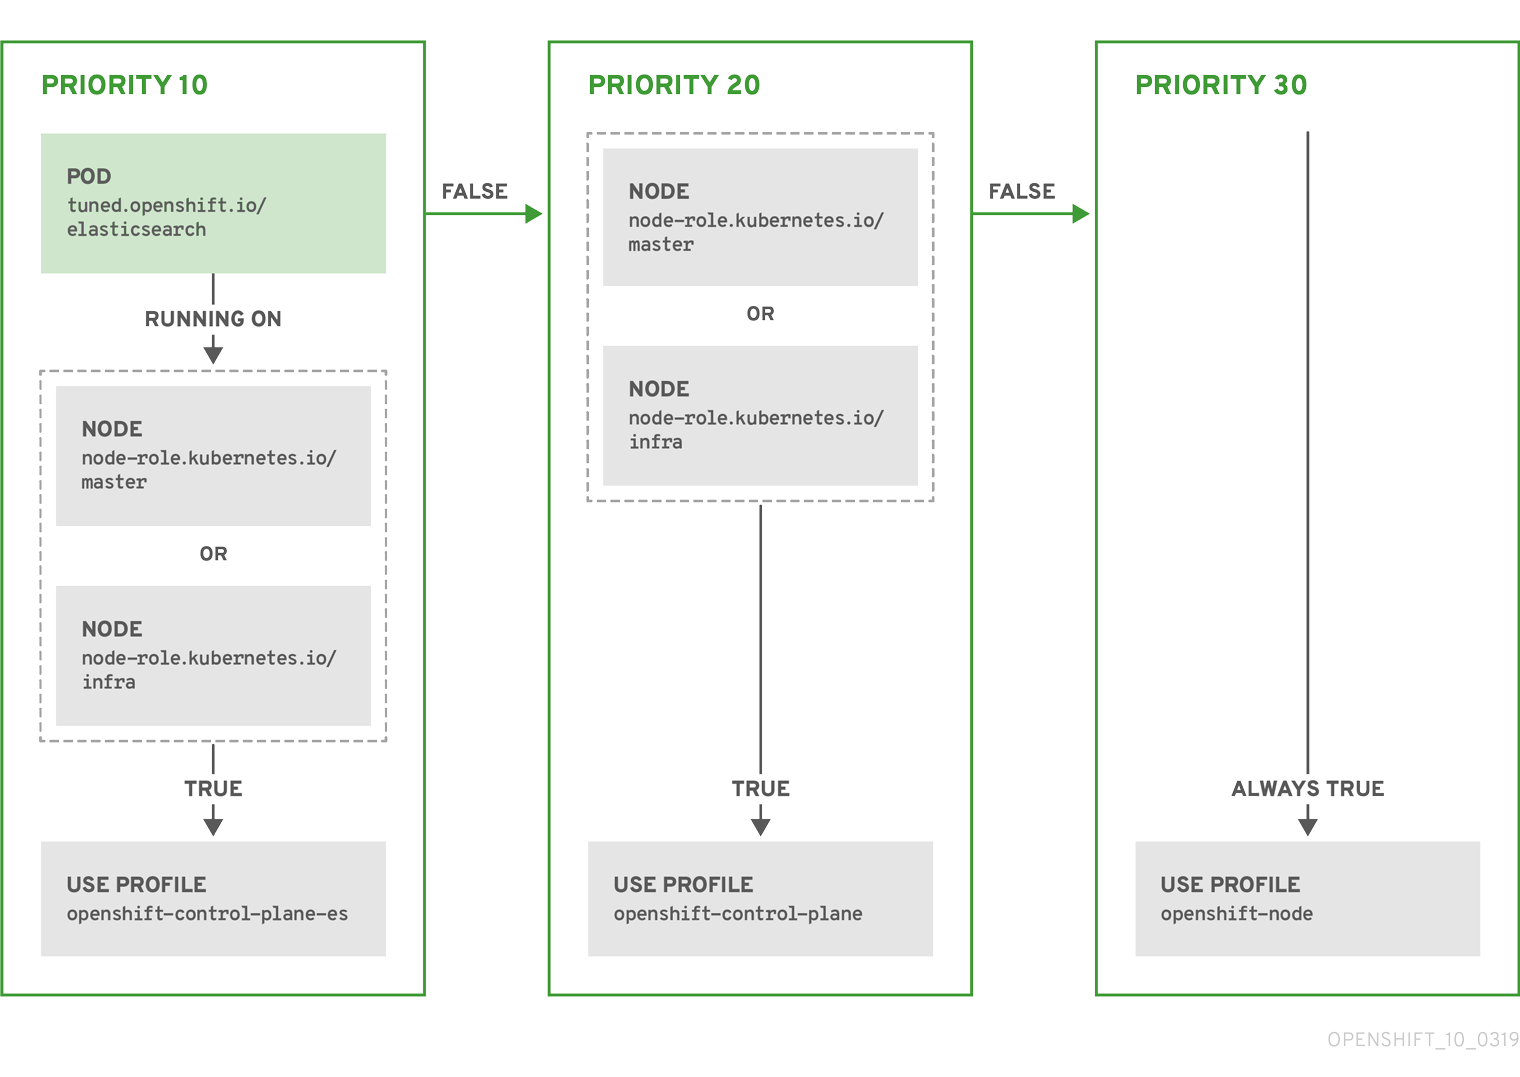
Default profiles set on a cluster
apiVersion: tuned.openshift.io/v1alpha1
kind: Tuned
metadata:
  name: default
  namespace: openshift-cluster-node-tuning-operator
spec:
  profile:
  - name: "openshift"
    data: |
      [main]
      summary=Optimize systems running OpenShift (parent profile)
      include=${f:virt_check:virtual-guest:throughput-performance}
      [selinux]
      avc_cache_threshold=8192
      [net]
      nf_conntrack_hashsize=131072
      [sysctl]
      net.ipv4.ip_forward=1
      kernel.pid_max=>131072
      net.netfilter.nf_conntrack_max=1048576
      net.ipv4.neigh.default.gc_thresh2=8192
      net.ipv4.neigh.default.gc_thresh3=32768
      net.ipv4.neigh.default.gc_thresh4=65536
      net.ipv6.neigh.default.gc_thresh2=8192
      net.ipv6.neigh.default.gc_thresh3=32768
      net.ipv6.neigh.default.gc_thresh4=65536
      [sysfs]
      /sys/module/nvme_core/parameters/io_timeout=4294967295
      /sys/module/nvme_core/parameters/max_retries=10
  - name: "openshift-control-plane"
    data: |
      [main]
      summary=Optimize systems running OpenShift control plane
      include=openshift
      [sysctl]
      # ktune sysctl settings, maximizing i/o throughput
      #
      # Minimal preemption granularity for CPU-bound tasks:
      # (default: 1 msec#  (1 + ilog(ncpus)), units: nanoseconds)
      kernel.sched_min_granularity_ns=10000000
      # The total time the scheduler will consider a migrated process
      # "cache hot" and thus less likely to be re-migrated
      # (system default is 500000, i.e. 0.5 ms)
      kernel.sched_migration_cost_ns=5000000
      # SCHED_OTHER wake-up granularity.
      #
      # Preemption granularity when tasks wake up.  Lower the value to
      # improve wake-up latency and throughput for latency critical tasks.
      kernel.sched_wakeup_granularity_ns=4000000
  - name: "openshift-node"
    data: |
      [main]
      summary=Optimize systems running OpenShift nodes
      include=openshift
      [sysctl]
      net.ipv4.tcp_fastopen=3
      fs.inotify.max_user_watches=65536
  - name: "openshift-control-plane-es"
    data: |
      [main]
      summary=Optimize systems running ES on OpenShift control-plane
      include=openshift-control-plane
      [sysctl]
      vm.max_map_count=262144
  - name: "openshift-node-es"
    data: |
      [main]
      summary=Optimize systems running ES on OpenShift nodes
      include=openshift-node
      [sysctl]
      vm.max_map_count=262144
  recommend:
  - profile: "openshift-control-plane-es"
    priority: 10
    match:
    - label: "tuned.openshift.io/elasticsearch"
      type: "pod"
      match:
      - label: "node-role.kubernetes.io/master"
      - label: "node-role.kubernetes.io/infra"

  - profile: "openshift-node-es"
    priority: 20
    match:
    - label: "tuned.openshift.io/elasticsearch"
      type: "pod"

  - profile: "openshift-control-plane"
    priority: 30
    match:
    - label: "node-role.kubernetes.io/master"
    - label: "node-role.kubernetes.io/infra"

  - profile: "openshift-node"
priority: 40
Supported Tuned daemon plug-ins
Node rebooting
Infrastructure node rebooting
Reboot a node using pod anti-affinity
apiVersion: v1
kind: Pod
metadata:
  name: with-pod-antiaffinity
spec:
  affinity:
    podAntiAffinity: 1
      preferredDuringSchedulingIgnoredDuringExecution: 2
      - weight: 100 3
podAffinityTerm:
  labelSelector:
matchExpressions:
- key: registry 4
  operator: In 5
  values:
  - default
  topologyKey: kubernetes.io/hostname
Reboot nodes running routers
Freeing node resources using garbage collection
Terminated containers removed though garbage collection
How images are removed though garbage collection
Set
Description
imageMinimumGCAge
The minimum age for an unused image before the image is removed by garbage collection. The default is 2m.
imageGCHighThresholdPercent
The percent of disk usage, expressed as an integer, which triggers image garbage collection. The default is 85.
imageGCLowThresholdPercent
The percent of disk usage, expressed as an integer, to which image garbage collection attempts to free. The default is 80.
Configure garbage collection for containers and images
$ oc describe machineconfigpool <name>
$ oc describe machineconfigpool worker

apiVersion: machineconfiguration.openshift.io/v1
kind: MachineConfigPool
metadata:
  creationTimestamp: 2019-02-08T14:52:39Z
  generation: 1
  labels:
    custom-kubelet: small-pods 1
$ oc label machineconfigpool worker custom-kubelet=small-pods
apiVersion: machineconfiguration.openshift.io/v1
kind: KubeletConfig
metadata:
  name: worker-kubeconfig 1
spec:
  machineConfigPoolSelector:
    matchLabels:
      custom-kubelet: small-pods 2
  kubeletConfig:
    evictionSoft: 3
    evictionSoft:
      memory.available: "500Mi" 4
      nodefs.available: "10%"
      nodefs.inodesFree: "5%"
      imagefs.available: "15%"
      imagefs.inodesFree: "10%"
    evictionSoftGracePeriod:  5
      memory.available: "1m30s"
      nodefs.available: "1m30s"
      nodefs.inodesFree: "1m30s"
      imagefs.available: "1m30s"
      imagefs.inodesFree: "1m30s"
    evictionHard:
      memory.available: "200Mi"
      nodefs.available: "5%"
      nodefs.inodesFree: "4%"
      imagefs.available: "10%"
      imagefs.inodesFree: "5%"
    evictionPressureTransitionPeriod: 0s 6
    imageMinimumGCAge: 5m 7
    imageGCHighThresholdPercent: 80 8
    imageGCLowThresholdPercent: 75 9
$ oc create -f <file-name>.yaml
oc create -f gc-container.yaml

kubeletconfig.machineconfiguration.openshift.io/gc-container created
$ oc get machineconfigpool

NAME     CONFIG                                   UPDATED   UPDATING
master   rendered-master-546383f80705bd5aeaba93   True      False
worker   rendered-worker-b4c51bb33ccaae6fc4a6a5   False     True
Allocate resources for nodes in an OpenShift cluster
How to allocate resources for nodes
Set
Description
kube-reserved
Resources reserved for node components. Default is none.
system-reserved
Resources reserved for the remaining system components. Default is none.
How OpenShift computes allocated resources
[Allocatable] = [Node Capacity] - [kube-reserved] - [system-reserved] - [Hard-Eviction-Thresholds]
How nodes enforce resource constraints
Eviction Thresholds
How the scheduler determines resource availability
Configure allocated resources for nodes
$ curl <certificate details> https://<master>/api/v1/nodes/<node-name>/proxy/stats/summary
$ curl <certificate details> https://<master>/api/v1/nodes/cluster.node22/proxy/stats/summary
{
    "node": {
"nodeName": "cluster.node22",
"systemContainers": [
{
    "cpu": {
"usageCoreNanoSeconds": 929684480915,
"usageNanoCores": 190998084
    },
    "memory": {
"rssBytes": 176726016,
"usageBytes": 1397895168,
"workingSetBytes": 1050509312
    },
    "name": "kubelet"
},
{
    "cpu": {
"usageCoreNanoSeconds": 128521955903,
"usageNanoCores": 5928600
    },
    "memory": {
"rssBytes": 35958784,
"usageBytes": 129671168,
"workingSetBytes": 102416384
    },
    "name": "runtime"
}
]
    }
}
$ oc describe machineconfigpool <name>
$ oc describe machineconfigpool worker

apiVersion: machineconfiguration.openshift.io/v1
kind: MachineConfigPool
metadata:
  creationTimestamp: 2019-02-08T14:52:39Z
  generation: 1
  labels:
    custom-kubelet: small-pods 1
$ oc label machineconfigpool worker custom-kubelet=small-pods
apiVersion: machineconfiguration.openshift.io/v1
kind: KubeletConfig
metadata:
  name: set-allocatable 1
spec:
  machineConfigPoolSelector:
    matchLabels:
      custom-kubelet: small-pods 2
  kubeletConfig:
    systemReserved:
      cpu: 500m
      memory: 512Mi
    kubeReserved:
      cpu: 500m
      memory: 512Mi
Advertising hidden resources for nodes in an OpenShift cluster
Opaque resources
Create Opaque Integer Resources
PATCH /api/v1/nodes/openshift-node-1/status HTTP/1.1
Accept: application/json
Content-Type: application/json-patch+json
Host: openshift-master:8080

[
  {
    "op": "add",
    "path": "/status/capacity/pod.alpha.kubernetes.io~1opaque-int-resource-foo",
    "value": "5"
  }
]
Consume Opaque Integer Resources
apiVersion: v1
kind: Pod
metadata:
  name: my-pod
spec:
  containers:
  - name: my-container
    image: myimage
    resources:
      requests:
cpu: 2
pod.alpha.kubernetes.io/opaque-int-resource-foo: 1
Conditions:
  Type    Status
  PodScheduled  False
...
Events:
  FirstSeen  LastSeen   Count   From          SubObjectPath Type      Reason        Message
  ---------  --------   -----   ----          ------------- --------  ------        -------
  14s        0s     6   default-scheduler       Warning   FailedScheduling  No nodes are available that match all of the following predicates:: Insufficient pod.alpha.kubernetes.io/opaque-int-resource-foo (1).
View node audit logs
About the API Audit Log
ip-10-0-140-97.ec2.internal
    {
        "kind":"Event",
        "apiVersion":"audit.k8s.io/v1beta1",
        "metadata":{"creationTimestamp":"2019-04-09T19:56:58Z"},
        "level":"Metadata",
        "timestamp":"2019-04-09T19:56:58Z",
        "auditID":"6e96c88b-ab6f-44d2-b62e-d1413efd676b",
        "stage":"ResponseComplete",
        "requestURI":"/api/v1/nodes/audit-2019-04-09T14-07-27.129.log",
        "verb":"get",
        "user":{"username":"kube:admin",
        "groups":["system:cluster-admins",
        "system:authenticated"],
        "extra":{"scopes.authorization.openshift.io":["user:full"]}},
        "sourceIPs":["10.0.57.93"],
        "userAgent":"oc/v1.13.4+b626c2fe1 (linux/amd64) kubernetes/ba88cb2",
        "objectRef":{"resource":"nodes",
        "name":"audit-2019-04-09T14-07-27.129.log",
        "apiVersion":"v1"},
        "responseStatus":{"metadata":{},
        "status":"Failure",
        "reason":"NotFound",
        "code":404},
        "requestReceivedTimestamp":"2019-04-09T19:56:58.982157Z",
        "stageTimestamp":"2019-04-09T19:56:58.985300Z",
        "annotations":{"authorization.k8s.io/decision":"allow",
        "authorization.k8s.io/reason":"RBAC: allowed by ClusterRoleBinding \"cluster-admins\" of ClusterRole \"cluster-admin\" to Group \"system:cluster-admins\""}}
4.10.2. Configuring the API Audit Log level
$ oc get APIServer

NAME      AGE
cluster   18h
$ oc edit APIServer cluster
apiVersion: config.openshift.io/v1
kind: APIServer
metadata:
  annotations:
    release.openshift.io/create-only: "true"
  creationTimestamp: 2019-05-09T18:56:37Z
  generation: 2
  name: cluster
  resourceVersion: "562502"
  selfLink: /apis/config.openshift.io/v1/apiservers/cluster
  uid: 2c4e980b-728c-11e9-967d-0a973adad40e
spec:
  logLevel: "Normal" 1
  operatorloglevel: "TraceAll" 2
4.10.3. Viewing the API Audit Log
$ oc --insecure-skip-tls-verify adm node-logs --role=master --path=openshift-apiserver/

ip-10-0-140-97.ec2.internal audit-2019-04-09T00-12-19.834.log
ip-10-0-140-97.ec2.internal audit-2019-04-09T11-13-00.469.log
ip-10-0-140-97.ec2.internal audit.log
ip-10-0-153-35.ec2.internal audit-2019-04-09T00-11-49.835.log
ip-10-0-153-35.ec2.internal audit-2019-04-09T11-08-30.469.log
ip-10-0-153-35.ec2.internal audit.log
ip-10-0-170-165.ec2.internal audit-2019-04-09T00-13-00.128.log
ip-10-0-170-165.ec2.internal audit-2019-04-09T11-10-04.082.log
ip-10-0-170-165.ec2.internal audit.log
$ oc adm node-logs <node-ip> <log-name> --path=openshift-apiserver/<log-name>
$ oc adm node-logs ip-10-0-140-97.ec2.internal audit-2019-04-08T13-09-01.227.log --path=openshift-apiserver/audit-2019-04-08T13-09-01.227.log
$ oc adm node-logs ip-10-0-140-97.ec2.internal audit.log --path=openshift-apiserver/audit.log
ip-10-0-140-97.ec2.internal {"kind":"Event",
        "apiVersion":"audit.k8s.io/v1beta1",
        "metadata":{"creationTimestamp":"2019-04-09T18:52:03Z"},
        "level":"Metadata",
        "timestamp":"2019-04-09T18:52:03Z",
        "auditID":"9708b50d-8956-4c87-b9eb-a53ba054c13d",
        "stage":"ResponseComplete",
        "requestURI":"/",
        "verb":"get",
        "user":{"username":"system:anonymous",
        "groups":["system:unauthenticated"]},
        "sourceIPs":["10.128.0.1"],
        "userAgent":"Go-http-client/2.0",
        "responseStatus":{"metadata":{},
        "code":200},
        "requestReceivedTimestamp":"2019-04-09T18:52:03.914638Z",
        "stageTimestamp":"2019-04-09T18:52:03.915080Z",
        "annotations":{"authorization.k8s.io/decision":"allow",
        "authorization.k8s.io/reason":"RBAC: allowed by ClusterRoleBinding \"cluster-status-binding\" of ClusterRole \"cluster-status\" to Group \"system:unauthenticated\""}}
$ oc --insecure-skip-tls-verify adm node-logs --role=master --path=kube-apiserver/

ip-10-0-140-97.ec2.internal audit-2019-04-09T14-07-27.129.log
ip-10-0-140-97.ec2.internal audit-2019-04-09T19-18-32.542.log
ip-10-0-140-97.ec2.internal audit.log
ip-10-0-153-35.ec2.internal audit-2019-04-09T19-24-22.620.log
ip-10-0-153-35.ec2.internal audit-2019-04-09T19-51-30.905.log
ip-10-0-153-35.ec2.internal audit.log
ip-10-0-170-165.ec2.internal audit-2019-04-09T18-37-07.511.log
ip-10-0-170-165.ec2.internal audit-2019-04-09T19-21-14.371.log
ip-10-0-170-165.ec2.internal audit.log
$ oc adm node-logs <node-ip> <log-name> --path=kube-apiserver/<log-name>
$ oc adm node-logs ip-10-0-140-97.ec2.internal audit-2019-04-09T14-07-27.129.log --path=kube-apiserver/audit-2019-04-09T14-07-27.129.log
$ oc adm node-logs ip-10-0-170-165.ec2.internal audit.log --path=kube-apiserver/audit.logip-10-0-140-97.ec2.internal {"kind":"Event",
"apiVersion":"audit.k8s.io/v1beta1",
"metadata":{"creationTimestamp":"2019-04-09T19:56:58Z"},
"level":"Metadata",
"timestamp":"2019-04-09T19:56:58Z",
"auditID":"6e96c88b-ab6f-44d2-b62e-d1413efd676b",
"stage":"ResponseComplete",
"requestURI":"/api/v1/nodes/audit-2019-04-09T14-07-27.129.log",
"verb":"get",
"user":{"username":"kube:admin",
"groups":["system:cluster-admins",
"system:authenticated"],
"extra":{"scopes.authorization.openshift.io":["user:full"]}},
"sourceIPs":["10.0.57.93"],
"userAgent":"oc/v1.13.4+b626c2fe1 (linux/amd64) kubernetes/ba88cb2",
"objectRef":{"resource":"nodes",
"name":"audit-2019-04-09T14-07-27.129.log",
"apiVersion":"v1"},
"responseStatus":{"metadata":{},
"status":"Failure",
"reason":"NotFound",
"code":404},
"requestReceivedTimestamp":"2019-04-09T19:56:58.982157Z",
"stageTimestamp":"2019-04-09T19:56:58.985300Z",
"annotations":{"authorization.k8s.io/decision":"allow",
"authorization.k8s.io/reason":"RBAC: allowed by ClusterRoleBinding \"cluster-admins\" of ClusterRole \"cluster-admin\" to Group \"system:cluster-admins\""}}
Work with containers
Init Containers
for i in {1..100}; do sleep 1; if dig myservice; then exit 0; fi; done; exit 1
$ curl -X POST http://$mgmt_svc_host:$mgmt_svc_port/register -d 'instance=$()&ip=$()'
Create Init Containers
apiVersion: v1
kind: Pod
metadata:
  name: myapp-pod
  labels:
    app: myapp
spec:
  containers:
  - name: myapp-container
    image: busybox
    command: ['sh', '-c', 'echo The app is running! && sleep 3600']
  initContainers:
  - name: init-myservice
    image: busybox
    command: ['sh', '-c', 'until nslookup myservice; do echo waiting for myservice; sleep 2; done;']
  - name: init-mydb
    image: busybox
    command: ['sh', '-c', 'until nslookup mydb; do echo waiting for mydb; sleep 2; done;']
kind: Service
apiVersion: v1
metadata:
  name: myservice
spec:
  ports:
  - protocol: TCP
    port: 80
    targetPort: 9376
kind: Service
apiVersion: v1
metadata:
  name: mydb
spec:
  ports:
  - protocol: TCP
    port: 80
    targetPort: 9377
$ create -f myapp.yaml

pod/myapp-pod created
$ oc get pods
NAME                          READY     STATUS              RESTARTS   AGE
myapp-pod                     0/1       Init:0/2            0          5s
$ oc create -f mydb.yaml
$ oc create -f myservice.yaml
$ oc get pods
NAME                          READY     STATUS              RESTARTS   AGE
myapp-pod                     1/1       Running             0          2m
Use volumes to persist container data
Work with volumes using the OpenShift CLI
$ oc set volume <object_selection> <operation> <mandatory_parameters> <options>
Syntax
Description
Example
<object_type> <name>
Selects <name> of type <object_type>.
deploymentConfig registry
<object_type>/<name>
Selects <name> of type <object_type>.
deploymentConfig/registry
<object_type>--selector=<object_label_selector>
Selects resources of type <object_type> that matched the given label selector.
deploymentConfig--selector="name=registry"
<object_type> --all
Selects all resources of type <object_type>.
deploymentConfig --all
-f or --filename=<file_name>
File name, directory, or URL to file to use to edit the resource.
-f registry-deployment-config.json
List volumes and volume mounts in a pod
$ oc set volume <object_type>/<name> --list [options]
Option
Description
Default
--name
Name of the volume.
-c, --containers
Select containers by name. It can also take wildcard '*' that matches any character.
'*'
$ oc set volume pod/p1 --list
$ oc set volume dc --all --name=v1
Add volumes to a pod
$ oc set volume <object_type>/<name> --add [options]
Option
Description
Default
--name
Name of the volume.
Automatically generated, if not specified.
-t, --type
Name of the volume source. Supported values: emptyDir, hostPath, secret, configmap, persistentVolumeClaim or projected.
emptyDir
-c, --containers
Select containers by name. It can also take wildcard '*' that matches any character.
'*'
-m, --mount-path
Mount path inside the selected containers.
--path
Host path. Mandatory parameter for --type=hostPath.
--secret-name
Name of the secret. Mandatory parameter for --type=secret.
--configmap-name
Name of the configmap. Mandatory parameter for --type=configmap.
--claim-name
Name of the persistent volume claim. Mandatory parameter for --type=persistentVolumeClaim.
--source
Details of volume source as a JSON string. Recommended if the desired volume source is not supported by --type.
-o, --output
Display the modified objects instead of updating them on the server. Supported values: json, yaml.
--output-version
Output the modified objects with the given version.
api-version
$ oc set volume dc/registry --add
$ oc set volume rc/r1 --add --name=v1 --type=secret --secret-name='$ecret' --mount-path=/data
$ oc set volume -f dc.json --add --name=v1 --type=persistentVolumeClaim \
  --claim-name=pvc1 --mount-path=/data --containers=c1
$ oc set volume rc --all --add --name=v1 \
  --source='{"gitRepo": {
    "repository": "https://github.com/namespace1/project1",
    "revision": "5125c45f9f563"
}}'
Update volumes and volume mounts in a pod
$ oc set volume <object_type>/<name> --add --overwrite [options]
$ oc set volume rc/r1 --add --overwrite --name=v1 --type=persistentVolumeClaim --claim-name=pvc1
$ oc set volume dc/d1 --add --overwrite --name=v1 --mount-path=/opt
Remove volumes and volume mounts from a pod
$ oc set volume <object_type>/<name> --remove [options]
Option
Description
Default
--name
Name of the volume.
-c, --containers
Select containers by name. It can also take wildcard '*' that matches any character.
'*'
--confirm
Indicate that we want to remove multiple volumes at once.
-o, --output
Display the modified objects instead of updating them on the server. Supported values: json, yaml.
--output-version
Output the modified objects with the given version.
api-version
$ oc set volume dc/d1 --remove --name=v1
$ oc set volume dc/d1 --remove --name=v1 --containers=c1
$ oc set volume rc/r1 --remove --confirm
Configure volumes for multiple uses in a pod
$ oc rsh <pod>
sh-4.2$ ls /path/to/volume/subpath/mount
example_file1 example_file2 example_file3
apiVersion: v1
kind: Pod
metadata:
  name: my-site
spec:
    containers:
    - name: mysql
      image: mysql
      volumeMounts:
      - mountPath: /var/lib/mysql
name: site-data
subPath: mysql 1
    - name: php
      image: php
      volumeMounts:
      - mountPath: /var/www/html
name: site-data
subPath: html 2
    volumes:
    - name: site-data
      persistentVolumeClaim:
claimName: my-site-data
Map volumes using projected volumes
Projected volumes
Example Pod Specifications
apiVersion: v1
kind: Pod
metadata:
  name: volume-test
spec:
  containers:
  - name: container-test
    image: busybox
    volumeMounts: 1
    - name: all-in-one
      mountPath: "/projected-volume" 2
      readOnly: true 3
  volumes: 4
  - name: all-in-one 5
    projected:
      defaultMode: 0400 6
      sources:
      - secret:
  name: mysecret 7
  items:
- key: username
  path: my-group/my-username 8
      - downwardAPI: 9
  items:
- path: "labels"
  fieldRef:
    fieldPath: metadata.labels
- path: "cpu_limit"
  resourceFieldRef:
    containerName: container-test
    resource: limits.cpu
      - configMap: 10
  name: myconfigmap
  items:
- key: config
  path: my-group/my-config
  mode: 0777 11
apiVersion: v1
kind: Pod
metadata:
  name: volume-test
spec:
  containers:
  - name: container-test
    image: busybox
    volumeMounts:
    - name: all-in-one
      mountPath: "/projected-volume"
      readOnly: true
  volumes:
  - name: all-in-one
    projected:
      defaultMode: 0755
      sources:
      - secret:
  name: mysecret
  items:
- key: username
  path: my-group/my-username
      - secret:
  name: mysecret2
  items:
- key: password
  path: my-group/my-password
  mode: 511
Pathing Considerations
apiVersion: v1
kind: Pod
metadata:
  name: volume-test
spec:
  containers:
  - name: container-test
    image: busybox
    volumeMounts:
    - name: all-in-one
      mountPath: "/projected-volume"
      readOnly: true
  volumes:
  - name: all-in-one
    projected:
      sources:
      - secret:
  name: mysecret
  items:
- key: username
  path: my-group/data
      - configMap:
  name: myconfigmap
  items:
- key: config
  path: my-group/data
Configure a Projected Volume for a Pod
apiVersion: v1
kind: Secret
metadata:
  name: mysecret
type: Opaque
data:
  pass: MWYyZDFlMmU2N2Rm
  user: YWRtaW4=
$ echo -n "admin" | base64
YWRtaW4=
$ echo -n "1f2d1e2e67df" | base64
MWYyZDFlMmU2N2Rm
$ oc create -f <secrets-filename>
$ oc create -f secret.yaml
secret "mysecret" created
$ oc get secret <secret-name>
$ oc get secret <secret-name> -o yaml
$ oc get secret mysecret
NAME       TYPE      DATA      AGE
mysecret   Opaque    2         17h
$ oc get secret mysecret -o yaml
apiVersion: v1
data:
  pass: MWYyZDFlMmU2N2Rm
  user: YWRtaW4=
kind: Secret
metadata:
  creationTimestamp: 2017-05-30T20:21:38Z
  name: mysecret
  namespace: default
  resourceVersion: "2107"
  selfLink: /api/v1/namespaces/default/secrets/mysecret
  uid: 959e0424-4575-11e7-9f97-fa163e4bd54c
type: Opaque
apiVersion: v1
kind: Pod
metadata:
  name: test-projected-volume
spec:
  containers:
  - name: test-projected-volume
    image: busybox
    args:
    - sleep
    - "86400"
    volumeMounts:
    - name: all-in-one
      mountPath: "/projected-volume"
      readOnly: true
  volumes:
  - name: all-in-one
    projected:
      sources:
      - secret:      1
  name: user
      - secret:      2
  name: pass
$ oc create -f <your_yaml_file>.yaml
$ oc create -f secret-pod.yaml
pod "test-projected-volume" created
$ oc get pod <name>
$ oc get pod test-projected-volume
NAME                    READY     STATUS    RESTARTS   AGE
test-projected-volume   1/1       Running   0          14s
$ oc exec -it <pod> <command>
$ oc exec -it test-projected-volume -- /bin/sh
/ # ls
bin               home              root              tmp
dev               proc              run               usr
etc               projected-volume  sys               var
Allowing containers to consume API objects
Expose Pod information to Containers using the Downward API
Field
Description
fieldPath
The path of the field to select, relative to the pod.
apiVersion
The API version to interpret the fieldPath selector within.
Selector
Description
metadata.name
The pod's name. This is supported in both environment variables and volumes.
metadata.namespace
The pod's namespace.This is supported in both environment variables and volumes.
metadata.labels
The pod's labels. This is only supported in volumes and not in environment variables.
metadata.annotations
The pod's annotations. This is only supported in volumes and not in environment variables.
status.podIP
The pod's IP. This is only supported in environment variables and not volumes.
How to consume container values using the downward API
Consume container values using environment variables
apiVersion: v1
kind: Pod
metadata:
  name: dapi-env-test-pod
spec:
  containers:
    - name: env-test-container
      image: gcr.io/google_containers/busybox
      command: [ "/bin/sh", "-c", "env" ]
      env:
- name: MY_POD_NAME
  valueFrom:
fieldRef:
  fieldPath: metadata.name
- name: MY_POD_NAMESPACE
  valueFrom:
fieldRef:
  fieldPath: metadata.namespace
  restartPolicy: Never
$ oc create -f pod.yaml
$ oc logs -p dapi-env-test-pod
Consume container values using a volume plug-in
kind: Pod
apiVersion: v1
metadata:
  labels:
    zone: us-east-coast
    cluster: downward-api-test-cluster1
    rack: rack-123
  name: dapi-volume-test-pod
  annotations:
    annotation1: "345"
    annotation2: "456"
spec:
  containers:
    - name: volume-test-container
      image: gcr.io/google_containers/busybox
      command: ["sh", "-c", "cat /tmp/etc/pod_labels /tmp/etc/pod_annotations"]
      volumeMounts:
- name: podinfo
  mountPath: /tmp/etc
  readOnly: false
  volumes:
  - name: podinfo
    downwardAPI:
      defaultMode: 420
      items:
      - fieldRef:
  fieldPath: metadata.name
path: pod_name
      - fieldRef:
  fieldPath: metadata.namespace
path: pod_namespace
      - fieldRef:
  fieldPath: metadata.labels
path: pod_labels
      - fieldRef:
  fieldPath: metadata.annotations
path: pod_annotations
  restartPolicy: Never
$ oc create -f volume-pod.yaml
$ oc logs -p dapi-volume-test-pod
cluster=downward-api-test-cluster1
rack=rack-123
zone=us-east-coast
annotation1=345
annotation2=456
kubernetes.io/config.source=api
Consume container resources using the downward API
Consume container resources using environment variables
....
spec:
  containers:
    - name: test-container
      image: gcr.io/google_containers/busybox:1.24
      command: [ "/bin/sh", "-c", "env" ]
      resources:
requests:
  memory: "32Mi"
  cpu: "125m"
limits:
  memory: "64Mi"
  cpu: "250m"
      env:
- name: MY_CPU_REQUEST
  valueFrom:
resourceFieldRef:
  resource: requests.cpu
- name: MY_CPU_LIMIT
  valueFrom:
resourceFieldRef:
  resource: limits.cpu
- name: MY_MEM_REQUEST
  valueFrom:
resourceFieldRef:
  resource: requests.memory
- name: MY_MEM_LIMIT
  valueFrom:
resourceFieldRef:
  resource: limits.memory
....
$ oc create -f pod.yaml
Consume container resources using a volume plug-in
....
spec:
  containers:
    - name: client-container
      image: gcr.io/google_containers/busybox:1.24
      command: ["sh", "-c", "while true; do echo; if [[ -e /etc/cpu_limit ]]; then cat /etc/cpu_limit; fi; if [[ -e /etc/cpu_request ]]; then cat /etc/cpu_request; fi; if [[ -e /etc/mem_limit ]]; then cat /etc/mem_limit; fi; if [[ -e /etc/mem_request ]]; then cat /etc/mem_request; fi; sleep 5; done"]
      resources:
requests:
  memory: "32Mi"
  cpu: "125m"
limits:
  memory: "64Mi"
  cpu: "250m"
      volumeMounts:
- name: podinfo
  mountPath: /etc
  readOnly: false
  volumes:
    - name: podinfo
      downwardAPI:
items:
  - path: "cpu_limit"
resourceFieldRef:
  containerName: client-container
  resource: limits.cpu
  - path: "cpu_request"
resourceFieldRef:
  containerName: client-container
  resource: requests.cpu
  - path: "mem_limit"
resourceFieldRef:
  containerName: client-container
  resource: limits.memory
  - path: "mem_request"
resourceFieldRef:
  containerName: client-container
  resource: requests.memory
....
$ oc create -f volume-pod.yaml
Consume secrets using the downward API
apiVersion: v1
kind: Secret
metadata:
  name: mysecret
data:
  password: cGFzc3dvcmQ=
  username: ZGV2ZWxvcGVy
type: kubernetes.io/basic-auth
$ oc create -f secret.yaml
apiVersion: v1
kind: Pod
metadata:
  name: dapi-env-test-pod
spec:
  containers:
    - name: env-test-container
      image: gcr.io/google_containers/busybox
      command: [ "/bin/sh", "-c", "env" ]
      env:
- name: MY_SECRET_USERNAME
  valueFrom:
secretKeyRef:
  name: mysecret
  key: username
  restartPolicy: Never
$ oc create -f pod.yaml
$ oc logs -p dapi-env-test-pod
Consume configuration maps using the downward API
apiVersion: v1
kind: ConfigMap
metadata:
  name: myconfigmap
data:
  mykey: myvalue
$ oc create -f configmap.yaml
apiVersion: v1
kind: Pod
metadata:
  name: dapi-env-test-pod
spec:
  containers:
    - name: env-test-container
      image: gcr.io/google_containers/busybox
      command: [ "/bin/sh", "-c", "env" ]
      env:
- name: MY_CONFIGMAP_VALUE
  valueFrom:
configMapKeyRef:
  name: myconfigmap
  key: mykey
  restartPolicy: Always
$ oc create -f pod.yaml
$ oc logs -p dapi-env-test-pod
Reference environment variables
apiVersion: v1
kind: Pod
metadata:
  name: dapi-env-test-pod
spec:
  containers:
    - name: env-test-container
      image: gcr.io/google_containers/busybox
      command: [ "/bin/sh", "-c", "env" ]
      env:
- name: MY_EXISTING_ENV
  value: my_value
- name: MY_ENV_VAR_REF_ENV
  value: $(MY_EXISTING_ENV)
  restartPolicy: Never
$ oc create -f pod.yaml
$ oc logs -p dapi-env-test-pod
Escaping environment variable references
apiVersion: v1
kind: Pod
metadata:
  name: dapi-env-test-pod
spec:
  containers:
    - name: env-test-container
      image: gcr.io/google_containers/busybox
      command: [ "/bin/sh", "-c", "env" ]
      env:
- name: MY_NEW_ENV
  value: $$(SOME_OTHER_ENV)
  restartPolicy: Never
$ oc create -f pod.yaml
$ oc logs -p dapi-env-test-pod
Copy files to or from an OpenShift container
Copy files
$ oc rsync <source> <destination> [-c <container>]
<pod name>:<dir>
Copy files to and from containers
oc rsync <local-dir> <pod-name>:/<remote-dir>
$ oc rsync /home/user/source devpod1234:/src

WARNING: cannot use rsync: rsync not available in container
status.txt
$ oc rsync devpod1234:/src /home/user/source

oc rsync devpod1234:/src/status.txt /home/user/
WARNING: cannot use rsync: rsync not available in container
status.txt
Use advanced Rsync features
$ rsync --rsh='oc rsh' --exclude-from=FILE SRC POD:DEST
$ export RSYNC_RSH='oc rsh'
$ rsync --exclude-from=FILE SRC POD:DEST
Executing remote commands in an OpenShift container
Execute remote commands in containers
$ oc exec <pod> [-c <container>] <command> [<arg_1> ... <arg_n>]
$ oc exec mypod date
Thu Apr  9 02:21:53 UTC 2015
Protocol for initiating a remote command from a client
/proxy/nodes/<node_name>/exec/<namespace>/<pod>/<container>?command=<command>
/proxy/nodes/node123.openshift.com/exec/myns/mypod/mycontainer?command=date
Use port forwarding to access applications in a container
Port forwarding
$ oc port-forward <pod> [<local_port>:]<remote_port> [...[<local_port_n>:]<remote_port_n>]
Use port forwarding
$ oc port-forward <pod> [<local_port>:]<remote_port> [...[<local_port_n>:]<remote_port_n>]
$ oc port-forward <pod> 5000 6000

Forwarding from 127.0.0.1:5000 -> 5000
Forwarding from [::1]:5000 -> 5000
Forwarding from 127.0.0.1:6000 -> 6000
Forwarding from [::1]:6000 -> 6000
$ oc port-forward <pod> 8888:5000

Forwarding from 127.0.0.1:8888 -> 5000
Forwarding from [::1]:8888 -> 5000
$ oc port-forward <pod> :5000

Forwarding from 127.0.0.1:42390 -> 5000
Forwarding from [::1]:42390 -> 5000
$ oc port-forward <pod> 0:5000
Protocol for initiating port forwarding from a client
/proxy/nodes/<node_name>/portForward/<namespace>/<pod>
/proxy/nodes/node123.openshift.com/portForward/myns/mypod
Monitor container health
Health checks
apiVersion: v1
kind: Pod
metadata:
  labels:
    test: liveness
  name: liveness-http
spec:
  containers:
  - name: liveness-http
    image: k8s.gcr.io/liveness 1
    args:
    - /server
    livenessProbe: 2
      httpGet:   3
# host: my-host
# scheme: HTTPS
path: /healthz
port: 8080
httpHeaders:
- name: X-Custom-Header
  value: Awesome
      initialDelaySeconds: 15  4
      timeoutSeconds: 1   5
    name: liveness   6
$ oc describe pod pod1

....

FirstSeen LastSeen    Count   From            SubobjectPath           Type        Reason      Message
--------- --------    -----   ----            -------------           --------    ------      -------
37s       37s     1   {default-scheduler }                            Normal      Scheduled   Successfully assigned liveness-exec to worker0
36s       36s     1   {kubelet worker0}   spec.containers{liveness}   Normal      Pulling     pulling image "k8s.gcr.io/busybox"
36s       36s     1   {kubelet worker0}   spec.containers{liveness}   Normal      Pulled      Successfully pulled image "k8s.gcr.io/busybox"
36s       36s     1   {kubelet worker0}   spec.containers{liveness}   Normal      Created     Created container with docker id 86849c15382e; Security:[seccomp=unconfined]
36s       36s     1   {kubelet worker0}   spec.containers{liveness}   Normal      Started     Started container with docker id 86849c15382e
2s        2s      1   {kubelet worker0}   spec.containers{liveness}   Warning     Unhealthy   Liveness probe failed: cat: can't open '/tmp/healthy': No such file or directory
Types of health checks
Configure health checks
apiVersion: v1
kind: Pod
metadata:
labels:
test: liveness
name: liveness-exec
spec:
containers:
- args:
image: k8s.gcr.io/liveness
livenessProbe:
exec: 1
command: 2
- cat
- /tmp/health
initialDelaySeconds: 15 3
...
$ oc describe pod liveness-exec
Events:
Type Reason Age From Message
---- ------ ---- ---- -------
Normal Scheduled 9s default-scheduler Successfully assigned openshift-logging/liveness-exec to ip-10-0-143-40.ec2.internal
Normal Pulling 2s kubelet, ip-10-0-143-40.ec2.internal pulling image "k8s.gcr.io/liveness"
Normal Pulled 1s kubelet, ip-10-0-143-40.ec2.internal Successfully pulled image "k8s.gcr.io/liveness"
Normal Created 1s kubelet, ip-10-0-143-40.ec2.internal Created container
Normal Started 1s kubelet, ip-10-0-143-40.ec2.internal Started container
spec:
containers:
livenessProbe:
exec:
command:
- /bin/bash
- '-c'
- timeout 60 /opt/eap/bin/livenessProbe.sh 1
timeoutSeconds: 1
periodSeconds: 10
successThreshold: 1
failureThreshold: 3
$ oc create -f <file-name>.yaml
apiVersion: v1
kind: Pod
metadata:
labels:
test: liveness
name: liveness-tcp
spec:
containers:
- name: contaier1 1
image: k8s.gcr.io/liveness
ports:
- containerPort: 8080 2
livenessProbe: 3
tcpSocket:
port: 8080
initialDelaySeconds: 15 4
timeoutSeconds: 1 5
$ oc create -f <file-name>.yaml
apiVersion: v1
kind: Pod
metadata:
labels:
test: readiness
name: readiness-http
spec:
containers:
- args:
image: k8s.gcr.io/readiness 1
readinessProbe: 2
httpGet:
# host: my-host 3
# scheme: HTTPS 4
path: /healthz
port: 8080
initialDelaySeconds: 15 5
timeoutSeconds: 1 6
$ oc create -f <file-name>.yaml
Work with clusters
View system event information in an OpenShift cluster
Events
View events using the CLI
$ oc get events [-n <project>] 1
$ oc get events -n openshift-config
LAST SEEN TYPE REASON OBJECT MESSAGE
97m Normal Scheduled pod/dapi-env-test-pod Successfully assigned openshift-config/dapi-env-test-pod to ip-10-0-171-202.ec2.internal
97m Normal Pulling pod/dapi-env-test-pod pulling image "gcr.io/google_containers/busybox"
97m Normal Pulled pod/dapi-env-test-pod Successfully pulled image "gcr.io/google_containers/busybox"
97m Normal Created pod/dapi-env-test-pod Created container
9m5s Warning FailedCreatePodSandBox pod/dapi-volume-test-pod Failed create pod sandbox: rpc error: code = Unknown desc = failed to create pod network sandbox k8s_dapi-volume-test-pod_openshift-config_6bc60c1f-452e-11e9-9140-0eec59c23068_0(748c7a40db3d08c07fb4f9eba774bd5effe5f0d5090a242432a73eee66ba9e22): Multus: Err adding pod to network "openshift-sdn": cannot set "openshift-sdn" ifname to "eth0": no netns: failed to Statfs "/proc/33366/ns/net": no such file or directory
8m31s Normal Scheduled pod/dapi-volume-test-pod Successfully assigned openshift-config/dapi-volume-test-pod to ip-10-0-171-202.ec2.internal
List of events
Name
Description
FailedValidation
Failed pod configuration validation.
Name
Description
BackOff
Back-off restarting failed the container.
Created
Container created.
Failed
Pull/Create/Start failed.
Killing
Killing the container.
Started
Container started.
Preempting
Preempting other pods.
ExceededGracePeriod
Container runtime did not stop the pod within specified grace period.
Name
Description
Unhealthy
Container is unhealthy.
Name
Description
BackOff
Back off Ctr Start, image pull.
ErrImageNeverPull
The image's NeverPull Policy is violated.
Failed
Failed to pull the image.
InspectFailed
Failed to inspect the image.
Pulled
Successfully pulled the image or the container image is already present on the machine.
Pulling
Pulling the image.
Name
Description
FreeDiskSpaceFailed
Free disk space failed.
InvalidDiskCapacity
Invalid disk capacity.
Name
Description
FailedMount
Volume mount failed.
HostNetworkNotSupported
Host network not supported.
HostPortConflict
Host/port conflict.
InsufficientFreeCPU
Insufficient free CPU.
InsufficientFreeMemory
Insufficient free memory.
KubeletSetupFailed
Kubelet setup failed.
NilShaper
Undefined shaper.
NodeNotReady
Node is not ready.
NodeNotSchedulable
Node is not schedulable.
NodeReady
Node is ready.
NodeSchedulable
Node is schedulable.
NodeSelectorMismatching
Node selector mismatch.
OutOfDisk
Out of disk.
Rebooted
Node rebooted.
Starting
Starting kubelet.
FailedAttachVolume
Failed to attach volume.
FailedDetachVolume
Failed to detach volume.
VolumeResizeFailed
Failed to expand/reduce volume.
VolumeResizeSuccessful
Successfully expanded/reduced volume.
FileSystemResizeFailed
Failed to expand/reduce file system.
FileSystemResizeSuccessful
Successfully expanded/reduced file system.
FailedUnMount
Failed to unmount volume.
FailedMapVolume
Failed to map a volume.
FailedUnmapDevice
Failed unmaped device.
AlreadyMountedVolume
Volume is already mounted.
SuccessfulDetachVolume
Volume is successfully detached.
SuccessfulMountVolume
Volume is successfully mounted.
SuccessfulUnMountVolume
Volume is successfully unmounted.
ContainerGCFailed
Container garbage collection failed.
ImageGCFailed
Image garbage collection failed.
FailedNodeAllocatableEnforcement
Failed to enforce System Reserved Cgroup limit.
NodeAllocatableEnforced
Enforced System Reserved Cgroup limit.
UnsupportedMountOption
Unsupported mount option.
SandboxChanged
Pod sandbox changed.
FailedCreatePodSandBox
Failed to create pod sandbox.
FailedPodSandBoxStatus
Failed pod sandbox status.
Name
Description
FailedSync
Pod sync failed.
Name
Description
SystemOOM
There is an OOM (out of memory) situation on the cluster.
Name
Description
FailedKillPod
Failed to stop a pod.
FailedCreatePodContainer
Failed to create a pod contianer.
Failed
Failed to make pod data directories.
NetworkNotReady
Network is not ready.
FailedCreate
Error creating: <error-msg>.
SuccessfulCreate
Created pod: <pod-name>.
FailedDelete
Error deleting: <error-msg>.
SuccessfulDelete
Deleted pod: <pod-id>.
Name
Description
SelectorRequired
Selector is required.
InvalidSelector
Could not convert selector into a corresponding internal selector object.
FailedGetObjectMetric
HPA was unable to compute the replica count.
InvalidMetricSourceType
Unknown metric source type.
ValidMetricFound
HPA was able to successfully calculate a replica count.
FailedConvertHPA
Failed to convert the given HPA.
FailedGetScale
HPA controller was unable to get the target's current scale.
SucceededGetScale
HPA controller was able to get the target's current scale.
FailedComputeMetricsReplicas
Failed to compute desired number of replicas based on listed metrics.
FailedRescale
New size: <size>; reason: <msg>; error: <error-msg>.
SuccessfulRescale
New size: <size>; reason: <msg>.
FailedUpdateStatus
Failed to update status.
Name
Description
Starting
Starting OpenShift-SDN.
NetworkFailed
The pod's network interface has been lost and the pod will be stopped.
Name
Description
NeedPods
The service-port <serviceName>:<port> needs pods.
Name
Description
FailedBinding
There are no persistent volumes available and no storage class is set.
VolumeMismatch
Volume size or class is different from what is requested in claim.
VolumeFailedRecycle
Error creating recycler pod.
VolumeRecycled
Occurs when volume is recycled.
RecyclerPod
Occurs when pod is recycled.
VolumeDelete
Occurs when volume is deleted.
VolumeFailedDelete
Error when deleting the volume.
ExternalProvisioning
Occurs when volume for the claim is provisioned either manually or via external software.
ProvisionFailed
Failed to provision volume.
ProvisionCleanupFailed
Error cleaning provisioned volume.
ProvisionSucceeded
Occurs when the volume is provisioned successfully.
WaitForFirstConsumer
Delay binding until pod scheduling.
Name
Description
FailedPostStartHook
Handler failed for pod start.
FailedPreStopHook
Handler failed for pre-stop.
UnfinishedPreStopHook
Pre-stop hook unfinished.
Name
Description
DeploymentCancellationFailed
Failed to cancel deployment.
DeploymentCancelled
Cancelled deployment.
DeploymentCreated
Created new replication controller.
IngressIPRangeFull
No available Ingress IP to allocate to service.
Name
Description
FailedScheduling
Failed to schedule pod: <pod-namespace>/<pod-name>. This event is raised for multiple reasons, for example: AssumePodVolumes failed, Binding rejected etc.
Preempted
By <preemptor-namespace>/<preemptor-name> on node <node-name>.
Scheduled
Successfully assigned <pod-name> to <node-name>.
Name
Description
SelectAll
This daemon set is selecting all pods. A non-empty selector is required.
FailedPlacement
Failed to place pod on <node-name>.
FailedDaemonPod
Found failed daemon pod <pod-name> on node <node-name>, will try to kill it.
Name
Description
CreateLoadBalancerFailed
Error creating load balancer.
DeleteLoadBalancer
Deleting load balancer.
EnsuringLoadBalancer
Ensuring load balancer.
EnsuredLoadBalancer
Ensured load balancer.
UnAvailableLoadBalancer
There are no available nodes for LoadBalancer service.
LoadBalancerSourceRanges
Lists the new LoadBalancerSourceRanges. For example, <old-source-range> -<new-source-range>.
LoadbalancerIP
Lists the new IP address. For example, <old-ip> -<new-ip>.
ExternalIP
Lists external IP address. For example, Added: <external-ip>.
UID
Lists the new UID. For example, <old-service-uid> -<new-service-uid>.
ExternalTrafficPolicy
Lists the new ExternalTrafficPolicy. For example, <old-policy> -<new-ploicy>.
HealthCheckNodePort
Lists the new HealthCheckNodePort. For example, <old-node-port> -new-node-port>.
UpdatedLoadBalancer
Updated load balancer with new hosts.
LoadBalancerUpdateFailed
Error updating load balancer with new hosts.
DeleteLoadBalancer
Deleting load balancer.
DeleteLoadBalancerFailed
Error deleting load balancer.
DeletedLoadBalancer
Deleted load balancer.
Estimating the number of pods the OpenShift nodes can hold
OpenShift cluster capacity tool
Run the cluster capacity tool on the command line
apiVersion: v1
kind: Pod
metadata:
name: small-pod
labels:
app: guestbook
tier: frontend
spec:
containers:
- name: php-redis
image: gcr.io/google-samples/gb-frontend:v4
imagePullPolicy: Always
resources:
limits:
cpu: 150m
memory: 100Mi
requests:
cpu: 150m
memory: 100Mi
$ ./cluster-capacity --kubeconfig <path-to-kubeconfig> \ 1
--podspec <path-to-pod-spec> 2
$ ./cluster-capacity --kubeconfig <path-to-kubeconfig> --podspec <path-to-pod-spec> --verbose
small-pod pod requirements:
- CPU: 150m
- Memory: 100Mi
The cluster can schedule 52 instance(s) of the pod small-pod.
Termination reason: Unschedulable: No nodes are available that match all of the
following predicates:: Insufficient cpu (2).
Pod distribution among nodes:
small-pod
- 192.168.124.214: 26 instance(s)
- 192.168.124.120: 26 instance(s)
Run the cluster capacity tool as a job inside a pod
$ cat << EOF| oc create -f -
kind: ClusterRole
apiVersion: v1
metadata:
name: cluster-capacity-role
rules:
- apiGroups: [""]
resources: ["pods", "nodes", "persistentvolumeclaims", "persistentvolumes", "services"]
verbs: ["get", "watch", "list"]
EOF
$ oc create sa cluster-capacity-sa
$ oc adm policy add-cluster-role-to-user cluster-capacity-role \
system:serviceaccount:default:cluster-capacity-sa
apiVersion: v1
kind: Pod
metadata:
name: small-pod
labels:
app: guestbook
tier: frontend
spec:
containers:
- name: php-redis
image: gcr.io/google-samples/gb-frontend:v4
imagePullPolicy: Always
resources:
limits:
cpu: 150m
memory: 100Mi
requests:
cpu: 150m
memory: 100Mi
$ oc create configmap cluster-capacity-configmap \
--from-file=pod.yaml=pod.yaml
apiVersion: batch/v1
kind: Job
metadata:
name: cluster-capacity-job
spec:
parallelism: 1
completions: 1
template:
metadata:
name: cluster-capacity-pod
spec:
containers:
- name: cluster-capacity
image: openshift/origin-cluster-capacity
imagePullPolicy: "Always"
volumeMounts:
- mountPath: /test-pod
name: test-volume
env:
- name: CC_INCLUSTER 1
value: "true"
command:
- "/bin/sh"
- "-ec"
- |
/bin/cluster-capacity --podspec=/test-pod/pod.yaml --verbose
restartPolicy: "Never"
serviceAccountName: cluster-capacity-sa
volumes:
- name: test-volume
configMap:
name: cluster-capacity-configmap
The pod.yaml key of the ConfigMap is the same as the pod specification file name, though it is not required. By doing this, the input pod spec file can be accessed inside the pod as /test-pod/pod.yaml.
$ oc create -f cluster-capacity-job.yaml
$ oc logs jobs/cluster-capacity-job
small-pod pod requirements:
- CPU: 150m
- Memory: 100Mi
The cluster can schedule 52 instance(s) of the pod small-pod.
Termination reason: Unschedulable: No nodes are available that match all of the
following predicates:: Insufficient cpu (2).
Pod distribution among nodes:
small-pod
- 192.168.124.214: 26 instance(s)
- 192.168.124.120: 26 instance(s)
Configure cluster memory to meet container memory and risk requirements
Manage application memory
Manage application memory strategy
OpenJDK settings
Override the JVM maximum heap size
Release unused memory to the operating system
`-XX:+UseParallelGC
-XX:MinHeapFreeRatio=5 -XX:MaxHeapFreeRatio=10 -XX:GCTimeRatio=4
-XX:AdaptiveSizePolicyWeight=90`.
Ensure JVM processes within a container are appropriately configured
`JAVA_TOOL_OPTIONS="-XX:+UnlockExperimentalVMOptions
-XX:+UseCGroupMemoryLimitForHeap -Dsun.zip.disableMemoryMapping=true"`
Find the memory request and limit from within a pod
apiVersion: v1
kind: Pod
metadata:
name: test
spec:
containers:
- name: test
image: fedora:latest
command:
- sleep
- "3600"
env:
- name: MEMORY_REQUEST 1
valueFrom:
resourceFieldRef:
containerName: test
resource: requests.memory
- name: MEMORY_LIMIT 2
valueFrom:
resourceFieldRef:
containerName: test
resource: limits.memory
resources:
requests:
memory: 384Mi
limits:
memory: 512Mi
$ oc rsh test
$ env | grep MEMORY | sort
MEMORY_LIMIT=536870912
MEMORY_REQUEST=402653184
OOM kill policy
# oc rsh test
$ grep '^oom_kill ' /sys/fs/cgroup/memory/memory.oom_control
oom_kill 0
$ sed -e '' </dev/zero # provoke an OOM kill
Killed
$ echo $?
137
$ grep '^oom_kill ' /sys/fs/cgroup/memory/memory.oom_control
oom_kill 1
$ oc get pod test
NAME READY STATUS RESTARTS AGE
test 0/1 OOMKilled 0 1m
$ oc get pod test -o yaml
...
status:
containerStatuses:
- name: test
ready: false
restartCount: 0
state:
terminated:
exitCode: 137
reason: OOMKilled
phase: Failed
$ oc get pod test
NAME READY STATUS RESTARTS AGE
test 1/1 Running 1 1m
$ oc get pod test -o yaml
...
status:
containerStatuses:
- name: test
ready: true
restartCount: 1
lastState:
terminated:
exitCode: 137
reason: OOMKilled
state:
running:
phase: Running Pod eviction
$ oc get pod test
NAME READY STATUS RESTARTS AGE
test 0/1 Evicted 0 1m
$ oc get pod test -o yaml
...
status:
message: 'Pod The node was low on resource: [MemoryPressure].'
phase: Failed
reason: Evicted
Configure the cluster to place pods on overcommited nodes
Overcommitment
Resource requests and overcommitment
Buffer Chunk Limiting for Fluentd
$ egrep "buffer_type|buffer_path" *.conf
output-es-config.conf:
buffer_type file
buffer_path `/var/lib/fluentd/buffer-output-es-config`
output-es-ops-config.conf:
buffer_type file
buffer_path `/var/lib/fluentd/buffer-output-es-ops-config`
Compute resources and containers
Container memory requests
Overcomitment and quality of service classes
Priority
Class Name
Description
1 (highest)
Guaranteed
If limits and optionally requests are set (not equal to 0) for all resources and they are equal, then the container is classified as Guaranteed.
2
Burstable
If requests and optionally limits are set (not equal to 0) for all resources, and they are not equal, then the container is classified as Burstable.
3 (lowest)
BestEffort
If requests and limits are not set for any of the resources, then the container is classified as BestEffort.
Reserve memory across quality of service tiers
Swap memory and QOS
Nodes overcommitment
$ sysctl -a |grep commit
vm.overcommit_memory = 1
$ sysctl -a |grep panic
vm.panic_on_oom = 0
Disable or enforcing CPU limits using CPU CFS quotas
$ oc describe machineconfigpool <name>
$ oc describe machineconfigpool worker
apiVersion: machineconfiguration.openshift.io/v1
kind: MachineConfigPool
metadata:
creationTimestamp: 2019-02-08T14:52:39Z
generation: 1
labels:
custom-kubelet: small-pods 1
$ oc label machineconfigpool worker custom-kubelet=small-pods
apiVersion: machineconfiguration.openshift.io/v1
kind: KubeletConfig
metadata:
name: disable-cpu-units 1
spec:
machineConfigPoolSelector:
matchLabels:
custom-kubelet: small-pods 2
kubeletConfig:
cpu-cfs-quota: 3
- "false"
Reserving resources for system processes
Disable overcommitment for a node
$ sysctl -w vm.overcommit_memory=0
Disable overcommitment for a project
quota.openshift.io/cluster-resource-override-enabled: "false"
$ oc create -f <file-name>.yaml
Enable features using feature gates
Feature gates and Technology Preview features
Features that are affected by FeatureGates
FeatureGate
Description
Default
ExperimentalCriticalPodAnnotation
Enables annotating specific Pods as critical so that their scheduling is guaranteed.
True
RotateKubeletServerCertificate
Enables the rotation of the server TLS certificate on the cluster.
True
SupportPodPidsLimit
Enables support for limiting the number of processes (PIDs) running in a Pod.
True
MachineHealthCheck
Enables automatically repairing unhealthy machines in a machine pool.
False
CSIBlockVolume
Enables external CSI drivers to implement raw block volume support.
False
LocalStorageCapacityIsolation
Enable the consumption of local ephemeral storage and also the sizeLimit property of an emptyDir volume.
False
Enable Technology Preview features using feature gates
apiVersion: config.openshift.io/v1
kind: FeatureGate
metadata:
name: cluster
spec:
featureSet: "TechPreviewNoUpgrade" 1