Storage
- Persistent storage overview
- Lifecycle of a volume and claim
- Persistent volumes
- Block volume support
- Create the EBS Storage Class
- Persistent storage using NFS
- Persistent Storage Using iSCSI
- Provision
- Enforce Disk Quotas
- iSCSI Volume Security
- iSCSI Multipathing
- iSCSI Custom Initiator IQN
- Persistent storage using the Container Storage Interface (CSI)
- CSI Architecture
- External CSI controllers
- CSI Driver DaemonSet
- Example CSI deployment
- Dynamic Provisioning
- Example using the CSI driver
- Enable volume expansion support
- Expanding Persistent Volume Claims (PVC) with a file system
- Recover from Failure when Expanding Volumes
- About dynamic provisioning
- Available dynamic provisioning plug-ins
- Define a StorageClass
- Change the default StorageClass
Persistent storage overview
Manage storage is a distinct problem from managing compute resources. OpenShift uses the Kubernetes persistent volume (PV) framework to allow cluster administrators to provision persistent storage for a cluster. Developers can use persistent volume claims (PVCs) to request PV resources without having specific knowledge of the underlying storage infrastructure.
PVCs are specific to a project, and are created and used by developers as a means to use a PV. PV resources on their own are not scoped to any single project; they can be shared across the entire OpenShift cluster and claimed from any project. After a PV is bound to a PVC, that PV can not then be bound to additional PVCs. This has the effect of scoping a bound PV to a single namespace, that of the binding project.
PVs are defined by a PersistentVolume API object, which represents a piece of existing, networked storage in the cluster that was provisioned by the cluster administrator. It is a resource in the cluster just like a node is a cluster resource. PVs are volume plug-ins like Volumes but have a lifecycle that is independent of any individual Pod that uses the PV. PV objects capture the details of the implementation of the storage, be that NFS, iSCSI, or a cloud-provider-specific storage system.
High availability of storage in the infrastructure is left to the underlying storage provider.
PVCs are defined by a PersistentVolumeClaim API object, which represents a request for storage by a developer. It is similar to a Pod in that Pods consume node resources and PVCs consume PV resources. For example, Pods can request specific levels of resources, such as CPU and memory, while PVCs can request specific storage capacity and access modes. For example, they can be mounted once read-write or many times read-only.
Lifecycle of a volume and claim
PVs are resources in the cluster. PVCs are requests for those resources and also act as claim checks to the resource. The interaction between PVs and PVCs have the following lifecycle.
Provision storage
In response to requests from a developer defined in a PVC, a cluster administrator configures one or more dynamic provisioners that provision storage and a matching PV.
Alternatively, a cluster administrator can create a number of PVs in advance that carry the details of the real storage that is available for use. PVs exist in the API and are available for use.
Bind claims
When creating a PVC, you request a specific amount of storage, specify the required access mode, and create a storage class to describe and classify the storage. The control loop in the master watches for new PVCs and binds the new PVC to an appropriate PV. If an appropriate PV does not exist, a provisioner for the storage class creates one.
The PV volume might exceed your requested volume. This is especially true with manually provisioned PVs. To minimize the excess, OpenShift binds to the smallest PV that matches all other criteria.
Claims remain unbound indefinitely if a matching volume does not exist or can not be created with any available provisioner servicing a storage class. Claims are bound as matching volumes become available. For example, a cluster with many manually provisioned 50Gi volumes would not match a PVC requesting 100Gi. The PVC can be bound when a 100Gi PV is added to the cluster.
Use Pods and claimed PVs
Pods use claims as volumes. The cluster inspects the claim to find the bound volume and mounts that volume for a Pod. For those volumes that support multiple access modes, we must specify which mode applies when using the claim as a volume in a Pod.
Once we have a claim and that claim is bound, the bound PV belongs to you for as long as you need it. We can schedule Pods and access claimed PVs by including persistentVolumeClaim in the Pod's volumes block.
PVC protection
PVC protection is enabled by default.
Release volumes
When we are finished with a volume, we can delete the PVC object from the API, which allows reclamation of the resource. The volume is considered released when the claim is deleted, but it is not yet available for another claim. The previous claimant's data remains on the volume and must be handled according to policy.
Reclaim volumes
The reclaim policy of a PersistentVolume tells the cluster what to do with the volume after it is released. Volumes reclaim policy can either be Retain, Recycle, or Delete.
The Recycle reclaim policy is deprecated in OpenShift 4. Dynamic provisioning is recommended for equivalent and better functionality.
- Retain reclaim policy allows manual reclamation of the resource for those volume plug-ins that support it.
- Recycle reclaim policy recycles the volume back into the pool of unbound persistent volumes once it is released from its claim.
- Delete reclaim policy deletes both the PersistentVolume object from OpenShift and the associated storage asset in external infrastructure, such as AWS EBS or VMware vSphere.
Dynamically provisioned volumes are always deleted.
Persistent volumes
Each PV contains a spec and status, which is the specification and status of the volume, for example:
PV object definition example
apiVersion: v1
kind: PersistentVolume
metadata:
  name: pv0001 1
spec:
  capacity:
    storage: 5Gi 2
  accessModes:
    - ReadWriteOnce 3
  persistentVolumeReclaimPolicy: Retain 4
  ...
status:
  ...
- 1 Name of the persistent volume.
- 2 The amount of storage available to the volume.
- 3 The access mode, defining the read-write and mount permissions.
- 4 The reclaim policy, indicating how the resource should be handled once it is released.
Types of PVs
OpenShift supports the following PersistentVolume plug-ins:
- AWS Elastic Block Store (EBS)
- Fibre Channel
- HostPath
- iSCSI
- NFS
- VMWare vSphere
Capacity
Generally, a PV has a specific storage capacity. This is set using the PV's capacity attribute.
Currently, storage capacity is the only resource that can be set or requested. Future attributes may include IOPS, throughput, and so on.
Access modes
A PersistentVolume can be mounted on a host in any way supported by the resource provider. Providers have different capabilities and each PV's access modes are set to the specific modes supported by that particular volume. For example, NFS can support multiple read-write clients, but a specific NFS PV might be exported on the server as read-only. Each PV gets its own set of access modes describing that specific PV’s capabilities.
Claims are matched to volumes with similar access modes. The only two matching criteria are access modes and size. A claim's access modes represent a request. Therefore, we might be granted more, but never less. For example, if a claim requests RWO, but the only volume available is an NFS PV (RWO+ROX+RWX), the claim would then match NFS because it supports RWO.
Direct matches are always attempted first. The volume's modes must match or contain more modes than you requested. The size must be greater than or equal to what is expected. If two types of volumes, such as NFS and iSCSI, have the same set of access modes, either of them can match a claim with those modes. There is no ordering between types of volumes and no way to choose one type over another.
All volumes with the same modes are grouped, and then sorted by size, smallest to largest. The binder gets the group with matching modes and iterates over each, in size order, until one size matches.
The following table lists the access modes:
Access Mode CLI abbreviation Description ReadWriteOnce RWO The volume can be mounted as read-write by a single node. ReadOnlyMany ROX The volume can be mounted as read-only by many nodes. ReadWriteMany RWX The volume can be mounted as read-write by many nodes. A volume's AccessModes are descriptors of the volume's capabilities. They are not enforced constraints. The storage provider is responsible for runtime errors resulting from invalid use of the resource.
For example, NFS offers ReadWriteOnce access mode. We must mark the claims as read-only to use the volume's ROX capability. Errors in the provider show up at runtime as mount errors.
iSCSI and Fibre Channel volumes do not currently have any fencing mechanisms. We must ensure the volumes are only used by one node at a time. In certain situations, such as draining a node, the volumes can be used simultaneously by two nodes. Before draining the node, first ensure the Pods that use these volumes are deleted.
Table 1.2. Supported access modes for PVs
Volume Plug-in ReadWriteOnce ReadOnlyMany ReadWriteMany AWS EBS X - Fibre Channel X X - HostPath X - - iSCSI X X - NFS X X X VMWare vSphere X - - Use a recreate deployment strategy for Pods that rely on AWS EBS.
Reclaim policy
The following table lists the current reclaim policy:
Reclaim policy Description Retain Manual reclamation If we do not want to retain all Pods, use dynamic provisioning.
Phase
Volumes can be found in one of the following phases:
Table 1.4. Volume phases
Phase Description Available A free resource not yet bound to a claim. Bound The volume is bound to a claim. Released The claim was deleted, but the resource is not yet reclaimed by the cluster. Failed The volume has failed its automatic reclamation. The CLI shows the name of the PVC bound to the PV.
Mount options
We can specify mount options while mounting a PV using the annotation volume.beta.kubernetes.io/mount-options.
For example:
Mount options example
apiVersion: v1
kind: PersistentVolume
metadata:
  name: pv0001
  annotations:
    volume.beta.kubernetes.io/mount-options: rw,nfsvers=4,noexec 1
spec:
  capacity:
    storage: 1Gi
  accessModes:
  - ReadWriteOnce
  nfs:
    path: /tmp
    server: 172.17.0.2
  persistentVolumeReclaimPolicy: Retain
  claimRef:
    name: claim1
    namespace: default
- 1 Specified mount options are used while mounting the PV to the disk.
The following PV types support mount options:
- AWS Elastic Block Store (EBS)
- iSCSI
- NFS
- VMWare vSphere
Fibre Channel and HostPath PVs do not support mount options.
Persistent volume claims
Each persistent volume claim (PVC) contains a spec and status, which is the specification and status of the claim, for example:
PVC object definition example
kind: PersistentVolumeClaim
apiVersion: v1
metadata:
  name: myclaim 1
spec:
  accessModes:
    - ReadWriteOnce 2
  resources:
    requests:
      storage: 8Gi 3
  storageClassName: gold 4
status:
  ...
- 1 Name of the PVC
- 2 The access mode, defining the read-write and mount permissions
- 3 The amount of storage available to the PVC
- 4 Name of the StorageClass required by the claim
Storage classes
Claims can optionally request a specific storage class by specifying the storage class's name in the storageClassName attribute. Only PVs of the requested class, ones with the same storageClassName as the PVC, can be bound to the PVC. The cluster administrator can configure dynamic provisioners to service one or more storage classes. The cluster administrator can create a PV on demand that matches the specifications in the PVC.
The cluster administrator can also set a default storage class for all PVCs. When a default storage class is configured, the PVC must explicitly ask for StorageClass or storageClassName annotations set to "" to be bound to a PV without a storage class.
Access modes
Claims use the same conventions as volumes when requesting storage with specific access modes.
Resources
Claims, such as Pods, can request specific quantities of a resource. In this case, the request is for storage. The same resource model applies to volumes and claims.
Claims as volumes
Pods access storage using the claim as a volume. Claims must exist in the same namespace as the Pod using the claim. The cluster finds the claim in the Pod's namespace and uses it to get the PersistentVolume backing the claim. The volume is mounted to the host and into the Pod, for example:
Mount volume to the host and into the Pod example
kind: Pod
apiVersion: v1
metadata:
  name: mypod
spec:
  containers:
    - name: myfrontend
      image: dockerfile/nginx
      volumeMounts:
      - mountPath: "/var/www/html" 1
name: mypd 2
  volumes:
    - name: mypd
      persistentVolumeClaim:
claimName: myclaim 3
- 1 Path to mount the volume inside the Pod
- 2 Name of the volume to mount
- 3 Name of the PVC, that exists in the same namespace, to use
Block volume support
We can statically provision raw block volumes by including API fields in your PV and PVC specifications.
The following table displays which volume plug-ins support block volumes.
Volume Plug-in Manually provisioned Dynamically provisioned AWS EBS X X Fibre Channel X HostPath iSCSI X NFS VMWare vSphere X X Block volume support is a Technology Preview feature only. Technology Preview features are not supported with Red Hat production service level agreements (SLAs) and might not be functionally complete. Red Hat does not recommend using them in production. These features provide early access to upcoming product features, enabling customers to test functionality and provide feedback during the development process.
Block volume examples
PV example
apiVersion: v1
kind: PersistentVolume
metadata:
  name: block-pv
spec:
  capacity:
    storage: 10Gi
  accessModes:
    - ReadWriteOnce
  volumeMode: Block 1
  persistentVolumeReclaimPolicy: Retain
  fc:
    targetWWNs: ["50060e801049cfd1"]
    lun: 0
    readOnly: false
- 1
- volumeMode field indicating that this PV is a raw block volume.
PVC example
apiVersion: v1
kind: PersistentVolumeClaim
metadata:
  name: block-pvc
spec:
  accessModes:
    - ReadWriteOnce
  volumeMode: Block 1
  resources:
    requests:
      storage: 10Gi
- 1
- volumeMode field indicating that a raw block PVC is requested.
Pod specification example
apiVersion: v1
kind: Pod
metadata:
  name: pod-with-block-volume
spec:
  containers:
    - name: fc-container
      image: fedora:26
      command: ["/bin/sh", "-c"]
      args: [ "tail -f /dev/null" ]
      volumeDevices:  1
- name: data
  devicePath: /dev/xvda 2
  volumes:
    - name: data
      persistentVolumeClaim:
claimName: block-pvc 3
- 1
- volumeDevices, similar to volumeMounts, is used for block devices and can only be used with PersistentVolumeClaim sources.
- 2
- devicePath, similar to mountPath, represents the path to the physical device.
- 3
- The volume source must be of type persistentVolumeClaim and must match the name of the PVC as expected.
Table 1.6. Accepted values for VolumeMode
Value Default Filesystem Yes Block No Table 1.7. Binding scenarios for block volumes
PV VolumeMode PVC VolumeMode Binding Result Filesystem Filesystem Bind Unspecified Unspecified Bind Filesystem Unspecified Bind Unspecified Filesystem Bind Block Block Bind Unspecified Block No Bind Block Unspecified No Bind Filesystem Block No Bind Block Filesystem No Bind Unspecified values result in the default value of Filesystem.
Persistent Storage Using AWS Elastic Block Store
OpenShift supports AWS Elastic Block Store volumes (EBS). We can provision the OpenShift cluster with persistent storage using AWS EC2. Some familiarity with Kubernetes and AWS is assumed.
The Kubernetes persistent volume framework allows administrators to provision a cluster with persistent storage and gives users a way to request those resources without having any knowledge of the underlying infrastructure. AWS Elastic Block Store volumes can be provisioned dynamically. Persistent volumes are not bound to a single project or namespace; they can be shared across the OpenShift cluster. Persistent volume claims are specific to a project or namespace and can be requested by users.
High-availability of storage in the infrastructure is left to the underlying storage provider.
Additional References
Create the EBS Storage Class
StorageClasses are used to differentiate and delineate storage levels and usages. By defining a storage class, users can obtain dynamically provisioned persistent volumes.
Procedure
- In the OpenShift console, click Storage -Storage Classes.
- In the storage class overview, click Create Storage Class.
- Define the desired options on the page that appears.
- Enter a name to reference the storage class.
- Enter an optional description.
- Select the reclaim policy.
- Select kubernetes.io/aws-ebs from the drop down list.
- Enter additional parameters for the storage class as desired.
- Click Create to create the storage class.
Create the Persistent Volume Claim
Prerequisites
Storage must exist in the underlying infrastructure before it can be mounted as a volume in OpenShift.
Procedure
- In the OpenShift console, click Storage -Persistent Volume Claims.
- In the persistent volume claims overview, click Create Persistent Volume Claim.
- Define the desired options on the page that appears.
- Select the storage class created previously from the drop-down menu.
- Enter a unique name for the storage claim.
- Select the access mode. This determines the read and write access for the created storage claim.
- Define the size of the storage claim.
- Click Create to create the persistent volume claim and generate a persistent volume.
Volume Format
Before OpenShift mounts the volume and passes it to a container, it checks that it contains a file system as specified by the fsType parameter in the persistent volume definition. If the device is not formatted with the file system, all data from the device is erased and the device is automatically formatted with the given file system.
This allows using unformatted AWS volumes as persistent volumes, because OpenShift formats them before the first use.
Maximum Number of EBS Volumes on a Node
By default, OpenShift supports a maximum of 39 EBS volumes attached to one node. This limit is consistent with the AWS volume limits.
OpenShift can be configured to have a higher limit by setting the environment variable KUBE_MAX_PD_VOLS. However, AWS requires a particular naming scheme (AWS Device Naming) for attached devices, which only supports a maximum of 52 volumes. This limits the number of volumes that can be attached to a node via OpenShift to 52.
Persistent storage using NFS
OpenShift clusters can be provisioned with persistent storage using NFS. Persistent volumes (PVs) and persistent volume claims (PVCs) provide a convenient method for sharing a volume across a project. While the NFS-specific information contained in a PV definition could also be defined directly in a Pod definition, doing so does not create the volume as a distinct cluster resource, making the volume more susceptible to conflicts.
Additional resources
Provision
Storage must exist in the underlying infrastructure before it can be mounted as a volume in OpenShift. To provision NFS volumes, a list of NFS servers and export paths are all that is required.
Procedure
- Create an object definition for the PV:
apiVersion: v1
kind: PersistentVolume
metadata:
  name: pv0001 1
spec:
  capacity:
    storage: 5Gi 2
  accessModes:
  - ReadWriteOnce 3
  nfs: 4
    path: /tmp 5
    server: 172.17.0.2 6
  persistentVolumeReclaimPolicy: Retain 7
- 1 The name of the volume. This is the PV identity in various oc <command> pod commands.
- 2 The amount of storage allocated to this volume.
- 3 Though this appears to be related to controlling access to the volume, it is actually used similarly to labels and used to match a PVC to a PV. Currently, no access rules are enforced based on the accessModes.
- 4 The volume type being used, in this case the nfs plug-in.
- 5 The path that is exported by the NFS server.
- 6 The host name or IP address of the NFS server.
- 7 The reclaim policy for the PV. This defines what happens to a volume when released.
Each NFS volume must be mountable by all schedulable nodes in the cluster.
- Verify that the PV was created:
$ oc get pv NAME LABELS CAPACITY ACCESSMODES STATUS CLAIM REASON AGE pv0001 <none> 5368709120 RWO Available 31s- Create a persistent volume claim which binds to the new PV:
apiVersion: v1 kind: PersistentVolumeClaim metadata: name: nfs-claim1 spec: accessModes: - ReadWriteOnce 1 resources: requests: storage: 5Gi 2- Verify that the persistent volume claim was created:
$ oc get pvc
NAME         STATUS   VOLUME   CAPACITY   ACCESS MODES   STORAGECLASS   AGE
nfs-claim1   Bound    pv0001   4Gi        RWO            gp2            2m
Enforce disk quotas
We can use disk partitions to enforce disk quotas and size constraints. Each partition can be its own export. Each export is one PV. OpenShift enforces unique names for PVs, but the uniqueness of the NFS volume's server and path is up to the administrator.
Enforce quotas in this way allows the developer to request persistent storage by a specific amount, such as 10Gi, and be matched with a corresponding volume of equal or greater capacity.
NFS volume security
This section covers NFS volume security, including matching permissions and SELinux considerations. The user is expected to understand the basics of POSIX permissions, process UIDs, supplemental groups, and SELinux.
Developers request NFS storage by referencing either a PVC by name or the NFS volume plug-in directly in the volumes section of their Pod definition.
The /etc/exports file on the NFS server contains the accessible NFS directories. The target NFS directory has POSIX owner and group IDs. The OpenShift NFS plug-in mounts the container's NFS directory with the same POSIX ownership and permissions found on the exported NFS directory. However, the container is not run with its effective UID equal to the owner of the NFS mount, which is the desired behavior.
As an example, if the target NFS directory appears on the NFS server as:
$ ls -lZ /opt/nfs -d
drwxrws---. nfsnobody 5555 unconfined_u:object_r:usr_t:s0   /opt/nfs

$ id nfsnobody
uid=65534(nfsnobody) gid=65534(nfsnobody) groups=65534(nfsnobody)
Then the container must match SELinux labels, and either run with a UID of 65534, the nfsnobody owner, or with 5555 in its supplemental groups in order to access the directory.
The owner ID of 65534 is used as an example. Even though NFS's root_squash maps root, uid 0, to nfsnobody, uid 65534, NFS exports can have arbitrary owner IDs. Owner 65534 is not required for NFS exports.
Group IDs
The recommended way to handle NFS access, assuming it is not an option to change permissions on the NFS export, is to use supplemental groups. Supplemental groups in OpenShift are used for shared storage, of which NFS is an example. In contrast block storage, such as iSCSI, use the fsGroup SCC strategy and the fsGroup value in the Pod's securityContext.
It is generally preferable to use supplemental group IDs to gain access to persistent storage versus using user IDs.
Because the group ID on the example target NFS directory is 5555, the Pod can define that group ID using supplementalGroups under the Pod's securityContext definition. For example:
spec:
  containers:
    - name:
    ...
  securityContext: 1
    supplementalGroups: [5555] 2
Assuming there are no custom SCCs that might satisfy the Pod's requirements, the Pod likely matches the restricted SCC. This SCC has the supplementalGroups strategy set to RunAsAny, meaning that any supplied group ID is accepted without range checking.
As a result, the above Pod passes admissions and is launched. However, if group ID range checking is desired, a custom SCC is the preferred solution. A custom SCC can be created such that minimum and maximum group IDs are defined, group ID range checking is enforced, and a group ID of 5555 is allowed.
To use a custom SCC, we must first add it to the appropriate service account. For example, use the default service account in the given project unless another has been specified on the Pod specification.
User IDs
User IDs can be defined in the container image or in the Pod definition.
It is generally preferable to use supplemental group IDs to gain access to persistent storage versus using user IDs.
In the example target NFS directory shown above, the container needs its UID set to 65534, ignoring group IDs for the moment, so the following can be added to the Pod definition:
spec:
  containers: 1
  - name:
  ...
    securityContext:
      runAsUser: 65534 2
- 1 Pods contain a securityContext specific to each container and a Pod's securityContext which applies to all containers defined in the Pod.
- 2 65534 is the nfsnobody user.
Assuming the default project and the restricted SCC, the Pod's requested user ID of 65534 is not allowed, and therefore the Pod fails. The Pod fails for the following reasons:
- It requests 65534 as its user ID.
- All SCCs available to the Pod are examined to see which SCC allows a user ID of 65534. While all policies of the SCCs are checked, the focus here is on user ID.
- Because all available SCCs use MustRunAsRange for their runAsUser strategy, UID range checking is required.
- 65534 is not included in the SCC or project's user ID range.
It is generally considered a good practice not to modify the predefined SCCs. The preferred way to fix this situation is to create a custom SCC A custom SCC can be created such that minimum and maximum user IDs are defined, UID range checking is still enforced, and the UID of 65534 is allowed.
To use a custom SCC, we must first add it to the appropriate service account. For example, use the default service account in the given project unless another has been specified on the Pod specification.
SELinux
By default, SELinux does not allow writing from a Pod to a remote NFS server. The NFS volume mounts correctly, but is read-only.
To enable writing to a remote NFS server, follow the below procedure.
Prerequisites
- The container-selinux package must be installed. This package provides the virt_use_nfs SELinux boolean.
Procedure
- Enable the virt_use_nfs boolean using the following command. The -P option makes this boolean persistent across reboots.
# setsebool -P virt_use_nfs 1
Export settings
In order to enable arbitrary container users to read and write the volume, each exported volume on the NFS server should conform to the following conditions:
- Every export must be exported using the following format:
/<example_fs> *(rw,root_squash)- The firewall must be configured to allow traffic to the mount point.
- For NFSv4, configure the default port 2049 (nfs) and port 111 (portmapper).
NFSv4
# iptables -I INPUT 1 -p tcp --dport 2049 -j ACCEPT # iptables -I INPUT 1 -p tcp --dport 111 -j ACCEPT- For NFSv3, there are three ports to configure: 2049 (nfs), 20048 (mountd), and 111 (portmapper).
NFSv3
# iptables -I INPUT 1 -p tcp --dport 2049 -j ACCEPT # iptables -I INPUT 1 -p tcp --dport 20048 -j ACCEPT # iptables -I INPUT 1 -p tcp --dport 111 -j ACCEPT- The NFS export and directory must be set up so that they are accessible by the target Pods. Either set the export to be owned by the container's primary UID, or supply the Pod group access using supplementalGroups, as shown in group IDs above.
Reclaim resources
NFS implements the OpenShift Recyclable plug-in interface. Automatic processes handle reclamation tasks based on policies set on each persistent volume.
By default, PVs are set to Retain.
Once claim to a PVC is deleted, and the PV is released, the PV object should not be reused. Instead, a new PV should be created with the same basic volume details as the original.
For example, the administrator creates a PV named nfs1:
apiVersion: v1
kind: PersistentVolume
metadata:
  name: nfs1
spec:
  capacity:
    storage: 1Mi
  accessModes:
    - ReadWriteMany
  nfs:
    server: 192.168.1.1
    path: "/"
The user creates PVC1, which binds to nfs1. The user then deletes PVC1, releasing claim to nfs1. This results in nfs1 being Released. If the administrator wants to make the same NFS share available, they should create a new PV with the same NFS server details, but a different PV name:
apiVersion: v1
kind: PersistentVolume
metadata:
  name: nfs2
spec:
  capacity:
    storage: 1Mi
  accessModes:
    - ReadWriteMany
  nfs:
    server: 192.168.1.1
    path: "/"
Delete the original PV and re-creating it with the same name is discouraged. Attempting to manually change the status of a PV from Released to Available causes errors and potential data loss.
Additional configuration and troubleshooting
Depending on what version of NFS is being used and how it is configured, there may be additional configuration steps needed for proper export and security mapping. The following are some that may apply:
NFSv4 mount incorrectly shows all files with ownership of nobody:nobody
- Could be attributed to the ID mapping settings, found in /etc/idmapd.conf on your NFS.
- See this Red Hat Solution.
Disable ID mapping on NFSv4 On both the NFS client and server, run: # echo 'Y' > /sys/module/nfsd/parameters/nfs4_disable_idmapping
Persistent Storage Using iSCSI
We can provision the OpenShift cluster with persistent storage using iSCSI. Some familiarity with Kubernetes and iSCSI is assumed.
The Kubernetes persistent volume framework allows administrators to provision a cluster with persistent storage and gives users a way to request those resources without having any knowledge of the underlying infrastructure.
High-availability of storage in the infrastructure is left to the underlying storage provider.
When you use iSCSI on Amazon Web Services, we must update the default security policy to include TCP traffic between nodes on the iSCSI ports. By default, they are ports 860 and 3260.
Provision
Verify that the storage exists in the underlying infrastructure before mounting it as a volume in OpenShift. All that is required for the iSCSI is the iSCSI target portal, a valid iSCSI Qualified Name (IQN), a valid LUN number, the filesystem type, and the PersistentVolume API.
Optionally, we can provide multipath portals and the Challenge Handshake Authentication Protocol (CHAP) configuration.
Example 2.1. Persistent Volume Object Definition
apiVersion: v1
kind: PersistentVolume
metadata:
  name: iscsi-pv
spec:
  capacity:
    storage: 1Gi
  accessModes:
    - ReadWriteOnce
  iscsi:
     targetPortal: 10.16.154.81:3260
     portals: ['10.16.154.82:3260', '10.16.154.83:3260']
     iqn: iqn.2014-12.example.server:storage.target00
     lun: 0
     fsType: 'ext4'
     readOnly: false
     chapAuthDiscovery: true
     chapAuthSession: true
     secretRef:
       name: chap-secret
Enforce Disk Quotas
Use LUN partitions to enforce disk quotas and size constraints. Each LUN is one persistent volume. Kubernetes enforces unique names for persistent volumes.
Enforce quotas in this way allows the end user to request persistent storage by a specific amount (e.g, 10Gi) and be matched with a corresponding volume of equal or greater capacity.
iSCSI Volume Security
Users request storage with a PersistentVolumeClaim. This claim only lives in the user's namespace and can only be referenced by a pod within that same namespace. Any attempt to access a persistent volume claim across a namespace causes the pod to fail.
Each iSCSI LUN must be accessible by all nodes in the cluster.
iSCSI Multipathing
For iSCSI-based storage, we can configure multiple paths using the same IQN for more than one target portal IP address. Multipathing ensures access to the persistent volume when one or more of the components in a path fail.
To specify multi-paths in the pod specification use the portals field. For example:
apiVersion: v1
kind: PersistentVolume
metadata:
  name: iscsi_pv
spec:
  capacity:
    storage: 1Gi
  accessModes:
    - ReadWriteOnce
  iscsi:
    targetPortal: 10.0.0.1:3260
    portals: ['10.0.2.16:3260', '10.0.2.17:3260', '10.0.2.18:3260'] 1
    iqn: iqn.2016-04.test.com:storage.target00
    lun: 0
    fsType: ext4
    readOnly: false
- 1 Add additional target portals using the portals field.
iSCSI Custom Initiator IQN
Configure the custom initiator iSCSI Qualified Name (IQN) if the iSCSI targets are restricted to certain IQNs, but the nodes that the iSCSI PVs are attached to are not guaranteed to have these IQNs.
To specify a custom initiator IQN, use initiatorName field.
apiVersion: v1
kind: PersistentVolume
metadata:
  name: iscsi_pv
spec:
  capacity:
    storage: 1Gi
  accessModes:
    - ReadWriteOnce
  iscsi:
    targetPortal: 10.0.0.1:3260
    portals: ['10.0.2.16:3260', '10.0.2.17:3260', '10.0.2.18:3260']
    iqn: iqn.2016-04.test.com:storage.target00
    lun: 0
    initiatorName: iqn.2016-04.test.com:custom.iqn 1
    fsType: ext4
    readOnly: false
- 1 Name of the initiator.
Persistent storage using the Container Storage Interface (CSI)
The Container Storage Interface (CSI) allows OpenShift to consume storage from storage backends that implement the CSI interface as persistent storage.
Container Storage Interface is a Technology Preview feature only. Technology Preview features are not supported with Red Hat production service level agreements (SLAs) and might not be functionally complete. Red Hat does not recommend using them in production. These features provide early access to upcoming product features, enabling customers to test functionality and provide feedback during the development process.
For more information about the support scope of Red Hat Technology Preview features, see https://access.redhat.com/support/offerings/techpreview/.
OpenShift does not ship with any CSI drivers. It is recommended to use the CSI drivers provided by community or storage vendors.
OpenShift 4.1 supports version 1.0.0 of the CSI specification.
CSI Architecture
CSI drivers are typically shipped as container images. These containers are not aware of OpenShift where they run. To use CSI-compatible storage backend in OpenShift, the cluster administrator must deploy several components that serve as a bridge between OpenShift and the storage driver.
The following diagram provides a high-level overview about the components running in pods in the OpenShift cluster.
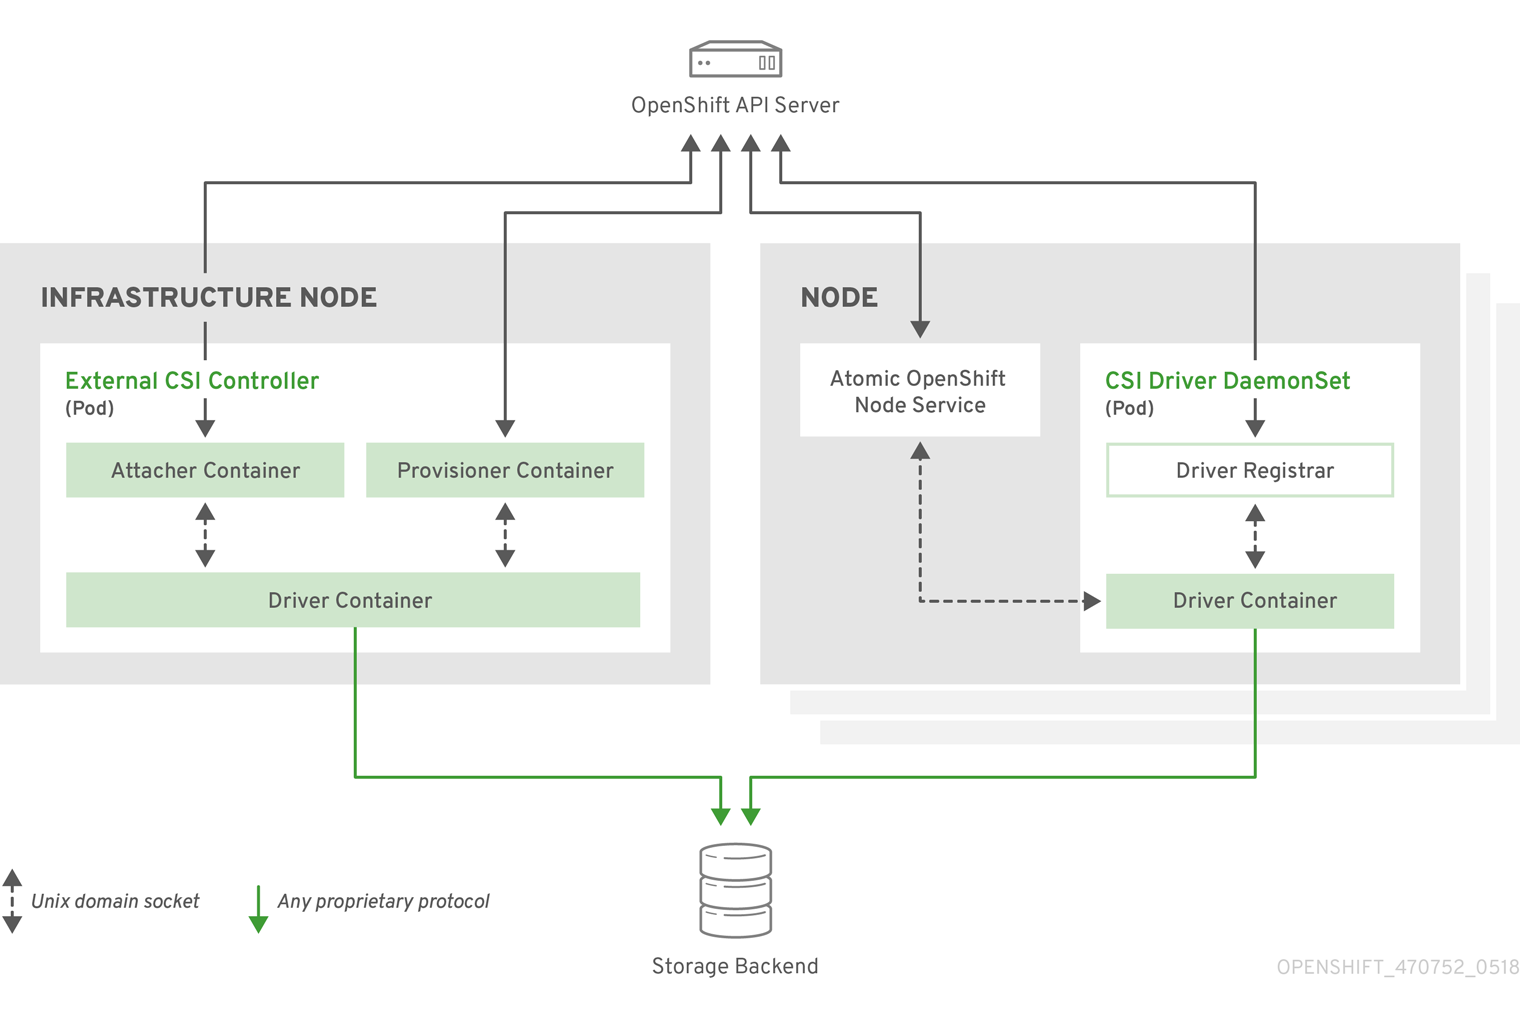
It is possible to run multiple CSI drivers for different storage backends. Each driver needs its own external controllers' deployment and DaemonSet with the driver and CSI registrar.
External CSI controllers
External CSI Controllers is a deployment that deploys one or more pods with three containers:
- An external CSI attacher container translates attach and detach calls from OpenShift to respective ControllerPublish and ControllerUnpublish calls to the CSI driver.
- An external CSI provisioner container that translates provision and delete calls from OpenShift to respective CreateVolume and DeleteVolume calls to the CSI driver.
- A CSI driver container
The CSI attacher and CSI provisioner containers communicate with the CSI driver container using UNIX Domain Sockets, ensuring that no CSI communication leaves the pod. The CSI driver is not accessible from outside of the pod.
attach, detach, provision, and delete operations typically require the CSI driver to use credentials to the storage backend. Run the CSI controller pods on infrastructure nodes so the credentials are never leaked to user processes, even in the event of a catastrophic security breach on a compute node.
The external attacher must also run for CSI drivers that do not support third-party attach or detach operations. The external attacher will not issue any ControllerPublish or ControllerUnpublish operations to the CSI driver. However, it still must run to implement the necessary OpenShift attachment API.
CSI Driver DaemonSet
The CSI driver DaemonSet runs a pod on every node that allows OpenShift to mount storage provided by the CSI driver to the node and use it in user workloads (pods) as persistent volumes (PVs). The pod with the CSI driver installed contains the following containers:
- A CSI driver registrar, which registers the CSI driver into the openshift-node service running on the node. The openshift-node process running on the node then directly connects with the CSI driver using the UNIX Domain Socket available on the node.
- A CSI driver.
The CSI driver deployed on the node should have as few credentials to the storage backend as possible. OpenShift will only use the node plug-in set of CSI calls such as NodePublish/NodeUnpublish and NodeStage/NodeUnstage, if these calls are implemented.
Example CSI deployment
Since OpenShift does not ship with any CSI driver installed, this example shows how to deploy a community driver for OpenStack Cinder in OpenShift.
Procedure
- Create a new project where the CSI components will run, and then create a new service account to run the components. An explicit node selector is used to run the Daemonset with the CSI driver also on master nodes.
# oc adm new-project csi --node-selector="" Created project csi # oc create serviceaccount cinder-csi serviceaccount "cinder-csi" created # oc adm policy add-scc-to-user privileged system:serviceaccount:csi:cinder-csi securitycontextconstraints.security.openshift.io/privileged added to: ["system:serviceaccount:csi:cinder-csi"]- Apply this YAML file to create the deployment with the external CSI attacher and provisioner and DaemonSet with the CSI driver.
# This YAML file contains all API objects that are necessary to run Cinder CSI
# driver.
#
# In production, this needs to be in separate files, e.g. service account and
# role and role binding needs to be created once.
#
# It serves as an example how to use external attacher and external provisioner
# images shipped with {product-title} with a community CSI driver.

kind: ClusterRole
apiVersion: rbac.authorization.k8s.io/v1
metadata:
  name: cinder-csi-role
rules:
  - apiGroups: [""]
    resources: ["persistentvolumes"]
    verbs: ["create", "delete", "get", "list", "watch", "update", "patch"]
  - apiGroups: [""]
    resources: ["events"]
    verbs: ["create", "get", "list", "watch", "update", "patch"]
  - apiGroups: [""]
    resources: ["persistentvolumeclaims"]
    verbs: ["get", "list", "watch", "update", "patch"]
  - apiGroups: [""]
    resources: ["nodes"]
    verbs: ["get", "list", "watch", "update", "patch"]
  - apiGroups: ["storage.k8s.io"]
    resources: ["storageclasses"]
    verbs: ["get", "list", "watch"]
  - apiGroups: ["storage.k8s.io"]
    resources: ["volumeattachments"]
    verbs: ["get", "list", "watch", "update", "patch"]
  - apiGroups: [""]
    resources: ["configmaps"]
    verbs: ["get", "list", "watch", "create", "update", "patch"]

---

kind: ClusterRoleBinding
apiVersion: rbac.authorization.k8s.io/v1
metadata:
  name: cinder-csi-role
subjects:
  - kind: ServiceAccount
    name: cinder-csi
    namespace: csi
roleRef:
  kind: ClusterRole
  name: cinder-csi-role
  apiGroup: rbac.authorization.k8s.io

---
apiVersion: v1
data:
  cloud.conf: W0dsb2JhbF0KYXV0aC11cmwgPSBodHRwczovL2V4YW1wbGUuY29tOjEzMDAwL3YyLjAvCnVzZXJuYW1lID0gYWxhZGRpbgpwYXNzd29yZCA9IG9wZW5zZXNhbWUKdGVuYW50LWlkID0gZTBmYTg1YjZhMDY0NDM5NTlkMmQzYjQ5NzE3NGJlZDYKcmVnaW9uID0gcmVnaW9uT25lCg== 1
kind: Secret
metadata:
  creationTimestamp: null
  name: cloudconfig
---
kind: Deployment
apiVersion: apps/v1
metadata:
  name: cinder-csi-controller
spec:
  replicas: 2
  selector:
    matchLabels:
      app: cinder-csi-controllers
  template:
    metadata:
      labels:
app: cinder-csi-controllers
    spec:
      serviceAccount: cinder-csi
      containers:
- name: csi-attacher
  image: quay.io/k8scsi/csi-attacher:v1.0.0
  args:
- "--v=5"
- "--csi-address=$(ADDRESS)"
- "--leader-election"
- "--leader-election-namespace=$(MY_NAMESPACE)"
- "--leader-election-identity=$(MY_NAME)"
  env:
- name: MY_NAME
  valueFrom:
    fieldRef:
      fieldPath: metadata.name
- name: MY_NAMESPACE
  valueFrom:
    fieldRef:
      fieldPath: metadata.namespace
- name: ADDRESS
  value: /csi/csi.sock
  volumeMounts:
- name: socket-dir
  mountPath: /csi
- name: csi-provisioner
  image: quay.io/k8scsi/csi-provisioner:v1.0.0
  args:
- "--v=5"
- "--provisioner=csi-cinderplugin"
- "--csi-address=$(ADDRESS)"
  env:
- name: ADDRESS
  value: /csi/csi.sock
  volumeMounts:
- name: socket-dir
  mountPath: /csi
- name: cinder-driver
  image: k8scloudprovider/cinder-csi-plugin:v0.3.0
  command: [ "/bin/cinder-csi-plugin" ]
  args:
- "--nodeid=$(NODEID)"
- "--endpoint=unix://$(ADDRESS)"
- "--cloud-config=/etc/cloudconfig/cloud.conf"
  env:
- name: NODEID
  valueFrom:
    fieldRef:
      fieldPath: spec.nodeName
- name: ADDRESS
  value: /csi/csi.sock
  volumeMounts:
- name: socket-dir
  mountPath: /csi
- name: cloudconfig
  mountPath: /etc/cloudconfig
      volumes:
- name: socket-dir
  emptyDir:
- name: cloudconfig
  secret:
secretName: cloudconfig

---

kind: DaemonSet
apiVersion: apps/v1
metadata:
  name: cinder-csi-ds
spec:
  selector:
    matchLabels:
      app: cinder-csi-driver
  template:
    metadata:
      labels:
app: cinder-csi-driver
    spec:
      2
      serviceAccount: cinder-csi
      containers:
- name: csi-driver-registrar
  image: quay.io/k8scsi/csi-node-driver-registrar:v1.0.2
  securityContext:
privileged: true
  args:
- "--v=5"
- "--csi-address=$(ADDRESS)"
  env:
- name: ADDRESS
  value: /csi/csi.sock
- name: KUBE_NODE_NAME
  valueFrom:
    fieldRef:
      fieldPath: spec.nodeName
  volumeMounts:
- name: socket-dir
  mountPath: /csi
- name: cinder-driver
  securityContext:
privileged: true
capabilities:
  add: ["SYS_ADMIN"]
allowPrivilegeEscalation: true
  image: k8scloudprovider/cinder-csi-plugin:v0.3.0
  command: [ "/bin/cinder-csi-plugin" ]
  args:
- "--nodeid=$(NODEID)"
- "--endpoint=unix://$(ADDRESS)"
- "--cloud-config=/etc/cloudconfig/cloud.conf"
  env:
- name: NODEID
  valueFrom:
    fieldRef:
      fieldPath: spec.nodeName
- name: ADDRESS
  value: /csi/csi.sock
  volumeMounts:
- name: socket-dir
  mountPath: /csi
- name: cloudconfig
  mountPath: /etc/cloudconfig
- name: mountpoint-dir
  mountPath: /var/lib/origin/openshift.local.volumes/pods/
  mountPropagation: "Bidirectional"
- name: cloud-metadata
  mountPath: /var/lib/cloud/data/
- name: dev
  mountPath: /dev
      volumes:
- name: cloud-metadata
  hostPath:
path: /var/lib/cloud/data/
- name: socket-dir
  hostPath:
path: /var/lib/kubelet/plugins/csi-cinderplugin
type: DirectoryOrCreate
- name: mountpoint-dir
  hostPath:
path: /var/lib/origin/openshift.local.volumes/pods/
type: Directory
- name: cloudconfig
  secret:
secretName: cloudconfig
- name: dev
  hostPath:
path: /dev
- 1 Replace with cloud.conf for your OpenStack deployment. For example, the Secret can be generated using the oc create secret generic cloudconfig --from-file cloud.conf --dry-run -o yaml.
- 2 Optionally, add nodeSelector to the CSI driver pod template to configure the nodes on which the CSI driver starts. Only nodes matching the selector run pods that use volumes that are served by the CSI driver. Without nodeSelector, the driver runs on all nodes in the cluster.
Dynamic Provisioning
Dynamic provisioning of persistent storage depends on the capabilities of the CSI driver and underlying storage backend. The provider of the CSI driver should document how to create a StorageClass in OpenShift and the parameters available for configuration.
As seen in the OpenStack Cinder example, we can deploy this StorageClass to enable dynamic provisioning.
Procedure
- Create a default storage class that ensures all PVCs that do not require any special storage class are provisioned by the installed CSI driver.
# oc create -f - << EOF
apiVersion: storage.k8s.io/v1
kind: StorageClass
metadata:
  name: cinder
  annotations:
    storageclass.kubernetes.io/is-default-class: "true"
provisioner: csi-cinderplugin
parameters:
EOF
Example using the CSI driver
The following example installs a default MySQL template without any changes to the template.
Prerequisites
- The CSI driver has been deployed.
- A StorageClass has been created for dynamic provisioning.
Procedure
Enable volume expansion support
Before we can expand persistent volumes, the StorageClass must have the allowVolumeExpansion field set to true.
Procedure
- Edit the StorageClass and add the allowVolumeExpansion attribute. The following example demonstrates adding this line at the bottom of the StorageClass's configuration.
apiVersion: storage.k8s.io/v1
kind: StorageClass
...
parameters:
  type: gp2
reclaimPolicy: Delete
allowVolumeExpansion: true 1
- 1Set this attribute to true allows PVCs to be expanded after creation.
Expanding Persistent Volume Claims (PVC) with a file system
Expanding PVCs based on volume types that need file system resizing, such as GCE, PD, EBS, and Cinder, is a two-step process. This process involves expanding volume objects in the cloud provider, and then expanding the file system on the actual node.
Expanding the file system on the node only happens when a new pod is started with the volume.
Prerequisites
- The controlling StorageClass must have allowVolumeExpansion set to true.
Procedure
- Edit the PVC and request a new size by editing spec.resources.requests. For example, the following expands the ebs PVC to 8 Gi.
kind: PersistentVolumeClaim
apiVersion: v1
metadata:
  name: ebs
spec:
  storageClass: "storageClassWithFlagSet"
  accessModes:
    - ReadWriteOnce
  resources:
    requests:
      storage: 8Gi 1
- 1Update spec.resources.requests to a larger amount will expand the PVC.
- Once the cloud provider object has finished resizing, the PVC is set to FileSystemResizePending. The following command is used to check the condition:
$ oc describe pvc <pvc_name>- When the cloud provider object has finished resizing, the persistent volume object reflects the newly requested size in PersistentVolume.Spec.Capacity. At this point, we can create or re-create a new pod from the PVC to finish the file system resizing. Once the pod is running, the newly requested size is available and the FileSystemResizePending condition is removed from the PVC.
Recover from Failure when Expanding Volumes
If expanding underlying storage fails, the OpenShift administrator can manually recover the Persistent Volume Claim (PVC) state and cancel the resize requests. Otherwise, the resize requests are continuously retried by the controller without administrator intervention.
Procedure
- Mark the persistent volume (PV) that is bound to the PVC with the Retain reclaim policy. This can be done by editing the PV and changing persistentVolumeReclaimPolicy to Retain.
- Delete the PVC. This will be recreated later.
- To ensure that the newly created PVC can bind to the PV marked Retain, manually edit the PV and delete the claimRef entry from the PV specs. This marks the PV as Available.
- Re-create the PVC in a smaller size, or a size that can be allocated by the underlying storage provider.
- Set the volumeName field of the PVC to the name of the PV. This binds the PVC to the provisioned PV only.
- Restore the reclaim policy on the PV.
About dynamic provisioning
The StorageClass resource object describes and classifies storage that can be requested, as well as provides a means for passing parameters for dynamically provisioned storage on demand. StorageClass objects can also serve as a management mechanism for controlling different levels of storage and access to the storage. Cluster Administrators (cluster-admin) or Storage Administrators (storage-admin) define and create the StorageClass objects that users can request without needing any intimate knowledge about the underlying storage volume sources.
The OpenShift persistent volume framework enables this functionality and allows administrators to provision a cluster with persistent storage. The framework also gives users a way to request those resources without having any knowledge of the underlying infrastructure.
Many storage types are available for use as persistent volumes in OpenShift. While all of them can be statically provisioned by an administrator, some types of storage are created dynamically using the built-in provider and plug-in APIs.
Available dynamic provisioning plug-ins
OpenShift provides the following provisioner plug-ins, which have generic implementations for dynamic provisioning that use the cluster's configured provider’s API to create new storage resources:
Storage type Provisioner plug-in name Notes AWS Elastic Block Store (EBS) kubernetes.io/aws-ebs For dynamic provisioning when using multiple clusters in different zones, tag each node with Key=kubernetes.io/cluster/<cluster_name>,Value=<cluster_id> where <cluster_name> and <cluster_id> are unique per cluster. Any chosen provisioner plug-in also requires configuration for the relevant cloud, host, or third-party provider as per the relevant documentation.
Define a StorageClass
StorageClass objects are currently a globally scoped object and must be created by cluster-admin or storage-admin users.
For AWS, a default StorageClass is created during OpenShift installation. We can change the default StorageClass after installation, but the created StorageClass cannot be deleted.
The following sections describe the basic object definition for a StorageClass and specific examples for each of the supported plug-in types.
Basic StorageClass object definition
The following resource shows the parameters and default values used to configure a StorageClass. This example uses the AWS ElasticBlockStore (EBS) object definition.
Sample StorageClass definition
kind: StorageClass 1
apiVersion: storage.k8s.io/v1 2
metadata:
  name: gp2 3
  annotations: 4
    storageclass.kubernetes.io/is-default-class: 'true'
    ...
provisioner: kubernetes.io/aws-ebs 5
parameters: 6
  type: gp2
...
- 1 (required) The API object type.
- 2 (required) The current apiVersion.
- 3 (required) The name of the StorageClass.
- 4 (optional) Annotations for the StorageClass
- 5 (required) The type of provisioner associated with this storage class.
- 6 (optional) The parameters required for the specific provisioner, this will change from plug-in to plug-in.
StorageClass annotations
To set a StorageClass as the cluster-wide default, add the following annotation to your StorageClass's metadata:
storageclass.kubernetes.io/is-default-class: "true"For example:
apiVersion: storage.k8s.io/v1
kind: StorageClass
metadata:
  annotations:
    storageclass.kubernetes.io/is-default-class: "true"
...
This enables any Persistent Volume Claim (PVC) that does not specify a specific volume to automatically be provisioned through the default StorageClass.
The beta annotation storageclass.beta.kubernetes.io/is-default-class is still working; however, it will be removed in a future release.
To set a StorageClass description, add the following annotation to your StorageClass's metadata:
kubernetes.io/description: My StorageClass DescriptionFor example:
apiVersion: storage.k8s.io/v1
kind: StorageClass
metadata:
  annotations:
    kubernetes.io/description: My StorageClass Description
...
AWS Elastic Block Store (EBS) object definition
aws-ebs-storageclass.yaml
kind: StorageClass
apiVersion: storage.k8s.io/v1
metadata:
  name: slow
provisioner: kubernetes.io/aws-ebs
parameters:
  type: io1 1
  zone: us-east-1d 2
  iopsPerGB: "10" 3
  encrypted: "true" 4
  kmsKeyId: keyvalue 5
  fsType: ext4 6
- 1 (required) Select from io1, gp2, sc1, st1. The default is gp2. See the AWS documentation for valid Amazon Resource Name (ARN) values.
- 2 (optional) The AWS zone. If no zone is specified, volumes are generally round-robined across all active zones where the OpenShift cluster has a node. The zone and zones parameters must not be used at the same time.
- 3 (optional) Only for io1 volumes. I/O operations per second per GiB. The AWS volume plug-in multiplies this with the size of the requested volume to compute IOPS of the volume. The value cap is 20,000 IOPS, which is the maximum supported by AWS. See the AWS documentation for further details.
- 4 (optional) Denotes whether to encrypt the EBS volume. Valid values are true or false.
- 5 (optional) The full ARN of the key to use when encrypting the volume. If none is supplied, but encypted is set to true, then AWS generates a key. See the AWS documentation for a valid ARN value.
- 6 (optional) File system that is created on dynamically provisioned volumes. This value is copied to the fsType field of dynamically provisioned persistent volumes and the file system is created when the volume is mounted for the first time. The default value is ext4.
Change the default StorageClass
If we are using AWS, use the following process to change the default StorageClass. This process assumes we have two StorageClasses defined, gp2 and standard, and to change the default StorageClass from gp2 to standard.
- List the StorageClass:
$ oc get storageclass

NAME                 TYPE
gp2 (default)        kubernetes.io/aws-ebs 1
standard             kubernetes.io/aws-ebs
- 1 (default) denotes the default StorageClass.
- Change the value of the annotation storageclass.kubernetes.io/is-default-class to false for the default StorageClass:
$ oc patch storageclass gp2 -p '{"metadata": {"annotations": {"storageclass.kubernetes.io/is-default-class": "false"}}}'- Make another StorageClass the default by adding or modifying the annotation as storageclass.kubernetes.io/is-default-class=true.
$ oc patch storageclass standard -p '{"metadata": {"annotations": {"storageclass.kubernetes.io/is-default-class": "true"}}}'- Verify the changes:
$ oc get storageclass

NAME                 TYPE
gp2                  kubernetes.io/aws-ebs
standard (default)   kubernetes.io/aws-ebs
Quick Links
Downloads Subscriptions Support Cases Customer Service Product Documentation
Help
Site Info
Related Sites
redhat.com openshift.com developers.redhat.com connect.redhat.com
About