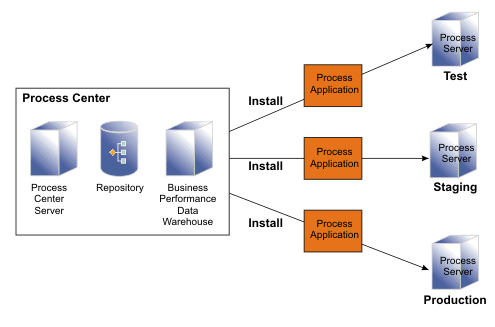
Install, deploy, and undeploy applications in the runtime environment
After you have developed, tested, and released a process application, install it on a process server in the runtime environment. If you have service modules that are not part of a process application and that are ready for use in the runtime environment, deploy them using the serviceDeploy utility or the administrative console.
Security considerations for runtime installation and deployment
Before you install a snapshot or deploy a service module in the runtime environment, consider any security requirements or restrictions associated with the snapshot, the module, or the environment.
If you have enabled Administrative and Application security, consider the following points.
Install process application snapshots
When you install a process application snapshot to a process server, the library items for that snapshot (including toolkit dependencies) are moved from the repository to the selected process server. The process server can be connected or offline. Depending on your needs and whether the process server is connected or offline, you can use the Process Center console or wsadmin commands to install the snapshot.
Verify the version of the Process Center server and the version of the connected or offline process server match exactly before you install to the process server. Version matching is applicable to the first three digits only ( 7.5.0 or 7.5.1).
If you plan to install a process application snapshot that contains IBM Business Process Manager Advanced content, the user or group to which you belong must be assigned to the Configurator, Operator and Deployer administrative security role. If you are not currently assigned to all of these roles, click Users and Groups in the WebSphere administrative console to modify the user or group roles. See "Administrative security roles" in the related links.
Connected process servers
You can install snapshots of process applications to connected process servers in the environment using either the Process Center console or the BPMInstall command. Ordinarily, you have connections to one or more servers in the environment.
Offline process servers
You can also install process application snapshots to an offline server running but is not connected to Process Center (for example, if the process server is behind a firewall). In this situation, use the wsadmin commands to create an installation package for a particular snapshot on the Process Center Server, transfer the package to the offline process server and then run the package. Always install snapshots to an offline Process Server from the same Process Center.
Steps in the snapshot installation process
The following steps happen on the target server during the installation process.
| Action taken on the target process server | Description |
|---|---|
| 1. Install library items and assets for the process application and referenced toolkits. | The installation process deploys only those referenced toolkits not already on the target server. Default values for environment variables and exposed process values (EPVs) are set, and other design-time versioned assets (such as Portal searches) are created. |
| 2. Run the installation service for each toolkit. | The installation service for each referenced toolkit must be started before the installation service for the referring toolkit. |
| 3. Run the installation service for the process application. | The installation service for the process application is the final installation service that is started. |
| 4. Migrate data and process instances if there are running business process definition instances. | The process server migrates data according to the principles outlined in Strategies for migrating instances. The specific actions of this step depend on the migration option that you choose. The migration options are described in Migrating instances. |
| 5. Send tracking definitions to the Performance Data Warehouse. | The process server updates the Performance Data Warehouse with any new or changed tracking definitions. |
| 6. Activate scheduled undercover agents (UCAs). | |
| 7. Deploy advanced content. | If the snapshot has advanced content, then the advanced artifacts, such as SCA modules and libraries, are deployed to the process server. |
| 8. On a connected process server, send a message saying the installation is complete. | The user who initiated the installation can see the completion message in the Process Center Console. |
Restrict installation access to runtime servers
In order to install a snapshot on a process server (a runtime server), you must have the appropriate access to the process application. Access requirements vary depending on whether the runtime server is in a non-production environment or in a production environment or is an online or offline server.
You must log in to the Process Admin Console.
By default, the following access to the process application is required for each type of environment:
- Administrative access to install to Process Servers in production environments
- Write access to install to any non-production Process Server
- Read access to install to Process Servers in development environments.
By default, anyone in the tw_admins group can install a process application on either an online or offline Process Server. Two subgroups within the tw_admins group allow you to further control who can install process applications. Use processCenterInstall to allow users to install process applications to online Process Servers. Use offlineInstall to allow users to install process applications to offline Process Servers. If you restrict access as described in the following procedure, a user must be a member of processCenterInstall or offlineInstall in addition to having administrative permission (membership in the tw_admins group). For example, to install to a Process Server in a staging environment, a user must have administrative access to the process application that is being installed and must also be a member of processCenterInstall.
To restrict installation access.
- Start the wsadmin scripting tool. To start wsadmin...
-
PROFILE_HOME/bin:
wsadmin -conntype NONE -lang jython - Extract the properties of the BPMProcessServer configuration object.
wsadmin> groups = AdminConfig.list('BPMServerSecurityGroups')
wsadmin> print AdminConfig.show(groups)
If processCenterInstall is missing then no value is displayed.
- View the output and note the processCenterInstall value.
For example, [processCenterInstall Existing_group_name].
- Update the processCenterInstall value.
- wsadmin> AdminConfig.modify(groups, [['processCenterInstall', 'New-Group-Name']])
Where, the New_group_name variable represents the group of users to whom you want to grant access. You can use an existing group or create a new one. If you create a new group, ensure it also exists on the Process Center.
- Verify your update.
- wsadmin> print AdminConfig.show(groups)
Save the changes and exit.
wsadmin> AdminConfig.save()
wsadmin> exit
- Restart the deployment manager.
- Restart the Process Server cluster or server.
Install snapshots on a connected process server
You can install snapshots to a connected process server by using the Process Center console or by using the BPMInstall command.
To install snapshots to process servers, the following access to the process application is required for each type of environment:
- Administrative access to install on process servers in production environments.
- Write access to install on any non-production process server.
- Read access to install on process servers in development environments.
In addition before you install a snapshot on a connected process server.
- Create a snapshot of the process application to be installed.
- Ensure the first three digits of the Process Center version match the Process Server version.
- Ensure the snapshot can be activated successfully in Process Center.
The target process server must support the business process management capability used by the snapshot.
For example, if your process application contains Advanced Integration Services ( Service Component Architecture modules and dependent libraries), you can install it only on a process server that is configured for BPM Advanced. In this example situation, if you attempt to install the snapshot on a Business Process Manager Standard or Business Process Manager Express server, you get a message or exception that states the server does not contain sufficient capabilities to run the process application. For more information about server capabilities, see Capabilities of IBM Business Process Manager configurations.
To install (deploy) IBM Business Process Manager Advanced content with a process application snapshot, the user or group to which you belong must be assigned the Deployer administrative security role. If you are not currently assigned to the Deployer role, perform the following task before you install the monitor model:
- Log in to the WebSphere Application Server administrative console.
- Click Users and Groups > Administrative User roles or Users and Groups > Administrative Group roles.
- Select your user or group to open it.
- Under Roles, select Deployer and click OK.
To install a snapshot.
- Log in to Process Center. Ensure the ID you use is in the tw_admins or tw_authors group;
if the process application contains Advanced Integration Services, the ID must also be assigned the deployer role for WAS.
- From the Process Apps tab, click the process application to install, and then click Snapshots. The Snapshots list displays all available snapshots and the status of each.
- Click Install next to the snapshot you want to install. The Install Snapshot to Server window opens.
- Select the server or servers on which you want to install the snapshot, and then click Install.
The installation process checks whether the target server is running any instances of the business process definitions that are included in the snapshot. If it detects one or more running instances on the target server, you are asked whether you want to migrate those running instances to the new snapshot. Also, consider how you want to handle any tokens that might be orphaned if the activities they were attached to are not part of the new instance.
The snapshot is installed in an active state. If the snapshot has toolkit dependencies, the toolkits are also installed if they do not exist on the target server.
If two users concurrently deploy snapshots that depend on the same toolkit, one snapshot will fail with an error message stating the snapshot name should be unique. Conflicting file imports cause this situation. Deploy the snapshot that failed again and the deployment will succeed. This problem still exists, however, if you have 20 or more users deploying snapshots concurrently. Therefore, limit your concurrent deployments of snapshots to 10 users or less.
Install snapshots on offline process servers
To install a snapshot on an Process Server that is not currently connected to the Process Center server (an offline server), create an installation package, extract it, and transfer it to the offline server. Then, use administrative commands on the server to install the package.
Complete the following tasks before you install a snapshot on an offline process server.
- Create a snapshot of the process application to be installed.
- Add an offline server, making sure that its version is identical to the version of the Process Center server.
- Before you install a snapshot on a Process Server, make sure the snapshot can be activated successfully on a Process Center. A snapshot that cannot be activated on Process Center will usually fail to activate on a Process Server.
- Ensure the target Process Server supports the capability exploited by the snapshot.
For example, if your process application contains Advanced Integration Services, that is, Service Component Architecture (SCA) modules and dependent libraries, you can install it only on a Process Server that is configured for IBM Business Process Manager Advanced. If you attempt to install the snapshot on a Business Process Manager Standard or Business Process Manager Express server, you will receive a message or exception that states the server does not contain sufficient capabilities to run the process application.
Additional information about server capabilities is in the topic Capabilities of IBM Business Process Manager configurations.
These tasks use the Process Center console and the BPMCreateOfflinePackage, BPMExtractOfflinePackage, and BPMInstallOfflinePackage commands to create an installation package and install it on an offline server. You can also use the retrieveProcessAppPackage and installProcessAppPackage commands,although they have been deprecated.
Installation packages are available on the Process Center server as long as the selected offline server exists. If you remove the offline server, the installation packages for that server are also deleted.
Do not try to install process application snapshots from two Process Centers to the same Process Server environment. Snapshots have names and acronyms that must be unique, but that uniqueness is determined in the Process Center at the time the snapshot is created. If snapshot names and acronyms are not unique, this error is generated during the installation of the snapshot: "java.lang.Exception: java.lang.Exception: The snapshot with name v3 of process application My process application is already present on this server."
If you are developing process applications in multiple Process Centers, ensure that you import the snapshots into a common Process Center before you install them on a Process Server. Installing from one Process Center ensures that duplicate snapshot names and acronyms are detected during import of the snapshot, instead of failing during installation.
Create an installation package
Use the Process Center console to create an installation package for the snapshot you want to install on the offline server.
Ensure you have the appropriate permissions for the process application.
- Administrative access to create an installation package for a Process Server in a production environment
- Write access to create an installation package for any non-production Process Server
- Read access to create an installation package for a Process Server in a development environment
Installation packages are available on the Process Center Server as long as the selected offline server exists. If you remove the offline server, the installation packages for that server are also deleted.
To create an installation package.
- Start Process Designer and open the Process Center console.
- Select the Process Apps tab, and then click the process application to install.
- Find the snapshot to install and click Install.
- Select the offline Process Server and click Create installation package.
- If you are prompted to migrate running instances from other snapshots, select the option you need. See Migrate instances for more information about each option and Manage orphaned tokens for ways to ensure that changes to the process do not disrupt the flow of data.
If there are no running instances on the selected Process Server, the migration option is ignored during the installation.
- Click Create installation package.
Extract the installation package, transfer it to the offline server and then install it.
Extract an installation package to a file
After you create an installation package, you need to extract it to a file. Use the BPMExtractOfflinePackage command to extract an installation package.
Create the installation package, as described in "Creating an installation package."
If necessary, use the BPMShowProcessApplication command to determine the snapshot and container acronyms for the process application.
To extract the installation package to a file, run the BPMExtractOfflinePackage command on the Process Center Server.
Example
The following example illustrates how to extract an installation package for the snapshot of the BillingDispute process application. The package was created by using the BPMCreateOfflinePackage command or the Process Center console.
In the example, the user establishes a SOAP connection to the Process Center server.
- Jython example
wsadmin -conntype SOAP -port 4080 -host ProcessCenterServer01.mycompany.com -user admin -password admin -lang jython AdminTask.BPMExtractOfflinePackage('[-containerAcronym BILLDISP -containerSnapshotAcronym SS2.0.1 -containerTrackAcronym Main -serverName processServer315 -outputFile C:/myProcessApps/BILLDISP201.zip]') - Jacl example
wsadmin -conntype SOAP -port 4080 -host ProcessCenterServer01.mycompany.com -user admin -password admin
$AdminTask BPMExtractOfflinePackage {-containerAcronym BILLDISP -containerSnapshotAcronym SS2.0.1 -containerTrackAcronym Main -serverName processServer315 -outputFile C:/myProcessApps/BILLDISP201.zip}
Transfer the installation package to the offline server and then install the snapshot. See "Transferring and installing an installation package."
Transferring and installing an installation package
After you create and extract an installation package, you need to transfer it to the offline server. Then, use administrative commands on the server to install the package.
Complete the following tasks before you install a snapshot on an offline Process Server.
- Create and extract an installation package.
- Ensure the offline server supports the capabilities in the snapshot. If you intend to install a snapshot of a business process application that contains an Advanced Integration Service, you can install the snapshot only on an IBM Business Process Manager Advanced offline server. For more information about server capabilities, see Capabilities of IBM Business Process Manager configurations.
- Ensure that you have the correct permission to perform the installation. See Restrict installation access to runtime servers.
Do not try to install process application snapshots from two Process Centers to the same Process Server environment. If you are developing process applications in multiple Process Centers, ensure that you import the snapshots into a common Process Center before installing them on a Process Server.
Installation packages are available on the Process Center Server as long as the selected offline server exists. If you remove the offline server, the installation packages for that server are also deleted.
To transfer an installation package and then install that package on an offline server.
- Transfer the installation package to the offline Process Server using FTP or a similar utility.
- To limit installation to specific groups, follow the instructions in Restrict installation access to runtime servers.
- Run the BPMInstallOfflinePackage command on the offline Process Server, which is located in the install_root/BPM/Lombardi/tools/process-installer directory.
Example
The following example illustrates how to install a snapshot of the BillingDispute process application. The snapshot installation package (BillingDispute.zip) was created and extracted on the Process Center Server and is being installed on the offline Process Server ProcessServer01.
In the example, the user establishes a SOAP connection to the Process Center server.
- Jython example
wsadmin -conntype SOAP -port 4080 -host ProcessServer01.mycompany.com -user admin -password admin -lang jython AdminTask.BPMInstallOfflinePackage('[-inputFile C:\myProcessApps\BillingDispute.zip]') - Jacl example
wsadmin -conntype SOAP -port 4080 -host ProcessServer01.mycompany.com -user admin -password admin
$AdminTask BPMInstallOfflinePackage {-inputFile C:\myProcessApps\BillingDispute.zip}
If you log into Business Space, you can navigate to the dashboard for the process application.
If you experience problems with the installation, check the process-installer.log file. See Troubleshooting snapshot installations for more information about where issues can occur.
Migrate instances
When you are installing snapshots on a process server, consider how to handle the business process definition instances running on the server.
To migrate instances, you must be a system administrator or a person with authorization to deploy new snapshots.
When a snapshot of a process application is installed on a server, instances of that process that use that snapshot are likely to be started. An instance is an active process. For an order process, each order results in a new instance. The instance runs until the process completes or fails. When you install a new snapshot, you must decide how to handle the data from the previous snapshot and the instances that are still running from that previous snapshot. IBM Business Process Manager offers two ways to migrate process instances:
- While the snapshot is being installed, select Migrate.
- Use the Migrate Inflight Data option after a snapshot is installed.
This topic describes the option of selecting Migrate while the snapshot is being installed.
Install snapshots of process applications from IBM Process Center. When you install a snapshot on a connected process server, the installation process checks to find out whether the target server is currently running instances of the business process definitions that are included in the snapshot. If the installation process detects running instances on the target server, you are asked whether you want to migrate those running instances to the new snapshot. You must also consider how you want to handle tokens that might be orphaned if the activities they were attached to are not part of the new snapshot.
Consult the following table to understand the migration options.
| Migration options | Description |
|---|---|
| Leave | The instances that are currently running continue to completion using the previously installed snapshot. |
| Migrate | The instances that are currently running are migrated to the new snapshot that you are installing. Wherever the running instances are in the flow of the process, the new version is implemented for the next item or step. Use this option to manipulate the data or use a policy file to manage orphaned tokens. See Manage orphaned tokens. |
| Delete | The instances that are currently running are immediately stopped and do not continue to completion. All records of the running instances are removed from the process server. The delete option does not delete BPEL process instances, human task instances, or business state machine instances.
This option is not available for process servers in production environments. |
If you migrate instances or delete instances from a snapshot, the snapshot is deactivated. If you leave running instances, the original snapshot is not deactivated when the new snapshot is installed.
The migration process
Before you begin to migrate instances, read the advice in Strategies for migrating instances. It contains important information about the migration implementation.
Test your migration. Verify the results of instance migration in a test environment before you install the new snapshot on a production server. It is a risky oversight to test a new version by creating new instances, but to fail to test for migrated instances.
When you select Migrate, the following actions occur automatically:
- The snapshot that originally contained the running instances is deactivated.
- The replacement snapshot is installed on the server.
- The migration program runs the installation service.
- The migration program migrates global data (exposed process variables, environment variables, participant groups). It uses the most recent time stamp on each exposed process variable to identify the global data to use in the replacement snapshot.
- The instance is migrated:
- The execution context is updated.
- The actions are updated.
- The migration program moves the "default" designation from the snapshot of the running instances to the newly installed snapshot. This action takes place only if the snapshot of the running instances was previously designated as the default snapshot.
- Instances from the source snapshot are deactivated.
- The updated snapshot is activated.
If, in spite of your preparation, your snapshot instance fails to install on the server, see Troubleshooting errors and failures in a failed process instance for suggestions about how to proceed.
Migrate BPEL instances
When you deploy a new version of a BPEL process, you might want the latest process version to apply to both new process instances and to process instances that have already started. To migrate running BPEL process instances to a new version of the process, you can use an administrative script to migrate process instances in bulk or use Business Process Choreographer Explorer to migrate specific instances.
When you install snapshots with BPEL content on a connected process server, the Migrate or Delete options apply to the business process definition instances but not to your running BPEL process instances.
Strategies for migrating instances
Migrate process instances is not a fully automated process. Understanding the way program elements are handled during migration helps you avoid migration failure.
See Migrate instances to understand the migration options available when the installation program discovers running instances of the process application on the server.
General principles
- Consider the business process definition and its variables as the interface and process instances as the realization of that interface.
- As part of instance migration, past (completed) tasks are migrated into the current process version. It is important the process can resolve a completed execution context in order to preserve historical information.
- The new process version must be designed to provide backward compatibility to instances to migrate.
- If you have removed a task, it is sometimes possible to account for the difference by moving the resulting orphaned token, although there are limitations to this capability.
Design-time considerations
In most cases, deprecate entities that you no longer want rather than deleting them. See the information about teams, undercover agents, services, and variables for some specific examples of this advice.
Here are some hints to aid you in successfully migrating instances.
- Environment variables
- Do not change the type of environment variables.
- Regardless of the migration option you choose, the process server copies environment variables from the installed snapshot or snapshots. If environment variable values were changed from the defaults, the most recently set values are the ones that are used. In the case where an installation service sets the values, those values are considered the most recent and are the values used.
- You can remove an environment variable as long as the process no longer refers to it. Because environment variables are accessed through JavaScript, removing them is less problematic than removing local variables.
- Exposed process values
- The instance migration process copies exposed process values (EPVs) from all installed snapshots. If EPVs were changed from the defaults, the most recently set values are the ones used. In the case where an installation service sets the values, those values are considered the most recent and are the values used.
- EPVs in referenced toolkits are copied only if the referenced toolkit is not already available on the target server.
- Gateways
- For a parallel gateway, both branches must complete to complete the process successfully. Therefore, if you choose to delete an orphaned token on one branch of a parallel gateway, the process using the parallel gateway will never be able to complete.
- Human services and coaches
- If migration occurs while a task is running, the user interface from the old version is still displayed. Refreshing or clicking Next has no effect. You need to restart or claim the task after migration.
- If update coaches and you want all existing instances to use the updated coaches, programmatically move the active token back to the task that uses the new coaches.
- Linked processes
- You can add a linked process if there is no token to be honored.
- Teams
- The migration program merges the team members (users and groups) from previously installed snapshots into the snapshot that now contains the migrated instances.
- Users added by an installation service before the migration are not overwritten. However, if the team on the target server is empty or does not exist (meaning that it was added in the new snapshot), it is "seeded" with the users and groups from the Process Center. This is considered a "seed" because the real bindings will likely be updated after the installation.
- If the team was updated in the new snapshot, if, for example, a user or group was added or deleted, those changes are not applied during the merge process.
- Do not change the assignment of a task to a new team. A team is determined when the task is created, not when the task is claimed or migrated. If a task is assigned the Employees role in the original instance, that assignment is migrated to the new instance. Only members of that group can claim the task.
- Services
- If a service was used but is no longer needed, leave it in the process application but mark it as deprecated. You can change the service to a no-operation service by directly joining the start event to the end event in your diagram.
- Tasks
- As part of the instance migration, you migrate past (completed) tasks into the current process version.
- Use a policy file to proactively compare snapshots before instance migration to identify tasks that potentially have orphaned tokens.
- You can add a task if it has no task instance associated with it.
- If you have removed a task, it is sometimes possible to account for the difference by moving the resulting orphaned token.
- Do not change the assignment of a task to a new team. See the section about "Teams" in this topic.
- You can move a token back to a task that has been modified to restart the task.
- Tokens
- In the BPMN process engine, a token is a pointer to an active execution step within the process. Tokens exist on activities. There can also be tokens for timer and message events on an active activity. When you migrate a process instance from one version to another, the tokens can be placed back on the same step in the new version to indicate the current active activity. However, if the step the token referenced no longer exists in the new version, the token is now “orphaned”.
- You cannot delete a token from a subprocess. You must delete tokens from the main process.
- Undercover agents
- An undercover agent (UCA) responds according to the settings from the old snapshot. That is, an active UCA still listens to events from the tip or from a previous version, even after migration. Therefore, do not delete or replace a UCA.
- Variables
- Your new process version must provide backward compatibility to the instances to migrate.
- Do not rename variables, or if you must, introduce the new variable with a new name, and deprecate the old variable. In this case, deprecating means to leave the variable unchanged and do not use it any more.
- Do not change the type of your variables, for example from a simple to a complex variable. If change a variable type, introduce a new variable with the new type, and deprecate the old variable.
- If you use complex types, you might find problems with a migrated instance. Each complex type has a version identifier specified for it. Migration does not update this identifier, which means you might have problems accessing complex type business objects after migration.
- If the old version of the process needed a variable, do not delete it. Update the documentation in your processes, services, and variable types to note that this variable or property is now deprecated.
- Migrated instances may fail when you add variables to a process, because the variables are not initialized. If a new variable is added, initialize it with an appropriate default value, or ensure the code is designed to handle an undefined or null variable.
Runtime actions
Administrators should schedule a blackout period and manage orphaned tokens to aid the process of migrating instances.
- Blackout periods
- Events that fire during migration could cause your migration to fail. In the Process Admin Console Event Manager, schedule a blackout period so events are not activated during instance migration.
- Orphaned tokens
- If you migrate currently running instances to a new version of the snapshot, problems can occur if the new version removes steps or other components from the business process definition. When instances running on a server have tokens on business process definition or service-level components that were removed in the new snapshot, migration can fail. Tokens indicate where a runtime instance is running. Tokens can be present on an activity, a conditional sequence line, a coach, a service call, and numerous other elements. For more information about orphaned tokens and advice about how to move or delete them, see Manage orphaned tokens.
Testing
Verify the results of instance migration in a test environment before you install the new snapshot on a production server.
Tuning for better performance
Performance depends on the number of instances in the process, the number of tasks in those instances, and the size of the execution context. Try testing how long the migration takes with 100 instances. From that result, estimate the time the whole migration requires.
The number of tasks associated with an instance and the size of the associated application data affects the migration time. Both current and closed tasks on an instance are migrated. One way to improve performance is to delete system task instances, such as cleanup tasks, that have completed and are no longer needed. Otherwise, the migration program will waste time migrating all those instances.
Another factor to consider is the performance of the database. Because instance migration is a single-threaded process, database performance will be a constraint on the processing time of instance migration, because of the number of selects, inserts, and deletes performed.
Migrate BPEL processes
When you deploy a new version of a BPEL process, you might want the latest process version to apply to both new process instances and to process instances that have already started. To migrate running BPEL process instances to a new version of the process, use either an administrative script to migrate process instances in bulk or Business Process Choreographer Explorer to migrate specific instances.
-
 Migrate specific BPEL process instances to a different process version
A process template represents a version of a process. Running BPEL process instances can be migrated to a different process template version. You might want to do this, for example, when a newer version of the process becomes available, or because the current version has errors in it and you want to roll back to a previous process version.
Use Business Process Choreographer Explorer to migrate selected process instances.
Migrate specific BPEL process instances to a different process version
A process template represents a version of a process. Running BPEL process instances can be migrated to a different process template version. You might want to do this, for example, when a newer version of the process becomes available, or because the current version has errors in it and you want to roll back to a previous process version.
Use Business Process Choreographer Explorer to migrate selected process instances.
- Migrate BPEL process instances in bulk to a new version of a process template
Use an administrative script to migrate running instances after deploying a new version of a process template, because new process instances are based on the new version, but existing instances based on the old template version continue running until they reach an end state.
Related concepts:
Migrate running process instances to a new version of the BPEL process
Migrate specific BPEL process instances to a different process version
A process template represents a version of a process. Running BPEL process instances can be migrated to a different process template version. You might want to do this, for example, when a newer version of the process becomes available, or because the current version has errors in it and you want to roll back to a previous process version. Use Business Process Choreographer Explorer to migrate selected process instances.
To migrate process instances, you must be a process administrator or system administrator. When a new version of a BPEL process is deployed, you can base new process instances on this process version if you start them in Business Process Choreographer Explorer from the corresponding template. However, existing process instances which are based on a previous version of the process continue to run with this version until they reach an end state. You can migrate these existing process instances to a different process version; you do not need to migrate all of the instances to the same version.
You can also use the migrateProcessInstances.py script to migrate process instances in bulk. See the related information section.
In Business Process Choreographer Explorer.to migrate process instances.
- Navigate to a page that shows a list of process instances. For example, click All Versions, select one or more process templates, then click Instances.
- Select the relevant process instance entries and click Migrate.
- In the Process Instance Migration page, select the process template version to migrate the process instances to.
- Optional: Test whether the process instances can be migrated to the process template version by clicking Test.
- Click Migrate to migrate the process instances to the specified process template version.
The process instances that qualify for migration to the selected process template version are migrated. For all other instances, an error message is displayed for each failed migration.
Migrate BPEL process instances in bulk to a new version of a process template
Use an administrative script to migrate running instances after deploying a new version of a process template, because new process instances are based on the new version, but existing instances based on the old template version continue running until they reach an end state.
The following conditions must be met:
- Run the script in the connected mode, that is, do not use the wsadmin -conntype none option.
- At least one cluster member must be running.
- Ifthe user ID does not have administrator authority, include the wsadmin -user and -password options to specify a user ID that has administrator authority.
-
 If you are not working with the default profile, use the wsadmin -profileName profile option to specify the profile.
Use the migrateProcessInstances.py script to migrate instances of a specific process template version to the latest version, or a specified version. Instances that are in an end state (finished, terminated, compensated, or failed) are not migrated. Only instances of the specified template with the same version as the specified "valid from" value are migrated. If you prefer to write a script to migrate instances, an MBean interface is available.
- Change to the Business Process Choreographer subdirectory where the administrative script is located.
 Enter the following command:
- cd install_root/ProcessChoreographer/admin

 Enter the following command:
- cd install_root/ProcessChoreographer/admin
 Enter the following command:
- cd install_root\ProcessChoreographer\admin
- Migrate the instances of process templates that are no longer valid. Enter the following command:
install_root/bin/wsadmin.sh -f migrateProcessInstances.py
        -cluster cluster_name        ( -templateName template_name)
       (-sourceValidFromUTC timestamp )
       [(-targetValidFromUTC timestamp )]
       [(-slice slice_size
Enter the following command:
install_root/bin/wsadmin.sh -f migrateProcessInstances.py
        -cluster cluster_name        ( -templateName template_name)
       (-sourceValidFromUTC timestamp )
       [(-targetValidFromUTC timestamp )]
       [(-slice slice_size
Enter the following command:
install_root\bin\wsadmin -f migrateProcessInstances.py
       -cluster cluster_name
       ( -templateName template_name)
       (-sourceValidFromUTC timestamp )
       [(-targetValidFromUTC timestamp )]
       [(-slice slice_size
Where:
- -cluster clusterName
- The name of the cluster where Business Process Choreographer is configured. In a multicluster setup, you must specify the application cluster because that is where Business Process Choreographer is configured.
- -templateName template_name
- The name of the process template to be migrated.
- -sourceValidFromUTC timestamp
- The timestamp specifies which version of the named template will have its instances migrated.
The timestamp string specifies the date from which the template is valid, in Coordinated Universal Time (UTC), and must have the following format: yyyy-mm-ddThh:mm:ss (year, month, day, T, hours, minutes, seconds). For example, 2009-01-31T13:40:50. In the administrative console this date is displayed in local time of the server, so make sure that you take the server time zone into account.
- -targetValidFromUTC timestamp
- This optionally specifies which version of the named process template the instances will be migrated to. If this parameter is not specified, the latest available version of the template will be used. The timestamp string has the same format as for the sourceValidFromUTC parameter.
- -slice slice_size
- This parameter is optional. The value slice_size specifies how many process instances are migrated in one transaction. The default value is 10.
- When the script runs, it outputs the name of the cluster where the migration is running. Check the SystemOut.log file to see the progress information and whether the migration of any instances caused any exceptions. For example, because instances are not in a suitable state or because a problem occurred during migration.
The instances have been migrated to the new template version.
Advanced installation topics
By default, a standard installation service is created for each process application when you first create and save the process application. You can customize this service to support more advanced requirements ( calling commands before or during the installation process).
Building custom installation services
An installation service is created by default when you create a new process application and is used when you install a snapshot. You can customize the service to handle advanced requirements in your target environment.
Ensure that you have write access to the process application to install. See Manage access to the Process Center for more information about granting access to process applications.
You can add calls and scripts to the installation service to perform specific functions when a process application is installed on a process server in another environment. The following list contains some of the tasks that a custom installation service might handle.
- Create or update database tables
- Update necessary environment variables
- Determine which snapshots are already installed
- Migrate individual process instances
- Create custom time schedules
For example, you can customize an installation service to create tables on the target process server to hold data such as the options for drop-down menus that exist in your process. When you need to add to or change those menu options, you can modify the service so that those database updates are handled automatically during installation.
To add functionality to an installation service.
- Open the process application in Process Designer.
- From the Setup category, open the installation service.
- In the diagram that opens, add the service calls and scripts that you need for your particular installation.
Save changes.
(Deprecated) Creating a custom installation script for offline process servers
To run commands immediately before a process application is installed on an offline server, customize the customProcessAppPreInstall file. This file is invoked automatically by the installProcessAppPackage command before it begins installing the snapshot.
- On the offline process server where you want to customize the installation, open a command prompt and go to the install_root/BPM/Lombardi/tools/process-installer directory.
- Open the customProcessAppPreInstall file in a text editor.
- Add commands to run immediately before the process application snapshot is installed, and then save your changes.
- Run the installProcessAppPackage command.
(Deprecated) Performing offline installation steps separately
To perform each step of process application installation separately, you can run the following commands individually or add them to a batch file or script. Doing so enables you to perform customization tasks between the installation steps.
For each of the following commands, you must specify the name of the installation package.
| Batch command | Script command | Description |
|---|---|---|
| importProcessAppPackage.bat | importProcessAppPackage.sh | Imports the installation package (.zip file) so that all library items within it are available for customization or alteration by way of custom scripts or the process application's installation service. |
| customProcessAppPreInstall.bat | customProcessAppPreInstall.sh | Runs any commands that you add. You can add commands to run immediately before the process application snapshot is installed (using installProcessAppPackage) on the offline process server. |
| executeProcessAppInstallationService.bat | executeProcessAppInstallationService.sh | Runs the installation service for each referenced toolkit and then runs the installation service for the process application. |
| migrateProcessAppGlobalData.bat | migrateProcessAppGlobalData.sh | Migrates data such as participant groups, exposed process values (EPVs), and environment variables to the new snapshot version that you are installing. The process server migrates data according to the rules outlined in Strategies for migrating instances. |
| migrateProcessAppInstances.bat | migrateProcessAppInstances.sh | Migrates currently running process instances according to the migration option chosen when the installation package was created. Migrate instances describes the migration options. If other snapshot versions are not discovered, migration does not occur. |
Completing post-installation tasks
Depending on the environment and the installed process application, there are several tasks that might need to be completed immediately after installation.
Use the following table to understand the possible post-installation tasks and determine whether you need to complete any of them.
| Task | Description | See |
|---|---|---|
| Set environment variables | In some cases, the correct value for a particular environment (such as test or production) might not be known during process design. In those cases, you need to provide the value after installing the process application in the new environment. | Configure runtime environment variables |
| Establish runtime participant groups | After a process application is installed on a process server in a new environment (such as test or production), you might need to add or remove users in the participant groups for that application. For example, users that exist in the test environment might not have been available in the development environment. | Configure runtime participant groups |
| Control exposed processes and services | After a process application is installed on a process server in a new environment (such as test or production), you might need to disable a particular exposed process or service within that application. | Configure exposed processes and services |
The installation service for your process application can be customized to handle these types of tasks. See Building custom installation services for more information.
Troubleshooting snapshot installations
Exceptions, timeouts, and other failures in the installation process can result in the snapshot not being installed on the server, or in an incomplete snapshot installation.
If you have problems when installing a snapshot, always check the SystemOut.log and SystemErr.log files for information. In addition, check the following list to see whether your problem matches the common errors described in this topic.
- An exception is generated during the installation of library items and assets
- The installation fails. Resolve this exception and try to install again.
- The installation process fails to send tracking definitions to the Business Performance Data Warehouse
- The installation continues, but you need to manually send the definitions after the installation is complete. See Sending tracking definitions to Performance Data Warehouse.
- The installation process fails with the error: Process server does not contain sufficient capabilities to run the Process Application.
- Ensure the target Process Server supports the capability exploited by the snapshot. For example, if your process application contains Advanced Integration Services, that is, Service Component Architecture modules and dependent libraries, you can install it only on a Process Server that is configured for IBM Business Process Manager Advanced.
You must remove these artifacts before you can install on an BPM Standard or BPM Express Process Server.
You might receive this error if you previously opened the process application or toolkit in Integration Designer. Opening a process application or toolkit in Integration Designer enables BPM Advanced capabilities in the process application; therefore, the process application or toolkit will require an BPM Advanced Process Server to deploy it. Restore the process application or toolkit to BPM Standard capabilities by disassociating the modules and libraries that were generated when the process application or toolkit was opened and then try to install again. See Disassociating a module or library from a process application or toolkit.
- The installation service generates an exception when installing the toolkit or process application
- The installation fails. Consider building the installation service to capture exceptions and roll back any changes made before the exception is generated; refer to Steps in the snapshot installation process if you need more information on the individual steps in the installation process. If the installation services do not handle exceptions, you might need to manually roll back changes before attempting to reinstall. For example, if all toolkit installation services complete and then the installation service for the process application fails halfway through its execution, you might need to roll back changes resulting from partial completion of this step. The toolkit installation is complete and does not need to be run again.
- The wsadmin connection times out while the BPMInstall command is running
- If you are using a SOAP connection, the time required for the BPMInstall command to complete often exceeds the default SOAP timeout value. Even though the command continues to run until it completes, you might see the exception java.net.SocketTimeoutException: Read timed out.
Edit the property...
- com.ibm.SOAP.requestTimeout
...in the profile_root/properties/soap.client.props file to increase the timeout value to prevent this exception.
Failures to migrate data or instances do not cause the installation to fail.
Deploy service modules
After you develop and test a service module in IBM Integration Designer and are satisfied the module is working as designed, you can deploy it into the runtime environment. Use the information in this topic to prepare for and complete a successful deployment.
IBM Business Process Manager enables you to deploy and run business integration components such as BPEL business processes, human tasks, business state machines, business rules, and other components. You can also run mediation flows that are contained in modules or mediation modules.
Restriction: The explanation and steps in this topic do not apply to Advanced Integration services, which are installed with the process applications that use them.
IBM Integration Designer extends the deployment capabilities of the Rational Application Developer base on which it is built. You can deploy your modules in one or more of the following ways:
- As EAR files for deployment on Process Server, using the administrative console or command-line tools.
- As serviceDeploy files for deployment on Process Server, using the serviceDeploy command-line tool.
- As project interchange files for import and project sharing in IBM Integration Designer.
Overview of the deployment process
When you are ready to deploy your module, follow these general steps.
- Verify a new or updated module in a test environment before deploying it to the runtime environment. For information, see the "Testing Modules" link at the end of this topic.
- Understand the dependency and packaging considerations for modules and libraries. In addition, be aware of the deployment implications when you change a library or module name. You can find links to information about dependencies and packaging at the end of this topic.
- If you plan to deploy on a cluster, make sure that you understand the specific requirements described in "Considerations for deploying modules on clusters."
- As necessary, set module deployment properties.
- Export the module from IBM Integration Designer. Note that exported modules can be shared.
- Deploy the module.
 The process for deploying service modules in a production environment is similar to the process described in "Developing and deploying applications" in the WAS ND information center. If you are unfamiliar with those topics, review them first.
When an enterprise archive (EAR) file is deployed and includes a mediation, a GovernanceData folder is generated with application details. The data is processed, but it is not used unless you configure the Endpoint Lookup mediation primitive or the Policy Resolution mediation primitive. See  Governance in the IBM WebSphere Enterprise Service Bus information center. The processing of the governance data requires a UTF-8 file encoding. If your Java virtual machine (JVM)
is using a different encoding, the characters that do not match with UTF-8 encoding cause a processing error. The JVM defaults to the operating system file encoding, but you can change it to UTF-8 with a file.encoding JVM
property with a value of UTF-8. Create a property as described in Java virtual machine custom properties in the IBM WAS information center.
Governance in the IBM WebSphere Enterprise Service Bus information center. The processing of the governance data requires a UTF-8 file encoding. If your Java virtual machine (JVM)
is using a different encoding, the characters that do not match with UTF-8 encoding cause a processing error. The JVM defaults to the operating system file encoding, but you can change it to UTF-8 with a file.encoding JVM
property with a value of UTF-8. Create a property as described in Java virtual machine custom properties in the IBM WAS information center.
EAR file overview
An EAR file is a critical piece in deploying a service application to a production server.
An enterprise archive (EAR) file is a compressed file that contains the libraries, enterprise beans, and JAR files the application requires for deployment.
You create a JAR file when you export your application modules from IBM Integration Designer. Use this JAR file and any other artifact libraries or objects as input to the installation process. The serviceDeploy command creates an EAR file from the input files that contain the component descriptions and Java™ code that make up the application.
Libraries and JAR files overview
Modules often use artifacts that are located in libraries, which are special projects in Integration Designer used for storing shared resources. At deployment time, Integration Designer libraries are transformed into utility JAR files and packaged in the applications to be run.
While developing a module, you might identify certain resources or components that could be used by other modules. These artifacts can be shared by using a library.
What is a library?
A library is a special project in Integration Designer used for the development, version management, and organization of shared resources, such as those resources that are typically shared between modules. Only a subset of artifact types can be created and stored in a library, including:
- Interfaces or web services descriptors (files with a .wsdl extension)
- Business object XML schema definitions (files with an .xsd extension)
- Business object maps (files with a .map extension)
- Relationship and role definitions (files with a .rel and .rol extension)
At deployment time, these Integration Designer libraries are transformed into utility JAR files in the applications to be run.
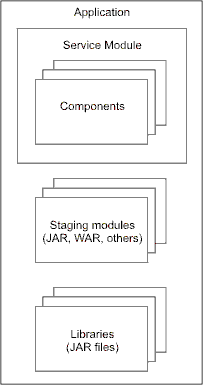
When a module needs an artifact, the server locates the artifact from the EAR class path and loads the artifact, if it is not already loaded, into memory. Figure 1 shows how an application contains components and related libraries.
Figure 1. Relationships among module, component, and library
What are JAR, RAR, and WAR files?
There are a number of files that can contain components of a module. These files are fully described in the Java™ Platform, Enterprise Edition specification.
Details about JAR files can be found in the JAR specification.
In IBM Business Process Manager, a JAR file also contains an application, which is the assembled version of the module with all the supporting references and interfaces to any other service components used by the module. To completely install the application, you need this JAR file, any other dependent JAR, web services archive (WAR), resource archive (RAR), staging libraries (Enterprise JavaBeans) JAR files, and any other archives. You then create an installable EAR file using the serviceDeploy command (see Install a module on a production server).
Naming conventions for staging modules
Within the library, there are requirements for the names of the staging modules. These names are unique for a specific module. Name any other modules required to deploy the application so that conflicts with the staging module names do not occur. For a module named myService, the staging module names are:
- myServiceApp
- myServiceWeb
The myServiceEJB and myServiceEJBClient staging modules no longer get created by serviceDeploy. However, those file names should not be used, because they could still be deleted by the serviceDeploy command.
Considerations when using libraries
Use libraries provides consistency of business objects and consistency of processing amongst modules because each calling module has its own copy of a specific component. To prevent inconsistencies and failures it is important to make sure that changes to components and business objects used by calling modules are coordinated with all of the calling modules. Update the calling modules by:
- Copying the module and the latest copy of the libraries to the production server
- Rebuilding the installable EAR file using the serviceDeploy command
- Stop the running application containing the calling module and reinstalling it
Module deployment properties
Each module has a set of deployment properties associated with it by default; these are stored in the deployment descriptor file. To specify different values for these properties, you can edit them directly in the descriptor file or in the IBM Integration Designer module deployment editor.
Any changes that you directly make to module deployment properties in deployment descriptor files are typically overwritten when the deploy code is next regenerated.
However, you can use the module deployment editor to specify and retain changes to module deployment properties. The module deployment editor saves your changes to a deployment side file, which is used to automatically update the module deployment properties in the deployment descriptor files whenever the deploy code is regenerated or the module is installed on the server.
You can use the module deployment editor to make the following kinds of updates to the deployment properties:
- Change URLs for web service exports
- Create and assign security roles for web service exports
- Bind security roles (including roles that are defined in assembly diagrams)
- Edit WS-Security properties for JAX-RPC exports and imports
- Add JAX-RPC handlers for web service imports and exports
- Add resource references
For EJB module generation during SCA module deployment, consider the following behavior of JAX-RPC web services:
- When a JAX-RPC web services SCA binding is used in your SCA module, it triggers an EJB module created dynamically at deployment time to contain the web service and its settings.
- You can get the information about the generated EJB module by using the administrative console to view the modules for the application.
Look up the related artifacts there or use the AdminApp.View command.
Fore more information, see Commands for the AdminApp object using wsadmin scripting in the WAS information center.
- If you have set properties on the SCA module's deployment descriptor that are related to the JAX-RPC web services SCA bindings, they will be transferred to the generated EJB module. For example, see the settings used in Implementing authentication.
- The values can be modified by accessing the web services subsections of the EJB module in the administrative console or by using the adminApp.edit
command with one of the options like -WebServicesClientBindPortInfo.
See Configure web service client port information using wsadmin scripting in the WAS information center.
- The EJB module is not created when JAX-WS bindings are used. JAX-WS bindings are the default web services SCA binding type for BPM.
Editing module deployment properties
Prepare to deploy to a server
After developing and testing a module, export the module from a test system and bring it into a production environment for deployment. To deploy an application you also should be aware of the paths needed when exporting the module and any libraries the module requires.
Before beginning this task, you should have developed and tested your modules on a test server and resolved problems and performance issues.
To prevent replacing an application or module already running in a deployment environment, make sure the name of the module or application is unique from any already deployed.
This task verifies that all of the necessary pieces of an application are available and packaged into the correct files to bring to the production server.
You can also export an enterprise archive (EAR) file from Integration Designer and deploy that file directly into IBM Business Process Manager.
If the services within a component use a database, deploy the application on a server directly connected to the database.
- Locate the folder that contains the components for the module you want to deploy.
The component folder should be named module-name with a file in it named module.module, the base module.
- Verify that all components contained in the module are in component subfolders beneath the module folder.
For ease of use, name the subfolder similar to module/component.
- Verify that all files that comprise each component are contained in the appropriate component subfolder and have a name similar to component-file-name.component.
The component files contain the definitions for each individual component within the module.
- Verify that all other components and artifacts are in the subfolders of the component that requires them.
In this step you ensure that any references to artifacts required by a component are available. Names for components should not conflict with the names the serviceDeploy command uses for staging modules. See Naming conventions for staging modules.
- Verify that a references file, module.references,
exists in the module folder of step 1.
The references file defines the references and the interfaces within the module.
- Verify that a wires file, module.wires,
exists in the component folder.
The wires file completes the connections between the references and the interfaces within the module.
- Verify that a manifest file, module.manifest,
exists in the component folder.
The manifest lists the module and all the components that comprise the module. It also contains a class path statement so the serviceDeploy command can locate any other modules needed by the module.
- Create a compressed file or a JAR file of the module as input to the serviceDeploy command that use to prepare the module for deployment to the production server.
Example folder structure for MyValue module before deployment
The following example illustrates the directory structure for the module MyValueModule, which is made up of the components MyValue, CustomerInfo, and StockQuote.
MyValueModule
   MyValueModule.manifest
   MyValueModule.references
   MyValueModule.wiring
   MyValueClient.jsp
process/myvalue
   MyValue.component
   MyValue.java
   MyValueImpl.java
service/customerinfo
   CustomerInfo.component
   CustomerInfo.java
   Customer.java
   CustomerInfoImpl.java
service/stockquote
   StockQuote.component
   StockQuote.java
   StockQuoteAsynch.java
   StockQuoteCallback.java
   StockQuoteImpl.java
Deploy the module onto the production systems as described in Deploy a module on a production server.
Considerations for deploying service applications on clusters
Deploy a service application on a cluster places additional requirements on you. It is important that you keep these considerations in mind as you deploy any service applications on a cluster.
Clusters can provide many benefits to your processing environment by providing economies of scale to help you balance request workload across servers and provide a level of availability for clients of the applications. Consider the following before deploying an application that contains services on a cluster:
- Will users of the application require the processing power and availability provided by clustering?
If so, clustering is the correct solution. Clustering will increase the availability and capacity of applications.
- Is the cluster correctly prepared for service applications?
Configure the cluster correctly before deploying and starting the first application that contains a service. Failure to configure the cluster correctly prevents the applications from processing requests correctly.
- Does the cluster have a backup?
You must deploy the application on the backup cluster also.
Cross-cluster modules
JNDI resources must not be shared across clusters. A cross-cluster module requires that each cluster have different JNDI resources. A scenario matching the following criteria will result in the log file indicating a NameNotFoundException:
- One module has a configured binding that generates JNDI resources.
- Another module is configured to use those generated JNDI resources.
- The modules are deployed in different clusters.
To resolve the problem, modify the module properties so that each module uses the JNDI resources in the same cluster as it.
Export modules for deployment or development
In IBM Integration Designer, you can export modules as EAR files for server deployment or as serviceDeploy files for command-line server deployment. You can also export modules as project interchange files so that you can share projects for development purposes. If you are exporting modules for adapter deployment, you might need to configure dependency libraries for the adapter on the server. The following topics explain how to export modules for deployment or development and how to configure dependency libraries for adapters that have been deployed on a server.
To create author artifacts in IBM Integration Designer and deploy them to an IBM Business Process Manager runtime environment, the major versions of the two products must match.
Export modules as EAR files
In IBM Integration Designer, you can export modules and libraries as EAR files and then deploy them on Process Server by using the administrative console or command-line tools.
- From the File menu, select Export. The Select page of the Export wizard opens.
- In the Select page, expand Business Integration and select Integration modules and libraries.
- Click Next. The Export Integration Modules and Libraries page opens.
- The intended usage of the exported content determines the export format. Select the Files for server deployment to export the content as EAR files.
- In the Select projects to export list box, select the check box beside the name of each project to export and click Next.
- Specify a file name for each archive, or leave the default file names as shown.
- In the Target directory field, specify the path and name of the target directory where you want to export the EAR files. Alternatively, you can click Browse to navigate the file system and select a target directory.
- Click Finish. The selected modules and libraries are exported as EAR files for server deployment.
Export modules and libraries as serviceDeploy files
In IBM Integration Designer, you can export modules and libraries as compressed files and then use the serviceDeploy command of Process Server to build and deploy them as EAR files.
- From the File menu, select Export. The Select page of the Export wizard opens.
- In the Select page, expand Business Integration and select Integration modules and libraries.
- Click Next. The Export Integration Modules and Libraries page opens.
- The intended usage of the exported content determines the export format. Select the Command line service deployment to export the content as compressed files.
- In the Select projects to export list box, select the check box beside the name of each project to export and click Next.
- In the Target file field, specify a path name for the exported .zip file. Alternatively, you can click Browse to navigate the file system and select a target file.
- If you have changed any of your generated Java 2 Platform Enterprise Edition projects, select the Include generated Java 2 Platform Enterprise Edition projects from workspace check box. The names of the Java 2 Platform Enterprise Edition projects will be displayed in the Additional projects list box. By default, all dependencies are automatically included in the serviceDeploy .zip file. These dependencies are required to successfully build an EAR file from the .zip file and deploy it using the serviceDeploy command-line tool.
- If there are global shared libraries the exported content depends on, these libraries are listed. These libraries must be deployed to the runtime environment according to these instructions: http://www-01.ibm.com/support/docview.wss?rs=2307&uid=swg21322617
- Click Finish to export the selected modules and libraries in a compressed file for command-line service deployment.
Export modules and libraries as project interchange files
In IBM Integration Designer, you can export modules and libraries as project interchange files. This enables you to share modules and their projects for development work.
It is advised that you do not select the staging projects if you are using the Rational Application Developer's project interchange export function. Although it is possible to import staging projects, it is not recommended. When importing projects from a project interchange file, the staging projects will be regenerated for you.
- From the File menu, select Export. The Select page of the Export wizard opens.
- In the Select page, expand Business Integration and select Integration modules and libraries.
- Click Next. The Export Integration Modules and Libraries page opens.
- The intended usage of the exported content determines the export format. Select Project interchange for sharing between workspaces to export the content as a project interchange file.
- In the Select projects to export list box, select the check box beside the name of each project to export and click Next.
- In the Target file field, type the path and name of the project interchange .zip file. (A file extension of .zip is recommended.) Alternatively, you can click Browse to navigate the file system and select the file.
- If your modules and libraries have dependent projects and you want to export these projects in the project interchange file, ensure the Include dependent projects from workspace check box is selected. The names of the dependent projects will be displayed in the Additional projects list box.
- Click Finish to export the selected content as a project interchange file.
Configure dependency libraries for adapters
The deployed adapter running in the server requires the same dependency libraries as it does in IBM Integration Designer to process requests. The method for adding these library files depends on the mode of the adapter deployment: deployed as a stand-alone adapter; or embedded in the EAR file.
In the test environment, the tools will automatically configure the required dependency libraries for you except when native libraries are used, for example, with the WebSphere Adapter for SAP Software or the WebSphere Adapter for JDBC, if using a Type 2 driver that uses native libraries.
For a production environment or testing on a remote server, however, add references to the dependency libraries. The following sections show you how to configure the dependency libraries for adapters with either stand-alone deployment or EAR deployment.
Stand-alone deployment
The dependency libraries may be added to the stand-alone deployed adapter either during initial deployment of the RAR file or by configuring the adapter properties after it has been deployed.
To set the values during initial deployment of the RAR file, from the navigation of the administrative console, select Resources > Resource Adapters > Resource adapters. Install the adapter and, afterward, add the paths to the Class path and Native path sections, before saving your configuration.
The class path is used to point to JAR files and the native path is used to point to folders containing native libraries, such as *.dll and *.so.
If a native library is dependent on other native libraries, the dependent libraries must be configured on the LIBPATH of the JVM hosting the application server (rather than on the native path) in order for that library to load successfully. You should configure an environment entry by selecting Servers > Application Servers > server_name > Java and Process Management > Process Definition > Environment Entries (where server_name is the name of the server; for example, server1). On the Environment Entries page, create a new environment entry to specify the LIBPATH of the JVM.
To set the dependency library path files after the adapter has been installed on the server, use the administrative console to modify the values for the adapter.
From the navigation of the administrative console, select Resources > Resource Adapters > Resource adapters. Select the installed adapter and, afterward, add the paths to the Class path and Native path sections before saving your configuration.
EAR deployment using the administrative console
If the dependency libraries can be loaded by the application, then you do not need to take any further steps. The dependency libraries are included in the connector module.
However, when native libraries are used, the dependency libraries are added as WebSphere shared libraries. You define the shared library containing external dependencies and associate them with the server.
To use the administrative console to add the dependency libraries as a shared library, follow these steps.
- Verify the dependency files are available on the server machine in the separate folder. If needed, copy dependency files on to the server machine.
- Define variables, one for the class path and one for the native path. The class path is a semicolon-separated list of absolute file paths to each library. For the native path, the value points to folders. To define a variable, select Environment > WebSphere Variables, which opens the WebSphere Variables page. Select the scope of your variable, for example, widCell. If you are uncertain about which scope is suitable, a link on the page provides help on the scope settings. Click New and create your variable pointing to a dependency library. Then click Apply and Save to add the variable to the list of variables on the server.
- Define the shared library through the server administrative console using the variables defined in the previous step. Select Environment >
Shared Libraries. As in the previous step, you must select your scope. Then click New. Create the shared library and click Apply and Save to add it to the server.
If a native library is dependent on other native libraries, the dependent libraries must be configured on the LIBPATH of the JVM hosting the application server (rather than on the native library path) in order for that library to load successfully. You should configure an environment entry by selecting Servers > Application Servers > server_name > Java and Process Management > Process Definition > Environment Entries (where server_name is the name of the server; for example, server1). On the Environment Entries page, create a new environment entry to specify the LIBPATH of the JVM.
- To associate a shared library with the server, select Servers > Application servers and select your server from the list. Check the Classloader policy and Class loading mode fields are correct for your requirements. Then set your shared library on the server by scrolling to Server Infrastructure on the same page and expanding Java and Process Management. Click Class loader. On the following page, click New and Apply to configure a class loader ID. On the next page, click Shared library references. Click Add on the following page and add your shared library. Then click Apply and Save to save the configuration and restart your server.
- Deploy the EAR to the server.
Export integration solutions for deployment or development
In IBM Integration Designer, you can export integration solutions as archive files for server deployment or as serviceDeploy files for command-line service deployment. You can also export integration solutions as project interchange files, which enables you to share projects for development purposes. The following topics explain how to export integration solutions for deployment or development.
To create author artifacts in IBM Integration Designer and deploy them to an IBM Business Process Manager runtime environment, the major versions of two products must match.
Export integration solutions as archive files
In IBM Integration Designer, you can export integration solutions as archive files and then deploy them on IBM Business Process Manager or WebSphere ESB using the administrative console or command-line tools.
To export integration solutions as archive files:
- If the Export an Integration Solution wizard is not currently open:
- From the File menu, select Export. The Select page of the Export wizard opens.
- In the Select page, expand Business Integration and select Integration solution.
- Click Next. The Export an Integration Solution wizard opens to the Select a File Format page.
- In the Select a File Format page, ensure that Server deployment is selected and click Next. The Select an Integration Solution and Projects page opens.
- In the Integration solution field, select the integration solution to export.
- In the Integration solution projects list:
- In the Core projects in integration solution section, select the core projects to export. These are projects that can be deployed and run on a server, such as modules, mediation modules, and user-authored enterprise application projects. Each project is exported as an EAR file.
- In the Global libraries referenced by core projects or integration solution section, select the global libraries to export. Each global library is exported as a JAR file.
- Click Next. The Select the Files and Set the Target Directory page opens.
- In the Target directory field, specify the fully qualified path to the target folder where you want to export the archive files.
- In the File Names column, accept the default EAR and JAR file names or type in new file names.
- Click Finish. The selected integration solution, projects, and libraries are exported to EAR and JAR files for server deployment.
Export integration solutions as serviceDeploy files
In IBM Integration Designer, you can export integration solution modules and mediation modules as compressed files and then use serviceDeploy and the command-line environment of IBM Business Process Manager to build and deploy them as EAR files.
To export integration solutions as serviceDeploy files:
- If the Export an Integration Solution wizard is not currently open:
- From the File menu, select Export. The Select page of the Export wizard opens.
- In the Select page, expand Business Integration and select Integration solution.
- Click Next. The Export an Integration Solution wizard opens to the Select a File Format page.
- In the Select a File Format page, ensure that Command-line service deployment is selected and click Next. The Select an Integration Solution and Projects page opens.
- In the Integration solution field, select the integration solution to export.
- In the Integration solution projects list, select the modules and mediation modules to export.
- Click Next. The Select the Files and Set the Target Directory page opens.
- In the Target directory field, specify the fully qualified path to the target folder where you want to export the compressed files.
- In the File Names column, accept the default file names for the compressed files or type in new file names.
- If you want generated Java 2 Platform Enterprise Edition staging projects from the workspace to be included in the compressed files that will be exported, select the Include generated Java 2 Platform Enterprise Edition projects from workspace check box and then select the generated Java 2 Platform Enterprise Edition projects from the Additional projects list.
- In the Globally shared libraries that will need to be deployed separately list, note the globally shared libraries listed. You will need to manually package, export, and deploy the globally shared libraries separately from the automatically prepared compressed files that contain the modules and mediation modules.
- Click Finish. The selected integration solution, modules, and mediation modules are exported to compressed files for command-line service deployment.
Export integration solutions as project interchange files
In IBM Integration Designer, you can export integration solutions as project interchange files. This enables you to share integration solutions and their projects for development work.
To export integration solutions as project interchange files:
- If the Export an Integration Solution wizard is not currently open:
- From the File menu, select Export. The Select page of the Export wizard opens.
- In the Select page, expand Business Integration and select Integration solution.
- Click Next. The Export an Integration Solution wizard opens to the Select a File Format page.
- In the Select a File Format page, ensure that Project interchange is selected and click Next. The Select an Integration Solution and Projects page opens.
- In the Integration solution field, select the integration solution to export.
- In the Integration solution projects list:
- In the Projects referenced by integration solution section, select the referenced projects to export.
- In the Dependent projects not in integration solution section, select the dependent projects to export. These projects are the dependent projects not included in the integration solution but are referenced by projects in the integration solution.
- Click Next. The Target File Selection page opens.
- In the Target file field, specify the fully qualified name of the target project interchange file.
- Click Finish. The selected integration solution and projects are exported in a project interchange file for sharing between development workspaces.
Deploy a module or mediation module
You can deploy a module or mediation module, as generated by IBM Integration Designer, into a production environment by using these steps.
Before deploying a service application to a production server, assemble and test the application on a test server. After testing, export the relevant files as described in Prepare to deploy to a server and bring the files to the production system to deploy. See the information centers for Integration Designer and WebSphere Application Server.
- Copy the module and other files onto the production server.
The modules and resources (EAR, JAR, RAR, and WAR files) needed by the application are moved to BPMion environment.
- Run the serviceDeploy command to create an installable EAR file.
This step defines the module to the server in preparation for installing the application into production.
- Locate the JAR file that contains the module to deploy.
- Issue the serviceDeploy command using the JAR file from the previous step as input.
- Locate the JAR file that contains the module to deploy.
- Install the EAR file from step 2. How you install the applications depends on whether you are installing the application on a stand alone server or a server in a cell.
You can either use the administrative console or a script to install the application. See the WebSphere Application Server information center for additional information.
Save the configuration. The module is now installed as an application.
- Start the application.
The application is now active and work should flow through the module.
Monitor the application to make sure the server is processing requests correctly.
Deploy secure applications
Deploy applications that have security constraints (secured applications) is similar to deploying applications with no security constraints. The only difference is that you might need to assign users and groups to roles for a secured application, which requires that you have the correct active user registry. If you are installing a secured application, roles would have been defined in the application. If delegation was required in the application, RunAs roles also are defined and a valid user name and password must be provided.
Before you perform this task, verify that you have designed, developed, and assembled an application with all the relevant security configurations. For more information about these tasks, see the Integration Designer information center. One of the required steps to deploy secured applications is to assign users and groups to the roles that were defined when the application was constructed. This task is completed as part of the step entitled, "Map security roles to users or groups". If an assembly tool was employed, this assignment might have been completed in advance. In that case, you can confirm the mapping by completing this step. You can add new users and groups and modify existing information during this step.
If a RunAs role has been defined in the application, the application will invoke methods using an identity setup during deployment. Use the RunAs role to specify the identity under which the downstream invocations are made. For example, if the RunAs role is assigned user "bob", and the client, "alice", is invoking a servlet (with delegation set) that calls the enterprise beans, the method on the enterprise beans is invoked with "bob" as the identity.
As part of the deployment process, one of the steps is to assign or modify users to the RunAs roles. This step is entitled, "Map RunAs roles to users". Use this step to assign new users or modify existing users to RunAs roles when the delegation policy is set to SpecifiedIdentity.
The steps described in the Procedure section are common for both deploying an application and modifying an existing application. If the application contains roles, you see the Map security roles to users or groups link during application deployment and also during managing applications, as a link in the Additional properties section.
- Go to the installed application that requires users to be mapped to the roles.
Complete the steps required for installing applications before the step entitled, "Map security roles to users or groups".
- Assign users and groups to roles.
- Map users to RunAs roles if RunAs roles exist in the application.
- Click Correct use of System Identity to specify RunAs roles, if needed.
Complete this action if the application has delegation set to use system identity, which is applicable to enterprise beans only. System identity uses the BPM security server ID to invoke downstream methods. Use this ID with caution because this ID has more privileges than other identities in accessing IBM Business Process Manager internal methods. This task is provided to make sure the deployer is aware the methods listed in the page have system identity set up for delegation and to correct them if necessary. If no changes are necessary, skip this task.
- Complete the remaining non-security related steps to finish installing and deploying the application.
After a secured application is deployed, verify that you can access the resources in the application with the correct credentials. For example, if your application has a protected web module, make sure only the users that you assigned to the roles can use the application.
Assigning users to roles
A secured application uses one or both of the security qualifiers securityPermission and securityIdentity. When these qualifiers are present, there are additional steps that must be taken at deployment time in order the application and its security features work correctly.
This task assumes that you have a secured application ready to deploy as an EAR file into IBM Business Process Manager. Applications implement interfaces that have methods. You can secure an interface or a method with the Service Component Architecture (SCA) qualifier securityPermission. When you invoke this qualifier, you specify a role ( "supervisors") that has permission to invoke the secured method. When you deploy the application you have the opportunity to assign users to the specified role.
The securityIdentity qualifier is equivalent to the RunAs role used for delegations in WebSphere Application Server. The value associated with this qualifier is a role. During deployment, the role is mapped to an identity. Invocation of a component secured with securityIdentity takes the specified identity, regardless of the identity of the user who is invoking the application.
- Follow the instructions for deploying an application into IBM Business Process Manager. See "Deploying a module or mediation module" for more details.
- Associate the correct users with the roles.
Security qualifier Action to take Security Permission Assign a user or users to the role specified. There are four choices: - Everyone - equivalent to no security.
- All authenticated - every authenticated user is a member of the role.
- Mapped User - Individual users are added to the role.
- Mapped Groups - Groups of users are added to the role.
The most flexible choice is Mapped Groups, because users can be added to the group and thus gain access to the application without restarting the server.
Security Identity Provide a valid user name and password for the identity to which the role is mapped.
Commands to implement roles and user assignments (System Authorization Facility directions)
The System Authorization Facility (SAF) is a z/OS interface that programs can use to communicate with an external security manager, such as RACF. You can use RACF commands to implement roles and user assignments.
The following examples can be used to construct the RACF commands needed to implement the roles and user assignments:
RDEFINE EJBROLE (optionalSecurityDomain).WebClientUser UACC(READ)
RDEFINE EJBROLE (optionalSecurityDomain).BPEAPIUser UACC(READ)
RDEFINE EJBROLE (optionalSecurityDomain).BPESystemAdministrator UACC(NONE)
PERMIT (optionalSecurityDomain).BPESystemAdministrator CLASS(EJBROLE) ID(WSCFG1) ACCESS(READ)
RDEFINE EJBROLE (optionalSecurityDomain).BPESystemMonitor UACC(NONE)
PERMIT (optionalSecurityDomain).BPESystemMonitor CLASS(EJBROLE) ID(WSCFG1) ACCESS(READ)
RDEFINE EJBROLE (optionalSecurityDomain).JMSAPIUser UACC(READ) APPLDATA(RACFUserIdentity)
RDEFINE EJBROLE (optionalSecurityDomain).AdminJobUser UACC(READ) APPLDATA(RACFUserIdentity)
RDEFINE EJBROLE (optionalSecurityDomain).JAXWSAPIUser UACC(READ)
PERMIT (optionalSecurityDomain).JAXWSAPIUser CLASS(EJBROLE) ID(WSGUEST) ACCESS(READ)
- RDEFINE EJBROLE (optionalSecurityDomain).businessspaceusers UACC(READ)
- RDEFINE EJBROLE (optionalSecurityDomain).WebFormUsers UACC(READ)
RDEFINE EJBROLE (optionalSecurityDomain).BusinessRuleUsers UACC(READ)
RDEFINE EJBROLE (optionalSecurityDomain).NoOne UACC(NONE)
RDEFINE EJBROLE (optionalSecurityDomain).AnyOne UACC(READ)
PERMIT (optionalSecurityDomain).AnyOne CLASS(EJBROLE) ID(WSGUEST) ACCESS(READ)
RDEFINE EJBROLE (optionalSecurityDomain).Administrator UACC(READ)
RDEFINE EJBROLE (optionalSecurityDomain).RestServicesUser UACC(READ)
RDEFINE EJBROLE (optionalSecurityDomain).TaskAPIUser UACC(READ)
RDEFINE EJBROLE (optionalSecurityDomain).TaskSystemAdministrator UACC(NONE)
PERMIT (optionalSecurityDomain).TaskSystemAdministrator CLASS(EJBROLE) ID(WSCFG1) ACCESS(READ)
RDEFINE EJBROLE (optionalSecurityDomain).TaskSystemMonitor UACC(NONE)
PERMIT (optionalSecurityDomain).TaskSystemMonitor CLASS(EJBROLE) ID(WSCFG1) ACCESS(READ)
RDEFINE EJBROLE (optionalSecurityDomain).EscalationUser UACC(READ) APPLDATA(RACFUserIdentity)
RDEFINE EJBROLE (optionalSecurityDomain).Allauthenticated UACC(READ)
RDEFINE EJBROLE (optionalSecurityDomain).everyone UACC(READ)
PERMIT (optionalSecurityDomain).everyone CLASS(EJBROLE) ID(WSGUEST) ACCESS(READ)
RDEFINE EJBROLE (optionalSecurityDomain).WBIOperator UACC(READ)
PERMIT (optionalSecurityDomain).WBIOperator CLASS(EJBROLE) ID(WSGUEST) ACCESS(READ)
Any user who wants to make use of the applications protected by these roles must be granted Read access to the role. It is important to note that unsecured applications run under the identity of the WebSphere Application Server unauthenticated user ID, which by default is WSGUEST. This user ID is usually defined with the RESTRICTED option, so if an unsecured application uses application facilities protected by the Java EE roles listed above, then WSGUEST must be given read access to the relevant profiles that implement the equivalent of EVERYONE user mapping for the role.
There is a subtlety in the user assignment to the roles when using SAF based authorization. To emulate EVERYONE access, the EJBROLE profile must be defined with a UACC of read and the WebSphere Application Server unauthenticated user ID (default WSGUEST) must be granted Read access. To emulate all authenticated access, the EJBROLE profile must be defined with a UACC of Read. See the WebSphere Application Server information center:
System Authorization Facility considerations for the operating system and application levels.
Applications that use securityIdentity or RunAs roles also need extra configuration for SAF security products. In RACF, this is done by using the EJBROLE APPLDATA parameter to assign a RACF user identity (RACFUserIdentity in the above examples) to the role. See the WebSphere Application Server information center:
System Authorization Facility (SAF) delegation.
Troubleshooting a failed deployment
Use the information in this group of topics to identify and resolve errors in the deployment environment.
Delete JCA activation specifications
The system builds JCA application specifications when installing an application that contains services. There are occasions when you must delete these specifications before reinstalling the application.
If you are deleting the specification because of a failed application installation, make sure the module in the Java™ Naming and Directory Interface (JNDI) name matches the name of the module that failed to install. The second part of the JNDI name is the name of the module that implemented the destination. For example in sca/SimpleBOCrsmA/ActivationSpec, SimpleBOCrsmA is the module name.
When security and role-based authorization are enabled, you must be logged in as administrator or configurator to perform this task.
Delete JCA activation specifications when you inadvertently saved a configuration after installing an application that contains services and do not require the specifications.
- Locate the activation specification to delete.
The specifications are contained in the resource adapter panel. Navigate to this panel by clicking Resources > Resource adapters.
- Locate the Platform Messaging Component SPI Resource Adapter.
To locate this adapter, you must be at the node scope for a standalone server or at the server scope in a deployment environment.
- Locate the Platform Messaging Component SPI Resource Adapter.
- Display the JCA activation specifications associated with the Platform Messaging Component SPI Resource Adapter.
Click the resource adapter name and the next panel displays the associated specifications.
- Delete all of the specifications with a JNDI Name that matches the module name that you are deleting.
- Click the check box next to the appropriate specifications.
- Click Delete.
The system removes selected specifications from the display.
Save the changes.
Delete SIBus destinations
Service integration bus (SIBus) destinations are used to hold messages being processed by SCA modules. If a problem occurs, you might have to remove bus destinations to resolve the problem.
If you are deleting the destination because of a failed application installation, make sure the module in the destination name matches the name of the module that failed to install. The second part of the destination is the name of the module that implemented the destination. For example in sca/SimpleBOCrsmA/component/test/sca/cros/simple/cust/Customer, SimpleBOCrsmA is the module name.
When security and role-based authorization are enabled, you must be logged in as administrator or configurator to perform this task.
Delete SIBus destinations when you inadvertently saved a configuration after installing an application that contains services or you no longer need the destinations.
This task deletes the destination from the SCA system bus only. You must also remove the entries from the application bus before reinstalling an application that contains services (see Deleting JCA activation specifications.)
- Log into the administrative console.
- Display the destinations on the SCA system bus.
- In the navigation pane, click Service integration > buses
- In the content pane, click SCA.SYSTEM.cell_name.Bus
- Under Destination resources, click Destinations
- Select the check box next to each destination with a module name that matches the module that you are removing.
- Click Delete.
The panel displays only the remaining destinations.
Delete the JCA activation specifications related to the module that created these destinations.
Use Ant scripts to automate builds and deployment
To create automate the builds and deployment of applications, you can use Ant scripts to invoke the headless (command line) batch processing environments of either IBM Integration Designer or Process Server. These headless environments are used exclusively to perform batch processing of Integration Designer modules. You cannot use these headless environments to deploy modules contained in process applications or toolkits to either a IBM Process Center server or a process server on Process Center.
Unless you have a specific reason for using the batch processing environment of Integration Designer (such as the specialized runAntWID.bat file provided with Integration Designer), it is generally recommended that use the batch processing environment of Process Server to gain access to standard tools like serviceDeploy and wsadmin. However, there are a couple of limitations to using the batch processing environment of Process Server, which are described in the topic "Limitations of batch testing in headless Process Server."
Detailed information about using Ant scripts for automating builds and deployment is found in "Automating tests using Ant scripts" and its subtopics.
Prevent timeout and out-of-memory exceptions during installation or deployment
Because Advanced Integration services can increase the size of a process application or toolkit, snapshot installation might fail with a timeout or out-of-memory exception.
A timeout exception can occur when the size of the process application or toolkit prevents the installation from completing in the time allotted (by default, 720 seconds). When this exception occurs, you can see a message like the following in the server log:
CWPFD2064W: A timeout occurred during processing of the job With a root cause: WTRN0124I: When the timeout occurred the thread with which the transaction ... sun.misc.Unsafe.park(Native Method)
An out-of-memory exception can occur when the size of the process application or toolkit exceeds the available memory during installation. During the installation process, the serviceDeploy utility (used for the Advanced Integration service content) is invoked for each Service Component Architecture (SCA) module in the process application. The default behavior is for serviceDeploy to run in the same process. When this exception occurs, you can see a message like the following in the server log:
CWPFD1300E: Service deploy failed with return code 3
With a root cause: java.lang.OutOfMemoryError
To resolve or prevent these errors, use the following system Java virtual machine (JVM) properties to override the default system behavior:
- com.ibm.bpm.pal.deploy.timeout
Use this property to set a new timeout value for the installation. The value is specified in seconds. To revert to the default behavior, delete the system property or set the value to 720.
- com.ibm.bpm.fds.sca.deploy.outOfProcess
Set the value of this property to true so that serviceDeploy runs in a new process for each SCA module in the process application. Be aware that this causes noticeable performance degradation of the overall installation process. If you set this system property, consider also setting the com.ibm.bpm.pal.deploy.timeout property to a value larger than the default.
To revert to the default behavior, delete the system property or set the value to false.
These system JVM properties need to be set on each affected server. Because they are scoped to the server, they are used for all process application installations on that server.
To set one or both of these system properties, use the following steps.
- Log in to the WAS administrative console.
- Select the server by clicking Servers > Server Types > WebSphere application servers > server_name.
- From the Server Infrastructure area, click Java and Process Management > Process definition > Java Virtual Machine > Custom Properties.
- Create one or both of these custom properties:
name = com.ibm.bpm.pal.deploy.timeout
value = timeout_value
name = com.ibm.bpm.fds.sca.deploy.outOfProcess
value = true
The timeout value is specified in seconds. - Click OK and save the changes to the configuration when prompted.
- Restart the server.