Troubleshooting and support for BPM
- Overview
- Troubleshooting checklist
- Messages overview
- BPM log files
- Transaction log file
- Troubleshooting installation and configuration
- Troubleshooting the z/OS installation and configuration
- Troubleshooting migration
- Troubleshooting
- ClassCastException when stopping an application containing a microflow
- XPath query returns an unexpected value from an array
- An activity has stopped because of an unhandled fault (Message:
- A microflow is not compensated
- A long-running BPEL process appears to have stopped
- Invoke a synchronous subprocess in another EAR file fails
- Hung threads when a long-running process is invoked synchronously (Message:
- Late binding calls the wrong version of a subprocess
- Unexpected exception during execution (Message: CWWBA0010E)
- Event unknown (Message: CWWBE0037E)
- Cannot find nor create a process instance (Message: CWWBA0140E)
- The failed state of the process instance does not allow the requested sendMessage action to be performed (Message: CWWBE0126E)
- Uninitialized variable or NullPointerException in a Java snippet
- Standard fault exception "missingReply" (message: CWWBE0071E)
- A fault is not caught by the fault handler
- Parallel paths are sequentialized
- Copying a nested data object to another data object destroys the reference on the source object
- CScope is not available
- Event service does not start (message CEIDS0058E)
- Error when sending event (message CEIDS0060E)
- Error when sending event (ServiceUnavailableException)
- Error when sending event (NameNotFoundException)
- Error when sending event (message CEIEM0025E)
- Error when sending event (message CEIEM0034E)
- Event is not valid (message CEIEM0027E)
- Synchronization mode not supported (message CEIEM0015E)
- Transaction mode not supported (message CEIEM0016E)
- Error when querying events (message CEIDS0060E)
- Events not being stored in the persistent data store
- Events not being received by consumers (no error message)
- Events not being received by consumers (NameNotFoundException)
- Event group with extended data elements contains no events
- Error when querying an event group (message CEIES0048E)
- Event catalog pattern query fails on a Windows system
- About
- Snapshot support
- Preparing the operating system before a snapshot
- Taking an operating system snapshot
- NFS support
- Configure the NFS server
- Configure the NFS clients
Overview
What are the symptoms of the problem?
- Who, or what, is reporting the problem?
- What are the error codes and messages?
- How does the system fail? For example, is it a loop, hang, lock up, performance degradation, or incorrect result?
- What is the business impact of the problem?
Where does the problem occur?
- Is the problem specific to one platform or operating system, or is it common for multiple platforms or operating systems?
- Is the current environment and configuration supported?
When does the problem occur?
- Does the problem happen only at a certain time of day or night?
- How often does the problem happen?
- What sequence of events leads up to the time the problem is reported?
- Does the problem happen after an environment change, such as upgrading or installing software or hardware?
Responding to these types of questions can provide you with a frame of reference in which to investigate the problem.
Under which conditions does the problem occur?
- Does the problem always occur when the same task is being performed?
- Does a certain sequence of events need to occur for the problem to surface?
- Do any other applications fail at the same time?
Can the problem be reproduced?
- Can the problem be re-created on a test machine?
- Are multiple users or applications encountering the same type of problem?
- Can the problem be re-created by running a single command, a set of commands, a particular application, or a stand-alone application?
Troubleshooting checklist
- Is the configuration supported?
- IBM Business Process Manager Advanced system requirements
- IBM Business Process Manager Standard system requirements
- IBM Business Process Manager Express system requirements
- IBM Business Process Manager Tools and Add-Ons requirements
-
Have you applied the latest fixes?
-
What is the problem?
-
Have any error messages been issued?
-
For additional help in finding error and warning messages, interpreting messages, and configuring log files, see Diagnosing problems with message logs in the Websphere Application Server information center.
-
Difficult problems can require the use of tracing, which exposes the low-level flow of control and interactions between components. For help in understanding and using traces, see Work with trace in the Websphere Application Server information center.
-
If the checklist does not guide you to a resolution, you can collect additional diagnostic data. This data is necessary for IBM Support to effectively troubleshoot and assist you in resolving the problem. See Contacting IBM Software Support.
Messages overview
You can find the full text of runtime messages, their explanations, and the recommended recovery actions by searching for the message identifier in the Messages section of the BPM Reference documentation.
Runtime message identifiers consist of a four- or five-character message prefix, followed by a four- or five-character message number, followed by a single-letter message type code. For example, zzzzL1042C. The message type code describes the severity of the error message:
| C | Severe message. |
| E | Urgent message. |
| I | Informational message. |
| N | Error message. |
| W | Warning message. |
IBM Business Process Manager forum on developerWorks
 Messages: installation and profile creation
BPM log files
Runtime logs
By default, log, error, and trace information for processes and applications on a process server is written to the SystemOut.log, SystemErr.log, and trace.log files, which are stored in the directory...
- install_root/profiles/profile_name/logs/server_name
Content from the following log files is now captured in the SystemOut.log file:
| TW BPD Engine | Errors generated as a result of process instance execution on the current server |
| TW Console | Actions that occurred in the Process Admin console |
| TW Error | Java exceptions |
| TW EventManager | Historical information about Event Manager processing |
| TW Exp/Imp | Process export and import transactions in Process Designer |
| TW Limit | Process server limit overruns |
| TW JavaScript | Logging associated with JavaScript log functions like log.info() or log.debug() |
| WS Inbound | Calls to published web services |
| WS Outbound | Data about web services consumed by processes |
| WS UCA Execution | Errors generated by Undercover Agent (UCA) execution |
Related concepts:
Installation and profile creation log files
Transaction log file
The transaction (tranlog) log file stores critical transactional data that is written to databases. It is an internal file that WebSphere Application Server uses to manage in-flight transactions and attempt to recover them if the server locks up.
CAUTION:
Never delete the transaction log file from a production environment. Deleting this file removes information on in-flight transactions from BPM memory. Without the transaction log file, there is no functionality to recover transactional information. In addition, long-running processes remain in an inconsistent state and you cannot complete the process flow except by deleting running instances. Deleting running instances might cause you to lose operational or business-critical data, which makes the database inconsistent with the message destination. Other inconsistencies that may be caused by deleting the transaction log file includes the following:
- Started transactions will neither be rolled back nor committed
- Artifacts will remain in the JVM since they are referenced or allocated by a transaction but never garbage collected
- Database content (amongst others navigation state of long running BPEL processes) remains in the Business Process Choreographer related tables and are never deleted
- Navigation messages of the Business Process Engine (BPE) of long running processes are never processed further
- Service Component Architecture (SCA) messages that belong to a process navigation and transaction remain on SCA-related queues
Delete the transaction log from a development environment causes the same problems. Because you can re-create business processes, deleting the files from a test environment is not as damaging as deleting them from a production environment.
Troubleshooting installation and configuration
- Read any error messages from the installation process.
See: Error messages: installation and profile creation and augmentation.
- If the installation of WebSphere Application Server Network Deployment was not successful, check Troubleshooting installation in the WAS Network Deployment information center .
- If the installation of WebSphere Application Server Feature Pack for Service Component Architecture (SCA) with the Service Data Objects (SDO) feature not successful, check Troubleshooting installation in the WAS Network Deployment information center .
- If the installation of WebSphere Feature Pack for Web Services was not successful (and installation of WAS Network Deployment was), check Troubleshooting web server plug-ins installation and removal in the WAS ND information center .
If a problem occurs during an installation of WebSphere Feature Pack for Web Services as part of the BPM installation, the installation process will not continue and an error message will be displayed.
- If the installation of IBM Business Process Manager was not successful (and installation of WAS Network Deployment and WebSphere Feature Pack for Web Services were), check other BPM installation log files. See Installation and profile creation log files.
- If you have successfully created a server profile, use the Quick Start console or the command-line method to start the server.
- Verify the server starts and loads properly by looking for a running Java process and the Open for e-business message in SystemOut.log and SystemErr.log.
If no Java process exists or if the message is not displayed, examine the same logs for any miscellaneous errors. Correct any errors and try again.
You can find SystemOut.log and SystemErr.log in:
-
profile_root/logs/servername
- Use the Quick Start console or the command-line method to stop the server, if it is running.
- To verify the ability of the web server to retrieve an application from BPM, see the step "Start the Snoop servlet to verify the ability of the web server to retrieve an application from the Application Server" in Troubleshooting installation in the WAS Network Deployment documentation.
- Start the administrative console.
- To resolve any IP address caching problems, see the step about resolving any IP address caching problems in Troubleshooting installation in the WAS Network Deployment documentation.
On the product support web site, you can review current information about resolutions to known problems, and you can read documents that can save you time gathering the information that you need to resolve a problem. Before opening a PMR, see the IBM Business Process Manager support page.
Messages and known issues during installation and profile creation
Some of the most commonly found error messages encountered when installing and configuring can be addressed with actions that resolve the underlying problems.
 The following IBM Business Process Manager installation and configuration errors appear on Linux, UNIX, and Windows platforms.
For information about messages that might be generated by the installation of WebSphere Application Server Network Deployment, refer to the Business Process Management messages topic.
If you do not see an error message that resembles yours, or if the information provided does not solve your problem, contact IBM Business Process Manager support at IBM for further assistance.
Informational messages
The following messages are for information only and do not require any action:
- Sample applications feature is not available for installation because the WAS Samples feature is not installed.
- Installation Manager cannot remove feature import.productProviders.feature from an installation package that was imported to Installation Manager.
- Installation Manager cannot remove feature import.configLauncher.feature from an installation package that was imported to Installation Manager.
Configuration errors were detected during the installation
If you are installing either the Advanced or Advanced Process Server editions of IBM Business Process Manager V8.5 with Installation Manager, and you selected to install only the client, you might get the following warning message: The packages are installed with warnings. View Log file
If you see this warning message after installing the client feature of Business Process Manager, either the Advanced or the Advanced Process Server edition, on a Windows system with just the client feature selected, examine the logs. If, in the logs, you see the following message, then you cannot use the Windows add or remove programs function to remove the client: 2464 WARNING 27:29.66 com.ibm.ws.exec.command.ExecCommand "C:\IBM\WebSphere\AppServer/util/bpm_configManagerLauncher.bat" cannot be found
To remove the client, use Installation Manager.
An earlier instance exists
When you perform a typical installation of IBM Business Process Manager after installing it previously on the same drive, you might see the following message:
- An earlier instance exists in drive where DB2 is being installed/BPMINST. Either delete or rename this folder. Press "Re-Validate" button once you have taken these steps.
- An earlier instance exists in instance_user_home/instance_user. Either delete or rename this folder. Press "Re-Validate" button once you have taken these steps.
- The DB2 instance folder folder already exists at path. Delete the DB2 instance folder folder and then retry the installation.
Delete the indicated folder and click Re-Validate before you continue the installation.
When you perform a custom installation, you might see the following message:
- The DB2 instance folder folder already exists at path. Delete the DB2 instance folder folder and then retry the installation.
Delete the indicated folder and run the installation again.
Supported IBM JDK was not found. The IBM JDK shipped with this product must be located at install_root/JDK. Correct this problem and try again.
If you use symbolic links to point to the IBM Java™ Development Kit (JDK) shipped with BPM, or to a JDK found in the PATH environment variable on your system, IBM SDK for Java validation might fail, resulting in a failed installation. This problem is caused by the way IBM SDK for Java validation code detects whether the JDK shipped with BPM is the current JDK used for installation.
To resolve this problem, do not use symbolic links in JVMs supplied with the installation image of IBM Business Process Manager and remove symbolic links from all JVMs that appear in your system's PATH environment variable.
Warning: Cannot convert string "<type_name>" to type FontStruct
If you install the web server plug-ins for WAS, you also install the ikeyman utility. The ikeyman utility is part of the Global Services Kit 7 (GSKit7).
 If you issue the ikeyman.sh script on a Linux system, you might see the following message:
Warning: Cannot convert string    "-monotype-arial-regular-r-normal--*-140-*-*-p-*-iso8859-1"
   to type FontStruct
You can safely ignore the warning and use the ikeyman utility.
CWWBB0627E error during installation with DB2 Express on Linux systems
When you install BPM, IBM Business Monitor, or WebSphere Enterprise Service Bus with DB2 Express on a 32- or 64-bit Linux system, the server does not start successfully. Also, the SystemOut.log file includes CWWBB0627E: Failed to create the database schema.
The problem occurs if you used the Administration server (DAS) user name, which defaults to bpmadmin, instead of the Instance user name, which defaults to bpminst.
This problem can occur in the following situations:
- When use the Administration server (DAS) user name during a Custom installation, in which you create the profile after installation
- During a Typical installation with an existing DB2 database
If the problem occurs, the SystemOut.log file contains the following information:
[5/24/11 10:40:27:131 CDT] 00000000 CreateSchemaM E   CWWBB0627E: Failed to create the database schema.
[5/24/11 10:40:27:227 CDT] 00000000 ProcessEngine E
[5/24/11 10:40:27:274 CDT] 00000000 ManagerAdmin  I   TRAS0018I: The trace state has changed. The new trace state is *=info.
[5/24/11 10:40:27:499 CDT] 00000000 CreateSchemaM I   CWWBB0625I: Started creating the database schema.
[5/24/11 10:40:27:502 CDT] 00000000 CreateSchemaM I   CWWBB0658I: Schema qualifier is: 'BPEDB'.
[5/24/11 10:40:27:909 CDT] 00000000 CreateSchemaM I   CWWBB0614E: Database schema creation or migration step failure   CREATE TABLE BPEDB.PROCESS_TEMPLATE_B_T ( PTID CHAR(16) FOR BIT DATA NOT NULL , NAME VARCHAR(220) NOT NULL ,
  DEFINITION_NAME VARCHAR(220) , DISPLAY_NAME VARCHAR(64) , APPLICATION_NAME VARCHAR(220) , DISPLAY_ID INTEGER
  NOT NULL , DISPLAY_ID_EXT VARCHAR(32) , DESCRIPTION VARCHAR(254) , DOCUMENTATION CLOB(4096) , EXECUTION_MODE
  INTEGER NOT NULL , IS_SHARED SMALLINT NOT NULL , IS_AD_HOC SMALLINT NOT NULL , STATE INTEGER NOT NULL ,
  VALID_FROM TIMESTAMP NOT NULL , TARGET_NAMESPACE VARCHAR(250) , CREATED TIMESTAMP NOT NULL , AUTO_DELETE   SMALLINT NOT NULL , EXTENDED_AUTO_DELETE INTEGER NOT NULL , VERSION VARCHAR(32) , SCHEMA_VERSION INTEGER NOT   NULL , ABSTRACT_BASE_NAME VARCHAR(254) , S_BEAN_LOOKUP_NAME VARCHAR(254) , S_BEAN60_LOOKUP_NAME VARCHAR(254) ,
  E_BEAN_LOOKUP_NAME VARCHAR(254) , PROCESS_BASE_NAME VARCHAR(254) , S_BEAN_HOME_NAME VARCHAR(254) ,
  E_BEAN_HOME_NAME VARCHAR(254) , BPEWS_UTID CHAR(16) FOR BIT DATA , WPC_UTID CHAR(16) FOR BIT DATA , BPMN_UTID   CHAR(16) FOR BIT DATA , BUSINESS_RELEVANCE SMALLINT NOT NULL , ADMINISTRATOR_QTID CHAR(16) FOR BIT DATA ,
  READER_QTID CHAR(16) FOR BIT DATA , A_TKTID CHAR(16) FOR BIT DATA , A_TKTIDFOR_ACTS CHAR(16) FOR BIT DATA ,
  COMPENSATION_SPHERE INTEGER NOT NULL , AUTONOMY INTEGER NOT NULL , CAN_CALL SMALLINT NOT NULL , CAN_INITIATE   SMALLINT NOT NULL , CONTINUE_ON_ERROR SMALLINT NOT NULL , IGNORE_MISSING_DATA INTEGER NOT NULL , EAR_VERSION   INTEGER NOT NULL , LANGUAGE_TYPE INTEGER NOT NULL , DEPLOY_TYPE INTEGER NOT NULL , MESSAGE_DIGEST VARCHAR(20)
  FOR BIT DATA , CUSTOM_TEXT1 VARCHAR(64) , CUSTOM_TEXT2 VARCHAR(64) , CUSTOM_TEXT3 VARCHAR(64) , CUSTOM_TEXT4
  VARCHAR(64) , CUSTOM_TEXT5 VARCHAR(64) , CUSTOM_TEXT6 VARCHAR(64) , CUSTOM_TEXT7 VARCHAR(64) , CUSTOM_TEXT8
  VARCHAR(64) , PRIMARY KEY ( PTID ) ) IN BPETS8K: com.ibm.db2.jcc.am.SqlSyntaxErrorException: DB2 SQL Error:
  SQLCODE=-204, SQLSTATE=42704, SQLERRMC=BPETS8K, DRIVER=3.61.65.
[5/24/11 10:40:27:912 CDT] 00000000 CreateSchemaM E   CWWBB0627E: Failed to create the database schema.
[5/24/11 10:40:27:912 CDT] 00000000 CreateSchemaM E   CWWBB0627E: Failed to create the database schema.
[5/24/11 10:40:27:948 CDT] 00000000 TraceBPE      E
To solve the problem, you can either create a new profile, or you can use the usermod command to add the Administrative server (DAS) user name:
- Create a new profile using the -manageprofiles command.
Set the Instance user name, which, by default, is bpminst, for the -dbUserId parameter.
- Add the Administrative server (DAS) user name, which, by default, is bpmadmin, to the bpmiadm1 group by running the following command:
- usermod -a -G bpmiadm1 bpmadmin
Installation and profile creation log files
Various log files are created during installation and uninstallation of IBM Business Process Manager and during profile creation, augmentation, and deletion. Consult the applicable logs if problems occur during these procedures.
Table 1 shows the log file names, locations, and descriptions for success and failure for BPM.
Some directory paths, file names, and indicator values in Table 1 contain spaces to allow the entries to fit in the table cells. The actual directory paths, file names, and indicator values do not contain spaces.
The variable install_root represents the installation directory of IBM Business Process Manager. The variable profile_root represents the root location of a profile.
For more information see Installation directories for the product and profiles.
| Log name and location | Log description |
|---|---|
| Agent data location/logs
Typically: C:\Documents and Settings\All Users\Application Data\IBM\Installation Manager\logs Agent data location/logs Typically: /var/ibm/InstallationManager/logs | Installation Manager log file directory under the Agent data location. For more information on the Agent data location refer to the Installation Manager documentation.
Contains log information for Business Process Manager and WAS installations and uninstallations. |
|
| Logs configuration actions that run at the end of the installation process to configure components, install system applications, and create Windows shortcuts and registry entries. |
|
|
Logs all events from PMT. |
|
|
|
|
|
|
|
|
|
|
| Logs all configuration actions that run during uninstallation events relating to IBM Business Process Manager. |
Launching Installation Manager directly on 64-bit systems
You can launch Installation Manager directly, for BPM, IBM Business Monitor, or IBM WebSphere Enterprise Service Bus, on 64-bit systems.
To launch Installation Manager directly, go to image_location/IM and do one of the following:
- If you do not have Installation Manager installed, run: install -input install_64.xml
- If you do have Installation Manager installed, run: install -input post-install_64.xml
This will start Installation Manager with the correct products preselected.
Warnings about GTK or ulimit on Linux or UNIX when installing or migrating
On the Linux or UNIX operating system, when you are installing or migrating, you might see a warning about 32-bit GTK libraries or increasing your ulimit.
GTK warning
If you are on a 64-bit system, you might receive the following message:
- Your operating system failed the launchpad prerequisites check. The following 32-bit GTK Library for running IBM Installation Manager is not available in underlying OS: list_of_missing_files. Please install the 32-bit GTK Library and restart the installation.
If you see this message, your server does not have the 32-bit version of the GTK library installed, or the library is an incorrect version. You must update your server with the correct version of the 32-bit GTK library before you continue the installation. You can get the library from the DVD or official website of your operating system.
ulimit warning
If you receive the following warning message during the prerequisite checking, use the platform-specific steps below to increase the ulimit number.
- Current system has detected a lower level of ulimit than the recommended value of recommended_value. Please increase the ulimit number to minimum value of recommended_value and re-start the installation.
- Shutdown your installer. If you are a root user open a command prompt and issue ulimit -n recommended_value and then restart the installer. If you are a non-root user, work with your system administrator to increase your ulimit -n recommended_value and then restart the installer.
The required value is calculated based on the version of WebSphere Application Server and the configuration that you are installing.
- Set the maximum number of open files using the following steps:

- Open /etc/security/limits.
- Edit or add the default section and include this line:
nofiles = recommended_value
Save and close the file.
- Log off and log in again.
- Open /etc/security/limits.conf.
- Locate the nofile parameter and increase the value. If a line containing the nofile parameter does not exist, add the following lines to the file:
* hard nofile recommended_value
* soft nofile recommended_value
Save and close the file.
- Log off and log in again.

- Open /etc/system and add the following line to the end of the file:
set rlim_fd_max=8800
Save and close the file.
- Log off and log in again.
- Open /etc/security/limits.
- Restart the computer.
- Restart the installer.
Troubleshooting problems creating database tables
While trying to create database tables for the Business Process Manager database, and the Performance Data Warehouse database, you might get errors or exceptions that prevent you from creating the tables. Your bootstrap operation also fails.
The errors might have occurred because the "NOT LOGGED" tag was removed from some of the tables. The message indicates that you have the wrong version of DB2:
DB21034E  The command was processed as an SQL statement because it was not a valid Command Line Processor command.  During SQL processing it returned:
SQL0355N  The column "RECORD", as defined, is too large to be logged.
SQLSTATE=42993
- Upgrade the database to the supported version (DB2 V9.7 fix pack 4 or above )
- Drop the existing Process Server and Performance Data Warehouse databases. This step is required because the databases are not complete. The error indicates that some of the tables are missing.
- Create the Process Server and Performance Data Warehouse databases again.
The tables for the databases are created successfully without any errors.
Troubleshooting Oracle transaction recovery messages
You must apply special grants for Oracle transaction recovery to work correctly. Servers that are configured to use an Oracle database might log the following errors in the SystemOut log file:
[4/19/12 13:44:50:062 EDT] 00000007 WSRdbXaResour E   DSRA0304E:  XAException occurred. XAException contents and details are: The cause is               : null.
[4/19/12 13:44:50:062 EDT] 00000007 WSRdbXaResour E   DSRA0302E:  XAException occurred.  Error code is: XAER_RMERR (-3).  Exception is: <null>
If there is a system failure, or the server was not stopped properly during a distributed transaction, the WAS transaction manager attempts to clean up any failed transactions that are found in the transaction logs. The Oracle database requires that you have special permissions for transaction recovery. The previous error occurs when a user that attempts to run the recover method does not have sufficient privileges.
To resolve these issues, runs as user SYS:
-
grant select on pending_trans$ to user_name;
grant select on dba_2pc_pending to user_name;
grant select on dba_pending_transactions to user_name;
- If you are using Oracle V10.2.0.3 or a previous version of the JDBC driver:
- grant execute on dbms_system to user_name;
- If you are using Oracle V10.2.0.4 or a more recent of the JDBC driver:
- grant execute on dbms_xa to user_name;
where user_name is the user name for the Oracle user that is configured during deployment environment creation.
Repeat the previous steps for each Oracle user defined during deployment environment creation.
Error running bootstrap command or creating profiles with SQL Server databases
If you are using Microsoft SQL Server databases, and you create the BPMDB or PDWDB databases with a case-sensitive collation attribute, then when you use bootstrapProcessServerData to load the databases with configuration data, you will get an error. If you are using PMT or manageProfiles create the profile, the profile will be created with partial success, and the profile log file will indicate failure running bootstrapProcessServer.ant.
When you create SQL Server databases for Process Server (BPMDB) and Performance Data Warehouse (PDWDB), they must not be case-sensitive. The COLLATE attribute value must indicate case-insensitivity by using CI rather than CS:
osql -b -S hostname -U db_user_account -P db_user_password -Q "CREATE DATABASE database_name COLLATE SQL_Latin1_General_CP1_CI_AS"If you get log errors and partial profile creation success, or failure when using bootstrapProcessServerData, check the creation commands for the databases. If they have COLLATE attribute values such as SQL_Latin1_General_CP1_CS_AS, change the CS (indicates case-sensitive) to CI (not case-sensitive), as in SQL_Latin1_General_CP1_CI_AS.
Problems testing a connection to a data source in a network deployment
In a network deployment environment, testing a connection to the cell-level jdbc/WPSDB data source can fail, with the error message UndefinedVariableException: Undefined Variable variable_name, where variable_name is a variable name such as WAS_INSTALL_ROOT, DB2_JCC_DRIVER_PATH, UNIVERSAL_JDBC_DRIVER_PATH or PUREQUERY_PATH. However, this does not necessarily indicate that you will have run time errors.
The test connection service provided by WebSphere Application Server often works only if the variables that contain path infomation (such as WAS_INSTALL_ROOT and ORACLE_DRIVER_INSTALL_PATH) are set on cell scope, which is not the case in BPM network deployments. See Test connection service .
If you attempt to test the data source connection, for example in the administrative console using Resources > JDBC > Data sources, and you get a message saying the test connection operation failed with the exception com.ibm.wsspi.runtime.variable.UndefinedVariableException: Undefined Variable variable_name, it does not necessarily indicate there will be a problem accessing the data source at run time. Ensure the location of your JDBC driver files is accessible to every client that must use the data source, and configure the variable with the full path of that location. Disregard the test connection error unless you are also experiencing trouble connecting to the data store at run time.
Troubleshooting memory issues for Business Process Manager servers
If you are using IBM Business Process Manager with a 32-bit operating system or JVM, you might notice issues with server performance and availability, including OutOfMemory exceptions. These happen when the operating system or JVM does not have enough accessible memory to support all the running processes.
If the server performance is severely degraded or if you see an OutOfMemory exception, consider switching to a 64-bit operating system or JVM. Otherwise, use the information in the following table to identify possible solutions for specific memory issues.
| Observed behavior | Possible actions |
|---|---|
| Severely degraded server performance (swapping occurs) |
|
| Severely degraded server performance (no swapping) combined with excessive garbage collection activity |
For more information on tuning the heap size and garbage collection settings, see Tuning the IBM virtual machine for Java and Java virtual machine settings at the end of this topic. |
| An OutOfMemory exception |
|
| Memory issues; for example, the instance occupies much of the available memory |
Reduce the branch context cache size. Reducing the cache size from 64 to 16 makes a huge difference in the amount of memory the instance uses, although you are trading off some performance for the improvement in memory use. To change the cache size, locate the 00static.xml file in PROFILE_HOME\config\cells\cell_name\nodes\node_name\servers\server_name\process-server\config/system/ In it, you can edit the value for branch-context-max-cache-size. |
Technote: How to resolve memory issues for BPM V7.5 servers
Troubleshooting native memory issues
MustGather: Out of Memory errors with WAS on AIX, Linux, or Windows
Performance degredation MustGather documents IBM Business Process Manager (BPM) Express V8.5 and V8.5.0 fix pack 1 (8.5.0.1)
Connection factories are not properly configured
When use the default configuration for BPM (BPM) Express V8.5 and V8.5.0 Fix Pack 1, you see errors and experience problems when you use Process Designer. You might also experience issues when you try to connect to the BPM service integration bus (SIBus).
In Process Designer, this issue is displayed in the following error message in the ae.log file:
javax.jms.JMSException: CWSIA0241E: An exception was received during the call to the method JmsManagedConnectionFactoryImpl.createConnection: com.ibm.websphere.sib.exception.SIResourceException: CWSIT0006E: It was not possible to contact any of the specified bootstrap servers. Please see the linked exception for further details. Bootstrap connections were attempted to: [localhost:7286:BootstrapSecureMessaging].at com.ibm.ws.sib.api.jms.impl.  JmsManagedConnectionFactoryImpl.createConnection
...
at com.lombardisoftware.client.ae.server.
    ServerNodeImpl.reconnectJMS
To resolve this issue, apply Fix Pack 1 to the BPM Express V8.5 or V8.5.0 environment and complete the following steps:
- Locate the host name for the Process Center server that Process Designer can access.
- Locate the port that is needed to connect securely to the SIBus.
- In the administrative console, go to the server settings page and click Server > Server Types > WebSphere application servers > server_name.
The server_name variable refers to the name of your server.
- On the right side of the window, expand Communications > Ports and connect to the SIB_ENDPOINT_SECURE_ADDRESS port.
- In the administrative console, go to the server settings page and click Server > Server Types > WebSphere application servers > server_name.
The server_name variable refers to the name of your server.
- Go to the connection factory settings by clicking Resources > JMS > Topic connection factories > TWClientConnectionFactory.
- In the Connection section of the connection factory settings, find Provider Endpoints and enter the appropriate value. The value is in the host_name:port_number:BootstrapSecureMessaging format.
The host_name variable is the externally accessible host name for the BPM server and the port_number variable is the SIB_ENDPOINT_SECURE_ADDRESS.
Because BPM Express allows only a single-server environment, there is only one entry. For BPM environments that use clustering, the list is a comma-separated list of all the endpoints for the messaging cluster.
The TWClientConnectionFactory endpoint is the main endpoint that receives outside connections into an BPMExpress environment. However, you might need to complete the steps for the following product connection factories that also do not have an accessible endpoint. Depending on the type, these endpoints are in the same administrative console section under Topic connection factories, Queue connection factories, or Connection factories.
- QueueConnectionFactory
- TopicConnectionFactory
- cacheMessageConnectionFactory
- eventMgrMessageConnectionFactory
- TWClientConnectionFactory
- TWClientConnectionFactoryNoTX
- TaskChangeConnectionFactory
- bpm.pal.service.deployCF
- PortalWebMessagingTopicConnectionFactory
- DataDefLoaderConnectionFactory
- ViewManagerConnectionFactory
- PostLoadCalculationConnectionFactory
- RepresentationManagerConnectionFactory
- bpm.BPDDocMig.service.deployCF
Save the configuration.
- Restart the server.
If you have further SIBus bootstrap issues, verify the host and port are accessible to the client. Also, verify that firewall and network issues do not exist.
Troubleshooting the launchpad application or Quick Start
If the launchpad application or Quick Start does not start, try the following troubleshooting tips.
Troubleshooting the launchpad application
Restart the launchpad after you make any changes.
- If you are using images from Passport Advantage , make sure that you download all disk images, even if you do not plan to install the component or product that an image is named after. The disk images are all required to be present for a successful installation from a local repository. Extract the contents into separate directories.
Extracting the files from the images into the same directory will cause errors to occur. IBM recommends that you use sibling directories.
- If you can start the launchpad, but selecting a link does not resolve to a page in the launchpad, you might have the media for the wrong operating system in the disk drive. Check the validity of the media.
- If you are attempting to use the Mozilla browser on a Windows system, Internet Explorer might open instead. The launchpad does not recognize Mozilla as the default browser if Internet Explorer is also installed on the same system. The launchpad is fully functional with Internet Explorer, so no action is required.
To create an environment variable that forces the use of Mozilla, issue the following case-specific command at a command prompt:
- set BROWSER=Mozilla
- Ensure the JavaScript function is enabled in your browser.
Mozilla: Click Edit > Preferences > Advanced > Scripts & Plugins:
- Enable JavaScript for: Navigator.
- Allow scripts to ... (Select all boxes).
Mozilla Firefox: Click Tools > Options > Content:
- Select Enable Java.
- Select Enable JavaScript.
- Click Advanced and Allow scripts to ... (Select all boxes).
Internet Explorer: Click Tools > Internet Options > Security > Custom Level for Internet > Scripting > Active scripting > Enable.
If the launchpad links still do not work after trying these tips, start the component installation programs directly.
Troubleshooting Quick Start
If links from the Quick Start console fail to open browser windows, or the Quick Start console fails to launch, or immediately quits, on the Microsoft Windows operating system when Mozilla Firefox is set as the default browser, try the following workarounds.
- Modify the Windows registry to delete the spaces in the location name:
- Navigate to HKEY_LOCAL_MACHINE\SOFTWARE\Clients\StartMenuInternet\FIREFOX.EXE\shell\open\command.
The preceding line might be word-wrapped. Be sure to navigate to the location specified in the preceding lines, up to the "command" key in the registry.
-
Change the "(Default)" entry so that spaces are removed from the path.
For example, if the path is set as "C:\Program Files\Mozilla Firefox\firefox.exe", change the path to its short equivalent "C:\Progra~1\Mozill~1\firefox.exe".
The short names might not be the same on all systems. For example, if you have installed "Mozilla Thunderbird" as well as "Mozilla Firefox", and both are installed in the "Program Files" directory, the short name to the location of Mozilla Firefox might be different from that in the previous example. You can use the "dir /X" command to determine the short names of individual files and directories located in the current directory.
If you choose this option, be careful the Windows registry does not become corrupted. This key might vary for different locales, so use caution or choose another workaround. IBM recommends that you back up the registry before making any changes.
- Navigate to HKEY_LOCAL_MACHINE\SOFTWARE\Clients\StartMenuInternet\FIREFOX.EXE\shell\open\command.
- Install Mozilla Firefox to a different location that does not contain spaces.
- Change the default browser temporarily.
- Set Windows Internet Explorer as the default browser.
-
Reset Mozilla Firefox as the default browser. This automatically changes the registry entry in the first workaround so the spaces are removed.
This only works when you set the default browser from within the Mozilla Firefox application. It will not work when using the "Set Program Access and Defaults" command in "Add/Remove Programs".
- Quick Start console fails to start on the Windows operating system
To run Quick Start on Windows 7, Windows Vista, or Windows Server 2008, use the administrator privilege. This is required for both administrative and non-administrative users.
Quick Start console fails to start on the Windows operating system
To run Quick Start on Windows 7, Windows Vista, or Windows Server 2008, use the administrator privilege. This is required for both administrative and non-administrative users.
For example:
- Right-click the Quick Start program shortcut at Start > Programs > IBM > Business Process Manager Advanced 8.5 (or Business Process Manager Advanced Process Server 8.5) > Deployment Environments > <profile_name> > <env_name> > - Quick Start.
- Click Run as administrator.
Diagnosing a failing Ant configuration script
Determine whether a product installation problem on an operating system is caused by a failing Apache Ant configuration script.
Start diagnosing installation problems by looking at the troubleshooting procedure. See Troubleshooting installation and configuration. After the installation completes successfully, several Ant scripts configure the product. The following procedure describes what to do when an Ant script fails. When the installation log does not indicate a failure, determine how to correct any problems with failing Ant configuration scripts.
The installation_root/logs/wbi/install/installconfig_server.log file, when present, describes any failure of an Ant script. Determine if any of the following configuration scripts failed. If so, use the configuration script recovery procedures. Use the investigative action to manually verify the following configuration scripts ran successfully during the configuration of the BPM product. If any script failed, use the recovery action steps to complete the function of the script.
To diagnose failed Ant configuration scripts.
- Diagnose the failed 90SConfigWBIMigrationScript.ant configuration script. This script changes the permissions of the following script to 755: installation_root/bin/BPMMigrate.
This script also replaces the following tokens in the installation_root/bin/BPMMigrate script:
From: To the value that you selected during installation: ${JAVAROOT} installation_root/java/jre/bin/java ${MIGRATIONJAR} installation_root/bin/migration/migrationGUI/migrationGUI.jar ${WASROOT} installation_root ${PRODUCTID} ${WS_CMT_PRODUCT_TYPE} - Investigative action: Verify the permissions are 755 for the following directories:
-
installation_root/bin/BPMMigrate.sh
- Recovery action: Issue the following command:
-
chmod 755 installation_root/bin/BPMMigrate.sh
- Investigative action: Open the following file in an editor and verify that real values exist instead of the following values: ${JAVAROOT}, ${MIGRATIONJAR}, ${WASROOT}, and ${PRODUCTID}.
-
installation_root/bin/BPMMigrate.sh
- Recovery action: Change the following tokens to values in the BPMMigrate script: ${JAVAROOT}, ${MIGRATIONJAR}, ${WASROOT}, and ${PRODUCTID}.
- Investigative action: Verify the permissions are 755 for the following directories:
- Diagnose the failed 85SConfigNoProfileFirstStepsWBI.ant. This script copies all files from the installation_root/properties/version/install.wbi/firststeps.wbi directory to the installation_root/firststeps/wbi/html/noprofile directory.
This script also replaces the following tokens in the following files:
-
installation_root/firststeps/wbi/firststeps.sh
From: To the value that you selected during installation: ${JAVAROOT} installation_root/java/jre/bin/java ${PROFILEROOT} installation_root ${HTMLSHELLJAR} installation_root/lib/htmlshellwbi.jar ${CELLNAME} ${WS_CMT_CELL_NAME} - Investigative action: Verify that all files are copied from the installation_root/properties/version/install.wbi/firststeps.wbi directory to the installation_root/firststeps/wbi/html/noprofile directory.
- Recovery action: Copy all of the files from the installation_root/properties/version/install.wbi/firststeps.wbi directory to the installation_root/firststeps/wbi/html/noprofile directory.
- Investigative action: Open the installation_root/firststeps/wbi/firststeps script in an editor. Verify that real values exist instead of the following values: ${JAVAROOT}, ${PROFILEROOT}, ${HTMLSHELLJAR}, and ${CELLNAME}.
- Recovery action: Change the following tokens to values in the installation_root/firststeps/wbi/firststeps script. ${JAVAROOT}, ${PROFILEROOT}, ${HTMLSHELLJAR}, and ${CELLNAME}.
After you correct any installation errors and any Ant script configuration errors by performing the corrective actions in this procedure, the installation is complete.
Start the Quick Start console.
DB2 log file error: SQL1092N "USERID does not have the authority to perform the requested command or operation"
After you install IBM DB2 Express, if use the domain user ID to create a new database, and tables, you might see an error in the DB2 log files. Follow these steps to enable the domain user ID to access the database.
You cannot use the domain user ID to run the db2cmd command to create a new database, and tables. If you do, you might see this error in the DB2 log files:
- SQL1092N "USERID does not have the authority to perform the requested command or operation."
DB2 cannot look up the domain user ID "USERID" as an authorization ID. It ignores the local group for the domain user ID. Even if you add the domain user ID to the local DB2ADMNS group, DB2 does not have the authority to perform database operations.
Resolve the problem
To enable the domain user ID to access the database.
- Add the domain user ID to the local group DB2ADMNS.
- Open the DB2 command window and run the following commands from the prompt:
db2set DB2_GRP_LOOKUP=LOCAL,TOKENLOCAL
db2 update dbm cfg using sysadm_group DB2ADMNS db2stop
db2start
- Restart the DB2 Windows services with the login ID set to the domain user ID.
For additional information, refer to the following DB2 information center document: Considerations for Windows 2008 and Windows Vista or higher: User Access Control feature.
Profile creation fails on Windows operating system
The Profile Management Tool or manageprofiles command on IBM Business Process Manager might fail on the Microsoft Windows operating system if it is launched without administrative privilege.
To install or run PMT on Windows 7, Windows Vista, or Windows Server 2008, elevate your Microsoft Windows user account privileges. If you do not use the correct privileges the profile creation will fail and you will receive an SQL1092N message in the log which indicates the user does not have authority to perform the requested actions. Whether you are an administrative user or a non-administrative user, right-click the pmt.bat file and select Run as administrator.
Alternatively, use the runas command at the command line. For example, the following command can run be executed from the install_root\bin\ProfileManagement directory:
- runas /user:MyAdminName /env pmt.bat
Non-administrative users are prompted for the administrator password.
To install or run the manageprofiles command on Windows 7, Windows Vista, or Windows Server 2008, elevate your Microsoft Windows user account privileges using the runas command. Remember to put double quotation marks around the manageprofiles command and all parameters. For example, the following command can run be executed from the install_root\bin directory:
- runas /env /user:MyAdminName "manageprofiles -create -templatePath install_root/profileTemplates/BPM/default.procctr"
Non-administrative users are prompted for the administrator password.
Recovering from profile creation failure after using BPMConfig
If the profile creation step fails after running theBPMConfig command, you need to delete the profiles and drop the databases that you created.
To resolve the problem.
- For each profile that you attempted to create, run the manageprofiles command to delete the profiles. For example, manageprofiles -delete -profileName profile_name.
- Delete the profile folders.
- From the BPM_HOME/bin, folder, run manageProfiles -validateAndUpdateRegistry
- Drop the databases if you have already created them.
Successful installation reported after profile creation failure
If the profile creation step fails during a custom installation, the failure is not recognized by Installation Manager, which reports a successful installation. This problem occurs only on Windows platforms.
This problem applies to IBM Business Process Manager - Process Server, IBM Business Monitor, or WebSphere Enterprise Service Bus.
The failure of the profile creation step is indicated in the profile creation log. For example, you might see the following error: INSTCONFFAILED: Profile augmentation failed.
To resolve the problem.
- Check the profile creation log, which is located in the <install_root>/logs/manageprofiles directory, to determine the cause of the error.
- Complete one of the following steps:
- Delete the profile that contains the error. Then, use the manageprofiles command or PMT to create a new profile.
- Install the product with a custom installation, but do not create a profile. Then, after installation, use the manageprofiles command or PMT to create the profile.
Recovering from profile creation or augmentation failure
The Profile Management Tool can experience failures when creating new or when augmenting existing profiles. The same can occur using manageprofiles.sh. If such a failure occurs, first check the log files as described in this topic, then follow the recovery instructions described, depending on the situation.
Log files
All manageprofiles log files are in install_root/logs/manageprofiles. Look at the following log files in the order given. Each log file must contain the entry "INSTCONFSUCCESS." If a file does not include this entry, a failure was detected. Look at the log files to determine why a failure was encountered and to determine a remedy.
- The log file profile_name_create_error.log (where profile_name is the name of the profile).
Look at this file only if you were creating a new profile, not augmenting an existing one.
-
install_root/logs/manageprofiles/profile_name_create_error.log
Search for the text Configuration action succeeded or Configuration action failed.
There can be multiple occurrences of Configuration action failed. Investigate and remedy each one. Also review the log files described in the following options, if the profile was created.
Additional information is available in the manageprofiles directory in the pmt.log, which logs all events that occur when a default profile is created during a complete installation using PMT.
- Log file profile_name_augment_error.log (where profile_name is the name of the profile).
This log file is located in the following directories:
-
install_root/logs/manageprofiles/profile_name_augment_error.log
Search for the text Configuration action succeeded or Configuration action failed.
There can be multiple occurrences of Configuration action failed. Investigate and remedy each one. Also review the log files described in the following options, if the profile was created.
To know the status of a profile you created during installation, runs:
-
install_root/bin/logProfileErrors.sh
- Individual profile template action log files.
If you discovered false values in the log files described in the preceding options, review the log files in the following directories:
-
install_root/logs/manageprofiles/profile_name
These log files do not follow a consistent naming convention, but typically, each is the name of the Apache Ant script that failed followed by .log. For example, suppose the following entry is in the profile_name_augment.log file:
<messages>Result of executing E:\o0536.15\profileTemplates\default.wbicore\actions\saveParamsWbiCore.ant
was:false</messages>
First look at the surrounding entries in the profile_name_augment.log file in the install_root/logs/manageprofiles directory. If you cannot determine the cause of the failure from the surrounding entries, look for the corresponding log file for any failing Ant script entries. In this case, the log file created by the saveParamsWbiCore.ant script is saveParamsWbiCore.ant.log. Look at that file to investigate why the failure occurred.
Recovery for creation failure
After you determine why profile creation failed and have addressed the cause of the failure, you can try to create the profile again.
When you create a profile, it first creates a WebSphere Application Server profile, and then augments it with BPM profile templates to create the BPM profile. Even if you encountered a profile creation failure, a profile can exist that does not have all the needed augmentations.
To determine if the profile exists, run the install_root/bin/manageprofiles -listProfiles command. If the profile name you used for creation does not exist, you can recreate the profile. If the profile name you used for creation exists, then the profile was created and you have encountered an augmentation failure. For tips on recovering from an augmentation failure, see Recovery for augmentation failure.
Recovery for augmentation failure
For recovery from a profile augmentation failure follow the steps below:
- If any of the profile creation was successful and if the create succeeded by a subsequent augmentation failed then you have to delete the profile using the manageprofiles command: manageprofiles -delete -profileName
- You must remove the profile directory manually since the deletion will leave file remnants behind.
- You must remove and recreate the database if the profile creation went far enough to start working with the database. However if it failed during WAS profile creation it is not necessary to remove and recreate the database.
Cluster member startup timeout errors reported in deployment manager log
If the deployment environment startup takes longer than the default timeout setting, you will see an exception in the deployment manager log. Provided the cluster members eventually start, you can ignore the exception.
Depending on their performance levels, some cluster members might not start within the timeout limits for the connector. If this happens, the following message appears in the deployment manager log:
[timestamp] 0000005a Cluster       E   WWLM0058E: Cluster member PSDELucia.WebApp.linux-tcisNode01.0 did not start properly.
   javax.management.JMRuntimeException: ADMN0034E: The service is unable to obtain a valid administrative client to connect process    "linux-tcisNode01" from process "dmgr", because of exception: com.ibm.websphere.management.exception.ConnectorException:
   java.net.SocketTimeoutException: Async operation timed out  at com.ibm.ws.management.AdminServiceImpl$1.run(AdminServiceImpl.java:1370)
 at com.ibm.ws.security.util.AccessController.doPrivileged(AccessController.java:118)
 at com.ibm.ws.management.AdminServiceImpl.invoke(AdminServiceImpl.java:1228)
 at com.ibm.ws.management.wlm.Cluster.launchMember(Cluster.java:2160)
 at com.ibm.ws.management.wlm.Cluster$MemberStateChange.run(Cluster.java:2964)
 at java.lang.Thread.run(Thread.java:769)
If you see this message, check the cluster member log to confirm that it is eventually starting. If it is, you can ignore the exception.
Reinstallation cannot create new profile when using the Typical installation and configuration option
If you try to reinstall BPM to the same location using the Typical installation and configuration option, or if you try to reinstall after a failed uninstall, the installation might fail because a new profile cannot be created.
If databases were created for the test environment, the databases must be dropped before you can create a new profile.
If the databases are not automatically dropped during uninstall, you must drop them manually.
- For the qbpmaps profile, the default databases are QBPMDB, QPDWDB, and QCMNDB
- For the qesb profile, the default databases are ECMNDB and QECMNDB (one or both)
- For the qmwas profile, the default databases are MONITOR and COGNOSCS
- For the qmbpmaps profile, the default databases are QBPMDB, QPDWDB, QCMNDB, MONITOR, and COGNOSCS
- For the qmesb profile, the default databases are ECMNDB, QECMNDB, MONITOR, and COGNOSCS
Troubleshooting the Business Process Choreographer configuration
Use this topic to solve problems relating to the configuration of Business Process Choreographer and its Business Flow Manager, or Human Task Manager components.
The purpose of this section is to aid you in understanding why the configuration of Business Flow Manager or Human Task Manager is not working as expected and to help you resolve the problem. The following tasks focus on problem determination and finding solutions to problems that might occur during configuration.
Business Process Choreographer log files
Where to find the log files for your Business Process Choreographer configuration.
Profile creation
The profile actions for Business Process Choreographer write to the bpcaugment.log file in the logs directory of the profile tool. You can find more detailed traces in the bpcaugment.wsadmin.log file in the same directory:
-
install_root/logs/manageprofiles/profileName/logs
Administrative scripts
The administrative scripts in the admin subdirectory of the ProcessChoreographer directory do not write their own log files. All of the Business Process Choreographer scripts that are run using wsadmin are logged in the application server log files and in the wsadmin.traceout file in the logs directory of the profile tool. However, because this file is overwritten each time that wsadmin is invoked, make sure that you either use one of the -tracefile or -appendtrace options, or save the log file before invoking wsadmin again.
 Use the wsadmin scripting tool
Troubleshooting the Business Process Choreographer database, and data source
Use this task to solve problems with the Business Process Choreographer database, and data source.
Both Business Flow Manager and Human Task Manager need a database. Without the database, enterprise applications that contain BPEL processes and human tasks will not work.
- If the Business Process Choreographer database is getting bigger and slower over time, consider performing following:
- Remove unnecessary objects from the Business Process Choreographer database
-
 Tuning the DB2 database for Business Process Choreographer
- To get a better idea of how many instances and activities are in the database, and to verify their numbers you can use variations
on the following example queries:
- If your typical process models run an average of x activities, then the number of activity instances should not be more than x times larger than the number of process instances. Any large deviation from this ratio might indicate a problem and be worth investigating further.
- To display the number of process instances that are in the database, we count the number of rows in the process instance table using the following query:
- select count(*) from process_instance_b_t with ur
By specifying with UR, locking is avoided, which could affect other users of the database.
- To display the number of activity instances that are in the database, we count the number of rows in the activity instance table using the following query:
- select count(*) from activity_instance_b_t with ur
Only activities that have the "business relevance" flag set are persisted in the activity instance table
- To display the number of process instances that are in the database, we count the number of rows in the process instance table using the following query:
- To see which process instances have the most activities, use the following query:
SELECT
   PI.PIID, PT.NAME, PI.STATE, COUNT(AI.AIID) AS NUMBER_OF_ACTIVITIES
FROM    ACTIVITY_INSTANCE_B_T AS AI,    PROCESS_INSTANCE_B_T AS PI,    PROCESS_TEMPLATE_B_T AS PT WHERE    PI.PTID = PT.PTID AND    AI.PIID = PI.PIID
GROUP BY    PI.PIID, PT.NAME, PI.STATE
ORDER BY    NUMBER_OF_ACTIVITIES DESC FETCH FIRST 20 ROWS ONLY WITH UR
where PI.PIID is the process instance ID from the process_instance_b_t table and PT.NAME is the name of the process template. This query might result in output that is similar to the following example:PIID NAME STATE NUMBER_OF_ACTIVITIES ----------------------------------- ---------- ------ -------------------- x'9003011CE5DED75B3EFDEB538C02DAE4' claimWork 6 147047 x'9003011E841DE9AF3EFDEB53045C4103' claimWork 6 96609 x'9003011E841DDEF13EFDEB53045C3DD9' claimWork 6 96462 ...
In this example, the claimWork process template has the most activities in the database. For process instances, the state, 6, indicates they are in the state TERMINATED. If the database is filling up with such instances, you should consider setting the property for automatic deletion in the model, configuring the cleanup service and cleanup jobs to periodically delete eligible instances, or running a script to delete completed instances. These and other techniques for reducing the size of the database are described in Cleanup procedures for Business Process Choreographer. - If you are interested in process instances that are in a particular state, use the following query:
- select count(*) from process_instance_b_t where state = processState with ur
where processState is one of the following integer values representing the state of the process instance:
0 = DELETED 1 = READY 2 = RUNNING 3 = FINISHED 4 = COMPENSATING 5 = FAILED 6 = TERMINATED 7 = COMPENSATED 8 = TERMINATING 9 = FAILING 10 = INDOUBT 11 = SUSPENDED 12 = COMPENSATION_FAILED
- If you are interested in activity instances that are in a particular state, use the following query:
- select count(*) from activity_instance_b_t where state = activityState with ur
where activityState is one of the following integer values representing the state of the activity instance:
1 = INACTIVE 2 = READY 3 = RUNNING 4 = SKIPPED 5 = FINISHED 6 = FAILED 7 = TERMINATED 8 = CLAIMED 9 = TERMINATING 10 = FAILING 11 = WAITING 12 = EXPIRED 13 = STOPPED 14 = PROCESSING_UNDO
Only activities that have the "business relevance" flag set are persisted in the activity instance table
- If your typical process models run an average of x activities, then the number of activity instances should not be more than x times larger than the number of process instances. Any large deviation from this ratio might indicate a problem and be worth investigating further.
- To investigatee the activity instances belonging to a particular process instance ID, use a query that is similar to the following example:
SELECT
   AI.LAST_STATE_CHANGE, ATP.NAME, AI.STATE
FROM    ACTIVITY_INSTANCE_B_T  AI,    ACTIVITY_TEMPLATE_B_T  ATP WHERE    AI.ATID = ATP.ATID and    AI.PIID = '9003011CE5DED75B3EFDEB538C02DAE4'
ORDER BY    AI.LAST_STATE_CHANGE DESC FETCH FIRST 40 ROWS ONLY WITH UR
This query might result in output that is similar to the following example:LAST_STATE_CHANGE NAME STATE ----------------------- ------------- ------- 2011-03-22-16.24.17.964333 Activity_17 7 2011-03-22-16.23.55.925757 Activity_14 5 2011-03-22-16.23.32.528576 Activity_14 5 2011-03-22-16.23.11.976875 Activity_14 5 2011-03-22-16.22.49.582347 Activity_14 5 2011-03-22-16.22.24.257894 Activity_14 5 2011-03-22-16.22.01.723894 Activity_14 5 ...
In this example, multiple instances of activity 14 are changing to the state FINISHED per second. Comparing this information with your knowledge about the process and how you expect it to behave, this might indicate an unintended loop that needs to be corrected in the model.
- If you are using DB2 :
- If using the DB2 Universal JDBC driver type 4
and get DB2 internal errors such as "com.ibm.db2.jcc.a.re:
XAER_RMERR : The DDM parameter value is not supported. DDM parameter code point having unsupported value : 0x113f DB2ConnectionCorrelator:
NF000001.PA0C.051117223022" when you test the connection on the Business Process Choreographer data source or when the server starts up, perform the following actions:
- Check the class path settings for the data source. In a default setup the WebSphere variable ${DB2UNIVERSAL_JDBC_DRIVER_PATH} can point to the embedded DB2 Universal JDBC driver which is found in the universalDriver_wbi directory.
- The version of the driver might not be compatible with your DB2 server version. Make sure that use the original db2jcc.jar files from the database installation, and not the embedded DB2 Universal JDBC driver. If required, changed the value of the WebSphere variable ${DB2UNIVERSAL_JDBC_DRIVER_PATH} to point to your original db2jcc.jar file.
- Restart the server.
- If the db2diag.log file of your DB2 instance contains messages like ADM5503E as illustrated below:
2004-06-25-15.53.42.078000   Instance:DB2   Node:000
PID:2352(db2syscs.exe)   TID:4360   Appid:*LOCAL.DB2.027785142343
data management  sqldEscalateLocks Probe:4   Database:BPEDB

ADM5503E  The escalation of "10" locks on table "GRAALFS .ACTIVITY_INSTANCE_T"
          to lock intent "X" has failed.  The SQLCODE is "-911"
Increase the LOCKLIST value. For example to set the value to 500, enter the following DB2 command:- db2 UPDATE DB CFG FOR BPEDB USING LOCKLIST 500
This can improve performance significantly.
- To avoid deadlocks, make sure the database system is configured to use sufficient memory, especially for the buffer pool. For DB2, use the DB2 Configuration Advisor to determine reasonable values for your configuration.
- If you get errors mentioning the data source implementation class COM.ibm.db2.jdbc.DB2XADataSource:
- Check the class path definition for your JDBC provider is correct.
- Check the component-managed authentication alias is set to BPCDB_nodeName.serverName_Auth_Alias if Business Process Choreographer is configured on a server and BPCDB_clusterName_Auth_Alias if Business Process Choreographer is configured on a cluster.
-
 If
you are using a remote DB2 for z/OS database, and you get SQL code 30090N in the SystemOut.log file when the application server attempts to start the first XA transaction with the remote database, perform the following tasks:
If
you are using a remote DB2 for z/OS database, and you get SQL code 30090N in the SystemOut.log file when the application server attempts to start the first XA transaction with the remote database, perform the following tasks:
- Verify the instance configuration variable SPM_NAME points to the local server with a host name not longer than eight characters. If the host name is longer than eight characters, define a short alias in the etc/hosts file.
- Check whether you have invalid sync point manager log entries in the sqllib/spmlog directory. Try clearing the entries in the sqllib/spmlog directory and restart.
- Consider increasing the value of SPM_LOG_FILE_SZ.
- If using the DB2 Universal JDBC driver type 4
and get DB2 internal errors such as "com.ibm.db2.jcc.a.re:
XAER_RMERR : The DDM parameter value is not supported. DDM parameter code point having unsupported value : 0x113f DB2ConnectionCorrelator:
NF000001.PA0C.051117223022" when you test the connection on the Business Process Choreographer data source or when the server starts up, perform the following actions:
- If you get a database error when deploying an enterprise application that contains a BPEL process or human task, make sure the database system used by the process container is running and accessible. When an enterprise application is deployed, any process templates and task templates are written into the Business Process Choreographer database.
- If you have problems using national characters. Verify the database was created with support for Unicode character sets.
- If tables and views cannot be found in the database, and the create schema option is not enabled, check the following settings:
- If a database schema qualifier is configured, check the following settings:
- The schema qualifier must match the schema in the database. It must be the same schema as used in the scripts.
- The user must be granted the privileges to work with the database tables and views.
- If no schema qualifier is configured, ensure that:
- The authentication alias of the user must be the same user ID as the one used to run the scripts, or must match the schema qualifier used in the scripts.
- The user must be granted the privileges to work with the database tables and views.
- If a database schema qualifier is configured, check the following settings:
- If the create schema option is enabled, and the database table and views cannot be found, the database tables and objects will be created automatically using the following terms:
- If a schema qualifier is configured, the tables and views will be created using the schema qualifier.
- If no schema qualifier is configured, the tables and views will be created using the user ID.
- If you get the error message com.ibm.bpe.util.Assert.assertion(Assert.java:66) Assertion violation ! (pWifl != null) in method >> com.ibm.bpe.database.Tom.augmentSharedWorkItem(Tom.java:9815), there is a problem with shared work items in the database, run the dbUtility.py script to check for and repair any database consistency problems. For details about using the utility refer to dbUtility.py administrative script.
REST API: The URL is not configured correctly
The REST API must be configured correctly, otherwise you get an error when you try to use the graphical process widget in the Business Process Choreographer Explorer, Business Process Archive Explorer, or Business Space.
Reason
This can have the following causes:
- To use the graphical process widget in a clustered environment, you must set the endpoints for the Business Flow Manager and Human Task Manager REST APIs manually.
- If you configured Business Process Choreographer Explorer or Business Process Archive Explorer in a cluster, to achieve load balancing, you must map the web modules to a web server and configure the correct host name and port for this web server.
- If you change the context root or map web modules to a web server, you might need to change the URL for the REST API.
Resolution
To correct this problem:
- If you configured Business Process Choreographer Explorer or Business Process Archive Explorer instances, check your log files for messages CWWBZ0052W or CWWBZ0053W, which contain information about the URL the instance was configured to use.
- If you have multiple Business Process Choreographer or Business Process Archive Manager configurations in a cell, and the REST API web modules for the following applications are mapped to the same web server, these web modules must have unique context roots:
- For the Business Process Choreographer Explorer:
-
- Business Flow Manager BPEContainer application
- Human Task Manager TaskContainer application
- For the Business Process Archive Explorer:
-
- Business Flow Manager BPArchiveMgr application
- Human Task Manager TaskArchiveMgr application
- To set the context roots for the Business Flow Manager, click Applications > Application Types > WebSphere enterprise applications then application_suffix > Context Root for Web Modules, where application is BPEContainer for a Business Process Choreographer configuration or BPArchiveMgr for a Business Process Archive Manager configuration, and suffix is either node_name_server_name or the cluster_name where Business Process Choreographer or Business Process Archive Manager is configured. Then make sure the context roots for the following web modules and are correct and unique.
- BFMIF_scopeWeb
- BFMJAXWSAPI
- BFMRESTAPI
- To set the context roots for the Human Task Manager, click Applications > Application Types > WebSphere enterprise applications then application_suffix > Context Root for Web Modules, where application is TaskContainer for a Business Process Choreographer configuration or TaskArchiveMgr for a Business Process Archive Manager configuration, and suffix is either node_name_server_name or the cluster_name where Business Process Choreographer is configured.
Then make sure the context roots for the following web modules and are correct and unique.
- HTMIF_scopeWeb
- HTMJAXWSAPI
- HTMRESTAPI
- To change the REST URLs the Business Process Choreographer Explorer uses:
- Click Servers > Clusters > WebSphere application server clusters > cluster_name or Servers > Server Types > WebSphere application servers > server_name . On the Configuration tab, in the Business Process Manager section, expand Business Process Choreographer and click Business Process Choreographer Explorer. Update the Business Flow Manager and Human Task Manager REST API URLs.
- Update the endpoints in config-rest.xml using a command similar to the following example, which uses PS.AppTarget as the cluster name:
wsadmin>AdminTask.updateRESTServiceProvider(['-clusterName',  'PS.AppTarget', '-appName', 'BPEContainer_PS.AppTarget', '-webModuleName','bfmrestapi.war', '-contextRoot', '/rest/bpm/bfmPS2/'])

wsadmin>AdminTask.updateRESTServiceProvider(['-clusterName',  'PS.AppTarget', '-appName', 'TaskContainer_PS.AppTarget', '-webModuleName','taskrestapi.war', '-contextRoot', '/rest /bpm/htmPS2/'])
.
- Click Servers > Clusters > WebSphere application server clusters > cluster_name or Servers > Server Types > WebSphere application servers > server_name . On the Configuration tab, in the Business Process Manager section, expand Business Process Choreographer and click Business Process Choreographer Explorer. Update the Business Flow Manager and Human Task Manager REST API URLs.
Connection timeout when running a wsadmin script
Run a wsadmin administrative script that calls an MBean in a network deployment environment results in several connections between server processes, such as the deployment manager, the node agent, and the cluster member using Java Management Extensions (JMX) connectors. Some Business Process Choreographer administrative scripts can run for longer than the default connection timeout specified for the connector used. This behavior results in messages similar to the following example: WASX7017E: Exception received while running file "/install_root/ProcessChoreographer/admin/script_name"; exception information: javax.management.JMRuntimeException: ADMN0034E: The service is unable to obtain a valid administrative client to connect process "nodeagent" from process "dmgr", because of exception: com.ibm.websphere.management.exception.ConnectorException: ADMC0009E: The system failed to make the SOAP RPC call: invoke.
Reason
Some Business Process Choreographer administrative scripts can perform database operations on large numbers of database objects. This means they can run for longer than the default connection timeout. When a wsadmin script is run with a connection to the server, the following connection timeouts can happen:
- For the call from the wsadmin environment to the deployment manager.
The default for is 180 seconds.
- For the connection from the deployment manager to the node agent.
The default is 600 seconds.
- For the connection from the node agent to the runtime deployment target. The default is 600 seconds.
Resolution
You have the following options:
- Modify the invocation parameters so that less work is performed, so the operation completes before the timeout. For example, many scripts have parameters that can be used to select fewer objects.
- Modify the properties for the connector used.
- Remote JMX connector
- This connector is used between server processes that reside on different physical machines, for example, between the deployment manager and the node agent. The default is the SOAP connector.
- Local JMX connector
- This connector is used between server processes that reside on the same physical machine, for example, between the node agent and its application servers. The default is the IPC connector.
The following example shows how to change the SOAP connector properties.
-
Modify the com.ibm.SOAP.requestTimeout property by editing soap.client.props that is located in the properties subdirectory of the profile_root directory.
-
Change the requestTimeout custom property using the administrative console:
- For servers or cluster members, click Servers > Application servers > server_name > Server Infrastructure > Administration > Administration Services > Additional properties > JMX Connectors > SOAPConnector > Additional Properties > Custom properties, locate the requestTimeout custom property, and modify its value.
- For the deployment manager, click System administration > Deployment manager > Additional Properties > Administration Services > Additional properties > JMX Connectors > SOAPConnector > Additional Properties > Custom properties, locate the requestTimeout custom property, and modify its value.
- For the node agents, click System administration > Node agents > node_agent_name > Additional Properties > Administration Services > Additional properties > JMX Connectors > SOAPConnector > Additional Properties > Custom properties, locate the requestTimeout custom property, and modify its value.
- For servers or cluster members, click Servers > Application servers > server_name > Server Infrastructure > Administration > Administration Services > Additional properties > JMX Connectors > SOAPConnector > Additional Properties > Custom properties, locate the requestTimeout custom property, and modify its value.
Java Management Extensions connector properties
6.0.x Business Process Choreographer API client fails in a V8.5 environment
You did not migrate your 6.0.x Business Process Choreographer API client when you upgraded to IBM Business Process Manager Advanced Version V8.5. When you try to run your client in the V8.5 environment, the client fails.
Symptom
Exceptions similar to the following example are written to the SystemOut.log file:
[9/6/07 21:05:27:093 PDT] 00000045 ExceptionUtil E CNTR0020E: EJB threw an unexpected (non-declared) exception during invocation of method "processMessage" on bean "BeanId(validateDataApp#validateDataEJB.jar#component.validateItem, null)".
Exception data: javax.ejb.AccessLocalException: ;
nested exception is: com.ibm.websphere.csi.CSIAccessException:
SECJ0053E: Authorization failed for /UNAUTHENTICATED while invoking (Home)com/ibm/bpe/api/BusinessFlowManagerHome create:4
securityName: /UNAUTHENTICATED;accessID: UNAUTHENTICATED is not granted any of the required roles: BPEAPIUser com.ibm.websphere.csi.CSIAccessException: SECJ0053E: Authorization failed for /UNAUTHENTICATED while invoking (Home)com/ibm/bpe/api/BusinessFlowManagerHome
create:4 securityName: /UNAUTHENTICATED;accessID: UNAUTHENTICATED is not granted any of the required roles: BPEAPIUser at com.ibm.ws.security.core.SecurityCollaborator.performAuthorization(SecurityCollaborator.java:484)
at com.ibm.ws.security.core.EJSSecurityCollaborator.preInvoke(EJSSecurityCollaborator.java:218)
at com.ibm.ejs.container.EJSContainer.preInvokeForStatelessSessionCreate(EJSContainer.java:3646)
at com.ibm.ejs.container.EJSContainer.preInvoke(EJSContainer.java:2868)
at com.ibm.bpe.api.EJSLocalStatelessGenericBusinessFlowManagerEJBHome_a412961d.create(Unknown Source)
Reason
If you have written a client that uses Business Process Choreographer APIs without first authenticating the user, you should modify the client to perform a login before using the APIs. After migration, the Java™ EE roles BPEAPIUser and TaskAPIUser are set to the value Everyone, which maintains compatibility with earlier versions by maintaining the 6.0.x behavior of not requiring a login when application security is enabled. For new installations these roles default to the value AllAuthenticated. The use of Everyone to map Java EE roles BPEAPIUser and TaskAPIUser is deprecated.
Resolution
Modify your API client to force the user to log on to the client before they use the APIs.
As a temporary workaround, you can change the mappings for the BPEAPIUser and the TaskAPIUser roles. To change the mapping:
- In the administrative console, click Applications > Enterprise Applications > BPEContainer_suffix, and under Detail Properties click Security role to user/group mapping
- Change the BPEAPIUser role from AllAuthenticated to Everyone, and click OK.
- Repeat step 2 for the TaskContainer_suffix and the TaskAPIUser role.
- After you have modified your client, change these roles back to AllAuthenticated to prevent unauthenticated users accessing the APIs.
Resolve a DB2 process load issue
You can encounter unexpected process load issues when running DB2
The following error message displays when DB2 encounters a process load issue:
CWLLG2068E: An unexpected exception occurred during an attempt to generate the next primary key.
Error: org.springframework.jdbc.UncategorizedSQLException: PreparedStatementCallback; uncategorized SQLException for SQL [update lsw_pri_key set high_key = ? where table_id = ?]; SQL state [57011]; error code [-964]; DB2 SQL Error: SQLCODE=-964, SQLSTATE=57011, SQLERRMC=null, DRIVER=3.61.65; nested exception is com.ibm.db2.jcc.am.SqlException: DB2 SQL Error: SQLCODE=-964, SQLSTATE=57011, SQLERRMC=null, DRIVER=3.61.65
Business Process Manager databases are maintained by an administrator. If your Business Process Manager databases are maintained by a database administrator, gather the server log files and FFDC entries, and then consult the database administrator. For IBM DB2, the database administrator must adjust the settings for LOGFILSIZ, LOGPRIMARY and LOGSECOND based on the environment.
- db2 get database config for BPMDB
- db2 get database config for PDWDB
BPMDB and PDWDB are the default database names. If you used different database names during the installation, substitute the database name.
To increase the LOGFILSIZ, use the following command, where xxxx is the new value for the LOGFILSIZ: db2 update database config for BPMDB using LOGFILSIZ xxxx
Increasing the number of primary and secondary logs is done with a similar command, where yy and zz are the new values:
- db2 update database config for BPMDB using LOGPRIMARY yy
- db2 update database config for BPMDB using LOGSECOND zz
You must update these settings for both the BPMDB and the PDWDB.
Increasing the LOGPRIMARY value also increases the disk requirements for the log files because the primary log files are preallocated during the very first connection to the database. Each log file has a size that is equal to LOGFILSIZ. You can use the database system monitor to help size the primary log files. See the IBM DB2 documentation for more information about these values and how to monitor them. The correct value for these parameters is specific to the environment. When you increase these values, increase them in small increments from their current settings until the problem is resolved.
Uninstall multiple server and tooling products causes errors
Uninstall multiple products ( IBM Business Process Manager and IBM Integration Designer) at the same time might cause Installation Manager errors or warnings.
Types of errors and warnings
The types of errors or warnings you receive vary, depending on the combination of products that you attempt to uninstall:
- If you uninstall server and tooling products ( IBM Integration Designer, IBM Business Process Manager Advanced, Process Server Test environment, and Process Designer)
at the same time, you might see the following errors:
2195 ERROR 01:13:39.22 **PAKENGINE** ERROR: NGIAction.execute : null 2197 ERROR 01:13:39.50 **PAKENGINE** ERROR: PakInstaller.installPak : null 2199 ERROR 01:13:39.76 **PAKENGINE** ERROR: The [UNINSTALL] PAK operation failed. Error: null 2201 INFO 01:13:40.12 **PAKENGINE** INFO: PAK action ends - Operation: UNINSTALL PAK file: C:\Program Files (x86)\IBM\WebSphere\AppServer_5_9b\properties\version\nif\backup\atlas.client.pak.
2202 ERROR CRIMABA65E664E 01:13:40.12 Unexpected exception
- If you uninstall tooling products ( IBM Integration Designer and Forms Designer 4.0) and the Process Server Test Environment at the same time, you might see the following warnings:
Failed to delete C:\AppServer\bin
1437 WARNING CRIMC9CB8AE9AW 39:48.47 Failed to delete C:\AppServer\BPM
1438 WARNING CRIMC9CB8AE9AW 39:48.53 Failed to delete C:\AppServer\configuration
1439 WARNING CRIMC9CB8AE9AW 39:48.61 Failed to delete C:\AppServer\features
1440 WARNING CRIMC9CB8AE9AW 39:48.68 Failed to delete C:\AppServer\java
1441 WARNING CRIMC9CB8AE9AW 39:48.75 Failed to delete C:\AppServer\lib
1442 WARNING CRIMC9CB8AE9AW 39:48.83 Failed to delete C:\AppServer\links
1443 WARNING CRIMC9CB8AE9AW 39:48.98 Failed to delete C:\AppServer\logs
1444 WARNING CRIMC9CB8AE9AW 39:49.06 Failed to delete C:\AppServer\optionalLibraries
1445 WARNING CRIMC9CB8AE9AW 39:49.14 Failed to delete C:\AppServer\ProcessChoreographer
1446 WARNING CRIMC9CB8AE9AW 39:49.22 Failed to delete C:\AppServer\profiles
1447 WARNING CRIMC9CB8AE9AW 39:49.45 Failed to delete C:\AppServer\properties
1448 WARNING CRIMC9CB8AE9AW 39:49.53 Failed to delete C:\AppServer\scriptLibraries
1449 WARNING CRIMC9CB8AE9AW 39:49.61 Failed to delete C:\AppServer\systemApps
1450 WARNING CRIMC9CB8AE9AW 39:49.68 Failed to delete C:\AppServer\temp
1451 WARNING CRIMC9CB8AE9AW 39:49.76 Failed to delete C:\AppServer
- If you uninstall tooling products and server product packages ( IBM Integration Designer, the Process Server Test Environment, and Process Designer)
at the same time, you might see the following errors:
java.lang.IllegalStateException: No metadata found for installed IU com.ibm.wid.splashpath..com.ibm.wid.splashpath.set 6.1.0.v20071130_1200.
com.ibm.cic.agent.internal.core.InstallRegistry$ProfileInstallRegistry.getInstalledIU(InstallRegistry.java:1064)
com.ibm.cic.agent.internal.core.InstallRegistry$ContextInstallRegistry.getInstalledIU(InstallRegistry.java:845)
com.ibm.cic.agent.internal.core.InstallRegistry$ContextInstallRegistry.getInstalledIU(InstallRegistry.java:845)
com.ibm.cic.agent.internal.core.InstallRegistry$ContextInstallRegistry.addInstalledIUs(InstallRegistry.java:834)
com.ibm.cic.agent.internal.core.InstallRegistry$ContextInstallRegistry.getInstalledIUs(InstallRegistry.java:826)
com.ibm.cic.agent.core.InstallContextTree.computePairs(InstallContextTree.java:205)
com.ibm.cic.agent.core.InstallContextTree.getPairs(InstallContextTree.java:181)
com.ibm.cic.agent.internal.core.MetadataReplacer.extractMetadataReplacementPairs(MetadataReplacer.java:123)
com.ibm.cic.agent.internal.core.MetadataReplacer.extractMetadataReplacementPairs(MetadataReplacer.java:114)
com.ibm.cic.agent.internal.core.MetadataReplacer.replace(MetadataReplacer.java:84)
com.ibm.cic.agent.internal.core.Director.expandAndQualify(Director.java:1167)
com.ibm.cic.agent.internal.core.Director.getSizeInfo(Director.java:231)
com.ibm.cic.agent.internal.core.Director.getSizeInfo(Director.java:173)
com.ibm.cic.agent.core.Agent.getSizeInfo(Agent.java:2446)
com.ibm.cic.agent.core.SpaceInfoUtils.getTotalSizeInfo(SpaceInfoUtils.java:212)
com.ibm.cic.agent.core.SpaceInfoUtils.getEclipseCacheLocationSizeListMap(SpaceInfoUtils.java:106)
com.ibm.cic.agent.core.SpaceInfoUtils.validateAvailableSpace(SpaceInfoUtils.java:268)
com.ibm.cic.agent.core.AgentUtil.validateJobs(AgentUtil.java:158)
com.ibm.cic.agent.core.Agent.uninstall(Agent.java:1550)
com.ibm.cic.agent.core.Agent.uninstall(Agent.java:1595)
com.ibm.cic.agent.internal.ui.wizards.UninstallWizard.performTask(UninstallWizard.java:113)
com.ibm.cic.agent.internal.ui.wizards.AgentUIWizard$2.run(AgentUIWizard.java:467)
com.ibm.cic.common.ui.internal.parts.ProgressPart$ProgressJob.run(ProgressPart.java:104)
org.eclipse.core.internal.jobs.Worker.run(Worker.java:54)
Resolve the problem
To resolve the problem, uninstall each server product individually.
You can also manually delete the remaining installation folders after the installation failure occurs.
Install a snapshot fails when single sign-on has been configured
Install a snapshot from IBM Process Center to Process Server can fail if single sign-on has been configured.
If you receive a message similar to the following one in the Process Center systemOut.log file after installing a snapshot then it is an indication that your single sign-on configuration needs to be updated.
8/29/12 2:35:14:235 EDT] 00001a91 HttpMethodBas W org.apache.commons.httpclient.HttpMethodBase processCookieHeaders Cookie rejected: "$Version=0; LtpaToken=Mj0K0SVfNfOK6r6+Oy6sDNAeIw0IKn5ghkYNA8KFUZuTy2SuI3bgE/EmquYoznVI3SakYJ9J3QfyqLR80/b9k46hioz/qBRGZgh7ZpMv7GE5DCKjuSkHganqoZKvIBseI222h6zDC8Ea0jelJWAc7IQEqH0Pgpg5hJOmdt258llWxuSL9scuz+leejgDnSJE3kzThjSMvBlxYbk6J7DF8OiTHguxSwlNS25Deud11mN3MI1L1O7vFx3FzEQ6PLdKi+4d8HYQ48755KjzNO1f4Q1/MywQWRCvXQszugmid/5batRcpgS998Hhe44OuibLeElViY+jsYQ31u/qpIB9s8yni7fx8c/k; $Path=/; $Domain=.ibm.com". Domain attribute ".ibm.com" violates RFC 2109: host minus domain may not contain any dots [8/29/12 2:35:14:237 EDT] 00001a91 AbstractSuppo I CWLLG0154I: v1 of the clone Remote login succeeded. [8/29/12 2:35:14:248 EDT] 00001a91 AbstractSuppo I CWLLG0714I: v1 of the clone Sending export. [8/29/12 2:35:14:950 EDT] 00001a91 AbstractSuppo E CWLLG0155E: v1 of the clone Installation failed. [8/29/12 2:35:15:005 EDT] 00001a91 GovernanceSer E com.lombardisoftware.server.ejb.governance.GovernanceEventServiceCore deploySnapshotFromGovernance CWLLG3512E: Governance service 'Install Snapshot' failed due the following error: 'CWLLG0155E:The install failed. Check server logs on APSEN01 for more information.'
To correct the problem, fully qualify the domain name in your single sign-on configuration on WAS. For example, instead of using mycorporation.com as the domain, use rtp.raleigh.mycorporation.com.
If Lightweight Third-Party Authentication (LTPA) is being used, you may also want to re-import the LTPA keys into WebSphere Application Server.
Install a snapshot fails after message confirms installation
Install a snapshot on IBM Process Center has a message that confirms the snapshot is installed and then moments later issues a message claiming the installation failed.
You may see the following sequence of messages in Process Center when you are installing a snapshot. First you see Installation is progressing which is followed by Currently installed. After these messages comes another message Installation terminated with an exception.
This sequence can happen when you are using IBM Business Process Manager Advanced. During the installation of a snapshot on a process server, the content of the snapshot is first imported into the process server and then the advanced artifacts, such as SCA modules and libraries, are deployed to the process server if they are present. If this advanced deployment of a snapshot fails, you receive message CWLLG2163E, which indicates the process application snapshot content is imported on the process server but advanced content failed to install. You can attempt to install the advanced content of the same snapshot again from the Process Admin Console by activating the snapshot. successful installation of BPM on Windows Server 2012 or Windows 8
Quick Start shortcut missing from Start Programs menu after successful installation of BPM on Windows Server 2012 or Windows 8
After the successful installation of IBM Business Process Manager on Microsoft Windows Server 2012 or Windows 8, when you click Start -> Programs -> IBM -> Business Process Manager 8.5, the Quick Start shortcut might be missing from the displayed menu. Other user-specific shortcuts, such as the profile shortcuts, might be missing also.
This is a known issue with Windows Server 2012 and Windows 8. A fix is currently not available.
To resolve the problem, switch to the All Applications view in the Metro UI, where the shortcuts are available. On the Metro UI screen, right-click, then click All Applications.
Troubleshooting the z/OS installation and configuration
The installation and augmentation jobs or scripts log records in the following ways:
- Job output messages
When you run the installation and augmentation jobs, you can view each job output to verify whether the job ran without error.
- Log file messages
Log file messages provide information and settings that were used by the installation and augmentation jobs. Log file messages for the installation process are written to the installation log file in the logs subdirectory in the location where the Installation Manager agent data is stored.
Log file messages for the augmentation process are written to the WAS_HOME/logs/manageprofiles/default_augment.log file. Search the profile augmentation log for >SEVERE< or >WARNING< level messages to determine overall error in processing. Individual Ant action logs are located in WAS_HOME/logs/manageprofiles/default. To determine what Ant file was running at the time of the error, you can look in the log for the last instance of "Buildfile" before the message in which you are interested.
Make sure that you have installed and configured WebSphere Application Server for z/OS successfully. See the installation troubleshooting information in the WebSphere Application Server Information Center if you are having trouble installing and configuring WebSphere Application Server for z/OS.
For current information available from the IBM Support Portal on known problems and their resolution, see the IBM Business Process Manager Advanced Support page.
-
 Correcting file ownership or permission problems with IBM Installation Manager
If you accidentally start an Installation Manager instance from the wrong user ID, some files might end up with ownerships that prevent normal use of the Installation Manager.
Correcting file ownership or permission problems with IBM Installation Manager
If you accidentally start an Installation Manager instance from the wrong user ID, some files might end up with ownerships that prevent normal use of the Installation Manager.
- IBM Business Process Manager configuration errors
If you experience a problem with one of the configuration tasks then there will be three main sources of information about the problem.
- Verification errors
When you verify the installation, you might encounter some problems, which are described in this section.
Correcting file ownership or permission problems with IBM Installation Manager
If you accidentally start an Installation Manager instance from the wrong user ID, some files might end up with ownerships that prevent normal use of the Installation Manager.
To correct this problem, log on to a super user or other privileged user ID and reset the file ownership and permissions for the Installation Manager binary files and agent data. For example:
chown IMADMIN:IMGROUP /InstallationManager/bin
chmod 775 /InstallationManager/bin
and
chown IMADMIN:IMGROUP /InstallationManager/appdata
chmod 775 /InstallationManager/appdata
If the users of a group-mode Installation Manager do not have umask set to allow group-write permission on created files, you might also have to set the permissions and owners when switching from one user ID to another. You might also need to set permissions and owners for the product files that you install with the Installation Manager to ensure that maintenance can be performed from other user IDs in the group.
IBM Business Process Manager configuration errors
If you experience a problem with one of the configuration tasks then there will be three main sources of information about the problem.
- The error messages issued by the task
- Error messages in the WebSphere deployment manager or application server job logs. If you are federating a node you might also find messages in the node agent job logs
- Log files in the UNIX file system
Wherever possible, the cause and solution to each problem is also documented with the symptoms. The problems described here were experienced when starting the server after completing the installation procedure for BPM. In the examples of error messages, the messages have been made easier to read by changing the places where line breaks occur. Therefore, if you see these errors in your system the messages will have a slightly different layout.
- Failure in loading T2 native library db2jcct2zos
This error can occur when using the DB2 Universal Driver connector, and WAS cannot load some external DB2 modules from SDSNLOAD or SDSNLOD2.
- DataSource has a null RelationalResourceAdapter property
The error shown in the example in this topic is caused by a redundant data source that is left behind after running the augmentation job. You can safely delete this data source by using the WebSphere administrative console. Be careful not to delete the JDBC provider that has a very similar name.
- SQLCODE = -471
This error can occur when the Universal Driver has not been properly configured in a DB2 system.
- SQL code -204 and -516
This error can be caused if the currentSchema property does not match the schema name of the tables and indexes that you created.
The error messages show the JCA authentication alias that is being used.
- Repeated SIB messages about acquiring and losing locks
This error can occur after correcting the DB2 Universal Driver configuration and restarting the server. The error messages are repeated continuously in the adjunct region.
Failure in loading T2 native library db2jcct2zos
This error can occur when using the DB2 Universal Driver connector, and WebSphere Application Server cannot load some external DB2 modules from SDSNLOAD or SDSNLOD2.
Error message: BBOO0220E:
error message: BBOO0220E:

CWSIS0002E: The messaging engine encountered an exception while starting.
Exception: com.ibm.ws.sib.msgstore.PersistenceException:
CWSIS1501E: The data source has produced an unexpected exception:
java.sql.SQLException: Failure in loading T2 native library db2jcct2zos, reason: java.lang.UnsatisfiedLinkError:
/pp/db2v8/UK14852/jcc/lib/libdb2jcct2zos.so:
EDC5157I An internal error has occurred. (errno2=0x0BDF03B2)DSRA0010E:
SQL State = null, Error Code = -99,999DSRA0010E: SQL State = null, Error Code = -99,999
com.ibm.ws.sib.utils.ras.SibMessage
com.ibm.ws.sib.utils.ras.SibMessage
There are a number of possible causes of a failure to load libdb2jcct2zos.so. A common error is the absence of the DB2 libraries from the STEPLIB of the WAS server processes. A failure like this can also be a symptom of a larger problem such as the DB2 Universal Driver not being been fully configured in the DB2 system you are accessing.
Check that all the steps for installing the DB2 Universal Driver have been performed for your DB2 system.
The installation instructions for the DB2 Universal Driver can be found in the DB2 Information Center.
DataSource has a null RelationalResourceAdapter property
The error shown in the example in this topic is caused by a redundant data source that is left behind after running the augmentation job. You can safely delete this data source by using the WebSphere administrative console. Be careful not to delete the JDBC provider that has a very similar name.
error message: BBOO0222I: DSRA8208I: JDBC driver type : 2
com.ibm.ws.exception.RuntimeWarning:
com.ibm.ws.runtime.component.binder.ResourceBindingException:
invalid configuration passed to resource binding logic. REASON: Invalid Configuration!
The DataSource: DB2 Universal JDBC Driver DataSource has a null RelationalResourceAdapter property.
To remove the redundant data source:
- Log in to the WebSphere administrative console and navigate to Resources > JDBC Providers.
- Set the scope to Server and click Apply.
- Click the JDBC provider called DB2 Universal JDBC Driver Provider.
- Click the link to Datasources on the right.
- You should see a list of three data sources. Select the check box next to DB2 Universal JDBC Driver Datasource and click the Delete button.
Save your configuration changes and restart the WebSphere server.
SQLCODE = -471
This error can occur when the Universal Driver has not been properly configured in a DB2 system.
In the SYSIBM.SYSROUTINES table, the WLM_ENVIRONMENT for SYSIBM.SYSTABLES has a WLM name that does not match that being used in the stored procedure address space JCL.
The installation instructions for the DB2 Universal Driver can be found in the DB2 Information Center .
ExtendedMessage: BBOO0220E:

CWSIS0002E: The messaging engine encountered an exception while starting.
Exception: com.ibm.ws.sib.msgstore.PersistenceException:
CWSIS1501E: The data source has produced an unexpected exception:
com.ibm.db2.jcc.t2zos.y:[IBM/DB2][T2zos/2.9.32]
v.readExecuteCallInternal: nativeExecuteCall:5587:
DB2 engine SQL error, SQLCODE = -471, SQLSTATE = 55023,
error tokens = SYSIBM.SQLTABLES;00E7900C
SQL code -204 and -516
This error can be caused if the currentSchema property does not match the schema name of the tables and indexes that you created. The error messages show the JCA authentication alias that is being used.
error message: BBOO0220E: SCHD0125E: Unexpected exception while processing the acquireLease operation:
com.ibm.ws.leasemanager.LeaseException: SCHD0300E:
Error during Database operation, localized message is _
:nativePrepareInto:1377:
DB2 engine SQL error, SQLCODE = -204, SQLSTATE = 42704,
error tokens = MDDBU.WSCH_LMGR,
Vendor Error Code is -204, ANSI-92 SQLState is 42704, cause:
[IBM/DB2][T2zos/2.9.32]T2zosPreparedStatement.readDescribeInput_
:nativeDescribeInput:2006:
DB2 engine SQL error, SQLCODE = -516, SQLSTATE = 26501,
error tokens =


..
..
com.ibm.db2.jcc.t2zos.y:
[IBM/DB2][T2zos/2.9.32]T2zosPreparedStatement.readDescribeInput:2006:
DB2 engine SQL error, SQLCODE = -516, SQLSTATE = 26501, ...
Repeated SIB messages about acquiring and losing locks
This error can occur after correcting the DB2 Universal Driver configuration and restarting the server. The error messages are repeated continuously in the adjunct region.
ExtendedMessage: BBOO0222I:

CWSIS1538I: The messaging engine, ME_UUID=68E9550CE7780888,
INC_UUID=5f244052b02f04b4,
is attempting to obtain an exclusive lock on the data store.
..
..
ExtendedMessage: BBOO0222I:

CWSIS1546I: The messaging engine, ME_UUID=68E9550CE7780888,
INC_UUID=5f244052b02f04b4,
has lost an existing lock or failed to gain an initial lock on the database
These error messages indicate there is a problem accessing the data store. Check the fixWPSvars.jacl had created (jdbc/MEdatasource) in the datasource. Check the datasource has an JCA authentication alias associated with it. If there is no JCA authentication alias associated with the datasource the database access defaults to the user ID of the servant region and tries to find tables called MKASRU which do not exist.
This error can occur because the -sibauth option has not been coded when running fixWPSvars.jacl. You can fix this in a number of ways:
- Associate the JDBC datasources used by the SIB with the JCA authentication alias called WPSDBAlias.
- Create a new JCA Authentication Alias and associate that with the JDBC. Re-run fixWPSvars.jacl using the -sibauth option to specify WPSDBAuth as the JCA authentication alias, or use the WebSphere administrative console to make the change, specifying WPSDBAlias as the alias name.
The following steps explain how to create a new JCA authentication alias to be used by the SIB to access DB2:
- Open the WebSphere administrative console and navigate to Security → Global security.
- Click the link to J2C Authentication data under Additional Properties.
- Click the New button.
- Enter a name for the alias, and enter the user ID and the password for the alias.
- Click OK.
- Click Save.
The following steps explain how to associate the Service Integration Bus with the authentication alias that you have created:
- Open the WebSphere administrative console and navigate to Service integration → Buses.
- Click the bus.
- On the next panel, click Messaging engines.

- Click the hyperlink to the messaging engine.
- Click the link to Data store under Additional Properties.

- Expand the drop-down list box in the Authentication alias field and select the alias you created earlier.
- Click OK and then save the change to the configuration.
- Stop and restart the server.
Verification errors
When you verify the installation, you might encounter some problems, which are described in this section.
- Resources not seen in the administrative console
When you are checking that applications you have installed exist in the system, you may not see them listed under the installed applications section. If you do not see the applications listed, log out of the administrative console and log back in.
- Resolve Topic not found errors in Process Portal
After you log on to Process Portal, you might see a Topic not found error when you click the Help icon, or when you switch from Process Portal to the Business Space Welcome page.
Resources not seen in the administrative console
When you are checking that applications you have installed exist in the system, you may not see them listed under the installed applications section. If you do not see the applications listed, log out of the administrative console and log back in.
If you do not see Service Integration Buses that you have configured, log out of the administrative console and log back in.
Resolve "Topic not found" errors in Process Portal
After you log on to Process Portal, you might see a Topic not found error when you click the Help icon, or when you switch from Process Portal to the Business Space Welcome page.
To resolve this issue:
- Stop the server or cluster.
- Go to the WAS_HOME/profiles/profile_name/config/BusinessSpace/help directory on the deployment manager node:
cd /WebSphere/V8T8DM/DeploymentManager/profiles/default/config/BusinessSpace/help
- Edit the file named bspace_help.link and change the Help1 value to be an absolute path:
- Help1=/WebSphere/V8T8DM/DeploymentManager/profiles/default/config/BusinessSpace/help
- Synchronize the cluster nodes.
- Restart the server or cluster.
Troubleshooting migration
Consider the following possibilities:
- A SOAP invocation timeout might have occurred
- Migration commands for the target environment might have failed for other reasons. You can diagnose some failures by enabling tracing for specific command-line utilities and rerunning those specific commands.
If you ran all the migration commands on the source environment and created a snapshot before the migration failed, you do not need to rerun all the migration commands again from the beginning. If the migration failed on the target, for example at the database upgrade step or when you ran the BPMMigrate command, you can restore the database, and rerun the commands on the target only.
SOAP invocation timeout
If you are using a SOAP connection, the migration command can take longer to complete than the specified SOAP timeout value. You might see an exception like...
- java.net.SocketTimeoutException: Read timed out
To prevent this problem, modify the value of the property...
- com.ibm.SOAP.requestTimeout
...in soap.client.props.
- If you installed the new version of the product on the same computer as the source environment, the file is found in
- BPM_home_8.5/util/migration/resources/
- If you installed the new version of the product on a different computer and copied the migration files to the source environment, the file is found in
- remote_migration_utility/util/migration/resources/
Enable tracing
To diagnose the reason for a migration failure, you can enable tracing and rerun a command. To enable tracing for migration commands:
- Locate the logging.properties file.
For the DBUpgrade command-line utility, the file is in BPM_home_8.5/util/dbUpgrade. For example:
-
/opt/ibm/WebSphere/AppServer/util/dbUgrade/logging.properties
For the following command-line utilities:
- BPMExtractDBConfiguration
- BPMExtractSourceInformation
- BPMManageApplications
- BPMMergeFileRegistry
- BPMMigrate
The file is in BPM_home_8.5/util/migration/resources. For example:
-
/opt/ibm/WebSphere/AppServer/util/migration/resources/logging.properties
- Set the log level in the logging.properties file. The default log level is FINE for both global logging level and file output log level. Change both properties to FINEST to capture more detail in the log. For example:
-
# default global logging level. Logging level possible values: FINEST, FINER, FINE, INFO, WARNING, SEVERE.
.level = FINEST
# file output properties
com.ibm.bpm.migration.logging.NonBlockingFileHandler.level = FINEST
If you see exceptions for any of the following commands, change the log level to FINEST, run the command again, and then check the results, as described for each command.
BPMExtractDBConfiguration troubleshooting
This command extracts data source information. If you see an exception when you run this command, you can diagnose the problem by changing the log level to FINEST and running the command again.
Change the log level to FINEST as described in "Troubleshooting migration." After you run the command again, check the log file named BPMExtractDBConfiguration_timestamp.log. If you cannot find the cause of the problem, you can provide the log to IBM support.
- If using the remote migration utility to run the command in the source environment, the log file is in remote_migration_utility/logs/migration.
- Otherwise, the log file is in BPM_home_8.5/logs/migration in the target environment.
The BPMExtractDBConfiguration command reads all the data source information from the WebSphere Application Server configuration under the cell scope or cluster scope.
Related reference:
BPMExtractDBConfiguration command-line utility
BPMExtractSourceInformation troubleshooting
This command takes a snapshot of the source environment. If you see an exception when you run this command, you can diagnose the problem by changing the log level to FINEST and running the command again.
Change the log level to FINEST as described in "Troubleshooting migration." After you run the command again, check the log file named BPMExtractSourceInformation_timestamp.log.
- If the -backupFolder parameter is set, the log file is in snapshot_folder/logs.
- If the -backupFolder parameter is not set and you are using the remote migration utility, the log file is in remote_migration_utility/logs/migration.
- If the -backupFolder parameter is not set and you are not using the remote migration utility, the log file is in BPM_home_8.5/logs/migration.
If you cannot find the cause of the problem, you can provide the log to IBM support.
Related reference:
BPMExtractSourceInformation command-line utility
BPMManageApplications troubleshooting
This command disables or enables the automatic starting of applications and schedulers. If you see an exception when you run this command, you can diagnose the problem by changing the log level to FINEST and running the command again.
Change the log level to FINEST as described in "Troubleshooting migration." After you run the command again, check the log file named BPMManageApplications_timestamp.log. If you cannot find the cause of the problem, you can provide the log to IBM support.
- If using the remote migration utility to run the command in the source environment, the log file is in remote_migration_utility/logs/migration.
- Otherwise, the log file is in BPM_home_8.5/logs/migration in the target environment.
To check the BPMManageApplications command was successful, perform the following actions:
- To see the status of your WebSphere Application Server applications, open the administrative console and go to Applications > Application types > WebSphere enterprise applications.
- To see the status of the schedulers, go to the server log for the application cluster. You can find the log under the profile path of any custom node, in node_profile/logs/app_cluster_member/SystemOut.log.
Check for a message in the log similar to the following message:
- [6/27/13 12:13:03:311 CST] 0000008b SchedulerDaem I SCHD0038I: The Scheduler Daemon for instance BPEScheduler has started.
This message provides the status for the scheduler daemon for the instance named BPEScheduler. If you do not see such a message, the scheduler is not started.
Related reference:
BPMManageApplications command-line utility
BPMGenerateUpgradeSchemaScripts troubleshooting
This command generates SQL scripts and upgradeSchema scripts. If you see an exception when you run this command, you can diagnose the problem by changing the log level to FINEST and running the command again.
Change the log level to FINEST as described in "Troubleshooting migration." After you run the command again, check the log file named BPMGenerateUpgradeSchemaScripts_timestamp.log. The file is found in deployment_manager_profile/logs/. If you cannot find the cause of the problem, you can provide the log to IBM support.
The command reads database information from the properties file specified by the target.config.property.file property in the migration.properties file. If the generated SQL scripts are not what you expect, check the value of that property or the specified file to make sure the settings are correct.
Related reference:
BPMGenerateUpgradeSchemaScripts command-line utility
DBUpgrade troubleshooting
This command upgrades the databases. If you see an exception when you run this command, you can diagnose the problem by changing the log level to FINEST and running the command again.
Change the log level to FINEST as described in "Troubleshooting migration." After you run the command again, check the log file named DBUpgrade_timestamp.log. The file is found in deployment_manager_profile/logs/. If you cannot find the cause of the problem, you can provide the log to IBM support.
The command reads topology information from the properties file specified by the target.config.property.file property in the migration.properties file. The command reads database information from the WebSphere Application Server data source, so if you find the wrong database connection is used when you run DBUpgrade, check the data source configuration is correct.
The DBUpgrade command automatically upgrades the schema and data for Process Server and Performance Data Warehouse, except for DB2 for z/OS databases. If your source version is WebSphere Process Server or BPM Advanced, it also updates the topology information in the Business Process Choreographer database.
For DB2 for z/OS databases, the schema upgrade for Process Server and Performance Data Warehouse must be done manually.
DB2 SQL error
If you are running DB2, the DBUpgrade command might fail with the following database exception:
- Error executing SQL statement: DB2 SQL Error: SQLCODE=-964, SQLSTATE=57011, SQLERRMC=null
This error occurs when the database transaction log is full. Increase the size of the database transaction log and run the DBUpgrade command again.
Database customizations
If you customized the Process Server database for performance tuning, you might get exceptions when you run the DBUpgrade command. For example, if you added an index to the column of a table, the command also tries to add an index and you see a database exception similar to the following exception (for Oracle):
- ORA-01408: such column list already indexed
You must drop the customized index first and run DBUpgrade again.
It is better to check before you run the migration to see whether there are conflicts between what is already customized and what DBUpgrade does. Where there are conflicts, remove the customizations before you run the command. For the schema changes that DBUpgrade makes, see the upgradeSchema_ProcessServer.sql file. This file is in target_deployment_manager_profile/dbscripts/Upgrade/de_name/database_type/ProcessServer_database_name.
Find the phases in the file that correspond to your source. Each phase starts with /* START of phase ProcUpgradeToversion */ and ends with /* END of phase ProcUpgradeToversion */. If your source version is V7.5.1, the database is upgraded to V8.0.0 first, then to V8.0.1, and finally to V8.5.0. In that case, you would read through three phases in the file.
Not enough disk space to run the command
If you have a large amount of data, you might run out of disk space when you run the DBUpgrade command. This command migrates the BLOB data in the LSW_BPD_INSTANCE_DATA, LSW_TASK_EXECUTION_CONTEXT table, and also reorganizes the database. It requires about twice as much disk space as the original database.
- DB2
- With a DB2 database, you might see errors similar to the following error:
Executing upgrade step: Enable LOGGED for LOB columns Error executing SQL statement: DB2 SQL Error: SQLCODE=-2216, SQLSTATE=01H52, SQLERRMC=-289, DRIVER=4.11.69
SQL statement that failed: call sysproc.admin_cmd('reorg table LSW_BPD_INSTANCE_DATA')
Verify there is enough free space on the database table space disk.
- Oracle
- With an Oracle database, you might see errors similar to the following error:
- java.sql.BatchUpdateException: ORA-01653: unable to extend table schema_name.LSW_TASK_EXECUTION_CONTEXT by 1024 in tablespace tablespace_name
If the table space was set to AUTOEXTEND size, make sure there is enough free disk space on the table space disk. If the table space was not set to AUTOEXTEND size, you might need to resize or add another data file.
Out-of-memory error
If you get an out-of-memory error that indicates too many or too large data records, you can increase the heap size of the JVM for the DBUpgrade command, or decrease the number of records to be updated as a batch.
- To increase the heap size of DBUpgrade, you can configure it in the BPM_home/util/dbUpgrade/upgrade.properties file.
For example:
JVM_HEAPSIZE_OPTIONS="-Xms512m -Xmx2048m"
$JAVA_EXE $JVM_HEAPSIZE_OPTIONS -cp $CLASSPATH
Or, you can increase the heap size as follows when you create the Java process. For example:- %JAVA_HOME%\bin\java" -Xms512m -Xmx2048m
- To decrease the number of records to be updated as a batch, configure the value of database.batch.size in the BPM_home/util/dbUpgrade/upgrade.properties file.
For example:
- database.batch.size=1000
Lowering the value requires less memory but also lowers performance.
Low performance
If you are migrating from a version earlier than V8.0 and have an issue with low performance, and if you find the database server input and output is not the issue, you can try increasing the number of threads to handle serializing and deserializing Java objects and updating the database. Complete the following steps:
- Open the BPM_home/util/dbUpgrade/upgrade.properties file.
- Increase the value of the worker.thread.size property. By default, the value is 1. The maximum number of threads depends on the processor number of the operating system that has IBM Business Process Manager installed.
Related reference:
DBUpgrade command-line utility
BPMMigrate troubleshooting
This command imports the migration snapshot. If you see an exception when you run this command, you can diagnose the problem by changing the log level to FINEST and running the command again.
Change the log level to FINEST as described in "Troubleshooting migration." After you run the command again, check the log file named BPMMigrate_timestamp.log. The file is found in snapshot_folder/logs/. If you cannot find the cause of the problem, you can provide the log to IBM support.
For the scheduler migration, the BPMMigrate command runs the AdminTask that is registered during server startup and uses the scheduler service to re-create each scheduler task. The trace for the AdminTask is saved in snapshot_folder/logs/. The log for the scheduler migration is saved on one of the active nodes, in BPM_home_8.5/profiles/custom_profile/logs. Collect both the trace file and the log file for analysis if an exception occurs.
Verify the messaging engine is started before you run BPMMigrate. Otherwise, the command fails when it tries to migrate the service integration bus messages.
The command migrates the 100SourceCustomMerged.xml file (if it exists) from the snapshot folder to the target environment. If you customized the process-center-install-group or offline-install-group, the customized settings are commented out during the migration. The file is renamed to 101CustomMigrated.xml, then copied to each node in the target environment.
Related reference:
BPMMigrate command-line utility
Troubleshooting the deployment environment
When processing appears sluggish or requests fail, use a focused approach to determine the source of the problem in the environment. The approach described is for non-standalone server environments.
You must be logged into the administrative console of the deployment manager to perform this task.
.
Investigate the state of the deployment environment if you notice any of the following symptoms:
- Unavailable applications
- Sluggish applications
- Stopped applications
- Decreased throughput
- Sluggish performance
- Display the topology layout that describes this deployment environment to determine the status of the topology.
- Display the topology to determine the state of the various roles in the topology. Note the roles with unexpected states or warning for further investigation.
- Locate the nodes that are causing the error state for each role.
- Make sure all nodes are synchronized.
On the Nodes page in the administrative console select any unsynchronized nodes and click Synchronize.
- Verify the messaging engines associated with all the buses are running.
If they are not running, stop and start the messaging engines.
- Locate the logs associated with the nodes in error and view the logs for error messages.
- Take any actions prescribed by the error messages to affect the correction.
- Correct any errors and restart the affected nodes.
The nodes previously in error start and the status of the topology becomes "running."
Restart any affected applications
- AIS does not refresh automatically in the Inspector view When you run a Business Process Diagram (BPD) in BPM Advanced, the process status does not automatically update in the Inspector view. An Advanced Integration Service (AIS) can take some time to run, depending on the service implementation.
- AIS does not participate in the same transaction as business process In IBM Business Process Manager Advanced, process navigation of business process definitions (BPDs) does not participate in the same transaction context as an advanced integration service (AIS). Therefore, a runtime failure in the BPD navigation that causes the BPD transaction to roll back does not roll back the transaction under which the currently executing AIS might be running. As a result, the AIS might be executed a second time.
- SSL fails when host name configuration fails IBM Business Process Manager uses host name verification for outbound connections that use SSL. Connections are refused if the host name the server connects to does not match the common name (CN) in the SSL certificate. This problem is most likely to occur when the initial configuration used localhost as a host name.
- Authors cannot drill down in a report When a report is present in Coach technology and you run it in playback mode using IBM Process Center for BPM Advanced, you might not be able to drill down in the report.
- Error occurs when importing process applications When you try to import process applications and toolkits into IBM Process Center for BPM Advanced, the import process might fail if you do not have proper rights in your operating system.
- Process Portal does not support automatic session rollover Process Portal does not support automatic session rollover if one of the nodes in a cluster becomes unavailable.
- Failure when sending tracking definitions Installing a snapshot from IBM Process Center to Process Server is successful, however there are errors in SystemOut.log (CWLLG2229E and sql error com.microsoft.sqlserver.jdbc.SQLServerException: The specified schema name "sa" either does not exist or you do not have permission to use it). Tracking definitions are not sent successfully.
Deployment environment status information
AIS does not refresh automatically in the Inspector view
When you run a Business Process Diagram (BPD) in BPM Advanced, the process status does not automatically update in the Inspector view. An Advanced Integration Service (AIS) can take some time to run, depending on the service implementation.
Even fast request and response services can seem to take a long time the first time they are called and the service is initializing.
Resolve the problem
If the process state in the Inspector view does not seem to progress, click the Refresh icon and wait for the AIS call to complete and the BPD to resume. Click the Refresh icon again if necessary.
If the AIS still does not complete, check with its implementation owner. The AIS might be waiting for something, such as a human task or an error to be fixed.
AIS does not participate in the same transaction as business process
In IBM Business Process Manager Advanced, process navigation of business process definitions (BPDs) does not participate in the same transaction context as an advanced integration service (AIS). Therefore, a runtime failure in the BPD navigation that causes the BPD transaction to roll back does not roll back the transaction under which the currently executing AIS might be running. As a result, the AIS might be executed a second time.
Overview
BPD process navigation is not part of the same transaction as an invoked AIS. If a BPD process navigation invokes an AIS and then experiences a runtime failure (not an error in the business process logic), the process navigation becomes unavailable while the AIS is running. When the AIS commits its transaction, it cannot indicate to the process navigation the AIS has concluded. When the process navigation later resumes, the AIS is invoked again because the process navigation is unaware of the previously successful invocation.
Resolve the problem
To resolve this problem, place checks within the AIS application logic to ensure that a second invocation does not corrupted the state of an application.
SSL fails when host name configuration fails
IBM Business Process Manager uses host name verification for outbound connections that use SSL. Connections are refused if the host name the server connects to does not match the common name (CN) in the SSL certificate. This problem is most likely to occur when the initial configuration used localhost as a host name.
Host name verification was introduced as a security update in BPM 8.0.1.1 and is applied in later releases. The update was also provided as an interim fix for earlier releases. When SSL fails verification, you receive this exception message:
- javax.net.ssl.SSLException: hostname in certificate didn't match: certificatehostname != targethostname
For more information about host names, see the related links at the end of this topic.
Certificate configuration
When a connection is established to a secure port, the initial handshake involves verifying the certificates. When you connect to a remote server over HTTPS, BPM expects the common name in the SSL certificate of the remote server to match the host name of the computer that it connected to. However, there are several scenarios in which BPM connects to itself using HTTPS. Therefore, BPM must be set up with a certificate that has a common name that matches the host name that BPM uses when it connects to itself.
When a profile is created, IBM WebSphere Application Server by default generates a self-signed root certificate that is valid for 15 years. In a distributed environment, a certificate is generated for each node and signed with the root certificate. The common name (CN) in the certificate is the same as the host name specified during profile creation.
SSL is a point-to-point connection. The common name in the certificate must match the host name of the computer that is trying to connect. When BPM is configured to connect to itself through a web server, the web server must be set up with a certificate that has a common name that must match the host name used by BPM to connect to this web server.
Problem scenarios and solutions
One problem occurs if you install and test BPM using localhost as your host name. Later, if you try to connect with an external name, for example https://myname.mycompany.com:9443/bpm/rest, or if you try to connect from another computer, the verification fails. The failure of the connection generates an error in Process Inspector and the Process Admin Console. To avoid this problem, the configuration documentation warns against using localhost as the host name. Particularly, the configuration documentation warns against using localhost for environments that are spread across multiple computers.
If you have a locally installed Process Center that you use for your own development purposes, set up the environment with a host name such as bpm.company.com. On the Windows operating system, set this environment in your Windows hosts file. Always use that host name to access the Process Center server.
In a production environment, always access clusters through the HTTP server. The HTTP server must be accessible from BPM and must have a fully qualified host name with a matching certificate.
Naming considerations for profiles, nodes, servers, hosts, and cells
Create a self-signed certificate
Create a certificate authority request
Authors cannot drill down in a report
When a report is present in Coach technology and you run it in playback mode using IBM Process Center for BPM Advanced, you might not be able to drill down in the report.
Symptom and cause
When you try to drill down in a report, you might see the following message:
- You are not allowed to view this report.
As an author, you are granted temporary access to reports when you run them in playback mode in Process Center, regardless of the permissions on the report. However, you are not automatically granted permission to drill down in the report.
Resolve the problem
In Process Center, grant yourself permission to drill down in reports.
Manage access to the Process Center repository
Error occurs when importing process applications
When you try to import process applications and toolkits into IBM Process Center for BPM Advanced, the import process might fail if you do not have proper rights in your operating system.
When the import process fails, the log file contains information that is similar to the following message:
- ERROR [org.apache.catalina.core.ContainerBase] Servlet.service() for servlet ImportSnapshotServlet threw exception java.io.IOException: The system cannot find the path specified
This error occurs when you do not have permission to write to the temporary directory the operating system uses during the import process.
You might also experience DB2 for z/OS deadlock timeouts (SQLCODE = -913 00C9008E) under significant network latency or heavy concurrent loads; for example:
- DB2 engine SQL error, SQLCODE = -913
- SQLSTATE = 57033
To resolve this issue, increase the value of the DB2 for z/OS system parameter for resource timeouts (IRLMRWT). This value is measured in seconds. See RESOURCE TIMEOUT field (IRLMRWT subsystem parameter) in the DB2 for z/OS Information Center.
- Grant permission to write to the temp directory If an import process fails because the system cannot find the path specified, modify permission settings for the temporary directory the operating system uses during the import process.
Grant permission to write to the temp directory
If an import process fails because the system cannot find the path specified, modify permission settings for the temporary directory the operating system uses during the import process.
Complete the following steps appropriate for your operating system:
- Windows Vista or Windows 7
- From the Start menu, click Control Panel > Administrative Tools > Services.
- Select the properties for the Process Center service.
- On the Log On tab, browse for a local user who has permission to write to the temp directory.
- Enter the appropriate password.
- Apply your changes and then restart the service.
- AIX, Linux, or Solaris
- Issue either of the following commands:
- chmod 777 /tmp
- chmod a+rwx /tmp
If your company has a security policy that requires you to change the password on the machine periodically, you must remember to also change your password in the Process Center service properties.
- Issue either of the following commands:
Process Portal does not support automatic session rollover
Process Portal does not support automatic session rollover if one of the nodes in a cluster becomes unavailable.
Overview
When you are working in a network deployment environment with a proxy, you are not directly connecting to a node in the cluster. If the node being accessed becomes unavailable while running a task, the submission of the Coach fails.
You might receive an error message similar to the following text:
- com.lombardisoftware.core.TeamWorksException: You have been automatically logged out for security reasons
Resolve the problem
To resolve this problem, log back in to Process Portal. You are then associated with a new node and can complete the task on that node.
Failure when sending tracking definitions
Install a snapshot from IBM Process Center to Process Server is successful, however there are errors in SystemOut.log (CWLLG2229E and sql error com.microsoft.sqlserver.jdbc.SQLServerException: The specified schema name "sa" either does not exist or you do not have permission to use it). Tracking definitions are not sent successfully.
In Microsoft SQL Server, the default schema name associated with a user must be the same as the user name. For example, if the Performance Data Warehouse database user name is perfDB then the default schema name associated with the user perfDB must also be named perfDB. When the Performance Data Warehouse database user name is sa, the default schema name is required to besa. However, sa is a super user in Microsoft SQL server and the default schema for the super user is dbo and this schema name cannot be changed.
Create an ordinary database user and assign the required rights to the user instead of using a super user, such as sa.
To recover from this situation, fix the Performance Data Warehouse data source to work properly on SQL Server by following these steps:
- On the Process Server network deployment environment, change the Performance Data Warehouse data source to use the Performance Data Warehouse user name perfDB instead of the username sa .
- Stop the Process Server deployment environment.
- Drop the Process Server Performance Data Warehouse database on SQL Server.
- Use db scripts, recreate the Performance Data Warehouse database with the user perfDB instead of the user sa.
- The Performance Data Warehouse tables in the database are created under the user schema perfDB.
- Restart the Process Server deployment environment.
- In the Process Admin console, run Update tracking definitions for each process application that is deployed. This may take some time to complete.
11. Troubleshooting NIST SP800-131a environment configurations
If you are configuring IBM Business Process Manager to support the National Institute of Standards and Technology (NIST) SP800-131a security standard, you might observe one or more of the following configuration issues.
| Symptom | Potential cause | What to do |
|---|---|---|
| Synchronization in the administrative console fails after conversion of certificates | The existing connection is using old certificates | Run the syncNode command |
| The deployment manager, node agent, or node cannot be stopped after you have made the changes to support NIST | PROFILE_DIR/properties/ssl.client.props file properties have not been updated | Update the PROFILE_DIR/properties/ssl.client.props file properties as they are not transferred during node synchronization |
| Browser cannot access the Process Admin console | The TLS 1.2 protocol might not be enabled in the browser |
|
| The Process Portal is empty when only Microsoft Internet Explorer is used |
|
|
| Process Designer login fails, resulting in apeer not authenticated error message |
|
|
| Process Designer login displays an empty page with the This program cannot display the webpage message | Process Designer uses Microsoft Internet Explorer to open the Process Center page, which is the default perspective. As a result, this error appears when TLS version 1.2 is not enabled in Microsoft Internet Explorer | Verify that TLS version 1.2 is supported and enabled in Microsoft Internet Explorer and reopen Process Designer |
| A configured Process Server does not show up in the Servers tab of the Process Designer | After the certificates were converted to the NIST SP 800-131a standard, Process Center and Process Server signers were not added to the Process Center and Process Server truststore | Confirm the Process Server signer certificate is added to the Process Center truststore, and the Process Center signer certificate is added to the Process Server truststore |
| When Firefox is used, Process Designer playback fails and returns the The connection was interrupted error message | Firefox does not support TLS version 1.2 | Change the default browser |
| When Microsoft Internet Explorer is used, Process Designer playback fails and returns the Internet Explorer cannot display the webpage error message | TLS version 1.2 is not enabled in Microsoft Internet Explorer | Change the default browser |
Enable a NIST SP800-131a compliant environment
12. Troubleshooting service module deployment failures
This topic describes the steps to take to determine the cause of a problem when deploying a service module. It also presents some possible solutions.
This topic assumes the following things:
- You have a basic understanding of debugging a module.
- Logging and tracing is active while the module is being deployed.
The task of troubleshooting a deployment begins after you receive notification of an error. There are various symptoms of a failed deployment that you have to inspect before taking action.
- Determine if the application installation failed.
Examine the SystemOut.log file for messages that specify the cause of failure. Some of the reasons an application might not install include the following:
- You are attempting to install an application on multiple servers in the same Network Deployment cell.
- An application has the same name as an existing module on the Network Deployment cell to which you are installing the application.
- You are attempting to deploy Java EE modules within an EAR file to different target servers.
If the installation has failed and the application contains services, you must remove any SIBus destinations or JCA activation specifications created before the failure before attempting to reinstall the application. The simplest way to remove these artifacts is to click Save > Discard all after the failure. If you inadvertently save the changes, you must manually remove the SIBus destinations and JCA activation specifications (see Deleting SIBus destinations and Deleting JCA activation specifications).
- If the application is installed correctly, examine it to determine if it started successfully.
If the application did not start successfully, the failure occurred when the server attempted to initiate the resources for the application.
- Examine the SystemOut.log file for messages that will direct you on how to proceed.
- Determine if resources required by the application are available or have started successfully.
Resources that are not started prevent an application from running. This protects against lost information. The reasons for a resource not starting include:
- Bindings are specified incorrectly
- Resources are not configured correctly
- Resources are not included in the resource archive (RAR) file
- Web resources not included in the web services archive (WAR) file
- Determine if any components are missing.
The reason for missing a component is an incorrectly built enterprise archive (EAR) file. Verify the all of the components required by the module are in the correct folders on the test system on which you built the Java™ archive (JAR) file. "Preparing to deploy to a server" contains additional information.
- Examine the application to see if there is information flowing through it.
Even a running application can fail to process information. Reasons for this are similar to those mentioned in step 2.b.
- Determine if the application uses any services contained in another application. Verify the other application is installed and has started successfully.
- Determine if the import and export bindings for devices contained in other applications used by the failing application are configured correctly. Use the administrative console to examine and correct the bindings.
- Correct the problem and restart the application.
- Delete JCA activation specifications The system builds JCA application specifications when installing an application that contains services. There are occasions when you must delete these specifications before reinstalling the application.
- Delete SIBus destinations Service integration bus (SIBus) destinations are used to hold messages being processed by SCA modules. If a problem occurs, you might have to remove bus destinations to resolve the problem.
Delete JCA activation specifications
The system builds JCA application specifications when installing an application that contains services. There are occasions when you must delete these specifications before reinstalling the application.
If you are deleting the specification because of a failed application installation, make sure the module in the Java™ Naming and Directory Interface (JNDI) name matches the name of the module that failed to install. The second part of the JNDI name is the name of the module that implemented the destination. For example in sca/SimpleBOCrsmA/ActivationSpec, SimpleBOCrsmA is the module name.
When security and role-based authorization are enabled, you must be logged in as administrator or configurator to perform this task.
Delete JCA activation specifications when you inadvertently saved a configuration after installing an application that contains services and do not require the specifications.
- Locate the activation specification to delete.
The specifications are contained in the resource adapter panel. Navigate to this panel by clicking Resources > Resource adapters.
- Locate the Platform Messaging Component SPI Resource Adapter.
To locate this adapter, you must be at the node scope for a standalone server or at the server scope in a deployment environment.
- Locate the Platform Messaging Component SPI Resource Adapter.
- Display the JCA activation specifications associated with the Platform Messaging Component SPI Resource Adapter.
Click the resource adapter name and the next panel displays the associated specifications.
- Delete all of the specifications with a JNDI Name that matches the module name that you are deleting.
- Click the check box next to the appropriate specifications.
- Click Delete.
The system removes selected specifications from the display.
Save the changes.
Related tasks:
Delete SIBus destinations
Service integration bus (SIBus) destinations are used to hold messages being processed by SCA modules. If a problem occurs, you might have to remove bus destinations to resolve the problem.
If you are deleting the destination because of a failed application installation, make sure the module in the destination name matches the name of the module that failed to install. The second part of the destination is the name of the module that implemented the destination. For example in sca/SimpleBOCrsmA/component/test/sca/cros/simple/cust/Customer, SimpleBOCrsmA is the module name.
When security and role-based authorization are enabled, you must be logged in as administrator or configurator to perform this task.
Delete SIBus destinations when you inadvertently saved a configuration after installing an application that contains services or you no longer need the destinations.
This task deletes the destination from the SCA system bus only. You must also remove the entries from the application bus before reinstalling an application that contains services (see Deleting JCA activation specifications.)
- Log into the administrative console.
- Display the destinations on the SCA system bus.
- In the navigation pane, click Service integration > buses
- In the content pane, click SCA.SYSTEM.cell_name.Bus
- Under Destination resources, click Destinations
- Select the check box next to each destination with a module name that matches the module that you are removing.
- Click Delete.
The panel displays only the remaining destinations.
Delete
the JCA activation specifications related to the module that created these destinations.
Related tasks:
Delete JCA activation specifications
13. Process Designer window is blank
After you log in to Process Designer, you might see a blank white Process Designer window, a partially displayed view, or an http error. Refresh your browser, or configure additional security in Internet Explorer V8 or V9.
Press F5 to refresh the browser. If the issue persists, additional security configuration might be required in Internet Explorer V8 or V9. To cause the page to load correctly:
- From the browser window, click Tools > Internet Options.
- Click the Advanced tab and scroll to the Security section in the Settings list.
- Select Enable native XMLHTTP support.
- Click Apply and then click OK.
Resolve browser display problems with administration tools
14. Troubleshooting a failure to access help topics
By default, IBM Business Process Manager is configured to access help topics from the IBM documentation website. If you are working behind a firewall, you might find that links from the product to help files do not resolve. In that case, you need to either revise the proxy settings in the product or download and install the help contents to your local system.
Reconfiguring proxy settings
The product documentation is found at http://pic.dhe.ibm.com/infocenter/dmndhelp/v8r5m0/index.jsp. If you can access the product documentation at that URL in a browser, but links to help topics from the product fail, you probably have a proxy server between BPM and the documentation site. Check to see whether the browser is configured to use a proxy server. If it is, configure the WebSphere server to communicate with that same proxy server.
In the WAS admin console, set the http.proxyHost and http.proxyPort properties to point to the proxy host and port that are in use. You can find instructions here: http://setgetweb.com/p/WAS85x/ae/twbs_configaddhttppropertiesadmin.html and http://setgetweb.com/p/WAS85x/ae/txml_configaddhttppropertieswsadmin.html
Downloading and installing IBM Business Process Manager documentation
If you need to work offline, you need to download the documentation files and install them into the same location as the BPM product. Downloading the documentation files requires a working Internet connection. When there is a new release of the product, you need to update your installed documentation to keep it current.
You can find the information center for BPM on the web at http://pic.dhe.ibm.com/infocenter/dmndhelp/v8r5m0/index.jsp. If using the embedded help system that is installed with the BPM product, you are using this site to access the latest documentation. For example, if you click the Help link in Process Designer, the embedded help system accesses the help documentation at that link.
If you are using IBM Business Process Manager V8.5.0.0, you need to install an interim fix before you download the documentation. This step is not necessary if you are using V8.5.0.1 or later. The fix is available on Fix Central: http://www.ibm.com/support/fixcentral. After you select the product group, product, installed version, and platform, click Continue and then select APAR or SPR, enter JR48590, and click Continue. When you download fix packages, ensure that you also download the readme file for each fix. Review each readme file for installation instructions and information about the fix.
To install the documentation for BPM Standard to a local directory, follow these steps. If you are using IBM Business Process Manager Advanced, you must follow these steps and then install the documentation for IBM Integration Designer separately.
- In a browser, navigate to the following web address: http://publib.boulder.ibm.com/dmndhelp/downloads/v8r5m0/localhelp_bpm85.zip.
Save the file to a local temp directory.
- Extract the contents of the compressed file to the BPM installation directory by entering the following commands:
- cd BPM_install_directory (where BPM_install_directory represents the directory where you previously installed the BPM Standard product).
- unzip localhelp_bpm85.zip. This command installs the documentation into BPM_install_directory/BPM/Lombardi/doc.local.
- If you need to update the documentation later, then you first need to remove the documentation that you previously installed locally.
- In a command window, enter cd BPM_install_directory.
- To remove the files, for Windows, enter del BPM/Lombardi/doc.local;
for UNIX, enter rm -fr BPM/Lombardi/doc.local.
- After you remove the old files in that way, follow steps 1 - 3 to install the update files.
- Restartyour IBM Business Process Manager server. The documentation is available from the Help links of the various BPM components (such as Process Server, Process Designer, and Process Center).
15. Troubleshooting administration tasks and tools
Use the information in this group of topics to identify and resolve problems that can occur while you are administering the runtime environment.
- Profile-specific log files
There are log files detailing the characteristics and runtime activities of individual profiles. These log files are located within the profile directory for each profile.These log files are located within the logs directory of the profile path.
- Resolve browser display problems with administration tools If you use Microsoft Internet Explorer V8 or higher to access Process Center console, Process Admin Console, Performance Admin console, or IBM Process Portal, you can have trouble viewing the page contents in the browser.
- Troubleshooting the failed event manager This topic discusses problems that you can encounter while using the failed event manager.
- Troubleshooting store-and-forward processing This topic discusses problems that you can encounter with store-and-forward processing.
- Troubleshooting BPEL processes and human tasks Use this topic to solve problems relating to BPEL processes and human tasks.
- Troubleshooting Common Event Infrastructure These topics provide troubleshooting information for the event service based on the task or activity you were doing when you encountered the problem.
- Troubleshooting the business process rules manager Some of the problems you might encounter using the business process rules manager are login errors, login conflicts, and access conflicts.
Profile-specific log files
There are log files detailing the characteristics and runtime activities of individual profiles. These log files are located within the profile directory for each profile.These log files are located within the logs directory of the profile path.
There are a number of log files created for each profile. Some of these logs describe the parameters used for the creation of the profile. These types of log files generally remain unchanged once the profile is fully configured. Other profile-specific logs are continually updated to capture error, warning, and information messages emitted during run time. Some of these log files are also used to capture a Common Base Event (that might include business object data) that is selected for monitoring.
The table below specifies the different types of profile-specific log files and the locations where you can find them within the product. Within the table, the variable installation_root represents the installation directory of IBM Business Process Manager. The variable profile_root represents the root location of a profile.
See Installation directories for the product and profiles.
| Log | Contents |
|---|---|
| First failure data capture (ffdc) log and exception files (common to all profile types) are found in these directories:
| Contains the ffdc log and exception files for individual profiles. There are two types of ffdc logs: a single log file with a compilation of all the errors encountered during the profile runtime, and numerous text files with details such as stack traces and other information. The naming conventions for the different types of profiles are given for both files, as follows:
|
| Deployment manager logs (deployment manager profiles only) are found in these directories:
| You will work primarily with four log files in this directory:You will work primarily with two log files in this directory:
|
| Node agent logs (managed-node profiles only) are found in these directories:
| You will work primarily with four log files in this directory:You
will work primarily with two log files in this directory:
|
| Server logs (managed-node
and stand-alone profiles only) are found in these directories:
| You will work primarily with four log files in this directory:You
will work primarily with two log files in this directory:
|
| Node federation log files are found in these directories (only applies to non-deployment manager profiles):
| Two log files are generated when you attempt to federate a node to a deployment manager:
|
| The location of the Integrated Solutions Console application deployment log file is listed here (only for deployment manager and stand-alone profiles):
| The iscinstall.log file contains information regarding the deployment of the administrative console application in a deployment manager or stand-alone profile. |
| The location of the Installation Verification Tool log file is listed here (only for deployment manager and stand-alone profiles):
| This log file contains the output generated by the Installation Verification Tool. You can start this program from the Quick start console after you create a deployment manager or stand-alone profile. The log contains basic configuration information and the messages that are displayed when you run the tool. |
| The location of the log file detailing the commands generated for a profile creation is listed here:
| This file contains the sequence of commands used by the product to set server environment variables and create a profile. All profile types will contain this file.These files contain the output from profile creation.
All profile types will contain this file.
|
Related concepts:
Installation and profile creation log files
Resolve browser display problems with administration tools
If you use Microsoft Internet Explorer V8 or higher to access Process Center console, Process Admin Console, Performance Admin console, or IBM Process Portal, you can have trouble viewing the page contents in the browser.
The following information guides you through the process of dealing with various browser display problems that may occur when using IBM Business Process Manager.
- To ensure all of the pages in these administration tools load correctly, run Internet Explorer in Compatibility View. See the Internet Explorer documentation for details on enabling Compatibility View.
This limitation does not apply to the WAS administrative console.
Process Center Console and Process Admin Console might require additional security configuration. If you are using Internet Explorer V8 or V9, the browser might respond with security related errors. If your browser returns security related errors, perform the following actions:
- For Internet Explorer V8, make sure the Enable native XMLHTTP support option is selected. Navigate to Tools > Internet Options > Advanced > Security.
- For Internet Explorer V9, add the Process Center Console and Process Admin Console URLs to the set of trusted sites. Navigate to Tools > Compatability view settings.
- For Internet Explorer V8, make sure the Enable native XMLHTTP support option is selected. Navigate to Tools > Internet Options > Advanced > Security.
- When using Microsoft Internet Explorer to open the Process Center console or the Process Admin console, Internet Explorer might deliver the following security warning:
Do you want to view only the webpage content that was delivered securely?
This webpage contains content that will not be delivered using a secure HTTPS connection, which could compromise the security of the entire webpage.
This is caused by the fact that some of web based applications included in BPM load some images using HTTP.
To resolve the issue, do one of the following:
- When presented the security warning pop-up window, click No.
- Change the browser settings to enable mixed content by clicking Tools > Internet Options > Security > Custom Level > Display mixed content: Enable.
- When exporting a process application from the Process Center using an HTTPS URL like https://9.115.196.249:9443/ProcessCenter in Microsoft Internet Explorer, you might receive the following error message:
- Unable to download ImportExportServlet from 9.115.196.249
To resolve this issue make sure the Do not save encrypted pages to disk option is not selected. Navigate to Tools > Internet Options > Advanced > Security.
Troubleshooting the failed event manager
This topic discusses problems that you can encounter while using the failed event manager.
This topic does not discuss how to use the failed event manager to find, modify, resubmit, or delete failed events on the system. For information about managing failed events, see Work with failed events in BPM.
Select the problem you are experiencing from the table below:
| Problem | Refer to the following |
|---|---|
| I am having trouble entering values in the Search page's By Date tab | Values in the By Date and From Date field automatically change to default if entered incorrectly |
| I am having trouble deleting expired events | Use the Delete Expired Events function appears to suspend the failed event manager |
| I am having trouble with failed events not being created | Failed events are not being created |
| I am having trouble retrieving or deleting large numbers of failed events | The server fails when retrieving or deleting large numbers of failed events |
| I am having trouble clearing a large number of failed events | The server fails when clearing a large number of failed events |
Values in the By Date and From Date field automatically change to default if entered incorrectly
The Search page's From Date and To Date fields require correctly formatted locale-dependent values. Any inconsistency in the value's format ( including four digits in the year instead of 2, or omitting the time) will cause the failed event manager to issue the following warning and substitute a default value in the field:
CWMAN0017E: The date entered could not be parsed correctly: your_incorrectly_formatted_date. Date: default_date is being used.
The default value of the From Date field is defined as January 1, 1970, 00:00:00 GMT.
The actual default value shown in your failed event manager implementation will vary depending on your locale and time zone. For example, the From Date field defaults to 12/31/69 7:00 PM for a workstation with an en_US locale in the Eastern Standard Time (EST) time zone. The default value for the To Date field is always the current date and time, formatted for your locale and time zone.
To avoid this problem, always enter your dates and times carefully, following the example provided above each field.
Use the Delete Expired Events function appears to suspend the failed event manager
If using the Delete Expired Events button in situations where there are many failed events in the current search results, or where those events contain a large amount of business data, the failed event manager can appear to be suspended indefinitely.
In this situation, the failed event manager is not suspended: it is working through the large data set, and will refresh the results set as soon as the command completes.
Failed events are not being created
If the Recovery subsystem is not creating failed events, go through the following checklist of potential causes:
- Ensure the wpsFEMgr application is running. If necessary, restart it.
- Ensure the failed event manager's database has been created, and the connection has been tested.
- Ensure the necessary failed event destination has been created on the SCA system bus. There should be one failed event destination for each deployment target.
- Ensure the Quality of Service (QoS) Reliability qualifier has been set to Assured for any Service Component Architecture (SCA) implementation, interface, or partner reference that participates in events you want the Recovery service to handle.
The server fails when retrieving or deleting large numbers of failed events
The server can fail if use the failed event manager to retrieve or delete a large number of failed events at once. To prevent this problem, be sure to check the total failed event count on the main page of the failed event manager before performing search or delete actions. If you have a large number of events, do not try to retrieve or delete all of them at once. Instead, use the Search failed events option to return a subset of failed events that match specific criteria. You can then delete all of the events in the filtered result set without causing a server failure.
There are several factors in the environment that can affect the number of failed events the server can return or delete in a single request, including other processes running on the same machine as the server and the amount of available memory.
The server fails when clearing a large number of failed events
The server can fail if you try to clear a large number of failed events using the Clear All option. To prevent this from happening, set a limit for the number of failed events that can be cleared using the JVM property failedEventLimit. If the failed event count is higher than that limit, the Clear All option returns an error, and you must delete the failed events (up to the limit specified) one at a time.
Troubleshooting store-and-forward processing
This topic discusses problems that you can encounter with store-and-forward processing.
Select the problem you are experiencing from the table below:
| Problem | Refer to the following |
|---|---|
| I am having problems setting the store-and-forward qualifier | Store-and-forward qualifier processing only works on asynchronous interfaces |
| Qualifying runtime exceptions are occurring, but events are not getting stored | Store is not activated by qualifying runtime exceptions |
| Messages are still being processed even though the Store and Forward widget shows the state is set to Store (Network deployment environment) | In a network deployment environment, messages are being processed even though the store-and-forward state is set to Store |
| The Store and Forward widget shows the state is set to Forward, but messages are not being processed by all members of the cluster. (Network deployment environment) | In a network deployment environment, messages are not getting processed by all members of the cluster even though the store-and-forward state is set to Forward |
Store-and-forward qualifier processing only works on asynchronous interfaces
The store-and-forward qualifier must be specified on an asynchronous interface. The store cannot be activated if the interface is called synchronously.
Here are some guidelines (with respect to components) to help you determine if the interface is being called synchronously or asynchronously.
- Examine your short-running business process and what import it invokes. For example, JMS is an asynchronous import. Therefore, it is called asynchronously by a short-running process. HTTP is a synchronous import. Therefore, it is called synchronously.
- Long-running processes invoke imports based on the preferred interaction style set on the import's
interface. Look at the interaction style set on the import's
interface to see whether it is synchronous or asynchronous.
You can find this setting on the interface's detail tab.
- POJO components invoke components based on the code that is written in the component. Look at the code written in the component to see whether it is synchronous or asynchronous.
Also, consider these restrictions:
- Store-and-forward qualifier cannot be set on long-running processes.
- Store-and-forward cannot be set on exports (except SCA export).
Store is not activated by qualifying runtime exceptions
If the store is not being activated by qualifying runtime exceptions, check the following.
- The exception specification in the store-and-forward qualifier matches the exception that occurs at run time. If the exception specification does not match, storing does not activate.
- The user code in the path is not catching the exception and wrapping it. Or, it is converting it into a different exception. The exception received by the store-and-forward function can be viewed in the exception details for the failed event.
- The destination component for a failed event has a store-and-forward qualifier set on it. Storing is activated once a failed event is generated. If a failed event is generated for a component that is upstream from the component that has a store-and-forward qualifier set on it, then the store-and-forward component is being invoked synchronously and not asynchronously. If a failed event is generated for a component that is downstream from the store-and-forward qualifier component, rather than the component with the store-and-forward qualifier set on it, then there is an asynchronous invocation closer to the failure and the store-and-forward qualifier should be moved to that component.
In a network deployment environment, messages are being processed even though the store-and-forward state is set to Store
Messages might continue to be processed by some members of a cluster, despite the state being set to Store, if the state is not set to Store for each member of the cluster. To fix this problem, confirm the state is set to Store for each member of the cluster in the Store and Forward widget. If any members of the cluster are set to Forward, change them to Store.
This might also happen if one of the members of the cluster is forced to restart. Since the Store state is not persistent, it reverts to the Forward state at restart. To fix this problem, change the state to Store for the module in the Store and Forward widget.
When the service becomes available again, you should not set the state to Store immediately if you want new events to be processed. If you set the state to Store before new events have the chance to be processed, they will be stored in the queue.
In a network deployment environment, messages are not getting processed by all members of the cluster even though the store-and-forward state is set to Forward
Messages might continue to be stored by some members of a cluster, despite the state being set to Forward, if the store-and-forward state is not set to Forward for each member of the cluster. To fix this problem, confirm the state is set to Forward for the module in the Store and Forward widget. If any members of the cluster are set to Store, change them to Forward.
Troubleshooting BPEL processes and human tasks
Use this topic to solve problems relating to BPEL processes and human tasks.
The following tasks focus on troubleshooting problems that can happen during the execution of a BPEL process or task.
- Enable tracing for Business Process Choreographer You can configure trace settings for Business Process Choreographer to help diagnose problems with the processing of BPEL processes and human tasks.
- Troubleshooting the execution of BPEL processes This describes the solutions to common problems with BPEL process execution.
- Work with process-related or task-related messages Describes how to get more information about Business Process Choreographer messages that are written to the display or a log file.
- Troubleshooting the administration of BPEL processes and human tasks This article describes how to solve some common problems with BPEL processes and human tasks.
- Troubleshooting escalation emails Use this information to solve problems relating to escalation emails
- Troubleshooting people assignment Use the following information to help solve problems relating to the assignment of people to authorization roles.
- Troubleshooting Business Process Choreographer Explorer or Business Process Archive Explorer Use this information to solve problems relating to Business Process Choreographer Explorer or Business Process Archive Explorer.
Related concepts:
Understanding the startup behavior of Business Process Choreographer: 

Recovery from infrastructure failures
Related tasks:
Query and replay failed messages, using the administrative console
Connection timeout when running a wsadmin script
Enable tracing for Business Process Choreographer
You can configure trace settings for Business Process Choreographer to help diagnose problems with the processing of BPEL processes and human tasks.
Trace settings
Business Process Choreographer tracing uses the standard application server tracing mechanism. This must be enabled in the normal way.You can specify the following trace settings for Business Process Choreographer.
| Trace string | What is logged |
|---|---|
| com.ibm.bpe.* | All available trace information for BPEL processes |
| com.ibm.bpe.basic.navigation.* | Major navigation steps and state changes for BPEL processes |
| com.ibm.bpe.basic.api* | Time and sequence of methods called by the Business Flow Manager API |
| com.ibm.task.* | All available trace information for human tasks |
| com.ibm.task.basic.api* | Time and sequence of methods called by the Human Task Manager API |
| com.ibm.task.basic.core* | Major steps in the processing of human tasks, state changes, and calls to SPIs |
| com.ibm.ws.staffsupport.* | All available trace information for the people directory providers |
To get a complete set of trace information for Business Process Choreographer, specify the following trace settings:
- com.ibm.bpe.*=all:com.ibm.task.*=all:com.ibm.ws.staffsupport.*=all
What to send to support
After enabling tracing, re-create your problem, then provide the following files:
- The WebSphere Application Server FFDC log, located in the ffdc folder
- The following log files:
- SystemOut.log
- SystemErr.log
- trace.log
Located in...
-
profile_root/logs/server_name directory.
If your problem scenario causes a lot of logging, backup files for the logs might be created with names, such as SystemOut_07.10.01_11.00.51.log. You can use the administrative console to change the number of backup files created and the size of the log files. It might be good to increase both of these values to ensure that you capture all of the data.
Diagnostic trace service settings
Troubleshooting the execution of BPEL processes
This describes the solutions to common problems with BPEL process execution.
In Business Process Choreographer Explorer, you can search for error message codes on the IBM technical support pages.
- On the error page, click the Search for more information link. This starts a search for the error code on the IBM technical support site. This site only provides information in English.
- Copy the error message code that is shown on the error page to the clipboard. The error code has the format CWWBcnnnnc, where each c is a character and nnnn is a 4-digit number. Go to the technical support page.
- Paste the error code into the Additional search terms field and click Go.
Solutions to specific problems are in the following topics.
- ClassCastException when stopping an application containing a microflow The SystemOut.log file contains ClassCastException exceptions around the time when an application containing a microflow had been stopped.
- XPath query returns an unexpected value from an array Using an XPath query to access a member in an array returns an unexpected value.
- An activity has stopped because of an unhandled fault (Message: CWWBE0057I) The system log contains a CWWBE0057I message, the process is in the state "running", but it does not proceed its navigation on the current path.
- A microflow is not compensated A microflow has called a service, and the process fails, but the undo service is not called.
- A long-running BPEL process appears to have stopped A long-running process is in the state running, but it appears that it is doing nothing.
- Invoking a synchronous subprocess in another EAR file fails When a long-running process calls another process synchronously, and the subprocess is located in another enterprise archive (EAR) file, the subprocess invocation fails.
- Hung threads when a long-running process is invoked synchronously (Message: WSVR0605W) A long-running process invokes another long-running process synchronously. Under heavy workload conditions, the thread monitor reports hung threads in the SystemOut.log file (message WSVR0605W).
- Late binding calls the wrong version of a subprocess A parent process invokes a subprocess using late binding. Both processes are in the same module. A new version of the subprocess is created by copying the module and changing the valid-from timestamp. After the module is deployed, the running instances of the parent process continue to invoke the old version of the subprocess instead of the new version.
- Unexpected exception during execution (Message: CWWBA0010E) Either the queue manager is not running or the Business Process Choreographer configuration contains the wrong database password.
- Event unknown (Message: CWWBE0037E) An attempt to send an event to a process instance or to start a new process instance results in a "CWWBE0037E: Event unknown." exception.
- Cannot find nor create a process instance (Message: CWWBA0140E) An attempt to send an event to a process instance results in a 'CreateRejectedException' message.
- The failed state of the process instance does not allow the requested sendMessage action to be performed (Message: CWWBE0126E) An attempt to send an event to a process instance results in an 'EngineProcessWrongStateException' message.
- Uninitialized variable or NullPointerException in a Java snippet Using an uninitialized variable in a BPEL process can result in diverse exceptions.
- Standard fault exception "missingReply" (message: CWWBE0071E) The execution of a microflow or long-running process results in a BPEL standard fault "missingReply" (message: CWWBE0071E), or this error is found in the system log or SystemOut.log file.
- A fault is not caught by the fault handler A fault handler is attached to an invoke activity to catch specific faults that are thrown by the invoked service. However, even if the invoked service returns the expected fault, the fault handler is not run.
- Parallel paths are sequentialized There are two or more parallel invoke activities inside a flow activity, but the invoke activities are run sequentially.
- Copying a nested data object to another data object destroys the reference on the source object A data object, Father, contains another data object, Child. Inside a Java snippet or client application, the object containing Child is fetched and set on a substructure of data object, Mother. The reference to Child in data object Father disappears.
- CScope is not available Starting a microflow or running a navigation step in a long-running process fails with an assertion, saying: 'postcondition violation !(cscope != null) '.
Related tasks:
Work with process-related or task-related messages
Troubleshooting Business Process Choreographer Explorer or Business Process Archive Explorer
ClassCastException when stopping an application containing a microflow
The SystemOut.log file contains ClassCastException exceptions around the time when an application containing a microflow had been stopped.
Reason
When an application is stopped, the classes contained in the EAR file are removed from the class path. However, microflow instances that need these classes may still be executing.
Resolution
Perform the following actions:
- Stop the microflow process template first. From now on, it is not possible to start new microflow instances from that template.
- Wait for at least the maximum duration of the microflow execution so that any running instances can complete.
- Stop the application.
XPath query returns an unexpected value from an array
Use an XPath query to access a member in an array returns an unexpected value.
Reason
A common cause for this problem is assuming the first element in the array has an index value of zero. In XPath queries in arrays, the first element has the index value one.
Resolution
Check that your use of index values into arrays start with element one.
An activity has stopped because of an unhandled fault (Message: CWWBE0057I)
The system log contains a CWWBE0057I message, the process is in the state "running", but it does not proceed its navigation on the current path.
Reason
An activity is put in a stopped state, if all of the following happen:
- A fault is raised by either the activity's implementation or during the evaluation of a condition, timer, or counter value associated with the activity, for example, its join condition or any of the transition conditions of its outgoing links.
- The fault is not handled on the enclosing scope.
- For invoke activities, inline human tasks, and Java snippets, if either of the following happens:
- The continueOnError attribute of the process is set to no and the continueOnError attribute of the activity is set to inherit or no.
- The continueOnError attribute of the process is set to yes and the continueOnError attribute of the activity is set to no.
- For all other activities, the continueOnError attribute of the process is set to no.
Resolution
The solution to this problem requires actions at two levels:
- An administrator must repair the stopped activity instance manually. For example, to force complete or force retry the stopped activity instance.
- The reason for the failure must be investigated. In some cases the failure is caused by a modeling error that must be corrected in the model.
Related concepts:
Related tasks:
Repairing stopped activities using the process state view
A microflow is not compensated
A microflow has called a service, and the process fails, but the undo service is not called.
Resolution
To trigger the compensation of a microflow, the following conditions must be met:
- Log on to the Business Process Choreographer Explorer and click Failed Compensations to check whether the compensation service has failed and needs to be repaired.
- The compensation of a microflow is triggered only when the transaction for the microflow is rolled back. Check whether this is the case.
- The compensationSphere attribute of the microflow must be set to required.
- A compensation service is run only if the corresponding forward service has not participated in the microflow's transaction. Ensure the forward service does not participate in the navigation transaction, for example, on the reference of the process component, set the Service Component Architecture (SCA) qualifier suspendTransaction to True.
Related concepts:
Compensation handling in BPEL processes
Related tasks:
Administer compensation for microflows
A long-running BPEL process appears to have stopped
A long-running process is in the state running, but it appears that it is doing nothing.
Reason
There are various possible reasons for such behavior:
- A navigation message has been retried too many times and has been moved to the retention or hold queue.
- A reply message from the Service Component Architecture (SCA) infrastructure failed repeatedly.
- The process is waiting for an event, timeout, or for a long-running invocation or task to return.
- An activity in the process is in the stopped state.
Resolution
Each of the possible reasons requires different corrective actions:
- Use the failed event manager console to display details about a failed message and to replay it.
- Check if there are any failed message in the failed event management view of the administrative console.
- If there are any failed events from Service Component Architecture (SCA) reply messages, reactivate the messages.
- Otherwise, either force complete or force retry the long-running activity.
- Check if there are activities in the stopped state, and repair these activities. If your system log contains a CWWBE0057I message you might also need to correct your model as described in Message: CWWBE0057I.
Related concepts:
Related tasks:
Forcing the completion of activities
Invoking a synchronous subprocess in another EAR file fails
When a long-running process calls another process synchronously, and the subprocess is located in another enterprise archive (EAR) file, the subprocess invocation fails.
Example of the resulting exception:
com.ibm.ws.sca.internal.ejb.util.EJBStubAdapter com.ibm.ws.sca.internal.ejb.util.EJBStubAdapter#003
Exception:
java.rmi.AccessException: CORBA NO_PERMISSION 0x49424307 No; nested exception is:
org.omg.CORBA.NO_PERMISSION: The WSCredential does not contain a forwardable token.
Enable Identity Assertion for this scenario.
vmcid: 0x49424000 minor code: 307 completed: No at com.ibm.CORBA.iiop.UtilDelegateImpl.mapSystemException(UtilDelegateImpl.java:202)
at javax.rmi.CORBA.Util.mapSystemException(Util.java:84)
Reason
Because the subprocess invocation leads to a remote EJB method call, Common Secure Interoperability Version 2 (CSIv2) identity assertion must be enabled when calling a synchronous subprocess in another EAR file.
Resolution
Configure CSIv2 inbound authentication and CSIv2 outbound authentication.
- For CSIv2 inbound authentication, see Configure Common Secure Interoperability Version 2 inbound communications
- For CSIv2 outbound authentication, see Configure Common Secure Interoperability Version 2 outbound communications
Hung threads when a long-running process is invoked synchronously (Message: WSVR0605W)
A long-running process invokes another long-running process synchronously. Under heavy workload conditions, the thread monitor reports hung threads in the SystemOut.log file (message WSVR0605W).
Reason
A long-running process that is called synchronously can often cause hung threads. A long-running process usually spans several transactions and needs a free thread to continue with its navigation. If all of the available threads are involved in the navigation step of the parent process that invokes the subprocess, the system becomes unresponsive. Because of the lack of free threads, the subprocess cannot complete.
Resolution
A long-running process should always invoke another long-running process asynchronously, even if the processes are separated by another component. For example, if a long-running process invokes a mediation and this mediation invokes another long-running process, then ensure the preferred interaction style of the mediation is asynchronous.
Related concepts:
Transactional behavior of long-running BPEL processes
Related tasks:
Defining transactional behavior in Integration Designer
Late binding calls the wrong version of a subprocess
A parent process invokes a subprocess using late binding. Both processes are in the same module. A new version of the subprocess is created by copying the module and changing the valid-from timestamp. After the module is deployed, the running instances of the parent process continue to invoke the old version of the subprocess instead of the new version.
Reason
In late binding, the process template name of the subprocess is specified as part of the reference partner properties of the invoke activity in the parent process. Business Process Choreographer determines the version of the process that is currently valid at run time.A common reason for late binding using the wrong version of a subprocess is the module that contains the subprocess does not have a Service Component Architecture (SCA) export. Without an export, processes in other modules are not visible to the parent process and it always invokes the version of the subprocess that is in the same module.
Resolution
In the assembly editor in Integration Designer, generate an SCA export with SCA native binding for the new version of the subprocess.
Related concepts:
Lifecycle management of BPEL subprocesses
Invoking different versions of a BPEL process
Unexpected exception during execution (Message: CWWBA0010E)
Either the queue manager is not running or the Business Process Choreographer configuration contains the wrong database password.
Resolution
Check the following items:
- If the systemout.log file contains "javax.jms.JMSException: MQJMS2005: failed to create MQQueueManager", start the queue manager.
- Verify the database administrator password stored in the Business Process Choreographer configuration matches the one set in the database.
Event unknown (Message: CWWBE0037E)
An attempt to send an event to a process instance or to start a new process instance results in a "CWWBE0037E: Event unknown." exception.
Reason
A common reason for this error is that a message is sent to a process but the receive or pick activity has already been navigated, so the message cannot be consumed by this process instance again.
Resolution
To correct this problem:
- If the event is supposed to be consumed by an existing process instance, you must pass correlation set values that match an existing process instance which has not yet navigated the corresponding receive or pick activity.
- If the event is supposed to start a new process instance, the correlation set values must not match an existing process instance.
For more information about using correlation sets in BPEL processes, see technote 1171649.
Cannot find nor create a process instance (Message: CWWBA0140E)
An attempt to send an event to a process instance results in a 'CreateRejectedException' message.
Reason
A common reason for this error is that a message is sent to a receive or pick activity that cannot instantiate a new process instance because its createInstance attribute is set to no and the values that are passed with the message for the correlation set which is used by this activity do not match any existing process instances.
Resolution
To correct this problem you must pass a correlation set value that matches an existing process instance.
For more information about using correlation sets in BPEL processes, see Correlation sets in BPEL processes.
The failed state of the process instance does not allow the requested sendMessage action to be performed (Message: CWWBE0126E)
An attempt to send an event to a process instance results in an 'EngineProcessWrongStateException' message.
Reason
A common reason for this error is that a message is sent to a receive or pick activity to create a new process instance, but a new process instance cannot be instantiated. This situation occurs if the values that are passed with the message for the correlation set used by this activity match an existing process instance, which is already in the failed state.
Resolution
To correct this problem either delete the existing process instance, or pass a correlation set value that does not match an existing process instance. For more information about using correlation sets in BPEL processes, see Correlation sets in BPEL processes.
Uninitialized variable or NullPointerException in a Java snippet
Use an uninitialized variable in a BPEL process can result in diverse exceptions.
Symptoms
Exceptions such as:
- During the execution of a Java snippet or Java expression, that reads or manipulate the contents of variables, a NullPointerException is thrown.
- During the execution of an assign, invoke, reply or throw activity, the BPEL standard fault "uninitializedVariable" (message CWWBE0068E) is thrown.
Reason
All variables in a BPEL process have the value null when a process is started, the variables are not pre-initialized. Using an uninitialized variable inside a Java snippet or Java expression leads to a NullPointerException.
Resolution
The variable must be initialized before it is used. This can be done by specifying an initial value when you define the variable, specifying an assign activity, for example, the variable needs to occur on the to-spec of an assign, or the variable can be initialized inside a Java snippet.
Standard fault exception "missingReply" (message: CWWBE0071E)
The execution of a microflow or long-running process results in a BPEL standard fault "missingReply" (message: CWWBE0071E), or this error is found in the system log or SystemOut.log file.
Reason
A two-way operation must send a reply. This error is generated if the process ends without navigating the reply activity. This can happen in any of the following circumstances:
- The reply activity is skipped.
- A fault occurs and corresponding fault handler does not contain a reply activity.
- A fault occurs and there is no corresponding fault handler.
Resolution
Correct the model to ensure that a reply activity is always performed before the process ends.
A fault is not caught by the fault handler
A fault handler is attached to an invoke activity to catch specific faults that are thrown by the invoked service. However, even if the invoked service returns the expected fault, the fault handler is not run.
Reason
A common reason for this problem is the fault handler does not have a fault variable to catch the data that is associated with the fault. If a fault has associated fault data, it is caught by a fault handler only when one of the following situations apply:
- The name of the fault handler matches the fault name and it has a fault variable with a data type that matches the type of the data associated with the fault
- The fault handler does not specify a fault name but it has a fault variable with a data type that matches the type of the data associated with the fault
- The catchAll fault handler is specified
Resolution
Add a fault variable to the fault handler. Ensure the data type of the fault variable matches the type of the data that is associated with the fault.
Related concepts:
Retrieval of fault data for BPEL processes
Related tasks:
Dealing with faults in your process in Integration Designer
Parallel paths are sequentialized
There are two or more parallel invoke activities inside a flow activity, but the invoke activities are run sequentially.
Resolution
- To achieve real parallelism, each path must be in a separate transaction. Set the 'transactional behavior' attribute of all the parallel invoke activities to 'commit before' or 'requires own'.
- The process engine serializes the execution of parallel paths for Oracle database systems. You cannot change this behavior. This is because the locks on database entities for these database systems are not as granular as, for example, those for DB2 databases. However, services that are triggered asynchronously by parallel branches still run in parallel; it is only the process navigation that is serialized for these database systems.
Related concepts:
Transactional behavior of long-running BPEL processes
Copying a nested data object to another data object destroys the reference on the source object
A data object, Father, contains another data object, Child. Inside a Java snippet or client application, the object containing Child is fetched and set on a substructure of data object, Mother. The reference to Child in data object Father disappears.
Reason
The reference to Child is moved from Father to Mother.
Resolution
When such a data transformation is performed in a Java snippet or client application, and you want to retain the reference in Father, copy the data object before it is assigned to another object. The following code snippet illustrates how to do this:
BOCopy copyService = (BOCopy)ServiceManager.INSTANCE.locateService
                      ("com/ibm/websphere/bo/BOCopy");
DataObject Child = Father.get("Child");
DataObject BCopy = copyService.copy(Child);
Mother.set("Child", BCopy);
CScope is not available
Start a microflow or running a navigation step in a long-running process fails with an assertion, saying: 'postcondition violation !(cscope != null) '.
Reason
In certain situations, the process engine uses the compensation service, but it was not enabled.
Resolution
Enable the compensation service.
Related tasks:
Administer the compensation service for a server
Work with process-related or task-related messages
Describes how to get more information about Business Process Choreographer messages that are written to the display or a log file.
Messages that belong to Business Process Choreographer are prefixed with either CWWB for process-related messages, or CWTK for task-related messages. The format of these messages is PrefixComponentNumberTypeCode. The type code can be:
- I
- Information message
- W
- Warning message
- E
- Error message
When processes and tasks run, messages are either displayed in Business Process Choreographer Explorer, or they are added to the SystemOut.log file and traces. If the message text provided in these files is not enough to help you solve your problem, you can use the WebSphere Application Server symptom database to find more information. To view Business Process Choreographer messages, check the activity.log file by using the WebSphere log analyzer.
- Start the WebSphere log analyzer.
-
install_root/bin/waslogbr.sh
- To check for the newest version of the symptom database.
-
File > Update database > WebSphere Application Server Symptom Database
- Optional: Load the activity log.
- Select the activity log file
- profile_root/profiles/profile_name/logs/activity.log
- Click Open.
- Select the activity log file
Troubleshooting the administration of BPEL processes and human tasks
This article describes how to solve some common problems with BPEL processes and human tasks.
The following information can help you to debug problems with your BPEL processes and human tasks.
- The administrative console stops responding if you try to stop a BPEL process application while it still has process instances. Before you try to stop the application, you must stop the BPEL processes so that no new instances are created, and perform one of the following actions:
- Wait for all of the existing process instances to end in an orderly way.
- Terminate and delete all of the process instances.
Only then can you stop the process application safely.
- The administrative console stops responding if you try to stop a human task application while it still has task instances. To stop the application, you must:
- Stop the human tasks so that no new instances are created.
- Perform one of the following actions:
- Wait for all of the existing task instances to end in an orderly way.
- Terminate and delete all task instances.
- Stop the task application.
- A long-running BPEL process that is started by an invocation task fails to start. A JSP snippet makes the invocation task available to users. In the following example, the synchronous calling pattern createAndCallTask is used. In this case, the long-running BPEL process fails to start:
HumanTaskManager htm = …
TaskTemplate taskTemplate = htm.getTaskTemplate( "start the process" );
Task task = htm.createAndCallTask( taskTemplate.getTKTID() );
while (task.getState() != TASK.TASK_STATE_FINISHED)
{
     Sleep(100);}
A long-running process consists of several transactions and its invocation style is asynchronous. Therefore it must be started using the asynchronous calling pattern, createAndStartTask.
HumanTaskManager htm = …
TaskTemplate taskTemplate = htm.getTaskTemplate( "start the process" );
Task task = htm.createAndStartTask( taskTemplate.getTKTID() );
while (task.getState() != TASK.TASK_STATE_FINISHED)
{
     Sleep(100);}
In addition, the transaction attribute in the JSP deployment descriptor must be set to NotSupported. This ensures the code snippet is executed without a transaction, and the createAndStartTask method opens a new transaction to start the process instance. This transaction is committed when the createAndStartTask method returns, and the message is visible.Include a "while" loop for states other than the finished state. For example, if during the execution of the process an activity fails, the end state might be TASK.TASK_STATE_FAILED.
Troubleshooting escalation emails
Use this information to solve problems relating to escalation emails
Escalations are triggered when human tasks do not progress as expected. The escalation creates work items. It can also send emails to the users that are affected by the escalation. If you are having problems with escalation emails, use the information here to help you to solve the problems.
- Check the SystemOut.log file for error messages relating to people assignments or email addresses.
- If the SystemOut.log file does not contain any relevant messages, enable the debug mode for the mail session server.
In the administrative console, click Resources > Mail > Mail sessions then HTMMailSession_server and select the Enable debug mode check box. When an escalation email is sent, debug information is written to the SystemOut.log file.
- If you are using virtual member manager as the people directory provider and you are having problems with email addresses, enable the Staff.Diagnosis custom property.
- In the administrative console, click Servers > Clusters > WebSphere application server clusters > cluster_name, then on the Configuration tab, in the Business Process Manager section, expand Business Process Choreographer, and click Human Task Manager.
- On the Configuration tab, under Additional Properties, click Custom Properties > Staff.Diagnosis, and type on in the Value field.
When an escalation email is sent, additional information about the people assignment is written to the SystemOut.log file.
- In the administrative console, click Servers > Clusters > WebSphere application server clusters > cluster_name, then on the Configuration tab, in the Business Process Manager section, expand Business Process Choreographer, and click Human Task Manager.
- Check if the Human Task Manager hold queue contains messages.
- In the administrative console, click Servers > Clusters > WebSphere application server clusters > cluster_name, then on the Configuration tab, in the Business Process Manager section, expand Business Process Choreographer, and click Human Task Manager.
- In the Runtime tab, click Replay Hold Queue. The messages in the hold queue are shown in the Hold queue messages field.
If the hold queue contains messages, check the First Failure Data Capture (FFDC) directory of your server for more information about the error.
- Check the values of the custom properties for the number of times an email is resent and the timeout for sending an email.
- In the administrative console, click Servers > Clusters > WebSphere application server clusters > cluster_name, then on the Configuration tab, in the Business Process Manager section, expand Business Process Choreographer, and click Human Task Manager.
- On the Configuration tab, in the Additional Propertiessection, click Custom Properties.
- Check the values of the EscalationEmail.RetryTimeout and the EscalationEmail.MaxRetries fields.
- EscalationEmail.RetryTimeout
- Specifies how long Human Task Manager waits until it resends an email notification that failed. The default value for this field is 3600 s. (one hour) If the retry fails, then the retry timeout is doubled dynamically for every time the retry fails. By default, if the first retry fails, another retry is made after two hours.
- EscalationEmail.MaxRetries
- Specifies the number of times Human Task Manager tries to resend an email notification that failed. The default value for this field is 4 retries. If the value of this field is set to 0, a failed email notification is not resent. If all of the retries fail, then a message is put into the hold queue. You can see the messages in the hold queue in the administrative console in the Runtime tab for Human Task Manager. If you replay the messages, this is equivalent to sending the email for the first time.
- In the administrative console, click Servers > Clusters > WebSphere application server clusters > cluster_name, then on the Configuration tab, in the Business Process Manager section, expand Business Process Choreographer, and click Human Task Manager.
Troubleshooting people assignment
Use the following information to help solve problems relating to the assignment of people to authorization roles. This information covers the following problems:
- User cannot administer process, scope, or activity instances
- Errors during the deployment of the people directory provider
- Entries in the people directory are not reflected in work item assignments
- Changes to the people directory are not immediately reflected in work-item assignments
- Unexpected people assignments for tasks or process instances
- Stopped human tasks
- Error and warning messages relating to people assignment
- Enable additional messages about people assignment decisions
- Issues with group work items and the "Group" people assignment criteria
- Cleanup of stored people assignment results
- Adapted XSL transformation file has no effect
You can also search for additional information in the Technical support search page.
- User cannot administer or monitor process, scope, or activity instances, and no administrative tasks are created
- If process administration is restricted to system administrators, instance-based administration is disabled, and all administrative actions on processes, scopes, and activities are limited to users in the BPESystemAdministrator role. For more information about this administration mode, see Alternative administration modes for BPEL processes.
If the Business Flow Manager has been switched to run in the alternate mode, you might need to perform one of the following actions:
- Make sure that all users and programs that perform administrative actions are using user IDs that are in the appropriate role. For example, BPESystemAdministrator or BPESystemmonitor.
- Restore instance-based administration, by turning the alternate process administration authorization mode off. How to turn it off is described in Optimizing BPEL process administration.
- Errors during the deployment of the people directory provider
- If you are using the LDAP
people directory provider, deployment might fail due to incorrect values of the provider configuration parameters.
- Make sure that all mandatory parameters are set.
- To set the baseDN parameter to the root of the LDAP directory tree, specify an empty string; set the baseDN parameter to two apostrophe (') characters (''). Do not use double quotation marks ("). Failure to set the baseDN parameter results in a NullPointerException exception at deployment time.
- Entries in the people directory are not reflected in work item assignments
- The maximum number of user IDs retrieved by a people query is specified by the Threshold variable, which is defined in the XSL transformation file in use. The sample XSL transformation file used for the LDAP people directory provider is LDAPTransformation.xsl.
-
install-root/ProcessChoreographer/Staff
This file is in the install-root/ProcessChoreographer/Staff directory. The default Threshold value is 1000000, therefore by default the threshold value is of no realistic importance. Do not lower this value without careful consideration.
- Create a new people directory provider configuration, providing your own version of the XSL file.
- Adapt the following entry in the XSL file according to your needs:
- <xsl:variable name="Threshold">1000000</xsl:variable>
- Changes to the people directory are not immediately reflected in work-item assignments
-
Business Process Choreographer caches the results of people assignments evaluated against a people directory, such as an LDAP server, in the runtime database. When changes occur in the people directory, these are not immediately reflected in the database cache.
The Administration guide describes three ways to refresh this cache:
- Refresh people query results, using the administrative console. Use this method if you have major changes and need to refresh the results for almost all people queries.
- Refresh people query results, using administrative commands. Use this method if you write administration scripts using the wsadmin tool, or to immediately refresh all or a subset of the people query results.
- Refresh people query results, using the refresh daemon. Use this method to set up a regular and automatic refresh of all expired people query results.
None of these methods can refresh the group membership association of a user for the Group verb. This group membership is cached in the user's login session (WebSphere security LTPA token), which by default expires after two hours. The group membership list of the process starter ID used for process navigation, is never refreshed.
- Unexpected people assignments for tasks or process instances
- Default people assignments are performed if you do not define people assignment criteria for certain roles for your tasks, or if people assignment fails or returns no result. These defaults might result in unexpected user authorization; for example, a process starter might receive process administrator rights. In addition, many authorizations are inherited by dependent artifacts. For example, the process administrator may also become the administrator of all inline tasks.
The following tables illustrate which defaults apply for which situation:
Roles for BPEL processes
Roles for BPEL processes If the role is not defined in the process model ... If the role is defined in the process model, but people assignment fails or does not return proper results ... Process administrator Process starter becomes process administrator An exception occurs and the process is not started: EngineAdministratorCannotBeResolvedException
Process reader No reader No reader Roles for inline human tasks and their escalations
Roles for inline human tasks and their escalations If the role is not defined in the task model ... If the role is defined in the task model, but people assignment fails or does not return proper results ... Task administrator Only inheritance applies Only inheritance applies Task potential starter; applies to invocation tasks only Everybody becomes potential starter An exception occurs and the process is not started Task potential owner Everybody becomes potential owner Administrators become potential owners Task editor No editor No editor Task reader Only inheritance applies Only inheritance applies Escalation receiver Administrators become escalation receivers Administrators become escalation receivers The following inheritance rules apply for inline tasks:
- Process administrators become administrators for all inline tasks, their subtasks, follow-on tasks, and escalations.
- Process readers become readers for all inline tasks, their subtasks, follow-on tasks, and escalations.
- Task administrators become administrators for all subtasks, follow-on tasks, and escalations of all these tasks.
- Task readers become readers for all subtasks, follow-on tasks, and escalations of all these tasks.
- Members of any task role become readers for this task's escalations, subtasks, and follow-on tasks.
- Escalation receivers become readers for the escalated task.
Roles for stand-alone human tasks and their escalations
Roles for stand-alone human tasks and their escalations If the role is not defined in the task model ... If the role is defined in task model, but people assignment fails or does not return correct results ... Task administrator Originator becomes administrator The task is not started Task potential instance creator Everybody becomes potential instance creator An exception is thrown and the task is not created Task potential starter Originator becomes potential starter An exception is thrown and the task is not started Potential owner Everybody becomes potential owner Administrators become potential owners Editor No editor No editor Reader Only inheritance applies Only inheritance applies Escalation receiver Administrators become escalation receivers Administrators become escalation receivers The following inheritance rules apply for stand-alone tasks:
- Task administrators become administrators for all subtasks, follow-on tasks, and escalations of all these tasks.
- Task readers become readers for all subtasks, follow-on tasks, and escalations of all these tasks.
- Members of any task role become readers for this task's escalations, subtasks, and follow-on tasks.
- Escalation receivers become readers for the escalated task.
When a method is invoked using the Business Flow Manager API, members of the BPESystemAdministrator role have administrator authorization, and members of the BPESystemMonitor role have reader authorization.
When a method is invoked using the Human Task Manager API, members of the TaskSystemAdministrator role have administrator authorization, and members of the TaskSystemMonitor role have reader authorization.
- Stopped human tasks
- If you encounter one or more of the following problems:
- Human tasks cannot be claimed, even though the BPEL process started navigating successfully.
- The SystemOut.log file contains the following message: CWWB0057I: Activity 'MyStaffActivity' of processes 'MyProcess' has been stopped because of an unhandled failure...
These problems indicate that administrative security might not be enabled. Human tasks and processes that use people authorization require that security is enabled and the user registry is configured. Take the following steps:
- Check that administrative security is enabled. In the administrative console, go to Security > Global security and make sure the Enable administrative security check box is selected.
- Check the user registry is configured. In the administrative console, go to Security > User Registries and check the Active user registry attribute.
- Restart the activity, if stopped.
- Error and warning messages relating to people assignment
- Some common errors can occur when accessing a people directory during people assignment. To see details for these errors, you can enable tracing with the following trace settings: com.ibm.bpe.*=all:
com.ibm.task.*=all:com.ibm.ws.staffsupport.ws.*=all
The following common error situations are indicated by warning or error messages:
- Could not connect to LDAP server in the trace.log file indicates failure to connect to the LDAP server. Check the network settings, the configuration (especially the provider URL) for the people directory provider you use, and verify whether your LDAP server requires an SSL connection.
- javax.xml.transform.TransformerException: org.xml.sax.SAXParseException: Element type "xsl:template" must be followed by either attribute specifications, ">" or "/>" in the System.out or System.err files indicates the LDAPTransformation.xsl file cannot be read. Check your people assignment configuration and the configured XSLT file for errors.
- LDAP object not found. dn: uid=unknown,cn=users,dc=ibm,dc=com [LDAP: error code 32 - No Such Object] in the trace.log file indicates that an LDAP entry cannot be found. Check the task model's people assignment criteria (verb) parameters and the LDAP directory content for mismatches in the task model.
- Requested attribute "uid" not found in: uid=test222,cn=users,dc=ibm,dc=com in the trace.log file indicates that an attribute cannot be found in the queried LDAP object. Check the task model's people assignment criteria (verb) parameters and the LDAP directory content for mismatches in the task model. Also check the XSLT file of your people assignment configuration for errors.
- Enable additional messages about people assignment decisions
- You can set a custom property to log additional messages in the SystemOut.log. The messages record the following events:
- If people resolution did not find any users for a task role, and default users were selected.
- If you are using VMM, warnings when specified entities or specific attributes could not be found in the VMM people directory.
- If you are using substitution, logs decisions whether or not users have been substituted.
Because these messages can significantly increase the amount of data in SystemOut.log, only enable these additional messages for testing or debugging purposes.
To enable the staff diagnosis feature perform the following steps:
- Use the administrative console, click Servers > Clusters > WebSphere application server clusters > cluster_name, then on the Configuration tab, in the Business Process Manager section, expand Business Process Choreographer, and click Human Task Manager.
- On the Configuration tab, set the value for the custom property Staff.Diagnosis to one of the following values:
- off
- Never writes additional people assignment information.
- on
- Always writes additional people assignment information.
- development_mode
- Only writes additional people assignment information when the server is running in development mode. this is the default value.
- Restart the server.
The following messages are generated:
- Core.StaffDiagMsgIsEnabled=CWTKE0057I: The output of people (staff) resolution diagnosis messages is enabled. Indicates the diagnosis feature is enabled. This message is generated when the Human Task Manager is started.
- Core.EverybodyIsPotInstanceCreator=CWTKE0047I: Everybody is potential instance creator for task {0}. Indicates that Everybody became the potential instance creator because no potential instance creator is defined.
- Core.OriginatorBecomesPotStarter=CWTKE0046I: Originator becomes potential starter of task {0}. For stand-alone tasks only: Indicates the originator became the potential starter because no potential starter is defined.
- Core.EverybodyIsPotentialStarter=CWTKE0045I: Everybody is potential starter of task {0}. For inline tasks only: Indicates that Everybody became the potential starter because no potential starter is defined.
- Core.OriginatorBecomesAdministrator=CWTKE0044I: Originator becomes administrator of task {0}. Indicates the originator became the administrator because no administrator is defined.
- Core.EscalationReceiverDoesNotExist=CWTKE0043W: Administrator(s) will be the escalation receiver(s) of the escalation {0}. Indicates the administrators became the escalation receivers because staff resolution for the escalation receivers either failed or returned an empty list. If no escalation receiver is defined, the default is Everybody, and a trace message is written.
- Core.EverybodyIsPotentialOwner=CWTKE0014I: Everybody is potential owner of task {0}. Indicates that Everybody became the potential owner because no potential owner is defined.
- Core.PotentialOwnerDoesNotExist=CWTKE0015W: Administrator(s) will be the potential owner(s) of the task {0}. Indicates the administrators became the potential owners because staff resolution for the potential owners either failed or returned an empty list. If no potential owner is defined, the default is Everybody, and a trace message is written.
- StaffPlugin.VMMEntityNotFound=CWWBS0457W: The VMM entity could not be found, received VMM message is ''{0}''. Indicates that a specified VMM entity (a group or person) was not found in the people directory and the reason. People or groups that cannot be found in the people directory are not included in the people resolution result.
- StaffPlugin.VMMEntityAttributeNotFound=CWWBS0454W: VMM entity ''{0}'' has no attribute with name ''{1}'' of type ''{2}''. Indicates that a specified attribute was not found when searching for a VMM entity (person) in the people directory. If no user email address is found, the user cannot receive email notifications for escalations. If no user preferredLanguage is found, the default language setting is used. If no substitution attributes (isAbsent or substitutes) are found when reading, an attempt is made to initialize the attributes. If no substitution attributes are found when writing or updating, an exception is generated.
- StaffPlugin.VMMResultIsEmpty=CWWBS0456W: The VMM invocation returned no requested result entities. Indicates that a (get or search) invocation of VMM did not return any entities. No users are included in the people resolution result.
- Issues with group work items and the "Group" people assignment criteria
- If you are using the Group people assignment criteria, the following situations can occur:
- Group members are not authorized, although the group name is specified:
- Set the group short name when using the Local OS registry for WebSphere security, and the group dn when using the LDAP registry.
- Make sure that you respect the case sensitivity of the group name.
One possible reason for this situation is that you have configured the LDAP user registry for WebSphere security and selected the Ignore case for authorization option. If so, either clear the option, or specify LDAP group dn in all uppercase.
- Set the group short name when using the Local OS registry for WebSphere security, and the group dn when using the LDAP registry.
- Changes in group membership are not immediately reflected in authorization. This might happen, when the affected user is still logged on. The group membership of a user is cached in her login session, and (by default) expires after two hours. You can either wait for the login session to expire (default is two hours), or restart the application server. The refresh methods offered by Human Task Manager do not apply for this people assignment criteria. Note the group membership list of the process starter is never refreshed.
- Group members are not authorized, although the group name is specified:
- Cleanup of stored people assignment results
- People assignment results are stored in the database. All stored people assignment results are subject to people assignment refreshes. If the task template that contains the task instance that leads to the computation of a people assignment result is deleted, the stored people assignment result is deleted as well. However, the stored people assignment results are not deleted if only the task instances that are using the stored people assignment results are deleted.
- To avoid large numbers of stored and unnecessary people assignment results in the database, take the following steps in the context of a task template:
- Assess whether your people assignment criteria definitions lead to shared or unshared people assignment results.
- If unshared assignment results occur, consider putting a cleanup procedure in place for people assignment results. Base the cleanup interval on the expected number of task instances, and the unshared people assignment results per cleanup interval. For more information on how to apply a script-based cleanup procedure, refer to Remove unused people query results, using administrative commands.
- Adapted XSL transformation file has no effect
- When adapting an XSL transformation file, the server needs to be restarted before the changes take effect. In addition, the adapted XSL file is applied only to newly deployed processes and tasks. The changes have no effect on processes and tasks that have been deployed before the XSL file was changed.
Troubleshooting Business Process Choreographer Explorer or Business Process Archive Explorer
Use this information to solve problems relating to Business Process Choreographer Explorer or Business Process Archive Explorer. Use the following information to solve problems relating to accessing or using Business Process Choreographer Explorer or Business Process Archive Explorer.
- Errors while trying to access Business Process Choreographer Explorer or Business Process Archive Explorer from a browser
- If you try to access Business Process Choreographer Explorer or Business Process Archive Explorer with a browser, but get an error message instead of the login page, try the following actions:
- Use the administrative console to make sure the web client application BPCExplorer_scope or BPCArchiveExplorer_scopeis deployed and running on the server.
- In the administrative console, on the page for the application, under "View Deployment Descriptor", verify the context root is the one you used when setting up the Business Process Choreographer Explorer or Business Process Archive Explorer.
- Make sure that your virtual host configuration is correct. By default, the web modules of the Business Process Choreographer applications are configured for the default_host virtual host. Verify the host names and ports that you use to access the Business Process Choreographer Explorer or Business Process Archive Explorer are associated with the host alias.
- Error message when using Business Process Choreographer Explorer or Business Process Archive Explorer
- If you get an error message when using Business Process Choreographer Explorer or Business Process Archive Explorer, click the Search for more information link on the error page.
This starts a search for the error code on the IBM technical support site. This site only provides information in English. Copy the error message code that is shown on the Business Process Choreographer Explorer or Business Process Archive Explorer Error page to the clipboard. The error code has the format CWWBcnnnnc, where each c is a character and nnnn is a 4-digit number. Go to the technical support page. Paste the error code into the Additional search terms field, and click Go.
- Error message StandardFaultException with the standard fault missingReply (message CWWBE0071E)
- If you get a StandardFaultException error with the standard fault missingReply (message CWWBE0071E), this is a symptom of a problem with your process model. For more information about solving this, see Troubleshooting the administration of BPEL processes and human tasks.
- Some items not displayed when you log on to Business Process Choreographer Explorer or Business Process Archive Explorer
-
If you can log on to Business Process Choreographer Explorer or Business Process Archive Explorer but some items are not displayed, or if certain actions are not enabled, this indicates a problem with your authorization. Possible solutions to this problem include:
- Use the administrative console to ensure that WebSphere administrative security is enabled.
- Check that you are logged onto Business Process Choreographer Explorer or Business Process Archive Explorer using the correct identity.
Depending on the authorization granted to the user ID, the administrative views and options are might be not visible or not enabled.
- Use IBM Integration Designer to check or modify the authorization settings defined in the BPEL process.
- Error message CWWBU0001E or a communication error with the HTMConnection function
- If you get the error message CWWBU0001E: "A communication error occurred when the BFMConnection function was called" or "A communication error occurred when the HTMConnection function was called", use the following information to help resolve the problem.
This error can indicate the process container or human task container has been stopped, and the client could not connect to the server. Verify the process container and the human task container are running and accessible. The nested exception might contain further details about the problem.
- Error message WWBU0024E
- If you get the error message WWBU0024E: "Could not establish a connection to local business process EJB" with a reason "Naming Exception",
use the following information to help resolve the problem.
This error is thrown if users attempt to log on while the process container or Business Process Archive Manager is not running. Verify the application BPEContainer_InstallScope or BPArchiveMgr_InstallScope is running, where InstallScope is either the cluster_name or nodename_servername.
Troubleshooting Common Event Infrastructure
These topics provide troubleshooting information for the event service based on the task or activity you were doing when you encountered the problem.
- Problems during startup Troubleshoot problems with starting up your Common Event Infrastructure server.
- Problems when sending events Troubleshoot problems with sending events on your Common Event Infrastructure server.
- Problems when receiving or querying events Troubleshoot problems involving receiving and querying events with your Common Event Infrastructure server.
- Miscellaneous problems
Troubleshoot miscellaneous problems with your Common Event Infrastructure server.
Problems during startup
Troubleshoot problems with starting up your Common Event Infrastructure server.
- Event service does not start (message CEIDS0058E) The event service does not start and outputs message CEIDS0058E to the WebSphere log file.
Event service does not start (message CEIDS0058E)
The event service does not start and outputs message CEIDS0058E to the WebSphere log file.
Cause
The event service uses SQL statements qualified with the user name. This error indicates the user name used by the event service to connect to the event database is not the same as the user ID that was used to create the database.
Remedy
The user ID used to connect to the event database must be the same one used to create the event database. To correct this problem:
-
- For a single server, select Servers > Application servers > server_name.
- For a cluster, select Servers > Clusters > cluster_name.
- For a single server, select Servers > Application servers > server_name.
- From the Configuration tab, select Business Integration > Common Event Infrastructure > Common Event Infrastructure Server.
- Change the specified user ID and password to match those used to create the database.
Save the configuration changes.
- Restart the server.
Problems when sending events
Troubleshoot problems with sending events on your Common Event Infrastructure server.
- Error when sending event (message CEIDS0060E) My event source encounters an error when trying to send an event, and message CEIDS0060E appears in the WebSphere log file.
- Error when sending event (ServiceUnavailableException) My event source application encounters an error when trying to send an event to the event server. The log file indicates a ServiceUnavailableException with the message "A communication failure occurred while attempting to obtain an initial context with the provider URL."
- Error when sending event (NameNotFoundException) My event source application encounters an error when trying to send an event to the event service. The log file indicates a NameNotFoundException with a message like "First component in name events/configuration/emitter/Default not found."
- Error when sending event (message CEIEM0025E) My event source application encounters an error when trying to send an event to the event server. The log file indicates a DuplicateGlobalInstanceIdException.
- Error when sending event (message CEIEM0034E) My event source encounters an error when trying to send an event to the event service. The log file indicates an EmitterException with the message "The JNDI lookup of a JMS queue failed because the JNDI name defined in the emitter profile is not bound in the JNDI."
- Event is not valid (message CEIEM0027E) My event source is trying to send an event, but the emitter does not submit it to the event service and outputs message CEIEM0027E to the log file ("The emitter did not send the event to the event server because the Common Base Event is not valid").
- Synchronization mode not supported (message CEIEM0015E) My event source is trying to send an event, but the emitter does not submit it to the event service and outputs message CEIEM0015E to the log file ("The emitter does not support the specified synchronization mode").
- Transaction mode not supported (message CEIEM0016E) My event source is trying to send an event, but the emitter does not submit it to the event service and outputs message CEIEM0016E to the log file ("The emitter does not support the specified transaction mode").
Error when sending event (message CEIDS0060E)
My event source encounters an error when trying to send an event, and message CEIDS0060E appears in the WebSphere log file.
Cause
The event service uses metadata stored in the event database to map Common Base Event elements and attributes to database tables and columns. This information is read from the database the first time an application attempts to use the event service after startup.
The metadata tables are populated when the event database is created. This error occurs if the tables do not contain the required metadata at run time.
Remedy
To correct this problem, you need to re-create the required metadata. When the event database is created, the database configuration administrative command also generates a database script that can be used to repopulate the metadata at a later time. The name of this script depends on the database type:
| Database type | Script name |
|---|---|
| DB2 | ins_metadata.db2 |
| Informix | ins_metadata.sql |
| Oracle | ins_metadata.ora |
| SQL Server | ins_metadata.mssql |
| DB2 UDB for iSeries | ins_metadata.db2 |
| DB2 for z/OS
| ins_metatdata.ddl
|
By default, the script is created in the profile_root/dbscripts/CEI_database_namenode directory.
You can run this script at any time.
By default, the script, ins_metadata.ddl, is created in the profile_root/dbscripts/CEI_Databasename/ddl directory.
You can run this script at any time using the DB2 SQL processor.
To re-create
the metadata, use the appropriate SQL processor to run the script:
- DB2: db2
- Oracle: SQL*Plus
- Informix: dbaccess
- SQL Server: osql
After repopulating the metadata, restart the server.
Error when sending event (ServiceUnavailableException)
My event source application encounters an error when trying to send an event to the event server. The log file indicates a ServiceUnavailableException with the message "A communication failure occurred while attempting to obtain an initial context with the provider URL."
Cause
This problem indicates the event source application cannot connect to the event server. This might be caused by either of the following conditions:
- The event server is not running.
- The event source application is not configured to use the correct JNDI provider URL.
Remedy
To correct this problem, follow these steps:
- To check the status of the event server, go to the /WebSphere/V8R5/DeploymentManager/default/binprofile_root/bin directory and run the serverStatus command:
- serverStatus servername
- If the event server is not running, use the startServer command to start it:
- startServer servername
- Check the host name and Remote Method Invocation (RMI) port for the server containing the application that cannot connect to the event server. Confirm the same values are specified in the JNDI URL configured for the event source application. If the CEI server is located on another server, then the JNDI needs to be resolved with that remote deployment target.
Error when sending event (NameNotFoundException)
My event source application encounters an error when trying to send an event to the event service. The log file indicates a NameNotFoundException with a message like "First component in name events/configuration/emitter/Default not found."
Cause
This problem indicates the event service is not available and might be caused by either of the following conditions:
- The event service has not been deployed.
- The event service is disabled.
Remedy
To deploy the event service:
- Start the wsadmin tool.
- Use the AdminTask object to run the deployEventService administrative command.
- Restart the server.
To enable the event service using the wsadmin tool:
- Start the wsadmin tool.
- Use the AdminTask object to run the enableEventService administrative command.
- Restart the server.
To enable the event service using the administrative console:
- Click Applications > Application Types > WebSphere enterprise applications > server > Container Services > Common Event Infrastructure Service.
- Select the Enable service at server startup property.
- Click OK to save your changes.
- Restart the server.
Error when sending event (message CEIEM0025E)
My event source application encounters an error when trying to send an event to the event server. The log file indicates a DuplicateGlobalInstanceIdException.
Cause
This problem indicates the emitter submitted the event, but the event service rejected it because another event already exists with the same global instance identifier. Each event must have a unique global instance identifier, specified by the globalInstanceId property.
Remedy
To correct this problem, do one of the following:
- Make sure your event source application generates a unique global instance identifier for each event.
- Leave the globalInstanceId property of your submitted events empty. The emitter then automatically generates a unique identifier for each event.
Error when sending event (message CEIEM0034E)
My event source encounters an error when trying to send an event to the event service. The log file indicates an EmitterException with the message "The JNDI lookup of a JMS queue failed because the JNDI name defined in the emitter profile is not bound in the JNDI."
Cause
This problem indicates the JMS transmission configuration being used by the emitter specifies one or more JMS resources that are not defined in the JMS configuration.
Remedy
To correct this problem:
- In the administrative console, click Service integration > Common Event Infrastructure > Event emitter factories > emitter_factory > JMS transmission settings. Make sure you are viewing the JMS transmission for the emitter factory used by your event source application.
- Check the values specified for the Queue JNDI name and Queue connection factory JNDI name properties. Verify the specified JNDI names exist in the JNDI namespace and are valid JMS objects. If necessary, modify these properties or create the required JMS resources.
Event is not valid (message CEIEM0027E)
My event source is trying to send an event, but the emitter does not submit it to the event service and outputs message CEIEM0027E to the log file ("The emitter did not send the event to the event server because the Common Base Event is not valid").
Cause
This message indicates that one or more of the event properties contain data that does not conform to the Common Base Event specification. There are many ways in which event data might not be valid, including the following:
- The global instance identifier must be at least 32 characters but no more than 64 characters in length.
- The severity must be within the range of 0 - 70.
Remedy
To correct this problem:
- Check the detailed exception message in the log file to determine which event property is not valid. For example, this messages indicates the length of the global instance identifier (ABC)
is not valid:
Exception: org.eclipse.hyades.logging.events.cbe.ValidationException : IWAT0206E The length of the identifier in the specified Common Base Event property is outside the valid range of 32 to 64 characters. Property: CommonBaseEvent.globalInstanceId Value: ABC - Correct the event content at the source so it conforms to the Common Base Event specification.
- Resubmit the event.
Synchronization mode not supported (message CEIEM0015E)
My event source is trying to send an event, but the emitter does not submit it to the event service and outputs message CEIEM0015E to the log file ("The emitter does not support the specified synchronization mode").
Cause
This problem indicates the parameters passed by the event source when sending the event specify a synchronization mode that is not supported by the emitter. This can be caused be either of the following conditions:
- The event source is specifying a synchronization mode that is not valid. This is indicated by an IllegalArgumentException with the message "Synchronization mode mode is not valid."
- The event source is specifying a synchronization mode the emitter is not configured to support. This is indicated by a SynchronizationModeNotSupportedException with the message "The emitter does not support the specified synchronization mode: mode."
Remedy
If the exception message indicates that your event source is specifying a synchronization mode that is not valid (IllegalArgumentException), check the method call that is trying to send the event. Verify the method parameters specify one of the valid synchronization modes:
- SynchronizationMode.ASYNCHRONOUS
- SynchronizationMode.SYNCHRONOUS
- SynchronizationMode.DEFAULT
These constants are defined by the com.ibm.events.emitter.SynchronizationMode interface.
If the exception message indicates the specified synchronization mode is not supported by the emitter (SynchronizationModeNotSupportedException), check the emitter factory configuration:
- In the administrative console, click Service Integration > Common Event Infrastructure > Event Emitter Factories > emitter_factory. Make sure you are viewing the emitter factory used by the event source application.
- Check the emitter factory settings to see which synchronization modes are supported:
- If the Support Event Service transmission property is selected, synchronous mode is supported.
- If the Support JMS transmission property is selected, asynchronous mode is supported.
Querying transaction modes: An event source can programmatically query the supported transaction modes for a particular emitter by using the isSynchronizationModeSupported() method. Refer to the Javadoc API documentation for more information.
- If the emitter does not support the synchronization mode you are trying to use, either change the emitter factory configuration or modify your event source to use a supported synchronization mode.
Transaction mode not supported (message CEIEM0016E)
My event source is trying to send an event, but the emitter does not submit it to the event service and outputs message CEIEM0016E to the log file ("The emitter does not support the specified transaction mode").
Cause
This problem indicates the parameters passed by the event source when sending the event specify a transaction mode that is not supported by the emitter. This can be caused be either of the following conditions:
- The event source is specifying a transaction mode that is not valid.
- The event source is specifying a synchronization mode that is not supported by the emitter environment. Transactions are supported only in a Java EE container.
Remedy
To correct this problem, check the method call that is trying to send the event and make sure the method parameters specify the correct transaction mode:
- If the emitter is running in a Java EE container, make sure the method parameters specify one of the valid transaction modes:
- TransactionMode.NEW
- TransactionMode.SAME
- TransactionMode.DEFAULT
These constants are defined by the com.ibm.events.emitter.TransactionMode interface.
- If the emitter is not running in a Java EE container, make sure the method parameters specify TransactionMode.DEFAULT.
Problems when receiving or querying events
Troubleshoot problems involving receiving and querying events with your Common Event Infrastructure server.
- Error when querying events (message CEIDS0060E) My event consumer encounters an error when trying to query events from the event service, and message CEIDS0060E appears in the WebSphere log file.
- Events not being stored in the persistent data store My event source application is successfully submitting events to the emitter, but when an event source queries the events, they are not in the persistent data store.
- Events not being received by consumers (no error message) My event source application is successfully submitting events to the emitter, but the events are not received by consumers using the JMS interface.
- Events not being received by consumers (NameNotFoundException) My event source application is successfully submitting events to the emitter, but the events are not published to consumers using the JMS interface, and the log file indicates a NameNotFoundException.
- Event group with extended data elements contains no events I have defined an event group that specifies extended data element predicates, but queries on the event group do not return the expected events.
- Error when querying an event group (message CEIES0048E) My event consumer application encounters an error when trying to query events from an event group. The log file indicates an EventGroupNotDefinedException and shows message CEIES0048E ("The event group is not defined in the event group list the event server instance is using.")
Error when querying events (message CEIDS0060E)
My event consumer encounters an error when trying to query events from the event service, and message CEIDS0060E appears in the WebSphere log file.
Cause
The event service uses metadata stored in the event database to map Common Base Event elements and attributes to database tables and columns. This information is read from the database the first time an application attempts to use the event service after startup.
The metadata tables are populated when the event database is created. This error occurs if the tables do not contain the required metadata at run time.
Remedy
To correct this problem, you need to re-create the required metadata. When the event database is created, the database configuration administrative command also generates a database script that can be used to repopulate the metadata at a later time. The name of this script depends on the database type:
| Database type | Script name |
|---|---|
| DB2 | ins_metadata.db2 |
| Informix | ins_metadata.sql |
| Oracle | ins_metadata.ora |
| SQL Server | ins_metadata.mssql |
| DB2 UDB for iSeries | ins_metadata.db2 |
| DB2 for z/OS
| ins_metatdata.ddl
|
By default, the script is created in the profile_root/dbscripts/CEI_database_namenode directory.
You can run this script at any time.
By default, the script, ins_metadata.ddl, is created in the profile_root/dbscripts/CEI_Databasename/ddl directory.
You can run this script at any time using the DB2 SQL processor.
To re-create the metadata, use the appropriate SQL processor to run the script:
- DB2: db2
- Oracle: SQL*Plus
- Informix: dbaccess
- SQL Server: osql
After repopulating the metadata, restart the server.
Events not being stored in the persistent data store
My event source application is successfully submitting events to the emitter, but when an event source queries the events, they are not in the persistent data store.
Cause
This problem indicates the emitter is not sending events to the event service, or the event service is not storing the events to the persistent data store. This can be caused be any of the following conditions:
- The persistent data store not enabled for the event service.
- The events do not belong to an event group that is configured for event persistence.
- The events are being filtered out by the emitter.
Remedy
To verify the persistent data store is enabled for the event service:
- In the administrative console, click Service integration > Common
Event Infrastructure > Event service > Event services > event_service.
- Verify the Enable event data store check box is selected.
- Click OK to save any changes.
To verify the event group is configured for event persistence:
- In the administrative console, click Service integration > Common
Event Infrastructure > Event service > Event services > event_service > Event
groups > event_group.
- Verify the Persist events to event data store check box is selected.
- Click OK to save any changes.
Multiple event groups: An event might belong to multiple event groups. If any applicable event group is configured for persistence, and the data store is enabled, the event is stored in the data store.
To check the filter settings:
- In the administrative console, click Service integration > Common Event Infrastructure > Event emitter factories > emitter_factory > Event filter. (Make sure you are viewing the settings for the emitter factory your event source application is using.)
- Check to see whether the filter configuration string excludes the events you are trying to send to consumers. If so, you can either modify the filter configuration string or modify the event data so the events are not filtered out.
- Click OK to save any changes.
Events not being received by consumers (no error message)
My event source application is successfully submitting events to the emitter, but the events are not received by consumers using the JMS interface.
Cause
This problem can be caused be any of the following conditions:
- Event distribution is not enabled for the event service.
- The events are being filtered out by the emitter.
- The events are being filtered out by the notification helper.
- The event consumer is not specifying the correct event group.
- The JMS connection is not started.
Remedy
The remedy for this problem depends upon the underlying cause.
-
To verify that event distribution is enabled for the event service:
- In the administrative console, click Service integration > Common Event Infrastructure > Event service > Event services > event_service.
- If the Enable event distribution property is not selected, select the check box.
- Click OK to save any changes.
-
To check the event filter settings for the emitter:
- In the administrative console, click Service integration > Common Event Infrastructure > Event emitter factories > emitter_factory > Event filter. (Make sure you are viewing the settings for the emitter factory your event source application is using.)
- Check to see whether the filter configuration string excludes the events you are trying to send to consumers. If so, you can either modify the filter configuration string or modify the event data so the events are not filtered out.
- Click OK to save any changes.
-
To check the event filter settings for the notification helper:
- Check your event consumer application to see if an event selector is specified for the notification helper using the NotificationHelper.setEventSelector method.
- If an event selector is specified, make sure it does not exclude the event you are trying to receive. (A null event selector passes all events.)
-
To check the event group specified by the event consumer:
- In the administrative console, click Service integration > Common Event Infrastructure > Event service > Event services > event_service > Event groups. The table shows a list of all event groups defined for the event service.
- Select the event group your event consumer subscribes to.
- Find the Event selector string property.
- Verify the specified event selector matches the content of the event you are trying to receive. If it does not match, you might want to make one of the following changes:
- Modify the event selector so the event is included in the event group.
- Modify the event data so the event matches the event group.
- Modify your event consumer to subscribe to a different event group that includes the event.
- To start the JMS connection:
In your event consumer, use the QueueConnection.start() method or the TopicConnection.start() method before attempting to receive events.
Events not being received by consumers (NameNotFoundException)
My event source application is successfully submitting events to the emitter, but the events are not published to consumers using the JMS interface, and the log file indicates a NameNotFoundException.
Cause
This problem indicates the event group configuration specifies one or more JMS resources that do not exist.
Remedy
To correct this problem:
- In the administrative console, click Service integration > Common
Event Infrastructure > Event service > Event services > event_service > Event
groups > event_group.
Multiple event groups: An event might belong to more than one event group.
- Check the values of the Topic JNDI name and Topic connection factory JNDI name properties. Verify the specified JMS resources exist. If necessary, use the configuration interface of your JMS provider to create the necessary resources.
Event group with extended data elements contains no events
I have defined an event group that specifies extended data element predicates, but queries on the event group do not return the expected events.
Cause
The event data might be valid XML but not conform with the Common Base Event specification. This can cause unexpected results without any error messages.
Consider an event with the following content:
<?xml version="1.0" encoding="ASCII"?>
<!-- Event that will match the XPath expression CommonBaseEvent         [@globalInstanceId] -->
<CommonBaseEvent
        xmlns:xsi="http://www.w3.org/TR/xmlschema-1/"
        xmlns:="http://www.ibm.com/AC/commonbaseevent1_0_1"
        version="1.0.1"
        creationTime="2005-10-17T12:00:01Z"
        severity="10"
        priority="60"
    >
    <situation categoryName="RequestSituation">
        <situationType xsi:type="RequestSituation"
            reasoningScope="INTERNAL"
            successDisposition="Suceeded"
            situationQualifier="TEST"
        />
    </situation>
    <sourceComponentId
        component="component"
        subComponent="subcomponent"
        componentIdType="componentIdType"
        location="localhost"
        locationType="Hostname"
        componentType="sourceComponentType"
    />
    <extendedDataElement name="color" type="string">
        <values>red</values>
    </extendedDataElement>
</CommonBaseEvent>
This event contains a single extended data element with a single child element.
Now consider an event group definition configured with the following XPath event selector string:
CommonBaseEvent[extendedDataElements[@name='color' and @type='string'
        and @values='red']]
This event selector fails to match the event because the XML definition of the event contains a misspelling. In the event data, the extendedDataElements element is misspelled as extendedDataElement. Because this is well-formed XML, it does not cause an error; instead, it is treated as an any element, which is not searchable.
Remedy
Verify the XML data for submitted events conforms to the Common Base Event specification.
Error when querying an event group (message CEIES0048E)
My event consumer application encounters an error when trying to query events from an event group. The log file indicates an EventGroupNotDefinedException and shows message CEIES0048E ("The event group is not defined in the event group list the event server instance is using.")
Cause
This problem indicates the event consumer application performed a query using the EventAccess bean, but the consumer specified an event group name that does not correspond to any existing event group.
Remedy
To correct this problem:
- In the administrative console, click Service integration > Common
Event Infrastructure > Event service > Event services > event_service > Event
groups. The table shows a list of all event groups defined for the event service.
- Verify the event source specifies a defined event group name in the parameters of the query method call.
Miscellaneous problems
Troubleshoot miscellaneous problems with your Common Event Infrastructure server.
- Event catalog pattern query fails on a Windows system
I am trying to do a pattern query for event definitions on a Windows system using the eventcatalog command. For example: eventcatalog -listdefinitions
-name EVENT% -pattern. I don't get the expected results.
Event catalog pattern query fails on a Windows system
I am trying to do a pattern query for event definitions on a Windows system using the eventcatalog command. For example: eventcatalog -listdefinitions -name EVENT% -pattern. I don't get the expected results.
Cause
The percent character (%) is a reserved character in the Windows command-line interface and is not passed properly to the eventcatalog command.
Remedy
On Windows systems, escape the percent character character by typing %%:
- eventcatalog -listdefinitions -name EVENT%% -pattern
Troubleshooting the business process rules manager
Some of the problems you might encounter using the business process rules manager are login errors, login conflicts, and access conflicts.
You can take various steps to troubleshoot these problems.
- Resolve login errors A log in error occurs upon logging in.
- Resolve login conflict errors A login conflict error occurs when another user with the same user ID is already logged in to the application.
- Resolve access conflict errors An access conflict error occurs when a business rule is updated in the data source by one user at the same time another user is updating the same rule.
Resolve login errors
A log in error occurs upon logging in. The login error message is as follows: Unable to process login. Check user ID and password and try again.
Login errors occur only when administrative security is enabled and either the user ID, password, or both, are incorrect.
To resolve login errors.
- Click OK on the error message to return to the Login page.
- Enter the valid User ID and Password.
- If passwords are case sensitive, make sure that Caps Lock key is not on.
- Verify the user ID and password are spelled correctly.
- Check with the system administrator to be sure the user ID and password are correct.
- If passwords are case sensitive, make sure that Caps Lock key is not on.
- Click Login.
If you resolve the login error, you will now be able to log in to the business process rules manager. If the error is not resolved, contact your system administrator.
Resolve login conflict errors
A login conflict error occurs when another user with the same user ID is already logged in to the application.
The login conflict message is as follows:
Another user is currently logged in with the same User ID. Select from the following options:
Usually this error occurs when a user closed the browser without logging out. When this condition occurs, the next attempted login before the session timeout expires results in a login conflict.
Login conflict errors occur only when administrative security is enabled.
To resolve login conflict errors, select from the following three options:
- Return to the Login page.
Use this option to open the application with a different user ID.
- Log out the other user with the same user ID.
Use this option to log out the other user and start a new session.
Any unpublished local changes made in the other session will be lost.
- Inherit the context of the other user with the same user ID and log out that user.
Use this option to continue work already in progress. All unpublished local changes in the previous session that have been saved will not be lost. The business process rules manager will open to the last page displayed in the previous session.
Resolve access conflict errors
An access conflict error occurs when a business rule is updated in the data source by one user at the same time another user is updating the same rule.
This error is reported when you publish your local changes to the repository.
To correct access conflict errors, perform the following actions:
- Find the source of the business rule that is causing the error and check if your changes on the local machine are still valid. Your change may no longer be required after the changes done by another user.
- If you choose to continue working in the business process rules manager, you must reload those business rule groups and rule schedules in error from the data source as your local changes of business rule groups and rule schedules in error are no longer usable. Reload a business rule group or rule schedule page, by clicking Reload in the Publish and Revert page of the rule for which the error was reported. You can still use local changes in other business rule groups and rule schedules not in error.
16. Troubleshooting WAS
Because IBM Business Process Manager is built on IBM WebSphere Application Server, the function that you are having problems with might be provided by the underlying WAS. You might want to consult troubleshooting information in the WebSphere Application Server documentation.
More specifically, IBM Business Process Manager is built on WAS,
Network Deployment.
For more information about troubleshooting in WebSphere Application Server, Network Deployment, see "Troubleshooting and support" in the WAS, Network Deployment, Information Center.
17. Tools for troubleshooting applications
IBM Business Process Manager and Integration Designer include several tools you can use to troubleshoot applications that you develop and deploy on the server.
During development of applications, you can use debugging tools in Integration Designer. You can implement runtime troubleshooting capabilities into applications using logging, tracing, and service component event monitoring. Administrators of running applications can use the failed event manager to view, modify, resubmit, and delete failed operations between Service Component Architecture (SCA) components.
- Debugging applications in IBM Integration Designer To debug applications running on IBM Business Process Manager, use your application development tool, such as IBM Integration Designer.
- Use logging, tracing, and monitoring in applications Designers and developers of applications that run on IBM Business Process Manager can use capabilities such as monitoring and logging that add troubleshooting features to applications.
- Tracing problems related to persistence When you encounter problems related to persisting data at run time, traces can be useful in analyzing the source of the problem.
- IBM Support Assistant Data Collector
Using IBM Support Assistant Data Collector, which is installed with BPM, you can search for information, investigate problems, and submit a problem report to IBM.
- Troubleshooting Service Component Architecture processing and call chains Cross-Component Trace identifies whether a Service Component Architecture (SCA) operation completed successfully. It allows you to identify systemout.log or trace.log data that is associated with BPM and WebSphere Enterprise Service Bus modules and components. The log records associated with the WebSphere Enterprise Service Bus applications hold information about errors or events that occurred during processing and can be used for problem determination using IBM Integration Designer.
- Work with failed events in BPM If an event fails, it is stored in a database in the failed events manager. Use the failed event manager to search for and handle failed events.
Debugging applications in IBM Integration Designer
To debug applications running on IBM Business Process Manager, use your application development tool, such as IBM Integration Designer. For more information about debugging applications, see "Component debugging".
Use logging, tracing, and monitoring in applications
Designers and developers of applications that run on IBM Business Process Manager can use capabilities such as monitoring and logging that add troubleshooting features to applications.
IBM Business Process Manager is built on IBM WebSphere Application Server, Network Deployment. See the topic "Adding logging and tracing to your application" in the WebSphere Application Server Information Center. To use logging, tracing, and monitoring with applications, perform the steps in the Procedure section.
- You can set up service component event monitoring for applications running on IBM Business Process Manager.
See the "Monitoring service component events" topic link in the Related Topics section at the bottom of this page.
- You can add logging and tracing to applications using WAS.
Add logging and tracing to your application
Tracing problems related to persistence
When you encounter problems related to persisting data at run time, traces can be useful in analyzing the source of the problem. Business processes model the flow of business in an organization. The model at run time stores and retrieves data such as employee names and bank accounts. The storage of data and access to data is transparent to the business process user but it is important for the business process application developer to understand how database, and EJBs store that data in the background. Moreover, when performance problems arise linked to persistence, the application developer needs to have appropriate traces to diagnose where the problems likely reside.
A detailed log setting can be used to capture a trace of persistence problems. To set this detailed log on, follow these steps:
- In the Integrated Solutions Console, expand Troubleshooting and select Logs and trace.
- In the Logging and tracing page, click your server name. On the following page, click Change log detail levels. These log levels let you control the events that are captured by the logs.
- Select either Configuration or Runtime.
Adding a trace using the Configuration tab will require restarting the server. Adding a trace using the Runtime tab will take effect immediately.
- Expand All Components. Scroll down the list to WLE.wle_repocore.* Selecting this item or some of its subsets results in logging traces of persistence-related elements in the repository. You can choose to log all messages and traces or a specific level.
- These logs can help you or those in support analyzing performance problems linked to persistence. Once selected, remember to save your changes to logging and tracing in the Integrated Solutions Console.
IBM Support Assistant Data Collector
Use IBM Support Assistant Data Collector, which is installed with BPM, you can search for information, investigate problems, and submit a problem report to IBM. You might have more than one version of IBM Support Assistant on your system. Regardless of which version of IBM Support Assistant you use, if you run the commands provided in the following topics, you will collect the appropriate information for BPM.
The IBM Support Assistant Data Collector is not supported for z/OS.
- Collecting data in graphical mode with IBM Support Assistant Data Collector
You can use a web-based graphical user interface to collect data with IBM Support Assistant Data Collector.
- Collecting data in console mode with IBM Support Assistant Data Collector
With console mode, you record your responses in a response file. You can then use the response file to run the same collection script and generate reports silently as many times as required.
- Selecting a problem type for IBM Data Collector
You can use IBM Support Assistant Data Collector to collect information about a number of specific problems. Choose the collector that is appropriate for the troubleshooting issue that you are trying to solve.
Related tasks:
Contacting IBM Software Support
Collecting data in graphical mode with IBM Support Assistant Data Collector
You can use a web-based graphical user interface to collect data with IBM Support Assistant Data Collector. The IBM Support Assistant Data Collector is not supported for z/OS.
To run the data collector from a web browser:
- Ensure that your Java environment is configured correctly:
- Verify that your Java runtime environment is at level 1.5 or higher.
- Verify the location of the Java runtime environment is included in your PATH environment setting. If the location is not included in your path, set the variable JAVA_HOME to point to the Java runtime environment.
- For example, if you have a Java Development Kit installed at C:\jre1.5, use the command:
- SET JAVA_HOME=C:\jre1.5
- For example, if you are using the bash shell and you have a Java Development Kit installed at /opt/jre15,
use the command:
- export JAVA_HOME=/opt/jre15
-
- Verify that your Java runtime environment is at level 1.5 or higher.
- In a web browser, open the following file:
- WAS_install_root/BPM/isadc/bpm/index.html
- On the main page, select a problem type.
- Click Start. The collection script runs and prompts you for additional information. The information can include configuration information or the sequence of events leading to the problem. The script might also prompt you for preferences for data collection. After it has all the necessary information, the script proceeds with the remainder of the collection. Typically, the collector takes about 15 to 20 minutes to run.
- At the end of the collection, you can send the results to IBM Support. You can choose HTTPS or FTP for file transfer. HTTPS is encrypted and FTP is unencrypted. The name of the compressed file the tool sends to IBM Support is shown in the collection status area.
Related concepts:
Selecting a problem type for IBM Data Collector
Related tasks:
Collecting data in console mode with IBM Support Assistant Data Collector
Collecting data in console mode with IBM Support Assistant Data Collector
With console mode, you record your responses in a response file. You can then use the response file to run the same collection script and generate reports silently as many times as required. The IBM Support Assistant Data Collector is not supported for z/OS.
To run the data collector and generate problem reports silently:
- Ensure that your Java environment is configured correctly:
- Verify that your Java runtime environment is at level 1.5 or higher.
- Verify the location of the Java runtime environment is included in your PATH environment setting. If the location is not included in your path, set the variable JAVA_HOME to point to the Java runtime environment.
- Windows: For example, if you have a Java Development Kit installed at C:\jre1.5, use the command:
- SET JAVA_HOME=C:\jre1.5
- UNIX: For example, if you are using the bash shell and you have a Java Development Kit installed at /opt/jre15, use the command:
- export JAVA_HOME=/opt/jre15
- Windows: For example, if you have a Java Development Kit installed at C:\jre1.5, use the command:
- Verify that your Java runtime environment is at level 1.5 or higher.
- Start the script from a command window.
- Go to the following directory:
- WAS_install_root/BPM/isadc/bpm/
- Run the following command:
-
isadc.sh
Ensure the script is executable file. If necessary, use the following command to change the file permissions:
-
chmod 755 isadc.sh
The IBM Support Assistant Data Collector starts in console mode.
- Go to the following directory:
- Create a response file.
-
isadc.sh -record response.txt
You can specify your own file name for response.txt.
When the data collector runs in console mode, there are no selection lists or entry fields for user input. Instead, available choices are presented as numbered lists and you enter the number of your selection followed by the Enter key. Input fields are transformed into prompts, at which you enter your response and press Enter.
To stop the collector tool, type the quit option.
- Run the tool using a response file.
-
isadc.sh response.txt
The response file is a plain text file. You can edit it to modify values as needed. For example, you can use the file on another computer after adjusting the response file values to reflect settings for the local computer.
Remember that sensitive information, such as user names and passwords, might be stored in the response file. Manage the file carefully, to prevent unauthorized access to important information.
Some data collection sessions require interaction with the user, and thus are not suitable for the silent collection option. For example, IBM Support might ask you to reproduce a problem during data collection, in order to collect log and trace files. In this case, silent collection cannot record and reproduce all steps.
Related concepts:
Selecting a problem type for IBM Data Collector
Related tasks:
Collecting data in graphical mode with IBM Support Assistant Data Collector
Selecting a problem type for IBM Data Collector
You can use IBM Support Assistant Data Collector to collect information about a number of specific problems. Choose the collector that is appropriate for the troubleshooting issue that you are trying to solve.
- Generic problem collector
- Use this collector only if the product installed successfully, no server processes are running, and a server profile exists. The generic problem collector gathers configuration information and logs from a profile.
- Log and trace collector
- Use this collector only if the product installed successfully. This utility collects log and trace files for a profile. It is faster than the generic problem collector.
- Migration problem
- Use this collector if a problem occurs during migration. Before you can use this collector, the product must have installed successfully, a server profile must exist, and no server processes can be running.
- Installation problem
- Use this collector if a problem occurs during installation. Before you can use this collector, IBM Installation Manager must have installed successfully.
- Profile wizard problem
- Use this collector if you encounter a problem when creating or augmenting a profile. Before you can use this collector, IBM Business Process Manager must have installed successfully.
- Reproduce problem with tracing level set
-
Use this collector to set trace levels to reproduce a problem. The utility starts and stops the server.
Be aware that this collector makes changes to the server tracing and tries to restore the original settings. Do not run this collector to avoid these actions.
Before you can use this collector, IBM Business Process Manager must have installed successfully. A profile must exist and you must be able to start it successfully.
Related tasks:
Collecting data in graphical mode with IBM Support Assistant Data Collector
Collecting data in console mode with IBM Support Assistant Data Collector
Troubleshooting Service Component Architecture processing and call chains
Cross-Component Trace identifies whether a Service Component Architecture (SCA) operation completed successfully. It allows you to identify systemout.log or trace.log data that is associated with BPM and WebSphere Enterprise Service Bus modules and components. The log records associated with the WebSphere Enterprise Service Bus applications hold information about errors or events that occurred during processing and can be used for problem determination using IBM Integration Designer.
Events that can be captured include:
- Errors that occur during processing because of corrupted data
- Errors when resources are not available, or are failing
- Interpretation of code paths
You can access the Cross-Component Trace page from the administrative console by clicking Troubleshooting > Cross-Component Trace.
Handling and deleting collected data
Consider the following with regard to handling and deleting data collected by Cross-Component Trace:
- SCA call chain information is added to the systemout.log and trace.log files and is purged as those files are purged.
- Data snapshots capture the input and output data of call chains.
The input and output data is captured as files in the logs\XCT directory. To display this data, IBM Integration Designer needs access to the systemout.log files and the logs\XCT directory. If IBM Integration Designer is not available on the server, copying the logs directory and placing it on a machine (so that it can be accessed by IBM Integration Designer) preserves the file structure so that IBM Integration Designer can make use of the log files and the data snapshot files.
IBM Integration Designer can use the data snapshot files where they are (without moving them) if it can access the files in the logs directory. If you need to move files, it is safest to move the entire logs directory. By moving the entire logs directory, you get the XCT, first failure data capture (FFDC) files, and the systemout.log and trace.log files.
Data snapshot files are written to server-specific subdirectories using the following directory structure:
logs\
     server      ffdc      xct\
        server-specific_dir\
                            2009-0-25-11
                            2009-0-26-12
                            2009-0-26-14
Where server-specific_dir name is derived from the name of the server.For example, server1 is the default server name for a stand-alone installation.
- Data snapshot files in logs\XCT\server are referenced from the systemout.log and trace.log files that were created at the same time by the server. When the old systemout.log and trace.log
files are deleted, the associated Cross-Component Trace data snapshot files in logs\XCT\server can also be deleted.
You can use the timestamps in the systemout.log and trace.log files to identify and determine what data snapshot files to delete. It is safe to delete all the data snapshot files for a server older than the oldest date in the systemout.log and trace.log files. Preferably, you should use the Delete data snapshot files function from the administrative console when data snapshot files are no longer needed. For detailed information on the ways that you can delete data snapshot files, see "Deleting data snapshot files".
- Do not save or add files to the logs\XCT directory.
Do not copy or create new directories into the logs\XCT directory.
IBM Business Process Manager manages the content of the logs\XCT directory and deletes items that are no longer needed. IBM Business Process Manager might consider unrecognized files or directories as unnecessary and delete them. To save a copy of the data snapshot files, copy the data to another directory outside of the logs\XCT directory.
Cross-Component Trace settings and call chain processing
The information in this section describes the effect that Cross-Component Trace configuration settings have on call-chain processing. It also includes a description of various Cross-Component Trace configurations and explains the call chain events that result from the configurations.
The following list includes general rules on call chain processing and Cross-Component Trace configuration decisions:
- If Cross-Component Trace is turned off for a server, then no Cross-Component Trace records are written to that server's logs.
- Cross-Component Trace configuration settings for a particular server, affect that server only.
For example, if Server A has Trace all = Yes and Server B has Trace all = No, Cross-Component call chains are in the logs for Server A only. Similarly, this rule applies to setting the data snapshot feature. If Enable data snapshot = Yes on Server A and Enable data snapshot = No on Server B, then only Server A will have data snapshot files in its logs directory.
- Application-specific Cross-Component Trace data flows between servers that have the Enable Cross-Component Trace = Yes.
For example, if both Server A and Server B have Enable Cross-Component Trace = Yes and Server A has enabled Cross-Component Trace for a specific SCA module, the calls made from the Cross-Component Trace-enabled module on Server A (to applications or services on Server B), will result in Server A having call chains for all of activity related to the Cross-Component Trace-enabled module. Server B would also have call chains, but only for those calls that came from the Cross-Component Trace-enabled module on Server A. The logs of the two servers can be combined to reveal the entire call chain activity.
- To create a Cross-Component Trace for long-running BPEL process instances, you must select Enable Cross-Component Trace and Trace all, or enable Cross-Component Trace for the SCA module before the BPEL process instance is created.
The following illustration is of two servers (Server A and Server B), both with Cross-Component Trace enabled. Server A has the Trace all value set to "Yes", while Server B has Trace all set to "No".
Figure 1. A remote messaging and remote support topology

For the Cross-Component Trace configuration scenario illustrated in Figure 1, call chain events would result on Server A, but not on Server B.
The following illustration is of two servers (Server A and Server B), both with Cross-Component Trace enabled. Server A has the Trace all value set to No and it includes Module A as a module on which to enable Cross-Component Trace. Server B has Trace all set to No and has no SCA modules selected for Cross-Component Trace.
Figure 2. A remote messaging and remote support topology

For the Cross-Component Trace configuration scenario illustrated in Figure 2, call chain events would result on Server A. Trace activity for all Module A operations are written to the log on Server A. Any calls made from Module A to applications or services on Server B, results in call chains. The call chains on Server B would only pertain to those calls that came from Module A (because that module is configured for Cross-Component Trace).
Related concepts:
Work with failed events in BPM
If an event fails, it is stored in a database in the failed events manager. Use the failed event manager to search for and handle failed events.
Actions for handling failed events include examining the types of data associated with the event (business, trace, or expiration data) to determine the cause of the failure. Actions also include editing the data, resubmitting the event, or both.
The following types of failed events can occur:
- Service Component Architecture (SCA) events
- WebSphere MQ events
- Java™ Message Service (JMS) events
- Business Process Choreographer events
- Business Flow Manager hold queue events
To view, modify, resubmit, or delete any failed event, the first step is to display the failed event manager. Click Servers > Deployment Environments > env_name > Failed Event Manager.
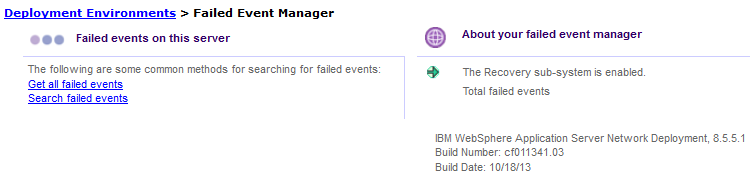
- Security considerations for recovery If you have enabled security for your IBM Business Process Manager applications and environment, it is important to understand how role-based access and user identity affect the Recovery subsystem.
- Finding failed events Use the failed event manager to help you search for failed events on all of the servers within the deployment environment. You can search for all failed events, or for a specific subset of events.
- Manage failed SCA events When problems processing a Service Component Architecture (SCA) request or response message create a failed SCA event in the Recovery subsystem, you must decide how to manage that event. Use the information in this topic to help you identify and fix the error and clear the event from the Recovery subsystem.
- Manage failed JMS events The Java Message Service (JMS) binding type and configuration determine whether a failed event is generated and sent to the failed event manager. When problems processing a JMS request or response message create a failed JMS event in the Recovery subsystem, you must decide how to manage that event. Use the information in this topic to help you identify and fix the error and clear the event from the Recovery subsystem.
- Manage failed WebSphere MQ events A WebSphere MQ event might fail if there is a problem such as a data-handling exception in the WebSphere MQ binding export or import used by an SCA module. When problems processing a WebSphere MQ request or response message create a failed WebSphere MQ event in the Recovery subsystem, you must decide how to manage that event. Use the information in this topic to help you identify and fix the error and clear the event from the Recovery subsystem.
- Manage stopped Business Process Choreographer events Stopped events occur if a Business Process Execution Language (BPEL) instance encounters an exception and one or more activities enter the Stopped state. Use the failed event manager and Business Process Choreographer Explorer to manage stopped Business Process Choreographer events in any process state. You can view, compensate, or terminate the process instance associated with a stopped Business Process Choreographer event. In addition, you can work with the activities associated with the event, viewing, modifying, retrying, or completing them as appropriate.
- Manage Business Flow Manager hold queue messages You can use the failed event manager to manage navigation messages that are stored in the Business Flow Manager hold queue. A navigation message might be stored in the hold queue if an infrastructure, such as a database, is unavailable or if the message is damaged.
- Work with data in failed events Each failed event has data about the event to help you identify when and where the failure occurred, including the event ID and status, the time it failed, and its deployment target. In addition, some types of failed events contain business data. You can browse the data for all failed events. In some cases, you can edit the data before resubmitting the event.
- Resubmitting failed events in BPM You can resubmit a failed event in BPM from the failed event manager. You can resubmit an event without changes, or, in some cases, you can edit the trace and expiration data or the business data before you resubmit the event. In addition, you can use the failed event manager to resubmit failed events with a process response qualifier to either the request queue or the response queue.
- Troubleshooting the failed event manager This topic discusses problems that you can encounter while using the failed event manager.
Security considerations for recovery
If you have enabled security for your IBM Business Process Manager applications and environment, it is important to understand how role-based access and user identity affect the Recovery subsystem.
- Role-based access for the failed event manager
- The failed event manager uses role-based access control for the failed event data and tasks. Only the administrator and operator roles are authorized to perform tasks within the failed event manager. Users logged in as either administrator or operator can view all data associated with failed events and can perform all tasks.
- Event identity and user permissions
- A failed event encapsulates information about the user who originated the request. If a failed event is resubmitted, its identity information is updated to reflect the user who resubmitted the event. Because different users logged in as administrator or operator can resubmit events, these users must be given permissions to the downstream components required to process the event.
For more information about implementing security, see Securing applications and their environment.
Finding failed events
Use the failed event manager to help you search for failed events on all of the servers within the deployment environment. You can search for all failed events, or for a specific subset of events.
One method of finding failed events is to click Get all failed events on the failed event manager main page; this action returns a list of all Service Component Architecture (SCA) and Java™ Message Service (JMS) failed events on the server. If Business Process Choreographer is installed, the query also returns failed, terminated, and stopped Business Process Choreographer events. You can use this search option when you have only a few failed events on the system, or when it is not necessary or possible to narrow the search results by criteria.
When you have a large number of failed events on the system, or when you want to examine only those events associated with a particular set of criteria, use a criteria-based search. The failed event manager supports searching based on the module, component, method, time period, session, qualifier, or exception associated with the failed event. Refer to the following table for more information about how and when to use the different criteria.
`
| Search criteria | Field or fields to use | Supported event types | Usage notes |
|---|---|---|---|
| The module, component, or method the event was en route to when it failed. | Module
Component Operation | SCA
JMS WebSphere MQ Business Process Choreographer Business Flow Manager hold queue | Use one or more of these fields to search for failed events associated with a specific module, component, or method. |
| The time period during which the event failed | From date To date | SCA
JMS WebSphere MQ Business Process Choreographer Business Flow Manager hold queue |
Formats for date and time are locale-specific. An example is provided with each field. If the value you provide is not formatted correctly, the failed event manager displays a warning and substitutes the default value for that field. The time is always local to the server. It is not updated to reflect the local time of the individual workstations running the administrative console. |
| The session in which the event failed | Session ID | SCA | None |
| The module or component from which the event originated | Source module
Source component | SCA | Use one or both of these fields to find only those failed events that originated from a specific source module or component. The failed event manager determines the source based on the point of failure, regardless of interaction type. |
| The type of business object in the failed event | Business object type | SCA | None |
| Whether the event had the event sequencing qualifier specified | Event sequencing qualifier | SCA | None |
| Whether the event caused the store to be started | Store and forward qualifier | SCA
Business Process Choreographer | None |
| Whether the event was caused because a failure response could not be sent to Business Process Choreographer | Process response qualifier | SCA | None |
| The exception thrown when the event failed | Exception text | SCA | Specify all or part of the exception text in the field to find all events associated with that exception. |
For more information about searching for failed events, see the online help available in the failed event manager.
Finding business process instances or Common Base Events related to a failed event
If a failed event is generated from a business process, the failed event manager provides a link to view that business process instance in Business Process Choreographer Explorer. In addition, a failed event can be related to one or more Common Base Events; in this case, the failed event manager has a link to those related events. A common session ID links the failed event with related business process instances or Common Base Events. Examining these related process instances or events can give you additional information about how or why the event failed.
Related tasks:
Troubleshooting Service Component Architecture and WebSphere MQ communications
Manage failed SCA events
When problems processing a Service Component Architecture (SCA) request or response message create a failed SCA event in the Recovery subsystem, you must decide how to manage that event. Use the information in this topic to help you identify and fix the error and clear the event from the Recovery subsystem. A Service Component Architecture (SCA) event is a request or response that is received by a service application. It might come from an external source, such as an inbound application adapter, or an external invocation to a web service. The event consists of a reference to the business logic that it wants to operate and its data, which is stored in a Service Data Object. When an event is received, it is processed by the appropriate application business logic.
A single thread of execution might branch off into multiple branches. The individual branches are linked to the main invoking event by the same session. If the business logic in a branch cannot run due to system failure, component failure, or component unavailability, a failed event is created. If multiple branches fail, a failed event is created for each branch. The Recovery service handles the following types of failed SCA events:
- Event failures that occur during an asynchronous invocation of an SCA operation
- Event failures that are caused by a runtime exception, for example, any exception that is not declared in the methods used by the business logic
The Recovery service does not handle failures from synchronous invocations.
The Recovery service sends failed SCA asynchronous interactions to failed event destinations that have been created on the deployment environment bus. The data for failed events is stored in the failed event database (by default, WPCRSDB). You can find the data in the failed event manager.
Failed SCA events typically have source and destination information associated with them. The source and destination are based on the failure point (the location where the invocation fails), regardless of the type of interaction. Consider the following example, where Component A is asynchronously invoking Component B. The request message is sent from A to B, and the response callback message is sent from B to A.
- If the exception occurs during the initial request, Component A is the source and Component B is the destination for the failed event manager.
- If the exception occurs during the response, Component B is the source and Component A is the destination for the failed event manager.
This pattern is true for all asynchronous invocations.
Because runtime exceptions are not declared as part of the interface, component developers should attempt to resolve the exception and thus prevent a runtime exception from inadvertently being propagated to the client if the client is a user interface.
To manage a failed SCA event.
- Use the failed event manager to locate information about the failed SCA event, taking note of the exception type.
- Locate the exception type in Table 1 to determine the location and possible causes of the error, as well as suggested actions for managing the failed event.
Failed SCA events
Exception type Possible cause of error Suggested action ServiceBusinessException A business exception occurred during the execution of a business operation. Look at the exception text to determine the exact cause, and then take appropriate action. ServiceExpirationRuntimeException A SCA asynchronous message has expired. Set the expiration time using the RequestExpiration qualifier on the service reference. Investigate why the service is not responding fast enough.
ServiceRuntimeException A runtime exception occurred during the invocation or execution of a service. Look at the exception text to determine the exact cause, and then take appropriate action. ServiceTimeoutRuntimeException Response to an asynchronous request was not received within the configured period of time. Set the expiration time using the RequestExpiration qualifier on the service reference. Investigate why the service is not responding fast enough.
ServiceUnavailableException This exception is used to indicate there was an exception thrown while invoking an external service via an import. Look at the exception text to determine the exact cause, and then take appropriate action. ServiceUnwiredReferenceRuntimeException A SCA reference used to invoke a service is not wired correctly. Look at the exception text to determine the exact cause, and then take appropriate action to correctly wire the SCA reference.
Manage failed JMS events
The Java™ Message Service (JMS) binding type and configuration determine whether a failed event is generated and sent to the failed event manager. When problems processing a JMS request or response message create a failed JMS event in the Recovery subsystem, you must decide how to manage that event. Use the information in this topic to help you identify and fix the error and clear the event from the Recovery subsystem. You can use the recovery binding property to enable or disable recovery for each JMS binding at authoring time. You can set the recoveryMode property to one of the following settings:
| bindingManaged | Allow binding to manage recovery for failed messages |
| unmanaged | Rely on transport-specific recovery for failed messages |
Recovery for JMS bindings is enabled by default. When it is enabled, JMS failed events are created in the following situations:
- The function selector fails
- The fault selector fails
- The fault selector returns the RuntimeException fault type
- The fault handler fails
- The data binding or data handler fails after one repetition in JMS
In addition, a failed SCA event is created when the ServiceRuntimeException exception is thrown in a JMS binding target component after another attempt in JMS.
These failures might occur during inbound or outbound communication. During outbound communication, JMSImport sends a request message and receives the response message. A failed event is generated if the JMS import binding detects a problem while it is processing the service response. During inbound communication, the following sequence of events occurs:
- JMSExport receives the request message.
- JMSExport starts the SCA component.
- The SCA component returns a response to JMSExport.
- JMSExport sends a response message.
A failed event is generated if the JMS export binding detects a problem while it is processing the service request.
The Recovery service captures the JMS message and stores it in a Recovery table in the Common database. It also captures and stores the module name, component name, operation name, failure time, exception detail, and JMS properties of the failed event. You can use the failed event manager to manage failed JMS events, or you can use a custom program.
To disable recovery, set the recoveryMode property to unmanaged.
If the recoveryMode property is missing for earlier versions of applications, the recovery capability is regarded as enabled. When recovery is disabled, a failed message is rolled back to its original destination and tried again. The system does not create a failed event.
To manage a failed JMS event.
- Use the failed event manager to locate information about the failed JMS event, taking note of the exception type.
- Locate the exception type in Table 1 to determine the location and possible causes of the error, as well as suggested actions for managing the failed event.
Failed JMS events
Exception type Location of error Possible cause of error Suggested action FaultServiceException Fault handler or fault selector There is malformed data in the JMS message. - Inspect the JMS message and locate the malformed data.
- Repair the client that originated the message so it creates correctly formed data.
- Resend the message.
- Delete the failed event.
There was an unexpected error in the fault handler or fault selector. - Debug the custom fault selector or fault handler, fixing any errors identified.
- Resubmit the failed event.
ServiceRuntimeException Fault handler The fault selector and runtime exception handler are configured to interpret the JMS message as a runtime exception. This is an expected exception. Look at the exception text to determine the exact cause, and then take appropriate action. DataBindingException or DataHandlerException Data binding or data handler There is malformed data in the JMS message. - Inspect the JMS message and locate the malformed data.
- Repair the client that originated the message so it creates correctly formed data.
- Resend the message.
- Delete the failed event.
There was an unexpected error in the data binding or data handler. - Debug the custom data binding or data handler, fixing any errors identified.
- Resend the message.
- Delete the failed event.
SelectorException Function selector There is malformed data in the JMS message. - Inspect the JMS message and locate the malformed data.
- Repair the client that originated the message so it creates correctly formed data.
- Resend the message.
- Delete the failed event.
There was an unexpected error in the function selector. - Debug the custom function selector, fixing any errors identified.
- Resend the message.
- Delete the failed event.
Manage failed WebSphere MQ events
A WebSphere MQ event might fail if there is a problem such as a data-handling exception in the WebSphere MQ binding export or import used by an SCA module. When problems processing a WebSphere MQ request or response message create a failed WebSphere MQ event in the Recovery subsystem, you must decide how to manage that event. Use the information in this topic to help you identify and fix the error and clear the event from the Recovery subsystem. You can use the recovery binding property to enable or disable recovery for each WebSphere MQ binding at authoring time. You can set the recoveryMode property to one of the following settings:
| bindingManaged | Allow binding to manage recovery for failed messages |
| unmanaged | Rely on transport-specific recovery for failed messages |
Recovery for WebSphere MQ bindings is enabled by default. When it is enabled, WebSphere MQ failed events are created in the following situations:
- The function selector fails
- The fault selector fails
- The fault selector returns the RuntimeException fault type
- The fault handler fails
- The data binding or data handler fails after another attempt in WebSphere MQ
In addition, a failed SCA event is created when the ServiceRuntimeException exception is thrown in a WebSphere MQ binding target component after another attempt in WebSphere MQ.
These failures might occur during inbound or outbound communication. During outbound communication, MQImport sends a request message and receives the response message. A failed event is generated if the WebSphere MQ import binding detects a problem while it is processing the service response. During inbound communication, the following sequence of events occurs:
- MQExport receives the request message.
- MQExport starts the SCA component.
- The SCA component returns a response to MQExport.
- MQExport sends a response message.
A failed event is generated if the WebSphere MQ export binding detects a problem while it is processing the service request.
The Recovery service captures the WebSphere MQ message and stores it in the failed event database. It also captures and stores the module name, component name, operation name, failure time, exception detail, and WebSphere MQ properties of the failed event. You can use the failed event manager to manage failed WebSphere MQ events, or you can use a custom program.
To disable recovery, set the recoveryMode property to unmanaged.
If the recoveryMode property is missing for earlier versions of applications, the recovery capability is regarded as enabled. When recovery is disabled, a failed message is rolled back to its original destination and tried again. The system does not create a failed event.
To manage a failed WebSphere MQ event.
- Use the failed event manager to locate information about the failed event, taking note of the exception type.
- Locate the exception type in Table 1 to determine the location and possible causes of the error, as well as suggested actions for managing the failed event.
Failed WebSphere MQ events
Exception type Location of error Possible cause of error Suggested action FaultServiceException Fault handler or fault selector There is malformed data in the WebSphere MQ message. - Inspect the message and locate the malformed data.
- Repair the client that originated the message so it creates correctly formed data.
- Resend the message.
- Delete the failed event.
There was an unexpected error in the fault handler or fault selector. - Debug the custom fault selector or fault handler, fixing any errors identified.
- Resubmit the failed event.
ServiceRuntimeException Fault handler The fault selector and runtime exception handler are configured to interpret the WebSphere MQ message as a runtime exception. This is an expected exception. Look at the exception text to determine the exact cause, and then take appropriate action. DataBindingException or DataHandlerException Data binding or data handler There is malformed data in the WebSphere MQ message. - Inspect the message and locate the malformed data.
- Repair the client that originated the message so it creates correctly formed data.
- Resend the message.
- Delete the failed event.
There was an unexpected error in the data binding or data handler. - Debug the custom data binding or data handler, fixing any errors identified.
- Resend the message.
- Delete the failed event.
SelectorException Function selector There is malformed data in the WebSphere MQ message. - Inspect the message and locate the malformed data.
- Repair the client that originated the message so it creates correctly formed data.
- Resend the message.
- Delete the failed event.
There was an unexpected error in the function selector. - Debug the custom function selector, fixing any errors identified.
- Resend the message.
- Delete the failed event.
Manage stopped Business Process Choreographer events
Stopped events occur if a Business Process Execution Language (BPEL) instance encounters an exception and one or more activities enter the Stopped state. Use the failed event manager and Business Process Choreographer Explorer to manage stopped Business Process Choreographer events in any process state. You can view, compensate, or terminate the process instance associated with a stopped Business Process Choreographer event. In addition, you can work with the activities associated with the event, viewing, modifying, retrying, or completing them as appropriate. Business Process Choreographer events might cause an activity to stop or the process instance to fail if they are not handled by the process logic. A failed event is generated when a long-running Business Process Execution Language (BPEL) process fails and one of the following events occurs:
- The process instance enters the failed or terminated state
- An activity enters the stopped state
The Recovery service captures the module name and component name for failed Business Process Choreographer events. Failed event data is stored in the Business Process Choreographer database (BPEDB) database.
The Recovery service does not handle failures from business process and human task asynchronous request and reply invocations.
To manage stopped events originating from a long-running BPEL process.
- Ensure the administrative console is running.
- Open the failed event manager by clicking...
- Servers | Deployment Environments
> env_name > Failed Event Manager.
- Perform a search to find the stopped Business Process Choreographer event or events you want to manage.
- For each stopped event you want to manage, do the following:
- Click the stopped event ID in the Event ID column of the Search Results page.
- From the event detail page, click Open calling process in Business Process Choreographer Explorer.
- Use Business Process Choreographer Explorer to manage the event and its associated activities.
- Click the stopped event ID in the Event ID column of the Search Results page.
Manage Business Flow Manager hold queue messages
You can use the failed event manager to manage navigation messages that are stored in the Business Flow Manager hold queue. A navigation message might be stored in the hold queue if an infrastructure, such as a database, is unavailable or if the message is damaged.
In a long-running process, the Business Flow Manager can send itself request messages that trigger follow-on navigation. These messages trigger either a process-related action ( starting a fault handler) or an activity-related action ( continuing process navigation at the activity). A navigation message always contains its associated process instance ID (piid). If the message triggers an activity-related action, it also contains the activity template ID (arid) and the activity instance ID (arid).
You can use the failed event manager to manage Business Flow Manager hold queue messages, or you can use a custom program.
You cannot delete Business Flow Manager hold queue messages in the failed event manager. If the related process instance does not exist, replay the hold queue message to delete the message.
Work with data in failed events
Each failed event has data about the event to help you identify when and where the failure occurred, including the event ID and status, the time it failed, and its deployment target. In addition, some types of failed events contain business data. You can browse the data for all failed events. In some cases, you can edit the data before resubmitting the event.
To browse failed event data, click any failed event ID. The failed event manager displays the data about the failed event data. For SCA events, you can edit the expiration and trace detail information from this detail page. If an event contains business data, the detail page has an Edit business data button. Click that button to open the business data editor, where you can browse and edit the business data. Note that you can edit only simple data types ( String, Long, Integer, Date, Boolean). If a data type is complex ( an array or a business object), you must navigate through the business data hierarchy until you reach the simple data types that make up the array or business object. Refer to the online help in the failed event manager for more information about viewing and editing this data.
Data associated with the failed event
All failed events have the following data:
- The event ID, type, and status
- The time the event failed
- The deployment target associated with the event
In addition, the following types of events have data specific to the event type:
- Business Process Choreographer
- Business Flow Manager hold queue
- JMS
- SCA
- WebSphere MQ
| Event type | Available data |
|---|---|
| SCA events |
|
| JMS events |
|
| WebSphere MQ events |
|
| Business Process Choreographer events |
|
| Business Flow Manager hold queue events |
|
Business data
SCA and Business Process Choreographer failed events typically include business data. Business data can be encapsulated in a business object, or it can be simple data that is not part of a business object. Business data for SCA failed events can be edited with the business data editor available in the failed event manager.
Resubmitting failed events in BPM
You can resubmit a failed event in BPM from the failed event manager. You can resubmit an event without changes, or, in some cases, you can edit the trace and expiration data or the business data before you resubmit the event. In addition, you can use the failed event manager to resubmit failed events with a process response qualifier to either the request queue or the response queue.
When a failed event is resubmitted, the processing resumes only for the failed branch and not for the entire event. You can use the unique ID of the event to track its success or failure. If a resubmitted event fails again, it is returned to the failed event manager with its original event ID and an updated failure time.
If you have modified the trace control value, you can also trace resubmitted SCA events to monitor the event processing.
If one of the following conditions occurs while an application is running in a unit-test environment or a production environment, you cannot resubmit the failed event:
- The application is stopped on the server
- The input and output parameters are modified
- The schema for the input and output parameters is modified
18. Development toolkit troubleshooting
These sections describe problems you might encounter while you are using the Business Monitor development toolkit.
You can find the latest troubleshooting tips as well as information about downloads and fixes in the Support and downloads tab of the following page:  IBM Business Monitor and WebSphere Business Monitor detailed system requirements.
- Business Monitor server fails to start in the test environment If you used a non-administrative ID to install a IBM Business Monitor server in a Windows installation of IBM Integration Designer or IBM Rational Application Developer, it is possible the server will fail to start in the Servers view.
- Java EE project generation results in an out-of-memory condition When you generate Java EE projects for very large monitor models, it is possible that you may experience an out-of-memory condition in the Eclipse workspace of IBM Integration Designer or in IBM Rational Application Developer.
- Server does not appear in the Servers view After you have installed the IBM Business Monitor development toolkit, the IBM Business Monitor server should appear in the Servers view in Rational Application Developer or Integration Designer. Verify the profile was created and restart Rational Application Developer or Integration Designer using the -clean parameter.
- Manually removing workspace server configuration To avoid problems with unresolved project resources, you should not continue to use the Business Monitor development toolkit workspace after the toolkit has been uninstalled. However, to use the workspace for non-toolkit projects, you should first remove any remaining toolkit server configurations.
- Visual model testing returns unexpected results When you are testing the visual model in the Monitor Model editor, you might get unexpected values if you use expressions containing user-defined XML Path Language (XPath) functions with certain dependencies. These functions might not evaluate as expected if they require database access, need to run in a Java™ 5 Platform, Enterprise Edition container, have dependencies on other JAR files, or are not capable of executing within a development environment for any other reason.
- Code generation fails when generating Java EE projects Event generation sometimes produces very long file names for the Common Base Events. You cannot generate the Java EE projects if you are using any Common Base Events with very long file names.
- Deployed monitor models are not startable A deployed monitor model does not show up as startable or started in the Integration Designer or Rational Application Developer servers view or in the WebSphere Application Server administrative console if the monitor model name or path name is too long.
- Top-level monitoring context is not created If you generated a monitor model from an Integration Designer application and your process is running and emitting events but a top-level monitoring context is not created when you think it should have been, you might not have created all the required events. This problem can also result in many No parent found exceptions.
- Metrics are not being evaluated correctly If you have a metric that you think is not being evaluated correctly at run time, and the metric receives its value from an expression that references itself or another metric, check that all reference metrics are being initialized correctly before they are used.
- Monitor models are not created for all imported processes When you import from WebSphere Business Modeler and two processes in the same project have the same name, even if they are in different catalogs, only one monitor model is generated for them.
- Versioning model in test environment fails After you remove a model with no errors and try to install a new version of that model (with a new time stamp and name) in the test environment, deployment of the model might intermittently fail.
- IBM Business Monitor server stops unexpectedly in the test environment If you are using the IBM Business Monitor test environment or a standalone environment where FileStore was selected as the Messaging Engine Repository, the system could stop and you might need to increase the file store size.
- Integrated Test Client cannot process imported events If an XML file of events begins with a blank line, the Integrated Test Client cannot read the file and therefore cannot emit the events. The only message that shows in the Integrated Test Client console is Emitting events.
- Monitor model debugger terminates after model is changed If you modify the monitor model and maintain the data from the previous debugging session, the debugger might terminate with an unrecoverable error in the SystemOut log.
- Monitor model debugger fails to start with older monitor model If you try to debug a monitor model that was created using an earlier version of the Monitor Model editor or using another tool, the monitor model debugger might fail to start.
Business Monitor server fails to start in the test environment
If you used a non-administrative ID to install a IBM Business Monitor server in a Windows installation of IBM Integration Designer or IBM Rational Application Developer, it is possible the server will fail to start in the Servers view.
If the server fails to start, you must first restart Integration Designer or Rational Application Developer using a user account that has administrative authority.
- In Integration Designer or Rational Application Developer, select File > Exit to exit the application.
- Open Windows Explorer and navigate to the location where Integration Designer or Rational Application Developer is installed.
- Launch Integration Designer or Rational Application Developer again by completing one of the following steps:
- On Windows XP, right-click the Integration Designer or Rational Application Developer executable and select Run As to open the Run As window, then specify the name of a user account that has administrative authority and click OK.
- On Windows Vista or Windows 7, right-click the Integration Designer or Rational Application Developer executable and select Run As Administrator.
- In the Servers view, select the Business Monitor server and click the Start icon.
The server should successfully start. When you next launch Integration Designer or Rational Application Developer, you can launch it in your usual way and you will not need to launch it using the Run As or Run as Administrator menu item.
Java EE project generation results in an out-of-memory condition
When you generate Java EE projects for very large monitor models, it is possible that you may experience an out-of-memory condition in the Eclipse workspace of IBM Integration Designer or in IBM Rational Application Developer.
To resolve these out-of-memory conditions, it is recommended that you increase the Java maximum heap size for Eclipse.
- Edit the eclipse.ini file located in the installation path of Integration Designer or Rational Application Developer.
- Change the Xmx parameter to a larger value, such as -Xmx1280m, -Xmx1408m, or -Xmx1536m.
- RestartIntegration Designer or Rational Application Developer and then create a new workspace.
- Generate the Java EE project for your monitor model.
Additional information about increasing the maximum heap size is found in the technote How to avoid "Out of Memory" error in Headless WebSphere Integration Developer environment.
Server does not appear in the Servers view
After you have installed the IBM Business Monitor development toolkit, the IBM Business Monitor server should appear in the Servers view in Rational Application Developer or Integration Designer. Verify the profile was created and restart Rational Application Developer or Integration Designer using the -clean parameter.
- Verify the profile was created in the profile_root directory.
- Start Rational Application Developer or Integration Designer with the -clean parameter.
- Open a command prompt and navigate to the directory where Rational Application Developer or Integration Designer is installed.
- Type one of the following commands depending on the development environment:
- Rational Application Developer: eclipse.exe -clean
- Integration Designer: wid.exe -clean
- If the server still does not appear, create a new server following the instructions in Add a new server to the test environment.
Manually removing workspace server configuration
To avoid problems with unresolved project resources, you should not continue to use the Business Monitor development toolkit workspace after the toolkit has been uninstalled. However, to use the workspace for non-toolkit projects, you should first remove any remaining toolkit server configurations. When you remove Business Monitor development toolkit using IBM Installation Manager, IBM Business Monitor server configurations remain in the workspace. After the uninstallation completes successfully, you can use the following procedure to delete the configurations from the workspace.
- In the development application, select Window > Show View > Servers.
- In the Servers view, delete the server configurations that are applicable to the environment.
- When the Delete Server confirmation message is displayed, make selections pertaining to the deletion of actively running servers and click OK.
WebSphere Business Monitor TechNotes
Visual model testing returns unexpected results
When you are testing the visual model in the Monitor Model editor, you might get unexpected values if you use expressions containing user-defined XML Path Language (XPath) functions with certain dependencies. These functions might not evaluate as expected if they require database access, need to run in a Java™ 5 Platform, Enterprise Edition container, have dependencies on other JAR files, or are not capable of executing within a development environment for any other reason. The problem occurs because the Monitor Model editor does not have the underlying infrastructure to support these dependencies. The user-defined XPath functions will work as expected when you run the functions on the IBM Business Monitor server or within the test environment.
Code generation fails when generating Java EE projects
Event generation sometimes produces very long file names for the Common Base Events. You cannot generate the Java EE projects if you are using any Common Base Events with very long file names. If this problem occurs, you will see an error when you right-click and select Generate Monitor Java EE Projects. Code generation fails with a code generation exception. If you click Details, the first line contains Class 'eventDefinitionList' not found.
To solve this problem:
- In the Project Explorer, under Event Definitions, select the event definition name and click Rename. Type a new name for the Common Base Event file.
- In the Monitor Model editor, click the Event Model tab and locate the Common Base Event file that you renamed. Click Remove. Click Add, browse to the new name, and click OK.
Deployed monitor models are not startable
A deployed monitor model does not show up as startable or started in the Integration Designer or Rational Application Developer servers view or in the WebSphere Application Server administrative console if the monitor model name or path name is too long.
If you try to deploy a monitor model with a long name, the monitor model does not show up as startable or started. An I/O exception occurs when loading the deployment descriptor from the deployed EAR file, which resides in a deep directory because of the long monitor model name. This exception occurs because Windows only supports 259 characters in any given path. Any path longer than 128 characters at creation time will likely cause problems by the time the model is deployed.
The exception is found in the System.Out log file and resembles the following:
00000075 MMIntegration E com.ibm.wbimonitor.lifecycle.
MMIntegration_General bindJMS_BATCH CWMLC0652E:
Runtime exception has occurred. Integration work flow will stop.
There are two possible ways to solve this problem. Either shorten the path to the temporary directory used by the Monitor test environment server, or shorten the name of the deployed monitor model.
Shortening the path to the temporary directory
To shorten the path to the temporary directory used by the server:
- Completely remove the monitor model, following all the steps in Remove the monitor model.
- Create a directory with a short name on the C drive, for example, C:\tmp.
- Start Rational Application Developer or Integration Designer and open the Servers view. Right-click the Monitor test environment server and click Administration > Run administrative console.
- Navigate to Servers > Server types > WebSphere application servers. Click server1.
- Under Server infrastructure, open Java and Process Management. Click Process Definition. Click Java Virtual Machine.
- In Generic JVM arguments, type:
- -Dworkspace.user.root=C:\tmp
- Click OK. Click Save.
- In the Business Monitoring perspective, in the Project Explorer, right-click the monitor model and click Generate Monitor Java EE projects. Add the monitor model EAR file to the server, following the steps in Add projects to the Monitor test environment server.
When the server restarts, it uses the C:\tmp directory as the Monitor test environment server temporary directory.
Shortening the name of the deployed monitor model
To shorten the name of the deployed monitor model:
- Completely remove the monitor model, following all the steps in Remove the monitor model.
- In the Business Monitoring perspective, in the Project Explorer, right-click the monitor model and click Generate Monitor Java EE projects.
- In the Generate Monitor Java EE Projects window, shorten the names for the Model Logic, Moderator, and Application files.
- Add the monitor model EAR file to the server, following the steps in Add projects to the Monitor test environment server.
Top-level monitoring context is not created
If you generated a monitor model from an Integration Designer application and your process is running and emitting events but a top-level monitoring context is not created when you think it should have been, you might not have created all the required events. This problem can also result in many No parent found exceptions. This problem occurs when the creation event for the top-level monitoring context is sent AFTER the other events that are being monitored.IBM Business Monitor tries to deliver the earlier events but cannot find a monitoring context instance to deliver them to, so it performs whatever action you specified for No matching monitoring context instances are found, which might include retrying delivery a number of times, ignoring the event, or generating an exception. Choosing the option for retrying the delivery of the event can help if the problem is just a timing issue, with some events arriving before the creation event because the events were sent out of order. In general, however, the creation event for the top-level monitoring context must arrive before any other events, including the creation events for any nested monitoring contexts.
To solve this problem:
- In the Monitor Model editor, right-click the top-level monitoring context and click Update from Application > application name, where application name is the application from which you generated the monitor model. Locate the component-level entry event for the component implementation that you are monitoring, and add it to your monitor model. Component-level events are represented by the blue cog icon that can be found in the event source tree within the wizard. Component-level events typically consist of ENTRY, EXIT and FAILURE events.
- In the Project Explorer, right-click the monitor model and click Generate Monitor Java EE projects.
- Add the updated project to the server.
Metrics are not being evaluated correctly
If you have a metric that you think is not being evaluated correctly at run time, and the metric receives its value from an expression that references itself or another metric, check that all reference metrics are being initialized correctly before they are used.
For example, you could have a metric that references itself so that its value can be incremented or used in the calculation of its future value, or you could have a metric that is calculated using another metric. If one of the referenced metrics is not set initially, its value will always be null because it does not have a value to use in the initial calculation.
To solve this problem when a metric references itself, make sure the metric has a default value. If the metric uses a calculation that involves another metric, you can either set a default value for the referenced metric or you can add a guard condition such as if (fn:exists(someMetric) then (someMetric + someOtherMetric) else someOtherMetric to make sure the referenced metric has a value.
Monitor models are not created for all imported processes
When you import from WebSphere Business Modeler and two processes in the same project have the same name, even if they are in different catalogs, only one monitor model is generated for them. You exported a project from WebSphere Business Modeler using the IBM Integration Designer export and clicked Export business measures as a monitor model or models. Only one monitor model was generated for two or more processes with the same name in different catalogs.
To solve this problem, you must return to WebSphere Business Modeler. You can either change the name of one of the processes, or complete the following steps:
- In WebSphere Business Modeler, switch to Process Server mode.
- Click the Technical Specification tab for one of the processes.
- Select the Implementation page, and set the Component name to a different name.
Export the project and monitor models again.
Versioning model in test environment fails
After you remove a model with no errors and try to install a new version of that model (with a new time stamp and name) in the test environment, deployment of the model might intermittently fail. When the failure occurs, the exception might read, for example:
AppDeploymentException: [] org.eclipse.jst.j2ee.commonarchivecore.internal.exception.SaveFailureException:
IWAE0017E Unable to replace original archive:
C:\IBM\WID61\wbmonitor\profiles\WBMonSrv_wps\wstemp\0\upload\SCAModelApplicationCSV2.ear IWAE0017E Unable to replace original archive:
C:\IBM\WID61\wbmonitor\profiles\WBMonSrv_wps\wstemp\0\upload\SCAModelApplicationCSV2.ear
Take the following action to correct the problem:
- Delete the contents of the wstemp directory.
- Restart the test server.
- Reinstall the new version of the model.
IBM Business Monitor server stops unexpectedly in the test environment
If you are using the IBM Business Monitor test environment or a standalone environment where FileStore was selected as the Messaging Engine Repository, the system could stop and you might need to increase the file store size. Check the SystemOut.log file for an error message similar to the following message:
 ObjectStoreFullException: CWSOM1042E:  ObjectStore=AbstractObjectStore(C:\IBM\WID61\wbmonitor\profiles
\WBMonSrv_wps\filestores\com.ibm.ws.sib\WBMonSrv_wps_Node.server1-MONITOR.WBMonSrv_wps_Cell.Bus-263BD65C369C145F
\store\PermanentStore)/1a041a04(ObjectStore) was asked to allocate space for ManagedObject=ManagedObject(null/null)/Constructed/1a001a0(PersistableRawData[ BINARYDATA ])
(ManagedObject) when it was full.
To increase the file store size on the messaging engine:
- Stop and restart the IBM Business Monitor server.
- Log in to the administrative console and select Service Integration > Buses > Monitor.[cellName].Bus > Messaging Engines.
- Open the Messaging Engine.
- Under Additional Properties, select Message Store.
- Increase the Maximum Permanent Store Size.
- Stop and restart the IBM Business Monitor server.
Integrated Test Client cannot process imported events
If an XML file of events begins with a blank line, the Integrated Test Client cannot read the file and therefore cannot emit the events. The only message that shows in the Integrated Test Client console is Emitting events.
To verify that a blank line is the problem, open the Windows Explorer browser and enter %TEMP% in the address line to find the temp directory on the machine. In the temp directory, open the ITCEmitter.log file. You might see a message similar to the following message:
INFO: WBM_ITC_EXCEPTION_OCCURRENCE :: Event Generator error using file: The processing instruction target matching "[xX][mM][lL]" is not allowed. : The processing instruction target matching "[xX][mM][lL]" is not allowed.
org.eclipse.hyades.logging.events.cbe.FormattingException: The processing instruction target matching "[xX][mM][lL]" is not allowed. : The processing instruction target matching "[xX][mM][lL]" is not allowed.
This error occurs because the file is not a valid XML file and the XML schema validation fails. The XML file could also fail validation for many other reasons, but a blank line at the beginning is one thing to check for. The file must be a valid XML file.
To fix this problem, delete the blank line at the beginning of the file and save your changes. Try to emit the events again using this file in the Integrated Test Client.
Monitor model debugger terminates after model is changed
If you modify the monitor model and maintain the data from the previous debugging session, the debugger might terminate with an unrecoverable error in the SystemOut log. If you debug a monitor model, make changes, and then debug the same model again and do not select the check box to Clear data from previous debug sessions, the debugger might terminate. In the SystemOut.log, you see an error that begins with R FATAL ERROR: '[ERR XP1031][ERR XPST0008] Variable or parameter '{http://www.ibm.com/xmlns/prod/websphere/ice}target1' is undefined.
This problem occurs because the previous events are no longer valid for the modified monitor model.
To solve the problem:
- Terminate the debugging session.
- Right-click the monitor model in the Project Explorer view, and click Debug As > Debug.
- In the Debug configuration window, right-click Monitor Model in the list and click New to create a new debug configuration. Alternatively, select an existing configuration that you have used before.
- Select Clear data from previous debug sessions to empty the input queue of incoming events and remove any remaining monitoring context instances from the previous debugging sessions.
- Use the Integrated Test Client to resubmit your events.
To prevent this problem, only retain data between debugging sessions when you are taking an incremental approach to debugging or your test cases are logically connected to one another.
Monitor model debugger fails to start with older monitor model
If you try to debug a monitor model that was created using an earlier version of the Monitor Model editor or using another tool, the monitor model debugger might fail to start. To be debugged, a monitor model must declare XML namespace prefixes for the XML Schema namespace and the XPath functions namespace. These definitions are added automatically if the monitor model is created using the Monitor Model editor.
To solve the problem, add the following to the namespace declaration section at the top of the monitor model:
xmlns:fn="http://www.w3.org/2005/xpath-functions"
xmlns:xs="http://www.w3.org/2001/XMLSchema"
19. Recovering from a failure
Recovering from a failure requires an understanding of standard system processing in the event of a failure, as well as an understanding of how to analyze problems that may be the cause of a failure.
- Overview of the recovery process The recovery process encompasses a set of tasks that include both analysis and procedures.
- Triggers for recovery The need for solution recovery can result from a variety of triggers.
- Assessing the state of the system The first thing to do when an abnormal condition occurs is to take the pulse of the overall system and get a feel for how much or how little of the system is operational and how much of it is rendered 'out of service' by whatever the external stimuli was that caused this condition.
- Recovery: Analyzing the problem For all unplanned system events, a set of basic recovery procedures can be leveraged at the point of identification.
- Recovery: First steps Administrators can facilitate solution recovery processes by following a first steps checklist of general practices.
- Failed-event locations: Where does the data go? For all (production and test) recovery activities there are a finite number of locations in the solution where events accumulate.
- Recovery troubleshooting tips This section provides a list of tips for troubleshooting the recovery process.
Overview of the recovery process
The recovery process encompasses a set of tasks that include both analysis and procedures.
When you must recover from a failure, these are the high-level steps to follow:
- Familiarize yourself with the possible kinds of failures. See Triggers for recovery for more information.
- Assess the state of the system. See Assessing the state of the system for more information.
- Form a hypothesis about what the problem is.
- Collect and analyze the data.
- Refer to other topics in this information center for instructions on fixing the problem.
Triggers for recovery
The need for solution recovery can result from a variety of triggers.
Situations from which solution recovery is necessary
Solution recovery is the process of returning the system to a state from which operation can be resumed. It encompasses a set of activities that address system failure or system instability that can be triggered by unforeseen circumstances.
You may need to perform solution recovery activities for the following circumstances:
- Hardware failure
Abnormal termination or system down can be caused by a power outage or catastrophic hardware failure. This can cause the system (all if not most JVMs) to stop.
In the case of a catastrophic hardware failure, the deployed solution may enter an inconsistent state on restart.
Hardware failures and environmental problems also account for unplanned downtime, although by far not as much as the other factors.
You can reduce the likelihood of hardware failures and environmental problems by using functions such as state-of-the-art LPAR capabilities with self-optimizing resource adjustments, Capacity on Demand (to avoid overloading of systems), and redundant hardware in the systems (to avoid single points of failure).
- System is not responsive
New requests continue to flow into the system but on the surface it appears that all processing has stopped.
- System is unable to initiate a new BPEL process instance
The system is responsive and the database seems to work correctly. Unfortunately, the new BPEL process instance creation is failing.
- Database, Network or Infrastructure Failure
In the case of fundamental infrastructure failure, the solution may require administration to restart/resubmit business transactions after the infrastructure failure is resolved.
- Poor tuning or a lack of capacity planning
System is functional but is severely overloaded. Transaction time-outs are reported and there is evidence of an overflow of the planned capacity.
Incomplete capacity planning or performance tuning can cause this type of solution instability.
- Defects in application module development
The modules that are part of a custom developed solution can have bugs. These bugs can result in solution instability and failed services.
Bugs in a custom developed solution can result from a variety of situations, including (but not limited to) the following:
- Business data that was not planned for or unforeseen by the application design.
- An incomplete error handling strategy for the application design.
A detailed error handling design can reduce solution instability.
- WebSphere software defect
A defect in the WebSphere product causes a backlog of events to process or clear.
Assessing the state of the system
The first thing to do when an abnormal condition occurs is to take the pulse of the overall system and get a feel for how much or how little of the system is operational and how much of it is rendered 'out of service' by whatever the external stimuli was that caused this condition.
Address a predefined set of questions to assess the extent of the outage. The following list provides examples of predefined questions designed to help you gather the appropriate information:
- Is this system still performing work?
Determine if system is still operational. Often times, a system can be operational, but because of overload or inappropriate tuning, or both, the system is not completing tasks quickly and is attempting to do work that is indeed failing.
The litmus test for each of these questions will be specific to the nature of the deployed solution.
- What special error handling support is built-in to the application?
If there is a lot of automated retry and various support logic, then the application itself might shield some errors from manifesting the IT operator.
These conditions must be known and documented for reference by the recovery team.
Things you can do to help assess the state of the system include the following:
- Check to see if the server is at least running.
Do you see the PID or get a positive feedback from the deployment manager via the administrative console?
- Check to see if there are locks in the database(s) or any unusual database traffic.
Most databases will have facilities to look at locks. Depending on the deployment topology, there maybe multiple databases.
- Messaging Engine Database
- Business Process Container Database
- WebSphere Process Server Common Database (Failed Events and Relationship data)
- Check to see what the status of the messaging system is.
Check for events or messages in the following locations:
- Business Process Choreographer Hold and Retention Destinations
- Number of failed events
- Number of messages on the solutions module destinations
- Check to see if the database is functioning.
Can you perform some simple SELECT operation, on unlocked data in a reasonable amount of time?
- Check to see if there are errors in the database log.
If the database is not working properly, then recovering the database (so that it can at least release locks and perform simple selects) is vital to system recovery.
If the messaging system is not working properly, then recovering the messaging subsystem, so that it can at least be viewed and managed, is also vital to system recovery.
A 'bottoms up' approach is not always conclusive. However, chances of successful recovery vary based on these basic activities.
From these basic procedures and health check kinds of activities, start to look at some specific situations. Patterns will be described, specifics will be given and insights as to what is going on under the covers will be provided.
Realize that this situational analysis is a read-only activity. While it provides vital information from which to determine the appropriate recovery actions, it should not change the state of the system under review. It is impossible to predict and provide prescriptive actions for all possible causes of a system outage. For example, consider the following decision tree:

There are many broad categories to investigate in the event of an unplanned outage. These broad categories will have sub categories and so on. Defining prescriptive actions for each node and the subsequent node will depend on the results of each investigation. Because this type of relationship is difficult to convey in a document form, using a support tool such as IBM Guided Activity Assist to interactively walk you through the investigative and decision making process is recommended. As you progress from the top to each child node, it is important to conduct the appropriate level of situational analysis.
Recovery: Analyzing the problem
For all unplanned system events, a set of basic recovery procedures can be leveraged at the point of identification.
There are six well defined steps to situational analysis:
- Define the question
- Gather information and resources (observe)
- Form hypothesis
- Perform experiment and collect data
- Analyze data
- Interpret data and draw conclusions that serve as a starting point for new hypothesis
For each production scenario the symptoms that initiate a recovery action may vary.
It is important to follow the guidelines for situational analysis and take the corrective action relative to the symptoms that are presented.
- Situational analysis Situational analysis is the cyclical execution of the scientific method and can take into account various situations that will initiate a recovery procedure.
Situational analysis
Situational analysis is the cyclical execution of the scientific method and can take into account various situations that will initiate a recovery procedure.
The following list is of the different types of situations that will initiate a recovery procedure:
- Abnormal termination or system down
A power outage or catastrophic hardware failure has caused the system (all if not most JVMs) to stop.
- System is not responsive
New requests continue to flow into the system but on the surface it appears that all processing has stopped.
- System is functional but is severely overloaded
Transaction time-outs are reported and there is evidence of an overflow of the planned capacity.
- System is unable to initiate new process instance
The system is responsive and the database seems to work correctly. Unfortunately, new process instance creation is failing.
Recovery: First steps
Administrators can facilitate solution recovery processes by following a first steps checklist of general practices.
The following list describes actions that you SHOULD NOT TAKE under normal circumstances when trying to recover a solution.
There could be special situations for which you might need to perform some of the actions listed in this topic. However, you should never initiate any of these actions without first consulting with the BPM support organization.
- Do not delete the transaction log file
The transaction (tranlog) log file stores critical transactional data that is written to databases. It is an internal file that WebSphere Application Server uses to manage in-flight transactions and attempt to recover them should the server lock up.
- Do not have the transaction logs local on the cluster members
Put the transaction logs on a shared drive. This is the only way to allow peer recovery, which helps minimize the downtime during recovery.
- Do not attempt database operations where the result set is large enough to additional resource contention (OutOfMemory)
- Avoid performing Business Process Choreographer Explorer operations that return large result sets.
- Avoid executing administrative scripts on process instances without considering the result set size.
- Do not drop or re-create databases in production
- Do not uninstall applications as part of your standard recovery procedures
You should only uninstall applications with the direction from the IBM support organization.
- Do not enable too much trace if the system is overloaded.
Too much trace will cause a slowdown in system throughput and might cause transaction time-outs. Too much trace can often add to the problems that need to be addressed, rather than providing insight as to how to solve the original problems.
Get immediate assistance from IBM support to define the correct trace specification.
- Do not experiment or try out new scripts or new commands on production systems.
- Do not run BPMion servers in development mode
Enable the Run in development mode option may reduce the startup time of an application server. This may include JVM settings such as disabling bytecode verification and reducing JIT compilation costs.
The following list describes the recommended recovery actions.
- Always take a snapshot of the configuration tree, the PI file of the application in question and the logs which are available.
Logs may be overwriting themselves depending on the configuration. Capturing a set early and often is an important step for postmortem analysis. See the topic on IBM Support Assistant (ISA) for details on the IBM Support Assistant, which helps with this type of activity.
- Always understand the database settings, especially related to database transaction log file size, connection pools, and lock timeouts.
Failed-event locations: Where does the data go?
For all (production and test) recovery activities there are a finite number of locations in the solution where events accumulate.
By adhering to guidelines and preventive measures described in Planning error prevention and recovery, all business events and associated data will reliably accumulate in one of these locations.
If you do not adhere to sound architectural and application development practices, then a percentage of inflight events may end up in an inconsistent state, from which recovery cannot be attained. Under such circumstances, (presumably identified during testing cycles) post recovery investigation and clean up is necessary to correct the issue so that future recovery activities are completely successful.
In order to accurately describe the following scenarios, it is important to put the information in the context of a use case.
- Use case: recovering data from failed events A use case provides a context for a recovery scenario. In the use case, a business has an application that receives a request to create a new Account.
Use case: recovering data from failed events
A use case provides a context for a recovery scenario. In the use case, a business has an application that receives a request to create a new Account.
The solution consists of multiple modules as recommended through module best practices.
The first module mediates the request and delegates work to an Account Creation process. In the Figure 1 we have implemented the solution as separate modules where the request is passed between the mediation module (AccountRouting) and the processing module (AccountCreation) via an SCA import/export. See the following screen capture for an illustration of the two modules.
Figure 1. Assembly diagram of account routing process

From the assembly diagram shown in Figure 1, you can begin to see at what locations in the flow that failures might occur. Any of the invocation points in the assembly diagram can propagate or involve a transaction. There are a few areas in the flow where data will collect as a result of application or system failures.
In general, transaction boundaries are created and managed by the interaction (synchronous and asynchronous) between components and import/export bindings and their associated qualifiers. Business data accumulates in specific recovery locations most often due to transaction failure, deadlock or rollback.
Transaction capabilities within WebSphere Application Server help IBM Business Process Manager enlist transactions with service providers. These enlisted interactions are particularly important to understand with respect to import and export bindings. Understanding how imports and exports are used within your specific business cases is important in determining where events in need of recovery accumulate.
An error handling strategy should define interaction patterns, transactions used, and import and export usage before developing the application. The solution architect should identify the preferences to use, and the guidelines that are then used as the application is created. For example, the architect needs to understand when to use synchronous compared to asynchronous calls, when to use BPEL fault handling and so forth. The architect must know whether or not all services can participate in transactions, and for those services that cannot participate, how to handle compensation if problems are encountered.
Additionally, the application shown in the assembly diagram in Figure 1 uses connectivity groups and module development best practices. By leveraging this pattern we now have the ability to stop the inbound flow of new events by stopping the AccountRouting module.
The following sections address the location of business data in the case of failure and recovery.
Business Flow Manager or Human Task Manager
In our business case, we use a BPEL process for AccountCreation process.
With regard to recovery, there are a some questions ask yourself with respect to BPEL and human task management:
- What type of process is being run (short running or long running, business state machine, human task) ?
Short running processes are known as microflows.
- Is the process developed properly and using fault handling to promote data integrity?
- How are the invocation patterns and unit of work properties configured to predict and control transaction boundaries?
Knowing the answers to these questions will affect your recovery strategy for invocations 7 and 8 shown in the assembly diagram, as highlighted in Figure 2.
Figure 2. Assembly diagram of account routing - invocations 7 and 8

Stateful components, such as long-running BPEL processes and business state machines, involve many database transactions where process activity changes and state changes are committed to the database. The work progresses by updating the database, and placing a message on an internal queue that describes what is to be done next.
If there are problems processing messages that are internal to the Business Flow Manager, these messages are moved to a Retention Queue. The system attempts to continue to process messages. If a subsequent message is successfully processed, the messages on the retention queue are resubmitted for processing. If the same message is placed on the retention queue five times, it is then placed on the hold queue.
Additional information about viewing the number of messages and replaying messages can be found in Replaying Messages from the Retention Queue / Hold Queue.
Failed event manager
The failed event manager is used to replay events or service invocation requests that are made asynchronously between most component types.
Failed events are created if the AccountRouting component makes an asynchronous call to the SCA Import binding AccountCreationSCAImport and a ServiceRuntimeException is returned.
Failed events are not generated in most cases where a long running BPEL process is the client in the service interaction. This means the invocation for 7 and 8 (as shown in Figure 2) will not typically result in a failed event. BPEL provides fault handlers and other ways to model for failure. For this reason, if there is a ServiceRuntimeException (SRE) failure calling "JDBCOutboundInterface", the SRE is returned to the BPEL for processing. The error handling strategy for the project should define how runtime exceptions are consistently handled in BPEL.
However, failed events are created for asynchronous response message for the BPEL client if these messages cannot be delivered to the process instance due to an infrastructure failure.
When mediation Service Invoke or Callout primitives are making an asynchronous invocation, retry behavior is defined by the primitive and overrides any asynchronous behavior from the destination. Failed events go to the failed event manager if the fail terminal on the primitive is not wired.
The following diagram illustrates how the failed event manager component works. Descriptions of the processing associated with each numbered step are provided in Figure 3.
Figure 3. Failed event manager processing

Failed event manager processing
- The source component makes a call using an asynchronous invocation pattern
- The SCA MDB picks the message up off the SCA destination
- The SCA MDB makes the call to the correct target component
- The target component throws a ServiceRuntimeException
- The SCA MDB transaction rolls back to the SCA destination
- The exception information is stored to the failed event manager database with a status of not confirmed
- The invocation is retried by the SIBus n number of times
The initial retry count value for new modules is 0 - one original and 0 retries. Existing modules from previous releases keep the existing retry count value of 4. You can change the retry count value by setting the asynchronous retry count for the modules at design time. Also, administrators can change it at run time using the configSCAAsyncRetryCount command. See Controlling system retries overview.
- After the number of retries reaches the specified limit, the message is moved to the failed event manager destination.
- The failed event manager database picks up the message
- The failed event manager database updates the failed event in the database, and the status is set to failed.
When are failed events created?
As stated, failed events are neither created for synchronous invocations nor typically for two-way business process interactions.
Failed events are generally created when clients use an asynchronous invocation pattern and a ServiceRuntimeException is thrown by the service provider.
If everything is done synchronously and in the same transaction, data is not collected anywhere. Instead it is all rolled back to the client that made the call. Where ever a commit is occurs, data collects. If the calls are all synchronous, but there are multiple commits, then these commits become an issue.
In general, you should use asynchronous processing calls or long running BPEL processes if multiple transactions are needed. So each ASYNC call is a chance for data to collect. Long running BPEL processes are a collection point.
| Invocation Pattern | Failed Event Created Y/N? | Notes |
|---|---|---|
| Synchronous | No | Failed events are not created for service business exceptions or when using a synchronous pattern |
| Asynchronous - One Way | No | By definition, one-way invocations cannot declare faults, meaning, it is impossible to throw a ServiceBusinessException. |
| Asynchronous - Deferred Response | No | Failed events are not created for service business exceptions |
| Asynchronous - Callback | No | Failed events are not created for service business exceptions |
| Invocation Pattern | Failed Event Created Y/N? | Notes |
|---|---|---|
| Synchronous | No | Failed events are not created for service runtime exceptions or when using a synchronous pattern. |
| Asynchronous - One Way | Yes | |
| Asynchronous - Deferred Response | Yes | |
| Asynchronous - Callback | Yes | |
| BPEL - Two Way | No |
Failed events are not created when the source component is a business process. For an asynchronous call, if the response cannot be returned to BPEL, then a failed event is created. |
| BPEL - One Way | Yes |
For additional information, review the information center topic titled Manage failed events.
Additional information about viewing and resubmitting failed events can be found in section Resubmitting failed events.
Service integration bus destinations
Messages that are waiting to be processed may accumulate in a few service integration bus (SIBus) destinations. For the most part these destinations are "system" destinations. Messages within these destinations typically are a mixture of three types:
- Asynchronous requests for processing
- Asynchronous replies to requests
- Asynchronous messages that failed deserialization or function selector resolution
Asynchronous replies can be valid Business Objects or faults returned as a result of a request.
SCA module destination
Again, refer back to our business case.
There would be two SCA module destinations in the solution:
- sca/AccountRouting
- sca/AccountCreation
These destinations are created when the module is deployed to an application server or a cluster.
There are rare opportunities for messages to accumulate in these destinations. The accumulation of messages in these locations is a strong indication there maybe a performance problem or an application defect. Investigate immediately. It is important to monitor the depth of the module destinations (with your chosen IT monitoring solution), because a back up of messages could lead to a system outage or a prolonged recycle time.
We call these SCA module destinations because the generated name is the same as the module name with the additional sca/. These destinations are pivotal in the functioning of SCA asynchronous invocations (brokering requests and responses). There are a varying number of additional destinations that are generated during application installation on the SCA.SYSTEM bus, but for the purpose of the discussion we'll be addressing the importance of the SCA module destination.
System integration bus retry
As we learned above, the failed event manager has a built-in retry mechanism with the SCA message driven bean (MDB).
Referring to our business case, there are a number of service integration bus destinations created by SCA to support asynchronous communication.
As we have learned, one of these destinations is called sca/AccountRouting. You can adjust the number of retries that happen when a ServiceRuntimeException occurs on an asynchronous service invocation. The number of retries can be controlled by setting the asynchronous retry count for the module at design time or by using the configSCAAsyncRetryCount command at run time. However, you cannot set the value less than 2 in modules with a BPEL process. The second delivery is required to return ServiceRuntimeExceptions back to the BPEL for processing.
For more information about retry behavior, see Controlling system retries overview.
System exception destinations
The failed event manager is one place where we can look to administer failures. When dealing with imports and exports that are JMS or EIS based, we must consider another important location.
Destinations on the SCA.Application bus are configured to route failed messages to the service integration bus system exception destination for that bus. Thus, if a JMS export picks up a message from the SCA.Application bus and runs into a rollback situation, the failed message is routed to the service integration bus system exception destination instead of to the process server recovery exception destination. This scenario differs from the failed event discussion above in that a failure to deserialize a message on the SCA.Application bus will not result in a failed event. There is a system exception destination on every bus within the solution. These destinations must be monitored and administered much like the "dead letter queue" common to MQ infrastructures.
Consider the following scenario.
 An external JMS client places a message on an inbound queue exposed via a JMS export. The JMS export binding MDB picks up the message for processing. From here, one of two things happens:
- The JMS export successfully parses the message and determines which operation on the interface to invoke at which point the message is sent to the SCA runtime for processing.
- The JMS export fails to recognize the message body as a valid business object or the JMS export binding deserializes the message body but is unable to determine the appropriate operation on the interface to invoke. At this point the message is placed on the system exception destination for the bus.
We can have this type of failure when trying to receive requests from the AccountRoutingJMSExport (1). This export is a JMS export and there is a possibility that events can accumulate on the system exception destination on the SCA.Application.Bus. Use the chosen IT monitoring solution to observe the depth of this destination.
Failed event manager and service integration bus destinations
For IBM Business Process Manager, the exception destination is set to the BPM exception destination queue. This queue follows a naming convention as follows:
Node name: MyNode Server name: server1
Recovery exception destination: WBI.FailedEvent.MyNode.server1
In general, all the destinations created on the SCA.System bus are configured to route failed messages to the recovery exception destination.
When a system failure occurs, in addition to capturing the failed message in this exception destination, the BPM recovery feature also generates a failed event that represents the system error and stores it into the Recovery database as described in the failed event manager section of this document.
Summary
In summary, IBM Business Process Manager provides administrative capabilities above and beyond the underlying WAS platform. Proper measures should be made to understand and use these capabilities along with following the guidance provided in the Planning error prevention section of Plan error prevention and recovery.
| Administrative Capability | Bundled With IBM Business Process Manager? | Summary |
|---|---|---|
| Business Process Choreographer Explorer | Yes | Read/Write/Edit/Delete Access. This is the central place to administer business processes and human tasks. |
| failed event manager | Yes | Read/Edit/Delete Access. This is the central place to administer Service Runtime Exceptions and other forms of infrastructure failures. |
|
Service Integration Bus Browser |
Yes |
Read/Delete. Use the Service Integration Bus Browser on the administrative console for browsing and performing day-to-day operational tasks on service integration buses. |
The number of events or records that can be simultaneously administered by these tools are specific to external factors such as memory allocation, result sets and DB tuning, connection timeout. Run tests and set the appropriate thresholds to avoid exceptions (OOM, TransactionTimeOut).
Related concepts:
Retention queues and hold queues
Recovery troubleshooting tips
This section provides a list of tips for troubleshooting the recovery process.
- Restarting deployment environments As one step in a recovery process, you may need to restart of you deployment environment.
- View the service integration bus Use the Service Integration Bus browser on the administrative console to view the service integration bus.
- Capturing javacore There are a number of methods that you can use to capture a javacore from an IBM JDK and thread dumps for non-IBM JDKs.
- Servers and recovery mode processing When you restart an application server instance with active transactions after a failure, the transaction service uses recovery logs to complete the recovery process.
- Retention queues and hold queues When a problem occurs while processing a message, it is moved to the retention queue or hold queue.
- Business Process Choreographer maintenance and recovery scripts There are several maintenance-related scripts for Business Process Choreographer. Run these maintenance scripts as part of a general maintenance policy to help maintain database performance, or as part of a recovery process as deemed necessary.
- Resolve indoubt transactions Transactions can become stuck in the indoubt state indefinitely due to exceptional circumstances, such as the removal of a node causing messaging engines to be destroyed.
- Review DB2 diagnostic information Use a text editor to view the DB2 diagnostic log file on the machine where you suspect a problem to have occurred. The most recent events recorded are the furthest down the file.
- Process recovery troubleshooting tips Using Business Process Choreographer Explorer can facilitate process recovery efforts.
- About recovering the messaging subsystem If the messaging system experiences problems you may need to recover the underlying messaging subsystem.
Restarting deployment environments
As one step in a recovery process, you may need to restart of you deployment environment.
About restarting deployment environments
The procedure to restart a deployment environment varies depending on the topology. Topologies are based on system configuration patterns, each pattern designed to meet particular business requirements.
IBM Business Process Manager supports a set of predetermined deployment environment configuration patterns. If none of the patterns meet your requirements, you can plan and create your own customized deployment environment.
In any given deployment environment configuration pattern there are a number of servers running as JVM processes. In general there are three types of servers as follows:
- Messaging Servers
Messaging servers are responsible for providing the Service Integration Bus (SIB) messaging infrastructure.
- WebSphere ESB Servers
Servers with profiles capable of only hosting and running mediation modules.
- WebSphere Process Servers
Servers with profiles capable of hosting and running all module types. This profile hosts the Business Process Choreographer component.
- Support Servers
This server is responsible for providing support and monitoring services such as the Common Event Infrastructure CEI.
The deployment patterns differ in how you group and organize all the functional components, so the pattern can address your business requirements in the most cost effective fashion. For more advanced and highly available environments, the servers would reside in clusters that are distributed across physical resources.
General practice for restarting servers as part of a recovery operation
A general model for starting servers is to start the messaging servers first, then the support servers and lastly the BPM servers. Each application architecture may have specific dependencies between application components that need to be taken into consideration.
Shutdown basically happens inverse to the startup procedure, starting with the application server clusters and ending with shutting down the messaging infrastructure after it has had time to quiesce and process any inflight transactions.
Related tasks:
Choose the deployment environment pattern
View the service integration bus
Use the Service Integration Bus browser on the administrative console to view the service integration bus.
Make sure you understand how the Service Integration Bus is used. Each deployment environment has its own bus. The single bus is called BPM.env_name.Bus. The Service Integration Bus Browser provides a single location for browsing and performing day-to-day operational tasks on service integration buses.
View the service integration bus is a useful way to determine if messages are accumulating on the destinations.
The accumulation of messages on the SCA Module destinations is a strong indication there maybe a performance problem or an application defect.
It is a good idea to periodically view the messages and determine if there are any messages have become locked for an extended duration of time as this may indicate there are "indoubt transactions".
- From the administrative console, expand Service integration.
- Select Buses.
- Select the appropriate messaging bus for the service. For example, for a messaging engine that is named DE1Cluster1.000-BPM.DE1,
the name of the bus would be, BPM.DE1.Bus.
- Select Destinations.
- Review the relevant information. You should look at the destinations named sca/XYZ, where XYZ is the name of the module.
- Select the link text for the destination that you are interested in viewing.
This will link you to a general properties page for the destination to view.
- From the general properties page of the destination, select the Queue points.

- From the Queue points page, select the link for the message point.
- Select the Runtime tab.
From this screen you can see the current message "depth" and the threshold.
Selecting the Messages link lets you view the message contents.
Ideally, use an appropriate IT monitoring tool and set alert thresholds for these destinations. The threshold value would be established during the performance test phase for the application.
Messages on a production system should never be deleted unless explicitly directed to do so by the L3 team.
Related concepts:
Service Integration Bus Browser
Related tasks:
Service integration bus for BPM
Capturing javacore
There are a number of methods that you can use to capture a javacore from an IBM JDK and thread dumps for non-IBM JDKs.
Capturing javacore
A javacore dump, or a thread dump as it is also called, is one of the primary problem determination documents that an application server creates.
- Use wsadmin to produce a javacore in the Profile directory:
- For Windows:
<PROFILE_DIR>\bin\wsadmin.bat [-host host_name] [-port port_number]
[-user userid -password password] -c "$AdminControl invoke [$AdminControl queryNames WebSphere:name=JVM,process=server1,*]
dumpThreads"
- For UNIX (IBM JDKs):
<PROFILE_DIR>>/bin/wsadmin.sh[-host host_name]
[-port port_number] [-user userid -password password] -c "\$AdminControl invoke [\$AdminControl queryNames WebSphere:name=JVM,process=server1,*]
dumpThreads"
The braces, [] around the AdminControl queryNames command are part of the command, and not used to signify optional parameters as is the case for braces around host, port and user. The process name: server1 may need to be change to fit your configuration.
- For Windows:
- A signal can be sent to the server process:
- Windows:
A launch script must be used to start the server process to allow the signal to be passed to the process. This does require special setup before starting the server.
- <PROFILE_DIR>\bin\startServer.bat server1 -script SERVER1.bat
- b. SERVER1.bat
The server process will start in a command window. You will need to check the logs to verify the server has successfully started since the intermediate JVM process which usually starts the server process is not used.
- <CTRL><BREAK>
Issue a <CTRL><BREAK> into the command window where the server process is running. A javacore will be produced.
- UNIX (all JDKs): kill -3 <pid>
Where <pid> is the process id of the WebSphere Process Server. For IBM JDKs a javacore will be produced in the <PROFILE_DIR>directory.
For non-IBM JDKs, a thread dump will be written to the native_stdout.log.
- Windows:
- An alternative method to dumping a windows core file is to use jvmdump.
This does not require special setup before starting the server. However, it does require a special executable file from the JVM team. The jvmdump.exe program can be requested by sending a note to jvmcookbook@uk.ibm.com. The advantage of this method is additional information can be obtained about native code being executed within JVM. The format of the dump differs from the IBM javacores.
- jvmdump.exe <PID>
- WAS_HOME>\java\jre\bin\jextract.exe <core.name.dmp>
- WAS_HOME\java\jre\bin\jdumpview.exe
- set dump <core.name.dmp>.zip
- display thread
Displays the current executing thread at the time of the dump
- c. display thread *
Display all of the threads from the dump.
For more details about the jdumpview utility consult the
 Diagnostics Guide for the IBM Developer Kit and Runtime Environment, Java™ Technology Edition, Version 5.0.
Configure the hang detection policy
Servers and recovery mode processing
When you restart an application server instance with active transactions after a failure, the transaction service uses recovery logs to complete the recovery process.
These recovery logs, which each transactional resource maintains, are used to rerun any Indoubt transactions and return the overall system to a self-consistent state. An indoubt transaction is one that has encountered environmental or other errors during commit processing. Logging occurs for normal inflight transactions, but those log entries are removed upon successful commit processing.
This recovery process begins as soon as all of the necessary subsystems within the application server are available during a server startup. If the application server is not restarted in recovery mode, the application server can start accepting new work as soon as the server is ready, which might occur before the recovery work has completed. This might be okay in many cases, but the more conservative option is provided here. To be clear, recovery will run on a server restart even if the server is started in 'normal' start model.
Related tasks:
Retention queues and hold queues
When a problem occurs while processing a message, it is moved to the retention queue or hold queue.
You can perform administrative actions on the messages in the retention queue and hold queue using either the administrative console or through scripting.
In some cases, viewing and replaying messages on the retention queue or the hold queue can be part of a recovery procedure.
Related concepts:
Use case: recovering data from failed events
BPEL processes: Recovery from infrastructure failures
Failed event manager console help field descriptions
Query and replay failed messages, using the administrative console
Query and replay failed messages, using administrative scripts
Business Process Choreographer maintenance and recovery scripts
There are several maintenance-related scripts for Business Process Choreographer. Run these maintenance scripts as part of a general maintenance policy to help maintain database performance, or as part of a recovery process as deemed necessary.
You should run these scripts to remove from the database the templates and their associated objects, as well as completed process instances, that are not contained in any corresponding valid application in the configuration repository.
There is also the possibility of having invalid process templates. This situation can occur if an application installation was canceled or not stored in the configuration repository by the user.
IBM Business Process Manager also provides a service that automates Business Process Choreographer cleanup. You can run that service from the administrative console.
Use the following scripts for Business Process Choreographer recovery maintenance:
- deleteInvalidProcessTemplate.py
- Run this script to delete, from the Business Process Choreographer database, business process templates that are no longer valid. You cannot use this script to remove templates of valid applications from the database. This condition is checked and a ConfigurationError exception is thrown if the corresponding application is valid.
These templates usually have no impact. They are not shown in Business Process Choreographer Explorer.
- deleteInvalidTaskTemplate.py
- Run this script to delete, from the Business Process Choreographer database, human task templates that are no longer valid. You cannot use this script to remove templates of valid applications from the database. This condition is checked and a ConfigurationError exception is thrown if the corresponding application is valid.
- deleteCompletedProcessInstances.py
- Run this script when all completed process instances have to be deleted. A top-level process instance is considered completed when it is in one of the following end states:
- Finished
- Terminated
- End
- Failed
You can specify the criteria to selectively delete top-level process instances and all their associated data (such as activity instances, child process instances, and inline task instances) from the database.
When running these scripts from the command line, make sure the SOAP client timeout is longer than the duration of the requested operation. For more information about this timeout, see "Connection timeout when running a wsadmin script".
Delete an allotment of completed process instances
You can delete an allotment of process instances from the development environment.
Use a script that wrappers the provided deleteCompletedProcessInstances.py
- By editing and placing correct user names, passwords, and paths in this wrapper script, you can delete an allotment of process instances from the development environment.
- Carefully selecting an adequate time slice prevents SOAP timeout exceptions when communicating with the deployment manager.
- The adequate time slice of administrable instances depends on many factors including, but not limited to, the following:
- JVM tuning and memory allocations
- Transaction log configuration for the database server
- SOAP connection Time-Out configuration
Example
For example, after altering the script and running the command as:
wsadmin.<bat|sh> -user<USERNAME> -password<PASSWORD> -f loopDeleteProcessInstances.py
2008-04-02T21:00:00 3600
This command will run deleteCompletedProcessInstances.py while increasing the completed before time stamp by one hour (60 minutes * 60 seconds) after every execution.
The deleteCompletedProcessInstances.py script has a time stamp parameter which can be used to control the number of instances being deleted. The smaller the interval, the fewer instances will be deleted per invocation of the deleteCompletedProcessInstances.py. This can be useful in situations where deletion of multiple process instances encounter transaction timeouts. The most common cause for transaction timeouts during process deletion involve the following:
- An untuned database
- An overloaded system
- An attempt to delete "too many" process instances at once
Use scripts to administer Business Process Choreographer
Delete process templates that are unused
Delete completed process instances
Delete human task templates that are unused
Configure the cleanup service and cleanup jobs
Connection timeout when running a wsadmin script
Resolve indoubt transactions
Transactions can become stuck in the indoubt state indefinitely due to exceptional circumstances, such as the removal of a node causing messaging engines to be destroyed.
Use the procedure to resolve indoubt transactions only if you have tried other procedures (such as restarting the server in recovery mode), unsuccessfully. When a transaction is stuck in the indoubt state, it must either be committed or rolled back so that normal processing by the affected messaging engine can continue.
You can use the administrative console to display the messages causing the problem by Listing messages on a message point.
If there are messages related to an indoubt transaction, the identity of the transaction displays in a panel associated with the message. You can then resolve the transaction in one of the following ways:
- Use the server's transaction management panels
- Use methods on the messaging engine's MBean
You should first attempt to resolve the indoubt transaction using the application server transaction management panels. If this does not work, then use methods on the messaging engine's MBean. These are described in the Procedure section below.
- Use the application server transaction management panels to resolve indoubt transactions
- Navigate to the transaction management panels in the administrative console
Click Servers > Application servers > [Content Pane] > server-name > [Container Settings] Container Services > Transaction Service > Runtime > Imported prepared transactions - Review
- If the transaction identity appears in the resulting panel, you can commit or roll back the transaction
Choose the option to roll back the transaction
If the transaction identity does not appear in the panel, the transaction identity was not enlisted with the Transaction Service on the server. In this case only, you should use methods on the MBean (as described in the next step) to display a list of the identities of the indoubt transactions managed directly by the messaging engine.
- Navigate to the transaction management panels in the administrative console
- Use methods on the messaging engine's MBean to resolve indoubt transactions
CAUTION:
Only perform this step if you were unable to display the transaction identity by using the server's transaction management panels
- The following methods on the messaging engine's MBean can be used to get a list of transaction identities (xid) and to commit and roll back transactions:
- getPreparedTransactions()
- commitPreparedTransaction(String xid)
- rollbackPreparedTransaction(String xid)
- To invoke the methods, you can use a wsadmin command, for example, you can use a command of the following form to obtain a list of the indoubt transaction identities from a messaging engine's
MBean:
- wsadmin> $AdminControl invoke [$AdminControl queryNames type=SIBMessagingEngine,*] getPreparedTransactions
Alternatively, you can use a script such as the following to invoke the methods on the MBean:
foreach mbean [$AdminControl queryNames type=SIBMessagingEngine,*] {
  set input 0

  while {$input >=0} {
    set xidList [$AdminControl invoke $mbean getPreparedTransactions]

    set meCfgId [$AdminControl getConfigId $mbean]
    set endIdx [expr {[string first "(" $meCfgId]  - 1}]
    set me [string range ${meCfgId} 0 $endIdx]

    puts "----Prepared Transactions for ME $me ----"
    set index 0
    foreach xid $xidList {
      puts "  Index=$index XID=$xid"
      incr index     }
    puts "------- End of list ---------"
    puts "Select index of XID to commit/rollback (-1 to continue) :"
    set input [gets stdin]

   if {$input < 0 } {
puts "No index selected, going to continue."
    } else {
      set xid [lindex $xidList $input]
      puts "Enter c to commit or r to rollback XID $xid"
      set input [gets stdin]
     if {$input == "c"} {
        puts "Committing xid=$xid"
        $AdminControl invoke $mbean commitPreparedTransaction $xid
      }
     if {$input == "r"} {
        puts "Rolling back xid=$xid"
        $AdminControl invoke $mbean rollbackPreparedTransaction $xid
      }
    }
    puts ""
  }}
This script lists the transaction identities of the transactions together with an index. You can then select an index and commit or roll back the transaction corresponding to that index.
- The following methods on the messaging engine's MBean can be used to get a list of transaction identities (xid) and to commit and roll back transactions:
In summary, to identify and resolve indoubt transactions:
- Use the administrative console to find the transaction identity of indoubt transactions.
- If a transaction identity appears in the transaction management panel, commit or roll back the transactions as required.
- If a transaction identity does not appear in the transaction management panel, use the methods on the messaging engine's MBean. For example, use a script to display a list of transaction identities for indoubt transactions. For each transaction:
- Enter the index of the transaction identity of the transaction.
- Enter c to commit the transaction
- Enter r to roll back the transaction.
- Enter the index of the transaction identity of the transaction.
- To check that transactions are no longer indoubt, restart the server and use the transaction management panel, or methods on the messaging engine's MBean.
Related tasks:
View the service integration bus
Review DB2 diagnostic information
Use a text editor to view the DB2 diagnostic log file on the machine where you suspect a problem to have occurred. The most recent events recorded are the furthest down the file. Review DB2 diagnostic information when your systems are not working well. This is a way to see if the log files are full.
On Unix type the following command: tail -f /home/db2inst1/sqllib/db2dump/db2diag.log
If the database is unresponsive, you will see something similar to the following:
2008-04-03-11.57.18.988249-300 I1247882009G504    LEVEL: Error PID     : 16020                TID  : 3086133792  PROC : db2agent (WPRCSDB) 0
INSTANCE: db2inst1             NODE : 000         DB   : WPRCSDB
APPHDL  : 0-658                APPID: 9.5.99.208.24960.080403084643
AUTHID  : DB2INST1
FUNCTION: DB2 UDB, data protection services, sqlpWriteLR, probe:6680
RETCODE : ZRC=0x85100009=-2062548983=SQLP_NOSPACE
          "Log File has reached its saturation point"
          DIA8309C Log file was full.

2008-04-03-11.57.18.994572-300 E1247882514G540    LEVEL: Error PID     : 16020                TID  : 3086133792  PROC : db2agent (WPRCSDB) 0
INSTANCE: db2inst1             NODE : 000         DB   : WPRCSDB
APPHDL  : 0-658                APPID: 9.5.99.208.24960.080403084643
AUTHID  : DB2INST1
FUNCTION: DB2 UDB, data protection services, sqlpgResSpace, probe:2860
MESSAGE : ADM1823E  The active log is full and is held by application handle           "274".  Terminate this application by COMMIT, ROLLBACK or FORCE           APPLICATION.
In the preceding example, looking at the DB line, you can see the WPRCSDB is experiencing full transaction logs.
Another way of viewing the db2diag logs is to log in as the DB2 user and run db2diag:
su -l db2inst1
 db2diag | less
Interpreting diagnostic log file entries
Process recovery troubleshooting tips
Use Business Process Choreographer Explorer can facilitate process recovery efforts.
The Business Process Choreographer Explorer provides a user interface for administrators to manage BPEL processes and human tasks.
You can use the Business Process Choreographer Explorer to check the status of the Business Process Choreographer database (BPEDB). If you are unable to retrieve database information through the Business Process Choreographer Explorer, or if the Business Process Choreographer is slow to return database information, it might be an indication of a problem with the database.
Attempting to retrieve thousands of process instances or tasks is not wise if performance or database problems are suspected. Selecting a view which does not retrieve considerable data, such as "My Process Templates", or limiting the amount of data retrieved for another view would be better options.
Repairing BPEL processes and activities
Start Business Process Choreographer Explorer
Business Process Choreographer Explorer overview
Tuning Business Process Choreographer Explorer
About recovering the messaging subsystem
If the messaging system experiences problems you may need to recover the underlying messaging subsystem.
Typically this involves checking the state of various queues but can also include analyzing the integration bus infrastructure.
Detailed information on recovering the messaging subsystem can be found in the WebSphere Application Server information center.
Related concepts:
Enterprise service bus messaging infrastructure
Troubleshooting service integration message problems
20. Disaster recovery
Disaster recovery consists of the policies and procedures that describe how to recover or continue the technology infrastructure critical to an organization after a natural or human-induced disaster.
Business continuity is an overall plan to keep all aspects of a business functioning in the midst of disruptive events. Disaster recovery is a subset of business continuity, focusing on the technology systems that support business continuity.
Disaster recovery consists of well-defined strategies to back up the primary data center and restore its data to a secondary data center.
- During normal operations, organizations use a live system. The backup programs run in the background to save environmental information and application data.
- When the live system goes down, the backup system is restored from the backed up data.
The topics in this section provide information about the supported scenarios and configuration for disaster recovery in a production environment that includes IBM Business Process Manager and IBM Business Monitor.
- Disaster recovery concepts When you are planning for disaster recovery, consider the topology of the production environment, the types of data, the scope of the recovery, and the plans for data consistency.
- Backing up data A backup system for disaster recovery is a copy of the production environment. The goal of any disaster recovery system is to create a mirror image of the data from the primary data center in a secondary data center. There are several ways to manage a backup system. Each method imposes some constraints on the production environment, and each presents some advantages and disadvantages.
- Runtime logs in a database: Overview Store transaction and compensation logs in a relational database to improve high availability support and disaster recovery processes.
- Disaster recovery procedures From the perspective of IBM Business Process Manager and IBM Business Monitor, disaster recovery means the production environment can be restored to the secondary data center through a well-defined replication method.
- Installation and configuration considerations Consider disaster recovery as you install and configure your operating system, databases, and production environment.
- Recovery scenarios Disaster recovery occurs at various times in a production environment. For example, in addition to the backups that occur according to a regular schedule, you also perform disaster recovery tasks as needed. The production environment might go through various states ( processes might be running) while the backup is taking place.
Disaster recovery concepts
When you are planning for disaster recovery, consider the topology of the production environment, the types of data, the scope of the recovery, and the plans for data consistency.
Production environment
The data center of an IT environment typically consists of various systems and environments, such as Enterprise Resource Planning (ERP), Customer Relationship Management (CRM), and Human Resource Management (HRM). The disaster recovery strategy must define the general rules from a high-level point of view, with detailed plans for each system.
Each system might be a complicated combination of software and hardware deployments. The disaster recovery for the system must take all components into consideration to provide a complete solution.
The underlying database to support IBM Business Process Manager, the messaging engine, Business Space that is powered by WebSphere, and IBM Business Monitor are also regarded as part of the production environment. They are included in the same recovery scope because the whole production environment must be in a consistent state during the restoration phase.
Data classification
The production environment contains four types of data.
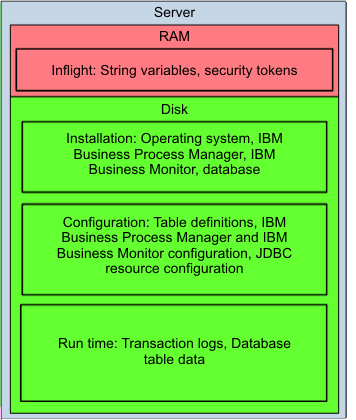
- RAM data
- RAM data is the intermediate data kept inside memory.
- Installation data
- Installation data is the data that is associated with the installation of IBM Business Process Manager and IBM Business Monitor, the underlying database installation, and the operating system data that is related to IBM Business Process Manager and IBM Business Monitor. The installation data does not change after initial installation.
- Configuration data
- Configuration data is the data that is associated with profile configuration, applications, resource configuration of IBM Business Process Manager and IBM Business Monitor, and related database, and table definitions. The configuration data changes when you install an application, create a profile, generate a new cluster member, or make other configuration changes.
- Runtime data
- Runtime data is the data that is associated with transaction logs, messages that are saved in the database table, process instance information persisted in the database table, and other persistent business states. Runtime data changes continuously while the production environment is running.
Some kinds of data, such as operating system installation and configuration data, IBM Business Process Manager and IBM Business Monitor installation data, and database installation data, can be rebuilt or reinstalled. Other kinds of data, such as transaction logs, application data, and configuration data for BPM and IBM Business Monitor, must be recovered.
Define your recovery scope, recovery point objective, and recovery time objective goals according to your business needs.
Recovery scope
Recovery scope defines which resources are part of a backup. In this case, the resources include IBM Business Process Manager and IBM Business Monitor configuration, runtime data, and all the customer data, including customer applications and process templates and instances.
Put IBM Business Process Manager and IBM Business Monitor underlying database files and all the profiles into the same volume group or consistency group. Putting the files in the same group affects the sizing result in the disaster recovery plan.
Recovery point objective
The recovery point objective defines how much data you can afford to lose between the original environment and the restored environment. From a business perspective, a smaller recovery point objective means that fewer business transactions are lost, which is critical for normal business operations.
To achieve a smaller recovery point objective, you must increase the frequency with which you back up the production environment. However, also consider the cost and effect of frequent backups on BPMion environment. The more times you back up, the more copies you must maintain.
Recovery time objective
The recovery time objective defines how long you can wait until the restored environment can continue with normal processing. From a business perspective, you might want to achieve different recovery time objectives that are based on your own business needs.
To define the appropriate recovery time objective, consider the work that must be done during disaster recovery. Increasing the frequency of your backups does not always lead to a smaller recovery time objective. For example, if the server startup takes 20 minutes, you cannot reduce recovery time below 20 minutes, no matter how often you back up. You must rearchitect your server to start faster or get a faster server.
Part of your comprehensive disaster recovery plan includes determining the recovery point objective and recovery time objective that are based on your real business needs.
Figure 1. Recovery point objective and recovery time objective

Consistency
After a disaster and a successful recovery of the production system from backup, ensure that you have consistent data. For IBM Business Process Manager and IBM Business Monitor, this consistency must apply to all cell members. If one node in a cell is inconsistent, the backup image and restore attempt are invalid.
You must have crash consistency and application consistency:
| Type of consistency | Description |
|---|---|
| Crash consistency | The bytes in the restoration match the ones in the primary system at the time of the backup. In a shared, multinode environment, the data for the cluster is assured to be in the same time sequence as the write operations. |
| Application consistency | When the operating system starts, there are no file system recovery errors. Applications are able to access data from the time of the backup without failure. The applications recover inflight transactions when they are restarted. |
Backing up data
A backup system for disaster recovery is a copy of the production environment. The goal of any disaster recovery system is to create a mirror image of the data from the primary data center in a secondary data center. There are several ways to manage a backup system. Each method imposes some constraints on the production environment, and each presents some advantages and disadvantages.
When you are thinking about disaster recovery, focus on this question: "What is the best way to build a disaster recovery solution for the organization’s business process applications?" Base your infrastructure design decisions on the real needs of your business. Before you start to consider how you want to configure a disaster recovery system, make sure that you clearly define your priorities.
- Managed by the operating system
- You can use the operating system to manage the data replication.
Operating system techniques rely on capabilities provided by the operating system to copy data from one location to another.
The operating system approach captures the state of a running production system at a specific point in time.
This system is simple to set up if you are just backing up a single server. If you are backing up a distributed production environment, you must set up a shared file system, such as the network file system (NFS) on UNIX.
- Managed by a storage area network (SAN)
- A storage system such as storage area network (SAN) can be used to provide a central repository of production environment data. The picture shows a typical system in which the deployment manager, messaging engine, application server, support, and database data are all mirrored on a backup system through a storage area network.

-
 Managed by the database
 - Databases that are designed for enterprise use have features that support high availability scenarios. You can use those features to manage runtime resources such as transaction logs and compensation logs. You can configure your system to store these logs in the database rather than in operating system files. You can use database features such as DB2 HADR or Oracle Data Guard to provide high availability for runtime logs and to automatically replicate transaction logs and compensation logs to a disaster recovery system.
Each backup method has its own constraints, advantages, and disadvantages, as described in the accompanying table.
| Type of replication | Constraints | Advantages | Disadvantages |
|---|---|---|---|
| Managed by the operating system | This type of replication ensures a coherent state across all data that is being replicated. For runtime data, this requirement means that no work can occur throughout the entire production environment during the replication. Business Process Manager servers must be quiesced and stopped. | This system is inexpensive and simple to maintain. |
This approach requires a maintenance window, which imposes limits on the server availability and on the recovery point objective. Therefore, it might not be appropriate for business-critical production servers. To minimize your recovery point objective, determine the ideal backup frequency by considering the business requirements and resources to take and maintain your backups. |
| Managed by a storage area network (SAN) | The production system can write to only one file system. The SAN must provide the capability to define a single consistency group that contains all replicated volumes, including those volumes that host the database, and the shared file system for the transaction and compensation logs. |
This replication type is the classic technique for disaster recovery. SAN replication capability is robust and well documented. Depending on the sophistication of the SAN being used, replication points can be very short. This method can be used to manage consistent replication across various managed resources. Most SAN systems support both periodic snapshots and synchronous replication of data to a remote site. | Requires extra hardware (the SAN), which is not available for all environments. |
| Managed by the database
The feature that supports this approach is introduced in V8.0.1.2 and V8.5.0.1. | The database manager must have access to all the data that must be replicated. To use this method, WebSphere Application Server transaction and compensation logs must be stored within the database. | Database replication solutions like DB2 HADR and Oracle Data Guard are familiar to many infrastructure teams. Various synchronous and asynchronous qualities of service are possible. | Configure all managed resources in to the same database can be problematic, depending on the amount of integration present in the application. |
![]()
Runtime logs in a database: Overview
Store transaction and compensation logs in a relational database to improve high availability support and disaster recovery processes.
The WAS transaction service writes information to a transaction log for every global transaction that involves two or more resources, or that is distributed across multiple servers. These transactions are started or stopped either by applications or by the container in which they are deployed. The transaction service maintains transaction logs to ensure the integrity of transactions. Information is written to the transaction logs in the preparation phase of a distributed transaction. If a WAS with active transactions restarts after a failure, the transaction service is able to use the logs to replay any in-doubt transactions. This implementation allows the overall system to be brought back to a consistent state. See Transaction log file.
The WAS compensation service allows applications on disparate systems to coordinate activities that are more loosely coupled than atomic transactions. It stores information in its own dedicated recovery logs. That information is necessary for compensation after a system failure.
IBM Business Process Manager now provides two ways that you can store these runtime logs in a data recovery system. As in previous releases, the transaction logs can be stored as operating system files. Using that approach, high-availability transaction support requires the use of a shared file system to host the transaction logs, such as Network File System (NSF) or IBM General Parallel File System (GPFS). The shared file system is typically mounted on a storage area network (SAN). Storing runtime data in the operating system files remains a recommended configuration, but now you have another configuration that you can use for high availability.
With new features introduced in BPM Version 8.0.1.2 and 8.5.0.1, you can choose to store transaction logs and compensation logs in a relational database. This configuration is a useful option to use database features such as DB2 HADR or Oracle Data Guard to provide high availability for runtime logs. It supports automatically replicating transaction logs and compensation logs to a disaster recovery system. Installation and configuration data can be copied directly from the primary site. All runtime data is persistent in database. You can use database replication to synchronize runtime data from the primary site to the disaster recovery site, if all related runtime data can be configured into the same database.
In the topology that is shown in the accompanying diagram, in each data center, each cluster has two members. To use high availability features, configure all members in application, message, and support clusters to use the database to store transaction logs. During normal processing, all cluster members access their own transaction tables to store transaction information. If one cluster member fails, the high availability manager notifies the other member from that cluster to take over the work. Then, the high availability manager starts an automatic peer recovery of the transaction log tables of the failed cluster member.
For database replication, you can be confident of data consistency only if you use a single database. If two or more databases are used by a single transaction, there is no way to guarantee the data consistency because it is impossible to coordinate the two replication processes. So for BPM Standard Edition, configure transaction logs in BPMDB. For process applications in BPM Advanced Edition, you can use CMNDB for transaction logs with Oracle products with Data Guard. You can use CMNDB with DB2 if the process application uses only BPEL.
Since a single transaction might involve two or three cluster members, make sure the transaction logs from all cluster members are configured in the database. Place compensation service logs in the same database.
The figure shows a typical configuration for primary and standby data centers.

Disaster recovery procedures
From the perspective of IBM Business Process Manager and IBM Business Monitor, disaster recovery means the production environment can be restored to the secondary data center through a well-defined replication method.
Disaster recovery for BPM and IBM Business Monitor is supported through disk replication technology. A snapshot of the original production environment is taken, and data is restored and validated in the secondary data center. Optionally, beginning in V8.0.1.2 and 8.5.0.1, you can store transaction and compensation logs in a relational database so you can use the high availability disaster recovery features the database offers.
The following topics provide some guidance in setting up and managing a disaster recovery system.
- Configure a disaster recovery backup system The configuration data of your system describes the BPM environment. Set up the disaster recovery data center to have the same configuration as the primary data center so that any recovery can be complete.
- Backing up runtime data by using a SAN drive The runtime data of your system is the information that is stored in transaction logs and compensation logs. You can use a storage area network (SAN) drive to copy files from your primary data center to a standby server.
- Storing transaction logs in a database for high availability You can configure transaction logs to be stored in a database where you can implement automatic replication and simpler disaster recovery.
- Restoring data If a disaster occurs in the primary data center, you can continue to provide business support if you have a valid backup. You restore the backup to the secondary data center and then verify the restored data.
- Verifying restored data After you restore the backup of BPMion environment to the secondary data center, verify the data to determine whether the backup is a valid copy.
Configure a disaster recovery backup system
The configuration data of your system describes the BPM environment. Set up the disaster recovery data center to have the same configuration as the primary data center so that any recovery can be complete. These instructions help you set up all of the installation images on a single replication volume. With that implementation, you are able to exactly duplicate the original data center configuration in your disaster recovery data center. If a disaster occurs while you are rolling out a configuration change to the environment, you can continue rolling out the configuration change when you restart the environment in the disaster recovery data center.
- Set up a disk replication system.
- Add the profile directory, profile_root.
- Add the following files from subdirectories of the installation directory, install_root: properties/profileRegistry.xml, properties/fsdb/*,
and properties/Profiles.menu.
- Add files from the logs directory that might contain errors that are related to profile actions. Those files might be useful in the disaster recovery data center.
- If the original data center uses a storage area network (SAN), create an identical directory for mounting the SAN in the disaster recovery data center. Create the profiles in a subdirectory of that mounted directory, /opt/ibm/WebSphere/profiles.
- Develop scripts for the recovery system. Actions that create a profile, delete a profile, add a node, or remove a node must also trigger a snapshot to the installation data. You need a snapshot of the installation data for these configuration changes because some of the files that are altered for these changes are contained in the installation data (see step 3).
- Develop scripts or procedures for mounting the disk.
- Develop scripts to start the administrative processes of your disaster recovery center.
- Develop scripts to start your disaster recovery center resources.
- Load in the disaster site recovery scripts or procedures for the configuration replication volume.
Do not schedule snapshots of this replication volume. Instead, cause a snapshot to be taken each time one of the configuration images changes. A configuration image changes when configuration changes are saved and when the configuration changes are replicated to a node. Any snapshot that is taken while the configuration changes are "in flight" captures an unusable view of the installation image. When you try to use such a snapshot in your disaster recovery center, you get unpredictable results. To prevent these troublesome snapshots, take a snapshot of the configuration volume every time the configuration is altered.
Related concepts:
Backing up runtime data by using a SAN drive
The runtime data of your system is the information that is stored in transaction logs and compensation logs. You can use a storage area network (SAN) drive to copy files from your primary data center to a standby server. Your runtime data is changing continually. Therefore, it is not reasonable to expect the backup data center can always have the same state as the primary data center, unless you are using synchronous replication. In many environments, synchronous replication is not a valid option because there are performance impacts from a synchronous implementation.
The runtime data consists of the WebSphere transaction logs and the compensation logs. Some of the files are associated with the BPM database, and some of the files are associated with any other resource managers. The files of interest are files that reflect the current state of the database tables, the current state of the transactions, and any other data that is managed by the resource that reflects the current state of the resource. These files vary from one implementation to another, depending on the database product or resource manager and vendor that is being used. The set of database tables in this runtime data includes at least all of the tables that are associated with the BPM configuration, such as persistent stores for messaging engines, business process applications, human tasks, and failed events.
Include the data that you require on a disk replication system with the following configuration:
- Configure the original data center.
- Create directories needed for mounting the SAN, like /opt/ibm/WebSphere/tranlogs on the WebSphere servers and /opt/ibm/WebSphere/database on the database server.
- Mount the storage area network (SAN) drive.
- Configure the transaction service to use a distributed file system. The SAN creates two volumes, one for the database, and one for the distributed file system, which is mounted on the SAN for its transaction logs. The distributed file system serves high availability by managing file locks for the distributed servers. The SAN serves disaster recovery by providing replication.
- Configure the database server to use this mount for its data and log files.
- Configure the disaster recovery data center.
- Create a directory in the disaster recovery data center similar to the one in the original data center.
- Load the disaster site recovery scripts or procedures for the run data replicated volume.
- Install and configure the data database catalog to find the appropriate files.
The entire set of files for the runtime data must be included in the same snapshot and that snapshot must be taken at an instant of time. Your performance needs might require you to place the database log files on different disk arms than the database data or indicate some other placement needs. Work with the database vendor, your SAN vendor, and your operating system to configure the optimum configuration for your requirements. As you work with your SAN vendor, you must make sure the write order is preserved in the snapshot and its replica.
Set a schedule for the snapshot that is taken of the volume. The schedule determines whether you can meet your recovery point objective. For example, if you have a recovery point objective of 30 minutes, capture a snapshot at an interval of just less than 30 minutes. You must consider the time that it takes to actually take a snapshot and transfer it to the disaster data center. Your SAN provider can help you sort out those details.
Related concepts:
Storing transaction logs in a database for high availability
You can configure transaction logs to be stored in a database where you can implement automatic replication and simpler disaster recovery.
For more information about this feature and why it can be useful, read Runtime logs in a database: Overview. Configure the transaction log location and the compensation log location for each server in the cluster before you enable high availability. This solution uses two data centers. One is the primary data center and the other is a standby data center. The installation and configuration data from the primary data center is copied to the standby data center. Database replication is used to synchronize replication of runtime data from the primary database to the standby database.
- At the primary site, install BPM on all nodes and create a deployment environment as you would normally.
- Set up and configure the database.
- Install the database for the primary data center.
- Use generated database scripts to create database objects.
- Install the database in corresponding standby data center.
- Configure the databases to implement data replication between the primary database, and the standby database.
- Install the database for the primary data center.
- Configure the transaction service.
- Start the deployment environment at the primary data center.
- For each cluster member in the application cluster and in the support cluster, create a data source on the cluster level. Configure the logs for the transaction service and the compensation service for each cluster member into the database. Use a unique prefix for each member. See detailed instructions inStoring transaction and compensation logs in a relational database for high availability in the WebSphere Application Server documentation.
- Start the deployment environment at the primary data center.
- When all cluster members in application and support clusters are configured, enable transaction high availability for each application and support cluster. On the Configuration page under General Properties, select Enable failover of transaction log recovery.
- Restart the whole environment and make sure there are no exceptions in the system log files. When you start a process server that is configured to store transaction and compensation logs in a database, the transaction service can time out while the service waits for the data source to become available. If that happens, you see this error message:
WSVR0009E: Error occurred during startup com.ibm.ws.exception.RuntimeError: com.ibm.ws.recoverylog.spi.InternalLogException: Failed to locate data source, com.ibm.ws.recoverylog.spi.InternalLogException: Failed to locate data source         at com.ibm.ws.tx.util.WASTMHelper.asynchRecoveryProcessingComplete(WASTMHelper.java:176)
        at com.ibm.tx.util.TMHelper.asynchRecoveryProcessingComplete(TMHelper.java:57)
If you encounter an error of this sort, increase the timeout value.- Open the administrative console.
- Select Servers > Application servers > server name.
- Under Server infrastructure, select Java and Process Management > Process Definition.
- Under Additional properties, select Java virtual machine > Custom properties > > New.
- In the Name entry field, type com.ibm.ws.recoverylog.custom.jdbc.impl.ConfigOfDataSourceTimeout.
- In the Value entry field, set an integer timeout variable such as 30000 to represent a 30-second timeout. The timeout period is measured in milliseconds.
- Select OK.
Devise a high availability and disaster recovery test plan that is appropriate for the business needs of your organization. The plan might include simulating a WAS ND failover and a cross-database failover to ensure that your system provides adequate business continuity.
Restoring data
If a disaster occurs in the primary data center, you can continue to provide business support if you have a valid backup. You restore the backup to the secondary data center and then verify the restored data. Restoration is the process of rebuilding all or part of a backup to the corresponding secondary environment, as shown in Figure 1:
Figure 1. Restoration process

To ensure the consistency of all data, the restoration must occur for the whole cell and underlying database.
To restore the production environment to the secondary environment:
- Reinstall the installation data, including the BPM installation data and the IBM Business Monitor installation data.
- Reinstall DB2 and create the DB2 instance.
- Restore the configuration data to all servers from the backup configuration data.
- Restore the runtime data to all servers by replicating the backup runtime data.
- Perform changes that are specific to the environment. For example, update the host name to reflect the secondary environment, or change the data source configuration to point to the secondary database.
- Validate the connectivity to the resources outside the recovery scope.
- To restart the environment, follow these steps:
- Start the database server.
- Start the deployment manager and node agents.
- Start the message servers of IBM Business Process Manager.
- Start the support servers of IBM Business Process Manager.
- Start the application servers of IBM Business Process Manager.
- Start the message servers of IBM Business Monitor.
- Start the support servers of IBM Business Monitor.
- Start the application servers of IBM Business Monitor.
- Start the database server.
- Verify the restored environment and determine whether it is valid.
- Recover inflight transactions.
- Redirect load to the new environment.
You can typically set the same host name and IP address for the secondary environment as for the primary environment. This step depends on your backup policy.
Verifying restored data
After you restore the backup of BPMion environment to the secondary data center, verify the data to determine whether the backup is a valid copy. You verify restored data at the following levels:
- System
- Module and application
- Process instance
- Consistency
- SCA
- Monitor
A failure, loss of data, or inconsistency from the process instance level can be tolerated. An abnormal state from the system level or application level, however, must be fixed because the backup is invalid.
Generally, verification is relatively simple for the system, module, and application levels. Verification of the instance level can be more difficult because the number of instances might be large. Use a real runtime scenario for the disaster recovery test, which takes the backup of the running instances and verifies the specific instances are working properly.
To verify the restored data in the secondary environment is valid:
- Verify the system-level services such as the Business Process Choreographer container and the Human Task Manager container are working properly. Verify the messaging engines for various buses can be started successfully. To perform these verifications,
you can use the System Health widget in Business Space.
- Verify the modules and applications can be started successfully. Verify the process templates can be started normally.
- Verify the process instances are in a consistent state. Some backups might not work properly after restoration. You must identify and discard those backups and use only the valid ones.
Figure 1. Backup to a remote storage system

- Verify the process instance state between IBM Business Process Manager and IBM Business Monitor is consistent.
- Verify that synchronous and asynchronous invocation for Service Component Architecture (SCA) can continue for processing.
- Verify that you see new instances in your monitor dashboards when you run new process instances.
Installation and configuration considerations
Consider disaster recovery as you install and configure your operating system, databases, and production environment.
- Operating system considerations Verify the basic operating system configurations for the primary and secondary environments are the same or consistent.
- Database considerations Install and configure the database for your primary and secondary environments in accordance with your disaster recovery plan.
- Environment considerations Install and configure your primary and secondary environments in accordance with your disaster recovery plan.
Operating system considerations
Verify the basic operating system configurations for the primary and secondary environments are the same or consistent.
The host name of the primary and secondary environments are used in the BPM and IBM Business Monitor configuration data, for example in the serverindex.xml file.
For an BPM server configuration where distributed transactions must be recovered, mirror the transaction logs on a different server that has the same server name, the same host name, and access to the same resource managers as the original server. Information about each server that is involved in a distributed transaction is stored in the transaction logs. This information includes the server name and the host name of the computer on which the server is running. When a distributed transaction is being recovered, the servers that are involved in the recovery use this stored information to contact each other. Therefore, if a server fails and the logs must be recovered on a new server, that new server must have the same server name and host name as the original server. The new server must also have the same access to the same resource managers, databases, and message queues as the original server.
In the examples that are in the topics that follow, all operating systems are deployed with Red Hat Enterprise Linux.
- Snapshot support To back up the primary environment without affecting normal functioning, you need the additional support of an operating system snapshot.
- NFS support In a distributed environment, the data of the production environment is distributed over several operating systems. Without special configuration, during run time, it is highly possible to get an inconsistent copy of the entire environment even when you use a snapshot. A consistent copy of the entire environment is required to ensure the proper behavior of the system. To ensure consistency, you can use a Network File System (NFS).
Snapshot support
To back up the primary environment without affecting normal functioning, you need the additional support of an operating system snapshot.
On the Linux platform, you can use Logical Volume Management (LVM). LVM provides a higher-level view of the disk storage on a computer system than the traditional view of disks and partitions. With LVM, the system administrator has more flexibility in allocating storage to applications and users by demand. The physical volumes of the disk are organized as logical volumes, and the file system is mounted on logical volumes. This organization allows the flexible and dynamic management of the disk size of the file system.
When you enable the snapshot function on the LVM, the file system supports concurrent backup while the file system is undergoing a write operation.
Without snapshot support, the native backup of a large number of files consumes a great deal of time. During this period of time, some files might be updated because transactions are continuing in the production environment, which means the backup contains files saved at different points in time. If any files are in an inconsistent state, the backup is not acceptable.
To support the snapshot functionality through LVM, the Copy on Write mechanism is used. When Copy on Write is used, the following sequence of events occurs:
- The snapshot creates a logical copy of the data after the application is frozen for a very short period.
- A write request to the original copy of the data results in the system copying the original data to the snapshot disk area before the original copy is overwritten.
- A read into the logical copy is redirected to the original copy if the data is not modified. If the data is modified, the read request is satisfied from the snapshot disk area.
The following topics provide information about taking the snapshot:
- Prepare the operating system before a snapshot Before you take a snapshot of the operating system, you create a physical volume and logical volume.
- Taking an operating system snapshot As part of your disaster recovery plan, you create a snapshot of the operating system from your primary environment. You then transfer the snapshot to your secondary environment.
Prepare the operating system before a snapshot
Before you take a snapshot of the operating system, you create a physical volume and logical volume.
When you prepare for an operating system snapshot, consider the following factors.
- The /opt and /home directories must be vacant, because any data in the directory is destroyed when you mount a directory.
- You can mount an extra disk with about 10 GB of vacant space and then create a physical volume on it.
- After you extend the physical volume to a volume group, you can create the new logical volume in the volume group.
To prepare the operating system before you take a snapshot:
- List the general information (physical volume, volume group, and logical volume) of the Linux operating system:
# pvdisplay # vgdisplay
# lvdisplay
- List the disk information:
- # fdisk -l
- Create a physical volume on the disk partition, as in the following example:
- /dev/sda2: # pvcreate /dev/sda2 /home
- Extend the new physical volume to the volume group:
- # vgextend VolGroup00 /dev/sda2
- Create a logical volume on the volume group:
- # lvcreate -name homebackup -size 10G VolGroup00
- Make the file system format for the new logical volume:
- # mkfs.ext3 /dev/VolGroup00/homebackup
- Mount the logical volume to the /home directory:
- # mount /dev/VolGroup00/homebackup/home /home
Take a snapshot of the operating system.
Next topic: Taking an operating system snapshot
Taking an operating system snapshot
As part of your disaster recovery plan, you create a snapshot of the operating system from your primary environment. You then transfer the snapshot to your secondary environment.
Make sure you have completed the steps described in "Preparing the operating system before a snapshot."
The longer you keep a snapshot, the more disk space will be taken up. Create snapshots periodically and sort them based on your recovery point objective.
You can also use other methods to create a snapshot.
To take an operating system snapshot:
- Take a snapshot of the /home directory.
The snapshot is also a new logical volume:
- # lvcreate -L1G -s -n homesnapshot /dev/VolGroup00/homebackup
You can also use the GUI tool in the operating system, which, for Red Hat Linux, is Logical Volume Management.
- To use the logical volume, create a directory under /mnt to store the snapshot files:
- # mkdir /mnt/homesnapshot
- Mount the snapshot logical volume to the new directory:
- # mount /dev/VolGroup00/homesnapshot /mnt/homesnapshot
If you no longer need a snapshot, unmount it and remove it to save disk space:
- # lvremove /dev/VolGroup00/homesnapshot
After you take a snapshot, compress it and then FTP it to the secondary environment. On the secondary environment, extract the snapshot files and test them.
Previous topic: Prepare the operating system before a snapshot
NFS support
In a distributed environment, the data of the production environment is distributed over several operating systems. Without special configuration, during run time, it is highly possible to get an inconsistent copy of the entire environment even when you use a snapshot. A consistent copy of the entire environment is required to ensure the proper behavior of the system. To ensure consistency, you can use a Network File System (NFS).
If a snapshot is performed at the operating system level, the snapshot for different operating systems might correspond to the state at different points in time.
When you use a Network File System (NFS), users on a client computer can access files over the network as if the files were on their local server. In this architecture, a file server is configured on one operating system, which functions as the central repository for all files. The NFS client operating system can connect with the file server and mount the specific directory to the file server. The NFS client operates transparently on the directory mapped on the file server.
When NFS is enabled, therefore, the configuration and installation data of the production environment can be configured on a centralized NFS file server. In combination with the snapshot support of the file server operating system, you can create a consistent backup of the entire production system.
Before you create a snapshot, you must set up your NFS server and clients.
- Configure the NFS server The first step in configuring your NFS environment is to configure the NFS server, which functions as the central repository for all files.
- Configure the NFS clients The second step in configuring your NFS environment is to configure the NFS clients.
Configure the NFS server
The first step in configuring your NFS environment is to configure the NFS server, which functions as the central repository for all files.
The following example shows how to configure your NFS server.
- Create the directories to mount to the NFS client directories ( /home/machine1, /home/machine2,
and /home/machine3).
Verify these directories have write authority.
- Configure the /etc/exports file:
/home/machine1 *(rw, sync)
/home/machine2 *(rw, sync, no_wdelay, nohide)
/home/machine3 *(rw, sync, no_root_squash)
/home/machine4 *(rw, sync, no_root_squash)
In this example, the /home/machine3 and /home/machine4 directories will be mounted to the remote managed-node profile directory for IBM Business Monitor.
You must have the no_root_squash parameter, or you will see an error (cp:failed to preserve ownership) when you create the managed-node profile for IBM Business Monitor.
- Before the NFS service starts, the portmap service must be running. To check its status, use the following command:
- # service portmap status
- If the portmap service has stopped, use the following command to start it:
- # service portmap start
- To start or restart the NFS service, use one of the following commands:
# service nfs start # service nfs restart
- To make the NFS service start automatically with the system, use the following command:
- # chkconfig --level 35 nfs on
- To check the NFS export directories, use the following command.
- # showmount -e <server_ip>
You can use this command on both the NFS server and the NFS client.
Configure the NFS client.
Next topic: Configure the NFS clients
Configure the NFS clients
The second step in configuring your NFS environment is to configure the NFS clients.
The following example shows how to configure your NFS server.
For each NFS client:
- To mount the corresponding directory to the remote NFS server, use the following commands:
# mount <server_ip>:/home/machine1 /home/dmgr
# mount <server_ip>:/home/machine2 /home/db2
# mount <server_ip>:/home/machine3 /home/custom01
- Make these mounts start automatically with the system so that you will not have to run these commands every time that you start your system.
- Repeat steps 1 and 2 for all other NFS clients.
Previous topic: Configure the NFS server
Database considerations
Install and configure the database for your primary and secondary environments in accordance with your disaster recovery plan.
The underlying database must be included in the same recovery scope of the BPM and IBM Business Monitor production environment.
In the examples in the topics in this section, DB2 is the underlying database type.
Installation
For the database installation in the primary environment, follow the instructions in the DB2 installation manual to install and create the DB2 instance and related database users.
For the secondary environment, perform the following tasks:
- Install DB2 with the same installation path and instance name as in the primary environment.
- Use the same user names and passwords used by DB2 in the system.
Configuration
The database configuration involves the creation of the database, and tablespace.
For the primary environment, perform the following tasks:
- Manually create all the necessary databases for the environment.
- Set the database path to the directory that is mounted on the NFS server.
For the secondary environment, mount the same directory of the database server on the NFS server. No configuration is required before restoration.
Environment considerations
Install and configure your primary and secondary environments in accordance with your disaster recovery plan.
Installation
When you install the BPM or IBM Business Monitor environment as the root user, there are no special instructions for the primary environment.
For the secondary environment, reinstall the environment with the same information, such as installation path, product version, and patch level, as in the primary environment.
Configuration
Configuration includes creating profiles and configuring cluster environments.
When creating profiles in the primary environment, the profile path must be located in the directory that is targeted at the NFS server. In the secondary environment, the same directory of the corresponding operating system must be mounted on the NFS server. No configuration is required before the restoration.
To configure the cluster environment, follow the normal process of cluster configuration. The following figure illustrates the entire test scenario example.
Figure 1. Production environment and backup environment
This example contains a total of ten servers, five for each environment (NFS server, Machine1, Machine2, Machine3, and Machine4).
Each server except the NFS server in the production environment has the same IP address and host name as the one in the primary environment. The NFS servers in the two environments have different IP addresses and host names.
DB2 and IBM Business Process Manager are all installed in the /opt/ibm directory under their installation servers. DB2 is installed on Machine2, BPM is installed on Machine1 and Machine2, and IBM Business Monitor is installed on Machine1, Machine3, and Machine4. For DB2, the databases related to IBM Business Process Manager and IBM Business Monitor are created under /home/db2, and the dmgr and custom profiles for BPM and IBM Business Monitor are created under /home.
The dmgr files for BPM and IBM Business Monitor are created on Machine1, IBM Business Process Manager custom profiles are created on Machine1 and Machine2, and IBM Business Monitor custom profiles are created on Machine3 and Machine4.
The following figure provides more information about the test scenario example. The structure in the figure is just an example. You can arrange your directories according to the requirements of your system.
Figure 2. Directories on the NFS server
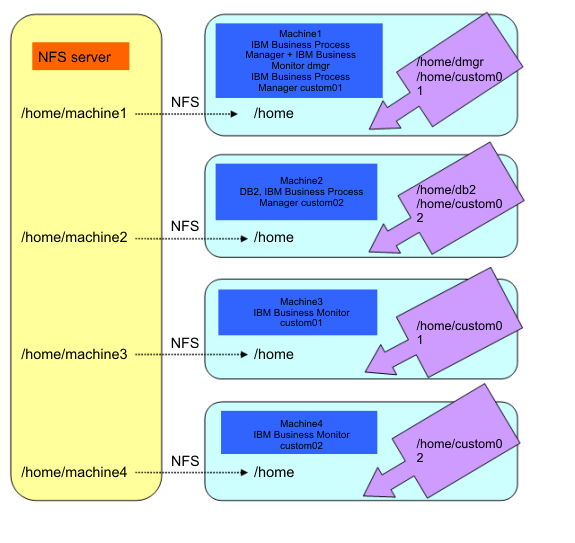
With this structure, to back up all profiles and database files, you can conveniently take a snapshot of the /home directory under the NFS server. Alternatively, you could separate the runtime data from the configuration data and make snapshots for them individually.
Keep the backups as small as possible because otherwise your processing time could be greater than your recovery time objective.
Recovery scenarios
Disaster recovery occurs at various times in a production environment. For example, in addition to the backups that occur according to a regular schedule, you also perform disaster recovery tasks as needed. The production environment might go through various states ( processes might be running) while the backup is taking place.
The topics in this section describe the disaster recovery scenario for BPM with IBM Business Monitor, including the installation, configuration, and underlying database. The recovery scope covers only the production environment and no other systems and components that interact with it.
In a complete scenario, the suggestions in this section would be incorporated into the overall disaster recovery document to provide a complete solution.
The following sections describe typical scenarios for backup, restoration, and verification.
- Configuration backup and restoration After a configuration change, such as when you create a profile, configure a deployment environment, or install an application, back up the configuration data of the primary environment. Then verify whether the configuration change can be restored successfully in the secondary environment.
- Runtime backup and restoration After you back up and restore the configuration and runtime data, verify whether the current instances, such as long-running process instances, short-running process instances, SCA invocation instances, and IBM Business Monitor monitored instances, can be restored to the secondary environment.
- Verification of the backup and restoration For production environment and application scenarios, test your backup and restoration procedure so that you can identify any problems that might exist in your procedure.
Configuration backup and restoration
After a configuration change, such as when you create a profile, configure a deployment environment, or install an application, back up the configuration data of the primary environment. Then verify whether the configuration change can be restored successfully in the secondary environment.
To verify the data for this scenario:
- After a configuration change, create a snapshot of the environment.
- Restore the snapshot to the secondary environment.
- To verify the secondary environment, start the whole environment independently, and make sure the secondary environment does not share any resources with the primary environment.
After you verify the data, you should discover the configuration changes are still valid in the secondary environment.
You can now safely take a snapshot of the configuration changes, because configuration changes are protected through the backup and restoration procedure.
Runtime backup and restoration
After you back up and restore the configuration and runtime data, verify whether the current instances, such as long-running process instances, short-running process instances, SCA invocation instances, and IBM Business Monitor monitored instances, can be restored to the secondary environment.
This is the most challenging scenario, and it requires special design considerations.
Because RAM data will be lost during the backup and restoration procedure, you must depend on global transactions to keep data integrity.
To ensure overall consistency, all modified resources inside the scenario design must be included in the same recovery scope.
For asynchronous invocation, you can get different replay results because you can have different settings on the transaction boundaries. Because the transaction cannot pass through the boundary of caller and partner, a separate transaction context is required for both caller and partner, so they can be restored through the disaster recovery procedure.
The testing scenario is shown in the following figure:

The scenario consists of the following steps:
- The OrderHandling main process is a long-running process, which itself is contained in a global transaction context. During the navigation, the transaction might be demarcated by invocation or human task activity; however, for each partition, it is still wrapped by a global transaction.
- The CheckCustomerAccountStatus subprocess is a long-running process as the partner of the main process, which is contained inside a global transaction as well. It will be invoked through asynchronous invocation.
The implementation for the CheckCustomerAccountStatus BPEL process is shown in the following figure:

CheckCustomerAccountStatus is a long-running process.
- The transactional behavior for Receive is Commit After.
- For Snippet, it is Participates.
- For Invoke, it is Commit After.
When you are restoring in the backup environment, the strings in Snippet and Invoke will be printed.
- The transactional behavior for Receive is Commit After.
- The UpdateOrderDatabase subprocess is a short-running process as the partner of the main process, which is contained inside a global transaction and invoked through asynchronous invocation.
- The CancelOrderandSendNotification component is an SCA component and invoked as asynchronous one-way.
The implementation for the CancelOrderandSendNotification BPEL process is shown in the following figure.
 CancelOrderandSendNotification is a microflow, so by default the transactional behavior is Participates. However, because the invocation style for InvokeNotification is synchronized and it is a one-way invocation, only the strings in InvokeNotification will be printed in the backup environment.
To verify the data for this scenario:
- Generate some load on the environment, and make sure that some instances are still running.
- Take a snapshot of the environment.
- Restore the snapshot to the secondary environment.
- To observe the behavior of the restored environment, start the whole environment in an isolated environment that does not share any resources with the primary environment.
After you verify the data, you should discover the running instances will continue for navigation in the secondary environment as normal and the instance states from BPM and IBM Business Monitor are consistent.
Through the persistence and transaction support of the underlying implementation, the running instances will continue to run through the backup and restoration procedure.
Verification of the backup and restoration
For production environment and application scenarios, test your backup and restoration procedure so that you can identify any problems that might exist in your procedure.
When your primary environment comes back, carry out the steps:
- Perform a clean shutdown of the secondary environment.
- Move all the data back to your primary environment.
- Start the primary system and switch all the connections back.
21. Searching knowledge bases
You can often find solutions to problems by searching IBM knowledge bases. Optimize your results by using available resources, support tools, and search methods.
To search for solutions to your problems in IBM knowledge bases.
- Search with IBM Support Assistant. IBM Support Assistant (ISA) is a free software serviceability workbench that helps you resolve questions and problems with IBM software products. The ISA tool can search multiple knowledge bases simultaneously
To search multiple Internet resources for BPM, open the ISA and click Search. From this page, you can search a variety of resources including:
- IBM Software Support Documents
- IBM developerWorks
- IBM newsgroups and forums
- IBM product information centers
These free newsgroups and forums do not offer any formal IBM product support. They are intended for user-to-user communication. IBM will not be actively participating in these discussions. However, IBM does review these newsgroups periodically to maintain a free flow of accurate information. You may also want to browse the following resources individually.
- Search the information center.
IBM provides extensive documentation in the form of online information centers. An information center can be installed on your local machine or on a local intranet. An information center can also be viewed on the IBM web site. You can use the powerful search function of the information center to query conceptual and reference information and detailed instructions for completing tasks.
- Search available technical resources. In addition to this information center, the following technical resources are available to help you answer questions and resolve problems:
- IBM Business Process Manager technotes
- IBM Business Process Manager Authorized Program Analysis Reports (APARs)
- IBM Business Process Manager support web site
- Redbooks Domain
- IBM Education Assistant
- IBM Business Process Manager forums and newsgroups
The following resources describe how to optimize your search results:
- Searching the IBM Support web site
- Use the Google search engine
- IBM Software Support RSS feeds
- My Support e-mail updates
22. Getting fixes
A product fix might be available to resolve your problem.
To get product fixes, perform the steps in the Procedure section.
- Determine which fix you need. Check the list of IBM Business Process Manager recommended fixes to confirm that your software is at the latest maintenance level.
Check the list of problems fixed in the IBM IBM Business Process Manager fix readme documentation that is available for each listed fix pack and refresh pack to see if IBM has already published an individual fix to resolve your problem. To determine what fixes are available using IBM Support Assistant, run a query on fix from the search page.
Individual fixes are published as often as necessary to resolve defects in BPM. In addition, two kinds of cumulative collections of fixes, called fix packs and refresh packs, are published periodically for BPM, in order to bring users up to the latest maintenance level. You should install these update packages as early as possible in order to prevent problems.
Fixes specific to the underlying WebSphere Application Server product may also be obtained from the WebSphere Application Server Support Site or from the WebSphere Application Server Support team. Fixes for individual APARs for WebSphere Application Server generally can be applied without affecting IBM Business Process Manager. However, consult with the software requirements page before updating WAS with cumulative collections of fixes (fix packs). First check to see the cumulative fix has passed certification, or contact the Support team for verification.
- Download the fix. Open the download document and follow the link in the Download package section. When downloading the file, ensure the name of the maintenance file is not changed. This includes both intentional changes and inadvertent changes caused by certain web browsers or download utilities.
- Apply the fix. Follow the instructions in the Installation Instructions section of the download document. See the "Updating IBM Business Process Manager"topic in the "Install" documentation.
- To receive weekly notification of fixes and updates, subscribe to My Support email updates.
Subscribe to My Support e-mail updates
Required interim fixes for the BPM V8.5 products
23. Contacting IBM Software Support
IBM Software Support provides assistance with product defects.
To take advantage of unique Support features, see the BPM support page. The Support Page contains the latest information on fixes and downloads, educational resources, and commonly encountered problems and their solutions.
Before contacting IBM Software Support, your company must have an active IBM software subscription and support contract, and you must be authorized to submit problems to IBM. The type of software subscription and support contract that you need depends on the type of product you have. For information about the types of software subscription and support contracts available, see "Enhanced Support" in the Software Support Handbook site listed in the Related Topics section.
To contact IBM Software Support with a problem, perform the steps in the Procedure section.
- Define the problem, gather background information, and determine the severity of the problem. For help, see the "Contacting IBM" in the Software Support Handbook.
- Gather diagnostic information. When explaining a problem to IBM, be as specific as possible. Include all relevant background information so that IBM Software Support specialists can help you solve the problem efficiently.
For information that IBM Support needs in order to help you solve a problem, see the BPM MustGather technote. You can use the BPM plug-in for the IBM Support Assistant to capture the data and send it to IBM.
If you are able to determine the problem is purely with underlying WebSphere Application Server functionality, consider requesting assistance specifically from the WAS Support team rather than the BPM team. For information that IBM Support needs in order to help you solve a WebSphere Application Server problem, see the WebSphere Application Server MustGather Technote.
- Submit your problem to IBM Software Support in one of the following ways:
- Use IBM Support Assistant: See the "IBM Support Assistant" topic.
- Online: Open a service request on the IBM Software Support site using the Electronic Service Request (ESR) tool.
- By telephone: For the telephone number to call in your country or region, go to the contacts page of the IBM Software Support Handbook on the Web and click the name of your geographic region.
If the problem you submit is for a software defect or for missing or inaccurate documentation, IBM Software Support creates an Authorized Program Analysis Report (APAR). The APAR describes the problem in detail. Whenever possible, IBM Software Support provides a workaround that you can implement until the APAR is resolved. Support will work and communicate with you on the progress and deliver the fix once it is completed. Additionally, once completed, IBM will also publish the resolved APARs on the Software Support Web site, so that other users who experience the same problem can benefit from the same resolution.
IBM Software Support specialists often use the IBM Assist On-site live, remote-assistance tool to help with problem determination, data collection, and problem resolution. Read the IBM Assist On-site website for information on how to prepare the machine for a remote-assistance
session.
Related tasks:
IBM Support Assistant Data Collector