Extend an existing installation
After you install and configure the runtime environment on your system in BPM, you might want to customize your configuration. For example, you might want to customize settings, set up an additional security provider, set up user accounts, and change and encrypt passwords.
Customizing the Process Server settings used to connect to Process Center
After you install and configure IBM Business Process Manager, you can use the wsadmin command to change the Process Server settings that are used for connecting to the Process Center.
Restriction: The BPMAuthor role must point to the same user in both the Process Center and the Process Server, and must have the same password.
Use the following procedure to customize the Process Server connection settings:
For example, you can complete the following tasks:
- Update the host and port name of the Process Center connection details.
- Change Process Server from an offline server to a Process Center connected server (online server), and vice versa.
- Change the Process Center connection URL.
To customize the settings that are used by Process Server to connect to a Process Center.
For network deployment Process Server environments on the deployment manager node, synchronize the nodes, and restart the application cluster member.
- Stop the Process Server environment. In a network deployment environment, stop the deployment manager and the nodes.
- To update the server settings with the WebSphere command-line administration tool (wsadmin) AdminConfig commands.
- Start the wsadmin scripting tool.
To start wsadmin...
PROFILE_HOME/bin:
- wsadmin -conntype NONE -lang jython
- Get the process server configuration of the application cluster.
- wsadmin> ps = AdminConfig.getid("/Cell:/ServerCluster:application_cluster_name/BPMClusterConfigExtension:/BPMProcessServer:/")
- Update the processCenterUrl variable.
- wsadmin> AdminConfig.modify(ps, [['processCenterUrl', 'https://new_server_name/ProcessCenter’]])
-
 If you are using BPM V8.5.0.1,
update the processCenterInternalUrl variable, which is the same as ProcessCenterUrl but with the literal string Internal appended at the end for the context root.
If you are using BPM V8.5.0.1,
update the processCenterInternalUrl variable, which is the same as ProcessCenterUrl but with the literal string Internal appended at the end for the context root.
- wsadmin> AdminConfig.modify(ps, [['processCenterInternalUrl', 'https://new_server_name/ProcessCenterInternal’]])
- To change the state of an offline Process Server to online, update the heartBeatInterval value to a number that is larger than 0 (zero). The heartbeat interval is the polling interval, in seconds, used by the Process Server to communicate its location and characteristics to the Process Center. For example, to set the value to 60 seconds, enter the following command:
- wsadmin> AdminConfig.modify(ps, [['heartBeatInterval', '60']])
To bring the server offline, disable polling by setting the heartBeatInterval value to a negative number:
- wsadmin> AdminConfig.modify(ps, [['heartBeatInterval', '-1']])
-1 is the special value to use for an offline server.
- Verify your updates.
- wsadmin> print AdminConfig.show(ps)
Save the changes and exit.
wsadmin> AdminConfig.save()
wsadmin> exit
- Start the wsadmin scripting tool.
To start wsadmin...
- Review the Business Process Manager security roles by navigating in the WAS administrative console to Servers > Deployment Environments > Deployment Environment Name > Related Items > Authentication Aliases. See IBM Business Process Manager security roles.
- Note the authentication alias for the ProcessCenterUser and BPMAuthor roles.
- If it does not exist, create the ProcessCenterUserAlias. See Modify authentication aliases. For ProcessCenterUserAlias, use a valid user name and password from the Process Center environment. The user does not need any special authorization in Process Center.
- To use a user other than DeAdmin (the default) to deploy snapshots from Process Center to the runtime Process Server, create a new BPMAuthorAlias. For BPMAuthorAlias, use a valid user name and password from the Process Server environment that has the authority to access and deploy snapshots to the runtime Process Server. This user is saved in the LSW_SERVER table in the Process Center database, and used when the process application is deployed to this Process Server.
- In the Business Process Manager security roles screen,
map the ProcessCenterUser role to ProcessCenterUserAlias and the appropriate alias to the BPMAuthor role.
- Verify your updates.
- wsadmin> print AdminConfig.show(ps)
The output looks something like this example:
...
[heartBeatInterval 60]
...
[processCenterUrl https://hostname:9082/ProcessCenter]
Save the changes and exit.
wsadmin> AdminConfig.save()
wsadmin> exit
- If you are using BPM V8.5.0.1,
you must verify the Process Server root signer SSL certificate is imported into Process Center because Process Center connects to Process Server by HTTPS by default. If you configure the processCenterUrl variable or the processCenterInternalUrl variable to use HTTPS,
then you also must verify the Process Center root signer certificated
is imported in Process Server. Follow the steps in Configure SSL communication in a network deployment environment.
To change the Process Center to connect to Process Server by HTTP. Then you do not need to import the Process Center root signer certificates into Process Server. Note that this change reverts back to the 8500 behavior of calculating unencrypted URLs for many scenarios, not only online deployment.
- Stop the Process Center environment. In a network deployment environment, stop the deployment manager and the nodes.
- Update the following server settings with the wsadmin AdminConfig commands.
- Start the wsadmin scripting tool. To start wsadmin using the Jython
language, run from the bin directory of the deployment manager profile:
- wsadmin -conntype NONE -lang jython
- Get the Process Center configuration of the application cluster:
- wsadmin> pc = AdminConfig.getid("/Cell:/ServerCluster:application_cluster_name/BPMClusterConfigExtension:/BPMProcessCenter:/")
- Update the useHTTPSURLPrefixes variable:
- wsadmin> AdminConfig.modify(pc, [['useHTTPSURLPrefixes', 'false’]])
- Verify your updates:
- wsadmin> print AdminConfig.show(pc)
Save the changes and exit:
wsadmin> AdminConfig.save()
wsadmin> exit
- Start the wsadmin scripting tool. To start wsadmin using the Jython
language, run from the bin directory of the deployment manager profile:
- Stop the Process Server environment. In a network deployment environment, stop the deployment manager and the nodes.
- Update the following server settings with the wsadmin AdminConfig commands.
- Start the wsadmin scripting tool. To start wsadmin using the Jython
language, run from the bin directory of the deployment manager profile:
- wsadmin -conntype NONE -lang jython
- Get the Process Server configuration of the application cluster:
- wsadmin> pc = AdminConfig.getid("/Cell:/ServerCluster:application_cluster_name/BPMClusterConfigExtension:/BPMProcessServer:/")
- Update the useHTTPSURLPrefixes variable:
- wsadmin> AdminConfig.modify(pc, [['useHTTPSURLPrefixes', 'false’]])
- Verify your updates:
- wsadmin> print AdminConfig.show(pc)
Save the changes and exit:
wsadmin> AdminConfig.save()
wsadmin> exit
- Start the wsadmin scripting tool. To start wsadmin using the Jython
language, run from the bin directory of the deployment manager profile:
- Stop the Process Center environment. In a network deployment environment, stop the deployment manager and the nodes.
- Restart the Process Server cluster or server. For network deployment Process Server environments, synchronize the nodes and restart the application cluster member.
The settings that are used to connect Process Server to Process Center are customized and the same changes are to the custom nodes.
Related tasks:
Change IBM Business Process Manager passwords
WebSphere Common Configuration Model
Security configuration properties
Stop and restart a cluster member
Customizing the Process Server or Process Center cluster to work with a web server on V8.5.0.0
After you install and configure IBM Business Process Manager, you must customize the environment so that it can function properly as a cluster with a web server.
Verify the Process Server has been installed and configured, and that you have created and configured the servers and clusters. You cannot start the cluster until you complete the procedures in this topic. The method used in BPM V8.5.0.0 to configure web servers has been replaced in BPM V8.5.0.1 by a more generic way of configuring endpoints. Perform the appropriate actions that are described in Customizing the Process Server or Process Center cluster to work with a web server on V8.5.0.1.
The procedures in this topic describe how to:
- Configure settings in both the Process Server and Process Center to point to a web server.
- Set the Process Center to Process Server communication to work with HTTP over SSL or HTTP Secure (HTTPS).
The host name and port number to access the servers are stored in two places. The first place is the BPMVirtualHostInfo configuration object. The second place is in one of the XML configuration files (99Local.xml, 100Custom.xml, etc.) at the profile configuration root. Step 1 deals with changing the BPMVirtualHostInfo configuration object. Step 2 deals with editing the XML files. Because you should use 100Custom.xml for all editing purposes, copy the properties that are stored in other XML files into 100Custom.xml, and then edit them to have correct values.
Complete the following steps:
- Configure the Process Server and the Process Center to point to a web server. If there is no web server, then all URLs point to the cluster member host name and port. If there is no web server, the cluster server member does not need to be changed.
If you have a web server, change all values to point to the web server host name and port with the actual host name and port of the web server.
If you are using the default port for http (80) or https (443), the port is an optional part of the URL.
- Start the wsadmin scripting tool. To start wsadmin using the Jython language, run from the bin directory of the deployment manager profile:
Deployment Manager Profile/bin
wsadmin -conntype NONE -lang jython
After running this command, synchronize all the nodes in the Process Admin console. - Extract the object properties.
wsadmin> virtualhosts = AdminConfig.list('BPMVirtualHostInfo') wsadmin> print virtualhosts - If the wsadmin print command shows multiple results, pick the server by counting from zero. In the following example, the print command shows two virtual hosts:
(cells/WIN-E6GDL89KDJDCell01/clusters/DE1.AppCluster|cluster-bpm.xml#BPMVirtualHostInfo_1369035785708)
(cells/WIN-E6GDL89KDJDCell01/clusters/DE2.SingleCluster|cluster-bpm.xml#BPMVirtualHostInfo_1369039814544)
To work with the first server that represents cluster 2 enter the following command:- wsadmin> vh = virtualhosts.split()[0]
To verify your selection, print the result again:
- wsadmin> print vh
The output confirms the server is selected:
(cells/WIN-E6GDL89KDJDCell01/clusters/DE1.AppCluster|cluster-bpm.xml#BPMVirtualHostInfo_1369035785708)

wsadmin> print AdminConfig.show(vh)
- Change the host to be the web server host name. The host name must be the same as the host name in the IHS SSL certificate.
- wsadmin> AdminConfig.modify(vh, [['hostname', 'bpmihs']])
- Change the port to the value of the web server port.
- wsadmin> AdminConfig.modify(vh, [['port', '443']])
- Change the transport protocol.
- wsadmin> AdminConfig.modify(vh, [['transportProtocol', 'https']])
- Verify your update.
- wsadmin> print AdminConfig.show(vh)
Save the changes and exit.
wsadmin> AdminConfig.save()
wsadmin> exit
- Start the wsadmin scripting tool. To start wsadmin using the Jython language, run from the bin directory of the deployment manager profile:
- Edit 100Custom.xml.
- Locate and open the Process Center or Process Server 100Custom.xml file so you can overwrite the values that are there with values from 99Local.xmls. The path takes this form:
- WAS_HOME\profiles\deployment manager profile name\config\cells\cell name\nodes\node name\servers\server name\process-center\config\100Custom.xml
or
- WAS_HOME\profiles\deployment manager profile name\config\cells\cell name\nodes\node name\servers\server name\process-server\config\100Custom.xml
Here is an example of an actual path:
- C:\IBM\BPM\v8.5\profiles\DmgrProfile\config\cells\Cell1\nodes\Node1\servers\SingleClusterMember1\process-center\config\100Custom.xml
- Locate and open the Process Center or Process Server 99Local.xml file so you can extract the values that are there.
- WAS_HOME\profiles\deployment manager profile name\config\cells\cell name\nodes\node name\servers\server name\process-center\config/system/99local.xml
or
- WAS_HOME\profiles\deployment manager profile name\config\cells\cell name\nodes\node name\servers\server name\process-server\config/system/99local.xml
Here is an example of an actual path:
- C:\IBM\BPM\v8.5\profiles\DmgrProfile\config\cells\Cell1\nodes\Node1\servers\SingleClusterMember1\process-center\config/system/99local.xml
- Copy all occurrences of http://hostname:port,
including the enclosing XML tags, and paste them into 100Custom.xml.
- Add merge="mergeChildren" to the parent XML tags that contain the http://hostname:port statements.
- Add merge="replace" to the XML tag that contains the http://IHS/proxy server_hostname:IHS/proxy
unsecure-port or https://IHS/proxy server_hostname:IHS/proxy
secure-port statement.
- Edit the host name and port values that should be changed.
Save and close 100Custom.xml.
The following example shows part of a Process Center 100Custom.xml file.
<properties> <webservices merge="mergeChildren"> <!-- <override-default-settings webservice-name="TeamWorksQueryServices" merge="mergeChildren"> <schema-namespace merge="replace">https://lombardisoftware.com/webservices/TeamWorksQueryServices</schema-namespace> </override-default-settings> --> </webservices> </common> <server merge="mergeChildren"> <email merge="mergeChildren"> <mail-template merge="mergeChildren"> <portal-link merge="replace">https://bpmihs/ProcessPortal</portal-link> <!-- Add port numbers if you have not used the default ports of 443 for https or 80 for http. --> <portal-run-task-link merge="replace">https://bpmihs/ProcessPortal/dashboards/TWP/BPM_WORK?tw.local.view=taskcompletion&tw.local.taskid={2}</portal-run-task-link> <portal-process-info-link merge="replace">https://bpmihs/ProcessPortal/dashboards/TWP/Process+Performance?tw.local.selectedInstanceId={6}</portal-process-info-link> <gadget-link merge="replace">https://bpmihs/ProcessPortal/gadgets/OpenSocial/BPMOpenSocialGadget.xml</gadget-link> </mail-template> </email> <connections-task-notification merge="mergeChildren"> <task-notification-template merge="mergeChildren"> <server-link merge="replace">https://bpmihs</server-link> <activity-stream-image-link merge="replace">https://bpmihs/ProcessPortal/com/ibm/bpm/social/img/Bpm_connections_48x48.png</activity-stream-image-link> <gadget-link merge="replace">https://bpmihs/ProcessPortal/gadgets/OpenSocial/BPMOpenSocialGadget.xml</gadget-link> </task-notification-template> </connections-task-notification> </server> </properties> - Locate and open the Process Center or Process Server 100Custom.xml file so you can overwrite the values that are there with values from 99Local.xmls. The path takes this form:
- To synchronize the changes, log in to the WebSphere Application Server admin console as an administrative user, click System administration > Nodes, click Full Resynchronize. Make sure to only work in the file system of the deployment manager profile. These changes are not replicated by using the usual syncNode command or by using the Synchronize button in the WebSphere Application Sserver admin console. You need to use a full resynchronize to copy all files from the deployment manager to the nodes, including changes that WAS does not track.
- Stop the deployment manager and the cluster or server.
- Restart the deployment manager and the cluster or server.
- To set the Process Center to Process Server communication to work with HTTP over SSL or HTTP Secure (HTTPS), use the procedure described in Configure SSL communication for a network deployment environment
Related tasks:
Change IBM Business Process Manager passwords
Stop and restart a cluster member
Customizing the Process Server or Process Center cluster to work with a web server on V8.5.0.1
After you install and configure IBM Business Process Manager, you must customize the environment so that it can function properly as a cluster with a web server.
This page describes only the additional BPM configuration that is required after configuring a web server in your WebSphere Application Server cell as described in  Implementing a web server plug-in.
Verify the Process Server has been installed and configured, and that you have created and configured the servers and clusters. You cannot start the cluster until you have completed the procedures in this topic. The method used in BPM V8.5.0.0 (see Customizing the Process Server or Process Center cluster to work with a web server on V8.5.0.0) was replaced in BPM V8.5.0.1 by a more generic way of configuring endpoints. If you use a web server as an entry point into the network, configure virtual host information about the web server so that BPM generates URLs that are based on the host name of the web server.
The following procedure describes the steps to follow for a simple configuration. For an advanced configuration, refer to the topic "Configuring BPM endpoints to match the topology."
- Stop the deployment manager.
- Start the wsadmin scripting client from the deployment manager profile /bin directory:
- wsadmin -conntype none -lang jython
- Get the deployment environment object.
The sample below assumes a deployment environment name of De1 . This should be adapted to the deployment environment name you chose during configuration.
dePath = '/Cell:/BPMCellConfigExtension:/BPMDeploymentEnvironment:De1/'
de = AdminConfig.getid(dePath)
print de
- Create the virtual host object for your web server:
webserver_vh = AdminConfig.create('BPMVirtualHostInfo',de, [['name','webserver_vh'], ['transportProtocol','https'],['hostname','webserver.example.com'],['port','443']], 'virtualHosts') - Point to the newly created BPMVirtualHostInfoObject object from either:
- The defaultVH property of the deployment environment (this causes all traffic to use the web server):
- AdminConfig.modify(de,[['defaultVH',webserver_vh]])
OR
- The EXTERNAL_CLIENT endpoint scenario (this causes all user traffic to use the web server, while internal traffic continues to connect to the current server's web container):
Find the BPMURL object for the EXTERNAL_CLIENT endpoint scenario:
for item in AdminUtilities.convertToList(AdminConfig.getid(dePath+'BPMURLS:/BPMURL:/')):
 if AdminConfig.showAttribute(item,'scenario') == 'EXTERNAL_CLIENT': bpmurl= item; break;

print bpmurl
An external client ( a web portal or an enterprise information system) is outside the server but interacts with an application installed in the server.Because Jython relies on indentation to identify the contents of a loop, the space character before the if statement is required, and pressing enter twice is necessary to execute the loop.
Set the web server virtual host for the EXTERNAL_CLIENT BPMURL and save your changes:
- AdminConfig.modify(bpmurl, [['virtualHost',webserver_vh]])
Save changes.
- AdminConfig.save()
- The defaultVH property of the deployment environment (this causes all traffic to use the web server):
- Restart the deployment manager.
Related tasks:
Change IBM Business Process Manager passwords
Stop and restart a cluster member
Configure BPM endpoints to match the topology
Configure the web server plug-in for Secure Sockets Layer
Selecting a web server topology diagram and roadmap
Configure a virtual host
In IBM Business Process Manager (BPM), if you have more than one deployment environment in the same cell, you need a script and instructions to configure a virtual host.
To configure the virtual host:
- Start the Deployment Manager.
- Run one of the following commands to view the usage instructions:
-

 -help
-help
-
 dmgr_profile\bin\updateVirtualHost
-?
dmgr_profile\bin\updateVirtualHost
-?
-
- Run the updateVirtualHost command with the deployment environment names and the virtual host name:
- updateVirtualHost -d Deployment Environment Name 1,Deployment Environment Name 2 -v virtual_host_name
The updateVirtualHost command is located in the dmgr_profile/bin directory.
Customizing Business Process Choreographer
Business Process Choreographer supports enterprise applications that contain BPEL processes or human tasks. Business Process Choreographer is configured by default when you use BPMConfig or the deployment environment wizard to create your Business Process Manager Advanced environment. Depending on your requirements, you might need to perform further customization.
- Optional: Verify the basic Business Process Choreographer configuration works: Perform Verifying that Business Process Choreographer works.
- Optional: The Business Process Choreographer configuration includes a Business Process Choreographer Explorer configuration. To view or modify the Business Process Choreographer Explorer settings using the administrative console, click Servers > Clusters > WebSphere application server clusters > cluster_name, then on the Configuration tab, in the Business Process Manager section, expand Business Process Choreographer, and click Business Process Choreographer Explorer.
- To create the Human Task Manager to be able to send escalation emails, use the administrative console to configure the settings for the Human Task Manager.
- Set the email sender address and email URL link prefixes, click Servers > Clusters > WebSphere application server clusters > cluster_name, then on the Configuration tab, in the Business Process Manager section, expand Business Process Choreographer, and click Human Task Manager, and complete the settings for the sender address and the prefixes for link URLs that are included in escalation emails.
- To set the email server address, port number, the user ID, and password for the email server, click Resources > Mail > Mail sessions, select Cell scope, then click HTM mail session_suffix, where suffix is either node_name_server_name or cluster_name, depending on where Business Process Choreographer is configured. Enter your settings.
- Set the context roots and endpoints.
- If using the Business Process Choreographer Explorer, Business Process Archive Manager, the Business Space, or a client that uses the REST API, change the default context roots for the REST API so they are unique for each combination of host name and port. To set the context roots perform the following actions:
- To set the context roots for the Business Flow Manager, click Applications > Application Types > WebSphere enterprise applications then application_suffix > Context Root for Web Modules, where application is BPEContainer for a Business Process Choreographer configuration or BPArchiveMgr for a Business Process Archive Manager configuration, and suffix is the name of the cluster where Business Process Choreographer or Business Process Archive Manager is configured. Then make sure the context roots for the following web modules and are correct and unique.
- BFMIF_scopeWeb
- BFMJAXWSAPI
- BFMRESTAPI
- To set the context roots for the Human Task Manager, click Applications > Application Types > WebSphere enterprise applications then application_suffix > Context Root for Web Modules, where application is TaskContainer for a Business Process Choreographer configuration or TaskArchiveMgr for a Business Process Archive Manager configuration, and suffix is the name of the cluster where Business Process Choreographer is configured.
Then make sure the context roots for the following web modules and are correct and unique.
- HTMIF_scopeWeb
- HTMJAXWSAPI
- HTMRESTAPI
- To change the REST URLs the Business Process Choreographer Explorer uses:
- Click Servers > Clusters > WebSphere application server clusters > cluster_name . On the Configuration tab, in the Business Process Manager section, expand Business Process Choreographer and click Business Process Choreographer Explorer. Update the Business Flow Manager and Human Task Manager REST API URLs.
- Update the endpoints in config-rest.xml using a command similar to the following example, which uses PS.AppTarget as the cluster name:
wsadmin>AdminTask.updateRESTServiceProvider(['-clusterName',  'PS.AppTarget', '-appName', 'BPEContainer_PS.AppTarget', '-webModuleName','bfmrestapi.war', '-contextRoot', '/rest/bpm/bfmPS2/'])

wsadmin>AdminTask.updateRESTServiceProvider(['-clusterName',  'PS.AppTarget', '-appName', 'TaskContainer_PS.AppTarget', '-webModuleName','taskrestapi.war', '-contextRoot', '/rest /bpm/htmPS2/'])
.
- Click Servers > Clusters > WebSphere application server clusters > cluster_name . On the Configuration tab, in the Business Process Manager section, expand Business Process Choreographer and click Business Process Choreographer Explorer. Update the Business Flow Manager and Human Task Manager REST API URLs.
- To set the context roots for the Business Flow Manager, click Applications > Application Types > WebSphere enterprise applications then application_suffix > Context Root for Web Modules, where application is BPEContainer for a Business Process Choreographer configuration or BPArchiveMgr for a Business Process Archive Manager configuration, and suffix is the name of the cluster where Business Process Choreographer or Business Process Archive Manager is configured. Then make sure the context roots for the following web modules and are correct and unique.
- If you changed any of the context roots for the Business Flow Manager or Human Task Manager also modify the corresponding endpoints:
- If using the Business Process Choreographer Explorer or Business Process Archive Explorer: Change the REST endpoint to match the new context roots by clicking Servers > Clusters > WebSphere application server clusters > cluster_name, then on the Configuration tab, in the Business Process Manager section, expand Business Process Choreographer, and click Business Process Choreographer Explorer, select the BPCExplorer_scope or BPCArchiveExplorer_scope instance to modify, and set the new value. For example, if the context root for the Business Flow Manager REST API is /rest/bpm/bfm then the full URL might be something like http://system7.mycompany.com:9080/rest/bpm/bfm.
If you mapped the modules to an HTTP server, proxy server, IP sprayer, load balancer, or similar server, the URL should be based on the hostname and port number for that server.
- If using the Business Space: Change the REST endpoints to match the new context roots by clicking Servers > Clusters > WebSphere application server clusters > cluster_name, then on the Configuration tab, in the Business Process Manager section, expand Business Process Choreographer, and either Business Flow Manager or Human Task Manager, then under Additional Properties click REST Service Endpoint, and set the new value.
If you mapped the modules to an HTTP server, proxy server, IP sprayer, load balancer, or similar server, the URL should be based on the hostname and port number for that server.
- If using the Business Process Choreographer Explorer or Business Process Archive Explorer: Change the REST endpoint to match the new context roots by clicking Servers > Clusters > WebSphere application server clusters > cluster_name, then on the Configuration tab, in the Business Process Manager section, expand Business Process Choreographer, and click Business Process Choreographer Explorer, select the BPCExplorer_scope or BPCArchiveExplorer_scope instance to modify, and set the new value. For example, if the context root for the Business Flow Manager REST API is /rest/bpm/bfm then the full URL might be something like http://system7.mycompany.com:9080/rest/bpm/bfm.
- If using the Business Process Choreographer Explorer, Business Process Archive Manager, the Business Space, or a client that uses the REST API, change the default context roots for the REST API so they are unique for each combination of host name and port. To set the context roots perform the following actions:
- Optional: Update your virtual host configuration. By default, the web modules of the Business Process Choreographer applications are configured for the default_host virtual host. Verify the ports associated with the host alias are correct. You might need to add host aliases for the host names and ports of additional cluster members or for the web server used. For more details about virtual hosts, refer to
 Virtual hosts.
- Depending on the type of people directory provider that you use for people assignment, you might need to configure it:
- The system and user registry people directory providers can be used without configuring them.
- If you are using LDAP, perform Configure the LDAP people directory provider.
- If you are using the Virtual Member Manager (VMM), perform Configure the Virtual Member Manager people directory provider.
- If you configured VMM, and you want to use people substitution, perform Configure people substitution.
- To use group work items, use the administrative console to enable them. Click Servers > Clusters > WebSphere application server clusters > cluster_name, then on the Configuration tab, in the Business Process Manager section, expand Business Process Choreographer, and click Human Task Manager, then select Enable group work items.
- If you have WebSphere application security enabled and you have a long-running process that calls a remote EJB method, make sure that your Common Secure
Interoperability Version 2 (CSIv2) inbound authentication configuration has CSIv2 identity assertion enabled. For more information about this, refer to Configure Common Secure Interoperability Version 2 inbound communications.
Business Process Choreographer is customized to your requirements.
Related tasks:
Troubleshooting the Business Process Choreographer configuration
Configure the people directory provider
Business Process Choreographer can use one of four people directory providers to determine who can start processes or claim activities or tasks. Two providers can be used in their default configurations (Local operating system user registry, WebSphere Application Server user registry). The Virtual Member Manager and LDAP people directory providers can usually be used in its default configuration, but in some cases, it must be configured.
Each type of supported people directory service requires a corresponding people directory provider plug-in. Table 1 lists the supported people directory providers and corresponding plug-ins, which are installed by default.
| People directory provider | People directory provider plug-in name |
|---|---|
| Virtual Member Manager (VMM) | VMM people directory provider |
| LDAP directory | LDAP people directory provider |
| Local operating system user registry | System people directory provider |
| WebSphere Application Server user registry | User Registry people directory provider |
- To use VMM and LDAP, you will probably need to customize the configuration before using it, as described in the following topics.
- You can use the user registry and system plug-ins with the default configurations. Because you can use these people directory providers without further customization, they are often ideal for development and test environments.
- Configure the Virtual Member Manager people directory provider You configure the Virtual Member Manager (VMM) people directory provider so that Business Process Choreographer can perform people assignment, which determines who can start processes or claim activities or tasks. The default configuration of the VMM people directory provider is ready to use, and only needs to be configured if you introduce custom people assignment criteria.
- Configure the LDAP people directory provider You configure the LDAP people directory provider so that Business Process Choreographer can perform people assignment, which determines who can start processes or claim activities or tasks.
Related concepts:
Authorization and people assignment for human tasks
Related tasks:
Troubleshooting people assignment
Configure the Virtual Member Manager people directory provider
You configure the Virtual Member Manager (VMM) people directory provider so that Business Process Choreographer can perform people assignment, which determines who can start processes or claim activities or tasks. The default configuration of the VMM people directory provider is ready to use, and only needs to be configured if you introduce custom people assignment criteria.
To configure the VMM people directory provider, you must have a configured federated repository, as described in Manage the realm in a federated repository configuration
If you created a customized version of the VMM transformation file and Business Process Choreographer is configured on a cluster, place your version of the transformation file in the ProcessChoreographer/Staff directory to make it available on each Process Server installation that hosts members of the cluster.
- In the administrative console, click Resources > People directory provider.
- Select the appropriate node. Configure the people directory provider (perform step 3) on every node that hosts members of the cluster. Select the first node, configure the people directory provider on that node, then repeat the configuration (step 3) for all of the other nodes that host members of the cluster.
- To create a new VMM people directory configuration:
- Click VMM People Directory Provider.
- In the Additional Properties, select People directory configuration.
- Click New > Browse, and select your copy of the VMM transformation file. If the node agent is running, you can browse the file system of remote nodes to select the file.
- Click Next to copy the file to the ProcessChoreographer/Staff directory on the selected node.
- Enter an administrative name for the new people directory configuration, and optionally, a description
- Enter a unique Java™ Naming and Directory Interface (JNDI) name to identify this configuration to the system, for example, bpe/staff/myvmmconfiguration.
There are no other configuration parameters
- Click OK, then click Save.
- To activate the provider configuration, stop and start the cluster where you configured the provider.
The VMM people directory provider is configured. If you have problems with this procedure, refer to Troubleshooting people assignment.
Related tasks:
 Selecting a registry or repository
 Selecting a registry or repository
Configure a property extension repository in a federated repository configuration
Configure a property extension repository in a federated repository configuration
Building human tasks with the Virtual Member
Manager and LDAP
Configure the LDAP people directory provider
You configure the LDAP people directory provider so that Business Process Choreographer can perform people assignment, which determines who can start processes or claim activities or tasks.
To configure LDAP, you must plan for it, as described in Plan for the people directory provider. The LDAP people directory provider configuration is initialized with a URL that points to a local LDAP server. You must change the URL later to point to the actual LDAP server, which is normally remote to the application server. The LDAP people directory provider is configured for an LDAP server that allows anonymous access.
- Make a copy of the standard transformation file for LDAP, and give it another name. For example, myLDAPTransformation.xsl. Copy it from the following location:
-

 install_root/ProcessChoreographer/Staff/LDAPTransformation.xsl.
-
 install_root\ProcessChoreographer\Staff\LDAPTransformation.xsl.
The
standard XSL transformation for LDAP is stored in install_root/ProcessChoreographer/Staff/LDAPTransformation.xsl.
-
- Adapt the copy of the transformation file to suit the schema for your organization, as described in Adapting the LDAP transformation file.
CAUTION:
Do not modify the original version of the transformation file because it can be overwritten without warning when you apply a service pack or fix pack.
- If Business Process Choreographer is configured on a cluster, place the copy of the transformation file in the ProcessChoreographer/Staff directory to make it available on each Process Server installation that hosts members of the cluster.
- In the administrative console, click Resources > People directory provider.
- Select the appropriate node. Configure the people directory provider (complete step 6) on every node that hosts the cluster members. Select the first node, configure the people directory provider on that node, then repeat the configuration (step 6) for all the other nodes that host the cluster members.
- Create an LDAP configuration on the selected node.
- Click LDAP People Directory Provider.
- Under Additional Properties, click People directory configuration.
- Click New > Browse, and select the copy of the XSL transformation file that you adapted in step 2. If the node agent is running, you can browse the file system of remote nodes to select the file.
- Click Next to copy the file to the ProcessChoreographer\Staff directory on the selected node.
- Enter an administrative name for the new people directory configuration, and optionally, a description
- Enter a unique Java™ Naming and Directory Interface (JNDI) name for human tasks to use to reference this provider. For example, bpe/staff/ldapserver1.
- Click Apply, then click Custom Properties.
- For each of the required properties and for any optional properties that you planned in 2, choose whichever
option applies and complete the following steps:
- To change an existing property, click the name of the property, enter a value, and click OK.
- To create an additional property, edit one pair of additionalParameterName<number> and additionalParameterValue<number> custom properties as required, for example:
- Set the value of additionalParameterName1 to java.ldap.referral.
- Set the value of additionalParameterValue1 to follow.
- To apply the changes, click Save.
- To activate the provider configuration, stop and start the cluster where you configured the provider.
Human tasks and processes can now use the people assignment services to resolve people assignment queries and to determine which activities can be performed by which people.
- Adapting the LDAP transformation file Describes how to adapt the LDAP transformation XSL file to suit your organization's LDAP schema.
Adapting the LDAP transformation file
Describes how to adapt the LDAP transformation XSL file to suit your organization's LDAP schema.
The default LDAPTransformation.xsl file maps predefined people assignment criteria to LDAP queries, which make use of elements of the default LDAP schema. The following assumptions apply to the this schema:
- The LDAP object class for group entries is groupOfName.
- The group entry attribute that contains the member distinguished names (DNs) for the group is member.
- The LDAP object class for person entries is inetOrgPerson.
- The attribute that contains the login ID in a person entry is uid.
- The person entry attribute that contains their email address is mail.
- The person entry attribute containing the distinguished name of the manager of a person is manager.
If your LDAP schema uses name for object class and attribute names that are different from those listed, you perform the following steps.
- Make a copy of the standard transformation file for LDAP, and give it another name, for example, myLDAPTransformation.xsl.
The standard XSL transformation for LDAP is located in:
- install_root/ProcessChoreographer/Staff/LDAPTransformation.xsl.
- install_root\ProcessChoreographer\Staff\LDAPTransformation.xsl.
install_root/ProcessChoreographer/Staff/LDAPTransformation.xsl.
-
- In the copy of the file, change the names of the object classes and attributes to match the names used by your LDAP schema. For most situations, you can change the settings for all people assignment criteria by editing the variable declaration part of the file:
 <xsl:variable name="DefaultGroupClass">groupOfNames</xsl:variable>
  <xsl:variable name="DefaultGroupClassMemberAttribute">member</xsl:variable>

  <xsl:variable name="DefaultPersonClass">inetOrgPerson</xsl:variable>
  <xsl:variable name="DefaultUserIDAttribute">uid</xsl:variable>
  <xsl:variable name="DefaultMailAttribute">mail</xsl:variable>
  <xsl:variable name="DefaultManagerAttribute">manager</xsl:variable>
CAUTION:
Do not modify the original version of the standard transformation file because it might be overwritten without warning when you apply a service pack or fix pack.
You can apply changes within the XSL templates that transform the individual staff assignment criteria, as illustrated in the following examples.
Example: GroupMembers
Change the object class for group entries to groupOfUniqueNames, the group entry attribute containing the member DN list to uniqueMember, and the person entry attribute containing the login in to cn:
<sldap:usersOfGroup>
...

<sldap:attribute>
<xsl:attribute name="name">uniqueMember</xsl:attribute>
<xsl:attribute name="objectclass">groupOfUniqueNames</xsl:attribute>
<xsl:attribute name="usage">recursive</xsl:attribute>
</sldap:attribute>

...
<sldap:attribute>
<xsl:attribute name="name">cn</xsl:attribute>
<xsl:attribute name="objectclass">inetOrgPerson</xsl:attribute>
<xsl:attribute name="usage">simple</xsl:attribute>
</sldap:attribute>
...
<sldap:resultObject>
<xsl:attribute name="objectclass">groupOfUniqueNames</xsl:attribute>
<xsl:attribute name="usage">recursive</xsl:attribute>
<sldap:resultAttribute>
<xsl:attribute name="name">uniqueMember</xsl:attribute>
<xsl:attribute name="destination">intermediate</xsl:attribute>
</sldap:resultAttribute>
</sldap:resultObject>

<sldap:resultObject>
<xsl:attribute name="objectclass"><xsl:value-of select="$DefaultPersonClass"/></xsl:attribute>
<xsl:attribute name="usage">simple</xsl:attribute>

<sldap:resultAttribute>
<xsl:attribute name="name">cn</xsl:attribute>
<xsl:attribute name="destination">userID</xsl:attribute>
</sldap:resultAttribute>
<sldap:resultAttribute>
<xsl:attribute name="name"><xsl:value-of select="$DefaultMailAttribute"/></xsl:attribute>
<xsl:attribute name="destination">eMailAddress</xsl:attribute>
</sldap:resultAttribute>
<sldap:resultAttribute>
<xsl:attribute name="name"><xsl:value-of select="$DefaultLocaleAttribute"/></xsl:attribute>
<xsl:attribute name="destination">preferredLocale</xsl:attribute>
</sldap:resultAttribute>
</sldap:resultObject>

</sldap:usersOfGroup>
Example: GroupMembersWithoutFilteredUsers
Change the LDAP filter operator to >=.
<sldap:StaffQueries>
<sldap:usersOfGroup>
...
</sldap:usersOfGroup>

<sldap:intermediateResult>
<xsl:attribute name="name">filteredusers</xsl:attribute>
<sldap:search>
<xsl:attribute name="filter">
<xsl:value-of select="staff:parameter[@id='FilterAttribute']"/>
  >=
<xsl:value-of select="staff:parameter[@id='FilterValue']"/>
</xsl:attribute>
...
<sldap:search>
...

</sldap:intermediateResult>
...
</sldap:StaffQueries>
Example: GroupSearch
Change the search attribute to MyType, the object class to mypersonclass, and the attribute containing the login ID to myuid.
<sldap:StaffQueries>
...
<sldap:search>
<xsl:attribute name="filter">
(&
...
<xsl:if test="staff:parameter[@id='MyType']!="">
(<xsl:value-of select="$GS_Type"/>=
<xsl:value-of select=staff:parameter[@id='Type']"/>)
</xsl:if>
)
...
</xsl:attribute>

<sldap:attribute>
<xsl:attribute name="name">myuid</xsl:attribute>
<xsl:attribute name="objectclass">mypersonclass</xsl:attribute>
<xsl:attribute name="usage">simple</xsl:attribute>
</sldap:attribute>
...
<sldap:resultObject>
<xsl:attribute name="objectclass">mypersonclass</xsl:attribute>
<xsl:attribute name="usage">simple</xsl:attribute>

<sldap:resultAttribute>
<xsl:attribute name="name">myuid</xsl:attribute>
<xsl:attribute name="destination">userID</xsl:attribute>
</sldap:resultAttribute>
<sldap:resultAttribute>
<xsl:attribute name="name"><xsl:value-of select="$DefaultMailAttribute"/></xsl:attribute>
<xsl:attribute name="destination">eMailAddress</xsl:attribute>
</sldap:resultAttribute>
<sldap:resultAttribute>
<xsl:attribute name="name"><xsl:value-of select="$DefaultLocaleAttribute"/></xsl:attribute>
<xsl:attribute name="destination">preferredLocale</xsl:attribute>
</sldap:resultAttribute>
</sldap:resultObject>

<sldap:search>
</sldap:StaffQueries>
Example: Manager of Employee
Change the attribute containing the manager DN to managerentry and the source of the manager login ID attribute to name.
<sldap:StaffQueries>

<sldap:intermediateResult>
...
<sldap:user>
...
<xsl:attribute name="name">managerentry</xsl:attribute>
...
<sldap:resultObject>
<xsl:attribute name="objectclass"><xsl:value-of select="$DefaultPersonClass"/></xsl:attribute>
<xsl:attribute name="usage">simple</xsl:attribute>

<sldap:resultAttribute>
<xsl:attribute name="name">managerentry</xsl:attribute>
<xsl:attribute name="destination">intermediate</xsl:attribute>
</sldap:resultAttribute>
</sldap:resultObject>
</sldap:user>
</sldap:intermediateResult>

<sldap:user>
...
<xsl:attribute name="name">name</xsl:attribute>
...
<sldap:resultObject>
<xsl:attribute name="objectclass"><xsl:value-of select="$DefaultPersonClass"/></xsl:attribute>
<xsl:attribute name="usage">simple</xsl:attribute>

<sldap:resultAttribute>
<xsl:attribute name="name">name</xsl:attribute>
<xsl:attribute name="destination">userID</xsl:attribute>
</sldap:resultAttribute>
<sldap:resultAttribute>
<xsl:attribute name="name"><xsl:value-of select="$DefaultMailAttribute"/></xsl:attribute>
<xsl:attribute name="destination">eMailAddress</xsl:attribute>
</sldap:resultAttribute>
<sldap:resultAttribute>
<xsl:attribute name="name"><xsl:value-of select="$DefaultLocaleAttribute"/></xsl:attribute>
<xsl:attribute name="destination">preferredLocale</xsl:attribute>
</sldap:resultAttribute>
</sldap:resultObject>

</sldap:user>
</sldap:StaffQueries>
Example: PersonSearch
Change the search attribute to MyAttribute, the object class to mypersonclass, and the source of the return attribute to myuid.
<sldap:StaffQueries>
...
<sldap:search>
<xsl:attribute name="filter">
(&
...
<xsl:if test="staff:parameter[@id='MyAttribute']!="">
(<xsl:value-of select="$PS_UserID"/>=
<xsl:value-of select=staff:parameter[@id='UserID']"/>)
)
</xsl:if>
...
</xsl:attribute>

<sldap:attribute>
<xsl:attribute name="name">myuid</xsl:attribute>
<xsl:attribute name="objectclass">mypersonclass</xsl:attribute>
<xsl:attribute name="usage">simple</xsl:attribute>
</sldap:attribute>
...
<sldap:resultObject>
<xsl:attribute name="objectclass">mypersonclass</xsl:attribute>
<xsl:attribute name="usage">simple</xsl:attribute>

<sldap:resultAttribute>
<xsl:attribute name="name">myuid</xsl:attribute>
<xsl:attribute name="destination">userID</xsl:attribute>
</sldap:resultAttribute>
<sldap:resultAttribute>
<xsl:attribute name="name"><xsl:value-of select="$DefaultMailAttribute"/></xsl:attribute>
<xsl:attribute name="destination">eMailAddress</xsl:attribute>
</sldap:resultAttribute>
<sldap:resultAttribute>
<xsl:attribute name="name"><xsl:value-of select="$DefaultLocaleAttribute"/></xsl:attribute>
<xsl:attribute name="destination">preferredLocale</xsl:attribute>
</sldap:resultAttribute>
</sldap:resultObject>
</sldap:search>
</sldap:StaffQueries>
Example: Users
Change the source of the return attribute to myuid and the object class to mypersonclass.
<sldap:user>
...
<xsl:attribute name="attribute">myuid</xsl:attribute>
<xsl:attribute name="objectclass">mypersonclass</xsl:attribute>

<sldap:resultObject>
<xsl:attribute name="objectclass">mypersonclass</xsl:attribute>
<xsl:attribute name="usage">simple</xsl:attribute>

<sldap:resultAttribute>
<xsl:attribute name="name">myuid</xsl:attribute>
<xsl:attribute name="destination">userID</xsl:attribute>
</sldap:resultAttribute>
<sldap:resultAttribute>
<xsl:attribute name="name"><xsl:value-of select="$DefaultMailAttribute"/></xsl:attribute>
<xsl:attribute name="destination">eMailAddress</xsl:attribute>
</sldap:resultAttribute>
<sldap:resultAttribute>
<xsl:attribute name="name"><xsl:value-of select="$DefaultLocaleAttribute"/></xsl:attribute>
<xsl:attribute name="destination">preferredLocale</xsl:attribute>
</sldap:resultAttribute>
</sldap:resultObject>

</sldap:user>
Configure people substitution
This topic describes how to configure people substitution for Business Process Choreographer.
You have configured WebSphere security for Federated Repositories, and if you introduce custom people assignment criteria, you have also performed Configure the Virtual Member Manager people directory provider. You know whether use a file registry, property extension registry, or an existing LDAP schema to store the property extensions.
To use people substitution in a production environment, use the Virtual Member Manager (VMM) property extension repository as described in this topic. If however, you only want to use people substitution in a single-server test environment, you can use the file registry that is associated by default with federated repositories, without having to configure VMM.
- Add the attributes, "isAbsent", "substitutes", "substitutionStartDate",
and "substitutionEndDate" to the VMM definition for PersonAccount:
- Locate the wimxmlextension.xml file:
- profile_root/config/cells/cell_name/wim/model/wimxmlextension.xml
- profile_root\config\cells\cell_name\wim\model\wimxmlextension.xml
It
is located in profile_root/config/cells/cell_name/wim/model
-
- Make a backup copy of the wimxmlextension.xml file.
- Edit the original copy of the wimxmlextension.xml file, and make sure that it contains the following definitions, which add the two attributes needed for user substitution to the PersonAccount entity type:
<wim:propertySchema nsURI="http://www.ibm.com/websphere/wim"
     dataType="STRING" multiValued="false" propertyName="isAbsent">
   <wim:applicableEntityTypeNames>PersonAccount
   </wim:applicableEntityTypeNames>
</wim:propertySchema>

<wim:propertySchema nsURI="http://www.ibm.com/websphere/wim"
     dataType="STRING" multiValued="true" propertyName="substitutes">
   <wim:applicableEntityTypeNames>PersonAccount
   </wim:applicableEntityTypeNames>
</wim:propertySchema>
<wim:propertySchema nsURI="http://www.ibm.com/websphere/wim"
     dataType="STRING" multiValued="false" propertyName="substitutionStartDate">
   <wim:applicableEntityTypeNames>PersonAccount
   </wim:applicableEntityTypeNames>
</wim:propertySchema>

<wim:propertySchema nsURI="http://www.ibm.com/websphere/wim"
     dataType="STRING" multiValued="false" propertyName="substitutionEndDate">
   <wim:applicableEntityTypeNames>PersonAccount
   </wim:applicableEntityTypeNames>
</wim:propertySchema>
If you are using a file registry, fileRegistry.xml, skip to step 4.
- Locate the wimxmlextension.xml file:
- Set up the property extension repository. For more information about setting up a property extension repository, see Configure a property extension repository in a federated repository configuration.
- Make sure that a database is available to store the property extensions.
- Verify the JDBC driver class is available on the server class path. Click Environment > WebSphere variables to check. If necessary, add the DataServer JDBC driver to the class path.
For DB2 , add db2jcc4.jar , db2jcc_license_cu.jar,
and db2jcc_license_cisuz.jar to the server's
class path, and click Apply > Save
- Verify the JDBC driver class is available on the server class path. Click Environment > WebSphere variables to check. If necessary, add the Universal JDBC driver to the class path.
For DB2, add db2jcc.jar , db2jcc_license_cu.jar,
and db2jcc_license_cisuz.jar to the server's
class path, and click Apply > Save
- Configure a DB2 Universal JDBC driver provider and type-4 data source for VMM using the administrative console. Set the webSphereDefaultIsolationLevel custom property for the data source to the value 2. For more information about changing the default isolation level, see Change the default isolation level for non-CMP
applications and describing how to do so using a new custom property webSphereDefaultIsolationLevel.
- Restart the server.
- Make a backup copy of the wimlaproperties.xml file.
- install_root/etc/wim/setup/wimlaproperties.xml
- install_root\etc\wim\setup
It is located in install_root/etc/wim/setup\wimlaproperties.xml
-
- Edit the original copy of the wimlaproperties.xml file, and add the following definitions:
<wimprop:property wimPropertyName="isAbsent" dataType="String" valueLength="128" multiValued="false"> <wimprop:applicableEntityName> <wimprop:entityName>PersonAccount</wimprop:entityName> </wimprop:applicableEntityName> </wimprop:property> <wimprop:property wimPropertyName="substitutes" dataType="String" valueLength="128" multiValued="true"> <wimprop:applicableEntityName> <wimprop:entityName>PersonAccount</wimprop:entityName> </wimprop:applicableEntityName> </wimprop:property> <wimprop:property wimPropertyName="substitutionStartDate" dataType="String" valueLength="128" multiValued="false"> <wimprop:applicableEntityName> <wimprop:entityName>PersonAccount</wimprop:entityName> </wimprop:applicableEntityName> </wimprop:property> <wimprop:property wimPropertyName="substitutionEndDate" dataType="String" valueLength="128" multiValued="false"> <wimprop:applicableEntityName> <wimprop:entityName>PersonAccount</wimprop:entityName> </wimprop:applicableEntityName> </wimprop:property> - Verify the application server (or in a network deployment environment, the deployment manager) is running. Be aware not to use the -conntype NONE option for the wsadmin utility.
- Use the VMM administrative task setupIdMgrPropertyExtensionRepositoryTables to create the substitution properties in the Property Extension Repository
database. For more details, see Set up an entry mapping repository, a property extension repository, or a custom registry database repository using wsadmin commands. For example:
$AdminTask setupIdMgrPropertyExtensionRepositoryTables {
-reportSqlError true
-schemaLocation install_root/etc/wim/setup
-laPropXML  install_root/etc/wim/setup/wimlaproperties.xml
-databaseType db2
-dbURL jdbc:DB2://host:port/name
-dbDriver com.ibm.db2.jcc.DB2Driver
-dbAdminId userID
-dbAdminPassword password }
For example, using a DB2 database on a Windows platform:
$AdminTask setupIdMgrPropertyExtensionRepositoryTables {
-reportSqlError true
-schemaLocation install_root\etc\wim\setup
-laPropXML  install_root\etc\wim\setup\wimlaproperties.xml
-databaseType db2
-dbURL jdbc:DB2://host:port/name
-dbDriver com.ibm.db2.jcc.DB2Driver
-dbAdminId userID
-dbAdminPassword password }
For example, using a DB2 database on a Linux or UNIX platform:
$AdminTask setupIdMgrPropertyExtensionRepositoryTables {
-reportSqlError true
-schemaLocation install_root/etc/wim/setup
-laPropXML  install_root/etc/wim/setup/wimlaproperties.xml
-databaseType db2
-dbURL jdbc:DB2://host:port/name
-dbDriver com.ibm.db2.jcc.DB2Driver
-dbAdminId userID
-dbAdminPassword password }
Where host is the host name of the database server, port is the service port for the DB2 instance, and name is the name of the database, and userID and password provide database administrator rights. - If you are using a LDAP user repository, locate the wimconfig.xml file.
- profile_root/config/cells/cellName/wim/config/wimconfig.xml
- profile_root\config\cells\cellName\wim\config\wimconfig.xml
Edit the file and add the following entries to exclude the substitution attributes from the LDAP repository:
<config:repositories xsi:type="config:LdapRepositoryType" adapterClassName="com.ibm.ws.wim.adapter.ldap.LdapAdapter" ...> ... <config:attributeConfiguration> <config:propertiesNotSupported name="isAbsent"/> <config:propertiesNotSupported name="substitutes"/> <config:propertiesNotSupported name="substitutionEndDate"/> <config:propertiesNotSupported name="substitutionStartDate"/> </config:attributeConfiguration> -
- Activate the extension property repository:
- Use the setIdMgrPropertyExtensionRepository command.
For more details, see Set up an entry mapping repository, a property extension repository, or a custom registry database repository using wsadmin commands.
For example, using a DB2 database named VMMDB,
a data source named VMMDS:
$AdminTask setIdMgrPropertyExtensionRepository { -dataSourceName jdbc/VMMDS -databaseType db2 -dbURL jdbc:DB2://host:port/VMMDB -dbAdminId userID -dbAdminPassword password -JDBCDriverClass com.ibm.db2.jcc.DB2Driver -entityRetrievalLimit 10 } - Verify the wimconfig.xml file contains an entry similar to the following example:
<config:propertyExtensionRepository
   adapterClassName="com.ibm.ws.wim.lookaside.LookasideAdapter"
   id="LA"
   databaseType="db2"
   dataSourceName="jdbc/VMMDS"
   dbAdminId="userID"
   dbAdminPassword="{xor}PasswordXOR"
   dbURL="jdbc:DB2://host:port/VMMDB"
   entityRetrievalLimit="10"
   JDBCDriverClass="com.ibm.db2.jcc.DB2Driver"/>>
- Use the setIdMgrPropertyExtensionRepository command.
For more details, see
- If you use an LDAP schema to hold the substitution information: It may or may not already have definitions for "isAbsent", "substitutes", "substitutionStartDate",
and "substitutionEndDate" (possibly with different names). Whether you have existing definitions, or you will create new ones, make sure the following items are set:
- The LDAP directory must allow write operations.
- The attribute for absence information ("isAbsent") must be of type Boolean or a String.
- The attribute that defines who the person can substitute for ("substitutes") must be of type String, multi-valued, and permit a length up to 128 characters.
- If your existing or chosen attribute names are not "isAbsent", "substitutes", "substitutionStartDate", and "substitutionEndDate", you must define your attribute names in the administrative console by clicking Servers > Clusters > WebSphere application server clusters > cluster_name, then on the Configuration tab, in the Business Process Manager section, expand Business Process Choreographer, and click Human Task Manager, on the Configuration tab select Custom properties then set the names for the custom properties Substitution.SubstitutesAttribute, Substitution.AbsenceAttribute, Substitution.StartDateAttribute, and Substitution.EndDateAttribute.
- Restart the server.
- Enable substitution in the Human Task Manager:
- Servers > Clusters > WebSphere application server clusters > cluster_name, then on the Configuration tab, in the Business Process Manager section, expand Business Process Choreographer, and click Human Task Manager, and click Human Task Manager, then either Runtime or Configuration.
- To enable substitution, select Enable substitution.
- If non-administrators are allowed to perform substitution for other users, clear the Restrict substitute management to administrators option.
This settings does not affect the ability of users to change substitution for themselves.
- Click Apply.
- If you selected Configuration in step 5.a, restart the server to activate the substitution settings.
- If you have problems with any of these steps, refer to Troubleshooting people assignment.
The people assignment service is configured to support user substitution for absent users.
Related tasks:
Configure the Virtual Member Manager people directory provider
Selecting a registry or repository
Selecting a registry or repository
Configure a property extension repository in a federated repository configuration
Configure a property extension repository in a federated repository configuration
Verifying that Business Process Choreographer works
Run the Business Process Choreographer installation verification application.
- Use either the administrative console or the wsadmin command, deploy the application in install_root/installableApps/bpcivt.ear.
Restriction: In a network deployment environment, you can only deploy one instance of the Business Process Choreographer installation verification application. For example, if you have two Business Process Choreographer clusters in the same network deployment cell, you can deploy the bpcivt.ear application only on one of the clusters. Later, to deploy it on the second cluster, you must first undeploy it from the first cluster. After the enterprise application is deployed, it is in the state stopped, and any process and task templates that it contains are in the state started. No process or task instances can be created until the application is started.
- Make sure that at least one member of the cluster is running.
- Verify the database system, and messaging service are running.
- Select the application BPCIVTApp and click Start to start the application.
- Verify the application works. Using a web browser, open the following page:
- http://app_server_host:port_no/bpcivt
Where app_server_host is the network name for the host of the application server and port_no is the port number used by the virtual host to which you mapped the IVT web module when installing the file bpcivt.ear. The port number depends on your system configuration. You should see a message indicating success.
- Optional: Stop and remove the bpcivt application.
For more information about undeploying BPEL process and human task applications, see Undeploy BPEL process and human task applications, using the administrative console.
- If an error occurs, it can be caused by any of the following situations:
- If Business Process Choreographer cannot access the database, check the database system is running, that all database clients are correctly configured, and the data source is defined correctly. Verify the user ID and password for the data source are valid.
- If Business Process Choreographer cannot read the input queues,
check the messaging service is running, and make sure the JMS provider and JMS resources are defined correctly.
- For further help, see Troubleshooting the Business Process Choreographer configuration.
The basic functionality of your Business Process Choreographer configuration works.
If you have configured the people directory provider, it will need to be tested separately.
Understanding the startup behavior of Business Process Choreographer
This topic explains why Business Process Choreographer is unavailable until all enterprise applications are started.
When the Business Process Choreographer is started or restarted, no messages in the internal queues are processed until all enterprise applications have started. It is not possible to change this behavior. The time the Business Flow Manager and Human Task Manager are unavailable during a restart depends on how long it takes until all enterprise applications are started. This behavior is necessary to avoid navigating any processes with associated enterprise applications that are not running.
Start to process messages in the internal queue before all applications are started would result in ClassNotFound exceptions.
Configure Oracle Real Application Cluster (RAC) for use with BPM
Oracle Real Application Clusters (RAC) is an option of an Oracle database that brings together two or more computers to form a clustered database that behaves as a single system. In a RAC database, Oracle processes that run in separate nodes access the same data from a shared disk storage.
There are two scenarios to consider:
- If you use Oracle 11g R2 with the SCAN feature, no additional manual configuration is required.
- If you do not use the SCAN feature or use an earlier version of Oracle that does not support the SCAN feature, complete the following procedure to configure IBM Business Process Manager for use with Oracle RAC. See Mapping IBM Business Process Manager configuration parameters to Oracle setup parameters.
IBM Business Process Manager always creates the JDBC URL in the following format
- jdbc:oracle:thin:@//[LISTENER_HOST][:LISTENER_PORT]/SERVICE
which can be edited to the following format to use Oracle RAC:
jdbc:oracle:thin:@(DESCRIPTION=(ADDRESS_LIST=
                  (ADDRESS=(PROTOCOL=TCP)(HOST=rac-node1)(port=1521))
                  (ADDRESS=(PROTOCOL=TCP)(HOST=rac-node2)(port=1521)))
                  (FAILOVER=on)(LOAD_BALANCE=on)
                  (CONNECT_DATA=(SERVER=DEDICATED)
                  (SERVICE_NAME=<service_name>)))
If a Oracle RAC node failover occurs, IBM Business Process Manager stops processing and you might need to restart all of the BPM nodes.
If you experience process-recovery issues, refer to Process recovery issues in certain situations in BPM V7.5.
- Set the RAC URL as the Oracle URL when you define the relevant Oracle JDBC data sources.
- In the administrative console, select Resources > JDBC > Data sources.
- Edit all the data sources using Oracle with the JDBC URL to use one of the preceding formats.
Refer to
Configure a data source using the administrative console.
- In the administrative console, select Resources > JDBC > Data sources.
- Update the Authentication Alias Configuration page and run the administrative task to update the URL to use the Oracle RAC. See Modify authentication aliases.
- In a network deployment environment, you must synchronize the nodes that contain Process Center, Process Server, or Performance Data Warehouse cluster members.
- In the administrative console, click System administration > Nodes.
- Select all of the nodes and click Full Resynchronize.
- Stop and restart all of the clusters and servers.
Mapping IBM Business Process Manager configuration parameters to Oracle setup parameters
About this task
To understand how to specify the correct information during the Oracle RAC database configuration, review the following parameter mapping information to ensure the JDBC URL is created correctly.The format of the JDBC URL that is generated during configuration is
- jdbc:oracle:thin:@//[LISTENER_HOST][:LISTENER_PORT]/SERVICE
where
- LISTENER_HOST represents the RAC SCAN name defined during the Oracle RAC setup. If you do not use Oracle RAC, LISTENER_HOST is specified in the BPM profile configuration parameter Database server host name.
- LISTENER_PORT represents the RAC SCAN listener port defined during the Oracle RAC setup. If you do not use Oracle RAC, LISTENER_PORT is specified in the BPM profile configuration parameter Server port.
- SERVICE represents the RAC service that is configured during the Oracle RAC setup. If you do not use Oracle RAC, SERVICE is specified in the BPM profile configuration parameter Common database name, for example, SID.
For example, an Oracle RAC setup with a RAC scan name of rac1.mycompany.com, a SCAN port of 1521, and a cluster-managed database service of MYSERVICE is specified with the following JDBC URL: jdbc:oracle:thin:@//rac1.mycompany.com:1521/MYSERVICE.mycompany.com
Configure a proxy server for Process Portal
If you use Process Portal in a three cluster topology with Process Server and Process Portal on different clusters, they must both be accessible using the same domain and port number. The configureProxyServer script provides a simple way to create the routing server functionality that is mandatory for BPM Process Portal configuration.
If you prefer, you can use any other proxy server or HTTP server. This information describes how to configure the WebSphere proxy server by using the administrative console. For information about configuring a different proxy server or an HTTP server, see the documentation for the product that you use.
If you have an existing server that can be used to route requests, decide whether you want to use that server. If using the WebSphere proxy server, decide whether you want to configure it manually or by running a script.
The script uses defaults that are suitable for creating a proxy server in a simple environment. The script is not suitable for more complex environments, for example if the proxy must run in a DMZ without normal access to the rest of the cell, or if you do not want to use the default values that are used by the script.
The reason why you need a routing server for three cluster configurations is because Process Portal uses web components that are distributed across two clusters. If you do not configure a suitable server to redirect requests to the appropriate clusters, the web browser's same origin policy will prevent Process Portal from working correctly. In a three cluster configuration, Process Portal relies on applications on both the application deployment target cluster and the support cluster.
- To configure a WebSphere proxy server by running a script, perform the following actions.
- Change to the directory were the proxy scripts are located.
-
 cd install_root/BPM/Lombardi/tools/proxy
-
 cd install_root\BPM\Lombardi\tools\proxy
This directory contains the following scripts.
- configureProxyServer.py
- configureProxyServer.sh
- configureProxyServer.bat
 The .sh and .bat files provide a convenient way to run the .py script.
  The .sh file provides a convenient
way to run the .py script.
The .sh file provides a convenient
way to run the .py script.
-
- Create and configure the WebSphere proxy server by running one of the following commands.
- wsadmin -f configureProxyServer.py options
- configureProxyServer.sh options
- configureProxyServer.bat options
Where options can include any of the following parameters:
- -d, --deployment-environment environment_name
- Optionally specifies the name of the deployment environment to configure a proxy server for. If you do not specify a deployment environment, a proxy server will be created for each deployment environment.
- -n, --node node_name
- Optionally specifies the name of the node to deploy the proxy servers to. If you do not specify a node, one will be selected for you.
- --no-save
- Optionally specifies not to save changes to the configuration.
- --no-sync
- Optionally specifies not to synchronize changes across all nodes.
Tip: If you require a non-interactive
session without prompts for a user ID and password, or if the installation uses non-standard symbolic links, use the wsadmin -f configureProxyServer.py options command syntax to create and configure the proxy server.
- You must restart all clusters in the deployment environment after running the configureProxyServer script.
- Change to the directory were the proxy scripts are located.
- To configure a WebSphere proxy server manually,
perform the following actions.
- Decide which node will host the proxy server. If necessary, create and federate a new managed node. Make a note of the node's host name as proxy_host_name.
- Create the proxy server using the administrative console by clicking Servers > Server types > WebSphere proxy servers > New.
- Identify the proxy server's port numbers. Click Servers > Server types > WebSphere proxy servers > your_proxy_server > Ports and note the port values proxy_http_port and proxy_https_port that correspond to the port values of the end points named PROXY_HTTP_ADDRESS and PROXY_HTTPS_ADDRESS.
- If proxy_http_port and proxy_https_port are using the default values 80 and 443,
skip to step 2.h.
- Add the following host aliases to the default_host virtual host:
- Host name: * Port: proxy_http_port
- Host name: * Port: proxy_https_port
- For each cluster member in the application deployment cluster in the deployment environment, note the port value of the end point named WC_defaulthost_secure as cluster_member_https_port.
- Add rewrite rules. Click Servers > Server types > WebSphere proxy servers > your_proxy_server > HTTP Proxy Server Settings > Rewriting
rules, then for each value of cluster_member_https_port that you noted in step 2.f,
add the following re-writing rule to the proxy server that you created in step 2.b:
- From URL Pattern: https://proxy_host_name:cluster_member_https_port/*
- To URL Pattern: https://proxy_host_name:proxy_https_port/*
- Set the cache.query.string custom property. Click Servers > Server types > WebSphere proxy servers > your_proxy_server > HTTP Proxy Server Settings > Proxy settings > Custom properties, and add the following custom property to the proxy server settings:
- Name: cache.query.string
- Value: true
- Restartall the clusters in the deployment environment.
- Start the proxy server.
- If you will configure a different type of routing server or an existing routing server, such as a web server, proxy server, or reverse proxy server, use the following resources to plan the routing changes necessary for Process Portal.
- The documentation for the product that you are using for routing requests.
- Verifying Process Portal provides a list of the applications that Process Portal depends on and the clusters on which they normally run.
- If you are using a third-party authentication product, make sure that it works correctly with the new proxy. See Configure third-party authentication products.
You have a suitably configured routing server to support Process Portal in a three cluster topology.
- Delete a proxy server To remove a proxy server, delete the proxy server, remove host aliases, and delete the virtual host.
- Verifying Process Portal After configuring Process Portal, use the Process Portal verification page to make sure the applications used by Process Portal are all accessible and that Process Portal is working.
Delete a proxy server
To remove a proxy server, delete the proxy server, remove host aliases, and delete the virtual host.
- In the administrative console, click Servers > Server Types > WebSphere proxy servers, and delete the proxy server.
- Click Environment > Virtual hosts > default_host > Host Aliases and remove the following host aliases:
- Host name: * Port: proxy_http_port
- Host name: * Port: proxy_https_port
- Click Environment > Virtual hosts and delete the virtual host.
Verifying Process Portal
After configuring Process Portal, use the Process Portal verification page to make sure the applications used by Process Portal are all accessible and that Process Portal is working.
- Verify that all the applications used by Process Portal are accessible.
- Use a web browser, open the URL for the BPM Process Portal verification page.
Process Portal URLs for HTTP and HTTPS
Protocol Port Process Portal URL HTTP Default (80) http://BPM_host/ProcessPortal/web_test HTTP Non-default http://BPM_host:port/ProcessPortal/web_test HTTPS Default (443) https://BPM_host/ProcessPortal/web_test HTTPS Non-default https://BPM_host:port/ProcessPortal/web_test Where BPM_host is the host name or IP address of the BPM server or routing server and port is the port number used for the Process Portal service.
- If you are prompted for them, enter a valid user ID and password.
- If you cannot log on to Process Portal, perform the following actions:
- Make sure that you are using the correct URL. Try using an IP address instead of a host name.
- If you get no logon window, or you get an HTTP error 404,
page not found, or WebGroup/Virtual Host error, try the following actions.
- If you use a proxy server:
- Check the proxy server's SystemOut.log file.
Any messages similar to the following message: TCPC0003E:
TCP Channel TCP_7 initialization failed. The socket bind failed for host * and port 80. The port may already be in use. probably indicate that another service is using the same port number. If there is a conflict, change the proxy port number and virtual host port number manually to avoid any possible conflicts.
To check or change the virtual host settings for the proxy server, in the administrative console, click Environment > Virtual Hosts.
If you change the proxy server port number, also check whether step 1.c.iv applies.
- Check the /ProcessPortal context root for the Process Portal web application is correctly mapped.
- Check the proxy server's SystemOut.log file.
Any messages similar to the following message: TCPC0003E:
TCP Channel TCP_7 initialization failed. The socket bind failed for host * and port 80. The port may already be in use. probably indicate that another service is using the same port number. If there is a conflict, change the proxy port number and virtual host port number manually to avoid any possible conflicts.
- If you are using an HTTP server as a routing server, check the web module mapping.
- If you use a proxy server:
- Make sure that you are using a valid user ID and password to access Process Portal.
- If you use a proxy server and are not using the default ports for http and https (80 or 443) perform the following actions:
- Verify the non-default ports that you are using for HTTP and HTTPS are redirected. Using the administrative console, click Environment > Virtual Hosts, and add the non-default host aliases for your servers to the default_host list. For example if you use port 81 for HTTP and port 444 for HTTPS, add *:81 and *:444 .
- If you use host names for the proxy servers rather than IP addresses, for each proxy server, make sure that host name of the proxy server is in the host files for the deployment manager and the proxy server itself.
- Restart the deployment manager.
- Configure the proxy server to add a rewriting rule for the application server SSL host name and port. On the admin console, Servers > WebSphere proxy servers > server_nameProxy Settings > HTTP Proxy Server Settings > Rewriting rules > New, for From URL pattern enter the protocol, host, port, and wildcard for the application server SSL service, for example https://app_server_host_name:9483/* . For To URL pattern enter the protocol, host, port, and wildcard for the proxy server SSL service, for example, https://proxy_server_host_name:444/*.
- Synchronize the managed nodes with the deployment manager using the syncNode command from the profile_root/bin directory or from the Quick start console for the profile. Use the following syntax:
-

 syncNode.sh deployment_manager port
- syncNode.bat deployment_manager port
Where deployment_manager is the host name or IP address of the deployment manager, and port is the port number. For more information about the syncNode command, see
syncNode command in the WebSphere Application Server information center.
-
- Try to open the Process Portal URL again.
- If the BPM Process Portal verification page is displayed, verify that each application listed on the page has a check mark next to it. If any applications are marked
with an x, there is a problem that must be resolved
with that application before Process Portal can work fully. If there are problems, consider the following.
- Click the application name for more information about it.
- For the applications that have a problem, perform the corresponding checks listed in the following table.
Troubleshooting problems shown on the BPM Process Portal verification page
Application Application name prefix Things to check Process Portal IBM_BPM_Process_Portal_ - Verify that Process Portal is configured.
- Check the EAR files are available on the routing server.
Process Portal Notification IBM_BPM_Process_Portal_Notification_ Process Portal Theme (WebDAV) mm.was_ WLE REST Services IBM_BPM_Teamworks_ - Make sure that application deployment target cluster is available.
- Verify the IBM_BPM_Teamworks_ application is installed.
- Verify the web modules in the EAR file are available on the routing server.
Business Space BSpaceEAR_ - Verify that Business Space is configured.
- Verify the EAR files are available on the routing server.
Business Space Theme (WebDAV) mm.was_ Mashups mm.was_ - Click the application name for more information about it.
- Use a web browser, open the URL for the BPM Process Portal verification page.
- Verify that Process Portal works.
- Open Process Portal. Using a web browser to access the URLs for the Process Portal.
Process Portal URLs for HTTP and HTTPS
Protocol Port Process Portal URL HTTP Default (80) http://BPM_host/portal HTTP Non-default http://BPM_host:port/portal HTTPS Default (443) https://BPM_host/portal HTTPS Non-default https://BPM_host:port/portal Where BPM_host is the host name or IP address of the BPM server or routing server and port is the port number used for the Process Portal service.
If you use HTTP and HTTPS protocols, verify both URLs.
- Verify the Process Portal is displayed and can be used.
- Open Process Portal. Using a web browser to access the URLs for the Process Portal.
Process Portal is working and users can use a web browser to interact with processes.
Configure the Business Space component and registering REST endpoints on the administrative console
You can install and configure the Business Space component using the administrative console.
Complete the following tasks:
- Install the product software and create a profile. When you install BPM, Business Space files are included with the installation for the profiles set up. Your profile is not configured for Process Portal until you explicitly configure the Business Space component on the profile.
- Optionally, set up a secured environment for Process Portal by enabling security.
- Configure REST services. If you have a stand-alone server environment or you are using the Deployment Environment wizard to configure the runtime environment, the REST service endpoints are configured and enabled automatically. For other environments, use the REST services administrative console page to configure the REST services.
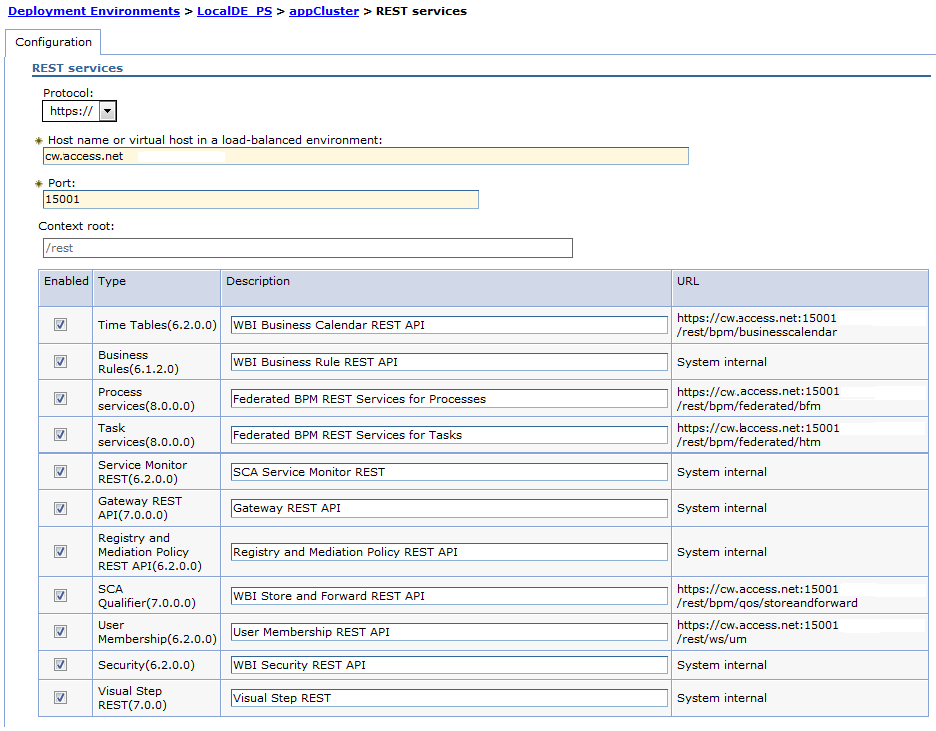
To have widgets available in Process Portal, configure the REST services for those widgets. On the Business Space Configuration administrative console page, you register the REST endpoints so that Business Space associates widgets with the endpoints and the widgets appear in the palette for use.
- Configure the Business Space component on a server or cluster by using a different data source than the product data source: create the data source in the server or cluster scope with the correct JNDI name of jdbc/mashupDS before configuring the Business Space component by using the administrative console.
- (Oracle) Optionally, to use a different schema for the Business Space database tables than the one the product database uses to create a data source manually before you open the Business Space Configuration page:
- Create the schema using the database product software.
- Use the administrative console to configure the JDBC provider.
- Use the administrative console to create a data source with the JNDI name of jdbc/mashupDS at the server or cluster scope, depending on the environment.
- Use the administrative console to create an authentication alias. Set the user name to the schema you created and set the authentication according to your Oracle setup.
- Set the authentication alias on the data source.
- Create the schema using the database product software.
If you are using deployment environments or other advanced profile configuration, use the administrative console to configure the Business Space component to work with Process Portal in the runtime environment.
- Ensure the administrative console is running.
- In the navigation pane click Servers > Server Types > WebSphere application servers or Servers > Clusters > WebSphere application server clusters.
- Select the name of your server or cluster target.
- On the Configuration page, in the Business Integration section, click Business Space Configuration. The Business Space Configuration page opens. If Business Space has already been configured, you can view this page, but you cannot edit the fields.
- Select Install Business Space service.
- In the Database schema name box,
type the name of the database schema to use for the Business Space database.
In Oracle, the schema is the same as the user name set on the authentication alias on the data source.
- If no data source is designated in the Existing
Business Space data source field, go to the Create Business Space data source using section and select a data source that connects to the database you want to use with Business Space.
Designating a data source in the Create Business Space data source using section creates a data source for Business Space with a JNDI name of jdbc/mashupDS that is modeled on the data source you selected.
The Business Space data source is created on the server or cluster on which you are configuring Business Space, even if the product data source is on a different server or cluster.
If you do not see an existing data source to use, you must cancel the Business Space Configuration page, set up the database, and the data source to use, and then restart the Business Space Configuration page to complete the configuration. See the Before you begin section.
- Click OK.
- To register the proper deployment target (cluster or server) for the system REST endpoints for each of the widgets you are using in Business Space, click REST service endpoint registration.

The target that you select for a REST service endpoint type can set the scope of the data displayed in some widgets. Or, you might want to select a particular cluster or server for better performance or availability.
If you are using Human Task Management widgets, you can select more than one REST service provider for a server or a cluster in the row for the Process Services and Task Services types. Select the provider with Name=Federated REST Services, the provider with Name=Business Process Choreographer REST services, or the provider with Name=BPD engine REST services. If you have tasks and processes running in both Business Process Choreographer and the business BPD engine, select the federated REST services. If you are using only processes and tasks running in the Business Process Choreographer (modeled in Integration Designer), select the Business Process Choreographer REST services. If you are using only processes and tasks running in the BPD engine (modeled in Process Designer), select the BPD engine.
If you do not specify the target, the REST endpoint of this type is not registered with Business Space, and any widgets that need the REST service endpoint of this type will not be visible in Business Space.
Save the configuration.
- Run the scripts to configure the Business Space database tables before starting the deployment environment or the clusters. The scripts were generated when you completed the configuration. See Configure the Business Space database.
If you are using Oracle, the password of the authentication alias of the Business Space data source is set to same as the Business Space schema name. The default value of the schema is IBMBUSSP. When you configure the Business Space component, you can specify a different schema on the administrative console or on the command line. In that case, the default password is the same as the schema you specify. To use a different password for the Business Space user name, use the administrative console to updated JDBC Resources: Find the data source jdbc/mashupsDS. Modify the value of the authentication alias to make it match the password of the Business Space schema name. Save changes and restart the server.
The Business Space component uses a proxy component to connect to your REST services. When REST services are not responsive, sometimes update the connection timeout settings to your REST services, depending on the performance of the REST service servers. See Change the timeout settings for the Business Space Ajax proxy.
Configure the Business Space Ajax proxy
You might want to modify the Business Space Ajax proxy for special considerations in Process Portal, such as changing timeout settings or blocking IP addresses for secure production environments. The Ajax proxy file, proxy-config.xml, is located in the following location if you are using the environment that is shipped with BPM:
profile_root/BusinessSpace/node_name/server_name/mm.runtime.prof/config/proxy-config.xml.
For issues with the Ajax proxy, see IBM Mashups tech
notes at http://www-01.ibm.com/support/search.wss?tc=SSWP9P.
The Ajax proxy is configured to be closed by default but provides a default policy that allows access to all Business Space endpoints for Process Portal. Follow the steps in Adding proxy polices to the Business Space Ajax proxy to allow access for additional URLs, and follow the steps in Blocking IP addresses using the Business Space Ajax proxy to restrict access to specific IP addresses.
- Modify the proxy-config.xml file as needed.
For example, if you are changing the timeout settings for the Business Space Ajax proxy, you modify the proxy:value for socket-timeout.
- Run the updateBlobConfig command using the wsadmin scripting client, designating the -serverName and -nodeName parameters for a stand-alone server or -clusterName for a cluster, -propertyFileName with the value of the path for the proxy-config.xml file, and -prefix with the value Mashups_.
The following example uses Jython:
AdminTask.updateBlobConfig('[-serverName server_name -nodeName node_name -propertyFileName "profile_root/BusinessSpace/node_name/server_name/mm.runtime.prof/config/proxy-config.xml" -prefix "Mashups_"]')
AdminConfig.save()
The following example uses Jacl:
$AdminTask updateBlobConfig {-serverName server_name -nodeName node_name -propertyFileName "profile_root/BusinessSpace/node_name/server_name/mm.runtime.prof/config/proxy-config.xml" -prefix "Mashups_"}
$AdminConfig save
- Add proxy policies to the Business Space Ajax proxy Add additional proxy policies to the proxy-config.xml file so that Process Portal works properly in a distributed environment.
- Change the timeout settings for the Business Space Ajax proxy Process Portal uses a proxy component to connect to your REST services. If REST services are not responsive, update the connection timeout settings to your REST services, depending on the performance of the REST service servers.
- Blocking IP addresses using the Business Space Ajax proxy The Ajax proxy forwards requests from widgets to BPM and target servers, if the servers are remote from the BPM server. The Ajax proxy is configured to be closed by default but provides a default policy that allows access to all endpoints. You can configure the Ajax proxy to restrict access to specific IP addresses.
Add proxy policies to the Business Space Ajax proxy
Add additional proxy policies to the proxy-config.xml file so that Process Portal works properly in a distributed environment. The Business Space Ajax proxy contains predefined policies to some IBM URLs, but is not open to all URLs. If you use resources from remote sites in Business Space, add new policies in the proxy-config.xml file following the formatting of one of the predefined policies, such as the <proxy:policy url="http://www-03.ibm.com/*" acf="none" basic-auth-support="true">, to allow content from the remote sites to work properly in the Web Feed widget and the Google Gadgets widget.
If you had a previous version of Business Space, and you want the Ajax proxy to continue to be open to all URLs as it was in the previous version, change <proxy:policy url="endpoint://*" acf="none" basic-auth-support="true"> to <proxy:policy url="*" acf="none" basic-auth-support="true">.
- Open the proxy-config.xml file. For information about where to find the Ajax proxy file, see Configure the Business Space Ajax proxy.
- To restrict the Ajax proxy so that it allows access to only specific endpoints, make sure the proxy-config.xml file contains <proxy:policy url="endpoint://*" acf="none" basic-auth-support="true"> instead of <proxy:policy url="*" acf="none" basic-auth-support="true">.
- Add policies for remote content.
The following predefined policies allow access to web feeds from specific remote sites so they work properly in the Web Feed widget.
<proxy:policy url="http://www.ibm.com/*" acf="none" basic-auth-support="true">
<proxy:actions>
<proxy:method>GET</proxy:method>
</proxy:actions>
</proxy:policy>

<proxy:policy url="http://www-03.ibm.com/*" acf="none" basic-auth-support="true">
<proxy:actions>
<proxy:method>GET</proxy:method>
</proxy:actions>
</proxy:policy>

<proxy:policy url="http://www.redbooks.ibm.com/*" acf="none" basic-auth-support="true">
<proxy:actions>
<proxy:method>GET</proxy:method>
</proxy:actions>
</proxy:policy>
To allow access to additional web feeds, Google Gadgets, or other remote content, add a policy like the following example:
<proxy:policy url="http://your_URL" acf="none" basic-auth-support="true">
<proxy:actions>
<proxy:method>GET</proxy:method>
</proxy:actions>
</proxy:policy>
- Complete the Ajax proxy configuration to fit the environment. See Configure the Business Space Ajax proxy.
Change the timeout settings for the Business Space Ajax proxy
Process Portal uses a proxy component to connect to your REST services. If REST services are not responsive, update the connection timeout settings to your REST services, depending on the performance of the REST service servers. If the REST service connections are timing out, update the following settings.
If you are using the Business Space environment that is shipped with your business process management product, the socket-timeout value is set to 30 seconds by default. Change it to an appropriate value for your situation.
If you are using Business Space with WebSphere Portal, the socket-timeout value is set to 10 seconds by default. Change it to an appropriate value for your situation (30 seconds, if you are using IBM Business Process Manager administration widgets).
- Open the proxy-config.xml file. For information about where to find the Ajax proxy file, see Configure the Business Space Ajax proxy.
- Change the proxy:value for socket-timeout.
The time is specified in milliseconds.
<proxy:meta-data>
 <proxy:name>socket-timeout</proxy:name>
 <proxy:value>30000</proxy:value>
</proxy:meta-data>
- Complete the Ajax proxy configuration to suit the environment. For information, see Configure the Business Space Ajax proxy.
Blocking IP addresses using the Business Space Ajax proxy
The Ajax proxy forwards requests from widgets to BPM and target servers, if the servers are remote from the BPM server. The Ajax proxy is configured to be closed by default but provides a default policy that allows access to all endpoints. You can configure the Ajax proxy to restrict access to specific IP addresses. The Ajax proxy is configured to be closed by default but provides a default policy that allows access to all Business Space endpoints. Follow the steps in Add proxy polices to the Business Space Ajax proxy to allow access for additional URLs, and follow the steps below to restrict access to specific IP addresses.
To restrict access to specific IP addresses, you can edit the Ajax proxy to filter IP addresses to allow or deny access. You define blacklist or whitelist rules in the proxy-config.xml file.
- Open the proxy-config.xml file. For information about where to find the Ajax proxy file, see Configure the Business Space Ajax proxy.
- Add filter rules that allow or deny access.
To define a blacklist rule for a particular IP address or set of addresses, use a proxy:deny element. To define a whitelist rule for a particular IP address or set of addresses, use a proxy:allow element. The filter rules are applied in order, with the last applicable filter rule taking precedence over previous filter rules.
Add the <proxy:ipfilter> information under the proxy rules of the proxy-config.xml file (after proxy policies and before </proxy-rules>).
<proxy:ipfilter>
<proxy:deny>9.6.0.0/255.255.0.0</proxy:deny>
<proxy:allow>9.6.1.0/255.255.255.0</proxy:allow>
<proxy:deny>9.6.1.4</proxy:deny>
</proxy:ipfilter>
In this example, the IP filter performs the following filters:
- blocks all 9.6.*.* IP addresses
- allows 9.6.1.* but blocks the specific IP address 9.6.1.4
So, in this case, the proxy would not allow access to IP address 9.6.2.5 or 9.6.120.7 and would respond with the following message: BMWPX0018E: The specified target hosts IP-address is prohibited by rule.
The proxy would allow access to 9.6.1.5 or 9.6.1.120 but would deny access to 9.6.1.4.
As you add new filter rules, you can combine them in several ways, but the proxy always handles them in order. The last matching rule will always take effect, regardless of any allow and deny rules that come before it.
- Complete the Ajax proxy configuration to suit the environment. For information, see Configure the Business Space Ajax proxy.
10. Extend a network deployment environment
After creating the network deployment environment, you can extend the environment using BPMConfig or by using the Deployment Environment wizard.
You can isolate user access for multiple deployment environments in your IBM Business Process Manager configuration. See Isolating user access for multiple deployment environments.
- Extend a network deployment environment for a DB2 database server
Extend the network deployment environment to work with a DB2 database server.
- Extend a network deployment environment for a DB2 for z/OS database server
Extend the network deployment environment to work with a DB2 for z/OS database server.
- Extend a network deployment environment for an Oracle database server
Extend the network deployment environment to work with an Oracle database server.
- Extend a network deployment environment for a SQL database server
Extend the network deployment environment to work with a SQL database server.
Extend a network deployment environment for a DB2 database server
Extend the network deployment environment to work with a DB2 database server.
- Use the Deployment Environment wizard
After performing the installation and creating the deployment manager, custom (managed node) profiles, and a deployment environment, you can extend a network deployment configuration based on the topology pattern templates packaged with the software. You can also extend the deployment by adding cluster members to a cell or adding multiple deployment environments.
- Extend the network deployment environment using BPMConfig
After creating a deployment environment using BPMConfig, you can run the command at a later time to extend the deployment environment, for example to create new profiles or to add additional nodes.
Use the Deployment Environment wizard
After performing the installation and creating the deployment manager, custom (managed node) profiles, and a deployment environment, you can extend a network deployment configuration based on the topology pattern templates packaged with the software. You can also extend the deployment by adding cluster members to a cell or adding multiple deployment environments.
- Add clusters:
The easiest way to expand your infrastructure is to add more cluster members to your existing clusters. You can add cluster members to each cluster independently or in combination, depending on where you see the need for growth. You can add an application cluster member, a messaging cluster member, or both. By expanding your clusters this way you can improve your application throughput, your message throughput, or both.
- Add deployment environments:
You can reate two independent deployment environments for applications in the same cell. However, you can create only one Process Center-based deployment environment in a single cell.
To extend the deployment environment:
- Log on to the administrative console. Ensure the user has appropriate privileges to update the deployment environment.
- Click Servers > Deployment Environments > Deployment_Environment_Name.


- Use the various options in the administrative console to extend the deployment environment.
Create the Advanced Process Center deployment environment
Create a Process Center deployment environment to store, run and administer process applications and toolkits that are developed in Process Designer and Integration Designer. You can create more than one deployment environments in the same cell using the Deployment Environment wizard. However, you can create only one Process Center-based deployment environment in a single cell.
Ensure that you have completed the following tasks:
- Installed the product
- Created the deployment manager profile and the associated nodes
- Ensure the database specified in the Database Configuration panel of the Deployment Environment wizard is already created. The deployment environment configuration never creates a database.
- Start all the local and remote nodes that to add in the deployment environment.
- When you create a 3-cluster deployment environment using the Deployment Environment wizard, the process might take a lot of time to complete. In that case, you can perform one of the following steps to create the 3-cluster environment:
- Increase the transaction timeout value using the Deployment Manager and re-create the deployment environment. See Preventing timeout and out-of-memory exceptions during installation or deployment.
- Do not create tables during the Deployment Environment creation. After creating the environment, create the databases, tables, and then run the bootstrap command.
- If you are using the Deployment Environment wizard, you can enable deployment manager trace for details about the deployment creation.
To enable trace for a single run and till the deployment manager restarts, log on to the administrative console, go to...
- Troubleshooting | Logs and trace | deployment_manager_name com.ibm.bpm.config.*=all to the Change log detail levels text area, and save the changes.
You must have Process Center installed to install a Process Center-based deployment environment. If you have a Process Server installed, start the IBM Installation Manager and modify the installation to use the Business Process Manager Advanced Process Center feature.
When security and role-based authorization are enabled, you must log in to the administrative console as a Cell administrator to create a deployment environment. This task describes the procedure for creating a deployment environment that is based on a specific pattern and uses the Deployment Environment wizard.
A snapshot that requires BPM Advanced Edition capability cannot be installed on more than one deployment environment in the same cell.
DB2 considerations:
- Process Server and IBM Performance Data Warehouse should not use the same database.
To create the deployment environment.
- From the administrative console, navigate to the Deployment Environments page by clicking...
- Servers | Deployment Environments
- Launch the Deployment Environment wizard by clicking New on the Deployment Environments page.
The Create new deployment environment page is displayed.
The database provides isolation of internal groups, such as administrators. If the database is shared by two deployment environments, one administrators group is shared between them. When such a situation occurs, both administrators are able to login as administrator for each of the deployment environment.
- Enter a unique name for the deployment environment in the Deployment environment name field.
- Enter a user name for the deployment environment administrator in the Deployment environment administrator user name field.
IBM recommends to use a different administrator for each deployment environment and also the cell administrator.
- Enter a password for the deployment environment administrator in the Password field.
- Reconfirm the password in the Confirm password field.
- Enter a unique name for the deployment environment in the Deployment environment name field.
- From the BPM Deployment Environment Type section, select Advanced Process Center.
Features represent the runtime processing capabilities of the deployment environment.
- From the section...
- Select the deployment environment pattern
...select a pattern for the deployment environment and click Next to display the Select Nodes page.
The available patterns are:
- Single Cluster: The application deployment target includes the messaging infrastructure and supporting applications.
- Application, Remote Messaging, Remote Support: A separate cluster each for application deployment, remote messaging, and remote support.
- On the Select Nodes page, select the nodes to include in this deployment environment, then click Next to display the Define Clusters page.
Select nodes that have the required capabilities for the environment you selected on the BPM Deployment Environment Features section.
Select at least one node for the deployment environment. For high-availability and failover environments, select at least two nodes. For scalability, you can add more nodes.
- On the Define Clusters page, assign the required number of clusters for each node and click Next to display the Customize Cluster Name and Ports page.
By default one cluster member is assigned on each node for each function. You change the number by replacing the number in each column.
A 0 (zero) value for a node means the node does not contribute to the selected function, based on features that you have selected.
- On the Customize Cluster Name and Ports page, customize the cluster names or cluster member names for the cluster type.
You can specify the starting port for the cluster members. The system generates default values for cluster member names and the starting port.
Ensure the starting port numbers you specify are at least 20 ports apart. Port numbers are reserved and assigned to each node for the cluster members using the port number specified. If you specify an initial port when you create the deployment environment, that same initial port specified would be assigned to the cluster member. For example, if the port number for the first cluster member is 2000, it would use the port numbers 2000, 2001, 2002, and so on. The port number of the second cluster member would be 2020 and the port numbers would be 2020, 2021, 2022, and so on. The port number of the third cluster member would be 2040.
If there is already a node on that physical system then there may be port conflicts and these must be resolved manually by changing the port values.
If you use additional servers with unique ports, WebSphere Application Server does not automatically configure the virtual host for the server. Specifically, WAS does not automatically add the host alias ports to a virtual host. However, you can use the administrative console to add a new host alias for each of the ports that are used by the new server.
- Required: On the Configure Databases page, select DB2, configure the database parameters for data sources of the deployment environment, click Test connection, and after the connection succeeds click Next to go to the Summary page.
On this page, define the following database information for the components that are included in this deployment environment. Where possible, the wizard supplies default information for the parameters, but change those values to match the values that you defined when you planned the environment.
The database specified in this panel must already exist. Deployment environment configuration never creates a database.
- Shared parameters
- User name: User name to connect to the database.
- Password: Password for the user name.
- Confirm password: Confirm the password for the user name.
- Server: Server name where the database is located.
- Port: Port number to connect to the database.
- Create Tables: Create the required tables.
If this option is selected, ensure the user has sufficient rights to access the database, and create tables. If this check box is cleared, ensure that you create tables and load the database with system information by running bootstrapProcessServerData after you have created the deployment environment.
- cellDB
The cellDB option is only visible when you create the first advanced deployment environment. After this, every advanced deployment environment that you shares the cellDB of the first environment.
- Name: name for the cell database.
- Common database
- Name: name for the common database which is used for CommonDB components, Business Space, Business Process Choreographer, and Messaging.
- Process database
- Name: name for the Process Center database.
- Performance Data Warehouse database
- Name: name for the Performance Data Warehouse database.
- Select the databases to separate from the Common database.
- Messaging: Select this option to create a separate messaging engine database.
- Name: name for the messaging engine database.
- Business Process Choreographer: Select this option to create a separate Business Process Choreographer database.
- Name: name for the Business Process Choreographer database.
- Messaging: Select this option to create a separate messaging engine database.
The Process Server and IBM Performance Data Warehouse should not use the same database.
You can clear the Create Tables check box to create the tables manually instead of the configuration creating it automatically. The scripts to create tables are generated in the folder...
- BPM_Install/profiles/DmgrProfile/dbscripts
You can run the scripts from the dbscripts folder and do not need to generate scripts using BPMConfig.
You can edit all key parameters, such as the database name, whether or not to create tables and the data source runtime user name for the deployment environment. You can select which database to use for the given component.
Steps that cannot be completed through the Deployment Environment wizard, and which need to be completed manually, are listed on the Deferred Configuration page. You can view this page after you have created the deployment environment. To view this administrative console page, click...
- Servers | Deployment Environments | Deployment environment name | Deployment Environment Configuration | Additional Properties | Deferred Configuration

- Shared parameters
- Verify the information on the Summary page is correct and perform the following substeps:
- To exit without generating the configuration, click Cancel.
- To save the environment configuration to configure a similar Deployment Environment, click Export for Scripting.
- If you are satisfied with the deployment environment configuration, click Generate Deployment Environment to save and complete the configuration of the deployment environment. This will also generate a properties file in the BPM_Install_Root/logs/config folder on the deployment manager machine with a timestamp in the file name, bpmconfig-de_name-timestamp.properties. Save this file for future reference or for troubleshooting any issues.
- If you have postponed the Process database table creation by clearing the create table option on the Database page, create the tables and load the database with system information by running bootstrapProcessServerData. The bootstrap code runs automatically if the Process database table creation is selected on the Database page wizard.
- Restart the following resources after you have completed your configurations in the order specified here. See Start and stop individual resources.
- Stop the deployment environment.
- Stop the node agent.
- Stop the deployment manager.
- Start the deployment manager.
- Start the node agent.
- Start the deployment environment.
For Advanced or Advanced-only deployment environments, the deployment manager and node agents need to be restarted for the cell scoped configuration to take affect. This is only required for the first deployment environment that you create.
When the configuration completes, you can examine the configuration files to view the changes.
Either save the changes to the master configuration or discard them.
If you use additional servers with unique ports, WAS does not automatically configure the virtual host for the server. Specifically, WAS does not automatically add the host alias ports to a virtual host. However, you can use the administrative console to add a new host alias for each of the ports that are used by the new server. To add a host alias, in the administrative console navigate to...
- Environment | Virtual hosts | default_host | Host Aliases | New
Clean all applicable profile logs or save them in another directory. You may want to clean or move the logs as they will be appended with the last configuration. This can make it difficult to view the most current information.
After you have configured a network deployment environment for BPM Advanced, if you test the connection to the cell-level jdbc/WPSDB data source ( in the administrative console, on the page Resources > JDBC > Data sources), you get a message saying the test connection operation failed with the exception com.ibm.wsspi.runtime.variable.UndefinedVariableException: Undefined Variable variable_name, where variable_name is a variable name such as WAS_INSTALL_ROOT, DB2_JCC_DRIVER_PATH, UNIVERSAL_JDBC_DRIVER_PATH or PUREQUERY_PATH.
This does not necessarily indicate there will be a problem accessing the data source at run time. Ensure the location of your JDBC driver files is accessible to every client that must use the data source, and configure the variable with the full path of that location. Disregard the test connection error unless you are also experiencing trouble connecting to the data store at run time.
If you are using DB2 PureScale, also
configure automatic client rerouting and configure workload balancing.
Related concepts:
Related tasks:IBM Business Process Manager configuration capabilities
Create the Standard Process Center deployment environment
Create a Process Center deployment environment to store, run and administer process applications and toolkits that are developed in Process Designer. You can create more than one deployment environments in the same cell using the Deployment Environment wizard. However, you can create only one Process Center-based deployment environment in a single cell.
Ensure that you have completed the following tasks:
- Installed the product
- Created the deployment manager profile and the associated nodes
- Ensure the database specified in the Database Configuration panel of the Deployment Environment wizard is already created. The deployment environment configuration never creates a database.
- Start all the local and remote nodes that to add in the deployment environment.
- When you create a 3-cluster deployment environment using the Deployment Environment wizard, the process might take a lot of time to complete. In that case, you can perform one of the following steps to create the 3-cluster environment:
- Increase the transaction timeout value using the Deployment Manager and re-create the deployment environment. See Preventing timeout and out-of-memory exceptions during installation or deployment.
- Do not create tables during the Deployment Environment creation. After creating the environment, create the databases, tables, and then run the bootstrap command.
- If you are using the Deployment Environment wizard, you can enable deployment manager trace for details about the deployment creation.
To enable trace for a single run and till the deployment manager restarts, log on to the administrative console, go to...
- Troubleshooting | Logs and trace | deployment_manager_name com.ibm.bpm.config.*=all to the Change log detail levels text area, and save the changes.
You must have Process Center installed to install a Process Center-based deployment environment. If you have a Process Server installed, start the IBM Installation Manager and modify the installation to use the Business Process Manager Advanced Process Center feature.
When security and role-based authorization are enabled, you must log in to the administrative console as a Cell administrator to create a deployment environment. This task describes the procedure for creating a deployment environment that is based on a specific pattern and uses the Deployment Environment wizard.
A snapshot that requires BPM Advanced Edition capability cannot be installed on more than one deployment environment in the same cell.
DB2 considerations:
- Process Server and IBM Performance Data Warehouse should not use the same database.
To create the deployment environment.
- From the administrative console, navigate to the Deployment Environments page by clicking...
- Servers | Deployment Environments
- Launch the Deployment Environment wizard by clicking New on the Deployment Environments page.
The Create new deployment environment page is displayed.
The database provides isolation of internal groups, such as administrators. If the database is shared by two deployment environments, one administrators group is shared between them. When such a situation occurs, both administrators are able to login as administrator for each of the deployment environment.
- Enter a unique name for the deployment environment in the Deployment environment name field.
- Enter a user name for the deployment environment administrator in the Deployment environment administrator user name field.
IBM recommends to use a different administrator for each deployment environment and also the cell administrator.
- Enter a password for the deployment environment administrator in the Password field.
- Reconfirm the password in the Confirm password field.
- Enter a unique name for the deployment environment in the Deployment environment name field.
- From the BPM Deployment Environment Type section, select Standard Process Center.
Features represent the runtime processing capabilities of the deployment environment.
- From the section...
- Select the deployment environment pattern
...select a pattern for the deployment environment and click Next to display the Select Nodes page.
The available patterns are:
- Single Cluster: The application deployment target includes the messaging infrastructure and supporting applications.
- Application, Remote Messaging, Remote Support: A separate cluster each for application deployment, remote messaging, and remote support.
- On the Select Nodes page, select the nodes to include in this deployment environment, then click Next to display the Define Clusters page.
Select nodes that have the required capabilities for the environment you selected on the BPM Deployment Environment Features section.
Select at least one node for the deployment environment. For high-availability and failover environments, select at least two nodes. For scalability, you can add more nodes.
- On the Define Clusters page, assign the required number of clusters for each node and click Next to display the Customize Cluster Name and Ports page.
By default one cluster member is assigned on each node for each function. You change the number by replacing the number in each column.
A 0 (zero) value for a node means the node does not contribute to the selected function, based on features that you have selected.
- On the Customize Cluster Name and Ports page, customize the cluster names or cluster member names for the cluster type.
You can specify the starting port for the cluster members. The system generates default values for cluster member names and the starting port.
Ensure the starting port numbers you specify are at least 20 ports apart. Port numbers are reserved and assigned to each node for the cluster members using the port number specified. If you specify an initial port when you create the deployment environment, that same initial port specified would be assigned to the cluster member. For example, if the port number for the first cluster member is 2000, it would use the port numbers 2000, 2001, 2002, and so on. The port number of the second cluster member would be 2020 and the port numbers would be 2020, 2021, 2022, and so on. The port number of the third cluster member would be 2040.
If there is already a node on that physical system then there may be port conflicts and these must be resolved manually by changing the port values.
If you use additional servers with unique ports, WebSphere Application Server does not automatically configure the virtual host for the server. Specifically, WAS does not automatically add the host alias ports to a virtual host. However, you can use the administrative console to add a new host alias for each of the ports that are used by the new server.
- Required: On the Configure Databases page, select DB2, configure the database parameters for data sources of the deployment environment, click Test connection, and after the connection succeeds click Next to go to the Summary page.
On this page, define the following database information for the components that are included in this deployment environment. Where possible, the wizard supplies default information for the parameters, but change those values to match the values that you defined when you planned the environment.
The database specified in this panel must already exist. Deployment environment configuration never creates a database.
- Shared parameters
- User name: User name to connect to the database.
- Password: Password for the user name.
- Confirm password: Confirm the password for the user name.
- Server: Server name where the database is located.
- Port: Port number to connect to the database.
- Create Tables: Create the required tables.
If this option is selected, ensure the user has sufficient rights to access the database, and create tables.
- Common database
- Name: name for the common database which is used for CommonDB components, Business Space, Business Process Choreographer, and Messaging.
- Process database
- Name: name for the Process Center database.
- Performance Data Warehouse database
- Name: name for the Performance Data Warehouse database.
- Select the databases to separate from the Common database.
- Messaging: Select this option to create a separate messaging engine database.
- Name: name for the messaging engine database.
- Messaging: Select this option to create a separate messaging engine database.
The Process Server and IBM Performance Data Warehouse should not use the same database.
You can clear the Create Tables check box to create the tables manually instead of the configuration creating it automatically. The scripts to create tables are generated in the folder...
- BPM_Install/profiles/DmgrProfile/dbscripts
You can run the scripts from the dbscripts folder and do not need to generate scripts using BPMConfig.
You can edit all key parameters, such as the database name, whether or not to create tables and the data source runtime user name for the deployment environment. You can select which database to use for the given component.
Steps that cannot be completed through the Deployment Environment wizard, and which need to be completed manually, are listed on the Deferred Configuration page. You can view this page after you have created the deployment environment. To view this administrative console page, click...
- Servers | Deployment Environments | Deployment environment name | Deployment Environment Configuration | Additional Properties | Deferred Configuration
- Shared parameters
- Verify the information on the Summary page is correct and perform the following substeps:
- To exit without generating the configuration, click Cancel.
- To save the environment configuration to configure a similar Deployment Environment, click Export for Scripting.
- If you are satisfied with the deployment environment configuration, click Generate Deployment Environment to save and complete the configuration of the deployment environment. This will also generate a properties file in the BPM_Install_Root/logs/config folder on the deployment manager machine with a timestamp in the file name, bpmconfig-de_name-timestamp.properties. Save this file for future reference or for troubleshooting any issues.
- If you have postponed the Process database table creation by clearing the create table option on the Database page, create the tables and load the database with system information by running bootstrapProcessServerData. The bootstrap code runs automatically if the Process database table creation is selected on the Database page wizard.
- Restart the following resources after you have completed your configurations in the order specified here. See Start and stop individual resources.
- Stop the deployment environment.
- Stop the node agent.
- Stop the deployment manager.
- Start the deployment manager.
- Start the node agent.
- Start the deployment environment.
For Advanced or Advanced-only deployment environments, the deployment manager and node agents need to be restarted for the cell scoped configuration to take affect. This is only required for the first deployment environment that you create.
When the configuration completes, you can examine the configuration files to view the changes.
Either save the changes to the master configuration or discard them.
If you use additional servers with unique ports, WAS does not automatically configure the virtual host for the server. Specifically, WAS does not automatically add the host alias ports to a virtual host. However, you can use the administrative console to add a new host alias for each of the ports that are used by the new server. To add a host alias, in the administrative console navigate to...
- Environment | Virtual hosts | default_host | Host Aliases | New
Clean all applicable profile logs or save them in another directory. You may want to clean or move the logs as they will be appended with the last configuration. This can make it difficult to view the most current information.
If you are using DB2 PureScale, also
configure automatic client rerouting and configure workload balancing.
Related concepts:
Related tasks:IBM Business Process Manager configuration capabilities
Create the Advanced Process Server deployment environment
Create a Process Server deployment environment to run processes, services and modules deployed from the Process Center. Or, deploy modules either from the command line or from the WebSphere administrative console. You can create more than one deployment environments in the same cell using the Deployment Environment wizard.
Ensure that you have completed the following tasks:
- Installed the product
- Created the deployment manager profile and the associated nodes
- Ensure the database specified in the Database Configuration panel of the Deployment Environment wizard is already created. The deployment environment configuration never creates a database.
- Start all the local and remote nodes that to add in the deployment environment.
- When you create a 3-cluster deployment environment using the Deployment Environment wizard, the process might take a lot of time to complete. In that case, you can perform one of the following steps to create the 3-cluster environment:
- Increase the transaction timeout value using the Deployment Manager and re-create the deployment environment. See Preventing timeout and out-of-memory exceptions during installation or deployment.
- Do not create tables during the Deployment Environment creation. After creating the environment, create the databases, tables, and then run the bootstrap command.
- If you are using the Deployment Environment wizard, you can enable deployment manager trace for details about the deployment creation.
To enable trace for a single run and till the deployment manager restarts, log on to the administrative console, go to...
- Troubleshooting | Logs and trace | deployment_manager_name com.ibm.bpm.config.*=all to the Change log detail levels text area, and save the changes.
You must have Process Server installed to install a Process Server-based deployment environment. If you have a Process Center installed, start the IBM Installation Manager and modify the installation to use the Business Process Manager Advanced Process Server Production or Business Process Manager Advanced Process Server Non-Production feature.
When security and role-based authorization are enabled, you must log in to the administrative console as a Cell administrator to create a deployment environment. This task describes the procedure for creating a deployment environment that is based on a specific pattern and uses the Deployment Environment wizard.
A snapshot that requires BPM Advanced Edition capability cannot be installed on more than one deployment environment in the same cell.
DB2 considerations:
- Process Server and IBM Performance Data Warehouse should not use the same database.
To create the deployment environment.
- From the administrative console, navigate to the Deployment Environments page by clicking...
- Servers | Deployment Environments
- Launch the Deployment Environment wizard by clicking New on the Deployment Environments page.
The Create new deployment environment page is displayed.
The database provides isolation of internal groups, such as administrators. If the database is shared by two deployment environments, one administrators group is shared between them. When such a situation occurs, both administrators are able to login as administrator for each of the deployment environment.
- Enter a unique name for the deployment environment in the Deployment environment name field.
- Enter a user name for the deployment environment administrator in the Deployment environment administrator user name field.
IBM recommends to use a different administrator for each deployment environment and also the cell administrator.
- Enter a password for the deployment environment administrator in the Password field.
- Reconfirm the password in the Confirm password field.
- Enter a unique name for the deployment environment in the Deployment environment name field.
- From the BPM Deployment Environment Type section, select Advanced Process Server.
Features represent the runtime processing capabilities of the deployment environment.
- From the section...
- Select the deployment environment pattern
...select a pattern for the deployment environment and click Next to display the Select Nodes page.
The available patterns are:
- Single Cluster: The application deployment target includes the messaging infrastructure and supporting applications.
- Application, Remote Messaging, Remote Support: A separate cluster each for application deployment, remote messaging, and remote support.
- On the Select Nodes page, select the nodes to include in this deployment environment, then click Next to display the Define Clusters page.
Select nodes that have the required capabilities for the environment you selected on the BPM Deployment Environment Features section.
Select at least one node for the deployment environment. For high-availability and failover environments, select at least two nodes. For scalability, you can add more nodes.
- On the Define Clusters page, assign the required number of clusters for each node and click Next to display the Customize Cluster Name and Ports page.
By default one cluster member is assigned on each node for each function. You change the number by replacing the number in each column.
A 0 (zero) value for a node means the node does not contribute to the selected function, based on features that you have selected.
- On the Customize Cluster Name and Ports page, customize the cluster names or cluster member names for the cluster type.
You can specify the starting port for the cluster members. The system generates default values for cluster member names and the starting port.
Ensure the starting port numbers you specify are at least 20 ports apart. Port numbers are reserved and assigned to each node for the cluster members using the port number specified. If you specify an initial port when you create the deployment environment, that same initial port specified would be assigned to the cluster member. For example, if the port number for the first cluster member is 2000, it would use the port numbers 2000, 2001, 2002, and so on. The port number of the second cluster member would be 2020 and the port numbers would be 2020, 2021, 2022, and so on. The port number of the third cluster member would be 2040.
If there is already a node on that physical system then there may be port conflicts and these must be resolved manually by changing the port values.
If you use additional servers with unique ports, WebSphere Application Server does not automatically configure the virtual host for the server. Specifically, WAS does not automatically add the host alias ports to a virtual host. However, you can use the administrative console to add a new host alias for each of the ports that are used by the new server.
- On the Configure Process Server page, set the values for the Process Center configuration and click Next.
- Environment name
Enter an environment name of the Process Server.
An environment name is the name by which this server or cluster will be known to a Process Center user.
- Environment type
From the pull-down list, select the environment type for the Process Server you are configuring.
The environment type refers to how the Process Server is used. For example, in what capacity will the Process Server be used - development, test, staging, or production. Load testing might be done on a test server, while a staging environment type might be used as a temporary location to host changes before putting those changes into production. You might specify a staging environment type if the Process Server you are configuring will be accessed and used to review content and new functionality.
There are four types of environments available for selection:
- Development
- The server will serve in a development capacity.
- Test
- The server will be used as a testing environment.
- Stage
- The server server will serve as a staging platform to be used as a preproduction server.
- Production
- The server will serve in a production capacity.
- Use server offline
Indicate whether the server you are configuring is an offline server.
An offline server is a Process Server that is not connected to the Process Center.
Offline servers can still be used when deploying snapshots of process applications. However the method for deploying process applications to an offline process server differs from the method for deploying process applications to an online process server.
- Protocol
Select either http:// or https:// as the connection protocol to the Process Center.
- Host name or virtual host in a load-balanced environment
Type the host or virtual host that this Process Server needs to communicate with Process Center.
Ensure specified the host name instead of localhost for the server name when you configure the Process Server. This is required when you are using the Process Designer remotely.
- Port
Port number of the Process Center.
- User name
Type a valid user name that exists on the Process Center. Process Server will connect to Process Center as this user.
- Password
Password for the user.
- Confirm password
Confirm the password for the user.
- Test Connection
Click to test the Process Center connection.
- Environment name
- Required: On the Configure Databases page, select DB2, configure the database parameters for data sources of the deployment environment, click Test connection, and after the connection succeeds click Next to go to the Summary page.
On this page, define the following database information for the components that are included in this deployment environment. Where possible, the wizard supplies default information for the parameters, but change those values to match the values that you defined when you planned the environment.
The database specified in this panel must already exist. Deployment environment configuration never creates a database.
- Shared parameters
- User name: User name to connect to the database.
- Password: Password for the user name.
- Confirm password: Confirm the password for the user name.
- Server: Server name where the database is located.
- Port: Port number to connect to the database.
- Create Tables: Create the required tables.
If this option is selected, ensure the user has sufficient rights to access the database, and create tables. If this check box is cleared, ensure that you create tables and load the database with system information by running bootstrapProcessServerData after you have created the deployment environment.
- cellDB
The cellDB option is only visible when you create the first advanced deployment environment. After this, every advanced deployment environment that you shares the cellDB of the first environment.
- Name: name for the cell database.
- Common database
- Name: name for the common database which is used for CommonDB components, Business Space, Business Process Choreographer, and Messaging.
- Process database
- Name: name for the Process Center database.
- Performance Data Warehouse database
- Name: name for the Performance Data Warehouse database.
- Select the databases to separate from the Common database.
- Messaging: Select this option to create a separate messaging engine database.
- Name: name for the messaging engine database.
- Business Process Choreographer: Select this option to create a separate Business Process Choreographer database.
- Name: name for the Business Process Choreographer database.
- Messaging: Select this option to create a separate messaging engine database.
The Process Server and IBM Performance Data Warehouse should not use the same database.
You can clear the Create Tables check box to create the tables manually instead of the configuration creating it automatically. The scripts to create tables are generated in the folder...
- BPM_Install/profiles/DmgrProfile/dbscripts
You can run the scripts from the dbscripts folder and do not need to generate scripts using BPMConfig.
You can edit all key parameters, such as the database name, whether or not to create tables and the data source runtime user name for the deployment environment. You can select which database to use for the given component.
Steps that cannot be completed through the Deployment Environment wizard, and which need to be completed manually, are listed on the Deferred Configuration page. You can view this page after you have created the deployment environment. To view this administrative console page, click...
- Servers | Deployment Environments | Deployment environment name | Deployment Environment Configuration | Additional Properties | Deferred Configuration
- Shared parameters
- Verify the information on the Summary page is correct and perform the following substeps:
- To exit without generating the configuration, click Cancel.
- To save the environment configuration to configure a similar Deployment Environment, click Export for Scripting.
- If you are satisfied with the deployment environment configuration, click Generate Deployment Environment to save and complete the configuration of the deployment environment. This will also generate a properties file in the BPM_Install_Root/logs/config folder on the deployment manager machine with a timestamp in the file name, bpmconfig-de_name-timestamp.properties. Save this file for future reference or for troubleshooting any issues.
- If you have postponed the Process database table creation by clearing the create table option on the Database page, create the tables and load the database with system information by running bootstrapProcessServerData. The bootstrap code runs automatically if the Process database table creation is selected on the Database page wizard.
- Restart the following resources after you have completed your configurations in the order specified here. See Start and stop individual resources.
- Stop the deployment environment.
- Stop the node agent.
- Stop the deployment manager.
- Start the deployment manager.
- Start the node agent.
- Start the deployment environment.
For Advanced or Advanced-only deployment environments, the deployment manager and node agents need to be restarted for the cell scoped configuration to take affect. This is only required for the first deployment environment that you create.
When the configuration completes, you can examine the configuration files to view the changes.
Either save the changes to the master configuration or discard them.
If you use additional servers with unique ports, WAS does not automatically configure the virtual host for the server. Specifically, WAS does not automatically add the host alias ports to a virtual host. However, you can use the administrative console to add a new host alias for each of the ports that are used by the new server. To add a host alias, in the administrative console navigate to...
- Environment | Virtual hosts | default_host | Host Aliases | New
Clean all applicable profile logs or save them in another directory. You may want to clean or move the logs as they will be appended with the last configuration. This can make it difficult to view the most current information.
After you have configured a network deployment environment for BPM Advanced, if you test the connection to the cell-level jdbc/WPSDB data source ( in the administrative console, on the page Resources > JDBC > Data sources), you get a message saying the test connection operation failed with the exception com.ibm.wsspi.runtime.variable.UndefinedVariableException: Undefined Variable variable_name, where variable_name is a variable name such as WAS_INSTALL_ROOT, DB2_JCC_DRIVER_PATH, UNIVERSAL_JDBC_DRIVER_PATH or PUREQUERY_PATH. This does not necessarily indicate there will be a problem accessing the data source at run time. Ensure the location of your JDBC driver files is accessible to every client that must use the data source, and configure the variable with the full path of that location. Disregard the test connection error unless you are also experiencing trouble connecting to the data store at run time. For additional information, see the WebSphere Application Server documentation about the test connection service.
If you are using DB2 PureScale, also
configure automatic client rerouting and configure workload balancing.
Related concepts:
Related tasks:IBM Business Process Manager configuration capabilities
Create the Standard Process Server deployment environment
Create a Process Server deployment environment to run processes and deployed from the Process Center. You can create more than one deployment environments in the same cell using the Deployment Environment wizard.
Ensure that you have completed the following tasks:
- Installed the product
- Created the deployment manager profile and the associated nodes
- Ensure the database specified in the Database Configuration panel of the Deployment Environment wizard is already created. The deployment environment configuration never creates a database.
- Start all the local and remote nodes that to add in the deployment environment.
- When you create a 3-cluster deployment environment using the Deployment Environment wizard, the process might take a lot of time to complete. In that case, you can perform one of the following steps to create the 3-cluster environment:
- Increase the transaction timeout value using the Deployment Manager and re-create the deployment environment. See Preventing timeout and out-of-memory exceptions during installation or deployment.
- Do not create tables during the Deployment Environment creation. After creating the environment, create the databases, tables, and then run the bootstrap command.
- If you are using the Deployment Environment wizard, you can enable deployment manager trace for details about the deployment creation.
To enable trace for a single run and till the deployment manager restarts, log on to the administrative console, go to...
- Troubleshooting | Logs and trace | deployment_manager_name com.ibm.bpm.config.*=all to the Change log detail levels text area, and save the changes.
You must have Process Server installed to install a Process Server-based deployment environment. If you have a Process Center installed, start the IBM Installation Manager and modify the installation to use the Business Process Manager Advanced Process Server Production or Business Process Manager Advanced Process Server Non-Production feature.
When security and role-based authorization are enabled, you must log in to the administrative console as a Cell administrator to create a deployment environment. This task describes the procedure for creating a deployment environment that is based on a specific pattern and uses the Deployment Environment wizard.
A snapshot that requires BPM Advanced Edition capability cannot be installed on more than one deployment environment in the same cell.
DB2 considerations:
- Process Server and IBM Performance Data Warehouse should not use the same database.
To create the deployment environment.
- From the administrative console, navigate to the Deployment Environments page by clicking...
- Servers | Deployment Environments
- Launch the Deployment Environment wizard by clicking New on the Deployment Environments page.
The Create new deployment environment page is displayed.
The database provides isolation of internal groups, such as administrators. If the database is shared by two deployment environments, one administrators group is shared between them. When such a situation occurs, both administrators are able to login as administrator for each of the deployment environment.
- Enter a unique name for the deployment environment in the Deployment environment name field.
- Enter a user name for the deployment environment administrator in the Deployment environment administrator user name field.
IBM recommends to use a different administrator for each deployment environment and also the cell administrator.
- Enter a password for the deployment environment administrator in the Password field.
- Reconfirm the password in the Confirm password field.
- Enter a unique name for the deployment environment in the Deployment environment name field.
- From the BPM Deployment Environment Type section, select Standard Process Server.
Features represent the runtime processing capabilities of the deployment environment.
- From the section...
- Select the deployment environment pattern
...select a pattern for the deployment environment and click Next to display the Select Nodes page.
The available patterns are:
- Single Cluster: The application deployment target includes the messaging infrastructure and supporting applications.
- Application, Remote Messaging, Remote Support: A separate cluster each for application deployment, remote messaging, and remote support.
- On the Select Nodes page, select the nodes to include in this deployment environment, then click Next to display the Define Clusters page.
Select nodes that have the required capabilities for the environment you selected on the BPM Deployment Environment Features section.
Select at least one node for the deployment environment. For high-availability and failover environments, select at least two nodes. For scalability, you can add more nodes.
- On the Define Clusters page, assign the required number of clusters for each node and click Next to display the Customize Cluster Name and Ports page.
By default one cluster member is assigned on each node for each function. You change the number by replacing the number in each column.
A 0 (zero) value for a node means the node does not contribute to the selected function, based on features that you have selected.
- On the Customize Cluster Name and Ports page, customize the cluster names or cluster member names for the cluster type.
You can specify the starting port for the cluster members. The system generates default values for cluster member names and the starting port.
Ensure the starting port numbers you specify are at least 20 ports apart. Port numbers are reserved and assigned to each node for the cluster members using the port number specified. If you specify an initial port when you create the deployment environment, that same initial port specified would be assigned to the cluster member. For example, if the port number for the first cluster member is 2000, it would use the port numbers 2000, 2001, 2002, and so on. The port number of the second cluster member would be 2020 and the port numbers would be 2020, 2021, 2022, and so on. The port number of the third cluster member would be 2040.
If there is already a node on that physical system then there may be port conflicts and these must be resolved manually by changing the port values.
If you use additional servers with unique ports, WebSphere Application Server does not automatically configure the virtual host for the server. Specifically, WAS does not automatically add the host alias ports to a virtual host. However, you can use the administrative console to add a new host alias for each of the ports that are used by the new server.
- On the Configure Process Server page, set the values for the Process Center configuration and click Next.
- Environment name
Enter an environment name of the Process Server.
An environment name is the name by which this server or cluster will be known to a Process Center user.
- Environment type
From the pull-down list, select the environment type for the Process Server you are configuring.
The environment type refers to how the Process Server is used. For example, in what capacity will the Process Server be used - development, test, staging, or production. Load testing might be done on a test server, while a staging environment type might be used as a temporary location to host changes before putting those changes into production. You might specify a staging environment type if the Process Server you are configuring will be accessed and used to review content and new functionality.
There are four types of environments available for selection:
- Development
- The server will serve in a development capacity.
- Test
- The server will be used as a testing environment.
- Stage
- The server server will serve as a staging platform to be used as a preproduction server.
- Production
- The server will serve in a production capacity.
- Use server offline
Indicate whether the server you are configuring is an offline server.
An offline server is a Process Server that is not connected to the Process Center.
Offline servers can still be used when deploying snapshots of process applications. However the method for deploying process applications to an offline process server differs from the method for deploying process applications to an online process server.
- Protocol
Select either http:// or https:// as the connection protocol to the Process Center.
- Host name or virtual host in a load-balanced environment
Type the host or virtual host that this Process Server needs to communicate with Process Center.
Ensure specified the host name instead of localhost for the server name when you configure the Process Server. This is required when you are using the Process Designer remotely.
- Port
Port number of the Process Center.
- User name
Type a valid user name that exists on the Process Center. Process Server will connect to Process Center as this user.
- Password
Password for the user.
- Confirm password
Confirm the password for the user.
- Test Connection
Click to test the Process Center connection.
- Environment name
- Required: On the Configure Databases page, select DB2, configure the database parameters for data sources of the deployment environment, click Test connection, and after the connection succeeds click Next to go to the Summary page.
On this page, define the following database information for the components that are included in this deployment environment. Where possible, the wizard supplies default information for the parameters, but change those values to match the values that you defined when you planned the environment.
The database specified in this panel must already exist. Deployment environment configuration never creates a database.
- Shared parameters
- User name: User name to connect to the database.
- Password: Password for the user name.
- Confirm password: Confirm the password for the user name.
- Server: Server name where the database is located.
- Port: Port number to connect to the database.
- Create Tables: Create the required tables.
If this option is selected, ensure the user has sufficient rights to access the database, and create tables.
- Common database
- Name: name for the common database which is used for CommonDB components, Business Space, Business Process Choreographer, and Messaging.
- Process database
- Name: name for the Process Center database.
- Performance Data Warehouse database
- Name: name for the Performance Data Warehouse database.
- Select the databases to separate from the Common database.
- Messaging: Select this option to create a separate messaging engine database.
- Name: name for the messaging engine database.
- Messaging: Select this option to create a separate messaging engine database.
The Process Server and IBM Performance Data Warehouse should not use the same database.
You can clear the Create Tables check box to create the tables manually instead of the configuration creating it automatically. The scripts to create tables are generated in the folder...
- BPM_Install/profiles/DmgrProfile/dbscripts
You can run the scripts from the dbscripts folder and do not need to generate scripts using BPMConfig.
You can edit all key parameters, such as the database name, whether or not to create tables and the data source runtime user name for the deployment environment. You can select which database to use for the given component.
Steps that cannot be completed through the Deployment Environment wizard, and which need to be completed manually, are listed on the Deferred Configuration page. You can view this page after you have created the deployment environment. To view this administrative console page, click...
- Servers | Deployment Environments | Deployment environment name | Deployment Environment Configuration | Additional Properties | Deferred Configuration
- Shared parameters
- Verify the information on the Summary page is correct and perform the following substeps:
- To exit without generating the configuration, click Cancel.
- To save the environment configuration to configure a similar Deployment Environment, click Export for Scripting.
- If you are satisfied with the deployment environment configuration, click Generate Deployment Environment to save and complete the configuration of the deployment environment. This will also generate a properties file in the BPM_Install_Root/logs/config folder on the deployment manager machine with a timestamp in the file name, bpmconfig-de_name-timestamp.properties. Save this file for future reference or for troubleshooting any issues.
- If you have postponed the Process database table creation by clearing the create table option on the Database page, create the tables and load the database with system information by running bootstrapProcessServerData. The bootstrap code runs automatically if the Process database table creation is selected on the Database page wizard.
- Restart the following resources after you have completed your configurations in the order specified here. See Start and stop individual resources.
- Stop the deployment environment.
- Stop the node agent.
- Stop the deployment manager.
- Start the deployment manager.
- Start the node agent.
- Start the deployment environment.
For Advanced or Advanced-only deployment environments, the deployment manager and node agents need to be restarted for the cell scoped configuration to take affect. This is only required for the first deployment environment that you create.
When the configuration completes, you can examine the configuration files to view the changes.
Either save the changes to the master configuration or discard them.
If you use additional servers with unique ports, WAS does not automatically configure the virtual host for the server. Specifically, WAS does not automatically add the host alias ports to a virtual host. However, you can use the administrative console to add a new host alias for each of the ports that are used by the new server. To add a host alias, in the administrative console navigate to...
- Environment | Virtual hosts | default_host | Host Aliases | New
Clean all applicable profile logs or save them in another directory. You may want to clean or move the logs as they will be appended with the last configuration. This can make it difficult to view the most current information.
If you are using DB2 PureScale, also
configure automatic client rerouting and configure workload balancing.
Related concepts:
Related tasks:IBM Business Process Manager configuration capabilities
Create the Advanced-only Process Server deployment environment
Create an Advanced-only Process Server deployment environment if you only want function that is equivalent to WebSphere Process Server or WebSphere Enterprise Service Bus. You can run SCA modules that are created in Integration Designer. You can deploy the modules either from the command line or from the WebSphere administrative console.
Ensure that you have completed the following tasks:
- Installed the product
- Created the deployment manager profile and the associated nodes
- Ensure the database specified in the Database Configuration panel of the Deployment Environment wizard is already created. The deployment environment configuration never creates a database.
- Start all the local and remote nodes that to add in the deployment environment.
- When you create a 3-cluster deployment environment using the Deployment Environment wizard, the process might take a lot of time to complete. In that case, you can perform one of the following steps to create the 3-cluster environment:
- Increase the transaction timeout value using the Deployment Manager and re-create the deployment environment. See Preventing timeout and out-of-memory exceptions during installation or deployment.
- Do not create tables during the Deployment Environment creation. After creating the environment, create the database, and tables.
- If you are using the Deployment Environment wizard, you can enable deployment manager trace for details about the deployment creation.
To enable trace for a single run and till the deployment manager restarts, log on to the administrative console, go to...
- Troubleshooting | Logs and trace | deployment_manager_name com.ibm.bpm.config.*=all to the Change log detail levels text area, and save the changes.
When security and role-based authorization are enabled, you must log in to the administrative console as a Cell administrator to create a deployment environment. This task describes the procedure for creating a deployment environment that is based on a specific pattern and uses the Deployment Environment wizard.
A snapshot that requires BPM Advanced Edition capability cannot be installed on more than one deployment environment in the same cell.
To create the deployment environment.
- From the administrative console, navigate to the Deployment Environments page by clicking...
- Servers | Deployment Environments
- Launch the Deployment Environment wizard by clicking New on the Deployment Environments page.
The Create new deployment environment page is displayed.
The database provides isolation of internal groups, such as administrators. If the database is shared by two deployment environments, one administrators group is shared between them. When such a situation occurs, both administrators are able to login as administrator for each of the deployment environment.
- Enter a unique name for the deployment environment in the Deployment environment name field.
- Enter a user name for the deployment environment administrator in the Deployment environment administrator user name field.
IBM recommends to use a different administrator for each deployment environment and also the cell administrator.
- Enter a password for the deployment environment administrator in the Password field.
- Reconfirm the password in the Confirm password field.
- Enter a unique name for the deployment environment in the Deployment environment name field.
- From the BPM Deployment Environment Type section, select Advanced-only Process Server.
Features represent the runtime processing capabilities of the deployment environment.
- From the section...
- Select the deployment environment pattern
...select a pattern for the deployment environment and click Next to display the Select Nodes page.
The available patterns are:
- Single Cluster: The application deployment target includes the messaging infrastructure and supporting applications.
- Application, Remote Messaging, Remote Support: A separate cluster each for application deployment, remote messaging, and remote support.
- On the Select Nodes page, select the nodes to include in this deployment environment, then click Next to display the Define Clusters page.
Select nodes that have the required capabilities for the environment you selected on the BPM Deployment Environment Features section.
Select at least one node for the deployment environment. For high-availability and failover environments, select at least two nodes. For scalability, you can add more nodes.
- On the Define Clusters page, assign the required number of clusters for each node and click Next to display the Customize Cluster Name and Ports page.
By default one cluster member is assigned on each node for each function. You change the number by replacing the number in each column.
A 0 (zero) value for a node means the node does not contribute to the selected function, based on features that you have selected.
- On the Customize Cluster Name and Ports page, customize the cluster names or cluster member names for the cluster type.
You can specify the starting port for the cluster members. The system generates default values for cluster member names and the starting port.
Ensure the starting port numbers you specify are at least 20 ports apart. Port numbers are reserved and assigned to each node for the cluster members using the port number specified. If you specify an initial port when you create the deployment environment, that same initial port specified would be assigned to the cluster member. For example, if the port number for the first cluster member is 2000, it would use the port numbers 2000, 2001, 2002, and so on. The port number of the second cluster member would be 2020 and the port numbers would be 2020, 2021, 2022, and so on. The port number of the third cluster member would be 2040.
If there is already a node on that physical system then there may be port conflicts and these must be resolved manually by changing the port values.
If you use additional servers with unique ports, WAS does not automatically configure the virtual host for the server. Specifically, WAS does not automatically add the host alias ports to a virtual host. However, you can use the administrative console to add a new host alias for each of the ports that are used by the new server.
- Required: On the Configure Databases page, select DB2, configure the database parameters for data sources of the deployment environment, click Test connection, and after the connection succeeds click Next to go to the Summary page.
On this page, define the following database information for the components that are included in this deployment environment. Where possible, the wizard supplies default information for the parameters, but change those values to match the values that you defined when you planned the environment.
The database specified in this panel must already exist. Deployment environment configuration never creates a database.
- Shared parameters
- User name: User name to connect to the database.
- Password: Password for the user name.
- Confirm password: Confirm the password for the user name.
- Server: Server name where the database is located.
- Port: Port number to connect to the database.
- Create Tables: Create the required tables.
If this option is selected, ensure the user has sufficient rights to access the database, and create tables. If this check box is cleared, ensure that you create the tables and load the database with system information by running bootstrapProcessServerData after you have created the deployment environment.
- cellDB
The cellDB option is only visible when you create the first advanced deployment environment. After this, every advanced deployment environment that you shares the cellDB of the first environment.
- Name: name for the cell database.
- Common database
- Name: name for the common database which is used for CommonDB components, Business Space, Business Process Choreographer, and Messaging.
- Select the databases to separate from the Common database.
- Messaging: Select this option to create a separate messaging engine database.
- Name: name for the messaging engine database.
- Business Process Choreographer:
Select this option to create a separate Business Process Choreographer database.
- Name: name for the Business Process Choreographer database.
- Messaging: Select this option to create a separate messaging engine database.
You can clear the Create Tables check box to create the tables manually instead of the configuration creating it automatically. The scripts to create tables are generated in the folder...
- BPM_Install/profiles/DmgrProfile/dbscripts
You can run the scripts from the dbscripts folder and do not need to generate scripts using BPMConfig.
You can edit all key parameters, such as the database name, whether or not to create tables and the data source runtime user name for the deployment environment. You can select which database to use for the given component.
Steps that cannot be completed through the Deployment Environment wizard, and which need to be completed manually, are listed on the Deferred Configuration page. You can view this page after you have created the deployment environment. To view this administrative console page, click...
- Servers | Deployment Environments | Deployment environment name | Deployment Environment Configuration | Additional Properties | Deferred Configuration
- Shared parameters
- Verify the information on the Summary page is correct and perform the following substeps:
- To exit without generating the configuration, click Cancel.
- To save the environment configuration to configure a similar Deployment Environment, click Export for Scripting.
- If you are satisfied with the deployment environment configuration, click Generate Deployment Environment to save and complete the configuration of the deployment environment. This will also generate a properties file in the BPM_Install_Root/logs/config folder on the deployment manager machine with a timestamp in the file name, bpmconfig-de_name-timestamp.properties. Save this file for future reference or for troubleshooting any issues.
- Restart the following resources after you have completed your configurations in the order specified here. See Start and stop individual resources.
- Stop the deployment environment.
- Stop the node agent.
- Stop the deployment manager.
- Start the deployment manager.
- Start the node agent.
- Start the deployment environment.
For Advanced or Advanced-only deployment environments, the deployment manager and node agents need to be restarted for the cell scoped configuration to take affect. This is only required for the first deployment environment that you create.
When the configuration completes, you can examine the configuration files to view the changes.
Either save the changes to the master configuration or discard them.
If you use additional servers with unique ports, WAS does not automatically configure the virtual host for the server. Specifically, WAS does not automatically add the host alias ports to a virtual host. However, you can use the administrative console to add a new host alias for each of the ports that are used by the new server. To add a host alias, in the administrative console navigate to...
- Environment | Virtual hosts | default_host | Host Aliases | New
Clean all applicable profile logs or save them in another directory. You may want to clean or move the logs as they will be appended with the last configuration. This can make it difficult to view the most current information.
After you have configured a network deployment environment for BPM Advanced, if you test the connection to the cell-level jdbc/WPSDB data source ( in the administrative console, on the page Resources > JDBC > Data sources), you get a message saying the test connection operation failed with the exception com.ibm.wsspi.runtime.variable.UndefinedVariableException: Undefined Variable variable_name, where variable_name is a variable name such as WAS_INSTALL_ROOT, DB2_JCC_DRIVER_PATH, UNIVERSAL_JDBC_DRIVER_PATH or PUREQUERY_PATH. This does not necessarily indicate there will be a problem accessing the data source at run time. Ensure the location of your JDBC driver files is accessible to every client that must use the data source, and configure the variable with the full path of that location. Disregard the test connection error unless you are also experiencing trouble connecting to the data store at run time. For additional information, see the WebSphere Application Server documentation about the test connection service.
If you are using DB2 PureScale, also
configure automatic client rerouting and configure workload balancing.
Related concepts:
Related tasks:IBM Business Process Manager configuration capabilities
Extend the network deployment environment using BPMConfig
After creating a deployment environment using BPMConfig, you can run the command at a later time to extend the deployment environment, for example to create new profiles or to add additional nodes.
Before running BPMConfig:
- You must have installed the product on the computer where you want to extend the deployment environment.
- You must have created the deployment environment by running BPMConfig.
- The deployment manager must be running.
Run BPMConfig with the same properties file on all computers that will participate in the deployment environment. Run first on the computer that has the deployment manager profile, and then run it on each computer that has a managed node.
At any given time, only one profile creation can be performed on a computer and only one node federation can be performed against a particular deployment manager. For this reason, if you are creating multiple profiles at once on different computers, use the federateLater option, then run BPMConfig with the -create -de options sequentially on each computer to federate the managed nodes. Run BPMConfig with the -create -de option to add additional managed nodes and profiles to your existing environment. When it runs, BPMConfig:
- Creates any local profiles specified in the configuration properties file that do not already exist.
- Creates a new managed node for each new node specified in the configuration properties based on the specified values.
- Federates the node and adds the node to the deployment environment. If the -create -profile action was issued with the -federateLater option, the node is created but not federated.
- Runs the bootstrap utility to load the Process database with system information so there is no need to perform this step manually. If the bpm.de.deferSchemaCreation property in the configuration properties file is set to true and the database tables are created separately, then the bootstrap utility will need to be run manually.
To extend an existing deployment environment to include additional nodes or profiles:
- If you do not already have a customized configuration properties file based on the existing deployment environment to extend, locate the sample configuration file that most closely reflects the environment you are trying to extend. Sample configuration files are provided in the
- BPM_home/BPM/samples/config.
folder.
For each of the different product configurations, there is a different folder containing sample configuration files. For example, for BPM Standard Advanced, there is an Advanced folder containing a set of sample configuration properties files. Within each folder, there is a set of files that are specific to the different database types and configuration environments. The sample files are named according to the following format: de_type-environment_type-topology-database_type. For example, the sample configuration properties file for configuring a single cluster Process Center environment using DB2 with BPM Standard Advanced is called Advanced-PC-SingleCluster-DB2. Find the sample properties file that most closely represents your target deployment environment and make a copy of this file.
- Modify the properties file to add the additional nodes and profiles to extend the existing environment.
When adding managed nodes to an existing deployment environment, define each new node by duplicating the set of bpm.de.node properties that exist in the properties file and specifying the values that apply to the new managed node. For more information about the available properties, read the comments in the sample files, or see the BPMConfig command reference and the examples.
If you are using an Oracle database, you must include the database user name and password for all databases, including the optional ones.
- Run BPMConfig on the computer that has the deployment manager and on each computer that has a managed node, passing it the names of the properties file you created. For example:
- BPM_home/bin/BPMConfig -create -de my_environment.properties
If the new or updated node is on the same computer as the deployment manager node, then the updated or new node is automatically synchronized with the deployment manager node. Before you start the node, ensure that this synchronization has completed by checking the syncNode.log file found in the PROFILE_ROOT/logs directory. If the new or updated node is on a different computer than the deployment manager node, run the syncNode.bat or syncNode.sh command on the new or updated node and wait for the synchronization to complete before starting the node.
Extend a network deployment environment for a DB2 for z/OS database server
Extend the network deployment environment to work with a DB2 for z/OS database server.
- Use the Deployment Environment wizard
After performing the installation and creating the deployment manager, custom (managed node) profiles, and a deployment environment, you can extend a network deployment configuration based on the topology pattern templates packaged with the software. You can also extend the deployment by adding cluster members to a cell or adding multiple deployment environments.
- Extend the network deployment environment using BPMConfig
After creating a deployment environment using BPMConfig, you can run the command at a later time to extend the deployment environment, for example to create new profiles or to add additional nodes.
Use the Deployment Environment wizard
After performing the installation and creating the deployment manager, custom (managed node) profiles, and a deployment environment, you can extend a network deployment configuration based on the topology pattern templates packaged with the software. You can also extend the deployment by adding cluster members to a cell or adding multiple deployment environments.
- Add clusters:
The easiest way to expand your infrastructure is to add more cluster members to your existing clusters. You can add cluster members to each cluster independently or in combination, depending on where you see the need for growth. You can add an application cluster member, a messaging cluster member, or both. By expanding your clusters this way you can improve your application throughput, your message throughput, or both.
- Add deployment environments:
You can create two independent deployment environments for applications in the same cell. However, you can create only one Process Center-based deployment environment in a single cell.
To extend the deployment environment:
- Log on to the administrative console. Ensure the user has appropriate privileges to update the deployment environment.
- Click Servers > Deployment Environments > Deployment_Environment_Name.
- Use the various options in the administrative console to extend the deployment environment.
Create the Advanced Process Center deployment environment
Create a Process Center deployment environment to store, run and administer process applications and toolkits that are developed in Process Designer and Integration Designer. You can create more than one deployment environments in the same cell using the Deployment Environment wizard. However, you can create only one Process Center-based deployment environment in a single cell.
Ensure that you have completed the following tasks:
- Installed the product
- Created the deployment manager profile and the associated nodes
- Ensure the database specified in the Database Configuration panel of the Deployment Environment wizard is already created. The deployment environment configuration never creates a database.
- Start all the local and remote nodes that to add in the deployment environment.
- When you create a 3-cluster deployment environment using the Deployment Environment wizard, the process might take a lot of time to complete. In that case, you can perform one of the following steps to create the 3-cluster environment:
- Increase the transaction timeout value using the Deployment Manager and re-create the deployment environment. See Preventing timeout and out-of-memory exceptions during installation or deployment.
- Do not create tables during the Deployment Environment creation. After creating the environment, create the databases, tables, and then run the bootstrap command.
- If you are using the Deployment Environment wizard, you can enable deployment manager trace for details about the deployment creation.
To enable trace for a single run and till the deployment manager restarts, log on to the administrative console, go to...
- Troubleshooting | Logs and trace | deployment_manager_name com.ibm.bpm.config.*=all to the Change log detail levels text area, and save the changes.
You must have Process Center installed to install a Process Center-based deployment environment. If you have a Process Server installed, start the IBM Installation Manager and modify the installation to use the Business Process Manager Advanced Process Center feature.
When security and role-based authorization are enabled, you must log in to the administrative console as a Cell administrator to create a deployment environment. This task describes the procedure for creating a deployment environment that is based on a specific pattern and uses the Deployment Environment wizard.
A snapshot that requires BPM Advanced Edition capability cannot be installed on more than one deployment environment in the same cell.
To create the deployment environment.
- From the administrative console, navigate to the Deployment Environments page by clicking...
- Servers | Deployment Environments
- Launch the Deployment Environment wizard by clicking New on the Deployment Environments page.
The Create new deployment environment page is displayed.
The database provides isolation of internal groups, such as administrators. If the database is shared by two deployment environments, one administrators group is shared between them. When such a situation occurs, both administrators are able to login as administrator for each of the deployment environment.
- Enter a unique name for the deployment environment in the Deployment environment name field.
- Enter a user name for the deployment environment administrator in the Deployment environment administrator user name field.
IBM recommends to use a different administrator for each deployment environment and also the cell administrator.
- Enter a password for the deployment environment administrator in the Password field.
- Reconfirm the password in the Confirm password field.
- Enter a unique name for the deployment environment in the Deployment environment name field.
- From the BPM Deployment Environment Type section, select Advanced Process Center.
Features represent the runtime processing capabilities of the deployment environment.
- From the section...
- Select the deployment environment pattern
...select a pattern for the deployment environment and click Next to display the Select Nodes page.
The available patterns are:
- Single Cluster: The application deployment target includes the messaging infrastructure and supporting applications.
- Application, Remote Messaging, Remote Support: A separate cluster each for application deployment, remote messaging, and remote support.
- On the Select Nodes page, select the nodes to include in this deployment environment, then click Next to display the Define Clusters page.
Select nodes that have the required capabilities for the environment you selected on the BPM Deployment Environment Features section.
Select at least one node for the deployment environment. For high-availability and failover environments, select at least two nodes. For scalability, you can add more nodes.
- On the Define Clusters page, assign the required number of clusters for each node and click Next to display the Customize Cluster Name and Ports page.
By default one cluster member is assigned on each node for each function. You change the number by replacing the number in each column.
A 0 (zero) value for a node means the node does not contribute to the selected function, based on features that you have selected.
- On the Customize Cluster Name and Ports page, customize the cluster names or cluster member names for the cluster type.
You can specify the starting port for the cluster members. The system generates default values for cluster member names and the starting port.
Ensure the starting port numbers you specify are at least 20 ports apart. Port numbers are reserved and assigned to each node for the cluster members using the port number specified. If you specify an initial port when you create the deployment environment, that same initial port specified would be assigned to the cluster member. For example, if the port number for the first cluster member is 2000, it would use the port numbers 2000, 2001, 2002, and so on. The port number of the second cluster member would be 2020 and the port numbers would be 2020, 2021, 2022, and so on. The port number of the third cluster member would be 2040.
If there is already a node on that physical system then there may be port conflicts and these must be resolved manually by changing the port values.
If you use additional servers with unique ports, WebSphere Application Server does not automatically configure the virtual host for the server. Specifically, WAS does not automatically add the host alias ports to a virtual host. However, you can use the administrative console to add a new host alias for each of the ports that are used by the new server.
- Required: On the Configure Databases page, select DB2 On ZOS, configure the database parameters for data sources of the deployment environment, click Test connection, and after the connection succeeds click Next to go to the Summary page.
On this page, define the database information for the components that are included in this deployment environment. Where possible, the wizard supplies default information for the parameters, but change those values to match the values that you defined when you planned the environment.
The databases specified in this panel need to be created by the DB2 z/OS System Administrator.
- Shared parameters
- User name: User name to connect to the database.
- Password: Password for the user name.
- Confirm password: Confirm the password for the user name.
- Server: Server name where the database subsystem is located.
- Port: Port number to connect to the database subsystem.
- Database connection location: Type the database connection location name.
- Storage group: Type the storage group name.
- Volume Catalog: Type the volume catalog name.
- Buffer pool of 4k size: name for the buffer pool with size 4k.
- Index buffer pool : Type the index buffer pool name.
- LOB buffer pool : Type the LOB buffer pool name.
- Buffer pool of 8k size: name for the buffer pool with size 8k.
- Buffer pool of 16k size: name for the buffer pool with size 16k.
- Buffer pool of 32k size: name for the buffer pool with size 32k.
- cellDB
The cellDB option is only visible when you create the first advanced deployment environment. After this, every advanced deployment environment that you shares the cellDB of the first environment.
- Name: name for the cell database.
- Schema name: Type the schema name for the cell database.
- Common database
- Name: name for the common database which is used for CommonDB components, Business Space, Business Process Choreographer, and Messaging.
- Schema name: Type the schema name for the common database.
- Process database
- Name: name for the Process Center database.
- Schema name: Type the schema name for the Process database.
- Performance Data Warehouse database
- Name: name for the Performance Data Warehouse database.
- Schema name: Type the schema name for the Performance Data Warehouse database.
- Select the databases to separate from the Common database.
- Messaging: Select this option to create a separate messaging engine database.
- Name: name for the messaging engine database.
- Schema name: Type the schema name for the messaging engine database.
- Business Process Choreographer: Select this option to create a separate Business Process Choreographer database.
- Name: name for the Business Process Choreographer database.
- Schema name: Type the schema name for the Business Process Choreographer database.
- Messaging: Select this option to create a separate messaging engine database.
The default schema names that are displayed on this page might conflict with your site naming convention or might conflict with existing schemas. As such, it is likely that change the schema name. Pay close attention to the values specified to avoid potential naming conflicts.
You can edit all key parameters, such as the database name, whether or not to create tables, the data source runtime user name, and the password for the deployment environment. You can select which database to use for the given component.
Steps that cannot be completed through the Deployment Environment wizard, and which need to be completed manually, are listed on the Deferred Configuration page. You can view this page after you have created the deployment environment. To view this administrative console page, click...
- Servers | Deployment Environments | Deployment environment name | Deployment Environment Configuration | Additional Properties | Deferred Configuration
- Shared parameters
- Verify the information on the Summary page is correct and perform the following substeps:
- To exit without generating the configuration, click Cancel.
- To save the environment configuration to configure a similar Deployment Environment, click Export for Scripting.
- If you are satisfied with the deployment environment configuration, click Generate Deployment Environment to save and complete the configuration of the deployment environment. This will also generate a properties file in the BPM_Install_Root/logs/config folder on the deployment manager machine with a timestamp in the file name, bpmconfig-de_name-timestamp.properties. Save this file for future reference or for troubleshooting any issues.
- Load the database with system information by running bootstrapProcessServerData.
This command must be run before starting any cluster members.
When the configuration completes, you can examine the configuration files to view the changes.
Either save the changes to the master configuration or discard them.
If you use additional servers with unique ports, WAS does not automatically configure the virtual host for the server. Specifically, WAS does not automatically add the host alias ports to a virtual host. However, you can use the administrative console to add a new host alias for each of the ports that are used by the new server. To add a host alias, in the administrative console navigate to...
- Environment | Virtual hosts | default_host | Host Aliases | New
Clean all applicable profile logs or save them in another directory. You may want to clean or move the logs as they will be appended with the last configuration. This can make it difficult to view the most current information.
After you have configured a network deployment environment for BPM Advanced, if you test the connection to the cell-level jdbc/WPSDB data source ( in the administrative console, on the page Resources > JDBC > Data sources), you get a message saying the test connection operation failed with the exception com.ibm.wsspi.runtime.variable.UndefinedVariableException: Undefined Variable variable_name, where variable_name is a variable name such as WAS_INSTALL_ROOT, DB2_JCC_DRIVER_PATH, UNIVERSAL_JDBC_DRIVER_PATH or PUREQUERY_PATH. This does not necessarily indicate there will be a problem accessing the data source at run time. Ensure the location of your JDBC driver files is accessible to every client that must use the data source, and configure the variable with the full path of that location. Disregard the test connection error unless you are also experiencing trouble connecting to the data store at run time. For additional information, see the WebSphere Application Server documentation about the test connection service.
Related concepts:
Related tasks:IBM Business Process Manager configuration capabilities
Create the Standard Process Center deployment environment
Create a Process Center deployment environment to store, run and administer process applications and toolkits that are developed in Process Designer. You can create more than one deployment environments in the same cell using the Deployment Environment wizard. However, you can create only one Process Center-based deployment environment in a single cell.
Ensure that you have completed the following tasks:
- Installed the product
- Created the deployment manager profile and the associated nodes
- Ensure the database specified in the Database Configuration panel of the Deployment Environment wizard is already created. The deployment environment configuration never creates a database.
- Start all the local and remote nodes that to add in the deployment environment.
- When you create a 3-cluster deployment environment using the Deployment Environment wizard, the process might take a lot of time to complete. In that case, you can perform one of the following steps to create the 3-cluster environment:
- Increase the transaction timeout value using the Deployment Manager and re-create the deployment environment. See Preventing timeout and out-of-memory exceptions during installation or deployment.
- Do not create tables during the Deployment Environment creation. After creating the environment, create the databases, tables, and then run the bootstrap command.
- If you are using the Deployment Environment wizard, you can enable deployment manager trace for details about the deployment creation.
To enable trace for a single run and till the deployment manager restarts, log on to the administrative console, go to...
- Troubleshooting | Logs and trace | deployment_manager_name com.ibm.bpm.config.*=all to the Change log detail levels text area, and save the changes.
You must have Process Center installed to install a Process Center-based deployment environment. If you have a Process Server installed, start the IBM Installation Manager and modify the installation to use the Business Process Manager Advanced Process Center feature.
When security and role-based authorization are enabled, you must log in to the administrative console as a Cell administrator to create a deployment environment. This task describes the procedure for creating a deployment environment that is based on a specific pattern and uses the Deployment Environment wizard.
A snapshot that requires BPM Advanced Edition capability cannot be installed on more than one deployment environment in the same cell.
To create the deployment environment.
- From the administrative console, navigate to the Deployment Environments page by clicking...
- Servers | Deployment Environments
- Launch the Deployment Environment wizard by clicking New on the Deployment Environments page.
The Create new deployment environment page is displayed.
The database provides isolation of internal groups, such as administrators. If the database is shared by two deployment environments, one administrators group is shared between them. When such a situation occurs, both administrators are able to login as administrator for each of the deployment environment.
- Enter a unique name for the deployment environment in the Deployment environment name field.
- Enter a user name for the deployment environment administrator in the Deployment environment administrator user name field.
IBM recommends to use a different administrator for each deployment environment and also the cell administrator.
- Enter a password for the deployment environment administrator in the Password field.
- Reconfirm the password in the Confirm password field.
- Enter a unique name for the deployment environment in the Deployment environment name field.
- From the BPM Deployment Environment Type section, select Standard Process Center.
Features represent the runtime processing capabilities of the deployment environment.
- From the section...
- Select the deployment environment pattern
...select a pattern for the deployment environment and click Next to display the Select Nodes page.
The available patterns are:
- Single Cluster: The application deployment target includes the messaging infrastructure and supporting applications.
- Application, Remote Messaging, Remote Support: A separate cluster each for application deployment, remote messaging, and remote support.
- On the Select Nodes page, select the nodes to include in this deployment environment, then click Next to display the Define Clusters page.
Select nodes that have the required capabilities for the environment you selected on the BPM Deployment Environment Features section.
Select at least one node for the deployment environment. For high-availability and failover environments, select at least two nodes. For scalability, you can add more nodes.
- On the Define Clusters page, assign the required number of clusters for each node and click Next to display the Customize Cluster Name and Ports page.
By default one cluster member is assigned on each node for each function. You change the number by replacing the number in each column.
A 0 (zero) value for a node means the node does not contribute to the selected function, based on features that you have selected.
- On the Customize Cluster Name and Ports page, customize the cluster names or cluster member names for the cluster type.
You can specify the starting port for the cluster members. The system generates default values for cluster member names and the starting port.
Ensure the starting port numbers you specify are at least 20 ports apart. Port numbers are reserved and assigned to each node for the cluster members using the port number specified. If you specify an initial port when you create the deployment environment, that same initial port specified would be assigned to the cluster member. For example, if the port number for the first cluster member is 2000, it would use the port numbers 2000, 2001, 2002, and so on. The port number of the second cluster member would be 2020 and the port numbers would be 2020, 2021, 2022, and so on. The port number of the third cluster member would be 2040.
If there is already a node on that physical system then there may be port conflicts and these must be resolved manually by changing the port values.
If you use additional servers with unique ports, WebSphere Application Server does not automatically configure the virtual host for the server. Specifically, WAS does not automatically add the host alias ports to a virtual host. However, you can use the administrative console to add a new host alias for each of the ports that are used by the new server.
- Required: On the Configure Databases page, select DB2
On ZOS, configure the database parameters for data sources of the deployment environment, click Test connection, and after the connection succeeds click Next to go to the Summary page.
On this page, define the database information for the components that are included in this deployment environment. Where possible, the wizard supplies default information for the parameters, but change those values to match the values that you defined when you planned the environment.
The database specified in this panel must already exist. Deployment environment configuration never creates a database.
- Shared parameters
- User name: User name to connect to the database.
- Password: Password for the user name.
- Confirm password: Confirm the password for the user name.
- Server: Server name where the database subsystem is located.
- Port: Port number to connect to the database subsystem.
- Database connection location: Type the database connection location name.
- Storage group: Type the storage group name.
- Volume Catalog: Type the volume catalog name.
- Buffer pool of 4k size: name for the buffer pool with size 4k.
- Index buffer pool : Type the index buffer pool name.
- LOB buffer pool : Type the LOB buffer pool name.
- Buffer pool of 8k size: name for the buffer pool with size 8k.
- Buffer pool of 16k size: name for the buffer pool with size 16k.
- Buffer pool of 32k size: name for the buffer pool with size 32k.
- Common database
- Name: name for the common database which is used for CommonDB components, Business Space, Business Process Choreographer, and Messaging.
- Schema name: Type the schema name for the common database.
- Process database
- Name: name for the Process Center database.
- Schema name: Type the schema name for the Process database.
- Performance Data Warehouse database
- Name: name for the Performance Data Warehouse database.
- Schema name: Type the schema name for the Performance Data Warehouse database.
- Select the databases to separate from the Common database.
- Messaging: Select this option to create a separate messaging engine database.
- Name: name for the messaging engine database.
- Schema name: Type the schema name for the messaging engine database.
- Messaging: Select this option to create a separate messaging engine database.
The default schema names that are displayed on this page might conflict with your site naming convention or might conflict with existing schemas. As such, it is likely that change the schema name. Pay close attention to the values specified to avoid potential naming conflicts.
For a production environment, you should set the same values for User name and Schema name and you should clear Create Tables. For a production environment, create the required schemas manually and use the SQL files generated to create the tables. When you create a 3-cluster Process Server using the Deployment Environment wizard the process will take a lot of time to complete. Perform one of the following steps to create the 3-cluster Process Server:
- Increase the transaction timeout value using the Deployment Manager and re-create the deployment environment.
- Do not create tables during the Deployment Environment creation. After creating the environment create the databases, tables, and then run the bootstrap command.
You can edit all key parameters, such as the database name, whether or not to create tables, the data source runtime user name, and the password for the deployment environment. You can select which database to use for the given component.
Steps that cannot be completed through the Deployment Environment wizard, and which need to be completed manually, are listed on the Deferred Configuration page. You can view this page after you have created the deployment environment. To view this administrative console page, click...
- Servers | Deployment Environments | Deployment environment name | Deployment Environment Configuration | Additional Properties | Deferred Configuration
- Shared parameters
- Verify the information on the Summary page is correct and perform the following substeps:
- To exit without generating the configuration, click Cancel.
- To save the environment configuration to configure a similar Deployment Environment, click Export for Scripting.
- If you are satisfied with the deployment environment configuration, click Generate Deployment Environment to save and complete the configuration of the deployment environment. This will also generate a properties file in the BPM_Install_Root/logs/config folder on the deployment manager machine with a timestamp in the file name, bpmconfig-de_name-timestamp.properties. Save this file for future reference or for troubleshooting any issues.
- Load the database with system information by running bootstrapProcessServerData.
This command must be run before starting any cluster members.
When the configuration completes, you can examine the configuration files to view the changes.
Either save the changes to the master configuration or discard them.
If you use additional servers with unique ports, WAS does not automatically configure the virtual host for the server. Specifically, WAS does not automatically add the host alias ports to a virtual host. However, you can use the administrative console to add a new host alias for each of the ports that are used by the new server. To add a host alias, in the administrative console navigate to...
- Environment | Virtual hosts | default_host | Host Aliases | New
Clean all applicable profile logs or save them in another directory. You may want to clean or move the logs as they will be appended with the last configuration. This can make it difficult to view the most current information.
Related concepts:
Related tasks:IBM Business Process Manager configuration capabilities
Create the Advanced Process Server deployment environment
Create a Process Server deployment environment to run processes, services and modules deployed from the Process Center. Or, deploy modules either from the command line or from the WebSphere administrative console. You can create more than one deployment environments in the same cell using the Deployment Environment wizard.
Ensure that you have completed the following tasks:
- Installed the product
- Created the deployment manager profile and the associated nodes
- Ensure the database specified in the Database Configuration panel of the Deployment Environment wizard is already created. The deployment environment configuration never creates a database.
- Start all the local and remote nodes that to add in the deployment environment.
- When you create a 3-cluster deployment environment using the Deployment Environment wizard, the process might take a lot of time to complete. In that case, you can perform one of the following steps to create the 3-cluster environment:
- Increase the transaction timeout value using the Deployment Manager and re-create the deployment environment. See Preventing timeout and out-of-memory exceptions during installation or deployment.
- Do not create tables during the Deployment Environment creation. After creating the environment, create the databases, tables, and then run the bootstrap command.
- If you are using the Deployment Environment wizard, you can enable deployment manager trace for details about the deployment creation.
To enable trace for a single run and till the deployment manager restarts, log on to the administrative console, go to...
- Troubleshooting | Logs and trace | deployment_manager_name com.ibm.bpm.config.*=all to the Change log detail levels text area, and save the changes.
You must have Process Server installed to install a Process Server-based deployment environment. If you have a Process Center installed, start the IBM Installation Manager and modify the installation to use the Business Process Manager Advanced Process Server Production or Business Process Manager Advanced Process Server Non-Production feature.
When security and role-based authorization are enabled, you must log in to the administrative console as a Cell administrator to create a deployment environment. This task describes the procedure for creating a deployment environment that is based on a specific pattern and uses the Deployment Environment wizard.
A snapshot that requires BPM Advanced Edition capability cannot be installed on more than one deployment environment in the same cell.
To create the deployment environment.
- From the administrative console, navigate to the Deployment Environments page by clicking...
- Servers | Deployment Environments
- Launch the Deployment Environment wizard by clicking New on the Deployment Environments page.
The Create new deployment environment page is displayed.
The database provides isolation of internal groups, such as administrators. If the database is shared by two deployment environments, one administrators group is shared between them. When such a situation occurs, both administrators are able to login as administrator for each of the deployment environment.
- Enter a unique name for the deployment environment in the Deployment environment name field.
- Enter a user name for the deployment environment administrator in the Deployment environment administrator user name field.
IBM recommends to use a different administrator for each deployment environment and also the cell administrator.
- Enter a password for the deployment environment administrator in the Password field.
- Reconfirm the password in the Confirm password field.
- Enter a unique name for the deployment environment in the Deployment environment name field.
- From the BPM Deployment Environment Type section, select Advanced Process Server.
Features represent the runtime processing capabilities of the deployment environment.
- From the section...
- Select the deployment environment pattern
...select a pattern for the deployment environment and click Next to display the Select Nodes page.
The available patterns are:
- Single Cluster: The application deployment target includes the messaging infrastructure and supporting applications.
- Application, Remote Messaging, Remote Support: A separate cluster each for application deployment, remote messaging, and remote support.
- On the Select Nodes page, select the nodes to include in this deployment environment, then click Next to display the Define Clusters page.
Select nodes that have the required capabilities for the environment you selected on the BPM Deployment Environment Features section.
Select at least one node for the deployment environment. For high-availability and failover environments, select at least two nodes. For scalability, you can add more nodes.
- On the Define Clusters page, assign the required number of clusters for each node and click Next to display the Customize Cluster Name and Ports page.
By default one cluster member is assigned on each node for each function. You change the number by replacing the number in each column.
A 0 (zero) value for a node means the node does not contribute to the selected function, based on features that you have selected.
- On the Customize Cluster Name and Ports page, customize the cluster names or cluster member names for the cluster type.
You can specify the starting port for the cluster members. The system generates default values for cluster member names and the starting port.
Ensure the starting port numbers you specify are at least 20 ports apart. Port numbers are reserved and assigned to each node for the cluster members using the port number specified. If you specify an initial port when you create the deployment environment, that same initial port specified would be assigned to the cluster member. For example, if the port number for the first cluster member is 2000, it would use the port numbers 2000, 2001, 2002, and so on. The port number of the second cluster member would be 2020 and the port numbers would be 2020, 2021, 2022, and so on. The port number of the third cluster member would be 2040.
If there is already a node on that physical system then there may be port conflicts and these must be resolved manually by changing the port values.
If you use additional servers with unique ports, WebSphere Application Server does not automatically configure the virtual host for the server. Specifically, WAS does not automatically add the host alias ports to a virtual host. However, you can use the administrative console to add a new host alias for each of the ports that are used by the new server.
- Required: On the Configure Databases page, select DB2 On ZOS, configure the database parameters for data sources of the deployment environment, click Test connection, and after the connection succeeds click Next to go to the Summary page.
On this page, define the database information for the components that are included in this deployment environment. Where possible, the wizard supplies default information for the parameters, but change those values to match the values that you defined when you planned the environment.
The databases specified in this panel need to be created by the DB2 z/OS System Administrator.
- Shared parameters
- User name: User name to connect to the database.
- Password: Password for the user name.
- Confirm password: Confirm the password for the user name.
- Server: Server name where the database subsystem is located.
- Port: Port number to connect to the database subsystem.
- Database connection location: Type the database connection location name.
- Storage group: Type the storage group name.
- Volume Catalog: Type the volume catalog name.
- Buffer pool of 4k size: name for the buffer pool with size 4k.
- Index buffer pool : Type the index buffer pool name.
- LOB buffer pool : Type the LOB buffer pool name.
- Buffer pool of 8k size: name for the buffer pool with size 8k.
- Buffer pool of 16k size: name for the buffer pool with size 16k.
- Buffer pool of 32k size: name for the buffer pool with size 32k.
- cellDB
The cellDB option is only visible when you create the first advanced deployment environment. After this, every advanced deployment environment that you shares the cellDB of the first environment.
- Name: name for the cell database.
- Schema name: Type the schema name for the cell database.
- Common database
- Name: name for the common database which is used for CommonDB components, Business Space, Business Process Choreographer, and Messaging.
- Schema name: Type the schema name for the common database.
- Process database
- Name: name for the Process Center database.
- Schema name: Type the schema name for the Process database.
- Performance Data Warehouse database
- Name: name for the Performance Data Warehouse database.
- Schema name: Type the schema name for the Performance Data Warehouse database.
- Select the databases to separate from the Common database.
- Messaging: Select this option to create a separate messaging engine database.
- Name: name for the messaging engine database.
- Schema name: Type the schema name for the messaging engine database.
- Business Process Choreographer: Select this option to create a separate Business Process Choreographer database.
- Name: name for the Business Process Choreographer database.
- Schema name: Type the schema name for the Business Process Choreographer database.
- Messaging: Select this option to create a separate messaging engine database.
The default schema names that are displayed on this page might conflict with your site naming convention or might conflict with existing schemas. As such, it is likely that change the schema name. Pay close attention to the values specified to avoid potential naming conflicts.
You can edit all key parameters, such as the database name, whether or not to create tables, the data source runtime user name, and the password for the deployment environment. You can select which database to use for the given component.
Steps that cannot be completed through the Deployment Environment wizard, and which need to be completed manually, are listed on the Deferred Configuration page. You can view this page after you have created the deployment environment. To view this administrative console page, click...
- Servers | Deployment Environments | Deployment environment name | Deployment Environment Configuration | Additional Properties | Deferred Configuration
- Shared parameters
- Verify the information on the Summary page is correct and perform the following substeps:
- To exit without generating the configuration, click Cancel.
- To save the environment configuration to configure a similar Deployment Environment, click Export for Scripting.
- If you are satisfied with the deployment environment configuration, click Generate Deployment Environment to save and complete the configuration of the deployment environment. This will also generate a properties file in the BPM_Install_Root/logs/config folder on the deployment manager machine with a timestamp in the file name, bpmconfig-de_name-timestamp.properties. Save this file for future reference or for troubleshooting any issues.
- Load the database with system information by running bootstrapProcessServerData.
This command must be run before starting any cluster members.
When the configuration completes, you can examine the configuration files to view the changes.
Either save the changes to the master configuration or discard them.
If you use additional servers with unique ports, WAS does not automatically configure the virtual host for the server. Specifically, WAS does not automatically add the host alias ports to a virtual host. However, you can use the administrative console to add a new host alias for each of the ports that are used by the new server. To add a host alias, in the administrative console navigate to...
- Environment | Virtual hosts | default_host | Host Aliases | New
Clean all applicable profile logs or save them in another directory. You may want to clean or move the logs as they will be appended with the last configuration. This can make it difficult to view the most current information.
After you have configured a network deployment environment for BPM Advanced, if you test the connection to the cell-level jdbc/WPSDB data source ( in the administrative console, on the page Resources > JDBC > Data sources), you get a message saying the test connection operation failed with the exception com.ibm.wsspi.runtime.variable.UndefinedVariableException: Undefined Variable variable_name, where variable_name is a variable name such as WAS_INSTALL_ROOT, DB2_JCC_DRIVER_PATH, UNIVERSAL_JDBC_DRIVER_PATH or PUREQUERY_PATH. This does not necessarily indicate there will be a problem accessing the data source at run time. Ensure the location of your JDBC driver files is accessible to every client that must use the data source, and configure the variable with the full path of that location. Disregard the test connection error unless you are also experiencing trouble connecting to the data store at run time. For additional information, see the WebSphere Application Server documentation about the test connection service.
Related concepts:
Related tasks:IBM Business Process Manager configuration capabilities
Create the Standard Process Server deployment environment
Create a Process Server deployment environment to run processes and deployed from the Process Center. You can create more than one deployment environments in the same cell using the Deployment Environment wizard.
Ensure that you have completed the following tasks:
- Installed the product
- Created the deployment manager profile and the associated nodes
- Ensure the database specified in the Database Configuration panel of the Deployment Environment wizard is already created. The deployment environment configuration never creates a database.
- Start all the local and remote nodes that to add in the deployment environment.
- When you create a 3-cluster deployment environment using the Deployment Environment wizard, the process might take a lot of time to complete. In that case, you can perform one of the following steps to create the 3-cluster environment:
- Increase the transaction timeout value using the Deployment Manager and re-create the deployment environment. See Preventing timeout and out-of-memory exceptions during installation or deployment.
- Do not create tables during the Deployment Environment creation. After creating the environment, create the databases, tables, and then run the bootstrap command.
- If you are using the Deployment Environment wizard, you can enable deployment manager trace for details about the deployment creation.
To enable trace for a single run and till the deployment manager restarts, log on to the administrative console, go to...
- Troubleshooting | Logs and trace | deployment_manager_name com.ibm.bpm.config.*=all to the Change log detail levels text area, and save the changes.
You must have Process Server installed to install a Process Server-based deployment environment. If you have a Process Center installed, start the IBM Installation Manager and modify the installation to use the Business Process Manager Advanced Process Server Production or Business Process Manager Advanced Process Server Non-Production feature.
When security and role-based authorization are enabled, you must log in to the administrative console as a Cell administrator to create a deployment environment. This task describes the procedure for creating a deployment environment that is based on a specific pattern and uses the Deployment Environment wizard.
A snapshot that requires BPM Advanced Edition capability cannot be installed on more than one deployment environment in the same cell.
To create the deployment environment.
- From the administrative console, navigate to the Deployment Environments page by clicking...
- Servers | Deployment Environments
- Launch the Deployment Environment wizard by clicking New on the Deployment Environments page.
The Create new deployment environment page is displayed.
The database provides isolation of internal groups, such as administrators. If the database is shared by two deployment environments, one administrators group is shared between them. When such a situation occurs, both administrators are able to login as administrator for each of the deployment environment.
- Enter a unique name for the deployment environment in the Deployment environment name field.
- Enter a user name for the deployment environment administrator in the Deployment environment administrator user name field.
IBM recommends to use a different administrator for each deployment environment and also the cell administrator.
- Enter a password for the deployment environment administrator in the Password field.
- Reconfirm the password in the Confirm password field.
- Enter a unique name for the deployment environment in the Deployment environment name field.
- From the BPM Deployment Environment Type section, select Standard Process Server.
Features represent the runtime processing capabilities of the deployment environment.
- From the section...
- Select the deployment environment pattern
...select a pattern for the deployment environment and click Next to display the Select Nodes page.
The available patterns are:
- Single Cluster: The application deployment target includes the messaging infrastructure and supporting applications.
- Application, Remote Messaging, Remote Support: A separate cluster each for application deployment, remote messaging, and remote support.
- On the Select Nodes page, select the nodes to include in this deployment environment, then click Next to display the Define Clusters page.
Select nodes that have the required capabilities for the environment you selected on the BPM Deployment Environment Features section.
Select at least one node for the deployment environment. For high-availability and failover environments, select at least two nodes. For scalability, you can add more nodes.
- On the Define Clusters page, assign the required number of clusters for each node and click Next to display the Customize Cluster Name and Ports page.
By default one cluster member is assigned on each node for each function. You change the number by replacing the number in each column.
A 0 (zero) value for a node means the node does not contribute to the selected function, based on features that you have selected.
- On the Customize Cluster Name and Ports page, customize the cluster names or cluster member names for the cluster type.
You can specify the starting port for the cluster members. The system generates default values for cluster member names and the starting port.
Ensure the starting port numbers you specify are at least 20 ports apart. Port numbers are reserved and assigned to each node for the cluster members using the port number specified. If you specify an initial port when you create the deployment environment, that same initial port specified would be assigned to the cluster member. For example, if the port number for the first cluster member is 2000, it would use the port numbers 2000, 2001, 2002, and so on. The port number of the second cluster member would be 2020 and the port numbers would be 2020, 2021, 2022, and so on. The port number of the third cluster member would be 2040.
If there is already a node on that physical system then there may be port conflicts and these must be resolved manually by changing the port values.
If you use additional servers with unique ports, WebSphere Application Server does not automatically configure the virtual host for the server. Specifically, WAS does not automatically add the host alias ports to a virtual host. However, you can use the administrative console to add a new host alias for each of the ports that are used by the new server.
- On the Configure Process Server page, set the values for the Process Center configuration and click Next.
- Environment name
Enter an environment name of the Process Server.
An environment name is the name by which this server or cluster will be known to a Process Center user.
- Environment type
From the pull-down list, select the environment type for the Process Server you are configuring.
The environment type refers to how the Process Server is used. For example, in what capacity will the Process Server be used - development, test, staging, or production. Load testing might be done on a test server, while a staging environment type might be used as a temporary location to host changes before putting those changes into production. You might specify a staging environment type if the Process Server you are configuring will be accessed and used to review content and new functionality.
There are four types of environments available for selection:
- Development
- The server will serve in a development capacity.
- Test
- The server will be used as a testing environment.
- Stage
- The server server will serve as a staging platform to be used as a preproduction server.
- Production
- The server will serve in a production capacity.
- Use server offline
Indicate whether the server you are configuring is an offline server.
An offline server is a Process Server that is not connected to the Process Center.
Offline servers can still be used when deploying snapshots of process applications. However the method for deploying process applications to an offline process server differs from the method for deploying process applications to an online process server.
- Protocol
Select either http:// or https:// as the connection protocol to the Process Center.
- Host name or virtual host in a load-balanced environment
Type the host or virtual host that this Process Server needs to communicate with Process Center.
Ensure specified the host name instead of localhost for the server name when you configure the Process Server. This is required when you are using the Process Designer remotely.
- Port
Port number of the Process Center.
- User name
Type a valid user name that exists on the Process Center. Process Server will connect to Process Center as this user.
- Password
Password for the user.
- Confirm password
Confirm the password for the user.
- Test Connection
Click to test the Process Center connection.
- Environment name
- Required: On the Configure Databases page, select DB2
On ZOS, configure the database parameters for data sources of the deployment environment, click Test connection, and after the connection succeeds click Next to go to the Summary page.
On this page, define the database information for the components that are included in this deployment environment. Where possible, the wizard supplies default information for the parameters, but change those values to match the values that you defined when you planned the environment.
The database specified in this panel must already exist. Deployment environment configuration never creates a database.
- Shared parameters
- User name: User name to connect to the database.
- Password: Password for the user name.
- Confirm password: Confirm the password for the user name.
- Server: Server name where the database subsystem is located.
- Port: Port number to connect to the database subsystem.
- Database connection location: Type the database connection location name.
- Storage group: Type the storage group name.
- Volume Catalog: Type the volume catalog name.
- Buffer pool of 4k size: name for the buffer pool with size 4k.
- Index buffer pool : Type the index buffer pool name.
- LOB buffer pool : Type the LOB buffer pool name.
- Buffer pool of 8k size: name for the buffer pool with size 8k.
- Buffer pool of 16k size: name for the buffer pool with size 16k.
- Buffer pool of 32k size: name for the buffer pool with size 32k.
- Common database
- Name: name for the common database which is used for CommonDB components, Business Space, Business Process Choreographer, and Messaging.
- Schema name: Type the schema name for the common database.
- Process database
- Name: name for the Process Center database.
- Schema name: Type the schema name for the Process database.
- Performance Data Warehouse database
- Name: name for the Performance Data Warehouse database.
- Schema name: Type the schema name for the Performance Data Warehouse database.
- Select the databases to separate from the Common database.
- Messaging: Select this option to create a separate messaging engine database.
- Name: name for the messaging engine database.
- Schema name: Type the schema name for the messaging engine database.
- Messaging: Select this option to create a separate messaging engine database.
The default schema names that are displayed on this page might conflict with your site naming convention or might conflict with existing schemas. As such, it is likely that change the schema name. Pay close attention to the values specified to avoid potential naming conflicts.
For a production environment, you should set the same values for User name and Schema name and you should clear Create Tables. For a production environment, create the required schemas manually and use the SQL files generated to create the tables. When you create a 3-cluster Process Server using the Deployment Environment wizard the process will take a lot of time to complete. Perform one of the following steps to create the 3-cluster Process Server:
- Increase the transaction timeout value using the Deployment Manager and re-create the deployment environment.
- Do not create tables during the Deployment Environment creation. After creating the environment create the databases, tables, and then run the bootstrap command.
You can edit all key parameters, such as the database name, whether or not to create tables, the data source runtime user name, and the password for the deployment environment. You can select which database to use for the given component.
Steps that cannot be completed through the Deployment Environment wizard, and which need to be completed manually, are listed on the Deferred Configuration page. You can view this page after you have created the deployment environment. To view this administrative console page, click...
- Servers | Deployment Environments | Deployment environment name | Deployment Environment Configuration | Additional Properties | Deferred Configuration
- Shared parameters
- Verify the information on the Summary page is correct and perform the following substeps:
- To exit without generating the configuration, click Cancel.
- To save the environment configuration to configure a similar Deployment Environment, click Export for Scripting.
- If you are satisfied with the deployment environment configuration, click Generate Deployment Environment to save and complete the configuration of the deployment environment. This will also generate a properties file in the BPM_Install_Root/logs/config folder on the deployment manager machine with a timestamp in the file name, bpmconfig-de_name-timestamp.properties. Save this file for future reference or for troubleshooting any issues.
- Load the database with system information by running bootstrapProcessServerData.
This command must be run before starting any cluster members.
When the configuration completes, you can examine the configuration files to view the changes.
Either save the changes to the master configuration or discard them.
If you use additional servers with unique ports, WAS does not automatically configure the virtual host for the server. Specifically, WAS does not automatically add the host alias ports to a virtual host. However, you can use the administrative console to add a new host alias for each of the ports that are used by the new server. To add a host alias, in the administrative console navigate to...
- Environment | Virtual hosts | default_host | Host Aliases | New
Clean all applicable profile logs or save them in another directory. You may want to clean or move the logs as they will be appended with the last configuration. This can make it difficult to view the most current information.
Related concepts:
Related tasks:IBM Business Process Manager configuration capabilities
Create the Advanced-only Process Server deployment environment
Create an Advanced-only Process Server deployment environment if you only want function that is equivalent to WebSphere Process Server or WebSphere Enterprise Service Bus. You can run SCA modules that are created in Integration Designer. You can deploy the modules either from the command line or from the WebSphere administrative console.
Ensure that you have completed the following tasks:
- Installed the product
- Created the deployment manager profile and the associated nodes
- Ensure the database specified in the Database Configuration panel of the Deployment Environment wizard is already created. The deployment environment configuration never creates a database.
- Start all the local and remote nodes that to add in the deployment environment.
- When you create a 3-cluster deployment environment using the Deployment Environment wizard, the process might take a lot of time to complete. In that case, you can perform one of the following steps to create the 3-cluster environment:
- Increase the transaction timeout value using the Deployment Manager and re-create the deployment environment. See Preventing timeout and out-of-memory exceptions during installation or deployment.
- Do not create tables during the Deployment Environment creation. After creating the environment, create the database, and tables.
- If you are using the Deployment Environment wizard, you can enable deployment manager trace for details about the deployment creation.
To enable trace for a single run and till the deployment manager restarts, log on to the administrative console, go to...
- Troubleshooting | Logs and trace | deployment_manager_name com.ibm.bpm.config.*=all to the Change log detail levels text area, and save the changes.
When security and role-based authorization are enabled, you must log in to the administrative console as a Cell administrator to create a deployment environment. This task describes the procedure for creating a deployment environment that is based on a specific pattern and uses the Deployment Environment wizard.
A snapshot that requires BPM Advanced Edition capability cannot be installed on more than one deployment environment in the same cell.
To create the deployment environment.
- From the administrative console, navigate to the Deployment Environments page by clicking...
- Servers | Deployment Environments
- Launch the Deployment Environment wizard by clicking New on the Deployment Environments page.
The Create new deployment environment page is displayed.
The database provides isolation of internal groups, such as administrators. If the database is shared by two deployment environments, one administrators group is shared between them. When such a situation occurs, both administrators are able to login as administrator for each of the deployment environment.
- Enter a unique name for the deployment environment in the Deployment environment name field.
- Enter a user name for the deployment environment administrator in the Deployment environment administrator user name field.
IBM recommends to use a different administrator for each deployment environment and also the cell administrator.
- Enter a password for the deployment environment administrator in the Password field.
- Reconfirm the password in the Confirm password field.
- Enter a unique name for the deployment environment in the Deployment environment name field.
- From the BPM Deployment Environment Type section, select Advanced-only Process Server.
Features represent the runtime processing capabilities of the deployment environment.
- From the section...
- Select the deployment environment pattern
...select a pattern for the deployment environment and click Next to display the Select Nodes page.
The available patterns are:
- Single Cluster: The application deployment target includes the messaging infrastructure and supporting applications.
- Application, Remote Messaging, Remote Support: A separate cluster each for application deployment, remote messaging, and remote support.
- On the Select Nodes page, select the nodes to include in this deployment environment, then click Next to display the Define Clusters page.
Select nodes that have the required capabilities for the environment you selected on the BPM Deployment Environment Features section.
Select at least one node for the deployment environment. For high-availability and failover environments, select at least two nodes. For scalability, you can add more nodes.
- On the Define Clusters page, assign the required number of clusters for each node and click Next to display the Customize Cluster Name and Ports page.
By default one cluster member is assigned on each node for each function. You change the number by replacing the number in each column.
A 0 (zero) value for a node means the node does not contribute to the selected function, based on features that you have selected.
- On the Customize Cluster Name and Ports page, customize the cluster names or cluster member names for the cluster type.
You can specify the starting port for the cluster members. The system generates default values for cluster member names and the starting port.
Ensure the starting port numbers you specify are at least 20 ports apart. Port numbers are reserved and assigned to each node for the cluster members using the port number specified. If you specify an initial port when you create the deployment environment, that same initial port specified would be assigned to the cluster member. For example, if the port number for the first cluster member is 2000, it would use the port numbers 2000, 2001, 2002, and so on. The port number of the second cluster member would be 2020 and the port numbers would be 2020, 2021, 2022, and so on. The port number of the third cluster member would be 2040.
If there is already a node on that physical system then there may be port conflicts and these must be resolved manually by changing the port values.
If you use additional servers with unique ports, WAS does not automatically configure the virtual host for the server. Specifically, WAS does not automatically add the host alias ports to a virtual host. However, you can use the administrative console to add a new host alias for each of the ports that are used by the new server.
- Required: On the Configure Databases page, select DB2
On ZOS, configure the database parameters for data sources of the deployment environment, click Test connection, and after the connection succeeds click Next to go to the Summary page.
On this page, define the database information for the components that are included in this deployment environment. Where possible, the wizard supplies default information for the parameters, but change those values to match the values that you defined when you planned the environment.
The databases specified in this panel need to be created by the DB2 z/OS System Administrator.
- Shared parameters
- User name: User name to connect to the database.
- Password: Password for the user name.
- Confirm password: Confirm the password for the user name.
- Server: Server name where the database subsystem is located.
- Port: Port number to connect to the database subsystem.
- Database connection location: Type the database connection location name.
- Storage group: Type the storage group name.
- Volume Catalog: Type the volume catalog name.
- Buffer pool of 4k size: name for the buffer pool with size 4k.
- Index buffer pool : Type the index buffer pool name.
- LOB buffer pool : Type the LOB buffer pool name.
- Buffer pool of 8k size: name for the buffer pool with size 8k.
- Buffer pool of 16k size: name for the buffer pool with size 16k.
- Buffer pool of 32k size: name for the buffer pool with size 32k.
- cellDB
The cellDB option is only visible when you create the first advanced deployment environment. After this, every advanced deployment environment that you shares the cellDB of the first environment.
- Name: name for the cell database.
- Schema name: Type the schema name for the cell database.
- Common database
- Name: name for the common database which is used for CommonDB components, Business Space, Business Process Choreographer, and Messaging.
- Schema name: Type the schema name for the common database.
- Select the databases to separate from the Common database.
- Messaging: Select this option to create a separate messaging engine database.
- Name: name for the messaging engine database.
- Schema name: Type the schema name for the messaging engine database.
- Business Process Choreographer: Select this option to create a separate Business Process Choreographer database.
- Name: name for the Business Process Choreographer database.
- Schema name: Type the schema name for the Business Process Choreographer database.
- Messaging: Select this option to create a separate messaging engine database.
The default schema names that are displayed on this page might conflict with your site naming convention or might conflict with existing schemas. As such, it is likely that change the schema name. Pay close attention to the values specified to avoid potential naming conflicts.
You can edit all key parameters, such as the database name, whether or not to create tables, the data source runtime user name, and the password for the deployment environment. You can select which database to use for the given component.
Steps that cannot be completed through the Deployment Environment wizard, and which need to be completed manually, are listed on the Deferred Configuration page. You can view this page after you have created the deployment environment. To view this administrative console page, click...
- Servers | Deployment Environments | Deployment environment name | Deployment Environment Configuration | Additional Properties | Deferred Configuration
- Shared parameters
- Verify the information on the Summary page is correct and perform the following substeps:
- To exit without generating the configuration, click Cancel.
- To save the environment configuration to configure a similar Deployment Environment, click Export for Scripting.
- If you are satisfied with the deployment environment configuration, click Generate Deployment Environment to save and complete the configuration of the deployment environment. This will also generate a properties file in the BPM_Install_Root/logs/config folder on the deployment manager machine with a timestamp in the file name, bpmconfig-de_name-timestamp.properties. Save this file for future reference or for troubleshooting any issues.
When the configuration completes, you can examine the configuration files to view the changes.
Either save the changes to the master configuration or discard them.
If you use additional servers with unique ports, WAS does not automatically configure the virtual host for the server. Specifically, WAS does not automatically add the host alias ports to a virtual host. However, you can use the administrative console to add a new host alias for each of the ports that are used by the new server. To add a host alias, in the administrative console navigate to...
- Environment | Virtual hosts | default_host | Host Aliases | New
Clean all applicable profile logs or save them in another directory. You may want to clean or move the logs as they will be appended with the last configuration. This can make it difficult to view the most current information.
After you have configured a network deployment environment for BPM Advanced, if you test the connection to the cell-level jdbc/WPSDB data source ( in the administrative console, on the page Resources > JDBC > Data sources), you get a message saying the test connection operation failed with the exception com.ibm.wsspi.runtime.variable.UndefinedVariableException: Undefined Variable variable_name, where variable_name is a variable name such as WAS_INSTALL_ROOT, DB2_JCC_DRIVER_PATH, UNIVERSAL_JDBC_DRIVER_PATH or PUREQUERY_PATH. This does not necessarily indicate there will be a problem accessing the data source at run time. Ensure the location of your JDBC driver files is accessible to every client that must use the data source, and configure the variable with the full path of that location. Disregard the test connection error unless you are also experiencing trouble connecting to the data store at run time. For additional information, see the WebSphere Application Server documentation about the test connection service.
Related concepts:
Related tasks:IBM Business Process Manager configuration capabilities
Extend the network deployment environment using BPMConfig
After creating a deployment environment using BPMConfig, you can run the command at a later time to extend the deployment environment, for example to create new profiles or to add additional nodes.
Before running BPMConfig:
- You must have installed the product on the computer where you want to extend the deployment environment.
- You must have created the deployment environment by running BPMConfig.
- The deployment manager must be running.
Run BPMConfig with the same properties file on all computers that will participate in the deployment environment. Run first on the computer that has the deployment manager profile, and then run it on each computer that has a managed node.
At any given time, only one profile creation can be performed on a computer and only one node federation can be performed against a particular deployment manager. For this reason, if you are creating multiple profiles at once on different computers, use the federateLater option, then run BPMConfig with the -create -de options sequentially on each computer to federate the managed nodes. Run BPMConfig with the -create -de option to add additional managed nodes and profiles to your existing environment. When it runs, BPMConfig:
- Creates any local profiles specified in the configuration properties file that do not already exist.
- Creates a new managed node for each new node specified in the configuration properties based on the specified values.
- Federates the node and adds the node to the deployment environment. If the -create -profile action was issued with the -federateLater option, the node is created but not federated.
- Runs the bootstrap utility to load the Process database with system information so there is no need to perform this step manually. If the bpm.de.deferSchemaCreation property in the configuration properties file is set to true and the database tables are created separately, then the bootstrap utility will need to be run manually.
To extend an existing deployment environment to include additional nodes or profiles:
- If you do not already have a customized configuration properties file based on the existing deployment environment to extend, locate the sample configuration file that most closely reflects the environment you are trying to extend. Sample configuration files are provided in the
- BPM_home/BPM/samples/config.
folder.
For each of the different product configurations, there is a different folder containing sample configuration files. For example, for BPM Standard Advanced, there is an Advanced folder containing a set of sample configuration properties files. Within each folder, there is a set of files that are specific to the different database types and configuration environments. The sample files are named according to the following format: de_type-environment_type-topology-database_type. For example, the sample configuration properties file for configuring a single cluster Process Center environment using DB2 with BPM Standard Advanced is called Advanced-PC-SingleCluster-DB2. Find the sample properties file that most closely represents your target deployment environment and make a copy of this file.
- Modify the properties file to add the additional nodes and profiles to extend the existing environment.
When adding managed nodes to an existing deployment environment, define each new node by duplicating the set of bpm.de.node properties that exist in the properties file and specifying the values that apply to the new managed node. For more information about the available properties, read the comments in the sample files, or see the BPMConfig command reference and the examples.
If you are using an Oracle database, you must include the database user name and password for all databases, including the optional ones.
- Run BPMConfig on the computer that has the deployment manager and on each computer that has a managed node, passing it the names of the properties file you created. For example:
- BPM_home/bin/BPMConfig -create -de my_environment.properties
If the new or updated node is on the same computer as the deployment manager node, then the updated or new node is automatically synchronized with the deployment manager node. Before you start the node, ensure that this synchronization has completed by checking the syncNode.log file found in the PROFILE_ROOT/logs directory. If the new or updated node is on a different computer than the deployment manager node, run the syncNode.bat or syncNode.sh command on the new or updated node and wait for the synchronization to complete before starting the node.
Extend a network deployment environment for an Oracle database server
Extend the network deployment environment to work with an Oracle database server.
- Use the Deployment Environment wizard
After performing the installation and creating the deployment manager, custom (managed node) profiles, and a deployment environment, you can extend a network deployment configuration based on the topology pattern templates packaged with the software. You can also extend the deployment by adding cluster members to a cell or adding multiple deployment environments.
- Extend the network deployment environment using BPMConfig
After creating a deployment environment using BPMConfig, you can run the command at a later time to extend the deployment environment, for example to create new profiles or to add additional nodes.
Use the Deployment Environment wizard
After performing the installation and creating the deployment manager, custom (managed node) profiles, and a deployment environment, you can extend a network deployment configuration based on the topology pattern templates packaged with the software. You can also extend the deployment by adding cluster members to a cell or adding multiple deployment environments.
- Add clusters:
The easiest way to expand your infrastructure is to add more cluster members to your existing clusters. You can add cluster members to each cluster independently or in combination, depending on where you see the need for growth. You can add an application cluster member, a messaging cluster member, or both. By expanding your clusters this way you can improve your application throughput, your message throughput, or both.
- Add deployment environments:
You can create two independent deployment environments for applications in the same cell. However, you can create only one Process Center-based deployment environment in a single cell.
To extend the deployment environment:
- Log on to the administrative console. Ensure the user has appropriate privileges to update the deployment environment.
- Click Servers > Deployment Environments > Deployment_Environment_Name.
- Use the various options in the administrative console to extend the deployment environment.
Create the Advanced Process Center deployment environment
Create a Process Center deployment environment to store, run and administer process applications and toolkits that are developed in Process Designer and Integration Designer. You can create more than one deployment environments in the same cell using the Deployment Environment wizard. However, you can create only one Process Center-based deployment environment in a single cell.
Ensure that you have completed the following tasks:
- Installed the product
- Created the deployment manager profile and the associated nodes
- Ensure the database specified in the Database Configuration panel of the Deployment Environment wizard is already created. The deployment environment configuration never creates a database.
- Start all the local and remote nodes that to add in the deployment environment.
- When you create a 3-cluster deployment environment using the Deployment Environment wizard, the process might take a lot of time to complete. In that case, you can perform one of the following steps to create the 3-cluster environment:
- Increase the transaction timeout value using the Deployment Manager and re-create the deployment environment. See Preventing timeout and out-of-memory exceptions during installation or deployment.
- Do not create tables during the Deployment Environment creation. After creating the environment, create the databases, tables, and then run the bootstrap command.
- If you are using the Deployment Environment wizard, you can enable deployment manager trace for details about the deployment creation.
To enable trace for a single run and till the deployment manager restarts, log on to the administrative console, go to...
- Troubleshooting | Logs and trace | deployment_manager_name com.ibm.bpm.config.*=all to the Change log detail levels text area, and save the changes.
You must have Process Center installed to install a Process Center-based deployment environment. If you have a Process Server installed, start the IBM Installation Manager and modify the installation to use the Business Process Manager Advanced Process Center feature.
When security and role-based authorization are enabled, you must log in to the administrative console as a Cell administrator to create a deployment environment. This task describes the procedure for creating a deployment environment that is based on a specific pattern and uses the Deployment Environment wizard.
A snapshot that requires BPM Advanced Edition capability cannot be installed on more than one deployment environment in the same cell.
Oracle database considerations:
- Verify the user name and schema name are exactly the same. The user specified should exist in the database before generating the environment.
- Process Server and IBM Performance Data Warehouse can use the same database instance, but should use different users.
To create the deployment environment.
- From the administrative console, navigate to the Deployment Environments page by clicking...
- Servers | Deployment Environments
- Launch the Deployment Environment wizard by clicking New on the Deployment Environments page.
The Create new deployment environment page is displayed.
The database provides isolation of internal groups, such as administrators. If the database is shared by two deployment environments, one administrators group is shared between them. When such a situation occurs, both administrators are able to login as administrator for each of the deployment environment.
- Enter a unique name for the deployment environment in the Deployment environment name field.
- Enter a user name for the deployment environment administrator in the Deployment environment administrator user name field.
IBM recommends to use a different administrator for each deployment environment and also the cell administrator.
- Enter a password for the deployment environment administrator in the Password field.
- Reconfirm the password in the Confirm password field.
- Enter a unique name for the deployment environment in the Deployment environment name field.
- From the BPM Deployment Environment Type section, select Advanced Process Center.
Features represent the runtime processing capabilities of the deployment environment.
- From the section...
- Select the deployment environment pattern
...select a pattern for the deployment environment and click Next to display the Select Nodes page.
The available patterns are:
- Single Cluster: The application deployment target includes the messaging infrastructure and supporting applications.
- Application, Remote Messaging, Remote Support: A separate cluster each for application deployment, remote messaging, and remote support.
- On the Select Nodes page, select the nodes to include in this deployment environment, then click Next to display the Define Clusters page.
Select nodes that have the required capabilities for the environment you selected on the BPM Deployment Environment Features section.
Select at least one node for the deployment environment. For high-availability and failover environments, select at least two nodes. For scalability, you can add more nodes.
- On the Define Clusters page, assign the required number of clusters for each node and click Next to display the Customize Cluster Name and Ports page.
By default one cluster member is assigned on each node for each function. You change the number by replacing the number in each column.
A 0 (zero) value for a node means the node does not contribute to the selected function, based on features that you have selected.
- On the Customize Cluster Name and Ports page, customize the cluster names or cluster member names for the cluster type.
You can specify the starting port for the cluster members. The system generates default values for cluster member names and the starting port.
Ensure the starting port numbers you specify are at least 20 ports apart. Port numbers are reserved and assigned to each node for the cluster members using the port number specified. If you specify an initial port when you create the deployment environment, that same initial port specified would be assigned to the cluster member. For example, if the port number for the first cluster member is 2000, it would use the port numbers 2000, 2001, 2002, and so on. The port number of the second cluster member would be 2020 and the port numbers would be 2020, 2021, 2022, and so on. The port number of the third cluster member would be 2040.
If there is already a node on that physical system then there may be port conflicts and these must be resolved manually by changing the port values.
If you use additional servers with unique ports, WebSphere Application Server does not automatically configure the virtual host for the server. Specifically, WAS does not automatically add the host alias ports to a virtual host. However, you can use the administrative console to add a new host alias for each of the ports that are used by the new server.
- Required: On the Configure Databases page, select Oracle, configure the database parameters for data sources of the deployment environment, click Test connection, and after the connection succeeds click Next to go to the Summary page.
On this page, define the database information for the components that are included in this deployment environment. Where possible, the wizard supplies default information for the parameters, but change those values to match the values that you defined when you planned the environment.
The database specified in this panel must already exist. Deployment environment configuration never creates a database.
- Shared parameters
- Server: Server name where the database is located.
- Port: Port number to connect to the database.
- Instance name: Type the instance name for the Oracle database.
- Create Tables: Create the required tables.
If this option is selected, ensure the user has sufficient rights to access the database, and create tables.
- cellDB
The cellDB option is only visible when you create the first advanced deployment environment. After this, every advanced deployment environment that you shares the cellDB of the first environment.
- User name: Type a user name for the cell database.
- Password: Password for the cell database user.
- Confirm password: Confirm the password for the cell database user.
- Common database
- User name: Type a user name for the common database which is used for CommonDB components, Business Space, Business Process Choreographer, and Messaging.
- Password: Password for the common database user.
- Confirm password: Confirm the password for the common database user.
- Process database
- User name: Type a user name for the Process Center database.
- Password: Password for the Process Center database user.
- Confirm password: Confirm the password for the Process database user.
- Performance Data Warehouse database
- User name: Type a user name for the Performance Data Warehouse database.
- Password: Password for the Performance Data Warehouse database user.
- Confirm password: Confirm the password for the Performance Data Warehouse database user.
- Select the databases to separate from the Common database.
- Messaging: Select this option to create a separate messaging engine database.
- User name: Type a user name for the messaging engine database.
- Password: Password for the messaging engine database user.
- Confirm password: Confirm the password for the messaging engine database user.
- Business Process Choreographer: Select this option to create a separate Business Process Choreographer database.
- User name: Type a user name for the Business Process Choreographer database.
- Password: Password for the Business Process Choreographer database user.
- Confirm password: Confirm the password for the Business Process Choreographer database user.
- Messaging: Select this option to create a separate messaging engine database.
The default schema names that are displayed on this page might conflict with your site naming convention or might conflict with existing schemas. As such, it is likely that change the schema name. Pay close attention to the values specified to avoid potential naming conflicts.
Also ensure that you have completed the following items:
- Verify the user name and the schema name are exactly the same. The user specified should exist in the database before generating the environment.
- Process Server and IBM Performance Data Warehouse can use the same database instance, but should use different users.
You can edit all key parameters, such as the database name, whether or not to create tables, the data source runtime user name, and the password for the deployment environment. You can select which database to use for the given component.
Steps that cannot be completed through the Deployment Environment wizard, and which need to be completed manually, are listed on the Deferred Configuration page. You can view this page after you have created the deployment environment. To view this administrative console page, click...
ul> Servers | Deployment Environments | Deployment environment name | Deployment Environment Configuration | Additional Properties | Deferred Configuration
- Shared parameters
- From the administrative console, navigate to the Deployment Environments page by clicking...
- Verify the information on the Summary page is correct and perform the following substeps:
- To exit without generating the configuration, click Cancel.
- To save the environment configuration to configure a similar Deployment Environment, click Export for Scripting.
- If you are satisfied with the deployment environment configuration, click Generate Deployment Environment to save and complete the configuration of the deployment environment. This will also generate a properties file in the BPM_Install_Root/logs/config folder on the deployment manager machine with a timestamp in the file name, bpmconfig-de_name-timestamp.properties. Save this file for future reference or for troubleshooting any issues.
- If you have postponed the Process Server database table creation by clearing the create table option on the Database page, create the tables and load the database with system information by running bootstrapProcessServerData.
This command must be run before starting any cluster members.
- Restart the following resources after you have completed your configurations in the order specified here. See Start and stop individual resources.
- Stop the deployment environment.
- Stop the node agent.
- Stop the deployment manager.
- Start the deployment manager.
- Start the node agent.
- Start the deployment environment.
For Advanced or Advanced-only deployment environments, the deployment manager and node agents need to be restarted for the cell scoped configuration to take affect. This is only required for the first deployment environment that you create.
When the configuration completes, you can examine the configuration files to view the changes.
Either save the changes to the master configuration or discard them.
If you use additional servers with unique ports, WAS does not automatically configure the virtual host for the server. Specifically, WAS does not automatically add the host alias ports to a virtual host. However, you can use the administrative console to add a new host alias for each of the ports that are used by the new server. To add a host alias, in the administrative console navigate to...
- Environment | Virtual hosts | default_host | Host Aliases | New
Clean all applicable profile logs or save them in another directory. You may want to clean or move the logs as they will be appended with the last configuration. This can make it difficult to view the most current information.
After you have configured a network deployment environment for BPM Advanced, if you test the connection to the cell-level jdbc/WPSDB data source ( in the administrative console, on the page Resources > JDBC > Data sources), you get a message saying the test connection operation failed with the exception com.ibm.wsspi.runtime.variable.UndefinedVariableException: Undefined Variable variable_name, where variable_name is a variable name such as WAS_INSTALL_ROOT, DB2_JCC_DRIVER_PATH, UNIVERSAL_JDBC_DRIVER_PATH or PUREQUERY_PATH. This does not necessarily indicate there will be a problem accessing the data source at run time. Ensure the location of your JDBC driver files is accessible to every client that must use the data source, and configure the variable with the full path of that location. Disregard the test connection error unless you are also experiencing trouble connecting to the data store at run time. For additional information, see the WebSphere Application Server documentation about the test connection service.
Related concepts:
Related tasks:IBM Business Process Manager configuration capabilities
Create the Standard Process Center deployment environment
Create a Process Center deployment environment to store, run and administer process applications and toolkits that are developed in Process Designer. You can create more than one deployment environments in the same cell using the Deployment Environment wizard. However, you can create only one Process Center-based deployment environment in a single cell.
Ensure that you have completed the following tasks:
- Installed the product
- Created the deployment manager profile and the associated nodes
- Ensure the database specified in the Database Configuration panel of the Deployment Environment wizard is already created. The deployment environment configuration never creates a database.
- Start all the local and remote nodes that to add in the deployment environment.
- When you create a 3-cluster deployment environment using the Deployment Environment wizard, the process might take a lot of time to complete. In that case, you can perform one of the following steps to create the 3-cluster environment:
- Increase the transaction timeout value using the Deployment Manager and re-create the deployment environment. See Preventing timeout and out-of-memory exceptions during installation or deployment.
- Do not create tables during the Deployment Environment creation. After creating the environment, create the databases, tables, and then run the bootstrap command.
- If you are using the Deployment Environment wizard, you can enable deployment manager trace for details about the deployment creation.
To enable trace for a single run and till the deployment manager restarts, log on to the administrative console, go to...
- Troubleshooting | Logs and trace | deployment_manager_name com.ibm.bpm.config.*=all to the Change log detail levels text area, and save the changes.
You must have Process Center installed to install a Process Center-based deployment environment. If you have a Process Server installed, start the IBM Installation Manager and modify the installation to use the Business Process Manager Advanced Process Center feature.
When security and role-based authorization are enabled, you must log in to the administrative console as a Cell administrator to create a deployment environment. This task describes the procedure for creating a deployment environment that is based on a specific pattern and uses the Deployment Environment wizard.
A snapshot that requires BPM Advanced Edition capability cannot be installed on more than one deployment environment in the same cell.
Oracle database considerations:
- Verify the user name and schema name are exactly the same. The user specified should exist in the database before generating the environment.
- Process Server and IBM Performance Data Warehouse can use the same database instance, but should use different users.
To create the deployment environment.
- From the administrative console, navigate to the Deployment Environments page by clicking...
- Servers | Deployment Environments
- Launch the Deployment Environment wizard by clicking New on the Deployment Environments page.
The Create new deployment environment page is displayed.
The database provides isolation of internal groups, such as administrators. If the database is shared by two deployment environments, one administrators group is shared between them. When such a situation occurs, both administrators are able to login as administrator for each of the deployment environment.
- Enter a unique name for the deployment environment in the Deployment environment name field.
- Enter a user name for the deployment environment administrator in the Deployment environment administrator user name field.
IBM recommends to use a different administrator for each deployment environment and also the cell administrator.
- Enter a password for the deployment environment administrator in the Password field.
- Reconfirm the password in the Confirm password field.
- Enter a unique name for the deployment environment in the Deployment environment name field.
- From the BPM Deployment Environment Type section, select Standard Process Center.
Features represent the runtime processing capabilities of the deployment environment.
- From the section...
- Select the deployment environment pattern
...select a pattern for the deployment environment and click Next to display the Select Nodes page.
The available patterns are:
- Single Cluster: The application deployment target includes the messaging infrastructure and supporting applications.
- Application, Remote Messaging, Remote Support: A separate cluster each for application deployment, remote messaging, and remote support.
- On the Select Nodes page, select the nodes to include in this deployment environment, then click Next to display the Define Clusters page.
Select nodes that have the required capabilities for the environment you selected on the BPM Deployment Environment Features section.
Select at least one node for the deployment environment. For high-availability and failover environments, select at least two nodes. For scalability, you can add more nodes.
- On the Define Clusters page, assign the required number of clusters for each node and click Next to display the Customize Cluster Name and Ports page.
By default one cluster member is assigned on each node for each function. You change the number by replacing the number in each column.
A 0 (zero) value for a node means the node does not contribute to the selected function, based on features that you have selected.
- On the Customize Cluster Name and Ports page, customize the cluster names or cluster member names for the cluster type.
You can specify the starting port for the cluster members. The system generates default values for cluster member names and the starting port.
Ensure the starting port numbers you specify are at least 20 ports apart. Port numbers are reserved and assigned to each node for the cluster members using the port number specified. If you specify an initial port when you create the deployment environment, that same initial port specified would be assigned to the cluster member. For example, if the port number for the first cluster member is 2000, it would use the port numbers 2000, 2001, 2002, and so on. The port number of the second cluster member would be 2020 and the port numbers would be 2020, 2021, 2022, and so on. The port number of the third cluster member would be 2040.
If there is already a node on that physical system then there may be port conflicts and these must be resolved manually by changing the port values.
If you use additional servers with unique ports, WebSphere Application Server does not automatically configure the virtual host for the server. Specifically, WAS does not automatically add the host alias ports to a virtual host. However, you can use the administrative console to add a new host alias for each of the ports that are used by the new server.
- Required: On the Configure Databases page, select Oracle, configure the database parameters for data sources of the deployment environment, click Test connection, and after the connection succeeds click Next to go to the Summary page.
On this page, define the database information for the components that are included in this deployment environment. Where possible, the wizard supplies default information for the parameters, but change those values to match the values that you defined when you planned the environment.
The database specified in this panel must already exist. Deployment environment configuration never creates a database.
- Shared parameters
- Server: Server name where the database is located.
- Port: Port number to connect to the database.
- Instance name: Type the instance name for the Oracle database.
- Create Tables: Create the required tables.
If this option is selected, ensure the user has sufficient rights to access the database, and create tables.
- Common database
- User name: Type a user name for the common database which is used for CommonDB components, Business Space, Business Process Choreographer, and Messaging.
- Password: Password for the common database user.
- Confirm password: Confirm the password for the common database user.
- Process database
- User name: Type a user name for the Process Center database.
- Password: Password for the Process Center database user.
- Confirm password: Confirm the password for the Process database user.
- Performance Data Warehouse database
- User name: Type a user name for the Performance Data Warehouse database.
- Password: Password for the Performance Data Warehouse database user.
- Confirm password: Confirm the password for the Performance Data Warehouse database user.
- Select the databases to separate from the Common database.
- Messaging: Select this option to create a separate messaging engine database.
- User name: Type a user name for the messaging engine database.
- Password: Password for the messaging engine database user.
- Confirm password: Confirm the password for the messaging engine database user.
- Messaging: Select this option to create a separate messaging engine database.
The default schema names that are displayed on this page might conflict with your site naming convention or might conflict with existing schemas. As such, it is likely that change the schema name. Pay close attention to the values specified to avoid potential naming conflicts.
Also ensure that you have completed the following items:
- Verify the user name and the schema name are exactly the same. The user specified should exist in the database before generating the environment.
- Process Server and IBM Performance Data Warehouse can use the same database instance, but should use different users.
You can edit all key parameters, such as the database name, whether or not to create tables, the data source runtime user name, and the password for the deployment environment. You can select which database to use for the given component.
Steps that cannot be completed through the Deployment Environment wizard, and which need to be completed manually, are listed on the Deferred Configuration page. You can view this page after you have created the deployment environment. To view this administrative console page, click...
ul> Servers | Deployment Environments | Deployment environment name | Deployment Environment Configuration | Additional Properties | Deferred Configuration
- Shared parameters
- Verify the information on the Summary page is correct and perform the following substeps:
- To exit without generating the configuration, click Cancel.
- To save the environment configuration to configure a similar Deployment Environment, click Export for Scripting.
- If you are satisfied with the deployment environment configuration, click Generate Deployment Environment to save and complete the configuration of the deployment environment. This will also generate a properties file in the BPM_Install_Root/logs/config folder on the deployment manager machine with a timestamp in the file name, bpmconfig-de_name-timestamp.properties. Save this file for future reference or for troubleshooting any issues.
- If you have postponed the Process Server database table creation by clearing the create table option on the Database page, create the tables and load the database with system information by running bootstrapProcessServerData.
This command must be run before starting any cluster members.
- Restart the following resources after you have completed your configurations in the order specified here. See Start and stop individual resources.
- Stop the deployment environment.
- Stop the node agent.
- Stop the deployment manager.
- Start the deployment manager.
- Start the node agent.
- Start the deployment environment.
For Advanced or Advanced-only deployment environments, the deployment manager and node agents need to be restarted for the cell scoped configuration to take affect. This is only required for the first deployment environment that you create.
When the configuration completes, you can examine the configuration files to view the changes.
Either save the changes to the master configuration or discard them.
If you use additional servers with unique ports, WAS does not automatically configure the virtual host for the server. Specifically, WAS does not automatically add the host alias ports to a virtual host. However, you can use the administrative console to add a new host alias for each of the ports that are used by the new server. To add a host alias, in the administrative console navigate to...
- Environment | Virtual hosts | default_host | Host Aliases | New
Clean all applicable profile logs or save them in another directory. You may want to clean or move the logs as they will be appended with the last configuration. This can make it difficult to view the most current information.
Related concepts:
Related tasks:IBM Business Process Manager configuration capabilities
Create the Advanced Process Server deployment environment
Create a Process Server deployment environment to run processes, services and modules deployed from the Process Center. Or, deploy modules either from the command line or from the WebSphere administrative console. You can create more than one deployment environments in the same cell using the Deployment Environment wizard.
Ensure that you have completed the following tasks:
- Installed the product
- Created the deployment manager profile and the associated nodes
- Ensure the database specified in the Database Configuration panel of the Deployment Environment wizard is already created. The deployment environment configuration never creates a database.
- Start all the local and remote nodes that to add in the deployment environment.
- When you create a 3-cluster deployment environment using the Deployment Environment wizard, the process might take a lot of time to complete. In that case, you can perform one of the following steps to create the 3-cluster environment:
- Increase the transaction timeout value using the Deployment Manager and re-create the deployment environment. See Preventing timeout and out-of-memory exceptions during installation or deployment.
- Do not create tables during the Deployment Environment creation. After creating the environment, create the databases, tables, and then run the bootstrap command.
- If you are using the Deployment Environment wizard, you can enable deployment manager trace for details about the deployment creation.
To enable trace for a single run and till the deployment manager restarts, log on to the administrative console, go to...
- Troubleshooting | Logs and trace | deployment_manager_name com.ibm.bpm.config.*=all to the Change log detail levels text area, and save the changes.
You must have Process Server installed to install a Process Server-based deployment environment. If you have a Process Center installed, start the IBM Installation Manager and modify the installation to use the Business Process Manager Advanced Process Server Production or Business Process Manager Advanced Process Server Non-Production feature.
When security and role-based authorization are enabled, you must log in to the administrative console as a Cell administrator to create a deployment environment. This task describes the procedure for creating a deployment environment that is based on a specific pattern and uses the Deployment Environment wizard.
A snapshot that requires BPM Advanced Edition capability cannot be installed on more than one deployment environment in the same cell.
Oracle database considerations:
- Verify the user name and schema name are exactly the same. The user specified should exist in the database before generating the environment.
- Process Server and IBM Performance Data Warehouse can use the same database instance, but should use different users.
To create the deployment environment.
- From the administrative console, navigate to the Deployment Environments page by clicking...
- Servers | Deployment Environments
- Launch the Deployment Environment wizard by clicking New on the Deployment Environments page.
The Create new deployment environment page is displayed.
The database provides isolation of internal groups, such as administrators. If the database is shared by two deployment environments, one administrators group is shared between them. When such a situation occurs, both administrators are able to login as administrator for each of the deployment environment.
- Enter a unique name for the deployment environment in the Deployment environment name field.
- Enter a user name for the deployment environment administrator in the Deployment environment administrator user name field.
IBM recommends to use a different administrator for each deployment environment and also the cell administrator.
- Enter a password for the deployment environment administrator in the Password field.
- Reconfirm the password in the Confirm password field.
- Enter a unique name for the deployment environment in the Deployment environment name field.
- From the BPM Deployment Environment Type section, select Advanced Process Server.
Features represent the runtime processing capabilities of the deployment environment.
- From the section...
- Select the deployment environment pattern
...select a pattern for the deployment environment and click Next to display the Select Nodes page.
The available patterns are:
- Single Cluster: The application deployment target includes the messaging infrastructure and supporting applications.
- Application, Remote Messaging, Remote Support: A separate cluster each for application deployment, remote messaging, and remote support.
- On the Select Nodes page, select the nodes to include in this deployment environment, then click Next to display the Define Clusters page.
Select nodes that have the required capabilities for the environment you selected on the BPM Deployment Environment Features section.
Select at least one node for the deployment environment. For high-availability and failover environments, select at least two nodes. For scalability, you can add more nodes.
- On the Define Clusters page, assign the required number of clusters for each node and click Next to display the Customize Cluster Name and Ports page.
By default one cluster member is assigned on each node for each function. You change the number by replacing the number in each column.
A 0 (zero) value for a node means the node does not contribute to the selected function, based on features that you have selected.
- On the Customize Cluster Name and Ports page, customize the cluster names or cluster member names for the cluster type.
You can specify the starting port for the cluster members. The system generates default values for cluster member names and the starting port.
Ensure the starting port numbers you specify are at least 20 ports apart. Port numbers are reserved and assigned to each node for the cluster members using the port number specified. If you specify an initial port when you create the deployment environment, that same initial port specified would be assigned to the cluster member. For example, if the port number for the first cluster member is 2000, it would use the port numbers 2000, 2001, 2002, and so on. The port number of the second cluster member would be 2020 and the port numbers would be 2020, 2021, 2022, and so on. The port number of the third cluster member would be 2040.
If there is already a node on that physical system then there may be port conflicts and these must be resolved manually by changing the port values.
If you use additional servers with unique ports, WebSphere Application Server does not automatically configure the virtual host for the server. Specifically, WAS does not automatically add the host alias ports to a virtual host. However, you can use the administrative console to add a new host alias for each of the ports that are used by the new server.
- On the Configure Process Server page, set the values for the Process Center configuration and click Next.
- Environment name
Enter an environment name of the Process Server.
An environment name is the name by which this server or cluster will be known to a Process Center user.
- Environment type
From the pull-down list, select the environment type for the Process Server you are configuring.
The environment type refers to how the Process Server is used. For example, in what capacity will the Process Server be used - development, test, staging, or production. Load testing might be done on a test server, while a staging environment type might be used as a temporary location to host changes before putting those changes into production. You might specify a staging environment type if the Process Server you are configuring will be accessed and used to review content and new functionality.
There are four types of environments available for selection:
- Development
- The server will serve in a development capacity.
- Test
- The server will be used as a testing environment.
- Stage
- The server server will serve as a staging platform to be used as a preproduction server.
- Production
- The server will serve in a production capacity.
- Use server offline
Indicate whether the server you are configuring is an offline server.
An offline server is a Process Server that is not connected to the Process Center.
Offline servers can still be used when deploying snapshots of process applications. However the method for deploying process applications to an offline process server differs from the method for deploying process applications to an online process server.
- Protocol
Select either http:// or https:// as the connection protocol to the Process Center.
- Host name or virtual host in a load-balanced environment
Type the host or virtual host that this Process Server needs to communicate with Process Center.
Ensure specified the host name instead of localhost for the server name when you configure the Process Server. This is required when you are using the Process Designer remotely.
- Port
Port number of the Process Center.
- User name
Type a valid user name that exists on the Process Center. Process Server will connect to Process Center as this user.
- Password
Password for the user.
- Confirm password
Confirm the password for the user.
- Test Connection
Click to test the Process Center connection.
- Environment name
- Required: On the Configure Databases page, select Oracle, configure the database parameters for data sources of the deployment environment, click Test connection, and after the connection succeeds click Next to go to the Summary page.
On this page, define the database information for the components that are included in this deployment environment. Where possible, the wizard supplies default information for the parameters, but change those values to match the values that you defined when you planned the environment.
The database specified in this panel must already exist. Deployment environment configuration never creates a database.
- Shared parameters
- Server: Server name where the database is located.
- Port: Port number to connect to the database.
- Instance name: Type the instance name for the Oracle database.
- Create Tables: Create the required tables.
If this option is selected, ensure the user has sufficient rights to access the database, and create tables.
- cellDB
The cellDB option is only visible when you create the first advanced deployment environment. After this, every advanced deployment environment that you shares the cellDB of the first environment.
- User name: Type a user name for the cell database.
- Password: Password for the cell database user.
- Confirm password: Confirm the password for the cell database user.
- Common database
- User name: Type a user name for the common database which is used for CommonDB components, Business Space, Business Process Choreographer, and Messaging.
- Password: Password for the common database user.
- Confirm password: Confirm the password for the common database user.
- Process database
- User name: Type a user name for the Process Center database.
- Password: Password for the Process Center database user.
- Confirm password: Confirm the password for the Process database user.
- Performance Data Warehouse database
- User name: Type a user name for the Performance Data Warehouse database.
- Password: Password for the Performance Data Warehouse database user.
- Confirm password: Confirm the password for the Performance Data Warehouse database user.
- Select the databases to separate from the Common database.
- Messaging: Select this option to create a separate messaging engine database.
- User name: Type a user name for the messaging engine database.
- Password: Password for the messaging engine database user.
- Confirm password: Confirm the password for the messaging engine database user.
- Business Process Choreographer: Select this option to create a separate Business Process Choreographer database.
- User name: Type a user name for the Business Process Choreographer database.
- Password: Password for the Business Process Choreographer database user.
- Confirm password: Confirm the password for the Business Process Choreographer database user.
- Messaging: Select this option to create a separate messaging engine database.
The default schema names that are displayed on this page might conflict with your site naming convention or might conflict with existing schemas. As such, it is likely that change the schema name. Pay close attention to the values specified to avoid potential naming conflicts.
Also ensure that you have completed the following items:
- Verify the user name and the schema name are exactly the same. The user specified should exist in the database before generating the environment.
- Process Server and IBM Performance Data Warehouse can use the same database instance, but should use different users.
You can edit all key parameters, such as the database name, whether or not to create tables, the data source runtime user name, and the password for the deployment environment. You can select which database to use for the given component.
Steps that cannot be completed through the Deployment Environment wizard, and which need to be completed manually, are listed on the Deferred Configuration page. You can view this page after you have created the deployment environment. To view this administrative console page, click...
ul> Servers | Deployment Environments | Deployment environment name | Deployment Environment Configuration | Additional Properties | Deferred Configuration
- Shared parameters
- Verify the information on the Summary page is correct and perform the following substeps:
- To exit without generating the configuration, click Cancel.
- To save the environment configuration to configure a similar Deployment Environment, click Export for Scripting.
- If you are satisfied with the deployment environment configuration, click Generate Deployment Environment to save and complete the configuration of the deployment environment. This will also generate a properties file in the BPM_Install_Root/logs/config folder on the deployment manager machine with a timestamp in the file name, bpmconfig-de_name-timestamp.properties. Save this file for future reference or for troubleshooting any issues.
- If you have postponed the Process Server database table creation by clearing the create table option on the Database page, create the tables and load the database with system information by running bootstrapProcessServerData.
This command must be run before starting any cluster members.
- Restart the following resources after you have completed your configurations in the order specified here. See Start and stop individual resources.
- Stop the deployment environment.
- Stop the node agent.
- Stop the deployment manager.
- Start the deployment manager.
- Start the node agent.
- Start the deployment environment.
For Advanced or Advanced-only deployment environments, the deployment manager and node agents need to be restarted for the cell scoped configuration to take affect. This is only required for the first deployment environment that you create.
When the configuration completes, you can examine the configuration files to view the changes.
Either save the changes to the master configuration or discard them.
If you use additional servers with unique ports, WAS does not automatically configure the virtual host for the server. Specifically, WAS does not automatically add the host alias ports to a virtual host. However, you can use the administrative console to add a new host alias for each of the ports that are used by the new server. To add a host alias, in the administrative console navigate to...
- Environment | Virtual hosts | default_host | Host Aliases | New
Clean all applicable profile logs or save them in another directory. You may want to clean or move the logs as they will be appended with the last configuration. This can make it difficult to view the most current information.
After you have configured a network deployment environment for BPM Advanced, if you test the connection to the cell-level jdbc/WPSDB data source ( in the administrative console, on the page Resources > JDBC > Data sources), you get a message saying the test connection operation failed with the exception com.ibm.wsspi.runtime.variable.UndefinedVariableException: Undefined Variable variable_name, where variable_name is a variable name such as WAS_INSTALL_ROOT, DB2_JCC_DRIVER_PATH, UNIVERSAL_JDBC_DRIVER_PATH or PUREQUERY_PATH. This does not necessarily indicate there will be a problem accessing the data source at run time. Ensure the location of your JDBC driver files is accessible to every client that must use the data source, and configure the variable with the full path of that location. Disregard the test connection error unless you are also experiencing trouble connecting to the data store at run time. For additional information, see the WebSphere Application Server documentation about the test connection service.
Related concepts:
Related tasks:IBM Business Process Manager configuration capabilities
Create the Standard Process Server deployment environment
Create a Process Server deployment environment to run processes and deployed from the Process Center. You can create more than one deployment environments in the same cell using the Deployment Environment wizard.
Ensure that you have completed the following tasks:
- Installed the product
- Created the deployment manager profile and the associated nodes
- Ensure the database specified in the Database Configuration panel of the Deployment Environment wizard is already created. The deployment environment configuration never creates a database.
- Start all the local and remote nodes that to add in the deployment environment.
- When you create a 3-cluster deployment environment using the Deployment Environment wizard, the process might take a lot of time to complete. In that case, you can perform one of the following steps to create the 3-cluster environment:
- Increase the transaction timeout value using the Deployment Manager and re-create the deployment environment. See Preventing timeout and out-of-memory exceptions during installation or deployment.
- Do not create tables during the Deployment Environment creation. After creating the environment, create the databases, tables, and then run the bootstrap command.
- If you are using the Deployment Environment wizard, you can enable deployment manager trace for details about the deployment creation.
To enable trace for a single run and till the deployment manager restarts, log on to the administrative console, go to...
- Troubleshooting | Logs and trace | deployment_manager_name com.ibm.bpm.config.*=all to the Change log detail levels text area, and save the changes.
You must have Process Server installed to install a Process Server-based deployment environment. If you have a Process Center installed, start the IBM Installation Manager and modify the installation to use the Business Process Manager Advanced Process Server Production or Business Process Manager Advanced Process Server Non-Production feature.
When security and role-based authorization are enabled, you must log in to the administrative console as a Cell administrator to create a deployment environment. This task describes the procedure for creating a deployment environment that is based on a specific pattern and uses the Deployment Environment wizard.
A snapshot that requires BPM Advanced Edition capability cannot be installed on more than one deployment environment in the same cell.
Oracle database considerations:
- Verify the user name and schema name are exactly the same. The user specified should exist in the database before generating the environment.
- Process Server and IBM Performance Data Warehouse can use the same database instance, but should use different users.
To create the deployment environment.
- From the administrative console, navigate to the Deployment Environments page by clicking...
- Servers | Deployment Environments
- Launch the Deployment Environment wizard by clicking New on the Deployment Environments page.
The Create new deployment environment page is displayed.
The database provides isolation of internal groups, such as administrators. If the database is shared by two deployment environments, one administrators group is shared between them. When such a situation occurs, both administrators are able to login as administrator for each of the deployment environment.
- Enter a unique name for the deployment environment in the Deployment environment name field.
- Enter a user name for the deployment environment administrator in the Deployment environment administrator user name field.
IBM recommends to use a different administrator for each deployment environment and also the cell administrator.
- Enter a password for the deployment environment administrator in the Password field.
- Reconfirm the password in the Confirm password field.
- Enter a unique name for the deployment environment in the Deployment environment name field.
- From the BPM Deployment Environment Type section, select Standard Process Server.
Features represent the runtime processing capabilities of the deployment environment.
- From the section...
- Select the deployment environment pattern
...select a pattern for the deployment environment and click Next to display the Select Nodes page.
The available patterns are:
- Single Cluster: The application deployment target includes the messaging infrastructure and supporting applications.
- Application, Remote Messaging, Remote Support: A separate cluster each for application deployment, remote messaging, and remote support.
- On the Select Nodes page, select the nodes to include in this deployment environment, then click Next to display the Define Clusters page.
Select nodes that have the required capabilities for the environment you selected on the BPM Deployment Environment Features section.
Select at least one node for the deployment environment. For high-availability and failover environments, select at least two nodes. For scalability, you can add more nodes.
- On the Define Clusters page, assign the required number of clusters for each node and click Next to display the Customize Cluster Name and Ports page.
By default one cluster member is assigned on each node for each function. You change the number by replacing the number in each column.
A 0 (zero) value for a node means the node does not contribute to the selected function, based on features that you have selected.
- On the Customize Cluster Name and Ports page, customize the cluster names or cluster member names for the cluster type.
You can specify the starting port for the cluster members. The system generates default values for cluster member names and the starting port.
Ensure the starting port numbers you specify are at least 20 ports apart. Port numbers are reserved and assigned to each node for the cluster members using the port number specified. If you specify an initial port when you create the deployment environment, that same initial port specified would be assigned to the cluster member. For example, if the port number for the first cluster member is 2000, it would use the port numbers 2000, 2001, 2002, and so on. The port number of the second cluster member would be 2020 and the port numbers would be 2020, 2021, 2022, and so on. The port number of the third cluster member would be 2040.
If there is already a node on that physical system then there may be port conflicts and these must be resolved manually by changing the port values.
If you use additional servers with unique ports, WebSphere Application Server does not automatically configure the virtual host for the server. Specifically, WAS does not automatically add the host alias ports to a virtual host. However, you can use the administrative console to add a new host alias for each of the ports that are used by the new server.
- On the Configure Process Server page, set the values for the Process Center configuration and click Next.
- Environment name
Enter an environment name of the Process Server.
An environment name is the name by which this server or cluster will be known to a Process Center user.
- Environment type
From the pull-down list, select the environment type for the Process Server you are configuring.
The environment type refers to how the Process Server is used. For example, in what capacity will the Process Server be used - development, test, staging, or production. Load testing might be done on a test server, while a staging environment type might be used as a temporary location to host changes before putting those changes into production. You might specify a staging environment type if the Process Server you are configuring will be accessed and used to review content and new functionality.
There are four types of environments available for selection:
- Development
- The server will serve in a development capacity.
- Test
- The server will be used as a testing environment.
- Stage
- The server server will serve as a staging platform to be used as a preproduction server.
- Production
- The server will serve in a production capacity.
- Use server offline
Indicate whether the server you are configuring is an offline server.
An offline server is a Process Server that is not connected to the Process Center.
Offline servers can still be used when deploying snapshots of process applications. However the method for deploying process applications to an offline process server differs from the method for deploying process applications to an online process server.
- Protocol
Select either http:// or https:// as the connection protocol to the Process Center.
- Host name or virtual host in a load-balanced environment
Type the host or virtual host that this Process Server needs to communicate with Process Center.
Ensure specified the host name instead of localhost for the server name when you configure the Process Server. This is required when you are using the Process Designer remotely.
- Port
Port number of the Process Center.
- User name
Type a valid user name that exists on the Process Center. Process Server will connect to Process Center as this user.
- Password
Password for the user.
- Confirm password
Confirm the password for the user.
- Test Connection
Click to test the Process Center connection.
- Environment name
- Required: On the Configure Databases page, select Oracle, configure the database parameters for data sources of the deployment environment, click Test connection, and after the connection succeeds click Next to go to the Summary page.
On this page, define the database information for the components that are included in this deployment environment. Where possible, the wizard supplies default information for the parameters, but change those values to match the values that you defined when you planned the environment.
The database specified in this panel must already exist. Deployment environment configuration never creates a database.
- Shared parameters
- Server: Server name where the database is located.
- Port: Port number to connect to the database.
- Instance name: Type the instance name for the Oracle database.
- Create Tables: Create the required tables.
If this option is selected, ensure the user has sufficient rights to access the database, and create tables.
- Common database
- User name: Type a user name for the common database which is used for CommonDB components, Business Space, Business Process Choreographer, and Messaging.
- Password: Password for the common database user.
- Confirm password: Confirm the password for the common database user.
- Process database
- User name: Type a user name for the Process Center database.
- Password: Password for the Process Center database user.
- Confirm password: Confirm the password for the Process database user.
- Performance Data Warehouse database
- User name: Type a user name for the Performance Data Warehouse database.
- Password: Password for the Performance Data Warehouse database user.
- Confirm password: Confirm the password for the Performance Data Warehouse database user.
- Select the databases to separate from the Common database.
- Messaging: Select this option to create a separate messaging engine database.
- User name: Type a user name for the messaging engine database.
- Password: Password for the messaging engine database user.
- Confirm password: Confirm the password for the messaging engine database user.
- Messaging: Select this option to create a separate messaging engine database.
The default schema names that are displayed on this page might conflict with your site naming convention or might conflict with existing schemas. As such, it is likely that change the schema name. Pay close attention to the values specified to avoid potential naming conflicts.
Also ensure that you have completed the following items:
- Verify the user name and the schema name are exactly the same. The user specified should exist in the database before generating the environment.
- Process Server and IBM Performance Data Warehouse can use the same database instance, but should use different users.
You can edit all key parameters, such as the database name, whether or not to create tables, the data source runtime user name, and the password for the deployment environment. You can select which database to use for the given component.
Steps that cannot be completed through the Deployment Environment wizard, and which need to be completed manually, are listed on the Deferred Configuration page. You can view this page after you have created the deployment environment. To view this administrative console page, click...
ul> Servers | Deployment Environments | Deployment environment name | Deployment Environment Configuration | Additional Properties | Deferred Configuration
- Shared parameters
- Verify the information on the Summary page is correct and perform the following substeps:
- To exit without generating the configuration, click Cancel.
- To save the environment configuration to configure a similar Deployment Environment, click Export for Scripting.
- If you are satisfied with the deployment environment configuration, click Generate Deployment Environment to save and complete the configuration of the deployment environment. This will also generate a properties file in the BPM_Install_Root/logs/config folder on the deployment manager machine with a timestamp in the file name, bpmconfig-de_name-timestamp.properties. Save this file for future reference or for troubleshooting any issues.
- If you have postponed the Process Server database table creation by clearing the create table option on the Database page, create the tables and load the database with system information by running bootstrapProcessServerData.
This command must be run before starting any cluster members.
- Restart the following resources after you have completed your configurations in the order specified here. See Start and stop individual resources.
- Stop the deployment environment.
- Stop the node agent.
- Stop the deployment manager.
- Start the deployment manager.
- Start the node agent.
- Start the deployment environment.
For Advanced or Advanced-only deployment environments, the deployment manager and node agents need to be restarted for the cell scoped configuration to take affect. This is only required for the first deployment environment that you create.
When the configuration completes, you can examine the configuration files to view the changes.
Either save the changes to the master configuration or discard them.
If you use additional servers with unique ports, WAS does not automatically configure the virtual host for the server. Specifically, WAS does not automatically add the host alias ports to a virtual host. However, you can use the administrative console to add a new host alias for each of the ports that are used by the new server. To add a host alias, in the administrative console navigate to...
- Environment | Virtual hosts | default_host | Host Aliases | New
Clean all applicable profile logs or save them in another directory. You may want to clean or move the logs as they will be appended with the last configuration. This can make it difficult to view the most current information.
Related concepts:
Related tasks:IBM Business Process Manager configuration capabilities
Create the Advanced-only Process Server deployment environment
Create an Advanced-only Process Server deployment environment if you only want function that is equivalent to WebSphere Process Server or WebSphere Enterprise Service Bus. You can run SCA modules that are created in Integration Designer. You can deploy the modules either from the command line or from the WebSphere administrative console.
Ensure that you have completed the following tasks:
- Installed the product
- Created the deployment manager profile and the associated nodes
- Ensure the database specified in the Database Configuration panel of the Deployment Environment wizard is already created. The deployment environment configuration never creates a database.
- Start all the local and remote nodes that to add in the deployment environment.
- When you create a 3-cluster deployment environment using the Deployment Environment wizard, the process might take a lot of time to complete. In that case, you can perform one of the following steps to create the 3-cluster environment:
- Increase the transaction timeout value using the Deployment Manager and re-create the deployment environment. See Preventing timeout and out-of-memory exceptions during installation or deployment.
- Do not create tables during the Deployment Environment creation. After creating the environment, create the database, and tables.
- If you are using the Deployment Environment wizard, you can enable deployment manager trace for details about the deployment creation.
To enable trace for a single run and till the deployment manager restarts, log on to the administrative console, go to...
- Troubleshooting | Logs and trace | deployment_manager_name com.ibm.bpm.config.*=all to the Change log detail levels text area, and save the changes.
When security and role-based authorization are enabled, you must log in to the administrative console as a Cell administrator to create a deployment environment. This task describes the procedure for creating a deployment environment that is based on a specific pattern and uses the Deployment Environment wizard.
A snapshot that requires BPM Advanced Edition capability cannot be installed on more than one deployment environment in the same cell.
Oracle database considerations:
- Verify the user name and schema name are exactly the same. The user specified should exist in the database before generating the environment.
To create the deployment environment.
- From the administrative console, navigate to the Deployment Environments page by clicking...
- Servers | Deployment Environments
- Launch the Deployment Environment wizard by clicking New on the Deployment Environments page.
The Create new deployment environment page is displayed.
The database provides isolation of internal groups, such as administrators. If the database is shared by two deployment environments, one administrators group is shared between them. When such a situation occurs, both administrators are able to login as administrator for each of the deployment environment.
- Enter a unique name for the deployment environment in the Deployment environment name field.
- Enter a user name for the deployment environment administrator in the Deployment environment administrator user name field.
IBM recommends to use a different administrator for each deployment environment and also the cell administrator.
- Enter a password for the deployment environment administrator in the Password field.
- Reconfirm the password in the Confirm password field.
- Enter a unique name for the deployment environment in the Deployment environment name field.
- From the BPM Deployment Environment Type section, select Advanced-only Process Server.
Features represent the runtime processing capabilities of the deployment environment.
- From the section...
- Select the deployment environment pattern
...select a pattern for the deployment environment and click Next to display the Select Nodes page.
The available patterns are:
- Single Cluster: The application deployment target includes the messaging infrastructure and supporting applications.
- Application, Remote Messaging, Remote Support: A separate cluster each for application deployment, remote messaging, and remote support.
- On the Select Nodes page, select the nodes to include in this deployment environment, then click Next to display the Define Clusters page.
Select nodes that have the required capabilities for the environment you selected on the BPM Deployment Environment Features section.
Select at least one node for the deployment environment. For high-availability and failover environments, select at least two nodes. For scalability, you can add more nodes.
- On the Define Clusters page, assign the required number of clusters for each node and click Next to display the Customize Cluster Name and Ports page.
By default one cluster member is assigned on each node for each function. You change the number by replacing the number in each column.
A 0 (zero) value for a node means the node does not contribute to the selected function, based on features that you have selected.
- On the Customize Cluster Name and Ports page, customize the cluster names or cluster member names for the cluster type.
You can specify the starting port for the cluster members. The system generates default values for cluster member names and the starting port.
Ensure the starting port numbers you specify are at least 20 ports apart. Port numbers are reserved and assigned to each node for the cluster members using the port number specified. If you specify an initial port when you create the deployment environment, that same initial port specified would be assigned to the cluster member. For example, if the port number for the first cluster member is 2000, it would use the port numbers 2000, 2001, 2002, and so on. The port number of the second cluster member would be 2020 and the port numbers would be 2020, 2021, 2022, and so on. The port number of the third cluster member would be 2040.
If there is already a node on that physical system then there may be port conflicts and these must be resolved manually by changing the port values.
If you use additional servers with unique ports, WAS does not automatically configure the virtual host for the server. Specifically, WAS does not automatically add the host alias ports to a virtual host. However, you can use the administrative console to add a new host alias for each of the ports that are used by the new server.
- Required: On the Configure Databases page, select Oracle, configure the database parameters for data sources of the deployment environment, click Test connection, and after the connection succeeds click Next to go to the Summary page.
On this page, define the database information for the components that are included in this deployment environment. Where possible, the wizard supplies default information for the parameters, but change those values to match the values that you defined when you planned the environment.
The database specified in this panel must already exist. Deployment environment configuration never creates a database.
- Shared parameters
- Server: Server name where the database is located.
- Port: Port number to connect to the database.
- Instance name: Type the instance name for the Oracle database.
- Create Tables: Create the required tables.
If this option is selected, ensure the user has sufficient rights to access the database, and create tables.
- cellDB
The cellDB option is only visible when you create the first advanced deployment environment. After this, every advanced deployment environment that you shares the cellDB of the first environment.
- User name: Type a user name for the cell database.
- Password: Password for the cell database user.
- Confirm password: Confirm the password for the cell database user.
- Common database
- User name: Type a user name for the common database which is used for CommonDB components, Business Space, Business Process Choreographer, and Messaging.
- Password: Password for the common database user.
- Confirm password: Confirm the password for the common database user.
- Select the databases to separate from the Common database.
- Messaging: Select this option to create a separate messaging engine database.
- User name: Type a user name for the messaging engine database.
- Password: Password for the messaging engine database user.
- Confirm password: Confirm the password for the messaging engine database user.
- Business Process Choreographer: Select this option to create a separate Business Process Choreographer database.
- User name: Type a user name for the Business Process Choreographer database.
- Password: Password for the Business Process Choreographer database user.
- Confirm password: Confirm the password for the Business Process Choreographer database user.
- Messaging: Select this option to create a separate messaging engine database.
The default schema names that are displayed on this page might conflict with your site naming convention or might conflict with existing schemas. As such, it is likely that change the schema name. Pay close attention to the values specified to avoid potential naming conflicts.
Also ensure that you have completed the following items:
- Verify the user name and the schema name are exactly the same. The user specified should exist in the database before generating the environment.
- Process Server and IBM Performance Data Warehouse can use the same database instance, but should use different users.
You can edit all key parameters, such as the database name, whether or not to create tables, the data source runtime user name, and the password for the deployment environment. You can select which database to use for the given component.
Steps that cannot be completed through the Deployment Environment wizard, and which need to be completed manually, are listed on the Deferred Configuration page. You can view this page after you have created the deployment environment. To view this administrative console page, click...
ul> Servers | Deployment Environments | Deployment environment name | Deployment Environment Configuration | Additional Properties | Deferred Configuration
- Shared parameters
- Verify the information on the Summary page is correct and perform the following substeps:
- To exit without generating the configuration, click Cancel.
- To save the environment configuration to configure a similar Deployment Environment, click Export for Scripting.
- If you are satisfied with the deployment environment configuration, click Generate Deployment Environment to save and complete the configuration of the deployment environment. This will also generate a properties file in the BPM_Install_Root/logs/config folder on the deployment manager machine with a timestamp in the file name, bpmconfig-de_name-timestamp.properties. Save this file for future reference or for troubleshooting any issues.
- Restart the following resources after you have completed your configurations in the order specified here. See Start and stop individual resources.
- Stop the deployment environment.
- Stop the node agent.
- Stop the deployment manager.
- Start the deployment manager.
- Start the node agent.
- Start the deployment environment.
For Advanced or Advanced-only deployment environments, the deployment manager and node agents need to be restarted for the cell scoped configuration to take affect. This is only required for the first deployment environment that you create.
When the configuration completes, you can examine the configuration files to view the changes.
Either save the changes to the master configuration or discard them.
If you use additional servers with unique ports, WAS does not automatically configure the virtual host for the server. Specifically, WAS does not automatically add the host alias ports to a virtual host. However, you can use the administrative console to add a new host alias for each of the ports that are used by the new server. To add a host alias, in the administrative console navigate to...
- Environment | Virtual hosts | default_host | Host Aliases | New
Clean all applicable profile logs or save them in another directory. You may want to clean or move the logs as they will be appended with the last configuration. This can make it difficult to view the most current information.
After you have configured a network deployment environment for BPM Advanced, if you test the connection to the cell-level jdbc/WPSDB data source ( in the administrative console, on the page Resources > JDBC > Data sources), you get a message saying the test connection operation failed with the exception com.ibm.wsspi.runtime.variable.UndefinedVariableException: Undefined Variable variable_name, where variable_name is a variable name such as WAS_INSTALL_ROOT, DB2_JCC_DRIVER_PATH, UNIVERSAL_JDBC_DRIVER_PATH or PUREQUERY_PATH. This does not necessarily indicate there will be a problem accessing the data source at run time. Ensure the location of your JDBC driver files is accessible to every client that must use the data source, and configure the variable with the full path of that location. Disregard the test connection error unless you are also experiencing trouble connecting to the data store at run time. For additional information, see the WebSphere Application Server documentation about the test connection service.
Related concepts:
Related tasks:IBM Business Process Manager configuration capabilities
Extend the network deployment environment using BPMConfig
After creating a deployment environment using BPMConfig, you can run the command at a later time to extend the deployment environment, for example to create new profiles or to add additional nodes.
Before running BPMConfig:
- You must have installed the product on the computer where you want to extend the deployment environment.
- You must have created the deployment environment by running BPMConfig.
- The deployment manager must be running.
Run BPMConfig with the same properties file on all computers that will participate in the deployment environment. Run first on the computer that has the deployment manager profile, and then run it on each computer that has a managed node.
At any given time, only one profile creation can be performed on a computer and only one node federation can be performed against a particular deployment manager. For this reason, if you are creating multiple profiles at once on different computers, use the federateLater option, then run BPMConfig with the -create -de options sequentially on each computer to federate the managed nodes. Run BPMConfig with the -create -de option to add additional managed nodes and profiles to your existing environment. When it runs, BPMConfig:
- Creates any local profiles specified in the configuration properties file that do not already exist.
- Creates a new managed node for each new node specified in the configuration properties based on the specified values.
- Federates the node and adds the node to the deployment environment. If the -create -profile action was issued with the -federateLater option, the node is created but not federated.
- Runs the bootstrap utility to load the Process database with system information so there is no need to perform this step manually. If the bpm.de.deferSchemaCreation property in the configuration properties file is set to true and the database tables are created separately, then the bootstrap utility will need to be run manually.
To extend an existing deployment environment to include additional nodes or profiles:
- If you do not already have a customized configuration properties file based on the existing deployment environment to extend, locate the sample configuration file that most closely reflects the environment you are trying to extend. Sample configuration files are provided in the
- BPM_home/BPM/samples/config.
folder.
For each of the different product configurations, there is a different folder containing sample configuration files. For example, for BPM Standard Advanced, there is an Advanced folder containing a set of sample configuration properties files. Within each folder, there is a set of files that are specific to the different database types and configuration environments. The sample files are named according to the following format: de_type-environment_type-topology-database_type. For example, the sample configuration properties file for configuring a single cluster Process Center environment using DB2 with BPM Standard Advanced is called Advanced-PC-SingleCluster-DB2. Find the sample properties file that most closely represents your target deployment environment and make a copy of this file.
- Modify the properties file to add the additional nodes and profiles to extend the existing environment.
When adding managed nodes to an existing deployment environment, define each new node by duplicating the set of bpm.de.node properties that exist in the properties file and specifying the values that apply to the new managed node. For more information about the available properties, read the comments in the sample files, or see the BPMConfig command reference and the examples.
If you are using an Oracle database, you must include the database user name and password for all databases, including the optional ones.
- Run BPMConfig on the computer that has the deployment manager and on each computer that has a managed node, passing it the names of the properties file you created. For example:
- BPM_home/bin/BPMConfig -create -de my_environment.properties
If the new or updated node is on the same computer as the deployment manager node, then the updated or new node is automatically synchronized with the deployment manager node. Before you start the node, ensure that this synchronization has completed by checking the syncNode.log file found in the PROFILE_ROOT/logs directory. If the new or updated node is on a different computer than the deployment manager node, run the syncNode.bat or syncNode.sh command on the new or updated node and wait for the synchronization to complete before starting the node.
Extend a network deployment environment for a SQL database server
Extend the network deployment environment to work with a SQL database server.
- Use the Deployment Environment wizard
After performing the installation and creating the deployment manager, custom (managed node) profiles, and a deployment environment, you can extend a network deployment configuration based on the topology pattern templates packaged with the software. You can also extend the deployment by adding cluster members to a cell or adding multiple deployment environments.
- Extend the network deployment environment using BPMConfig
After creating a deployment environment using BPMConfig, you can run the command at a later time to extend the deployment environment, for example to create new profiles or to add additional nodes.
Use the Deployment Environment wizard
After performing the installation and creating the deployment manager, custom (managed node) profiles, and a deployment environment, you can extend a network deployment configuration based on the topology pattern templates packaged with the software. You can also extend the deployment by adding cluster members to a cell or adding multiple deployment environments.
- Add clusters:
The easiest way to expand your infrastructure is to add more cluster members to your existing clusters. You can add cluster members to each cluster independently or in combination, depending on where you see the need for growth. You can add an application cluster member, a messaging cluster member, or both. By expanding your clusters this way you can improve your application throughput, your message throughput, or both.
- Add deployment environments:
You can create two independent deployment environments for applications in the same cell. However, you can create only one Process Center-based deployment environment in a single cell.
To extend the deployment environment:
- Log on to the administrative console. Ensure the user has appropriate privileges to update the deployment environment.
- Click Servers > Deployment Environments > Deployment_Environment_Name.
- Use the various options in the administrative console to extend the deployment environment.
SQL Server database server with Windows authentication
Create the network deployment environment to work with an SQL Server database server using Windows authentication. The username and password you used to log on to the system would be used to connect to and access the SQL database.
Create the Advanced Process Center deployment environment
Create a Process Center deployment environment to store, run and administer process applications and toolkits that are developed in Process Designer and Integration Designer. You can create more than one deployment environments in the same cell using the Deployment Environment wizard. However, you can create only one Process Center-based deployment environment in a single cell.
Ensure that you have completed the following tasks:
- Installed the product
- Created the deployment manager profile and the associated nodes
- Ensure the database specified in the Database Configuration panel of the Deployment Environment wizard is already created. The deployment environment configuration never creates a database.
- Start all the local and remote nodes that to add in the deployment environment.
- When you create a 3-cluster deployment environment using the Deployment Environment wizard, the process might take a lot of time to complete. In that case, you can perform one of the following steps to create the 3-cluster environment:
- Increase the transaction timeout value using the Deployment Manager and re-create the deployment environment. See Preventing timeout and out-of-memory exceptions during installation or deployment.
- Do not create tables during the Deployment Environment creation. After creating the environment, create the databases, tables, and then run the bootstrap command.
- If you are using the Deployment Environment wizard, you can enable deployment manager trace for details about the deployment creation.
To enable trace for a single run and till the deployment manager restarts, log on to the administrative console, go to...
- Troubleshooting | Logs and trace | deployment_manager_name com.ibm.bpm.config.*=all to the Change log detail levels text area, and save the changes.
You must have Process Center installed to install a Process Center-based deployment environment. If you have a Process Server installed, start the IBM Installation Manager and modify the installation to use the Business Process Manager Advanced Process Center feature.
When security and role-based authorization are enabled, you must log in to the administrative console as a Cell administrator to create a deployment environment. This task describes the procedure for creating a deployment environment that is based on a specific pattern and uses the Deployment Environment wizard.
A snapshot that requires BPM Advanced Edition capability cannot be installed on more than one deployment environment in the same cell.
SQL Server considerations:
- Verify the user name and schema exist before the configuration is done. The schema value should be the default schema for the user chosen.
- Process Server and IBM Performance Data Warehouse should not use the same database.
- If connections to the database will be made by the current Windows user the server is running under, the SQL Server must have Windows authentication mode or SQL Server and Windows Authentication mode enabled, as specified through Microsoft SQL Server Management Studio.
To create the deployment environment.
- From the administrative console, navigate to the Deployment Environments page by clicking...
- Servers | Deployment Environments
- Launch the Deployment Environment wizard by clicking New on the Deployment Environments page.
The Create new deployment environment page is displayed.
The database provides isolation of internal groups, such as administrators. If the database is shared by two deployment environments, one administrators group is shared between them. When such a situation occurs, both administrators are able to login as administrator for each of the deployment environment.
- Enter a unique name for the deployment environment in the Deployment environment name field.
- Enter a user name for the deployment environment administrator in the Deployment environment administrator user name field.
IBM recommends to use a different administrator for each deployment environment and also the cell administrator.
- Enter a password for the deployment environment administrator in the Password field.
- Reconfirm the password in the Confirm password field.
- Enter a unique name for the deployment environment in the Deployment environment name field.
- From the BPM Deployment Environment Type section, select Advanced Process Center.
Features represent the runtime processing capabilities of the deployment environment.
- From the section...
- Select the deployment environment pattern
...select a pattern for the deployment environment and click Next to display the Select Nodes page.
The available patterns are:
- Single Cluster: The application deployment target includes the messaging infrastructure and supporting applications.
- Application, Remote Messaging, Remote Support: A separate cluster each for application deployment, remote messaging, and remote support.
- On the Select Nodes page, select the nodes to include in this deployment environment, then click Next to display the Define Clusters page.
Select nodes that have the required capabilities for the environment you selected on the BPM Deployment Environment Features section.
Select at least one node for the deployment environment. For high-availability and failover environments, select at least two nodes. For scalability, you can add more nodes.
- On the Define Clusters page, assign the required number of clusters for each node and click Next to display the Customize Cluster Name and Ports page.
By default one cluster member is assigned on each node for each function. You change the number by replacing the number in each column.
A 0 (zero) value for a node means the node does not contribute to the selected function, based on features that you have selected.
- On the Customize Cluster Name and Ports page, customize the cluster names or cluster member names for the cluster type.
You can specify the starting port for the cluster members. The system generates default values for cluster member names and the starting port.
Ensure the starting port numbers you specify are at least 20 ports apart. Port numbers are reserved and assigned to each node for the cluster members using the port number specified. If you specify an initial port when you create the deployment environment, that same initial port specified would be assigned to the cluster member. For example, if the port number for the first cluster member is 2000, it would use the port numbers 2000, 2001, 2002, and so on. The port number of the second cluster member would be 2020 and the port numbers would be 2020, 2021, 2022, and so on. The port number of the third cluster member would be 2040.
If there is already a node on that physical system then there may be port conflicts and these must be resolved manually by changing the port values.
If you use additional servers with unique ports, WebSphere Application Server does not automatically configure the virtual host for the server. Specifically, WAS does not automatically add the host alias ports to a virtual host. However, you can use the administrative console to add a new host alias for each of the ports that are used by the new server.
- Required: On the Configure Databases page, select Microsoft SQL Server using Windows Authentication, configure the database parameters for data sources of the deployment environment, click Test connection, and after the connection succeeds click Next to go to the Summary page.
On this page, define the database information for the components that are included in this deployment environment. Where possible, the wizard supplies default information for the parameters, but change those values to match the values that you defined when you planned the environment.
The database specified in this panel must already exist. Deployment environment configuration never creates a database.
- Shared parameters
- Server: Server name where the database is located.
- Port: Port number to connect to the database.
- Create Tables: Create the required tables.
If this option is selected, ensure the user has sufficient rights to access the database, and create tables.
- cellDB
The cellDB option is only visible when you create the first advanced deployment environment. After this, every advanced deployment environment that you shares the cellDB of the first environment.
- Name: name for the cell database.
- Common database
- Name: name for the common database which is used for CommonDB components, Business Space, Business Process Choreographer, and Messaging.
- Process database
- Name: name for the Process Center database.
- Performance Data Warehouse database
- Name: name for the Performance Data Warehouse database.
- Select the databases to separate from the Common database.
- Messaging: Select this option to create a separate messaging engine database.
- Name: name for the messaging engine database.
- Business Process Choreographer: Select this option to create a separate Business Process Choreographer database.
- Name: name for the Business Process Choreographer database.
- Messaging: Select this option to create a separate messaging engine database.
For an SQL server:
- Verify the user name and the schema exist before the configuration is done. The schema value should be the default schema for the user chosen.
- Process Server and IBM Performance Data Warehouse should not use the same database.
- If connections to the database will be made by the current Windows user the server is running under, the SQL Server must have Windows authentication mode or SQL Server and Windows Authentication mode enabled, as specified through Microsoft SQL Server Management Studio.
You can clear the Create Tables check box to create the tables manually instead of the configuration creating it automatically. The scripts to create tables are generated in the folder...
- BPM_Install/profiles/DmgrProfile/dbscripts
You can run the scripts from the dbscripts folder and do not need to generate scripts using BPMConfig.
You can edit all key parameters, such as the database name, whether or not to create tables, the data source runtime user name, and the password for the deployment environment. You can select which database to use for the given component.
Steps that cannot be completed through the Deployment Environment wizard, and which need to be completed manually, are listed on the Deferred Configuration page. You can view this page after you have created the deployment environment. To view this administrative console page, click...
- Servers | Deployment Environments | Deployment environment name | Deployment Environment Configuration | Additional Properties | Deferred Configuration
- Shared parameters
- Verify the information on the Summary page is correct and perform the following substeps:
- To exit without generating the configuration, click Cancel.
- To save the environment configuration to configure a similar Deployment Environment, click Export for Scripting.
- If you are satisfied with the deployment environment configuration, click Generate Deployment Environment to save and complete the configuration of the deployment environment. This will also generate a properties file in the BPM_Install_Root/logs/config folder on the deployment manager machine with a timestamp in the file name, bpmconfig-de_name-timestamp.properties. Save this file for future reference or for troubleshooting any issues.
- If you have postponed the Process Server database table creation by clearing the create table option on the Database page, create the tables and load the database with system information by running bootstrapProcessServerData.
This command must be run before starting any cluster members.
- Verify the deployment environment was created properly by completing the following steps:
- Log off from the administrative console, shut down the deployment manager, and then shut down all of the custom profiles.
- Start the custom profiles, start the deployment manager, and then log in to the administrative console.
- In the administrative console, start the deployment environment by clicking...
- Servers | Deployment Environments
Select the check box next to the deployment environment and clicking Start.
- After 5 to 10 minutes (or longer, depending on the system),
refresh the deployment environment page; the Status of the deployment environment changes to started.
- Locate the Tables folder for the common database. Check the tables have been created with the four schemas that you created manually.
- Optional: Check that tables have been created with the XXXBE## schema in the Business Process Choreographer database.
- In the administrative console, select Applications > Application Types > WebSphere enterprise applications and check the installed applications started successfully.
- Select Resources > JDBC > Data sources and test the connection of every component that is not related to the message engine (that is, every component that does not include ME in the name) is successful.
- Log off from the administrative console, shut down the deployment manager, and then shut down all of the custom profiles.
- Restart the following resources after you have completed your configurations in the order specified here. See Start and stop individual resources.
- Stop the deployment environment.
- Stop the node agent.
- Stop the deployment manager.
- Start the deployment manager.
- Start the node agent.
- Start the deployment environment.
For Advanced or Advanced-only deployment environments, the deployment manager and node agents need to be restarted for the cell scoped configuration to take affect. This is only required for the first deployment environment that you create.
When the configuration completes, you can examine the configuration files to view the changes.
Either save the changes to the master configuration or discard them.
If you use additional servers with unique ports, WAS does not automatically configure the virtual host for the server. Specifically, WAS does not automatically add the host alias ports to a virtual host. However, you can use the administrative console to add a new host alias for each of the ports that are used by the new server. To add a host alias, in the administrative console navigate to...
- Environment | Virtual hosts | default_host | Host Aliases | New
Clean all applicable profile logs or save them in another directory. You may want to clean or move the logs as they will be appended with the last configuration. This can make it difficult to view the most current information.
After you have configured a network deployment environment for BPM Advanced, if you test the connection to the cell-level jdbc/WPSDB data source ( in the administrative console, on the page Resources > JDBC > Data sources), you get a message saying the test connection operation failed with the exception com.ibm.wsspi.runtime.variable.UndefinedVariableException: Undefined Variable variable_name, where variable_name is a variable name such as WAS_INSTALL_ROOT, DB2_JCC_DRIVER_PATH, UNIVERSAL_JDBC_DRIVER_PATH or PUREQUERY_PATH. This does not necessarily indicate there will be a problem accessing the data source at run time. Ensure the location of your JDBC driver files is accessible to every client that must use the data source, and configure the variable with the full path of that location. Disregard the test connection error unless you are also experiencing trouble connecting to the data store at run time. For additional information, see the WebSphere Application Server documentation about the test connection service.
Related concepts:
Related tasks:IBM Business Process Manager configuration capabilities
Create the Standard Process Center deployment environment
Create a Process Center deployment environment to store, run and administer process applications and toolkits that are developed in Process Designer. You can create more than one deployment environments in the same cell using the Deployment Environment wizard. However, you can create only one Process Center-based deployment environment in a single cell.
Ensure that you have completed the following tasks:
- Installed the product
- Created the deployment manager profile and the associated nodes
- Ensure the database specified in the Database Configuration panel of the Deployment Environment wizard is already created. The deployment environment configuration never creates a database.
- Start all the local and remote nodes that to add in the deployment environment.
- When you create a 3-cluster deployment environment using the Deployment Environment wizard, the process might take a lot of time to complete. In that case, you can perform one of the following steps to create the 3-cluster environment:
- Increase the transaction timeout value using the Deployment Manager and re-create the deployment environment. See Preventing timeout and out-of-memory exceptions during installation or deployment.
- Do not create tables during the Deployment Environment creation. After creating the environment, create the databases, tables, and then run the bootstrap command.
- If you are using the Deployment Environment wizard, you can enable deployment manager trace for details about the deployment creation.
To enable trace for a single run and till the deployment manager restarts, log on to the administrative console, go to...
- Troubleshooting | Logs and trace | deployment_manager_name com.ibm.bpm.config.*=all to the Change log detail levels text area, and save the changes.
You must have Process Center installed to install a Process Center-based deployment environment. If you have a Process Server installed, start the IBM Installation Manager and modify the installation to use the Business Process Manager Advanced Process Center feature.
When security and role-based authorization are enabled, you must log in to the administrative console as a Cell administrator to create a deployment environment. This task describes the procedure for creating a deployment environment that is based on a specific pattern and uses the Deployment Environment wizard.
A snapshot that requires BPM Advanced Edition capability cannot be installed on more than one deployment environment in the same cell.
SQL Server considerations:
- Verify the user name and schema exist before the configuration is done. The schema value should be the default schema for the user chosen.
- Process Server and IBM Performance Data Warehouse should not use the same database.
- If connections to the database will be made by the current Windows user the server is running under, the SQL Server must have Windows authentication mode or SQL Server and Windows Authentication mode enabled, as specified through Microsoft SQL Server Management Studio.
To create the deployment environment.
- From the administrative console, navigate to the Deployment Environments page by clicking...
- Servers | Deployment Environments
- Launch the Deployment Environment wizard by clicking New on the Deployment Environments page.
The Create new deployment environment page is displayed.
The database provides isolation of internal groups, such as administrators. If the database is shared by two deployment environments, one administrators group is shared between them. When such a situation occurs, both administrators are able to login as administrator for each of the deployment environment.
- Enter a unique name for the deployment environment in the Deployment environment name field.
- Enter a user name for the deployment environment administrator in the Deployment environment administrator user name field.
IBM recommends to use a different administrator for each deployment environment and also the cell administrator.
- Enter a password for the deployment environment administrator in the Password field.
- Reconfirm the password in the Confirm password field.
- Enter a unique name for the deployment environment in the Deployment environment name field.
- From the BPM Deployment Environment Type section, select Standard Process Center.
Features represent the runtime processing capabilities of the deployment environment.
- From the section...
- Select the deployment environment pattern
...select a pattern for the deployment environment and click Next to display the Select Nodes page.
The available patterns are:
- Single Cluster: The application deployment target includes the messaging infrastructure and supporting applications.
- Application, Remote Messaging, Remote Support: A separate cluster each for application deployment, remote messaging, and remote support.
- On the Select Nodes page, select the nodes to include in this deployment environment, then click Next to display the Define Clusters page.
Select nodes that have the required capabilities for the environment you selected on the BPM Deployment Environment Features section.
Select at least one node for the deployment environment. For high-availability and failover environments, select at least two nodes. For scalability, you can add more nodes.
- On the Define Clusters page, assign the required number of clusters for each node and click Next to display the Customize Cluster Name and Ports page.
By default one cluster member is assigned on each node for each function. You change the number by replacing the number in each column.
A 0 (zero) value for a node means the node does not contribute to the selected function, based on features that you have selected.
- On the Customize Cluster Name and Ports page, customize the cluster names or cluster member names for the cluster type.
You can specify the starting port for the cluster members. The system generates default values for cluster member names and the starting port.
Ensure the starting port numbers you specify are at least 20 ports apart. Port numbers are reserved and assigned to each node for the cluster members using the port number specified. If you specify an initial port when you create the deployment environment, that same initial port specified would be assigned to the cluster member. For example, if the port number for the first cluster member is 2000, it would use the port numbers 2000, 2001, 2002, and so on. The port number of the second cluster member would be 2020 and the port numbers would be 2020, 2021, 2022, and so on. The port number of the third cluster member would be 2040.
If there is already a node on that physical system then there may be port conflicts and these must be resolved manually by changing the port values.
If you use additional servers with unique ports, WebSphere Application Server does not automatically configure the virtual host for the server. Specifically, WAS does not automatically add the host alias ports to a virtual host. However, you can use the administrative console to add a new host alias for each of the ports that are used by the new server.
- Required: On the Configure Databases page, select Microsoft SQL Server using Windows Authentication, configure the database parameters for data sources of the deployment environment, click Test connection, and after the connection succeeds click Next to go to the Summary page.
On this page, define the database information for the components that are included in this deployment environment. Where possible, the wizard supplies default information for the parameters, but change those values to match the values that you defined when you planned the environment.
The database specified in this panel must already exist. Deployment environment configuration never creates a database.
- Shared parameters
- Server: Server name where the database is located.
- Port: Port number to connect to the database.
- Create Tables: Create the required tables.
If this option is selected, ensure the user has sufficient rights to access the database, and create tables.
- Common database
- Name: name for the common database which is used for CommonDB components, Business Space, Business Process Choreographer, and Messaging.
- Process database
- Name: name for the Process Center database.
- Performance Data Warehouse database
- Name: name for the Performance Data Warehouse database.
- Select the databases to separate from the Common database.
- Messaging: Select this option to create a separate messaging engine database.
- Name: name for the messaging engine database.
- Messaging: Select this option to create a separate messaging engine database.
For an SQL server:
- Verify the user name and the schema exist before the configuration is done. The schema value should be the default schema for the user chosen.
- Process Server and IBM Performance Data Warehouse should not use the same database.
- If connections to the database will be made by the current Windows user the server is running under, the SQL Server must have Windows authentication mode or SQL Server and Windows Authentication mode enabled, as specified through Microsoft SQL Server Management Studio.
You can clear the Create Tables check box to create the tables manually instead of the configuration creating it automatically. The scripts to create tables are generated in the folder...
- BPM_Install/profiles/DmgrProfile/dbscripts
You can run the scripts from the dbscripts folder and do not need to generate scripts using BPMConfig.
You can edit all key parameters, such as the database name, whether or not to create tables, the data source runtime user name, and the password for the deployment environment. You can select which database to use for the given component.
Steps that cannot be completed through the Deployment Environment wizard, and which need to be completed manually, are listed on the Deferred Configuration page. You can view this page after you have created the deployment environment. To view this administrative console page, click...
- Servers | Deployment Environments | Deployment environment name | Deployment Environment Configuration | Additional Properties | Deferred Configuration
- Shared parameters
- Verify the information on the Summary page is correct and perform the following substeps:
- To exit without generating the configuration, click Cancel.
- To save the environment configuration to configure a similar Deployment Environment, click Export for Scripting.
- If you are satisfied with the deployment environment configuration, click Generate Deployment Environment to save and complete the configuration of the deployment environment. This will also generate a properties file in the BPM_Install_Root/logs/config folder on the deployment manager machine with a timestamp in the file name, bpmconfig-de_name-timestamp.properties. Save this file for future reference or for troubleshooting any issues.
- If you have postponed the Process Server database table creation by clearing the create table option on the Database page, create the tables and load the database with system information by running bootstrapProcessServerData.
This command must be run before starting any cluster members.
- Verify the deployment environment was created properly by completing the following steps:
- Log off from the administrative console, shut down the deployment manager, and then shut down all of the custom profiles.
- Start the custom profiles, start the deployment manager, and then log in to the administrative console.
- In the administrative console, start the deployment environment by clicking...
- Servers | Deployment Environments
Select the check box next to the deployment environment and clicking Start.
- After 5 to 10 minutes (or longer, depending on the system),
refresh the deployment environment page; the Status of the deployment environment changes to started.
- Locate the Tables folder for the common database. Check the tables have been created with the four schemas that you created manually.
- Optional: Check that tables have been created with the XXXBE## schema in the Business Process Choreographer database.
- In the administrative console, select Applications > Application Types > WebSphere enterprise applications and check the installed applications started successfully.
- Select Resources > JDBC > Data sources and test the connection of every component that is not related to the message engine (that is, every component that does not include ME in the name) is successful.
- Log off from the administrative console, shut down the deployment manager, and then shut down all of the custom profiles.
- Restart the following resources after you have completed your configurations in the order specified here. See Start and stop individual resources.
- Stop the deployment environment.
- Stop the node agent.
- Stop the deployment manager.
- Start the deployment manager.
- Start the node agent.
- Start the deployment environment.
For Advanced or Advanced-only deployment environments, the deployment manager and node agents need to be restarted for the cell scoped configuration to take affect. This is only required for the first deployment environment that you create.
When the configuration completes, you can examine the configuration files to view the changes.
Either save the changes to the master configuration or discard them.
If you use additional servers with unique ports, WAS does not automatically configure the virtual host for the server. Specifically, WAS does not automatically add the host alias ports to a virtual host. However, you can use the administrative console to add a new host alias for each of the ports that are used by the new server. To add a host alias, in the administrative console navigate to...
- Environment | Virtual hosts | default_host | Host Aliases | New
Clean all applicable profile logs or save them in another directory. You may want to clean or move the logs as they will be appended with the last configuration. This can make it difficult to view the most current information.
Related concepts:
Related tasks:IBM Business Process Manager configuration capabilities
Create the Advanced Process Server deployment environment
Create a Process Server deployment environment to run processes, services and modules deployed from the Process Center. Or, deploy modules either from the command line or from the WebSphere administrative console. You can create more than one deployment environments in the same cell using the Deployment Environment wizard.
Ensure that you have completed the following tasks:
- Installed the product
- Created the deployment manager profile and the associated nodes
- Ensure the database specified in the Database Configuration panel of the Deployment Environment wizard is already created. The deployment environment configuration never creates a database.
- Start all the local and remote nodes that to add in the deployment environment.
- When you create a 3-cluster deployment environment using the Deployment Environment wizard, the process might take a lot of time to complete. In that case, you can perform one of the following steps to create the 3-cluster environment:
- Increase the transaction timeout value using the Deployment Manager and re-create the deployment environment. See Preventing timeout and out-of-memory exceptions during installation or deployment.
- Do not create tables during the Deployment Environment creation. After creating the environment, create the databases, tables, and then run the bootstrap command.
- If you are using the Deployment Environment wizard, you can enable deployment manager trace for details about the deployment creation.
To enable trace for a single run and till the deployment manager restarts, log on to the administrative console, go to...
- Troubleshooting | Logs and trace | deployment_manager_name com.ibm.bpm.config.*=all to the Change log detail levels text area, and save the changes.
You must have Process Server installed to install a Process Server-based deployment environment. If you have a Process Center installed, start the IBM Installation Manager and modify the installation to use the Business Process Manager Advanced Process Server Production or Business Process Manager Advanced Process Server Non-Production feature.
When security and role-based authorization are enabled, you must log in to the administrative console as a Cell administrator to create a deployment environment. This task describes the procedure for creating a deployment environment that is based on a specific pattern and uses the Deployment Environment wizard.
A snapshot that requires BPM Advanced Edition capability cannot be installed on more than one deployment environment in the same cell.
SQL Server considerations:
- Verify the user name and schema exist before the configuration is done. The schema value should be the default schema for the user chosen.
- Process Server and IBM Performance Data Warehouse should not use the same database.
- If connections to the database will be made by the current Windows user the server is running under, the SQL Server must have Windows authentication mode or SQL Server and Windows Authentication mode enabled, as specified through Microsoft SQL Server Management Studio.
To create the deployment environment.
- From the administrative console, navigate to the Deployment Environments page by clicking...
- Servers | Deployment Environments
- Launch the Deployment Environment wizard by clicking New on the Deployment Environments page.
The Create new deployment environment page is displayed.
The database provides isolation of internal groups, such as administrators. If the database is shared by two deployment environments, one administrators group is shared between them. When such a situation occurs, both administrators are able to login as administrator for each of the deployment environment.
- Enter a unique name for the deployment environment in the Deployment environment name field.
- Enter a user name for the deployment environment administrator in the Deployment environment administrator user name field.
IBM recommends to use a different administrator for each deployment environment and also the cell administrator.
- Enter a password for the deployment environment administrator in the Password field.
- Reconfirm the password in the Confirm password field.
- Enter a unique name for the deployment environment in the Deployment environment name field.
- From the BPM Deployment Environment Type section, select Advanced Process Server.
Features represent the runtime processing capabilities of the deployment environment.
- From the section...
- Select the deployment environment pattern
...select a pattern for the deployment environment and click Next to display the Select Nodes page.
The available patterns are:
- Single Cluster: The application deployment target includes the messaging infrastructure and supporting applications.
- Application, Remote Messaging, Remote Support: A separate cluster each for application deployment, remote messaging, and remote support.
- On the Select Nodes page, select the nodes to include in this deployment environment, then click Next to display the Define Clusters page.
Select nodes that have the required capabilities for the environment you selected on the BPM Deployment Environment Features section.
Select at least one node for the deployment environment. For high-availability and failover environments, select at least two nodes. For scalability, you can add more nodes.
- On the Define Clusters page, assign the required number of clusters for each node and click Next to display the Customize Cluster Name and Ports page.
By default one cluster member is assigned on each node for each function. You change the number by replacing the number in each column.
A 0 (zero) value for a node means the node does not contribute to the selected function, based on features that you have selected.
- On the Customize Cluster Name and Ports page, customize the cluster names or cluster member names for the cluster type.
You can specify the starting port for the cluster members. The system generates default values for cluster member names and the starting port.
Ensure the starting port numbers you specify are at least 20 ports apart. Port numbers are reserved and assigned to each node for the cluster members using the port number specified. If you specify an initial port when you create the deployment environment, that same initial port specified would be assigned to the cluster member. For example, if the port number for the first cluster member is 2000, it would use the port numbers 2000, 2001, 2002, and so on. The port number of the second cluster member would be 2020 and the port numbers would be 2020, 2021, 2022, and so on. The port number of the third cluster member would be 2040.
If there is already a node on that physical system then there may be port conflicts and these must be resolved manually by changing the port values.
If you use additional servers with unique ports, WebSphere Application Server does not automatically configure the virtual host for the server. Specifically, WAS does not automatically add the host alias ports to a virtual host. However, you can use the administrative console to add a new host alias for each of the ports that are used by the new server.
- On the Configure Process Server page, set the values for the Process Center configuration and click Next.
- Environment name
Enter an environment name of the Process Server.
An environment name is the name by which this server or cluster will be known to a Process Center user.
- Environment type
From the pull-down list, select the environment type for the Process Server you are configuring.
The environment type refers to how the Process Server is used. For example, in what capacity will the Process Server be used - development, test, staging, or production. Load testing might be done on a test server, while a staging environment type might be used as a temporary location to host changes before putting those changes into production. You might specify a staging environment type if the Process Server you are configuring will be accessed and used to review content and new functionality.
There are four types of environments available for selection:
- Development
- The server will serve in a development capacity.
- Test
- The server will be used as a testing environment.
- Stage
- The server server will serve as a staging platform to be used as a preproduction server.
- Production
- The server will serve in a production capacity.
- Use server offline
Indicate whether the server you are configuring is an offline server.
An offline server is a Process Server that is not connected to the Process Center.
Offline servers can still be used when deploying snapshots of process applications. However the method for deploying process applications to an offline process server differs from the method for deploying process applications to an online process server.
- Protocol
Select either http:// or https:// as the connection protocol to the Process Center.
- Host name or virtual host in a load-balanced environment
Type the host or virtual host that this Process Server needs to communicate with Process Center.
Ensure specified the host name instead of localhost for the server name when you configure the Process Server. This is required when you are using the Process Designer remotely.
- Port
Port number of the Process Center.
- User name
Type a valid user name that exists on the Process Center. Process Server will connect to Process Center as this user.
- Password
Password for the user.
- Confirm password
Confirm the password for the user.
- Test Connection
Click to test the Process Center connection.
- Environment name
- Required: On the Configure Databases page, select Microsoft SQL Server using Windows Authentication, configure the database parameters for data sources of the deployment environment, click Test connection, and after the connection succeeds click Next to go to the Summary page.
On this page, define the database information for the components that are included in this deployment environment. Where possible, the wizard supplies default information for the parameters, but change those values to match the values that you defined when you planned the environment.
The database specified in this panel must already exist. Deployment environment configuration never creates a database.
- Shared parameters
- Server: Server name where the database is located.
- Port: Port number to connect to the database.
- Create Tables: Create the required tables.
If this option is selected, ensure the user has sufficient rights to access the database, and create tables.
- cellDB
The cellDB option is only visible when you create the first advanced deployment environment. After this, every advanced deployment environment that you shares the cellDB of the first environment.
- Name: name for the cell database.
- Common database
- Name: name for the common database which is used for CommonDB components, Business Space, Business Process Choreographer, and Messaging.
- Process database
- Name: name for the Process Center database.
- Performance Data Warehouse database
- Name: name for the Performance Data Warehouse database.
- Select the databases to separate from the Common database.
- Messaging: Select this option to create a separate messaging engine database.
- Name: name for the messaging engine database.
- Business Process Choreographer: Select this option to create a separate Business Process Choreographer database.
- Name: name for the Business Process Choreographer database.
- Messaging: Select this option to create a separate messaging engine database.
For an SQL server:
- Verify the user name and the schema exist before the configuration is done. The schema value should be the default schema for the user chosen.
- Process Server and IBM Performance Data Warehouse should not use the same database.
- If connections to the database will be made by the current Windows user the server is running under, the SQL Server must have Windows authentication mode or SQL Server and Windows Authentication mode enabled, as specified through Microsoft SQL Server Management Studio.
You can clear the Create Tables check box to create the tables manually instead of the configuration creating it automatically. The scripts to create tables are generated in the folder...
- BPM_Install/profiles/DmgrProfile/dbscripts
You can run the scripts from the dbscripts folder and do not need to generate scripts using BPMConfig.
You can edit all key parameters, such as the database name, whether or not to create tables, the data source runtime user name, and the password for the deployment environment. You can select which database to use for the given component.
Steps that cannot be completed through the Deployment Environment wizard, and which need to be completed manually, are listed on the Deferred Configuration page. You can view this page after you have created the deployment environment. To view this administrative console page, click...
- Servers | Deployment Environments | Deployment environment name | Deployment Environment Configuration | Additional Properties | Deferred Configuration
- Shared parameters
- Verify the information on the Summary page is correct and perform the following substeps:
- To exit without generating the configuration, click Cancel.
- To save the environment configuration to configure a similar Deployment Environment, click Export for Scripting.
- If you are satisfied with the deployment environment configuration, click Generate Deployment Environment to save and complete the configuration of the deployment environment. This will also generate a properties file in the BPM_Install_Root/logs/config folder on the deployment manager machine with a timestamp in the file name, bpmconfig-de_name-timestamp.properties. Save this file for future reference or for troubleshooting any issues.
- If you have postponed the Process Server database table creation by clearing the create table option on the Database page, create the tables and load the database with system information by running bootstrapProcessServerData.
This command must be run before starting any cluster members.
- Verify the deployment environment was created properly by completing the following steps:
- Log off from the administrative console, shut down the deployment manager, and then shut down all of the custom profiles.
- Start the custom profiles, start the deployment manager, and then log in to the administrative console.
- In the administrative console, start the deployment environment by clicking...
- Servers | Deployment Environments
Select the check box next to the deployment environment and clicking Start.
- After 5 to 10 minutes (or longer, depending on the system),
refresh the deployment environment page; the Status of the deployment environment changes to started.
- Locate the Tables folder for the common database. Check the tables have been created with the four schemas that you created manually.
- Optional: Check that tables have been created with the XXXBE## schema in the Business Process Choreographer database.
- In the administrative console, select Applications > Application Types > WebSphere enterprise applications and check the installed applications started successfully.
- Select Resources > JDBC > Data sources and test the connection of every component that is not related to the message engine (that is, every component that does not include ME in the name) is successful.
- Log off from the administrative console, shut down the deployment manager, and then shut down all of the custom profiles.
- Restart the following resources after you have completed your configurations in the order specified here. See Start and stop individual resources.
- Stop the deployment environment.
- Stop the node agent.
- Stop the deployment manager.
- Start the deployment manager.
- Start the node agent.
- Start the deployment environment.
For Advanced or Advanced-only deployment environments, the deployment manager and node agents need to be restarted for the cell scoped configuration to take affect. This is only required for the first deployment environment that you create.
When the configuration completes, you can examine the configuration files to view the changes.
Either save the changes to the master configuration or discard them.
If you use additional servers with unique ports, WAS does not automatically configure the virtual host for the server. Specifically, WAS does not automatically add the host alias ports to a virtual host. However, you can use the administrative console to add a new host alias for each of the ports that are used by the new server. To add a host alias, in the administrative console navigate to...
- Environment | Virtual hosts | default_host | Host Aliases | New
Clean all applicable profile logs or save them in another directory. You may want to clean or move the logs as they will be appended with the last configuration. This can make it difficult to view the most current information.
After you have configured a network deployment environment for BPM Advanced, if you test the connection to the cell-level jdbc/WPSDB data source ( in the administrative console, on the page Resources > JDBC > Data sources), you get a message saying the test connection operation failed with the exception com.ibm.wsspi.runtime.variable.UndefinedVariableException: Undefined Variable variable_name, where variable_name is a variable name such as WAS_INSTALL_ROOT, DB2_JCC_DRIVER_PATH, UNIVERSAL_JDBC_DRIVER_PATH or PUREQUERY_PATH. This does not necessarily indicate there will be a problem accessing the data source at run time. Ensure the location of your JDBC driver files is accessible to every client that must use the data source, and configure the variable with the full path of that location. Disregard the test connection error unless you are also experiencing trouble connecting to the data store at run time. For additional information, see the WebSphere Application Server documentation about the test connection service.
Related concepts:
Related tasks:IBM Business Process Manager configuration capabilities
Create the Standard Process Server deployment environment
Create a Process Server deployment environment to run processes and deployed from the Process Center. You can create more than one deployment environments in the same cell using the Deployment Environment wizard.
Ensure that you have completed the following tasks:
- Installed the product
- Created the deployment manager profile and the associated nodes
- Ensure the database specified in the Database Configuration panel of the Deployment Environment wizard is already created. The deployment environment configuration never creates a database.
- Start all the local and remote nodes that to add in the deployment environment.
- When you create a 3-cluster deployment environment using the Deployment Environment wizard, the process might take a lot of time to complete. In that case, you can perform one of the following steps to create the 3-cluster environment:
- Increase the transaction timeout value using the Deployment Manager and re-create the deployment environment. See Preventing timeout and out-of-memory exceptions during installation or deployment.
- Do not create tables during the Deployment Environment creation. After creating the environment, create the databases, tables, and then run the bootstrap command.
- If you are using the Deployment Environment wizard, you can enable deployment manager trace for details about the deployment creation.
To enable trace for a single run and till the deployment manager restarts, log on to the administrative console, go to...
- Troubleshooting | Logs and trace | deployment_manager_name com.ibm.bpm.config.*=all to the Change log detail levels text area, and save the changes.
You must have Process Server installed to install a Process Server-based deployment environment. If you have a Process Center installed, start the IBM Installation Manager and modify the installation to use the Business Process Manager Advanced Process Server Production or Business Process Manager Advanced Process Server Non-Production feature.
When security and role-based authorization are enabled, you must log in to the administrative console as a Cell administrator to create a deployment environment. This task describes the procedure for creating a deployment environment that is based on a specific pattern and uses the Deployment Environment wizard.
A snapshot that requires BPM Advanced Edition capability cannot be installed on more than one deployment environment in the same cell.
SQL Server considerations:
- Verify the user name and schema exist before the configuration is done. The schema value should be the default schema for the user chosen.
- Process Server and IBM Performance Data Warehouse should not use the same database.
- If connections to the database will be made by the current Windows user the server is running under, the SQL Server must have Windows authentication mode or SQL Server and Windows Authentication mode enabled, as specified through Microsoft SQL Server Management Studio.
To create the deployment environment.
- From the administrative console, navigate to the Deployment Environments page by clicking...
- Servers | Deployment Environments
- Launch the Deployment Environment wizard by clicking New on the Deployment Environments page.
The Create new deployment environment page is displayed.
The database provides isolation of internal groups, such as administrators. If the database is shared by two deployment environments, one administrators group is shared between them. When such a situation occurs, both administrators are able to login as administrator for each of the deployment environment.
- Enter a unique name for the deployment environment in the Deployment environment name field.
- Enter a user name for the deployment environment administrator in the Deployment environment administrator user name field.
IBM recommends to use a different administrator for each deployment environment and also the cell administrator.
- Enter a password for the deployment environment administrator in the Password field.
- Reconfirm the password in the Confirm password field.
- Enter a unique name for the deployment environment in the Deployment environment name field.
- From the BPM Deployment Environment Type section, select Standard Process Server.
Features represent the runtime processing capabilities of the deployment environment.
- From the section...
- Select the deployment environment pattern
...select a pattern for the deployment environment and click Next to display the Select Nodes page.
The available patterns are:
- Single Cluster: The application deployment target includes the messaging infrastructure and supporting applications.
- Application, Remote Messaging, Remote Support: A separate cluster each for application deployment, remote messaging, and remote support.
- On the Select Nodes page, select the nodes to include in this deployment environment, then click Next to display the Define Clusters page.
Select nodes that have the required capabilities for the environment you selected on the BPM Deployment Environment Features section.
Select at least one node for the deployment environment. For high-availability and failover environments, select at least two nodes. For scalability, you can add more nodes.
- On the Define Clusters page, assign the required number of clusters for each node and click Next to display the Customize Cluster Name and Ports page.
By default one cluster member is assigned on each node for each function. You change the number by replacing the number in each column.
A 0 (zero) value for a node means the node does not contribute to the selected function, based on features that you have selected.
- On the Customize Cluster Name and Ports page, customize the cluster names or cluster member names for the cluster type.
You can specify the starting port for the cluster members. The system generates default values for cluster member names and the starting port.
Ensure the starting port numbers you specify are at least 20 ports apart. Port numbers are reserved and assigned to each node for the cluster members using the port number specified. If you specify an initial port when you create the deployment environment, that same initial port specified would be assigned to the cluster member. For example, if the port number for the first cluster member is 2000, it would use the port numbers 2000, 2001, 2002, and so on. The port number of the second cluster member would be 2020 and the port numbers would be 2020, 2021, 2022, and so on. The port number of the third cluster member would be 2040.
If there is already a node on that physical system then there may be port conflicts and these must be resolved manually by changing the port values.
If you use additional servers with unique ports, WebSphere Application Server does not automatically configure the virtual host for the server. Specifically, WAS does not automatically add the host alias ports to a virtual host. However, you can use the administrative console to add a new host alias for each of the ports that are used by the new server.
- On the Configure Process Server page, set the values for the Process Center configuration and click Next.
- Environment name
Enter an environment name of the Process Server.
An environment name is the name by which this server or cluster will be known to a Process Center user.
- Environment type
From the pull-down list, select the environment type for the Process Server you are configuring.
The environment type refers to how the Process Server is used. For example, in what capacity will the Process Server be used - development, test, staging, or production. Load testing might be done on a test server, while a staging environment type might be used as a temporary location to host changes before putting those changes into production. You might specify a staging environment type if the Process Server you are configuring will be accessed and used to review content and new functionality.
There are four types of environments available for selection:
- Development
- The server will serve in a development capacity.
- Test
- The server will be used as a testing environment.
- Stage
- The server server will serve as a staging platform to be used as a preproduction server.
- Production
- The server will serve in a production capacity.
- Use server offline
Indicate whether the server you are configuring is an offline server.
An offline server is a Process Server that is not connected to the Process Center.
Offline servers can still be used when deploying snapshots of process applications. However the method for deploying process applications to an offline process server differs from the method for deploying process applications to an online process server.
- Protocol
Select either http:// or https:// as the connection protocol to the Process Center.
- Host name or virtual host in a load-balanced environment
Type the host or virtual host that this Process Server needs to communicate with Process Center.
Ensure specified the host name instead of localhost for the server name when you configure the Process Server. This is required when you are using the Process Designer remotely.
- Port
Port number of the Process Center.
- User name
Type a valid user name that exists on the Process Center. Process Server will connect to Process Center as this user.
- Password
Password for the user.
- Confirm password
Confirm the password for the user.
- Test Connection
Click to test the Process Center connection.
- Environment name
- Required: On the Configure Databases page, select Microsoft SQL Server using Windows Authentication, configure the database parameters for data sources of the deployment environment, click Test connection, and after the connection succeeds click Next to go to the Summary page.
On this page, define the database information for the components that are included in this deployment environment. Where possible, the wizard supplies default information for the parameters, but change those values to match the values that you defined when you planned the environment.
The database specified in this panel must already exist. Deployment environment configuration never creates a database.
- Shared parameters
- Server: Server name where the database is located.
- Port: Port number to connect to the database.
- Create Tables: Create the required tables.
If this option is selected, ensure the user has sufficient rights to access the database, and create tables.
- Common database
- Name: name for the common database which is used for CommonDB components, Business Space, Business Process Choreographer, and Messaging.
- Process database
- Name: name for the Process Center database.
- Performance Data Warehouse database
- Name: name for the Performance Data Warehouse database.
- Select the databases to separate from the Common database.
- Messaging: Select this option to create a separate messaging engine database.
- Name: name for the messaging engine database.
- Messaging: Select this option to create a separate messaging engine database.
For an SQL server:
- Verify the user name and the schema exist before the configuration is done. The schema value should be the default schema for the user chosen.
- Process Server and IBM Performance Data Warehouse should not use the same database.
- If connections to the database will be made by the current Windows user the server is running under, the SQL Server must have Windows authentication mode or SQL Server and Windows Authentication mode enabled, as specified through Microsoft SQL Server Management Studio.
You can clear the Create Tables check box to create the tables manually instead of the configuration creating it automatically. The scripts to create tables are generated in the folder...
- BPM_Install/profiles/DmgrProfile/dbscripts
You can run the scripts from the dbscripts folder and do not need to generate scripts using BPMConfig.
You can edit all key parameters, such as the database name, whether or not to create tables, the data source runtime user name, and the password for the deployment environment. You can select which database to use for the given component.
Steps that cannot be completed through the Deployment Environment wizard, and which need to be completed manually, are listed on the Deferred Configuration page. You can view this page after you have created the deployment environment. To view this administrative console page, click...
- Servers | Deployment Environments | Deployment environment name | Deployment Environment Configuration | Additional Properties | Deferred Configuration
- Shared parameters
- Verify the information on the Summary page is correct and perform the following substeps:
- To exit without generating the configuration, click Cancel.
- To save the environment configuration to configure a similar Deployment Environment, click Export for Scripting.
- If you are satisfied with the deployment environment configuration, click Generate Deployment Environment to save and complete the configuration of the deployment environment. This will also generate a properties file in the BPM_Install_Root/logs/config folder on the deployment manager machine with a timestamp in the file name, bpmconfig-de_name-timestamp.properties. Save this file for future reference or for troubleshooting any issues.
- If you have postponed the Process Server database table creation by clearing the create table option on the Database page, create the tables and load the database with system information by running bootstrapProcessServerData.
This command must be run before starting any cluster members.
- Verify the deployment environment was created properly by completing the following steps:
- Log off from the administrative console, shut down the deployment manager, and then shut down all of the custom profiles.
- Start the custom profiles, start the deployment manager, and then log in to the administrative console.
- In the administrative console, start the deployment environment by clicking...
- Servers | Deployment Environments
Select the check box next to the deployment environment and clicking Start.
- After 5 to 10 minutes (or longer, depending on the system),
refresh the deployment environment page; the Status of the deployment environment changes to started.
- Locate the Tables folder for the common database. Check the tables have been created with the four schemas that you created manually.
- Optional: Check that tables have been created with the XXXBE## schema in the Business Process Choreographer database.
- In the administrative console, select Applications > Application Types > WebSphere enterprise applications and check the installed applications started successfully.
- Select Resources > JDBC > Data sources and test the connection of every component that is not related to the message engine (that is, every component that does not include ME in the name) is successful.
- Log off from the administrative console, shut down the deployment manager, and then shut down all of the custom profiles.
- Restart the following resources after you have completed your configurations in the order specified here. See Start and stop individual resources.
- Stop the deployment environment.
- Stop the node agent.
- Stop the deployment manager.
- Start the deployment manager.
- Start the node agent.
- Start the deployment environment.
For Advanced or Advanced-only deployment environments, the deployment manager and node agents need to be restarted for the cell scoped configuration to take affect. This is only required for the first deployment environment that you create.
When the configuration completes, you can examine the configuration files to view the changes.
Either save the changes to the master configuration or discard them.
If you use additional servers with unique ports, WAS does not automatically configure the virtual host for the server. Specifically, WAS does not automatically add the host alias ports to a virtual host. However, you can use the administrative console to add a new host alias for each of the ports that are used by the new server. To add a host alias, in the administrative console navigate to...
- Environment | Virtual hosts | default_host | Host Aliases | New
Clean all applicable profile logs or save them in another directory. You may want to clean or move the logs as they will be appended with the last configuration. This can make it difficult to view the most current information.
Related concepts:
Related tasks:IBM Business Process Manager configuration capabilities
Create the Advanced-only Process Server deployment environment
Create an Advanced-only Process Server deployment environment if you only want function that is equivalent to WebSphere Process Server or WebSphere Enterprise Service Bus. You can run SCA modules that are created in Integration Designer. You can deploy the modules either from the command line or from the WebSphere administrative console.
Ensure that you have completed the following tasks:
- Installed the product
- Created the deployment manager profile and the associated nodes
- Ensure the database specified in the Database Configuration panel of the Deployment Environment wizard is already created. The deployment environment configuration never creates a database.
- Start all the local and remote nodes that to add in the deployment environment.
- When you create a 3-cluster deployment environment using the Deployment Environment wizard, the process might take a lot of time to complete. In that case, you can perform one of the following steps to create the 3-cluster environment:
- Increase the transaction timeout value using the Deployment Manager and re-create the deployment environment. See Preventing timeout and out-of-memory exceptions during installation or deployment.
- Do not create tables during the Deployment Environment creation. After creating the environment, create the database, and tables.
- If you are using the Deployment Environment wizard, you can enable deployment manager trace for details about the deployment creation.
To enable trace for a single run and till the deployment manager restarts, log on to the administrative console, go to...
- Troubleshooting | Logs and trace | deployment_manager_name com.ibm.bpm.config.*=all to the Change log detail levels text area, and save the changes.
When security and role-based authorization are enabled, you must log in to the administrative console as a Cell administrator to create a deployment environment. This task describes the procedure for creating a deployment environment that is based on a specific pattern and uses the Deployment Environment wizard.
A snapshot that requires BPM Advanced Edition capability cannot be installed on more than one deployment environment in the same cell.
SQL Server considerations:
- Verify the user name and schema exist before the configuration is done. The schema value should be the default schema for the user chosen.
- If connections to the database will be made by the current Windows user the server is running under, the SQL Server must have Windows authentication mode or SQL Server and Windows Authentication mode enabled, as specified through Microsoft SQL Server Management Studio.
To create the deployment environment.
- From the administrative console, navigate to the Deployment Environments page by clicking...
- Servers | Deployment Environments
- Launch the Deployment Environment wizard by clicking New on the Deployment Environments page.
The Create new deployment environment page is displayed.
The database provides isolation of internal groups, such as administrators. If the database is shared by two deployment environments, one administrators group is shared between them. When such a situation occurs, both administrators are able to login as administrator for each of the deployment environment.
- Enter a unique name for the deployment environment in the Deployment environment name field.
- Enter a user name for the deployment environment administrator in the Deployment environment administrator user name field.
IBM recommends to use a different administrator for each deployment environment and also the cell administrator.
- Enter a password for the deployment environment administrator in the Password field.
- Reconfirm the password in the Confirm password field.
- Enter a unique name for the deployment environment in the Deployment environment name field.
- From the BPM Deployment Environment Type section, select Advanced-only Process Server.
Features represent the runtime processing capabilities of the deployment environment.
- From the section...
- Select the deployment environment pattern
...select a pattern for the deployment environment and click Next to display the Select Nodes page.
The available patterns are:
- Single Cluster: The application deployment target includes the messaging infrastructure and supporting applications.
- Application, Remote Messaging, Remote Support: A separate cluster each for application deployment, remote messaging, and remote support.
- On the Select Nodes page, select the nodes to include in this deployment environment, then click Next to display the Define Clusters page.
Select nodes that have the required capabilities for the environment you selected on the BPM Deployment Environment Features section.
Select at least one node for the deployment environment. For high-availability and failover environments, select at least two nodes. For scalability, you can add more nodes.
- On the Define Clusters page, assign the required number of clusters for each node and click Next to display the Customize Cluster Name and Ports page.
By default one cluster member is assigned on each node for each function. You change the number by replacing the number in each column.
A 0 (zero) value for a node means the node does not contribute to the selected function, based on features that you have selected.
- On the Customize Cluster Name and Ports page, customize the cluster names or cluster member names for the cluster type.
You can specify the starting port for the cluster members. The system generates default values for cluster member names and the starting port.
Ensure the starting port numbers you specify are at least 20 ports apart. Port numbers are reserved and assigned to each node for the cluster members using the port number specified. If you specify an initial port when you create the deployment environment, that same initial port specified would be assigned to the cluster member. For example, if the port number for the first cluster member is 2000, it would use the port numbers 2000, 2001, 2002, and so on. The port number of the second cluster member would be 2020 and the port numbers would be 2020, 2021, 2022, and so on. The port number of the third cluster member would be 2040.
If there is already a node on that physical system then there may be port conflicts and these must be resolved manually by changing the port values.
If you use additional servers with unique ports, WAS does not automatically configure the virtual host for the server. Specifically, WAS does not automatically add the host alias ports to a virtual host. However, you can use the administrative console to add a new host alias for each of the ports that are used by the new server.
- Required: On the Configure Databases page, select Microsoft SQL Server using Windows Authentication, configure the database parameters for data sources of the deployment environment, click Test connection, and after the connection succeeds click Next to go to the Summary page.
On this page, define the database information for the components that are included in this deployment environment. Where possible, the wizard supplies default information for the parameters, but change those values to match the values that you defined when you planned the environment.
The database specified in this panel must already exist. Deployment environment configuration never creates a database.
- Shared parameters
- Server: Server name where the database is located.
- Port: Port number to connect to the database.
- Create Tables: Create the required tables.
If this option is selected, ensure the user has sufficient rights to access the database, and create tables.
- cellDB
The cellDB option is only visible when you create the first advanced deployment environment. After this, every advanced deployment environment that you shares the cellDB of the first environment.
- Name: name for the cell database.
- Common database
- Name: name for the common database which is used for CommonDB components, Business Space, Business Process Choreographer, and Messaging.
- Select the databases to separate from the Common database.
- Messaging: Select this option to create a separate messaging engine database.
- Name: name for the messaging engine database.
- Business Process Choreographer: Select this option to create a separate Business Process Choreographer database.
- Name: name for the Business Process Choreographer database.
- Messaging: Select this option to create a separate messaging engine database.
For an SQL server:
- Verify the user name and the schema exist before the configuration is done. The schema value should be the default schema for the user chosen.
- Process Server and IBM Performance Data Warehouse should not use the same database.
- If connections to the database will be made by the current Windows user the server is running under, the SQL Server must have Windows authentication mode or SQL Server and Windows Authentication mode enabled, as specified through Microsoft SQL Server Management Studio.
You can clear the Create Tables check box to create the tables manually instead of the configuration creating it automatically. The scripts to create tables are generated in the folder...
- BPM_Install/profiles/DmgrProfile/dbscripts
You can run the scripts from the dbscripts folder and do not need to generate scripts using BPMConfig.
You can edit all key parameters, such as the database name, whether or not to create tables, the data source runtime user name, and the password for the deployment environment. You can select which database to use for the given component.
Steps that cannot be completed through the Deployment Environment wizard, and which need to be completed manually, are listed on the Deferred Configuration page. You can view this page after you have created the deployment environment. To view this administrative console page, click...
- Servers | Deployment Environments | Deployment environment name | Deployment Environment Configuration | Additional Properties | Deferred Configuration
- Shared parameters
- Verify the information on the Summary page is correct and perform the following substeps:
- To exit without generating the configuration, click Cancel.
- To save the environment configuration to configure a similar Deployment Environment, click Export for Scripting.
- If you are satisfied with the deployment environment configuration, click Generate Deployment Environment to save and complete the configuration of the deployment environment. This will also generate a properties file in the BPM_Install_Root/logs/config folder on the deployment manager machine with a timestamp in the file name, bpmconfig-de_name-timestamp.properties. Save this file for future reference or for troubleshooting any issues.
- Verify the deployment environment was created properly by completing the following steps:
- Log off from the administrative console, shut down the deployment manager, and then shut down all of the custom profiles.
- Start the custom profiles, start the deployment manager, and then log in to the administrative console.
- In the administrative console, start the deployment environment by clicking...
- Servers | Deployment Environments
Select the check box next to the deployment environment and clicking Start.
- After 5 to 10 minutes (or longer, depending on the system),
refresh the deployment environment page; the Status of the deployment environment changes to started.
- Locate the Tables folder for the common database. Check the tables have been created with the four schemas that you created manually.
- Optional: Check that tables have been created with the XXXBE## schema in the Business Process Choreographer database.
- In the administrative console, select Applications > Application Types > WebSphere enterprise applications and check the installed applications started successfully.
- Select Resources > JDBC > Data sources and test the connection of every component that is not related to the message engine (that is, every component that does not include ME in the name) is successful.
- Log off from the administrative console, shut down the deployment manager, and then shut down all of the custom profiles.
- Restart the following resources after you have completed your configurations in the order specified here. See Start and stop individual resources.
- Stop the deployment environment.
- Stop the node agent.
- Stop the deployment manager.
- Start the deployment manager.
- Start the node agent.
- Start the deployment environment.
For Advanced or Advanced-only deployment environments, the deployment manager and node agents need to be restarted for the cell scoped configuration to take affect. This is only required for the first deployment environment that you create.
When the configuration completes, you can examine the configuration files to view the changes.
Either save the changes to the master configuration or discard them.
If you use additional servers with unique ports, WAS does not automatically configure the virtual host for the server. Specifically, WAS does not automatically add the host alias ports to a virtual host. However, you can use the administrative console to add a new host alias for each of the ports that are used by the new server. To add a host alias, in the administrative console navigate to...
- Environment | Virtual hosts | default_host | Host Aliases | New
Clean all applicable profile logs or save them in another directory. You may want to clean or move the logs as they will be appended with the last configuration. This can make it difficult to view the most current information.
After you have configured a network deployment environment for BPM Advanced, if you test the connection to the cell-level jdbc/WPSDB data source ( in the administrative console, on the page Resources > JDBC > Data sources), you get a message saying the test connection operation failed with the exception com.ibm.wsspi.runtime.variable.UndefinedVariableException: Undefined Variable variable_name, where variable_name is a variable name such as WAS_INSTALL_ROOT, DB2_JCC_DRIVER_PATH, UNIVERSAL_JDBC_DRIVER_PATH or PUREQUERY_PATH. This does not necessarily indicate there will be a problem accessing the data source at run time. Ensure the location of your JDBC driver files is accessible to every client that must use the data source, and configure the variable with the full path of that location. Disregard the test connection error unless you are also experiencing trouble connecting to the data store at run time. For additional information, see the WebSphere Application Server documentation about the test connection service.
Related concepts:
Related tasks:IBM Business Process Manager configuration capabilities
SQL Server database server without Windows authentication
Create the network deployment environment to work with an SQL Server database server without Windows authentication. You will need to provide the username and passsword for accessing the SQL database.
- Create the Advanced Process Center deployment environment
Create a Process Center deployment environment to store, run and administer process applications and toolkits that are developed in Process Designer and Integration Designer.
You can create more than one deployment environments in the same cell using the Deployment Environment wizard. However, you can create only one Process Center-based deployment environment in a single cell.
- Create the Standard Process Center deployment environment
Create a Process Center deployment environment to store, run and administer process applications and toolkits that are developed in Process Designer.
You can create more than one deployment environments in the same cell using the Deployment Environment wizard. However, you can create only one Process Center-based deployment environment in a single cell.
- Create the Advanced Process Server deployment environment
Create a Process Server deployment environment to run processes, services and modules deployed from the Process Center. Or, deploy modules either from the command line or from the WebSphere administrative console. You can create more than one deployment environments in the same cell using the Deployment Environment wizard.
- Create the Standard Process Server deployment environment
Create a Process Server deployment environment to run processes and deployed from the Process Center.
You can create more than one deployment environments in the same cell using the Deployment Environment wizard.
- Create the Advanced-only Process Server deployment environment
Create an Advanced-only Process Server deployment environment if you only want function that is equivalent to WebSphere Process Server or WebSphere Enterprise Service Bus.
You can run SCA modules that are created in Integration Designer. You can deploy the modules either from the command line or from the WebSphere administrative console.
Create the Advanced Process Center deployment environment
Create a Process Center deployment environment to store, run and administer process applications and toolkits that are developed in Process Designer and Integration Designer. You can create more than one deployment environments in the same cell using the Deployment Environment wizard. However, you can create only one Process Center-based deployment environment in a single cell.
Ensure that you have completed the following tasks:
- Installed the product
- Created the deployment manager profile and the associated nodes
- Ensure the database specified in the Database Configuration panel of the Deployment Environment wizard is already created. The deployment environment configuration never creates a database.
- Start all the local and remote nodes that to add in the deployment environment.
- When you create a 3-cluster deployment environment using the Deployment Environment wizard, the process might take a lot of time to complete. In that case, you can perform one of the following steps to create the 3-cluster environment:
- Increase the transaction timeout value using the Deployment Manager and re-create the deployment environment. See Preventing timeout and out-of-memory exceptions during installation or deployment.
- Do not create tables during the Deployment Environment creation. After creating the environment, create the databases, tables, and then run the bootstrap command.
- If you are using the Deployment Environment wizard, you can enable deployment manager trace for details about the deployment creation.
To enable trace for a single run and till the deployment manager restarts, log on to the administrative console, go to...
- Troubleshooting | Logs and trace | deployment_manager_name com.ibm.bpm.config.*=all to the Change log detail levels text area, and save the changes.
You must have Process Center installed to install a Process Center-based deployment environment. If you have a Process Server installed, start the IBM Installation Manager and modify the installation to use the Business Process Manager Advanced Process Center feature.
When security and role-based authorization are enabled, you must log in to the administrative console as a Cell administrator to create a deployment environment. This task describes the procedure for creating a deployment environment that is based on a specific pattern and uses the Deployment Environment wizard.
A snapshot that requires BPM Advanced Edition capability cannot be installed on more than one deployment environment in the same cell.
SQL Server considerations:
- Verify the user name and schema exist before the configuration is done. The schema value should be the default schema for the user chosen.
- Process Server and IBM Performance Data Warehouse should not use the same database.
- If connections to the database will be made by the current Windows user the server is running under, the SQL Server must have Windows authentication mode or SQL Server and Windows Authentication mode enabled, as specified through Microsoft SQL Server Management Studio.
To create the deployment environment.
- From the administrative console, navigate to the Deployment Environments page by clicking...
- Servers | Deployment Environments
- Launch the Deployment Environment wizard by clicking New on the Deployment Environments page.
The Create new deployment environment page is displayed.
The database provides isolation of internal groups, such as administrators. If the database is shared by two deployment environments, one administrators group is shared between them. When such a situation occurs, both administrators are able to login as administrator for each of the deployment environment.
- Enter a unique name for the deployment environment in the Deployment environment name field.
- Enter a user name for the deployment environment administrator in the Deployment environment administrator user name field.
IBM recommends to use a different administrator for each deployment environment and also the cell administrator.
- Enter a password for the deployment environment administrator in the Password field.
- Reconfirm the password in the Confirm password field.
- Enter a unique name for the deployment environment in the Deployment environment name field.
- From the BPM Deployment Environment Type section, select Advanced Process Center.
Features represent the runtime processing capabilities of the deployment environment.
- From the section...
- Select the deployment environment pattern
...select a pattern for the deployment environment and click Next to display the Select Nodes page.
The available patterns are:
- Single Cluster: The application deployment target includes the messaging infrastructure and supporting applications.
- Application, Remote Messaging, Remote Support: A separate cluster each for application deployment, remote messaging, and remote support.
- On the Select Nodes page, select the nodes to include in this deployment environment, then click Next to display the Define Clusters page.
Select nodes that have the required capabilities for the environment you selected on the BPM Deployment Environment Features section.
Select at least one node for the deployment environment. For high-availability and failover environments, select at least two nodes. For scalability, you can add more nodes.
- On the Define Clusters page, assign the required number of clusters for each node and click Next to display the Customize Cluster Name and Ports page.
By default one cluster member is assigned on each node for each function. You change the number by replacing the number in each column.
A 0 (zero) value for a node means the node does not contribute to the selected function, based on features that you have selected.
- On the Customize Cluster Name and Ports page, customize the cluster names or cluster member names for the cluster type.
You can specify the starting port for the cluster members. The system generates default values for cluster member names and the starting port.
Ensure the starting port numbers you specify are at least 20 ports apart. Port numbers are reserved and assigned to each node for the cluster members using the port number specified. If you specify an initial port when you create the deployment environment, that same initial port specified would be assigned to the cluster member. For example, if the port number for the first cluster member is 2000, it would use the port numbers 2000, 2001, 2002, and so on. The port number of the second cluster member would be 2020 and the port numbers would be 2020, 2021, 2022, and so on. The port number of the third cluster member would be 2040.
If there is already a node on that physical system then there may be port conflicts and these must be resolved manually by changing the port values.
If you use additional servers with unique ports, WebSphere Application Server does not automatically configure the virtual host for the server. Specifically, WAS does not automatically add the host alias ports to a virtual host. However, you can use the administrative console to add a new host alias for each of the ports that are used by the new server.
- Required: On the Configure Databases page, select Microsoft SQL Server without Windows Authentication, configure the database parameters for data sources of the deployment environment, click Test connection, and after the connection succeeds click Next to go to the Summary page.
On this page, define the database information for the components that are included in this deployment environment. Where possible, the wizard supplies default information for the parameters, but change those values to match the values that you defined when you planned the environment.
The database specified in this panel must already exist. Deployment environment configuration never creates a database.
- Shared parameters
- User name: User name to connect to the database.
- Password: Password for the user name.
- Confirm password: Confirm the password for the user name.
- Server: Server name where the database is located.
- Port: Port number to connect to the database.
- Create Tables: Create the required tables.
If this option is selected, ensure the user has sufficient rights to access the database, and create tables.
- cellDB
The cellDB option is only visible when you create the first advanced deployment environment. After this, every advanced deployment environment that you shares the cellDB of the first environment.
- Name: name for the cell database.
- Common database
- Name: name for the common database which is used for CommonDB components, Business Space, Business Process Choreographer, and Messaging.
- Process database
- Name: name for the Process Center database.
- Performance Data Warehouse database
- Name: name for the Performance Data Warehouse database.
- Select the databases to separate from the Common database.
- Messaging: Select this option to create a separate messaging engine database.
- Name: name for the messaging engine database.
- Business Process Choreographer: Select this option to create a separate Business Process Choreographer database.
- Name: name for the Business Process Choreographer database.
- Messaging: Select this option to create a separate messaging engine database.
For an SQL server:
- Verify the user name and the schema exist before the configuration is done. The schema value should be the default schema for the user chosen.
- Process Server and IBM Performance Data Warehouse should not use the same database.
- If connections to the database will be made by the current Windows user the server is running under, the SQL Server must have Windows authentication mode or SQL Server and Windows Authentication mode enabled, as specified through Microsoft SQL Server Management Studio.
You can clear the Create Tables check box to create the tables manually instead of the configuration creating it automatically. The scripts to create tables are generated in the folder...
- BPM_Install/profiles/DmgrProfile/dbscripts
You can run the scripts from the dbscripts folder and do not need to generate scripts using BPMConfig.
You can edit all key parameters, such as the database name, whether or not to create tables, the data source runtime user name, and the password for the deployment environment. You can select which database to use for the given component.
Steps that cannot be completed through the Deployment Environment wizard, and which need to be completed manually, are listed on the Deferred Configuration page. You can view this page after you have created the deployment environment. To view this administrative console page, click...
- Servers | Deployment Environments | Deployment environment name | Deployment Environment Configuration | Additional Properties | Deferred Configuration
- Shared parameters
- Verify the information on the Summary page is correct and perform the following substeps:
- To exit without generating the configuration, click Cancel.
- To save the environment configuration to configure a similar Deployment Environment, click Export for Scripting.
- If you are satisfied with the deployment environment configuration, click Generate Deployment Environment to save and complete the configuration of the deployment environment. This will also generate a properties file in the BPM_Install_Root/logs/config folder on the deployment manager machine with a timestamp in the file name, bpmconfig-de_name-timestamp.properties. Save this file for future reference or for troubleshooting any issues.
- If you have postponed the Process Server database table creation by clearing the create table option on the Database page, create the tables and load the database with system information by running bootstrapProcessServerData.
This command must be run before starting any cluster members.
- Verify the deployment environment was created properly by completing the following steps:
- Log off from the administrative console, shut down the deployment manager, and then shut down all of the custom profiles.
- Start the custom profiles, start the deployment manager, and then log in to the administrative console.
- In the administrative console, start the deployment environment by clicking...
- Servers | Deployment Environments
Select the check box next to the deployment environment and clicking Start.
- After 5 to 10 minutes (or longer, depending on the system),
refresh the deployment environment page; the Status of the deployment environment changes to started.
- Locate the Tables folder for the common database. Check the tables have been created with the four schemas that you created manually.
- Optional: Check that tables have been created with the XXXBE## schema in the Business Process Choreographer database.
- In the administrative console, select Applications > Application Types > WebSphere enterprise applications and check the installed applications started successfully.
- Select Resources > JDBC > Data sources and test the connection of every component that is not related to the message engine (that is, every component that does not include ME in the name) is successful.
- Log off from the administrative console, shut down the deployment manager, and then shut down all of the custom profiles.
- Restart the following resources after you have completed your configurations in the order specified here. See Start and stop individual resources.
- Stop the deployment environment.
- Stop the node agent.
- Stop the deployment manager.
- Start the deployment manager.
- Start the node agent.
- Start the deployment environment.
For Advanced or Advanced-only deployment environments, the deployment manager and node agents need to be restarted for the cell scoped configuration to take affect. This is only required for the first deployment environment that you create.
When the configuration completes, you can examine the configuration files to view the changes.
Either save the changes to the master configuration or discard them.
If you use additional servers with unique ports, WAS does not automatically configure the virtual host for the server. Specifically, WAS does not automatically add the host alias ports to a virtual host. However, you can use the administrative console to add a new host alias for each of the ports that are used by the new server. To add a host alias, in the administrative console navigate to...
- Environment | Virtual hosts | default_host | Host Aliases | New
Clean all applicable profile logs or save them in another directory. You may want to clean or move the logs as they will be appended with the last configuration. This can make it difficult to view the most current information.
After you have configured a network deployment environment for BPM Advanced, if you test the connection to the cell-level jdbc/WPSDB data source ( in the administrative console, on the page Resources > JDBC > Data sources), you get a message saying the test connection operation failed with the exception com.ibm.wsspi.runtime.variable.UndefinedVariableException: Undefined Variable variable_name, where variable_name is a variable name such as WAS_INSTALL_ROOT, DB2_JCC_DRIVER_PATH, UNIVERSAL_JDBC_DRIVER_PATH or PUREQUERY_PATH. This does not necessarily indicate there will be a problem accessing the data source at run time. Ensure the location of your JDBC driver files is accessible to every client that must use the data source, and configure the variable with the full path of that location. Disregard the test connection error unless you are also experiencing trouble connecting to the data store at run time. For additional information, see the WebSphere Application Server documentation about the test connection service.
Related concepts:
Related tasks:IBM Business Process Manager configuration capabilities
Create the Standard Process Center deployment environment
Create a Process Center deployment environment to store, run and administer process applications and toolkits that are developed in Process Designer. You can create more than one deployment environments in the same cell using the Deployment Environment wizard. However, you can create only one Process Center-based deployment environment in a single cell.
Ensure that you have completed the following tasks:
- Installed the product
- Created the deployment manager profile and the associated nodes
- Ensure the database specified in the Database Configuration panel of the Deployment Environment wizard is already created. The deployment environment configuration never creates a database.
- Start all the local and remote nodes that to add in the deployment environment.
- When you create a 3-cluster deployment environment using the Deployment Environment wizard, the process might take a lot of time to complete. In that case, you can perform one of the following steps to create the 3-cluster environment:
- Increase the transaction timeout value using the Deployment Manager and re-create the deployment environment. See Preventing timeout and out-of-memory exceptions during installation or deployment.
- Do not create tables during the Deployment Environment creation. After creating the environment, create the databases, tables, and then run the bootstrap command.
- If you are using the Deployment Environment wizard, you can enable deployment manager trace for details about the deployment creation.
To enable trace for a single run and till the deployment manager restarts, log on to the administrative console, go to...
- Troubleshooting | Logs and trace | deployment_manager_name com.ibm.bpm.config.*=all to the Change log detail levels text area, and save the changes.
You must have Process Center installed to install a Process Center-based deployment environment. If you have a Process Server installed, start the IBM Installation Manager and modify the installation to use the Business Process Manager Advanced Process Center feature.
When security and role-based authorization are enabled, you must log in to the administrative console as a Cell administrator to create a deployment environment. This task describes the procedure for creating a deployment environment that is based on a specific pattern and uses the Deployment Environment wizard.
A snapshot that requires BPM Advanced Edition capability cannot be installed on more than one deployment environment in the same cell.
SQL Server considerations:
- Verify the user name and schema exist before the configuration is done. The schema value should be the default schema for the user chosen.
- Process Server and IBM Performance Data Warehouse should not use the same database.
- If connections to the database will be made by the current Windows user the server is running under, the SQL Server must have Windows authentication mode or SQL Server and Windows Authentication mode enabled, as specified through Microsoft SQL Server Management Studio.
To create the deployment environment.
- From the administrative console, navigate to the Deployment Environments page by clicking...
- Servers | Deployment Environments
- Launch the Deployment Environment wizard by clicking New on the Deployment Environments page.
The Create new deployment environment page is displayed.
The database provides isolation of internal groups, such as administrators. If the database is shared by two deployment environments, one administrators group is shared between them. When such a situation occurs, both administrators are able to login as administrator for each of the deployment environment.
- Enter a unique name for the deployment environment in the Deployment environment name field.
- Enter a user name for the deployment environment administrator in the Deployment environment administrator user name field.
IBM recommends to use a different administrator for each deployment environment and also the cell administrator.
- Enter a password for the deployment environment administrator in the Password field.
- Reconfirm the password in the Confirm password field.
- Enter a unique name for the deployment environment in the Deployment environment name field.
- From the BPM Deployment Environment Type section, select Standard Process Center.
Features represent the runtime processing capabilities of the deployment environment.
- From the section...
- Select the deployment environment pattern
...select a pattern for the deployment environment and click Next to display the Select Nodes page.
The available patterns are:
- Single Cluster: The application deployment target includes the messaging infrastructure and supporting applications.
- Application, Remote Messaging, Remote Support: A separate cluster each for application deployment, remote messaging, and remote support.
- On the Select Nodes page, select the nodes to include in this deployment environment, then click Next to display the Define Clusters page.
Select nodes that have the required capabilities for the environment you selected on the BPM Deployment Environment Features section.
Select at least one node for the deployment environment. For high-availability and failover environments, select at least two nodes. For scalability, you can add more nodes.
- On the Define Clusters page, assign the required number of clusters for each node and click Next to display the Customize Cluster Name and Ports page.
By default one cluster member is assigned on each node for each function. You change the number by replacing the number in each column.
A 0 (zero) value for a node means the node does not contribute to the selected function, based on features that you have selected.
- On the Customize Cluster Name and Ports page, customize the cluster names or cluster member names for the cluster type.
You can specify the starting port for the cluster members. The system generates default values for cluster member names and the starting port.
Ensure the starting port numbers you specify are at least 20 ports apart. Port numbers are reserved and assigned to each node for the cluster members using the port number specified. If you specify an initial port when you create the deployment environment, that same initial port specified would be assigned to the cluster member. For example, if the port number for the first cluster member is 2000, it would use the port numbers 2000, 2001, 2002, and so on. The port number of the second cluster member would be 2020 and the port numbers would be 2020, 2021, 2022, and so on. The port number of the third cluster member would be 2040.
If there is already a node on that physical system then there may be port conflicts and these must be resolved manually by changing the port values.
If you use additional servers with unique ports, WebSphere Application Server does not automatically configure the virtual host for the server. Specifically, WAS does not automatically add the host alias ports to a virtual host. However, you can use the administrative console to add a new host alias for each of the ports that are used by the new server.
- Required: On the Configure Databases page, select Microsoft SQL Server without Windows Authentication, configure the database parameters for data sources of the deployment environment, click Test connection, and after the connection succeeds click Next to go to the Summary page.
On this page, define the database information for the components that are included in this deployment environment. Where possible, the wizard supplies default information for the parameters, but change those values to match the values that you defined when you planned the environment.
The database specified in this panel must already exist. Deployment environment configuration never creates a database.
- Shared parameters
- User name: User name to connect to the database.
- Password: Password for the user name.
- Confirm password: Confirm the password for the user name.
- Server: Server name where the database is located.
- Port: Port number to connect to the database.
- Create Tables: Create the required tables.
If this option is selected, ensure the user has sufficient rights to access the database, and create tables.
- Common database
- Name: name for the common database which is used for CommonDB components, Business Space, Business Process Choreographer, and Messaging.
- Process database
- Name: name for the Process Center database.
- Performance Data Warehouse database
- Name: name for the Performance Data Warehouse database.
- Select the databases to separate from the Common database.
- Messaging: Select this option to create a separate messaging engine database.
- Name: name for the messaging engine database.
- Messaging: Select this option to create a separate messaging engine database.
For an SQL server:
- Verify the user name and the schema exist before the configuration is done. The schema value should be the default schema for the user chosen.
- Process Server and IBM Performance Data Warehouse should not use the same database.
- If connections to the database will be made by the current Windows user the server is running under, the SQL Server must have Windows authentication mode or SQL Server and Windows Authentication mode enabled, as specified through Microsoft SQL Server Management Studio.
You can clear the Create Tables check box to create the tables manually instead of the configuration creating it automatically. The scripts to create tables are generated in the folder...
- BPM_Install/profiles/DmgrProfile/dbscripts
You can run the scripts from the dbscripts folder and do not need to generate scripts using BPMConfig.
You can edit all key parameters, such as the database name, whether or not to create tables, the data source runtime user name, and the password for the deployment environment. You can select which database to use for the given component.
Steps that cannot be completed through the Deployment Environment wizard, and which need to be completed manually, are listed on the Deferred Configuration page. You can view this page after you have created the deployment environment. To view this administrative console page, click...
- Servers | Deployment Environments | Deployment environment name | Deployment Environment Configuration | Additional Properties | Deferred Configuration
- Shared parameters
- Verify the information on the Summary page is correct and perform the following substeps:
- To exit without generating the configuration, click Cancel.
- To save the environment configuration to configure a similar Deployment Environment, click Export for Scripting.
- If you are satisfied with the deployment environment configuration, click Generate Deployment Environment to save and complete the configuration of the deployment environment. This will also generate a properties file in the BPM_Install_Root/logs/config folder on the deployment manager machine with a timestamp in the file name, bpmconfig-de_name-timestamp.properties. Save this file for future reference or for troubleshooting any issues.
- If you have postponed the Process Server database table creation by clearing the create table option on the Database page, create the tables and load the database with system information by running bootstrapProcessServerData.
This command must be run before starting any cluster members.
- Verify the deployment environment was created properly by completing the following steps:
- Log off from the administrative console, shut down the deployment manager, and then shut down all of the custom profiles.
- Start the custom profiles, start the deployment manager, and then log in to the administrative console.
- In the administrative console, start the deployment environment by clicking...
- Servers | Deployment Environments
Select the check box next to the deployment environment and clicking Start.
- After 5 to 10 minutes (or longer, depending on the system),
refresh the deployment environment page; the Status of the deployment environment changes to started.
- Locate the Tables folder for the common database. Check the tables have been created with the four schemas that you created manually.
- Optional: Check that tables have been created with the XXXBE## schema in the Business Process Choreographer database.
- In the administrative console, select Applications > Application Types > WebSphere enterprise applications and check the installed applications started successfully.
- Select Resources > JDBC > Data sources and test the connection of every component that is not related to the message engine (that is, every component that does not include ME in the name) is successful.
- Log off from the administrative console, shut down the deployment manager, and then shut down all of the custom profiles.
- Restart the following resources after you have completed your configurations in the order specified here. See Start and stop individual resources.
- Stop the deployment environment.
- Stop the node agent.
- Stop the deployment manager.
- Start the deployment manager.
- Start the node agent.
- Start the deployment environment.
For Advanced or Advanced-only deployment environments, the deployment manager and node agents need to be restarted for the cell scoped configuration to take affect. This is only required for the first deployment environment that you create.
When the configuration completes, you can examine the configuration files to view the changes.
Either save the changes to the master configuration or discard them.
If you use additional servers with unique ports, WAS does not automatically configure the virtual host for the server. Specifically, WAS does not automatically add the host alias ports to a virtual host. However, you can use the administrative console to add a new host alias for each of the ports that are used by the new server. To add a host alias, in the administrative console navigate to...
- Environment | Virtual hosts | default_host | Host Aliases | New
Clean all applicable profile logs or save them in another directory. You may want to clean or move the logs as they will be appended with the last configuration. This can make it difficult to view the most current information.
Related concepts:
Related tasks:IBM Business Process Manager configuration capabilities
Create the Advanced Process Server deployment environment
Create a Process Server deployment environment to run processes, services and modules deployed from the Process Center. Or, deploy modules either from the command line or from the WebSphere administrative console. You can create more than one deployment environments in the same cell using the Deployment Environment wizard.
Ensure that you have completed the following tasks:
- Installed the product
- Created the deployment manager profile and the associated nodes
- Ensure the database specified in the Database Configuration panel of the Deployment Environment wizard is already created. The deployment environment configuration never creates a database.
- Start all the local and remote nodes that to add in the deployment environment.
- When you create a 3-cluster deployment environment using the Deployment Environment wizard, the process might take a lot of time to complete. In that case, you can perform one of the following steps to create the 3-cluster environment:
- Increase the transaction timeout value using the Deployment Manager and re-create the deployment environment. See Preventing timeout and out-of-memory exceptions during installation or deployment.
- Do not create tables during the Deployment Environment creation. After creating the environment, create the databases, tables, and then run the bootstrap command.
- If you are using the Deployment Environment wizard, you can enable deployment manager trace for details about the deployment creation.
To enable trace for a single run and till the deployment manager restarts, log on to the administrative console, go to...
- Troubleshooting | Logs and trace | deployment_manager_name com.ibm.bpm.config.*=all to the Change log detail levels text area, and save the changes.
You must have Process Server installed to install a Process Server-based deployment environment. If you have a Process Center installed, start the IBM Installation Manager and modify the installation to use the Business Process Manager Advanced Process Server Production or Business Process Manager Advanced Process Server Non-Production feature.
When security and role-based authorization are enabled, you must log in to the administrative console as a Cell administrator to create a deployment environment. This task describes the procedure for creating a deployment environment that is based on a specific pattern and uses the Deployment Environment wizard.
A snapshot that requires BPM Advanced Edition capability cannot be installed on more than one deployment environment in the same cell.
SQL Server considerations:
- Verify the user name and schema exist before the configuration is done. The schema value should be the default schema for the user chosen.
- Process Server and IBM Performance Data Warehouse should not use the same database.
- If connections to the database will be made by the current Windows user the server is running under, the SQL Server must have Windows authentication mode or SQL Server and Windows Authentication mode enabled, as specified through Microsoft SQL Server Management Studio.
To create the deployment environment.
- From the administrative console, navigate to the Deployment Environments page by clicking...
- Servers | Deployment Environments
- Launch the Deployment Environment wizard by clicking New on the Deployment Environments page.
The Create new deployment environment page is displayed.
The database provides isolation of internal groups, such as administrators. If the database is shared by two deployment environments, one administrators group is shared between them. When such a situation occurs, both administrators are able to login as administrator for each of the deployment environment.
- Enter a unique name for the deployment environment in the Deployment environment name field.
- Enter a user name for the deployment environment administrator in the Deployment environment administrator user name field.
IBM recommends to use a different administrator for each deployment environment and also the cell administrator.
- Enter a password for the deployment environment administrator in the Password field.
- Reconfirm the password in the Confirm password field.
- Enter a unique name for the deployment environment in the Deployment environment name field.
- From the BPM Deployment Environment Type section, select Advanced Process Server.
Features represent the runtime processing capabilities of the deployment environment.
- From the section...
- Select the deployment environment pattern
...select a pattern for the deployment environment and click Next to display the Select Nodes page.
The available patterns are:
- Single Cluster: The application deployment target includes the messaging infrastructure and supporting applications.
- Application, Remote Messaging, Remote Support: A separate cluster each for application deployment, remote messaging, and remote support.
- On the Select Nodes page, select the nodes to include in this deployment environment, then click Next to display the Define Clusters page.
Select nodes that have the required capabilities for the environment you selected on the BPM Deployment Environment Features section.
Select at least one node for the deployment environment. For high-availability and failover environments, select at least two nodes. For scalability, you can add more nodes.
- On the Define Clusters page, assign the required number of clusters for each node and click Next to display the Customize Cluster Name and Ports page.
By default one cluster member is assigned on each node for each function. You change the number by replacing the number in each column.
A 0 (zero) value for a node means the node does not contribute to the selected function, based on features that you have selected.
- On the Customize Cluster Name and Ports page, customize the cluster names or cluster member names for the cluster type.
You can specify the starting port for the cluster members. The system generates default values for cluster member names and the starting port.
Ensure the starting port numbers you specify are at least 20 ports apart. Port numbers are reserved and assigned to each node for the cluster members using the port number specified. If you specify an initial port when you create the deployment environment, that same initial port specified would be assigned to the cluster member. For example, if the port number for the first cluster member is 2000, it would use the port numbers 2000, 2001, 2002, and so on. The port number of the second cluster member would be 2020 and the port numbers would be 2020, 2021, 2022, and so on. The port number of the third cluster member would be 2040.
If there is already a node on that physical system then there may be port conflicts and these must be resolved manually by changing the port values.
If you use additional servers with unique ports, WebSphere Application Server does not automatically configure the virtual host for the server. Specifically, WAS does not automatically add the host alias ports to a virtual host. However, you can use the administrative console to add a new host alias for each of the ports that are used by the new server.
- On the Configure Process Server page, set the values for the Process Center configuration and click Next.
- Environment name
Enter an environment name of the Process Server.
An environment name is the name by which this server or cluster will be known to a Process Center user.
- Environment type
From the pull-down list, select the environment type for the Process Server you are configuring.
The environment type refers to how the Process Server is used. For example, in what capacity will the Process Server be used - development, test, staging, or production. Load testing might be done on a test server, while a staging environment type might be used as a temporary location to host changes before putting those changes into production. You might specify a staging environment type if the Process Server you are configuring will be accessed and used to review content and new functionality.
There are four types of environments available for selection:
- Development
- The server will serve in a development capacity.
- Test
- The server will be used as a testing environment.
- Stage
- The server server will serve as a staging platform to be used as a preproduction server.
- Production
- The server will serve in a production capacity.
- Use server offline
Indicate whether the server you are configuring is an offline server.
An offline server is a Process Server that is not connected to the Process Center.
Offline servers can still be used when deploying snapshots of process applications. However the method for deploying process applications to an offline process server differs from the method for deploying process applications to an online process server.
- Protocol
Select either http:// or https:// as the connection protocol to the Process Center.
- Host name or virtual host in a load-balanced environment
Type the host or virtual host that this Process Server needs to communicate with Process Center.
Ensure specified the host name instead of localhost for the server name when you configure the Process Server. This is required when you are using the Process Designer remotely.
- Port
Port number of the Process Center.
- User name
Type a valid user name that exists on the Process Center. Process Server will connect to Process Center as this user.
- Password
Password for the user.
- Confirm password
Confirm the password for the user.
- Test Connection
Click to test the Process Center connection.
- Environment name
- Required: On the Configure Databases page, select Microsoft SQL Server without Windows Authentication, configure the database parameters for data sources of the deployment environment, click Test connection, and after the connection succeeds click Next to go to the Summary page.
On this page, define the database information for the components that are included in this deployment environment. Where possible, the wizard supplies default information for the parameters, but change those values to match the values that you defined when you planned the environment.
The database specified in this panel must already exist. Deployment environment configuration never creates a database.
- Shared parameters
- User name: User name to connect to the database.
- Password: Password for the user name.
- Confirm password: Confirm the password for the user name.
- Server: Server name where the database is located.
- Port: Port number to connect to the database.
- Create Tables: Create the required tables.
If this option is selected, ensure the user has sufficient rights to access the database, and create tables.
- cellDB
The cellDB option is only visible when you create the first advanced deployment environment. After this, every advanced deployment environment that you shares the cellDB of the first environment.
- Name: name for the cell database.
- Common database
- Name: name for the common database which is used for CommonDB components, Business Space, Business Process Choreographer, and Messaging.
- Process database
- Name: name for the Process Center database.
- Performance Data Warehouse database
- Name: name for the Performance Data Warehouse database.
- Select the databases to separate from the Common database.
- Messaging: Select this option to create a separate messaging engine database.
- Name: name for the messaging engine database.
- Business Process Choreographer: Select this option to create a separate Business Process Choreographer database.
- Name: name for the Business Process Choreographer database.
- Messaging: Select this option to create a separate messaging engine database.
For an SQL server:
- Verify the user name and the schema exist before the configuration is done. The schema value should be the default schema for the user chosen.
- Process Server and IBM Performance Data Warehouse should not use the same database.
- If connections to the database will be made by the current Windows user the server is running under, the SQL Server must have Windows authentication mode or SQL Server and Windows Authentication mode enabled, as specified through Microsoft SQL Server Management Studio.
You can clear the Create Tables check box to create the tables manually instead of the configuration creating it automatically. The scripts to create tables are generated in the folder...
- BPM_Install/profiles/DmgrProfile/dbscripts
You can run the scripts from the dbscripts folder and do not need to generate scripts using BPMConfig.
You can edit all key parameters, such as the database name, whether or not to create tables, the data source runtime user name, and the password for the deployment environment. You can select which database to use for the given component.
Steps that cannot be completed through the Deployment Environment wizard, and which need to be completed manually, are listed on the Deferred Configuration page. You can view this page after you have created the deployment environment. To view this administrative console page, click...
- Servers | Deployment Environments | Deployment environment name | Deployment Environment Configuration | Additional Properties | Deferred Configuration
- Shared parameters
- Verify the information on the Summary page is correct and perform the following substeps:
- To exit without generating the configuration, click Cancel.
- To save the environment configuration to configure a similar Deployment Environment, click Export for Scripting.
- If you are satisfied with the deployment environment configuration, click Generate Deployment Environment to save and complete the configuration of the deployment environment. This will also generate a properties file in the BPM_Install_Root/logs/config folder on the deployment manager machine with a timestamp in the file name, bpmconfig-de_name-timestamp.properties. Save this file for future reference or for troubleshooting any issues.
- If you have postponed the Process Server database table creation by clearing the create table option on the Database page, create the tables and load the database with system information by running bootstrapProcessServerData.
This command must be run before starting any cluster members.
- Verify the deployment environment was created properly by completing the following steps:
- Log off from the administrative console, shut down the deployment manager, and then shut down all of the custom profiles.
- Start the custom profiles, start the deployment manager, and then log in to the administrative console.
- In the administrative console, start the deployment environment by clicking...
- Servers | Deployment Environments
Select the check box next to the deployment environment and clicking Start.
- After 5 to 10 minutes (or longer, depending on the system),
refresh the deployment environment page; the Status of the deployment environment changes to started.
- Locate the Tables folder for the common database. Check the tables have been created with the four schemas that you created manually.
- Optional: Check that tables have been created with the XXXBE## schema in the Business Process Choreographer database.
- In the administrative console, select Applications > Application Types > WebSphere enterprise applications and check the installed applications started successfully.
- Select Resources > JDBC > Data sources and test the connection of every component that is not related to the message engine (that is, every component that does not include ME in the name) is successful.
- Log off from the administrative console, shut down the deployment manager, and then shut down all of the custom profiles.
- Restart the following resources after you have completed your configurations in the order specified here. See Start and stop individual resources.
- Stop the deployment environment.
- Stop the node agent.
- Stop the deployment manager.
- Start the deployment manager.
- Start the node agent.
- Start the deployment environment.
For Advanced or Advanced-only deployment environments, the deployment manager and node agents need to be restarted for the cell scoped configuration to take affect. This is only required for the first deployment environment that you create.
When the configuration completes, you can examine the configuration files to view the changes.
Either save the changes to the master configuration or discard them.
If you use additional servers with unique ports, WAS does not automatically configure the virtual host for the server. Specifically, WAS does not automatically add the host alias ports to a virtual host. However, you can use the administrative console to add a new host alias for each of the ports that are used by the new server. To add a host alias, in the administrative console navigate to...
- Environment | Virtual hosts | default_host | Host Aliases | New
Clean all applicable profile logs or save them in another directory. You may want to clean or move the logs as they will be appended with the last configuration. This can make it difficult to view the most current information.
After you have configured a network deployment environment for BPM Advanced, if you test the connection to the cell-level jdbc/WPSDB data source ( in the administrative console, on the page Resources > JDBC > Data sources), you get a message saying the test connection operation failed with the exception com.ibm.wsspi.runtime.variable.UndefinedVariableException: Undefined Variable variable_name, where variable_name is a variable name such as WAS_INSTALL_ROOT, DB2_JCC_DRIVER_PATH, UNIVERSAL_JDBC_DRIVER_PATH or PUREQUERY_PATH. This does not necessarily indicate there will be a problem accessing the data source at run time. Ensure the location of your JDBC driver files is accessible to every client that must use the data source, and configure the variable with the full path of that location. Disregard the test connection error unless you are also experiencing trouble connecting to the data store at run time. For additional information, see the WebSphere Application Server documentation about the test connection service.
Related concepts:
Related tasks:IBM Business Process Manager configuration capabilities
Create the Standard Process Server deployment environment
Create a Process Server deployment environment to run processes and deployed from the Process Center. You can create more than one deployment environments in the same cell using the Deployment Environment wizard.
Ensure that you have completed the following tasks:
- Installed the product
- Created the deployment manager profile and the associated nodes
- Ensure the database specified in the Database Configuration panel of the Deployment Environment wizard is already created. The deployment environment configuration never creates a database.
- Start all the local and remote nodes that to add in the deployment environment.
- When you create a 3-cluster deployment environment using the Deployment Environment wizard, the process might take a lot of time to complete. In that case, you can perform one of the following steps to create the 3-cluster environment:
- Increase the transaction timeout value using the Deployment Manager and re-create the deployment environment. See Preventing timeout and out-of-memory exceptions during installation or deployment.
- Do not create tables during the Deployment Environment creation. After creating the environment, create the databases, tables, and then run the bootstrap command.
- If you are using the Deployment Environment wizard, you can enable deployment manager trace for details about the deployment creation.
To enable trace for a single run and till the deployment manager restarts, log on to the administrative console, go to...
- Troubleshooting | Logs and trace | deployment_manager_name com.ibm.bpm.config.*=all to the Change log detail levels text area, and save the changes.
You must have Process Server installed to install a Process Server-based deployment environment. If you have a Process Center installed, start the IBM Installation Manager and modify the installation to use the Business Process Manager Advanced Process Server Production or Business Process Manager Advanced Process Server Non-Production feature.
When security and role-based authorization are enabled, you must log in to the administrative console as a Cell administrator to create a deployment environment. This task describes the procedure for creating a deployment environment that is based on a specific pattern and uses the Deployment Environment wizard.
A snapshot that requires BPM Advanced Edition capability cannot be installed on more than one deployment environment in the same cell.
SQL Server considerations:
- Verify the user name and schema exist before the configuration is done. The schema value should be the default schema for the user chosen.
- Process Server and IBM Performance Data Warehouse should not use the same database.
- If connections to the database will be made by the current Windows user the server is running under, the SQL Server must have Windows authentication mode or SQL Server and Windows Authentication mode enabled, as specified through Microsoft SQL Server Management Studio.
To create the deployment environment.
- From the administrative console, navigate to the Deployment Environments page by clicking...
- Servers | Deployment Environments
- Launch the Deployment Environment wizard by clicking New on the Deployment Environments page.
The Create new deployment environment page is displayed.
The database provides isolation of internal groups, such as administrators. If the database is shared by two deployment environments, one administrators group is shared between them. When such a situation occurs, both administrators are able to login as administrator for each of the deployment environment.
- Enter a unique name for the deployment environment in the Deployment environment name field.
- Enter a user name for the deployment environment administrator in the Deployment environment administrator user name field.
IBM recommends to use a different administrator for each deployment environment and also the cell administrator.
- Enter a password for the deployment environment administrator in the Password field.
- Reconfirm the password in the Confirm password field.
- Enter a unique name for the deployment environment in the Deployment environment name field.
- From the BPM Deployment Environment Type section, select Standard Process Server.
Features represent the runtime processing capabilities of the deployment environment.
- From the section...
- Select the deployment environment pattern
...select a pattern for the deployment environment and click Next to display the Select Nodes page.
The available patterns are:
- Single Cluster: The application deployment target includes the messaging infrastructure and supporting applications.
- Application, Remote Messaging, Remote Support: A separate cluster each for application deployment, remote messaging, and remote support.
- On the Select Nodes page, select the nodes to include in this deployment environment, then click Next to display the Define Clusters page.
Select nodes that have the required capabilities for the environment you selected on the BPM Deployment Environment Features section.
Select at least one node for the deployment environment. For high-availability and failover environments, select at least two nodes. For scalability, you can add more nodes.
- On the Define Clusters page, assign the required number of clusters for each node and click Next to display the Customize Cluster Name and Ports page.
By default one cluster member is assigned on each node for each function. You change the number by replacing the number in each column.
A 0 (zero) value for a node means the node does not contribute to the selected function, based on features that you have selected.
- On the Customize Cluster Name and Ports page, customize the cluster names or cluster member names for the cluster type.
You can specify the starting port for the cluster members. The system generates default values for cluster member names and the starting port.
Ensure the starting port numbers you specify are at least 20 ports apart. Port numbers are reserved and assigned to each node for the cluster members using the port number specified. If you specify an initial port when you create the deployment environment, that same initial port specified would be assigned to the cluster member. For example, if the port number for the first cluster member is 2000, it would use the port numbers 2000, 2001, 2002, and so on. The port number of the second cluster member would be 2020 and the port numbers would be 2020, 2021, 2022, and so on. The port number of the third cluster member would be 2040.
If there is already a node on that physical system then there may be port conflicts and these must be resolved manually by changing the port values.
If you use additional servers with unique ports, WebSphere Application Server does not automatically configure the virtual host for the server. Specifically, WAS does not automatically add the host alias ports to a virtual host. However, you can use the administrative console to add a new host alias for each of the ports that are used by the new server.
- On the Configure Process Server page, set the values for the Process Center configuration and click Next.
- Environment name
Enter an environment name of the Process Server.
An environment name is the name by which this server or cluster will be known to a Process Center user.
- Environment type
From the pull-down list, select the environment type for the Process Server you are configuring.
The environment type refers to how the Process Server is used. For example, in what capacity will the Process Server be used - development, test, staging, or production. Load testing might be done on a test server, while a staging environment type might be used as a temporary location to host changes before putting those changes into production. You might specify a staging environment type if the Process Server you are configuring will be accessed and used to review content and new functionality.
There are four types of environments available for selection:
- Development
- The server will serve in a development capacity.
- Test
- The server will be used as a testing environment.
- Stage
- The server server will serve as a staging platform to be used as a preproduction server.
- Production
- The server will serve in a production capacity.
- Use server offline
Indicate whether the server you are configuring is an offline server.
An offline server is a Process Server that is not connected to the Process Center.
Offline servers can still be used when deploying snapshots of process applications. However the method for deploying process applications to an offline process server differs from the method for deploying process applications to an online process server.
- Protocol
Select either http:// or https:// as the connection protocol to the Process Center.
- Host name or virtual host in a load-balanced environment
Type the host or virtual host that this Process Server needs to communicate with Process Center.
Ensure specified the host name instead of localhost for the server name when you configure the Process Server. This is required when you are using the Process Designer remotely.
- Port
Port number of the Process Center.
- User name
Type a valid user name that exists on the Process Center. Process Server will connect to Process Center as this user.
- Password
Password for the user.
- Confirm password
Confirm the password for the user.
- Test Connection
Click to test the Process Center connection.
- Environment name
- Required: On the Configure Databases page, select Microsoft SQL Server without Windows Authentication, configure the database parameters for data sources of the deployment environment, click Test connection, and after the connection succeeds click Next to go to the Summary page.
On this page, define the database information for the components that are included in this deployment environment. Where possible, the wizard supplies default information for the parameters, but change those values to match the values that you defined when you planned the environment.
The database specified in this panel must already exist. Deployment environment configuration never creates a database.
- Shared parameters
- User name: User name to connect to the database.
- Password: Password for the user name.
- Confirm password: Confirm the password for the user name.
- Server: Server name where the database is located.
- Port: Port number to connect to the database.
- Create Tables: Create the required tables.
If this option is selected, ensure the user has sufficient rights to access the database, and create tables.
- Common database
- Name: name for the common database which is used for CommonDB components, Business Space, Business Process Choreographer, and Messaging.
- Process database
- Name: name for the Process Center database.
- Performance Data Warehouse database
- Name: name for the Performance Data Warehouse database.
- Select the databases to separate from the Common database.
- Messaging: Select this option to create a separate messaging engine database.
- Name: name for the messaging engine database.
- Messaging: Select this option to create a separate messaging engine database.
For an SQL server:
- Verify the user name and the schema exist before the configuration is done. The schema value should be the default schema for the user chosen.
- Process Server and IBM Performance Data Warehouse should not use the same database.
- If connections to the database will be made by the current Windows user the server is running under, the SQL Server must have Windows authentication mode or SQL Server and Windows Authentication mode enabled, as specified through Microsoft SQL Server Management Studio.
You can clear the Create Tables check box to create the tables manually instead of the configuration creating it automatically. The scripts to create tables are generated in the folder...
- BPM_Install/profiles/DmgrProfile/dbscripts
You can run the scripts from the dbscripts folder and do not need to generate scripts using BPMConfig.
You can edit all key parameters, such as the database name, whether or not to create tables, the data source runtime user name, and the password for the deployment environment. You can select which database to use for the given component.
Steps that cannot be completed through the Deployment Environment wizard, and which need to be completed manually, are listed on the Deferred Configuration page. You can view this page after you have created the deployment environment. To view this administrative console page, click...
- Servers | Deployment Environments | Deployment environment name | Deployment Environment Configuration | Additional Properties | Deferred Configuration
- Shared parameters
- Verify the information on the Summary page is correct and perform the following substeps:
- To exit without generating the configuration, click Cancel.
- To save the environment configuration to configure a similar Deployment Environment, click Export for Scripting.
- If you are satisfied with the deployment environment configuration, click Generate Deployment Environment to save and complete the configuration of the deployment environment. This will also generate a properties file in the BPM_Install_Root/logs/config folder on the deployment manager machine with a timestamp in the file name, bpmconfig-de_name-timestamp.properties. Save this file for future reference or for troubleshooting any issues.
- If you have postponed the Process Server database table creation by clearing the create table option on the Database page, create the tables and load the database with system information by running bootstrapProcessServerData.
This command must be run before starting any cluster members.
- Verify the deployment environment was created properly by completing the following steps:
- Log off from the administrative console, shut down the deployment manager, and then shut down all of the custom profiles.
- Start the custom profiles, start the deployment manager, and then log in to the administrative console.
- In the administrative console, start the deployment environment by clicking...
- Servers | Deployment Environments
Select the check box next to the deployment environment and clicking Start.
- After 5 to 10 minutes (or longer, depending on the system),
refresh the deployment environment page; the Status of the deployment environment changes to started.
- Locate the Tables folder for the common database. Check the tables have been created with the four schemas that you created manually.
- Optional: Check that tables have been created with the XXXBE## schema in the Business Process Choreographer database.
- In the administrative console, select Applications > Application Types > WebSphere enterprise applications and check the installed applications started successfully.
- Select Resources > JDBC > Data sources and test the connection of every component that is not related to the message engine (that is, every component that does not include ME in the name) is successful.
- Log off from the administrative console, shut down the deployment manager, and then shut down all of the custom profiles.
- Restart the following resources after you have completed your configurations in the order specified here. See Start and stop individual resources.
- Stop the deployment environment.
- Stop the node agent.
- Stop the deployment manager.
- Start the deployment manager.
- Start the node agent.
- Start the deployment environment.
For Advanced or Advanced-only deployment environments, the deployment manager and node agents need to be restarted for the cell scoped configuration to take affect. This is only required for the first deployment environment that you create.
When the configuration completes, you can examine the configuration files to view the changes.
Either save the changes to the master configuration or discard them.
If you use additional servers with unique ports, WAS does not automatically configure the virtual host for the server. Specifically, WAS does not automatically add the host alias ports to a virtual host. However, you can use the administrative console to add a new host alias for each of the ports that are used by the new server. To add a host alias, in the administrative console navigate to...
- Environment | Virtual hosts | default_host | Host Aliases | New
Clean all applicable profile logs or save them in another directory. You may want to clean or move the logs as they will be appended with the last configuration. This can make it difficult to view the most current information.
Related concepts:
Related tasks:IBM Business Process Manager configuration capabilities
Create the Advanced-only Process Server deployment environment
Create an Advanced-only Process Server deployment environment if you only want function that is equivalent to WebSphere Process Server or WebSphere Enterprise Service Bus. You can run SCA modules that are created in Integration Designer. You can deploy the modules either from the command line or from the WebSphere administrative console.
Ensure that you have completed the following tasks:
- Installed the product
- Created the deployment manager profile and the associated nodes
- Ensure the database specified in the Database Configuration panel of the Deployment Environment wizard is already created. The deployment environment configuration never creates a database.
- Start all the local and remote nodes that to add in the deployment environment.
- When you create a 3-cluster deployment environment using the Deployment Environment wizard, the process might take a lot of time to complete. In that case, you can perform one of the following steps to create the 3-cluster environment:
- Increase the transaction timeout value using the Deployment Manager and re-create the deployment environment. See Preventing timeout and out-of-memory exceptions during installation or deployment.
- Do not create tables during the Deployment Environment creation. After creating the environment, create the database, and tables.
- If you are using the Deployment Environment wizard, you can enable deployment manager trace for details about the deployment creation.
To enable trace for a single run and till the deployment manager restarts, log on to the administrative console, go to...
- Troubleshooting | Logs and trace | deployment_manager_name com.ibm.bpm.config.*=all to the Change log detail levels text area, and save the changes.
When security and role-based authorization are enabled, you must log in to the administrative console as a Cell administrator to create a deployment environment. This task describes the procedure for creating a deployment environment that is based on a specific pattern and uses the Deployment Environment wizard.
A snapshot that requires BPM Advanced Edition capability cannot be installed on more than one deployment environment in the same cell.
SQL Server considerations:
- Verify the user name and schema exist before the configuration is done. The schema value should be the default schema for the user chosen.
- If connections to the database will be made by the current Windows user the server is running under, the SQL Server must have Windows authentication mode or SQL Server and Windows Authentication mode enabled, as specified through Microsoft SQL Server Management Studio.
To create the deployment environment.
- From the administrative console, navigate to the Deployment Environments page by clicking...
- Servers | Deployment Environments
- Launch the Deployment Environment wizard by clicking New on the Deployment Environments page.
The Create new deployment environment page is displayed.
The database provides isolation of internal groups, such as administrators. If the database is shared by two deployment environments, one administrators group is shared between them. When such a situation occurs, both administrators are able to login as administrator for each of the deployment environment.
- Enter a unique name for the deployment environment in the Deployment environment name field.
- Enter a user name for the deployment environment administrator in the Deployment environment administrator user name field.
IBM recommends to use a different administrator for each deployment environment and also the cell administrator.
- Enter a password for the deployment environment administrator in the Password field.
- Reconfirm the password in the Confirm password field.
- Enter a unique name for the deployment environment in the Deployment environment name field.
- From the BPM Deployment Environment Type section, select Advanced-only Process Server.
Features represent the runtime processing capabilities of the deployment environment.
- From the section...
- Select the deployment environment pattern
...select a pattern for the deployment environment and click Next to display the Select Nodes page.
The available patterns are:
- Single Cluster: The application deployment target includes the messaging infrastructure and supporting applications.
- Application, Remote Messaging, Remote Support: A separate cluster each for application deployment, remote messaging, and remote support.
- On the Select Nodes page, select the nodes to include in this deployment environment, then click Next to display the Define Clusters page.
Select nodes that have the required capabilities for the environment you selected on the BPM Deployment Environment Features section.
Select at least one node for the deployment environment. For high-availability and failover environments, select at least two nodes. For scalability, you can add more nodes.
- On the Define Clusters page, assign the required number of clusters for each node and click Next to display the Customize Cluster Name and Ports page.
By default one cluster member is assigned on each node for each function. You change the number by replacing the number in each column.
A 0 (zero) value for a node means the node does not contribute to the selected function, based on features that you have selected.
- On the Customize Cluster Name and Ports page, customize the cluster names or cluster member names for the cluster type.
You can specify the starting port for the cluster members. The system generates default values for cluster member names and the starting port.
Ensure the starting port numbers you specify are at least 20 ports apart. Port numbers are reserved and assigned to each node for the cluster members using the port number specified. If you specify an initial port when you create the deployment environment, that same initial port specified would be assigned to the cluster member. For example, if the port number for the first cluster member is 2000, it would use the port numbers 2000, 2001, 2002, and so on. The port number of the second cluster member would be 2020 and the port numbers would be 2020, 2021, 2022, and so on. The port number of the third cluster member would be 2040.
If there is already a node on that physical system then there may be port conflicts and these must be resolved manually by changing the port values.
If you use additional servers with unique ports, WAS does not automatically configure the virtual host for the server. Specifically, WAS does not automatically add the host alias ports to a virtual host. However, you can use the administrative console to add a new host alias for each of the ports that are used by the new server.
- Required: On the Configure Databases page, select Microsoft SQL Server without Windows Authentication, configure the database parameters for data sources of the deployment environment, click Test connection, and after the connection succeeds click Next to go to the Summary page.
On this page, define the database information for the components that are included in this deployment environment. Where possible, the wizard supplies default information for the parameters, but change those values to match the values that you defined when you planned the environment.
The database specified in this panel must already exist. Deployment environment configuration never creates a database.
- Shared parameters
- User name: User name to connect to the database.
- Password: Password for the user name.
- Confirm password: Confirm the password for the user name.
- Server: Server name where the database is located.
- Port: Port number to connect to the database.
- Create Tables: Create the required tables.
If this option is selected, ensure the user has sufficient rights to access the database, and create tables.
- cellDB
The cellDB option is only visible when you create the first advanced deployment environment. After this, every advanced deployment environment that you shares the cellDB of the first environment.
- Name: name for the cell database.
- Common database
- Name: name for the common database which is used for CommonDB components, Business Space, Business Process Choreographer, and Messaging.
- Select the databases to separate from the Common database.
- Messaging: Select this option to create a separate messaging engine database.
- Name: name for the messaging engine database.
- Business Process Choreographer: Select this option to create a separate Business Process Choreographer database.
- Name: name for the Business Process Choreographer database.
- Messaging: Select this option to create a separate messaging engine database.
For an SQL server:
- Verify the user name and the schema exist before the configuration is done. The schema value should be the default schema for the user chosen.
- Process Server and IBM Performance Data Warehouse should not use the same database.
- If connections to the database will be made by the current Windows user the server is running under, the SQL Server must have Windows authentication mode or SQL Server and Windows Authentication mode enabled, as specified through Microsoft SQL Server Management Studio.
You can clear the Create Tables check box to create the tables manually instead of the configuration creating it automatically. The scripts to create tables are generated in the folder...
- BPM_Install/profiles/DmgrProfile/dbscripts
You can run the scripts from the dbscripts folder and do not need to generate scripts using BPMConfig.
You can edit all key parameters, such as the database name, whether or not to create tables, the data source runtime user name, and the password for the deployment environment. You can select which database to use for the given component.
Steps that cannot be completed through the Deployment Environment wizard, and which need to be completed manually, are listed on the Deferred Configuration page. You can view this page after you have created the deployment environment. To view this administrative console page, click...
- Servers | Deployment Environments | Deployment environment name | Deployment Environment Configuration | Additional Properties | Deferred Configuration
- Shared parameters
- Verify the information on the Summary page is correct and perform the following substeps:
- To exit without generating the configuration, click Cancel.
- To save the environment configuration to configure a similar Deployment Environment, click Export for Scripting.
- If you are satisfied with the deployment environment configuration, click Generate Deployment Environment to save and complete the configuration of the deployment environment. This will also generate a properties file in the BPM_Install_Root/logs/config folder on the deployment manager machine with a timestamp in the file name, bpmconfig-de_name-timestamp.properties. Save this file for future reference or for troubleshooting any issues.
- Verify the deployment environment was created properly by completing the following steps:
- Log off from the administrative console, shut down the deployment manager, and then shut down all of the custom profiles.
- Start the custom profiles, start the deployment manager, and then log in to the administrative console.
- In the administrative console, start the deployment environment by clicking...
- Servers | Deployment Environments
Select the check box next to the deployment environment and clicking Start.
- After 5 to 10 minutes (or longer, depending on the system),
refresh the deployment environment page; the Status of the deployment environment changes to started.
- Locate the Tables folder for the common database. Check the tables have been created with the four schemas that you created manually.
- Optional: Check that tables have been created with the XXXBE## schema in the Business Process Choreographer database.
- In the administrative console, select Applications > Application Types > WebSphere enterprise applications and check the installed applications started successfully.
- Select Resources > JDBC > Data sources and test the connection of every component that is not related to the message engine (that is, every component that does not include ME in the name) is successful.
- Log off from the administrative console, shut down the deployment manager, and then shut down all of the custom profiles.
- Restart the following resources after you have completed your configurations in the order specified here. See Start and stop individual resources.
- Stop the deployment environment.
- Stop the node agent.
- Stop the deployment manager.
- Start the deployment manager.
- Start the node agent.
- Start the deployment environment.
For Advanced or Advanced-only deployment environments, the deployment manager and node agents need to be restarted for the cell scoped configuration to take affect. This is only required for the first deployment environment that you create.
When the configuration completes, you can examine the configuration files to view the changes.
Either save the changes to the master configuration or discard them.
If you use additional servers with unique ports, WAS does not automatically configure the virtual host for the server. Specifically, WAS does not automatically add the host alias ports to a virtual host. However, you can use the administrative console to add a new host alias for each of the ports that are used by the new server. To add a host alias, in the administrative console navigate to...
- Environment | Virtual hosts | default_host | Host Aliases | New
Clean all applicable profile logs or save them in another directory. You may want to clean or move the logs as they will be appended with the last configuration. This can make it difficult to view the most current information.
After you have configured a network deployment environment for BPM Advanced, if you test the connection to the cell-level jdbc/WPSDB data source ( in the administrative console, on the page Resources > JDBC > Data sources), you get a message saying the test connection operation failed with the exception com.ibm.wsspi.runtime.variable.UndefinedVariableException: Undefined Variable variable_name, where variable_name is a variable name such as WAS_INSTALL_ROOT, DB2_JCC_DRIVER_PATH, UNIVERSAL_JDBC_DRIVER_PATH or PUREQUERY_PATH. This does not necessarily indicate there will be a problem accessing the data source at run time. Ensure the location of your JDBC driver files is accessible to every client that must use the data source, and configure the variable with the full path of that location. Disregard the test connection error unless you are also experiencing trouble connecting to the data store at run time. For additional information, see the WebSphere Application Server documentation about the test connection service.
Related concepts:
Related tasks:IBM Business Process Manager configuration capabilities
Extend the network deployment environment using BPMConfig
After creating a deployment environment using BPMConfig, you can run the command at a later time to extend the deployment environment, for example to create new profiles or to add additional nodes.
Before running BPMConfig:
- You must have installed the product on the computer where you want to extend the deployment environment.
- You must have created the deployment environment by running BPMConfig.
- The deployment manager must be running.
Run BPMConfig with the same properties file on all computers that will participate in the deployment environment. Run first on the computer that has the deployment manager profile, and then run it on each computer that has a managed node.
At any given time, only one profile creation can be performed on a computer and only one node federation can be performed against a particular deployment manager. For this reason, if you are creating multiple profiles at once on different computers, use the federateLater option, then run BPMConfig with the -create -de options sequentially on each computer to federate the managed nodes. Run BPMConfig with the -create -de option to add additional managed nodes and profiles to your existing environment. When it runs, BPMConfig:
- Creates any local profiles specified in the configuration properties file that do not already exist.
- Creates a new managed node for each new node specified in the configuration properties based on the specified values.
- Federates the node and adds the node to the deployment environment. If the -create -profile action was issued with the -federateLater option, the node is created but not federated.
- Runs the bootstrap utility to load the Process database with system information so there is no need to perform this step manually. If the bpm.de.deferSchemaCreation property in the configuration properties file is set to true and the database tables are created separately, then the bootstrap utility will need to be run manually.
To extend an existing deployment environment to include additional nodes or profiles:
- If you do not already have a customized configuration properties file based on the existing deployment environment to extend, locate the sample configuration file that most closely reflects the environment you are trying to extend. Sample configuration files are provided in the
- BPM_home/BPM/samples/config.
folder.
For each of the different product configurations, there is a different folder containing sample configuration files. For example, for BPM Standard Advanced, there is an Advanced folder containing a set of sample configuration properties files. Within each folder, there is a set of files that are specific to the different database types and configuration environments. The sample files are named according to the following format: de_type-environment_type-topology-database_type. For example, the sample configuration properties file for configuring a single cluster Process Center environment using DB2 with BPM Standard Advanced is called Advanced-PC-SingleCluster-DB2. Find the sample properties file that most closely represents your target deployment environment and make a copy of this file.
- Modify the properties file to add the additional nodes and profiles to extend the existing environment.
When adding managed nodes to an existing deployment environment, define each new node by duplicating the set of bpm.de.node properties that exist in the properties file and specifying the values that apply to the new managed node. For more information about the available properties, read the comments in the sample files, or see the BPMConfig command reference and the examples.
If you are using an Oracle database, you must include the database user name and password for all databases, including the optional ones.
- Run BPMConfig on the computer that has the deployment manager and on each computer that has a managed node, passing it the names of the properties file you created. For example:
- BPM_home/bin/BPMConfig -create -de my_environment.properties
If the new or updated node is on the same computer as the deployment manager node, then the updated or new node is automatically synchronized with the deployment manager node. Before you start the node, ensure that this synchronization has completed by checking the syncNode.log file found in the PROFILE_ROOT/logs directory. If the new or updated node is on a different computer than the deployment manager node, run the syncNode.bat or syncNode.sh command on the new or updated node and wait for the synchronization to complete before starting the node.
- From the administrative console, navigate to the Deployment Environments page by clicking...
- From the administrative console, navigate to the Deployment Environments page by clicking...
- From the administrative console, navigate to the Deployment Environments page by clicking...
- From the administrative console, navigate to the Deployment Environments page by clicking...
- From the administrative console, navigate to the Deployment Environments page by clicking...