WebSphere Portal v7 to v8 migration
- Overview
- Apply WAS fix packs to source host
- Apply Portal fix packs to source host
- Prep source portal
- Create /opt/IBM and /media mounts on target host
- Install Installation Manager on target host
- Install WAS v8.5.5 on target host
- Install Portal v8 on target host
- Make tarball backup
- Migrate deployment manager
- Migrate application server nodes
- Set up unique multicast ports
- Upgrade ConfigEngine
- Migrate databases
- Upgrade node profile
- Upgrade default admin theme
- Install Welcome Portlet
- Update portlet URLs
- Rebuild search indexes
- Enable JCR text search indexing
- Custom JSP files
- Update authoring portlet theme
- Configure web server plugin
Overview
This document discusses a WebSphere Portal v7 to v8 migration scenario.
Before starting...
- Review system requirements
- Confirm DB2 configuration
- Confirm versions
- Review what's changed
- Review what is migrated?
Confirm database configuration
DB2 v9.7 FP 6...
| Env | DB Host | Port | User | Pass | Portal DBs |
|---|---|---|---|---|---|
| DEV | v8DevDb | 60004 | db2admin | foo | FDBKDB COMDB JCRDB RELDB LMDB CUSDB |
| TST | v8TstDb | 60004 | db2adm2 | foo | FDBKDB COMDB JCRDB RELDB LMDB CUSDB |
Versions
Target hosts:
- AIX v6.1 OS level...
-
oslevel -s
7100-01-08-1334 - DB2 version...
-
db2admin@v8DevDb /db2data/db2admin ->db2level
DB21085I Instance "db2admin" uses "64" bits and DB2 code release "SQL09076" with level identifier "08070107".
Informational tokens are "DB2 v9.7.0.6", "s120629", "IP23414", and Fix Pack "6". - LDAP repository: TDS v6.2
- Source WAS...
- Source Portal...
What is migrated?
WebSphere Portal automatically migrates the following applications and configuration data...
- Security configuration
- Access control
- Portal behavior
- Portlet applications
- Customized portal resources, such as themes and skins, pages, and portlets
- Personalized content
- Virtual portals
Apply WAS fix packs to source host
- Log on to source host as user root and run: "slibclean"
- sudo su - wpsadmin
- mkdir /opt/IBM/UpdateInstaller/was70029fix
- From client, upload fixes...
-
scp -r fixes wpsadmin@source_host:/opt/IBM/UpdateInstaller/was70029fix
- From host, copy WAS fixes into place
- cp /opt/IBM/UpdateInstaller/was70029fix/WAS/*.pak /opt/IBM/UpdateInstaller/maintenance
wpsadmin@v7host  /opt/IBM/UpdateInstaller/maintenance$ ls -l
total 1781424
-rw-------    1 wpsadmin staff      25337900 Dec 12 17:56 7.0.0-WS-IHS-AixPPC64-FP0000029.pak
-rw-------    1 wpsadmin staff      39938326 Dec 12 17:56 7.0.0-WS-PLG-AixPPC64-FP0000029.pak
-rw-------    1 wpsadmin staff     742962010 Dec 12 17:56 7.0.0-WS-WAS-AixPPC64-FP0000029.pak
-rw-------    1 wpsadmin staff     103839334 Dec 12 17:56 7.0.0-WS-WASSDK-AixPPC64-FP0000029.pak
- Stop all WebSphere Java processes
-
cd /opt/IBM/WebSphere1/wp_profile/bin
./stopServer.sh WebSphere_Portal -username wpsadmin -password ***
cd /opt/IBM/WebSphere1/appserver/bin
./stopNode.sh -username wpsadmin -password ***
cd /opt/IBM/WebSphere/appserver/bin
./stopManager.sh -username wpsadmin -password *** - Install WAS fixes...
-
cp /opt/IBM/UpdateInstaller/maintenance
./update.sh -options "WAS70029.WebSphere.response" -silent
./update.sh -options "WAS70029.WebSphere1.response" -silent - Verify version:
-
/opt/IBM/WebSphere/appserver/bin/versionInfo.sh
/opt/IBM/WebSphere1/appserver/bin/versionInfo.sh - If it fails right away, check logs in...
-
/opt/IBM/WebSphere/appserver/logs/update
Apply portal fix packs to source host
For our scenarios, we fixpack up to v7.0.0.2 CF26.
- Review: IBM WebSphere Portal 7.0.0.2 Combined Cumulative Fix Readme - cluster
- On v7 portal host, extract 7.0-WP-UpdateInstaller-AIX.tar.gz to...
-
/opt/IBM/WebSphere1/update
- Run HealthChecker
-
cd /opt/IBM/WebSphere/appserver/bin
./startManager.sh
cd /opt/IBM/WebSphere1/appserver/bin
./startNode.sh
cd /opt/IBM/WebSphere1/wp_profile/bin
./startServer.sh WebSphere_Portal
cd /opt/IBM/WebSphere1/wp_profile/ConfigEngine
./ConfigEngine.sh -DRequiredWAS=7.0.0.29 action-health-check-validationYou should get output similar to...
BUILD SUCCESSFUL
Total time: 14 minutes 44 seconds
- Unzip fix archive...
-
unzip 7.0.0.2-WP-WCM-Combined-CFPM99534-CF026.zip
- Copy PM99534.jar to fixes directory
-
/opt/IBM/WebSphere1/update/fixes
- Verify information in wkplc.properties, wkplc_dbtype.properties, wkplc_dbdomain.properties, and wkplc_comp.properties...
- PortalAdminPwd and WasPassword parameters in wkplc.properties
- DbUser and DbPassword in wkplc_dbdomain.properties
- Disable automatic synchronization
-
System administration | Node agents | nodeagent | File Synchronization Service | Automatic Synchronization (uncheck) | OK | Save
- Synchronize nodes
-
System administration | Nodes | Synchronize
- Restart primary node agent
-
System administration \ Node agents | nodeagent | Restart
- Set up command-line
-
cd /opt/IBM/WebSphere1/appserver/bin
. ./setupCmdLine.sh - Stop WebSphere_Portal
-
cd /opt/IBM/WebSphere1/wp_profile/bin
./stopServer.sh WebSphere_Portal -username wpsadmin -password *** - Install portal fixes
cd /opt/IBM/WebSphere1/update ./updatePortal.sh -install \ -installDir "/opt/IBM/WebSphere1/PortalServer" \ -fix \ -fixDir "/opt/IBM/WebSphere1/update/fixes" \ -fixes PM99534 <!-- -fixes CF026 --> - Run WPVersionInfo to verify
-
cd /opt/IBM/WebSphere1/PortalServer/bin
./WPVersionInfo.sh > /tmp/WPVersionInfo.txt - Redeploy any customized WCM portlets
To update the deployed remote rendering portlet:
- Backup any files (e.g. custom JSPs) which have been copied to the deployed remote rendering portlet WAR directory
- Log in to Portal as the Portal Administrator
- Navigate to:
-
Administration | Portlet Management | Web Modules
Find and select the remote rendering portlet web module
Click the Update Portlet Icon to the right of the selected portlet
Select the updated portlet WAR file located in:
-
/opt/IBM/WebSphere1/PortalServer/wcm/prereq.wcm/installableApps
- Click Next and Finish
We cannot upgrade the source portal with a fixpack after migration if you intend to re-migrate the JCR. For example, if the source portal is running V6.1.0.4 and you migrate the portal to v8.0, we cannot then upgrade the source portal to V6.1.0.5 and migrate the JCR again. This is not supported.
Prep source portal
- Remove JCR search collections
- Remove old WCM versions
- Disable JCR Text Search
- Enable the clear versions tool and clean up WCM Versions...
-
http://[HOST]:[PORT]/wps/wcm/myconnect/?MOD=ClearVersions&keep=3&&library=library_name&fix=true
- Remove obsolete portlets from virtual portal scripts
- Disable automatic synchronization
- Verify property files
- Remove locked WCM content
- Create directories for src and tgt...
- mkdir /opt/IBM/supp_dir
- mkdir /opt/IBM/backup_dir
- Verify WCM library names and virtual portal contexts
In v8.0, if the name of a web content library is the same as the URL context of a virtual portal, we can experience incorrect rendering behavior. To prevent this issue, rename the library to a different name before you perform the migration. For each web content library with a name that matches the URL context of a virtual portal on the source server, go to...
-
Administration | Portal Content | Web Content Libraries | Edit Library icon
...enter a new name for the library that is distinct from the URL context of the virtual portal.
Create /opt/IBM and /media mounts on target host
wpsadmin@v8DevHost /home/wpsadmin ->hostname
v8DevHost
wpsadmin@v8DevHost /home/wpsadmin ->df -g
Filesystem    GB blocks      Free %Used    Iused %Iused Mounted on
/dev/hd4           3.00      2.81    7%    11397     2% /
/dev/hd2          11.00      7.32   34%    59609     4% /usr
/dev/hd9var        4.00      3.66    9%     8940     2% /var
/dev/hd3           4.00      3.94    2%      101     1% /tmp
/dev/hd1           3.00      2.96    2%       72     1% /home
/dev/hd11admin      3.00      3.00    1%        9     1% /admin
/proc                 -         -    -         -     -  /proc
/dev/hd10opt       4.00      3.80    6%     7187     1% /opt
/dev/livedump      0.25      0.25    1%        4     1% /var/adm/ras/livedump
/dev/lvapp        50.00     49.80    1%        4     1% /opt/IBM
Dmgr directory: /opt/IBM/WebSphere
Portal directory: /opt/IBM/WebSphere1
Verify /tmp > 3 GB free
wpsadmin@v8TstHost /home/wpsadmin ->df -g
Filesystem    GB blocks      Free %Used    Iused %Iused Mounted on
/dev/hd4           3.00      2.81    7%    11409     2% /
/dev/hd2          11.00      7.32   34%    59730     4% /usr
/dev/hd9var        4.00      3.62   10%     8988     2% /var
/dev/hd3           4.00      3.94    2%       96     1% /tmp
/dev/hd1           3.00      2.96    2%       79     1% /home
/dev/hd11admin      3.00      3.00    1%        9     1% /admin
/proc                 -         -    -         -     -  /proc
/dev/hd10opt       4.00      3.73    7%     8177     1% /opt
/dev/livedump      0.25      0.25    1%        4     1% /var/adm/ras/livedump
/dev/lvportalwps     90.00     89.63    1%        4     1% /opt/IBM
/dev/lvrafrepo     20.00     19.92    1%        4     1% /rafrepo
/dev/lvmedia      50.00     14.17   72%    33264     1% /media
Install Installation Manager
- On your notebook computer, download, install, and run XMing X server
- In putty, enable X11 forwarding
- On target host, install Installation Manager 1.6.2...
-
username@v8DevHost /home/username ->xauth list
v8DevHost/unix:11 MIT-MAGIC-COOKIE-1 0c723ae2ccd7660271b1bafc01b5d55f
v8DevHost/unix:10 MIT-MAGIC-COOKIE-1 d15b40a439806573a57f10099fa9cfaf
username@v8DevHost /home/username ->sudo su -
root@v8DevHost / ->xauth add v8DevHost/unix:10 MIT-MAGIC-COOKIE-1 d15b40a439806573a57f10099fa9cfaf
root@v8DevHost / ->DISPLAY=localhost:10.0
root@v8DevHost / ->export DISPLAY
root@v8DevHost / ->xclock
root@v8DevHost /cd /media/installmgr
root@v8DevHost / ./installc -acceptLicense
root@v8DevHost / cd /opt/IBM/InstallationManager/eclipse
root@v8DevHost / ./IBMIM - If it does not work, we might need to enable X11 in sshd
- vi cd /etc/ssh/sshd_config
- Set X11Forwarding yes
- stopsrc -s sshd
- root@v8DevHost /etc/ssh ->startsrc -s sshd
Install WAS v8.5.5
By default, Portal v8 is installed with WAS v8.0. We can configure Portal v8 with WAS v8.5.5 if you install WAS first, then install Portal v8 specifying "Using existing WAS installation".
The following procedure installs WAS ND v8.5.5 twice, once for a dmgr, once for portal
- Download WAS v8.5.5 FP1
- On your notebook computer, download, install, and run XMing X server
- Log on to target host
- Set ulimit for number of files and file blocks
-
ulimit -n 20480
ulimit -f unlimited - Set umask 022 in .profile
- Install WAS v8.5.5 binaries for use by dmgr profile
- Start Installation Manager
-
/opt/IBM/InstallationManager/eclipse
./IBMIM...and go to...
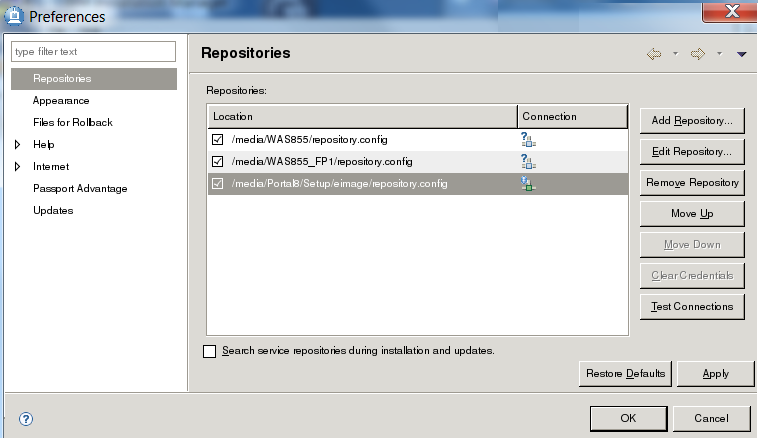
-
File | Preferences | Repositories | Add Respository

- Add WAS v8.5.5 repository...
-
/media/WAS855/repository.config
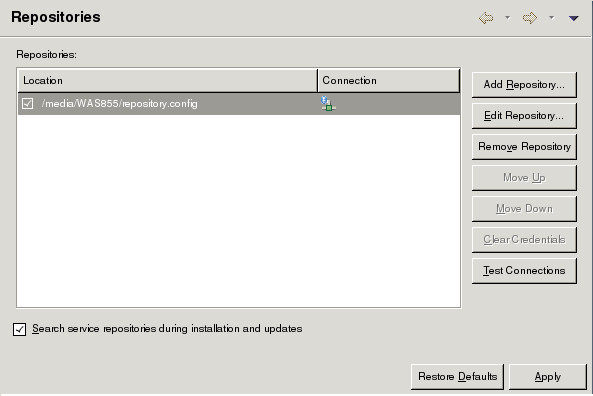
..and then click Apply
- On IIM main page, click Install, select the WAS ND package, then click Next...

- Accept the license terms, then click Next
- Set location of Shared Resources Directory
-
/opt/IBM/IMShared

- Set WAS home
-
/opt/IBM/WebSphere/appserver

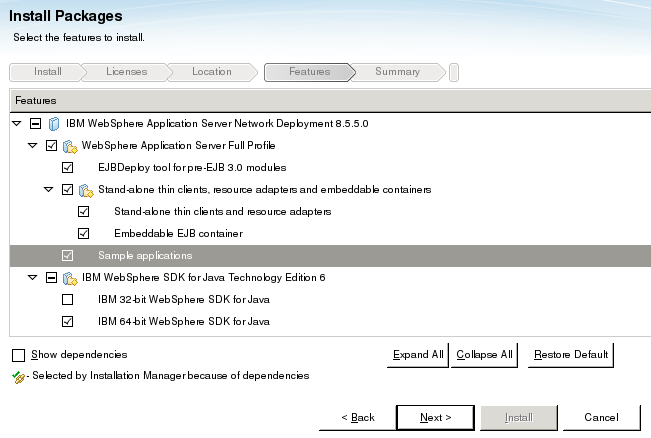
- Select default features
- Accept summary information
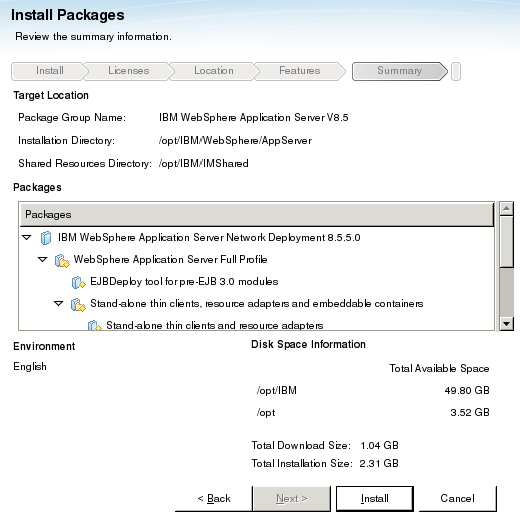
- On last screen, Select None and Finish

- Start Installation Manager
- Install WAS v8.5.5 binaries for use by portal profile
- Select Install, then select Continue in pop-up panel.

- On the Install Packages screen, select...
-
Create a new package group
...and for Installation Directory select...
-
/opt/IBM/WebSphere1/appserver
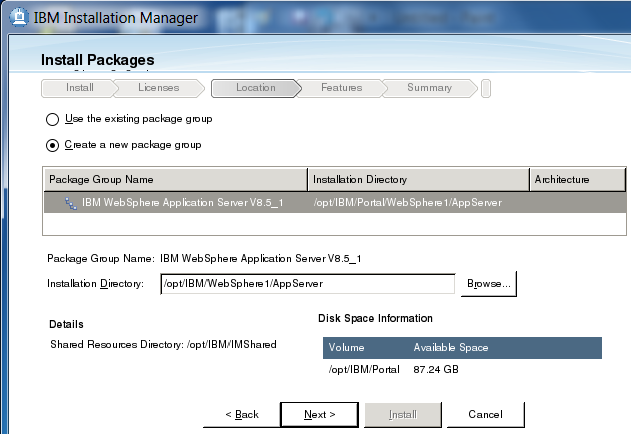
- Select defaults for remainder of panels, then on summary page, select Install

- On last screen, select None, then Finish
- Select Install, then select Continue in pop-up panel.
- Install Fixes
- Add repository for WAS 8.5.5 FP 1
-
/media/WAS855_FP1/repository.config
Uncheck: "Search service repositories during installation and updates"

- On the main IIM page, select Update
- On the "Select a package group to find updates for", select first package group

- On the panel, "Select updates to install", verify V8.5.5.1 is selected

- On the panel, "Select the features to install", keep defaults, then select Next
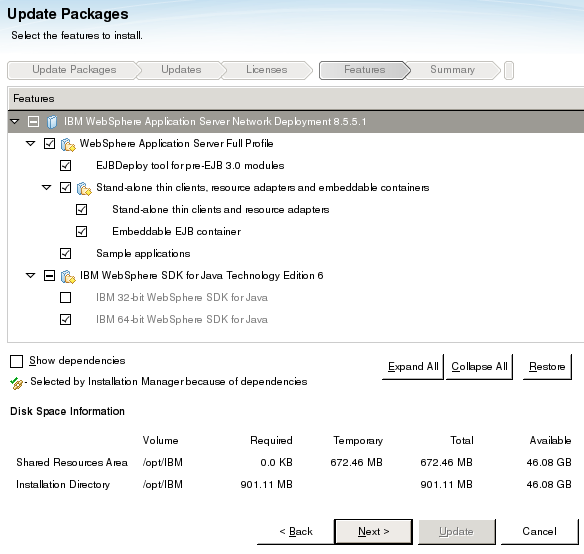
- On the Summary panel, select Update
- After it finishes, do the same for the second package group
- Add repository for WAS 8.5.5 FP 1
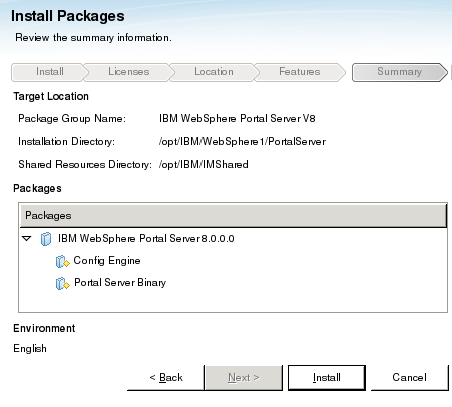
Install Portal v8
- Add repository...
-
/media/Portal8/Setup/eimage/repository.config
- On Install Packages panel, select IBM WebSphere Portal Server

- Select "Create a new package group" and set Installation Directory to...
-
/opt/IBM/WebSphere1/PortalServer

- For migration target host, for features, select only...
- Config Engine
- Portal Server Binary
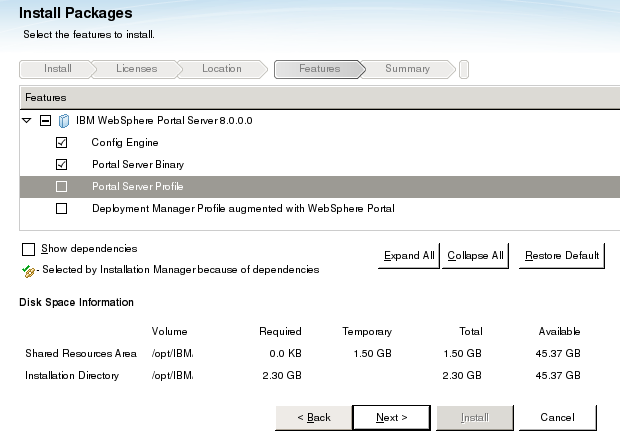
For non-migration host, for features, select...
- Config Engine
- Portal Server Binary
- Portal Server Profile

- On the next screen, select "Existing WebSphere Application Server Root Directory"
-
/opt/IBM/WebSphere1/appserver
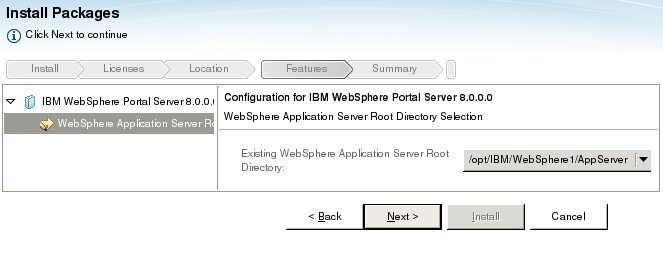
For a non-migration host, we would set node and cell name...
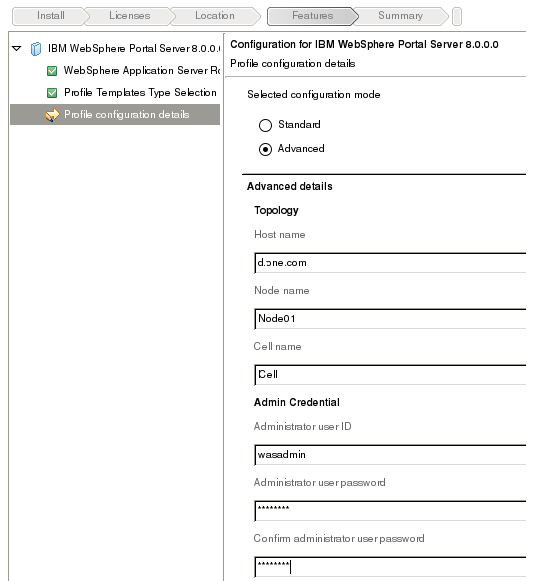
Cell PortalCell1 Node PortalNode1 The dmgr cell and node names MUST be different than the portal cell and node names for the federation step, which we will execute later, to work successfully.
- On the Summary page, click install...
Migration target summary...
Non-migration target summary...

Upgrade Portal v8 with FP1
- Review: Update Portal v8 with FP1
- Add FP1 to Installation Manager repository
/media/Portal8_FP1/repository.config
- From Installation Manager select "Update"
- If you have more than one fix in your repository, it will try to install them all. To install just FP1, de-select "Show recommended only", then select only "v8.0.0.1"

Update portal with Portal Cumulative Fix 09
After upgrading portal v8 with Cumulative Fix 9 we should be able to syndicate between the v7 and v8 portals, which means we do not have to use the update WCM data after migration procedure to refresh WCM data.
- Download CF09
- Add CF09 to Installation Manager repository
- Change class loader from parent first to parent last.
- Stop all WebSphere processes
- Update wps.properties to include profile name and location
- Install CF09 with Installation Manager GUI
-
cd /opt/IBM/InstallationManager/eclipse
./IBMIMTo install from command-line...
- Determine offering ID...
-
$ cd /opt/IBM/InstallationManager/eclipse/tools
$ ./imcl listAvailablePackages -repositories /media/CF09/repository.config
com.ibm.websphere.PORTAL.SERVER.v80_8.0.1.20131217_0755 - Install
./imcl install \
       com.ibm.websphere.PORTAL.SERVER.v80_8.0.1.20131217_0755 \
       -repositories /media/CF09/repository.config \
       -installationDirectory /opt/IBM/WebSphere1/PortalServer \
       -sharedResourcesDirectory /opt/IBM/IMShared \
       -log /tmp/imcl.log  \
       -acceptLicense
- Determine offering ID...
- Start all WebSphere processes
- Synchronize nodes
- Perform post-upgrade steps
- Copy over any custom shared libraries jar files
Migrate v7 dmgr to remote v8 dmgr
- From target host, copy filesForDmgr.zip to the source dmgr host...
-
scp filesForDmgr.zip wpsadmin@v7host.myco.com:/opt/IBM/WebSphere/AppServer
- On source host, stop the dmgr, and unarchive file...
-
cd /opt/IBM/WebSphere/Appserver/bin
./stopManager.sh
cd /opt/IBM/WebSphere/Appserver
unzip filesForDmgr.zipFailure to copy the migration plug-in files to the dmgr can result in the following error when you try to upgrade the ConfigEngine tool:
-
com.ibm.websphere.management.exception.InvalidConfigDataTypeException: ADMG0007E: The configuration data type CellCompRegistryCollection is not valid
If the dmgr profile location is not set to the default location...
-
./Appserver/profiles/Dmgr01
...copy metadata_wkplc.xml in the compressed file to the actual dmgr profile directory...
-
cp ./Appserver/profiles/Dmgr01/config/.repository/metadata_wkplc.xml $MY_DMGR_PROFILE/config/.repository
- On the target host, create WAS_V85_aix.ppc64_RemoteMigrSupport.jar...
-
cd /opt/IBM/WebSphere/AppServer/bin/migration/bin/
./createRemoteMigrJar.sh -targetDir /tmp - Copy file to v7 source environment...
-
scp /tmp/WAS_V85_aix.ppc64_RemoteMigrSupport.jar wpsadmin@v7host.myco.com:/tmp
rm /tmp/WAS_V85_aix.ppc64_RemoteMigrSupport.jar - On source host, extract, set perms, and run WASPreUpgrade...
mkdir /opt/IBM/WebSphere/AppServer/supp_dir
mv /tmp/WAS_V85_aix.ppc64_RemoteMigrSupport.jar  /opt/IBM/WebSphere/AppServer/supp_dir
cd /opt/IBM/WebSphere/AppServer/supp_dir
jar xvf WAS_V85_aix.ppc64_RemoteMigrSupport.jar
chmod -R 755 /opt/IBM/WebSphere/AppServer/supp_dir
cd /opt/IBM/WebSphere/AppServer/supp_dir/bin/

./WASPreUpgrade.sh /opt/IBM/backup_dir  \
                   /opt/IBM/WebSphere/AppServer/  \
                   -oldProfile Dmgr01 \
                   -machineChange true  \
                   -javaoption -Xmx2048m
If you get an error, we can re-run with trace...
./WASPreUpgrade.sh /opt/IBM/backup_dir \ /opt/IBM/WebSphere/AppServer/ \ -traceString trace_spec \ -traceFile trace_file \ -oldProfile wp_profile_name \ -machineChange true \ -javaoption -Xmx2048m - On target host, copy backup_dir to /opt/IBM...
-
scp -r wpsadmin@v7host.myco.com:/opt/IBM/backup_dir /opt/IBM
- Log on to v7 dmgr console and make a note of dmgr cell and node name.
- On target host, create dmgr profile...
cd /opt/IBM/WebSphere/AppServer/bin/ ./manageprofiles.sh -create \ -profileName Dmgr01 \ -templatePath /opt/IBM/WebSphere/AppServer/profileTemplates/management \ -serverType DEPLOYMENT_MANAGER \ -nodeName v7hostCellManager01 \ -cellName v7hostCell01 \ -hostName v8host - On target host, run WASPostUpgrade...
cd /opt/IBM/WebSphere/AppServer/bin/
./WASPostUpgrade.sh /opt/IBM/backup_dir  \
                    -profileName Dmgr01 \
                    -oldProfile Dmgr01 \
                    -username wpsadmin \
                    -password foo!  \
                    -replacePorts TRUE  \
                    -backupConfig TRUE  \
                    -scriptCompatibility TRUE \
                    -keepDmgrEnabled TRUE
Migrate appserver nodes
- On the portal v8.0 host, run...
-
cd /opt/IBM/WebSphere1/PortalServer/bin
./genRemMigPkg.sh /tmpThis creates file...
- /tmp/PORTAL_V8.0.0.1_WAS_V85_aix.ppc64_RemoteMigrSupport.jar
- On source host, create directory to hold files we will extract...
-
mkdir /opt/IBM/supp_dir
- Copy jar file from target host to supp_dir directory on source host...
-
scp /tmp/PORTAL_V8.0.0.1_WAS_V85_aix.ppc64_RemoteMigrSupport.jar wpsadmin@v7srcportal.myco.com:/opt/IBM/supp_dir
- On source, extract and set perms...
-
cd /opt/IBM/supp_dir
jar xvf PORTAL_V8.0.0.1_WAS_V85_aix.ppc64_RemoteMigrSupport.jar
chmod -R 755 /opt/IBM/supp_dir - Set...
- ulimit -n 20000
- Clean log directories...
- Stop servers
-
cd /opt/IBM/WebSphere1/wp_profile/bin
./stopServer.sh WebSphere_Portal -username wpsadmin -password ***
cd /opt/IBM/WebSphere1/AppServer/bin
./stopNode.sh -username wpsadmin -password ***
cd /opt/IBM/WebSphere/AppServer/bin
./stopManager.sh -username wpsadmin -password *** - Compress archive logs...
cd /opt/IBM/WebSphere1/wp_profile/logs/WebSphere_Portal for i in `ls verbosegc.* trace_* SystemOut_* SystemErr_*` do echo $i gzip $i done - Restart Source portal
-
cd /opt/IBM/WebSphere/AppServer/bin
./startManager.sh
cd /opt/IBM/WebSphere1/AppServer/bin
./startNode.sh
cd /opt/IBM/WebSphere1/wp_profile/bin
./startServer.sh WebSphere_Portal
- Stop servers
- Stop dmgr on target...
-
cd /opt/IBM/WebSphere/AppServer/bin
./stopManager.sh - Archive then remove dmgr files in backup_dir...
-
cd /opt/IBM
tar cvf backup_dir.tar backup_dir; gzip backup_dir.tar
rm -rf backupdir/* - On the source host run WASPreUpgrade...
cd /opt/IBM/supp_dir/bin/
./WASPreUpgrade.sh /opt/IBM/backup_dir \
                   /opt/IBM/WebSphere1/AppServer \
                   -oldProfile wp_profile\
                   -machineChange true \
                   -javaoption -Xmx3096m
Output...
old profile path          = /opt/IBM/WebSphere1/wp_profile/
old cell                  = v7srcportalCell01
old node                  = v7srcportal
old server name           = WebSphere_Portal
new profile path          = /opt/IBM/backup_dir/profiles/wp_profile/
new cell                  = v7srcportalCell01
new node                  = v7srcportal
isWAS60Release            = false
isVMMDBRepositoryUsed     = false

MIGR0303I: The existing Application Server environment is saved.
MIGR0420I: The first step of migration completed successfully.
- On target host, tarball existing backup_dir then remove contents.
-
cd /opt/IBM
tar cvf backup_dir_dmgr.tar backup_dir
gzip backup_dir_dmgr.tar
rm -rf backup_dir/* - From target host, copy extracted files from source host...
scp -r wpsadmin@v7srcportal.myco.com:/opt/IBM/backup_dir/* /opt/IBM/backup_dir
- On target, ff there is enough disk space, make another tarball backup. Stop all WebSphere java processes before running
-
df -g
cd /opt/IBM
tar cvf WebSpherePreProfile.tar WebSphere
tar cvf WebSphere1PreProfile.tar WebSphere1
gzip WebSpherePreProfile.tar; gzip WebSphere1PreProfile.tar - Create a profile on the target node:
cd /opt/IBM/WebSphere1/AppServer/bin ./manageprofiles.sh -create \ -defaultPorts \ -enableAdminSecurity false \ -profileName wp_profile \ -profilePath /opt/IBM/WebSphere1/wp_profile \ -templatePath /opt/IBM/WebSphere1/AppServer/profileTemplates/default \ -nodeName v7srcportal \ -cellName v7srcportalCell01 \ -hostName v8host \ -isDefault \ -omitAction samplesInstallAndConfig defaultAppDeployAndConfig - On target, update the backup files created when running WASPreUpgrade to point to the new environment. Replace the source deployment manager host name with the target deployment manager host name.
-
backup_dir/profiles/wp_profile/config/cells/v7srcportalCell01/nodes/v7srcportalCellManager01/serverindex.xml
backup_dir/profiles/wp_profile/properties/wsadmin.properties - On target host, verify dmgr is started
-
cd /opt/IBM/WebSphere/AppServer/bin
./startManager.sh - On source host, verify dmgr is stopped
- Run WASPostUpgrade...
cd /opt/IBM/WebSphere1/AppServer/bin
./WASPostUpgrade.sh /opt/IBM/backup_dir  \
                    -profileName wp_profile  \
                    -oldProfile wp_profile  \
                    -username wpsadmin  \
                    -password foo!  \
                    -includeApps true  \
                    -backupConfig false  \
                    -javaoption -Xmx3096m
MyCo ProdlineA output...
old profile path = /opt/IBM/WebSphere1/wp_profile/ old cell = v7srcportalCell01 old node = v7srcportal old server name = WebSphere_Portal new profile path = /opt/IBM/WebSphere1/wp_profile/ new cell = v7srcportalCell01 new node = v7srcportal isWAS60Release = false isVMMDBRepositoryUsed = false - In the target environment, edit...
-
/opt/IBM/WebSphere1/wp_profile/ConfigEngine/properties/wkplc.properties
...and set WasSoapPort and WasRemoteHostName to the target deployment manager.
More info
Set up unique multicast ports
Set unique broadcast ports on target host...
- Start node agent
-
cd /opt/IBM/WebSphere1/AppServer/bin
./startNode.sh - Open the WAS admin console and select...
- System administration | Deployment manager | Ports
- Update the following ports:
- CELL_DISCOVERY_ADDRESS
- DCS_UNICAST_ADDRESS
Source Target CELL_DISCOVERY_ADDRESS 7277 CELL_DISCOVERY_ADDRESS 7377 DCS_UNICAST_ADDRESS 9352 DCS_UNICAST_ADDRESS 9452 - Click...
-
System administration | Node agents | node_agent | Ports
- Update the following ports:
- DCS_UNICAST_ADDRESS
- NODE_DISCOVERY_ADDRESS
- NODE_IPV6_MULTICAST_DISCOVERY_ADDRESS
- NODE_MULTICAST_DISCOVERY_ADDRESS
- Repeat this step on all node agents
Source Target DCS_UNICAST_ADDRESS 9353 DCS_UNICAST_ADDRESS 9453 NODE_DISCOVERY_ADDRESS 7272 NODE_DISCOVERY_ADDRESS 7372 NODE_IPV6_MULTICAST_DISCOVERY_ADDRESS 5001 NODE_IPV6_MULTICAST_DISCOVERY_ADDRESS 5101 NODE_MULTICAST_DISCOVERY_ADDRESS 5000 NODE_MULTICAST_DISCOVERY_ADDRESS 5100 - Update the following ports:
- Click...
-
Servers | Server types | WebSphere application servers | application_servers | Ports
The default value for application_servers is WebSphere_Portal however you may have more servers defined. You need to update the ports on all application servers listed.
- Update the following ports:
- DCS_UNICAST_ADDRESS
Source Target DCS_UNICAST_ADDRESS 10030 DCS_UNICAST_ADDRESS 10130 - Fully resynchronize the primary node:
- Click...
-
System administration | Nodes
- Select the check box for the primary node.
- Click on Full Resynchronize.
- Click...
- Restart the dmgr and node agent.
-
cd /opt/IBM/WebSphere1/AppServer/bin
./stopNode.sh -username wpsadmin -password foo!
cd /opt/IBM/WebSphere/AppServer/bin
./stopManager.sh -username wpsadmin -password foo!
cd /opt/IBM/WebSphere/AppServer/bin
./startManager.sh
cd /opt/IBM/WebSphere1/AppServer/bin
./startNode.sh
Upgrade the ConfigEngine tool
To upgrade the ConfigEngine tool, from the target v8 host, run...
cd /opt/IBM/WebSphere1/PortalServer/bin/
./upgradeConfigEngine.sh wp_profile  \
                         -conntype SOAP  \
                         -WasRemoteHostName v8host.myco.com  \
                         -WasSoapPort 8879  \
                         -user wpsadmin  \
                         -password foo!  \
                         -LocalHostName v8host
Trace information is stored in the UpgradeConfigEngineTrace.log file in the WP_PROFILE/ConfigEngine/log directory.
Migrate databases
The process of connecting to the domain copies must be done after you upgrade the ConfigEngine tool but before you upgrade the Portal profile. For more information on this process, see the Wiki article: Connecting to database domains
- In source environment, in the JCR domain, execute reorgchk and runstats.
Run the statistics on all the columns in all tables and indexes. Gather at least a minimum level of sampling and distribution.
- Restore v7 copies of RELDB, JCRDB, FDBKDB, COMDB, LMDB, and CUSDB to v8 databases, then set all DbUrls in wkplc_dbdomain.properties to point to v8 databases
- Verify connectivity from portal v8 host to DB2 host...
-
telnet v8DevDb 60004
- Optional: Use DB2 client to validate db configuration
- Verify values of the following...
Parameter Recommended Actual lock list size 10000 package cache size 24000 AUTOMATIC(3214) statistics heap size 16384 AUTOMATIC(4384) - On the database copies, verify the Statement Heap size is set to at least 32k.
- List the database manager configuration parameters...
-
db2 get db cfg for dbname
- If the Statement Heap size is smaller than 32k, increase it by running
-
UPDATE DB CFG FOR dbname USING stmtheap 32768
- List the database manager configuration parameters...
- Disable all automatic maintenance on the database, including health monitoring.
DBAs run a full reorg and runstats of all tables once a week (sat 4 am).
- Start the dmgr and the node
- On the target portal, edit...
- /opt/IBM/WebSphere1/wp_profile/ConfigEngine/properties/wkplc_dbdomain.properties
...and set DB properties...
- DbUrl
-
feedback.DbUrl=jdbc:db2://v8DevDb.myco.com:60004/fdbkdb:returnAlias=0;
likeminds.DbUrl=jdbc:db2://v8DevDb.myco.com:60004/lmdb:returnAlias=0;
release.DbUrl=jdbc:db2://v8DevDb.myco.com:60004/reldb:returnAlias=0;
community.DbUrl=jdbc:db2://v8DevDb.myco.com:60004/comdb:returnAlias=0;
customization.DbUrl=jdbc:db2://v8DevDb.myco.com:60004/cusdb:returnAlias=0;
jcr.DbUrl=jdbc:db2://v8DevDb.myco.com:60004/jcrdb:returnAlias=0; - DbUser
-
feedback.DbUser=db2admin
likeminds.DbUser=db2admin
release.DbUser=db2admin
community.DbUser=db2admin
customization.DbUser=db2admin
jcr.DbUser=db2admin - DbPassword
-
feedback.DbPassword=foo
likeminds.DbPassword=foo
release.DbPassword=foo
community.DbPassword=foo
customization.DbPassword=foo
jcr.DbPassword=foo
- DbUrl
- From target portal host, set up DB2 Client jar files...
-
mkdir /opt/IBM/WebSphere1/PortalServer/db2drivers
cd /opt/IBM/WebSphere1/PortalServer/db2drivers
scp wpsadmin@v7host.myco.com:/opt/IBM/WebSphere1/PortalServer/db2drivers/*.jar .Note that it is not uncommon for obsolete DB2 Client jar files are installed on source portal. This can happen, for example, if DB2 Server was upgraded, and nobody remembered to copy latest client jars to portal environment. If this is the case, copy the jar files from the DB2 server host.
- Verify paths to Type 4 database drivers, db2jcc4.jar and db2jcc_license_cu.jar, in properties file...
- /opt/IBM/WebSphere1/wp_profile/ConfigEngine/properties/wkplc_dbtype.properties
- Validate from command-line...
-
cd /opt/IBM/WebSphere1/wp_profile/ConfigEngine
nohup ./ConfigEngine.sh validate-database > validate-database.logOK to run with nohup, but do not run as a background process
- Increase space in the transaction log...
-
db2 update db cfg for jcrdb using logprimary double_current_value
db2 update db cfg for jcrdb using logsecond double_current_value - Connect to the database domains:
-
cd /opt/IBM/WebSphere1/wp_profile/ConfigEngine
nohup ./ConfigEngine.sh connect-database > connect-database.log - Log on to dmgr console and synchronize nodes...
-
System Administrations | Nodes | Synchronize
Property extension database
If we are using a property extension database, on the dmgr, set up access to the database drivers...
- In wkplc.properties, set la.DbType
- Add library paths to VMM_JDBC_CLASSPATH variable. From the console, got to...
-
Environment | WebSphere Variables | Scope: Cell
...and set VMM_JDBC_CLASSPATH variable, for example...
-
WP_DB2_JDBC_DRIVER_CLASSPATH_VMM_1
If this variable does not exist, click New to create the variable.
We can confirm this value by clicking...
-
Resources | JDBC | JDBC provider | your_VMM_JDBC_provider
Enter the complete paths to the library files in Value. These files must be JDBC Version 4 compliant, for example...
-
SQLLIB/java/db2jcc4.jar
- Stop and restart the appropriate servers to propagate the changes.
- Create the local dmgr WebSphere variable used to access the database drivers:
./ConfigEngine.sh wp-prep-vmm-db-secured-environment \ -DWasPassword=foo \ -DDbDomain=la|federated.db \ -Ddb_type.NodeDbLibrary=/path/to/dmgr/jars \ -DDmgrNodeName=dmgr_node_name - Create the variable used to access the VMM database drivers:
cd /opt/IBM/WebSphere1/wp_profile/ConfigEngine
./ConfigEngine.sh wp-node-prep-vmm-db-secured-environment \
                -DWasPassword=dmgr_password \
                -DDbDomain=la|federated.db \
                -DVmmNodeName=node_name \
                -Ddb_type.NodeDbLibrary=/path/to/db/jars
VmmNodeName is a list of one or more nodes names in the cell which share the same database driver paths. The db_type in db_type.NodeDbLibrary should be set to the type of database we are using, for example db2.
Retain custom table spaces
If a database domain in the earlier portal server uses assigned custom table spaces to retain for use on the new portal server (instead of using the default table spaces), update the table space property file and the index space property file for the database table. Complete these updates only after you have upgraded the ConfigEngine tool.
To retain assigned custom table spaces, update these files on the target portal server:
- database_domain.table_name.tablespace
- database_domain.table_name.index_name.indexspace
Make tarball backup
Tarball backups allow us to restore portal filesystems without having to contact infrastructure backup team. We back up dmgr, portal, and Installation Manager directories.
- Log on as root and verify there is enough space...
-
cd /opt/IBM
du -gs WebSphere
du -gs WebSphere1
df -k - If enough space, make tarball...
-
cd /opt/IBM/WebSphere1/wp_profile/bin
./stopServer.sh WebSphere_Portal -username wpsadmin -password foo!
cd /opt/IBM/WebSphere1/appserver/bin
./stopNode.sh -username wpsadmin -password foo!
cd /opt/IBM/WebSphere/appserver/bin
./stopManager.sh -username wpsadmin -password foo!
cd /opt/IBM
tar cvf WebSphereD.tar WebSphere
gzip WebSphereD.tar
tar cvf WebSphere1D.tar WebSphere1
gzip WebSphere1D.tar
tar cvf InstallationManager.tar /var/ibm/InstallationManager
gzip InstallationManager.tar
tar cvf IMShared.tar /opt/IBM/IMShared
gzip IMShared.tar
cd /opt/IBM/WebSphere/appserver/bin
./startManager.sh
cd /opt/IBM/WebSphere1/appserver/bin
./startNode.sh
cd /opt/IBM/WebSphere1/wp_profile/bin
./startServer.sh WebSphere_Portal
Upgrade wp_profile
We run the upgrade-profile task to upgrade the v7 profile, wp_profile, from v7 to v8.The longest running part of this long running script (2+ hrs) is the modification of the JCR schema from JCR7.0.0.2 to JCR8.0.0.1
After running any ConfigEngine tasks, IBM recommends to review...
-
/opt/IBM/WebSphere1/wp_profile/ConfigEngine/log/ConfigTrace.log
- Start dmgr and node agents
- In dmgr console, synchronize all nodes.
- On the primary node.
cd /opt/IBM/WebSphere1/wp_profile/ConfigEngine
./ConfigEngine.sh upgrade-profile  \
                  -DWasPassword=foo!  \
                  -DPortalAdminPwd=foo!   \
                  -Dwcm.transactionTimeout=1200
If upgrade-profile fails, we can restart using:
For example:
- -Dwp.migration.framework.resume=deploy-apps
To get resume_point, we can review the ConfigEngine logs in...
-
/opt/IBM/WebSphere1/wp_profile/ConfigEngine/log
If upgrade-profile files with error...
-
Fri Dec 27 15:56:16 CST 2013 Target started: import-nodes import-nodes:
--- Exception Thrown ---
/opt/IBM/WebSphere1/PortalServer/jcr/wp.content.repository.install/config/includes/jcr.install_cfg.xml:826: com.ibm.icm.jcr.task.TaskException: TASK001X: Remote task execution failed with response code 404 due to exception : Not Found
...and WebSphere_Portal/SystemOut.log has:
-
[12/27/13 15:56:16:601 CST] 00000128 filter E com.ibm.ws.webcontainer.filter.FilterInstanceWrapper doFilter SRVE
8109W: Uncaught exception thrown by filter Extensible Filter: java.io.FileNotFoundException: SRVE0190E: File not found:
/jcr/remotetask
The portal wiki has a fix...
./ConfigEngine.sh action-create-ear-wp.content.repository.install \
                  -DWasPassword=foo!  \
                  -DPortalAdminPwd=foo!

./ConfigEngine.sh action-modify-servlet-path-wp.content.repository.install \
                  -DWasPassword=foo!  \
                  -DPortalAdminPwd=foo!

./ConfigEngine.sh action-connect-database-edit-ear-wp.content.repository.install \
                  -DWasPassword=foo!  \
                  -DPortalAdminPwd=foo!
Synchronize nodes and restart all processes...
-
cd /opt/IBM/WebSphere1/wp_profile/bin
./stopServer.sh WebSphere_Portal -username wpsadmin -password foo!
cd /opt/IBM/WebSphere1/AppServer/bin
./stopNode.sh -username wpsadmin -password foo!
cd /opt/IBM/WebSphere/AppServer/bin
./stopManager.sh -username wpsadmin -password foo!
./startManager.sh
cd /opt/IBM/WebSphere1/AppServer/bin
./startNode.sh
cd /opt/IBM/WebSphere1/wp_profile/bin
./startServer.sh WebSphere_PortalThen retry...
./ConfigEngine.sh upgrade-profile \ -DWasPassword=foo! \ -DPortalAdminPwd=foo! \ -Dwp.migration.framework.resume=deploy-theme - Start the portal server
cd /opt/IBM/WebSphere1/wp_profile/bin
./startServer.sh WebSphere_Portal
- To verify, open portal in web browser...
Upgrade default administration theme
The portal migration process uses v7 administration themes. After successful migration, to use v8 administration themes, run the following ConfigEngine tasks.
- Upgrade the administration pages theme:
./ConfigEngine.sh action-upgrade-theme-admin-oob \
                  -DWasPassword=foo!  \
                  -DPortalAdminPwd=foo!
Error:
-
EJPXA0240E: The resource [web-app com.ibm.wps.portlets.welcome uid=com.ibm.wps.portlets.welcome]
To fix, install Install WelcomePortlet.war
- Upgrade the Web Content Manager administration pages theme:
./ConfigEngine.sh action-upgrade-wcm-theme-admin-oob
                  -DWasPassword=foo!  \
                  -DPortalAdminPwd=foo!
If the migrated v7 theme does not render correct, we can set the Portal v8 theme as default.
Install Welcome Portlet
Log on to portal and go to admin page...
-
http://v8DevHost.myco.com:10039/wps/myportal/Administration
...and install...
-
/opt/IBM/WebSphere1/PortalServer/ap/wp.ap.welcome/installableApps/WelcomePortlet.war
See also: Deploying portlets common across clusters
Update portlet urls
After migrating, verify and update as needed the portlets URLs. In some cases, portlets have the incorrect URL after migration.
Perform the following steps in the newly migrated environment....
- Export the portlet configuration for both base and virtual portals...
cd /opt/IBM/WebSphere1/PortalServer/bin
./xmlaccess.sh -in /opt/IBM/WebSphere1/PortalServer/doc/xml-samples/ExportAllPortlets.xml \
               -user wpsadmin \
               -password foo! \
               -url http://v8host.myco.com:10039/wps/config \
               -out /tmp/Server_config.xml

./xmlaccess.sh -in /opt/IBM/WebSphere1/PortalServer/doc/xml-samples/ExportAllPortlets.xml \
               -user wpsadmin \
               -password foo! \
               -url http://v8host.myco.com:10039/wps/config/URL_mapping_context_of_the_VP \
               -out /tmp/Server_configVP.xml
The exported configuration is stored in Server_config.xml
- Verify output XML file and update URLs as needed.
Edit Server_config.xml and verify that all URLs are valid. All the files listed in the XML file must be present and accessible in the specified locations. For example..
-
$ grep "<url>" /tmp/Server_config.xml | grep sitemap.war
<url>file://localhost/$archive_root$/sitemap.war.webmod/sitemap.war</url>
$ find /opt/IBM/WebSphere1/wp_profile -name sitemap.war | grep installedApps
/opt/IBM/WebSphere1/wp_profile/installedApps/v7hostCell01/PA_SearchSitemapPort.ear/sitemap.warIf the URLs do not match the actual location in your environment, update those entries according to the actual location of the files.
If the files specified in the URL field do not exist in the migrated environment or are no longer needed in the configuration, remove those entries.
- Modify the XML file to remove the global-settings and services-settings entries
- Import the updated configuration using the Server_config.xml file you updated:
cd PortalServer_root/bin
./xmlaccess.sh -in Server_config.xml \
               -user wpsadmin \
               -password foo! \
               -url http://v8host.myco.com:port/wps/config
After the request has been processed, make sure that the import process has given the following return message:
-
<status element="all" result="ok">
- Resync the cluster from the Deployment Manager console.
- Restart the Enterprise Applications from the Deployment Manager console.
- Activate the deployed portlets:
-
./ConfigEngine.sh activate-portlets -DWasPassword=password
- Restart the portal.
Rebuild search indexes
Before you migrated the search components, you exported the search collections as XML files and deleted the search collections from the Manage Search portlet. After migrating to the current version of WebSphere Portal, we can rebuild your search indexes.
- Create the new search collections.
- Import the backed up configuration information for each of the search collections.
- Check if the URLs for the crawlers are still valid.
- Stop the WebSphere Portal server.
- If the schedules have not been set, start the crawlers manually.
Ignore this step if schedules have been set. When schedules are set, the crawlers update the search collections.
JSP files and Web content plug-ins
Any JSP files used on the old system will need to be manually copied to the new system. Any Web content plug-ins used on the old system, such as custom workflows, will need to be manually copied to the new system and enabled.
Update authoring portlet theme
You must change the theme of the hidden Web Content Manager authoring portlet to Portal 8.0 theme, otherwise Web Content Manager related portlets do not work properly.
- Log in to Portal as an administrator and go to...
-
Administration | Manage Pages
- In the Search by menu select...
-
Unique name contains
...and search for...
-
com.ibm.wps.hiddenpage.wcm.Authoring_Portlet
- Select...
-
Web Content Manager page | Edit Page Properties | Theme field | Portal 8.0 | OK
Configure Web Server Plug-in
- Review v7 source properties
Web server properties...
Web server name webserver1 Port 80 Web server installation location /opt/IBM/HTTPServer Configuration file name /opt/IBM/HTTPServer/conf/httpd.conf Plug-in properties...
Web server copy of Web server plug-in files /opt/IBM/Plugins/config/webserver1/plugin-cfg.xml Plug-in key store directory and file name /opt/IBM/Plugins/config/webserver1/plugin-key.kdb Plug-in logging /opt/IBM/Plugins/logs/webserver1/http_plugin.log - Use Installation Manager to install WebSphere Customization Toolbox

Install into /opt/IBM/Websphere/WebSphere/Toolbox
root@v8host /opt/IBM/WebSphere/Toolbox ->ls -l
total 24
drwxr-xr-x    5 root     system          256 Jan 07 16:22 WCT
drwxr-xr-x    3 root     system          256 Jan 07 16:22 bin
drwxr-xr-x    8 root     system         4096 Jan 07 16:22 java
drwxr-xr-x    2 root     system         4096 Jan 07 16:22 lafiles
drwxr-xr-x    3 root     system         4096 Jan 07 16:22 lib
drwxr-xr-x    2 root     system          256 Jan 07 16:22 plugins
drwxr-xr-x    6 root     system          256 Jan 07 16:22 properties
drwxr-xr-x    2 root     system          256 Jan 07 16:22 uninstall
drwxr-xr-x    2 root     system          256 Jan 07 16:22 util
- In IHS httpd.conf file, set...
-
Listen 80
- Start web server and admin server
-
cd /opt/IBM/HTTPServer/bin
./apachectl start
./adminctl start - Run the WCT GUI...
-
cd /opt/IBM/WebSphere/Toolbox/WCT
./wct.sh - Specify port 80.

- Choose "local" install

- Review summary info then click Configure.
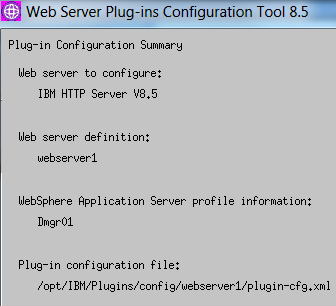
- Create web server definition
-
cd /opt/IBM/WebSphere/AppServer/profiles/Dmgr01/bin
. ./setupCmdLine.sh
cp /opt/IBM/Plugins/bin/configurewebserver1.sh .
./configurewebserver1.sh - Log on to dmgr and verify web server definition was created.

- Synchronize nodes
- Add rewrite rules at end of httpd.conf, right before plug-in directives.
- Configure LoadModule
# LoadModule foo_module modules/mod_foo.so
LoadModule authz_host_module modules/mod_authz_host.so
LoadModule auth_basic_module modules/mod_auth_basic.so
LoadModule authn_file_module modules/mod_authn_file.so
LoadModule authz_user_module modules/mod_authz_user.so
#LoadModule authz_groupfile_module modules/mod_authz_groupfile.so
LoadModule include_module modules/mod_include.so
LoadModule log_config_module modules/mod_log_config.so
LoadModule env_module modules/mod_env.so
#LoadModule mime_magic_module modules/mod_mime_magic.so
LoadModule expires_module modules/mod_expires.so
LoadModule headers_module modules/mod_headers.so
LoadModule unique_id_module modules/mod_unique_id.so
LoadModule setenvif_module modules/mod_setenvif.so
#LoadModule proxy_module modules/mod_proxy.so
#LoadModule proxy_connect_module modules/mod_proxy_connect.so
#LoadModule proxy_ftp_module modules/mod_proxy_ftp.so
#LoadModule proxy_http_module modules/mod_proxy_http.so
LoadModule mime_module modules/mod_mime.so
#LoadModule dav_module modules/mod_dav.so
#LoadModule dav_fs_module modules/mod_dav_fs.so
LoadModule autoindex_module modules/mod_autoindex.so
#LoadModule asis_module modules/mod_asis.so
#LoadModule info_module modules/mod_info.so
LoadModule cgid_module modules/mod_cgid.so
LoadModule dir_module modules/mod_dir.so
LoadModule actions_module modules/mod_actions.so
#LoadModule speling_module modules/mod_speling.so
#LoadModule userdir_module modules/mod_userdir.so
LoadModule alias_module modules/mod_alias.so
LoadModule rewrite_module modules/mod_rewrite.so
LoadModule deflate_module modules/mod_deflate.so
LoadModule cache_module modules/mod_cache.so
- Restart web server
-
cd /opt/IBM/HTTPServer/bin
./apachectl restartAdd myhost.myvirtualportal.com to...
-
c:/windows/system32/drivers/etc/hosts
- Pull up virtual portal
SSL test:
../bin/gskcmd -keydb \
              -create \
              -db ihsserverkey.kdb \
              -pw password \
              -type cms \
              -expire 360 \
              -stash
../bin/gskcmd -cert \
              -create \
              -db ihsserverkey.kdb \
              -pw password \
              -size 1024 \
              -dn "CN=v8host.myco.com,O=clientd,OU=IBM HTTP Server,ST=FL,C=US" \
              -label HTTPCert \
              -default_cert yes \
              -expire 360
Create web server definition and plug-in configuration from command-line
./wctcmd.sh -tool pct  \
            -defLocPathname /opt/IBM/Plugins  \
            -defLocName ProdLineAPlugin \
            -createDefinition webserver1  \
            -response /opt/IBM/WebSphere/Toolbox/WCT/responsefile.txt  \
Example of the content of a response file for an IHS local plug-in configuration.
configType=local_standalone
enableAdminServerSupport=true
enableUserAndPass=true
enableWinService=false
ihsAdminCreateUserAndGroup=true
ihsAdminPassword=******
ihsAdminPort=8008
ihsAdminUnixUserGroup=grp101
ihsAdminUnixUserID=user1
mapWebServerToApplications=true
profileName=AppSrv01
wasExistingLocation=opt/IBM/WebSphere/AppServer85
webServerConfigFile1=opt/IBM/HTTPServer/conf/httpd.conf
webServerDefinition=webserver1
webServerHostName=local.ibm.com
webServerInstallArch=32
webServerOS=windows
webServerPortNumber=80
webServerSelected=ihs
The following is an example of the content of a response file for an IHS remote plug-in configuration.
configType=remote
enableAdminServerSupport=true
enableUserAndPass=true
enableWinService=false
ihsAdminCreateUserAndGroup=true
ihsAdminPassword=******
ihsAdminPort=8008
ihsAdminUnixUserGroup=grp101
ihsAdminUnixUserID=user1
mapWebServerToApplications=true
profileName=AppSrv01
wasExistingLocation=opt/IBM/WebSphere/AppServer85
wasMachineHostname=192.168.1.2
webServerConfigFile1=opt/IBM/HTTPServer/conf/httpd.conf
webServerDefinition=webserver1
webServerHostName=remote.ibm.com
webServerInstallArch=32
webServerOS=windows
webServerPortNumber=80
webServerSelected=ihs
Delete a definition...
./wctcmd.sh -tool pct
            -defLocPathname /data/IBM/WebSphere/Plugins
            -defLocName DefinitionLocationName
            -deleteDefinition DefinitionName
./wctcmd.sh -tool pct
            -removeDefinitionLocation
            -defLocPathname /data/IBM/WebSphere/Plugins
...or...
./wctcmd.sh -tool pct
            -removeDefinitionLocation
            -defLocName someDefinitionLocationName
Enable JCR text search indexing
Before beginning with migration, we disabled JCR text search indexing in the v7 environment. Now that the migration is complete, we need to re-enable JCR text search indexing.
Edit...
-
wp_profile_root/PortalServer/jcr/lib/com/ibm/icm/icm.properties
...and set...
-
key = jcr.textsearch.enabled
value = true
Restart portal for the changes to take effect.
Create JCR search collection
To create the default JCRCollection1 search collection, log on to Portal as an administrator and go to...-
Applications | Content | Web Content Management
Edit the portlet and save it. You do not have to actually change anything, saving the configuration triggers the indexing. A new JCRCollection1 JCR search collection is generated automatically.