Install Commerce v6.x
Contents
- Pre-Install
- Install DB2 server
- Install DB2 client
- Install DB2 fixpacks
- Catalog database
- Configure Web servers
- Install the IHS Plug-in
- Apply IHS fixpacks
- Install ftp
- Install WAS ND and Commerce
- Apply Commerce fixpacks
- Make wasuser a member db2grp3
- Create a WebSphere Commerce instance
- Verify the instance creation
- Configure JVM
- Configure SSL
- Configure Plug-in
- Copy bundled static files to Web servers
- Copy custom static files to Web servers
- Change from temp DB to permanent DB
- Verify configuration
- Create clustered environment
- Publish a Consumer Direct store
- Verify store publish
- Create backups
- Configure automatic startup scripts
- Configure automatic shutdown scripts
See also
Commerce Install Procedure
- Pre-Install
- Verify WebSphere Commerce Version 6.0 supported software Technote #7007501
- Verify IBM WebSphere Commerce Version 6.0 Operating System prerequisites Technote #7007429
- Verify IBM WebSphere Commerce Version 6.0 Networking prerequisites Technote #7007555
- Verify Database servers
DB2 Universal Database Version 8.2.3 Enterprise Server Edition
- Configure at least 3GB of physical memory for the machine that will be running Commerce.
- Install required OS packages.
compat-libstdc++-296-2.96-132.7.2
compat-libstdc++-33-3.2.3-47
compat-db-4.1.25-9
xorg-x11-deprecated-libs-6.8.1-23.EL
rpm-build-4.3.3-7_nonptl
glibc-2.3.4
pdksh-5.2.14To check what packages are installed...
rpm -qa | grep package_name
To install...
up2date pkgname
For example...
up2date rpm-build
To determine fully-qualified DNS name, run: "uname -n"
- Install gcc
up2date gcc
- Verify disk availability
Run: df -k
Commerce will be installed under...
/opt/websphere/AppServer
/opt/websphere/CommerceServer60The GUI WebSphere Commerce installer might not allow you to install to another file system until it has used up /opt, and if /opt is undersized in the root partition you could have disk space issues later on.
- Verify language
echo $LANG
We need en_US
- Ensure that any Lotus Notes server, Web servers, Java application servers, and any nonessential Java processes are stopped before installing WebSphere Commerce.
- Ensure that any other InstallShield MultiPlatform installers have completed or you have exited them before installing WebSphere Commerce.
- When using Red Hat Enterprise Linux, ensure your firewall configuration is set to permissive. If not set to permissive, a problem might be encountered when installing DB2.
To get version...
cat /etc/redhat-release
Red Hat Enterprise Linux AS release 4 (Nahant Update 6)
setenforce 0
Supposedly this is only turned on by default on RHEL 5, however run the above just to be safe.
If not turned of you get error: "Failed to find VM - aborting"
- If you have a Web server on the machine using any of the following ports:
80, 443, 5432, 5433, 8000, 8001, 8002, 8004, 8006, and 8007
...stop the Web server.
To verify ports are not in use...
netstat -anp
- Set firewall on Windows jump boxes to allow traffic to your listening ports.
- Ensure that your operating system does not log your command line inputs.
By default some operating systems log the commands and parameters that are entered through a command line. This log file is not deleted when the user logs off and may be a security risk.
- Configure the DB2 server
See: Install and configure 64-bit DB2 Universal Database
- Install DB2 client
We are installing the Application Development version of DB2 client, which includes the DBD-DB2-1.1 perl module, which is required for the eservice-driver to connect to the Ecard Database.
If perl module is not loaded, you will get the following C header file errors...
Constants.xs:16:20: sqlcli.h: No such file or directory
Constants.xs:18:21: sqlcli1.h: No such file or directory
Constants.xs:19:20: sqlext.h: No such file or directory- Download the DB2 Enterprise Server Edition ESE binary...
DB2 UDB Enterprise Server Edition V8.1 Linux for Intel 32-bit (C48THML)
Run db2_install.
- In menu that comes up, choose...
DB2.ADCL DB2 Application Development Client
- Create user wasuser
- Set up DB2 environment for wasuser
cd /opt/IBM/db2/V8.1/instance
./db2icrt -s CLIENT wasuser - Add the following to .bash_profile of user wasuser.
LIBPATH=$LIBPATH:/opt/WAS/CommerceServer60/bin
export LIBPATH
. sqllib/db2profile
umask 0027 - Verify current directory is in PATH of wasuser.
- Update DB2 client licenses.
The license file is located in the download directory.
db2licm -a db2ese.lic
- Download the DB2 Enterprise Server Edition ESE binary...
- Install DB2 fixpacks
- Untar...
- FP16_MI00207.tar - Regular fixpak
- FP16_MI00207_ADCL.tar - Application Development Client
- Stop any websphere processes. We don't want any open transactions.
- As root, run...
./installFixPak -y
cd adcl
./db2_install - As root, run...
. /home/db2inst3/sqllib/db2profile
cd /opt/IBM/db2/V8.1/instance
db2 get instance
./db2iupdt db2inst3 - Verify fixpack level
# db2level
DB21085I Instance "db2inst3" uses "32" bits and DB2 code release "SQL08029" with level identifier "030A0106".
Informational tokens are "DB2 v8.1.2.144", "s080111", "MI00207", and FixPak "16".
Product is installed at "/opt/IBM/db2/V8.1".
- Untar...
- Catalog Database
For example, for STAGE environment...
-
db2 catalog tcpip node SKYWAYN remote 10.1.70.52 server 60004
db2 catalog db SKY_STG as SKYWAYSTG at node SKYWAYN
db2 terminate
db2 connect to SKYWAYSTG user wasuser using wasuser1
db2 attach to SKYWAYN user wasuser using wasuser1
db2 "list node directory"
db2 get instance
db2 list database directory
db2 list tables for schema wasuser
select tabname from syscat.tables
db2 "quit" - Configure the Web server
These instructions detail how to install and configure the remote IBM HTTP Server with WebSphere Plug-in
- Review
- Log on as user root
- Uncompress and untar the WC_WAS_ND_xLinux_V6025.tar.gz installation images into /tmp
- cd /tmp/WAS6/disk1/IHS
root> ./installInstall into...
/opt/ihs/ihs60

Click Next.
- Select Custom installation and click Next.

- Perform a full installation by checking the HTTPServer Base and Security features.

Click Next.
- Specify a HTTP Port and a HTTP Administration
Port that are not in use and click Next. Figure 24
shows the ports selection.

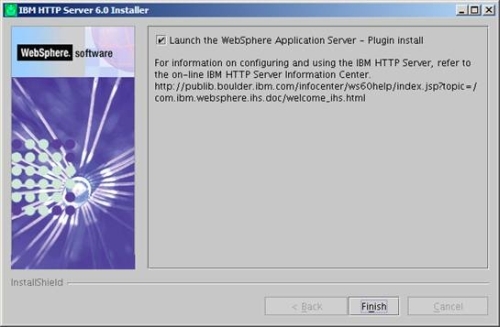
- Select Launch the WebSphere Application Server - Plugin install and click Finish.
- Review
- Install the IBM HTTP Server Plug-in
- Start the Installation Wizard from /tmp
root> cd /tmp/WAS6/disk1/plugin
root> ./install
- Deselect the Installation roadmap: Overview and installation scenarios and click Next.

- Select the Web server to configure. In this case, it is IBM HTTP Server V6, which was installed above.

Click Next.
- Select Web server machine (remote) because the Web server and application server are going to reside on separate machines.
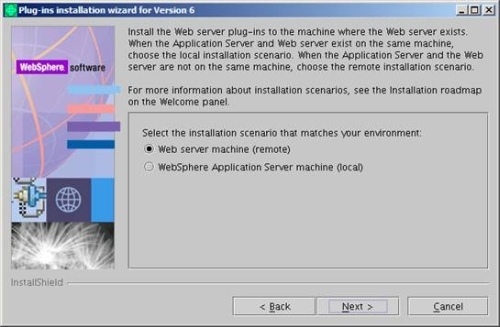
Click Next.
- Specify the plug-in installation path. For example,
/opt/ihs/ihs60/plugin
Click Next.

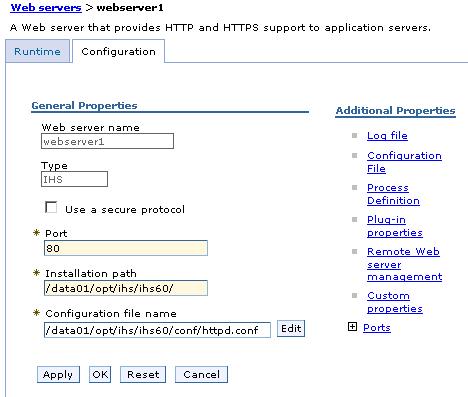
- Specify the location of the httpd.conf file and the Web server port number. Specify port 80 that was specified during the installation of the Web server above.

Click Next.
- Specify a unique Web server definition name. Use webserver1 for a standalone appserver.
Note that the Commerce instance creation on a standalone appserver will use webserver1 by default and there is no way to change the name. If you comfigure Commerce to a federated WAS node, you can use any name you want.

- Specify the location of the plugin-cfg.xml file. For example,
/opt/IBMIHS/Plugins/config/webserver1/plugin-cfg.xml

- Specify the host name of the application server machine. Use the fully qualified host name or the numeric IP address.
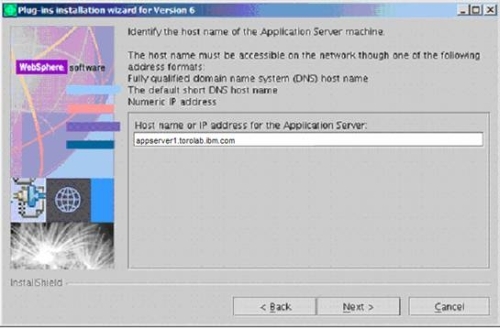
Click Next and then Finish.
- Start the Installation Wizard from /tmp
- Apply IBM HTTP server fixpacks
- Configure the WebSphere Application Server update installer.
download.updii.61017.linux.ia32.zip
- Apply the latest refresh pack for the IBM HTTP server
6.0-WS-WASIHS-LinuxX32-RP0000002.tar
Apply the refresh pack to the Web server before applying latest fix pack level.
- Apply the latest IBM HTTP server fix pack.
6.0.2-WS-WASIHS-LinuxX32-FP00000029.pak
- Apply the 6.0.2 refresh pack for the IBM HTTP server plug-in
Apply the refresh pack to the Web server plug-in before it is updated to the latest fix pack level.
The refresh pack will update the Web server plug-in to level 6.0.2.
6.0-WS-WASPlugIn-LinuxX32-RP0000002.tar
- Update the Web server plug-in to the latest fix pack level.
6.0.2-WS-WASPlugIn-LinuxX32-FP00000029.pak
- Configure the WebSphere Application Server update installer.
- Install ftp
- up2date vsftpd
- Edit /etc/services and enable ftp port 21
- Install WebSphere Application Server and WebSphere Commerce
- Download installation images.
- WebSphere Commerce Enterprise V6.0 Disk 1 and Disk 2 for Windows, linux, Solaris, iSeries, Linux on Intel, Linux on zSeries, Linux on iSeries and pSeries Multilingual
- WebSphere Commerce - DB2 Universal Database Enterprise Server Edition and Administrative Client V8.2.3 for linux
Local copies of...
- WC_DB2_ESE_and_Client_xLnx_26_V823.tar.gz WC_Enterprise_V60.zip WC_WAS_ND_xLinux_V6025.tar.gz
...can be found in...
10.1.70.138:/software
...into /tmp.
Review the WebSphere Commerce README file.
The README file contains information about last-minute changes to the product. Last-minute changes can include additional fixes that must be installed before using WebSphere Commerce.
- WebSphere Commerce Enterprise V6.0 Disk 1 and Disk 2 for Windows, linux, Solaris, iSeries, Linux on Intel, Linux on zSeries, Linux on iSeries and pSeries Multilingual
- Log on as user root.
Set umask 002.
- Create non-root user: wasuser
useradd wasuser
Set the home directory. You might have to manually create this directory. If you create the directory manually, change the ownership to wasuser.
- Create a user group: wasgroup.
groupadd wasgroup
Add the wasuser to the new group, setting the new group as the Primary Group or Default Group.
/usr/bin/gpasswd -a wasuser wasgroup
su - wasuser
newgrp wasgroupTo confirm wasuser is a member of wasgroup...
groups wasuser
- Edit the wasuser profile and verify the current working directory is part of the PATH variable.
PATH=$PATH:.:
export PATH - Verify that the wasuser locale code is set properly.
echo $LANG
We want en_US
- Run Commerce installer...
root> cd /tmp/WC60/disk1
root> chmod u+x setup_linux
root> ./setup_linux
If you get a message saying rpm-build is not installed, even though you have confirmed it is installed and current, ignore message and click next.
Select Custom Installation because the database server and the Web server are on separate machines from the application server machine.

Click Next.
- Specify the components to be installed. Deselect...
- IBM DB2 Universal Database Enterprise Server Edition,
- IBM HTTP Server
- WebSphere Application Server Web server plug-ins
These components are already installed on the remote Web server and remote database server.

Click Next.
- Check Remote web server because the Web server is on a remote machine.

Click Next.
- Specify the installation path for the WebSphere Application Server and the WebSphere Commerce installation directory.
/opt/websphere/AppServer

Click Next.
- Specify the IBM DB2 Universal Administration Client installation information.
For example...
DB userid db2inst1 DB userpass ******** Database user group wasgroup Database user home /home/wasuser Do NOT create this user. The install program will create this user.
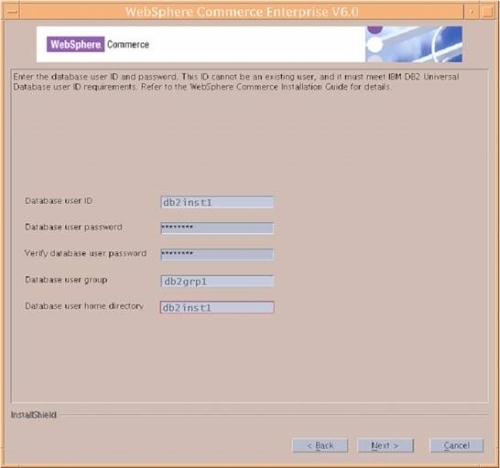
Click Next.
- Specify the user name and p for the Configuration Manager.

Click Next.
- Specify the non-root information and click Next.
For example...
/home/wasuser

- If you wish, create a response file from your install.

Click Next, then Finish, and wait for the installation to complete.
- Make non-root user (wasuser) a member of the database user group.
/usr/bin/gpasswd -a wasuser db2grp3
su - wasuser
newgrp db2grp3To confirm wasuser is a member of db2grp3...
groups wasuser
- Review WebSphere Commerce installation logs
The following log files contain messages generated by the WebSphere Commerce installation wizard:
- WC_installdir/logs/install.log
- WC_installdir/logs/wctrace_date_time.log
The wctrace_date_time.log file is intended for use by IBM support only. Examining this file might not provide you with any useful information.
- WC_installdir/logs/wcnonroot.log
- WC_installdir/logs/wcinstall.log
The installation wizard will create the wcinstall.log file only if errors or warnings are encountered during the installation process.
If the installation of WebSphere Commerce fails, these log files will be in /tmp.
The WebSphere Commerce installation is complete if the following message appears in the install.log log file: WebSphere Commerce installation complete.
- WC_installdir/logs/install.log
- Download installation images.
- Apply Commerce fixpacks
- Copy UpdateInstallers and fix pack files from...
10.1.70.138:/software
...to your server...
download.updii.6108.linux.ia32.zip 6.0.2-WS-WAS-LinuxX32-FP00000029.pak 6.0.0-WS-WCServer-FP002.pak.zip download.updii.61017.linux.ia32.zip 6.0.2-WS-WASJavaSDK-LinuxX32-FP00000029.pak
- Configure the WebSphere Application Server Update Installer
download.updii.61017.linux.ia32.zip
- Update JAVA SDK for WebSphere Application Server
Before installing, stop help processes
su - wasuser
cd /opt/websphere/Comm*/bin
./stopHelp.sh - Download the latest Java SDK cumulative Fix Pack and update the Java Virtual Machine.
6.0.2-WS-WASJavaSDK-LinuxX32-FP00000029.pak
- Update WebSphere Application Server
Download the latest WebSphere Application Server cumulative Fix Pack and update the application server.
We installed...
6.0.2-WS-WAS-LinuxX32-FP00000029.pak
- Apply WAS ND fixpack for PMR # 08793 370 000...
6.0.2.23-WS-WAS-IFPK65800.pak
- Install the WebSphere Commerce Update Installer.
download.updii.6108.linux.ia32.zip
- Apply Commerce fixpacks.
A copy of...
6.0.0-WS-WCServer-FP002.pak.zip
Rename file to .jar (remove the .zip extension) and do not unzip it.
For install instructions see the Update Installer Installation Guide
- Apply 6.0.0.2-WS-WCServer-IFJR27373
Corrects the way that WebSphere Commerce Accelerator code deals with null values in the cookie.
- Copy UpdateInstallers and fix pack files from...
- Set the wasuser user to be a member of the database user group, db2grp3.
/usr/bin/gpasswd -a wasuser db2grp3
To confirm that a wasuser is a member of db2grp3...
groups wasuser
Note that you will NOT be able to run WAS commands such as serverStatus.sh and wsadmin.sh until AFTER you have create a profile.
- Create a WebSphere Commerce instance
See: Create a WebSphere Commerce instance
- Verify the instance creation
Check the instance creation log files:
- The configuration information for the new WebSphere Commerce instance is stored in
WC_profiledir/installedApps/WC_clientx_cellWC_instance.ear/xml/config/wc-server.xml
Confirm that this file exists before checking the log files produced during the instance creation.
- Create a WebSphere Commerce instance produces log files in...
WC_installdir/instances/instance/logs
Ensure that there are no errors in the following log files:
- createInstanceANT.err.log
- createInstanceANT.log
- reatedb.db2.log
- messages.txt
- trace.txt
- sec_check.log
- The configuration information for the new WebSphere Commerce instance is stored in
- Configure JVM
For generic jvm arguments set...
-Xk40000 -Xp10240k,1024k -DinvocationCacheSize=0
Recommended heap settings are...
Min Heap Size : 256
Max Heap Size: 1280 - Configure SSL key stores and trust stores
You can either use self-signed certs or verisign certs
To generated self-signed certificates and key datbase, on the web server machine, use ikeyman or command-line utilities...
mkdir /opt/ihs/ihs60/keys
cd /opt/ihs/ihs60/keys
../bin/ikeymanHere are example values...
gsk7cmd -keydb -create -db mykeydb.kdb -pw p -type cms -expire 360 -stash
gsk7cmd -cert -create -db mykeydb.kdb -pw p -size 1024 -dn "CN=hostname,O=CoName,OU=IHS,ST=MO,C=US" -label IHS -default_cert yes -expire 360
As wasuser, restart WebSphere Commerce
- Prepare IBM HTTP Server and Plug-in
-
Edit IHS *.conf file and add required stanzas
- httpd.conf
- skyway.conf
- clientx.conf
See also: Manually editing the httpd.conf file for WebSphere Commerce instance
- In WAS ND console, expand...
Servers | Web servers | remotewebserver
- Verify settings are correct...
- Click Generate Plug-in. A message displays with the path to the plug-in configuration file on the WebSphere Commerce server.
Verify plugin has mappings to the WC_clientx application. If it does not, in the WAS console, go to...
Enterprise Applications | WC_clientx | Map modules to servers
...and map your webserver to the modules.
- Copy the plugin-cfg.xml file from the WebSphere Commerce server to the remote Web server. Copy the plug-in file to the plugin directory specified in the httpd.conf file.
For example, copy the file to...
/ihs/ihs60/plugin/clientx/httpconf/plugin-cfg.xml
- Update the WebSpherePluginConfig directive in the httpd.conf file to point to the plugin-cfg.xml file copied in the previous step.
- Add virtual host aliases for clientx virtual hosts.
- In httpd.conf set...
<IfModule worker.c>
ThreadLimit 100
ServerLimit 30
StartServers 2
MaxClients 3000
MinSpareThreads 100
MaxSpareThreads 750
ThreadsPerChild 100
MaxRequestsPerChild 0
</IfModule>
-
- Copy bundled static files to Web servers
- Log on to Commerce appserver
- Run...
cd /opt/websphere/AppServer/profiles/clientx/installedApps/WC_clientx_cell/WC_clientx.ear
scp -r * root@webserver:/opt/ihs/ihs60/htdocs/en_US
- On webserver, go to...
cd /opt/ihs/ihs60/htdocs
...and create file removeJSPJAR.pl...
use strict; my $filter = $ARGV[0]; if ( !$filter ) { print "Static file extensions were not specified.\n"; exit; } system("find en_US/ > t.out"); open F, "< t.out"; while ( my $file = <F> ) { chomp( $file ); my @extensions = split( /\,/, $filter ); my $markForDelete = 1; # Skip thread statements that do not match foreach my $extension ( @extensions ) { if ( $file =~ /\.$extension$/ ) { $markForDelete = 0; last; } } unlink($file) if ( $markForDelete ); } close F; unlink("t.out"); - Execute removeJSPJAR.pl
perl ./removeJSPJAR.pl html,css,js,gif,jpg,gif,bmp
- Copy custom static files to Web servers
To deploy new custom web content from developers...
- Copy tarball from...
foo5dc4sl43:/db2backup/ibm/nbaxa510/nbaxa510_static-*.tar.gz
...to...
webserver:/opt/ihs/ihs60/htdocs/en_US
You can also use static files on one of the production webservers
- Verify there is enough file system space to handle expanded file: df -k
- Verify contents of tar file before expanding. Change invalid paths. For example, change...
/usr/clientx/htdocs/en_US/MyStore
...to...
./MyStore
- Unarchive tar file...
cd /opt/ihs/ihs60/htdocs/en_US
gunzip xvf nbaxa510-static*.tar.gz
tar xvf nbaxa510-static*.tar - Remove tar file when finished to free up disk space.
- Re-run procedure for copying bundled static content.
- Set owner and permissions:
-
cd /opt/ihs/ihs60/htdocs/en_US
find . -name \* -exec chown ihsadmin {} \;
find . -name \* -exec chgrp ihsadmin {} \;
find . -type d -exec cxxod 775 {} \;
find . -type f -exec cxxod 664 {} \;
- Copy tarball from...
- Catalog Database
For example, for STAGE environment...
-
db2 catalog tcpip node SKYWAYN remote 10.1.70.52 server 60004
db2 catalog db SKY_STG as SKYWAYSTG at node SKYWAYN
db2 terminate
db2 connect to SKYWAYSTG user wasuser using wasuser1
db2 attach to SKYWAYN user wasuser using wasuser1
db2 "list node directory"
db2 get instance
db2 list database directory
db2 list tables for schema wasuser
select tabname from syscat.tables
db2 "quit" - Change from temp DB to permanent DB
If you had to configure the Commerce system against a temporary database, because the migrated DB had name longer than 7 characters, follow this procedure to point Commerce to the actual DB.
- On each production appserver, catalog production DBs...
db2 catalog tcpip node SKYWAYN remote 10.1.84.42 server 60004
db2 catalog db CLIENTX as CLIENTX at node SKYWAYN
db2 connect to CLIENTX user wasuser using wasuser1
db2 list tables
db2 catalog tcpip node EESRVN remote 10.1.84.39 server 60004
db2 catalog db EESRV as EESRV at node EESRVN
db2 connect to EESRV user wasuser using wasuser1
db2 list tables
db2 catalog tcpip node SKYWAYON remote 10.1.84.21 server 60004
db2 catalog db SKYWAY_ODS as SKYWAYODS at node SKYWAYON
db2 connect to SKYWAYODS user wasuser using wasuser1
db2 list tables for schema wasuserYou might get error: SQL0805N Package "NULLID.SQLC2E03 0X41414141414A4852" was not found. SQLSTATE=51002
To fix, run...
db2 connect to CLX user db2inst1 using svvs123
cd /home/wasuser/sqllib/bin
db2 BIND /home/wasuser/sqllib/bnd/@db2ubind.lst BLOCKING ALL GRANT PUBLIC
db2 connect to CLX user wasuser using wasuser1
db2 list tables for all - Use WAS console to update JAAS login/p for DBs
- cd /opt/WAS/CommerceServer60/instances/clientx/xml
- In clientx.xml update the Merchant Key to...
MerchantKey="hrJ5wDwTbB22O++bPxL8IqlTX7MkiZhu"
- In clientx.xml update...
   DBHost="10.1.84.42"
   DBMSName="DB2"
   DBNode="clientx"
   DBServerPort="60004"
   DBUserHomeDir=""
   DBUserID="wasuser"
   DBUserPwd="???"
   active="true"
   name="clientx" />
- Update the EAR file...
- cd /opt/websphere/CommerceServer60/bin
- ./config_ant.sh -DinstanceName=clientx UpdateEAR
- Restart server1 using WAS ND console
- On each production appserver, catalog production DBs...
- Verify configuration
- Check the SystemOut.log for a clean start-up.
- Open the WebSphere Commerce Administration console.
If you are unable to pull up the Commerce admin console...
- Troubleshoot: WebSphere Commerce tools fail to start properly
- Verify permissions under installedApps are at least 755
- If you get...
Forbidden
You don't have permission to access /adminconsole on this server.
Additionally, a 403 Forbidden error was encountered while trying to use an ErrorDocument to handle the request....apply Commerce maintenance (Technote #1232042)
The pk23354 part of the above maintenance should already be in the cum fix pack we just installed: 6.0.2-WS-WAS-LinuxX32-FP00000029.tar
Just install 6.0.2.5-WS-WAS-IFWC-file-permission3.pak.zip using WAS update installer
Rename file to .jar (remove the .zip extension) and do not unzip it.
- Open the WebSphere Commerce Accelerator. For example...
https://staging.host1.com:8000/accelerator
If you get a not found message, and you are using IP address virtual hosts in httpd.conf, verify there is an IP address alias for the Virtual Host in the appserver, for example....

- If you suspect problems with the plugin, you can set plugin logging to "Debug" by editing...
profiles/profile/config/cells/cell/nodes/node/servers/webserver1/plugin-cfg.xml
The http server re-reads plugin-cfg.xml every 60 seconds.
- If some parts of the screen do not render, clear your browser cache. You also might want to set your browser to re-read pages every time:
Tools | Internet Options | Temporary Internet files | Settings | Check for newer versions of stored pages | Every visit to the page

- Commerce only works with Internet Explorer. Do not try using Firefox or any other browser.
- Check the SystemOut.log for a clean start-up.
- In Web Container for each appserver, enable servlet caching.
- Create Clustered Environment
- Create commerce instance clientx on a single application server which is selected as the first server with in the cell
- Increase dmgr heap size and soap connection time out
- Federate the first application server node
- Perform federation of nodes
- Publish a Consumer Direct storefront asset store
- As wasuser, start the WebSphere Commerce server, if it has not already started.
- Open the WebSphere Commerce Administration console.

- Select the site and click OK.
- From the top menu, select Store Archives > Publish.

This document contains screenshots for publishing an extended sites store model. Select Extended sites in the dropdown box, and then enable the ExtendedSitesOrganizationStructure.sar checkbox. Note that you can publish a different store model and use this section as a guide.
- Click Next.

- Ensure that all of the information in the Summary page is correct, and then click Finish to publish the store.

- An informational message states that the publish process has started.

- The Publish Status page automatically displays, and the ExtendedSitesOrganizationStructure.sar is given a status of "Publishing".

- After the sar is successfully published, the status changes to "Successful".

- Follow the above steps to publish the following additional sars:
- ExtendedSitesHub.sar
- ConsumerDirectStorefrontAssetStore.sar
Even though you can publish the new sars after federating or clustering, we recommend publishing all the sars you need prior to federating or clustering. After all sars are published, the Publish Status page looks like...

- As wasuser, start the WebSphere Commerce server, if it has not already started.
- Verify the store publish
- Check the WebSphere Commerce Server status.
- If it has not started yet, start the WebSphere Commerce server.
- Check the SystemOut.log to confirm a clean start-up.
- Try accessing the storefront.
- Check the WebSphere Commerce Server status.
- Create backups
- Configure automatic startup scripts
To configure automatic startup of Clientx processes after a Linux reboot...
- On the WAS ND machine, create a master startup script to start deployment manager. Edit...
/opt/WAS/dmgr/bin/WASstartupscript.sh
...and insert...
/opt/websphere/profiles/Dmgr01/bin/startManager.sh
Set ownership and perms of this script to wasuser and 775.
- On the WAS machines, create a master startup script to start application servers. Edit...
/opt/WAS/AppServer/profiles/clientx/bin/WASstartupscript.sh
and insert...
/opt/websphere/AppServer/profiles/clientx/bin/startNode.sh
/opt/websphere/AppServer/profiles/clientx/bin/startServer.sh ECard_xxx
/opt/websphere/AppServer/profiles/clientx/bin/startServer.sh server1Set ownership and perms of this script to wasuser and 775.
- Edit /etc/rc.local on all machines, and call the startup script...
su - wasuser -c ". /home/wasuser/.profile; /opt/WAS/dmgr/bin/WASstartupscript.sh"
- On the WAS ND machine, create a master startup script to start deployment manager. Edit...
- Configure automatic shutdown scripts
- On the WAS ND machine, create a master shutdown script to stop deployment manager. Edit...
/opt/WAS/dmgr/bin/WASshutdown.sh
...and insert...
/opt/websphere/profiles/Dmgr01/bin/stopManager.sh
Set ownership and perms of this script to wasuser and 775.
- On the WAS machines, create a master shutdown script to stop application servers. Edit...
/opt/WAS/AppServer/profiles/clientx/bin/WASshutdown.sh
and insert...
/opt/websphere/AppServer/profiles/clientx/bin/stopServer.sh server1
/opt/websphere/AppServer/profiles/clientx/bin/stopServer.sh ECard_xxx
/opt/websphere/AppServer/profiles/clientx/bin/stopNode.shSet ownership and perms of this script to wasuser and 775.
- Edit /etc/rc.local on all machines, and call the shutdown script...
su - wasuser -c ". /home/wasuser/.profile; /opt/WAS/dmgr/bin/WASshutdown.sh"
- On the WAS ND machine, create a master shutdown script to stop deployment manager. Edit...
Author: Michael Pareene
michael.pareene@skyway.net
612.220.8724