Common Tasks - Clientx
Contents
- Check the Commerce Server status
- Start the Commerce server
- Stop the Commerce server
- Stop and start portal
- Check the SystemOut.log
- Copy static files to remote Web server
- Open the Commerce Accelerator
- Open the Commerce Administration console
- Open the Commerce organization administration console
- Start the node agent
- Stop the node agent
- Start the Deployment Manager
- Stop the Deployment Manager
- Open the WAS ND console
- Back up the WAS configuration
- Back up the database
- Regenerate the IHS Plug-in
- Start the IHS
- Stop the IHS
- Verify the virtual host settings
- Map virtual hosts for Web modules
- Map modules to servers or cluster
- Access the store front
- Start the cluster
- Stop the cluster
- Start the Commerce Server via the ND console
- Stop the Commerce Server via the ND console
- Start the IHS via the ND console
- Stop the IHS via the ND console
- Start the IHS server
- Change wc-server.xml
- DB2 commands
See also:
Check the WebSphere Commerce Server status
To check connections for appservers:
/usr/local/svvs/home/svadmin/checkConnect on all appservers
For standalone profiles, as user wasuser...
wasuser> cd /data01/opt/websphere/AppServer/profiles/clientx/bin
wasuser> ./serverStatus.sh -all
ADMU0116I: Tool information is being logged in file
/data01/opt/websphere/AppServer/profiles/clientx/logs/serverStatus.log
ADMU0128I: Start tool with the clientx profile
ADMU0503I: Retrieving server status for all servers
ADMU0505I: Servers found in configuration:
ADMU0506I: Server name: server1
ADMU0506I: Server name: nodeagent
ADMU0509I: The Application Server "server1" cannot be reached.
It appears to be stopped.
ADMU0508I: The Node Agent "nodeagent" is STARTED
Start the WebSphere Commerce server
For dmgr profiles logon, as user wasuser, run...
wasuser> cd /data01/opt/websphere/AppServer/profiles/clientx/bin
wasuser> ./startNode.sh
wasuser> cd /data01/opt/websphere/dmgr/bin
wasuser> ./startManager.sh
For standalone profiles logon as wasuser and run...
wasuser> cd /data01/opt/websphere/AppServer/profiles/clientx/bin
wasuser> ./startServer.sh server1

ADMU0116I: Tool information is being logged in file
/data01/opt/websphere/AppServer/profiles/clientx/logs/server1/startServer.log
ADMU0128I: Start tool with the clientx profile
ADMU3100I: Reading configuration for server: server1
ADMU3200I: Server launched. Waiting for initialization status.
ADMU3000I: Server server1 open for e-business; process id is 34022
You must start with non-root user "wasuser"
Stop the WebSphere Commerce server
For dmgr profiles logon as wasuser and run...
wasuser> cd /data01/opt/websphere/dmgr/bin
wasuser> ./stopManager.sh
wasuser> cd /data01/opt/websphere/AppServer/profiles/clientx/bin
wasuser> ./stopNode.sh
For standalone profiles logon as wasuser and run...
wasuser> cd /data01/opt/websphere/AppServer/profiles/clientx/bin
wasuser> ./stopServer.sh server1

ADMU0116I: Tool information is being logged in file
/data01/opt/websphere/AppServer/profiles/clientx/logs/server1/stopServer.log
ADMU0128I: Start tool with the clientx profile
ADMU3100I: Reading configuration for server: server1
ADMU3201I: Server stop request issued. Waiting for stop status.
ADMU4000I: Server server1 stop completed.
You must stop as non-root user "wasuser"
Stop and Start WebSphere_Portal
cd /data01/opt/websphere/AppServer/profiles/wp_profile/bin
./stopServer.sh WebSphere_Portal -username wasadmin -p wasadmin
./startServer.sh WebSphere_Portal
Note that you can change WebSphere_Portal configuration settings without getting into the portal WAS console by updating server.xml and then cycling the portal.
Check the SystemOut.log
- Open...
WC_profiledir/logs/server1/SystemOut.log
- Scan down through the log. You can find errors by searching in the text editor with the string "E".
- If there are any errors in the server start-up before reaching the "Server server1 open for e-business" message, this indicates that the server did not successfully start.
- There are a few exceptions that appear in the start-up sequence of the
SystemOut.log that you can safely ignore:
WebApp E Error while adding servlet mapping.
...and...
MetaDataLoade E loadWebContainerPorts could not find any http or https ports
Copy static files to remote Web server
- Log on to appserver
- Run...
cd /data01/opt/WebSphere/AppServer/profiles/clientx/installedApps/WC_clientx_cell/WC_clientx.ear
scp -r * 10.1.70.144:/data01/opt/ihs/ihs60/htdocs/en_US
- Clientx has additional static files that need to be copied into...
/data01/opt/ihs/ihs60/htdocs/en_US
They can be found on...
foo5dc4sl43:/db2backup/ibm/nbaxa510/nbaxa510-static-09102008.tar.gz
- On webserver, go to...
cd /data01/opt/ihs/ihs60/htdocs
...and create file removeJSPJAR.pl...
use strict; my $filter = $ARGV[0]; if ( !$filter ) { print "Static file extensions were not specified.\n"; exit; } system("find en_US/ > t.out"); open F, "< t.out"; while ( my $file = <F> ) { chomp( $file ); my @extensions = split( /\,/, $filter ); my $markForDelete = 1; # Skip thread statements that do not match foreach my $extension ( @extensions ) { if ( $file =~ /\.$extension$/ ) { $markForDelete = 0; last; } } unlink($file) if ( $markForDelete ); } close F; unlink("t.out"); - Execute removeJSPJAR.pl
perl ./removeJSPJAR.pl html,css,js,gif,jpg,gif,bmp
Open the WebSphere Commerce Accelerator
In an Internet Explorer browser, type this URL:
https://10.1.70.146:8000/accelerator
Open the WebSphere Commerce Administration console
In an Internet Explorer browser, type this URL:
https://10.1.70.146:8002/adminconsole
Open the WebSphere Commerce organization administration console
In an Internet Explorer browser, type this URL:
https://10.1.70.146:8004/orgadminconsole
Start the node agent
Navigate to the bin directory of your WebSphere Commerce profile and use the startNode command to start the node agent.
wasuser> cd /data01/opt/websphere/AppServer/profiles/clientx/bin
wasuser> ./startNode.sh

ADMU0116I: Tool information is being logged in file
/data01/opt/websphere/AppServer/profiles/clientx/logs/nodeagent/startServer.log
ADMU0128I: Start tool with the clientx profile
ADMU3100I: Reading configuration for server: nodeagent
ADMU3200I: Server launched. Waiting for initialization status.
ADMU3000I: Server nodeagent open for e-business; process id is 41876
You must start with non-root user "wasuser"
Stop the node agent
Navigate to the bin directory of your WebSphere Commerce profile and use the startNode command to start the Node Agent.
wasuser> cd /data01/opt/websphere/AppServer/profiles/clientx/bin
wasuser> ./stopNode.sh

ADMU0116I: Tool information is being logged in file
/data01/opt/websphere/AppServer/profiles/clientx/logs/nodeagent/stopServer.log
ADMU0128I: Start tool with the clientx profile
ADMU3100I: Reading configuration for server: nodeagent
ADMU3201I: Server stop request issued. Waiting for stop status.
ADMU4000I: Server nodeagent stop completed.
You must stop with non-root user "wasuser"
Start the Deployment Manager
Logon as user wasuser.
wasuser> cd /data01/opt/websphere/AppServer/profiles/Dmgr01/bin
wasuser> ./startManager.sh

ADMU0116I: Tool information is being logged in file
/data01/opt/websphere/AppServer/profiles/Dmgr01/logs/dmgr/startServer.log
ADMU0128I: Start tool with the Dmgr01 profile
ADMU3100I: Reading configuration for server: dmgr
ADMU3200I: Server launched. Waiting for initialization status.
ADMU3000I: Server dmgr open for e-business; process id is 9642
You must start with non-root user "wasuser"
Stop the Deployment Manager
Navigate to the bin directory of your Deployment Manager profile. Use the stopManager command to stop the Deployment Manager.
wasuser> cd /data01/opt/websphere/AppServer/profiles/Dmgr01/bin
wasuser> ./stopManager.sh

ADMU0116I: Tool information is being logged in file
/data01/opt/websphere/AppServer/profiles/Dmgr01/logs/dmgr/stopServer.log
ADMU0128I: Start tool with the Dmgr01 profile
ADMU3100I: Reading configuration for server: dmgr
ADMU3201I: Server stop request issued. Waiting for stop status.
ADMU4000I: Server dmgr stop completed.
You must stop with non-root user "wasuser"
Open the WAS Network Deployment Manager Administration console
In an Internet Explorer browser, type this URL:
http://dmgr.ibm.com:9075/ibm/console
Note: The port number is dependent on the ports assigned when the profile was first created.
Back up the WAS configuration
For information on OS-level backups, see Clientx file system backup schedule
Run backupConfig.sh to back up the WebSphere Application Server configuration:
wasuser> cd /data01/opt/websphere/AppServer/profiles/clientx/bin
wasuser> ./backupConfig.sh /home/wasuser/postFederate.zip

ADMU0116I: Tool information is being logged in file
/data01/opt/websphere/AppServer/profiles/clientx/logs/backupConfig.log
ADMU0128I: Start tool with the clientx profile
ADMU5001I: Back up config directory
/data01/opt/websphere/AppServer/profiles/clientx/config to file
/home/wasuser/postFederate.zip
ADMU0505I: Servers found in configuration:
ADMU0506I: Server name: server1
ADMU0506I: Server name: nodeagent
ADMU2010I: Stop all server processes for node appserver1Node01
ADMU0510I: Server server1 is now STOPPED
ADMU0510I: Server nodeagent is now STOPPED
................................................
ADMU5002I: 1,038 files successfully backed up
Back up the database
Log in as the db2 user, and use the backup command to make an archive of your database.
wasuser> db2 backup database SKY_STG to /backup/mall/2007.11.19
Regenerate the IBM HTTP Server Plug-in
- Open the WebSphere Application Server ND Administration console.
- Expand Servers > Web servers.
- Select the Web server.
- Click Generate Plug-in.

- Click Propagate Plug-in.
Start the IBM HTTP Server
Use the apachectl command in the
HTTPServer_installdir
/bin directory
to start the IBM HTTP Server:
root> cd /usr/IBMIHS/bin
root> ./apachectl -f
/usr/IBM/WebSphere/CommerceServer60/instances/clientx/httpconf/httpd.conf -k start
Stop the IBM HTTP Server
Use the apachectl command in the
HTTPServer_installdir
/bin
directory to stop the IBM HTTP server:
root> cd /usr/IBMIHS/bin
root> ./apachectl -f
/usr/IBM/WebSphere/CommerceServer60/instances/clientx/httpconf/httpd.conf -k stop
Verify the virtual host settings
- Open the WebSphere Application Server ND Administration console.
- Expand Environment > Virtual Hosts. You see a list of virtual
hosts.
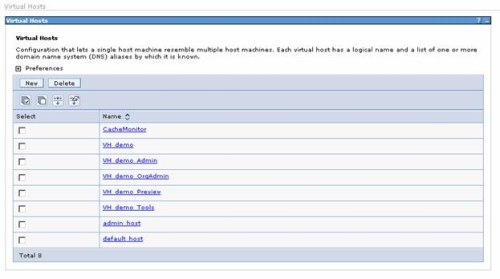
- Click on a virtual host. For example, VH_clientx
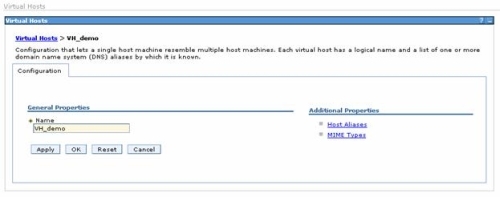
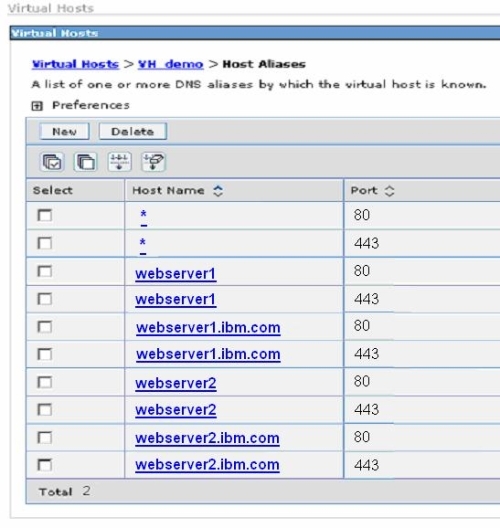
- Click Host Aliases.
- Verify that ports 80 and 443 are defined for the WebSphere Commerce servers
that have been federated.
- Repeat Steps 4 to 6 for the other virtual hosts. Ensure that the following
ports are defined as follows:
Virtual host Port(s) VH_clientx 80, 443 VH_clientx_Admin 8002 VH_clientx_OrgAdmin 8004 VH_clientx_Preview 8006, 8007 VH_clientx_Tools 8000 - Make any necessary changes.
- Continue with the remaining steps to save changes to the master configuration only if changes are required.
- Click OK.
- Click Save and select Synchronize changes with Nodes to ensure that the deployment manager profile immediately synchronizes the configuration changes with the other nodes.
- Click Save.
- Click OK.
- Regenerate the IBM HTTP Server Plug-in.
Map virtual hosts for Web modules
- Open the WebSphere Application Server ND Administration console.
- Expand...
Applications | Enterprise Applications | WC_enterprise_application | Map virtual hosts for Web modules
- Verify that the mapping for virtual hosts to Web modules is correct.

- Make any necessary changes.
- Continue with the remaining steps to save changes to the master configuration only if changes are required.
- Click OK.
- Click Save and select Synchronize changes with Nodes to ensure that the deployment manager profile immediately synchronizes the configuration changes with the other nodes.
- Click Save, then OK.
Map modules to servers or cluster
- Go to...
Enterprise Applications | WC_enterprise application | Map Modules to servers
Select relevant application servers, cluster, and Web servers. Put a checkmark beside all of the modules listed, then click Apply. Do this for all modules that are not mapped to the application server or cluster and to all Web servers that are not mapped to the Web modules.
- Click Save to save your configuration.
- Select Synchronize changes with Nodes to ensure that the deployment manager profile immediately synchronizes the configuration changes with the other nodes.
- Click Save.
Access the store front
Use the bookmark to test the store front if one has already been created. Otherwise, complete the following to bookmark and test the store:
- Open the WebSphere Commerce Accelerator.
- Select the site and click OK.
- From the top menu select...
Store Archives | Publish Status
- Put a checkmark beside the store that you just published and click Details.
- Click Launch Store to open an Internet Explorer browser with your newly published store home page. Add this home page URL to your Internet Explorer bookmarks.
- Browse around and verify that you can add to the cart and checkout an order.
Start the cluster
- Open the WebSphere Application Server ND Manager Administration console.
- Expand Servers > Clusters.
- Enable the checkbox next to the cluster.
- Click Start.
- If the cluster started successfully, the Status column for that particular
cluster contains a green arrow.
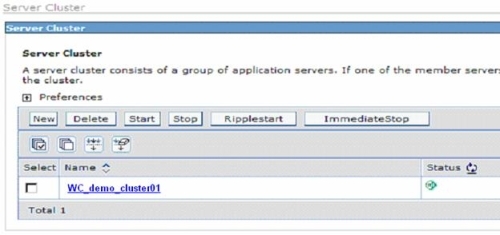
- When a cluster is started, all application servers that belong to the
cluster are also started. Verify that the application servers were all started
successfully by following these additional steps:
- Expand Servers > Application servers.
- Verify that the Status column contains a green arrow for all application servers that are part of the cluster.
Stop the cluster
- Open the WebSphere Application Server ND Manager Administration console.
- Expand Servers > Clusters.
- Enable the checkbox next to the cluster.
- Click Stop.
- If the cluster stopped successfully, the Status column for that particular cluster contains a red cross.
- When a cluster is stopped, all application servers that belong to the
cluster are also stopped. Verify that the application servers were all stopped
successfully by following these additional steps:
- Expand Servers > Application servers.
- Verify that the Status column contains a red cross for all application servers that are part of the cluster.
Start the WebSphere Commerce Server via the ND Manager Administration console
- Open the WebSphere Application Server ND Manager Administration console.
- Expand Servers > Application servers.
- Enable the checkbox next to the application server you wish to start.
- Click Start.
- If the application server started successfully, the Status column for that particular application server contains a green arrow.
Stop the WebSphere Commerce Server via the ND Manager Administration console
- Open the WebSphere Application Server ND Manager Administration console.
- Expand Servers > Application servers.
- Enable the checkbox next to the application server you wish to start.
- Click Stop.
- If the application server stopped successfully, the Status column for that particular application server contains a red cross.
Start the IBM HTTP Server via the ND Manager Administration console
- Open the WebSphere Application Server ND Manager Administration console.
- Expand Servers > Web servers.
- Enable the checkbox next to the Web server you wish to start.
- Click Start.
- If the Web server started successfully, the Status column for that particular Web server contains a green arrow.
Stop the IBM HTTP Server via the ND Manager Administration console
- Open the WebSphere Application Server ND Manager Administration console.
- Expand Servers > Web servers.
- Enable the checkbox next to the Web server you wish to stop.
- Click Stop.
- If the Web server stopped successfully, the Status column for that particular Web server contains a red cross.
Change wc-server.xml after deployment.jar
If you need to make a change to wc-server.xml after deployment...
- cd /data01/opt/websphere/CommerceServer60/instances/clientx/xml
- Edit clientx.xml and add your change
- cd /data01/opt/websphere/CommerceServer60/bin
- ./config_ant.sh -DinstanceName=clientx UpdateEAR
- Restart server1 using WAS ND console
Start the IBM HTTP Administrative server
Navigate to the bin directory within the IBM HTTP server installation directory and use the htpasswd command to set the IBM HTTP Server Administrative user and p. Use the adminctl command to start the IBM HTTP Administrative server.
root> cd /usr/IBMIHS/bin
root> ./htpasswd -c -b /usr/IBMIHS/conf/admin.passwd admin p

Adding p for user admin

root> ./adminctl start
./adminctl start: admin http started
DB2 commands
### Set environment for user...
/opt/IBM/db2/V8.1/instance/db2icrt -u wasuser
### Catalog a remote database
### Sample commands
sudo su - wasuser
db2 catalog tcpip node SKYWAYSTG remote 10.1.70.137 server 60004
db2 terminate
db2 list node directory show detail
db2 catalog database SKY_STG at node SKYWAYSTG
db2 terminate
db2 list database directory
db2 connect to SKY_STG user wasuser using wasuser1
db2 list tables
db2 "terminate"
db2 "quit"
### List instances
db2ilist
### List current instance
db2 get instance
### List catalog for node
db2 list node directory show detail
### Connect to database (local)
db2 connect to db [user username using user-pw]
### Attach to Node
db2 attach to SKYWAYN user wasuser using wasuser1
### List tables
db2 list tables [for {user | all | system | schema schema-name}] [show detail]
### View table space information
db2 list tablespaces [show detail
### Attach to db
db2 attach to SKYWAYSTG user wasuser using wasuser1
### Find DB2 version
db2level
db2licm l
### Check for SVCENAME from database manager configuration
db2 get dbm cfg
### Update SVCENAME if needed (require restart of db2 instance)
db2 update dbm cfg using SVCENAME DB2_svr20aix
### Set TCPIP communication protocol (require restart of db2 instance)
db2set DB2COMM=tcpip
### Check registry to TCPIP changes
db2set -a
db2set -lr
### Stop Instance
db2stop
### Stop (FORCE) Instance
db2stop force
### Start Instance
db2start
### Create Instance
db2icrt u
### Delete Instance
db2idrop
### Find all databases for a certain instance
db2 list database directory
### Check for active databases
db2 list active databases
### Create database
db2 create db
### Drop database
db2 drop db
### Start/Activate database
db2 activate db
### Deactivate database
db2 deactivate db
### Delete tables
db2 drop table
### Find table structure
db2 describe table
### Catalog remote node
db2 catalog tcpip node remote server
### Catalog remote database (node must be calatalog first)
db2 catalog db at node
### List catalog for db
db2 list db directory show detail
### Delete db catalog
db2 uncatalog db dbname
### Delete node catalog
db2 uncatalog node nodename
### Enable a user account that has been disabled.
db2 connect to sky_stg user wasuser using wasuser1
db2 "update userreg set status=1 where LOGONID='wcsadmin'"