Administer data grids
- Administer data grids
- Create simple data grids
- Create session persistence to a data grid
- Create dynamic cache data grids
- Configure the maximum capacity of a data grid
- Secure data grids
- Clear data grids
- Invalidate data
- Remove data grids
- Administer with the xscmd utility
Administer data grids
We can create three different types of data grids:

Create simple data grids
Use simple data grids, with WebSphere Application Server or stand-alone Java applications, to perform create, retrieve, update and delete operations.
Key-value pairs are stored in-memory, reducing expensive database queries. The keys can be of any existing Java type, such as...
- java.lang.String
- Integer
Values can be any serializable object type. Every time data is needed, the simple data grid on the appliance is checked first. If the appliance does not have the data, the data is retrieved from the database and inserted into the simple data grid. We can create a simple data grid by writing an application that uses the ObjectMap API.
- Create the simple data grid. In the user interface, click...
-
Data Grid | Simple Data Grid
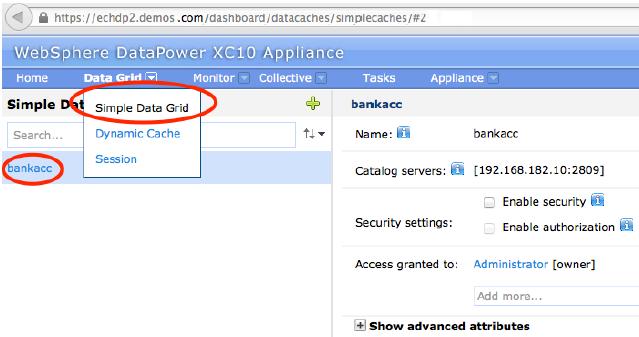
Click the add icon (
 ) and specify a name for the simple data grid to create.
The following characters cannot be used in the name of the data grid:
-
^ . \\ /, # $ @ : ; \ * ? < > | = + & % [ ] " "
- Download the objectgrid.xml file for your Simple Data Grid.
Click the download icon (
 ) and save the file to the local file system.
- Create a Java application using the ObjectMap API that accesses the data grid.
- Configure security sending data to the data grid.
-
Configure replicas...
-
Data Grid | Simple Data Grid | Show advanced attributes
Replicas are created only when the appliance is in a collective. If the number of appliances in the collective is n, the maximum number of replicas is n-1.
- Configure a capacity limit for the data grid.
- Configure a time to live evictor for a Simple Data Grid.
- Monitor the data grid in the DataPower XC10 appliance user interface.
Configure a TTL evictor for a Simple Data Grid
When you create a Simple Data Grid, a default (static) map and a set of dynamic maps are created. By default, no time to live evictor is configured.
To set a TTL value using...
- creation time (.*CT)
- last update time (*.LUT)
- last access time (*.LAT)
To change default behavior so that a TTL evictor is enabled for a default map...
- In the user interface, click...
-
Data Grid | Simple Data Grid | data_grid_name | Show advanced attributes
- In the Evictor for map named list box, select an evictor type.
Selecting an evictor type to other than NONE enables TTL for a default map.
- Specify a value in the box...
-
Evict data from time to live maps after
Default is 3600 seconds. A value of 0 turns off TTL eviction for the entire grid.
- Click Apply Changes to save.
You are warned about data loss once the grid restarts.
Examples
| Evictor type | TTL | Notes |
|---|---|---|
| NONE | 3600 | Entries evicted after 1 hour for dynamic maps ending in *.CT, *.LUT, and *.LAT. |
| Creation Time | 3600 | Entries evicted after 1 hour for dynamic maps ending in *.CT, *.LUT, and *.LAT.
The default map evicts entries 1 hour after the creation time. |
| Last updated time | 4800 | Entries evicted after 80 minutes for dynamic maps ending in *.CT, *.LUT, and *.LAT.
The default map evicts entries 80 minutes after the last time the entry was updated. |
| NONE | 0 | TTL eviction is turned off for all maps (default and dynamic) for this grid. |
| Last access time | 0 | TTL eviction is turned off for all maps (default and dynamic) for this grid. |
Evictors
Evictors remove data from the data grid. We can configure an evictor for a dynamic map and a default map on a simple grid.
Evictor types
The evictor removes entries based on a time to live concept. We can select an evictor that is based on the time it was created, on the time it was last accessed, or updated. By default, an evictor is created with a dynamic map.
- None
-
Entries never expire and are never removed from the map.
- Creation time
-
Entries evicted when time from creation equals TTL value. Set in milliseconds. For example, if set to 10 seconds, the entry is evicted ten seconds after it was inserted. Most useful for scenarios where high amounts of additions to the cache exist that are only used for a fixed period of time, for example, stock quotes that need to be refreshed every 20 minutes or less.
- Last access time
-
Entries are evicted depending upon when they were last accessed, whether they were read or updated. Generally best if set to a low number. For example, if the value is equal to 15, and an entry has existed for 14 seconds but then gets accessed, the entry does not expire again for another 15 seconds. If set to a relatively high number, many entries might never be evicted.
- Last update time
-
Entries are evicted depending upon when they were last updated. Most useful for scenarios such as holding session data from a client, such as WebSphere Commerce. Session data must be destroyed if the client does not use the session data for some period of time. For example, session data times out after 30 minutes of no activity by the client. In this scenario, using an evictor type of Last access time or Last update time with the TTL value set to 30 minutes is appropriate.
Create session persistence to a data grid
Before setting WAS session persistence to use the XC10 data grids...
- Determine the IP address or fully-qualified host name of the appliance.
- Determine the User ID and password of a user that has data cache creation permissions to appliance user interface.
- Install WebSphere eXtreme Scale Client in the WAS configuration.
- If the appliance has transport layer security enabled, enable Global Security in the WAS admin console.
Only sessions that use cookies as the session tracking mechanism can be saved to the data grid. We cannot persist sessions that use URL rewriting as a session tracking mechanism.
Configure session management when we are installing a WAS application
- In the WAS admin console, click...
-
Applications | New application | New Enterprise Application
Choose...
-
Detailed path for creating the application
...and complete the initial wizard steps.
- In the eXtreme Scale session management settings step of the wizard, configure the data grid to use.
For the Manage session persistence by field, choose...
-
WebSphere DataPower XC10 appliance

Enter the information about the appliance and the data grid on the appliance to use. We can either create a new data grid or use an existing data grid that you have already configured on the appliance.
To save the sessions in an existing data grid on the appliance, know the name of the data grid to use. You also have the option to create a new data grid on the appliance when you configure the application.
To create a session data grid before configuring the application
-
Data Grid | Session

Click the add icon (
) and specify a name for the session data grid to create.
- Complete the wizard steps to finish installing your application.
We can also install the application with a wsadmin script. In the following example, the -SessionManagement parameter creates the same configuration that we can in the administrative console:
AdminApp.install('C:/A.ear', '[
    -nopreCompileJSPs
    -distributeApp
    -nouseMetaDataFromBinary
    -nodeployejb
    -appname A
    -edition 8.0
    -createMBeansForResources
    -noreloadEnabled
    -nodeployws
    -validateinstall off
    -noprocessEmbeddedConfig
    -filepermission .*\.dll=755#.*\.so=755#.*\.a=755#.*\.sl=755
    -buildVersion Unknown
    -noallowDispatchRemoteInclude
    -noallowServiceRemoteInclude
    -asyncRequestDispatchType DISABLED
    -nouseAutoLink
    -SessionManagement [[true XC10SessionManagement myXC10.ibm.com:!:username:!:password:!:AGrid80]]
    -MapWebModToVH [[MicroWebApp microwebapp.war,WEB -INF/web.xml default_host]
                    [MicroSipApp microsipapp.war,WEB -INF/web.xml default_host]
                    [MicroDG1App microdg1app.war,WEB-INF/web.xml default_host]
                    [MicroDG2App microdg2app.war,WEB-INF/web.xml default_host]
                    [MicroSip2App microsip2app.war,WEB-INF/web.xml default_host]]]')
Configure session management on an existing application
- In the WAS administrative console, click...
-
Applications | Application Types | WebSphere enterprise applications | application_name | Web Module properties | Session management | eXtreme Scale session management settings
- Update the fields to enable session persistence to a data grid.
We can also update the application with a wsadmin script.In the following example, the -SessionManagement parameter creates the same configuration that we can in the administrative console:
-
AdminApp.edit('-edition9.0', '[ -SessionManagement [[true XC10SessionManagement myXC10.ibm.com:!:username:!:password:!:Grid80]]]')
The :!: characters that are passed are used as delimiters. The values that are passed are:
- applicationIdentifier:!:username:!:password:!:gridName
When you save the changes, the application uses the configured data grid for session persistence on the appliance.
Configure session management on an existing server
- In the WAS administrative console, click...
-
Servers | Server Types | WebSphere appservers | server_name | Session management | eXtreme Scale session management settings
- Update the fields to enable session persistence.
You configure session management on an existing server with the following wsadmin tool commands:
AdminTask.configureServerSessionManagement('[
    -nodeName my_node
    -serverName server1
    -enableSessionManagement true
    -sessionManagementType XC10SessionManagement
    -XC10SessionManagement [-applianceIdentifier myserver.ibm.com
                            -userName xcadmin
                            -password ********
                            -gridName myTestGrid]]')
When you save the changes, the server now uses the configured data grid for session persistence with any applications that are running on the server.
If the entire data grid that is hosting the application session data is unreachable from the web container client, the client instead uses the base web container in WAS for session management. The data grid might be unreachable in the following scenarios:
- A network problem between the Web container and the appliance.
- The server processes on the appliance have been stopped.
The least recently used sessions are invalidated from the web container session cache. If the data grid on the appliance becomes available, sessions that were invalidated from the web container cache can retrieve data from the remote data grid and load the data into a new session. If the entire data grid on the appliance is not available and the session is invalidated from the session cache, the user session data is lost. Because of this issue, do not shut down entire production data grid when the system is running under load.
When you configure this scenario, the security credentials for the IBM WebSphere DataPower XC10 appliance are automatically stored in the WAS configuration. If you change the credentials for the data grid after the initial configuration, the WAS no longer has the correct credentials. We can reset the credentials by applying the eXtreme Scale session management settings again.
- Configure security before you begin to send data to the data grid.
- Configure replicas.
Replicas ensure that the data grid data is available if the primary copy fails. To configure replicas, on the appliance click...
-
Data Grid | Session | Show advanced attributes
Replicas are created only when the appliance is in a collective. If the number of appliances in the collective is n, the maximum number of replicas is n-1. Therefore if you configure three replicas, but you only have two appliances in the collective, only one replica is created. Additional replicas are created if you add appliances to the collective. Set the number of replicas to the ideal amount to have, so that as appliances join the collective, new replicas can be created. The data grid content is cleared when you edit the number of replicas.
- Configure a capacity limit for the data grid
By configuring capacity limits on the data grid, we can ensure that the storage capacity for the collective is used in a predictable manner.
- We can monitor the session data grid in the DataPower XC10 appliance user interface.
Configure HTTP session manager with WebSphere Portal
We can persist HTTP sessions from WebSphere Portal into a data grid. Your WebSphere eXtreme Scale Client and WebSphere Portal environment must meet the following requirements:
- Install WebSphere eXtreme Scale Client on your WAS and WebSphere Portal nodes.
- WebSphere Portal Version 7 or later.
- Custom portlets must be configured within WebSphere Portal. The administrative portlets that come with WebSphere Portal cannot currently be integrated with data grids.
Introducing WebSphere DataPower XC10 appliance into a WebSphere Portal environment can be beneficial in the following scenarios:
Although the following scenarios introduce benefits, increased processor usage in the WebSphere Portal tier can result from introducing WebSphere DataPower XC10 appliance into the environment.
- When session persistence is required.
For example, if the session data from your custom portlets must stay available during a WebSphere Portal Server failure, we can persist the HTTP sessions to the WebSphere DataPower XC10 appliance data grid. Data replicates among many servers, increasing data availability.
- In a multiple data center topology.
If your topology spans multiple data centers across different physical locations, we can persist the WebSphere Portal HTTP sessions to the WebSphere DataPower XC10 appliance data grid. The sessions replicate across data grids in the data centers. If a data center fails, the sessions are rolled over to another data center that has a copy of the data grid data.
- To lower memory requirements on the WebSphere Portal Server tier.
By offloading session data to a remote tier of container servers, a subset of sessions are on the WebSphere Portal servers. This offload of data reduces the memory requirements on the WebSphere Portal Server tier.
- Configure the wps WebSphere Portal application and any custom portlets to enable the sessions to be stored in the data grid.
- If TLS/SSL is configured for the WebSphere Portal server and for the appliance, configure the TLS/SSL truststores.
- If the resulting outbound communication from the portal server to the appliance uses TLS/SSL, add the appliance certificate to the WAS configuration. Use...
cd was_root/bin
wsadmin.sh -conntype SOAP
           -port <PORTAL_SERVER_SOAP_PORT>
           -lang jython
           -user wpsadmin
           -password wpsadmin
           -f addXC10PublicCert.py
- If the resulting outbound communication from the portal server to the appliance uses TLS/SSL, add the appliance certificate to the WAS configuration. Use...
- If the resulting inbound communication from the appliance to the portal server uses TLS/SSL, update the appliance truststore to include the public certificates for the portal server. Updating the truststore enables communication between the appliance and portal.
- Extract the public key of the Portal Server personal certificate. Use the IKEYMAN utility. This utility creates a .arm file.
- Download the public truststore for the appliance.
- Use the iKeyman utility to update the truststore.jks file that you extracted from the appliance with the public Portal Server certificate in the .arm file.
- Upload the updated truststore file to the appliance. Click Submit TLS settings after you upload the truststore. The collective automatically restarts when you submit the TLS settings and the new truststore is added to the other appliances in the collective.
- Restart the portal servers.
We can access the WebSphere Portal Server, and HTTP session data for the configured custom portlets is persisted to the data grid.
If the entire data grid that is hosting the application session data is unreachable from the web container client, the client instead uses the base web container in WAS for session management. The data grid might be unreachable in the following scenarios:
- A network problem between the Web container and the remote container servers.
- The remote container server processes have been stopped.
The number of session references kept in memory, specified by sessionTableSize parameter, is still maintained when the sessions are stored in the base web container. The least recently used sessions are invalidated from the web container session cache when the sessionTableSize value is exceeded. If the remote data grid becomes available, sessions that were invalidated from the web container cache can retrieve data from the remote data grid and load the data into a new session. If the entire remote data grid is not available and the session is invalidated from the session cache, the user.s session data is lost. Because of this issue, you should not shut down the entire production remote data grid when the system is running under load.
Create dynamic cache data grids
Use the appliance to store data from your WAS dynamic cache. By setting up this capability, we can enable applications that are written with the Dynamic Cache API or applications using container-level caching (such as servlets) to use the features and performance capabilities of the appliance.
When you configure the dynamic cache provider in WAS to use DataPower XC10 appliance, the cache data is stored outside of the WAS topology. All the cache data is stored in the appliance. The memory that was being used for caching in the appservers can be used for other purposes.
- Review the following IBM WebSphere Commerce documents:
- Install the WebSphere eXtreme Scale Client in the WAS configuration.
- If the appliance has transport layer security enabled, enable global security in the WAS admin console.
- Specify the catalog service running on the appliance in WAS.
The catalog service enables the WAS dynamic cache configuration to communicate with the DataPower XC10 appliance. We can configure the catalog service in the WAS admin console by creating a catalog service domain.

- Create the Dynamic Cache data grid on the DataPower XC10 appliance.
To use the dynaCfgToAppliance to create the Dynamic Cache data grid, log on to the dmgr host machine and run...
-
cd DMGR_PROFILE/bin
./dynaCfgToAppliance IP_address cache_name appliance_admin admin_pw SOAP_port /path/to/soap.client.props...where...
IP_address IP address of the appliance cache_name JNDI name of the dynamic cache. If there slashes (/) in the name, the slashes are converted by the script to a dash for the name of the Dynamic Cache data grid in Appliance. For example, if dynamic cache name is services/cache1, the data grid created on the appliance is named services-cache1 appliance_admin Administrator ID for logging in to the DataPower XC10 appliance user interface. admin_pw Administrator password for logging in to the DataPower XC10 appliance user interface. SOAP_port (Optional) SOAP port for the dmgr if we are using a port number other than the default of 8879. /path/to/soap.client.props (Optional) This file enables SOAP security and specifies the user name and password to administer the WAS dmgr. -
com.ibm.SOAP.securityEnabled=true
com.ibm.SOAP.loginUserid=
com.ibm.SOAP.loginPassword=<The script...
- Creates the data grid on the appliance
- Set the appliance ID and password credentials with the following custom properties:
- xc10.<data_grid_name>.userid
- xc10.<data_grid_name>.password
If we run the script again after the initial configuration, the custom properties are updated.
To create the dynamic cache data grid using the user interface
- Click...
-
Data Grid | Dynamic Cache

- Create a WAS cache instance to configure with the DataPower XC10 appliance.

- Optional: Configure the baseCache instance to use the appliance.
Create the following custom properties on the JVM. When you configure the baseCache instance, all of the cache instances in the JVM also have the properties set. We can override the values of the baseCache custom properties by creating custom properties on the individual cache instances.
-
Resources | Cache instances | cache_instance_type | cache_instance_name | Custom properties
Set...
- xc10.<data_grid_name>.userid
- xc10.<data_grid_name>.password
The value of the <data_grid_name> in each custom property is the JNDI name of the data grid, replacing any slashes (/) with dashes. For example, with the previous example, the custom property names are...
- xc10.services-cache1.userid
- xc10.services-cache1.password

The values should be set to a user ID and password that can access the data grid in the DataPower XC10 appliance configuration. We can encode the password using...
-
DMGR_HOME/bin/encodePassword
- Enable the DataPower XC10 appliance as the dynamic cache provider.
Select the WebSphere eXtreme Scale dynamic cache provider in the administrative console.
- Configure the replication setting for the cache.
We can enable cache replication in the WAS Version 7.0 administrative console.
- Set the topology custom property on the cache instance to modify.
com.ibm.websphere.xs.dynacache.topology = remote
- Configure WAS v6.1 specific settings...
- Enable the DataPower XC10 appliance as the dynamic cache provider.
Configure the dynamic cache provider for a cache instance by setting the cache instance custom property...
-
com.ibm.ws.cache.CacheConfig.cacheProviderName
To set the provider to use the DataPower XC10 appliance...
-
com.ibm.ws.objectgrid.dynacache.CacheProviderImpl
To set the provider back to the default WAS dynamic cache provider for a specific cache instance, set the name of the custom property to default. If we are configuring the baseCache instance to use the DataPower XC10 appliance cache provider, you might need to set the property to default on your other cache instances if we want them to use the default cache provider.
- Configure the replication setting for the cache.
Create a replication domain using either...
- Create replication domain using administrative console
- Force the cache to report that it is a replicated cache, even though a replication domain has not been assigned. Set cache instances custom property...
-
com.ibm.ws.cache.CacheConfig.enableCacheReplication = true
- Enable the DataPower XC10 appliance as the dynamic cache provider.
- (Optional) Configure security
- Configure replicas.
Replicas ensure that the data grid data is available if the primary copy fails. To configure replicas, on the appliance click...
-
Data Grid | Dynamic Cache | Show advanced attributes
Replicas are created only when the appliance is in a collective. If the number of appliances in the collective is n, the maximum number of replicas is n-1. Therefore if you configure three replicas, but you only have two appliances in the collective, only one replica is created. Additional replicas are created if you add appliances to the collective. Set the number of replicas to the ideal amount to have, so that as appliances join the collective, new replicas can be created. The data grid content is cleared when you edit the number of replicas.
- Configure a capacity limit for the data grid
- Monitor the dynamic cache data grid in the DataPower XC10 appliance user interface.
See also...
Create catalog service domains in WAS
With WebSphere DataPower XC10 appliance, you define catalog service domains to establish connections with the catalog servers that are running on the appliance. Creating this configuration is required for dynamic cache data grids only.
- Create the catalog service domain is only required for dynamic cache data grids. If we are using simple data grids or session data grids, you do not need to configure the catalog service domain. The WebSphere eXtreme Scale Client must be installed on WAS.
By creating a catalog service domain, we are defining a highly available collection of catalog servers. By configuring a catalog service domain, we are establishing connections to the catalog servers that are running on the WebSphere DataPower XC10 appliance. This catalog service domain represents the group of catalog servers that are running on the appliances in your collective.
- Create the catalog service domain.
- In the WAS administrative console, click...
-
System administration | WebSphere eXtreme Scale | Catalog service domains | New
- Define a name, default value, and JMX authentication credentials for the catalog service domain.
- Add catalog server endpoints.
To view the catalog servers that are running in the collective, click...
-
Collective | Members | member_name
The Catalog servers field lists the catalog servers that are running in the collective. Specify the endpoints with IP addresses or fully-qualified host names.
Client port Not required for connections to catalog servers running on the appliance. Listener port 2809 - Test the connection to the catalog servers within the catalog service domain.
-
System administration | WebSphere eXtreme Scale | Catalog service domains | catalog_service_domain | Test connection
When you click this button, all of the defined catalog service domain end points are queried one by one, if any one end point is available, returns a message that indicates that the connection to the catalog service domain was successful.
- In the WAS administrative console, click...
Catalog service domain administrative tasks
Use the Jacl or Jython scripting languages to manage catalog service domains in your WAS configuration. With WebSphere DataPower XC10 appliance, you define catalog service domains to establish connections with the catalog servers that are running on the appliance. Creating this configuration is required for dynamic cache data grids only.
List all administrative tasks
To get a list of all of the administrative tasks associated with catalog service domains...- wsadmin>$AdminTask help XSDomainManagement
createXSDomain
Register a new catalog service domain...
| Argument | Description |
|---|---|
| -name (required) | Name of the catalog service domain to create. |
| -default | Set true to make catalog service domain default for the cell. |
| -properties | Custom properties for the catalog service domain. |
defineDomainServers step arguments
| Argument | Description | ||||
|---|---|---|---|---|---|
| name_of_endpoint | Name of the catalog service endpoint.
| ||||
| custom_properties | Custom properties for the catalog service domain endpoint. If you do not have any custom properties, use a set of double quotes ("") for this argument. | ||||
| endpoint_ports | Port numbers for the catalog service domain endpoint. The ports must be specified in the following order: <client_port>,<listener_port>
|
Return value: :
Usage
Batch mode requires correct formatting of the command entry. Consider using interactive mode to ensure the values that you enter are processed correctly. When you use batch mode, you must define the -defineDomainServers step arguments using a specific array of properties. This array of properties is in the format name_of_endpoint custom_properties endpoint_ports. The endpoint_ports value is a list of ports that must be specified in the following order: <client_port>,<listener_port>.
- Create a catalog service domain of remote endpoints using Jacl:
- $AdminTask createXSDomain {-name TestDomain -default true -defineDomainServers
{{xhost1.ibm.com "",2809}} }}
- Create a catalog service domain of remote endpoints using Jython
string:
- AdminTask.createXSDomain('[-name TestDomain -default true
-defineDomainServers [[xhost1.ibm.com "",2809]
[xhost2.ibm.com "",2809]] ]')
- Create a catalog service domain of existing application server
endpoints using Jacl:
- $AdminTask createXSDomain {-name TestDomain -default true -defineDomainServers
{{cellName/nodeName/serverName "" 1109}}}
Interactive...
- Jacl:
- $AdminTask createXSDomain {-interactive}
- Jython string:
- AdminTask.createXSDomain ('[-interactive]')
deleteXSDomain
Delete a catalog service domain.
Required parameters:
- -name
- Name of the catalog service domain to delete.
Return value: :
Usage
- Jacl:
- $AdminTask deleteXSDomain {-name TestDomain }
- Jython string:
- AdminTask.deleteXSDomain('[-name TestDomain ]')
Interactive...
- Jacl:
- $AdminTask deleteXSDomain {-interactive}
- Jython string:
- AdminTask.deleteXSDomain ('[-interactive]')
getDefaultXSDomain
Return the default catalog service domain for the cell.
Required parameters: None
Return value: : The name of the default catalog service domain.
Usage
- Jacl:
- $AdminTask getDefaultXSDomain
- Jython string:
- AdminTask.getDefaultXSDomain
Interactive...
- Jacl:
- $AdminTask getDefaultXSDomain {-interactive}
- Jython string:
- AdminTask.getDefaultXSDomain ('[-interactive]')
listXSDomains
Return a list of the existing catalog service domains.
Required parameters: None
Return value: : A list of all of the catalog service domains in the cell.
Usage
- Jacl:
- $AdminTask listXSDomains
- Jython string:
- AdminTask.listXSDomains
Interactive...
- Jacl:
- $AdminTask listXSDomains {-interactive}
- Jython string:
- AdminTask.listXSDomains ('[-interactive]')
modifyXSDomain
Modify an existing catalog service domain.
Batch mode requires correct formatting of the command entry. Consider using interactive mode to ensure the values that you enter are processed correctly. When you use batch mode, you must define the -modifyEndpoints, -addEndpoints and -removeEndpoints step arguments using a specific array of properties. This array of properties is in the format name_of_endpoint host_name custom_properties endpoint_ports. The endpoint_ports value is a list of ports that must be specified in the following order:
-
<client_port>,<listener_port>
| Argument | Description |
|---|---|
| -name (required) | Name of the catalog service domain to edit. |
| -default | If set to true, specifies that the selected catalog service domain is the default for the cell. (Boolean) |
| -properties | Custom properties for the catalog service domain. |
| Argument | Description |
|---|---|
| name_of_endpoint | Name of the catalog service endpoint.
|
| endpoint_ports | Port numbers for the catalog service domain endpoint. The endpoints must be specified in the following order: <client_port>,<listener_port>
|
addEndpoints step arguments
| Argument | Description | ||||
|---|---|---|---|---|---|
| name_of_endpoint | Name of the catalog service endpoint.
| ||||
| custom_properties | Custom properties for the catalog service domain endpoint. If you do not have any custom properties, use a set of double quotes ("") for this argument. | ||||
| endpoint_ports | Port numbers for the catalog service domain endpoint. The endpoints must be specified in the following order:
|
| Argument | Description |
|---|---|
| name_of_endpoint | Name of the catalog service endpoint to delete. |
Return value: :
Usage
- Jacl:
-
$AdminTask modifyXSDomain {-name TestDomain -default true -modifyEndpoints
{{xhost1.ibm.com "",2809}} -addEndpoints {{xhost2.ibm.com "",2809}}}
-removeEndpoints {{xhost3.ibm.com}}}
- Jython string:
- AdminTask.modifyXSDomain('[-name TestDomain
-default false -modifyEndpoints [[xhost1.ibm.com "",2809]]
-addEndpoints [[xhost3.ibm.com "",2809]]
-removeEndpoints [[xhost2.ibm.com]]]')
Interactive...
- Jacl:
- $AdminTask modifyXSDomain {-interactive}
- Jython string:
- AdminTask.modifyXSDomain ('[-interactive]')
testXSDomainConnection
Test the connection to a catalog service domain.
Required parameters:
- -name
- Name of the catalog service domain to which to test the connection.
Optional parameters
- -timeout
- Maximum amount of time to wait for the connection, in seconds.
Return value: : If a connection can be made, returns true, otherwise, connection error information is returned.
Usage
- Jacl:
- $Admintask testXSDomainConnection
- Jython string:
- AdminTask.testXSDomainConnection
Interactive...
- Jacl:
- $AdminTask testXSDomainConnection {-interactive}
- Jython string:
- AdminTask.testXSDomainConnection ('[-interactive]')
testXSServerConnection
Test the connection to a catalog server. This command works for both stand-alone servers and servers that are a part of a catalog service domain.
Required parameters:
- host
- Host on which the catalog server resides.
- listenerPort
- Listener port for the catalog server.
Optional parameters
- timeout
- Maximum amount of time to wait for a connection to the catalog server, in seconds.
Return value: :
Usage
- Jacl:
- $Admintask testXSServerConnection {-host xhost1.ibm.com -listenerPort 2809}
- Jython string:
- AdminTask.testXSServerConnection('[-host xshost3.ibm.com -listenerPort 2809]')
Interactive...
- Jacl:
- $AdminTask testXSServerConnection {-interactive}
- Jython string:
- AdminTask.testXSServerConnection ('[-interactive]')
Configure the maximum capacity of a data grid
By default, data grids do not have a configured maximum capacity limit. We can configure a maximum capacity for any data grid type:
- Simple Data Grid
- Session Data Grid
- Dynamic Cache Data Grid
Capacity limits are enforced by comparing the total size of all primary data in the grid to the configured capacity limit. Capacity used by replica copies of data is not counted.
The limit is not a guarantee of an allocated amount of space for the data grid. A data grid might not be able to reach its configured capacity limit if the collective does not have the capacity to store the data. Reasons for insufficient capacity in the collective might be a high capacity limit on the data grid, or capacity that is consumed by other data grids in the collective.
When the capacity limit for a particular data grid is breached, the grid handles insert operations in one of the following ways:
- By default, insert operations that would breach the grid limit capacity are rejected.
Client processes receive an exception in response to insert requests. Read, update, and delete operations succeed even if the data grid is exceeding its capacity limit. With these limited operations, the data grid can run at a minimum level of function but additional growth of the data grid is prevented.
- Available only on a Simple Data Grid, we can override this default behavior by selecting the option...
-
Use least recently used (LRU) eviction for this data grid
This accommodates new inserts into a simple data grid and maintains the capacity limit by removing the least recently used data entry. Setting the maximum capacity on a data grid does not require a restart, however if you have selected the LRU option on a simple grid, then the grid will automatically be restarted for changes to take affect. This is also the case if you decide to turn off the LRU option on a simple grid.
To configure data grid capacity limits...
- In the user interface, click...
-
Data Grid | data_grid_type | data_grid_name | Show advanced attributes
- Select Limit the amount of capacity for this data grid.
- If we are setting the maximum capacity for a simple data grid and want the grid to accept new insert operations (instead of rejecting them) at the expense of least recently used data entries, then select...
-
Use least recently used (LRU) eviction for this data grid
Click Apply Changes to save. You are warned that the data in the grid will be lost to complete the restart.
- View the current capacity consumption to determine the maximum capacity to define for the selected data grid.

In this chart, the current data grid that is being configured, MyGrid, is currently using 900 megabytes of capacity. It has a currently configured capacity limit of 2000 megabytes. At the collective level, the total capacity of the collective is 4000 megabytes. In addition, the total of all the configured limits on the capacity-limited data grids is 3400 megabytes. Those grids are currently using 2900 megabytes. Finally, there is at least one data grid in the collective that does not have a capacity limit defined. These data grids without defined capacity limits are consuming approximately 900 megabytes.
- Enter a value for the limit of primary data consumption in MB.
When you press enter, the potential maximum capacity consumption of the primary and replica data displays. This number varies based on the number of replicas that you have defined. However, remember that the number of replicas is limited by the number of appliances in the collective. If you have four replicas defined, and three appliances in the collective, your collective contains one primary and two replicas.
- Click Apply changes to save the configuration. You do not need to restart the data grid to activate the new limit.
Capacity Limit Example 1: Multiple data grids
Data grids A, B, and C are defined in a collective with a total capacity of 600 gigabytes of storage. No replicas are defined on any of the data grids. Data grid A has a capacity limit of 100 gigabytes. Data grid B has a capacity limit of 50 gigabytes. Data grid C has a capacity limit of 200 gigabytes. In this scenario, at least 250 gigabytes of unused capacity are always available in the collective. The total size of the three data grids cannot grow beyond 350 gigabytes.
Capacity Limit Example 2: Replicas
Data grid A is defined in a collective of two appliances. Data grid A has one synchronous and two asynchronous replicas, for a total of three replicas. The grid capacity limit is defined as 100 megabytes. Initially the maximum capacity consumption of this grid is 200 megabytes. Because the collective has only two appliances, one primary and one replica copy of the data exist. The primary data grid can use up to 100 megabytes. The replica grows at the same rate as the primary data grid, resulting in a maximum total consumed capacity of 200 megabytes. If a third appliance is added to the collective, a second replica copy of the data is placed. The maximum consumption of the grid becomes 300 megabytes, from the one primary plus two replicas.
Capacity Limit Example 3: Data grids with no capacity limit
Data grids A, B, and C are defined in a collective with a total capacity of 600 gigabytes of storage. Data grid A has a limit of 100 gigabytes. Data grid B has a limit of 50 gigabytes. Data grid C has no capacity limit. No replicas are defined for any of the three grids. Because data grid C has no limit, the data grid could potentially consume the entire 600 gigabytes of available capacity. As a result, data grid A and data grid B would not be able to insert any data. Any data that data grid A or data grid B inserted remains, but the data grids are not guaranteed to be able reach their capacity limits. Data grid C is guaranteed to have at least 450 gigabytes available to consume because the only other data grids on the system cannot consume more than a total of 150 gigabytes out of the 600 gigabytes of capacity. This 450 gigabyte calculation ignores any capacity that is consumed by the replica data. If two or more unlimited data grids exist in the collective, the potential capacity of any specific data grid is not guaranteed.
Secure data grids
After you create the data grids, the security of the data grid is disabled by default. We can change the security settings for a data grid to restrict access to a certain user or group of users.
When you change the security settings for a data grid, the data grid automatically restarts. When the data grid is restarted, any data that is in the data grid is lost. Configure the security for the data grids before you begin to save data in the data grid. Communication through the REST gateway is always secure, even if you do not have security enabled on the data grid.
- In the user interface, navigate to...
-
Data Grid | data_grid_type | data_grid_name
- Enable security or authorization for the data grid. Click Enable security to enable any user that has access to the user interface to access the data grid. To further restrict access, click...
-
Enable authorization
With authorization enabled, we can specify a list of users or user groups in the Access granted to list. When enable authorization is selected, only users that are listed in this access list can access the data grid data. We can assign the following access to users or user groups by clicking the name of the default access type that is displayed in the user interface:
read The user or user group can read or query data from the data grid. write The user or user group can read, query, and write data to the data grid. create The user or user group can read, query, write, insert, and create dynamic maps in the data grid. all The user or user group can read, query, write, insert, create dynamic maps, remove, and invalidate data from the data grid. Appliance administrators have all permission by default. When you change the security and authorization settings, there is a timeout value of five minutes.
Authentication timeout If password is changed for user that has authenticated to the data grid, the original credential is still valid for up to five minutes. Authorization timeout If permissions are removed that has authenticated to the data grid, that user continues to have the permission for up to five minutes. If you add a permission to a user, the user gets the permissions immediately.
Clear data grids
We can permanently delete all of the entries in a data grid. We can clear the data grid to remove stale information or test entries.
- In the user interface, click...
-
Data Grid | data_grid_type | data_grid_name
- Click the clear grid icon (
 ) to delete all of the data grid entries. Confirm to remove all of the entries in the data grid.
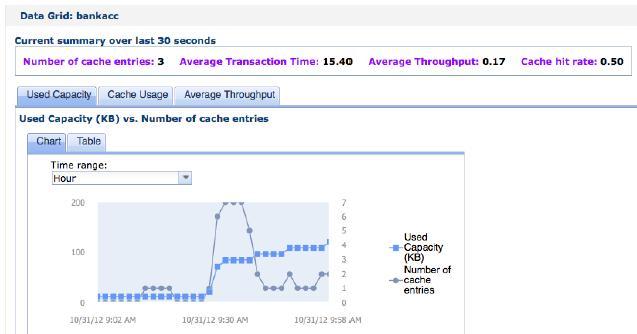
- We can verify that the data grid entries were deleted in the user interface. Click...
-
Monitor | Individual Data Grid Overview | data_grid_name | view the Used capacity vs. Number of cache entries chart
For simple data grids and session data grids, the number of entries in the data grid should approach zero. However, with a dynamic cache data grid, several entries remain in the data grid. These data grid entries contain the configuration information for the dynamic cache data grid.
Invalidate data
Use the query interfaces in the monitoring console and in the xscmd utility to retrieve small sets of keys from a map and invalidate sets of data.
- If we are using xscmd to query and invalidate data, set up the xscmd utility.
Use the console or the xscmd utility to query data grid contents. We can query the data by running a regular expression on the data key. We can then use the same query to invalidate data.
A regular expression is a structured string used to match other strings. Some examples of common regular expressions follow:
| Regular expression | Description |
|---|---|
| . | Finds any one character. |
| .* | Finds any one character zero or more times. |
| A.* | Finds all keys that start with "A". |
| .*A | Finds all keys that end with "A". |
| A? | Finds "A", zero or one time. |
| A* | Finds "A", zero or many times. |
| A+ | Finds "A", one time or many times. |
| A?B*C+ | Finds any one character, followed by zero or one A, followed by zero or many Bs, followed by one or many Cs |
| [ABC].* | Finds keys that start with the letters "A", or "B", or "C". |
| .*ABC.* | Finds keys with the string "ABC" somewhere in the string. |
| (ABC|DEF).* | Finds keys that start with the string "ABC" or "DEF". |
See the java.util.regex.Pattern API documentation for the full regular expression syntax.
Query or invalidate data with the console
- Go to the query page in the console. In the user interface, click...
-
Data Management | Query Data Grid Contents
- Search or filter the data in the map. Use one of the following options to search or filter the data:
- Type a regular expression in the field and click the Search button
(
 ).
A list of keys that match the regular expression displays. The list
of data could be a subset of all of the matching data.
).
A list of keys that match the regular expression displays. The list
of data could be a subset of all of the matching data.
- To filter the results on a set of partitions, click the Filter button (
 ). We can then type a regular expression and choose a range of partitions on which we want to filter the results.
- Type a regular expression in the field and click the Search button
(
- Invalidate data. When you invalidate the data, the data is permanently removed from the data grid.
- Selected keys
- We can select keys from the table to invalidate. We can either
click entries individually or click the select all checkbox, which
selects a maximum of 500 entries that are in the table. When you have
the entries selected to remove, click...
-
Invalidate | Selected keys
- All keys matching query
- We can also invalidate all the data that matches your regular
expression. Using this option deletes all data in the data grid that
matches the regular expression, not just the maximum of 500 entries
that is displayed in the console. To invalidate entries with the selected
regular expression, click...
-
Invalidate | All keys matching query
Query or invalidate data with the xscmd utility
- Query data:
-
xscmd.sh -c findbykey
         -g <data_grid>
         -m <map>
         -fs <find_string>
        [-fp <partitionid>]
Include the data grid, map, and regular expression for the find string value. We can also filter on the partition ID. The result returns a subset of the entire query.
- Invalidate data:
- Include the -inv argument in the command
to invalidate the data that is selected by the query.
xscmd -c findbykey
      -g <data_grid>
      -m <map>
      -fs <find_string>
     [-fp <partitionid>] -inv
Include the data grid, map, and regular expression for the find string value. We can also filter on the partition ID. When we run the invalidation, all matching values are invalidated, not just the small set that is returned by the query.
If your regular expression starts with the characters .*, the characters might not process correctly when we run the command. To resolve this issue, format your regular expression in one of the following ways:
- Enclose your regular expression with apostrophe characters:
-
-fs '.*'
- Use a backslash to escape the asterisk character:
-
-fs .\*
To look for all entries in the Grid1 data grid and Map1 map, run...
- xscmd -c findbykey -g Grid1 -m Map1 -fs ".*"
...which returns...
3 matching keys were found.

Partition Key
--------- ---
2         keyghi
4         keydef
6         keyabc
Remove data grids
To clear the data grid data, we can remove the data grid and then recreate the data grid.
- In the user interface, click...
-
Data Grid | data_grid_type
Select the data_grid_name to delete.
- Click the remove icon (
 ) to begin the removal process.
A message box is displayed requesting confirmation that this data grid can permanently be removed. Click OK to confirm the removal.
- We can monitor the removal of the data grid in the Tasks view.
Administer with the xscmd utility
- Start the appliance
- Install the WXS client
- Verify JAVA_HOME environment variable is set to use the WXS runtime.
- Verify the IP address and port number of active catalog servers. From the appliance interface
-
Collective | Members | member_name
- From the appliance user interface, download the active truststore...
-
Appliance | Settings | Transport Layer Security | Download active truststore
The default truststore file is xsatruststore.jks. The default password is: xc10pass.
- If client authentication is enabled, on the client installation, set environment variables.
-
CLIENT_AUTH_LIB=/path/to/security/JAR
export CLIENT_AUTH_LIB - Connect the xscmd utility to the appliance.
cd $WAS_HOME/bin
xscmd.bat -ts xsatruststore.jks
          -tst jks
          -tsp xc10pass
          -user xcadmin
          -pwd xcadmin
          -cep myxc10.mycompany.com
          -prot TLS
          -cxpv IBMJSSE2
          -tt TCP/IP [additional parameters]
- Display general help...
-
./xscmd.sh -h
- Display list of all commands...
-
./xscmd.sh -lc
- Display help for a specific command...
-
./xscmd.sh -h command_name
- Display a list of the command groups...
-
./xscmd.sh -lcg
- Display a list of the commands within a command group...
-
./xscmd.sh -lc command_group_name
- Run commands that connect to specific catalog servers.
-
./xscmd.sh -c <command_name> -cep cathost:catport(,cathost:catport)
Do not use the following commands in a WebSphere DataPower XC10 appliance environment:
- -c releaseShard
- -c reserveShard
- -c swapShardWithPrimary
- -c suspendBalancing
- -c resumeBalancing
- -c teardown
- -c triggerPlacement
- -c showinfo
- Optional: Set a timeout value.
Use the -to or --timeout option as a global parameter on any command. Number of seconds before timing out when connected to catalog servers. If we are connecting to a catalog server that might be unavailable due to operating system and other network timeouts, using this option can be useful to reduce the wait to a controlled time. The default is 30 seconds.
Configure security profiles for the xscmd utility
By creating a security profile, we can use saved security parameters to use the xscmd utility with secure environments.
To save a security profile, run xscmd with either...
- -ssp profile_name
- --saveSecProfile profile_name
The profile can contain settings for...
- user names and passwords
- credential generators
- keystores
- truststores
- transport types
Adding the parameter to your xscmd command saves the following parameters:
 -al,--alias <alias>
 -arc,--authRetryCount <integer>
 -ca,--credAuth <support>
 -cgc,--credGenClass <className>
 -cgp,--credGenProps <property>
 -cxpv,--contextProvider <provider>
 -ks,--keyStore <filePath>
 -ksp,--keyStorePassword <password>
 -kst,--keyStoreType <type>
 -prot,--protocol <protocol>
 -pwd,--password <password>
 -ts,--trustStore <filePath>
 -tsp,--trustStorePassword <password>
 -tst,--trustStoreType <type>
 -tt,--transportType <type>
 -user,--username <username>
The ProfileManagement command group in the xscmd utility contains commands for managing security profiles.
Security profiles are saved in...
-
$HOME/.xscmd/profiles/security/<profile_name>.properties
Do not include the .properties file name extension on the profile_name parameter. This extension is automatically added to the file name.
To use a saved security profile, add the -sp profile_name or --securityProfile profile_name parameter to the command we are running. For example:
-
xscmd -c listHosts -cep myhost.mycompany.com -sp myprofile
-
xscmd -lc ProfileManagement
-
xscmd -c listProfiles -v
-
xscmd -c showProfile -pn profile_name
-
xscmd -c RemoveProfile -pn profile_name.