Administer WXS v8.6
- Start and stop stand-alone servers
- Start stand-alone servers (XIO)
- Stop stand-alone servers that use XIO
- Start stand-alone servers that use the ORB transport
- Stop stand-alone servers that use the ORB transport
- Stop servers gracefully with the xscmd utility
- Start and stop servers in a WAS environment
- Start and stop servers in the Liberty profile
- Use the embedded server API to start and stop servers
- Administer with xscmd
- Control placement
- Manage ObjectGrid availability
- Manage data center failures
- Query, display, and invalidate data
- Retrieve WXS environment information with the xscmd utility
- Start WXS servers using the Eclipse Equinox OSGi framework
- Install OSGi-enabled plug-ins
- Administer OSGI-enables services
- Administer with Managed Beans (MBeans)
- Administer J2C client connections
Start and stop stand-alone servers
We can start and stop stand-alone catalog and container servers with scripts or the embedded server API.
If we are starting or stopping servers in a stand-alone environment that is using an external client security provider, set the CLIENT_AUTH_LIB environment variable before we run the start and stop scripts.
The start and stop scripts used depend on the type of transport mechanism...
- For an enterprise data grid that uses the XIO transport, use the startXsServer or stopXsServer scripts.
- For Java applications that use the ORB transport, use the startOgServer or stopOgServer scripts.
 Deprecated: The startOgServer and stopOgServer commands start servers that use the ORB transport mechanism.
The ORB is deprecated, but we can continue using these scripts if you were using the ORB in a previous release. The XIO transport mechanism replaces the ORB. Use the startXsServer and stopXsServer scripts to start and stop servers that use the XIO transport.
Deprecated: The startOgServer and stopOgServer commands start servers that use the ORB transport mechanism.
The ORB is deprecated, but we can continue using these scripts if you were using the ORB in a previous release. The XIO transport mechanism replaces the ORB. Use the startXsServer and stopXsServer scripts to start and stop servers that use the XIO transport.
See also...
Start stand-alone servers (XIO)
When running a stand-alone configuration, the environment is comprised of catalog servers, container servers, and client processes. WXS servers can also be embedded within existing Java applications using the embedded server API. You must manually configure and start these processes.
We can start WXS servers in an environment that does not have WAS installed.
Start a stand-alone catalog service that uses the XIO transport
Start the catalog service manually when we are using a distributed WXS environment that is not running in WAS.
If we are using WAS, the catalog service automatically starts within the existing processes.
Start the catalog service with the startXsServer script.
The catalog service can run in a single process or can include multiple catalog servers to form a catalog service domain. A catalog service domain is required in a production environment for high availability. We can also specify additional parameters to the script to bind the transport to a specific host and port, specify the domain, or enable security.
- Start a single catalog server process.
-
cd wxs_home/bin
startXsServer.sh catalogServerDo not use a single JVM to run the catalog service in a production environment. If the catalog service fails, no new clients are able to route to the deployed WXS, and no new ObjectGrid instances can be added to the domain. For these reasons, you should start a set of JVMs to run a catalog service domain.
- Start a catalog service domain that consists of multiple endpoints.
To start a set of servers to run a catalog service, use the -catalogServiceEndPoints option on the startXsServer script. This argument accepts a list of catalog service endpoints in the format of...
- serverName:hostName:clientPort:peerPort
The following example shows how to start the first of three JVMs to host a catalog service:
-
cd wxs_home/bin
startXsServer.sh cs1 -catalogServiceEndPoints cs1:s1.myco.com:6601:6602,cs2:s2.myco.com:6601:6602,cs3:s3.myco.com:6601:6602In this example, the cs1 server on the s1.myco.com host is started. This server name is the first argument that is passed to the script. During initialization of the cs1 server, the -catalogServiceEndpoints parameters are examined to determine which ports are allocated for this process. The list is also used to allow the cs1 server to accept connections from other servers: cs2 and cs3.
- To start the remaining catalog servers in the list, pass the following arguments to the startXsServer script.
Start the cs2 server on the s2.myco.com host.
-
startXsServer.sh cs2 -catalogServiceEndPoints cs1:s1.myco.com:6601:6602,cs2:s2.myco.com:6601:6602,cs3:s3.myco.com:6601:6602
Start cs3 on s3.myco.com:
-
startXsServer.sh cs3 -catalogServiceEndPoints cs3:s3.myco.com:6601:6602,cs1:s1.myco.com:6601:6602,cs2:s2.myco.com:6601:6602
The order of the list for the -catalogServiceEndpoints parameter can be different for the various catalog servers, but the servers contained in the list must be the same. Do not put any spaces in the list.
Start at least two catalog servers in parallel. We start catalog servers that are in a data grid in parallel, because each server pauses to wait for the other catalog servers to join the core group. A catalog server configured for a data grid does not start until it identifies other members in the group. The catalog server eventually times out if no other servers become available.
- Bind the transport to a specific host and port.
Aside from ports defined in the catalogServiceEndpoints argument, each catalog service also uses an ORB to accept connections from clients and containers. By default, the ORB listens on port 2809 of the localhost. To bind the ORB to a specific host and port on a catalog service JVM, use the -listenerHost and -listenerPort arguments.
The following example shows how to start a single JVM catalog server with its transport bound to port 7000 on s1.myco.com:
startXsServer.sh catalogServer  \
                 -listenerHost s1.myco.com  \
                 -listenerPort 7000
Each WXS container and client must be provided with catalog service ORB endpoint data. Clients only need a subset of this data, but you should use at least two endpoints for high availability.
- Optional: Name the catalog service domain
A catalog service domain name is not required when starting a catalog service. However, if we are using multi-master replication or are using multiple catalog service domains within the same set of processes, then you need to define a unique catalog service domain name. The default domain name is Default Domain. To give your domain a name, use the -domain option. The following example demonstrates how to start a single catalog service JVM with the domain name myDomain.
-
startXsServer.sh catalogServer -domain myDomain
- Start a secure catalog service.
- Start the catalog service programmatically.
Any JVM setting that is flagged by the CatalogServerProperties.setCatalogServer method can host the catalog service for WXS. This method indicates to the WXS server run time to instantiate the catalog service when the server is started. The following code shows how to instantiate the WXS catalog server:
-
CatalogServerProperties catalogServerProperties = ServerFactory.getCatalogProperties();
catalogServerProperties.setCatalogServer(true);
//The getInstance() method will start the catalog service.
Server server = ServerFactory.getInstance();
Start container servers that use the XIO transport
We can start container servers from the command line using a deployment topology or using a server.properties file.
To start a container process, you need an ObjectGrid XML file that specifies which WXS servers the container will host. All required classes must be in the classpath for the container.
- Start the container server...
cd wxs_install_root/bin
startXsServer.sh c0 \
                 -objectGridFile ../xml/mycoGrid.xml \
                 -catalogServiceEndPoints s1.myco.com:2809
On the container, the -catalogServiceEndPoints option is used to reference the listener host and port on the catalog service. The catalog service uses the -listenerHost and -listenerPort options to specify the host and port for listener binding or accepts the default binding. When starting a container, use the -catalogServiceEndPoints option to reference the values that are passed to the -listenerHost and -listenerPort options on the catalog service. If -listenerHost and -listenerPort options are not used when the catalog service is started, the XIO transport binds to port 2809 on the localhost for the catalog service. Do not use the -catalogServiceEndPoints option to reference the hosts and ports that were passed to the -catalogServiceEndPoints option on the catalog service. On the catalog service, the -catalogServiceEndPoints option is used to specify ports necessary for static server configuration. This process is identified by c0, the first argument passed to the script. Use the mycoGrid.xml to start the container.
If the catalog server XIO transport is running on a different host than your container or it is using a non-default port, use the -catalogServiceEndPoints argument to connect to the XIO transport. For this example, assume that a single catalog service is running on port 2809 on s1.myco.com
- Start the container using a deployment policy.
Although not required, a deployment policy is recommended during container start up. The deployment policy is used to set up partitioning and replication for WXS. The deployment policy can also be used to influence placement behavior. Because the previous example did not provide a deployment policy file, the example receives all default values with regard to replication, partitioning, and placement. So, the maps in the CompanyGrid are in one mapSet. The mapSet is not partitioned or replicated. The following example uses the mycoGridDpReplication.xml file to start the c0 container server:
cd wxs_install_root/bin
startXsServer.sh c0 \
                 -objectGridFile ../xml/mycoGrid.xml  \
                 -deploymentPolicyFile ../xml/mycoGridDpReplication.xml  \
                 -catalogServiceEndPoints s1.myco.com:2809
Note: If you have Java classes stored in a specific directory, or we are using a loader or agent, instead of altering the startXsServer script, we can launch the server with arguments as follows:
-
-jvmArgs -cp C:\DirectoryPOJOs\POJOs.jar
In the mycoGridDpReplication.xml file, a single map set contains all of the maps. This mapSet is divided into 10 partitions. Each partition has one synchronous replica and no asynchronous replicas. Any container that uses the mycoGridDpReplication.xml deployment policy paired with the mycoGrid.xml ObjectGrid XML file is also able to host CompanyGrid shards.
Start another container JVM, the c1 JVM:
cd wxs_install_root/bin
startXsServer.sh c1
                 -objectGridFile ../xml/mycoGrid.xml  \
                 -deploymentPolicyFile ../xml/mycoGridDpReplication.xml  \
                 -catalogServiceEndPoints s1.myco.com:2809
Each deployment policy contains one or more objectgridDeployment elements. When a container is started, it publishes its deployment policy to the catalog service. The catalog service examines each objectgridDeployment element. If the objectgridName attribute matches the objectgridName attribute of a previously received objectgridDeployment element, the latest objectgridDeployment element is ignored. The first objectgridDeployment element received for a specific objectgridName attribute is used as the master. For example, assume that the c2 JVM uses a deployment policy that divides the mapSet into a different number of partitions:
mycoGridDpReplicationModified.xml

<?xml version="1.0" encoding="UTF-8"?>
<deploymentPolicy xmlns:xsi="http://www.w3.org/2001/XMLSchema-instance"
                     xsi:schemaLocation="http://ibm.com/ws/objectgrid/deploymentPolicy ../deploymentPolicy.xsd"
                     xmlns="http://ibm.com/ws/objectgrid/deploymentPolicy">

    <objectgridDeployment objectgridName="CompanyGrid">
        <mapSet
            name="mapSet1" numberOfPartitions="5"
            minSyncReplicas="1"
            maxSyncReplicas="1"
            maxAsyncReplicas="0">
            <map ref="Customer" />
            <map ref="Item" />
            <map ref="OrderLine" />
            <map ref="Order" />
        </mapSet>
    </objectgridDeployment>

</deploymentPolicy>
Now, we can start a third JVM, the c2 JVM:
cd wxs_install_root/bin
startXsServer.sh c2 \
                 -objectGridFile ../xml/mycoGrid.xml  \
                 -deploymentPolicyFile ../xml/mycoGridDpReplicationModified.xml  \
                 -catalogServiceEndPoints s1.myco.com:2809
The container on the c2 JVM is started with a deployment policy that specifies 5 partitions for mapSet1. However, the catalog service already holds the master copy of the objectgridDeployment for the CompanyGrid. When the c0 JVM was started it specified that 10 partitions exist for this mapSet. Because it was the first container to start and publish its deployment policy, its deployment policy became the master. Therefore, any objectgridDeployment attribute value that is equal to CompanyGrid in a subsequent deployment policy is ignored.
- Start a container using a server properties file.
Use a server properties file to set up trace and configure security on a container. Run the following commands to start container c3 with a server properties file:
cd wxs_install_root/bin
startXsServer.sh c3 \
                 -objectGridFile ../xml/mycoGrid.xml  \
                 -deploymentPolicyFile ../xml/mycoGridDpReplicationModified.xml  \
                 -catalogServiceEndPoints s1.myco.com:2809  \
                 -serverProps ../serverProps/server.properties
An example server.properties file follows:
-
server.properties
workingDirectory=
traceSpec=*=all=disabled systemStreamToFileEnabled=true enableMBeans=true memoryThresholdPercentage=50This is a basic server properties file that does not have security enabled.
- Start a container server programmatically.
startXsServer script (XIO)
The startXsServer script starts container and catalog servers that use the XIO transport mechanism. You must use the startXsServer when we want an enterprise data grid. Use a variety of parameters when you start your servers to enable trace, specify port numbers, and so on.
Use the startXsServer script to start servers.
To start a catalog server:
-
cd wxs_install_root/bin
startXsServer.sh <server>[options]
To start a default configured catalog server...
-
startXsServer.sh catalogServer
If you have Java classes stored in a specific directory, or we are using a loader or agent, instead of altering the startXsServer script, we can launch the server with arguments as follows:
-
-jvmArgs -cp C:\DirectoryPOJOs\POJOs.jar
Options for starting catalog servers
The following parameters are all optional. Parameters for starting a catalog server:
- -catalogServiceEndPoints <serverName:hostName:clientPort:peerPort>
- List of catalog servers to link together into a catalog service domain. Each attribute is defined as follows:
- serverName
- Name of the catalog server.
- hostName
- Host name for the computer where the server is launched.
- clientPort
- Port used for peer catalog service communication.
- peerPort
- This value is the same as the haManagerPort. Port used for peer catalog service communication.
-
startXsServer.sh cs1 -catalogServiceEndPoints cs1:s1.myco.com:6601:6602,cs2:s2.myco.com:6601:6602,cs3:s3.myco.com:6601:6602
If you start additional catalog servers, they must include the same servers in the -catalogServiceEndPoints argument. The order of the list can be different, but the servers contained in the list must be the same for each catalog server. Do not put any spaces in the list.
- -clusterSecurityFile <cluster security xml file>
- Specifies the objectGridSecurity.xml file on the hard disk, which describes the security properties that are common to all servers (including catalog servers and container servers). One of the property example is the authenticator configuration which represents the user registry and authentication mechanism.
Example:
/opt/xs/ogsecurity.xml
- -clusterSecurityUrl <cluster security xml URL>
- Specifies the objectGridSecurity.xml file as a URL to the file on the hard disk or on the network, which describes the security properties that are common to all servers (including catalog servers and container servers). One of the property example is the authenticator configuration which represents the user registry and authentication mechanism.
Example: file:///opt/xs/ogsecurity.xml
- -domain <domain name>
- Name of the catalog service domain for this catalog server. The catalog service domain creates a group of highly available catalog servers. Each catalog server for a single domain should specify the same value for the -domain parameter.
- -JMXConnectorPort <port>
- Defines the SSL port to which the JMX service binds.
- -haManagerPort <port>
- Port number the high availability manager uses. If this property is not set, a free port is chosen. This property is ignored in WAS environments.
- -JMXServicePort <port>
- Port number on which the MBean server listens communication with JMX. The JMXServicePort property specifies the non-SSL port for JMX. You must use a different port number for each JVM in the configuration. To use JMX/RMI, explicitly specify the JMXServicePort and port number, even to use the default port value. This property applies to both the container server and the catalog service.
(Required for stand-alone environments only.)
Default: 1099 for catalog servers
- -jvmArgs <JVM arguments>
- Set of JVM arguments. Every option after the -jvmArgs option is used to start the server JVM. When the -jvmArgs parameter is used, ensure that it is the last optional script argument specified.
Example:-jvmArgs -Xms256M -Xmx1G
- -listenerHost <host name>
-
Host name to which the ORB or eXtremeIO (XIO) transport binds for communication. The value must be a fully-qualified domain name or IP address. If the configuration involves multiple network cards, set the listener host and port to let the transport mechanism in the JVM know the IP address for which to bind. If you do not specify which IP address to use, symptoms such as connection timeouts, unusual API failures, and clients that seem to hang can occur. Default: localhost
- -listenerPort <port>
- Port number to which the ORB or eXtremeIO (XIO) transport binds. This setting configures containers and clients to communicate with the catalog service. In WAS, the listenerPort is inherited by the BOOTSTRAP_ADDRESS port (when we are using the ORB transport) or the XIO_address port (when we are using XIO transport) port configuration. This property applies to both the container server and the catalog service.
Default: 2809
- -quorum true|false
-
Enables quorum for the catalog service. Quorum is used to ensure that a majority of the catalog service domain is available before moving partitions on the available container servers. To enable quorum, set the value to true or enabled. The default value is disabled. This property applies to the catalog service only.
- -script <script file>
- Location of a custom script for commands you specify to start catalog servers or containers and then parameterize or edit as you require.
- -serverProps <server properties file>
- Server property file that contains the server-specific security properties. The file name specified for this property is just in plain file path format, such as c:/tmp/og/catalogserver.props.
- -timeout <seconds>
- Specifies a number of seconds before the server start times out.
- -traceFile <trace file>
-
File name to write trace information. This property applies to both the container server and the catalog service. Example: ../logs/c4Trace.log
- -traceSpec <trace specification>
-
Enables trace and the trace specification string for the container server. Trace is disabled by default. This property applies to both the container server and the catalog service. Examples:
- ObjectGrid=all=enabled
- ObjectGrid*=all=enabled
- -transport <transport type>
-
Specifies the type of transport to use for all the servers in the catalog service domain. We can set the value to XIO or ORB.
The startXsServer script sets the transport type to XIO by default.
If you have both the -transport parameter and the transport server property defined on a catalog server, the value of the -transport parameter is used.
Usage for container servers
-
startXsServer.sh <server> -objectgridFile <xml file> -deploymentPolicyFile <xml file> [options]
startXsServer.sh <server> -objectgridUrl <xml URL> -deploymentPolicyUrl <xml URL> [options]
Options for container servers
- -catalogServiceEndPoints <hostName:port,hostName:port>
- Specifies the ORB host and port on the catalog service.
Default: localhost:2809
- -deploymentPolicyFile <deployment policy xml file>
- Path to the deployment policy file on the hard disk.
The deployment policy is used to set up partitioning and replication.
The deployment policy can also be used to influence placement behavior.
Example: ../xml/SimpleDP.xml
- -deploymentPolicyUrl <deployment policy url>
- Specifies the URL for the deployment policy file on the hard disk or on the network. The deployment policy is used to set up partitioning and replication. The deployment policy can also be used to influence placement behavior.
Example: file://xml/SimpleDP.xml
- -JMXConnectorPort <port>
- Defines the SSL port to which the JMX service binds.
- -JMXServicePort <port>
-
Port number on which the MBean server listens communication with JMX. The JMXServicePort property specifies the non-SSL port for JMX. You must use a different port number for each JVM in the configuration. To use JMX/RMI, explicitly specify the JMXServicePort and port number, even to use the default port value. This property applies to both the container server and the catalog service. (Required for stand-alone environments only.) Default: 1099
- -jvmArgs <JVM arguments>
- Set of JVM arguments. Every option after the -jvmArgs option is used to start the server JVM. When the -jvmArgs parameter is used, ensure that it is the last optional script argument specified.
Example:-jvmArgs -Xms256M -Xmx1G
- -listenerHost <host name>
-
Host name to which the ORB or eXtremeIO (XIO) transport binds for communication. The value must be a fully-qualified domain name or IP address. If the configuration involves multiple network cards, set the listener host and port to let the transport mechanism in the JVM know the IP address for which to bind. If you do not specify which IP address to use, symptoms such as connection timeouts, unusual API failures, and clients that seem to hang can occur.
Default: localhost
- -listenerPort <port>
- Port number to which the ORB or eXtremeIO (XIO) transport binds. This setting configures containers and clients to communicate with the catalog service. In WAS, the listenerPort is inherited by the BOOTSTRAP_ADDRESS port (when we are using the ORB transport) or the XIO_address port (when we are using XIO transport) port configuration. This property applies to both the container server and the catalog service.
Default: 2809
- -objectgridFile <ObjectGrid descriptor xml file>
- Path to the ObjectGrid descriptor file that specifies which WXS server the container will host.
- -objectgridUrl <ObjectGrid descriptor url>
- Specifies a URL for the ObjectGrid descriptor file that specifies which WXS server the container will host.
- -script <script file>
- Location of a custom script for commands you specify to start catalog servers or containers and then parameterize or edit as you require.
- -serverProps <server properties file>
- Path to the server property file.
Example:../security/server.props
- -timeout <seconds>
- Specifies a number of seconds before the server start times out.
- -traceFile <trace file>
-
File name to write trace information. This property applies to both the container server and the catalog service. Example: ../logs/c4Trace.log
- -traceSpec <trace specification>
-
Enables trace and the trace specification string for the container server. Trace is disabled by default. This property applies to both the container server and the catalog service. Examples:
- ObjectGrid=all=enabled
- ObjectGrid*=all=enabled
- -zone <zone name>
- Specifies the zone to use for all of the containers within the server.
Stop stand-alone servers that use the IBM eXtremeIO transport
Use the stopXsServer script to stop WXS server processes.
Run the stopXsServer script by navigating to the bin directory:
-
cd wxs_install_root /bin
- Stop a single container server.
Run the stopXsServer script to stop the container server. Use this command only when we are stopping a single container server. If we run the single catalog server stop command on several container servers in succession, you might see performance and churn issues for shard placement .
-
stopXsServer containerServer -catalogServiceEndPoints s1.myco.com:2809
The -catalogServiceEndPoints option should match the value of the -catalogServiceEndPoints option that was used to start the container. If a -catalogServiceEndPoints was not used to start the container, the default values are likely localhost or the hostname and 2809 for the listener port to connect to the catalog service. Otherwise, use the values that are passed to -listenerHost and -listenerPort on the catalog service. If the -listenerHost and -listenerPort options are not used when starting the catalog service, the listener port binds to port 2809 on the localhost for the catalog service.
- Stop multiple container servers.
To prevent churn and performance issues for shard placement when we want to stop multiple container servers at the same time, use the following command format. Separate a list of container servers with commas:
-
stopXsServer containerServer0,containerServer1,containerServer2 -catalogServiceEndPoints s1.myco.com:2809
To stop all of the containers on a specific zone or host, we can use the -teardown parameter.
- Stop catalog servers.
Run the stopXsServer script to stop the catalog server.
- stopXsServer.sh catalogServer -catalogServiceEndPoints s1.myco.com:2809
When stopping a catalog service, use the -catalogServiceEndPoints option to reference the host and port on the catalog service. The catalog service uses -listenerHost and -listenerPort options to specify the host and port for binding or accepts the default binding. If the -listenerHost and -listenerPort options are not used when starting the catalog service, the XIO transport binds to port 2809 on the localhost for the catalog service. The -catalogServiceEndPoints option is different when stopping a catalog service than when you started the catalog service.
Start a catalog service requires peer access ports and client access ports, if the default ports were not used. Stopping a catalog service requires only the listener port.
- Stop the web console server. To stop the web console server...
-
cd wxs_install_root/ObjectGrid/bin
./stopConsoleServer.sh - Enable trace for the server stop process.
If a container fails to stop, we can enable trace to help with debugging the problem. To enable trace during the stop of a server, add the -traceSpec and -traceFile parameters to the stop commands. The -traceSpec parameter specifies the type of trace to enable and the -traceFile parameter specifies path and name of the file to create and use for the trace data.
cd wxs_install_root /bin
stopXsServer.sh c4 \
                -catalogServiceEndPoints s1.myco.com:2809 \
                -traceFile ../logs/c4Trace.log \
                -traceSpec ObjectGrid=all=enabled
After the trace is obtained, look for errors related to port conflicts, missing classes, missing or incorrect XML files or any stack traces. Suggested startup trace specifications are:
- ObjectGrid=all=enabled
- ObjectGrid*=all=enabled
- Stop embedded servers programmatically.
stopXsServer script (XIO)
The stopXsServer script stops catalog and container servers.
Use the stopXsServer script to stop a server. You must provide the name of the server and its catalog service endpoints.
To stop a catalog or container server:
-
cd wxs_install_root/bin
stopXsServer.sh <server_name> -catalogServiceEndPoints <csHost:csListenerPort,csHost:csListenerPort> [options]
Options
- -catalogServiceEndPoints <csHost:csListenerPort, csHost:csListenerPort...>
- Specifies the ORB host and port number.
For container severs: The list of catalog service endpoints should be the same as the list that was used to start the container server. If you did not specify this option when you started the container server, use the default value of localhost:2809.
For catalog servers: If we are stopping the catalog service, use the values that you indicated for the -listenerHost and -listenerPort options when you started the catalog service. If you did not specify these options when you started the catalog server, use the default value of localhost:2809. The -catalogServiceEndPoints value you use when you stop the catalog service is different from when you start the catalog service.
- -clientSecurityFile <security properties file>
- Path to the client properties file that defines security properties for the client.
- -traceSpec <trace specification>
-
Enables trace and the trace specification string for the container server. Trace is disabled by default. This property applies to both the container server and the catalog service. Examples:
- ObjectGrid=all=enabled
- ObjectGrid*=all=enabled
- -traceFile <trace file>
-
File name to write trace information. This property applies to both the container server and the catalog service. Example:
-
../logs/c4Trace.log
- -jvmArgs <JVM arguments>
- Set of JVM arguments. Every option after the -jvmArgs option is used to start the server JVM. When the -jvmArgs parameter is used, ensure that it is the last optional script argument specified.
Example:
- -jvmArgs -Xms256M -Xmx1G
Start stand-alone servers that use the ORB transport
(Deprecated) When running a stand-alone configuration, the environment is comprised of catalog servers, container servers, and client processes. WXS servers can also be embedded within existing Java applications using the embedded server API. You must manually configure and start these processes.
We can start WXS servers in an environment that does not have WAS installed.
Deprecated: The startOgServer and stopOgServer commands start servers that use the ORB transport mechanism. The ORB is deprecated, but we can continue using these scripts if you were using the ORB in a previous release. The XIO
transport mechanism replaces the ORB. Use the startXsServer and stopXsServer scripts to start and stop servers that use the XIO transport.
Start a stand-alone catalog service that uses the ORB transport
(Deprecated) Start the catalog service manually when we are using a distributed WXS environment that is not running in WAS.
Deprecated: The startOgServer and stopOgServer commands start servers that use the ORB transport mechanism.
The ORB is deprecated, but we can continue using these scripts if you were using the ORB in a previous release. The XIO transport mechanism replaces the ORB. Use the startXsServer and stopXsServer scripts to start and stop servers that use the XIO transport.
Start the catalog service with the startOgServer script.
The catalog service can run in a single process or can include multiple catalog servers to form a catalog service domain. A catalog service domain is required in a production environment for high availability. We can also specify additional parameters to the script to bind the ORB to a specific host and port, specify the domain, or enable security.
- Start a single catalog server process.
To start a single catalog server...
-
cd objectgridRoot/bin
startOgServer.sh catalogServerDo not use a single JVM to run the catalog service in a production environment. If the catalog service fails, no new clients are able to route to the deployed WXS, and no new ObjectGrid instances can be added to the domain. For these reasons, you should start a set of JVMs to run a catalog service domain.
- Start a catalog service domain that consists of multiple endpoints.
To start a set of servers to run a catalog service, use the -catalogServiceEndPoints option on the startOgServer script. This argument accepts a list of catalog service endpoints in the format of...
-
serverName:hostName:clientPort:peerPort
The following example shows how to start the first of three JVMs to host a catalog service:
- Navigate to the bin directory.
-
cd wxs_install_root /bin
- Run the startOgServer command.
-
startOgServer.sh cs1 -catalogServiceEndPoints cs1:s1.myco.com:6601:6602,cs2:s2.myco.com:6601:6602,cs3:s3.myco.com:6601:6602
In this example, the cs1 server on the s1.myco.com host is started. This server name is the first argument that is passed to the script. During initialization of the cs1 server, the -catalogServiceEndpoints parameters are examined to determine which ports are allocated for this process. The list is also used to allow the cs1 server to accept connections from other servers: cs2 and cs3.
- To start the remaining catalog servers in the list, pass the following arguments to the startOgServer script.
Start the cs2 server on the s2.myco.com host.
startOgServer.sh cs2 -catalogServiceEndPoints
cs1:s1.myco.com:6601:6602,cs2:s2.myco.com:6601:6602,cs3:s3.myco.com:6601:6602
Start cs3 on s3.myco.com:
startOgServer.sh cs3 -catalogServiceEndPoints
cs3:s3.myco.com:6601:6602,cs1:s1.myco.com:6601:6602,cs2:s2.myco.com:6601:6602
The order of the list for the -catalogServiceEndpoints parameter can be different for the various catalog servers, but the servers contained in the list must be the same. Do not put any spaces in the list.
Start at least two catalog servers in parallel.
We start catalog servers that are in a data grid in parallel, because each server pauses to wait for the other catalog servers to join the core group. A catalog server configured for a data grid does not start until it identifies other members in the group. The catalog server eventually times out if no other servers become available.
- Navigate to the bin directory.
- Bind the ORB to a specific host and port.
Aside from ports defined in the catalogServiceEndpoints argument, each catalog service also uses an ORB to accept connections from clients and containers. By default, the ORB listens on port 2809 of the localhost. To bind the ORB to a specific host and port on a catalog service JVM, use the -listenerHost and -listenerPort arguments. The following example shows how to start a single JVM catalog server with its ORB bound to port 7000 on s1.myco.com:
startOgServer.sh catalogServer -listenerHost s1.myco.com
-listenerPort 7000
Each WXS container and client must be provided with catalog service ORB endpoint data. Clients only need a subset of this data, but you should use at least two endpoints for high availability.
- Optional: Name the catalog service domain
A catalog service domain name is not required when starting a catalog service. However, if we are using multi-master replication or are using multiple catalog service domains within the same set of processes, then you need to define a unique catalog service domain name. The default domain name is Default Domain. To give your domain a name, use the -domain option. The following example demonstrates how to start a single catalog service JVM with the domain name myDomain.
startOgServer.sh catalogServer -domain myDomain
- Start a secure catalog service.
- Start the catalog service programmatically.
Any JVM setting that is flagged by the CatalogServerProperties.setCatalogServer method can host the catalog service for WXS. This method indicates to the WXS server run time to instantiate the catalog service when the server is started. The following code shows how to instantiate the WXS catalog server:
CatalogServerProperties catalogServerProperties =
 ServerFactory.getCatalogProperties();
catalogServerProperties.setCatalogServer(true);

//The getInstance() method will start the catalog service.
Server server = ServerFactory.getInstance();
Start container servers that use the ORB transport
(Deprecated) We can start container servers from the command line using a deployment topology or using a server.properties file.
Deprecated: The startOgServer and stopOgServer commands start servers that use the ORB transport mechanism.
The ORB is deprecated, but we can continue using these scripts if you were using the ORB in a previous release. The XIO transport mechanism replaces the ORB. Use the startXsServer and stopXsServer scripts to start and stop servers that use the XIO transport.
To start a container process, you need an ObjectGrid XML file that specifies which WXS server the container will host. Ensure that your container is equipped to host each ObjectGrid in the XML that you pass to it. All of the classes that these ObjectGrids require must be in the classpath for the container.
startOgServer.sh c0 -objectGridFile ../xml/mycoGrid.xml
                    -catalogServiceEndPoints s1.myco.com:2809
On the container server, the -catalogServiceEndPoints option is used to reference the ORB host and port on the catalog service. The catalog service uses the -listenerHost and -listenerPort options to specify the host and port for ORB binding or accepts the default binding. When starting a container, use the -catalogServiceEndPoints option to reference the values that are passed to the -listenerHost and -listenerPort options on the catalog service. If -listenerHost and -listenerPort options are not used when the catalog service is started, the ORB binds to port 2809 on the localhost for the catalog service. Do not use the -catalogServiceEndPoints option to reference the hosts and ports that were passed to the -catalogServiceEndPoints option on the catalog service. On the catalog service, the -catalogServiceEndPoints option is used to specify ports necessary for static server configuration. This process is identified by c0, the first argument passed to the script. Use the mycoGrid.xml to start the container. If the catalog server ORB is running on a different host than your container or it is using a non-default port, use the -catalogServiceEndPoints argument to connect to the ORB. For this example, assume that a single catalog service is running on port 2809 on s1.myco.com
Although not required, a deployment policy is recommended during container start up. The deployment policy is used to set up partitioning and replication for WXS. The deployment policy can also be used to influence placement behavior. Because the previous example did not provide a deployment policy file, the example receives all default values with regard to replication, partitioning, and placement. So, the maps in the CompanyGrid are in one mapSet. The mapSet is not partitioned or replicated. The following example uses the mycoGridDpReplication.xml file to start a container JVM, the c0 JVM:
cd wxs_install_root/bin
startOgServer.sh c0 -objectGridFile ../xml/mycoGrid.xml
                    -deploymentPolicyFile ../xml/mycoGridDpReplication.xml
                    -catalogServiceEndPoints s1.myco.com:2809
Note: If you have Java classes stored in a specific directory, or we are using a loader or agent, instead of altering the StartOgServer script, we can launch the server with arguments as follows:
-
-jvmArgs -cp C:\DirectoryPOJOs\POJOs.jar
In the mycoGridDpReplication.xml file, a single map set contains all of the maps. This mapSet is divided into 10 partitions. Each partition has one synchronous replica and no asynchronous replicas. Any container that uses the mycoGridDpReplication.xml deployment policy paired with the mycoGrid.xml ObjectGrid XML file is also able to host CompanyGrid shards. Start another container JVM, the c1 JVM:
cd wxs_install_root/bin
startOgServer.sh c1 -objectGridFile ../xml/mycoGrid.xml
                    -deploymentPolicyFile ../xml/mycoGridDpReplication.xml
                    -catalogServiceEndPoints s1.myco.com:2809
Each deployment policy contains one or more objectgridDeployment elements. When a container is started, it publishes its deployment policy to the catalog service. The catalog service examines each objectgridDeployment element. If the objectgridName attribute matches the objectgridName attribute of a previously received objectgridDeployment element, the latest objectgridDeployment element is ignored. The first objectgridDeployment element received for a specific objectgridName attribute is used as the master. For example, assume that the c2 JVM uses a deployment policy that divides the mapSet into a different number of partitions:
mycoGridDpReplicationModified.xml

<?xml version="1.0" encoding="UTF-8"?>
<deploymentPolicy xmlns:xsi="http://www.w3.org/2001/XMLSchema-instance"
    xsi:schemaLocation="http://ibm.com/ws/objectgrid/deploymentPolicy
  ../deploymentPolicy.xsd"
    xmlns="http://ibm.com/ws/objectgrid/deploymentPolicy">

    <objectgridDeployment objectgridName="CompanyGrid">
        <mapSet name="mapSet1" numberOfPartitions="5"
            minSyncReplicas="1" maxSyncReplicas="1"
            maxAsyncReplicas="0">
            <map ref="Customer" />
            <map ref="Item" />
            <map ref="OrderLine" />
            <map ref="Order" />
        </mapSet>
    </objectgridDeployment>

</deploymentPolicy>
Now, we can start a third JVM, the c2 JVM:
cd wxs_install_root/bin
startOgServer.sh c2 -objectGridFile ../xml/mycoGrid.xml
                    -deploymentPolicyFile ../xml/mycoGridDpReplicationModified.xml
                    -catalogServiceEndPoints s1.myco.com:2809
The container on the c2 JVM is started with a deployment policy that specifies 5 partitions for mapSet1. However, the catalog service already holds the master copy of the objectgridDeployment for the CompanyGrid. When the c0 JVM was started it specified that 10 partitions exist for this mapSet. Because it was the first container to start and publish its deployment policy, its deployment policy became the master. Therefore, any objectgridDeployment attribute value that is equal to CompanyGrid in a subsequent deployment policy is ignored.
Use a server properties file to set up trace and configure security on a container. Run the following commands to start container c3 with a server properties file:
cd wxs_install_root/bin
startOgServer.sh c3 -objectGridFile ../xml/mycoGrid.xml
                    -deploymentPolicyFile ../xml/mycoGridDpReplicationModified.xml
                    -catalogServiceEndPoints s1.myco.com:2809
                    -serverProps ../serverProps/server.properties
An example server.properties file follows:
server.properties
workingDirectory=
traceSpec=*=all=disabled systemStreamToFileEnabled=true enableMBeans=true memoryThresholdPercentage=50
This is a basic server properties file that does not have security enabled.
startOgServer script (ORB)
(Deprecated) The startOgServer script starts container and catalog servers that use the ORB transport mechanism. Use a variety of parameters when you start your servers to enable trace, specify port numbers, and so on.
Use the startOgServer script to start servers.
Deprecated: The startOgServer and stopOgServer commands start servers that use the ORB transport mechanism.
The ORB is deprecated, but we can continue using these scripts if you were using the ORB in a previous release. The XIO transport mechanism replaces the ORB. Use the startXsServer and stopXsServer scripts to start and stop servers that use the XIO transport.
To start a catalog server:
cd wxs_install_root/bin
startOgServer.sh <server>[options]
To start a default configured catalog server...
cd wxs_install_root/bin
startOgServer.sh catalogServer
Note: If you have Java classes stored in a specific directory, or we are using a loader or agent, instead of altering the startOgServer script, we can launch the server with arguments as follows:
-
-jvmArgs -cp C:\DirectoryPOJOs\POJOs.jar
Options for starting catalog servers
The following parameters are all optional. Parameters for starting a catalog server:
- -catalogServiceEndPoints <serverName:hostName:clientPort:peerPort>
- List of catalog servers to link together into a catalog service domain. Each attribute is defined as follows:
- serverName
- Name of the catalog server.
- hostName
- Host name for the computer where the server is launched.
- clientPort
- Port used for peer catalog service communication.
- peerPort
- This value is the same as the haManagerPort. Port used for peer catalog service communication.
startOgServer.sh cs1 -catalogServiceEndPoints
cs1:s1.myco.com:6601:6602,cs2:s2.myco.com:6601:6602,cs3:s3.myco.com:6601:6602
If you start additional catalog servers, they must include the same servers in the -catalogServiceEndPoints argument. The order of the list can be different, but the servers contained in the list must be the same for each catalog server. Do not put any spaces in the list.
- -clusterSecurityFile <cluster security xml file>
- Specifies the objectGridSecurity.xml file on the hard disk, which describes the security properties that are common to all servers (including catalog servers and container servers). One of the property example is the authenticator configuration which represents the user registry and authentication mechanism.
Example:
/opt/xs/ogsecurity.xml
- -clusterSecurityUrl <cluster security xml URL>
- Specifies the objectGridSecurity.xml file as a URL to the file on the hard disk or on the network, which describes the security properties that are common to all servers (including catalog servers and container servers). One of the property example is the authenticator configuration which represents the user registry and authentication mechanism.
Example:
file:///opt/xs/ogsecurity.xml
- -domain <domain name>
- Name of the catalog service domain for this catalog server. The catalog service domain creates a group of highly available catalog servers. Each catalog server for a single domain should specify the same value for the -domain parameter.
- -JMXConnectorPort <port>
- Defines the SSL port to which the JMX service binds.
- -haManagerPort <port>
- Port number the high availability manager uses. If this property is not set, a free port is chosen. This property is ignored in WAS environments.
- -JMXServicePort <port>
- Port number on which the MBean server listens communication with JMX. The JMXServicePort property specifies the non-SSL port for JMX. You must use a different port number for each JVM in the configuration. To use JMX/RMI, explicitly specify the JMXServicePort and port number, even to use the default port value. This property applies to both the container server and the catalog service.
(Required for stand-alone environments only.)
Default: 1099 for catalog servers
- -jvmArgs <JVM arguments>
- Set of JVM arguments. Every option after the -jvmArgs option is used to start the server JVM. When the -jvmArgs parameter is used, ensure that it is the last optional script argument specified.
Example:-jvmArgs -Xms256M -Xmx1G
- -listenerHost <host name>
-
Host name to which the ORB or eXtremeIO (XIO) transport binds for communication. The value must be a fully-qualified domain name or IP address. If the configuration involves multiple network cards, set the listener host and port to let the transport mechanism in the JVM know the IP address for which to bind. If you do not specify which IP address to use, symptoms such as connection timeouts, unusual API failures, and clients that seem to hang can occur. Default: localhost
- -listenerPort <port>
- Port number to which the ORB or eXtremeIO (XIO) transport binds. This setting configures containers and clients to communicate with the catalog service. In WAS, the listenerPort is inherited by the BOOTSTRAP_ADDRESS port (when we are using the ORB transport) or the XIO_address port (when we are using XIO transport) port configuration. This property applies to both the container server and the catalog service.
Default: 2809
- -quorum true|false
-
Enables quorum for the catalog service. Quorum is used to ensure that a majority of the catalog service domain is available before moving partitions on the available container servers. To enable quorum, set the value to true or enabled. The default value is disabled. This property applies to the catalog service only.
- -script <script file>
- Location of a custom script for commands you specify to start catalog servers or containers and then parameterize or edit as you require.
- -serverProps <server properties file>
- Server property file that contains the server-specific security properties. The file name specified for this property is just in plain file path format, such as c:/tmp/og/catalogserver.props.
- -traceSpec <trace specification>
-
Enables trace and the trace specification string for the container server. Trace is disabled by default. This property applies to both the container server and the catalog service. Examples:
- ObjectGrid=all=enabled
- ObjectGrid*=all=enabled
- -traceFile <trace file>
-
File name to write trace information. This property applies to both the container server and the catalog service. Example: ../logs/c4Trace.log
- -timeout <seconds>
- Specifies a number of seconds before the server start times out.
- -transport <transport type>
-
Specifies the type of transport to use for all the servers in the catalog service domain. We can set the value to XIO or ORB.
The startOgServer script sets the transport type to ORB by default.
If you have both the -transport parameter and the transport server property defined on a catalog server, the value of the -transport parameter is used.
Usage for container servers
startOgServer.sh <server> -objectgridFile <xml file> -deploymentPolicyFile <xml file> [options]
startOgServer.sh <server> -objectgridUrl <xml URL> -deploymentPolicyUrl <xml URL> [options]
Options for container servers
- -catalogServiceEndPoints <hostName:port,hostName:port>
- Specifies the ORB host and port on the catalog service. Default: localhost:2809
- -deploymentPolicyFile <deployment policy xml file>
- Path to the deployment policy file on the hard disk. The deployment policy is used to set up partitioning and replication.
The deployment policy can also be used to influence placement behavior.
Example: ../xml/SimpleDP.xml
- -deploymentPolicyUrl <deployment policy url>
- Specifies the URL for the deployment policy file on the hard disk or on the network. The deployment policy is used to set up partitioning and replication. The deployment policy can also be used to influence placement behavior.
Example: file://xml/SimpleDP.xml
- -JMXConnectorPort <port>
- Defines the SSL port to which the JMX service binds.
- -JMXServicePort <port>
-
Port number on which the MBean server listens communication with JMX. The JMXServicePort property specifies the non-SSL port for JMX. You must use a different port number for each JVM in the configuration. To use JMX/RMI, explicitly specify the JMXServicePort and port number, even to use the default port value. This property applies to both the container server and the catalog service. (Required for stand-alone environments only.) Default: 1099
- -jvmArgs <JVM arguments>
- Set of JVM arguments. Every option after the -jvmArgs option is used to start the server JVM. When the -jvmArgs parameter is used, ensure that it is the last optional script argument specified.
Example:-jvmArgs -Xms256M -Xmx1G
- -listenerHost <host name>
-
Host name to which the ORB or eXtremeIO (XIO) transport binds for communication. The value must be a fully-qualified domain name or IP address. If the configuration involves multiple network cards, set the listener host and port to let the transport mechanism in the JVM know the IP address for which to bind. If you do not specify which IP address to use, symptoms such as connection timeouts, unusual API failures, and clients that seem to hang can occur. Default: localhost
- -listenerPort <port>
- Port number to which the ORB or eXtremeIO (XIO) transport binds. This setting configures containers and clients to communicate with the catalog service. In WAS, the listenerPort is inherited by the BOOTSTRAP_ADDRESS port (when we are using the ORB transport) or the XIO_address port (when we are using XIO transport) port configuration. This property applies to both the container server and the catalog service.Default: 2809
- -objectgridFile <ObjectGrid descriptor xml file>
- Path to the ObjectGrid descriptor file that specifies which WXS server the container will host.
- -objectgridUrl <ObjectGrid descriptor url>
- Specifies a URL for the ObjectGrid descriptor file that specifies which WXS server the container will host.
- -script <script file>
- Location of a custom script for commands you specify to start catalog servers or containers and then parameterize or edit as you require.
- -serverProps <server properties file>
- Path to the server property file. Example:
-
../security/server.props
- -timeout <seconds>
- Specifies a number of seconds before the server start times out.
- -traceFile <trace file>
-
File name to write trace information. This property applies to both the container server and the catalog service. Example: ../logs/c4Trace.log
- -traceSpec <trace specification>
-
Enables trace and the trace specification string for the container server. Trace is disabled by default. This property applies to both the container server and the catalog service. Examples:
- ObjectGrid=all=enabled
- ObjectGrid*=all=enabled
- -zone <zone name>
- Specifies the zone to use for all of the containers within the server.
See also...
Stop stand-alone servers that use the ORB transport
(Deprecated) Use the stopOgServer script to stop WXS server processes.
Deprecated: The startOgServer and stopOgServer commands start servers that use the ORB transport mechanism. The ORB is deprecated, but we can continue using these scripts if you were using the ORB in a previous release. The XIO
transport mechanism replaces the ORB. Use the startXsServer and stopXsServer scripts to start and stop servers that use the XIO transport.
Run the stopOgServer script by navigating to the bin directory:
cd wxs_install_root /bin
- Stop a single container server.
Run the stopOgServer script to stop the container server. Use this command only when we are stopping a single container server. If we run the single catalog server stop command on several container servers in succession, you might see performance and churn issues for shard placement .
stopOgServer containerServer -catalogServiceEndPoints s1.myco.com:2809
The -catalogServiceEndPoints option should match the value of the -catalogServiceEndPoints option that was used to start the container. If a -catalogServiceEndPoints was not used to start the container, the default values are likely localhost or the hostname and 2809 for the ORB port to connect to the catalog service. Otherwise, use the values that are passed to -listenerHost and -listenerPort on the catalog service. If the -listenerHost and -listenerPort options are not used when starting the catalog service, the ORB binds to port 2809 on the localhost for the catalog service.
- Stop multiple container servers.
To prevent churn and performance issues for shard placement when we want to stop multiple container servers at the same time, use the following command format. Separate a list of container servers with commas:
stopOgServer containerServer0,containerServer1,containerServer2
-catalogServiceEndPoints s1.myco.com:2809
To stop all of the containers on a specific zone or host, we can use the -teardown parameter.
- Stop catalog servers.
Run the stopOgServer script to stop the catalog server.
stopOgServer.sh catalogServer -catalogServiceEndPoints s1.myco.com:2809
When stopping a catalog service, use the -catalogServiceEndPoints option to reference the ORB host and port on the catalog service. The catalog service uses -listenerHost and -listenerPort options to specify the host and port for ORB binding or accepts the default binding. If the -listenerHost and -listenerPort options are not used when starting the catalog service, the ORB binds to port 2809 on the localhost for the catalog service. The -catalogServiceEndPoints option is different when stopping a catalog service than when you started the catalog service.
Start a catalog service requires peer access ports and client access ports, if the default ports were not used. Stopping a catalog service requires only the ORB port.
- Stop the web console server.
-
cd wxs_install_root/ObjectGrid/bin
./stopConsoleServer.sh - Enable trace for the server stop process.
If a container fails to stop, we can enable trace to help with debugging the problem. To enable trace during the stop of a server, add the -traceSpec and -traceFile parameters to the stop commands. The -traceSpec parameter specifies the type of trace to enable and the -traceFile parameter specifies path and name of the file to create and use for the trace data.
cd wxs_install_root /bin
stopOgServer.sh c4 -catalogServiceEndPoints s1.myco.com:2809 \
                   -traceFile ../logs/c4Trace.log  \
                   -traceSpec ObjectGrid=all=enabled
After the trace is obtained, look for errors related to port conflicts, missing classes, missing or incorrect XML files or any stack traces. Suggested startup trace specifications are:
- ObjectGrid=all=enabled
- ObjectGrid*=all=enabled
- Stop embedded servers programmatically.
- stopOgServer script (ORB) (Deprecated) The stopOgServer script stops catalog and container servers.
stopOgServer script (ORB)
(Deprecated) The stopOgServer script stops catalog and container servers.
Use the stopOgServer script to stop a server. You must provide the name of the server and its catalog service endpoints.
Deprecated: The startOgServer and stopOgServer commands start servers that use the ORB transport mechanism.
The ORB is deprecated, but we can continue using these scripts if you were using the ORB in a previous release. The XIO transport mechanism replaces the ORB. Use the startXsServer and stopXsServer scripts to start and stop servers that use the XIO transport.
cd wxs_install_root/bin
stopOgServer.sh <server_name> -catalogServiceEndPoints <csHost:csListenerPort,csHost:csListenerPort> [options]
Options
- -catalogServiceEndPoints <csHost:csListenerPort, csHost:csListenerPort...>
- ORB host and port number.
For container severs: The list of catalog service endpoints should be the same as the list that was used to start the container server. If you did not specify this option when you started the container server, use the default value of localhost:2809.
For catalog servers: If we are stopping the catalog service, use the values that you indicated for the -listenerHost and -listenerPort options when you started the catalog service. If you did not specify these options when you started the catalog server, use the default value of localhost:2809. The -catalogServiceEndPoints value you use when you stop the catalog service is different from when you start the catalog service.
- -clientSecurityFile <security properties file>
- Path to the client properties file that defines security properties for the client.
- -traceSpec <trace specification>
-
Enables trace and the trace specification string for the container server. Trace is disabled by default. This property applies to both the container server and the catalog service. Examples:
- ObjectGrid=all=enabled
- ObjectGrid*=all=enabled
- -traceFile <trace file>
-
File name to write trace information. This property applies to both the container server and the catalog service. Example: ../logs/c4Trace.log
- -jvmArgs <JVM arguments>
- Set of JVM arguments. Every option after the -jvmArgs option is used to start the server JVM. When the -jvmArgs parameter is used, ensure that it is the last optional script argument specified.
Example:-jvmArgs -Xms256M -Xmx1G
Stopping servers gracefully with the xscmd utility
Use the xscmd utility with the -c teardown command to stop a list or group of catalog and container servers. This command simplifies shutting down all or portions of a data grid, avoiding unnecessary placement and recovery actions by the catalog service that normally occur when processes are stopped or killed.
- Stop a specific list of servers.
Provide a list of servers after the -teardown parameter:
-
xscmd -c teardown -sl catalogServer1,catalogServer2,containerServer1
- Stop all the servers in a specific zone.
The catalog server determines the servers running in the zone, and the xscmd utility prompts you with a list of the servers in the selected zone before shutting down the servers:
-
xscmd -c teardown -z zone_name
- Stop all the servers on a specific host.
For example to shut down all the servers on myhost.mymyco.com, enter...
-
-hf myhost.mymyco.com
The catalog server determines the servers running on the host, and the xscmd utility prompts you with a list of the servers in the selected host before shutting down the servers:
-
xscmd -teardown -hf <host_name>
Start and stop servers in a WAS environment
Catalog and container servers can automatically start in a WAS or WAS Network Deployment environment.
Configure catalog servers and container servers to run on WAS:
The life cycle of catalog and container servers in WAS is linked to the processes on which these servers run.
- Start catalog services in WAS:
The life cycle a catalog server is tied to the WAS process. After you configure the catalog service domain in WAS, restart each server that you defined as a part of the catalog service domain. The catalog service starts automatically on the servers that you associated with the catalog service domain. The catalog service can also start automatically in the following scenarios, depending on the edition of WAS:
- Base WAS: We can configure the application to automatically start a container server and catalog service. This feature simplifies unit testing in development environments such as Rational Application Developer because you do not need to explicitly start a catalog service.
- WAS Network Deployment: The catalog service automatically starts in the dmgr process if the dmgr node has WXS installed and the dmgr profile is augmented.
- Start container servers in WAS:
The life cycle of a container server is tied to the WAS application. When you start the configured application, the container servers also start.
- Stop an entire data grid of servers:
We can stop catalog and container servers by stopping the applications and associated application servers. However, we can also stop an entire data grid with the xscmd utility or MBeans:
- In the xscmd utility:
- With Mbeans:
Use the tearDownServers operation on the PlacementServiceMBean Mbean.
- In the xscmd utility:
- Stop Liberty profile processes:
We can stop Liberty servers using the Liberty profile server command
Start and stop servers in the Liberty profile
Use the Liberty profile server command to start and stop WXS servers in the Liberty profile.
The Liberty profile is the JVM process that starts in OSGi and provides a flexible framework for serving applications. The WXS server is the mechanism that provides grid services. The main two services are the catalog service and the container service. A Liberty profile is started from the command line with the server start server_name or server run server_name commands. When the Liberty profile starts, it reads server.xml to determine what Liberty profile features to start. WXS has three features: server, client, and web. If you add the server feature to the feature manager, then the Liberty profile starts the WXS server bundles. However, adding the server feature does not necessarily start any WXS servers.
The WXS servers start only when a valid service is configured. For example, if we want to configure a catalog service, then the isCatalog="true" attribute must be set on the xsServer ... element in server.xml.
The following options are available to configure a container service:
- Copy a valid objectgrid.xml file (with or without an acmycoing objectGridDeployment.xml file) into the wlp_home/usr/servers/server_name/grids directory. This grids directory is a monitored directory, and changes to files in this directory initiate events in the Liberty profile runtime environment. For example, when new objectgrid.xml, objectGridDeployment.xml, or both files are found, WXS creates and starts a new container. When one of these files are deleted, WXS stops that container. When files are modified, WXS stops and restarts the container. Multiple containers can exist in the same WXS server, which requires that subdirectories exist inside the grids directory.
- Install an OSGi bundle
This bundle must reference a blueprint.xml file that contains server metadata. This method of starting a server is similar to how we can start servers OSGi environments without the Liberty profile in WXS Version 7.1.1. In Version 8.5, the server element is no longer required in the blueprint.xml file. Therefore, you must define the server metadata in server.xml. Additionally, bundles are simple to install and start by dropping them into the grids directory in a similar way that you drop XML files in the grids directory.
Use this task to start WXS servers with the Liberty profile server command. The wlp/bin directory contains a script called server to help control the server process. The following syntax for this command is supported:
-
server <task> [server] [options]
- Start WXS servers. When we run the start command, the server is launched as a background process. Use the following example to start the server:
-
bin/server start server_name bin/server.bat start server_name
- Stop WXS servers; for example: When we run the stop command, the running server is stopped. Use the following example to stop the server:
-
bin/server stop server_name bin/server.bat stop server_name
- Start WXS servers. When we run the start command, the server is launched as a background process. Use the following example to start the server:

Use the embedded server API to start and stop servers
With WXS, we can use a programmatic API for managing the life cycle of embedded servers and containers. We can programmatically configure the server with any of the options that we can also configure with the command line options or file-based server properties. We can configure the embedded server to be a container server, a catalog service, or both.
- You must have a method for running code from within an already existing Java virtual machine. The WXS classes must be available through the class loader tree.
- If container servers are using eXtremeMemory, first configure the native libraries.
We can run many administration tasks with the Administration API. One common use of the API is as an internal server for storing Web application state. The Web server can start an embedded WXS server, report the container server to the catalog service, and the server is then added as a member of a larger distributed grid. This usage can provide scalability and high availability to an otherwise volatile data store. We can programmatically control the complete life cycle of an embedded WXS server. The examples are as generic as possible and only show direct code examples for the outlined steps.
- Obtain the ServerProperties object from the ServerFactory class and configure any necessary options.
Every WXS server has a set of configurable properties. When a server starts from the command line, those properties are set to defaults, but we can override several properties by providing an external source or file. In the embedded scope, we can directly set the properties with a ServerProperties object. Set these properties before you obtain a server instance from the ServerFactory class. The following example snippet obtains a ServerProperties object, sets the CatalogServiceBootStrap field, and initializes several optional server settings.
ServerProperties props = ServerFactory.getServerProperties(); props.setCatalogServiceBootstrap("host:port"); // required to connect to specific catalog service props.setServerName("ServerOne"); // name server props.setTraceSpecification("com.ibm.ws.objectgrid=all=enabled"); // Sets trace spec - If we want the server to be a catalog service, obtain the CatalogServerProperties object.
Every embedded server can be a catalog service, a container server, or both a container server and a catalog service. The following example obtains the CatalogServerProperties object, enables the catalog service option, and configures various catalog service settings.
CatalogServerProperties catalogProps = ServerFactory.getCatalogProperties();
catalogProps.setCatalogServer(true);
// false by default, it is required to set as a catalog service
catalogProps.setQuorum(true);
// enables
// disables quorum
- Obtain a Server instance from the ServerFactory class.
The Server instance is a process-scoped singleton that is responsible for managing the membership in the grid. After this instance has been instantiated, this process is connected and is highly available with the other servers in the grid.
The following example shows how to create the Server instance:
Server server = ServerFactory.getInstance();
Reviewing the previous example, the ServerFactory class provides a static method that returns a Server instance. The ServerFactory class is intended to be the only interface for obtaining a Server instance. Therefore, the class ensures that the instance is a singleton, or one instance for each JVM or isolated classloader. The getInstance method initializes the Server instance. Configure all the server properties before you initialize the instance. The Server class is responsible for creating new Container instances. Use both the ServerFactory and Server classes for managing the life cycle of the embedded Server instance.
- Start a Container instance using the Server instance.
Before shards can be placed on an embedded server, you must create a container on the server. The Server interface has a createContainer method that takes a DeploymentPolicy argument. The following example uses the server instance that you obtained to create a container using a created DeploymentPolicy file. Note that Containers require a classloader that has the application binaries available to it for serialization. We can make these binaries available by calling the createContainer method with the Thread context classloader set to the classloader to use.
DeploymentPolicy policy = DeploymentPolicyFactory.createDeploymentPolicy(new URL("file://urltodeployment.xml"), new URL("file://urltoobjectgrid.xml")); Container container = server.createContainer(policy); - Remove and clean up a container server.
We can remove and clean up a container server using the running the teardown method on the obtained Container instance. Running the teardown method on a container properly cleans up the container and removes the container from the embedded server.
The process of cleaning up the container includes the movement and tearing down of all the shards placed within that container. Each server can contain many containers and shards. Cleaning up a container does not affect the life cycle of the parent Server instance. The following example demonstrates how to run the teardown method on a server. The teardown method is made available through the ContainerMBean interface. By using the ContainerMBean interface, if you no longer have programmatic access to this container, we can still remove and clean up the container with its MBean. A terminate method also exists on the Container interface, do not use this method unless it is absolutely needed. This method is more forceful and does not coordinate appropriate shard movement and clean up.
container.teardown();
- Stop the embedded server.
When you stop an embedded server, you also stop any containers and shards running on the server. When you stop an embedded server, you must clean up all open connections and move or tear down all the shards. The following example demonstrates how to stop a server and using the waitFor method on the Server interface to ensure that the Server instance shuts down completely. Similarly to the container example, the stopServer method is made available through the ServerMBean interface. With this interface, we can stop a server with the corresponding Managed Bean (MBean).
ServerFactory.stopServer();
// Uses the factory to kill the Server singleton
// or server.stopServer();
// Uses the Server instance directly server.waitFor();
// Returns when the server has properly completed its shutdown procedures
Full code example:
 import java.net.MalformedURLException;
import java.net.URL;

import com.ibm.websphere.objectgrid.ObjectGridException;
import com.ibm.websphere.objectgrid.deployment.DeploymentPolicy;
import com.ibm.websphere.objectgrid.deployment.DeploymentPolicyFactory;
import com.ibm.websphere.objectgrid.server.Container;
import com.ibm.websphere.objectgrid.server.Server;
import com.ibm.websphere.objectgrid.server.ServerFactory;
import com.ibm.websphere.objectgrid.server.ServerProperties;

public class ServerFactoryTest {

    public static void main(String[] args) {

        try {

            ServerProperties props = ServerFactory.getServerProperties();
            props.setCatalogServiceBootstrap("catalogservice-hostname:catalogservice-port");
            props.setServerName("ServerOne");
            // name server
            props.setTraceSpecification("com.ibm.ws.objectgrid=all=enabled");
            // TraceSpec
            /*
             * In most cases, the server will serve as a container server only
             * and will connect to an external catalog service. This is a more
             * highly available way of doing things. The commented code excerpt
             * below will enable this Server to be a catalog service.
             *
             *
             * CatalogServerProperties catalogProps =
             * ServerFactory.getCatalogProperties();
             * catalogProps.setCatalogServer(true);
            // enable catalog service
             * catalogProps.setQuorum(true);
            // enable quorum              */

            Server server = ServerFactory.getInstance();

            DeploymentPolicy policy = DeploymentPolicyFactory.createDeploymentPolicy (new URL("url to deployment xml"),  new URL("url to objectgrid xml file"));
            Container container = server.createContainer(policy);

            /*
             * Shard will now be placed on this container if the deployment requirements are met.
             * This encompasses embedded server and container creation.
             *
             * The lines below will simply demonstrate calling the cleanup methods              */

            container.teardown();
            server.stopServer();
            int success = server.waitFor();

        } catch (ObjectGridException e) {
            // Container failed to initialize         } catch (MalformedURLException e2) {
            // invalid url to xml file(s)
        }

    }}
Embedded server API
WXS includes application programming interfaces (APIs) and system programming interfaces for embedding WXS servers and clients within your existing Java applications.
Instantiate the WXS server
Use several properties to configure the WXS server instance, which we can retrieve from the ServerFactory.getServerProperties method. The ServerProperties object is a singleton, so each call to the getServerProperties method retrieves the same instance.
We can create a server with the following code.
Server server = ServerFactory.getInstance();
All properties set before the first invocation of the getInstance method are used to initialize the server.
Set server properties
We can set the server properties until the ServerFactory.getInstance method is called for the first time. The first call of the getInstance method instantiates the WXS server, and reads all the configured properties. Setting the properties after creation has no effect. The following example shows how to set properties before instantiating a Server instance.
// Get the server properties associated with this process.
ServerProperties serverProperties = ServerFactory.getServerProperties();

// Set the server name for this process.
serverProperties.setServerName("EmbeddedServerA");

// Set the name of the zone this process is contained in.
serverProperties.setZoneName("EmbeddedZone1");

// Set the end point information required to bootstrap to the catalog service.
serverProperties.setCatalogServiceBootstrap("localhost:2809");

// Set the listener host name to use to bind to.
serverProperties.setListenerHost("host.local.domain");

// Set the listener port to use to bind to.
serverProperties.setListenerPort(9010);

// Turn off all MBeans for this process.
serverProperties.setMBeansEnabled(false);

Server server = ServerFactory.getInstance();
Embed the catalog service
Any JVM setting that is flagged by the CatalogServerProperties.setCatalogServer method can host the catalog service for WXS. This method indicates to the WXS server run time to instantiate the catalog service when the server is started. The following code shows how to instantiate the WXS catalog server:
CatalogServerProperties catalogServerProperties =
 ServerFactory.getCatalogProperties();
catalogServerProperties.setCatalogServer(true);

Server server = ServerFactory.getInstance();
Embed a container server
Run the Server.createContainer method for any JVM to host multiple WXS container servers. The following code shows how to instantiate a container server:
Server server = ServerFactory.getInstance();
DeploymentPolicy policy = DeploymentPolicyFactory.createDeploymentPolicy(
    new File("META-INF/embeddedDeploymentPolicy.xml").toURI().toURL(),
    new File("META-INF/embeddedObjectGrid.xml").toURI().toURL());
Container container = server.createContainer(policy);
Self-contained server process
We can start all the services together, which is useful for development and also practical in production. By starting the services together, a single process does all of the following actions: starts the catalog service, starts a set of containers, and runs the client connection logic. Start the services in this way sorts out programming issues before deploying in a distributed environment. The following code shows how to instantiate a self-contained WXS server:
CatalogServerProperties catalogServerProperties =
 ServerFactory.getCatalogProperties();
catalogServerProperties.setCatalogServer(true);

Server server = ServerFactory.getInstance();
DeploymentPolicy policy = DeploymentPolicyFactory.createDeploymentPolicy(
    new File("META-INF/embeddedDeploymentPolicy.xml").toURI().toURL(),
    new File("META-INF/embeddedObjectGrid.xml").toURI().toURL());
Container container = server.createContainer(policy);
Embed WXS in WAS
The configuration for WXS is set up automatically when you install WXS in a WAS environment. You are not required to set any properties before you access the server to create a container. The following code shows how to instantiate a WXS server inWAS:
Server server = ServerFactory.getInstance();
DeploymentPolicy policy = DeploymentPolicyFactory.createDeploymentPolicy(
    new File("META-INF/embeddedDeploymentPolicy.xml").toURI().toURL(),
    new File("META-INF/embeddedObjectGrid.xml").toURI().toURL);
Container container = server.createContainer(policy);
Administer with the xscmd utility
With the xscmd utility,we can complete administrative tasks in the environment such as: establishing multi-master replication links, overriding quorum, and stopping groups of servers with the teardown command.
- Your catalog servers and container servers must be started. If the catalog servers are in a catalog service domain, at least two catalog servers must be started.
- Verify that the JAVA_HOME environment variable is set to use the runtime environment that installed with the product. If we are using the trial version of the product, set the JAVA_HOME environment variable.
The xscmd utility replaces the xsadmin sample utility as a fully supported monitoring and administration tool. You could complete similar operations with the xsadmin tool, but this tool is not supported. The xsadmin sample provides a method for parsing and discovering current deployment data, and can be used as a foundation for writing custom utilities. If you were previously using the xsadmin tool for monitoring and administration, consider updating your scripts to use the xscmd utility.
- Display general help
-
cd wxs_home/bin
./xscmd.sh -h - Display a list of all of the commands...
-
./xscmd.sh -lc
- Display the help for a specific command...
-
./xscmd.sh -h command_name
- Display a list of the command groups...
-
./xscmd.sh -lcg
- Display a list of the commands within a command group...
-
./xscmd.sh -lc command_group_name
- Run commands that connect to specific catalog servers. By default, xscmd connects localhost:2809. We can also provide a list of remote host names and ports. The xscmd utility connects to a random host on your list. Hosts provided must be within the same catalog service domain.
- Provide a list of stand-alone catalog servers to connect:
- ./xscmd.sh -c <command_name> -cep hostname:port(,hostname:port)
The listener port is specified when we run startOgServer or startXsServer.
- Provide a list of WAS catalog servers to connect.
-
./xscmd.sh -c <command_name> -cep was_hostname:port(,hostname:port)
The was_hostname value is the host name of the catalog server in the WAS cell. The port value is the listener port, which is inherited:
For ORB transport, the BOOTSTRAP_ADDRESS value for each WAS application server is used. Default is 9809 for dmgr catalog servers.
For XIO, the XIO_ADDRESS value is used. Default is 4809 for dmgr catalog servers.
If container servers are running in a secured WAS environment, run the xscmd utility from the WXS client installation in the WAS environment. For example...
-
cd /opt/IBM/WebSphere/AppServer/bin
./xscmd.sh ...We can set a timeout value using the -to or --timeout options as a global parameter. Values are in seconds. Default is 30 seconds.
- Provide a list of stand-alone catalog servers to connect:
See also:
- Improve response time and data availability with WXS multi-master capability
- Eclipse runtime options
- Port number settings in WAS versions
Shard placement on container servers
During startup, we can choose to delay the placement of shards. When running container servers, we can suspend, resume, or change placement of shards.
Control placement during startup
We can control when shards begin to be placed while your environment is starting. Some control is in place by default. If you do not take any actions to control placement, shards begin to be placed immediately. When shards are placed immediately, the shards might not be placed evenly as subsequent container servers start, and further placement operations run to balance the distribution.
- Temporarily suspend the balancing of shards to prevent immediate shard placement when your container servers are starting.
Suspending the balancing of shards prevents uneven shard placement. Before you start your container servers, use the command...
-
xscmd -c suspendBalancing
...to stop the balancing of shards for a specific data grid and map set.
After the container servers are started, to begin the placement of shards on the container servers...
-
xscmd -c resumeBalancing
- Configure the placementDeferralInterval property to minimize the number of shard placement cycles on the container servers.
Shard placement is triggered at the defined time interval. The default value for this property is 15 seconds.
Set the placementDeferralInterval property in the server properties file for the catalog server. If we are using the embedded server API, use the setPlacementDeferralInterval method on the CatalogServerProperties interface. This property sets a number of milliseconds before shards are placed on the container servers.
With the default value, when a container server starts, placement does not start until after the time specified in the property has passed. If multiple container servers are starting in succession, the deferral interval timer is reset if a new container server starts within the given interval. For example, if a second container server starts 10 seconds after the first container server, placement does not start until 15 seconds after the second container server started. However, if a third container server starts 20 seconds after the second container server, placement has already begun on the first two container servers.
When container servers become unavailable, placement is triggered as soon as the catalog server learns of the event so that recovery can occur as quickly as possible.
Use the following tips to help determine if your placement deferral value is set to the right amount of time:
- As you concurrently start the container servers, look at the CWOBJ1001 messages in the SystemOut.log file for each container server. The timestamp of these messages in each container server log file indicates the actual container server start time. You might consider adjusting the placementDeferralInterval property to include more container server starts. If the first container server starts 90 seconds before the last container server, you might set the property to 90 seconds.
- Note how long the CWOBJ1511 messages occur after the CWOBJ1001 messages. This amount of time can indicate if the deferral has occurred successfully.
- If we are using a development environment, consider the length of the interval when we are testing the application.
- Configure the numInitialContainers attribute.
If you previously used the numInitialContainers attribute, we can continue using the attribute. However, the use of the xscmd -c suspendBalancing and xscmd -c resumeBalancing commands followed by the placementDeferralInterval are suggested over the numInitialContainers attribute to control placement. The numInitialContainers attribute specifies the number of container servers that are required before initial placement occurs for the shards in this mapSet element. The numInitialContainers attribute is in the deployment policy descriptor XML file. If you have both numInitialContainers and placementDeferralInterval set, note that until the numInitialContainers value has been met, no placement occurs, regardless of the value of the placementDeferralInterval property.
Controlling placement after initial startup
- To force placement to occur...
-
xscmd -c triggerPlacement -g my_OG -ms my_Map_Set
...where my_OG and my_Map_Set are set to values for the data grid and map set, to force placement to occur during a point in time at which placement might not occur otherwise.
For example, you might run this command when the amount of time specified by the placementDeferralInterval property has not yet passed or when balancing is suspended.
- Reassign a primary shard.
To assign a replica shard to be the new primary shard
-
xscmd -c swapShardWithPrimary
The previous primary shard becomes a replica.
- Rebalance the primary and replica shards.
To adjust the ratio of primary and replica shards to be equitable among the running container servers in the configuration.
-
xscmd -c balanceShardTypes
The ratio is consistent within one shard on each container server.
- Suspend or resume placement.
To stop and start the balancing of shards for a specific data grid and map set, use either....
-
xscmd -c suspendBalancing
...or...
-
xscmd -c resumeBalancing
When balancing has been suspended, the following placement actions can still run:
- Shard promotion can occur when container servers fail.
- Shard role swapping with...
-
xscmd -c swapShardWithPrimary
- Shard placement triggered balancing with the command...
-
xscmd -c triggerPlacement -g myOG -ms myMapSet
- Re-enable shard containers that were disabled for shard placement .
When a problem occurs with placing shards on a particular shard container, the shard container is placed in the disabled for shard placement list. The shard containers in this list cannot be used for placement until you re-enable the shard container, or the JVM that is hosting the shard container is recycled. When the JVM is stopped, the shard container is removed.
When the JVM is restarted, the container count increments and a new name is used for the shard container for a specified data grid. Problems that might cause a shard container to be disabled include: long garbage collection cycles that are impacting JVM health, DNS or naming configuration problems, intermittent network outages, and other problems. Any shards that were successfully placed on the shard container are not moved off the container shard. It is possible that clients can access a shard, however, communication between container shards or between catalog servers and container servers is not working.
The shard containers that are in the disabled for shard placement list are designated as UNASSIGNED. Unless the JVM for the shard container is recycled, or another shard container stopped or started, the shards remain unassigned, unless we run the command...
-
xscmd -c triggerPlacement
The balance cycle does not automatically run when a shard container is disabled because it is possible the shard in question (or the data in the shard) could be causing the problem. To avoid propagating that shard to other shard containers, the balance cycle does not automatically run. Investigate the issue, and run the command...
-
xscmd -c triggerPlacement
...before any container lifecycle changes.
To list the shard containers that are disabled, use...
-
xscmd -c listDisabledForPlacement
The shard containers in this list cannot be used for placement until you re-enable the shard container. Resolve any issues with the shard container, then run...
-
xscmd -c enableForPlacement -ct <shard_container>
We can monitor the placement in the environment with the command...
-
xscmd -c placementServiceStatus
Manage ObjectGrid availability
The availability state of an ObjectGrid instance determines which requests can be processed at any particular time. Use the StateManager interface to set and retrieve the state of an ObjectGrid instance.
Four availability states exist for a given ObjectGrid instance.
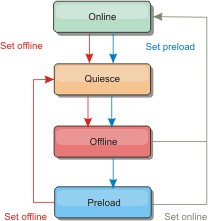
| ONLINE | Default availability state for an ObjectGrid. An ONLINE ObjectGrid is able to process any requests from a typical WXS client. However, requests from a preload client are rejected while the ObjectGrid is ONLINE. |
| QUIESCE | Transitional. An ObjectGrid that is in QUIESCE is soon moved to the OFFLINE state. While in the QUIESCE state, an ObjectGrid is allowed to process outstanding transactions. However, any new transactions are rejected. An ObjectGrid can remain in QUIESCE for up to 30 seconds. After this time, the availability state is moved to OFFLINE. |
| OFFLINE | Results in the rejection of all transactions that are sent to the ObjectGrid. |
| PRELOAD | Used to load data into an ObjectGrid from a preload client. While the ObjectGrid is in the PRELOAD state, only a preload client can commit transactions against the ObjectGrid. All other transactions are rejected. |
A request is rejected if an ObjectGrid is not in the appropriate availability state to support that request. An AvailabilityException exception results whenever a request is rejected.
- Set the initial state of an ObjectGrid with the ObjectGrid configuration XML file.
Use the initialState attribute on an ObjectGrid to indicate its startup state. Normally, when an ObjectGrid completes initialization, it is available for routing. The state can later be changed to prevent traffic from routing to an ObjectGrid. If the ObjectGrid needs to be initialized, but not immediately available, we can use the initialState attribute.
The initialState attribute is set on the ObjectGrid configuration XML file. The default state is ONLINE. Valid values include:
- ONLINE (default)
- PRELOAD
- OFFLINE
If the initialState attribute is set on an ObjectGrid, the state must be explicitly set back to online or the ObjectGrid will remain unavailable. An AvailabilityException exception results if the ObjectGrid is not in the ONLINE state.
Using the initialState attribute for preloading
If the ObjectGrid is preloaded with data, there can be a period of time between when the ObjectGrid is available and switching to a preload state to block client traffic. To avoid this time period, the initial state on an ObjectGrid can be set to PRELOAD. The ObjectGrid still completes all the necessary initialization, but it blocks traffic until the state has changed and allows the preload to occur.
The PRELOAD and OFFLINE states both block traffic, but use the PRELOAD state if we want to initiate a preload.
Failover and balancing behavior
If a replica data grid is promoted to be a primary data grid, the replica does not use the initialState setting. If the primary data grid is moved for a rebalance, the initialState setting is not used because the data is copied to the new primary location before the move is completed. If replication is not configured, then the primary goes into the initialState setting if failover occurs, and a new primary must be placed.
- Change the availability state with the StateManager interface.
Use the StateManager interface to set the availability state of an ObjectGrid. To set the availability state of an ObjectGrid running on the servers, pass a corresponding ObjectGrid client to the StateManager interface. The following code demonstrates how to change the availability state of an ObjectGrid.
ClientClusterContext client = ogManager.connect("localhost:2809", null, null);
ObjectGrid myObjectGrid = ogManager.getObjectGrid(client, "myObjectGrid");
StateManager stateManager = StateManagerFactory.getStateManager();
stateManager.setObjectGridState(AvailabilityState.OFFLINE, myObjectGrid);
Each shard of the ObjectGrid transitions to the desired state when the setObjectGridState method is called on the StateManager interface. When the method returns, all shards within the ObjectGrid should be in the proper state.
Use an ObjectGridEventListener plug-in to change the availability state of a server side ObjectGrid. Only change the availability state of a server-side ObjectGrid when the ObjectGrid has a single partition. If the ObjectGrid has multiple partitions, the shardActivated method is called on each primary, which results in superfluous calls to change the state of the ObjectGrid
public class OGListener implements ObjectGridEventListener,
   ObjectGridEventGroup.ShardEvents {
    public void shardActivated(ObjectGrid grid) {
            StateManager stateManager = StateManagerFactory.getStateManager();
            stateManager.setObjectGridState(AvailabilityState.PRELOAD, grid);
    }}
Because QUIESCE is a transitional state, we cannot use the StateManager interface to put an ObjectGrid into the QUIESCE state. An ObjectGrid passes through this state on its way to the OFFLINE state.
- Retrieve the availability state.
Use the getObjectGridState method of the StateManager interface to retrieve the availability state of a particular ObjectGrid.
StateManager stateManager = StateManagerFactory.getStateManager();
AvailabilityState state = stateManager.getObjectGridState(inventoryGrid);
The getObjectGridState method chooses a random primary within the ObjectGrid and returns its AvailabilityState. Because all shards of an ObjectGrid should be in the same availability state or transitioning to the same availability state, this method provides an acceptable result for the current availability state of the ObjectGrid.
Manage data center failures
When the data center enters a failure scenario, consider overriding quorum so that container server events are not ignored. Use the xscmd utility to query about and run quorum tasks, such as the quorum status and overriding quorum.
- Configure the quorum mechanism to be the same setting in all of the catalog servers.
- Quorum is the minimum number of catalog servers that are necessary to conduct placement operations for the data grid and is the full set of catalog servers, unless you configure a lower number. WXS expects to lose quorum for the following reasons:
- Catalog service JVM member fails
- Network brown out
- Data center loss
The following message indicates that quorum has been lost. Look for this message in the catalog service logs.
CWOBJ1254W: The catalog service is waiting for quorum.
Override quorum in a data center failure scenario only. When you override quorum, any surviving catalog server instance can be used. All survivors are notified when one is told to override quorum.
- Query quorum status with the xscmd utility.
-
xscmd -c showQuorumStatus -cep cathost:2809
Use this option to display the quorum status of a catalog service instance.
We can optionally use the -to or --timeout option on your command to reduce the timeout value to avoid waiting for operating system or other network timeouts during a network brown out or system loss. The default timeout value is 30 seconds. One of the following outcomes is displayed:
- Quorum is disabled
The catalog servers are running in a quorum-disabled mode. Quroum disabled mode is a development or single data center mode. Do not use quorum disabled mode for multiple data center configurations.
- Quorum is enabled and the catalog server has quorum
Quorum is enabled and the system is working normally.
- Quorum is enabled but the catalog server is waiting for quorum
Quorum is enabled and quorum has been lost.
- Quorum is enabled and the quorum is overridden
Quorum is enabled and quorum has been overridden.
- Quorum status is outlawed
When a brown out occurs, splitting the catalog service into two partitions, A and B. The catalog server A has overridden quorum. The network partition resolves and the server in the B partition is outlawed, requiring a JVM restart. It also occurs if the catalog JVM in B restarts during the brown out and then the brown out clears.
- Quorum is disabled
- Override quorum with the xscmd utility.
xscmd -c overrideQuorum -cep cathost:2809
Running this command forces the surviving catalog servers to re-establish a quorum.
- Diagnose quorum with the xscmd utility.
- Display a list of the core groups :
xscmd -c listCoreGroups -cep cathost:2809
- Teardown servers:
Use the -c teardown option to remove a server manually from the data grid. Removing a server from the grid is usually not necessary. Servers are automatically removed when they are detected as failed, but the command is provided for use under the guidance of IBM support.
xscmd -c teardown server1,server2,server3 -cep cathost:2809 -g Grid
- Display the route table:
Use the -c routetable option to display the current route table by simulating a new client connection to the data grid. It also validates the route table by confirming that all container servers are recognizing their role in the route table, such as which type of shard for which partition.
xscmd -c routetable -cep cathost:2809 -g myGrid
- Check the map sizes:
Use the -c showMapSizes option to verify that key distribution is uniform over the shards in the key. If some container servers have more keys than others, then it is likely the hash function on the key objects has a poor distribution.
xscmd -c showMapSizes -cep cathost:2809 -g myGrid -ms myMapSet
- Set trace strings:
Use the -c setTraceSpec option to set the trace settings for all JVMs that match the filter specified for the xscmd command. This setting changes the trace settings only, until another command is used or the JVMs modified fail or stop.
xscmd.sh -c setTraceSpec  \
         -spec ObjectGrid*=event=enabled  \
         -cep cathost:1099  \
         -g myGrid  \
         -hf host1
This string enables trace for all JVMs on the server with the specified host name, in this case host1.
- Display unassigned shards:
Use the -c showPlacement -sf U option to display the list of shards that cannot be placed on the data grid. Shards cannot be placed when the placement service has a constraint that is preventing placement. For example, if you start JVMs on a single physical server while in production mode, then only primary shards can be placed. Replicas are not assigned until JVMs start on a second physical server. The placement service places replicas only on JVMs with different IP addresses than the JVMs that are hosting the primary shards. Having no JVMs in a zone can also cause shards to be unassigned.
xscmd -c showPlacement -sf U -cep cathost:2809 -g myGrid
- Display a list of the core groups :
Querying, displaying, and invalidating data
Use the query interfaces in the monitoring console and in the xscmd utility to retrieve small sets of keys and values from a map and invalidate sets of data.
- If we are using the web console to query display, and invalidate data, configure the monitoring console first.
- If we are using xscmd to query display, and invalidate data, set up the xscmd utility.
Use the console or the xscmd utility to query data grid contents. We can query the data by running a regular expression on the data key. We can then use the same query to invalidate data.
- Query display, or invalidate data with the console.
- Go to the query page in the console. In the web console, click Management > Query Data Grid Contents. Choose the map on which we want to filter.
- Search or filter the data in the map. Use one of the following options to search or filter the data:
- Type a regular expression in the field and click the Search button (
 ).
A list of keys that match the regular expression displays. The list of data could be a subset of all of the matching data.
).
A list of keys that match the regular expression displays. The list of data could be a subset of all of the matching data.
- To filter the results on a set of partitions, click the Filter button (
 ). We can then type a regular expression and choose a range of partitions on which we want to filter the results.
- Type a regular expression in the field and click the Search button (
- Display values for the displayed keys. Select Show values. The values display in the table. If the value is too long to display, an ellipsis (...)
truncates the value. Click the value to display the full field. Values are returned as text strings. Some values might not convert to human readable strings, and hexadecimal numbers are displayed.
The application might store object values for which the Java class is not known to the server. If the application is using XDF, these values display. If XDF is not being used, and the Java class is not known to the server, a message is returned that the class of the object was unavailable to the server.
- Invalidate data. When you invalidate the data, the data is permanently removed from the data grid.
- Selected keys
- We can select keys from the table to invalidate. We can either click entries individually or click the select all check box, which selects a maximum of 500 entries that are in the table. When you have the entries selected to remove, click Invalidate > Selected keys.
- All keys matching query
- We can also invalidate all the data that matches your regular expression. Using this option deletes all data in the data grid that matches the regular expression, not just the maximum of 500 entries that is displayed in the console. To invalidate entries with the selected regular expression, click Invalidate > All keys matching query.
- Delete the entire contents of a map. Click Clear Map. Confirm to delete all of the entries in the selected map.
- Query display, or invalidate data with the xscmd utility.
- Query data:
-
xscmd.sh -c findbykey
         -g <data_grid>
         -m <map
         -fs <find_string> [-fp <partitionid>]
Include the data grid, map, and regular expression for the find string value. We can also filter on the partition ID. The result returns a subset of the entire query.
- Invalidate data:
- Include the -inv argument in the command to invalidate the data that is selected by the query.
xscmd -c findbykey -g <data_grid>  \
      -m <map  \
      -fs <find_string> [-fp <partitionid>]  \
      -inv
Include the data grid, map, and regular expression for the find string value. We can also filter on the partition ID. When we run the invalidation, all matching values are invalidated, not just the small set that is returned by the query.
- Display values for queried data:
- Include the -rv argument in the command to display values for the data that is selected by the query.
xscmd.sh -c findbykey -g <data_grid> -m <map
-fs <find_string> -rv
Include the data grid, map, and regular expression for the find string value. We can also filter on the partition ID. The result returns a subset of the entire query and includes the values for each key.
 If your regular expression starts with the characters .*,
the characters might not process correctly when we run the command.
To resolve this issue, format your regular expression in one of the following ways:
If your regular expression starts with the characters .*,
the characters might not process correctly when we run the command.
To resolve this issue, format your regular expression in one of the following ways:
- Enclose your regular expression with apostrophe characters: -fs '.*'
- Use a backslash to escape the asterisk character: -fs .\*
Example:
The following example looks for all entries in the Grid data grid and Map1 map.
xscmd -c findbykey -g Grid -m Map1 -fs ".*"
The command returns the following results:
3 matching keys were found.

Partition Key --------- ---
2         keyghi 4         keydef 6         keyabc
java.utils.regex.Pattern API documentation
Retrieve WXS environment information with the xscmd utility
Retrieve environment information for the entire WXS domain...
-
./xscmd.sh -c showinfo
Retrieve information about a specific server...
-
./xscmd.sh -c showinfo -s <server_name>
View a list of servers, use the -sl parameter.
-
./xscmd.sh -c showinfo -sl <server_name>[,<server_name>]
Retrieve environment information for a specific set of servers running on a particular host...
-
./xscmd.sh -c showinfo -hf <host_name>
Start WXS servers using the Eclipse Equinox OSGi framework
WXS container servers can be started in an Eclipse Equinox OSGi framework using several methods.
Before we can start a WXS container, you must have completed the following tasks:
- The WXS server bundle must be installed into Eclipse Equinox.
- Your application must be packaged as an OSGi bundle.
- Your WXS plug-ins (if any) must be packaged as an OSGi bundle. They can be bundled in the same bundle as the application or as separate bundles.
- If container servers are using eXtremeMemory, first configure the native libraries.
This task describes how to start a WXS container server in an Eclipse Equinox OSGi framework. Use any of the following methods to start container servers using the Eclipse Equinox implementation:
- OSGi Blueprint service
We can include all configuration and metadata in an OSGi bundle.
Figure 1. Eclipse Equinox process for including all configuration and metadata in an OSGi bundle
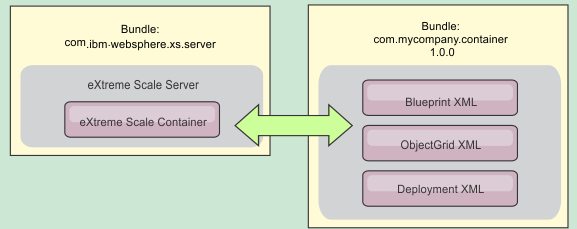
- OSGi Configuration Admin service
We can specify configuration and metadata outside of an OSGi bundle.
Figure 2. Eclipse Equinox process for specify configuration and metadata outside of an OSGi bundle
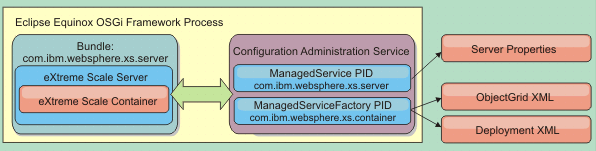
- Programmatically
Supports customized configuration solutions.
In each case, a WXS server singleton is configured and one or more containers are configured.
The WXS server bundle, objectgrid.jar, includes all of the required libraries to start and run a WXS grid container in an OSGi framework. The server runtime environment communicates with user-supplied plug-ins and data objects using the OSGi service manager.
After a WXS server bundle is started and the WXS server is initialized, it cannot be restarted . The Eclipse Equinox process must be restarted to restart a WXS server.
Use WXS support for Spring namespace to configure WXS container servers in a Blueprint XML file. When the server and container XML elements are added to the Blueprint XML file, the WXS namespace handler automatically starts a container server using the parameters that are defined in the Blueprint XML file when the bundle is started. The handle stops the container when the bundle is stopped.
To configure WXS container servers with Blueprint XML, complete the following steps:
- Start a WXS container server using OSGi blueprint.
- Create a container bundle.
- Install the container bundle into the Eclipse Equinox OSGi framework.
- Start the container bundle.
- Start a WXS container server using OSGi configuration admin.
- Configure the server and container using config admin .
- When the WXS server bundle is started, or the persistent identifiers are created with config admin, the server and container automatically start.
- Start a WXS container server using the ServerFactory API.
Create an OSGi bundle activator class, and use the WXS ServerFactory API to start a server.
Running WXS containers with non-dynamic plug-ins in an OSGi environment
Installing and starting OSGi-enabled plug-ins
In this task, you install the dynamic plug-in bundle into the OSGi framework. Then, you start the plug-in.
This topic assumes that the following tasks have been completed:
- The WXS server or client bundle has been installed into the Eclipse Equinox OSGi framework.
- One or more dynamic BackingMap or ObjectGrid plug-ins have been implemented.
- The dynamic plug-ins have been packaged as OSGi services in OSGi bundles.
This task describes how to install the bundle using the Eclipse Equinox console. The bundle can be installed using several different methods, including modifying the config.ini configuration file. Products that embed Eclipse Equinox include alternative methods for managing bundles.
OSGi allows bundles to be started that have duplicate services. WXS uses the latest service ranking. When starting multiple OSGi frameworks in a WXS data grid, make sure that the correct service rankings are started on each server. Failure to do so causes the grid to be started with a mixture of different versions.
Install the plug-in bundle into the Eclipse Equinox OSGi framework using the OSGi console.
- Start the Eclipse Equinox framework with the console enabled;
for example:
<java_home>/bin/java -jar <equinox_root>/plugins/org.eclipse.osgi_3.6.1.R36x_v20100806.jar -console
- Install the plug-in bundle in the Equinox console.
osgi> install file:///<path to bundle>
Equinox displays the bundle ID for the newly installed bundle:
Bundle id is 17
- Enter the following line to start the bundle in the Equinox console, where <id> is the bundle ID assigned when the bundle was installed:
osgi> start <id>
- Retrieve the service status in the Equinox console to verify that the bundle has started:
osgi> ss
When the bundle has started successfully, the bundle displays the ACTIVE state; for example:
17 ACTIVE com.mymyco.plugin.bundle_VRM
Install the plug-in bundle into the Eclipse Equonix OSGi framework using the config.ini file.
- Copy the plug-in bundle into the Eclipse Equinox plug-ins directory; for example:
<equinox_root>/plugins
- Edit the Eclipse Equinox config.ini configuration file, and add the bundle to the osgi.bundles property; for example:
osgi.bundles=\
org.eclipse.osgi.services_3.2.100.v20100503.jar@1:start, \
org.eclipse.osgi.util_3.2.100.v20100503.jar@1:start, \
org.eclipse.equinox.cm_1.0.200.v20100520.jar@1:start, \
com.mymyco.plugin.bundle_VRM.jar@1:start
Verify there is a blank line after the last bundle name. Each bundle is separated by a comma.
- Start the Eclipse Equinox framework with the console enabled;
for example:
<java_home>/bin/java -jar <equinox_root>/plugins/org.eclipse.osgi_3.6.1.R36x_v20100806.jar -console
- Retrieve the service status in the Equinox console to verify
that the bundle has started; for example:
osgi> ss
When the bundle has started successfully, the bundle displays the ACTIVE state; for example:
17 ACTIVE com.mymyco.plugin.bundle_VRM
Results
The plug-in bundle is now installed and started. The WXS container or client can now be started.
Administer OSGi-enabled services using the xscmd utility
Use xscmd utility to run administrator tasks such as...
- Viewing services and their rankings that are being used by each container
- Updating the runtime environment to use new versions of the bundles
With the Eclipse Equinox OSGi framework, we can install multiple versions of the same bundle, and we can update those bundles during run time. WXS is a distributed environment that runs the container servers in many OSGi framework instances.
Administrators are responsible for manually copying, installing, and starting bundles into the OSGi framework. WXS includes an OSGi ServiceTrackerCustomizer to track any services that have been identified as WXS plug-ins in the ObjectGrid descriptor XML file. Use the xscmd utility to validate which version of the plug-in is used, which versions are available to be used, and to perform bundle upgrades.
WXS uses the service ranking number to identify the version of each service. When two or more services are loaded with the same reference, WXS automatically uses the service with the highest ranking.
- Run the osgiCurrent command, and verify that each WXS server is using the correct plug-in service ranking.
Since WXS automatically chooses the service reference with the highest ranking, it is possible that the data grid may start with multiple rankings of a plug-in service.
If the command detects a mismatch of rankings or if it is unable to find a service, a non-zero error level is set. If the command completed successfully then the error level is set to 0.
The following example shows the output of the osgiCurrent command when two plug-ins are installed in the same grid on four servers. The loaderPlugin plug-in is using ranking 1, and the txCallbackPlugin is using ranking 2.
OSGi Service Name Current Ranking ObjectGrid Name MapSet Name Server Name
----------------- --------------- --------------- ----------- -----------
loaderPlugin      1               MyGrid          MapSetA     server1
loaderPlugin      1               MyGrid          MapSetA     server2
loaderPlugin      1               MyGrid          MapSetA     server3
loaderPlugin      1               MyGrid          MapSetA     server4
txCallbackPlugin  2               MyGrid          MapSetA     server1
txCallbackPlugin  2               MyGrid          MapSetA     server2
txCallbackPlugin  2               MyGrid          MapSetA     server3
txCallbackPlugin  2               MyGrid          MapSetA     server4
The following example shows the output of the osgiCurrent command when server2 was started with a newer ranking of the loaderPlugin:
OSGi Service Name Current Ranking ObjectGrid Name MapSet Name Server Name
----------------- --------------- --------------- ----------- -----------
loaderPlugin      1               MyGrid          MapSetA     server1
loaderPlugin      2               MyGrid          MapSetA     server2
loaderPlugin      1               MyGrid          MapSetA     server3
loaderPlugin      1               MyGrid          MapSetA     server4
txCallbackPlugin  2               MyGrid          MapSetA     server1
txCallbackPlugin  2               MyGrid          MapSetA     server2
txCallbackPlugin  2               MyGrid          MapSetA     server3
txCallbackPlugin  2               MyGrid          MapSetA     server4
- Run the osgiAll command to verify that the plug-in services have been correctly started on each WXS container server.
When bundles start that contain services that an ObjectGrid configuration is referencing, the WXS runtime environment automatically tracks the plug-in, but does not immediately use it. The osgiAll command shows which plug-ins are available for each server.
When run without any parameters, all services are shown for all grids and servers. Additional filters, including the -serviceName <service_name> filter can be specified to limit the output to a single service or a subset of the data grid.
The following example shows the output of the osgiAll command when two plug-ins are started on two servers. The loaderPlugin has both rankings 1 and 2 started and the txCallbackPlugin has ranking 1 started. The summary message at the end of the output confirms that both servers see the same service rankings:
Server: server1
   OSGi Service Name   Available Rankings
   -----------------   ------------------
   loaderPlugin        1, 2
   txCallbackPlugin    1

Server: server2
   OSGi Service Name   Available Rankings
   -----------------   ------------------
   loaderPlugin        1, 2
   txCallbackPlugin    1

Summary - All servers have the same service rankings.
The following example shows the output of the osgiAll command when the bundle that includes the loaderPlugin with ranking 1 is stopped on server1. The summary message at the bottom of the output confirms that server1 is now missing the loaderPlugin with ranking 1:
Server: server1
   OSGi Service Name   Available Rankings
   -----------------   ------------------
   loaderPlugin        2
   txCallbackPlugin    1

Server: server2
   OSGi Service Name   Available Rankings
   -----------------   ------------------
   loaderPlugin        1, 2
   txCallbackPlugin    1

Summary - The following servers are missing service rankings:
   Server  OSGi Service Name Missing Rankings
   ------  ----------------- ----------------
   server1 loaderPlugin      1
The following example shows the output if the service name is specified with the -sn argument, but the service does not exist:
Server: server2
   OSGi Service Name Available Rankings
   ----------------- ------------------
   invalidPlugin     No service found

Server: server1
   OSGi Service Name Available Rankings
   ----------------- ------------------
   invalidPlugin     No service found

Summary - All servers have the same service rankings.
- Run the osgiCheck command to check sets of plug-in services and rankings to see if they are available.
The osgiCheck command accepts one or more sets of service rankings in the form: -serviceRankings <service name>;<ranking>[,<serviceName>;<ranking>]
When the rankings are all available, the method returns with an error level of 0. If one or more rankings are not available, a non-zero error level is set. A table of all of the servers that do not include the specified service rankings is displayed. Additional filters can be used to limit the service check to a subset of the available servers in the WXS domain.
If the specified ranking or service is absent, the following message is displayed:
Server  OSGi Service Unavailable Rankings
------  ------------ --------------------
server1 loaderPlugin 3
server2 loaderPlugin 3
- Run the osgiUpdate command to update the ranking of one or more plug-ins for all servers in a single ObjectGrid and MapSet in a single operation.
The command accepts one or more sets of service rankings in the form: -serviceRankings <service name>;<ranking>[,<serviceName>;<ranking>] -g <grid name> -ms <mapset name>
With this command, we can complete the following operations:
- Verify that the specified services are available for updating on each of the servers.
- Change the state of the grid to offline using the StateManager interface. This process quiesces the grid and waits until any running transactions have completed and prevents any new transactions from starting. This process also signals any ObjectGridLifecycleListener and BackingMapLifecycleListener plug-ins to discontinue any transactional activity. plug-ins.
- Update each WXS container running in an OSGi framework to use the new service versions.
- Changes the state of the grid to online, allowing transactions to continue.
The update process is idempotent so that if a client fails to complete any one task, it results in the operation being rolled back. If a client is unable to perform the rollback or is interrupted during the update process, the same command can be issued again, and it continues at the appropriate step.
If the client is unable to continue, and the process is restarted from another client, use the -force option to allow the client to perform the update. The osgiUpdate command prevents multiple clients from updating the same map set concurrently.
- Updating OSGi services for WXS plug-ins with xscmd WXS supports upgrading container server plug-in bundles while the grid is active. This support allows administrators to complete application updates and additions without needing to restart grid processes.
Updating OSGi services for WXS plug-ins with xscmd
WXS supports upgrading container server plug-in bundles while the grid is active. This support allows administrators to complete application updates and additions without needing to restart grid processes.
Complete the following steps before you update WXS OSGi bundles to a new version:
- Start WXS servers in a supported OSGi framework.
- Separate all WXS plug-ins into bundles, and they must use service rankings to identify each version of the plug-ins.
- Specify cache objects as either Java primitive types such as byte[], Integer or String, or they must be stored using a MapSerializerPlugin plug-in The data objects are stored in the WXS bundle and are not upgraded. Only the plug-ins that interact with the data are updated.
- Design cache object data to be version compatible. New plug-ins must be able to interact with data created by older plug-ins.
- Design plug-ins to listen for ObjectGridLifecycle and BackingMapLifecycle events to refresh any references to other plug-ins or the metadata that the plug-ins might have so that they can be refreshed when it is updated.
- The WXS OSGi update process only affects servers. Independently update any clients that are using plug-ins.
Without OSGi enablement, if an administrator needs to update the application plug-ins or cache objects, each grid node must be upgraded one-by-one, causing stress on the network, memory and cpu utilization. This is required since plug-ins and cache Java objects are directly stored in the grid. When classes are updated without restarting the processes, the grid plug-ins have conflicts because each class has a different ClassLoader.
The WXS product includes the xscmd utility and MBeans that allows administrators to view all the plug-in bundles installed in each grid container's hosting OSGi framework and choose which revision to use. When the xscmd is used to update the plug-ins to a new ranking, the grid is quiesced and all transactions are drained, the plug-ins are updated, and the grid is activated again. If an error occurs during the update process, the process is rolled-back and the old ranking is restored.
- Create a version of the bundle, increasing the version number in the bundle manifest, and increasing the ranking for each WXS plug-in service. If the original bundle version is Bundle-Version: 1.0.0, then the next version can be defined as Bundle-Version: 1.1.0.
If the original service ranking is ranking="1", then the next ranking can be defined as ranking="2".
OSGi service rankings must be integers.
- Copy the new bundle to each OSGi framework node that is hosting a WXS container server.
- Install the new bundle into the OSGi framework. The bundle is assigned a bundle identifier; for example:
osgi> install <URL to bundle>
- Start the new bundle using the assigned bundle identifier; for example:
osgi> start <id
After the new bundle is started, the WXS OSGi service tracker detects the bundle and makes it available for updating.
- Use the xscmd -c osgiAll command to verify that each container server sees the new bundle. The osgiAll command queries all containers in the grid for all services that are referenced in the ObjectGrid descriptor XML file and displays all rankings that are available; for example:
xscmd -c osgiAll

Server: server1
   OSGi Service Name          Available Rankings
   -----------------          ------------------
   myLoaderServiceFactory     1, 2
   mySerializerServiceFactory 1, 2

Server: server2
   OSGi Service Name          Available Rankings
   -----------------          ------------------
   myLoaderServiceFactory     1, 2
   mySerializerServiceFactory 1, 2

Summary - All servers have the same service rankings.
- Use the xscmd -c osgiCheck command
to verify that one or more service rankings are valid update targets;
for example:
xscmd -c osgiCheck -sr
mySerializerServiceFactory;2,myLoaderServiceFactory;2

CWXSI0040I: The command osgiCheck has completed successfully.
- If the osgiCheck command did not find any resulting errors, suspend the balancer of the placement service to avoid shard movements, in case of a failure during the update process. To suspend placement, for each object grid and map set that are affected by the update...
-
xscmd -c suspendBalancing
For example...
-
xscmd -c suspendBalancing -g MyGrid -ms MyMapSet
- After balancing has been suspended for each object grid and map set, use the xscmd -c osgiCheck command again to verify that one or more service rankings are valid update targets; for example:
xscmd -c osgiCheck -sr
mySerializerServiceFactory;2,myLoaderServiceFactory;2

CWXSI0040I: The command osgiCheck has completed successfully.
- After balancing has been suspended for the object grid and map set, use the osgiUpdate command to update the service on all of the servers for an object grid and map set;
for example:
xscmd -c osgiUpdate  -sr
mySerializerServiceFactory;2,myLoaderServiceFactory;2 -g MyGrid -ms MyMapSet
- Verify that the upgrade succeeded; for example:
Update succeeded for the following service rankings:
Service                     Ranking
-------                     -------
mySerializerServiceFactory  2
myLoaderServiceFactory      2
- After you verify that the ranking has been updated successfully, enable balancing again, using the xscmd -c resumeBalancing command;
for example:
xscmd -c resumeBalancing -g MyGrid -ms MyMapSet
- Stop and uninstall the old bundle in each OSGi framework that is hosting the WXS container. For example, enter the following code in the Eclipse Equinox console:
osgi> stop <id
osgi> uninstall <id
Administer with Managed Beans (MBeans)
Use several different types of Java Management Extensions (JMX) MBeans to administer and monitor deployments. Each MBean refers to a specific entity, such as a map, data grid, server, or service.
JMX MBean interfaces and WXS
Each MBean has get methods that represent attribute values. These get methods cannot be called directly from your program. The JMX specification treats attributes differently from operations. We can view attributes with a vendor JMX console, and we can perform operations in your program or with a vendor JMX console.
Access Managed Beans (MBeans) using the wsadmin tool
Use the wsadmin utility provided in WAS to access managed bean (MBean) information.
Run the wsadmin tool from the bin directory in your WAS installation. The following example retrieves a view of the current shard placement in a dynamic WXS. We can run the wsadmin tool from any installation where WXS is running. You do not have to run the wsadmin tool on the catalog service.
$ wsadmin.sh -lang jython
wsadmin>placementService = AdminControl.queryNames
 ("com.ibm.websphere.objectgrid:*,type=PlacementService")
wsadmin>print AdminControl.invoke(placementService,
 "listObjectGridPlacement","library ms1")

<objectGrid name="library" mapSetName="ms1">
  <container name="container-0" zoneName="false Domain"
  hostName="host1.myco.org" serverName="server1">
     <shard type="Primary" partitionName="0"/>
     <shard type="SynchronousReplica" partitionName="1"/>
  </container>
  <container name="container-1" zoneName="false Domain"
  hostName="host2.myco.org" serverName="server2">
     <shard type="SynchronousReplica" partitionName="0"/>
     <shard type="Primary" partitionName="1"/>
  </container>
  <container name="UNASSIGNED" zoneName="_ibm_SYSTEM"
  hostName="UNASSIGNED" serverName="UNNAMED">
    <shard type="SynchronousReplica" partitionName="0"/>
    <shard type="AsynchronousReplica" partitionName="0"/>
  </container>
</objectGrid>
Access Managed Beans (MBeans) programmatically
We can connect to MBeans with Java applications. These applications use the interfaces in the com.ibm.websphere.objectgrid.management package.
Programmatic methods for accessing MBeans vary depending on the type of server to which we are connecting.
- Connect to a stand-alone catalog service MBean server
- Connect to a container MBean server
- Connect to a catalog service MBean server that is hosted in WAS
- Connect to a catalog service MBean server with security enabled
- Connect to a stand-alone catalog service MBean server:
The following example program connects to a stand-alone catalog service MBean server and returns an XML formatted string that lists each container server along with its allocated shards for a given ObjectGrid and MapSet.
Figure 1. CollectPlacementPlan.java
package com.ibm.websphere.sample.xs.admin;

import java.util.Set;
import javax.management.MBeanServerConnection;
import javax.management.ObjectName;
import javax.management.remote.JMXConnector;
import javax.management.remote.JMXConnectorFactory;
import javax.management.remote.JMXServiceURL;

/**
 * Collects the placement information from the Catalog Server for a given ObjectGrid.
 */
public final class CollectPlacementPlan {
    private static String hostName = "localhost";

    private static int port = 1099;

    private static String objectGridName = "library";

    private static String mapSetName = "ms1";

    /**
     * Connects to the ObjectGrid Catalog Service to retrieve placement information and
    * prints it out.
     *
     * @param args
     * @throws Exception
     * If there is a problem connecting to the catalog service MBean server.
     */
    public static void main(String[] args) throws Exception {
        String serviceURL = "service:jmx:rmi:///jndi/rmi://" + hostName + ":" + port +
                    "/objectgrid/MBeanServer";
        JMXServiceURL jmxUrl = new JMXServiceURL(serviceURL);
        JMXConnector jmxCon = JMXConnectorFactory.connect(jmxUrl);

        try {
            MBeanServerConnection catalogServerConnection = jmxCon.getMBeanServerConnection();

            Set placementSet = catalogServerConnection.queryNames(new
      ObjectName("com.ibm.websphere.objectgrid"
             + ":*,type=PlacementService"), null);
            ObjectName placementService = (ObjectName) placementSet.iterator().next();
            Object placementXML = catalogServerConnection.invoke(placementService,
                "listObjectGridPlacement", new Object[] {
                objectGridName, mapSetName }, new String[] { String.class.getName(),
       String.class.getName() });
            System.out.println(placementXML);
        } catch (Exception e) {
            if(jmxCon != null) {
                jmxCon.close();
            }
        }
    }}
A few notes regarding the sample program:
- The JMXServiceURL value for the catalog service is always of the following form: service:jmx:rmi:///jndi/rmi://<host>:<port>/objectgrid/MBeanServer, where <host> is the host on which the catalog service is running and <port> is the JMX service port that is provided with the -JMXServicePort option when starting the catalog service. If no port is specified, the default is 1099.
- For the ObjectGrid or map statistics to be enabled, specify the following property in the server properties file when we are starting an ObjectGrid container:
- statsSpec=all=enabled
- To disable the MBeans running in the container servers, specify the following property in the server properties file:
- enableMBeans=false
An example of the output follows. This output indicates that two container servers are active. The Container-0 container server hosts four primary shards. The Container-1 container server hosts a synchronous replica for each of the primary shards on the Container-0 container server. In this configuration, two synchronous replicas and one asynchronous replica are configured. As a result, the Unassigned container server is left with the remaining shards. If two more container servers are started, the Unassigned container server is not displayed.
<objectGrid name="library" mapSetName="ms1">
  <container name="Container-1" zoneName="false Zone"
    hostName="myhost.mymyco.com" serverName="ogserver">
    <shard type="SynchronousReplica" partitionName="0"/>
    <shard type="SynchronousReplica" partitionName="1"/>
    <shard type="SynchronousReplica" partitionName="2"/>
    <shard type="SynchronousReplica" partitionName="3"/>
  </container>
  <container name="Container-0" zoneName="false Zone"
    hostName="myhost.mymyco.com" serverName="ogserver">
    <shard type="Primary" partitionName="0"/>
    <shard type="Primary" partitionName="1"/>
    <shard type="Primary" partitionName="2"/>
    <shard type="Primary" partitionName="3"/>
  </container>
  <container name="library:ms1:_UnassignedContainer_" zoneName="_ibm_SYSTEM"
    hostName="UNASSIGNED" serverName="UNNAMED">
    <shard type="SynchronousReplica" partitionName="0"/>
    <shard type="SynchronousReplica" partitionName="1"/>
    <shard type="SynchronousReplica" partitionName="2"/>
    <shard type="SynchronousReplica" partitionName="3"/>
    <shard type="AsynchronousReplica" partitionName="0"/>
    <shard type="AsynchronousReplica" partitionName="1"/>
    <shard type="AsynchronousReplica" partitionName="2"/>
    <shard type="AsynchronousReplica" partitionName="3"/>
  </container>
</objectGrid>
- Connect to a container MBean server:
Container servers host MBeans to query information about the individual maps and ObjectGrid instances running within the container server. The following example program prints the status of each container server that is hosted by the catalog server with the JMX address of localhost:1099:
Figure 2. CollectContainerStatus.java
package com.ibm.websphere.sample.xs.admin;

import java.util.List;
import java.util.Set;

import javax.management.MBeanServerConnection;
import javax.management.ObjectInstance;
import javax.management.ObjectName;
import javax.management.remote.JMXConnector;
import javax.management.remote.JMXConnectorFactory;
import javax.management.remote.JMXServiceURL;

/**
 * Collects placement status from each of the available containers directly.
 */
public final class CollectContainerStatus {
    private static String hostName = "localhost";

    private static int port = 1099;

    /**
     * @param args */
    public static void main(String[] args) throws Exception {
        String serviceURL = "service:jmx:rmi:///jndi/rmi://" + hostName + ":" + port + "/objectgrid/MBeanServer";
        JMXServiceURL jmxUrl = new JMXServiceURL(serviceURL);
        JMXConnector jmxCon = JMXConnectorFactory.connect(jmxUrl);

        try {
            MBeanServerConnection catalogServerConnection = jmxCon.getMBeanServerConnection();

            Set placementSet = catalogServerConnection.queryNames(new ObjectName("com.ibm.websphere.objectgrid"
                    + ":*,type=PlacementService"), null);

            ObjectName placementService = (ObjectName) placementSet.iterator().next();
            List<String> containerJMXAddresses = (List<String>) catalogServerConnection.invoke(placementService,
                    "retrieveAllServersJMXAddresses", new Object[0], new String[0]);
            for (String address : containerJMXAddresses) {
                JMXServiceURL containerJMXURL = new JMXServiceURL(address);
                JMXConnector containerConnector = JMXConnectorFactory.connect(containerJMXURL);
                MBeanServerConnection containerConnection = containerConnector.getMBeanServerConnection();
                Set<ObjectInstance> containers = containerConnection.queryMBeans(
                        new ObjectName("*:*,type=ObjectGridContainer"), null);
                for (ObjectInstance container : containers) {
                    System.out.println(containerConnection.getAttribute(container.getObjectName(), "Status"));
                }
            }
        } finally {
            if(jmxCon != null) {
                jmxCon.close();
            }
        }
    }}
The example program prints out the container server status for each container. An example of the output follows:
<container name="Container-0" zoneName="false Zone" hostName="descartes.rchland.ibm.com"
  serverName="ogserver">
  <shard type="Primary" partitionName="1"/>
  <shard type="Primary" partitionName="0"/>
  <shard type="Primary" partitionName="3"/>
  <shard type="Primary" partitionName="2"/>
</container>
- Connect to a catalog service MBean server that is hosted in WAS:
The method for programmatically accessing MBeans in WAS is slightly different from accessing MBeans in a stand-alone configuration.
- Create and compile a Java program to connect to the MBean server. An example program follows:
Figure 3. CollectPlacementPlan.java
package com.ibm.websphere.sample.xs.admin; import java.util.Set; import javax.management.MBeanServerConnection; import javax.management.ObjectName; import javax.management.remote.JMXConnector; import javax.management.remote.JMXConnectorFactory; import javax.management.remote.JMXServiceURL; /** * Collects the placement information from the catalog server running in a dmgr for a given ObjectGrid. */ public final class CollectPlacementPlanWAS { private static String hostName = "localhost"; private static int port = 9809; private static String objectGridName = "library"; private static String mapSetName = "ms1"; /** * Connects to the catalog service to retrieve placement information and prints it out. * * @param args * @throws Exception * If there is a problem connecting to the catalog service MBean server. */ public static void main(String[] args) throws Exception { // connect to bootstrap port of the dmgr String serviceURL = "service:jmx:iiop://" + hostName + ":" + port + "/jndi/JMXConnector"; JMXServiceURL jmxUrl = new JMXServiceURL(serviceURL); JMXConnector jmxCon = JMXConnectorFactory.connect(jmxUrl); try { MBeanServerConnection catalogServerConnection = jmxCon.getMBeanServerConnection(); Set placementSet = catalogServerConnection.queryNames(new ObjectName("com.ibm.websphere.objectgrid" + ":*,type=PlacementService"), null); ObjectName placementService = (ObjectName) placementSet.iterator().next(); Object placementXML = catalogServerConnection.invoke(placementService, "listObjectGridPlacement", new Object[] { objectGridName, mapSetName }, new String[] { String.class.getName(), String.class.getName() }); System.out.println(placementXML); } finally { if(jmxCon != null) { jmxCon.close(); } } }} - Run the following command.
"$JAVA_HOME/bin/java" "$WAS_LOGGING" \
 -Djava.security.auth.login.config="$app_server_root/properties/wsjaas_client.conf" \
 -Djava.ext.dirs="$JAVA_HOME/jre/lib/ext:$WAS_EXT_DIRS:$WAS_HOME/plugins:$WAS_HOME/lib/WMQ/java/lib" \
 -Djava.naming.provider.url=<an_IIOP_URL_or_a_corbaloc_URL_to_your_application_server_machine_name> \
 -Djava.naming.factory.initial=com.ibm.websphere.naming.WsnInitialContextFactory \
 -Dserver.root="$WAS_HOME" "$CLIENTSAS" "$CLIENTSSL" $USER_INSTALL_PROP \
 -classpath "$WAS_CLASSPATH":<list_of_your_application_jars_and_classes> \
 <fully_qualified_class_name_to_run> <your_application_parameters>
This command assumes that the was_root/bin/setupCmdLine.sh script has been run to set the variables properly. An example of the format of the java.naming.provider.url property value is...
-
corbaloc:iiop:1.0@<host>:<port>/NameService
- Create and compile a Java program to connect to the MBean server. An example program follows:
- Connect to a catalog service MBean server with security enabled:
What to do next
For more examples on how to display statistics and perform administrative operations with MBeans, see the xsadmin sample application. We can look at the source code of the xsadmin sample application in the wxs_home/samples/xsadmin.jar file in a stand-alone installation, or in the wxs_home/xsadmin.jar file in a WAS installation.
We can also find more information about MBeans in the com.ibm.websphere.objectgrid.management package.
Administer J2C client connections
The WXS connection factory includes a WXS client connection that can be shared between applications and persisted through application restarts.
The client connection includes a management bean that provides connection status information and lifecycle management operations.
Maintain client connections. When the first connection is obtained from the XSConnectionFactory connection factory object, a WXS client connection is established to the remote data grid and the ObjectGridJ2CConnection MBean is created. The client connection is maintained for the life of the process. To end a client connection, invoke one of the following events::
- Stop the resource adapter. A resource adapter can be stopped, for example, when it is embedded in an application and the application is stopped.
- Invoke the resetConnection MBean operation on the ObjectGridJ2CConnection MBean. When the connection is reset, all connections are invalidated, transactions completed, and the ObjectGrid client connection is destroyed. Subsequent calls to the getConnection methods on the connection factory result in a new client connection.
WAS also provides additional management beans for managing J2C connections, monitoring connection pools, and performance.
See also: