Install Guide:Rational Performance Tester V8.1
|
Install Procedure
- Hardware requirements
- Software requirements
- Rational Performance Tester
- Rational Performance Tester Agent
- Rational Service Tester
- Create user ids
- Upgrade requirements
- Install over existing Eclipse
- Linux file handles
- Resource monitoring on Windows Vista
- Install using launchpad
- Install using Setup disks
- Install RPT Agent
- Enable a test server for data collection
- License enablement
- License types
- Purchase licenses
- Manage licenses
- Runtime licenses
- Runtime license examples
- License enablement
- Web-based help
Appendix
Hardware requirements
| Hardware | Requirements |
|---|---|
| Processor | Minimum 1.5 GHz Intel Pentium 4 or higher.
With large test runs, use a 2 GHz or higher Intel Pentium dual-core processor. |
| Memory | Minimum for RPT and RST for SOA Quality: 768 MB of RAM
Minimum for just the Agent Controller: 500 MB of RAM. With large test runs, use 2 GB of RAM. To verify system memory on Windows:
Memory size is in with the speed info on the bottom right.
|
| Disk space | Minimum: 1.5 GB of disk for product package installation. Additional disk for test, schedules, etc...
Additional disk is required if you use FAT32 instead of NTFS. An additional 500 MB of disk is required in for TEMP directory (/tmp) Large test runs can store several gigabytes of data. Verify that you have adequate disk before attempting a large test run. |
| Display | 1024 x 768 resolution minimum using 256 Colors or higher
Agent Controller: 800 x 600 display minimum using 256 Colors or higher |
| Other hardware | Microsoft mouse or compatible pointing device |

See also...
Software requirements
| Operating system | RS Workbench | Agent Controller |
|---|---|---|
| AIX 5.2 TL7 or later | No | Yes |
| AIX 5.3 TL3 or later | No | Yes |
| Red Hat Desktop 4 updates 1-7.
Includes 64-bit version running in 32-bit mode Intel only. Not pSeries or zSeries | Yes | Yes |
| Red Hat Enterprise Linux 4 updates 1-7.
Includes 64-bit version running in 32-bit mode Intel only. Not pSeries or zSeries | Yes | Yes |
| RHEL 5 update 2.
Includes 64-bit version running in 32-bit mode Intel only. Not pSeries or zSeries | Yes | Yes |
| SuSE Linux Enterprise Server V9.0 SP1 to SP4
Intel only. Not pSeries or zSeries | Yes | Yes |
| SuSE Linux Enterprise Desktop / Enterprise Server V10.0 to SP2
Intel only. Not pSeries or zSeries | Yes | Yes |
| Microsoft Windows Server 2003 Enterprise/Standard Edition with SP 1, 2, or 3.
Includes 64-bit version running in 32-bit mode | Yes | Yes |
| Microsoft Windows Server 2008 | Yes | Yes |
| Microsoft Windows XP with SP 1, 2 or 3.
Includes 64-bit version running in 32-bit mode | Yes | Yes |
| Microsoft Windows Vista SP1 | Yes | Yes |
| z/OS 1.4, 1.5, 1.6, 1.7, 1.8, 1.9 System Z | No | Yes |
Data Collection Infrastructure functions are not supported by the RPT Agent Controller on Microsoft Windows Server 2008 or z/OS.
The listed operating systems support all of the languages that are supported by RPT.
The SAP and Citrix extensions are supported only on Microsoft Windows operating systems.
Install Media: Rational Performance Tester
| Disks | Description | ||||
|---|---|---|---|---|---|
| Quick Start Guide | |||||
| Rational Performance Tester | RPT workbench software, including...
When you start the launchpad, options include:
| ||||
| Rational Performance Tester Agent | Agent software, including...
|
Rational Performance Tester Agent
RPT Agent is bundled with the Rational Performance Tester product kit.
Install Media: Rational Service Tester for SOA Quality
| Disks | Description |
|---|---|
| Quick Start Guide | Translated versions of the Quick Start Guide. |
| Rational Service Tester | Installation software, including the launchpad and Installation Manager |
| Rational Service Tester Product Activation Kit | Product license for the RST workstation. |
| Rational Enterprise Deployment CDs | Rational License Server. |
Java 6 is required on the z/OS operating system.
Software requirements for extending an installed Eclipse IDE
The products in this version of the Rational Software Delivery Platform were developed for use with version 3.4, or later, of the Eclipse IDE. You can only extend an existing Eclipse IDE of version 3.4 with latest updates from eclipse.org.
To extend an installed Eclipse IDE, you also require a Java runtime environment from one of these Java development kits:
Windows...
- IBM 32-bit SDK for Windows, Java 2 Technology Edition, V6.0 service release 2
- Sun Java 2 Standard Edition 6.0 Update 2 for Microsoft Windows
Linux...
- IBM 32-bit SDK for Linux on Intel architecture, Java 2 Technology Edition, V6.0 service release 7
- Sun Java 2 Standard Edition 6.0 Update 7 for Linux x86 (not supported for SUSE Linux Enterprise Server [SLES] V9)
You might need to update Eclipse version in order to install updates to RPT.
Virtualization software
RPT supports Citrix Presentation Manager V4 or 4.5, running on Windows Server 2003 Standard Edition or Windows Server 2003 Professional Edition. Although the client for Citrix Presentation Server is available on Linux, RPT does not support the Citrix extension on Linux.
RPT also supports Windows Terminal Server 2003 and later.
To reduce the likelihood of connection problems caused by firewalls between the workbench computer and the agent computers, locate the workbench computer and the agent computers on the same local network, and then use Remote Desktop to access the workbench computer.
Do NOT use virtualized agent computers. Agent computers need full, real-time access to the hardware platform for accurate load generation and measurement.
Additional software requirements
- Linux: The GNU Image Manipulation Program Toolkit (GTK+), V2.2.1 or later, and associated libraries (GLib, Pango).
- One of the following Web browsers to view the readme files and
the installation guide and to support the Standard Widget Toolkit
(SWT) browser widget:
- Microsoft Internet Explorer 6.0 with SP 1, or later
- Linux: Mozilla 1.6 or later
- Linux: Firefox 1.0.0 or later, 1.5, 2.0, 3.0 or later
- On RHEL Workstation V4.0, set environment variable MOZILLA_FIVE_HOME to the folder containing Firefox or Mozilla installation.
For example, enter this command:
-
setenv MOZILLA_FIVE_HOME /usr/lib/firefox-1.5
- To support the SWT browser widget, Firefox browser must have been compiled with linkable Gecko libraries. Firefox downloads from mozilla.org currently do not satisfy this criteria, but Firefox installations that are included in major Linux distributions often do.
- On RHEL Workstation V4.0, set environment variable MOZILLA_FIVE_HOME to the folder containing Firefox or Mozilla installation.
- The Launchpad does not support Mozilla 1.6; if browser is Mozilla, you need version 1.7, or later, to run the launchpad.
- To view multimedia user assistance, such as tours, tutorials, and demonstration viewlets, install Adobe Flash Player.
- Adobe Flash Player V6.0 release 65 or later
- Linux: Adobe Flash Player V6.0 release 69 or later
Create user ids
You must have a user ID that meets the following requirements to install RPT, RST, RPT Agent.
- ID must not contain double-byte characters.
- user ID belongs to the Administrators group.
- On Linux, ID must be able to log in as root.
To install RPT as a non-Admin, manually run the userinst program from the Setup disk instead of running launchpad. Running the userinst program provides you with the same functionality as starting RPTv8 installation from the launchpad.
Upgrade considerations
- Before installing RPT v8, uninstall RPT versions 7.0.2.3 and earlier.
If you attempt to install the latest version of RPT, an error message is displayed to uninstall the older version before proceeding.
- Uninstall any version of the Rational Agent Controller or TPTP Agent Controller.
- For Rational License Server or Rational License Client, do NOT uninstall those packages. Uninstalling Rational License Server or Rational License Client might disable some of the Rational products on computer or on other computers.
- If you install RPT and RST into the same package group, install the same versions of both products.
- If you install into an existing instance of Eclipse, or if you install in the same package group as another product other than RST, streamlined Eclipse mode is not available. Only Full Eclipse mode is available.
- If you have a previous version of the Rational Agent Controller installed and you have instrumented a server for data collection...
- Stop data collection
- Uninstrument servers
- Uninstall Rational Agent Controller
- RPT v8 includes an updated version of the Rational License Key Administrator (LKAD). The Installation Manager uninstalls any existing version of LKAD before installing the new version of LKAD, and LKAD settings are not preserved. Before you install RPTv8, back up LKAD settings.
Start the LKAD by clicking...
-
Start | Programs | Rational | Rational License Key Administrator
The LKAD main window and wizard page open simultaneously. Click Settings to find RPTv8 settings. Edit Windows Registry (regedit), and back up and then restore the following Registry branches to back up LKAD settings:
-
HKEY_LOCAL_MACHINE\SOFTWARE\Rational Software\Licensing
HKEY_CURRENT_USER\Software\Rational Software\Licensing
Install over existing Eclipse
RPT packages installed using Installation Manager come with a version of Eclipse. If you already have Eclipse installed on workstation, you can add product package directly to that Eclipse installation and extend the functions of the Eclipse IDE.
Extending an Eclipse IDE adds the functions of the newly installed product, but maintains IDE preferences and settings. Previously installed plug-ins are also still available.
You might extend existing Eclipse IDE, for example, because to gain the functionality provided in a product package, but you also want to have the preferences and settings in current IDE when you work with the functionality from RPTv8 package. You also might want to work with plug-ins that you have installed that already extend the Eclipse IDE.
The existing Eclipse IDE must be version 3.4 for the latest updates from eclipse.org to be extended. Installation Manager checks that the Eclipse instance you specify meets the requirements for the installation package.
To extend an existing Eclipse IDE: in the Location page of the Install Packages wizard, select...
-
Extend an existing Eclipse IDE option
When installing products on the Windows Vista operating system, do not install Eclipse in the Program Files directory...
-
C:\Program Files\
Otherwise, users without Administrator privileges will be unable to use RPTv8.
Linux file handles
For best product performance, increase the number of file handles above the default of 1024 handles.
- Log in as root.
- Edit...
/etc/initscript
...and set...
-
ulimit -n 30000
eval exec "$4" - Save and Exit
Do not leave an empty initscript file on computer. If you do so, computer will not start up the next time that you turn it on or restart.
- Restrict the number of handles available to users or groups by modifying the limits.conf file in the etc/security directory.
Both SLES V9 and RHEL V4.0 have this file by default.
If you do not have this file, consider using a smaller number in step 4 in the previous procedure (for example, 2048). Do this so that most users have a reasonably low limit on the number of open files allowed per process. If you use a relatively low number in step 4, it is less important to do this. However, if you set a high number in step 4 earlier and you do not establish limits in the limits.conf file, computer performance can be significantly reduced.
The following sample limits.conf file restricts all users, and then sets different limits for others afterwards. This sample assumes set handles to 8192 in step 4 earlier.
*  soft  nofile  1024
*  hard  nofile  2048
root  soft  nofile  4096
root  hard  nofile  8192
user1   soft  nofile  2048
user1   hard  nofile  2048
Note that the * in the preceding example sets the limits for all users first. These limits are lower than the limits that follow. The root user has a higher number of allowable handles open, while number available to user1 is between the two. Verify that you read and understand the documentation contained in the limits.conf file before making changes.
Install using launchpad
To install RPT as a non-Admin, you cannot use launchpad to start the installation process. Instead, manually run the userinst program from the Setup disk. Running the userinst program provides you with the same functionality as starting the installation of RPT from the launchpad.
- If you are installing from compressed files, such as ZIP or ISO files, extract the files into...
- /disk1
- /disk2
- /disk3
- /disk4
- Extract the Setup disk image to a directory named RPT_SETUP.
- Start the launchpad...
RPT_SETUP/launchpad.exe
The launchpad program automatically...
- Installs Installation Manager
- Sets the repository
If you install Installation Manager directly, set repository preferences manually.
You can install silently.
Windows Vista notes:
- You must run launchpad as administrator.
If launchpad starts automatically, for example, if you are installing from a CD,
- Stop launchpad
- Right-click launchpad.exe
- Click "Run as Administrator"
Do NOT install RPTv8s within...
-
C:\Program Files
If you select either an Installation Location or a Shared Resources Directory within the Program Files directory, the packages installed must be run as administrator.
- Select a language in which to run the launchpad and Installation Manager. Click OK.
- Select RPTv8 to install from the launchpad menu. The Install Packages window opens.
- Click on a product package to highlight it.
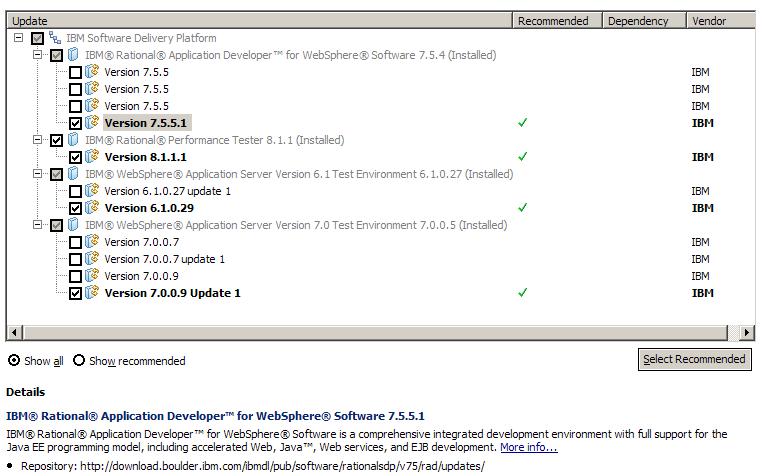
- Search for updates to RPTv8 packages, click...
-
Check for Other Versions and Extensions
You can update now, or you can run Installation Manager after the install and update then.

Updates found are displayed in the Installation Packages list on the Install Packages page below their corresponding product.
For Installation Manager to search the predefined IBM update repository locations for the installed packages, the preference...
-
Search the linked repositories during installation and updates
...on the Repositories preference page must be selected. This preference is selected by default. Internet access is also required. A progress indicator shows the search is taking place. You can install updates at the same time that you install the base product package.
- Select RPTv8 package and any updates to the package to install.
Updates that have dependencies are automatically selected and cleared together.
Click Next to continue.
If you install multiple packages at the same time, then all the packages will be installed into the same package group.
- On the Licenses page, read the license agreement for the selected package.
If you selected more than one package to install, there might be a license agreement for each package. On the left side of the License page, click each package version to display its license agreement. The package versions selected to install (for example, the base package and an update) are listed under the package name.
- The Features pages lists packages to install

- On the Location page, type the path for the shared resources directory in the Shared Resources Directory field, or accept the default path.
The shared resources directory contains resources that can be shared by one or more package groups.
Click Next to continue.
The default path is:
- C:\Program Files\IBM\IBMIMShared
- Linux: /opt/IBM/IBMIMShared
You can specify the shared resources directory only the first time that you install a package. Use largest disk for this to help ensure adequate space for the shared resources of future packages. You cannot change the directory location unless you uninstall all packages.
- On the Location page, create a package group to install RPTv8 package into or if this is an update, use the existing package group.
A package group represents a directory in which packages share resources with other packages in the same group.
To create a new package group:
- Click Create a new package group.
- Type the path for the installation directory for the package group. The name for the package group is created automatically.
The default path is:
- C:\Program Files\IBM\SDP
- Linux: /opt/IBM/SDP
- Click Next to continue.
- On the next Location page, you can choose to extend an existing Eclipse IDE already installed on system, adding the functionality in the packages that you are installing.
You must have Eclipse V3.4 with the latest updates from eclipse.org to select this option.
- If you do not want to extend an existing Eclipse IDE, click Next to continue.
- To extend an existing Eclipse IDE:
- Select Extend an existing Eclipse.
- In the Eclipse IDE field, type or navigate to the location of the folder containing the eclipse executable file...
- eclipse.exe
- eclipse.bin
Installation Manager will check if the Eclipse IDE version is valid for the package that you are installing. The Eclipse IDE JVM field displays the JVM for the IDE that you specified.
- Click Next to continue.
- On the Features page under Languages, select the languages for the package group.
The corresponding national language translations for the user interface and documentation for RPTv8 package will be installed.
- On the next Features page, select the package features to install.
- To see the dependency relationships between features, select...
-
Show Dependencies
- Click a feature to view its brief description under Details.
- Select or clear features in the packages.
Installation Manager will automatically enforce any dependencies with other features and display updated download size and disk requirements for the installation.
- If you plan to collect response time breakdown data using the Data Collection Infrastructure, select the check box...
-
Rational Performance Tester Agent
- When you are finished selecting features, click Next to continue.
- To see the dependency relationships between features, select...
- On the help system configuration page, select one of the following options ...
- Access help from the Web
- Download help and access content locally
- Access help from a server on intranet

- On the Summary page, review choices before installing RPTv8 package.
To change the choices that you made on previous pages, click Back and make changes.
- When you are satisfied with installation choices, click Install to install the package.
A progress indicator shows the percentage of the installation completed.
During install, logs can be found under...
-
C:/Documents and Settings/All Users/Application Data/IBM/Installation Manager/logs
The install can take 2+ hrs. Progress may seem to stall. Be patient, and let it finish.
- When the installation process is complete, a message confirms the success of the process.
- Click View log file to open the installation log file for the current session in a new window. You must close the Installation Log window to continue.
- In the Install Package wizard, select whether you want RPTv8 to start when you exit.
- Click Finish to launch the selected package. The Install Package wizard closes and you are returned to the Start page of Installation Manager.
- Install Rational Performance Tester Agent
- Install licenses
Enable a test server for data collection
- Verify DCI software is installed.
- Open the instrumentation application...
-
Start menu | IBM Software Delivery Platform | Rational Data Collection Infrastructure | Application Server Instrumenter
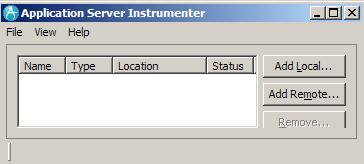
- Click the Add Local button and select the type of application server that you have running on the server.

- Fill in the server type specific fields including the location of the server if required and click OK.
- Stop and start the server for the instrumentation to take effect.
- From the Start menu, select...
-
IBM Software Delivery Platform | Rational Data Collection Infrastructure | Start Data Collection.
All RPT systems involved with the DCI must have the data collection software running for the transaction breakdown functionality to be available within the results of an RPT schedule.
When instrumenting or uninstrumenting a server using the Application Server Instrumenter (instrumentServer.bat|sh), if you get...
-
Error during install/uninstall
...review logs files in...
-
C:\Program Files\IBM\tivoli\common
...or...
-
/var/ibm/tivoli/common
IBM Tivoli log files include...
- trace-install.log
- trace-ma.log
- trace-tapmagent.log
For WAS v6.x, if you create a new profile and then instrument without first starting WAS, the Application Server Instrumenter will falsely report that the server is already instrumented.
To fix...
- Re-start Application Server Instrumenter.
- Select the entry just added from the list of instrumented servers and click Remove.
- Restart WAS.
- Restart Application Server Instrumenter and use it to instrument the server.
Install using Setup disks and inst
To start install, log on as an admin and run...
-
RPT_SETUP\InstallerImage_win32\install.exe
...or log on as a non-Admin and run...
-
RPT_SETUP\InstallerImage_win32\userinst.exe
The default installation directory is written as...
-
C:\installation_directory\product\inst.file
The default log location for installation information is...
-
C:\log_file_dir\log.txt
Installation Manager is installed if it is not already on computer.
License enablement
Product activation licenses allow you to start RPT. Runtime licenses allow you to run tests.
For activation, use...
-
Installation Manger | Manage License wizard
...using one of the following activation methods...
- Import product activation kit containing a permanent license key.
- Import floating license keys from a Rational License Server.
Floating licenses can be shared among multiple team members.
Number of concurrent users cannot exceed number of floating licenses. If all are in use, the individual must wait until an existing user logs off.
Install floating license keys in a Rational License Server. The server responds to user requests for access to the license keys and will grant access to the number of concurrent users that equals the number of licenses the organization purchased.
License types
- Authorized User license
Authorizes a single individual to use a Rational software product. Each individual user who accesses RPTv8 in any manner requires an Authorized User license.
Cannot be reassigned unless the purchaser replaces the original assignee on a long-term or permanent basis.
- Authorized User Fixed Term License (FTL)
Authorizes a single individual to use a Rational software product for a specific length of time (the term).
An Authorized User FTL cannot be reassigned unless the purchaser replaces the original assignee on a long-term or permanent basis.
When purchased using Passport Advantage Express, IBM will automatically extend the license term for an additional year at the prevailing price unless you notify IBM before the license expires that you do not want an extension. The subsequent FTL term starts when the initial FTL term expires. The price for this subsequent term is currently 80% of the initial FTL price, but is subject to change.
If you notify IBM that you do not want to extend the license term, stop using RPTv8 when the license expires.
See also...
Some 7.0 and later versions of Rational products require an upgraded version of the Rational License Server.
Purchase licenses
- Determine type of license to purchase.
- Purchase license by going to ibm.com/software/howtobuy.
- Enable product using one of the following methods...
- For Authorized User licenses, go to Passport Advantage and follow the instructions there for downloading product activation kit. After you have downloaded the activation kit, import RPTv8 activation .jar file using Installation Manager.
Back up RPTv8 activation .jar file. If you uninstall RPTv8 and then install RPTv8 again, you might need to use RPTv8 activation .jar file to license RPTv8 again.
- For Floating licenses, go to the Rational Licensing and Download site, login, and then select the link to connect to the Rational License Key Center. From there use Proof of Entitlement to obtain floating license keys for license server.
Optionally, you can go to Passport Advantage to download the activation kit for product. After importing the activation kit, you can switch from a floating to a permanent license type if you use computer offline for long periods.
- For Authorized User licenses, go to Passport Advantage and follow the instructions there for downloading product activation kit. After you have downloaded the activation kit, import RPTv8 activation .jar file using Installation Manager.
Runtime licenses
As noted, RPT has two types of licensing...
| Product activation | Start RPT. Managed with Installation Manager. |
| Runtime licensing | Run performance tests on specific protocols with multiple virtual users. Managed with LKAD. Consists of protocol keys and virtual tester license key packs. Also known as Flex licensing. |
For product activation, there are two forms:
- Product activation kit installed on the computer where RPTv8 is installed
- Floating product license checked out from a Rational License Server.
You can download RPTv8 activation kit from Passport Advantage for authorized user purchases.
For floating product licenses...
- Log on to the Rational License Center to download a floating license key
- Import it to Rational License Server
Use the version of Rational License Server that is shipped with RPTv8. Earlier versions of Rational License Server might not support all of the necessary licensing functions.
Administrators can install the Rational License Server from Passport Advantage or from RPTv8 media.
Author Note: I have have not been successfull configuring the Rational License Server co-located on same machine as RPT workbench. I receive "Unable to connect to license server" errors. It appears that two competing versions licadmin.exe get installed, and the listed workarounds I've seen do not resolve the problem.
What has worked for me is to install the Rational License Server on it's own machine.
Runtime licensing is checked when you run a performance schedule. Runtime licensing consists of the correct protocol keys and virtual tester license key packs.
- You need a protocol key to run performance tests with any protocol other than HTTP.
- You need a virtual tester license key pack to run tests with more than five virtual users.
You can check out these keys from the same Rational License Server used for product activation.
To check out protocol and virtual tester license keys, open LKAD...
-
Start | Programs | Rational | Rational License Key Administrator
Type the name or IP address of Rational License Server. Protocol and virtual tester license keys are available from the Rational License Key Center in the form of .upd files. If you double-click a .upd file in Windows, the LKAD program should start automatically and import the license keys.
There is no Linux version of the LKAD.
To check out protocol and virtual tester license keys in Linux, create and edit the .flexlmrc file. Create the file .flexlmrc in the home directory of each user who runs more than five virtual testers, uses a protocol other than HTTP, or uses the floating license product activation. Edit the .flexlmrc file, adding a line with the computer name or the IP address of the Rational License Server.
For example, add the line...
-
RATIONAL_LICENSE_FILE=@license-server-name.com
...or...
-
RATIONAL_LICENSE_FILE=@license-server-ip-address
Runtime license examples
Trial license allows you to run RPT for 30 days from initial installation. After thirty days license expires.
Trial license allows you to run HTTP performance tests with up to 5 virtual users. For other protocols except for SOA, the trial license allows you to run tests with a single user. The trial license for RPT does not allow you to run tests using the SOA protocol.
| Protocol | Trial | Protocol key | 500-user virtual tester key pack and protocol key |
|---|---|---|---|
| HTTP | 5 | n/a | 505 |
| Siebel | 1 | 5 | 505 |
| SAP | 1 | 5 | 505 |
| MySAP | 1 | 5 | 505 |
| Citrix | 1 | 5 | 505 |
| Socket | 1 | n/a | 505 |
| SIP | 0 | 5 | 505 |
| SOA | 0 | 5 | 505 |
License enablement
To review license information for installed packages, including license types and expiration dates...
- Start Installation Manager.
- On the main page, click Manage Licenses.
Web-based help
Help is available on RPTv8 infocenter, and is viewable from within RPTv8 via...
-
Help | Help Contents
To enable connections to the infocenter...
-
Window | Preferences | Help | Content
...and select...
-
Include help content from a remote infocenter
Verify URL for product infocenter is in the list of available infocenters. If infocenter is not listed...
- Click Add.
- In the Name field, type a name for the connection.
- In the Host field, type http://publib.boulder.ibm.com.
- In the Path field, type /infocenter/rpthelp/v8r1m0/index.jsp.
- Select Use default port.
- Click OK.
- Select the entry for product infocenter.
- Click Test Connection.
Connection Successful is displayed if the connection is made. If Connection failed is displayed, verify that you have an active Internet connection and check the settings.
Install help content from an archive file
Most help content is not installed when you install product. If you do not have an Internet connection, to access help content locally you can install it from the bundled archive file.
You can use this procedure to install help from the bundled archive file, or from downloaded help archive files.
- During install, choose...
Download help and access the content locally
- Extract the help archive file...
-
com.ibm.rpt.remote.help.updateSite.zip
...to a temporary folder.
By default, on Windows, the help archive file is found in...
-
C:\Program Files\IBM\SDP\rpt\remotehelp\docs
- Start RPT and select a workspace. A warning message is displayed indicating that you need to install help content.
- Click Launch Local Help Updater.
Alternately, from the main window of RPTv8, click...
-
Help -> Local Help Updater
The Local Help Updater is a browser application. You might be prompted to adjust browser security settings to run the Local Help Updater. The Updater site opens in a separate browser window.
- On the Public Sites page, click the Internal Sites tab.
- Click the plus sign icon. A file chooser window opens.
- Type any name in the Name field.
For example, type "RPT Documentation."
- Click Browse, then navigate to the directory where you extracted com.ibm.rpt.remote.help.updateSite.zip.
Select the site.xml file, and then click OK. The name and location should now be displayed in the list of internal sites.
- Click the name of the internal site.
- The Available Features list will be populated with a list of the help that is available for download.
Depending on network connection speed, this might take a few minutes. Select the help content that you need.
- Click Install.
The help content is downloaded and installed. A progress bar opens and tracks the status of the download. After the help is installed, the following message is displayed: Platform has been reset.
You must restart workbench for the changes to take effect.
- Click OK, and then close the browser window.
- In RPTv8, click File -> Restart.
Download help content from the Local Help System Updater site
This topic explains how to download help content from the Local Help System Updater site. Most help content is not installed when you install product.
To access all help content locally, you need download it from the IBM Local Help System Updater Web site.
During installation, the help access option...
-
Download help and access the content locally
...was selected. Before using the help for RPTv8, you have to download the help to a local system.
To download the help content from the Local Help System Updater site:
- If the help system window is open, close it
- With product open, click Help -> Local Help Updater. The Updater site opens in a separate browser window.
- On the Public Sites page, select the URL of the help to download.
- The Available Features list will be populated with a list of the help that is available for download.
Depending on network connection speed, this might take a few minutes. Select the help content that you need.
- Click Install.
The help content is downloaded and installed. A progress bar opens and tracks the status of the download.
- When the download is completed, open the help in RPTv8 by selecting Help -> Help Contents.
The help selected is installed on system. The files will be updated automatically each time you start the application and an Internet connection is available.
Update help content
Use the Local Help System updater to update local help content without restarting product. If an Internet connection is available, the local help content is automatically updated each time start product.
Before you can update local help content, initially download the help content for product from the Local Help System Updater Web site.
An Internet connection is required.
Updates are automatically installed each time you start RPTv8, if you have an Internet connection.
To update the help without restarting RPTv8, follow these steps.
- Close RPTv8 help system window.
- Open the Local Help System Updater by selecting Help -> Local Help Updater. The Updater site opens in a separate browser window.
- Click the Installed Features tab.
- Click Search for Updates If updates to the content you have installed are available, they are installed to help system. A progress bar indicates the status of the request.
- When the update is completed, open the help in RPTv8 by selecting Help -> Help Contents.
Remove help content
Use the Local Help System Updater to remove installed help content.
Use this procedure if you have downloaded help features using the Local Help System Updater and decide to remove help content.
To use the Local Help System Updater to remove installed content:
- Close RPTv8 help system window.
- Open the Local Help System Updater by selecting Help -> Local Help Updater. The Updater site opens in a separate browser window.
- Click the Installed Features tab.
- Select the features to remove, and then click Remove. The help features selected are removed from your system. A progress bar indicates the status of the request.
- When the removal is completed, open the help in RPTv8 by selecting Help -> Help Contents.
Set up an intranet server for help
You can set up an intranet server behind a firewall to provide help content to users. In this way, users do not have to download and save help content to their computers.
Verify that you have a server available that can be accessed by users behind a firewall.
See the Installation Manager infocenter for the instructions on setting up an intranet server for help content.
Change the way you access help
During the installation process, a help content access method was selected. Close the help browser before you change the way that you access help content.
To change the way that you access help content:
-
Window | Preferences | Help | Content
A list of the infocenter or centers opens. Depending on the access method that was chosen, complete one of the following procedures.
Change from accessing help from an infocenter on an IBM Web site to accessing help on an intranet server
- Disable the link to the Internet site by selecting the Internet URL in the Contents list, and then clicking Disable.
- Click Add; then name the intranet connection, specify the intranet URL for the server containing the help content, and then click OK.
- Click OK to close Preferences.
-
To open help...
-
Help | Help Contents
Change from accessing help from an infocenter to accessing help locally
- Ensure that Include help content from a remote infocenter is selected.
- Disable the link to RPTv8 Information Center by selecting that connection in the Contents list, and then clicking Disable.
- Click Add, and then enter a name for the local help connection. Specify the localhost Host IP address 127.0.0.1 and path /help. Select any unused port number, and then click OK.
- Save any work and close and restart RPTv8.
- Follow the instructions in Downloading help content from the Local Help System Updater site to download help content.
Change from accessing help locally to accessing help from an IBM Web site
- Ensure that Include help content from a remote infocenter is selected.
- Disable the link to localhost by selecting that connection in the Contents list, and then clicking Disable.
- Click Add; then name the connection, specify the Internet URL for the IBM Web site containing the help content, and then click OK. This URL might already be available in the list of connections. If it is listed, select the connection and click Enable.
- Click OK to close the Preferences window.
- Click Help -> Help Contents, to open help.
Change from accessing help locally to accessing help from an intranet server
- Ensure that Include help content from a remote infocenter is selected.
- Disable the link to localhost by selecting that connection in the Contents list, and then clicking Disable.
- Click Add; then name the connection, specify the intranet URL for the server containing the help content, and then click OK.
- Click OK to close Preferences.
- Click Help -> Help Contents, to open help.
Change from accessing help from an intranet server to accessing help locally
- Ensure that Include help content from a remote infocenter is selected.
- Disable the link to the intranet server by selecting that connection in the Contents list, and then clicking Disable.
- Click Add; then enter a name for the local help connection. Specify the localhost Host address 127.0.0.1 and path /help. Enter any unused port number, and then click OK.
- Save any work and close and restart RPTv8.
- Follow the instructions in Downloading help content from the Local Help System Updater site to download help content.
Change from accessing help from an intranet server to accessing help from an IBM Web site
- Disable the link to intranet site by selecting the intranet URL in the Contents list, and then clicking Disable.
- Click Add; then name the connection, specify the URL for the IBM Web site containing the help content, and then click OK.
- Click OK to close the Preferences window.
Terms
| Package | An installable unit of a software product.
Software product packages are separately installable units that can operate independently from other packages of that software product. |
| Package group | Directory in which different product packages share resources with other packages in the same group.
When you install a package using Installation Manager, you can create a new package group or install the packages into an existing package group. Eclipse-based packages installed in the same package group are able to use the shell-sharing features of Eclipse. Some packages cannot share a package group, in which case the option to use an existing package group is unavailable. |
| Repository | A storage area for installable software packages.
A repository can be disc media, a folder on a local hard disk, or a server or Web location. |
| Shared directory | Required for packages to share resources. |
Package groups
During installation, you specify a package group into which to install a product.
- A package group represents a directory in which products share resources.
- When you install a product using the Installation Manager, you either create a package group or install RPTv8 into an existing package group. A new package group is assigned a name automatically; however, you choose the installation directory for the package group.
- After creating a package group you cannot change the installation directory. The installation directory contains files and resources shared by RPTv8s installed into that package group.
- Product resources designed to be shared with other packages are installed in the shared resources directory. Not all products can share a package group, in which case the option to use an existing package group will be disabled.
- When you install multiple products at the same time, all products are installed into the same package group.
For Windows Vista, do NOT create package groups in C:\Program Files\. Otherwise, users without Administrator privileges will be unable to use RPTv8.
Shared resources directory
Where product resources are installed so that they can be used by multiple product package groups. Defined during install.
Use largest disk drive for shared resources directories.
You cannot change the directory location unless you uninstall all product packages.
For Windows Vista, do NOT create the shared resources directory in...
-
C:\Program Files\
Otherwise, users without Administrator privileges will be unable to use RPTv8.
Coexistence
Some products are designed to coexist and share functions when they are installed in the same package group.
When you install each product package, you select whether to install RPTv8 package into an existing package group or whether to create a new package group. Installation Manager blocks products that are not designed to share or do not meet version compatibility and other requirements.
To install more than one product at a time, RPTv8s must be able to share a package group.
Any number of eligible products can be installed to a package group. When a product is installed, RPTv8 functions are shared with all of the other products in the package group. If you install a development product and a testing product into one package group, when you start either of RPTv8s, you have both the development and testing functions available to you in user interface. If you add a product with modeling tools, all of RPTv8s in the package group will have the development, testing, and modeling functionality available.
Installation Manager overview
Installation Manager includes six wizards for maintaining packages:
| Install wizard | You can accept defaults or create a custom installation. |
| Update wizard | Searches for available updates to packages that you have installed. An update might be...
The Update wizard searches connected repositories for updates. To apply an update to a computer that is not connected to the Internet, download the update and extract it to a local repository. |
| Modify wizard | Modify certain elements of a package that you have already installed. During the first installation of the package, you select the features to install. Later, if you require other features, you can use the modify packages wizard to add them to package. You can also remove features and add or remove languages. |
| Manage Licenses | Use to...
Runtime floating license keys are not managed using Installation Manager, rather, use the LKAD program, installed with the Rational License Server. |
| Roll Back | Revert to a previous version of a package. |
| Uninstall wizard | Remove a package from computer. |