Create subcommunities
Create a subcommunity to bring together a subset of members within an existing community.
You must be a community owner to create a subcommunity. When creating a subcommunity, you and any other community owners automatically become owners of that subcommunity. The subcommunity has exactly the same functionality as the parent community; we can edit it, add widgets, and perform the same actions in it as we can in the parent community.
Create subcommunities is a useful way of organizing your community members into smaller groups with different areas of focus. By creating subcommunities, we can share information and collaborate with a more targeted selection of people while maintaining the goals and objectives of the parent community. We can add as many subcommunities as you like to a community.
We cannot create nested subcommunities within a community, and we cannot add an existing community as a subcommunity of another community.
To create a subcommunity.
- Log in to IBM Connections and open the community to which to add a subcommunity.
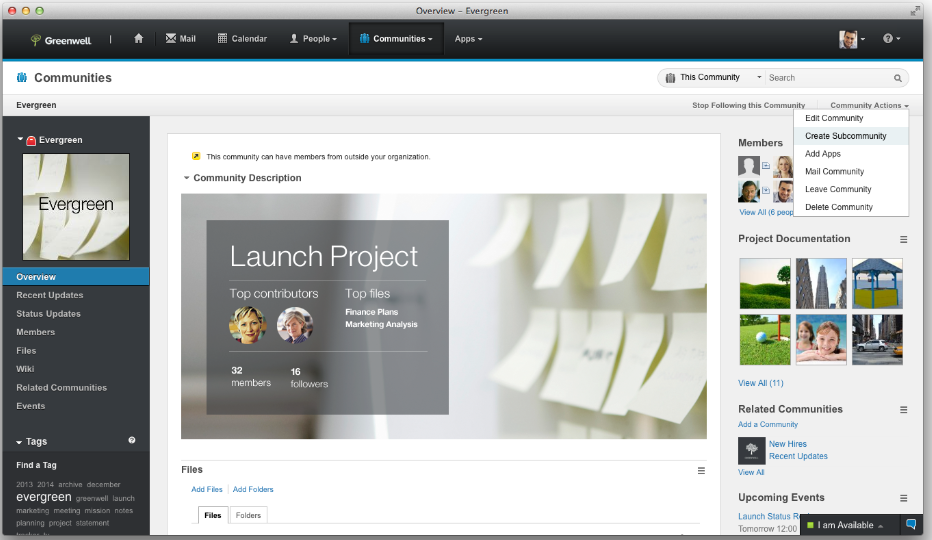
- From the Overview page, select Community Actions > Create Subcommunity.
- Required: Enter a name for the subcommunity in the Name field.
- Required: Specify the level of access you want for the community. The access options available depend on the access level of the parent community.
- When the parent community is public, the subcommunity can have public, moderated, or restricted access.
- When the parent community is moderated, the subcommunity can have moderated or restricted access.
- When the parent community is restricted, the subcommunity must also have restricted access.
The External access check box determines whether the community can have external users
 . We cannot change this setting for a new subcommunity. That is, all subcommunities have the same setting for external access as the parent community.
- When the parent community is public, the subcommunity can have public, moderated, or restricted access.
- Enter a description for the subcommunity in the Description field.
- Enter one or more tags in the Tags field.
- To upload an image for the subcommunity, click Upload a Community Image and browse for an image.
- To apply a different theme to the subcommunity, click Change Community Theme, and select a theme.
- To generate a web address for the subcommunity, click Access Advanced Features and enter a one-word, unique term that identifies the subcommunity in the Web Address field. This field displays only if you have a Web Address entry in the parent community. To not create a web address, ensure that you leave this field blank.
- Certain keywords with a technical meaning, such as html or atom, are reserved and cannot be used in subcommunity web addresses. If we enter a reserved keyword, an error message is displayed, and we are prompted to enter a different keyword.
- If the web address contains a non-alphanumeric character, such as an ampersand (&), we must escape the character by using a forward slash ( / ) before the character.
- If we do not see the option to create a web address for the subcommunity in the user interface, this means the administrator has disabled this option for the organization.
- Certain keywords with a technical meaning, such as html or atom, are reserved and cannot be used in subcommunity web addresses. If we enter a reserved keyword, an error message is displayed, and we are prompted to enter a different keyword.
- Add members to the subcommunity by doing one of the following:
- To add a subset of the parent community membership to the subcommunity, enter the names of the people to add in the field provided.
- To add all the members of the parent community to the subcommunity, click Add all members of this community to the new subcommunity.
If a person joins a subcommunity, they are automatically added to the parent community. This applies to public communities only.
We can only add people and groups to the subcommunity, who are also members of the parent community.
- To add a subset of the parent community membership to the subcommunity, enter the names of the people to add in the field provided.
- If moderation is available and editable at the site, we can select from the following options:
- Owners must approve all content (widgets) where widgets might be one or more of the following widgets: blogs, files, or forums.
When this option is enabled, community owners can review unpublished content that has been submitted for approval and decide whether to publish it to the community or reject it.
- Viewers can flag inapproriate content (widgets) where widgets might be one or more of the following widgets: blogs, files, or forums. When this option is enabled, community owners can review content that has been flagged as inappropriate by other users, and decide whether to keep the content or remove it from the community.
For more information about moderation in communities, see Moderating community content.
- Owners must approve all content (widgets) where widgets might be one or more of the following widgets: blogs, files, or forums.
When this option is enabled, community owners can review unpublished content that has been submitted for approval and decide whether to publish it to the community or reject it.
- Click Save to save the subcommunity.
Results
Your subcommunity is created as a child of the parent community.A Subcommunities link is added to the navigation sidebar in the parent community to enable you to open the subcommunity from the parent community. We can also access the subcommunities from the I’m a Member or I’m an Owner views.
What to do next
We can add content, edit, customize, delete, and follow subcommunities, and work with them in exactly the same way that you would a regular community.
If we are creating multiple subcommunities within a community, consider adding the Subcommunities widget to the parent community. This widget allows you to see all your subcommunities at a glance and navigate easily to them from the parent community.
- Access the subcommunities
Add the Subcommunities widget to the community to give you easy access to the subcommunities.
Parent topic:
Manage the communities
Related concepts:
Related: