Overview - IBM Connections v4
- Overview
- What's new in IBM Connections 4?
- Supported languages
- Administrators: Deploying a preview guide to your users
- Accessibility
- Plan
- Install
- The installation process
- Pre-installation tasks
- Prepare to configure the LDAP directory
- Create the Cognos administrator account
- Install IBM WebSphere Application Server (WAS)
- Set up federated repositories
- Create DBs
- Populate the Profiles DB
- Configure Tivoli Directory Integrator
- Add source data to the Profiles DB
- Configure the Manager designation in user profiles
- Supplemental user data for Profiles
- Install Cognos Business Intelligence
- Install IBM Connections
- Before installing
- Install as a non-root user
- Install IBM Connections 4.0
- Install in console mode
- Install silently
- Modify the installation in interactive mode
- Modify the installation in silent mode
- Modify the installation in console mode
- Post-installation tasks
- Mandatory post-installation tasks
- Review the JVM heap size
- Configure IBM HTTP Server
- Configure the Home page administrator
- Enable Search dictionaries
- Create the initial Search index
- Copy Search conversion tools to local nodes
- Access Windows network shares
- Configure Moderation
- Synchronize files shared with communities
- Configure Cognos Business Intelligence
- Apply fix packs to update the Cognos server
- Configure support for LDAP authentication for Cognos Business Intelligence
- Grant access to global metrics
- Grant access to community metrics
- Configure the IBMConnectionsMetricsAdmin role on Cognos
- Configure PowerCube refresh schedules
- Configure Cognos Business Intelligence to use IBM HTTP Server
- Optional post-installation tasks
- Mandatory post-installation tasks
- Uninstall IBM Connections
- Update and migrating
- Prepare IBM Connections for maintenance
- Back up IBM Connections
- Save your customizations
- Prepare to migrate the media gallery
- Migrate to IBM Connections 4.0
- Export application artifacts from IBM Connections 3.0.1
- Migrate data from IBM Connections 3.0.1 DBs
- Uninstall a deployment before migration
- Install IBM Connections 4.0 for migration
- Import application artifacts to IBM Connections 4.0
- Post-migration tasks
- Create the Search index after migrating or updating
- Synchronize the application member tables and corporate directory
- Post-migration steps for profile types and profile policies
- Post-migration step for status updates
- Post-migration steps for the media gallery terms and conditions
- Additional post-migration steps for the media gallery
- Roll back a migration
- Update IBM Connections 4.0
Overview
| Activities | Collaboration tool for collecting, organizing, sharing, and reusing work related to a project goal. |
| Blogs | Online journals used to deliver timely information with a personal touch. |
| Bookmarks | Social bookmarking tool for saving, organizing, and sharing Internet and intranet bookmarks. Previously named Dogear. |
| Communities | A website where people who share a common interest can interact with one another, share information, and exchange ideas. Community members can participate in community-specific activities and forums, and can share blogs, bookmarks, feeds, and files. |
| Files | A common repository in which you can upload files and share them with others. Store versions of a file, view who has downloaded a file or commented on it, and see highly recommended files. |
| Forums | A place to brainstorm and collect feedback on topics that are relevant to you and your colleagues. Statements and comments are collected in a format that captures the exchange of ideas and presents them as an ongoing conversation. |
| Home page | A central location that provides a snapshot of the latest updates collected from IBM Connections. Perform in-context actions on entries in your activity stream, check the latest updates from the content and people that you are following, stay up to date with the latest notifications and updates that require a response from you, or post your own status updates. |
| Profiles | Directory of the people in your organization, including the information you need to form and encourage effective networks across your organization. |
| Metrics | Statistics tool that collects and displays information about how people use Connections applications. Community metrics show details on a particular community while global metrics show information across all of Connections. |
| Wikis | A tool for creating wikis that individuals, groups, and communities can use to capture, share, and coauthor information. View page changes, recommendations, and comments. |
What's new in IBM Connections 4?
IBM Connections:
- Share a status update or file from anywhere in IBM Connections. Log in and then click the Share link in the header.
- The activity stream displays an aggregated view of the latest updates from people or events that you are following and people in your network. To view more information about an update, repost it, or like it, click the entry to launch the embedded experience.
- IBM Connections now introduces an enhanced Metrics application. Metrics employs the analytic capabilities of the IBM Cognos Business Intelligence server, which is provided as part of the IBM Connections installation to support the collection of metrics data. Administrators and designated users can work with interactive displays of global metrics by clicking Server Metrics in the footer. Community owners can view non-interactive reports for their communities by clicking Metrics in the navigation pane.
- The rich text editor, which is used across the IBM Connections applications, has been upgraded to CKEditor 3.6.3 in this release. There are a number of new features in the Wikis editor.
- Profiles has been updated to include the activity stream, which shows the profile owner's latest updates from across IBM Connections.
- When viewing search results, you can filter the results from Profiles to exclude inactive profiles by selecting Exclude Inactive People from the Show menu on the Profiles Search Results page.
- The social analytic widgets now recommend private as well as public content, based on your existing relationships with public and private content in IBM Connections.
- The Trending widget displays a list of the hot topics that are trending in your organization. The widget displays when you filter search results using the Status Updates option.
- Status updates and microblogging content are now included in the analysis of the relationships that are used to recommend content and people in the social analytics widgets.
Activities:
- Activity members are now displayed in a Members view within the activity instead of in a Members section in the navigation pane.
- Standard activity owners can go to the Members view to make an activity public.
- Titles and descriptions in activity entries are automatically saved so that if you are unexpectedly disconnected from the application, you do not lose your latest changes.
- In an activity entry, you can link to files and folders in the Files application.
- Activity owners can convert an entry into a to do item.
Blogs:
User interface improvements make it easier for you to go directly to your blogs.
Bookmarks:
The following features are new for Bookmarks:
- A new user interface makes it easier for you to access and manage bookmarks.
- When you install the Add Bookmark browser button, you also have the option to install a Discuss This and Related Community browser buttons for posting web pages to an IBM Connections forum or linking together related communities.
Communities:
- The Events widget allows community owners to share information about upcoming events with the rest of the community.
- For deployments that make use of owner moderation of communities, owners can disable content approval and content flagging on individual communities.
- Use the Related Communities widget to suggest communities for colleagues to join.
- Share status with members of your community.
- The Recent Updates view provides a centralized place to see what is new in a community.
- You can add more information to the community description and it is collapsible.
- LDAP groups can now be added as members of a community.
Files:
- Files now enables you to do the following actions:
- Upload multiple files at the same time.
- Download all of the files in a view.
- Add files to a folder during upload.
- Select and perform actions on multiple files at one time.
- Delete a file version.
- Share folders with communities.
- Give community members access to edit files you own.
- Move files uploaded to a community to trash; from trash you and others can restore or delete the files.
- Stop sharing a file in one action, including removing the file from any shared folders and communities.
- Stop sharing files that were shared with you. For example, if someone shared a file with you, and then you shared the file with a community, you can stop sharing with the community.
- Upload multiple files at the same time.
- A file's owners and editors can lock and unlock the file.
- The file lock icon displays a red key in the owner's view when the file is locked by another user. The file owner can unlock the file at any time.
- A graphic Like option is now available on the file page; the Recommend file option has been changed to a Like file option.
- For files that you are adding or have added to a folder, you can give access to those files to anyone who has access to the folder.
- The files summary page and tabs have been redesigned to provide more information, such as in which folders the file resides and whether the file is referenced by status updates.
- The Communities application contains an option for displaying files that are shared through the community.
- Files that are referenced in one or more status updates are noted as such.
Forums:
- When a user is notified by email that someone has added a topic to a forum, the user can click a Reply to this topic link in the email. This creates a response email the user can add content to and send. This create a new forum topic as a response to the topic they were notified about in the email. Attachments in the email are added to the response topic.
- You can add content from any web page or IBM Connections source to a forum topic by clicking a button in your browser tool bar. Click Bookmark or Discuss This, and then follow the steps for installing the Discuss This button. Then navigate to any web or IBM Connections page, click Discuss This, and select a forum to post the content to.
Home page:
- The Home page user interface has been updated so that it is easier to find information that is important to you. The Updates tab and the Widgets tab have been replaced by a single page with different views available from the navigation sidebar. Use these views to filter the display and check for your latest updates and notifications. For example, you can check the Action Required view for items that require a response from you. The My Notifications view now includes responses to topics in addition to notifications that you have sent and received.
- The improved microblogging experience allows you to gather information in a meaningful way and act on it in context. You can now attach files to your status updates, and use hashtags to tag your updates and make them easier for other users to find. You can repost status updates to share information with the people who are following you, or click Like to recommend an update. You can also preview images and download files to work on them locally.
- The steps for following tags from the Home page have changed.
- The Events widget helps you to keep track of upcoming community events that you are attending and that you are following. The widget is available from the activity stream views.
Profiles:
- The The Board tab has been replaced with the Recent Updates tab on the user's profiles page. The Recent Updates list of posts is similar to the board in that it displays status messages and responses. It also includes information about other actions performed by the profile owner, such as sharing a file or adding a post to a blog. The message posting area itself is essentially identical to the earlier version, enabling you and others to view and post messages to a user's wall.
- The Recent Posts tab on the Profiles page has been removed. Recent posts appear under the profile owner's Recent Updates tab.
- Use the Recent Updates area on your profile page to post a status message.
- The business card has been redesigned for improved layout and access.
- On the Invite to My Network page, the Also Follow option is enabled by default.
- You can now accept a network invitation from the inviter's profile page.
- The Network Contact or Pending Invitation indicator label now displays next to the person's name on their profile page.
- You can now accept an invitation to join a person's network from that person's profile page.
Wikis:
- There are no longer My Wikis and Public Wikis tabs. All views are together in the same list.
- See wikis you are following by clicking I'm Following.
- Pages can be removed from a wiki by moving them to the trash. From the trash, pages can be deleted or restored to the wiki.
- You can now download a version of a page from the page comparison view, as an HTML file.
- The wiki editor has been updated. Administrators can divide toolbars into multiple toolbars. You can navigate between toolbars with the Tab key. Also, toolbars now include a button for adding and editing iFrames.
- The wiki editor has two new features: the editor area expands downward as you add content. As your editing space expands, a toolbar displays even if scrolling is required.
What's new in installing?
- The installation wizard is based on IBM Installation Manager 1.4.4.
- You can install and configure IBM Cognos Business Intelligence, obtained separately, by using the scripts, models, and specifications that are included with IBM Connections.
- Console Mode is available. Use this character-based interface to install, modify, or uninstall the product when you do not have access to the graphical interface.
- Silent installation has been extended so that you can install both IBM Connections and IBM Installation Manager in silent mode.
- The initial configuration of administrators for Home page and Blogs is now handled automatically during installation. However, to configure widgets, you still need to assign a Home page administrator.
What's new in administering?
IBM Connections:
- You can run Profiles synchronization commands in preview mode.
- There is an entirely new interface for viewing metrics. The Metrics application uses IBM Cognos Business Intelligence to collect and display statistics that show how people use Connections. With the new Metrics application, community owners can view metrics for their own communities, and system administrators plus designated users can view and interact with server-level metrics that show information across all of Connections.
- All of the applications now use Freemarker templates for notifications. This has no effect on email notifications.
- There are several changes to the configuration of IBM Sametime awareness through the Sametime server.
- You can remove microblogging functionality from your deployment by disabling the microblogging service reference in LotusConnections-config.xml.
Activities:
- The underlying implementation of the Activities content store is changing with release 4. If you are installing Activities for the first time, the new implementation is used to store resources associated with Activities automatically. If you are upgrading from a previous version of Activities, Activities data continues to be stored in the existing content store, which uses the old implementation. If you want to gain the benefits of the new implementation, you can create an additional content store which uses it.
Blogs:
- The Blogs frontpage blog is now created for you by default when you install the Blogs service.
- A new configuration property, connections.blogs.feed.return401_fornopermission_toviewblog, lets you change the error page returned when a user cannot access a blog page from 401 to 403.
- A new configuration property, connections.blogs.onlymembercanvote lets you limit voting in an Ideation blog to community members.
- A new configuration property, connections.blogs.lastModifierDisabled, controls whether or not to display the last modifier information in blogs entries.
- Blogs notification is simplified so that you have fewer notification templates to configure.
Bookmarks:
- Administrators can control whether Bookmarks links are redirected from the Bookmarks application or whether external links directly access external web pages.
Communities:
- You can create an administrator who can edit the content of all communities, public and restricted.
- You can configure Linked Library widgets (formerly named Custom Library widgets) in communities by editing a new library-config.xml file. Properties in that file control functionality such as whether to display the person card for the ECM users, whether to download files through a proxy or directly from the ECM server, and whether to display the Views dropdown on the main document list.
Files:
Forums:
- Use the ForumsService.filterInput command to retrieve a subset of forums on which you want to perform an operation.
- You can now manually recalculate the count of forums and forum topics in your organization using administrative commands.
- You can enable and disable a that allows users to click a button to add the contents of a current web or IBM Connections page to a forum. When enabled, users can click Bookmark or Discuss This in the footer of any IBM Connections page and add a Discuss This button to their browser tool bar. When they click it, then select a forum they have posting access to, the current content of the page is added to a new forum topic.
- There is a new command, ForumsTrashService.filterForumsByName(), to help you restore forums from the trash by filtering on forum names.
- You can ensure that only a topic or replay creator can edit their topic or reply.
Home page:
- The Home page administrative user interface has been updated to include options for adding custom widgets that are based on the OpenSocial gadget specification.
News:
- New DB clean-up tasks for the News repository allow you to purge the system of reply-to ID records that have expired and also remove any reply-to attachments that were not properly removed from the shared data store.
- You can use NewsMailinService commands to delete compromised reply-to IDs from the system and ensure that mail-in replies are received from secure IDs only.
- You can control the size of microblog data in your deployment by configuring settings in the news-config.xml file.
- A new administrative command allows you to generate a report of all the communities that the News repository has interacted with.
- In the event of a DB failure, you can use the NewsMicrobloggingService.deleteMicroblogs command to delete microblog and associated data for a community from the News repository.
- To enable the display of third-party applications in the activity stream filter list, you must
- The activity stream search service, which is bundled with the News application, provides an indexing and search infrastructure that enables search capabilities over the activity stream. Administrators can manage the service from a user interface that is accessed using a URL.
Profiles: register the applications in the news-config.xml file.
- New configuration properties allow you to control how you want the events generated by Profiles to be handled for your deployment.
- The Profiles population wizard now uses JVM version 1.6.
- The configuration model for customizing profiles has been enhanced to clearly separate the definition of the profile data model and the presentation of profile records in the user interface. Much of the process for customizing your profiles deployment has changed.
- Most of the profile customization present in your previous release is migrated to new files provided in this release. However, when migrating profile data to this release, the following manual tasks are required:
- Profile types used in the widgets-config.xml or profiles-policy.xml must be added to the new profile-types.xml file after migration.
- String bundles referenced as resources in LotusConnections-config.xml must be copied to the new Connections 4 deployment.
- Profile types used in the widgets-config.xml or profiles-policy.xml must be added to the new profile-types.xml file after migration.
- New TDI properties have been added to the profiles_tdi.properties file to control debug information.
- New samples have been supplied for reference when creating custom TDI assembly lines.
- Profiles now supplies more standardized modes and attribute configuration options in the TDI Connectors.
For examples see topic's such as Use the ProfileConnector and Use the PhotoConnector.
- Error messages and their descriptions have been improved.
Search:
IBM Connections 4 includes new and enhanced APIs for Search.
- This release of IBM Connections introduces a new folder structure in which each application has its own index folder. The Search application also uses new folders to contain backup indexes, provide a staging location for the index, store the XML files that are created after an application is crawled, and store the content extracted from files.
- The crawling and indexing processes are now carried out in separate phases so that the process of crawling an application is completed before indexing for that application begins. This update to the two-stage indexing process results in improved reliability and performance.
- When you build the index for the first time, you no longer need to manually copy the index to each node that is running the Search application. This process is now automated.
- The resumption of interrupted or failed crawling and file content extraction now takes place automatically, and is always enabled for both initial and incremental indexing.
- The Search application now has much faster file content extraction due to direct access to the file system used by Files and Wikis to store file content.
- A reduced need for server restarts means that you can now build a new Search index using the background indexing SearchService commands and switch over a production deployment to the new index without a server restart. Similarly, you can update Search configuration options and apply them without a server restart using the reloadSearchConfiguration command.
- Status updates and community events are now included in the content that is indexed by the Search application.
- A new facet known as trending is applied to search results that are specific to status updates. Using this facet, keywords are extracted from recent status updates and weighted based on frequency of use.
- Language guessing has been improved for field-level searches to ensure more accurate search results.
- The command for creating a stand-alone index has been extended to include two additional parameters. These parameters allow you to persist application seedlists to a specified location and also to specify a file content extraction location if you have already extracted file content using the command...
-
SearchService.startBackgroundFileContentExtraction
...or during a previous run of the command...
-
SearchService.startBackgroundIndex
- If you are experiencing problems with crawling, to run a background crawl and verify that the process is completing successfully...
-
SearchService.startBackgroundCrawl
- To extract file content outside of the indexing process....
- By updating a configuration setting in the search-config.xml file, you can specify that interrupted or failed indexing tasks are automatically resumed..
- Additional globalization settings are available for Search. In addition to configuring accent-insensitive searching, you can enable settings to ignore punctuation in search terms and perform a one-to-two mapping in search terms.
- You can perform a number of steps to verify that the Search is working as expected.
- Verbose logging can help you to monitor the progress of the Search crawling and indexing operations.
- The following commands that were previously used for enabling and disabling indexing tasks according to task type have been replaced. Use the SearchService.enableTask(String taskName) and SearchService.disableTask(String taskName) to enable and disable indexing tasks instead.
- SearchService.enableFileContentTask(String taskName)
- SearchService.enableIndexingTask(String taskName)
- SearchService.disableFileContentTask(String taskName)
- SearchService.disableIndexingTask(String taskName)
- A new SearchService command enables you to get a list of the tasks that are currently running for the Search application.
- To delete all scheduled tasks from the Home page DB and restore the default tasks that are automatically configured when you first install the product, use the SearchService.resetAllTasks() command.
- Use the SearchService.retryIndexing command when you want to reindex content that was not indexed successfully during initial or incremental indexing.
- A new administrative command allows you to free up disk space by deleting persisted seedlist data from your system.
- Use the SearchService.listIndexingNodes() command to verify the names of the Search indexing nodes in your deployment.
- When restoring the Search index, the steps that you perform depend on what type of environment you are using.
- You can edit settings in the search-config.xml file to specify the maximum number of seedlist threads used when indexing.
- When you add a new node to your deployment after installing IBM Connections, you need to manually create Search work managers for the newly-added node.
- New commands are available to allow you to reload the Search index and configuration without having to restart the Search application.
- You can edit settings for persisted data to specify whether the data is deleted after a successful incremental index and also specify the maximum age for persisted pages.
- To avoid performance hits by avoiding unnecessary full search crawls, update...
- The seedlistSets.maximumPageSize property allows you to specify the maximum number of items on a search results page.
- You can specify the default timeout for seedlist requests by setting a value for IBM WAS environment variable...
-
named SEARCH_SEEDLIST_TIMEOUT
- You can change deployment settings so that search results related to inactive users are automatically included in search results.
- To list the indexing tasks defined for the social analytics service...
- To tune the social analytics indexing process by configuring the number of iterations used by the indexing jobs....
- You can now configure dynamic, global properties for the social analytics service using SearchService commands.
Wikis:
- There are no Wikis administrative updates in this release.
What's new in customizing?
If you customized the IBM Connections user interface in a previous release of the product, note that there is no migration path provided for importing your changes into IBM Connections 4. Before upgrading to IBM Connections 4, review and make a note of your existing customizations so that you can verify them post-migration and rework if necessary.
- Review the customization
tips and best practices provided to help you to implement and
manage customizations in your IBM Connections deployment.
- Many of the customization paths have changed since the previous release of IBM Connections.
- You can customize sprited images by modifying the images and copying them to the appropriate customization directory.
- When you want to completely change the behavior of a Dojo module
and you need the change to take effect as soon as the module is loaded,
you can override the JavaScript files used by IBM Connections.
- You can extend the user interface by packaging your JavaScript, HTML, and CSS resources as an OSGi bundle when you want to add new functionality, widgets, or scripts to the product.
- In this release of the product, you can extend your deployment by adding custom JSTL tags.
- Customize notifications by modifying existing template files or by replacing files with custom templates created by you.
You can also edit the text strings and images used in notifications.
What's new in security?
- OAuth support - You can now use OAuth to support API access to IBM Connections.
access to data and the API Reference and Open Authorization sections of the IBM Social Business Development
wiki for details.
- Users can allow applications access to their Connections data
without sharing credentials, and revoke that access at any time.
- Also, users can report a malicious application to an administrator who can remove it from the list of applications enabled for OAuth.
What's new in mobile?
- Starting with the IBM Connections 3.0.1 July 2011 Mobile release, you can access IBM Connections from a mobile device using an app designed specifically for that device. With the Connections 4 release, these native apps have been enhanced. To support the enhancements, there is now a DB associated with the Mobile application and a configuration file that administrators can edit to customize the native applications.
What's new in developing?
The Connections API documentation has been moved to the API Reference section of the IBM Social Business Development wiki.
What's new in troubleshooting and support?
- Browse the list of frequently-asked
troubleshooting questions about the Search application to find
solutions to common problems.
- To help you troubleshoot
problems with the email digest feature, you can access specific
URLs to trigger email digests to be sent to the currently logged-in
user or to the next available tranche of users.
- Various error message description tables have been updated in the product documentation, including those for Profiles error messages.
Supported languages
The IBM Connections user interface is available in multiple languages.
Related tasks
Administrators: Deploying a preview guide to your users
The IBM Connections 4 preview guide is available for you to distribute to your users for new installations and upgrades to IBM Connections 4. This guide is designed to help your users become productive on the new software quickly, and to provide them with links to documentation resources for further help. This guide provides the following information for this release:
- Overview of several new applications
- Important changes from the previous release
- Familiar applications that remain the same
- Links to product tours, reference cards, and product documentation
- A few key productivity tips
You can download the preview guide from the IBM Connections wiki
There are two files available to you:
- An Adobe PDF file, ready for emailing, printing, or distributing to your organization.
- An IBM Symphony. ODT file that can be customized for your organization; for example, you can add contact information for your Help Desk.
This file includes instructions in blue text for customizing information. Remember to remove these instructions before rolling out the file to your organization.
IBM recommends that you distribute the guide to your users before their new IBM Connections software is installed or updated.
Accessibility
Accessibility applications help users who have a disability, such as restricted mobility or limited vision, to use information technology products successfully.
IBM strives to provide products with usable access for everyone, regardless of age or ability.
The major accessibility features in this product enable users to do the following tasks:
- Use assistive technologies, such as screen-reader software and
digital speech synthesizer, to hear what is displayed on the screen.
Consult the product documentation of the assistive technology for
details about using those technologies with this product.
- Operate specific or equivalent features using only the keyboard.
- Customize display attributes such as color, contrast, and font
size.
- Magnify what is displayed on the screen.
The accessibility of IBM Connections is optimized when using a Microsoft Windows XP client, Microsoft Windows Server 2003 or later, FireFox 3.6 or later, and JAWS 12 or later.
In addition, the documentation was modified to include the following features to aid accessibility:
- All documentation is available in HTML formats to give the maximum
opportunity for users to apply screen-reader software technology.
- All images in the documentation are provided with alternative text so that users with vision impairments can understand the contents of the images.
IBM Connections user interface
This product uses standard Windows navigation keys. Refer to the Product accessibility topic in the Using section of this product documentation for information about any unique keys that are used by the individual applications.To display the business card, hover over a person's name, and then press Ctrl + Enter to open the business card. Press Tab to set focus to the first element in the business card
For JAWS users: To activate buttons in the user interface, press the Enter key, even when JAWS announces to use the space bar.
Plan
- Install, configure, secure, and administer IBM WebSphere Application Server (WAS).
- Install IBM Tivoli Directory Server, Microsoft Active Directory, Sun Java. System Directory Server, or IBM Lotus Domino LDAP directory, and then configure WAS to use that LDAP directory with federated repositories.
- Create, manage, and drop IBM DB2®, Oracle, or Microsoft SQL Server DBs.
- Install IBM HTTP Server, and then configure it to interact with IBM WAS over HTTP and HTTPS.
Directory path conventions
| Directory variable | Description | Default installation root |
|---|---|---|
| app_server_root | IBM WAS installation directory | AIX: /usr/IBM/WebSphere/AppServer
Linux: /opt/IBM/WebSphere/AppServer Windows: C:\IBM\WebSphere\AppServer |
| profile_root | WAS installation directory | AIX: /usr/IBM/WebSphere/AppServer/profiles/profile_name
Linux: /opt/IBM/WebSphere/AppServer/profiles/profile_name Windows: C:\IBM\WebSphere\AppServer\profiles\profile_name |
| ibm_http_server_root | IBM HTTP Server installation directory | AIX: /usr/IBM/HTTPServer
Linux: /opt/IBM/HTTPServer Windows: C:\IBM\HTTPServer |
| connections_root | IBM Connections installation directory | AIX or Linux: /opt/IBM/Connections
Windows: C:\IBM\Connections |
| local_data_directory_root | Local content stores | AIX or Linux: /opt/IBM/Connections/data/local
Windows: C:\IBM\Connections\data\local |
| shared_data_directory_root | Shared content stores | AIX or Linux: /opt/IBM/Connections/data/shared
Windows: C:\IBM\Connections\data\shared\ |
| IM_root | IBM Installation Manager installation directory | AIX: /opt/IBM/InstallationManager
Linux: /var/IBM/InstallationManager Windows: C:\\IBM\Installation Manager |
| shared_resources_root | Shared resources directory | AIX or Linux: /opt/IBM/SSPShared
Windows: C:\IBM\SSPShared |
| db2_root | DB2 DB installation directory | AIX or Linux: /usr/IBM/db2/version Linux:
/opt/ibm/db2/version Windows: C:\IBM\SQLLIB\version |
| oracle_root | Oracle DB installation directory | AIX or Linux: /home/oracle/oracle/product/version/db_1
Windows: C:\oracle\product\version\db_1 |
| sql_server_root | Microsoft SQL Server DB installation directory | Windows: C:\Microsoft SQL Server |
| Cognos_BI_install_path | IBM Cognos BI Server installation directory | AIX or Linux: /opt/IBM/Cognos64
Windows: C:\IBM\Cognos64 You specify the installation directory in the cognos-setup.properties file during installation. |
| Cognos_Transformer_install_path | Cognos Transformer installation directory | AIX or Linux: /opt/IBM/Cognos
Windows: C:\IBM\Cognos You can specify the installation directory in the cognos-setup.properties file during installation. |
Deployment options
Install IBM Connections in one of three deployment topologies to achieve optimum scaling, load balancing, and failover.
A network deployment can consist of a single server that hosts all IBM Connections applications or two or more sets of clustered servers that share the workload. You must configure an additional system with WAS Network Deployment Manager.
IBM Cognos Business Intelligence is an optional component in the deployment. If used, Cognos must be federated to the same Deployment Manager as the IBM Connections servers. However, Cognos servers cannot be configured within an IBM Connections cluster.
A network deployment provides the administrator with a central management facility and it ensures that users have constant access to data. It balances the workload between servers, improves server performance, and facilitates the maintenance of performance when the number of users increases. The added reliability also requires a larger number of systems and the experienced administrative personnel who can manage them.
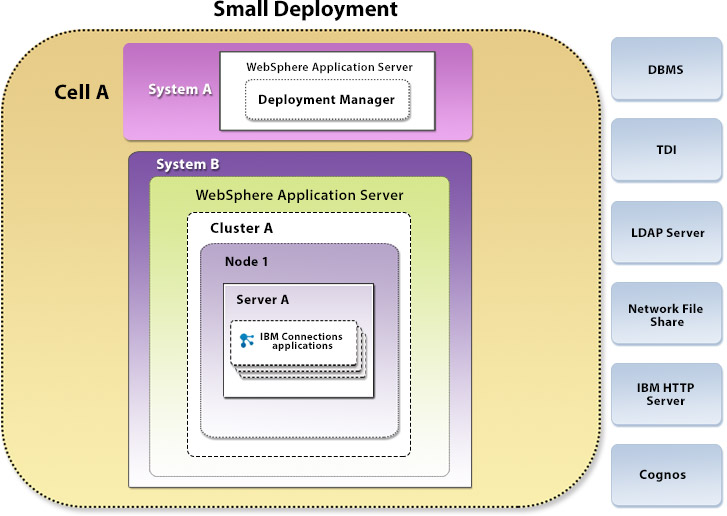
When you are installing IBM Connections, you have three deployment options:
- Small deployment
- Install all IBM Connections applications on a single node in a single cluster. This option is the simplest deployment but has limited flexibility and does not allow individual applications to be scaled up. All the applications run within a single Java Virtual Machine (JVM).
The diagram depicts a topology with up to 8 servers. If you install the servers on shared systems, you do not need to deploy 8 separate systems.
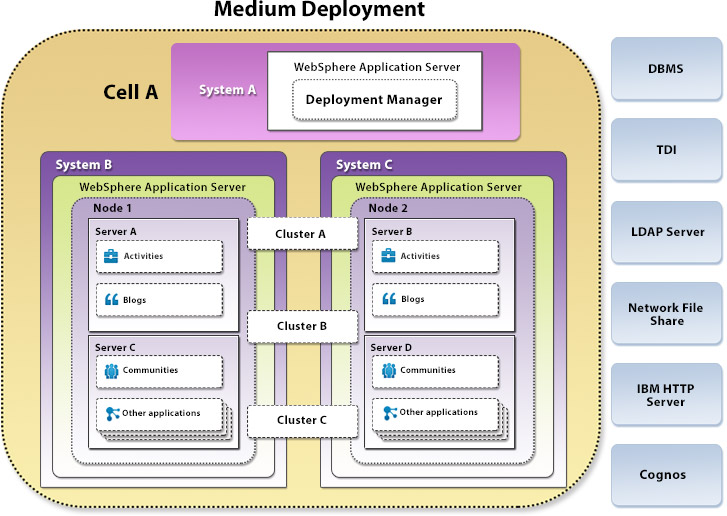
- Medium deployment
- Install a subset of applications in separate clusters. IBM Connections provides three predefined cluster names shared among all of its applications. For example, Profiles application loads may be higher, and require their own cluster, while other applications could be installed in a different cluster.
- Large deployment
- Install each application in its own cluster. IBM Connections provides a predefined cluster name for each application. This option provides the best performance in terms of scalability and availability options but also requires more system resources. In most cases, you should install the News and Home page applications in the same cluster.

In a multi-node cluster, configure network share directories as shared content stores.
- For NFS, use NFS v4 because NFS v3 lacks advanced locking capability.
- For Microsoft SMB, use the UNC file-naming convention...
-
\\machine-name\share-name
The number of JVMs required for each cluster depends on the user population and workload. For failover, you must have two JVMs per application, or two nodes for each cluster, scaled horizontally. Horizontal scaling refers to having multiple JVMs per application with each JVM running on a WAS instance. Vertical scaling refers to running multiple JVMs for the same application on a single WAS instance. Vertical scaling is not officially supported in IBM Connections. However, it is typically not needed unless your server has several CPUs.
For performance and security reasons, consider using a proxy server in your deployment.
IBM Cognos Business Intelligence does not have to be deployed before you install the Metrics application. Even if you do not plan to deploy Cognos now, you should install the Metrics application so that events are recorded in the Metrics DB for use when Cognos is available to provide reports.
For added security when you are planning to run 3rd party OpenSocial gadgets, such as those from iGoogle, configure locked domains. Locked domains are required to isolate these gadgets from access to your intranet and SSO information. The basic configuration of locked domains is as follows:
- A second top-level domain that is not in your SSO domain.
For example, if you organization's SSO domain is example.com, you will require a distinct top level domain, such as example-modules.com.
- A wild card SSL certificate for this domain name.
No additional server instances are required for the basic configuration.
IBM Connections system requirements
Detailed system requirements for IBM Connections web page.
IBM Connections support statement
The statement proposes revisions to the definition of "supported" and "unsupported" with respect to the various products on which IBM Connections depends for proper operation.
To view the support statement, go to the IBM Connections support statements web page.
Worksheet for installing IBM Connections
Record your installation and configuration data.
Recording installation data
While installing and configuring IBM Connections, it can be difficult to remember all the UIDs, passwords, server names, and other information required during and after installation. Print out and use this worksheet to record that data.
LDAP server details
| LDAP data type | Example | Details |
|---|---|---|
| LDAP server type and version | Lotus Domino 8.5 | |
| Primary host | domino_ldap.example.com | |
| Port | 389 | |
| Bind distinguished name | cn=lcadmin,ou=People,dc=example,dc=com | |
| Bind password | ||
| Certificate mapping | ||
| Certificate filter | ||
| Login attribute | mail or uid |
WAS details
| WAS item | Example | Details |
|---|---|---|
| WAS version | V7.0 fix pack 21 | |
| Installation location | C:\IBM\WebSphere\AppServer | |
| Update installer location | C:\IBM\WebSphere\UpdateInstaller | |
| Administrator ID | wsadmin | |
| Administrator password | ||
| WAS URL | http://was.example.com:9060/ibm/console | |
| WAS secure URL | https://was.example.com:9043/ibm/console | |
| WAS host | ||
| HTTP transport port | ||
| HTTPS transport port | ||
| SOAP connector port | ||
| Run application server as a service? (True/False) |
Database details
| Database item | Example | Details |
|---|---|---|
| Database type and version | Oracle Database 10g Enterprise Edition Release 2 10.2.0.4 | |
| Database instance or service name | ||
| Database server host | DB.example.com | |
| Port | DB2=50000
Oracle=1433 MS SQL Server=1523 | |
| JDBC driver fully qualified file path | C:\IBM\SQLLIB | |
| Database client name and version | MS SQL Server Management Studio Express® v9.0.2 | |
| Database client UID | db2admin | |
| Database client user password | ||
| DB2 administrators group (Windows only) | DB2ADMNS | |
| DB2 users group (Windows only) | DB2USERS | |
| Activities DB server host | ||
| Activities DB server port | ||
| Activities DB name. | OPNACT | |
| Activities DB application UID | ||
| Activities DB application user password | ||
| Blogs DB server host | ||
| Blogs DB server port | ||
| Blogs DB name. | BLOGS | |
| Blogs DB application UID | ||
| Blogs DB application user password | ||
| Cognos DB server host | ||
| Cognos DB server port | ||
| Cognos DB name. | COGNOS | |
| Cognos DB application UID | ||
| Cognos DB application user password | ||
| Communities DB server host | ||
| Communities DB server port | ||
| Communities DB name | SNCOMM. | |
| Communities DB application UID | ||
| Communities DB application user password | ||
| Dogear DB server host | ||
| Dogear DB server port | ||
| Dogear DB name. | DOGEAR. | |
| Dogear DB application UID | ||
| Dogear DB application user password | ||
| Files DB server host | ||
| Files DB server port | ||
| Files DB name. | FILES. | |
| Files DB application UID | ||
| Files DB application user password | ||
| Forums DB server host | ||
| Forums DB server port | ||
| Forums DB name. | FORUM. | |
| Forums DB application UID | ||
| Forums DB application user password | ||
| Home page DB server host | ||
| Home page DB server port | ||
| Home page DB name. | HOMEPAGE. | |
| Home page DB application UID | ||
| Home page DB application user password | ||
| Metrics DB server host | ||
| Metrics DB server port | ||
| Metrics DB name. | METRICS. | |
| Metrics DB application UID | ||
| Metrics DB application user password | ||
| Mobile DB server host | ||
| Mobile DB server port | ||
| Mobile DB name. | MOBILE. | |
| Mobile DB application UID | ||
| Mobile DB application user password | ||
| Profiles DB server host | ||
| Profiles DB server port | ||
| Profiles DB name. | PEOPLEDB. | |
| Profiles DB application UID | ||
| Profiles DB application user password | ||
| Wikis DB server host | ||
| Wikis DB server port | ||
| Wikis DB name. | WIKIS | |
| Wikis DB application UID | ||
| Wikis DB application user password |
Tivoli Directory Integrator details
| Tivoli Directory Integrator item | Example | Details |
|---|---|---|
| Tivoli Directory Integrator installation location | C:\IBM\TDI\ | |
| Tivoli Directory Integrator version. | 7.1 fix pack 2. | |
| Solutions Directory path | C:\IBM\TDISOL\TDI |
LDAP-Profiles mapping details
This table is derived from the map_dbrepos_from_source.properties file.
| Profiles DB attribute | LDAP attribute (example) | Profiles DB column |
|---|---|---|
| alternateLastname | null | PROF_ALTERNATE_LAST_NAME |
| bldgId | null | PROF_BUILDING_IDENTIFIER |
| blogUrl | null | PROF_BLOG_URL |
| calendarUrl | null | PROF_CALENDAR_URL |
| countryCode | c | PROF_ISO_COUNTRY_CODE |
| courtesyTitle | null | PROF_COURTESY_TITLE |
| deptNumber | null | PROF_DEPARTMENT_NUMBER |
| description | description | PROF_DESCRIPTION |
| displayName | cn | PROF_DISPLAY_NAME |
| distinguishedName | $dn | PROF_SOURCE_UID |
| PROF_MAIL | ||
| employeeNumber | employeenumber | PROF_EMPLOYEE_NUMBER |
| employeeTypeCode | employeetype | PROF_EMPLOYEE_TYPE |
| experience | null | PROF_EXPERIENCE |
| faxNumber | facsimiletelephonenumber | PROF_FAX_TELEPHONE_NUMBER |
| floor | null | PROF_FLOOR |
| freeBusyUrl | null | PROF_FREEBUSY_URL |
| givenName | givenName | PROF_GIVEN_NAME |
| givenNames | givenName | |
| groupwareEmail | null | PROF_GROUPWARE_EMAIL |
| guid | (Javascript function: {func_map_from_GUID}) | PROF_GUID |
| ipTelephoneNumber | null | PROF_IP_TELEPHONE_NUMBER |
| isManager | null | PROF_IS_MANAGER |
| jobResp | null | PROF_JOBRESPONSIBILITIES |
| loginId | employeenumber | PROF_LOGIN and PROF_LOGIN_LOWER |
| logins | PROF_LOGIN | |
| managerUid | $manager_uid
This attribute represents a lookup of the UID of a manager using DN in the manager field. | PROF_MANAGER_UID |
| mobileNumber | mobile | PROF_MOBILE |
| nativeFirstName | null | PROF_NATIVE_FIRST_NAME |
| nativeLastName | null | PROF_NATIVE_LAST_NAME |
| officeName | physicaldeliveryofficename | PROF_PHYSICAL_DELIVERY_OFFICE |
| orgId | ou | PROF_ORGANIZATION_IDENTIFIER |
| pagerId | null | PROF_PAGER_ID |
| pagerNumber | null | PROF_PAGER |
| pagerServiceProvider | null | PROF_PAGER_SERVICE_PROVIDER |
| pagerType | null | PROF_PAGER_TYPE |
| preferredFirstName | null | PROF_PREFERRED_FIRST_NAME |
| preferredLanguage | preferredlanguage | PROF_PREFERRED_LANGUAGE |
| preferredLastName | null | PROF_PROF_PREFERRED_LAST_NAME |
| profileType | null | PROF_TYPE |
| secretaryUid | $secretaryUid
This attribute represents a lookup of the UID of a secretary using DN in the secretary field. | PROF_SECRETARY_UID |
| shift | null | PROF_SHIFT |
| surname | sn | PROF_SURNAME |
| surnames | sn | PROF_SURNAME |
| telephoneNumber | telephonenumber | PROF_TELEPHONE_NUMBER |
| timezone | null | PROF_TIMEZONE |
| title | null | PROF_TITLE |
| uid | (Javascript function - {func_map_to_db_UID}) | PROF_UID |
| workLocationCode | postallocation | PROF_WORK_LOCATION |
IBM Connections details
| IBM Connections item | Example | Details |
|---|---|---|
| IBM Connections installation location | C:\IBM\Connections | |
| Response file directory path. | C:\IBM\Connections\InstallResponse.txt | |
| DNS host | connections.example.com | |
| Choose: DNS MX Records or Java Mail Session? | ||
| DNS MX Records only: Local mail domain | example.com | |
| Java Mail Session only: DNS server name or SMTP relay host | dns.example.com; relayhost.example.com | |
| Domain name for Reply-to email address | ||
| Suffix or prefix for Reply-to email address | ||
| Server that receives Reply-to emails | ||
| User name and password for that server | ||
| URL and ports for admin and user access | You can look up the URLs for each application in the text files that the installation wizard generates under connections_root | |
| Activities server name | ||
| Activities cluster member name | ||
| Activities URL | http://www.example.com:9080/activities | |
| Activities secure URL | https://www.example.com:9446/activities | |
| Activities statistics files directory path | ||
| Activities content files directory path | ||
| Blogs server name | ||
| Blogs cluster member name | ||
| Blogs URL | http://www.example.com:9080/blogs | |
| Blogs secure URL | https://www.example.com:9446/blogs | |
| Blogs upload files directory path | ||
| Bookmarks server name | ||
| Bookmarks cluster member name | ||
| Bookmarks URL | http://www.example.com:9080/dogear | |
| Bookmarks secure URL | https://www.example.com:9446/dogear | |
| Bookmarks favicon files directory path | ||
| Communities server name | ||
| Communities cluster member name | ||
| Communities URL | http://www.example.com:9080/communities | |
| Communities secure URL | https://www.example.com:9446/communities | |
| Communities statistics files directory path | ||
| Communities discussion forum content directory path | ||
| Files server name | ||
| Files cluster member name | ||
| Files URL | http://www.example.com:9080/files | |
| Files secure URL | https://www.example.com:9446/files | |
| Files content store directory path | ||
| Forums server name | ||
| Forums cluster member name | ||
| Forums URL | http://www.example.com:9080/forums | |
| Forums secure URL | https://www.example.com:9446/forums | |
| Forums content store directory path | ||
| Home page server name | ||
| Home page cluster member name | ||
| Home page URL | http://www.example.com:9080/homepage | |
| Home page secure URL | https://www.example.com:9446/homepage | |
| Home page content store directory path | ||
| Metrics server name | ||
| Metrics cluster member name | ||
| Moderation server name | ||
| Moderation cluster member name | ||
| Moderation URL | http://www.example.com:9080/moderation | |
| Moderation secure URL | https://www.example.com:9446/moderation | |
| Profiles server name | ||
| Profiles cluster member name | ||
| Profiles URL | http://www.example.com:9080/profiles | |
| Profiles secure URL | https://www.example.com:9446/profiles | |
| Profiles statistics files directory path | ||
| Profiles cache directory path | ||
| Search server name | ||
| Search cluster member name | ||
| Search dictionary directory path | ||
| Search index directory path | ||
| Wikis server name | ||
| Wikis cluster member name | ||
| Wikis URL | http://www.example.com:9080/wikis | |
| Wikis secure URL | https://www.example.com:9446/wikis | |
| Wikis content directory path |
IBM HTTP Server
| IBM HTTP Server item | Example | Details |
|---|---|---|
| IBM HTTP Server installation location | C:\IBM\HTTPServer\ | |
| IBM HTTP Server version | V7.0 fix pack 21. | |
| IBM HTTP Server httpd.conf file directory path | C:\IBM\HTTPServer\conf\ | |
| web server definition name | webserver1 | |
| web server plugin-cfg.xml file directory path | C:\IBM\HTTPServer\Plugins\config\webserver1\ | |
| IBM HTTP Server host | ||
| IBM HTTP Server fully qualified host | ||
| IBM HTTP Server IP address | ||
| IBM HTTP Server communication port | 80 | |
| IBM HTTP Server administration port | 8008 | |
| Run IBM HTTP Server as a service? (Y/N) | ||
| Run IBM HTTP administration as a service? (Y/N) | ||
| IBM HTTP Server administrator ID | ||
| IBM HTTP Server administrator password |
Cognos BI Server and Transformer
| Cognos BI Server and Transformer item | Details |
|---|---|
| Cognos BI Server and Transformer | Refer to the cognos-setup.properties file. |
IBM Connections release notes
The release notes for IBM Connections 4 explain compatibility, installation, and other getting-started issues.
Contents
IBM Connections 4 introduces metrics for Communities. Metrics data is available for the entire product as well as for individual communities. Metrics employs the analytic capabilities of the IBM Cognos Business Intelligence server, which is provided as part of the IBM Connections installation to support the collection of metrics data.
The IBM Connections 4 announcement is available at www.ibm.com/common/ssi/index.wss.
- Detailed product description, including a description of new function
- Product-positioning statement
- Packaging and ordering details
- International compatibility information
IBM Connections system requirements
Install IBM Connections 4
For step-by-step installation instructions, refer to the Installing section of the product documentation.
Once mandatory tasks are completed, go to fix central to obtain the latest iFixes and apply them using " Update IBM Connections 4.0" to ensure the deployment will have the latest set of Software Fixes.
Known problems
Known problems are documented in the form of individual technotes in the Support Portal
As problems are discovered and resolved, the IBM Support team updates the knowledge base. By searching the knowledge base, you can quickly find workarounds or solutions to problems.
The following links launch customized queries of the live Support knowledge base:
- All known problems for IBM Connections 4.0
- Activities
- Blogs
- Bookmarks
- Communities
- Files
- Forums
- Home page
- Mobile
- News
- Profiles
- Search
- Wikis
- Installation
- IBM Connections Plugin for Lotus Notes®
- IBM Connections Plugin for Microsoft Office
- IBM Connections Plugin for Microsoft Outlook
- IBM Connections Plugin for Microsoft Windows Explorer
- IBM Connections Plugin for WebSphere Portal
- IBM Connections APIs
Install
New for IBM Connections 4.0 install
- The installation wizard is based on IBM Installation Manager 1.4.4.
- You can install and configure IBM Cognos Business Intelligence, obtained separately, by using the scripts, models, and specifications that are included with IBM Connections.
- Console Mode is available. Use this character-based interface to install, modify, or uninstall the product when you do not have access to the graphical interface.
- Silent installation has been extended so that you can install both IBM Connections and IBM Installation Manager in silent mode.
- The initial configuration of administrators for Home page and Blogs is now handled automatically during installation. However, to configure widgets, you still need to assign a Home page administrator.
Migrate to this release
- After migration to IBM Connections 4.0, you can reuse content stores from 3.0.1.
- In Profiles, the data model for profile-type definitions has been moved into a dedicated profiles-types.xml file and the rules for presentation of a profile have been moved into a set of FreeMarker template files.
- During the DB migration process, data from the Profiles DB is copied to the Home page DB.
- The migration tool no longer migrates content stores, which must be manually migrated.
The installation process
- Review software and hardware requirements.
- Install required software:
- WebSphere Application Server
- LDAP directory
- Database server
- Tivoli Directory Integrator
- IBM Cognos (optional)
- Determine SMTP and DNS details of the mail infrastructure.
- Prepare the LDAP directory
- Create application DBs
- Install IBM Connections
- Complete post-installation tasks
Accessibility applications for installing IBM Connections
Use the wizards
IBM Connections wizards provide non-graphical console modes for installation and other tasks. You can use accessibility applications in the following wizards:
- IBM Connections installation
- Database creation
- Profiles population
- Connector installation
- Update installation
Pre-installation tasks
If you are migrating from IBM Connections version 3.0.1, do not complete the tasks for creating DBs or populating the Profiles DB. The migration process handles those tasks automatically.
Prepare to configure the LDAP directory
- Install a supported LDAP directory.
- Set the Size Limit parameter in the LDAP configuration to match the number of users in the directory.
This allows the Profiles population wizard to return the correct number of records.
For example, if the directory has 100,000 users, set this parameter to 100000.
If you cannot set the Size Limit parameter, you could run the wizard multiple times. Alternatively, you could write a JavaScript function to split the original LDAP search filter, then run...
-
collect_dns_iterate.bat
populate_from_dns_files.bat - Turkish locales have some limitations. See the Base entry comparison for Turkish locale.
- Identify LDAP attributes to use for the following roles.
If no corresponding attribute exists, create one. You can use an attribute for multiple purposes. For example, you can use the mail attribute to perform the login and messaging tasks.
Display name The cn LDAP attribute is used to display a person's name in the product user interface. Log in Attribute or attributes to log in to IBM Connections. For example: uid. The login name must be unique in the LDAP directory. Messaging Optional. Attribute to use to define the email address of a person. The email address must be unique in the LDAP directory. If a person does not have an email address and does not have an LDAP attribute that represents the email address, that person cannot receive notifications. Global unique identifier Attribute to use as the unique identifier of each person and group in the organization. Must be unique across the organization. - Collect LDAP directory information
Directory Type Directory service from the available vendors and versions. Primary host
Port
Bind distinguished name
Bind password
Certificate mapping
Certificate filter, if applicable.
LDAP entity types or classes LDAP object classes. For example, select the LDAP inetOrgPerson object class for the Person Account entity, or the LDAP groupOfUniqueNames object class for the Group entity. Search base Distinguished name (DN) of the LDAP subtree as the search scope. For example, select o=ibm.com to allow all directory objects underneath this subtree node to be searched. For example: -
Group, OrgContainer, PersonAccount, or inetOrgPerson
Create the Cognos administrator account
Create a new user, or select an existing user in the LDAP directory to serve as the administrator of the IBM Cognos BI Server component. We will add the administrator credentials to a configuration script when you deploy Cognos Business Intelligence.
The Cognos administrator account must reside in the same LDAP directory used by IBM Connections.
If you will use an existing LDAP account, take note of the user name and password.
For example, if your organization already has a Cognos deployment, you might choose to use the same administrator account with Connections.
If an acceptable account does not exist already, create it now; again, note the credentials for use later.
Install IBM WAS
WAS Network Deployment is bundled with the IBM Connections install image.
To establish an environment with one Deployment Manager and one or more managed nodes, use the following table to determine the installation option that you should choose. The IBM Connections installation wizard creates server instances that require each node to have an application server. Choose one of these options when installing WAS to ensure that each node has an application server.
WAS options
- IBM Connections deployment
- Deployment Manager and one node on the same system
- Deployment Manager and nodes on separate systems
You can deploy one node on the same system as the DM but you must use separate systems for all other nodes in a cluster.
Install and configure WAS
- Install WAS Network Deployment.
Enable security when the installation wizard requests it. The administrative user ID that you create must be unique and must not exist in the LDAP repository that you plan to federate.
- Apply the available fix packs.
- Configure WAS to communicate with the LDAP directory.
- Perform this step on the Deployment Manager Integrated Solutions Console.
- Configure the LDAP for Cognos separately.
- Configure Application Security.
- For each node to add to the cell:
-
cd app_server_root/profiles/profile/bin
addNode.sh DM_host DM_SoapPort -username AdminUserId -password AdminPwd...where...
- DM_host is the host of the Deployment Manager
- DM_SoapPort is the SOAP port of the Deployment Manager
- AdminUserId is the UID for the Deployment Manager
- AdminPwd is the password for the Deployment Manager
Synchronize all the nodes.
You can also add nodes after you have deployed IBM Connections.
Set up federated repositories
Use federated repositories with IBM WAS to manage and secure user and group identities. You can configure the user directory for IBM Connections to be populated with users from more than one LDAP directory.
For IBM Tivoli Directory Server, for group entities, choose one of the following object classes...
- groupOfNames
- groupOfUniqueNames
WAS uses groupOfNames by default. In most cases, delete the default mapping and create a new mapping for group entities using the LDAP groupOfUniqueNames object class.
For groupOfUniqueNames object class for group entities, for the group member attribute, use uniqueMember
For groupOfNames object class group entities, for the group member attribute, use member
Configure the LDAP for Cognos separately.
Set up federated repositories in WAS
- Prepare to configure the LDAP directory.
- Start WAS and log in to the Integrated Solutions Console on the Deployment Manager:
-
http://dmgr_host:9060/ibm/console
- Click...
-
Security | Global Security | Available realm definitions | Federated Repositories | Configure | Add Base entry to Realm | Add Repository
- On the New page, set repository identifier, for example MyRepo.
- Set the LDAP directory
- IBM Tivoli Directory Server 6.1, 6.2, 6.3
- z/OS Integrated Security Services LDAP Server
- IBM Lotus Domino 8.0 or later, 8.5 or later
- Novell Directory Services eDirectory 8.8
- Sun Java System Directory Server 7
- Microsoft Active Directory 2008
- Microsoft Active Directory Application Mode
- Active Directory Lightweight Directory Services (AD LDS)
- Set the host of the primary LDAP directory server.
- If the directory does not allow LDAP attributes to be searched anonymously, provide values for...
- Bind distinguished name
- Bind password fields
For example, Domino LDAP directory does not allow anonymous access.
- Set the login attribute or attributes to use for authentication in the Login properties field. Separate multiple attributes with a semicolon. For example:
-
uid;mail
If you are using Active Directory, and you use an email address as the login, specify mail as the value for this property.
If you use the samAccountName attribute as the login, specify uid as the value for this property.
- Click Apply and then click Save.
- On the Repository reference page, set...
- LDAP attribute type
- Value pairs for the base element in the realm and the LDAP repository.
Types include...
- DN of a base entry that uniquely identifies this set of entries in the realm
- Identifies entries in the realm. For example, on a Domino LDAP server:
-
cn=john doe, o=example
- DN of a base entry in this repository
- Identifies entries in the LDAP directory. For example...
-
cn=john doe, o=example
The search base entry is the top node of a subtree which consists of many possible entries beneath. For example, the search base entry could be o=example and one of the entries underneath this search base could be...
-
cn=john doe, o=example
If you have defined flat groups in the Domino directory, do not enter a value in this field. Flat groups are group names such as SalesGroup, as opposed to:
-
cn=SalesGroup,ou=Groups
If you configure a search base in this Step, you will not be able to access the groups.
- Click Apply and then click Save.
- Click OK to return the Federated Repositories page.
- In the Repository Identifier column, click the link for
the repository or repositories that you just added.
- In the Additional Properties area, click the LDAP entity types link.
- Click the Group entity type and modify the object classes mapping.
You can also edit the Search bases and Search filters fields, if necessary. Enter LDAP parameters that are suitable for the LDAP directory.
You can accept the default object classes value for Group. However, if you are using Domino, change the value to dominoGroup.
- Click Apply and then click Save.
- Click the PersonAccount entity type and modify the default object classes mapping.
You can also edit the Search bases and Search filters fields, if necessary. Enter LDAP parameters that are suitable for the LDAP directory. Click Apply, and then click Save to save this setting.
If you are using a Domino LDAP, replace the default mapping with dominoPerson and dominoGroup object classes for person account and group entities.
- In the navigation links at the beginning of the page, click the name of the repository modified to return to the Repository page.
- Optional: If your applications rely on group membership from LDAP:
- Click the Group attribute definition link in the Additional Properties area, and then click the Member attributes link.
- Click New to create a group attribute definition.
- Enter group membership values in the Name of member attribute and Object class fields.
- Click Apply and then click Save.
If you have already accepted the default groupOfNames value for Group, then you can also accept the default value for Member.
If you changed objectclass for Group to dominoGroup earlier, add dominoGroup to the definition of Member.
If you do not configure the group membership attribute, the group member attribute is used when you search group membership. To enable searches of nested group membership, configure the group membership attribute.
Consider an example of group membership attribute for using Activities: the Member attribute type is used by the groupOfNames object class, and the uniqueMember attribute type is used by groupOfUniqueNames.
- Click the Group attribute definition link in the Additional Properties area, and then click the Member attributes link.
- If you want to support more than one LDAP directory, repeat
steps 8-22 for each additional LDAP directory.
- Set the new repository as the current respository:
- Click Global Security in the navigation links at the beginning of the page.
- Select Federated Repositories from the Available realm definitions field, and then click Set as current.
- Click Global Security in the navigation links at the beginning of the page.
- Enable login security on WAS:
- Select the Administrative Security and Application Security check boxes. For better performance, clear the Java 2 security check box.
- Click Apply and then click Save.
The administrative user name and password are now required because you set up security on WAS.
- Select the Administrative Security and Application Security check boxes. For better performance, clear the Java 2 security check box.
- Create an administrator for WAS:
- Click Users and Groups > Administrative user roles and
then click Add.
- Select Adminstrator from the Roles box and then search for a user.
- Select the target user and click the right arrow to
move the user name to the Mapped to role box.
- Click OK and then click Save.
- Log out of the DM.
- Restart the DM and the nodes.
- Log in to the DM using the new administrator credentials.
Ensure that this UID does not have spaces in the name.
- Click Users and Groups > Administrative user roles and
then click Add.
- Set a primary administrative user:
- Click...
-
Security | Global Security | Available realm definitions | Federated Repositories | Configure
- Enter the user name mapped in the previous step in the Primary administrative user name box.
- Click Apply and then click Save.
- Click...
- Log out of the DM and restart WAS.
- When WAS is running again, log in to the Integrated Solutions Console using the primary administrative user name and password.
- Optional: Test the new configuration by adding
some LDAP users to the WAS with administrative roles.
- Optional: If you are using SSL for LDAP, add
a signer certificate to your trust store :
- From the WAS Integrated Solutions Console, select...
-
SSL Certificate and key management | Key Stores and certificates | CellDefaultTrustStore | Signer Certificates | Retrieve from port
- Set the DNS name of the LDAP directory in the Host field.
- Set the secure LDAP port in the Port field (typically 636).
- Type an alias name, such as LDAPSSLCertificate, in the Alias field.
- Click Apply and then click Save.
- From the WAS Integrated Solutions Console, select...
- Optional: If you plan to enable single sign-on (SSO) for IBM Connections, prepare the WAS environment :
- From the WAS Integrated Solutions Console, select Security > Global security > web and SIP security > Single sign-on (SSO).
- Select Enabled, Interoperability Mode, and web inbound security attribute propagation.
- Return to the Global security page and click web and SIP security > General settings.
- Select Use available authentication data when an unprotected URI is accessed.
- Click Apply and then click Save.
- From the WAS Integrated Solutions Console, select Security > Global security > web and SIP security > Single sign-on (SSO).
- Optional: Verify that users in the LDAP directory have been successfully added to the repository:
- From the WAS Integrated Solutions Console, select Users and Groups > Manage Users.
- In the Search by field, enter a user name that you know to be in the LDAP directory and click Search. If the search succeeds, you have partial verification that the repository is configured correctly. However, this check cannot check for the groups that a user belongs to.
- From the WAS Integrated Solutions Console, select Users and Groups > Manage Users.
Results
You have configured WAS to use a federated repository.Choose login values
Determine which LDAP attribute or attributes you want to use to log in to IBM Connections.
The following scenarios are supported:
- Single LDAP attribute with a single value
- For example:
-
uid=jsmith
- Multiple LDAP attributes, each with a single value
- To specify multiple attributes, separate them with a semicolon
when you enter them in the Login properties field (while adding the repository to IBM WAS).
For example, where uid=jsmith and mail=jsmith@example.com, you would enter: uid; mail.
- Single LDAP attribute with multiple values
-
For example, mail is the login attribute and it accepts two different email addresses: an intranet address and an extranet address. For example:
-
mail=jsmith@myCompany.com
mail=jsmith@example.com - Multiple LDAP attributes, each with multiple values
- For example:
-
uid=jsmith
uid=john_smith
mail=jsmith@example.com
mail=john_smith@example.com
mail=jsmith@MyCompany.com - Multiple LDAP directories
- For example: One LDAP directory uses uid as the login attribute and the other uses mail. You must repeat the steps in Set up federated repositories for each LDAP directory.
Multi-valued attributes
You can map multiple values to common attributes such as uid or mail.
If, for example, you mapped the following attributes for a user called Sample User, all three values for the user are populated in the PROFILE_LOGIN table in the Profiles DB:
- mail=suser@example.com
- mail=sample_user@example.com
- mail=user_sample@example.com
A similar example for the uid property would have the following attributes:
- uid=suser
- uid=sampleuser
- uid=user_sample
By default, the population wizard only allows you to choose one attribute for logins, so you can't select mail and uid. You can, however, write a custom function to union multiple attributes.
Custom attributes
The Profiles population wizard populates uid and mail, but maps the loginID attribute to null. You can specify a custom attribute if the directory uses a unique login attribute other than, for example, uid, mail, or cn. The login value can be based on any attribute defined in the repository, by setting loginID=attribute when you populate the Profiles DB.
The following sample extract from the profiles-config.xml file shows the standard login attributes:
<loginAttributes>
    <loginAttribute>uid</loginAttribute>
    <loginAttribute>email</loginAttribute>
    <loginAttribute>loginId</loginAttribute>
</loginAttributes>
The value for the loginID attribute is stored in the Prof_Login column of the Employee table in the Profiles DB.
Use Profiles or LDAP as the repository
The default login attributes defined in the profiles-config.xml file are uid, email, or loginID
If you change the default IBM Connections configuration to use the LDAP directory as the user repository, WAS maps uid as the login default.
Set the global ID attribute for users and groups
Unique identifier of each person and group in the organization. Must be unique across the organization.
By default, WAS reserves the following attributes as unique identifiers for the following LDAP directory servers:
| IBM Tivoli Directory Server | ibm-entryUUID |
| Microsoft Active Directory | objectGUID
For AD, the samAccountName attribute has a 20-character limit; other IDs used by IBM Connections have a 256-character limit. |
| IBM Domino Enterprise Server | dominoUNID
If the bind ID for the Domino LDAP does not have sufficient manager access to the Domino directory, the Virtual Member Manager (VMM) does not return the correct attribute type for the Domino schema query; DN is returned as the VMM ID. To override VMM's default ID setting, add the following line to the <config:attributeConfiguration> section of the wimconfig.xml file: <config:externalIdAttributes name="dominoUNID"/> |
| Sun Java System Directory Server | nsuniqueid |
| eNovell Directory Server | GUID |
| Custom ID | If your organization already uses a unique identifier for each user and group, you can configure IBM Connections to use that identifier. |
The wimconfig.xml file is stored in the following location:
- AIX
- /usr/IBM/WebSphere/AppServer/profiles/<profile_name>/config/cells/<cell_name>/wim/config
- Linux
- /opt/IBM/WebSphere/AppServer/profiles/<profile_name>/config/cells/<cell_name>/wim/config
- Microsoft Windows
- <drive>:\IBM\WebSphere\AppServer\profiles\<profile_name>\config\cells\<cell_name>\wim\config
IBM recommends that you do not allow the GUID of a user to change. If you change the GUID, the user will not have access to their data unless you re-synchronize the LDAP and Profiles DB with the new GUID. When you change the GUID and run the sync_all_dns batch file, the user's GUID is changed only in the Profiles DB, and not in the DBs for other IBM Connections applications. Similarly, if you delete users and re-add them to the LDAP, the GUID value that the LDAP generates is now different than the value that is stored in the other application DBs.
To resolve this discrepancy, use the SWAP command.
To allow deletes and adds, or migration across various LDAP servers (for example, from staging to production), use an LDAP attribute that is fixed across various directories or when entries are recreated.
Specify a custom ID attribute for users or groups
Specify custom global unique ID attributes to identify users and groups in the LDAP directory.
This is an optional task.
By default, IBM Connections looks for LDAP attributes to use as the global unique IDs (guids) to identify users and groups in the LDAP directory. The identifiers assigned by LDAP directory servers are usually unique for any LDAP entry instance. If the user information is deleted and re-added, or exported and imported into another LDAP directory, the guid changes. Changes like this are usually implemented when employees change status, a directory record is deleted and added again, or when user data is ported across directories.
When the guid of a user changes, you must synchronize the LDAP with the Profiles DB before that user logs in again. Otherwise, the user will have two accounts in IBM Connections and the user's previous content will appear to be lost as it is associated with the previous guid. If you assign a fixed attribute to each record, you can minimize the possibility of accidentally introducing dual accounts for a user in IBM Connections.
The wimconfig.xml file governs a single ID attribute for all supported objects such as users, groups, and organizations in WAS. You can use LotusConnections-config.xml to override the ID attribute in the wimconfig.xml file.
For example, you could use the wimconfig.xml file to specify the ibm-entryUUID attribute as the ID Key attribute for users and groups in all applications running on WAS, and then modify LotusConnections-config.xml to specify the employeeID as the ID Key attribute for IBM Connections applications.
You can change the default setting to use a custom ID to identify users and groups in the directory.
A custom ID must meet the following requirements:
- The ID must be static and unique. It must not be reassigned across
users and groups in the directory.
- The ID must not exceed
256 characters in length. To achieve faster search results, use a
fixed-length attribute for the ID.
If you are planning to install the Files or Wikis application, the ID cannot exceed 252 characters in length.
- The ID must have a one-to-one mapping per directory object. You cannot use an attribute with multiple values as a unique ID.
To specify a custom attribute as the unique ID for users or groups, complete the following steps:
- From the VMM_HOME/model directory,
open the wimxmlextension.xml file. If no file
with this name exists, create one.
VMM_HOME is the directory where the Virtual Member Manager files are located. This location is set to either the wim.home system property or the user.install.root/config/cells/local.cell/wim directory.
- Add the definitions of the new property types and the entity
types to which they apply. Ensure that the XML is well-formed and
conforms to the schema defined in wimschema.xsd.
- To select a single ID attribute for both users and groups,
use the following sample XML, which defines a new property type called
enterpriseID and adds this property type to the PersonAccount and
Group entity types:
<?xml version="1.0" encoding="UTF-8"?>
<sdo:datagraph xmlns:sdo="commonj.sdo"
xmlns:wim="http://www.example.com/websphere/wim">
<wim:schema>
<wim:propertySchema
nsURI="http://www.example.com/websphere/wim"
dataType="STRING" multiValued="false"
propertyName="enterpriseID">
<wim:applicableEntityTypeNames>PersonAccount
</wim:applicableEntityTypeNames>
</wim:propertySchema>
<wim:propertySchema
nsURI="http://www.example.com/websphere/wim"
dataType="STRING" multiValued="false"
propertyName="enterpriseID">
<wim:applicableEntityTypeNames>Group
</wim:applicableEntityTypeNames>
</wim:propertySchema>
</wim:schema>
</sdo:datagraph>
- To use two different ID attributes, one for users and a different
one for groups, use the following sample XML, which defines a property
type called customUserID and adds it to the PersonAccount entity type,
and also defines a property type called customGroupID and adds it
to the Group entity type:
<?xml version="1.0" encoding="UTF-8"?>
<sdo:datagraph xmlns:sdo="commonj.sdo"
xmlns:wim="http://www.example.com/websphere/wim">
<wim:schema>
<wim:propertySchema
nsURI="http://www.example.com/websphere/wim"
dataType="STRING" multiValued="false"
propertyName="customUserID">
<wim:applicableEntityTypeNames>PersonAccount
</wim:applicableEntityTypeNames>
</wim:propertySchema>
<wim:propertySchema
nsURI="http://www.example.com/websphere/wim"
dataType="STRING" multiValued="false"
propertyName="customGroupID">
<wim:applicableEntityTypeNames>Group
</wim:applicableEntityTypeNames>
</wim:propertySchema>
</wim:schema>
</sdo:datagraph>
The customUserID and customGroupID properties are not related to the properties of the login ID.
- To select a single ID attribute for both users and groups,
use the following sample XML, which defines a new property type called
enterpriseID and adds this property type to the PersonAccount and
Group entity types:
- Add the new property types to each repository adapter.
Open the wimconfig.xml file in a text editor.
Option Description AIX /usr/IBM/WebSphere/AppServer/profiles/<profile_name>/config/cells/<cell_name>/wim/config Linux /opt/IBM/WebSphere/AppServer/profiles/<profile_name>/config/cells/<cell_name>/wim/config Microsoft Windows C:\IBM\WebSphere\AppServer\profiles\<profile_name>\config\cells\<cell_name>\wim\config - Find and edit the <config:attributeConfiguration> element,
adding one of the following texts:
- To use a single ID attribute for both users and groups, using
a string called enterpriseid, add the following text:
<config:attributeConfiguration>
	<config:externalIdAttributes
name="enterpriseID" syntax="String"/>
</config:attributeConfiguration>
- To use two different ID attributes, one for users and the other for groups, add the following text:
<config:attributeConfiguration>
	<config:attributes name="userPassword"
propertyName="password"/>
	<config:attributes name="customUserID"
propertyName="customUserID"/>
	<config:attributes name="customGroupID"
propertyName="customGroupID"/>
	<config:propertiesNotSupported
name="homeAddress"/>
	<config:propertiesNotSupported
name="businessAddress"/>
</config:attributeConfiguration>
- To use a single ID attribute for both users and groups, using
a string called enterpriseid, add the following text:
- Save and close the wimconfig.xml file.
What to do next
If you specified different ID attributes for users and groups, complete the steps in the Configuring the custom ID attribute for users or groups topic in the Post-installation tasks section of the product documentation. The steps in that task configure IBM Connections to use the custom ID attributes specified in this task.
When you map fields in the Profiles DB, ensure that you add the custom ID attribute to the PROF_GUID field in the EMPLOYEE table.
Create DBs
Create DBs for the applications that you plan to install. You can use the DB wizard or run the SQL scripts that are provided with IBM Connections.
If you are migrating from Lotus Connections version 3.0.1, do not complete the tasks for creating DBs. The migration process manages those tasks automatically. However, create the following new DBs if you plan to use the associated applications:
- Cognos
- Metrics
- Mobile
Each IBM Connections application requires its own DB, except Moderation, News, and Search. The Moderation application does not have an associated DB or content store, while the News and Search applications share the Home page DB.
The DB wizard automates the process of creating DBs for the applications that you plan to install. It is a more reliable method for creating DBs because it validates the DBs as you create them.
Consult your DB documentation for detailed information about preparing your DBs.
You must have already created and started a DB instance before you can create DBs.
Complete the procedures that are appropriate for your deployment:
Create multiple DB instances
Create multiple instances of a DB for a more versatile DB environment.
This is an optional procedure. If you need to have only one DB instance (in Oracle terminology, one DB), you can skip this task.
(Windows only) Complete the following steps for each instance that you plan to create:
- Create a new user and add it to the Administrators group.
If you are using DB2, add the new user to the DB2ADMNS group as well.
- Remove the user account from the Users group.
- In the Local Security Policy utility, add these rights to the new user:
- Act as part of the operating system
- Adjust memory quotas|Increase quotas for a process
- Create a token object
- Debug programs
- Lock pages in memory
- Log on as a service
- Replace a process level token
- Act as part of the operating system
The new account uses the local system as the domain.
A DB environment with multiple instances provides several benefits:
- the ability to use different instances for development and production.
- restricted access to sensitive information.
- an optimized configuration for each instance.
For example, if you need to make changes to one of the instances, you can restart just that instance instead of restarting the whole system. Similarly, if you need to take an instance offline, only the DBs that are hosted on that instance are unavailable during the outage, while your other DBs are unaffected.
Multiple instances require additional system resources.
To create multiple instances of a DB:
- DB2
For each instance to create, log in as the instance owner before creating the instance.
> Use the DB2 Command Line Processor to enter commands.
> After creating the instance, add the instance to the user environment variable. The instance is then visible in the DB2 Control Center.
- AIX: An instance called db2inst1 is created during DB2 installation.
- Create a group for DB2:
- mkgroup db2iadm1
- Create a user for DB2:
mkuser groups=db2iadm1 db2instN
where db2instN is the name of a user. DB2 prompts you to enter a password for the user. Repeat this step to create enough users to match the number of DB instances.
- Create DB2 instances:
Login with root user and go to /opt/IBM/db2/V9.5/instance.
./db2icrt -u db2instN db2instN
...where db2instN is the name of a user and also the name of an instance. Repeat this step to create enough instances to match the number of DBs.
- Set the port of the instance:
Edit the/etc/services file and add the following line:
db2c_instance_name instance_port/tcpwhere instance_name is the name of the instance and instance_port is the port of that instance. Repeat this step for each instance.
- Set the communication protocols for the instance:
db2 update DB manager configuration using svcename db2c_instance_name
db2set DB2COMM=tcpip
db2stop
db2start
Repeat this step for each instance. - Edit your firewall configuration to allow the new instances to communicate through their listening ports.
- Create a group for DB2:
- Linux:
An instance called db2inst1 is created during DB2 installation, along with three users: db2inst1, db2fenc1, and dasusr1.
- Create groups for DB2:
groupadd -g 999 db2iadm1
groupadd -g 998 db2fadm1
groupadd -g 997 dasadm1
- Create users for DB2 in
the db2iadm1 group:
useradd -u 1100 -g db2iadm1 -m -d /home/db2instN db2instN -p db2instX
where db2instN is the name of a user and db2instX is the password for that user. Create enough users to match the number of DB instances.
- Create the db2fenc1 user for DB2 in the db2fadm1 group:
useradd -u 1101 -g db2fadm1 -m -d /home/db2fenc1 db2fenc1 -p db2instX
- Create the dasusr1 user for DB2 in the dasadm1 group:
useradd -u 1102 -g dasadm1 -m -d /home/dasadm1 dasusr1 -p db2instX
- Create new DB2 instances:
Login with root user and go to /opt/ibm/db2/V9.5/instance.
./db2icrt -u db2fenc1 db2instN
Create enough instances to match the number of DBs.
- Set the port of the instance:
Edit the /etc/services file and add the following line:
db2c_<instance_name> <instance_port>/tcp
...where instance_name is the name of the instance and instance_port is the port of that instance. Repeat this step for each instance.
- Log in as the DB instance and set the communication protocols
for the instance:
su - db2instN
db2 update DB manager configuration using svcename
 db2c_instance_name
db2set DB2COMM=tcpip
db2stop
db2start
Repeat this step for each instance. - Edit your firewall configuration to allow the new instances to communicate through their listening ports.
- Create groups for DB2:
- Microsoft Windows:
- Create an instance:
- db2icrt instance_name -s ese -u db2_admin_user
where instance_name is the name of the instance and db2_admin_user is the user account for that instance.
- Set the port of the instance:
Edit the C:\WINDOWS\system32\drivers\etc\services file and add the following line:
db2c_instance_name instance_port/tcp
- Set the current instance parameter:
set DB2INSTANCE=instance_name
- Set the communication protocols for the instance:
db2 update DB manager configuration using svcename
 db2c_instance_name
db2set DB2COMM=npipe,tcpip
db2stop
db2start
- Edit your firewall configuration to allow the new instances to communicate through their listening ports.
- Create an instance:
- AIX: An instance called db2inst1 is created during DB2 installation.
- Oracle:
Each DB is a DB instance.
Use the Oracle Database Configuration Assistant (DBCA) to create Oracle a new DB:
- Open the DBCA tool:
- AIX or Linux:
-
$ sudo su - oracleuser
$ export [[ORACLE_HOME]]=...
$ export PATH=$PATH:$ORACLE_HOME/bin
$ export DISPLAY=hostname:displaynumber.screennumber...where hostname:displaynumber.screennumber represents the client system, monitor number, and window number. For example:
-
localhost:0.0
- $ dbca &
- AIX or Linux:
- Open the DBCA tool:
- Windows:
- Click Start
- Select Oracle > Oracle_home_name > Configuration and
Migration Tools > Database Configuration Assistant.
where Oracle_home_name is the Oracle home on your system. For example:
-
OraDB10g_Home1
- Click Start
- Run the SQL Server installation wizard. On the Instance Name panel
of the installation wizard, select Named instance, and then specify a new instance name in the field.
- Edit your firewall configuration to allow the new instances to communicate through their listening ports.
- Ensure that Named Pipes is enabled in the SQL Server Network Configuration for all instances.
Use the same collation that you are using for the application DBs; that is: Latin1_General_BIN. Ensure that the ancillary DBs, such as the master, model, tempdb, and msdb DBs, use that collation.
For Authentication mode, use Mixed Mode (Windows Authentication and SQL Server Authentication).
If you receive any warnings or errors from the System Configuration Check dialog, correct them from the SQL Server 2005 instance installation.
What to do next
When you create multiple DB instances, you must install the DBs on each instance. If you are using the DB wizard to install the DBs, you must prepare and run the DB wizard once for each instance and if you are using the scripts to install the DBs, you must run the scripts once for each instance.Register the DB2 product license key
Register the DB2 product license key for the version of DB2 that is included with IBM Connections.
Only perform this procedure if you are using the version of DB2 that was included with IBM Connections. If you installed IBM Connections and DB2 from the product DVD, the license key was already provided.
If you used DB2 with an earlier version of IBM Connections, your installation of DB2 is already registered and you can skip this task.
Install DB2 before beginning this task but do not create any application DBs until after you have completed this task. To register the DB2 product license key, complete the following steps:
- Navigate
to the IBM Passport Advantage® web
site and log in.
If you installed IBM Connections and DB2 from the product DVD, the license key was already provided. You can skip Steps 1-3 and begin at Step 4.
- Choose Find
by Part Number and search
for part number CZ381ML.
- Download
the part and extract the DB2_ESE_Restricted_QS_Activation_97.zip file,
making a note of the download location.
- Log into DB2 using an ID with SYSADM authority.
- Open a command prompt, change to the directory where the license file is stored, and run the following command:
On the DVD image, the license is stored in the DB2.License directory.
- db2licm -a path_to_lic_file/db2ese_o.lic
where path_to_lic_file is the directory to which you extracted the db2ese_o.lic file.
- Verify the license is registered by running the following command:
- db2licm -l
If the license is correctly registered, the details of your DB2 installation are displayed.
- Restart DB2.
What to do next
Create your IBM Connections application DBs.Create a dedicated DB2 user
Create a dedicated IBM DB2 DB user named lcuser with restricted privileges. Perform this task to create a DB2 DB user, called lcuser, with a limited set of privileges. The scripts that are provided with IBM Connections grant the appropriate rights to lcuser and are written with the assumption that the user name is lcuser. Always use lowercase characters for this user name.
To create a dedicated DB2 DB user named lcuser, complete the following steps:
- AIX or Linux:
- Log into the DB2 server as the root user, and then type the following command to create a new user:
useradd -u 1004 -g db2iadm1 -m -d /db2home/lcuser lcuser -p password
where password is new password for the new user. The command assumes that your DB2 users group is db2iadm1 and that your home directory for DB2 is db2home. If these values are different in your environment, modify the command accordingly.
- Log into the DB2 server as the root user, and then type the following command to create a new user:
- Windows
- Click Start > Control
Panel and select Administrative Tools > Computer Management.
- From the Computer Management console, select...
-
System Tools > Local Users and Groups
- Right-click Users and select New User.
- Add a user named lcuser. Enter the required
details, including the password. Clear the User must change
password at next logon check box. Click Create.
- Click Close.
- Open the Users object, right-click lcuser, and select Properties from the context menu.
- Click the Member Of tab and then click the Add button.
- Type DB2USERS in the Enter the object names to select field, and click OK. Click OK again to save your changes.
If the DB2USERS group is not found, extended security for DB2 on Windows might not be enabled.
- Click Start > Control
Panel and select Administrative Tools > Computer Management.
Configure the DB2 DBs for unicode
You must configure each DB2 DB used in the IBM Connections deployment for unicode.
Configure the DB2 DBs for unicode ensures that DB2 tools like export and import do not corrupt unicode data.
You must perform the following steps on each DB2 instance in the deployment:
- Stop any WebSphere server
connected to the DB2 DB
you are configuring.
- Log in to the DB2 server
as the DB2 instance owner.
- Open the DB2 command
window.
- Run the following commands:
db2set DB2CODEPAGE=1208
db2stop force
db2start
- Run the following commands to check the new configuration:
db2set
This should return DB2CODEPAGE=1208. If not, it is not configured correctly and you should try Step 4 again.
Create DBs with the DB wizard
Use the DB wizard to create DBs for the IBM Connections applications. You must be logged in with the DB administrator account.
Prepare the DB wizard
Before you can use the wizard to create DBs for your IBM Connections deployment, prepare the DB server.
Ensure that you have given the necessary permissions to the UIDs that need to log in to the DB system and access the IBM Connections Wizards directory.
If you are planning to create multiple DB instances, prepare and run the DB wizard once for each instance.
(DB2 only) Create a dedicated IBM DB2 DB user named lcuser.
(Oracle only) Ensure that the Statement cache size for the data sources on WAS is no larger than 50. A higher value could lead to Out Of Memory errors on the application server instance.
(AIX only) If you are downloading the wizard, the TAR program available by default with AIX does not handle path lengths longer than 100 characters. To overcome this restriction, use the GNU file archiving program instead. This program is an open source package that IBM distributes through the AIX Toolbox for Linux Applications at the IBM AIX Toolbox web site. Download and install the GNU-compatible TAR package. You do not need to install the RPM Package Manager because it is provided with AIX.
After you have installed the GNU-compatible TAR program, change to the directory where you downloaded the IBM Connections TAR file, and enter the following command to extract the files from it:
-
gtar -xvf Lotus_Connections_wizard_aix.tar
This command creates a directory named after the wizard.
(AIX only) Download and install the following packages from the AIX Toolbox for Linux Applications webpage:
- gtk2-2.10.6, pango-1.14.5, fontconfig-2.4.2, pkg-config-0.19, libjpeg-6b, freetype2-2.3.9, expat-2.0.1, zlib-1.2.3, xft-2.1.6, xcursor-1.1.7, glib-1.2.10, glib2-2.12.4, atk-1.12.3, gettext-0.10.40, libpng-1.2.32, and libtiff-3.8.2
Some of these packages have dependencies on other packages. The AIX package installer alerts you to any additional packages that might be required.
To prepare the DB wizard, complete the following steps:
- Log in to your DB server as the root user or system administrator.
- (AIX and Linux only) Grant display authority to all userss under the root user or system administrator:
xhost + // Grant display authority to other users
If granting display authority to all users is a security concern for you, change the command to grant display authority to a specific user or users.
echo $DISPLAY // Echo the value of DISPLAY under the root user
- (AIX and Linux only) Ensure that the current user is qualified or else switch to a qualified user by running the following commands:
- DB2
su - db2inst1
export DISPLAY=localhost:0.0
xclock
Ctrl + C - Oracle
Before running the DB wizard, create an Oracle DB instance.
su - oracle
export DISPLAY=localhost:0.0
xclock
Press Ctrl + C
If you can see the xclock application running after issuing the xclock command, then you have permission to run the DB wizard. If you cannot see the xclock application, run the xhost + command as root user and then run the su command.
- DB2
- Start the DB instance:
Run the DB commands under the user account that has administrative access to the DB.
- AIX or Linux:
- DB2
- Oracle (login as oracle or use the su oracle command to change to oracle)
export ORACLE_SID=orcl // Set the current Oracle DB
export ORACLE_HOME=/home/oracle/oracle/product/10.2.0/db_1 // Set the Oracle home directory
cd $ORACLE_HOME/bin
./sqlplus "/ as sysdba"
startup // Start the current Oracle DB
- DB2
- Microsoft Windows:
Windows registers most DB instances as a service. You can start or stop a DB service manually if necessary.
- DB2
- Log in to the Control Center.
- In Object View, right-click the DB instance.
- In the menu, click Start to start the DB manager.
- Log in to the Control Center.
- Oracle
- Open the Windows Services
panel: Click Start > All Programs > Administrative Tools > Services.
- Right-click the Oracle service.
- From the menu, click Start to start the DB service.
- Open the Windows Services
panel: Click Start > All Programs > Administrative Tools > Services.
- SQL Server
- Open SQL Server Management Studio.
- Connect the DB instance.
- Start the DB instance from the studio.
- Open SQL Server Management Studio.
- DB2
- AIX or Linux:
- Copy the Wizards directory in the IBM Connections installation media to the system
that hosts the DB server.
If you have more instances, exit from the current instance and repeat this step for each instance.
(AIX and Linux only) Ensure that users other than root have permission to access the IBM Connections Wizards directory.
(DB2 only) For more information about working with multiple instances, see the Set the current instance environment variables topic in the DB2 information center.
Use the DB wizard
Use the DB wizard to create DBs for the IBM Connections applications that you plan to install.
Before using the wizard for the first time, complete the steps described in the Preparing the DB wizard topic.
When you are creating a DB either with the DB wizard or SQL scripts, you must log into the system where the DB is hosted with the DB administrator account. The default values for DB2 are db2admin on Microsoft Windows, and db2inst1 on Linux and AIX. For Oracle, the default value on AIX and Linux is oracle, and system administrator on Windows. For SQL Server, the default value is the system administrator.
Oracle and SQL Server connect to IBM Connections DBs with the user accounts that are configured during DB creation. The passwords of those user accounts are defined later in this task.
(Oracle only) Ensure that the Statement cache size for the data sources on WAS is no larger than 50. A higher value could lead to Out Of Memory errors on the application server instance.
If you migrated from IBM Connections 3.0.1, the numdb parameter was set to 12, the maximum number of IBM Connections 4.0 DBs. If the instance has additional DBs, increase the value of the numdb parameter to match the total number of DBs on the instance.
To change the parameter:
- db2 UPDATE DBM CFG USING NUMDB nn
where nn is a number of DBs.
DB2 uses a user account called lcuser. If you are creating a DB2 DB with SQL scripts, manually create the lcuser account on your operating system and then run the appGrants.sql script to grant the appropriate privileges to the lcuser account. When you use the DB wizard, this script runs automatically.
If you are using Linux on IBM System z with the DASD driver, the SQL scripts are located in the connections.s390.sql/application_subdirectory directory of the IBM Connections set-up directory or installation media.
If you are using Linux on IBM System z with the SCSI driver, back up the connections.s390.sql directory and rename the connections.sql directory to connections.s390.sql.
(AIX only) Download and install the following packages from the AIX Toolbox for Linux Applications webpage:
gtk2-2.10.6, pango-1.14.5, fontconfig-2.4.2, pkg-config-0.19, libjpeg-6b, freetype2-2.3.9, expat-2.0.1, zlib-1.2.3, xft-2.1.6, xcursor-1.1.7, glib-1.2.10, glib2-2.12.4, atk-1.12.3, gettext-0.10.40, libpng-1.2.32, and libtiff-3.8.2
Some of these packages have dependencies on other packages. The AIX package installer alerts you to any additional packages that might be required. Use the IBM Connections DB wizard to create, update, and remove DBs.
You can review the scripts that the wizard executes by looking in the connections.sql directory in the installation media. On DB2, the commands are shown in the log that the wizard creates. On Oracle and SQL Server, the log shows the results of the commands.
To create DBs with the wizard, complete the following steps:
- (DB2 on Windows 2008 64-bit.) On Windows 2008, you must perform DB2 administration tasks with full
administrator privileges.
- Logged in as the instance owner, open a command prompt
and change to the DB2 bin directory.
For example: C:\IBM\SQLLIB\BIN.
- Enter the following command: db2cwadmin.bat. This command opens the DB2 command line processor while also setting your DB2 privileges.
- Logged in as the instance owner, open a command prompt
and change to the DB2 bin directory.
For example: C:\IBM\SQLLIB\BIN.
- From the IBM Connections Wizards directory, open the following file to launch the wizard:
- AIX: ./dbWizard.sh
- Linux: ./dbWizard.sh
- Microsoft Windows: dbWizard.bat
- Click Next to continue.
- Select the option to Create a DB
and click Next.
- Enter the details of the DB you wish to create and
then click Next:
- Select a DB type.
- Select the location of the DB.
For an Oracle DB on Windows 2008 64-bit, enter the value of the ORACLE_HOME registry key.
For example, the key for Oracle 11g on Windows 2008 64-bit is HKEY_LOCAL_MACHINE\SOFTWARE\ORACLE\Key_OraDb11g_home1 and the value is C:\app\Administrator\product\11.2.0\dbhome_1.
- Specify a DB instance.
The DB instance that you specify must already exist on your system.
- Select a DB type.
- Select an application and click Next.
If you are creating DBs in this task, only applications that have not already been installed to a DB instance are available. If you are updating DBs, you can only choose applications that are already installed.
The News and Search DBs are contained in the Home page DB.
The Metrics application has some additional requirements:
- If you select the Metrics application, you must also select the IBM Cognos application.
- If you have already deployed Cognos components and have a Cognos Content Store available, you do not need to create another.
- If you do create a Cognos Content Store, only the container is created now; the tables are created when you start the Cognos BI Server for the first time.
- You do not need a dedicated DB server for Cognos or for the Metrics application; you can host the Metrics DB and the Cognos Content Store on the same DB server as the other Connections DBs.
- Even if you do not plan to deploy Cognos yet, you should create the Metrics DB and the Cognos Content Store now so that IBM Connections can begin collecting event data immediately.
- If you select the Metrics application, you must also select the IBM Cognos application.
- (Oracle and SQL Server DBs only) Enter the password for the DBs and then click Next. Choose one of
the following options:
- Use the same password for all applications. Enter the password in the Password and Confirm password fields.
- Create different passwords for each application. Enter a different password for each application DB, and confirm the password in the confirm field.
- Use the same password for all applications. Enter the password in the Password and Confirm password fields.
- (SQL Server only) Set the location of the DB file and then click Next.
- Use the same DB file location for all applications. Enter the location of the DB or click Browse to choose a location.
- Use different DB file locations for each application. For each application, enter the location of the DB file or click Browse to choose a location.
- Use the same DB file location for all applications. Enter the location of the DB or click Browse to choose a location.
- Review the Pre Configuration Task Summary to ensure that
the values you entered on previous pages in the wizard are correct.
If you want to make a change, click Back to
edit the value. Click Create to begin creating
DBs.
Click Show detailed DB commands to preview each SQL command before it is executed by the wizard. If you choose to save the commands, you must have write-access to the folder you choose to save them in.
- Review the Post Configuration Task Summary panel and, if necessary, click View Log to open the log file. Click Finish to exit the wizard.
What to do next
(DB2 for Linux on System z only.) To improve DB performance, enable the NO FILE SYSTEM CACHING option.
Use the DB wizard in silent mode
Run the DB wizard in silent mode when you need an identical installation on multiple servers.
Ensure that the wizard has created the response.properties file in the user_settings/lcWizard/response/dbWizard directory.
To create a response file, run the wizard in standard mode and specify that you would like to create a response file. You can modify the existing response file or create your own, using a text editor.
(DB2 only) If you use only one DB instance and if that instance includes other DBs besides IBM Connections, configure the numdb parameter to match the total number of DBs on the instance.
If you migrated from IBM Connections 3.0.1, the numdb parameter was set to 12, the maximum number of IBM Connections 4.0 DBs. If the instance has additional DBs, increase the value of the numdb parameter to match the total number of DBs on the instance.
To change the parameter:
- db2 UPDATE DBM CFG USING NUMDB nn
where nn is a number of DBs.
(Oracle only) Ensure that the Statement cache size for the data sources on WAS is no larger than 50. A higher value could lead to Out Of Memory errors on the application server instance. To create DBs in silent mode, complete the following steps:
- (DB2 on Windows 2008 64-bit.) On Windows 2008, you must perform DB2 administration tasks with full
administrator privileges.
- Logged in as the instance owner, open a command prompt
and change to the DB2 bin directory.
For example: C:\IBM\SQLLIB\BIN.
- Enter the following command: db2cwadmin.bat. This command opens the DB2 command line processor while also setting your DB2 privileges.
- Logged in as the instance owner, open a command prompt
and change to the DB2 bin directory.
For example: C:\IBM\SQLLIB\BIN.
- From a command prompt, change to the directory where the wizard is located.
- Launch the wizard:
- AIX: ./dbWizard.sh -silent response_file
- Linux: ./dbWizard.sh -silent response_file
- Microsoft Windows: dbWizard.bat -silent response_file
where response_file is the file path to the response file.
If the path to the response_file contains a space, this parameter must be enclosed in double quotation marks (").
What to do next
After the wizard has finished, check the log file in the Lotus_Connections_set-up_directory/Wizards/DBWizard directory for messages. The log file name uses the time as a postfix. For example: dbConfig_20110308_202501.log.The DB wizard response file
The IBM Connections DB wizard can record your input in a response file that you can use for silent installations.
When you want to run the DB wizard in silent mode, use the response file to duplicate the settings that you selected when you ran the wizard in interactive mode. You can start the wizard from a command prompt and then pass the response file in as a parameter. The wizard uses the values in the response file rather than requiring you to interact with it.
There is a sample response file called dbWizard_response.properties in the Wizards/samples directory on the IBM Connections set-up directory or installation media.
The response.properties file collects a specific set of values. Those values are described in the following table:
| Property | Value | Description |
|---|---|---|
| dbtype | db2 | oracle | sqlserver | The DB system to use. Choose from IBM DB2, Oracle, or Microsoft SQL Server. |
| dbInstance | DB_instance_name | The instance name of the DB that you
want to use. For example:
|
| dbHome | DB_location | File path to the DB.
If you encounter an Invalid DB instance error, the file path to the DB might be incorrect. If the dbHome value is, for example, /home/oracle/oracle/product/10.2.0/db_1/, then you must remove the final / character. This limitation applies only on Oracle DBs. On Windows, you need to add an escape character '\'. For example, activities.filepath=C\:\\SQLSERVER. |
| action | create | delete | upgrade | The action performed by the wizard. The options are create, delete, or upgrade. |
| dbVersion | DB2: 9 | Oracle: 10 or 11| SQL Server 2005:9 SQL Server 2008: 10 | The major version number of the DB
type.
For example, if you use SQL Server 2005, enter 9. If you use SQL Server 2008, enter 10. |
| applications | activities, blogs, cognos, communities, dogear, files, forum, homepage, metrics, mobile, profiles, wikis | IBM Connections applications for which the wizard creates DBs. Use a comma (,) character to separate multiple applications. |
If you are creating Oracle or SQL Server DBs, add the additional properties described in the following table:
| Property | Value | Description |
|---|---|---|
| <application>.password | Password for application DBs | Password for the applications.
The passwords will be removed from the response file after the wizard has finished processing. |
| <application>.filepath | File path to the directory where DB files are stored | (SQL Server only) File path to the DB
file location.
On Windows, add an escape character '\'. For example, activities.filepath=C\:\\SQLSERVER. |
If you are upgrading DBs and a JDBC connection is needed, add the additional properties described in the following table:
| Property | Recommended value | Description |
|---|---|---|
| port |
| Database server port for starting JDBC |
| administrator |
| Database administrator account for starting JDBC |
| adminPassword | Database administrator password for starting JDBC | |
| storyLifetimeInDays | The Home page upgrade requires this parameter. It should be the same as the value in the news-config.xml file. | |
| profiles.db.name profiles.db.hostname profiles.db.port profiles.db.admin profiles.db.adminPassword | The Home page migration process copies data from the Profiles DB. For this reason, you must update the Home page DB before updating the Profiles DB. The migration process supports the use of different instances to host the Home page and Profiles DBs. | |
| jdbcLibPath | (SQL Server only) JDBC library path for
starting JDBC.
On Windows, add an escape character '\'. For example, jdbcLibPath=C\:\\sqljdbc4.jar |
Create DBs with SQL scripts
Create IBM Connections DBs using the SQL scripts that are provided on the installation media. Use the SQL scripts to create DBs for IBM Connections takes longer than using the wizard, and does not validate the DBs, but might be necessary in some circumstances.
Create IBM DB2 DBs manually
Create IBM DB2 DBs with SQL scripts instead of using the IBM Connections DB wizard.
Use this procedure if you do not want to use the DB wizard to create your DBs.
The SQL scripts are located in a compressed file called connections.sql.zip|tar, located in the IBM_Connections_Install/IBMConnections/connections.sql directory of the IBM Connections set-up directory or installation media. Extract this file before proceeding. When extracted, the SQL scripts are located in the IBMConnections/connections.sql/application_subdirectory directory of the IBM Connections set-up directory or installation media, where application_subdirectory is the directory that contains the SQL scripts for each application.
If you are using AIX, see the note in the Preparing the DB wizard topic about decompressing TAR files.
If you are using Linux on IBM System z with the DASD driver, the SQL scripts are located in the Lotus_Connections_Install_s390/LotusConnections/connections.s390.sql directory.
If you are using Linux on IBM System z with the SCSI driver, back up the connections.s390.sql directory and rename the connections.sql directory to connections.s390.sql.
If the DB server and IBM Connections are installed on different systems, copy the SQL scripts to the system that hosts the DB server.
(AIX only) Configure the AIX system that hosts the DB2 DBs to use the enhanced journaled file system (JFS2), which supports file sizes larger than 2 GB. To enable large files in the JFS system, complete the following steps:
- In the SMIT tool, select...
-
System Storage Management>File System>Add/Change/Show/Delete File Systems
- Select the file system type you want to use and specify other characteristics as wanted. If you use a Journaled File System, set Large File Enabled to true.
When you are creating a DB either with the DB wizard or SQL scripts, you must log into the system where the DB is hosted with the DB administrator account. The default values for DB2 are db2admin on Microsoft Windows, and db2inst1 on Linux and AIX. For Oracle, the default value on AIX and Linux is oracle, and system administrator on Windows. For SQL Server, the default value is the system administrator.
You must perform this task for each IBM Connections application that you are installing.
where file_path is the full path to the log file and application is the name of the log file. For example:
db2 -tvf createDb.sql >> /home/db2inst1/db_activities.log
Ensure that you have write permissions for the directories and log files.
To create the application DBs, complete the following steps:
- Optional: (Only required if the DB server
and IBM Connections are installed
on different systems.) Copy the IBM Connections SQL scripts to the DB2 DB system. Authorize a UID that can create the DBs.
- Log in to the DB2 DB system with the UID of the owner of the DB instance.
The UID must have privileges to create a DB, a tablespace,
tables, and indexes.
If you created multiple DB instances, specify the UID for the first instance.
The default administrative ID for Microsoft Windows is db2admin.
- Start the DB2 command
line processor in command mode and enter the following command:
db2start
- For Home page and Profiles, change to the directory where
the SQL scripts for each application are stored, and then enter the following command to run the script:
db2 -tvf createDb.sql
- For Home page, run the following script:
db2 -tvf initData.sql
- For Activities, Communities, Blogs, Bookmarks, Files, Forums,
Mobile, and Wikis, change to the directory where the SQL scripts for
each application are stored, and then enter the following command
to run the script:
db2 -td@ -vf createDb.sql
The SQL scripts for Bookmarks are stored in the dogear directory.
- Run the following command to grant access privileges to
the lcuser account for the Home page and Profiles DBs:
db2 -tvf <application_subdirectory>/appGrants.sql
- Run the following command to grant access privileges to
the lcuser account for the Activities, Communities, Blogs, Bookmarks,
Files, Forums, Mobile, and Wikis DBs:
db2 -td@ -vf application_subdirectory/appGrants.sql
- Run the following commands to generate statistics for the Home page DB:
db2 -tvf application_subdirectory/reorg.sql
db2 -tvf application_subdirectory/updateStats.sql
- Run the following commands to create Calendar tables in
the Communities DB:
db2 -td@ -vf communities/calendar-createDb.sql
db2 -td@ -vf communities/calendar-appGrants.sql
- To use the Metrics application, run the following commands to create the Metrics and Cognos DBs:
db2 -td@ -vf metrics/createDb.sql
db2 -td@ -vf metrics/appGrants.sql
db2 -td@ -vf cognos/createDb.sql
db2 -td@ -vf cognos/appGrants.sql
The first two of these commands create the Metrics DB and the following two commands create the Cognos DB. The Cognos DB tables are created when you start the Cognos BI Server for the first time.
- Close the DB2 command line processor.
- Optional: When you install IBM Connections, the JDBC configuration page of the installation wizard asks you to provide a UID and password for the Application User. The UID that you specify on that page must have read and write access to the DB. You can provide the UID of an administrative user or you can create a dedicated user ID with fewer privileges.
What to do next
(DB2 for Linux on System z only.) To improve DB performance, enable the NO FILE SYSTEM CACHING option.
Create Oracle DBs manually
Create Oracle DBs with SQL scripts instead of using the IBM Connections DB wizard.
Follow this procedure if you do not want to use the DB wizard to create your DBs.
The SQL scripts are located in a compressed file called connections.sql.zip|tar, located in the IBM_Connections_Install/IBMConnections/connections.sql directory of the IBM Connections set-up directory or installation media. Extract this file before proceeding. When extracted, the SQL scripts are located in the IBMConnections/connections.sql/application_subdirectory directory of the IBM Connections set-up directory or installation media, where application_subdirectory is the directory that contains the SQL scripts for each application.
If the DB server and IBM Connections are installed on different systems, copy the SQL scripts to the system that hosts the DB server.
You must specify the Unicode AL32UTF8 character set.
This task describes how to use SQL scripts to create Oracle DBs for IBM Connections applications. Complete this task only if you do not want to use the DB wizard.
sql> spool on
sql> spool output_file
where output_file is the full path and name of the file where the output is captured.
When you have completed this task, run the following command: sql> spool off
To manually create the application DB tables:
- Log in with the same UID that you used to install the Oracle DB system.
- Create an Oracle
UID with system DB administrator privileges that you can
use to manage the DB tables. Alternatively, use an existing
ID that has administrative privileges, such as SYS.
- Set the ORACLE_SID.
If you created multiple DBs, specify the DB on which to install the tables by providing the SID for that DB.
- Run SQL Plus by entering the following command:
sqlplus /NOLOG
- Log in as an administrator with the sysdba role by entering
the following command:
connect as sysdba
If not logged in as sysdba, the statistics gathering job for the Bookmarks DB is not created or correctly scheduled. As a result, DB performance is impacted.
- Enter the Oracle UID and password.
- For each application, change to that application's SQL
scripts directory and enter the following command to create the application's
DB tables:
- @application_subdirectory/createDb.sql password
Repeat this step for each IBM Connections application that you plan to install.
Begin the command with the @ symbol.
The createDB script creates a dedicated user ID for the JDBC connector for an application DB. Later, when you run the IBM Connections installation wizard, you must provide the UID that you specify in this step. You can specify one of the following default UIDs:
- Activities: OAUSER
- Blogs: BLOGSUSER
- Bookmarks: DOGEARUSER
- Cognos: COGNOS
- Communities: SNCOMMUSER
- Files: FILESUSER
- Forums: DFUSER
- Home page: HOMEPAGEUSER
- Metrics: METRICSUSER
- Mobile: MOBILEUSER
- Profiles: PROFUSER
- Wikis: WIKISUSER
Each of these default UIDs has a narrower set of privileges than an administrative UID.
You can change the passwords for these DB users later in Oracle Enterprise Manager Console. If you change the passwords there, you must also change them in the J2C authentication alias settings in the WAS Integrated Solutions Console.
If you plan to install the Metrics application, you can create the DB now but the tables are not created until you start the Cognos BI Server for the first time.
- Optional: (Communities only.) Run the following commands:
@application_subdirectory/calendar-createDb.sql
@application_subdirectory/calendar-appGrants.sql
- Optional: (Dogear only.) Run the following command:
@application_subdirectory/createHistogramStatsJob.sql
- This script creates a job to collect histogram statistics.
- You must run this command while logged in with the SYS ID.
- This script creates a job to collect histogram statistics.
- (Home page only.) Run the following command:
@application_subdirectory/initData.sql
- Run the following command to grant access privileges for
each application:
@application_subdirectory/appGrants.sql
- Close the SQL Plus window.
Create SQL Server DBs manually
Create Microsoft SQL Server DBs with SQL scripts instead of using the IBM Connections DB wizard.
Follow this procedure if you do not want to use the DB wizard to create your DBs.
The SQL scripts are located in a compressed file called connections.sql.zip|tar, located in the IBM_Connections_Install/IBMConnections/connections.sql directory of the IBM Connections set-up directory or installation media. Extract this file before proceeding. When extracted, the SQL scripts are located in the IBMConnections/connections.sql/application_subdirectory directory of the IBM Connections set-up directory or installation media, where application_subdirectory is the directory that contains the SQL scripts for each application.
If the DB server and IBM Connections are installed on different systems, copy the SQL scripts to the system that hosts the DB server.
Before beginning the task, decide whether to use SQL Server with or without an instance name, and with or without an A-Record Alias.
If you installed SQL Server with a default instance, you do not need to supply details of the sql_server_instance_name.
For example, in a default instance
- The name of the server is ServerA.
- You configured the default instance when setting up SQL Server.
- Use only the server name.
Alternatively, in an instancename example:
- ServerB is the name of the server
- You configured the instancename as Connections when setting up
SQL Server.
- Use the ServerB\Connections naming format.
Finally, where the A-Record is specified as an Alias for SQL Server:
- ServerC is the name of the server
- You configured the default instance when setting up SQL Server.
- You created an A-Record to use as an alias for a new SQL Server
called ServerC.
- Use the name of the new A-Record.
For example, use A-Record-Name\sqlserver_server_instance_name>
This task describes how to use SQL scripts to create SQL Server DBs for IBM Connections applications.
Download the SQL Server JDBC 2 driver from the Microsoft web site and follow the instructions to extract the driver files. IBM Connections uses the sqljdbc4.jar file.
IBM recommends that you obtain this Microsoft hotfix for the JDBC 2 driver for production deployments.
>> \file_path\db_application.log
where file_path is the full path to the log file and application is the name of the log file.
For example:
sqlcmd >> \home\admin_user\lc_logs\db_activities.log
where sqlcmd is a command with parameters and admin_user is the logged-in user. Ensure that you have write permissions for the directories and log files. To create the application DB tables:
- Configure SQL Server account mode and Windows Authentication mode:
- Create a SQL Server Account such as lcuser.
- Apply sysadmin permissions.
- Create a SQL Server Account such as lcuser.
- Configure Local Account Mode:
- Create a local account, such as lcuser, on the system
that is hosting SQL Server.
- Add the local account to SQL Server with sysadmin permissions.
- Add the local account to the Local Administrators group.
You must specify these credentials later as parameters of the U and P flags for the sqlcmd command.
- Create a local account, such as lcuser, on the system
that is hosting SQL Server.
- Create a directory on the SQL Server system where you can
store the application DBs.
Later on, you need to specify these directories as parameters of the file path flag for the sqlcmd command.
- Create a SQL Server UID with system DB administrator privileges that you can use to manage the DB tables or use an
existing ID that has administrative privileges, such as sa.
You will specify these credentials as parameters of the U and P flags for the sqlcmd command later.
- Perform the following steps once per application to create
each DB:
- Open a command prompt and change to the directory to
which you copied the DB creation scripts for the application.
- Enter the following command to create the application
DB table:
If your DB server has multiple SQL Server instances, add the following parameter as the first parameter in each command:
-S sqlserver_server_name\sqlserver_server_instance_name
sqlcmd -U admin_user -P admin_password -i "createDb.sql" -v filepath="path_to_db" password="password_for_application_user" where
- admin_user and admin_password are the credentials for the UID that you created in a previous
step or an existing ID with administrative privileges.
- path_to_db is the directory in which the created
DB is stored.
- password_for_application_user is the password
for each application DB.
- The DB UIDs are named as follows:
- Activities: OAUSER
- Blogs: BLOGSUSER
- Bookmarks: DOGEARUSER
- Cognos:COGNOSUSER
- Communities: SNCOMMUSER
- Files: FILESUSER
- Forums: DFUSER
- Home page: HOMEPAGEUSER
- Metrics: METRICSUSER
- Mobile: MOBILEUSER
- Profiles: PROFUSER
- Wikis: WIKISUSER
- Activities: OAUSER
When you run the installation wizard, you are asked to provide a UID for the JDBC provider. Set the UID created by the DB creation script and the password that you defined in this step.
You can change the passwords for these DB users later in SQL Server Management Studio. If you change the passwords there, you must also change them in the J2C authentication alias in the WAS Integrated Solutions Console.
If you plan to install the Metrics application, you can create the DB now but the tables are not created until you start the Cognos BI Server for the first time.
Example for SQL Server Account Mode:
sqlcmd -S sql_server_name\sql_server_instance_name -U sql_server_account -P sql_server_account_password -i "createDb.sql" -v filepath="sql_server_data_path" password="password_for_application_user"
Example for Local Account Mode:
sqlcmd -S sql_server_name\sql_server_instance_name -U servername \local_account -P local_account_password -i "createDb.sql" -v filepath="sql_server_data_path" password="password_for_application_user"
...where
- sql_server_account andsql_server_account_password are the credentials for SQL Server. These credentials do not apply
for Windows Local Account
or Windows Domain Account.
- servername \local_account are the credentials for the UID.
- sql_server_data_path is the directory in which the created DB is stored.
- admin_user and admin_password are the credentials for the UID that you created in a previous
step or an existing ID with administrative privileges.
- Open a command prompt and change to the directory to
which you copied the DB creation scripts for the application.
- (Home page only) Perform the following steps for the Home
page application:
- Open a command prompt and change to the directory to
which you copied the DB creation scripts for this application.
- Enter the following command to create the application
DB table:
sqlcmd -U admin_user -P admin_password -i initData.sql
- Open a command prompt and change to the directory to
which you copied the DB creation scripts for this application.
- Optional: (Communities only) Run the following commands:
sqlcmd -U admin_user -P admin_password -i calendar-createDb.sql
sqlcmd -U admin_user -P admin_password -i calendar-appGrants.sql
- Perform the following steps to grant access privileges
for the applications:
- Open a command prompt and change to the directory to
which you copied the DB creation scripts for each application.
- Enter the following command:
sqlcmd -U admin_user -P admin_password -i appGrants.sql
- Open a command prompt and change to the directory to
which you copied the DB creation scripts for each application.
What to do next
For more information about Microsoft SQL Server 2005 and 2008, go to the Microsoft SQL Server web site.Enable NO FILE SYSTEM CACHING for DB2 on System z
When your operating system is Linux on System z, enable the NO FILE SYSTEM CACHING option for IBM DB2 DBs to improve performance.
- Enabling the NO FILE SYSTEM CACHING option on an unsupported device could cause your DB to become inaccessible. Ensure that your file system supports the NO FILE SYSTEM CACHING option and that it meets the requirements for creating table spaces without file system caching.
- Create a backup copy of the DB2 DB using native DB tools.
- If the DB server and IBM Connections are installed on different systems, copy the SQL scripts
to the system that hosts the DB server.
- The SQL scripts for DB2 for Linux on System z are located in the connections.s390.sqlapplication_subdirectory directory of the IBM Connections set-up directory
or installation media, where application_subdirectory is the directory that contains the SQL scripts for each application.
- You can enable the NO FILE SYSTEM CACHING option for the Activities, Communities, and Profiles DBs only.
When you create DB2 DBs for IBM Connections under Linux on System z, the IBM Connections DB wizard and the createDb.sql script create table spaces with the FILE SYSTEM CACHING option enabled. If you are storing DB2 table spaces on devices where Direct I/O (DIO) is enabled, such as Small Computer System Interface (SCSI) disks that use Fibre Channel Protocol (FCP), you can improve DB performance by enabling the NO FILE SYSTEM CACHING option.
To enable the NO FILE SYSTEM CACHING option:
- Log in to the DB2 DB system with the UID of the owner of the DB instance.
The UID must have privileges to create a DB, a table space,
tables, and indexes.
If you created multiple DB instances, specify the UID for the first instance.
- Enable the NO FILE SYSTEM CACHING option for the Activities
table space by entering the following commands:
CONNECT TO OPNACT
ALTER TABLESPACE OAREGTABSPACE NO FILE SYSTEM CACHING
CONNECT RESET
- Enable the NO FILE SYSTEM CACHING option for the Communities
table space by entering the following commands:
CONNECT TO SNCOMM
ALTER TABLESPACE SNCOMMREGTABSPACE NO FILE SYSTEM CACHING
ALTER TABLESPACE DFREGTABSPACE NO FILE SYSTEM CACHING
CONNECT RESET
- Enable the NO FILE SYSTEM CACHING option for the Forums
table space by entering the following commands:
CONNECT TO FORUM
ALTER TABLESPACE DFREGTABSPACE NO FILE SYSTEM CACHING
CONNECT RESET
- Enable the NO FILE SYSTEM CACHING option for the Profiles
table space by entering the following commands:
CONNECT TO PEOPLEDB
ALTER TABLESPACE USERSPACE4K NO FILE SYSTEM CACHING
ALTER TABLESPACE TEMPSPACE4K NO FILE SYSTEM CACHING
ALTER TABLESPACE USERSPACE32K NO FILE SYSTEM CACHING
ALTER TABLESPACE TEMPSPACE32K NO FILE SYSTEM CACHING
CONNECT RESET
- Close the DB2 command line processor.
Populate the Profiles DB
Populate the Profiles DB with data from the LDAP directory.
- Spend time planning your Profiles population, integration, and
customization.
- Involve all the relevant stakeholders at an early stage of the planning process.
- If possible, phase the Profiles rollout and get feedback from
pilot users.
- Prepopulate Profiles photos.
- Plan for business card use and for Sametime presence awareness.
- Ensure that Tivoli Directory
Integrator is correctly configured.
- Consider using Tivoli Directory Integrator to populate the LDAP and then to populate the Profiles DB.
If you are migrating from IBM Connections version 3.0.1 or 3.0.1.1, do not complete the tasks for populating the Profiles DB. The migration process handles those tasks separately.
Related
Configure Tivoli Directory Integrator
Configure IBM Tivoli Directory Integrator (TDI) to synchronize and exchange information between the Profiles DB and the LDAP directory.
Install all the required software, including a DB server and LDAP directory, and that you have created the Profiles DB.
The internal name of the Profiles DB is PEOPLEDB.
Use Tivoli Directory Integrator to populate the Profiles DB repository from an LDAP directory.
You can manually run various Profiles tasks by using the appropriate scripts in the TDI Solution directory.
To configure Tivoli Directory Integrator:
- Install Tivoli Directory
Integrator, if it is not already installed.
When prompted for the location of the Solution directory, select Do not specify. Use the current working directory at startup time.
At the end of the installation process, clear the Start the Configuration editor check box.
After you have configured Tivoli Directory Integrator, update it with the recommended fix packs.
- Make the DB libraries available to Tivoli Directory Integrator by doing one of
the following:
- DB2: Copy the db2jcc.jar and db2jcc_license_cu.jar files
from the java subdirectory of the directory where
you installed DB2. Paste the files into a temporary location. The wizard will eventually paste
the drivers into the jvm/jre/lib/ext subdirectory
of Tivoli Directory Integrator.
For example, if you installed Tivoli Directory Integrator on a Linux system in /opt/IBM/TDI/V7.1, the path would be /opt/IBM/TDI/V7.1/jvm/jre/lib/ext.
- Oracle: Copy the ojdbc6.jar file from
the jdbc/lib subdirectory of the directory where
you installed Oracle. Paste the files into a temporary location. The wizard will eventually paste the drivers into the jvm/jre/lib/ext subdirectory
of Tivoli Directory Integrator.
For example, if you installed Tivoli Directory Integrator on a Linux system in /opt/IBM/TDI/V7.1, the path would be /opt/IBM/TDI/V7.1/jvm/jre/lib/ext.
- SQL Server:
Download the SQL Server JDBC 2 driver from the Microsoft web site and follow the instructions to extract the driver files. IBM Connections uses the sqljdbc4.jar file.
IBM recommends that you obtain this Microsoft hotfix for the JDBC 2 driver for production deployments.
Paste the files into a temporary location. The wizard will eventually paste the drivers into the jvm/jre/lib/ext subdirectory of Tivoli Directory Integrator.
For example: If you installed Tivoli Directory Integrator on a Windows system in C:\IBM\TDI\V7.1, the path would be C:\IBM\TDI\V7.1\jvm\jre\lib\ext.
- DB2: Copy the db2jcc.jar and db2jcc_license_cu.jar files
from the java subdirectory of the directory where
you installed DB2. Paste the files into a temporary location. The wizard will eventually paste
the drivers into the jvm/jre/lib/ext subdirectory
of Tivoli Directory Integrator.
- Edit the ibmdisrv file to increase
runtime memory and disable the JIT compiler. To increase the runtime
memory, add the two -Xms256M -Xmx1024M space-separated
arguments to the Java invocation
command; to disable the JIT compiler, add the -Xnojit argument.
The ibmdisrv file is stored in the TDI directory.
- AIX or Linux: ibmdisrv
After you add the new arguments, the Java invocation command is similar to the following text:
"$TDI_JAVA_PROGRAM" -Xms256M -Xmx1024M $TDI_MIXEDMODE_FLAG -Xnojit -cp "$TDI_HOME_DIR/IDILoader.jar" "$LOG_4J" com.ibm.di.loader.ServerLauncher "$@" & - Windows: ibmdisrv.bat
After you add the new arguments, the Java invocation command is similar to the following text:
"%TDI_JAVA_PROGRAM%" -Xms256M -Xmx1024M -Xnojit -classpath "%TDI_HOME_DIR%\IDILoader.jar"
%ENV_VARIABLES% com.ibm.di.loader.IDILoader com.ibm.di.server.RS %*"
- AIX or Linux: ibmdisrv
- (AIX or Linux only.) Ensure that there is a localhost
entry in the /etc/hosts file. For example:
127.0.0.1 localhost
Related tasks
Introduction to IBM Tivoli Directory Integrator
IBM Connections uses IBM Tivoli Directory Integrator to transform, move, and synchronize data from the LDAP directories to the Profiles DB.
AssemblyLines
The main tool within Tivoli Directory Integrator is the AssemblyLine. An AssemblyLine processes data such as entries, records, items, and objects from an LDAP directory, transforms it, and outputs it to the Profiles DB. When you import data from multiple LDAP directories, the AssemblyLine processes, transforms, and combines all the source data before outputting it.
How data is organized can differ greatly from system to system.
For example, DBs usually store information in records with a fixed number of fields. Directories usually work with variable objects called entries, and other systems use messages or key-value pairs.
Connectors
Connectors are the components required to build an AssemblyLine. Connectors are designed so that you do not need to deal with the technical details of working with various data stores, systems, services, or transports. Each type of connector uses a specific protocol or API to handle the details of data source access. You can create your own connectors to support different functions or use the connectors that are provided with IBM Connections.
For more information about creating connectors, see the Developing custom Tivoli Directory Integrator assembly lines for Profiles topic.
work Entries
Tivoli Directory Integrator collects and stores all types of information in a Java data container called a work Entry. The data values are kept in objects called Attributes that the work Entry holds and manages. AssemblyLine components process the information in the work Entry by joining in additional data, verifying content, computing new attributes and values, as well as changing existing ones, until the data is ready for delivery to the Profiles DB.
Tivoli Directory Integrator internal attribute mapping, business rules, and transformation logic do not need to deal with type conflicts.
Attribute mapping
Attribute Maps are your instructions on which attributes are brought into the AssemblyLine during input, or included in output operations. An AssemblyLine is designed and optimized for working with one item at a time, such as one data record, one directory entry or one registry key. If you want to perform multiple updates or multiple deletes, then you must write AssemblyLine scripts.
Add source data to the Profiles DB
Populate the Profiles DB with information from the source server by using the Profiles population wizard or by populating the DB manually.
The Profiles population wizard provides an interface to make it easier for you to populate the Profiles DB with information from the LDAP directory. Alternatively, if you do not want to use the wizard, you can populate the DB manually by manually updating the profiles_tdi.properties file in the TDI directory.
Although LDAP is the default source, and the only source supported by the Profiles population wizard, other sources are available if you are manually populating the Profiles DB.
You can create custom TDI connectors to add, update, and synchronize your source data and Profiles DB content. See topics such as Developing custom Tivoli Directory Integrator assembly lines for Profiles and Using the ProfileConnector for more information.
Procedure
To populate the Profiles DB with information from the LDAP server, do one of the following:
- Run the Profiles population wizard on the server where Tivoli Directory Integrator is installed.
- Populate the Profiles DB manually by updating the property values relevant to your configuration in the profiles_tdi.properties file.
Related
Use the Profiles population wizard
Use the Profiles population wizard to populate the IBM Connections Profiles DB with data from the LDAP directory.
You can populate the Profiles DB with the help of the population wizard, as described here, or manually as described in the Manually populating the Profiles DB topic. You might choose to use the population wizard to simplify the properties mapping process from your source to the target Profiles DB.
Ensure that you have created a Profiles DB, and installed and configured Tivoli Directory Integrator and an LDAP directory.
Run the population wizard on the system where Tivoli Directory Integrator is installed.
If you need to configure multiple systems with Profiles data, you can run the wizard in silent mode.
The population wizard populates only those entries where the value for surname is not null.
You can run the population wizard before, during, or after installing IBM Connections. To populate the Profiles DB, complete the following steps:
- Log into the system where Tivoli Directory
Integrator is installed as the root user or system administrator.
- (AIX and Linux only): Grant display authority to all users
by running the following commands under the root user or system administrator:
xhost + // Grant display authority to other users
If granting display authority to all users is a security concern for you, change the command to grant display authority to a specific user or users.
echo $DISPLAY // Echo the value of DISPLAY under the root user
- Copy the Wizards directory from the IBM Connections installation media to the system
...where Tivoli Directory Integrator is installed.
Microsoft Windows: If you are installing from disk or ISO, change the permissions for the Wizards folder from Read Only to Write or the population wizard will fail.
- Run the following script from the Wizards directory:
- AIX: ./populationWizard.sh
- Linux: ./populationWizard.sh
If the wizard does not run correctly, you might need to edit the populationWizard.sh file and enter the correct JRE/JVM path for your system The populationWizard.sh file expects the path to be jvm/linux/jre/bin.
- Microsoft Windows: populationWizard.bat
- AIX: ./populationWizard.sh
- On the Welcome page of the wizard, click Launch
Information Center to open the IBM Connections Information Center in a browser
window. Click Next to continue.
- Select Default settings or, if you
are resuming an earlier session, click Last successful
default settings and click Next.
This page is shown only if you have already used the wizard to populate the Profiles DB.
- Enter the location of Tivoli Directory
Integrator and then click Next.
This page is shown only if the wizard cannot automatically detect your Tivoli Directory Integrator directory.
- Select a DB type and click Next.
- Enter the following information about the DB, and
then click Next:
- Host name
- The name of the system that hosts the DB.
- Port
- The communications port for connecting to the DB. Add a
new port or choose one of the following default ports:
- DB2
- 50000
- Oracle
- 1521
- SQL Server
- 1433
- Database name
- The default name of the DB is PEOPLEDB.
There is no default name for the Oracle DB, Instead, enter the name of the DB instance.
- JDBC driver library path
- Enter the path to the JDBC driver on the host machine. For example: IBM/sqllib/java.
- DB2
- You can find the db2jcc.jar and db2jcc_license_cu.jar files in the IBM/DB2/v9.7/SQLLIB/java directory.
- Oracle
- You can find the ojdbc6.jar file in the oracle/product/11.2.0/db_1/jdbc/lib directory.
- SQL Server
- Download the SQL Server JDBC 2 driver from the Microsoft web site and follow the instructions to extract the driver files. IBM Connections uses the sqljdbc4.jar file.
- User ID
- Enter your UID. This must be a DB user who has write access to the Profiles DB. For DB2, the default value is LCUSER. For Oracle and SQL Server, default value is PROFUSER. These user names are automatically created when you create the DB.
- Password
- Enter your password.
- Enter the following properties for the LDAP server, and
then click Next:
- LDAP server name
- The host or IP address of the LDAP server.
- LDAP server port
- The default port is 389. If SSL is selected, the default port is 636.
- Use SSL communication
- Select the check box to enable SSL.
- (Optional) Create an empty truststore file where you can
store trusted LDAP server certificates. (Complete this step if you
want to use SSL. If you already have a truststore file that contains
the LDAP server certificates, you can skip this step.) The Profiles
population wizard downloads the LDAP server certificates from the LDAP directory for you.
- Start the iKeyman utility by running the following file:
- AIX or Linux:TDI_Install_directory/jvm/jre/bin/./ikeyman
- Windows: TDI_Install_directory\jvm\jre\bin\ikeyman.exe
where TDI_Install_directory is the directory
...where Tivoli Directory Integrator is installed.
On the Windows 7 and Windows 2008 operating systems, right-click ikeyman.exe and select Run as administrator.
- Click Key Database File from
the menu bar and then click New.
- Select JKS or PKCS12 as
the key DB type.
- Save the new file to an appropriate location and click OK.
- Enter a password in the Password Prompt dialog
box and then confirm the password. Click OK.
You need this password when you use the Profiles population wizard.
- Exit the iKeyman utility.
The Profiles population wizard can use the new truststore file to communicate with the LDAP server in SSL handshaking mode. It can also use the file when fetching data from the LDAP.
- Start the iKeyman utility by running the following file:
- Optional: If you selected SSL when you entered
the LDAP properties, you are asked to enter the following keystore
properties:
- Truststore file
- File where trusted server certificates are stored. Used when SSL handshaking is performed.
- Keystore password
- Password to access the keystore.
- Keystore type
- Format of the trusted server certificate. Currently only JKS and PKCS12 are supported in Java.
If the LDAP server certificate is not in the truststore, an Accept permanently message appears that asks you to permanently accept the certificate in the truststore file. If you do not accept it, the wizard cannot connect to the LDAP server with SSL and will not continue with the population task.
Ensure that the global.properties file in Tivoli Directory Integrator (TDI) is configured with the file trust store name, password and type you just created.
See: Tivoli Directory Administrator's Guide for Client SSL Configuration of TDI Components. The Understand IBM Tivoli Directory Integrator for IBM Connections white paper is also helpful.
Oracle 10gR2 is supplied with the ojdbc14.jar JDBC driver while Oracle 11gR2 is supplied with ojdbc6.jar.
- Enter the authentication details for the Bind
distinguished name (DN) and Bind password,
and then click Next.
The Profiles population wizard does not support anonymous binding for LDAP. If you wish to populate the Profiles DB using anonymous binding, you must populate the DB manually.
- Enter the details of the Base distinguished
name (LDAP user search base) and LDAP user
search filter, and then click Next.
- Map LDAP attributes or JS Functions to the Profiles DB fields.
For each user in the LDAP, Tivoli Directory Integrator will create a row in the DB, mapping each LDAP attribute or JavaScript function to the corresponding column in the DB. The wizard automatically validates each mapping. If you need to change the default mapping, select the required LDAP attributes or JavaScript functions and create or modify the field.
The uid, guid, dn, surname, and displayName attributes are always required.
You can use the Group By filter in Metrics to categorize the metrics report by a particular user attribute. To do so, ensure correct mapping between the LDAP attribute and the Profiles DB field. Metrics defines the Group By attributes by default as country, organization and title.
- Optional: You can choose to run the following additional tasks:
- Countries
- Add country data to each profile.
- Departments
- Add department data to each profile.
- Organizations
- Add organization data to each profile.
- Employee types
- Add employee-type data to each profile.
- Work locations
- Add location data to each profile.
Select Yes if you want to mark the profiles of each manager.
For all the entries in this list (except Mark managers), you need to prepare corresponding CSV files with the required information. An Employee Type CSV file might include regular=IBM Employee and manager=IBM Manager. You can edit the profiles-config.xml file to specify whether you want to display the code or the value, where regular or manager are the employee type codes stored in LDAP and IBM Employee or IBM Manager are the values.
Examine the CSV files in the Wizards/TDIPopulation/TDISOL/OS/samples directory, where OS is your operating system, to see the input file format of the optional tasks:
- Countries task
- isocc_sample.csv
- Departments task
- deptinfo_sample.csv
- Organizations task
- orginfo_sample.csv
- Employee types task
- emptype_sample.csv
- Work locations task
- workloc_sample.csv
- Review the Summary page to ensure that the information
you entered in the previous panels is correct. To make changes, click Back to
return to the relevant page and edit the information. Otherwise, click Configure to
begin populating the DB.
- Review the message on the Result page. If necessary, click View log to examine the log in detail. Click Finish to exit the wizard.
Results
The Profiles population wizard has populated the Profiles DB with data from the LDAP directory.Use the Profiles population wizard in silent mode
You can run the Profiles population wizard in silent mode to populate the Profiles DB.
When you run the Profiles population wizard in silent mode, it creates the map_dbrepos_from_source.properties file, located in the Wizards\TDIPopulation\platform\TDI directory, and updates this file with data from the mappings.properties file.
When you use the Profiles population wizard in interactive mode, the wizard creates a response file called tdisettings.properties in the Wizards\TDIPopulation directory in the Wizards\TDIPopulation directory. You can modify the existing response file or create a new one. It also creates a mappings.properties file, which contains properties very similar to those in map_dbrepos_from_source.properties file.
If you need to configure multiple systems with Profiles data, you can run the wizard in silent mode.
You can also modify the mappings files manually.
- (AIX only) If you are downloading the wizard, the TAR program available by default with AIX does not handle path lengths longer than 100 characters. To overcome this restriction, use the GNU file archiving program instead. This program is an open source package that IBM distributes through the AIX Toolbox for Linux Applications at the IBM AIX Toolbox web site. Download and install the GNU-compatible TAR package. You do not need to install the RPM Package Manager because it is provided with AIX.
After you have installed the GNU-compatible TAR program, change to the directory where you downloaded the IBM Connections TAR file, and enter the following command to extract the files from it:
gtar -xvf Lotus_Connections_wizard_aix.tar
This command creates a directory named after the wizard.
To run the Profiles population wizard in silent mode, complete the following steps:
- Log in to your DB server as the root user or system administrator.
- (AIX and Linux only) Grant display authority to all
userss under the root user or system
administrator:
xhost + // Grant display authority to other users
If granting display authority to all users is a security concern for you, change the command to grant display authority to a specific user or users.
echo $DISPLAY // Echo the value of DISPLAY under the root user
- Ensure that the Profiles population wizard has created
the tdisettings.properties response file in the TDIPopulation directory.
- Open a command prompt, change to the TDIPopulation directory,
and enter the following commands to launch the wizard in silent mode:
- AIX/Linux:
populationWizard.sh -silent response_file [ -mappingFile mapping_file] [ -dbPassword db_password] [ -ldapPassword ldap_password] [ -sslPassword ssl_password] [ -help | -? | /help | /? | -usage] - Windows:
populationWizard.bat -silent response_file
                   [ -mappingFile mapping_file]
                   [ -dbPassword db_password]
                   [ -ldapPassword ldap_password]
                   [ -sslPassword ssl_password]
                   [ -help | -? | /help | /? | -usage]
where response_file is the full path to the tdisettings.properties response file, mapping_file is the full path to the mappings.properties file, dbPassword is the password for the Profiles DB, ldapPassword is the password for bind user in the LDAP directory, and sslPassword is the password for the SSL key store.
If you do not specify a mapping file, the default mapping file for the LDAP directory type is used. These mapping files are located in the Wizards/TDIPopulation directory,
...where you can edit the file for the LDAP directory type. For more information about editing the mapping file, see the Mapping fields manually topic. The following table lists the mappings files for applicable LDAP directory types:
Options to specify a supported LDAP directory
Directory type Map file IBM Lotus Domino defaultMapping_domino.properties IBM Tivoli Directory Server defaultMapping_tivoli.properties Microsoft Active Directory Application Mode defaultMapping_adam.properties Microsoft Windows Server 2003 Active Directory defaultMapping_ad.properties Novell Directory Services defaultMapping_nds.properties Sun ONE defaultMapping_sun.properties The parameters for running the population wizard in silent mode are described in the following table:
Command parameters
Parameter Value Description responseFile (required) full path to the tdisettings.properties response file After running the population wizard successfully, the tdisettings.properties response file is stored in the Wizards\TDIPopulation directory in the IBM Connections set-up directory. mappingFile (optional) full path to the mappings.properties file The mappings.properties file is stored in the Wizards\TDIPopulation directory in the IBM Connections set-up directory. If you do not use specify a different file with the -mappingFile parameter, the wizard uses this file to map properties to the LDAP directory. dbPassword (optional) Database password Overwrites the DB password in the response file. If you do not specify the DB password here, you must specify it in the response file. ldapPassword (optional) LDAP password Overwrites the LDAP password in the response file. If you do not specify the LDAP password here, you must specify it in the response file. sslPassword (optional) SSL key store password Overwrites the SSL key store password in the response file. If you do not specify the SSL password here, you must specify it in the response file. - AIX/Linux:
Results
After the wizard has finished, check the log file in the <user home>/lcwizard/log/tdi/ directory for messages. The log file name uses the time as a suffix. For example: tdi_20090912_163536.log.The tdisettings.properties file
When you run the Profiles population wizard, you can record your selections in two response files: a tdisettings.properties file and a mapping file.
After running the Profiles population wizard in interactive mode, you can repeat the same configuration in silent mode by starting the wizard from the command line and passing the response files in as an argument. The wizard uses the values in the response files rather than requiring you to interact with it.
The tdisettings.properties file collects the values that are described in the following table.
| Property | Description | Value |
|---|---|---|
| db.hostname | Host name of the DB server. | |
| db.jdbcdriver | Location of the JDBC driver. | Example: C\:\\IBM\\SQLLIB\\java
The extra "\" symbol is an escape character. |
| db.name | Name of the Profiles DB. | Default: PEOPLEDB |
| db.password | Password for connecting to the DB. The property is required if you do not specify -dbPassword as a command parameter. |
|
| db.port | Database server port for invoking JDBC. |
|
| db.type | DB2, Oracle, or SQL Server. | db2 | oracle | sqlserver |
| db.user | Name of the DB user, such as lcuser. | Example: lcuser |
| ldap.dn.base | LDAP distinguished name search base. | Example: dc=example, dc=com |
| ldap.enable.ssl | Boolean value that determines if SSL is enabled. If the value of this property is yes, you must also provide values for the ssl.keystore, ssl.password, and ssl.type properties. |
yes | no |
| ldap.filter | Filter for the LDAP. | Example: (&(uid=*)(objectclass=inetOrgPerson)) |
| ldap.hostname | Host name of the LDAP server. | |
| ldap.password | Password for connecting to the LDAP directory. | Default: 389 or 663 (SSL) |
| ldap.port | Communications port of the LDAP server. | Default: 389 or 663 (SSL) |
| ldap.user | DN of the LDAP administrative user. | |
| ssl.keyStore | File path to the keystore. Required only if the ldap.enable.ssl property is set to yes. | |
| ssl.password | SSL password. Required only if the ldap.enable.ssl property is set to yes. | |
| ssl.type | SSL standard. Required only if the ldap.enable.ssl property is set to yes. | JKS | PKCS12 |
| task.list | Tasks that the Profiles population wizard
can perform. You can choose from the following options: LDAP_OPTIONAL_TASK_MARK_MANAGER,
LDAP_OPTIONAL_TASK_FILL_COUNTRIES, LDAP_OPTIONAL_TASK_FILL_DEPARTMENT,
LDAP_OPTIONAL_TASK_FILL_ORGANIZATION, LDAP_OPTIONAL_TASK_FILL_EMPLOYEE,
and LDAP_OPTIONAL_TASK_FILL_WORK_LOCATION
To execute multiple tasks, separate the tasks with the comma symbol. | Example: LDAP_OPTIONAL_TASK_MARK _MANAGER,LDAP_OPTIONAL _TASK_FILL_COUNTRIES |
| task.country.csv | File path to the isocc.csv file. Required if you specify LDAP_OPTIONAL_TASK_FILL_COUNTRIES in the task.list property. | Example: C\:\\build\\isocc.csv
The extra "\" symbol is an escape character. |
| task.department.csv | File path to the deptinfo.csv file. Required if you specify LDAP_OPTIONAL_TASK_FILL_DEPARTMENT in the task.list property. | Example: C\:\\build\\deptinfo.csv
The extra "\" symbol is an escape character. |
| task.empoyeetype.csv | File path to the emptype.csv file. Required if you specify LDAP_OPTIONAL_TASK_FILL_EMPLOYEE in the task.list property. | Example: C\:\\build\\emptype.csv
The extra "\" symbol is an escape character. |
| task.organization.csv | File path to the orginfo.csv file. Required if you specify LDAP_OPTIONAL_TASK_FILL_ORGANIZATION in the task.list property. | Example: C\:\\build\\orginfo.csv
The extra "\" symbol is an escape character. |
| task.worklocation.csv | File path to the workloc.csv file. Required if you specify LDAP_OPTIONAL_TASK_FILL_ORGANIZATION in the task.list property. | Example: C\:\\build\\workloc.csv
The extra "\" symbol is an escape character. |
| TDI.dir | Installation location of Tivoli Directory Integrator. | Example: C\:\\IBM\\TDI\\V7.1
The extra "\" symbol is an escape character. |
For more information about using CSV files to provide additional data for Profiles, see the Supplemental user data for Profiles topic. For information about TDI properties, see Tivoli Directory Integrator solution properties for Profiles.
Manually populating the Profiles DB
Instead of using the Profiles population wizard, you can manually populate the DB.
You can populate the Profiles DB manually, as described here, or with the help of the population wizard as described in the Using the Profiles population wizard topic. You might choose to manually populate the DB to take advantage of functionality not provided by the wizard, such as anonymous LDAP access, large data sets, and property configuration other than what is provided by the wizard, for example alternate source options.
Additional and related information about configuration and mapping properties may be available in the Using the Profiles population wizard topic.
Before starting this task, complete the steps in the Mapping fields manually topic. You must set up the mapping file before starting this task.
(AIX only). An AIX limitation causes a file naming error when you extract the tdisol.tar archive. The system renames the profile-links.xsd to profile-links.xs. To resolve this issue, use the GNU Tar program, version 1.14 or higher, to extract the archive. Download the program from ftp://ftp.gnu.org/gnu/tar/ and install it as the default tar utility in the path. The default location for GNU Tar is /usr/local/bin.
The internal name of the Profiles DB is PEOPLEDB.
After installing the Profiles DB and defining mapping and validation to populate the Profiles DB:
- Update the profiles_tdi.properties file
to specify values for the following properties.
To locate this file, extract the tdisol.tar|zip file from the tdisol directory in your IBM Connections installation media. After extraction, the file is located in the tdisol.tar|zip/tdisol/TDI directory.
The following list contains properties that you must review. Edit any property values that require editing for your configuration.
- source_ldap_url
- Universal resource locator of the LDAP directory. Enables programs
to access the LDAP directory. Use the following syntax to specify
the value:
source_ldap_url=ldap://myldap.enterprise.example.com:389
- source_ldap_user_login
- If you cannot use Anonymous search, a user login name is required
. Use the following syntax to specify the value:
source_ldap_user_login=uid=wpsbind,cn=users,l=Bedford Falls,
st=New York,c=US,ou=Enterprise,o=Sales Division,dc=example,dc=com
- source_ldap_user_password
- If you cannot use anonymous search, a user password is required,
along with user login name. Use the following syntax to specify the value:
{protect}-source_ldap_user_password=wpsbindTivoli Directory Integrator automatically encrypts any properties which have the {protect} prefix. If you do not want to encrypt these properties, remove the {protect} prefix.
- source_ldap_search_base
- A portion of the LDAP DN that must be part of all entries processed.
This base usually contains the expected organization (o) value, such
as source_ldap_search_base=o=ibm.com. Use the following syntax to specify the value:
source_ldap_search_base=l=Bedford Falls,st=New York,c=US,
ou=Enterprise,o=Sales Division,dc=example,dc=com
- source_ldap_search_filter
- A search filter to further refine the entries used. A typical
value might be source_ldap_search_filter=cn=*. Use
the following syntax to specify the value:
source_ldap_search_filter=(&(uid=*)(objectclass=inetOrgPerson))
- source_ldap_use_ssl
- Required only if you are using SSL to authenticate. Specifies whether to use Secure Sockets Layer for the connection. Options are true or false.
- dbrepos_jdbc_driver
- JDBC driver used to access the Profiles DB repository. The default value of the properties file references the DB2 DB provided with Profiles as follows:
dbrepos_jdbc_driver=com.ibm.db2.jcc.DB2Driver
If you are using DB2, you do not need to modify this value. If you are using an Oracle DB, change the value to reference an Oracle DB. The following values are examples:dbrepos_jdbc_driver=oracle.jdbc.driver.OracleDriver
dbrepos_jdbc_driver=oracle.jdbc.pool.OracleConnectionPoolDataSource
If you are using SQL Server, change the value to reference the SQL Server DB. The following value is an example:com.microsoft.sqlserver.jdbc.SQLServerDriver
- dbrepos_jdbc_url
- Universal resource locator of the DB that you created. This value specifies the peopledb DB, and must include the port.
For example:
- DB2:
jdbc:db2://localhost:50000/peopledb
- Oracle:
jdbc:oracle:thin:@localhost:1521:PEOPLEDB
- SQL Server:
jdbc:sqlserver://enterprise.example.com:1433;DatabaseName=PEOPLEDB
- DB2:
- dbrepos_username
- The user name used to authenticate to the DB that you created.
Use the following syntax to specify the value:
dbrepos_username=<db_admin_id>
- dbrepos_password
- The password used to authenticate to the DB that you created.
Use the following syntax to specify the value:
{protect}-dbrepos_password=act1vities
You can provide values for additional properties if necessary, see Tivoli Directory Integrator solution properties for Profiles for details.
- Complete the steps in the Mapping
fields manually task. You must complete the mapping task before
continuing.
- Run the ./collect_dns.sh or collect_dns.bat script
to create a file containing the distinguished names (DNs) to be processed
from the source LDAP directory.
Before starting the script, ensure that you have completed the steps in the Mapping fields manually task.
If the script does not run, you might need to enable its Executable attribute by running the chmod command first. The Executable attribute of a script can become disabled after the script is copied from a read-only medium such as DVD.
The new file is named collect.dns by default but you can rename it if necessary. If you change the file name, update the source_ldap_collect_dns_file parameter in the profiles_tdi.properties file.
After the script runs, it creates a log file called ibmdi.log in the tdisol.tar|zip/tdisol/TDI directory. Examine this file to find out whether any errors occurred during the process.
- Populate the DB repository from the source LDAP directory
by running the ./populate_from_dn_file.sh or populate_from_dn_file.bat script.
Depending on how many records you are processing, this step could take many hours.
For example, 5,000 records might take a few minutes, while half a million records could take over 12 hours. Tivoli Database Integrator prints a message to the screen after every 1,000 iterations to inform you of its progress.
If a failure occurs during processing, such as loss of the network connection to the LDAP directory server, start processing the names from where it was interrupted. Examine the PopulateDBFromDNFile.log file in the logs subdirectory to find out which distinguished name was last successfully processed. The ibmdi.log file also tracks the tasks that you run. Edit the collect.dns file to remove all entries up to and including the last successfully processed entry. Start the task again. You can repeat this step as many times as necessary until all the distinguished names are processed.
- Optional: If you are setting the PROF_IS_MANAGER field
based on PROF_MANAGER_UID references in other employee
records, run the ./mark_managers.sh or mark_managers.bat script.
Manager identification is not performed as part of the previous record population step because it must run across all the records and it is possible that the initial record population step does not complete in a single pass for large organizations.
If the manager designation was not part of the source records for your data set, you can run this task to analyze all the records after population. This task will take each user record and see if it is referenced as the manager for any other users. If yes, the user will be marked as a manager. If not, the user will be marked as not a manager. If you need to use this process to set this profile attribute, you will also need to run it periodically to perform updates. For more information, see Synchronizing user data between Profiles and the LDAP directory.
- Optional: Run additional and optional scripts
to populate additional fields.
For example, run the ./fill_country.sh or fill_country.bat script to populate the Country table from the isocc.csv file.
Tivoli Directory Integrator solution properties for Profiles
IBM Connections maps LDAP, DB, and other properties with Tivoli Directory Integrator configuration parameters.
The properties described in this topic are found in the supplied profiles_tdi.properties file.
The TDI parameter column in the tables contains the name of the parameter in the LDAP connector. See the Tivoli Directory Integrator product documentation for more information.
You can find additional information about LDAP properties at ibm.com® and other sites.
All file paths specified are relative to the TDI solution directory.
The following properties are associated in an LDAP directory that will be used as the source for the data. If you wish to use a source other than LDAP, see Manually populating the Profiles DB.
| Property | TDI parameter | Definition |
|---|---|---|
| source_ldap_url | LDAP URL hostname and LDAP URL Port |
Required. The LDAP web address used to access the source LDAP system. The port is required and is typically 389 for non-SSL connections. Express this value in the form of ldap://host:port. For example: ldap://myservername.com:389. If using the population wizard, this property is configured using the LDAP server name and LDAP server port on the LDAP server connection page. The LDAP query constructed from the source URL, search base, and search filter are stored in a source url property, which can be used to segment the Profiles DB user set during synchronization. Using different values for this property, which may be equivalent (for example referencing the LDAP server by IP address or DNS name) is not advised. The default value is ldap://localhost:389. |
| source_ldap_use_ssl | LDAP URL Use SSL connection |
Required if you are using SSL to authenticate. Set to either true or false. Set to true if you are using SSL (for example if you are using port 636 in the LDAP URL). The default value is false. If using the population wizard, this property is configured with the Use SSL communication checkbox on the LDAP server connection page. |
| source_ldap_user_login | Login user name |
Login user name used for authentication. You can leave this blank if no authentication is required. If using the population wizard, this property is configured in the Bind distinguished name (DN) field on the LDAP authentication properties page. |
| source_ldap_user_password | Login password |
Login password used for authentication. Leave this blank if no authentication is required. The value will be encrypted in the file the next time it is loaded. If using the population wizard, this property is configured in the Bind password field on the LDAP authentication properties page. |
| source_ldap_search_base or source_ldap_user_search_base | Search Base |
The search base (the location from where the search begins) of the iterating directory. The search begins at this point in the ldap directory structure and searches all records underneath. This should be a distinguished name. Most directories require a search base, and as such it must be a valid distinguished name. Some directory services allow you to specify a blank string which defaults to whatever the server is configured to do. A default value is not specified. If using the population wizard, this property is configured in the LDAP user search base field on the LDAP page. |
| source_ldap_search_filter or source_ldap_user_search_filter | Search Filter |
Search filter used when iterating the directory. This determines which objects are included or excluded in the search. If using the search base and the specified search filter properties do not allow you to adequately construct your search set, use the source_ldap_required_dn_regex property. Search filters are used by those directories to select entries from which data is retrieved from a search operation. Care should be taken when specifying search filters as they can affect performance of the directory being searched. The directory server schema being queried can impact performance. A default value is not specified. If using the population wizard, this is the LDAP user search filter field on the LDAP authentication properties page. |
| source_ldap_sort_page_size | Page size |
If specified, the LDAP Connector tries to use paged mode search. Paged mode causes the directory server to return a specific number of entries (called pages) instead of all entries in one chunk. Not all directory servers support this option. The default value is 0, which indicates that paged mode is disabled. The default value is 0. This parameter is not configurable when using the population wizard. |
| source_ldap_authentication_method | Authentication Method |
Options include the following:
This parameter is not configurable when using the population wizard. |
| source_ldap_collect_dns_file |
Name of the file used to collect distinguished names (DNs) by the collect_dns.bat/sh process from the source, and then used during population by the populate_from_dn_file.bat/sh processes to look up entries to add to the DB repository. This file can also be constructed by hand to populate an explicit set of users. The default value is collect.dns. This parameter is not configurable when using the population wizard. | |
| source_ldap_escape_dns |
Indicates that special characters have not been escaped properly and identifies them so the processor can find those characters and escape them. Special characters are:
The backslash is used to escape special characters. A plus sign is represented by \+ and a backslash is represented by \\. if your distinguished names contains these special characters and you receive errors when running the collect_dns/populate_from_dn_file process, set this property to true so that the characters are escaped. The default value is false. This parameter is not configurable when using the population wizard. | |
| source_ldap_required_dn_regex |
Allows a regular expression to be used to limit the distinguished names (DNs) which are processed by providing a regular expression which must be matched. If the regular expression is not matched, that particular record is skipped. Although the search filter property gives some flexibility, in case this is not sufficient, you can use a more powerful regular expression. A default value is not specified. This parameter is not configurable when using the population wizard. | |
| source_ldap_sort_attribute | Sort Attribute |
Specifies server-side sorting. This parameter instructs the LDAP server to sort entries matching the search base on the specified field name. Server-side sorting is an LDAP extension. The iterating directory must be able to support this sorting extension. A default value is not specified. This parameter is not configurable when using the population wizard. |
| source_ldap_iterate_with_filter |
This property should be used if the size of the data to be retrieved from LDAP exceeds the search limit from the LDAP. For example, if your search parameters would return 250K records but the LDAP only allows 100K to be returned at a time, this parameter must be used. If the data is too large, an LDAP size limit exceeded error message is generated. To configure this mechanism, see the Populating a large user set topic. When set to true, this specifies that the default iteration assembly line use the collect_ldap_dns_generator.js file to iterate over a set of LDAP search bases and filters. The cconfig setting replaces the sync_all_dns_forLarge and collect_dns_iterate scripts used in earlier releases. This parameter is not configurable when using the population wizard. The default value is false. | |
| source_ldap_binary_attributes | Binary Attributes |
By default, this property is set internally to GUID, objectGUID, objectSid, sourceObjectGUID. Any additional values specified in the property are appended to the list. This parameter is not configurable when using the population wizard. The default value is GUID. |
| source_ldap_time_limit_seconds | Time Limit |
Specifies the maximum number of seconds that can be used when searching for entries; 0 = no limit. This parameter is not configurable when using the population wizard. The default value is 0. |
| source_ldap_map_functions_file |
Specifies the location of any referenced function mappings. When using the population wizard, the functions shown in the mapping dialog are read from and written to this file. The default value is profiles_functions.js. | |
| source_ldap_logfile |
In addition to the standard logs/ibmdi.log file, output from the populate_from_dn_file.bat or populate_from_dn_file.sh task is written to this file. This parameter is not configurable when using the population wizard. The default value is logs/PopulateDBFromSource.log. | |
| source_ldap_compute_function_for_givenName |
Connections allows Javascript functions for setting values of common LDAP fields such as cn, sn, givenName to execute before Connections performs its mapping. For example, sn and/or givenName can be parsed from cn (common name). This parameter is not configurable when using the population wizard. A default value is not specified. | |
| source_ldap_compute_function_for_sn |
Connections allows Javascript functions for setting values of common LDAP fields such as cn, sn, givenName to execute before Connections performs its mapping. For example, sn and/or givenName can be parsed from cn (common name). This parameter is not configurable when using the population wizard. A default value is not specified. | |
| source_ldap_collect_updates_file |
This property is no longer used. | |
| source_ldap_manager_lookup_field |
This property is no longer used. | |
| source_ldap_secretary_lookup_field |
This property is no longer used. |
Many properties in the TDI LDAP connector are not mapped to Profiles TDI properties. To configure properties other than those listed here, consider using an alternate source repository and creating your own specialized configuration. Use the LDAP iterator and connectors provided with the TDI solution directory as a starting point, see Using a custom source repository connector for more information.
The following properties are associated with the Profiles DB repository.
The following properties must be set in the profiles_tdi.properties file, even if developing your own assembly lines using the connectors provided in the Profiles TDI solution directory. These properties are not configured in the Connector panels, but rather in the profiles_tdi.properties file.
| Property | TDI parameter | Definition |
|---|---|---|
| dbrepos_jdbc_driver | JDBC Driver |
Required. The JDBC driver implementation class name used to access the Profiles DB repository. For DB2, the default is com.ibm.db2.jcc.DB2Driver. For example: dbrepos_jdbc_driver=com.ibm.db2.jcc.DB2Driver For Oracle, the default is oracle.jdbc.driver.OracleDriver. For example: dbrepos_jdbc_driver=oracle.jdbc.driver.OracleDriver If you are using a Microsoft SQL Server DB, change the value to reference a SQL Server driver, for example: dbrepos_jdbc_driver=com.microsoft.sqlserver.jdbc.SQLServerDriver This corresponds to the JDBC driver path in the population wizard. If not using the wizard, this library must be present in the CLASSPATH of Tivoli Directory Integrator, or Tivoli Directory Integrator cannot load the library when initializing the Connector and cannot communicate with the Relational Database (RDBMS). To install a JDBC driver library so that Tivoli Directory Integrator can use it, copy it into the TDI_install_dir/jars directory, or a subdirectory such as TDI_install_dir/jars/local. |
| dbrepos_jdbc_url | JDBC URL |
Required. JDBC web address used to access the Profiles DB repository. You must modify the hostname portion and port to reference your server information. You can find this information by accessing the WAS Administration Console (http://yourhost:9060), and then selecting Resources > JDBC > Data sources > profiles. The default syntax is for DB2, unless using the wizard, but the default uses a local host. If the DB2 is not on the same system as the TDI solution directory, update the URL with the host. If you are using an Oracle DB, use the following syntax: dbrepos_jdbc_url=jdbc:oracle:thin:@<host_name>:1521:orcl If you are using a SQL Server DB, use the following syntax: dbrepos_jdbc_url=jdbc:sqlserver://<host_name>:1433;DBName=PEOPLEDB |
| dbrepos_username | User name |
Required. User name under which the DB tables, which are part of the Profiles DB repository, are accessed. |
| dbrepos_password | Password |
Required. Password associated with the username under which the DB tables, which are part of the Profiles DB repository, are accessed. |
| dbrepos_mark_manger_if_referenced |
This property is no longer used. |
The following properties are associated with the task that monitors the Profiles employee draft table for changes and transmits them through a DSML v2 connector.
| Property | TDI parameter | Definition |
|---|---|---|
| monitor_changes_dsml_server_authentication |
Type of authentication used by the DSML server update requests. Options include the following:
| |
| monitor_changes_dsml_server_url | Required if you are transmitting
user changes back to the source repository.
Web address of the DSML server to which the DSML update requests should be sent. | |
| monitor_changes_dsml_server_username | Required if you are transmitting
user changes back to the source repository.
User name used for authentication to the DSML server. | |
| monitor_changes_dsml_server_password | Required if you are transmitting
user changes back to the source repository.
Password used for authentication to DSML server that the DSML update requests should be sent to. | |
| monitor_changes_map_functions_file |
Path to the file containing mapping functions for mapping from a changed DB field to a source. for example LDAP field. This is only needed if changes made to the source based on DB repository field changes are not mapped one-to-one. You can use the same file you use to map from source to DB repository fields, assuming the functions are named appropriately. | |
| monitor_changes_sleep_interval |
Polling interval, in seconds, between checks for additional changes when no changes exist. |
The following properties are associated with the Tivoli Directory Integrator processing that reads a Tivoli Directory Server change log and subsequently updates the DB repository with those changes.
| Property | TDI parameter | Definition |
|---|---|---|
| ad_changelog_ldap_url |
LDAP web address used to access the LDAP system that was updated. For example: ldap://host:port | |
| ad_changelog_ldap_user_login |
Login user name to use to authenticate with an LDAP system that has been updated. You can leave this blank if no authentication is needed. | |
| ad_changelog_ldap_user_password |
Login user name to use to authenticate with an LDAP that has been updated. You can leave this blank if no authentication is needed. The value will be encrypted in the file the next time it is loaded. | |
| ad_changelog_ldap_search_base | ||
| ad_changelog_ldap_use_ssl |
Defines whether or not to use SSL in authenticating with an LDAP system that was updated. The options are true and false. | |
| ad_changelog_timeout | ||
| ad_changelog_sleep_interval |
Polling interval, in seconds, between checks for additional changes when no changes exist. | |
| ad_changelog_use_notifications |
Indicates whether to use changelog notifications rather than polling. If true, the tds_changelog_sleep_interval is not applicable since polling is not used. The options are true and false. | |
| ad_changelog_ldap_page_size | ||
| ad_changelog_start_at |
Change number in the Active Directory changelog to start at. Typically this is an integer, while the special value EOD means start at the end of the changelog. | |
| ad_changelog_ldap_required_dn_regex. | ||
| tds_changelog_ldap_authentication_method | Authentication Method |
Authentication method used to connect to LDAP to read records. Options include the following:
|
| tds_changelog_ldap_changelog_base | ChangelogBase |
Changelog base to use when iterating through the changes. This is typically cn=changelog. |
| tds_changelog_ldap_time_limit_seconds | Time Limit |
Search for entries must take no more than this number of seconds; 0 = no limit. |
| tds_changelog_ldap_url | LDAP URL |
LDAP web address used to access the LDAP system that was updated. For example: ldap://host:port |
| tds_changelog_ldap_use_ssl | Use SSL |
Defines whether or not to use SSL in authenticating with an LDAP system that was updated. The options are true and false. |
| tds_changelog_ldap_user_login | Login user name |
Login user name to use to authenticate with an LDAP system that has been updated. You can leave this blank if no authentication is needed. |
| tds_changelog_ldap_user_password | Login password |
Login user name to use to authenticate with an LDAP that has been updated. You can leave this blank if no authentication is needed. The value will be encrypted in the file the next time it is loaded. |
| tds_changelog_sleep_interval |
Polling interval, in seconds, between checks for additional changes when no changes exist. | |
| tds_changelog_start_at_changenumber |
Change number in the Tivoli Directory Server changelog to start at. Typically this is an integer, while the special EOD value means start at the end of the changelog. | |
| tds_changelog_use_notifications |
Indicates whether to use changelog notifications rather than polling. If true, the tds_changelog_sleep_interval is not applicable since polling is not used. The options are true and false. |
The following properties are available in the profiles_tdi.properties file and are associated with Tivoli Directory Integrator debug activities.
The debug properties enable TDI debugging for an entire assembly. In addition, enabling debug_update_profile which enables debugging for the commands that use the Profiles Connector, also enables Java debugging for the following packages.
- log4j.logger.com.ibm.lconn.profiles.api.tdi=ALL
- log4j.logger.com.ibm.lconn.profiles.internal.service=ALL
- log4j.logger.java.sql=ALL
The following properties are not configurable when using the population wizard.
| Property | TDI parameter | Definition |
|---|---|---|
| sync_all_dns | For information about sync_all_dns, see Understanding how the sync_all_dns process works. | |
| debug_managers |
Flag that instructs TDI to log additional debug information for the following command(s). The options are true and false. To enable, set as debug_managers=true. This property maps as follows: debug_managers mark_managers The default setting is false. | |
| debug_photos |
Flag that instructs TDI to log additional debug information for the following command(s). The options are true and false. This property maps as follows: debug_photos load_photos_from_files dump_photos_to_files The default setting is false. | |
| debug_pronounce |
Flag that instructs TDI to log additional debug information for the following command(s). The options are true and false. This property applies to the following command(s): debug_pronounce load_pronounce_from_files, dump_pronounce_to_files The default setting is false. | |
| debug_fill_codes |
Flag that instructs TDI to log additional debug information for the following command(s). The options are true and false. This property applies to the following command(s): debug_fill_codes fill_country fill_department fill_emp_type fill_organization fill_worklok The default setting is false. | |
| debug_draft |
Flag that instructs TDI to log additional debug information for the following command(s). The options are true and false. This property applies to the following command(s): debug_draft process_draft_updates reset_draft_iiterator_state set_draft_iterator_count The default setting is false. | |
| debug_update_profile |
Flag that instructs TDI to log additional debug information for the following command(s). The options are true and false. This property applies to the following command(s): debug_update_profile populate_from_dn_file delete_or_inactivate_employees populate_from_xml_file process_ad_changes process_tds_changes The default setting is false. | |
| debug_collect |
Flag that instructs TDI to log additional debug information for the following command(s). The options are true and false. This property applies to the following command(s): debug_collect collect_dns The default setting is false. | |
| debug_special |
Flag that instructs TDI to log additional debug information for the following command(s). The options are true and false. This property applies to the following command(s): debug_special unused at present The default setting is false. | |
| trace_profile_tdi_javascript |
Enables generation of an internal Javascript trace file. Options are OFF, FATAL, ERROR, WARN, INFO, DEBUG, TRACE, ALL ( values are not case-sensitive). The default setting is OFF. |
Batch files for processing Profiles data
IBM Connections provides several batch files that automate the collection and processing of LDAP data for the Profiles DB.
Batch file functions
The name of each batch file ends with the .sh suffix for the IBM AIX and Linux operating systems and with the .bat suffix for the Microsoft Windows operating system.
The following list describes each batch file and its functions. You can search for more information about these files in the help topics.
- clearLock
- Delete the lock file that is generated by the sync_all_dns batch file.
- collect_dns
- Create a file called collect.dns that contains the distinguished names from the LDAP directory. This batch file is used in the first step of the process to populate the Profiles DB.
- delete_or_inactivate_employees
- Deactivate
employee records in the Profiles DB. The records
are not removed from the Profiles DB but are set to an inactive
state and the employee login and mail address values are removed.
These changes are propagated to the member and login tables in the DBs of installed applications. The records to be deactivated are defined in the delete_or_inactivate_employees.in file. To remove users from only the Profiles DB, change the value of the sync_delete_or_inactivate property in the profiles_tdi.properties file to delete.
You must manually create the delete_or_inactivate_employees.in file. Use the following format for adding entries:
$dn:cn=Any User3,cn=Users,l=WestfordFVT,st=Massachusetts,c=US,ou=Lotus,o=Software Group,dc=ibm,dc=com uid:Any User3
- dump_photos_to_files
- Copy all the photos from the PHOTO table in the Profiles DB to a folder on the local system called dump_photos. This batch file also creates a local file called collect_photos.in that contains the UID and URL of each photo.
- dump_pronounce_to_files
- Copy all the pronunciation files from the PRONUNCIATION table in the Profiles DB to a folder on the local system called dump_pronounce. the local files. This batch file also creates a local file called collect_pronounce.in that contains the UID and URL of each pronunciation file.
- fill_country
- Populate the COUNTRY table in the Profiles DB from the isocc.csv file.
- fill_department
- Populate the DEPARTMENT table in the Profiles DB from the deptinfo.csv file.
- fill_emp_type
- Populate the EMP_TYPE table in the Profiles DB from the emptype.csv file.
- fill_organization
- Populate the ORGANIZATION table in the Profiles DB from the orginfo.csv file.
- fill_workloc
- Populate the WORKLOC table in the Profiles DB from the workloc.csv file.
- load_photos_from_files
- Load all the photos from the dump_photos folder on the local system to the PHOTO table in the Profiles DB. This batch file reads the collect_photos.in file and the dump_photos folder that you created with the dump_photos_to_files batch file. This batch file loads photos only for people who are already recorded in the DB.
- load_pronounce_from_files
- Load all the pronunciation files from the dump_pronounce folder on the local system to the PRONUNCIATION table in the Profiles DB. This batch file reads the collect_pronounce.in file and the dump_pronounce folder that you created with the dump_pronounce_to_files batch file. This batch file loads pronunciation files only for people who are already recorded in the DB.
- mark_managers
- Set the PROF_IS_MANAGER field in the Profiles DB, based on the value of the PROF_MANAGER_UID field in the employee records.
- populate_from_dn_file
- Populate the Profiles DB from the source LDAP directory. This batch file reads the collect.dns data file that you created with the collect_dns batch file. The batch file also updates existing employee records in the Profiles DB.
- process_ad_changes
- Synchronize
LDAP directory changes with the Profiles DB
when the LDAP directory type is Microsoft Active
Directory. This batch file is stored in the solution-dir/Samples directory.
For
more information, go to the Active Directory Change Detection Connector topic
in the Tivoli Directory
Integrator information center. For information about permissions,
go to the How
to poll for object attribute changes topic on the Microsoft Support website.The sync_all_dns script is recommended when you want to synchronize changes in the LDAP directory with the Profiles DB.
- process_draft_updates
- Synchronize changes from the Profiles DB back to the LDAP directory.
- process_tds_changes
- Synchronize LDAP directory changes with the Profiles DB when the LDAP directory type is IBM Tivoli Directory Server. This batch file is stored in the solution-dir/Samples directory.
The sync_all_dns script is recommended when you want to synchronize changes in the LDAP directory with the Profiles DB.
- sync_all_dns
- Update the Profiles DB to capture changes to the LDAP directory. This synchronization process includes updates to employee records and additions and deletions of records.
- tdienv
- Set the correct environment for IBM Tivoli Directory Integrator. This batch file sets the path to the Tivoli Directory Integrator program, the Tivoli Directory Integrator host, and the Tivoli Directory Integrator port. If you installed Tivoli Directory Integrator to a custom location, modify the path to that location before using this batch file.
Populate a large user set
Populate the Profiles DB from an LDAP directory with a large user population.
In very large organizations, the number of users in the LDAP directory exceeds the capacity of the Tivoli Directory Integrator assembly lines for Profiles. To overcome this restriction, you can populate the DB by using manual TDI assembly lines. You cannot use the Profiles population wizard.
For related information and details, see Tivoli Directory Integrator help.
Limits with large user sets
The LDAP administrator can change the LDAP size limit. The capacity of the standard assembly lines provided with IBM Connections is 100,000 users. In some cases, you can modify the maximum number of entries returned from the LDAP or adjust the source_ldap_page_size parameter in the profiles_tdi.properties file.
For example, set the parameter to the maximum number of records the LDAP repository will return, using the following sample statement:
source_ldap_page_size=1000
If you receive the following, adjust the source_ldap_page_size parameter in the profiles_tdi.properties file.LDAP: error code 4 - Sizelimit Exceeded
If neither of these alternatives is successful, use a special set of assembly lines to populate your Profiles DB from the LDAP directory.
Alternative population process
If you have a very large set of data, set the source_ldap_iterate_with_filter property in the profiles_tdi.properties file to true. This uses the collect_ldap_dns_generator.js file to retrieve search criteria for a batch of records. The batch is always smaller than the limit of the LDAP retrieval.
The collect_ldap_dns_generator.js file constructs a search filter with a portion of UIDs but does not modify the search base. It is data-specific so you need to modify it for your own deployment. Modify suppliesSearchBase() or suppliesSearchBase(), depending on which filter is used in the LDAP retrieval.
If one of the filters is changed to return true (in the supplied file, suppliesSearchBase returns true), the corresponding function, either getNextSearchBase() or getNextSearchFilter(), is called in iterations. Each time the function is called it returns a string with the next search base or filter to use. When it reaches the end of the batch, it returns null.
In the sample file, the UID is examined over a range of its first characters.
The process first uses some special characters and then examines the first two characters of the UID string, or example aa*, ab*, and so on. After it reaches zz* it returns null and the collect_dns assembly line stops processing. You can then run populate_from_dn_file.
Map fields manually
To populate the Profiles DB with data from the enterprise LDAP directory, map the content of the fields in the DB to the fields in the LDAP directory.
Edit the map_dbrepos_from_source.properties file to map fields between the Profiles DB and the LDAP directory. Open the profiles_functions.js file to see the options for the different mapping functions. You can add your own functions if necessary.
When you run the Profiles population wizard in interactive mode, it generates two property files in the Wizards\TDIPopulation directory: a tdisetting.properties file and a mappings.properties file. The properties in mappings.properties are very similar to those in map_dbrepos_from_source.properties.
The internal name of the Profiles DB is PEOPLEDB.
To map fields:
- On the system hosting your Tivoli Directory
Integrator installation, create a subdirectory in which to store the Tivoli Directory Integrator solution
directory. Make sure that the file path does not contain spaces. Do
not, for example, create the subdirectory in the Program
Files directory in Microsoft Windows.
- Copy the tdisol compressed file from
the TDISOL directory of the IBM Connections installation media to the system
...where you installed Tivoli Directory Integrator.
- Use appropriate
tools, extract the tdisol file to the directory
that you created in Step 1. This process creates a Tivoli Directory Integrator Solution directory
called TDI.
- From the TDI solution directory, open
the tdienv.bat or tdienv.sh file in a text editor.
Ensure that the path to the Tivoli Directory
Integrator installation directory is specified correctly in the TDIPATH variable.
If the path is not correct, edit the TDIPATH environment
variable.
- AIX or Linux:
The default value for TDIPATH is:
export TDIPATH=/opt/IBM/TDI/V7.1
- Windows:
The default value for TDIPATH is:
SET TDIPATH=C:\IBM\TDI\V7.1
- AIX or Linux:
- Edit the properties files to define the mapping between
the LDAP directory and the Profiles DB. Consider using LDAP
viewer software to help you map the fields. To define the mappings
that are used when populating the Profiles DB from the enterprise
directory:
- From the TDI directory, open the map_dbrepos_from_source.properties file
in a text editor.
- Add or modify the field values. Any values that you omit or set
to null are not populated in the DB. You can modify the values
in one of the following ways:
- 1:1 mapping
- If one field in the Profiles DB matches one field in the enterprise directory, type the name of the field in the Profiles DB
and set it equal to the associated source DB LDAP property.
For example:
bldgId=buildingname
- Complex mapping
- If there is a more complex relationship between the fields in
the Profiles DB and enterprise directory, such as the content
of the property in the enterprise LDAP directory must be split into
multiple fields in the Profiles DB, use a JavaScript function to define the relationship.
Define the function in the profiles_functions.js file
and wrap the name of the JavaScript function
in braces {}. Begin function names with func_ so
that you can more easily identify them. For example:
bldgId={func_map_to_db_bldgId}
See Example complex mapping of Profiles data for an example of complex mapping.
The uid, guid, dn, surname, and displayName attributes are always required.
- From the TDI directory, open the map_dbrepos_from_source.properties file
in a text editor.
- Open the tdi-profile-config.xml file. After the IBM Tivoli Directory Integrator Solution
files are extracted, the file is located in the following directory:
TDI/conf/LotusConnections-config
- Modify the file to configure the extension attribute, specifying
the property's name and mapping from the source. Use the following parameters:
Custom extension attribute parameters
Parameter Description extensionId The ID of the extension attribute. This parameter is required.
sourceKey The name of the attribute from the source. This parameter is required.
For example, to add a simple attribute called spokenLangs, the configuration would look like the following extract from the tdi-profiles-config.xml file:
<simpleAttribute extensionId="spokenLangs"
    sourceKey="spokenLang"/>
The formatting between the tdi-profile-config.xml and the profiles-config.xml files is compatible, so you can copy and paste configuration information between the files. For the extension to be displayed in the user interface, the modifications must be made in profiles-config.xml.
To leverage the custom attribute in the Profiles user interface or REST API, configure the application per the instructions in the Customize Profiles section. For a detailed example that uses custom attributes, see Creating a simple profile data model and template customization.
- Save your changes to the tdi-profile-config.xml file.
- Optional: Write a JavaScript function that combines different
attributes from the LDAP directory to map a customized extension
attribute for the Profiles DB:
- Add the extension attribute function definition in the map_dbrepos_from_source.properties file,
using the following format:
extattr.spokenLangs={func_map_to_langs}
The extensionAttribute name must match the specified extensionId in the tdi-profiles-config.xml extension attribute definition.
- Add a new func_map_to_db_extensionAttribute JavaScript function in the TDISolution\TDI\profiles_functions.js file. Write logic for the function that specifies the new extension attribute mapping.
- Repeat these steps for each JavaScript function.
- Add the extension attribute function definition in the map_dbrepos_from_source.properties file,
using the following format:
What to do next
The properties in the map_dbrepos_from_source.properties file have the default values defined in the following table. Many of them are null. You must determine which LDAP properties to map to your DB fields and edit this file to specify values that apply to your configuration. Any values that you omit or set to null are not populated in the DB.
Default values for properties in the map_dbrepos_from_source.properties file
TDI property Default LDAP attribute mapping alternateLastname null bldgId null blogUrl null calendarUrl null countryCode c courtesyTitle null deptNumber null description null displayName cn Required.
distinguishedName $dn Required.
email mail employeeNumber employeenumber employeeTypeCode employeetype experience null faxNumber facsimiletelephonenumber floor null freeBusyUrl null givenName givenName givenNames gn groupwareEmail null guid Required ipTelephoneNumber null isManager null jobResp null loginId
logins null managerUid $manager_uid This property represents a lookup of the UID of the manager using the DN in the manager field.
mobileNumber mobile nativeFirstName null nativeLastName null officeName physicaldeliveryofficename orgId ou pagerId null pagerNumber null pagerServiceProvider null pagerType null preferredFirstName null preferredLanguage preferredlanguage preferredLastName null secretaryUid null shift null surname sn You must provide this field because the Search application expects to find it in the Profiles DB.
Required.
surnames sn telephoneNumber telephonenumber timezone null title null uid Required. workLocationCode postallocation Map the guid, uid, and loginId: The guid property identifies the global unique ID of a user. This property's value is created by the LDAP directory and is unique, complex, and never changes. It is essential in that it maps each user's IBM Connections data to their User ID when using the Profiles DB as the user repository. The mapping of the guid property must be handled differently depending on the type of LDAP directory that you are using:
- Microsoft Active Directory
guid={function_map_from_objectGUID} You must use a JavaScript function to define the value for Active Directory because objectGUID is stored in Active Directory as a binary value, but is mapped to guid, which is stored as a string in the Profiles DB. Also, the samAccountName property used by Active Directory has a 20 character limit, as opposed to the 256 character limit of the other IDs used by IBM Connections.
- IBM Lotus Domino
guid={function_map_from_dominoUNID}
- IBM Directory Server
guid=ibm-entryUuid
- Sun Java System Directory
Server
guid=nsUniqueID
- Novell eDirectory
guid={function_map_from_GUID}
- It must be present in every entry that is to be added to the DB.
- It must be unique.
- In a multi-LDAP environment, it must be unique across LDAP directories.
- It must be 256 characters or fewer in length.
> If you are mapping the uid from an LDAP field, specify the name of the field. However, if you need to parse it from the distinguished name and it is in the DN in the form of uid=value, use the following mapping function:
{func_map_to_db_UID}
Use the isManager and managerUid properties to set up the organizational structure of the organization. The isManager field determines whether the current person is a manager or not. You must assign a Y (Yes) or N (No) value to this property for each entry. Y identifies the person as a manager. The managerUid identifies the UID of the current person's manager. By default, managerUid is mapped to $manager_uid, which represents a lookup of the UID of the manager (using the DN contained in the LDAP manager field). If a user's manager information is not contained in the $manager_uid field, you should adjust the mapping accordingly. These two properties work together to identify manager/employee relationships and create a report-to chain out of individual user entries.
If users intend to log into Profiles using a single-valued user name other than the value specified in the uid or email properties, you must map that user name value to the loginId property. To do so, complete the following step:
- Set the loginId property in the map_dbrepos_from_source.propeties file equal to the LDAP property to use as the login ID.
For example, if you want to use employeeNumber as the login property, edit the property value as follows:
loginId=employeeNumber
If you have more than one additional login ID (such as with a long and short form UID) and you want to allow users to login with either of their login IDs, you can populate multiple additional login IDs by using one of the following settings:
logins=multiValuedLdapAttribute
or
logins={function_to_get_multiple_ldap_values}
For more information, see the Tivoli Directory Integrator product documentation.
Add profile types:
IBM Connections supports the ability to classify a profile using a profile type. The profile type allows the application to provide the set of properties that are intended for a given profile object. For more information, see Profile-types.
Example complex mapping of Profiles data
This example illustrates a sample complex mapping using Javascript functions to define mapping between the LDAP directory and the Profiles DB.
When manually mapping Profiles fields you can perform 1:1 or complex mapping as described in the Mapping fields manually topic.
In this example, the mapping pertains to the surnames list. The primary CRUD functions (create, retrieve, update and delete) are illustrated context. The example is intended for illustrative purposes only.
The map_dbrepos_from_source.properties mapping file contains the following statement:
surname=sn
surnames={func_surNames_basic}
This means there is an LDAP field named sn which contains a list of surnames. The first property (surname=sn) causes the first entry in the list to be stored in the surname field or row in the Profiles user table. If the second property were also assigned to sn, this would cause the list to be placed in the Profiles SURNAME table. However, the following function has been specified.
function func_surNames_basic(fieldName)
{
    var fieldName str = fieldName.toString();   // be cautious, make sure it is a string.
    var result = work.getAttribute("sn");       // get the list

    if(result == null)
    {
        result = "no sn work element";          // return bogus value. See the function
                                                // func_compute_givenName() in profiles_functions.js
                                                // for a more realistic approach.
    }
    else
    {
        result = result.clone();
        var len = result.size();
        for (var i = 0; i <len; i++)
        {
            var val = result.getValue(i);
            if (!(val instanceof java.lang.String))
            {
                val = java.lang.String.valueOf(val);
                val = val + " Esq                    // append .Esq.
                result.setValue(i, val);             // update value
            }
        }
    }
    result.setValue(len, fieldNamestr);
    return result;
}
In the first line the fieldName value is the name of the property, in this example the surnames property. This makes it possible to use the same function for a number of items.
In the third line the sn list is a variable named result. The argument of the getAttribute() must be the value of a property, in this example the sn property value.
A test for sn not being available occurs at the fourth line in the result = "no sn work element" statement.
Given that the list is available, we clone it to avoid changing the entry list. We next iterate through the list testing to verify that each value is a string. This is a best practice even though in this case it may seem unnecessary. The line containing .result.getValue(i);. gets the next item in the list; this represents the R element of CRUD. The result.setValue(i, val); line shows how to modify a value; this represents the U element of CRUD. After the iteration we add the fieldname to the list in the result.setValue(len, fieldNamestr); statement; this represents the C element of CRUD. The example uses the same setValue method for both the create and update functions.
Further, let.s suppose we don.t want any more than five names in the surnames list. Add the following entry after the for (var i = 0; i <len; i++) { demonstrate how the delete function works.
if (i > 4)
{
result.removeValue(i);
len--; i--;
continue;
}
Attribute mapping for Profiles
When the Profiles directory service is enabled, IBM Connections relies on the Profiles DB to provide user data such as user name, ID, and email.
The internal name of the Profiles DB is PEOPLEDB.
The following table shows the mapping relationships between Profiles, the Profiles directory service, Virtual Member Manager, and LDAP.
Attribute mapping table
Profiles DB column Profiles Directory Service Virtual Member Manager LDAP PROF_GUID ID uniqueId UUID/GUID/UNID (defined in RFC4122) PROF_DISPLAY_NAME Name cn/displayName cn/displayName PROF_MAIL Mail mail/ibm-primaryEmail mail/ibm-primaryEmail PROF_SOURCE_UID DN uniqueName DN PROF_UID UID UID UID or samAccountName (in MS AD/ADAM only) PROF_LOGIN LOGIN Login attributes other than UID and mail LDAP login attributes other than UID and mail The following table shows the population functions that are used in TDI scripts to populate ID into PROF_GUID.
Population functions for populating ID into PROF_GUID
LDAP implementations LDAP attribute type names LDAP syntax TDI scripts with functions IBM Lotus Domino Server dominoUNID Directory String (in Byte String Format) {function_map_from_dominoUNID}
Novell eDirectory Server GUID Octet String (in Binary Format) {function_map_from_GUID}
Microsoft AD/ADAM Server/Service objectGUID Octet String (in Binary Format) {function_map_from_objectGUID}
Microsoft AD/ADAM Server/Service objectSID Octet String (in Binary Format) {function_map_from_objectSID}
IBM Tivoli Directory Server ibm-entryUUID Directory String (in Canonical Format) n/a Sun Java Directory Server nsuniqueid Directory String (in Canonical Format) n/a Configure the Manager designation in user profiles
When you map manager data in the Profiles DB, you can mark manager profiles and also create report-to chains.
Each profile contains a manager_uid field which stores the uid value of that person's manager. This information is used to build the Reports To display widget in the Profiles user interface. For information about the manager_uid field, see Mapping fields manually.
Additionally, the isManager field (which equates to the Mark manager mapping task in the Profiles population wizard) is used to mark the user profile as being a manager. This information is used to build the People Managed display widget in the Profiles user interface. A Y or N attribute is assigned to an employee to indicate whether the employee is listed as a manager of other employees.
You can set the isManager field as described in the Mapping fields manually topic (using either 1:1 mapping or function mapping) or by running the Mark manager task (using the population wizard or by running the mark_manager.bat or mark_manager.sh script). For more information about these options see Using the Profiles population wizard and Manually populating the Profiles DB.
If you are setting the ismanager field using a 1:1 mapping, ensure specified how to set the field in the map_dbrepos_from_source.properties file. For example, if the LDAP has an ismanager field that is set to a value of Y or N, your map_dbrepos_from_source.properties file could specify the following property:
PROF_IS_MANAGER=ismanager
If the manager information is supplied directly from the source, the Mark manager task is not necessary.
The Mark manager task will iterate through the profiles, and see if that particular profile is referenced as the manager for any other profiles. If yes, it will mark that profile as a manager. If that profile is not referenced as anyone else's manager, it will be marked as not a manager.
For information about configuring the display of the Reports To and People Managed widgets for your organization, see Enabling the display of organizational structure information.
Supplemental user data for Profiles
You can supplement user profiles data using a mapping table, the profiles_tdi.properties file, and CSV files.
Map user data
You can map additional user data to supplemental tables within the Profiles DB and then display that data in a user's profile.
When the LDAP directory provides a code or abbreviation for a particular setting, the supplemental table can provide extra data. For example, an employeeType of P in the LDAP directory might correspond to Permanent. If the employee-type table is populated with data such as p;permanent, this extra data can be displayed in the profile.
The profiles_tdi.properties file stores the settings that determine how the files are formatted.These properties are supplied in the profiles_tdi.properties file. The file path specified is relative to the TDI solution directory.
The mapping task for Profiles maps your user data to the following entities:- Fill countries
- Add country data to each profile.
- Fill departments
- Add department data to each profile.
- Fill organization
- Add organization data to each profile.
- Fill employee types
- Add employee-type data to each profile.
- Fill work locations
- Add location data to each profile.
CSV files
A CSV (comma separated value) file is required as input for each of these tasks.
The following properties pertain to the CVS files used by these tasks:
country_table_csv_separator=;
country_table_csv_file=isocc.csv

department_table_csv_separator=;
department_table_csv_file=deptinfo.csv

emp_type_table_csv_separator=;
emp_type_table_csv_file=emptype.csv

organization_table_csv_separator=;
organization_table_csv_file=orginfo.csv

workloc_table_csv_separator=;
workloc_table_csv_file=workloc.csv
The separator character separates the different tokens in each line. The second property is the name of the file, relative to the solution directory.
The first token is the code. The next attributes are read in order for each additional field. No other fields are required.
The data that can be populated in these tables is usually provided as two values per line: code;description. For the workloc code, the values can be code;addr1;addr2;city;state;zip. For example: WSF;FIVE TECHNOLOGY PARK DR;;WESTFORD;MA;01886-3141.
Fields that you do not require in your mapping can be omitted from the file; this example uses only one addr field.
The default file name for each codes is shown in the following list:
- countryCode
- isocc.csv
- deptNumber
- deptinfo.csv
- orgId
- orginfo.csv
- employeeTypeCode
- emptype.csv
- workLocationCode
- workloc.csv
Sample CSV file
This sample shows some lines from the isocc.csv file, which can be used to fill countries data:
ad;Andorra, Principality of
ae;United Arab Emirates
af;Afghanistan, Islamic State of
ag;Antigua and Barbuda
ai;Anguilla
al;Albania
am;Armenia
an;Netherlands Antilles
ao;Angola
aq;Antarctica
ar;Argentina
You can find more sample CSV files in the wizard_files_directory/TDIPopulation/TDISOL/aix|lin|win/samples directory,
...where the wizard_files_directory is the location of the various Wizard files that you downloaded or received on disk, and aix|lin|win is the AIX, Linux, or Microsoft Windows version of the directory.
Install Cognos Business Intelligence
IBM Cognos Business Intelligence collects, manages, and displays statistical information for the Metrics application in IBM Connections. Installing Cognos Business Intelligence involves installing IBM WAS Network Deployment, plus a DB client, in addition to the Cognos components.
This documentation assumes you are deploying Cognos Business Intelligence before you install IBM Connections. If you choose to deploy Cognos later, you can ignore any Cognos-related validation errors during the Connections installation process and then return to this section later for instructions on deploying the Cognos components. Even if you are not deploying Cognos now, you can create the raw Metrics DB and install the Metrics application so that Connections can immediately begin capturing event data for later use.
IBM Connections requires a customized version of Cognos Business Intelligence, which is installed using the provided script. You cannot use previously deployed Cognos Business Intelligence components with the Metrics application. For best performance, use a separate computer for the customized version of Cognos Business Intelligence.
To install the Cognos Business Intelligence and its supporting software, complete these tasks:
Install required patches on the Cognos BI Server system
Before installing IBM Cognos Business Intelligence and its related software, prepare the server environment by applying required patches to the operating system and other third-party components.
Any required patches must be installed before you attempt to deploy the Cognos server.
- Review IBM technote
7022463, Cognos BI
10.1.1 Software Environments - Required Patches.
Open Motif libraries are still required (as mentioned in the technote) for headless Linux systems.
- Install the patches specified for your server environment.
- Restart the server to make sure all patches take effect.
Install WAS for Cognos Business Intelligence
Install IBM WAS Network Deployment on the computer that will host IBM Cognos Business Intelligence, so that the server can be managed by the Deployment Manager used with IBM Connections.
The WebSphere node hosting the Cognos BI server will be federated to the same dedicated Deployment Manager as your IBM Connections deployment. Do not use a WebSphere node that has already been federated to a different Deployment Manager.
- Install WAS Network Deployment as described in the WAS Version 7.0 information center.
This server should be installed using the Application server profile; you will federate it to the Deployment Manager in a later task.
If you will use a server where the appropriate version of WAS Network Deployment is already deployed, you do not have to install it again; just create a new Application server profile for Cognos Business Intelligence as follows:
IBM AIX, Linux
manageprofiles.sh -create -templatepath WAS_install_root/profileTemplates/default -adminUserName was_admin_name -adminPassword was_admin_password
Microsoft Windows
manageprofiles.bat -create -templatepath WAS_install_root\profileTemplates\default -adminUserName was_admin_name -adminPassword was_admin_password
You can verify that the installation was successful by reviewing the WAS log stored in: Cognos_WAS_node_profile/logs/Cognos_server_name/SystemOut.log; for example on Windows:
C:\IBM\WebSphere\AppServer\profiles\CognosNode01\logs\cognos_server\SystemOut.log
- On the newly installed server, set the system clock to
match the time (and time zone) on the Deployment Manager.s computer.
The node.s clock must be synced to within 1 minute of the Deployment Manager.s clock to ensure that federation does not fail in a later task.
Install Cognos Business Intelligence components
Install IBM Cognos Business Intelligence on the computer where you previously installed IBM WAS Network Deployment and the DB client. The Cognos product consists of two components (Cognos BI Server and Cognos Transformer); you must install both components as part of this deployment.
The following conditions must be satisfied to ensure that the Cognos Business Intelligence components installs correctly:
- The Cognos Content Store
DB must have been created on the DB server, and that DB
server must be running (see Create
DBs
- The Deployment Manager must be running.
- The DB client must have been installed on the current server,
but does not have to be running.
- The current server must reside within the same domain as the IBM Connections servers so you can
enable SSO (Single Sign-On) as required for generating reports.
- The user running the Cognos installation script must have permissions to use the DB client.
Install Cognos Business Intelligence requires two Cognos packages (BI Server and Transformer) in addition to the scripts provided in the IBM Connections kit.
The installation packages for Cognos Business Intelligence components are available in the IBM Connections kit as separate downloads.
Package names for Cognos components to be installed for use with IBM Connections.
Operating System Cognos BI Server package name Cognos Transformer package name IBM AIX IBM Cognos Business Intelligence Server 64-bit 10.1.1 AIX Multilingual IBM Cognos Business Intelligence Transformer 10.1.1 AIX Multilingual Linux IBM Cognos Business Intelligence Server 64-bit 10.1.1 Linux x86 Multilingual IBM Cognos Business Intelligence Transformer 10.1.1 Linux x86 Multilingual Microsoft Windows IBM Cognos Business Intelligence Server 64-bit 10.1.1 Windows Multilingual IBM Cognos Business Intelligence Transformer 10.1.1 Windows Multilingual zLinux (System z) IBM Cognos Business Intelligence Server 64-bit 10.1.1 Linux on System z Multilingual (CI5W5ML IBM Cognos Business Intelligence Transformer 10.1.1 Linux on System z Multilingual (CI2QHML) - Create a shared network folder where Cognos Transformer can publish metrics data
(in the form of PowerCubes) for reports to access.
The shared network folder is used when you cluster multiple Cognos servers; you can use any name you want for the folder. Record this location so you can assign it to the cognos.cube.path property when you set up the cognos-setup.properties file in step 6.
- Prepare the Cognos BI
Server package:
- Download the Cognos BI
Server package to a temporary location on the server.
- Create a directory to contain the expanded package;
for example:
- AIX or Linux: /opt/biserver_10.1.1
- Windows: C:\biserver_10.1.1
- AIX or Linux: /opt/biserver_10.1.1
- Expand the package into the new directory.
- Download the Cognos BI
Server package to a temporary location on the server.
- Prepare the Cognos Transformer
package:
- Download the Cognos Transformer
package to a temporary location on the server.
- Create a directory to contain the expanded package;
for example:
- AIX or Linux: /opt/transformer_10.1.1
- Windows: C:\transformer_10.1.1
Due to potential file name conflicts, the Transformer package cannot share a directory with the BI Server package. Extracting the packages to the same location will overwrite libraries and result in a non-functioning server.
- AIX or Linux: /opt/transformer_10.1.1
- Expand the package into the new directory.
- Download the Cognos Transformer
package to a temporary location on the server.
- Prepare the Cognos server
setup package:
CognosConfig.zip or CognosConfig.tar can be found in the /Cognos folder within the Connections product media.
- Download the CognosConfig package
to a temporary location on the server.
- Create a directory to contain the expanded package;
for example:
- AIX or Linux: /opt/CognosSetup
- Windows: C:\CognosSetup
- AIX or Linux: /opt/CognosSetup
- Expand the package into the new directory.
- Download the CognosConfig package
to a temporary location on the server.
- Set up the JDBC driver:
- Locate the type 4 JDBC driver provided by your DB
server product.
- Copy the JDBC driver to the following location: /CognosSetup/BI-Customization/JDBC
- Locate the type 4 JDBC driver provided by your DB
server product.
- Prepare the cognos-setup.properties file
by filling in a value for each property.
The cognos-setup.properties file is located in the CognosSetup directory where you expanded the Cognos server setup package in step 4. This file provides values that are used during installation; each property setting in the file is accompanied by a description.
Notes® on the settings in this file:
- The shared network folder is represented by the cognos.cube.path property;
set this property to the name you used for the shared network folder
that you created in step 1.
- The Cognos administrator account specified for the cognos.admin.username setting
must represent a valid LDAP user . this is not the WebSphere administrator. You should have
already set up a user in the LDAP for this purpose; for information
see Create the Cognos administrator.
- (Oracle DB) When you installed the Oracle DB
client, you should have written down the DB settings
hat you will use in the cognos-setup.properties file;
refer to those settings now.
- Any passwords stored in this file will be removed after the script finishes running; if you need to run the script again you will need to insert the passwords before the next run. If you prefer, you can omit the passwords from the properties file and supply them on the command line when you run the script, as shown in step 9.
- The shared network folder is represented by the cognos.cube.path property;
set this property to the name you used for the shared network folder
that you created in step 1.
- (RedHat Linux 6
64-bit systems) Run the following command to preload libraries needed
for the setup scripts used in the next step:
export LD_PRELOAD=/usr/lib64/libfreebl3.so
- (SuSE 11 zLinux systems) Create a symbolic link to the libXm.so.3 package:
The openmotif22-libs-32bit-2.2.4-138.18.1 kit includes libXm.so.4, while the Cognos installer program issetup script links with libXm.so.3 and encounters an error if it is not available. Prevent this error by creating a symbolic link to libXm.so.3 with the following command:
ln -s /usr/lib/libXm.so.4 /usr/lib/libXm.so.3
- (Microsoft SQL
Server) If you are using Microsoft SQL
Server as your DB management system, configure it to
support remote connections before running the cognos-setup.bat|sh script,
or the DB validation will fail. For information on enabling
remote connections in SQL Server, see the Microsoft site.
- Run the cognos-setup.sh script
to install the Cognos BI
Server and Transformer components.
Any of the properties specified in the cognos-setup.properties file can be passed in as parameters when you run this script. In particular, you might want to supply passwords using this method rather than adding them into the properties file because they will be deleted from the file after it runs. For any properties you supply at run time, use the following syntax:
cognos-setup.sh -property_name1=property_value1 -property_name2=property_value2
For example, the properties file contains settings for four passwords. You can pass all of them in at run time by including them on the command line as shown:
cognos-setup.sh -was.local.admin.password=WASadmin_pwd -cognos.admin.password=CognosAdmin_pwd -cognos.db.password=CognosContentStore_pwd -metrics.db.password=Metrics_DB_pwd
Output from this operation is stored in the /CognosSetup/cognos-setup.log.
If you encounter an error when running the cognos-setup.bat|sh script, correct the error and run the script again before proceeding to the next step. For example, if you provided an incorrect password in the cognos-setup.properties file, modify the password and then run the cognos-setup.sh script again. Remember that if you added passwords to the properties file, they were deleted after the previous run, and must be provided again. If you encounter other problems, see Troubleshoot Cognos Business Intelligence components for possible solutions.
- Now run the cognos-configure.sh script
to configure the Cognos server
and set up DB connections.
Any of the properties specified in this script can be passed in as parameters when you run this script, using the syntax shown in the previous step.
Output from this operation is stored in the /CognosSetup/cognos-configure.log.
If you encounter an error when running the cognos-configure.sh script, correct the error and run the script again before proceeding to the next step. For example, if you provided an incorrect password in the cognos-setup.properties file, modify the password and then run the cognos-setup.sh script again. Remember that if you added passwords to the properties file, they were deleted after the previous run, and must be provided again. If you encounter other problems, see Troubleshoot Cognos Business Intelligence components for possible solutions.
- Leave the Cognos server
stopped for now; you will start the server after federating it to
the Deployment Manager in the next task.
In the future, whenever you want to stop the Cognos server, you must stop the WAS hosting it; wait at least 1 full minute to ensure that all of the Cognos processes (AIX or Linux: cgsServer.sh and CAM_LPSvr processes;
Windows: cgsLauncher.exe and CAM_LPSvr processes) have completely stopped before you attempt to start the server again.
Results
The Cognos BI Server and Transformer components are installed into the directories specified in the cognos-setup.properties file; for example:
- Cognos BI Server: cognos.biserver.install.path
- AIX or Linux: /opt/IBM/Cognos64
- Windows: C:\Program Files\IBM\Cognos
- AIX or Linux: /opt/IBM/Cognos64
- Cognos Transformer: cognos.transformer.install.path
- AIX or Linux: /opt/IBM/Cognos
- Windows: C:\Program Files (x86)\IBM\Cognos
- AIX or Linux: /opt/IBM/Cognos
During the installation, you might see the following message: ERROR: The system cannot find the file specified. If this message is followed by "success" messages" similar to those shown here, then the installation was successful and you can ignore the error message.
<date><time> : daily refresh success
<date><time> : rebuild <year><month> successYou can verify that the components were installed successfully by reviewing the installation logs at the following locations:
- Cognos BI Server installation log: Cognos_BI_install_path/logs/cogserver.log
- AIX or Linux: /opt/IBM/Cognos64/logs/cogserver.log
- Windows: C:\Program Files\IBM\Cognos\logs\cogserver.log
- AIX or Linux: /opt/IBM/Cognos64/logs/cogserver.log
- Cognos Transformer installation log: Cognos_Transformer_install_path/logs/cogserver.log:
- AIX or Linux: /opt/IBM/Cognos/logs/cogserver.log
- Windows: C:\Program Files (x86)\IBM\Cognos\logs\cogserver.log
- AIX or Linux: /opt/IBM/Cognos/logs/cogserver.log
Install the DB client for Cognos Transformer
Install a DB client on the computer where you will host IBM Cognos Business Intelligence. The Cognos Transformer component requires the use of a DB client to ensure proper access to the DB server for PowerCube generation and reporting.
Install the DB2 DB client for Cognos Transformer
Install the IBM DB2 DB client on the computer
...where you will host IBM Cognos Business Intelligence.
Before you install the DB client, the DB server must be installed and running, and you must have created the Metrics DB and the Cognos Content Store DB.
- Install the DB client on the server where you will
deploy Cognos Business Intelligence,
using the instructions provided with your DB product.
For instructions on installing the IBM DB2 client, see the Installation methods for IBM data server clients in the DB2 information center.
- (DB2 on Linux only) Ensure that the DB2 client library is properly sourced:
- In the DB2 client
installation directory, open the /etc/ld.so.conf file
for editing.
- Add the following library /opt/ibm/db2/V9.7/lib32 to
the file.
- Save and close the file.
- Run the ldconfig command to regenerate dynamic link libraries (DLLs).
- In the DB2 client
installation directory, open the /etc/ld.so.conf file
for editing.
- Create a connection between the client and the DB.
First, connect the client to the node (the DB2 server) where the DB is hosted by completing the following steps.
- Log on to the client computer as a user with at least DB2 SYSADM authority.
You cannot catalog a node as a root authority.
- Change to the home directory of instance.
The substeps below refer to this directory as INSTHOME.
- (AIX or Linux) Set up the instance environment
by running the startup script:
bash, Bourne, or Korn shell
. INSTHOME/sqllib/db2profile
C shell
source INSTHOME/sqllib/db2cshrc
...where INSTHOME indicates the home directory of the instance.
- Open the DB2 command
line processor:
AIX or Linux
db2
Windows
db2cmd
...where INSTHOME indicates the home directory of the instance.
- Catalog the DB2 server
by entering the following commands in the command line processor:
db2 => catalog tcpip node Node_name remote Host_name|IP_address server Service_name|DB2_Instance_Port db2 => terminateWhere:- Node_name indicates a local
nickname (for example, the short host) that you can set for the DB2 server.
- Host_name|IP_address indicates
the host or IP address of the server instance where the DB
resides (both IPv4 and IPv6 addresses are accepted).
- Service_name|DB2_Instance_Port indicates the service name or DB2 instance port used for the connection (typically port 50000 for DB2).
For example, connect to the server called "db2node" with the IP address "2001:DB8:0:0:0:0:0:0" on port 50000 as follows:
db2 =>  catalog tcpip node db2node remote 2001:DB8:0:0:0:0:0:0 server 50000
DB20000I  The CATALOG TCPIP NODE command completed successfully.
DB21056W  Directory changes may not be effective until the directory cache is refreshed.

db2 =>  terminate
DB20000I  The TERMINATE command completed successfully.
- Node_name indicates a local
nickname (for example, the short host) that you can set for the DB2 server.
Now connect the client to the DB2 DB itself .
For DB2, configure the client to use Metrics as both the Database name and the Database alias.
- Run the following commands in the DB2 command line processor:
db2 => catalog DB Database_name as Database_alias at node Node_name

db2 => connect to Metrics user Metrics_db_user

db2 => terminate
Where the DB2 server is the node you just connected to, and the DB information matches the values specified in the cognos-setup.properties file that is used during installation:- Database_name indicates the name of the Metrics DB (the metrics.db.name setting;
the default value is METRICS).
- Database_alias indicates the alias for the Metrics DB (the metrics.db.local setting;
the default value is METRICS).
- Node_name is the same local
nickname that you used to connect to the DB2 server
earlier in this step.
- Metrics_db_user indicates the user name that will be used to access the DB (the metrics.db.user setting; the default value is LCUSER).
For example, catalog the METRICS DB on the server "db2node" as the user "LCUSER" and then test the connection with the following commands:
db2 =>  catalog DB METRICS as METRICS at node db2node
DB20000I  The CATALOG DATABASE command completed successfully.
DB21056W  Directory changes may not be effective until the directory cache is refreshed.

db2 =>  connect to METRICS user LCUSER
Database Connection Information
Database server = DB2 9.7.0
SQL authorization ID = LCUSER
Local DB alias = METRICS

db2 =>  terminate
DB20000I  The TERMINATE command completed successfully.
- Database_name indicates the name of the Metrics DB (the metrics.db.name setting;
the default value is METRICS).
- When you have successfully cataloged the DB, close
the DB2 command line processor
with the following command:
db2 => quit
For more information on connecting the DB2 client to the DB2 server and DB (including optional arguments), see Configure client-to-server connections using the command line processor in the DB2 information center.
- Log on to the client computer as a user with at least DB2 SYSADM authority.
Install the Oracle DB client for Cognos Transformer
Install the Oracle DB client on the computer where you will host IBM Cognos Business Intelligence.
Before you install the DB client, the DB server must be installed and running, and you must have created the Metrics DB and the Cognos Content Store DB.
For troubleshooting information on configuring the Oracle DB client for use with Cognos, see the IBM technote, Resolve Oracle connection errors.
- Install the standard 32-bit DB client on the server
...where you will deploy Cognos Business Intelligence; for information see Install Oracle Database Client.
Be sure to install the standard 32-bit client rather than the Instant Client, which is not supported by Cognos. If you installed the 64-bit client, you must uninstall it before installing the 32-bit client.
- Copy the following files to the Cognos_Transformer_install_path/bin directory:
- Oracle_client_install_path/lib/libclntsh.so.11.1
- Oracle_client_install_path/lib/libnnz11.so
If you are using a different version of the Oracle client, you should find similar files (named for the version) in the same location, and can use those files instead.
- Oracle_client_install_path/lib/libclntsh.so.11.1
- (AIX or Linux) If you are not logged in as root,
change the permissions on the two files using chmod 755.
- Restart the server:
- Stop the IBM WAS
that hosts the Cognos server.
- Wait at least 1 full minute to ensure that all Cognos processes have stopped:
- AIX or Linux: cgsServer.sh and CAM_LPSvr processes
- Windows: cgsLauncher.exe and CAM_LPSvr processes
- AIX or Linux: cgsServer.sh and CAM_LPSvr processes
- Start WAS.
- Start the Cognos server.
If possible restart the server and then start Cognos service. If you cannot restart the server, just restarting the Cognos service should do.
- Stop the IBM WAS
that hosts the Cognos server.
- Define the ORACLE_HOME, TNS_ADMIN, and LD_LIBRARY_PATH
locations:
ORACLE_HOME=/u01/app/oracle/product/11.2.0/client_1
LD_LIBRARY_PATH=Cognos_Transformer_install_path/bin; ORACLE_HOME/lib
TNS_ADMIN=ORACLE_HOME/network/admin
- Edit the Oracle_client_install_path/network/admin/tnsnames.ora file
and add the following TNS settings into the file:
The TNS setting on the Oracle client should look like the example that follows:
METRICS =
  (DESCRIPTION =
    (ADDRESS_LIST =
      (ADDRESS = (PROTOCOL = TCP)(HOST = Oracle_DB_server_host_name)(PORT = Port))
    )
    (CONNECT_DATA =
      (SERVICE_NAME = Database_service_name)
    )
  )
...where:
- Oracle_DB_server_host_name is
the host of the server hosting the Oracle DB server; for
example: oradb.example.com.
- Port is port on which the Oracle DB server is listening; typically port 1521.
- Database_service_name is the DB service name; for example orcl.
- Oracle_DB_server_host_name is
the host of the server hosting the Oracle DB server; for
example: oradb.example.com.
- Write down the following settings so you can enter them
into the cognos-setup.properties file in a later
task:
Use the same values for the Oracle_DB_server_host_name, the Port, and the Database_instance_name that you used in the Oracle tnsnames.ora file.
cognos.db.type=oracle
cognos.db.host=Oracle_DB_server_host_name:Port
cognos.db.name=Database_instance_name
cognos.db.user=cognos           //created by installer
cognos.db.password=pass

metrics.db.type=oracle
metrics.db.host=Oracle_Database_Server:1521
metrics.db.name=orcl

metrics.db.local.name=METRICS   //local TNS name
metrics.db.user=metricsuser     //created by installer
metrics.db.password=pass
- Verify the client can connect to the Metrics DB.
If the Oracle client encounters errors connection to the Metrics DB, refer to the IBM technote, Resolve Oracle connection errors.
Federate the Cognos server to the Deployment Manager
The computer hosting the IBM Cognos Business Intelligence server must be federated to the same dedicated Deployment Manager used by IBM Connections.
Before attempting to federate the Cognos node to the Deployment Manager, make sure that:
- The Deployment Manager is running.
- The Cognos server is
stopped (if you started it after installation, stop it now by stopping
the IBM WAS hosting it).
- The system clock on the Cognos server
is set to within 1 minute of the time (and time zone) of the system
clock on the Deployment Manager.
- The Deployment Manager and the Cognos server are either both registered in the DNS or are referenced in each other.s etc/hosts file.
This task involves working on the newly installed Cognos Business Intelligence server to add the node to the Deployment Manager, and then working on the Deployment Manager to create virtual ports for the new node.
- On the Deployment Manager, disable Java 2 security:
- Log into the Integrated Solutions Console as the WebSphere administrator.
- Click Security > Global Security
- Look under "Java 2 security" and clear the selection
for Use Java 2 security to restrict application access
to local resources.
- Click Apply.
- Click OK.
- Log into the Integrated Solutions Console as the WebSphere administrator.
- Use the computer hosting the Cognos components to federate the new node
to the Deployment Manager:
- On the computer hosting the Cognos components, open a command window and
navigate to the/bin directory in the WAS
installation root; for example:
- IBM AIX, Linux: /opt/IBM/WebSphere/AppServer/bin
- Microsoft Windows:: C:\Program Files\IBM\WebSphere\AppServer\bin
- IBM AIX, Linux: /opt/IBM/WebSphere/AppServer/bin
- Run the addNode command to federate
the node to the Deployment Manager as follows:
addNode.bat|sh DM_host_name DM_port -profileName Cognos_profile_name -includeapps -username DM_admin_user_name -password DM_admin_password
where:
- DM_host_name is the fully
qualified host of the Deployment Manager.
- DM_port is the SOAP_CONNECTOR
port that the Deployment Manager is listening on; the default port
is 8879.
You can determine the port by checking the SOAP_CONNECTOR_ADDRESS value in the following file on the computer hosting the Deployment Manager::
WAS_install_root/profiles/DM_Name/properties/portdef.props; for example on Windows:
C:\IBM\WebSphere\AppServer\profiles\Dmgr01\properties\portdef.props
- Cognos_profile_name is the profile name where Cognos Business Intelligence is installed (in case
multiple profiles are installed on the same server). Tip: If you only installed one WebSphere profile on the server, you can omit this parameter.
If you are not sure of the Deployment Manager.s profile name, you can determine it by looking at the directory name
...where it was installed; for example on Linux:
/opt/IBM/WebSphere/AppServer/profiles/Cognos_profile_name
- DM_admin_user_name is the user name of the WebSphere administrator on the Deployment Manager, and DM_admin_password is the associated password.
Make sure you specify -includeapps as shown in the example.
For example:
addNode.bat lc40.example.com 8879 -profileName AppSrv01 -includeapps -username wasadmin -password my_WASadmin_pwd
- Now start the node agent by running the startNode command (from within the same directory); for example:
- AIX or Linux: startNode.sh
- Windows: startNode.bat
- Move back to the Deployment Manager and create virtual ports for the new node:
- Log into the Integrated Solutions Console as the WebSphere administrator.
- In the navigation tree, click Servers > Server Types > WebSphere Application servers > Cognos_server_name > Ports.
- Note the values for the following ports, for use in
the next step:
- WC_defaulthost
- WC_defaulthost_secure
- WC_defaulthost
- Back in the navigation tree, click Environment > Virtual Hosts > default_host > Host Aliases.
- Click the New button in the ports
table and add a port representing WC_defaulthost;
then click OK:
- Host name: *
- Port: use the value of the WC_defaulthost port that you noted earlier.
- Host name: *
- Click the New button again and
add a port representing WC_defaulthost_secure; then
click OK:
- Host name: *
- Port: use the value of the WC_defaulthost_secure port that you noted earlier.
- Host name: *
- Save the changes to the master configuration by clicking the Save link in the "Messages" box at the top of the page.
- Synchronize the new node to the Deployment Manager:
- On the navigation tree, click System
Administration > Nodes.
- In the nodes table, click the checkbox that precedes
the new node (the Cognos server).
- Click the Synchronize button
in the table and wait for the operation to finish before proceeding
to the next step.
Synchronization might take several minutes to complete; be sure to allow sufficient time before restarting the Cognos server in the next task.
- Restart the Cognos server:
- Stop the IBM WAS
that hosts the Cognos server.
- Wait at least 1 full minute to ensure that all Cognos processes have stopped:
- AIX or Linux: cgsServer.sh and CAM_LPSvr processes
- Windows: cgsLauncher.exe and CAM_LPSvr processes
- AIX or Linux: cgsServer.sh and CAM_LPSvr processes
- Start WAS.
- Start the Cognos server.
Validate the Cognos BI server installation
Verify the IBM Cognos Business Information server is correctly installed by viewing its content manager and dispatcher pages.
Make sure the Cognos server is running.
For configuration tips and information on troubleshooting the Cognos Business Intelligence installation, see Troubleshoot Cognos Business Intelligence.
- From any browser, navigate to the Cognos server.s content manager at the following address:
http://Host_Name:Port/Context_Root/servlet
where:
- Host_Name is the fully qualified
host of the Cognos server;
for example, host.example.com.
This value is specified in the was.fqdn.hostname property in the cognos-setup.properties file used for installing the server.
- Port is the port that the Cognos server is listening on.
- Context_Root is the context
root to which you installed the Cognos server;
for example, cognos.
This value is specified in the cognos.context_root property in the cognos-setup.properties file using for installing the server (the default value was set to cognos).
http://cognosserver.example.com:9083/cognos/servlet
The IBM Cognos Content Manager displays the following information: build number, server start time, current time, and current server state. The state should be running; if it is not, see Troubleshoot Cognos Business Intelligence components for possible problems and suggested solutions.
- Host_Name is the fully qualified
host of the Cognos server;
for example, host.example.com.
- Next, verify the dispatcher:
- In the browser, navigate to the dispatcher.s address:
- If you have not yet federated the node to the Deployment Manager,
use the following URL:
http://Host_Name:Port/Context_Root/servlet/dispatch/ext
- If you have already federated the node to the Deployment Manager,
use the following URL:
http://Host_Name:Port/Context_Root/servlet/dispatch
Images and icons may not display properly for this URL, but it is sufficient to validate that the IBMConnectionsMetrics folder and subfolders exist.
where the Host_Name, Port, and Context_Root values are the same as those used in step 1. For example:
http://cognosserver.example.com:9083/cognos/servlet/dispatch
The dispatcher displays tabs listing public and private folders.
- If you have not yet federated the node to the Deployment Manager,
use the following URL:
- In the dispatcher, click the Public tab; in the list of public folders click the IBMConnectionsMetrics folder and verify that it contains three subfolders (Metrics, MetricsCubeDS, and MetricsDBQuery).
- In the browser, navigate to the dispatcher.s address:
What to do next
If you deployed Cognos Business Intelligence as a prerequisite step to installing IBM Connections, continue the next section, Install IBM Connections. You will complete the Cognos configuration tasks after you install the Connections applications.
If you originally installed IBM Connections without first deploying Cognos Business Intelligence and are now deploying the Cognos server, skip the Connections installation topics (which you have already completed) and instead go directly to Configure Cognos Business Intelligence.
Install IBM Connections
Select the IBM Connections applications and install them in a clustered deployment.
An IBM Connections deployment consists of the following components:
- WAS nodes:
- One node with IBM WAS
Network Deployment Manager (DM) installed.
- One or more WAS nodes that can be federated into the DM cell. These nodes are hosts for cluster members.
- One node with IBM WAS
Network Deployment Manager (DM) installed.
- A system with a DB server installed.
- An LDAP server.
- A system with IBM HTTP Server installed.
Before beginning the installation, you must understand the prerequisites for IBM Connections 4.0. For more information, see the Before installing topic and ensure that you meet all the conditions that are prescribed for your deployment environment.
Before installing
Verify that all necessary prerequisite conditions are complete before installing IBM Connections.
Prerequisites
- Check the Release notes for late-breaking issues.
- If you previously installed IBM Installation Manager, update it to V1.4.4 or higher. For more information,
go to the IBM Installation
Manager updates webpage.
Use the same user account to install IBM Installation Manager and IBM Connections.
- IBM Installation Manager
presents three options for the type of deployment that you can install.
For more information about these options, see the Deployment
options topic.
- The IBM Connections installation process supports the creation of new server instances and clusters.
Do not use existing clusters to deploy IBM Connections.
- You can install IBM Connections with either root or non-root accounts on AIX and Linux, or administrator or non-administrator accounts on Microsoft Windows.
For more information, see the Installing as a non-root user topic.
- Complete the Pre-installation tasks.
If you are migrating from IBM Connections 3.0.1, you need to complete only the following tasks:
- Install IBM WAS if you are installing on the same host as 3.0.1.
- Set up federated repositories
- Do not complete the Pre-installation tasks for creating DBs or populating the Profiles DB. The migration process handles those tasks separately.
Prepare to configure the LDAP directory.
- Install IBM WAS if you are installing on the same host as 3.0.1.
- Install IBM WAS Network Deployment
(Application Server option) on each node. IBM Connections is installed on the system where WAS
Deployment Manager is installed. For more information, see the Installing IBM WAS topic.
- Back up the profile_root/Dmgr01 directory.
- Configure WAS to communicate with the LDAP directory. For more
information, see the Set up federated repositories topic.
- Prepare directories to use as content stores. You need to provide
shared content stores on network share devices and local content stores
on each node. Both shared and local content stores must be accessible
using the same path from all nodes and from the Deployment Manager.
- Set the system clocks on the Deployment Manager and the nodes
to within 1 minute of each other. If these system clocks are further
than 1 minute apart, you might experience synchronization errors.
- Copy the JDBC files for your DB type to the Deployment Manager
(DM) and then from the DM to each node. Place the copied files in
the same location on each node as their locations on the DM. If, for
example, you copied the db2jcc.jar file from
the C:\IBM\SQLLIB directory on the DM, place
the copy in the C:\IBM\SQLLIB directory on each
node.
JDBC files
Database type JDBC files DB2 db2jcc.jar
db2jcc_license_cu.jar
Oracle ojdbc6.jar
Ensure that you are using the latest version of the ojdbc6.jar file.
SQL Server sqljdbc4.jar
- If you are going to use a trusted SSL certificate, ensure that
is available before you begin the installation.
- If you do not plan to deploy IBM Cognos Business
Intelligence now to support metrics, you can still install the Metrics
application along with the other IBM Connections applications. This enables Connections to begin
collecting event data immediately and store it in the Metrics DB
for use when Cognos is available
to provide reports.
- (Microsoft Windows) You must use an administrator account
to install IBM Connections on Windows. If you are installing
on Windows Server 2008, you
must use a local administrator account. If you use a domain administrator account, the installation might fail.
- (Linux only) If you receive an error
message after attempting to start IBM Installation Manager, you might need to install additional
32-bit libraries. For more information about required Linux libraries, see the Linux libraries topic. For more information
about IBM Installation Manager
errors, go to the Unable to install Installation Manager on RHEL 6.0/6.1
(64-bit) webpage.
- (AIX and Linux) Ensure that the directory paths that
you enter contain no spaces.
- (AIX and Linux) Ensure that the Open File Descriptor
limit is 8192. For information about setting the file limit, go to
the Installation error messages topic and search for error code CLFRP0042E.
- (AIX only) IBM Installation Manager requires additional
libraries for the AIX operating
system. For more information, go to the Required filesets on AIX for Installation Manager webpage.
- (AIX only) If IBM Installation Manager hangs while being installed
on your system, you might need to update your version of the software.
For more information, read the IBM Installation
Manager hangs on 64-bit AIX systems technote.
- (AIX only) If you are downloading IBM Installation Manager, the TAR
program available by default with AIX does not handle path lengths longer than 100 characters.
To overcome this restriction, use the GNU file archiving program instead.
This program is an open source package that IBM distributes through the AIX Toolbox for Linux Applications at the IBM AIX Toolbox website. Download
and install the GNU-compatible TAR package. You do not need to install
the RPM Package Manager because it is provided with AIX.
After installing the GNU-compatible compression program, change to the directory where you downloaded the IBM Connections tar file. Enter the following command to extract the files from the file:
gtar -xvf Lotus_Connections_wizard_aix.tar
This command creates a directory named after IBM Installation Manager.
Tips:
- Establish naming conventions for nodes, servers, clusters, and
web servers.
- Use a worksheet to record the UIDs, passwords, server names,
and other information required during and after installation.
For more information, see the Worksheet for installing IBM Connections topic.
- Install and configuring IBM Connections is a complex process; not only should you read the instructions but you must also pay attention to the Before you begin prerequisites in each topic.
Linux libraries
The complete list of Linux libraries required for deploying IBM Connections 4.0.
Linux
Install the following Linux packages and libraries:Ensure that the GTK library is available on your system. Even when you are installing on a 64-bit system, you still need the 32-bit version of the GTK library.
compat-libstdc++-33.x86_64
libcanberra-gtk2.i686
PackageKit-gtk-module
gtk2.i686
compat-libstdc++-33.i686
compat-libstdc++-296
compat-libstdc++
libXtst.i686
Cognos
If you plan to install Cognos, you also need the libraries listed in the Cognos BI 10.1.1 Software Environments - Required Patches technote.
Both 32-bit and 64-bit versions are required.
Install as a non-root user
Grant permissions to a non-root user to install IBM Connections.
Ensure that you complete all the prerequisite tasks that are relevant for your environment. For more information, see the Before installing topic. This task applies to the AIX and Linux operating systems only.
By default, only root users have the necessary permissions to install an IBM Connections deployment. On the AIX and Linux operating systems, you can permit non-root users to install the product by changing their permissions to access certain data directories. On the Windows operating system, the user must be a member of the administrator group.
The non-root user must be the same user who installed IBM WAS.
To grant the necessary permissions to a non-root user:
- Unless it already exists, create the non-root user account
to use to install IBM Connections.
- If it does not already exist, create a home directory for
the user.
- Edit the install.ini file:
- Open the install.ini file for editing
from the following location:
- AIX: IBM_Connections_set-up directory/IM/aix/install.ini
- Linux: IBM_Connections_set-up directory/IM/linux/install.ini
- Linux on System z: IBM_Connections_set-up directory/IM/zlinux/install.ini
- AIX: IBM_Connections_set-up directory/IM/aix/install.ini
- In the second line of the file, change admin to nonadmin.
- Save and close the file.
- Open the install.ini file for editing
from the following location:
- Open a command prompt and grant the appropriate permissions
to the user by entering the commands shown in the following table:
- AIX or Linux:
Use either the chmod or chown commands, depending on your security environment. Use the chown commands to grant permissions to a user and group but ensure that the group includes the user account that installed WAS.
Non-root user permissions
Directory Permissions chmod command chown command app_server_root RWX chgrp -R non-root_user_group app_server_root chmod -R g+wrx app_server_root where non-root_user_group is a user group that contains the non-root user account.
chown -R non-root_ID:group app_server_root where non-root_ID is the non-root user account and group is the user group that contains this account.
IBM_ Connections set-up directory
RWX chgrp -R non-root_user_group IBM_Connections_set-up_directory chmod -R g+wrx IBM_Connections_set-up_directory chown -R non-root_ID:group IBM_connections_set-up_directory connections_root RWX chgrp -R non-root_user_group connections_root chmod -R g+wrx connections_root chown -R non-root_ID:group connections_root IM_root RWX chgrp -R non-root_user_group IM_root chmod -R g+wrx IM_root chown -R non-root_ID:group IM_root shared_resources_root RWX chgrp -R non-root_user_group shared_resources_root chmod -R g+wrx shared_resources_root chown -R non-root_ID:group shared_resources_root var/ibm/InstallationManager
RWX chmod -R ugo+rwx /var/ibm/InstallationManager Grant permissions to this folder only if the root user installed IBM Installation Manager.
chown -R non-root_ID:group /var/ibm/InstallationManager
- AIX or Linux:
- Install IBM Connections using either the wizard, the console, or a silent installation method.
Example
Grant permissions to a non-root user who wants to install an IBM Connections deployment on Linux.
Assumptions:
- The app_server_root directory is /opt/IBM/Websphere/Appserver.
- The IBM_Connections_set-up_directory directory
is /opt/ConnectionsSetup.
- The connections_root, IM_root, and shared_resources_root directories are subdirectories
of the /opt/ConnectionsInstallation directory.
- The non-root user account is a member of the ConnectionsInstallers group.
Procedure:
- Create a non-root user account called ConnectionsInstaller.
- Create a home directory for the new user account.
- Add the new user account to the ConnectionsInstallers group.
- Open a command prompt and enter the following commands:
- chgrp -R ConnectionsInstallers /opt/IBM/Websphere/Appserver
chmod -R g+wrx /opt/IBM/Websphere/Appserver chown -R ConnectionInstaller:ConnectionsInstallers
/opt/IBM/Websphere/Appserver
- chgrp -R ConnectionsInstallers /opt/ConnectionsSetup
chmod -R g+wrx /opt/ConnectionsSetup chown -R ConnectionInstaller:ConnectionsInstallers
/opt/IBM/Websphere/Appserver
- chgrp -R ConnectionsInstallers /opt/ConnectionsInstallation chmod -R g+wrx /opt/ConnectionsInstallation chown -R ConnectionInstaller:ConnectionsInstallers /opt/IBM/Websphere/Appserver
- chgrp -R ConnectionsInstallers /opt/IBM/Websphere/Appserver
chmod -R g+wrx /opt/IBM/Websphere/Appserver chown -R ConnectionInstaller:ConnectionsInstallers
/opt/IBM/Websphere/Appserver
Install IBM Connections 4.0
Ensure that you complete all the prerequisite tasks that are relevant for your environment. For more information, see the Before installing topic.
To install IBM Connections, run the IBM Installation Manager wizard on the system where the Deployment Manager is installed.
If an error occurs during installation, IBM Installation Manager cancels the installation and rolls back the installation files. Installation errors are usually caused by environment problems such as insufficient disk space, privilege issues, or corruption of a WebSphere profile. If your installation is canceled, complete the following steps:
- Identify and resolve the error that caused the cancellation. After
canceling the installation, IBM Installation Manager displays an error message with an error code.
You can look up the error code in the Installation error messages topic or check the log files.
- Restore the Deployment Manager profile from your backup.
- Delete the connections_root directory.
- Start this task again.
To install IBM Connections, complete the following steps:
- On each
node, stop any running instances of WAS and WebSphere node agents.
- Start WAS
Network Deployment Manager.
- Copy
the installation files to the system hosting the Deployment Manager.
Ensure that the directory path that you enter contains no spaces.
- From the Connections setup directory, run the file to start
the IBM Connections launchpad:
- AIX or Linux: Connections set-up/launchpad.sh
- Windows: Connections set-up\launchpad.exe
The launchpad needs a web browser to run. If your system does not have a web browser, take one of the following actions:
- Install a web browser.
- Install IBM Connections in silent mode. For more information, see the Installing silently topic.
- Start IBM Installation Manager
manually:
- Open a command prompt.
- Change to the Connections_install/IM/OS directory, where OS is your operating
system.
- Enter ./install.sh -input response.xml.
- Open a command prompt.
- AIX or Linux: Connections set-up/launchpad.sh
- Click Install IBM Connections 4.0 and then click Launch the IBM Connections 4.0 install
wizard.
Click the links to Documentation, Pre-installation tasks, or Post-installation tasks to view the product documentation.
- In the Select packages to install window, select the packages
to install and click Next to
continue.
Accept the default setting for Show all versions.
If you are using an earlier version of IBM Installation Manager than 1.4.4, the 1.4.4 package is selected in this window.
Click Check for Other Versions and Extensions to search for updates to IBM Installation Manager.
- Review and accept the license agreement by clicking I accept the terms in the license agreements. Click Next.
- Set the location of shared directories for IBM Installation Manager.
- Set the location of the Shared Resources Directory.
- Set the location of the Installation Manager Directory. This option appears only if you have not previously installed IBM Installation Manager.
- Click Next.
- Set the location of the Shared Resources Directory.
- The Shared Resources directory stores resources that can be shared
by multiple packages. If you used IBM Installation Manager before, the wizard automatically enters
this value.
- The Installation Manager directory stores resources that are unique
to the packages that you are installing.
- Choose to Use the existing package group or Create a new package group.
If you are using the wizard for the first time, the Use the existing package group option is not available.
- Set the location of the installation directory for IBM Connections. You can accept
the default directory location, enter a new directory name, or click Browse to select an existing directory. Click Next.
- Confirm the applications to install and click Next. You can select from the following options:
- The wizard always installs the Home page, News, and Search applications.
- To use media gallery widgets in the Communities application, you must
install the Files application. Media gallery widgets store photo and
video files in the Files DB.
- Even if you are not configuring Cognos yet, install Metrics now so that your application data is captured from the moment that IBM Connections is deployed. Metrics captures your deployment data whereas Cognos is used for viewing data reports. If you install Metrics at a later stage, you will not have any data reports for the period before you installed Metrics.
Option Description IBM Connections 4.0 Install all IBM Connections applications. Activities Collaborate with colleagues. Blogs Write personal perspectives about projects. Communities Interact with people on shared projects. Bookmarks Bookmark important websites. Files Share files among users. Forums Discuss projects and exchange information. Metrics Identify and analyze usage and trends. Mobile Access IBM Connections from mobile devices. Moderation Forum and community owners can moderate the content of forums. Profiles Find people in the organization. Wikis Create content for your website. - The wizard always installs the Home page, News, and Search applications.
- Enter the details of your WAS environment:
- Select the WAS installation location that contains the Deployment Manager.
Note the default path to the WAS installation:
- AIX: /usr/IBM/WebSphere/AppServer
- Linux: /opt/IBM/WebSphere/AppServer
- Windows: C:\Program Files\IBM\WebSphere\AppServer
- AIX: /usr/IBM/WebSphere/AppServer
- Enter the properties of the WAS Deployment Manager (DM):
- Deployment Manager profile
- Name of the DM to use for IBM Connections. The wizard automatically detects any available DMs.
- Host name
- Name of the host DM server.
- Administrator ID
- The administrative ID of the DM.This ID is set to the connectionsAdmin J2C authentication alias, which is mapped to the following J2EE roles: dsx-admin, widget-admin, and search-admin. It is also used by the service integration bus. To use security management software such as Tivoli Access Manager or SiteMinder, the ID that you specify here must exist in the LDAP directory. For more information, see the Switching to unique administrator IDs for system level communication topic.
- Administrator Password
- The password for the administrative ID of the DM.
- SOAP port
- The SOAP port of the DM. The wizard automatically detects this value.
- Click Validate to verify the DM information that you entered and that application security is enabled on WAS. If the verification fails, IBM Installation Manager displays an error message.
(AIX and Linux) The validation process checks the number of open files that are supported by your system. If the value for this parameter, known as the Open File Descriptor limit, is too low, a file open error, memory allocation failure, or connection establishment error could occur. If one of these errors occurs, exit the installation wizard and increase the open file limit before restarting the wizard. To set the file limit, go to the Installation error messages topic and search for error code CLFRP0042E. The recommended value for IBM Connections is 8192. For more information about the Open File Descriptor limit, see the documentation for your operating system.
- When the verification test is successful, click Next.
The wizard creates a dmInfo.properties file under WAS to record details of the cell, node, and server.
- Configure your topology. For more information about each option, see the Deployment options topic.
If you return to this page from a later page in the installation wizard, your settings are still present but not visible. If you want to change any settings, you must enter all of the information again. If you do not want to change your initial settings, click Next.
- Small deployment:
- Select the Small deployment topology.
- Enter a Cluster name for the topology.
- Select a Node.
- Click Next.
- Select the Small deployment topology.
- Medium deployment:
- Select the Medium deployment topology.
- Select the default
value or enter a Cluster name for each application
or for groups of applications.
For example, use Cluster1 for Activities, Communities, and Forums.
IBM Installation Manager creates servers and clusters when required.- Select a Node for each cluster. Accept the predefined node or select a different node.
These nodes host application server instances that serve IBM Connections applications. You can assign multiple nodes to a cluster, where each node is a server member of that cluster.- Enter a Server member name for the selected node. Choose the default or enter a custom name.
If you enter a custom server member name, the name must be unique across all nodes in your deployment.
- Click Next.
- Large deployment:
- Select the Large deployment topology.
- Enter a Cluster name for each application.
IBM Installation Manager creates servers and clusters when required.
- Select a Node for each cluster. Accept the predefined node or
select a different node.These nodes host application server instances that serve IBM Connections applications. You can assign multiple nodes to a cluster, where each node is a server member of that cluster.
- Enter a Server member name for the selected node. Choose the default or enter a custom name.
If you enter a custom server member name, the name must be unique across all nodes in your deployment.
- Click Next.
- Enter the DB information:
If you return to this page from a later page in the installation wizard, your settings are still present but not visible. If you want to change any settings, you must enter all of the information again. If you do not want to change your initial settings, click Next.
- Specify whether the installed applications use the same
DB server or instance: Select Yes or No.
If allowed by your DB configuration, you can select multiple DB instances as well as different DB servers.
- Select a Database type from one of the following options:
- IBM DB2 Universal Database.
- Oracle Enterprise Edition
- Microsoft SQL Server Enterprise Edition
- Enter the Database server host. For example: appserver.enterprise.example.com
If your installed applications use different DB servers, enter the DB host for each application.
- Enter the Port number of the DB server. The default values are: 50000 for DB2, 1521 for Oracle, and 1433 for SQL Server.
If your installed applications use different DB servers or instances, enter the port for each DB server or instance.
- Enter the JDBC driver location. For example:
- AIX: /usr/IBM/WebSphere/AppServer/lib
- Linux:
/opt/IBM/WebSphere/AppServer/lib
- Windows:
C:\IBM\WebSphere\Appserver\lib
- Ensure that the following JDBC driver libraries are present in the JDBC directory:
- DB2
- db2jcc.jar and db2jcc_license_cu.jar
Ensure that your user account has the necessary permissions to access the DB2 JDBC files.
- Oracle
- ojdbc6.jar
- SQL Server
- Download the SQL Server JDBC 2 driver from the Microsoft website to a local directory
and enter that directory name in the JDBC driver library field.
The directory must not contain the sqljdbc.jar file, only the sqljdbc4.jar file. Even though the data source is configured to use the sqljdbc4.jar file, an exception occurs if both files are present in the same directory.
IBM recommends that you obtain this Microsoft hotfix for the JDBC 2 driver for production deployments.
- Enter the User ID and Password for each DB. If each DB
uses the same user credentials, select the Use the same
password for all applications check box and then enter
the UID and password for the first DB in the list.
If your DB type is Oracle, connect to the DB with the UID that you used when you created the application DB.
- Click Validate to verify your DB settings. If the validation fails, check your DB settings. When the validation succeeds, click Next.
IBM Installation Manager tests your DB connection with the DB values that you supplied. You can change the DB configuration later in the WAS Integrated Solutions Console.
- Specify your Cognos configuration details as explained in the table, and then click Validate to verify your connection.
- The IBM Cognos configuration panel appears only if you chose to install
the Metrics application earlier in this task.
- Ensure that Cognos Business Intelligence Server is running because
the wizard pings the server during the validation process.
- If you do not want to deploy Cognos now, enter dummy values for UID and password, click Load node info, and then click Validate. Ignore the error message that appears. To continue installing IBM Connections, click Next. For information about deploying Cognos, see the Installing Cognos Business Intelligence topic. For information about resolving Cognos validation problems, see the Troubleshooting Cognos validation problems topic.
Option Description Administrator UID Set the user name of the administrator account that you selected for Cognos Business Intelligence. This user must be included in the LDAP directory used with Connections. Administrator password Set the password for the Cognos administrator. Name Click the Load node info button to retrieve the list of available nodes and profiles, then click the arrow and select the WebSphere profile that hosts the Cognos BI server. The profile you select here must match the profile you specified as the was.profile.name in the cognos-setup.properties file. Host name
This is a non-editable field that is populated when you select a profile in the Name field. Seeing the associated host for each profile/node can help you choose the correct node where the Cognos BI Server is running.
Server name There might be multiple servers installed on the same computer as the Cognos BI server; click the arrow and select the instance that represents the Cognos server. Must match what you specified as the cognos.was.server.name in the cognos-setup.properties file. Tip: A default value of cognos_server was assigned in the properties file, so unless you changed that value, use it now.Port Set the number of the port that the Cognos BI Server is listening on; this defaults to port 9080 but might have been changed. You can determine the port by checking the WC_defaulthost value in the following file: WAS_install_root/config/cells/Cell_Name/nodes/Node_Name/serverindex.xml; for example on Windows: C:\IBM\WebSphere\AppServer\profiles\AppSvr01\config\cells\lc40Cell01\nodes\lc40CellManager01\serverindex.xml
Web context root The context root determines which requests will be delegated to the Cognos application for processing (any request beginning with this string will be handled by Cognos). Must match the cognos.contextroot specified in the cognos-setup.properties file. Tip: A default value of cognos was assigned in the properties file, so unless you changed that value, use it now.If you deployed Cognos Business Intelligence and the validation fails at this point, you can click Next and continue installing IBM Connections. After the installation is complete, you can correct the validation issue as explained in the topic, Troubleshooting Cognos validation problems.
- Set the locations of the content stores. All nodes in a cluster must have read-write access to shared content. Both shared and local content stores must be accessible using the same path from all nodes and from the DM. Each content store is represented by a corresponding WebSphere variable that is further defined as shared or local. Local content is node-specific.
If you are migrating from IBM Connections 3.0.1, you can reuse your existing content stores in 4.0. For more information, see the Content store migration topic.
- Enter the location of the Shared content store. The shared content store usually resides in a shared repository
that grants read-write access to the DM and all the nodes. Use one
of the following methods to create a shared data directory:
- Network-based file shares (for example: NFS, SMB/Samba, and so
on)
- Storage area network drives (SAN)
- If you are using a shared-file system on Microsoft Windows, specify the file location using the Universal Naming
Convention (UNC) format. For example: \\server_name\share_name.(Windows only) If you use Remote Desktop Connection to map shared folder drives, ensure that you use the same session to start the node agents. Otherwise, the shared drives might be invisible to the nodes.
- Enter the location of the Local content store.
- Click Validate to verify that the account that you are using to install IBM Connections has write access to the content store.
- Click Next.
- Select a Notification solution. Notifications are email messages to users about new information and events in your IBM Connections deployment.
- Enable Notification only.
Use notifications but without the ReplyTo capability.
- Enable Notification and ReplyTo.
Use notifications and the ReplyTo capability. To use ReplyTo, your mail server must be able to receive all the replies and funnel these replies into a single inbox. IBM Connection connects to the mail server using the IMAP protocol.
- None.
Do not use a notification solution in your IBM Connections deployment. You can configure notifications after installation.
- Select and specify a mail server solution and then click Next.
- WebSphere Java Mail Session: Use a single mail server for all notifications. Select this option if you can access an SMTP server directly using the host.
Complete the following fields to identify the mail server to use for sending email:
- Host name of SMTP messaging server
- Enter the host or IP address of the preferred SMTP mail server.
- This SMTP server requires authentication
- Select the check box to force authentication when mail is sent from this server.
- User ID
- If the SMTP server requires authentication, enter the UID.
- Password
- If the SMTP server requires authentication, enter the user password.
- Encrypt outgoing mail traffic to the SMTP messaging server using SSL
- Select this check box if you want to encrypt outgoing mail to the SMTP server.
- Port
- Accept the default port of 25, or enter port 465 if you are using SSL.
- DNS MX Records: Use information from DNS to determine which mail servers to use. Select this option if you use a Domain Name System (DNS) server to access the SMTP messaging server.
- Messaging domain name
- Enter the name or IP address of the messaging domain.
- Choose a specific DNS server
- Select this check box if you want to specify a unique SMTP server.
- DNS server for the messaging servers query
- Enter the host or IP address of the DNS server.
- DNS port used for the messaging servers query
- Enter the port that is used for sending queries using the messaging server.
- This SMTP server requires authentication
- Select the check box to force authentication when notification mail is sent from this server.
- User ID
- If SMTP authentication is required, enter the administrator user ID for the SMTP server.
- Password
- If SMTP authentication is required, enter the password for the administrator user of the SMTP server.
- Encrypt outgoing mail traffic to the SMTP messaging server using SSL
- Select the check box if you want to use the Secure Sockets Layer (SSL) when connecting to the SMTP server.
- Port
- Set the port to use for the SMTP server connection. The default port for the SMTP protocol is 25. The default port number for SMTP over SSL is 465.
- If you click Do not enable Notification, IBM Installation Manager skips the rest of this step. You can configure notification later.
- If you selected the Notification and ReplyTo option, configure the ReplyTo email settings. IBM Connections uses a unique ReplyTo address to identify both the person who replied to a notification and the event or item that triggered the notification.
- Enter a domain name. For example: mail.example.com.
This domain name is used to build the ReplyTo address. The address consists of the suffix or prefix, a unique key, and the domain name.
- The reply email address is given a unique ID by the system. You can customize
the address by adding a prefix or suffix, using a maximum of 28 characters.
This extra information is useful if the domain name is already in
use for other purposes. Select one of the following options:
- None
- Use the ID generated by the system.
- Prefix
- Enter a prefix in the Example field.
- Suffix
- Enter a suffix in the Example field.
As you select an option, the wizard creates an example of the address, combining your selection with the ID generated by the system.
For example:
- unique_id@domain
- prefix_unique_id@domain
- unique_id_suffix@domain -
- Specify
the details of the mail file to which ReplyTo emails are sent:
- Server
- The domain where your mail server is located. For example: replyTo.mail.example.com.
- User ID
- The user account for the mail server. The UID and password are credentials that IBM Connections will use to poll the inbox on the mail server to retrieve the replies and process the content. IBM Connections connects to the mail server using IMAP.
- Password
- Password for the user account. The UID and password are credentials that IBM Connections will use to poll the inbox on the mail server to retrieve the replies and process the content. IBM Connections connects to the mail server using IMAP.
- Click Next.
You can modify the ReplyTo settings after installation. To edit the domain name and prefix or suffix, edit the news-config.xml file. For more information, see the Post-migration step for status updates topic. To edit the server and authentication details, log in to the WAS Integrated Solutions Console and navigate to the Mail Sessions page, where you can edit the configuration.- Review the information that you have entered. To revise your selections, click Back. To finalize the installation, click Next.
- Review the result of the installation. Click Finish to exit the installation wizard.
- Restart the Deployment Manager:
- AIX or Linux: Open a command prompt and change to
the profile_root/Dmgr01/bin directory. Enter the ./stopManager.sh
command and then enter the ./startManager.sh command.
- Windows: Stop and restart the Deployment Manager service.
- Start all the federated nodes and enter the startNode command. Repeat these steps for each node:
- Log in to a node.
- From a command line, change to the profile_root/bin directory.
- Enter the startNode command for
your operating system:
- AIX or Linux: ./startNode.sh
- Windows: startNode.bat
- AIX or Linux: ./startNode.sh
- Log in to the Integrated Solutions Console on the DM to perform a full synchronization of all nodes.
- Go to System administration > Nodes.
- Select the nodes and click Full Resynchronize.
Wait until the DM copies all the application EAR files to the installedApps directory on each of the nodes. This process can take up to 30 minutes.
To verify that the DM has distributed the application EAR files to the nodes, check the SystemOut.log file of each node agent. The default path to the SystemOut.log file on a node is profile_root/logs/nodeagent.
Look for a message such as the following example: ADMA7021I: Distribution of application application_name completed successfully. where application_name is the name of an IBM Connections application.
- Restart the Deployment Manager.
- Start all your IBM Connections clusters:
- Log in to the Integrated Solutions Console
on the DM
- Go to Servers > Clusters > WebSphere Application server
clusters.
- Select the IBM Connections clusters and click Start.
If you installed a cluster with multiple Search nodes, create the initial index. For more information about creating the Search index, see the Creating the initial Search index topic.
- The index is ready when the INDEX.READY and CRAWLING_VERSION files are present in the index directory.
If you are installing a non-English language deployment, enable Search dictionaries. For more information, see the Enabling Search dictionaries topic.
If some applications do not start, the file-copying process might not have completed. Wait a few minutes and start the applications.
Results
The installation wizard has installed IBM Connections in a network deployment.
To confirm that the installation was successful, open the log files in connections_root/logs. Each IBM Connections application installed has a log file, using the following naming format: application_nameInstall.log, where application_name is the name of an IBM Connections application. Search for the words error or exception to check whether any errors or exceptions occurred during installation.
To view the log file for system events that occurred during the installation, open the date_time.xml file, where date_time represents the date and time of the installation. The file is located by default in the following directory:
- AIX or Linux (root user): /var/ibm/InstallationManager/logs
- AIX or Linux (non-root user): /home/user/var/ibm/Installation Manager/logs where user is the non-root user name
- Windows Server 2008 64-bit: C:\ProgramData\IBM\Installation Manager\logs
What to do next
Complete the post-installation tasks that are relevant to your installation. For more information, see the Post-installation tasks topic.
Access network shares:
If you installed WAS on Microsoft Windows and configured it to run as a service, ensure that you can access network shares. For more information, see the Accessing Windows network shares topic.
Install in console mode
Install IBM Connections in console mode. This method is convenient if you cannot or do not want to use the graphical mode.
Ensure that you complete all the prerequisite tasks that are relevant for your environment. For more information, see the Before installing topic. Use console mode to complete the installation process in a non-graphical environment. This mode is useful when you have to install IBM Connections on a system that does not have a video card.
In steps where you enter custom information, such as server details, you can type P at any time to return to the previous input choice in that step. However, you cannot type P to return to a previous step.
To install IBM Connections, you need to use IBM Installation Manager, which manages the installation process.
To install IBM Connections in console mode, complete the following steps:
- On each
node, stop any running instances of WAS and WebSphere node agents.
- Start WAS
Network Deployment Manager.
- Copy
the installation files to the system hosting the Deployment Manager.
Ensure that the directory path that you enter contains no spaces.
- Start IBM Installation
Manager in console mode:
Run IBM Installation Manager on the system where the Deployment Manager is installed.
- If Installation Manager is already installed, open a command
prompt and change to the IBM Installation Manager installation directory. Then run the following command:
- AIX or Linux: /opt/IBM/InstallationManager/eclipse/tools/imcl
-c
- Windows: \Program Files\IBM\Installation Manager\eclipse\tools\imcl.exe -c
- AIX or Linux: /opt/IBM/InstallationManager/eclipse/tools/imcl
-c
- To install both IBM Installation
Manager and IBM Connections,
open a command prompt and change to the IBM Installation Manager installation directory. Then run the following command:
- AIX: Lotus_Connections_Install/IM/aix/install.console.sh
- Linux: Lotus_Connections_Install/IM/linux/install.console.sh
- Windows: Lotus_Connections_Install\IM\windows\install.console.bat
The batch script calls a response file which contains information about the repositories for both IBM Installation Manager and IBM Connections.
- AIX: Lotus_Connections_Install/IM/aix/install.console.sh
- To use another language for the installation process, open
a command prompt, change to the IBM Installation Manager installation directory, and run the following command:
- AIX: Lotus_Connections_Install/IM/aix/tools/imcl
-c -nl language_code
- Linux: Lotus_Connections_Install/IM/linux/tools/imcl
-c -nl language_code
- Windows: \Program Lotus_Connections_Install\IM\windows\tools\imcl.exe -c -nl language_code
where language_code is the two-letter code for a language, such as fr for French.
- AIX: Lotus_Connections_Install/IM/aix/tools/imcl
-c -nl language_code
- If Installation Manager is already installed, open a command
prompt and change to the IBM Installation Manager installation directory. Then run the following command:
- In the console window, specify the IBM Connections repository:
If you chose the option to run the install.console.bat|sh file in Step 4, you can skip this step.
- Type P to edit preferences.
- Type 1 to specify repositories.
- Type D to add a repository.
- Set the repository path for IBM Connections 4.0, for example: Lotus_Connections/repository.xml.
- Type A to save the repository
information.
- Type C to return to the console window.
- Type P to edit preferences.
- In the Select packages to install step, type 1 to select the package and then type N to proceed.
- Review the license agreement by typing the appropriate
number to view license information. To accept the license agreement,
type A. Type N to proceed.
- Set the location of the shared resources directory
for IBM Installation Manager.
- Enter the location of the Shared Resources
Directory.
- Type N to proceed.
The Shared Resources directory stores resources that can be shared by multiple packages. If you used IBM Installation Manager before, the wizard automatically enters this value.
Ensure that the directory path that you enter contains no spaces.
- Enter the location of the Shared Resources
Directory.
- Set the location of the IBM Installation Manager installation directory.
- Enter the location of the Installation Manager
Directory.
- Type N to proceed.
This option is available only if you have not previously installed IBM Installation Manager.
The Installation Manager directory stores resources that are unique to the packages that you are installing.
Ensure that the directory path that you enter contains no spaces.
- Enter the location of the Installation Manager
Directory.
- Set the locations of the package group for IBM Installation Manager and the installation directory for IBM Connections:
- The wizard automatically detects the IBM Connections package group. Type M to change the default location where the package group
will be installed.
- Type N to proceed.
- To accept the default location for the IBM Connections installation directory, type N. To specify a new directory name, type M and enter the new directory name and path.
- Type N to proceed.
- The wizard automatically detects the IBM Connections package group. Type M to change the default location where the package group
will be installed.
- Select the applications to install and then
type N to proceed. You can select from the following options:
- The wizard always installs the Home page, News, and Search applications.
- If you clear the selections of the Home page, News, or Search
applications, the wizard will exit.
- To use media gallery widgets in the Communities application, you must
install the Files application. Media gallery widgets store photo and
video files in the Files DB.
- Even if you are not configuring Cognos yet, install Metrics now so that your application data is captured from the moment that IBM Connections is deployed. Metrics captures your deployment data whereas Cognos is used for viewing data reports. If you install Metrics at a later stage, you will not have any data reports for the period before you installed Metrics.
Option Description IBM Connections 4.0 Install all IBM Connections applications. Activities Collaborate with colleagues. Blogs Write personal perspectives about projects. Communities Interact with people on shared projects. Bookmarks Bookmark important websites. Files Share files among users. Forums Discuss projects and exchange information. Metrics Identify and analyze usage and trends. Mobile Access IBM Connections from mobile devices. Moderation Forum and community owners can moderate the content of forums. Profiles Find people in the organization. Wikis Create content for your website. - The wizard always installs the Home page, News, and Search applications.
- Enter the details
of your WAS environment:
- Select the WAS installation location that contains the Deployment Manager.
Note the default path to the WAS installation:
- AIX: /usr/IBM/WebSphere/AppServer
- Linux: /opt/IBM/WebSphere/AppServer
- Windows: C:\Program Files\IBM\WebSphere\AppServer
- AIX: /usr/IBM/WebSphere/AppServer
- Enter the properties of the WAS Deployment Manager (DM):
- Deployment Manager profile
- Name of the DM to use for IBM Connections. The wizard automatically detects any available DMs.
- Host name
- Name of the host DM server.
- Administrator ID
- The administrative ID of the DM.This ID is set to the connectionsAdmin J2C authentication alias, which is mapped to the following J2EE roles: dsx-admin, widget-admin, and search-admin. It is also used by the service integration bus. To use security management software such as Tivoli Access Manager or SiteMinder, the ID that you specify here must exist in the LDAP directory. For more information, see the Switching to unique administrator IDs for system level communication topic.
- Administrator Password
- The password for the administrative ID of the DM.
- SOAP port
- The SOAP port of the DM. The wizard automatically detects this value.
- Press Enter to verify the DM information that you entered. The verification process also checks that application security is enabled on WAS. If the verification fails, IBM Installation Manager displays an error message.
(AIX and Linux) The validation process checks the number of open files that are supported by your system. If the value for this parameter, known as the Open File Descriptor limit, is too low, a file open error, memory allocation failure, or connection establishment error could occur. If one of these errors occurs, exit the installation wizard and increase the open file limit before restarting the wizard. To set the file limit, go to the Installation error messages topic and search for error code CLFRP0042E. The recommended value for IBM Connections is 8192. For more information about the Open File Descriptor limit, see the documentation for your operating system.
- If the verification check is successful, type N to proceed. If verification fails, press B to re-enter the required information.
The wizard creates a dmInfo.properties file under WAS to record details of the cell, node, and server.
- Configure your topology. For more information about each option, see the Deployment options topic.
- Small deployment:
- Type 1 to select the Small deployment topology.
- Enter a Cluster name for the topology.
- Select a Node.
- Enter a Server member name for the node.
- Type N to proceed.
- Type 1 to select the Small deployment topology.
- Medium deployment:
- Type 2 to select the Medium
deployment topology.
- Select the default
value or enter a Cluster name for each application
or for groups of applications.
For example, use Cluster1 for Activities, Communities, and Forums.
IBM Installation Manager creates servers and clusters when required.- Select a Node for each cluster. Accept the predefined node or select a different node.
These nodes host application server instances that serve IBM Connections applications. You can assign multiple nodes to a cluster, where each node is a server member of that cluster.- Enter a Server member name for the selected node. Choose the default or enter a custom name.
If you enter a custom server member name, the name must be unique across all nodes in your deployment.
- The topology specified is displayed. To re-specify any details, type the number that corresponds to the application; for example, type 1 for Activities.
- Type N to proceed.
- Large deployment:
- Type 3 to select the Large deployment topology.
- Enter a Cluster name for each application.
IBM Installation Manager creates servers and clusters when required.
- Select a Node for each cluster. Accept the predefined node or
select a different node.These nodes host application server instances that serve IBM Connections applications. You can assign multiple nodes to a cluster, where each node is a server member of that cluster.
- Enter a Server member name for the selected node. Choose the default or enter a custom name.
If you enter a custom server member name, the name must be unique across all nodes in your deployment.
- The topology specified is displayed. To re-specify any details, type the number that corresponds to the application; for example, type 1 for Activities.
- Type N to proceed.
- Enter the DB information:
- Specify whether the installed applications use the same
DB server or instance: Type 1 to specify
that the applications use same DB server or instance; type 2 to specify that they use different DB servers
or instances.
If allowed by your DB configuration, you can select multiple DB instances as well as different DB servers.
- Select a Database type from one of the following options:
- IBM DB2 Universal Database
- Oracle Enterprise Edition
- Microsoft SQL Server Enterprise Edition
- Enter the Database server host. For example: appserver.enterprise.example.com
If your installed applications use different DB servers, enter the DB host for each application.
- Enter the Port number of the DB server. The default values are: 50000 for DB2, 1521 for Oracle, and 1433 for SQL Server.
If your installed applications use different DB servers or instances, enter the port for each DB server or instance.
- Enter the JDBC driver location. For example:
- AIX: /usr/IBM/WebSphere/AppServer/lib
- Linux:
/opt/IBM/WebSphere/AppServer/lib
- Windows:
C:\IBM\WebSphere\Appserver\lib
- Ensure
that the following JDBC driver libraries are present in the JDBC directory:
- DB2
- db2jcc.jar and db2jcc_license_cu.jar
Ensure that your user account has the necessary permissions to access the DB2 JDBC files.
- Oracle
- ojdbc6.jar
- SQL Server
- Download the SQL Server JDBC 2 driver from the Microsoft website to a local directory
and enter that directory name in the JDBC driver library field.
The directory must not contain the sqljdbc.jar file, only the sqljdbc4.jar file. Even though the data source is configured to use the sqljdbc4.jar file, an exception occurs if both files are present in the same directory.
IBM recommends that you obtain this Microsoft hotfix for the JDBC 2 driver for production deployments.
- Enter the User ID and Password for each DB. If each DB
uses the same user credentials, confirm the Use the same
password for all applications question and then enter
the UID and password for the first DB in the list.
If your DB type is Oracle, connect to the DB with the UID that you used when you created the application DB.
- If you need to make changes, type the number that corresponds
to the application to change. Alternatively, type R to reset all the DB specifications to their default
values.
- Press Enter to verify your DB
settings. If the validation fails, check your DB settings. When
the validation succeeds, click Next.
IBM Installation Manager tests your DB connection with the DB values that you supplied. You can change the DB configuration later in the WAS Integrated Solutions Console.
- If the verification check is successful, type N to proceed. If verification fails, press B to re-enter the required information.
- Specify your Cognos configuration.
The IBM Cognos configuration panel appears only if you chose to install the Metrics application earlier in this task.
If you do not want to configure Cognos now, enter dummy values for UID and password, and select any values from the list of nodes and servers. Then press Enter and ignore the validation error message that appears. To continue installing IBM Connections, type N. For information about configuring Cognos after installation, see the Installing Cognos Business Intelligence topic. For information about resolving Cognos validation problems, see the Troubleshooting Cognos validation problems topic.
- Enter the LDAP UID for the Cognos administrator.
- Enter the password for the Cognos administrator.
- Select the node where the Cognos BI Server is installed.
- Enter the port of the Cognos server.
- Enter the web context root.
- Press Enter to validate the configuration.
- Type N to proceed.
- Set the locations of the content stores. Shared content must be read/write accessible by all nodes in a cluster. Both shared and local content stores must be accessible using the same path from all nodes and the DM. Local content is node-specific. Each content store is represented by a corresponding WebSphere variable that is further defined as shared or local.
If you are migrating from IBM Connections 3.0.1, you can reuse your existing content stores in 4.0. For more information, see the Content store migration topic.
- Enter the location of the Shared content store. The shared content store usually resides in a shared repository
that grants read-write access to the DM and all the nodes. Use one
of the following methods to create a shared data directory:
- Network-based file shares (for example: NFS, SMB/Samba, and so
on)
- Storage area network drives (SAN)
- If you are using a shared-file system on Microsoft Windows, specify the file location using the Universal Naming
Convention (UNC) format. For example: \\server_name\share_name.(Windows only) If you use Remote Desktop Connection to map shared folder drives, ensure that you use the same session to start the node agents. Otherwise, the shared drives might be invisible to the nodes.
- Enter the location of the Local content store.
- Press Enter to verify that the account that you are using to install IBM Connections has write access to the content store.
- Click Next.
- Select a Notification solution. Notifications are email messages to users about new information and events in your IBM Connections deployment.
- Enable Notification only.
Use notifications but without the ReplyTo capability.
- Enable Notification and ReplyTo.
Use notifications and the ReplyTo capability. To use ReplyTo, your mail server must be able to receive all the replies and funnel these replies into a single inbox. IBM Connection connects to the mail server using the IMAP protocol.
- None.
Do not use a notification solution in your IBM Connections deployment. You can configure notifications after installation.
- If you chose a mail notification option, select and specify a mail server solution.
- WebSphere Java Mail Session: Use a single mail server for all notifications. Select this option if you can access an SMTP server directly using the host.
Identify the mail server to use for sending email:
- Host name of SMTP messaging server
- Enter the host or IP address of the preferred SMTP mail server.
- This SMTP server requires authentication
- Enter Y to force authentication when mail is sent from this server.
- User ID
- If the SMTP server requires authentication, enter the UID.
- Password
- If the SMTP server requires authentication, enter the user password.
- Encrypt outgoing mail traffic to the SMTP messaging server using SSL
- If you want to encrypt outgoing mail to the SMTP server, press Y.
- Port
- Press Enter to accept the default port of 25, or enter 465 if you are using SSL.
- DNS MX Records: Use information from DNS to determine which mail servers to use. Select this option if you use a Domain Name System (DNS) server to access the SMTP messaging server.
- Messaging domain name
- Enter the name or IP address of the messaging domain.
- Choose a specific DNS server
- To specify a unique SMTP server, press Y.
- DNS server for the messaging servers query
- Enter the host or IP address of the DNS server.
- DNS port used for the messaging servers query
- Enter the port that is used for sending queries using the messaging server.
- This SMTP server requires authentication
- Enter Y to force authentication when mail is sent from this server.
- User ID
- If SMTP authentication is required, enter the administrator user ID for the SMTP server.
- Password
- If SMTP authentication is required, enter the password for the administrator user of the SMTP server.
- Encrypt outgoing mail traffic to the SMTP messaging server using SSL
- If you want to encrypt outgoing mail to the SMTP server, press Y.
- Port
- Press Enter to accept the default port of 25, or enter 465 if you are using SSL.
- If you specify Do not enable Notification, IBM Installation Manager skips the rest of this step. You can configure notification later.
- If you selected the Notification and ReplyTo option, configure the ReplyTo email settings. IBM Connections uses a unique ReplyTo address to identify both the person who replied to a notification and the event or item that triggered the notification.
- Enter a domain name. For example: mail.example.com.
This domain name is used to build the ReplyTo address. The address consists of the suffix or prefix, a unique key, and the domain name.
- The reply email address is given a unique ID by the system. You can customize
the address by adding a prefix or suffix, using a maximum of 28 characters.
This extra information is useful if the domain name is already in
use for other purposes. Select one of the following options:
- None
- Use the ID generated by the system.
- Prefix
- Enter a prefix in the Example field.
- Suffix
- Enter a suffix in the Example field.
As you select an option, the wizard creates an example of the address, combining your selection with the ID generated by the system.
For example:
- unique_id@domain
- prefix_unique_id@domain
- unique_id_suffix@domain -
- Specify
the details of the mail file to which ReplyTo emails are sent:
- Server
- The domain where your mail server is located. For example: replyTo.mail.example.com.
- User ID
- The user account for the mail server. The UID and password are credentials that IBM Connections will use to poll the inbox on the mail server to retrieve the replies and process the content. IBM Connections connects to the mail server using IMAP.
- Password
- Password for the user account. The UID and password are credentials that IBM Connections will use to poll the inbox on the mail server to retrieve the replies and process the content. IBM Connections connects to the mail server using IMAP.
- Click Next.
You can modify the ReplyTo settings after installation. To edit the domain name and prefix or suffix, edit the news-config.xml file. For more information, see the Post-migration step for status updates topic. To edit the server and authentication details, log in to the WAS Integrated Solutions Console and navigate to the Mail Sessions page, where you can edit the configuration.
- Review the information that you entered. To revise your selections, press B. To continue installing, press N.
- To install the product, press I. To generate a response file, press G.
- Review the result of the installation. Press F to exit the installation wizard.
- Restart the Deployment Manager:
- AIX or Linux: Open a command prompt and change to
the profile_root/Dmgr01/bin directory. Enter the ./stopManager.sh
command and then enter the ./startManager.sh command.
- Windows: Stop and restart the Deployment Manager service.
- Start all the federated nodes and enter the startNode command. Repeat these steps for each node:
- Log in to a node.
- From a command line, change to the profile_root/bin directory.
- Enter the startNode command for
your operating system:
- AIX or Linux: ./startNode.sh
- Windows: startNode.bat
- AIX or Linux: ./startNode.sh
- Log in to the Integrated Solutions Console on the DM to perform a full synchronization of all nodes.
- Go to System administration > Nodes.
- Select the nodes and click Full Resynchronize.
Wait until the DM copies all the application EAR files to the installedApps directory on each of the nodes. This process can take up to 30 minutes.
To verify that the DM has distributed the application EAR files to the nodes, check the SystemOut.log file of each node agent. The default path to the SystemOut.log file on a node is profile_root/logs/nodeagent.
Look for a message such as the following example: ADMA7021I: Distribution of application application_name completed successfully. where application_name is the name of an IBM Connections application.
- Restart the Deployment Manager.
- Start all your IBM Connections clusters:
- Log in to the Integrated Solutions Console
on the DM
- Go to Servers > Clusters > WebSphere Application server
clusters.
- Select the IBM Connections clusters and click Start.
If you installed a cluster with multiple Search nodes, create the initial index. For more information about creating the Search index, see the Creating the initial Search index topic.
- If you are installing a non-English language deployment, enable Search dictionaries. For more information, see the Enabling Search dictionaries topic.
- The index is ready when the INDEX.READY and CRAWLING_VERSION files are present in the index directory.
If some applications do not start, the file-copying process might not have completed. Wait a few minutes and start the applications.
Results
The installation wizard has installed IBM Connections in a network deployment.
To confirm that the installation was successful, open the log files in connections_root/logs. Each IBM Connections application installed has a log file, using the following naming format: application_nameInstall.log, where application_name is the name of an IBM Connections application. Search for the words error or exception to check whether any errors or exceptions occurred during installation.
To view the log file for system events that occurred during the installation, open the date_time.xml file, where date_time represents the date and time of the installation. The file is located by default in the following directory:
- AIX or Linux (root user): /var/ibm/InstallationManager/logs
- AIX or Linux (non-root user): /home/user/var/ibm/Installation Manager/logs where user is the non-root user name
- Windows Server 2008 64-bit: C:\ProgramData\IBM\Installation Manager\logs
What to do next
Complete the post-installation tasks that are relevant to your installation. For more information, see the Post-installation tasks topic.
Access network shares:
If you installed WAS on Microsoft Windows and configured it to run as a service, ensure that you can access network shares. For more information, see the Accessing Windows network shares topic.
Install silently
Silent installation is a tool for installing the same IBM Connections profile on multiple computers without using the IBM Installation Manager. This simplifies the installation process in enterprises that need multiple, identical instances of IBM Connections.
Silent installation uses installation parameters in a response file to install identical IBM Connections profiles on different computers. To specify silent installation parameters you can edit the default response file provided with IBM Connections, or create a new file.
In addition to silently installing IBM Connections, you can use the silent installation process to modify, update, or uninstall IBM Connections.
Install IBM Connections in silent mode (with an existing IBM Installation Manager)
Use a silent installation to perform an identical installation of IBM Connections on multiple systems.
Ensure that you complete all the prerequisite tasks that are relevant for your environment. For more information, see the Before installing topic.
Ensure that IBM Installation Manager is installed on your system. To prevent errors caused by using the wrong version of IBM Installation Manager, remove the following line from the default response file:
<offering id='com.ibm.cic.agent' version='1.4.4000.20110525_1254' profile='IBM Installation Manager' features='agent_core,agent_jre' installFixes='none'/>
To create a customized version of the default response file, run the installation wizard in interactive mode. For more information, see the Creating a response file topic.
Use a response file for your intended deployment, install IBM Connections on multiple systems without needing to interact with the installation wizard.
To perform a silent installation:
- cd IM_root/eclipse/tools
- Enter the following command:
- AIX or Linux: ./imcl -input response_file -log log_file -acceptLicense
- Windows: imcl.exe -input response_file -log log_file
-acceptLicense
The IM_root/eclipse directory contains a similar file called IBMIM.exe but that file is not suitable for silent installation.
where response_file is the full path and name of the response file and log_file is the full path and name of the log file. The default name of the response file is LC.rsp. By default, the response file is in the following directory:
- AIX or Linux: connections_root.
- Microsoft Windows:: connections_root.
Examples:
- AIX or Linux: ./imcl -input /opt/IBM_Connections_Install/IBMConnections/LC.rsp
-log /mylog/silent_install_log.xml -acceptLicense
- Windows: imcl.exe -input E:\IBM_Connections_Install\IBMConnections\LC.rsp -log \mylog\silent_install_log.xml -acceptLicense
- AIX or Linux: ./imcl -input response_file -log log_file -acceptLicense
Results
IBM Installation Manager writes the result of the installation command to the log file specified with the -log parameter.
To check the complete details of the installation, open each of the log files in connections_root/logs. Each IBM Connections application installed has a log file, using the following naming format: applicationInstallog.txt, where application is the name of an IBM Connections application.
If the installation is successful, the log files are empty. For example:<?xml version="1.0" encoding="UTF-8"?> <result> </result>
The log file contains an error element if the operation was not completed successfully. A successful installation adds a value of 0 to the log file. An unsuccessful installation adds a positive integer to the log file.The log file for IBM Installation Manager records the values that you entered when you ran IBM Installation Manager in interactive mode. To review the log file for IBM Installation Manager, open the date_time.xml file, where date_time represents the date and time of the installation. The file by default is in the following directory:- AIX or Linux (root user): /var/ibm/InstallationManager/logs
- AIX or Linux (non-root user): user_home/var/ibm/InstallationManager/logs
- Windows (administrator): C:\ProgramData\IBM\Installation Manager\logs
- Windows (non-administrator): C:\user\Application Data\IBM\Installation Manager\logs
What to do next
Complete any applicable post-installation tasks. For more information, see the Post-installation tasks topic.
Install IBM Connections and IBM Installation Manager in silent mode
Use a silent installation to perform an identical installation of IBM Connections and IBM Installation Manager on multiple systems.
This task assumes that IBM Installation Manager is not installed on your system.
Ensure that you complete all the prerequisite tasks that are relevant for your environment. For more information, see the Before installing topic.
However, do not complete the prerequisite tasks that relate to IBM Installation Manager.
Edit the default response file to suit your environment. For more information, see the Using the default response file topic.
Use a response file for your intended deployment, install IBM Connections on multiple systems without needing to interact with the installation wizard.
To perform a silent installation:
- Open a command prompt and go to the location of the silent
installation file. The file is stored in the IBM_Connections_set-up/IBM_Connections_install/IM/OS directory,
...where IBM_Connections_set-up is the directory or media where the IBM Connections installation files are located and OS represents your operating system
To change the paths to the response file and log file, edit the lc_install.ini file. The file is located in the IBM_Connections_set-up/IBM_Connections_install/IM/OS directory.
- Run the silent installation script:
- AIX or Linux (root user): ./installc -input response_file -log log_file -acceptLicense
- AIX or Linux (non-root user): ./userinstc
-input response_file -log log_file -acceptLicense
- Windows (administrator):
installc.exe -input response_file -log log_file -acceptLicense
- Windows (non-administrator): userinstc.exe -input response_file -log log_file -acceptLicense
where response_file is the full path and name of the response file and log_file is the full path and name of the log file. The default name of the file is LC.rsp.
By default, the response file is stored in the IBM_Connections_set-up/IBM_Connections_install/IBMConnecgtions directory on the installation media.
- AIX or Linux (root user): ./installc -input response_file -log log_file -acceptLicense
Results
IBM Installation Manager writes the result of the installation command to the log file specified with the -log parameter.
To check the complete details of the installation, open each of the log files in connections_root/logs. Each IBM Connections application installed has a log file, using the following naming format: applicationInstallog.txt, where application is the name of an IBM Connections application.
If the installation is successful, the log files are empty. For example:
<?xml version="1.0" encoding="UTF-8"?>
<result>
</result>
The log file contains an error element if the operation was not completed successfully. A successful installation adds a value of 0 to the log file. An unsuccessful installation adds a positive integer to the log file.The log file for IBM Installation Manager records the values that you entered when you ran IBM Installation Manager in interactive mode. To review the log file for IBM Installation Manager, open the date_time.xml file, where date_time represents the date and time of the installation. The file by default is in the following directory:
- AIX or Linux (root user): /var/ibm/InstallationManager/logs
- AIX or Linux (non-root user): user_home/var/ibm/InstallationManager/logs
- Windows (administrator): C:\ProgramData\IBM\Installation Manager\logs
- Windows (non-administrator): C:\user\Application Data\IBM\Installation Manager\logs
What to do next
Complete any applicable post-installation tasks. For more information, see the Post-installation tasks topic.
The default response file
Response files provide input parameters for silent installations of IBM Connections.
The default response file for AIX and Linux is called LC.rsp and is located in the IBM Connections set-up directory or installation media. You can edit this file and use it as input for a silent installation.
IBM does not provide a default response file on Windows because it is more convenient if you to generate the file yourself. For information about generating a response file, see the Creating a response file topic.
Instead of generating a new response file, you can edit the default response file that is provided with the product. However, if you edit the default response file, you need to add encrypted passwords to the file. For more information, see the Creating encrypted passwords for a response file topic.
Use the default response file
Use the default response file to specify silent installation parameters for your environment.
Encrypt your administrator passwords. For more information about encrypting passwords, see the Creating encrypted passwords for a response file topic.
Silent installation uses the parameters in a response file to install the same IBM Connections profile on multiple computers.
If you are silently installing IBM Connections as a non-root user in an AIX or Linux environment, you must specify that parameter in the silent-install.ini file.
- Navigate to the connections_root directory and open the LC.rsp response file.
- Specify your installation parameters. For more information,
see the Default response file topic.
- Add the encrypted passwords to the relevant elements of
the response file. The following example shows the elements for the Activities passwords:
<data key='user.activities.adminuser.password' value='encrypted_password'/>
<data key='user.activities.dbUserPassword value='encrypted_password'/>
where encrypted_password is the password after you encrypted it.
- Change the default WAS administrator name from wasadmin if your administrator name is different.
- Save your changes.
- If you are performing the silent installation as a non-root
user on AIX or Linux systems:
- Open the silent-install.ini file
for editing from the following location:
- AIX: IBM_Connections_set-up/IBM_Connections_install/IM/aix/silent-install.ini
- Linux: IBM_Connections_set-up/IBM_Connections_install/IM/linux/silent-install.ini
- Linux on System z: IBM_Connections_set-up/IBM_Connections_install_s390/IM/zlinux/silent-install.ini
where IBM_Connections_set-up is the IBM Connections set-up directory or installation media.
- AIX: IBM_Connections_set-up/IBM_Connections_install/IM/aix/silent-install.ini
- In the second line of the file, change admin to nonadmin.
- Save and close the file.
- Open the silent-install.ini file
for editing from the following location:
Create a response file
Use a response file to install, modify, update, or uninstall IBM Connections without user interaction.
You can create a response file by using IBM Installation Manager or by editing the file that is provided with the product. For more information about editing the file, see the Default response file topic.
Ensure that IBM Installation Manager is installed. For more information, see the Installing IBM Connections 4.0 topic.
To ensure that the response file captures the details of your SSL certificates, start IBM WAS.
The default location of a response file that you generate is the connections_root/silentResponseFile directory. To specify a different location, edit the generate_install_responsefile.bat|sh file or generate_other_responsefile.bat|sh file, depending on the task to carry out.
Instead of creating your own response file, you can edit the file that is provided with the product. The file is in the IBM_Connections_set-up/IBM_Connections_install/IBMConnections directory. However, this default file is applicable only for installation. The response files for modifying, updating, rolling back, and uninstalling the product are based on the response file for installation. Before you create a response file for any of those procedures, you must first run the silent installation procedure.
For more information about creating response files with IBM Installation Manager, go to the Recording a response file with Installation Manager webpage.
This task describes the procedure to generate a response file for the following procedures:
- Install IBM Connections
- Modify an existing installation by adding or removing IBM Connections applications
- Update an existing installation by installing a fix pack
- Roll back an update
- Uninstall IBM Connections
For each procedure, run a simulated instance of the IBM Installation Manager and record your input to a response file. Later, you can run a silent command that uses this response file as an input parameter.
Default response files on AIX or Linux:
- Install
- LC.rsp
- Modify - Add
- LC_modify_add.rsp
- Modify - Remove
- LC_modify_remove.rsp
- Update
- LC_update.rsp
- Roll back
- LC_rollback.rsp
- Uninstall
- LC_uninstall.rsp
To create a response file, complete the following steps:
- Open a command prompt and go to the IM_root/eclipse directory.
- Ensure that the IBM_Connections_set-up/IBM_Connections_install/IM/OS/skip directory allows write access, where IBM_Connections_set-up is the directory or media where the IBM Connections installation files are located, and OS represents your operating system.
- Run the command to record a response file. This command
uses the -skipInstall agentDataLocation argument, which records the installation commands without installing IBM Connections. Substitute your own file name and path for
the response file. Verify the file paths that you enter exist
because IBM Installation Manager
does not create directories for the response file.
- AIX and Linux: ./IBMIM -record /response_files/install_product.xml
-skipInstall agentDataLocation
- Microsoft Windows:: IBMIM.exe -record responseFile -skipInstall agentDataLocation
where agentDataLocation is the file path to the skip directory, which stores IBM Installation Manager data files.
- The -log option is not available when recording a response file.
- Use quotation marks around file paths that contain spaces.
- You can use the same agentDataLocation parameter in the next recording session to update, modify, roll back or uninstall IBM Connections. However, if you want to record a new installation, you must specify a new agentDataLocation parameter.
- AIX and Linux: ./IBMIM -record /response_files/install_product.xml
-skipInstall agentDataLocation
- Enter the required information in the IBM Installation Manager.
- To install a new deployment, open Files > Preferences, and enter the path to the IBM Connections repository; for example: C:\build\\IBM_Connections_Install\IBMConnections. Click Install and enter the required information as if you were installing the product. For more information, see the Installing IBM Connections 4.0 topic.
- To modify an existing installation, click Modify and enter the required information.
- To add applications, select the applications to
add in the Application Selection pane.
Ensure that all the currently installed applications are also selected.
- To remove applications, clear the check boxes of the applications to remove in the Application Selection pane.
For more information, see the Modifying the installation in interactive mode topic.
- To add applications, select the applications to
add in the Application Selection pane.
- To update an existing installation, click Update and enter the required information.
- To roll back an update, click Rollback and enter the required information
- To uninstall IBM Connections, click Uninstall and enter the required information. For more information, see the Uninstalling a deployment topic.
- Confirm that the new response file is present.
What to do next
Use the response file to silently install, modify, update, roll back, or uninstall IBM Connections.If you are running IBM Installation Manager as a non-administrator and plan to use the response file to install the product on another user's system, change the file paths in your response file from absolute paths to relative paths.
Create encrypted passwords for a response file
Add encrypted passwords to your edited version of the default response file.
You can create a response file using IBM Installation Manager or by editing the file that is provided with the product. For more information about editing the file, see the Default response file topic.
When you edit the default response file to suit your own environment, create encrypted passwords and add them to the file. Create encrypted passwords for both WebSphere Application Sever and your DBs.
To create encrypted passwords for a response file, complete the following steps:
- Open a command prompt and change to the IBM_Connections_setup/IBM_Connections_Install/IM/OS/tools where OS is your operating system.
- Run the following command:
- AIX or Linux: ./imutilsc encryptString Password -silent -noSplash
- Windows: imutilsc.exe
encryptString Password -silent -noSplash
where Password is your password.
- AIX or Linux: ./imutilsc encryptString Password -silent -noSplash
- Add the encrypted password to the relevant line in the response file. You usually need to enter passwords for both the WAS
administrator and the DB user. For example:
<data key='user.activities.adminuser.password' value='encrypted_password'/>
<data key='user.activities.dbUserPassword value='encrypted_password'/>
where encrypted_password is the value generated by the command.
You might also need to change the default WAS administrator name from wasadmin, if different from your administrator name.
- Repeat these steps for each unique password.
What to do next
Use the response file to silently install, modify, update, roll back, or uninstall IBM Connections.Directory paths for IBM Installation Manager
IBM Installation Manager uses default directory paths for its installation files.
Purpose
This topic describes the default directory paths for IBM Installation Manager.IBM Installation Manager
Each instance of Installation Manager must have its own installation directory and agent data directory.
The directories where IBM Installation Manager is installed are determined by the type of user account that you used to install the product.
Any changes that you make to an installation of IBM Installation Manager installed with a root user or non-administrator account do not affect an installation of IBM Installation Manager installed with a non-root user or non-administrator account. The reverse is also true.
The following table indicates the location of the relevant directories.
Default installation directories for IBM Installation Manager
Directory Root/Administrator Non-root/non-administrator Default installation directory AIX or Linux: /opt/IBM/InstallationManager/eclipse
Windows: C:\IBM\Installation Manager\eclipseAIX or Linux: /<user/IBM/InstallationManager/eclipse
Windows XP Professional, Windows Server 2003: C:\<user>\IBM\Installation Manager\eclipse
Windows Vista, Windows Server 2008, Windows 7: C:\Users\<user>\IBM\Installation Manager\eclipse
Eclipse log file AIX or Linux: /var/ibm/InstallationManager/pluginState/.metadata
Windows Server 2008: C:\ProgramData\IBM\Installation Manager\pluginState\.metadata
AIX or Linux: /<user/var/ibm/InstallationManager/pluginState/.metadata
Windows Server 2008: C:\Users\<user\IBM\Installation ManagerInstaller\pluginState\.metadata
Default agent data location. For more information about agent data, go to the Agent data location page in the IBM Installation Manager information center.
AIX or Linux: /var/ibm/InstallationManager
Windows Server 2008: C:\ProgramData\IBM\Installation Manager
AIX or Linux: /<user>/var/ibm/InstallationManager
Windows Server 2008: C:\Users\<user>\AppData\Roaming\IBM\Installation Manager
To find the location of IBM Installation Manager:
- AIX or Linux:
- Open the /etc/.ibm/registry/InstallationManager.dat file.
- Examine the location entry.
For example, location=/var/ibm/InstallationManager.
- Open the /etc/.ibm/registry/InstallationManager.dat file.
- Windows:
- Open the Windows Registry.
- Search for the following registry key: HKLM\SOFTWARE\Wow6432Node\IBM\Installation
Manager\location.
- Open the key and examine its value.
- Open the Windows Registry.
Modify the installation in interactive mode
Modify your deployment of IBM Connections by adding or removing applications. Use the Modify function of the IBM Installation Manager to add or remove IBM Connections applications.
To modify your installation:
- Open a command prompt and change to the IM_root directory.
- Run the following command:
- AIX or Linux: ./launcher
- Windows: launcher.exe
- AIX or Linux: ./launcher
- From the IBM Installation
Manager menu, click File > Preferences.
- Click Repositories.
- In the Repositories area, select the repositories that
you want to modify.
- Click OK to save your selections.
- Click Modify.
- Select IBM Connections and click Next.
- In the Application Selection page, choose the applications
you want to add or remove and then click Next.
- Add applications: Select the check boxes of any applications
that are not already installed and to add to your deployment.
- Remove applications: Clear the check boxes of any installed applications to remove from your deployment.
All installed applications are selected by default.
The Home page, News, and Search applications are required and cannot be removed.
- Add applications: Select the check boxes of any applications
that are not already installed and to add to your deployment.
- Enter the administrative ID and password of the Deployment Manager.
This ID is set to the connectionsAdmin J2C authentication alias, which is mapped to the following J2EE roles: dsx-admin, widget-admin, and search-admin. It is also used by the service integration bus. To use security management software such as Tivoli Access Manager or SiteMinder, the ID that you specify here must exist in the LDAP directory. For more information, see the Switching to unique administrator IDs for system level communication topic.
- Configure your topology:
The panel described in this step appears only if you selected new applications to install.
If you select an existing cluster on which to deploy applications, the nodes in that cluster are fixed and cannot be modified.
- Small deployment:
- Select the Small deployment topology.
- Enter a Cluster name for the topology.
- Select a Node.
- Click Next.
- Select the Small deployment topology.
- Medium deployment:
- Select the Medium deployment topology.
- Select the default
value or enter a Cluster name for each application
or for groups of applications.
For example, use Cluster1 for Activities, Communities, and Forums.
IBM Installation Manager creates servers and clusters when required.- Select a Node for each cluster. Accept the predefined node or select a different node.
These nodes host application server instances that serve IBM Connections applications. You can assign multiple nodes to a cluster, where each node is a server member of that cluster.- Enter a Server member name for the selected node. Choose the default or enter a custom name.
If you enter a custom server member name, the name must be unique across all nodes in your deployment.
- Click Next.
- Large deployment:
- Select the Large deployment topology.
- Enter a Cluster name for each application.
IBM Installation Manager creates servers and clusters when required.
- Select a Node for each cluster. Accept the predefined node or
select a different node.These nodes host application server instances that serve IBM Connections applications. You can assign multiple nodes to a cluster, where each node is a server member of that cluster.
- Enter a Server member name for the selected node. Choose the default or enter a custom name.
If you enter a custom server member name, the name must be unique across all nodes in your deployment.
- Click Next.
- Enter the DB information.
The panel described in this step appears only if you selected new applications to install and if the new applications require DB configuration.
- Specify whether the installed applications use the same
DB server or instance: Select Yes or No.
If allowed by your DB configuration, you can select multiple DB instances as well as different DB servers.
- Select a Database type from one of the following options:
- IBM DB2 Universal Database
- Oracle Enterprise Edition
- Microsoft SQL Server Enterprise Edition
- Enter the Database server host. For example: appserver.enterprise.example.com
If your installed applications use different DB servers, enter the DB host for each application.
- Enter the Port number of the DB server. The default values are: 50000 for DB2, 1521 for Oracle, and 1433 for SQL Server.
If your installed applications use different DB servers or instances, enter the port for each DB server or instance.
- Enter the JDBC driver location. For example:
- AIX: /usr/IBM/WebSphere/AppServer/lib
- Linux:
/opt/IBM/WebSphere/AppServer/lib
- Windows:
C:\IBM\WebSphere\Appserver\lib
- Ensure
that the following JDBC driver libraries are present in the JDBC directory:
- DB2
- db2jcc.jar and db2jcc_license_cu.jar
Ensure that your user account has the necessary permissions to access the DB2 JDBC files.
- Oracle
- ojdbc6.jar
- SQL Server
- Download the SQL Server JDBC 2 driver from the Microsoft website to a local directory
and enter that directory name in the JDBC driver library field.
The directory must not contain the sqljdbc.jar file, only the sqljdbc4.jar file. Even though the data source is configured to use the sqljdbc4.jar file, an exception occurs if both files are present in the same directory.
IBM recommends that you obtain this Microsoft hotfix for the JDBC 2 driver for production deployments.
- Enter the User ID and Password for each DB. If each DB
uses the same user credentials, select the Use the same
password for all applications check box and then enter
the UID and password for the first DB in the list.
If your DB type is Oracle, connect to the DB with the UID that you used when you created the application DB.
- Click Validate to verify your DB settings. If the validation fails, check your DB settings. When the validation succeeds, click Next.
IBM Installation Manager tests your DB connection with the DB values that you supplied. You can change the DB configuration later in the WAS Integrated Solutions Console.
- In the summary panel, confirm your selection and click Modify.
- When the modification process is complete, restart the Deployment Manager and all the nodes.
Wait until the DM copies all the application EAR files to the installedApps directory on each of the nodes. This process can take up to 30 minutes.
To verify that the DM has distributed the application EAR files to the nodes, check the SystemOut.log file of each node agent. The default path to the SystemOut.log file on a node is profile_root/logs/nodeagent.
Look for a message such as the following example: ADMA7021I: Distribution of application application_name completed successfully. where application_name is the name of an IBM Connections application.
To confirm that the installation was successful, open the log files in connections_root/logs. Each IBM Connections application installed has a log file, using the following naming format: application_nameInstall.log, where application_name is the name of an IBM Connections application. Search for the words error or exception to check whether any errors or exceptions occurred during installation.
Modify the installation in silent mode
Modify your deployment of IBM Connections by adding or removing applications in silent mode. With the help of a response file, use the Modify function of the IBM Installation Manager to add or remove IBM Connections applications.
To modify your installation in silent mode, complete one of the following tasks:
Add applications in silent mode
Add applications to your deployment of IBM Connections without using the installation wizard.
Create a response file for this task by running a simulated modification. For more information, see the Creating a response file topic.
Instead of generating a new response file, you can edit the default response file that is provided with the product. However, if you edit the default response file, you need to add encrypted passwords to the file. For more information, see the Creating encrypted passwords for a response file topic.
A silent modification uses a response file to automate the addition of applications to your deployment.
To perform a silent modification:
- cd IM_root/eclipse/tools
- Enter the following command:
- AIX or Linux: ./imcl -input response_file -log log_file -acceptLicense
- Windows: imcl.exe -input response_file -log log_file
-acceptLicense
The IM_root/eclipse directory contains a similar file called IBMIM.exe but that file is not suitable for silent installation.
where response_file is the full path and name of the response file and log_file is the full path and name of the log file. The default name of the response file is LC.rsp. By default, the response file is in the following directory:
- AIX or Linux: connections_root.
- Microsoft Windows:: connections_root.
Examples:
- AIX or Linux: ./imcl -input /opt/IBM_Connections_Install/IBMConnections/LC.rsp
-log /mylog/silent_install_log.xml -acceptLicense
- Windows: imcl.exe -input E:\IBM_Connections_Install\IBMConnections\LC.rsp -log \mylog\silent_install_log.xml -acceptLicense
- AIX or Linux: ./imcl -input response_file -log log_file -acceptLicense
Results
IBM Installation Manager writes the result of the installation command to the log file specified with the -log parameter.
To check the complete details of the installation, open each of the log files in connections_root/logs. Each IBM Connections application installed has a log file, using the following naming format: applicationInstallog.txt, where application is the name of an IBM Connections application.
If the installation is successful, the log files are empty. For example:
<?xml version="1.0" encoding="UTF-8"?>
<result>
</result>
The log file contains an error element if the operation was not completed successfully. A successful installation adds a value of 0 to the log file. An unsuccessful installation adds a positive integer to the log file.The log file for IBM Installation Manager records the values that you entered when you ran IBM Installation Manager in interactive mode. To review the log file for IBM Installation Manager, open the date_time.xml file, where date_time represents the date and time of the installation. The file by default is in the following directory:
- AIX or Linux (root user): /var/ibm/InstallationManager/logs
- AIX or Linux (non-root user): user_home/var/ibm/InstallationManager/logs
- Windows (administrator): C:\ProgramData\IBM\Installation Manager\logs
- Windows (non-administrator): C:\user\Application Data\IBM\Installation Manager\logs
Remove applications in silent mode
Silently remove applications from your deployment of IBM Connections.
Create a response file for this task by running a simulated modification. For more information, see the Creating a response file topic.
Instead of generating a new response file, you can edit the default response file that is provided with the product. However, if you edit the default response file, you need to add encrypted passwords to the file. For more information, see the Creating encrypted passwords for a response file topic.
A silent modification uses a response file to automate the removal of applications from your deployment.
To perform a silent modification:
- cd IM_root/eclipse/tools
- Enter the following command:
- AIX or Linux: ./imcl -input response_file -log log_file -acceptLicense
- Windows: imcl.exe -input response_file -log log_file
-acceptLicense
The IM_root/eclipse directory contains a similar file called IBMIM.exe but that file is not suitable for silent installation.
where response_file is the full path and name of the response file and log_file is the full path and name of the log file. The default name of the response file is LC.rsp. By default, the response file is in the following directory:
- AIX or Linux: connections_root.
- Microsoft Windows:: connections_root.
Examples:
- AIX or Linux: ./imcl -input /opt/IBM_Connections_Install/IBMConnections/LC.rsp
-log /mylog/silent_install_log.xml -acceptLicense
- Windows: imcl.exe -input E:\IBM_Connections_Install\IBMConnections\LC.rsp -log \mylog\silent_install_log.xml -acceptLicense
- AIX or Linux: ./imcl -input response_file -log log_file -acceptLicense
Results
IBM Installation Manager writes the result of the installation command to the log file specified with the -log parameter.
To check the complete details of the installation, open each of the log files in connections_root/logs. Each IBM Connections application installed has a log file, using the following naming format: applicationInstallog.txt, where application is the name of an IBM Connections application.
If the installation is successful, the log files are empty. For example:
<?xml version="1.0" encoding="UTF-8"?>
<result>
</result>
The log file contains an error element if the operation was not completed successfully. A successful installation adds a value of 0 to the log file. An unsuccessful installation adds a positive integer to the log file.The log file for IBM Installation Manager records the values that you entered when you ran IBM Installation Manager in interactive mode. To review the log file for IBM Installation Manager, open the date_time.xml file, where date_time represents the date and time of the installation. The file by default is in the following directory:
- AIX or Linux (root user): /var/ibm/InstallationManager/logs
- AIX or Linux (non-root user): user_home/var/ibm/InstallationManager/logs
- Windows (administrator): C:\ProgramData\IBM\Installation Manager\logs
- Windows (non-administrator): C:\user\Application Data\IBM\Installation Manager\logs
Modify the installation in console mode
Use console mode, modify your deployment of IBM Connections by adding or removing applications. Use IBM Installation Manager in console mode to add or remove IBM Connections applications. This method is convenient if you cannot or do not want to use the interactive mode.
To modify your installation:
- On each
node, stop any running instances of WAS and WebSphere node agents.
- Start WAS
Network Deployment Manager.
- Open a command prompt and change to the IM_root/tools
- Start IBM Installation Manager in console mode:
- AIX or Linux: ./imcl -c
- Windows: imcl.exe -c
- AIX or Linux: ./imcl -c
- Type 1 to begin modifying the deployment.
- In the Select packages to install step, type 1 to select the package and then type N to proceed.
- Select the applications to add or remove
and then type N.
- Add applications: Set the numbers corresponding to applications
that are not already installed and to add to your deployment.
- Remove applications: Set the numbers corresponding to installed applications to remove from your deployment. The Home page, News, and Search applications are required and can't be removed.
All installed applications are selected by default.
- Add applications: Set the numbers corresponding to applications
that are not already installed and to add to your deployment.
- Enter the administrative ID and password of the Deployment Manager.
This ID is set to the connectionsAdmin J2C authentication alias, which is mapped to the following J2EE roles: dsx-admin, widget-admin, and search-admin. It is also used by the service integration bus. To use security management software such as Tivoli Access Manager or SiteMinder, the ID that you specify here must exist in the LDAP directory. For more information, see the Switching to unique administrator IDs for system level communication topic.
- Configure your topology. For more information about each option,
see the Deployment options topic.
- Small deployment:
- Type 1 to select the Small deployment topology.
- Enter a Cluster name for the topology.
- Select a Node.
- Enter a Server member name for the node.
- Type N to proceed.
- Type 1 to select the Small deployment topology.
- Medium deployment:
- Type 2 to select the Medium
deployment topology.
- Select the default
value or enter a Cluster name for each application
or for groups of applications.
For example, use Cluster1 for Activities, Communities, and Forums.
IBM Installation Manager creates servers and clusters when required.- Select a Node for each cluster. Accept the predefined node or select a different node.
These nodes host application server instances that serve IBM Connections applications. You can assign multiple nodes to a cluster, where each node is a server member of that cluster.- Enter a Server member name for the selected node. Choose the default or enter a custom name.
If you enter a custom server member name, the name must be unique across all nodes in your deployment.
- The topology specified is displayed. To re-specify any details, type the number that corresponds to the application; for example, type 1 for Activities.
- Type N to proceed.
- Large deployment:
- Type 3 to select the Large deployment topology.
- Enter a Cluster name for each application.
IBM Installation Manager creates servers and clusters when required.
- Select a Node for each cluster. Accept the predefined node or
select a different node.These nodes host application server instances that serve IBM Connections applications. You can assign multiple nodes to a cluster, where each node is a server member of that cluster.
- Enter a Server member name for the selected node. Choose the default or enter a custom name.
If you enter a custom server member name, the name must be unique across all nodes in your deployment.
- The topology specified is displayed. To re-specify any details, type the number that corresponds to the application; for example, type 1 for Activities.
- Type N to proceed.
- Enter the DB information:
- Specify whether the installed applications use the same
DB server or instance: Type 1 to specify
that the applications use same DB server or instance; type 2 to specify that they use different DB servers
or instances.
If allowed by your DB configuration, you can select multiple DB instances as well as different DB servers.
- Select a Database type from one of the following options:
- IBM DB2 Universal Database
- Oracle Enterprise Edition
- Microsoft SQL Server Enterprise Edition
- Enter the Database server host. For example: appserver.enterprise.example.com
If your installed applications use different DB servers, enter the DB host for each application.
- Enter the Port number of the DB server. The default values are: 50000 for DB2, 1521 for Oracle, and 1433 for SQL Server.
If your installed applications use different DB servers or instances, enter the port for each DB server or instance.
- Enter the JDBC driver location. For example:
- AIX: /usr/IBM/WebSphere/AppServer/lib
- Linux:
/opt/IBM/WebSphere/AppServer/lib
- Windows:
C:\IBM\WebSphere\Appserver\lib
- AIX: /usr/IBM/WebSphere/AppServer/lib
- Ensure
that the following JDBC driver libraries are present in the JDBC directory:
- DB2
- db2jcc.jar and db2jcc_license_cu.jar
Ensure that your user account has the necessary permissions to access the DB2 JDBC files.
- Oracle
- ojdbc6.jar
- SQL Server
- Download the SQL Server JDBC 2 driver from the Microsoft website to a local directory
and enter that directory name in the JDBC driver library field.
The directory must not contain the sqljdbc.jar file, only the sqljdbc4.jar file. Even though the data source is configured to use the sqljdbc4.jar file, an exception occurs if both files are present in the same directory.
IBM recommends that you obtain this Microsoft hotfix for the JDBC 2 driver for production deployments.
- Enter the User ID and Password for each DB. If each DB
uses the same user credentials, confirm the Use the same
password for all applications question and then enter
the UID and password for the first DB in the list.
If your DB type is Oracle, connect to the DB with the UID that you used when you created the application DB.
- If you need to make changes, type the number that corresponds
to the application to change. Alternatively, type R to reset all the DB specifications to their default
values.
- Press Enter to verify your DB
settings. If the validation fails, check your DB settings. When
the validation succeeds, click Next.
IBM Installation Manager tests your DB connection with the DB values that you supplied. You can change the DB configuration later in the WAS Integrated Solutions Console.
- If the verification check is successful, type N to proceed. If verification fails, press B to re-enter the required information.
- Review the information that you have entered. To revise your selections, press B. To finish modifying, press M.
- Review the result of the installation. Press F to exit the installation wizard.
- Restart the Deployment Manager:
- AIX or Linux: Open a command prompt and change to
the profile_root/Dmgr01/bin directory. Enter the ./stopManager.sh
command and then enter the ./startManager.sh command.
- Windows: Stop and restart the Deployment Manager service.
- Start all the federated nodes and enter the startNode command. Repeat these steps for each node:
- Log in to a node.
- From a command line, change to the profile_root/bin directory.
- Enter the startNode command for
your operating system:
- AIX or Linux: ./startNode.sh
- Windows: startNode.bat
- AIX or Linux: ./startNode.sh
- Log in to the Integrated Solutions Console on the DM to perform a full synchronization of all nodes.
- Go to System administration > Nodes.
- Select the nodes and click Full Resynchronize.
Wait until the DM copies all the application EAR files to the installedApps directory on each of the nodes. This process can take up to 30 minutes.
To verify that the DM has distributed the application EAR files to the nodes, check the SystemOut.log file of each node agent. The default path to the SystemOut.log file on a node is profile_root/logs/nodeagent.
Look for a message such as the following example: ADMA7021I: Distribution of application application_name completed successfully. where application_name is the name of an IBM Connections application.
- Start all your IBM Connections clusters:
- Log in to the Integrated Solutions Console
on the DM
- Go to Servers > Clusters > WebSphere Application server
clusters.
- Select the IBM Connections clusters and click Start.
If you installed a cluster with multiple Search nodes, create the initial index. For more information about creating the Search index, see the Creating the initial Search index topic.
- If you are installing a non-English language deployment, enable Search dictionaries.
- The index is ready when the INDEX.READY and CRAWLING_VERSION files are present in the index directory.
If some applications do not start, the file-copying process might not have completed. Wait a few minutes and start the applications.
Post-installation tasks
After installation, you need to perform further tasks to ensure an efficient deployment.
After running the wizards to install applications and create DBs, check which of the following additional tasks you need to complete.Tasks to be completed
After you complete the mandatory post-installation tasks, update the deployment with the latest fixes.
Mandatory post-installation tasks
Review the JVM heap size
Review the size of the Java Virtual Machine heap and adjust it, if necessary, to avoid out-of-memory errors or to suit your hardware capabilities.
If you selected the Small or Medium deployment option when you installed IBM Connections, IBM Installation Manager set the Maximum Heap Size of the Java Virtual Machine (JVM) on each application server. This setting is designed to avoid out-of-memory errors.
Review the heap size on each server to ensure that you are allocating enough memory for IBM Connections but also to ensure that you are not allocating more memory than the physical capabilities of the systems where the JVMs are deployed.
Whether you installed a Small, Medium, or Large deployment of IBM Connections, you should review the JVM heap sizes in your deployment and make adjustments, if necessary.
To review the JVM heap size:
- Log into the WAS Integrated Solutions Console and select Servers > Server Type > WebSphere application servers.
- Click server,
...where server is the name of an IBM Connections server. You might have several servers in your deployment, so you might need to repeat these steps for each server.
- In the Server Infrastructure area, click Java
and Process Management and then click Process Definition > Java Virtual Machine.
- Review the Maximum heap size. IBM Installation Manager sets the following default values:
- Small deployment:
- Maximum Heap Size
- 2506 MB
- Medium deployment:
- Maximum Heap Size
- 2506 MB
- Large deployment:
Each application in a Large deployment, except News and Search, has a default Heap size of 256 MB. The News and Search applications have a default Heap size of 784 MB.
Ensure that you are not allocating more memory than the physical capacity of the system where the JVM is installed.
- Small deployment:
- Adjust the current values of the heap size up or down to
suit the needs of your deployment and your hardware capabilities.
- Click OK and then click Save.
- Repeat these steps for any additional servers in your deployment.
Configure IBM HTTP Server
Configure IBM HTTP Server to manage web requests to IBM Connections.
When you have successfully installed IBM Connections to run on WAS, you can configure IBM HTTP Server to handle web traffic by completing the following tasks:
Define IBM HTTP Server
Define IBM HTTP Server to manage web connections.
Install web server plug-ins for IBM HTTP Server, if they are not already installed. For more information, go to the Install web server plug-ins web site.
IBM Connections uses a web server as the entry point for all the applications.
This procedure describes how to create a web server using the Integrated Solutions Console. There are other ways to create the web server. See the IBM WAS information center for more information.
To define IBM HTTP Server:
- Start the IBM HTTP Administration Server:
- AIX / Linux
-
cd IHS_HOME/bin
./adminctl start - Windows:
- Open the Services window in the Windows Control Panel.
- Verify the IBM HTTP Administration Server service is started. If this service is not running, start it
- Open the Services window in the Windows Control Panel.
- AIX / Linux
- Log in to the WAS Integrated Solutions Console on the Deployment Manager and select...
-
System administration > Nodes > Add Node
- Select Unmanaged node and click Next.
- Set the properties of the node...
- Name
- Enter the name of the node.
- Host Name
- Enter the fully qualified DNS host for IBM HTTP Server. For example: webserver.example.com.
- Platform
- Select the operating system type that hosts your IBM HTTP Server.
- Select Servers > Server Types > Web servers and click New.
- Provide values for the following fields:
- Select node
- Select the node specified in Step 4.
- Server name
- Enter the name of the your web server. The default value is webserver1.
- Type
- Select IBM HTTP Server.
- Click Next.
- Select the default web server template and click Next.
- On the Enter the properties for the new web server page, check the paths and make adjustments if necessary, and then enter the user name and password specified when you installed IBM HTTP Server. Confirm the password and click Next.
- Confirm to create the new web server.
- Click Finish and then click Save.
- Synchronize all the nodes.
- Select Servers > Server Types > Web servers and click the link to your webserver.
- Click Generate Plug-in.
- Select the check box for your webserver.
- Click Propagate Plug-in.
- Select Servers > Server Types > Web servers and click the link to your webserver.
- Click Plug-in properties and then click Copy to Web Server key store directory.
If the plugin-key.kdb file is on a different system from the IBM HTTP Server system, copy it manually from the WAS system to the IBM HTTP Server system.
- Restart IBM HTTP Server.
What to do next
Complete the steps in the Configuring IBM HTTP Server for SSL topic.
Configure IBM HTTP Server to handle file downloads from the Files and Wikis applications. For information on this configuration, see the Configuring Files and Wikis downloads topic.
Configure IBM HTTP Server for SSL
Configure IBM HTTP Server to use the SSL protocol.
To support SSL, create a self-signed certificate and then configure IBM HTTP Server for SSL traffic. If you use this certificate in production, users might receiver warning messages from their browsers. In a typical production deployment, you would use a certificate from a trusted certificate authority.
To configure IBM HTTP Server for SSL:
- Create a key file.
- Start the iKeyman user interface.
- Click Key Database File in the main user interface, then click New.
Select CMS for the Key DB type. IBM HTTP Server does not support DB types other than CMS.
- Enter a name for the new key file.
For example, hostname-key.kdb. Click OK.
- Enter your password in the Password Prompt dialog box, and confirm the password. Select Stash the password to a file and then click OK. The new key DB should display in the iKeyman utility with default signer certificates. Ensure that there is a functional, non-expiring signer certificate for each of your personal certificates.
- Start the iKeyman user interface.
- Create a self-signed certificate:
- Start the iKeyman user interface.
- Click Key Database File and then
click Open.
- Enter your key file name in the Open dialog box and
click OK.
- In the Password Prompt dialog box, enter your password
and click OK.
- Click Personal Certificates in
the Key Database content frame, and then click New Self-Signed.
- Enter the required information about the key file, your webserver, and organization in the dialog box.
- Click OK.
Save the new self-signed certificate with a unique file name; do not overwrite the default Plugin-key.kdb file because that file might be accessed by other applications.
- Start the iKeyman user interface.
- Stop IBM HTTP Server.
- Log in to the WAS Integrated Solutions Console for the Deployment Manager and
select Servers > Server
types > Web servers.
- From the list of web servers, click the web server that
you defined for this profile.
- On the Configuration page for this web server, click Edit for
the Configuration file name field. This action
opens the httpd.conf configuration file on the Deployment Manager.
- Add the following text to the end of the configuration
file:
LoadModule ibm_ssl_module modules/mod_ibm_ssl.so
<IfModule mod_ibm_ssl.c>
Listen 0.0.0.0:443
<VirtualHost *:443>
ServerName server_name
#DocumentRoot C:\IBM\HTTPServer\htdocs
SSLEnable
</VirtualHost>
</IfModule>
SSLDisable
Keyfile "path_to_key_file"
SSLStashFile "path_to_stash_file"
where
- server_name is the host of the IBM HTTP Server.
- path_to_key_file is the path to the key file
that you created with the iKeyman utility.
- path_to_stash_file is the path to the associated stash file.
- AIX:
- Keyfile: /usr/IBM/keyfiles/key_file.kdb
- SSLStashFile: /usr/IBM/keyfiles/key_file.sth
- Linux:
- Keyfile: /opt/IBM/keyfiles/key_file.kdb
- SSLStashFile: /opt/IBM/keyfiles/key_file.sth
- Microsoft Windows::
- Keyfile: C:\IBM\keyfiles\key_file.kdb
- SSLStashFile: C:\IBM\keyfiles\key_file.sth
...where key_file is the name that you have given to your key file and stash file.
- server_name is the host of the IBM HTTP Server.
- Click Apply and then click OK.
- Restart IBM HTTP
Server to apply the changes.
- Test the new configuration: Open a web browser and ensure that you can successfully reach https://server_name. You might be prompted to accept the self-signed certificate on your browser.
Results
IBM Connections users can access applications through the SSL protocol.If you receive an error message about failing to load a GSK library (libgsk7ssl.so), install the libgsk7ssl.so GSK library. For more information, go to the following Support page: Failure attempting to load GSK library when using SSL with IBM HTTP Server.
What to do next
For more information about securing web communications, go to the IBM WAS Information Center or read the IBM WAS V7.0 Security Handbook.
For more information about the key store and setting up the IBM HTTP Server, see the Securing communications topic in the WAS Information Center. The key file can be shared between two webservers, thus providing failover capability.
Map applications to IBM HTTP Server
Map IBM Connections applications to IBM HTTP Server.
Complete this task if you installed and configured IBM HTTP Server before installing IBM Connections.
If you plan to configure a reverse proxy, see the Configuring a reverse caching proxy topic.
If you installed and configured IBM HTTP Server after installing IBM Connections, your IBM Connections applications are automatically mapped to the web server. However, if you installed and configured IBM HTTP Server before installing IBM Connections, manually map the applications.
To map your IBM Connections applications to IBM HTTP Server and regenerate the plugin:
- Open the WAS Integrated Solutions Console on the system where
you installed the Deployment Manager.
- Select Applications > Application Types > WebSphere enterprise
applications.
- Map an IBM Connections application to IBM HTTP Server:
This step instructs you to select webserver1. Ensure defined this web server before you attempt to complete these steps.
- Select application > Manage Modules,
...where application is an IBM Connections application.
- In the Clusters and Servers box,
select the cluster and server on which you installed the application.
If necessary, use the Ctrl key to select both targets.
- Select the check boxes for all the modules and click Apply.
- Review the Server details and ensure that both servers
are listed there. Click OK and then click Save.
- Repeat this step for each IBM Connections application.
- Select application > Manage Modules,
- From the WAS
Integrated Solutions Console, select Servers > Server Types > Web servers and then click the web server (webserver1).
- Click Generate
Plug-in.
- Click
your web server again and then click Propagate Plug-in.
If you have trouble propagating the plug-in on Linux, restart IBM HTTP Server s:
 ./adminctl start
 ./apachectl -k stop
 ./apachectl -k start
- Stop and restart
the web server.
- Synchronize the nodes.
- Restart all IBM Connection
clusters.
- Restart the Deployment Manager.
What to do next
To verify that the mappings are correct, complete the steps in the Verifying application mappings topic.
Test the mappings: open a web browser and try to access each of the applications by specifying the web address using the following syntax:
http://hostname/application_name
where hostname is the host of the web server to which you mapped the application and application_name is the name of the application. Do not specify the port.
Verify application mappings
Verify that IBM Connections applications are mapped to your webserver.
If you installed and configured IBM HTTP Server after installing IBM Connections, your IBM Connections applications are automatically mapped to the web server. However, if you installed and configured IBM HTTP Server before installing IBM Connections, manually map the applications. To verify whether the mappings exist, complete the following steps:
- From the WAS
Integrated Solutions Console, select Servers > Server Types > Web servers and then click the web server (webserver1).
- Click Generate
Plug-in.
- Click
your web server again and then click Propagate Plug-in.
If you have trouble propagating the plug-in on Linux, restart IBM HTTP Server s:
 ./adminctl start
 ./apachectl -k stop
 ./apachectl -k start
- Wait until a confirmation message is displayed; for example:
PLGC0062I: The plug-in configuration file is propagated from /opt/IBM/WebSphere/AppServer/profiles/Dmgr01/config/cells/servernameCell01/nodes/webserver1/servers/webserver1/plugin-cfg.xml to /opt/IBM/HTTPServer/Plugins/config/webserver1/plugin-cfg.xml.
The message identifies where the plugin-cfg.xml file is on the system that hosts IBM HTTP Server. In this example, the file path is: /opt/IBM/HTTPServer/Plugins/config/webserver1/plugin-cfg.xml.
- Log on to the system that hosts IBM HTTP Server and open the plugin-cfg.xml file.
- Verify the URIs for the installed IBM Connections applications are present. For example:
<UriGroup Name="default_host_Cluster1_URIs">
<Uri AffinityCookie="JSESSIONID" AffinityURLIdentifier="jsessionid" Name="/activities/*"/>
<Uri AffinityCookie="JSESSIONID" AffinityURLIdentifier="jsessionid" Name="/activities/quickrpicker/*"/>
<Uri AffinityCookie="JSESSIONID" AffinityURLIdentifier="jsessionid" Name="/communities/*"/>
<Uri AffinityCookie="JSESSIONID" AffinityURLIdentifier="jsessionid" Name="/communities/calendar/*"/>
<Uri AffinityCookie="JSESSIONID" AffinityURLIdentifier="jsessionid" Name="/communities/recomm/*"/>
<Uri AffinityCookie="JSESSIONID" AffinityURLIdentifier="jsessionid" Name="/forums/*"/>
<Uri AffinityCookie="JSESSIONID" AffinityURLIdentifier="jsessionid" Name="/metrics/service/*"/>
<Uri AffinityCookie="JSESSIONID" AffinityURLIdentifier="jsessionid" Name="/metrics/*"/>
<Uri AffinityCookie="JSESSIONID" AffinityURLIdentifier="jsessionid" Name="/profiles/*"/>
<Uri AffinityCookie="JSESSIONID" AffinityURLIdentifier="jsessionid" Name="/profiles/seedlist/*"/>
</UriGroup>
If the IBM Connections URIs are not present, complete the steps in the Mapping applications to IBM HTTP Server topic.
Add certificates to the WebSphere trust store
Import a self-signed IBM HTTP Server certificate into the default trust store of IBM WAS.
Before you complete this procedure, ensure that IBM HTTP Server is configured to support SSL.
This topic describes the procedure to configure certificates in a deployment with one webserver.
To establish trusted server to server communication for IBM Connections, import signer certificates from IBM HTTP Server into the WAS default trust store.
There are different types of certificates that you can use. This procedure describes how to import a self-signed certificate. You can also import a certificate that you purchased from a third-party Certificate Authority. To help decide a key file strategy for your environment, go the IBM HTTP Server information center.
To import a public certificate from IBM HTTP Server to the default trust store in IBM WAS, complete the following steps:
- Log into the IBM WAS
Integrated Solutions Console and select Security > SSL Certificate and key management > Key stores and certificates.
- Click CellDefaultTrustStore.
- Click Signer Certificates.
- Click Retrieve from port.
- Enter the Host name, SSL Port, and Alias of the webserver.
- Click Retrieve Signer Information and then click OK. The root certificate is added to the list of signer certificates.
Results
If your configuration changes aren't successful, ensure that you have applied the instructions to configure a default personal certificate.
What to do next
Verify that users can create a private community and add other widgets, such as Activities, Blogs, Dogear, and so on, to it. Ensure that there are no errors when these widgets are added. If problems are reported, consult the Communities SystemOut.log file.
The proxy-config.tpl file allows a proxy to work with self-signed certificates. This is true for an out-of-the-box deployment but for improved security you should set the value of the unsigned_ssl_certificate_support property to false when your deployment is ready for production.
Ensure that you are ready to renew your certificate before it expires. WAS provides a utility for monitoring certificates.
Add certificates to IBM HTTP Server
Add signer certificates to an IBM HTTP Server plug-in.
Before you complete this procedure, ensure that IBM HTTP Server is configured to support SSL.
To establish trusted communication between IBM HTTP Server and a web browser, import signer certificates from WAS.
There are different types of certificates that you can use. This procedure describes how to import the self-signed certificate that is shipped with WAS. You can also import a certificate that you purchased from a third-party Certificate Authority, or create a new self-signed certificate. To import a public WAS certificate into the IBM HTTP Server plug-in:
- Copy the plugin-key.kdb file from the ibm_http_server_root/Plugins/config/webserver1 directory
to the app_server_root/profiles/AppSrv01/config/cells/cell_name/nodes/node_name/servers/webserver_name directory.
where cell_name, node_name, and webserver_name are the names of your WAS cell, the name of the node that you are configuring, and your web server.
- Log into the IBM WAS
Integrated Solutions Console and select Security > SSL Certificate and key management > Key stores and certificates.
- Click CellDefaultTrustStore.
- Click Personal Certificates.
- Select the check box beside the default certificate and click Extract.
- Enter a fully-qualified Certificate file name. If you do not specify a directory path, the certificate is stored
in the app_server_root/profiles/profile_name/etc directory, where profile_name is the name of
the current WAS profile.
- Click OK to extract the file.
- In the IBM WAS
Integrated Solutions Console, select Servers > Server Types > Web servers.
- Click webserver_name, where webserver_name is the name of your IBM HTTP Server web server.
- Click Plug-in properties and then
click Manage keys and certificates.
- Under Additional Properties, click Signer certificatesand then click Add.
- Enter the certificate Alias and
its fully-qualified File nameand then click OK.
- Click Save to import the file.
- In the IBM WAS
Integrated Solutions Console, select Servers > Server Types > Web servers > webserver_name > Plug-in properties.
- Click Copy to web server key store directory to synchronize the KDB file with IBM HTTP Server.
- To apply the changes, restart IBM HTTP Server.
Results
If your configuration changes are not successful, ensure that you have applied the instructions to configure a default personal certificate.
What to do next
The proxy-config.tpl file allows the proxy to work with self-signed certificates. For improved security, set the value of the unsigned_ssl_certificate_support property to false when your deployment is ready for production.
Determine which files to compress
If you are not compressing content with the IBM WAS Edge components or a similar device, configure the IBM HTTP Server to compress certain types of content to improve browser performance.
This is an optional configuration. You do not need to perform this procedure if you are compressing content elsewhere in your network. Compression requires a significant amount of CPU; you must monitor resource availability if you choose to use this option. The directives discussed here do not compress images, but do compress JavaScript.
To specify which types of files to compress:
- Use a text editor, open the httpd.conf file.
The file is stored in the following directory by default:
- AIX: /usr/IBM/HTTPServer/conf
- Linux: /opt/IBM/HTTPServer/conf
- Microsoft Windows:: C:\IBM\HTTPServer\conf
- AIX: /usr/IBM/HTTPServer/conf
- Find the following entry in the configuration file:
LoadModule deflate_module modules/mod_deflate.so
If this entry is not present, add it.
- Add the following statements to compress multiple content
types used by IBM Connections:
#Only the specified MIME types will be compressed.

AddOutputFilterByType DEFLATE application/atom+xml
AddOutputFilterByType DEFLATE application/atomcat+xml
AddOutputFilterByType DEFLATE application/javascript
AddOutputFilterByType DEFLATE application/json
AddOutputFilterByType DEFLATE application/octet-stream
AddOutputFilterByType DEFLATE application/x-javascript
AddOutputFilterByType DEFLATE application/xhtml+xml
AddOutputFilterByType DEFLATE application/xml
AddOutputFilterByType DEFLATE text/css
AddOutputFilterByType DEFLATE text/html
AddOutputFilterByType DEFLATE text/javascript
AddOutputFilterByType DEFLATE text/plain
AddOutputFilterByType DEFLATE text/xml
AddOutputFilterByType DEFLATE text/xsl
- Add the following statement to specifically indicate that
image files and binaries must not be compressed to prevent web browser
hangs:
# Ensures that images and executable binaries are not compressed
SetEnvIfNoCase Request_URI \\.(?:gif|jpe?g|png|exe)$ no-gzip dont-vary
- Add the following statement to ensure that proxy servers
do not modify the User Agent header needed by the previous statements:
# Ensure that proxies do not deliver the wrong content
Header append Vary User-Agent env=!dont-vary
If the following line is commented out, remove the commenting from it:LoadModule headers_module modules/mod_headers.so
- Save and close the configuration file.
- Restart IBM HTTP Server.
Update web addresses in IBM HTTP Server
Update the web addresses that IBM HTTP Server uses to access IBM Connections applications.
If you installed and configured IBM HTTP Server after installing IBM Connections, your IBM Connections applications are automatically mapped to the web server. However, if you installed and configured IBM HTTP Server before installing IBM Connections, manually map the applications.
Before continuing with this task, map the application modules to IBM HTTP Server.
If you are using the Files or Wikis applications, configure IBM HTTP Server to handle file downloads from those applications.
If you choose to let the WAS redirect servlet manage file downloading, configure the server to transfer data synchronously instead of asynchronously. This configuration helps avoid errors caused by using too much memory. See the Excessive native memory use in IBM WAS technote for instructions.
If you do not install a web server such as IBM HTTP Server, users must include the correct port in the web address that they use to access the application. When you use a webserver, users can access the applications without using port numbers.
By default, the web address that you enter to access IBM Connections applications includes the port number for each application. To avoid using ports, update the web addresses by editing LotusConnections-config.xml. IBM HTTP Server can then redirect requests to the appropriate port for each application.
To update the web addresses to your IBM Connections applications, complete the following steps:
- Stop WAS.
- Check out LotusConnections-config.xml. The file is stored by default in the following directory:
- AIX: /usr/IBM/WebSphere/AppServer/profiles/profile_name/config/cells/cell_name/LotusConnections-config
- Linux: /opt/IBM/WebSphere/AppServer/profiles/profile_name/config/cells/cell_name/LotusConnections-config
- Windows: C:\IBM\WebSphere\AppServer\profiles\profile_name\config\cells\cell_name\LotusConnections-config
- For each application, update the web addresses specified
in the href and ssl_href properties:
<sloc:href>
<sloc:hrefPathPrefix>/application</sloc:hrefPathPrefix>
<sloc:static
href="http://webserver:port"
ssl_href="https://webserver:port">
<sloc:interService
href="https://webserver:port">
</sloc:href>
where
- webserver is the domain name of IBM HTTP Server, such as webserver.example.com.
- port is the default port of the application.
Remove the port when you specify a webserver.
- application is the name of an IBM Connections application.
Each href attribute in LotusConnections-config.xml is case-sensitive and must specify a fully-qualified domain name.
For example, to update the web address for Communities, add the following specifications to the file:
<sloc:href>
<sloc:hrefPathPrefix>/communities</sloc:hrefPathPrefix>
<sloc:static href="http://webserver.example.com"
ssl_href="https://webserver.example.com">
<sloc:interService  href="https://webserver.example.com">
</sloc:href>
To use a reverse proxy, the web addresses defined in this file must be updated to match the appropriate proxy server URLs. Go to the IBM Connections wiki for more information about deployment scenarios, including how to configure a reverse proxy.- Save and check in LotusConnections-config.xml.
- Synchronize the nodes.
- Log on to each application to ensure that the web addresses in the navigation bar are correct.
Results
You can access each application without needing to specify a port.Configure the Home page administrator
Create an administrator for Home page so that you can make changes to the application such as adding and removing widgets.
IBM Connections administrators must be dedicated users. Their only purpose should be application administration.
Only a Home page administrator can add, remove, enable, or disable widgets on the Home page.
You can also create global administrators for any of the applications, for the purpose of managing content.
To configure administrative access to the Home page application, complete the following steps:
- Log in to the WAS Integrated Solutions Console on the Deployment Manager.
- Select Applications > Application Types > WebSphere enterprise
applications.
- Click the link to the Home page application.
- Click the Security role to user/group mapping link.
- Select the check box beside the admin role and then click Map
Users.
- In the Search String box, type the name of the person whom you would like to set as an administrator,
and then click Search. If the user name exists
in the LDAP directory, it is found and displayed in the Available box.
- Select the name from the Available box
and then move it into the Selected column by
clicking the right arrow button.
- Repeat Steps 4 and 5 to add more users to the administrative
role.
- Click OK.
- From the Enterprise Applications > <application> > Security role to
user/group mapping page, click OK and
then click Save.
- Synchronize and restart all your WAS instances.
Enable Search dictionaries
During installation, only the English language dictionary is enabled by default. When your organization spans multiple geographies and multiple languages, you need to enable the relevant language dictionaries for your deployment to ensure that Search returns optimum results for your users.
For non-English deployments, enabling multilingual support for Search is a mandatory post-installation step that needs to be performed before you start your IBM Connections Search server for the first time. Without multiple dictionary support, for languages other than English, Search only returns results where there is an exact match between the search term and content term. Enabling multiple dictionaries ensures better quality search results when your user base is multilingual.
For information about how to enable multilingual support, see Configuring dictionaries for Search.
Related
- Configure dictionaries for Search
Create the initial Search index
When you install IBM Connections, Search indexing is automatically configured. To create the initial Search index, all you need to do is wait for one of the default indexing tasks to run.
When you are installing a non-English language deployment, you must enable the relevant language dictionaries for your deployment before creating the initial Search index. Without multiple dictionary support, for languages other than English, Search only returns results
...where there is an exact match between the search term and the content term. Enabling multiple dictionaries ensures better quality search results when your user base is multilingual. Initial index creation occurs when any scheduled indexing task fires and an index does not yet exist. As part of the initial index creation process, the index is automatically rolled out to the secondary nodes in your deployment. Each node running the Search application must have the Search index stored locally on the node's file system. Because there are multiple indexes in a clustered environment, they must all be kept in synchronization with each other.
The Search index directory is defined by the IBM WAS variable SEARCH_INDEX_DIR. You can change the location of the index by editing this variable.
After the initial index has been built and optimized, the contents of the index directory are copied to a staging folder. When the newly-built index is successfully posted, JMS messages are broadcast so that each node automatically downloads the index from the staging folder and loads it. The index management tables are populated at the same time. For Search to function properly, the initial index must have completed successfully and it must be deployed to all nodes.
Do not stop your deployment until the index has been copied to all nodes. If the server is stopped during this process, the index will not be successfully rolled out to all nodes. In this event, you need to manually copy the index from the staging location to the other nodes.
You can change the location of the Search index staging folder by editing the WAS variable, SEARCH_INDEX_SHARED_COPY_LOCATION.
Related
- Configure dictionaries for Search
- Recreating the Search index
- Create a background index
- Change the location of the Search index
- Search default scheduled tasks
Copy Search conversion tools to local nodes
To enable full indexing of data, copy the Search conversion tools to local nodes.
Perform this task only on nodes in the Search cluster. If you added a node to an existing cluster, as described in the Add a node to a cluster topic, complete this task only if the new node is a member of the Search cluster. References to nodes in the steps of this task apply only to nodes in the Search cluster.
Steps 1-3 and 6-7 are required for all supported operating systems. However, if your deployment has only one node, skip steps 1-3. Steps 4-5 are required only if you are using the AIX or Linux operating system.
The Search conversion tools index Files and Wiki attachments. The tools work best when they are available locally on each node. However, when IBM Connections was installed, the conversion tools were deployed on a network share. Therefore, copy the tools to each node in the Search cluster.
To copy Search conversion tools to local nodes, complete the following steps:
- Identify the nodes in the Search cluster.
- Log in to the Integrated Solutions Console and click Servers > Clusters > WebSphere application server clusters.
- Click cluster_name, where cluster_name is the name of the Search
cluster.
- In the Additional Properties area, expand Cluster members and then click Details.
- In the table of cluster members, make a note of the nodes that host the cluster members.
- Log in to the Integrated Solutions Console and click Servers > Clusters > WebSphere application server clusters.
- Copy the shared_data_directory_root/search/stellent directory from the shared content folder to a local directory on
each node. Use exactly the same path on each node. The following path is an example only and might be different on your operating
system:
- AIX or Linux: /opt/IBM/Connections/data/local/search/stellent
- Windows: C:\IBM\Connections\data\local\search\stellent
The new directory contains the exporter executable file.
- AIX or Linux: /opt/IBM/Connections/data/local/search/stellent
- On the Deployment Manager, update the FILE_CONTENT_CONVERSION
Websphere variable to point to the exporter file
in the local directory on each node.
For example: /opt/IBM/Connections/data/local/search/stellent/dcs/oiexport/exporter
The exporter file must be in the same file path on all nodes.
- (AIX and Linux only) Back up the setupCmdLine.sh file on each node. This file is in the app_server_root/AppServer/bin directory.
- (AIX and Linux only) Add the following text to the end
of the setupCmdLine.sh file on each node:
- export PATH=$PATH:SearchBinariesHome/dcs/oiexport
where SearchBinariesHome is the path to the directory specified in Step 2.
- Choose the option for your operating system:
- AIX: export LIBPATH=$LIBPATH:SearchBinariesHome/dcs/oiexport
- Linux: export LD_LIBRARY_PATH=$LD_LIBRARY_PATH:SearchBinariesHome/dcs/oiexport
- AIX: export LIBPATH=$LIBPATH:SearchBinariesHome/dcs/oiexport
- export PATH=$PATH:SearchBinariesHome/dcs/oiexport
- Restart all node agents.
- Restart WAS on each node.
Access Windows network shares
Configure a user account to access network shares in an IBM Connections deployment on the Microsoft Windows operating system
This task applies only to deployments of IBM Connections environments where the data is located on network file shares, and where you have installed WAS on Microsoft Windows and configured it to run as a service. When WAS runs as a Windows service, it uses the local system account to log in with null credentials. When WAS tries to access an IBM Connections network share using Universal Naming Convention (UNC) mapping, the access request fails because the content share is accessible only to valid UIDs.
When using a Windows service to start WAS, you must use UNC mapping; you cannot use drive letters to reference network shares.
To resolve this problem, configure the WAS service login attribute to log in with a user account that is authorized to access the content share.
To configure the WAS service:
- Click
Start > Control Panel and select Administrative Tools > Services.
- Open the service for the first node in the list of WAS
services.
- Click the Log On tab
and select This account.
- Enter a user account name or click Browse to search
for a user account.
- Enter the account password,
and then confirm the password.
- Click OK to
save your changes and
click OK again to return to the Services window.
- Stop and restart the service.
- Repeat steps 3-7 for each node.
What to do next
Your corporate password policy might require that you change this login attribute periodically. If so, remember to update this service configuration. Otherwise, your access to network shares might fail.Configure Moderation
Configure moderation so that moderators can review content for blogs, forums, and community files from a central interface.
If the moderation application is installed and enabled, you can define a person or set of people who will review and approve the content that users add to certain applications before it is published or review and act on content that has been flagged as problematic. Moderated content can be:
- Blog entries and comments. These can be in
stand-alone blogs or
community blogs.
- Forum posts and replies. These can be in
stand-alone forums or
community forums.
- Files and comments within a community.
To enable moderation, follow these steps:
- Install
the Moderation application as part of the Connections installation or migration.
- Assign users to the role of global
moderator so they can moderate
content from a central interface.
- Configure moderation in the contentreview-config.xml file if you want to enable moderation features such as owner moderation or assign content reviewers for flagged content.
Designating global moderators
Assign users to the role of global-moderator so they can moderate content for blogs, forums, and community files from a central interface.
In order for a user to moderate content, they must be assigned the global-moderator role for the Moderation application and for the applications you want moderated, which can be Blogs, Forums, Files, and Communities.
To map users to a global moderator role, complete the following steps:
- Map a user to a global-moderator role:
- Expand Applications > Application Types, and then select WebSphere
enterprise applications. Find and click the link to the application to configure.
- Click Security role to user/group mapping.
- Select the check box for the global-moderator role,
and then click Map users.
- In the Search String box, type
the name of the user to assign to the role, and then click Search.
If the user exists in the directory, it is displayed in the Available list.
- Select the user or group name from the Available box,
and then move it into the Selected column by
clicking the right arrow button.
- Click OK.
- Click OK, and then click Save to save the changes.
- Expand Applications > Application Types, and then select WebSphere
enterprise applications. Find and click the link to the application to configure.
- Synchronize and restart all your WAS instances.
Configure J2C Aliases for the moderation proxy service
Configure J2C Aliases so that community owners can moderate their community Blogs, Forums, and Files applications.
Moderation actions are performed by a moderation API. Community owners cannot access that API, so IBM Connections handles their moderation requests through a proxy service. The proxy service uses J2C Aliases to pass the requests. Proxy service alias users must be in the global-moderator roles of the appropriate applications, and they must be able to log in to IBM Connections.
By default the proxy service uses the connectionsAdmin J2C Alias provided during installation. That user is mapped to the global-moderator roles for Blogs, Forums, Files, Moderation, and Communities by the installation program, and can log in to IBM Connections. However, you can create different moderation aliases for each of the different supported applications. You can create the following aliases:
- For Blogs create an alias called moderationBlogsAlias.
- For Files create an alias called moderationFilesAlias.
- For Forums create an alias called moderationForumAlias.
The different applications recognize these specific aliases. You can map any users to these aliases, but all users must be in the global-moderator roles of the appropriate application, and they must be able to log into IBM Connections. For example, the moderationBlogsAlias user must be in the global-moderator role for Blogs. See Roles.
The proxy service logs its actions, so if the users (other than the connectionAdmin user) are only used for this purpose, it will make reading the log more clear.
To create moderation aliases and then map them to a global moderator role:
- Create a moderation alias:
- From the IBM WAS
Integrated Solutions Console, expand Security,
and then click Global security.
- In the Authentication area, expand Java
Authentication and Authorization Service, and click J2C
authentication data.
- Click New.
- Name the alias, for example moderationFilesAlias.
- Set the name and password of a user for the alias.
- Click OK.
- From the IBM WAS
Integrated Solutions Console, expand Security,
and then click Global security.
- Map an alias user to a global-moderator role:
- Expand Applications > Application Types, and then select WebSphere
enterprise applications. Find and click the link to the application to configure.
- Click Security role to user/group mapping.
- Select the check box for the global-moderator role,
and then click Map users.
- In the Search String box, type
the name of the user to assign to the role, and then click Search.
If the user exists in the directory, it is displayed in the Available list.
- Select the user or group name from the Available box,
and then move it into the Selected column by
clicking the right arrow button.
- Click OK.
- Click OK, and then click Save to save the changes.
- Expand Applications > Application Types, and then select WebSphere
enterprise applications. Find and click the link to the application to configure.
- Synchronize and restart all your WAS instances.
Synchronize files shared with communities
After upgrading, you must synchronize files that have been shared with communities. After upgrading the IBM Connections applications and DBs, but before any users have access, you must synchronize files shared with communities.
To run the command FilesDataIntegrityService.syncAllCommunityShares() follow the steps detailed in the topic Run Files administrative commands.Related tasks
- Run Files administrative commands
Configure Cognos Business Intelligence
Configure your IBM Cognos Business Intelligence environment to work with IBM Connections.
After you have installed Cognos Business Intelligence, configure the environment by completing the following tasks:
Apply fix packs to update the Cognos server
Apply available fix packs to the Cognos Business Intelligence server to provide important product corrections. These fixes must be applied after Cognos Business Intelligence has been installed.
Install Cognos Business Intelligence and federate the server to the IBM Connections Deployment Manager as explained in Install Cognos Business Intelligence in the Pre-installation section of this documentation.
For additional information on updating Cognos Business Intelligence with fix packs, see Install Fix Packs in the Cognos information center.
Download the latest fix pack and apply it to the Cognos server. At a minimum, you will need to apply the fix pack listed below, but you should check with IBM Fix Central in case additional fix packs were made available after this documentation was published. Fix packs are cumulative; when you install the latest fix pack, it includes updates from all previous fix packs.
- Stop IBM WAS
and verify that all Cognos services
have stopped before proceeding to the next step.
After stopping the server, wait at least 1 full minute to ensure that all Cognos processes have stopped:
- IBM AIX or Linux: cgsServer.sh and CAM_LPSvr processes
- Microsoft Windows:: cgsLauncher.exe and CAM_LPSvr processes
- IBM AIX or Linux: cgsServer.sh and CAM_LPSvr processes
- Download fix packs for Cognos Business
Intelligence 10.1.1 from IBM Fix Central.
Fix packs required for a new deployment of IBM Cognos for IBM Connections
Operating system Fix pack AIX 10.1.1-BA-CBI-AIX64-FP001 Linux 10.1.1-BA-CBI-Linuxi38664-FP001 Windows 10.1.1-BA-CBI-Win64-FP001 zLinux 10.1.1-BA-CBI-zLinux64-FP001 - Review the fix pack prerequisites and make sure your deployment satisfies all requirements.
- Download the appropriate compressed tar file
for your operating system using the links in the "Download Package"
section.
Some browsers might change a downloaded file.s type from .tar.gz to a file type not recognized by the operating system. To correct this, change the file type back to .tar.gz after the download is complete. Using Download Director will prevent inadvertent renaming of files at download.
- Review the fix pack prerequisites and make sure your deployment satisfies all requirements.
- Expand the downloaded fix pack.
AIX or Linux
- Open command prompt or terminal window.
- Change to the directory where you have downloaded the fix pack.
- Run the following command to expand the package using either GNU Zip (gzip)
or GNU Tar (tar):
gunzip fix_pack_file_name.tar.gz | tar xvf .
Windows
- Open a command prompt.
- Change to the directory where you have downloaded the fix pack.
- Expand the package using your file compress and decompress utility (if you are using WinZip, select the option "Use folder names" to retain the package.s folder structure).
- Open command prompt or terminal window.
- Apply the fix pack:
AIX or Linux:
- Change to the directory where you expanded the fix pack.
- Now change to the following subdirectory:
- AIX: /aix64h
- Linux: /linuxi38664h
- zLinux: /zlinux64h
- AIX: /aix64h
- Run the following command: ./issetup
If you do not use XWindow, run an unattended installation as explained in Set Up an Unattended Installation Using a File From an Installation on Another Computer in the Cognos information center.
- Follow the instructions in the installation wizard,
install the fix pack in the same location as your existing IBM Cognos components.
This installation location is the path specified for the cognos.biserver.install.path property in the cognos-setup.properties file.
Windows:
-
cd FIX_DIR/win64h
./issetup.exe - Change to the directory where you expanded the fix pack.
- Follow the instructions in the installation wizard, install the fix pack in the same location as your existing IBM Cognos components.
This installation location is the path specified for the cognos.biserver.install.path property in the cognos-setup.properties file.
- Generate a new Cognos BI Server EAR file with the fix pack:
- Locate the cognos-setup-update.sh script
in the directory where you expanded the CognosConfig.zip or CognosConfig.tar when
you installed Cognos Business Intelligence components as
part of the pre-install task.
- Edit the cognos-setup.properties file
and verify that it contains the appropriate values for each property.
All passwords were removed from this file the last time it was used, so you must either add the passwords again, or pass them in from the command line when you run the cognos-setup-update.sh script.
- Run the cognos-setup-update.sh script.
- Apply the new EAR file to the Cognos server by running an update in the WebSphere Integrated Solutions Console:
- On the server where Cognos BI
Server is installed, start WAS.
- Log in to the Integrated Solutions Console as the WebSphere administrator.
- Click Servers > Enterprise Applications.
- In the list of applications, select the Cognos where you generated the new EAR file,
and click the Update button in the table.
- Browse to the newly built EAR file residing in the Cognos_BI_Server_install_path directory,
and click Next.
- Complete the remaining screens by accepting the default
values and clicking Next.
- Click Finish to complete the update.
- If necessary, enable anonymous access to the Cognos server:
If you disabled anonymous access to the Cognos server, you must enable it now because the script that updates the configuration requires that anonymous access be enabled. There are two ways to enable anonymous access. You can run the Cognos Configuration tool or, if your Cognos server runs on AIX or Linux and does not provide a graphical user interface, you can enable anonymous access manually.
It is not necessary to disable anonymous access again when you complete this task because you will do that when you configure LDAP authentication in the next task.
Enable anonymous access with the Cognos Configuration tool:
- Navigate to the /bin directory
of the Cognos BI Server installation directory:
For example:
- AIX or Linux: /opt/IBM/Cognos64/bin/
- Windows: C:\Program Files\IBM\Cognos\bin
- AIX or Linux: /opt/IBM/Cognos64/bin/
- Start the Cognos Configuration
tool:
- AIX or Linux: ./cogconfig.sh
- Windows: cogconfig.bat
- AIX or Linux: ./cogconfig.sh
- Expand Local Configuration > Security > Authentication > Cognos and set Allow
anonymous access? to True.
- Exit the Cognos Configuration
tool, making sure to select No at the following prompt: The service 'IBM Cognos' is not running
on the local computer. Before you can use it your computer must start
the service. Do you want to start this service before exiting?
- Restart IBM WAS.
Enable anonymous access manually:
- Navigate to the /configuration directory
within the Cognos BI Server
installation directory:
For example:
- AIX or Linux: /opt/IBM/Cognos64/bin/
- Windows: C:\Program Files\IBM\Cognos\bin
- AIX or Linux: /opt/IBM/Cognos64/bin/
- Open the working copy of the cogstartup.xml file
for editing.
- Within the <crn:instance name="Cognos" class="Cognos"> section,
change the allowAnon parameter:
From:
<crn:parameter name="allowAnon">
<crn:value xsi:type="xsd:boolean"> false </crn:value>
</crn:parameter>
To:
<crn:parameter name="allowAnon">
<crn:value xsi:type="xsd:boolean"> true </crn:value>
</crn:parameter>
- Save and close the file.
- Restart WAS.
- Run the cognos-configure.sh script to configure the Cognos server and set up DB connections, just as you did when you originally deployed the Cognos server.
Output from this operation is stored in the /CognosSetup/cognos-configure.log file.
If you encounter an error when running the cognos-configure.sh script, correct the error and run the script again before proceeding to the next task.
Configure support for LDAP authentication for Cognos Business Intelligence
Configure the IBM Cognos Business Intelligence server to support the use of an LDAP directory for user authentication.
Configure Cognos Business Intelligence to use the same LDAP directory that IBM Connections uses for authentication. Configuring LDAP authentication involves disabling anonymous access and restricting access to the namespace. Be sure to use the namespace specified by the cognos.namespace property in the cognos-setup.properties file; by default, that namespace is called IBMConnections.
For general information on LDAP authentication in Cognos, see the Cognos information center.
If you will be configuring LDAP authentication over SSL, see the IBM technote Configure LDAPS (LDAP via SSL) for CRN/Cognos 8 (also applicable to later versions of the product).
Set the values for the LDAP properties as shown in this example, which configures Cognos for IBM Directory Server. For detailed instructions, see Configure LDAP support in the Cognos information center.
- Start the Cognos Configuration
tool.
The Cognos Configuration tool provides a graphical user interface for defining LDAP properties. If your IBM AIX or Linux server does not support a graphical user interface, see the topic Configure LDAP settings manually for instructions on configuring these LDAP authentication settings manually.
- Navigate to the /bin directory of
the Cognos BI Server installation directory.
For example:
- IBM AIX or Linux: /opt/IBM/Cognos64/bin/
- Microsoft Windows::C:\IBM\Cognos\bin
- IBM AIX or Linux: /opt/IBM/Cognos64/bin/
- Start the Cognos Configuration
tool:
- AIX or Linux: ./cogconfig.sh
- Windows:cogconfig.bat
- AIX or Linux: ./cogconfig.sh
- Expand Local Configuration > Security > Authentication > IBMConnections and set the values
shown here for the following properties:
IBMConnections is the namespace, specified in the cognos.namespace property of the cognos-setup.properties file used for deploying the Cognos server.
These settings are for IBM Directory Server; you might need different settings for another LDAP directory.
- User lookup: (uid=${userID})
- Use external identity? True
- External identify mapping: (uid=${environment("REMOTE_USER")})
- User lookup: (uid=${userID})
- Expand Local Configuration > Security > Authentication > Cognos and set Allow
anonymous access? to False.
- Exit the Cognos Configuration
tool, making sure to select No at the following prompt: The service 'IBM Cognos' is not running
on the local computer. Before you can use it your computer must start
the service. Do you want to start this service before exiting?
- Restart the Cognos server:
- Stop the IBM WAS
that hosts the Cognos server.
- Wait at least 1 full minute to ensure that all Cognos processes have stopped:
- AIX or Linux: cgsServer.sh and CAM_LPSvr processes
- Windows: cgsLauncher.exe and CAM_LPSvr processes
- AIX or Linux: cgsServer.sh and CAM_LPSvr processes
- Start WAS.
- Start the Cognos server.
- Stop the IBM WAS
that hosts the Cognos server.
What to do next
After you have configured LDAP authentication for Cognos Business Intelligence, add users to the IBMConnectionsMetricsAdmin within the Cognos deployment as described in Configure the IBMConnectionsMetricsAdmin role on Cognos.
Configure LDAP settings manually
If your IBM Cognos Business Intelligence server runs on IBM AIX or Linux and does not provide a graphical user interface, you can configure LDAP authentication settings manually.
You can configure the use of the LDAP directory by adding a component to the Cognos server.s cogstartup.xml file and then customizing it for your deployment.
For general information on LDAP authentication in Cognos, see the Cognos information center.
If you will be configuring LDAP authentication over SSL, see the IBM technote Configure LDAPS (LDAP via SSL) for CRN/Cognos 8 (also applicable to later versions of the product).
- On the computer where you installed Cognos Business Intelligence, navigate to
the /configuration directory within the installation location of the BI Server component (specified by the cognos.biserver.install.path property
in the cognos-setup.properties file); for example:
- IBM AIX or Linux: /opt/IBM/Cognos64/configuration
- Microsoft Windows:: C:\IBM\Cognos\configuration
- IBM AIX or Linux: /opt/IBM/Cognos64/configuration
- Make a backup copy of the cogstartup.xml file.
- Open the working copy of the cogstartup.xml file
for editing.
- Now open the Authentication sample file for your locale,
stored in the /samples subdirectory.
The file name includes the locale code; for example, open the Authentication_en.xmlfile if you are using English.
- Within the Authentication_language_code.xml file,
locate and copy the section of code for the LDAP directory product.
Look for the (Begin of)LDAP template and (End of)LDAP template comments that enclose the section, and be sure to copy everything between them (the entire crn_instance).
<!--
===============================================
(Begin of) LDAP template
-->
 <crn:instance name="LDAP Name" class="LDAP"...>

...

</crn:instance>
<!--
(End of) LDAP template
===============================================
-->
- Paste the copied code into the cogstartup.xml file.
You can insert the new code before the closing </crn:instances> line at the end of the file.
       </crn:instances>     </crn:value>
  </crn:parameter>
</crn:parameters>
- Update the new code by making the following changes:
The settings shown in substeps a, b, and c are for IBM Directory Server; you might need different settings for another LDAP directory.
- Change the userLookup parameter:
From:
<crn:parameter name="userLookup">
<crn:value xsi:type="xsd:string"> ${userID} </crn:value>
</crn:parameter>
To:
<crn:parameter name="userLookup"> <crn:value xsi:type="xsd:string"> (uid=${userID}) </crn:value> </crn:parameter> - Change the useExternalIdentity parameter:
From:
<crn:parameter name="useExternalIdentity">
<crn:value xsi:type="xsd:boolean"> false </crn:value>
</crn:parameter>
To:
<crn:parameter name="useExternalIdentity">
<crn:value xsi:type="xsd:boolean"> true </crn:value>
</crn:parameter>
- Change the externalIdentityMapping parameter:
From:
<crn:parameter name="externalIdentityMapping">
<crn:value xsi:type="xsd:string"> ${environment("REMOTE_USER")} </crn:value>
</crn:parameter>
To:
<crn:parameter name="externalIdentityMapping"> <crn:value xsi:type="xsd:string"> (uid=${environment("REMOTE_USER")}) </crn:value> </crn:parameter> - Within the <crn:instance name="Cognos" class="Cognos"> section,
change the allowAnon parameter:
From:
<crn:parameter name="allowAnon">
<crn:value xsi:type="xsd:boolean"> true </crn:value>
</crn:parameter>
To:
<crn:parameter name="allowAnon">
<crn:value xsi:type="xsd:boolean"> false </crn:value>
</crn:parameter>
- Change the userLookup parameter:
- Save and close the file.
- Validate the modified file: ./cogconfig.sh
-config
- Restart the Cognos server:
- Stop the IBM WAS
that hosts the Cognos server.
- Wait at least 1 full minute to ensure that all Cognos processes have stopped:
- AIX or Linux: cgsServer.sh and CAM_LPSvr processes
- Windows: cgsLauncher.exe and CAM_LPSvr processes
- AIX or Linux: cgsServer.sh and CAM_LPSvr processes
- Start WAS.
- Start the Cognos server.
- Stop the IBM WAS
that hosts the Cognos server.
What to do next
After you have configured LDAP authentication for Cognos Business Intelligence, add users to the IBMConnectionsMetricsAdmin within the Cognos deployment as described in Configure the IBMConnectionsMetricsAdmin role on Cognos.
Grant access to global metrics
Configure the metrics-report-run security role to grant users the authority to view and interact with global metrics.
Other than administrators, only the users assigned to the metrics-report-run role can access global metrics. Whenever a user with this authorization level views the global metrics, the report information is updated automatically.
Configure the metrics-report-run security role in IBM WAS.
- On the Deployment Manager, log in to the Integrated Solutions Console as the WebSphere administrator.
- In the navigation tree, click Enterprise
Applications > Metrics > Security
role to user/group mapping.
- In the roles table, click the check box next to the metrics-report-run role.
- Click the Map Groups button in the table.
- Add one or more user groups to the metrics-report-run role,
giving those users the ability to view and interact with global metrics
reports.
For best results, limit access to a small set of users whose jobs require them to view the most recent metrics. Granting this level of access to a large number of users slow performance, as update requests are processed in sequence.
- Click OK.
- Save the change to the master configuration by clicking
the Save link in the "Messages" box.
- Synchronize all nodes in the cell to the Deployment Manager,
and then restart the node agents:
- On the navigation tree, click System
Administration > Nodes.
- Click the Full Resynchronize button
in the table.
- Return to the navigation tree and click System Administration > Node agents.
- In the nodes table, click the box in front of each node.
- Click the Restart button in the table.
- On the navigation tree, click System
Administration > Nodes.
Grant access to community metrics
Configure the community-metrics-run security role to grant users the authority to view community metrics using static reports.
Other than administrators and community owners, only the users assigned to the community-metrics-run role can access community metrics. Users with this level of access see static reports, which can be refreshed by clicking the Update button in the Metrics user interface. You can map this role to everyone, or to subset of the user population. For example, you can gradually provide the community metrics feature to the user population by mapping this role to small group first, and then adding more users to the role over time.
Configure the community-metrics-run security role in IBM WAS.
- On the Deployment Manager, log in to the Integrated Solutions Console as the WebSphere administrator.
- In the navigation tree, click Enterprise
Applications > Metrics > Security
role to user/group mapping.
- In the roles table, click the check box next to the community-metrics-run role.
- Click the Map Groups button in the table.
- Add one or more user groups to the community-metrics-run
role, giving those users the ability to view community metrics as
static reports.
- Click OK.
- Save the change to the master configuration by clicking
the Save link in the "Messages" box.
- Synchronize all nodes in the cell to the Deployment Manager,
and then restart the node agents:
- On the navigation tree, click System
Administration > Nodes.
- Click the Full Resynchronize button
in the table.
- Return to the navigation tree and click System Administration > Node agents.
- In the nodes table, click the box in front of each node.
- Click the Restart button in the table.
- On the navigation tree, click System
Administration > Nodes.
Configure the IBMConnectionsMetricsAdmin role on Cognos
Configure the IBMConnectionsMetricsAdmin in Cognos Business Intelligence to ensure that the Metrics administrator has access to features and reports.
After you have configured LDAP authentication for Cognos Business Intelligence, configure the IBMConnectionsMetricsAdmin so that specified LDAP users can access Cognos features. In particular, you will want to add the following users to this role:
- The user assigned to the Cognos administrator account
The Cognos administrator is the primary person responsible for configuring Cognos features and reports.
- All users who have been assigned to the admin role for Connections
Anyone tasked with administering the Connections deployment should have access to Cognos features to ensure they can manage the full deployment as needed.
- All users who have been assigned to the metrics-report-run role
Users who have been authorized to run global metrics reports require access to Cognos before they can work with the reports.
- Use a browser to navigate to the Cognos deployment with the following address: http://Host_Name:Port/Context_Root/servlet/dispatch/ext
where:
- Host_Name is the fully qualified
host of the Cognos server;
for example, host.example.com. This value is
specified in the was.fqdn.hostname property in the cognos-setup.properties file
used for installing the server.
- Port is the port that the Cognos server is listening on.
- Context_Root is the context root to which you installed the Cognos server; for example, cognos.
- Host_Name is the fully qualified
host of the Cognos server;
for example, host.example.com. This value is
specified in the was.fqdn.hostname property in the cognos-setup.properties file
used for installing the server.
- Log in to Cognos using
an IBM Connections administrator account.
- On the Cognos dashboard,
click Log On.
- On the next page, click Launch and
then select IBM Cognos Administration.
- Select the Security tab.
- On the Directory page, select Cognos from
the list and then select the IBMConnectionsMetricsAdmin role.
- Add users to the IBMConnectionsMetricsAdmin role:
- With the IBMConnectionsMetricsAdmin role
selected, click the Set properties
 icon.
icon.
- In the properties window, click the Members tab,
and then click Add.
- In the Add window, click Show users in the list.
- Select all users who require administrator access to Cognos Business Intelligence,
click Add to add them to the role.
Remember to add at least the following users:
- The Cognos administrator
- All Connections administrators
- All users assigned to the metrics-report-run role
- The Cognos administrator
- Click OK to save the change.
- Save the change to the master configuration by clicking Save in the "Messages" box.
- With the IBMConnectionsMetricsAdmin role
selected, click the Set properties
- Back in the users list, select the System Administrators role
and limit access to the role by removing Everyone from
the members list:
- With the System Administrators role
selected, click the Set properties icon.
- In the properties window, click the Members tab.
- In the Members window, select Everyone,
and then click Remove to delete it from the list of members.
- Click OK to save the change.
- Save the change to the master configuration by clicking Save in the "Messages" box.
- With the System Administrators role
selected, click the Set properties
Configure PowerCube refresh schedules
By default, IBM Cognos Transformer refreshes each PowerCube with incremental updates once each day, and replaces the cube.s data for the current month once a week. These jobs are scheduled by default but you might need to modify the schedules to avoid conflicts with other activities.
When scheduling the refresh jobs, keep the following issues in mind:
- These jobs should run at times when the Cognos system usage is relatively low, to
minimize the impact on normal usage. You should adjust these times
based on your system's usage pattern.
- The weekly refresh should run only once every week; since it will
take longer to complete, you should schedule it for the time when
system usage is lowest (for example, on the weekend).
- The daily refresh should run early in the morning (for example, just after midnight), so users can see the latest metrics for the previous day.
On the computer hosting Cognos Transformer, schedule the PowerCube updates, making sure the schedules for the daily and weekly jobs do not collide:- AIX or Linux:
Edit the cron jobs in the system crontab.
- Windows:
Edit the MetricsCubeDailyRefresh job to ensure it does not collide with the weekly refresh. You can modify the job.s properties in the Task Scheduler Library; for more information see the next topic.
Configure the job scheduler for Cognos Transformer on Windows
Rather than store administrative credentials in a script, you can add them to the job properties of the IBM Cognos Transformer to enable scheduled tasks on Microsoft Windows.
Finish configuring the job scheduler to run the Transformer periodically by adding the Windows Administrator credentials to the MetricsCubeDailyRefresh scheduler job.
- Click Start > Control
Panel > Administrative Tools and click Task Scheduler.
- In the navigation tree, click Task Scheduler
Library.
- In the list of scheduled tasks, click MetricsCubeDailyRefresh to
view its properties.
- In the MetricsCubeDailyRefresh Properties window,
open the General tab and click the Change
User or Group button.
- In the Select user or group dialog
box, type administrator in the Enter the object name to select field, and then click the Check
Names button.
The Task Scheduler compiles a list accounts with administrative access on this Windows server.
- When the Task Scheduler dialog box
prompts to Enter the user account information to run
this task, select the Windows Administrator
user name that will be associated with the MetricsCubeDailyRefresh
task, and type the password associated with that account; then click OK.
The selected administrator account now has the authority to run the MetricsCubeDailyRefresh task.
- Click OK to save the change and
close the MetricsCubeDailyRefresh Properties window.
- Close the Task Scheduler.
Configure Cognos Business Intelligence to use IBM HTTP Server
IBM Cognos Business Intelligence uses the same IBM HTTP Server as IBM Connections, but configure Cognos Business Intelligence to work with that server.
After you have configured IBM HTTP Server as described in the section Configure IBM HTTP Server, complete these tasks to configure the Cognos BI Server and the Cognos Transformer components to use HTTP:
Configure Cognos BI Server to use HTTP
Configure the Cognos BI Server to use the IBM HTTP Server that operates with the IBM Connections deployment.
Use the Cognos Configuration tool to specify settings that enable Cognos BI Server to operate with IBM HTTP Server.
The Cognos Configuration tool provides a graphical user interface. If your IBM AIX or Linux server does not support a graphical user interface, see the topic Configure HTTP manually for Cognos BI Server for instructions on configuring these settings manually.
- Navigate to the /bin directory of
the Cognos BI Server installation directory.
For example:
- IBM AIX, Linux: /opt/IBM/Cognos64/bin/
- Microsoft Windows::C:\IBM\Cognos\bin
- IBM AIX, Linux: /opt/IBM/Cognos64/bin/
- Start the Cognos Configuration
tool:
- AIX, Linux: ./cogconfig.sh
- Windows:cogconfig.bat
- AIX, Linux: ./cogconfig.sh
- Expand Local Configuration > Environment and edit the URLs
for the following properties by removing any reference to ports 908x and
replacing them with port 80:
The URLs must be updated to point to the HTTP server's host and port. The port must be included even if it's the standard port 80.
- Gateway Sets
In this section, change only the "Dispatch URIs for gateway" attribute.
- Other URI Sets
- Gateway Sets
- Save your changes.
- Exit the Cognos Configuration
tool, making sure to select No at the following prompt: The service 'IBM Cognos' is not running
on the local computer. Before you can use it your computer must start
the service. Do you want to start this service before exiting?
- Restart the Cognos server:
- Stop the IBM WAS
that hosts the Cognos server.
- Wait at least 1 full minute to ensure that all Cognos processes have stopped:
- AIX or Linux: cgsServer.sh and CAM_LPSvr processes
- Windows: cgsLauncher.exe and CAM_LPSvr processes
- AIX or Linux: cgsServer.sh and CAM_LPSvr processes
- Start WAS.
- Start the Cognos server.
- Stop the IBM WAS
that hosts the Cognos server.
Configure HTTP manually for Cognos BI Server
If your IBM Cognos Business Intelligence server runs on IBM AIX or Linux and does not provide a graphical user interface, you can configure HTTP settings manually.
You can configure HTTP by adding a component to the Cognos BI Server.s cogstartup.xml file and then customizing it for your deployment.
For more information, see the Cognos information center.
- On the computer where you installed Cognos Business Intelligence, navigate to
the /configuration directory within the installation location of the BI Server component (specified by the cognos.biserver.install.path property
in the cognos-setup.properties file); for example:
- AIX or Linux: /opt/IBM/Cognos64/configuration
- Microsoft Windows:: C:\IBM\Cognos\configuration
- AIX or Linux: /opt/IBM/Cognos64/configuration
- Make a backup copy of the cogstartup.xml file.
- Open the working copy of the cogstartup.xml file
for editing.
- In the file, locate the following parameters and update
their URI port references from 90xx to
port 80:
In this file, the URLs must be updated to point to the HTTP server's host and port. The port must be included even if it's the standard port 80.
<crn:parameter name=
- gateway
- gatewayDispatcherURIList
- sdk
- contentManagers
After your changes, those parameters should look like the ones that follow:
<crn:parameter name=" gateway "> <crn:value xsi:type="xsd:anyURI">http://cognos.example.com: 80 /ibmcognos/cgi-bin/cognos.cgi</crn:value> </crn:parameter> <crn:parameter name=" gatewayDispatcherURIList " opaque="true"> <crn:value xsi:type="cfg:sortedArray"> <crn:item xsi:type="xsd:anyURI" order="0">http://cognos.example.com: 80 /cognos/servlet/dispatch/ext</crn:item> </crn:value> </crn:parameter> <crn:parameter name=" sdk "> <crn:value xsi:type="xsd:anyURI">http://cognos.example.com: 80 /cognos/servlet/dispatch</crn:value> </crn:parameter> <crn:parameter name=" contentManagers "> <crn:value xsi:type="cfg:array"> <crn:item xsi:type="xsd:anyURI">http://cognos.example.com: 80 /cognos/servlet</crn:item> </crn:value> <crn:parameter> - gateway
- Save and close the file.
- Validate the modified file:
- Set JAVA_HOME to the WAS_install_path/java directory.
- Run the configuration script:
- AIX or Linux: ./cogconfig.sh -config
- Windows: cogconfig.bat -config
- AIX or Linux: ./cogconfig.sh -config
- Check the Cognos_BI_Server_install_path/logs/cogconfig_response.csv file for a success message.
- Set JAVA_HOME to the WAS_install_path/java directory.
- Restart the Cognos server:
- Stop the IBM WAS
that hosts the Cognos server.
- Wait at least 1 full minute to ensure that all Cognos processes have stopped:
- AIX or Linux: cgsServer.sh and CAM_LPSvr processes
- Windows: cgsLauncher.exe and CAM_LPSvr processes
- AIX or Linux: cgsServer.sh and CAM_LPSvr processes
- Start WAS.
- Start the Cognos server.
- Stop the IBM WAS
that hosts the Cognos server.
Configure Cognos Transformer to use HTTP
Configure the Cognos Transformer to use the IBM HTTP Server that operates with the IBM Connections deployment.
Use the Cognos Configuration tool to specify settings that enable Cognos Transformer to operate with IBM HTTP Server.
The Cognos Configuration tool provides a graphical user interface. If your IBM AIX or Linux server does not support a graphical user interface, see the topic Configure HTTP manually for Cognos Transformer for instructions on configuring these settings manually.
- Navigate to the /bin directory of
the Cognos Transformer installation directory.
For example:
- AIX, Linux: /opt/IBM/Cognos/bin/
- Windows:C:\Program Files (x86)\IBM\Cognos\bin
- AIX, Linux: /opt/IBM/Cognos/bin/
- Start the Cognos Configuration
tool:
- AIX, Linux: ./cogconfig.sh
- Windows:cogconfig.bat
- AIX, Linux: ./cogconfig.sh
- Expand Local Configuration > Environment and edit the URLs
for the following properties by removing any reference to ports 908x and
replacing them with port 80:
The URLs must be updated to point to the HTTP server's host and port. The port must be included even if it's the standard port 80.
- Gateway Sets
- Other URI Sets
- Gateway Sets
- Save your changes.
- Exit the Cognos Configuration
tool.
You do not need to restart the Transformer component.
Configure HTTP manually for Cognos Transformer
If your IBM Cognos Business Intelligence server runs on IBM AIX or Linux and does not provide a graphical user interface, you can configure HTTP settings manually.
You can configure HTTP by adding a component to the Cognos Transformer.s cogstartup.xml file and then customizing it for your deployment.
For more information, see the Cognos information center.
- On the computer where you installed Cognos Business Intelligence, navigate to
the /configuration directory within the installation location of the Transformer component (specified by the cognos.transformer.install.path property
in the cognos-setup.properties file); for example:
- IBM AIX or Linux: /opt/IBM/Cognos/configuration
- Microsoft Windows: C:\Program Files (x86)\IBM\Cognos\configuration
- IBM AIX or Linux: /opt/IBM/Cognos/configuration
- Make a backup copy of the cogstartup.xml file.
- Open the working copy of the cogstartup.xml file
for editing.
- In the file, locate the following parameters and update
their URI port references from 90xx to
port 80: I
In this file, the URLs must be updated to point to the HTTP server's host and port. The port must be included even if it's the standard port 80.
<crn:parameter name=
- gateway
- gatewayDispatcherURIList
After your changes, those parameters should look like the ones that follow:
<crn:parameter name=" gateway "> <crn:value xsi:type="xsd:anyURI">http://cognos.example.com: 80 /ibmcognos/cgi-bin/cognos.cgi</crn:value> </crn:parameter> <crn:parameter name=" gatewayDispatcherURIList " opaque="true"> <crn:value xsi:type="cfg:sortedArray"> <crn:item xsi:type="xsd:anyURI" order="0">http://cognos.example.com: 80 /cognos/servlet/dispatch/ext</crn:item> </crn:value> </crn:parameter> - gateway
- Save and close the file.
- Validate the modified file:: ./cogconfig.sh
-config
- Set the path as shown for your operating system:
- AIX: LIBPATH=Cognos_BI_Server_install_path/bin64
- Linux: LD_LIBRARY_PATH=Cognos_BI_Server_install_path/bin64
- Windows: PATH=Cognos_BI_Server_install_path/bin64;%PATH%
- AIX: LIBPATH=Cognos_BI_Server_install_path/bin64
- Set JAVA_HOME to the WAS_install_path/java directory.
- Run the configuration script:
- AIX or Linux: ./cogconfig.sh -config
- Windows: cogconfig.bat -config
- AIX or Linux: ./cogconfig.sh -config
- Check the Cognos_Transformer_install_path/logs/cogconfig_response.csv file for a success message.
You do not need to restart the Transformer component.
- Set the path as shown for your operating system:
Optional post-installation tasks
Complete the post-installation tasks that are relevant to your deployment.
Related tasks
- Define valid administrator email addresses
- Manage content moderation and flagged content
- Change application URLs
Add a node to a cluster
Add a node to an existing cluster.
You must already have a cluster with at least one member.
Ensure installed IBM WAS Network Deployment (Application Server option) on the new node.
If you are adding a node to a Search cluster, do not use these instructions. Instead, use the instructions in the Add an additional Search node to a cluster topic.
Although the IBM Cognos Business Intelligence server is managed by the same Deployment Manager as IBM Connections, you cannot add that node to the Connections cluster.
To add a node to a cluster:
- Add a node to the DM cell:
- Log on to the new node.
- Open a command prompt and change to the bin directory
of the local WAS profile:
app_server_root/profiles/profile_name/bin
where profile_name is the name of the applicable WAS profile on this node.
- Run the addNode command to add this node to the DM cell:
.
addnode [dmgr_host] [dmgr_port] [-username uid] [-password pwd] [-localusername localuid] [-localpassword localpwd]
where
- dmgr_host is the host of the Deployment
Manager
- dmgr_port is the SOAP port of the deployment
manager (the default is 8879)
- uid and pwd are the DM administrator user
name and password
- localuid and localpwd are the user name and password for the WAS administrator of the node
- dmgr_host is the host of the Deployment
Manager
- Open the addNode.log file and confirm
that the node was successfully added to the DM cell. The file is stored
in the following location:
app_server_root/profiles/profile_name/log/addNode.log
- Log on to the new node.
- Copy the relevant JDBC files from the DM node to this node,
placing them in the same location as the JDBC files on the DM. If,
for example, you copied the db2jcc.jar file from
the C:\IBM\SQLLIB directory on the DM, you must
copy the same file to the C:\IBM\SQLLIB directory
on this node. See the following table to determine which files to
copy. See the following table to determine which files to copy:
JDBC files
Database type JDBC files DB2 db2jcc.jar
db2jcc_license_cu.jar sql
Oracle ojdbc6.jar
SQL Server sqljdbc4.jar
- Ensure that the shared folders that are used for the application
content stores in the cluster are accessible from the new node: from
the new node, try to access the shared directories.
- Add additional members
to an existing IBM Connections cluster:
- Log on to the Deployment Manager Integration Solutions Console.
- Click Servers > Clusters > cluster_name > Cluster members > New. Set the following information about the new cluster
member:
- Member name
- The name of the server instance that is created for the cluster.
The DM creates a server instance with this name.
Each member name in the same cluster must be unique. The Integration Solutions Console prevents you from reusing the same member name in a cluster.
- Select node
- The node where the server instance is located.
Click Add Member to add this member to the cluster member list.
- Click Next to go to the summary
page where you can examine detailed information about this cluster
member. Click Finish to complete this step
or click Previous to modify the settings.
- Click Save to save the configuration.
- Click Server > Servers > Clusters > cluster_name > Cluster members. In the member list, click the new member that you
added in the previous step.
- On the detailed configuration page, click Ports to expand the port information of the member. Make a note of the WC_defaulthost and WC_defaulthost_secure ports.
For example, the WC_defaulthost port is typically 9084, while the WC_defaulthost_secure port is typically 9447.
- Click Environment > Virtual Hosts > default_host > Host Aliases > New. Enter the following information for the host alias
for the WC_defaulthost port:
- Host name
- The IP address or DNS host of the node where the new member is located.
- Port:
- The port for WC_defaulthost.
For example, 9084.
Click OK to complete the virtual host configuration.
- Click Save to save the configuration.
- Repeat the previous two substeps to add the host alias
for the WC_defaulthost_secure port.
- Click System administration > Nodes.
- In the node list page, select all the nodes where the target cluster members are located and then click Synchronize.
- Log on to the Deployment Manager Integration Solutions Console.
What to do next
Configure IBM HTTP Server to connect to this node.
Repeat this task for each new node to add to a cluster.
(AIX or Linux only) If you installed the Search application on the new node, configure the path variables to point to that application. For more information, see the Copying Search conversion tools to local nodes topic.
If you experience interoperability failure, you might be running two servers on the same host with the same name. This problem can cause the Search and News applications to fail. For more information, go to the NameNotFoundException from JNDI lookup operation web page.
Configure a reverse caching proxy
Configure a reverse proxy that directs all traffic to your IBM Connections deployment to a single server.
This is an optional configuration. IBM recommends for optimal performance, especially if users are accessing IBM Connections from a wide area network (WAN).
Install IBM WebSphere Edge Components which is supplied with WAS Network Deployment.
You must also have completed the basic configuration of WebSphere Edge Components, set up a target backend server, and created an administrator account.
The IBM WAS Edge components provide a caching proxy that you can use to optimize your deployment. Edge components are provided with the WAS Network Deployment software.
A reverse proxy configuration intercepts browser requests, forwards them to the appropriate content host, caches the returned data, and delivers that data to the browser. The proxy delivers requests for the same content directly from the cache, which is much quicker than retrieving it again from the content host. Information can be cached depending on when it will expire, how large the cache should be, and when the information should be updated.
This topic describes how to configure the Edge components to optimize the performance of IBM Connections.
- Open the ibmproxy.conf configuration
file for the Edge components in a text editor. The file is stored
in the following directory:
- AIX or Linux: /etc/
- Microsoft Windows:: C:\IBM\edge\cp\etc\
- AIX or Linux: /etc/
- Make the following edits to the file:
- In the SendRevProxyName Directive section, add or enable
the following rule:
SendRevProxyName yes
- In the PureProxy Directive section, add or enable the following rule:
PureProxy off
- In the SSL Directives section, add or enable the following rules:
SSLEnable On
SSLCaching On
- In the Keyring Directive section, add or enable the following rules:
KeyRing C:\ProxyKey\proxykey.kdb
KeyRingStash C:\ProxyKey\proxykey.sth
- In the Mapping Rules section, add the following reverse
pass rules:
ReversePass http://httpserver/* http://proxyserver/*
ReversePass https://httpserver/* https://proxyserver/*
where httpserver is the host of the HTTP server. The HTTP server is usually IBM HTTP Server, but could be a load balancer or another proxy, depending on your deployment. proxyserver is the host of the proxy server.
You can specify * in the URL (to indicate that all URLs for the server can be passed) only if IBM Connections is the only application installed on the server. Alternatively, you can use a more specific URL such as http://httpserver/connections/*. You can use more than one ReversePass rule if you need to specify different servers for each component.
- Also in the Mapping Rules section, add the following proxy rules:
Proxy /* http://<httpserver>/* :80
Proxy /* https://<httpserver>/* :443
- Set the CacheTimeMargin rule to zero seconds. When a
document's expiry date is set to .soon. and soon is defined by the CacheTimeMargin rule, setting this rule to zero disables the calculation
and forces all documents to be cached, regardless of their expiry
date. This setting is required for Blogs caching to function properly;
it does not negatively affect the other applications.
CacheTimeMargin 0 seconds
- Prevent the validation of a cache object from sending
multiple requests for the same resource to the backend server by setting
the KeepExpired rule to on. An expired or stale
copy of the resource will be returned for the brief time that the resource is being updated on the proxy.
KeepExpired On
- In the Method Directives section, add the following methods:
Enable CONNECT
Enable PUT
Enable DELETE
- Add the following rule to the CacheQueries Directives section:
CacheQueries PUBLIC
- Configure the proxy to allow large file uploads by editing and uncommenting the LimitRequestBody directive:
LimitRequestBody n M
where n is the maximum file size in MB. For example: LimitRequestBody 50 M allows a file size of up to 50 MB.
- In the SendRevProxyName Directive section, add or enable
the following rule:
- Save and close the ibmproxy.conf file.
- Update the dynamicHosts attribute in LotusConnections-config.xml to reflect the URL of the proxy server:
<dynamicHosts enabled="true"> <host href="http://proxy.example.com" ssl_href="https://proxy.example.com"/> </dynamicHosts>The dynamic hosts settings does not affect interservice URLs. Therefore, even when the proxy server is enabled, IBM Connections still routes internal communication between the applications through their own interservice URLs. You can force this internal traffic to be routed over the proxy server by updating the interservice URLs to use the proxy server.
Each href attribute in LotusConnections-config.xml is case-sensitive and must specify a fully-qualified domain name.
- Optional: Using iKeyman, extract certificates from IBM Connections and add them to the proxy server key DB:
- Open the IBM Connections kdb file and extract the certificates.
- Open the kdb file on the proxy server and add the certificates that you extracted from IBM Connections.
For more information about iKeyman, go to the Import and exporting keys topic in the IBM HTTP Server information center.
- Open the IBM Connections kdb file and extract the certificates.
- Restart the Edge server.
Enable locked domains
Assuming that you have completed the server setup previously described, to enable locked domains in IBM Connections, specify an additional atrribute in the LotusConnections-config.xml to ensure that only ConnectionsOpensocial application is mapped to the locked domain host.
For added security, only the ConnectionsCommon.ear should be mapped to the locked host. Although no SSO tokens will be flowing from the host, this extra precaution limits exposure of your Connections infrastructure to potentially malicious gadgets.- Add the new attribute to LotusConnections-config.xml
:
- Start the wsadmin tool.
- Access the Connections configuration
file:
execfile("<$WAS_HOME>/profiles/<DMGR>/config/bin_lc_admin/ connectionsConfig.py")If you are prompted to specify which server to connect to, enter 1. This information is not used by the wsadmin client when you are making configuration changes. - Check out the Connections configuration files :
LCConfigService.checkOutConfig("/working_directory", "cell_name")...where:
- working_directory is the temporary working
directory where the configuration XML and XSD files are copied to.
The files are kept in this working directory while you change them.
- cell_name is the name of the WAS cell hosting
the Connections application. This argument is case sensitive. If you
do not know the cell name, you can determine it by entering the following command in the wsadmin command processor: print AdminControl.getCell(),
for example:
LCConfigService.checkOutConfig("/temp","foo01Cell01")
- working_directory is the temporary working
directory where the configuration XML and XSD files are copied to.
The files are kept in this working directory while you change them.
- From the temporary directory where you checked out the Connections configuration files to, open LotusConnections-config.xml
in a text editor.
- Add this attribute to LotusConnections-config.xml.
<sloc:serviceReference bootstrapHost="{locked.host.name}" bootstrapPort="2809" clusterName="" enabled="true" serviceName="opensocialLocked" ssl_enabled="true"> <sloc:href> <sloc:hrefPathPrefix>/connections/opensocial</sloc:hrefPathPrefix> <sloc:static href="http://{locked.host.name.authority/http}" ssl_href="https://{locked.host.name.authority/https}"/> <sloc:interService href="https://{locked.host.name.authority/https}"/> </sloc:href> </sloc:serviceReference> - Save LotusConnections-config.xml.
- Check in the changed configuration property files : LCConfigService.checkInConfig()
- After making updates, enter the following command to deploy the changes: synchAllNodes()
- Start the wsadmin tool.
- Restart your Connections server.
For example, this configuration could look like the following sample:
<sloc:serviceReference bootstrapHost="hern120w.dyn.webahead.renovations.com"
                       bootstrapPort="2809"
                       clusterName=""
                       enabled="true"
                       serviceName="opensocialLocked"
                       ssl_enabled="true">
        <sloc:href>
            <sloc:hrefPathPrefix>/connections/opensocial</sloc:hrefPathPrefix>
            <sloc:static href="http://hern120w.locked.com:9080" ssl_href="https://hernw120.locked.com:9443"/>
            <sloc:interService href="https://hern120w.dyn.webahead.renovations.com:9443"/>
        </sloc:href>
    </sloc:serviceReference>
Separate Common and Widget Container applications from the News cluster
Run the ConfigEngine script to configure IBM® Connections to separate critical user interface components to a new cluster. Doing so provides high availability and failover capability for the Connections Web user interface features.
Install all of the applications you need, and make sure all your applications works correctly after installing. Understand these applications to better evaluate whether or not you want to separate them out to a dedicated cluster in your particular environment:
- The Common application is responsible for serving up static content,
including images, css, and javascript to all IBM Connections applications. Additionally as
an OSGi container, it is the component that enables Social Mail.
- The WidgetContainer application provides the ability to render
gadgets, proxies requests to remote services, and handles REST requests.
With the requirement to proxy requests, it has the potential to be
very resource intensive.
- After installation, if the cluster fails, not all Web user interface elements will render.
- Add new nodes if needed as described in Installing IBM WAS.
- Stop all clusters in the IBM Connections deployment.
- On the deployment manager, open a command prompt, and then
change to the following directory on the WebSphere® Application Server
hosting the IBM Connections server:
- On AIX® or Linux:
connections_root/ConfigEngine
- On Microsoft Windows::
connections_root\ConfigEngine
- On AIX® or Linux:
- Enter the following command, if needed, to run the script
that removes the Common application from the News cluster. In addition,
the script removes the associated dynacache objects:
- On AIX or Linux:.
./ConfigEngine.sh remove-common-ear -DWasUserid=<was_admin_username> -DWasPassword=<was_admin_password> > /tmp/remove-common-ear.log 2>&1 - On Microsoft Windows::
ConfigEngine.bat remove-common-ear
                 -DWasUserid=<was_admin_username>
                 -DWasPassword=<was_admin_password> > C:\remove-common-ear.log 2>&1
For example, on the Microsoft Windows operating system, you would enter the following command:
ConfigEngine.bat remove-common-ear -DWasUserid=wasadmin -DWasPassword=yourpassword > C:\remove-common-ear.log 2>&1 - On AIX or Linux:.
- Check for a success message in the log file.
- Enter the following command, if needed, to run the script
that removes the WidgetContainer application from the News cluster.
In addition, the script removes the associated dynacache objects:
- AIX or Linux:
./ConfigEngine.sh remove-widgetcontainer-ear -DWasUserid=<was_admin_username> -DWasPassword=<was_admin_password> > /tmp/remove-widgetcontainer-ear.log 2>&1 - Microsoft Windows::
ConfigEngine.bat remove-widgetcontainer-ear
                 -DWasUserid=<was_admin_username>
                 -DWasPassword=<was_admin_password> > C:\remove-widgetcontainer-ear.log 2>&1
For example, on the Microsoft Windows operating system, you would enter the following command:
ConfigEngine.bat remove-widgetcontainer-ear -DWasUserid=wasadmin -DWasPassword=yourpassword > C:\remove-widgetcontainer-ear.log 2>&1 - AIX or Linux:
- Check for a success message in the log file.
- Change to the ./properties directory to open and edit the wkplc_comp.properties file according to the following settings for
separating out Common or WidgetContainer or both:
Property values for commonear
Property Name Description commonear.ClusterName Desired cluster name for Common. commonear.FirstNodeName Name of first node of the cluster. commonear.SecondaryNodesNames Comma-delimited list of secondary node names. commonear.<FirstNodeName>.ServerName Name of the server on the first node, note that the <FirstNodeName> needs to be an actual name. commonear.<SecondaryNodesNames1>.ServerName Name of the server on the secondary node 1, note that the <SecondaryNodesNames1> needs to be an actual name. ... ... commonear.<SecondaryNodesNamesN>.ServerName Name of the server on the secondary node n, note that the <SecondaryNodesNamesN> needs to be an actual name. Property values for the widgetcontainer
Property Description widgetcontainer.ClusterName Desired cluster name for the WidgetContainer. widgetcontainer.FirstNodeName Name of first node of the cluster. widgetcontainer.SecondaryNodesNames Comma-delimited list of secondary node names. widgetcontainer.<FirstNodeName>.ServerName Name of the server on the first node, note that the <FirstNodeName> needs to be an actual name. widgetcontainer.<SecondaryNodesNames1>.ServerName Name of the server on the secondary node 1, note that the <SecondaryNodesNames1> needs to be an actual name. ... ... widgetcontainer.<SecondaryNodesNamesN>.ServerName Name of the server on the secondary node n, note that the <SecondaryNodesNamesN> needs to be an actual name. Ensure the server name(s) selected is/are not already in use.
- Enter the following command, if needed, to run the script
that creates a new cluster and deploys the Common application onto
it. In addition, the script will create associated dynacache objects,
set the cluster as bus member of the ConnectionsBus, and update the cluster name in the LotusConnections-config.xml for the Common application's
service entry:
- AIX or Linux:
./ConfigEngine.sh install-common-ear -DWasUserid=<was_admin_username> -DWasPassword=<was_admin_password> > /tmp/install-common-ear.log 2>&1
- Microsoft Windows::
ConfigEngine.bat install-common-ear -DWasUserid=<was_admin_username> -DWasPassword=<was_admin_password> > C:\install-common-ear.log 2>&1
For example, on the Microsoft Windows operating system, you would enter the following command:
ConfigEngine.bat install-common-ear -DWasUserid=wasadmin -DWasPassword=yourpassword > C:\install-common-ear.log 2>&1
- AIX or Linux:
- Check for a success message in the log file.
- Enter the following command, if needed, to run the script
that creates a new cluster and deploys the WidgetContainer application
onto it. In addition, the script will create associated dynacache
objects, set the cluster as bus member of the ConnectionsBus, and
update the cluster name in the LotusConnections-config.xml for the WidgetContainer application's service entry:
- AIX or Linux:
./ConfigEngine.sh install-widgetcontainer-ear -DWasUserid=<was_admin_username> -DWasPassword=<was_admin_password> > /tmp/install-widgetcontainer-ear.log 2>&1
- Microsoft Windows::
ConfigEngine.bat install-widgetcontainer-ear -DWasUserid=<was_admin_username> -DWasPassword=<was_admin_password> > C:\install-widgetcontainer-ear.log 2>&1
For example, on the Microsoft Windows operating system, you would enter the following command:
ConfigEngine.bat install-widgetcontainer-ear -DWasUserid=wasadmin -DWasPassword=yourpassword > C:\install-widgetcontainer-ear.log 2>&1
- AIX or Linux:
- Check for a success message in the log file.
- Configure IHS to refresh the application mapping according
to the instructions contained in the topic Mapping applications
to IBM HTTP Server.
For the users who have not yet deployed IHS, the ports for the servers that host the Common (webresources ) and WidgetContainer (opensocial) applications (as specified in the <profile_root>/config/cells/<cell_name>/LotusConnections-config/LotusConnections-config.xml file) remain the old ports and need to be updated manually to the new ports.
The new http port and secure http port can be found in <LC_HOME>/<new_server>.properties. For example, this entry in LotusConnections-config.xml is for Common:
<sloc:serviceReference clusterName="CommonCluster" enabled="true" serviceName="webresources" ssl_enabled="true">
<sloc:href>
<sloc:hrefPathPrefix>/connections/resources</sloc:hrefPathPrefix>
<sloc:static href="http://yourserver.renovations.com:9081" ssl_href="https://yourserver.renovations.com:9444"/>
<sloc:interService href="https://yourserver.renovations.com:9444"/>
</sloc:href>
</sloc:serviceReference>
- Restart Connections.
- Restart IHS.
Configure the custom ID attribute for users or groups
Configure IBM Connections to use custom ID attributes to identify users and groups in the LDAP directory.
- If
you specified a single ID attribute for both users and groups,
you don't need to complete this task. This task is required only
if you specified a custom ID attribute for users or groups in the Specifying
a custom ID for users or groups topic.
- Ensure that you have completed the steps to specify different ID attributes for users and groups in the Specifying a custom ID for users or groups topic.
You can change the default setting to use a custom ID to identify users and groups in the directory. To configure IBM Connections to use the custom ID attribute that you specified earlier:
- Add the new attribute to LotusConnections-config.xml.
To do so:
- Start
the wsadmin tool.
- Use the following command
to access the IBM Connections configuration file:
execfile("<$WAS_HOME>/profiles/<DMGR>/config/bin_lc_admin/ connectionsConfig.py")
If you are prompted to specify which server to connect to, enter 1. This information is not used by the wsadmin client when you are making configuration changes.
- Check out the IBM Connections configuration files : LCConfigService.checkOutConfig("/working_directory",
"cell_name")
where
- working_directory is the temporary working
directory to which the configuration XML and XSD files are copied.
The files are kept in this working directory while you change them.
- cell_name is the name of the IBM WAS cell hosting the IBM Connections application. This argument is case sensitive. If you do not know the cell name, you can determine it by entering the following command
in the wsadmin command processor:
print AdminControl.getCell()
For example:
LCConfigService.checkOutConfig("/temp","foo01Cell01")
- working_directory is the temporary working
directory to which the configuration XML and XSD files are copied.
The files are kept in this working directory while you change them.
- From the temporary directory to which you
checked out
the IBM Connections configuration
files, open LotusConnections-config.xml
in a text editor.
- Add the new custom
properties to LotusConnections-config.xml.
For example:
<sloc:serviceReference serviceName="directory"
...
custom_user_id_attribute="customUserID"
custom_group_id_attribute="customGroupID"/>
- Save LotusConnections-config.xml.
- Check in the changed configuration property
files using
the following command:LCConfigService.checkInConfig()
- After making updates, enter the following command to deploy the changes: synchAllNodes()
- Start
the wsadmin tool.
- Stop and restart the WAS instance hosting IBM Connections.
Configure Files and Wikis downloading
You can make downloading files from the Files and Wikis applications much more efficient by configuring an IBM HTTP Server to handle most of the download instead of the WAS. It is strongly recommended that you configure production deployments this way.
Install an IBM HTTP Server in your WAS environment. See the topic Configuring IBM HTTP Server for information.
In network deployments, Files and Wikis data must be stored on a shared file system, as described in the topic Deployment options. All IBM HTTP Servers in the deployment must have read access to the files, and all WASs must have write access.
If you choose not to configure the IBM HTTP Server to download files, configure the WAS to transfer data synchronously instead of asynchronously in order to avoid errors related to using too much memory. See the tech note Excessive native memory use in IBM WAS for instructions.
In the default deployment with an IBM HTTP Server, file download requests are passed from the IBM HTTP Server to the WAS. The WAS accesses the binary files in a data directory on the file system and returns them to the IBM HTTP Server, which passes them to the browser.
This is inefficient in deployments where large numbers of users are downloading files, partly because WAS has a limited thread pool that is tuned for short-lived transactions, and optimized for J2EE applications and not file downloads. In this environment it is possible that you would need to create a cluster to handle downloads, especially if you have slow transfer rates, for example caused by people in different geographies downloading 2MB at 2KB per second. This would cause problems, such as making it impractical to properly tune the thread pool.
Configure the IBM HTTP Server to download the binary files instead makes downloading far more efficient, since IBM HTTP Server is designed specifically for serving files. This leaves WAS to perform tasks such as security checking and cache validation while leaving downloading to the IBM HTTP Server.
To configure this environment, you install an add-on module to the IBM HTTP Server. As in typical deployments, download requests are passed from the IBM HTTP Server to the WAS. But instead of responding with the binary data, the WAS only adds a special header to its response. The add-on module recognizes the header and directs the IBM HTTP Server to download the binary data.
This configuration requires making the Files and Wikis data directories available to the IBM HTTP Server using an alias. This creates a security concern, so configure the access control at the IBM HTTP Server level. After you configure security, access to the Files and Wikis data directories is denied unless a specific environment variable is set. Requests to the Files and Wikis applications on WAS are then configured to set the variable. In other words, only requests passing through WAS are able to access the data directory, with WAS acting as the authorizer.
If you use the add-on module you must use an IBM HTTP Server address for the IBM Connections "inter-service" URL. See the topic Troubleshoot inter-server communication for information on setting an inter-service URL.
Do the following tasks to configure IBM HTTP Server downloading:
- Install the IBM Connections Files or Wikis applications.
- On the server installed IBM Connections on, navigate to the connections_root/plugins/ihs/mod_ibm_local_redirect/platform directory
to find the module file (mod_ibm_local_redirect.so) appropriate to
your IBM HTTP Server operating
system. These are the platform directories:
- /aix_ppc32-ap20
- /aix_ppc32-ap22
- /linux390-ap20
- /linux390-ap22
- /linux_ia32-ap20
- /linux_ia32-ap22
- /win_ia32-ap20
- /win_ia32-ap22
For example, on Linux computers:
/IBM/Connections/plugins/ihs/mod_ibm_local_redirect/linux_ia32-ap20/mod_ibm_local_redirect.so
- You can use these whether you installed IBM HTTP Server from the 32-bit or 64-bit supplemental package on all supported platforms, as the IBM HTTP Server process is 32-bits in both cases and requires 32-bit modules. See this support document for more information on this topic. For IBM HTTP Server 6.1.x releases, use the ap20 versions; for version 7.x releases use the ap22 version.
- /aix_ppc32-ap20
- Copy the module to the appropriate directory location on
your IBM HTTP Server. By default,
modules are located in the ibm_http_server_root/modules
directory.
- Open the IBM HTTP
Server httpd.conf file (in the ibm_http_server_root/conf
directory by default) and add the following statements to load the ibm_local_redirect_module,
and the required mod_env environment variable module:
LoadModule ibm_local_redirect_module path_to_module/mod_ibm_local_redirect.so
For example: LoadModule ibm_local_redirect_module modules/mod_ibm_local_redirect.soLoadModule env_module path_to_mod_env/mod_env.so
For example: LoadModule env_module modules/mod_env.so
By default, the mod_env module is installed in the /modules directory. It might already be loaded, or it might be a commented-out line that you can remove comments from to load.
- Do one of the following, according to your IBM HTTP Server operating system:
- Microsoft Windows:: Give the IBM HTTP Server user READ access to the data
directory root. For optimal security, do not give the user WRITE access.
- AIX and Linux: Give the IBM HTTP Server user READ and EXECUTE access to the data directory root.
You can find the data_directory_root path in the files-config.xml or wikis-config.xml file, in the file.storage.rootDirectory attribute. This attribute will contain either the path itself, or a WAS variable whose value is the path. If it contains a variable, you can find the path by opening the WAS console, clicking Environment > WebSphere Variables, and finding the variable.
For example, if the element's value is ${FILES_CONTENT_DIR}, find FILES_CONTENT_DIR in the console to find the path. See the topic Changing configuration property values for information on opening the files-config.xml or wikis-config.xml file.
- Microsoft Windows:: Give the IBM HTTP Server user READ access to the data
directory root. For optimal security, do not give the user WRITE access.
- On all virtual hosts in the same domain as Files or Wikis,
including both HTTP and HTTPS, do the following to expose the data
directory root:
- Open the httpd.conf file.
- Add the following to create an alias for the data directory
root:
Alias /<alias> "data_directory_root"
For example, if the Files data directory root is /opt/IBM/Connections/Data/Files (on Linux), the following line creates the alias files_content for that directory:Alias /files_content /opt/IBM/Connections/Data/Files
- Do not use the application context root (/files or /wikis by default)
as part of the alias, but you can use any other value. For example,
use /files_content, but not /files/content. The application context
root is the last part of the application URL, for example the application
context root of a Files application with the URL www.my.enterprise.com/files
is /files. You can see the value in the files.href.prefix property
in LotusConnections-config.xml. See the topic Changing common configuration property values for
information on opening the configuration file.
- Include quotes around the file path on Windows computers, and
always use forward slashes, for example: "C:/IBM/Connections/Data/Files"
- The example assumes the HTTP server is on the same computer as IBM Connections. If the HTTP server is on a different computer (as is common), specify the data directory using the network share path appropriate to your environment. For example, use a UNC network share format such as: Alias /files_content "//<server>/<sharename>/Files"
- Open the httpd.conf file.
- In the httpd.conf file, add these lines
after the lines you added in Step 6, to make the alias more secure:
<Directory "data_directory_root">
 Order Deny,Allow
 Deny from all
 Allow from env=REDIRECT_FILES or WIKIS_CONTENT
 </Directory>
For example:<Directory "/opt/IBM/Connections/Data/Files"> Order Deny,Allow Deny from all Allow from env=REDIRECT_FILES_CONTENT </Directory>
- This secures the data by only allowing requests where REDIRECT_FILES_CONTENT
or REDIRECT_WIKIS_CONTENT is specified. Use any environment variable
you want, as long as it is not already in the IBM HTTP Server environment.
- The example assumes the HTTP server is on the same computer as
IBM Connections. If the HTTP server is on a different computer (as
is common), specify the data directory using the network share path
appropriate to your environment.
For example, use a UNC network share format such as: <Directory "//<server>/<sharename>/Files">
- This secures the data by only allowing requests where REDIRECT_FILES_CONTENT
or REDIRECT_WIKIS_CONTENT is specified. Use any environment variable
you want, as long as it is not already in the IBM HTTP Server environment.
- In the httpd.conf file, add these lines
after the lines you added in Step 7, to enable the module for Files
or Wikis:
<Location application_context_root>
 IBMLocalRedirect On
 IBMLocalRedirectKeepHeaders X-LConn-Auth,Cache-Control,Content-Type,Content-Disposition,
Last-Modified,ETag,Content-Language,Set-Cookie
 SetEnv FILES or WIKIS_CONTENT true
</Location>
For example:<Location /files> IBMLocalRedirect On IBMLocalRedirectKeepHeaders X-LConn-Auth,Cache-Control,Content-Type,Content-Disposition, Last-Modified,ETag,Content-Language,Set-Cookie SetEnv FILES_CONTENT true </Location>
- The application_context_root value is the last
part of the application URL, for example the application context root
of a Files application with the URL www.my.enterprise.com/files is
/files. This is /files or /wikis by default, but can be changed during
post-installation steps. You can see the value in the files.href.prefix property
in LotusConnections-config.xml. See the topic Changing common configuration property values for
information on opening the configuration file.
- Specify IBMLocalRedirectKeepHeaders instructs
the plugin to keep the specified headers from the application server,
instead of recomputing them. This is critical because the applications
set such directives as the content-type and content-disposition that
the IBM HTTP Server would not
know about.
- If your environment requires additional headers (for example for
a proxy cache), you can add them to the comma-delimited IBMLocalRedirectKeepHeaders list
to ensure that the module retains them during redirection.
- Header names must be comma-delimited with no space before or after
commas. Also, all header names must be on one line regardless of how
many there are.
- The SetEnv value sets the token that the data directory requires
to be accessible. It must match the value after REDIRECT_ that
you set in Allow from env= in Step 7.
For example, if you set REDIRECT_FILES_CONTENT in Step 7, this value must be SetEnv FILES_CONTENT true.
- You can think of this as a lock and key mechanism: only requests that go through the Files or Wikis applications get a key, and the applications ensure that only authorized users can unlock particular files.
- The application_context_root value is the last
part of the application URL, for example the application context root
of a Files application with the URL www.my.enterprise.com/files is
/files. This is /files or /wikis by default, but can be changed during
post-installation steps. You can see the value in the files.href.prefix property
in LotusConnections-config.xml. See the topic Changing common configuration property values for
information on opening the configuration file.
- Do the following to test that the IBM HTTP Server is configured properly and securely:
- Restart the IBM HTTP
Server. Make sure it loads properly and there are no log errors about
loading modules or configuration. If there are problems, make sure
the load module and configuration directives do not contain typos.
- Try to access the alias directory directly at http/https:host/alias and
make sure you are denied permission. If you can access the directory,
make sure that the Order Deny, Allow; Deny from All; Allow
from env from Step 7 are all there.
- Access the application and download a file to make sure it functions. The module is not yet enabled.
- Restart the IBM HTTP
Server. Make sure it loads properly and there are no log errors about
loading modules or configuration. If there are problems, make sure
the load module and configuration directives do not contain typos.
- Check out the files-config.xml or wikis-config.xml file
using the steps in the topic Changing configuration property
values, and specify the following property attributes:
<download>
<modIBMLocalRedirect enabled="true" hrefPathPrefix="/alias" />
</download>
The alias must have a forward slash in front of it.
- Restart Files or Wikis.
- Download a file to make sure it works.
- Do the following to test whether the IBM HTTP Server is downloading the files:
- Open the httpd.conf file and add # characters to comment
out the last line in the <Directory> element, for example:
<Directory "data_directory_root">
 Order Deny,Allow
 Deny from all
 #Allow from env=REDIRECT_FILES or WIKIS_CONTENT
</Directory>
For example:<Directory "C:\IBM\Connections\Data\Files"> Order Deny,Allow Deny from all #Allow from env=REDIRECT_FILES_CONTENT </Directory>
- Save the file.
- Try to download a file from Files or Wikis. You should
be denied. Test over both HTTP and HTTPS protocols (if HTTPS is enabled).
- Open the httpd.conf file and remove the # characters from the last line specified in Step a.
Check the standard IBM HTTP Server error and request logs for any problems.
- Open the httpd.conf file and add # characters to comment
out the last line in the <Directory> element, for example:
What to do next
- If you get a permission denied error trying to download a file, IBM HTTP Server might not have access
to the content. You can temporarily disable security on the directory,
and ensure you can access it directly first, then re-enable security.
Note that you can tell if WebSphere or IBM HTTP Server is encountering
an issue by the error page displayed, and by the path. If IBM HTTP Server is having a problem
with the module invoked, the path will include /<alias>.
- If you get log errors about loading the module, make sure that
it is only loaded once, that you have selected the correct binary,
and that you are on a supported platform.
- If it works for HTTP but not HTTPS (or vice versa), make sure that the configuration lines are in a global context or in each virtual host, depending on your setup.
- webserver is the domain name of IBM HTTP Server, such as webserver.example.com.
- Enter a Server member name for the selected node. Choose the default or enter a custom name.
- Select a Node for each cluster. Accept the predefined node or select a different node.
- Type 2 to select the Medium
deployment topology.
- Small deployment:
- Click Validate to verify your DB settings. If the validation fails, check your DB settings. When the validation succeeds, click Next.
- Enter a Server member name for the selected node. Choose the default or enter a custom name.
- Select a Node for each cluster. Accept the predefined node or select a different node.
- Select the Medium deployment topology.
- Small deployment:
- Enter the location of the Local content store.
- Network-based file shares (for example: NFS, SMB/Samba, and so
on)
- Enter a Server member name for the selected node. Choose the default or enter a custom name.
- Select a Node for each cluster. Accept the predefined node or select a different node.
- Type 2 to select the Medium
deployment topology.
- Select the WAS installation location that contains the Deployment Manager.
- Enter the location of the Local content store.
- Network-based file shares (for example: NFS, SMB/Samba, and so
on)
- Click Validate to verify your DB settings. If the validation fails, check your DB settings. When the validation succeeds, click Next.
- Enter a Server member name for the selected node. Choose the default or enter a custom name.
- Select a Node for each cluster. Accept the predefined node or select a different node.
- Select the Medium deployment topology.
- Select the WAS installation location that contains the Deployment Manager.
- DM_admin_user_name is the user name of the WebSphere administrator on the Deployment Manager, and DM_admin_password is the associated password.
- DM_host_name is the fully
qualified host of the Deployment Manager.
- On the computer hosting the Cognos components, open a command window and
navigate to the/bin directory in the WAS
installation root; for example: