Manage and sharing assets in the Process Center repository
The Process Center includes a repository for processes, services, and assets created in Process Designer and IBM Integration Designer.
Use the Process Center to create and manage process applications and toolkits. Toolkits provide a place to store assets that can be shared among process applications.
Manage the Process Center repository
The Process Center includes a repository for processes, services, and assets created in Process Designer and IBM Integration Designer. The following sections provide an introduction to the types of tasks involved in managing and maintaining the Process Center repository.
Overview
The Process Center Console provides the tools that you need to maintain the repository. The following figure illustrates how the Process Center Console provides access to the Process Center:
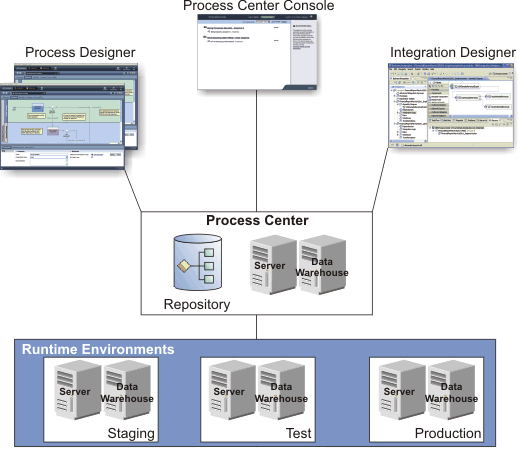
- From the Process Center console, you can process applications and toolkits and grant other users access to those process applications and toolkits.
- Users in Process Designer process models, services, and assets within process applications and toolkits.
- The Process Center includes two main features-a Process Center server and Performance Data Warehouse. These features allow users working in Process Designer to run their process applications and store performance data for testing and playback purposes during development efforts.
- From the Process Center console, administrators install process applications that are ready for testing or production on the Process Servers in those environments.
Where to perform tasks
The Process Center console provides a location for users to create and maintain high-level library items such as process applications and toolkits. For users who are primarily administrators and do not actively work in Process Designer, the Process Center console enables you to manage snapshot creation and the deployment of process applications. Another primary task for administrators is managing access to the Process Center repository by setting up the appropriate authorization for users and groups.
The Process Center console is also available within Process Designer. Process Designer users with administrator authority can perform the same actions using the embedded Process Center console as they can using the browser-based Process Center console.
To use Process Center console to test, install, or administer a process application snapshot that contains IBM Business Process Manager Advanced content, the user or group to which you belong must be assigned to the WebSphere Application Server administrative security roles of Configurator, Operator, and Deployer. If you are not currently assigned to all of these roles, click Users and Groups in the WebSphere administrative console to modify the user or group roles.
The procedures in the following sections provide instructions for users working in the Process Center console as well as the embedded Process Center console in Process Designer.
- Manage process applications, tracks, and snapshots The Process Center repository provides a structured hierarchy to help you manage multiple process development efforts.
- Filtering and sorting process applications, snapshots, and toolkits Use the sorting and filtering capabilities in the Process Center console to help you quickly locate specific process applications, snapshots, or toolkits in the Process Center repository.
- Documenting process applications and toolkits From the Process Center console, you can view or print information about a process application snapshot or toolkit snapshot. You can generate a report about the process application or toolkit or about an asset of the process application or toolkit. You can also view or generate a report about the changes made from one snapshot to another.
- Manage process applications You can create, clone, and import process applications as well as perform other maintenance tasks on the process applications.
- Manage and using toolkits You can create toolkits to enable Process Designer users to share library items across process applications.
- Manage tracks You can enable and manage tracks for the process applications and toolkits that you create or to which you have administrative access.
- Manage snapshots Snapshots record the state of library items within a process application or track at a specific point in time. You can create snapshots in the Process Center console or in the Designer view. Snapshot management, such as installing, exporting, and archiving, is performed in the Process Center console.
- Applying governance to a process application You can apply a governance process that provides a control over the installation of process applications or notifies people when a snapshot is installed or changes status. When an Installation Requested governance process is applied to a process application, requests made from IBM Process Center to install a snapshot of that process application trigger a governance process. When a Snapshot Status Change governance process is applied, all changes to the status of a snapshot are reported.
- Manage access to the Process Center repository Administrators can manage user access to the Process Center repository from the Process Center console.
- Manage IBM Business Process Manager servers From the Process Center console, repository administrators can manage the BPM servers in their environment.
- Manage library items in the Designer view The Designer view offers several tools to ensure that you can quickly and easily access items that you work with on a regular basis. With the Designer, you can move or copy items between existing or new process applications and toolkits. You can also revert to previous versions of individual library items using snapshots.
- Subscribing to Blueworks Live processes If members of your team discover and develop processes in Blueworks Live™, you can access those processes and work with them in Process Designer.
- Manage external files External files are images, style sheets, JAR files, or other assets that are part of an IBM Business Process Manager implementation but that are developed outside of Process Designer. You can add these external files to your process application or toolkit in the Designer view so that all project assets are included in the Process Center repository.
- Import files from Teamworks 6 You can import files from Teamworks 6 using the Process Center console.
- Import and exporting BPMN models BPM supports importing and exporting of models in the BPMN 2.0 format. You can import BPMN models into the IBM Process Center, for example BPMN models that have been exported from IBM WebSphere Business Modeler, WebSphere Business Compass, Blueworks Live, or IBM Rational Software Architect. You can also export your process applications from the IBM Process Center to a BPMN 2.0 file archive (.zip).
- SAP Solution Manager integration To bridge the flexible modeling of IBM Business Process Manager and the repository capabilities of SAP Solution Manager, the SAP Solution Manager integration offers you a way to import business blueprints from SAP Solution Manager into IBM Process Center, edit, customize, and model them using Process Designer, and then export the completed blueprints back to the SAP Solution Manager to be configured.
Related concepts:
Manage process applications, tracks, and snapshots
The Process Center repository provides a structured hierarchy to help you manage multiple process development efforts.
Overview
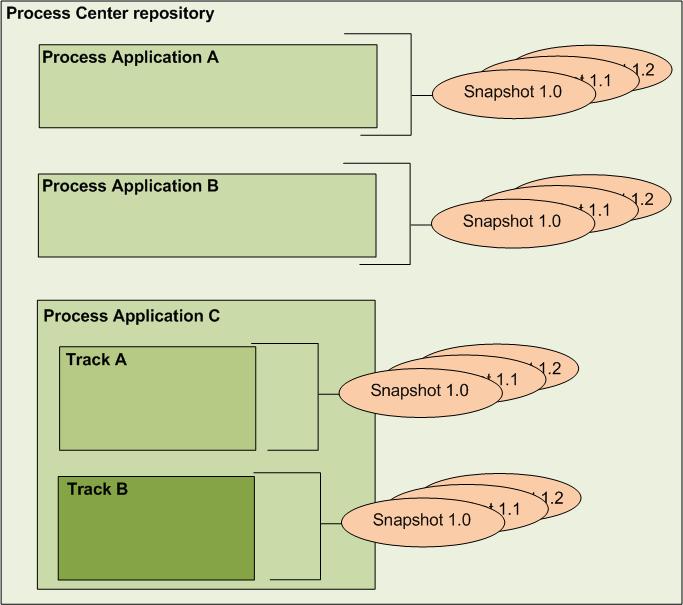
As shown in the following figure and described in Table 1, the Process Center repository includes process applications, tracks, and snapshots:
| Content type | Description |
|---|---|
| Process applications | Containers for the process models and supporting implementations that BPM analysts and developers create in Process Designer. You should create a process application for each business process to be automated using IBM Business Process Manager. |
| Tracks | Optional subdivisions in a process application based on team tasks or process application versions. You can determine if additional tracks are necessary for each process application and, if so, enable them at any time. |
| Snapshots | Record the state of the items within a process application or track at a specific point in time. From the Process Center console, you can create snapshots of your process applications. You can also deploy particular snapshots of your process applications on the Process Servers in development, staging, test, and production environments. |
On Process Server, there is one snapshot that is marked as default for each process application. This snapshot is used to start instances when a process or service is run and a specific snapshot is not provided.
On Process Center, consider the following behavior of default snapshot selection:
- In Process Center, the current (tip) snapshot is a special snapshot context that is the most current version of any artifact in a track or a process application. Remember that each track is a parallel version of a process application or toolkit, and each track has a current snapshot.
- The current (tip) snapshot is used to run instances when a process or service is running and a specific snapshot is not provided. If you do not want an instance to run on the current snapshot, you must select a specific snapshot.
- When a process or a service is started for a current (tip) snapshot, any changes that are made to the current snapshot are visible to that process instance or service during its execution.
- If a specific snapshot is used to start a process instance or a service, changes to the process application are not visible to that instance when it is running. If the specific snapshot is the current snapshot, the instance continues on the specific snapshot even if the current snapshot changes.
Create and maintain high-level library items
See the following topics to learn how to create and maintain process applications, tracks, and snapshots:
| Task | Description |
|---|---|
| Create, importing, and archiving process applications | Create and maintain containers where BPM analysts and developers can develop process models and underlying implementations. |
| Enable, creating, editing, and archiving tracks | Create subdivisions in process applications to enable development of separate versions of the same application in Process Designer. |
| Create, comparing, and archiving snapshots | Capture and save the items within a process application or track at specific points in time. |
Filtering and sorting process applications, snapshots, and toolkits
Use the sorting and filtering capabilities in the Process Center console to help you quickly locate specific process applications, snapshots, or toolkits in the Process Center repository.
By default, all process applications, snapshots, and toolkits are shown on the corresponding Process Center console tab, and by default the list is sorted according to the most recent update.
Filtering
You can use any of the following filter options to search through the artifacts in your repository. Note that not all filters are supported for all artifact types.
| Filter option | Available for | Result |
|---|---|---|
| All |
Process applications Snapshots (including the tip) Toolkits | Lists all process applications, snapshots, or toolkits (the default behavior) |
| Favorites |
Process applications Toolkits | Lists only those process applications or toolkits you designated as favorites |
| Archived |
Process applications Snapshots Toolkits | Lists all archived process applications, snapshots, or toolkits |
| Deployed |
Snapshots (including the tip) | Lists only those snapshots deployed to the Process Center Server |
| Installed |
Snapshots | Lists only those snapshots that are installed on a process server |
Further refine any filtered list by using the search field to the right of the filters. As you type text into this field, the list refreshes to show only those items with names that contain the text string. Note the filter is not case sensitive.
Sorting
Use any of the following options to sort a list of process applications, snapshots, or toolkits. Sorting works in conjunction with filtering to help you locate specific items in a list.
| Sort option | Available for | Result |
|---|---|---|
| Acronym |
Process applications Toolkits | Sorts the list alphabetically, based on the process application or toolkit acronym name |
| Recently updated |
Process applications Toolkits | Sorts the list based on the most recently modified item |
| Name |
Process applications Snapshots (including the tip) Toolkits | Sorts the list alphabetically, based on the process application, snapshot, or toolkit name |
| Date |
Snapshots (including the tip) | Sorts the list based on the date the snapshot was taken, with the most recent snapshot on top.
The tip is always listed first and is not affected by this sorting action. |
Documenting process applications and toolkits
From the Process Center console, you can view or print information about a process application snapshot or toolkit snapshot. You can generate a report about the process application or toolkit or about an asset of the process application or toolkit. You can also view or generate a report about the changes made from one snapshot to another.
It is important to have an optimal display of process application content in whatever browser product you have chosen to use. If you are using Microsoft Windows Internet Explorer, you may find that your process flow diagrams and other diagrams will render more quickly and with increased fidelity by installing Microsoft Silverlight. To view and print information about a snapshot:
- Click the process application or toolkit in the Process Center console.
- In the snapshot page, click the snapshot for which you want to view information.
- Expand an asset element and then click the name of an asset
item to view its detailed information. The presentation of the detailed information differs depending on the kind of asset item that you selected.
For example, if you expand the Business Process Definitions asset
element and then click the name of a business process definition, a process flow diagram opens and you can view the implemented activities and hypertext links that are associated with the diagram.
- You can perform the following actions:
Goal Description Action Determine the changes that occurred between two snapshots of a process application. You can compare the currently selected snapshot with another snapshot in any of the tracks of the current process application. You can then generate and print a comparison report. - Click Compare.
- Select a snapshot to compare against the current snapshot.
- Click Generate to generate the comparison report.
- Click Print in the report.
Share and review high-level information with a business user. You can select changed components from one snapshot and copy them to the tip of a track that has associated dependencies. For example, you can share the process diagram or information about team members that are involved in the activities. Click Copy Generate and print a report for audit purposes. Generate a report of an entire process application or for a specific asset after selecting that asset. The report includes information about the process application, toolkits, and implementation. The information also contains historical information (who created or updated the artifacts and when the artifact was updated). - Click Generate Report
- Click Print in the report.
Print the information that you are viewing. You can print the current asset view. Click Print. A printer-friendly version of the information you are viewing is made available for printing. Search You can search an asset list by entering a search term in the search field located in the upper right-corner of the asset list tab bar. Search filters the returned asset list to include only those assets that include the search term in the asset name, or are assigned a tag that matches the search term. Enter a search term in the search field.
Manage process applications
You can create, clone, and import process applications as well as perform other maintenance tasks on the process applications.
Before performing any of the following tasks, start Process Designer and open the appropriate view.
To create and import process applications, you must have access to the Process Center repository.
- Editing process application settings Each process application and toolkit created in the Process Center repository includes settings that you can change while working in the Designer, such as global settings, environment variables and server configurations for your process application.
- Set environment variables Set environment variables to ensure that process implementations use correct values in each deployment environment.
- Add a server configuration Configure servers that your process application or toolkit uses.
- Create new process applications in the Process Center console When you create a new process application, you provide a name, acronym, and optional description of the process application. After you create the process application, you can open it in the Designer to create library items perform other edits.
- Cloning process applications in the Process Center console You can create a copy of a process application using the Clone option in the Process Center console.
- Archive process applications in the Process Center console If a process application is no longer used, you can archive it. When you archive a process application, it no longer appears in the list of all process applications in the Process Center console, and you must restore it before you can open it in the Designer view.
- Remove process applications from the Process Center repository To remove a process application from the Process Center repository, use the Process Designer to first archive the process application and then delete it.
- Import and exporting process applications from the Process Center console You can import process applications from other Process Center repositories, and you can also export process applications.
- Undeploy a process application tip on a Process Center server You can use the Process Center console to undeploy a process application tip from the Process Center server. The process application must have been created in an Advanced edition and use an Advanced Integration Service. When you undeploy a tip, all Advanced Integration Service artifacts and the associated business level application (BLA) are removed from the server. However, the process application definition and other artifacts are still present in the repository.
Editing process application settings
Each process application and toolkit created in the Process Center repository includes settings that you can change while working in the Designer, such as global settings, environment variables and server configurations for your process application.
To edit process application settings, you must have administrative access to the process application or you must be the user who created the process application.
To edit process application settings:
- Open the process application in the Designer view. The Process App Settings editor opens. The settings editor is always available from the drop down list in the toolbar, and cannot be closed.
- To edit the general settings, click the Overview tab:
Set Description Name Type a new name or alter the existing name. Acronym Type a new acronym or alter the existing one. The acronym for a process application must be unique and is limited to seven characters. IBM Business Process Manager uses the acronym to identify this process application and the library items that it contains and so it must be a valid JavaScript identifier. When you change the acronym, any existing scripts or other implementations in the process application that rely on the current acronym will be broken unless you update them with the new acronym. For this reason, Process Designer displays a warning, requesting confirmation to continue with the change.
Description Type a new description or alter the existing one. Exposed Items The Overview page provides a shortcut list of exposed items to allow for quick navigation to important artifacts in your process application. Web services in a process application are always exposed. You must explicitly expose BPDs and Human services by choosing the exposure settings from the Overview page of the item. See Exposing BPDs or Exposing a Human service.
Portal Admin Team By default, members of the tw_admins security group can perform the following administrative actions on process instances in the process application.
- Abort Process Instance
- Suspend Process Instance
- Resume Process Instance
- Change instance Due date
- Move token
- Delete Token
You can configure a Portal Admin Team that can contain users or groups that have permission to administer tasks for a specific process application. See Configure Web Inspector to work with Portal Admin Teams.
Click Select to add or remove users and teams from the Portal Admin Team. Or, click New to create a new team that represents the groups of users in your enterprise that can perform the Portal Admin Team actions. You can add users or teams as members, or define an expression to determine membership.
Coach XSL The Coach transform XSL specified in this field is used for all Coaches in the process application except individual Coaches with a transform XSL override set to something other than <Use Default>. By default, this field is set to the CoachDesigner.xsl file that resides in the System Data toolkit. Click New to browse for and add a new Coach XSL to the process application as a managed design file. Or click Select to choose a managed design file that has already been added to the process application. The Coach transform XSL is available as part of the Heritage Coach designer settings.
Coach CSS The Coach CSS specified in this field is used for all Coaches in the process application except individual Coaches with a CSS override set to something other than <Use Default>. By default, this field is set to the coach_designer.css file that resides in the System Data toolkit. Click New to browse for and add a new Coach CSS to the process application as a managed web file. Or click Select to choose a managed web file that has already been added to the process application. The Coach CSS is available as part of the Heritage Coach designer settings
Advanced XML Settings The Namespace field in the Advanced XML Settings pane identifies the namespace of the process application. If you do not enter a specific namespace identifer, the editor automatically populates the Namespace field with a shortened version of the process application name. The Namespace field should only be changed by an advanced user as the namespace is used by other process applications to reference this process application. In addition, external web services use its serialized representation to interact with this process application. A change to the namespace means these applications referencing this process application also need to be updated.
The Optimize settings for IBM Integration Designer check box indicates that this project is being used or is intended to be eventually used in collaboration with IBM Integration Designer.
- To set environment variables (such as port numbers) for each deployment environment, click the Environment tab and see Set environment variables for instructions.
- To add server configurations, click the Server tab and see Add a server configuration for instructions.
- Click Save in the main toolbar.
Set environment variables
Set environment variables to ensure that process implementations use correct values in each deployment environment.
Each process application and toolkit created in the Process Center repository includes environment variables. You can set these environment variables to ensure that your process implementations are using correct values, whatever environment you deploy to or whatever change occurs at run time in the environment. Suppose your process includes an implementation that requires the port number for an external application. By using an environment variable, you can set the port number for each environment in which the process will run. Plus, administrators can verify and adjust environment variable values from the Process Admin Console after a process application is installed.
To set environment variables:
- Open the appropriate process application or toolkit in the Designer view. You will see the Settings view when you first click Open in Designer from a newly created process application or toolkit in the Process Center. Alternately you can select Process App Settings or Toolkit Settings from the drop-down list on the toolbar in Process Designer.
- In the settings editor, click the Environment Variable tab.
- Click Add to add a new variable.
- Click the <NEW VARBL> placeholder in the Key cell, type the name of the new environment variable, and press Enter. Environment variable names must be valid JavaScript identifiers (they must begin with a letter or a '_' and can contain only letters, digits or the '_' character). The following examples are all valid names: ecmsystem_port , ecmSystem_port , and ecm_system_port
- Click the Default cell for the newly entered variable, type in a value, and press Enter. If you do not provide values for the other environments, the default value is used for all environments.
- If you know the value for the Development, Test, Staging, or Production environment, click the appropriate cell, type in the value, and press Enter. If you do not know the appropriate value for each environment, you can leave the setting blank and an administrator can provide the correct value after installation. If you do not provide a value for an environment and an administrator does not provide a value after installation, IBM Business Process Manager uses the default value.
- To use one of the preceding variables in a script in the current process application, you can simply use the variable key preceded by tw.env. For example, to set the value of a process variable to an environment variable in a JavaScript, you can type: "tw.local.port = tw.env.ecmsystem_port" If the environment variable you want to use in your script is in a toolkit, you can precede the variable key with tw.env.toolkit.[toolkit_acronym]. So, to use the same environment variable from a toolkit with an acronym of BA, you can type: "tw.local.port = tw.env.toolkit.BA.ecmsystem_port"
- To remove an environment variable, click any cell to remove it and then click Remove.
Environment variables are also used to configure server connections for ILOG Rules Server, IBM Content Integrator Server, IBM Case Manager Server, and Enterprise Content Management (ECM) Server. However, the environment variables are automatically set when you create a server configuration in the Settings page of the Designers view, as described in the topic Add a server configuration.
Configure runtime settings for installed snapshots
Add a server configuration
Configure servers that your process application or toolkit uses. To set server configurations:
- Select the Servers tab from the Process App Settings editor. You will see the Process App Settings editor when you first click Open in Designer from a newly created process application in the Process Center. Alternatively you can select Process App Settings from the drop-down list on the toolbar in Process Designer.
- Beneath the Servers heading click Add to add a new server configuration.
- Beneath the Server Details heading, enter a meaningful name for server.
- Click the Type cell for the newly
entered variable and select one of the available options:
Type Description ILOG Rules Server Use to connect to an ILOG Rule Execution Server. In the Default field, specify a URL that includes the hostname, domain, and port number. For example: http://myHost.labwide.ibm.com:9080
A port number must be specified in the URL for a Decision service to be discovered.
The other fields will automatically be populated with the same URL and can all use the same port number. See Add a JRules Decision Service component to a service for more information.
Enterprise Content Management (ECM) Server Use the ECM Server selection to connect to an ECM server. In the Hostname field, specify an IP address or a hostname and domain (but do not specify http:// or another protocol). For example: myHost.labwide.ibm.com
See Add an ECM server for more information.
IBM Content Integrator Server Use the IBM Content Integrator connector to access an ECM repository. Enter the connector name and URLs for the servers (default, development, test, etc). In the Default field, specify a URL that includes the hostname, domain, port number, and context root (which is configurable during deployment of the SOA web service). For example: http://myHost.labwide.ibm.com:9080/vbr_soa
The other fields will automatically be populated with the same URL and can all use the same port number. Choose the type of documents to attach to a Heritage Coach
If you import a process application from an BPM export (.twx) file that was created before Business Process Manager 7.5.1 and the process application references an IBM Content Integrator Server, the connector name will be lost and manually specify it again in the Servers tab of the Process App Settings editor.
IBM Case Manager Server Use to integrate a business process developed in Process Designer with a case management case in IBM Case Manager. In the Hostname field, specify an IP address or a hostname and domain (but do not specify http:// or another protocol). For example: myHost.labwide.ibm.com
See Add an Case Manager server for more information.
IBM Connections Server Use to enable integration with IBM Connections so that business card information displays when users click an avatar or a name. With IBM Connections V4.0 or later, you also can enable users to, after they set preferences, receive notifications in IBM Connections when new tasks are assigned to them. You must set the environment type to match the environment type of Process Server or Process Center unless you set the environment type to Default. The default environment type works regardless of the environment type of Process Server or Process Center.
IBM Sametime Server Use to enable instant messaging support, which lets users communicate with others in their organization as they work on process activities. Your administrator must configure the Process Portal environment for IBM Lotus Sametime Connect integration and send you the Sametime Connect server location. For an IP address, use the following pattern where sthost is the name of the Sametime Connect server and secureport is the port of the Sametime Connect server: https://sthost:secureport/stwebclient/popup.jsp
See Enable Sametime Connect integration for Process Portal and Enable IBM Connections integration for business card support in Process Portal for more information.
Web Service Server Use to integrate a business process developed inProcess Designer with a web service. In the WSDL URL field, specify the URL of the web service server. For example:
http://mycorporation.com/webservice
See Add a web service server for more information.
- Enter the server connection details.
Create new process applications in the Process Center console
When you create a new process application, you provide a name, acronym, and optional description of the process application. After you create the process application, you can open it in the Designer to create library items perform other edits.
To create a new process application:
- Select the Process Apps tab.
- Click the Create New Process App option.
- In the Create New Process App window, enter a name and an acronym for your process application.
The acronym for a process application must be unique and is limited to seven characters. IBM Business Process Manager uses the acronym as an identifier for this process application and the library items that it contains. For example, when manipulating the items within the process application using the BPM JavaScript API, you can use the acronym to specify the namespace of the items.
Providing a description is optional. When you enter a description, you can view it in the Process Center console by clicking the question mark next to the process application name.
- To create library items in the process application or perform other edits, click the Open in Designer option.
To take advantage of tracks in this process application, enable the tracks in the Process Center console.
Cloning process applications in the Process Center console
You can create a copy of a process application using the Clone option in the Process Center console.
To clone a process application:
- Select the Process Apps tab.
- In the list of process applications, click the process application to clone.
- Click Clone from the snapshot pop-up
menu (
 ). The Process Center console opens the Process Apps tab and displays the cloned process application or toolkit with COPY added to the end of the original name and the number 2 added to the end of the original acronym.
- To change the name and acronym of the cloned application, click the application to open it, click the Manage option, and then edit the text in the appropriate fields.
- To create library items in the process application or perform other edits, click the Open in Designer option.
Cloning does not change the namespace of the cloned process application. One reason for keeping the namespace the same in the cloned application is that other process applications may reference that namespace. If you do want to change the namespace in the cloned process application, it can be updated in the Advanced XML Settings section of the Process App Settings page.
To take advantage of tracks in this process application, enable the tracks in the Process Center console.
Archive process applications in the Process Center console
If a process application is no longer used, you can archive it. When you archive a process application, it no longer appears in the list of all process applications in the Process Center console, and you must restore it before you can open it in the Designer view. Note that only the business process definitions of the process application are archived. If the process application contains BPEL processes and the associated instance data has to be archived, follow the instructions in "Archiving completed BPEL process and task instances".
To archive a process application:
- Select the Process Apps tab.
- In the list of process applications, click the process application to archive.
- Click the Manage option.
- Click the Archive Process App option.
- When prompted, click the Archive button to confirm to archive this process application.
The process application is archived.
To view or restore the archived process application, click the Archived filter in the Process Apps tab.
The restore action brings back only the business process definitions of the process application. If the process application contains BPEL processes and the associated instance data was archived, the restore action does not bring back the archived process instance data.
Related reference:
Archive completed BPEL process and task instances
Remove process applications from the Process Center repository
To remove a process application from the Process Center repository, use the Process Designer to first archive the process application and then delete it.
To remove the process application:
- From the Process Apps view of the Process Designer, click the process application to remove.
- Click Manage.
- From the Manage page, click Archive Process App.
- Click Process Apps to return to the list of process applications.
- Click Archived to display a list of archived processes.
- Click the X icon next to the process application you want to remove. When you are prompted, confirm the action.
Import and exporting process applications from the Process Center console
You can import process applications from other Process Center repositories, and you can also export process applications.
When importing a process application, the users and security groups, which are referenced by the participant groups in a process application, must exist in the user repository.
- To import process applications from an BPM export (.twx) file, follow these steps:
- Select the Process Apps tab.
- Click the Import Process App option.
- In the Import Process App window, click the Browse button to locate the BPM export (.twx) file to import.
Process applications that you import should have unique acronyms. If an acronym is not unique, the import completes with a warning; however, attempts to install snapshots of the process application on test and productions servers will fail with an error.
- Click the Next button to import the selected .twx file. In the Import Process App window, click to expand the sections that show the snapshots that will be imported and the snapshots that are already available (and will not be imported).
- Click the Import button.
When the import is complete, the imported process application is included in the list in the Process Apps tab.
If you import a process application from an BPM export (.twx) file that was created before Business Process Manager 7.5.1 and the process application references an IBM Content Integrator Server, the connector name will be lost and manually specify it again in the Servers tab of the Process App Settings editor.
- To export process applications to an BPM, follow these steps:
- Select the Process Apps tab.
- In the list of process applications, click the application to export.
- Find the snapshot to export. If a snapshot does not exist, create one by clicking Create New Snapshot.
- Click the Export option for the snapshot.
- Select BPMN 2.0 export (.zip) or BPM export (.twx). A .twx file is a proprietary
IBM format that includes snapshot and version information and can be reused by BPM products. The BPMN 2.0 export format conforms
to BPMN 2.0 standards and can be reused by products that support that standard. It contains the high-level process flow but not all the specifics conveyed in a .twx file.
- Locate the directory to which you want to save the export file, name the file, and then save it. The exported file can be imported into any Process Center repository.
Repository administrators can see a log of all imports by clicking the Admin option on the Process Center console and then clicking Import and Export Log.
Related reference:
Export process applications to BPMN 2.0

Undeploy a process application tip on a Process Center server
You can use the Process Center console to undeploy a process application tip from the Process Center server. The process application must have been created in an Advanced edition and use an Advanced Integration Service. When you undeploy a tip, all Advanced Integration Service artifacts and the associated business level application (BLA) are removed from the server. However, the process application definition and other artifacts are still present in the repository.
If the process application uses BPEL processes, the associated process instance data is cleaned up from the Business Process Choreographer database before the process application tip is undeployed.
- From the Process Center console, select the Process Apps tab.
- Select the appropriate process application, and then click the Snapshots option. In the list of snapshots, the tip (named Current, by default) is listed first.
- Click Undeploy from the tip pop-up
menu ().
- Click OK.
To use the process application tip, perform a playback in the Process Designer or publish the tip from IBM Integration Designer.
Manage and using toolkits
You can create toolkits to enable Process Designer users to share library items across process applications.
Process applications can share library items from one or more toolkits, and toolkits can share library items from other toolkits.
Users who have access to a toolkit can create a dependency on the toolkit and use the library items within it for their process development efforts. See the following sections to learn how to create and maintain toolkits, as well as how to use them during process development.
Before performing any of the following tasks, you should start Process Designer and open the appropriate view.
To create and import toolkits, you must have access to the Process Center repository.
- Editing toolkit settings Each process application and toolkit created in the Process Center repository includes settings that you can change while working in the Designer, such as global settings, environment variables and server configurations for your process application.
- System toolkits During IBM Business Process Manager installation, a number of system toolkits are imported into the IBM Process Center repository. These system toolkits provide resources that you can use as you build your process applications.
- Create toolkits in the Process Center console When you create a toolkit, you provide a name, acronym, and optional description of the toolkit. After you create the toolkit, you can open it in the Designer to create library items perform other edits.
- Cloning toolkits in the Process Center console You can create a copy of a toolkit using the Clone option in the Process Center console.
- Create a toolkit dependency in the Designer view When you create a dependency on a toolkit, you can use the library items from that toolkit for the implementation of the process steps you are building in your current project. For example, after you create a dependency on a toolkit that includes several services, the Designer view automatically makes those services available when a developer is choosing the implementation for an activity.
- Delete a toolkit dependency in the Designer view You can delete a dependency on a toolkit from the Designer view.
- Archive toolkits in the Process Center console If a toolkit is no longer used, you can archive it. When you archive a toolkit, it no longer appears in the list of toolkits in the Process Center console, and you must restore it before you can open it in the Designer view.
- Import toolkits from the Process Center console You can import toolkits from other BPM libraries using the Process Center console.
- Export toolkits from the Process Center Console You can export toolkits for use in other libraries from the Process Center console.
- Undeploy a toolkit tip on a Process Center server You can use the Process Center console to undeploy a toolkit tip from the Process Center server. When you undeploy a tip, all Advanced Integration Service artifacts and the associated business level application (BLA) are removed from the server..
- Delete toolkits If you no longer need a toolkit, you can delete it from the repository. Deleting a toolkit removes all of the files and other artifacts associated with the toolkit. You can delete any toolkit except the system toolkits.
Editing toolkit settings
Each process application and toolkit created in the Process Center repository includes settings that you can change while working in the Designer, such as global settings, environment variables and server configurations for your process application.
To edit toolkit settings, you must have administrative access to the toolkit or you must be the user who created the toolkit.
To edit toolkit settings:
- Open the toolkit in the Designer view. The Toolkit Settings editor opens. The settings editor is always available from the drop down list in the toolbar, and cannot be closed.
- To edit the general settings, click the Overview tab:
Set Description Name Type a new name or alter the existing name. Acronym Type a new acronym or alter the existing one. The acronym for a toolkit must be unique and is limited to seven characters. IBM Business Process Manager uses the acronym to identify this toolkit and the library items that it contains and so it must be a valid JavaScript identifier. When you change the acronym, any existing scripts or other implementations in the toolkit that rely on the current acronym will be broken unless you update them with the new acronym. For this reason, Process Designer displays a warning, requesting confirmation to continue with the change.
Description Type a new description or alter the existing one. Exposed Items The Overview page provides a shortcut list of exposed items to allow for quick navigation to important artifacts in your toolkit. Web services in a toolkit are always exposed. You must explicitly expose BPDs and Human services by choosing the exposure settings from the Overview page of the item. See Exposing BPDs or Exposing a Human service Coach XSL The Coach transform XSL specified in this field is used for all Coaches in the toolkit except individual Coaches with a transform XSL override set to something other than <Use Default>. By default, this field is set to the CoachDesigner.xsl file that resides in the System Data toolkit. You can click New to browse for and add a new Coach XSL to the toolkit as a managed design file. Or you can click Select to choose a managed design file that has already been added to the toolkit. The Coach transform XSL is available as part of the Heritage Coach designer settings.
Coach CSS The Coach CSS specified in this field is used for all Coaches in the toolkit except individual Coaches with a CSS override set to something other than <Use Default>. By default, this field is set to the coach_designer.css file that resides in the System Data toolkit. You can click New to browse for and add a new Coach CSS to the toolkit as a managed web file. Or you can click Select to choose a managed web file that has already been added to the toolkit. The Coach CSS is available as part of the Heritage Coach designer settings.
Advanced XML Settings The Namespace field in the Advanced XML Settings pane identifies the namespace of the toolkit. If you do not enter a specific namespace identifer, the editor automatically populates the Namespace field with a shortened version of the toolkit name. The Namespace field should only be changed by an advanced user as the namespace is used by other process applications to reference this toolkit. In addition, external web services use its serialized representation to interact with this toolkit. A change to the namespace means these applications referencing this toolkit also need to be updated.
The Optimize settings for IBM Integration Designer check box indicates that this project is being used or is intended to be eventually used in collaboration with IBM Integration Designer.
- To set environment variables (such as port numbers) for each deployment environment, click the Environment tab and see Set environment variables for instructions.
- To add server configurations, click the Server tab and see Add a server configuration for instructions.
- Click Save in the main toolbar.
System toolkits
During IBM Business Process Manager installation, a number of system toolkits are imported into the IBM Process Center repository. These system toolkits provide resources that you can use as you build your process applications.
You cannot edit or change the library items in any system toolkit, but you can open the toolkit and view the items within it.
System Data toolkit
The System Data toolkit gives you access to assets that all BPM projects require, such as standard variable types and standard charts for reports. Each process application and toolkit that you create automatically includes a System Data toolkit dependency. Here are some of the resources provided in this toolkit:
- The System Data toolkit is imported into the Process Center repository so that each process application and toolkit that you create has access to BPM system data. The System Data toolkit includes assets that all BPM projects require, including variable types.
- The System Data toolkit provides many predefined variable types. These variables are defined as business objects. You can open a business object in Process Designer and review the Documentation field to learn when and how to use each variable type.
- It contains a CaseReference business object to help you build a reference to an IBM Case Manager case.
- The Process Admin Console displays all user attribute definitions that exist in the Process Center repository, including the default definitions from the System Data toolkit.
- The System Data toolkit includes services and a Heritage Coach that can serve as a template to implement and manage conditional activities.
- The System Data toolkit includes SQL Integration services so that you can easily integrate with external databases.
- The System Data toolkit provides a generic web service connector, Call WebService via SOAP. This connector abstracts the complexity of the web service implementation and requires only minimal configuration.
- It also provides some key performance indicators (KPIs). BPM displays the KPIs in the current process application and any KPIs in referenced toolkits, including the System Data toolkit.
System Governance toolkit
The Process Center repository also provides the System Governance (TWSYSG) toolkit, which you can user for more specialized purposes. The System Governance toolkit contains the machinery required to build a governance process to control the installation of snapshots or to notify stakeholders about snapshot creation or status change. You must have administrative authority for a process application to apply a governance process to it.
- The toolkit has integration services for installation and snapshot status, templates that provide business process definitions for installation and snapshot status change, and governance business objects.
- Custom governance processes must be developed from one of the templates in the toolkit. The System Governance toolkit provides two templates, the Installation Requested template and the Snapshot Status Change template. Create custom governance business process definitions to meet your business needs by using these governance templates as a base.
See the topic about governance services for more details about the content of the System Governance toolkit.
System Content Management toolkit
Add the System Content Management (SYSCM) toolkit to your dependencies to gain access to Enterprise Content Management types and services. You need these resources to allow a business process developed in Process Designer to work with an ECM system. The toolkit also contains data types that enable integration with Enterprise Content Management systems, such as the ECMContentEvent business object.
System Coaches toolkit
Add a dependency on the System Coaches (SYSC) toolkit so that you can add stock Coach Views to your Coach.
Dashboards toolkit
Add a dependency on the Dashboards toolkit so that you can create custom, localized dashboards with the reusable interface elements, implementation services, and data objects.
Related concepts:
System services to implement conditional activities
Related tasks:
Create toolkits in the Process Center console
When you create a toolkit, you provide a name, acronym, and optional description of the toolkit. After you create the toolkit, you can open it in the Designer to create library items perform other edits.
To create toolkits in the Process Center console:
- Select the Toolkits tab.
- Click the Create New Toolkit option.
- In the Create New Toolkit window, enter a name and an acronym for your toolkit.
The acronym for a toolkit must be unique and is limited to seven characters. IBM Business Process Manager uses the acronym as an identifier for this toolkit and the library items that it contains. For example, when manipulating the items within the toolkit using the BPM JavaScript API, you can use the acronym to specify the namespace of the items.
Providing a description is optional. When you enter a description, you can view it in the Process Center console by clicking the question mark next to the toolkit name.
- To create library items in the toolkit or perform other edits, click the Open in Designer option.
If you have multiple library items to be shared across projects, move those library items to the toolkit.
To take advantage of tracks in this process application, enable the tracks in the Process Center console.
Cloning toolkits in the Process Center console
You can create a copy of a toolkit using the Clone option in the Process Center console.
To clone toolkits:
- Select the Toolkits tab.
- In the list of toolkits, click the toolkit to clone.
- Find the snapshot you want clone.
- Click Clone from the snapshot pop-up
menu (). The Process Center console opens the Toolkits tab and displays the cloned toolkit with COPY added to the end of the original name and the number 2 added to the end of the original acronym.
- To change the name and acronym of the cloned toolkit, click the toolkit to open it, click the Manage option, and then edit the text in the appropriate fields.
- To create library items in the toolkit or perform other edits, click the Open in Designer option.
To take advantage of tracks in this process application, enable the tracks in the Process Center console.
Create a toolkit dependency in the Designer view
When you create a dependency on a toolkit, you can use the library items from that toolkit for the implementation of the process steps you are building in your current project. For example, after you create a dependency on a toolkit that includes several services, the Designer view automatically makes those services available when a developer is choosing the implementation for an activity.
To create a dependency on a toolkit, one or more snapshots of that toolkit must exist. If not, the library items within the toolkit are not available for reuse.
To create a dependency on a toolkit:
- Verify the process application or toolkit for which you are creating a toolkit dependency is open in the Designer view. If tracks are enabled, the track name is displayed in parentheses after the process application or toolkit.
- Click the plus sign next to Toolkits in the library.
- From the Add Dependency window, click to select the snapshot of the toolkit that you want. Choose the snapshot that includes the version of the library items that you need to reuse in your current project.
When you expand the Toolkits entry in the library, you see the toolkit snapshot that you added. You can click to expand the toolkit to see the library items within it.
Restriction: You will not see the snapshot listed in the Change Dependency box, and you will also not see the yellow warning marker if:
- You have read permissions on for a toolkit.
- The toolkit snapshot has not been released.
Double-clicking an item category, such as Processes, shows the processes included. The library items that you see are automatically made available for reuse throughout your current project.
Delete a toolkit dependency in the Designer view
You can delete a dependency on a toolkit from the Designer view.
When you delete a toolkit dependency, you must be sure to update implementations of library items from the toolkit. For example, if a service from the toolkit is the implementation for an activity, the implementation for that activity is missing or broken as soon as you remove the toolkit dependency. Missing implementations are marked with alert icons in the properties for an affected activity.
To delete a dependency on a toolkit:
- Verify the process application or toolkit that contains the dependency you want to remove is open in the Designer view. If tracks are enabled, the track name is displayed in parentheses
after the process application or toolkit.
- Expand the Toolkits entry in the library:
- Right-click the toolkit in the library and choose Remove dependency from the pop-up menu.
Update any implementations of library items from the toolkit.
Archive toolkits in the Process Center console
If a toolkit is no longer used, you can archive it. When you archive a toolkit, it no longer appears in the list of toolkits in the Process Center console, and you must restore it before you can open it in the Designer view.
If you archive a toolkit and that toolkit has existing dependencies in the Designer, those dependencies remain intact, including implementations that rely on library items within the toolkit. However, you should not use archived toolkits when creating toolkit dependencies in the Designer view because archived items are not considered part of the active IBM Business Process Manager library.
Note that only the business process definitions of the process application are archived. If the process application contains BPEL processes and the associated instance data has to be archived, follow the instructions in "Archiving completed BPEL process and task instances".
To archive toolkits:
- Select the Toolkits tab.
- In the list of toolkits, click the toolkit to archive.
- Click the Manage option.
- Click the Archive Toolkit option.
- When prompted, click the Archive button to confirm to archive this toolkit.
The toolkit is archived.
To view or restore the archived toolkit, click the Archived filter in the Toolkits tab.
The restore action brings back only the business process definitions of the process application. If the process application contains BPEL processes and the associated instance data was archived, the restore action does not bring back the archived process instance data.
Related reference:
Archive completed BPEL process and task instances
Import toolkits from the Process Center console
You can import toolkits from other BPM libraries using the Process Center console.
Follow these steps to import toolkits from an BPM export (.twx) file:
- Select the Toolkits tab.
- Click the Import Toolkit option.
- In the Import Toolkit window, click the Browse button to locate the BPM export (.twx) file to import.
Toolkits that you import should have unique acronyms. If an acronym is not unique, the import completes with a warning; however, attempts to install snapshots that include references to a toolkit with a non-unique acronym will fail with an error.
- Click the Next button to import the selected .twx file. In the Import Toolkit window, click to expand the sections that show the snapshots that will be imported and the snapshots that are already available (and will not be imported).
- Click the Import button. When the import is complete, the imported toolkit is included in the list in the Toolkits tab.
Imported toolkits are immutable, which means that no one can change the items within an imported toolkit. The user who imports a toolkit has administrative access to that toolkit. Administrators can change the immutable quality of a toolkit by enabling the Allow users to update toolkit option in the Manage tab for the imported toolkit.
Administrators can also grant other users access to an imported toolkit. The following table describes the type of access the toolkit administrator can grant to other users and groups:
| Access Type | Description |
|---|---|
| Read | Users with Read access can clone the imported toolkit or copy items from the toolkit to a different toolkit or process application. |
| Write | Users with Write access have all the capabilities included with Read access plus they can import a new version of the toolkit and archive older versions of the toolkit. Write access also enables users to restore previously archived versions. |
| Admin | Users with Admin access have all the capabilities included with Write access plus they can grant or remove administrative access to the toolkit. |
Administrators can grant access to other users as described in Manage access to process applications and toolkits.
Export toolkits from the Process Center Console
You can export toolkits for use in other libraries from the Process Center console.
Follow these steps to export toolkits to an BPM export (.twx) file:
- Select the Toolkits tab.
- In the list of toolkits, click the toolkit to export.
- Find the snapshot to export. If a snapshot does not exist, create one by clicking Create New Snapshot.
- Click the Export option for the snapshot.
- Select BPMN 2.0 export (.zip) or BPM export (.twx).
- Locate the directory to which you want to save the exported file, name the file, and then save it. The exported file can be imported into any Process Center repository.
Repository administrators can see a log of all exports by clicking the Admin option on the Process Center console and then clicking Import and Export Log.
1.5.10. Undeploy a toolkit tip on a Process Center server
You can use the Process Center console to undeploy a toolkit tip from the Process Center server. When you undeploy a tip, all Advanced Integration Service artifacts and the associated business level application (BLA) are removed from the server..
If the toolkit uses BPEL processes, the associated process instance data is cleaned up from the Business Process Choreographer database before the toolkit tip is undeployed.
- From the Process Center console, select the Toolkits tab.
- Select the appropriate toolkit. and then click the Snapshots option. In the list of snapshots, the tip (named Current, by default) is listed first.
- Click Undeploy from the tip's
pop-up menu ().
- Click OK.
To use the toolkit tip, perform a playback in the Process Designer or publish the tip from IBM Integration Designer.
1.5.11. Delete toolkits
If you no longer need a toolkit, you can delete it from the repository. Deleting a toolkit removes all of the files and other artifacts associated with the toolkit. You can delete any toolkit except the system toolkits.
Before you delete a toolkit, do the following tasks:
- Archive the toolkit. Archiving deactivates all snapshots. If the toolkit contains artifacts specific to IBM Business Process Manager Advanced ( Advanced Integration Services), the snapshots on the Process Center Server are also stopped and undeployed.
- Ensure that no process application or toolkit references the toolkit you want to delete. If any process application or toolkit ever referenced this toolkit, those process applications or toolkits need to be deleted first. This is the only way to remove the references.
For more information on dependencies and archiving, see the related links at the end of this topic. To delete a toolkit.
- Log in to the Process Center console with Repository Admin privileges.
- Find the toolkit you want to delete. If it does not appear in the list, make sure you are using the Archived filter to view the list of toolkits.
- From the Snapshots page for the toolkit, click Delete Toolkit.
- When prompted, confirm to delete the toolkit.
Archive toolkits in the Process Center console
Delete a toolkit dependency in the Designer view
Manage tracks
You can enable and manage tracks for the process applications and toolkits that you create or to which you have administrative access.
Before performing any of the following tasks, start Process Designer and access the Process Center console. If configure user accounts and authorizations you can do so by managing access to the Process Center repository.
- Enable tracks in the Process Center console A track is an optional subdivision in a process applications based on team tasks or process application versions. If additional tracks are necessary for a process application, you can enable them at any time.
- Create new tracks in the Process Center console When you create a process application or a toolkit, IBM Business Process Manager creates a single default track named Main. After tracks are enabled for a process application or toolkit, you can additional tracks.
- Editing tracks in the Process Center console You can change the name of a track and the description of the track from the Process Center console.
- Set the default track in the Process Center console When you create a process application or a toolkit, IBM Business Process Manager creates a single default track named Main. If you additional tracks, you can configure one of the new tracks as the default track.
- Archive tracks in the Process Center console If a track is no longer used, you can archive it. When you archive a track, the option for that track no longer appears in the Tracks drop-down menu for the process application or toolkit. If only two tracks exist for a process application or toolkit and you archive one of them, the Tracks drop-down menu is no longer displayed. You must restore an archived track before you can open it in the Designer view in Process Designer.
Enable tracks in the Process Center console
A track is an optional subdivision in a process applications based on team tasks or process application versions. If additional tracks are necessary for a process application, you can enable them at any time.
To enable tracks in the Process Center console:
- Select the Process Apps or Toolkits tab.
- Select the process application or toolkit for which you want to enable tracks.
- Click the Manage option.
- Click the Allow users to create tracks in this process app check box.
For toolkits, the check box label is Allow users to create tracks in this toolkit.
Administrators can now additional tracks in the selected process application or toolkit.
Create new tracks in the Process Center console
When you create a process application or a toolkit, IBM Business Process Manager creates a single default track named Main. After tracks are enabled for a process application or toolkit, you can additional tracks.
To create a new track, enable tracks and use a snapshot as the basis for a new track.
- Select the Process Apps or Toolkits tab.
- Select the process application or toolkit for which you want to create a new track.
- If a snapshot does not exist, create one by clicking Create New Snapshot.
- Click the New Track option for the snapshot.
The New Track option is available only if you have enabled tracks for the process application or toolkit.
- Enter a name and, optionally, a description, and click Save.
When you create a new track, the Process Center console displays a drop-down menu for the process application or toolkit that enables you to select the track that you want.
An acronym is automatically generated for the track. The acronym for the new track is derived from the first character of each word in the track name. For example, if the track name is My New Track, an acronym of MNT is automatically generated. The acronym is used to differentiate multiple versions of a process application snapshot or toolkit. See "Naming conventions".
- To access the new track, click the Tracks drop-down menu and select the track that you want.
- To open the new track in the Designer in Process Designer, click Open <name of track> in Designer.
Editing tracks in the Process Center console
You can change the name of a track and the description of the track from the Process Center console.
To edit tracks in the Process Center console:
- Select the Process Apps or Toolkits tab.
- Select the process application or toolkit in which the track to edit resides.
- Click the Tracks drop-down menu and select the track that you want.
- Click the Edit Track Details option.
- In the Track Details window, edit the track name and the description, and click Save.
Note that you cannot edit the track acronym.
Set the default track in the Process Center console
When you create a process application or a toolkit, IBM Business Process Manager creates a single default track named Main. If you additional tracks, you can configure one of the new tracks as the default track.
When a track is the default track, the library items within it run by default when an event or other trigger that applies to items in more than one track is received by the Process Center server. For example, when you are executing a service by URL and that service exists in more than one track, the service in the default track is run.
To set the default track in the Process Center console:
- Select the Process Apps or Toolkits tab.
- Click to select the process application or toolkit that contains the track that you want.
- Click the Tracks drop-down menu and select the track that you want.
- Select the Make Default Track option.
Archive tracks in the Process Center console
If a track is no longer used, you can archive it. When you archive a track, the option for that track no longer appears in the Tracks drop-down menu for the process application or toolkit. If only two tracks exist for a process application or toolkit and you archive one of them, the Tracks drop-down menu is no longer displayed. You must restore an archived track before you can open it in the Designer view in Process Designer.
To archive tracks in the Process Center console:
- Select the Process Apps or Toolkits tab.
- Select the process application or toolkit in which the track to archive resides.
- Click the Tracks drop-down menu and select the track that you want.
- Select the Archive Track option.
- When prompted, click the Archive button to confirm to archive this track.
The track is archived.
To view or restore archived tracks, click the Manage option for your process application or toolkit, and then click the View Archived Tracks option.
Manage snapshots
Snapshots record the state of library items within a process application or track at a specific point in time. You can create snapshots in the Process Center console or in the Designer view. Snapshot management, such as installing, exporting, and archiving, is performed in the Process Center console.
In addition to the topics covered in this section, you can refer to the following topics for more information about managing snapshots:
- Import and export snapshots of process applications
- Import and export snapshots of toolkits
- Archive snapshots of toolkits
- Install snapshots to a process server
- Undeploy snapshots from a process server
You can create snapshots of the process applications and toolkits that you have created or to which you have write or administrative access.
Before performing any of the following tasks, start Process Designer and open the appropriate view.
BPM does not require unique snapshot names. However, you cannot install a snapshot of a process application in a runtime environment if a snapshot with the same name has already been installed. This is also true for snapshots in different tracks.
- Create snapshots in the Process Center console You can create snapshots for process applications or toolkits from the Process Center console.
- Create snapshots in the Designer view You can create snapshots for process applications or toolkits from the Designer view.
- Comparing snapshots in the Designer view You can compare previously created snapshots in the Designer view. You can see information about the snapshots, such as the time they were created and any processes that were added to them.
- Set status for snapshots To manage the development of your toolkit and process applications (such as testing, approvals, and reuse), you can set status for snapshots.
- Create snapshots from the revision history in the Designer view In addition to capturing snapshots of your ongoing efforts in the Designer view, you also can create snapshots from previous points in time by using the entries in the revision history. For example, if you need a snapshot of your project as it existed before several new items were added, you can use the revision history to locate the point in time that meets your needs.
- Activating snapshots for use with IBM Process Portal If you want exposed library items within particular snapshots to display in IBM Process Portal while those items are being developed in (and reside on) the Process Center server, you need to activate the snapshot that contains the version of the items to display. For example, if you are developing a business BPD and you want to start the BPD in Process Portal, you need to activate the snapshot that contains the version of the BPD to start.
- Deactivating snapshots on a Process Center server If you previously activated a snapshot on the Process Center server, you can deactivate it.
- Archive snapshots in the Process Center console If a process application snapshot or a toolkit snapshot is no longer used, you can archive it. When you archive a snapshot, it no longer appears in the list of snapshots for the process application or toolkit in the Process Center console. You must restore a snapshot to edit it or perform any other actions on it.
- Undeploy a snapshot on a Process Center server If a process application snapshot contains Advanced Integration Services ( SCA modules or BPEL processes), you can use the Process Center console to undeploy a snapshot from the Process Center server.
- Delete unnamed snapshots from a Process Center server, automated method You can configure IBM Process Center to automatically delete unnamed snapshots that you no longer need to keep on the server.
- Delete unneeded snapshots from a Process Center server manually Every time that a Process Designer user saves work, an unnamed snapshot is created. Hundreds of unnamed snapshots quickly accumulate. Over time, you can also accumulate snapshots that were once active but are no longer used. Deleting the snapshots that are not used or needed is good practice for several reasons.
Create snapshots in the Process Center console
You can create snapshots for process applications or toolkits from the Process Center console.
You must have one of the following permissions to create a snapshot in the Process Center console:
- You have administrative privileges ( you are a member of the administrative group tw_admins)
- You have write permission for the process application or toolkit
To create snapshots:
- Select the Process Apps or Toolkits tab.
- Select the process application or toolkit for which you want to create a snapshot.
- Click the Create New Snapshot option.
If multiple tracks exist, select the track that you want from the menu, and then click Create New Snapshot.
- Enter a name for the snapshot and click Save. The description is optional.
The resulting snapshot is displayed in the Process Center console.
An acronym is automatically generated for the snapshot. The acronym is used to differentiate multiple versions of the snapshot. See "Naming conventions".
The snapshot records the current state of the library items within the track. You now can install the snapshot on a process server, compare it to other snapshots, or archive the snapshot.
Manage access to process applications and toolkits
Create snapshots in the Designer view
You can create snapshots for process applications or toolkits from the Designer view.
You must have write permission for the process application or toolkit to create a snapshot in Process Designer. Write permission is required even for users with administrative access ( those users in the tw_admins group).
To create a snapshot in the Designer view:
- Verify the process application or toolkit for which you want to create a snapshot is open in the Designer view. If tracks are enabled, the track name is displayed in parentheses after the process application or toolkit name.
- Click the Snapshot icon.
- Enter a name for the snapshot, and click OK.
The Designer displays the newly created snapshot in the Revision History tab.
An acronym is automatically generated for the snapshot. The acronym is used to differentiate multiple versions of the snapshot. See "Naming conventions".
You can now import the snapshot as a process application, compare it to other snapshots, or archive it. You also can create snapshots from previous points in time.
Related tasks:
Export process updates to SAP Solution Manager
Manage access to process applications and toolkits
Comparing snapshots in the Designer view
You can compare previously created snapshots in the Designer view. You can see information about the snapshots, such as the time they were created and any processes that were added to them.
To compare snapshots:
- To view new or changed library items in each snapshot, click the circle icon in the Revision History header.
To return to the list of snapshots, click the snapshot icon in the Revision History header.
- To view the state of an entire process application or toolkit as of a particular snapshot, click the icon next to the snapshot in the Revision History.
The Designer displays a message in the toolbar to indicate that it is showing the contents of the entire process application as they existed when the snapshot was created. While this message is displayed, you can examine the library contents, but you cannot make changes.
To get back to the current state of your process application or toolkit, click the icon next to the message.
When you are back in the current state, you can change and add library items.
Set status for snapshots
To manage the development of your toolkit and process applications (such as testing, approvals, and reuse), you can set status for snapshots. If you created a snapshot or have Admin or Write access for a snapshot, you can use Process Center to select an existing status or to create a status. For a process application, go to the Process Apps tab and select Snapshots. For a toolkit, go to the Toolkits tab and select Snapshots.
For each listed snapshot, the status is displayed next to the name. Select Status from the menu, and designate an existing value, such as Rejected, or type in a new status to use.
The following status values are available by default for process application snapshots:
- New
- Rejected
- Validated
- Released
The following status values are available by default for toolkit snapshots:
- New
- Rejected
- Released
Released allows the toolkit snapshot to be visible to registered remote Process Centers if the toolkit is shared.
Registering Process Centers and sharing toolkits
Create snapshots from the revision history in the Designer view
In addition to capturing snapshots of your ongoing efforts in the Designer view, you also can create snapshots from previous points in time by using the entries in the revision history. For example, if you need a snapshot of your project as it existed before several new items were added, you can use the revision history to locate the point in time that meets your needs.
You must have write permission for the process application or toolkit to create a snapshot in Process Designer. Write permission is required even for users with administrative access ( those users in the tw_admins group).
To create snapshots from the revision history:
- To view the detailed revision history, click the circle icon in the Revision History header.
- Find the point in time at which you want to create a snapshot, and click the corresponding snapshot icon in the Revision History.
- In the Take Snapshot window, type a name for the snapshot, and click OK.
The revision history displays the new snapshot, which you can install on a test or production server or export to a different Process Center.
An acronym is automatically generated for the snapshot. The acronym is used to differentiate multiple versions of the snapshot. See "Naming conventions".
Manage access to process applications and toolkits
Activating snapshots for use with IBM Process Portal
If you want exposed library items within particular snapshots to display in IBM Process Portal while those items are being developed in (and reside on) the Process Center server, you need to activate the snapshot that contains the version of the items to display. For example, if you are developing a business BPD and you want to start the BPD in Process Portal, you need to activate the snapshot that contains the version of the BPD to start.
Activating the version of the BPD you want to use enables you to start and run the BPD on IBM Process Portal for testing and other purposes.
Note that only the BPD is activated when you activate a process application. If the process application uses BPEL processes and the associated templates were stopped (as described in "Administering BPEL process and task templates"), follow the instructions in that section to start the templates.
Exposed BPDs and data from the current working version (tip) are always available. Activation is required only when you want to access a snapshot version of an item or data that resides on the Process Center server. When you deploy snapshots of process applications on Process Servers in other environments, such as test and production environments, those snapshots are active by default.
To activate or deactivate a snapshot, you must be a repository administrator, an administrator for the selected process application or toolkit, or the user who created the process application or toolkit.
- In the Process Center console, select the Process Apps or Toolkits tab.
- Click to select the process application or toolkit for which you want to activate a snapshot. If multiple tracks exist, select the track that you want from the drop-down menu.
- Find the snapshot that you want, and then click Activate from its pop-up menu ().
When you start IBM Process Portal by directing your browser to http://[host_name]:[port]/portal, providing the name of the host on which IBM Process Center server is installed and the port designated for the server during installation, you can access the exposed library items in the activated snapshot. Using the previous example, you can start the exposed BPD in Process Portal.
To deactivate a snapshot, follow the preceding steps and click the Deactivate option.
Related tasks:
Administer BPEL process and task templates
BPEL process administration - frequently asked questions
Filtering and sorting process applications, snapshots, and toolkits
Deactivating snapshots on a Process Center server
If you previously activated a snapshot on the Process Center server, you can deactivate it. If you activated a snapshot that contains a business BPD, you were able to run the BPD on IBM Process Portal. When you deactivate the snapshot, the BPD is no longer available to be run on IBM Process Portal.
To deactivate a snapshot, you must be a repository administrator, an administrator for the selected process application or toolkit, or the user who created the process application or toolkit.
- In the Process Center console, select the Process Apps or Toolkits tab.
- Click to select the process application or toolkit for which you want to deactivate a snapshot. If multiple tracks exist, select the track that you want from the drop-down menu.
- Find the snapshot that you want, and then click Deactivate from its pop-up menu ().
After you deactivate the snapshot, you can no longer access the exposed library items in the snapshot.
Related tasks:
Administer BPEL process and task templates
Undeploy a snapshot on a Process Center server
BPEL process administration - frequently asked questions
Filtering and sorting process applications, snapshots, and toolkits
Archive snapshots in the Process Center console
If a process application snapshot or a toolkit snapshot is no longer used, you can archive it. When you archive a snapshot, it no longer appears in the list of snapshots for the process application or toolkit in the Process Center console. You must restore a snapshot to edit it or perform any other actions on it.
To archive a snapshot, you must have write or administrative access to the process application or toolkit. Note that only the business process definitions of the process application are archived. If the process application contains BPEL processes and the associated instance data has to be archived, follow the instructions in "Archiving completed BPEL process and task instances".
To archive a snapshot:
- Select the Process Apps or Toolkits tab.
- Select the process application or toolkit for which you want to archive snapshots. If multiple tracks exist, select the track that you want from the drop-down menu.
- Find the snapshot that you want, and then click Archive from its pop-up menu ().
- When prompted, click Archive to confirm your selection.
The snapshot is archived.
To view or restore archived snapshots, click the Archived filter.
The restore action brings back only the business process definitions of the process application. If the process application contains BPEL processes and the associated instance data was archived, the restore action does not bring back the archived process instance data.
Related reference:
Archive completed BPEL process and task instances
Undeploy a snapshot on a Process Center server
If a process application snapshot contains Advanced Integration Services ( SCA modules or BPEL processes), you can use the Process Center console to undeploy a snapshot from the Process Center server.
Deactivate the snapshot before you undeploy it. See "Deactivating snapshots on a Process Center server" in the related links section of this topic. When you activate a snapshot on the on a Process Center server, it is considered deployed on that server. In order to remove the Advanced Integration Services artifacts and the associated business level application (BLA) from the Process Center server, you must undeploy the snapshot.
To deploy a snapshot to a server, see Deploy snapshots to a process server.
If the process application uses BPEL processes, the associated process instance data is cleaned up from the Business Process Choreographer database before the snapshot is undeployed.
If you used the Process Center console to launch the Process Admin Console before you undeploy the snapshot, it is possible the following steps might undeploy the snapshot from both the Process Center server and the process server.
- From the Process Center console, select the process application, then click the Snapshots tab.
- Find the snapshot you want to undeploy, and then click Undeploy from its pop-up menu ().
- Click OK.
To use the snapshot, perform a playback in the Process Designer or deploy the snapshot from IBM Integration Designer.
Related tasks:
Deactivating snapshots on a Process Center server
![]()
1.7.10. Delete unnamed snapshots from a Process Center server, automated method
You can configure IBM Process Center to automatically delete unnamed snapshots that you no longer need to keep on the server.
You must be a repository administrator or development environment administrator to do this task. A named snapshot is a snapshot that has a version number or other identifier. Unnamed snapshots exist between the named snapshots. Every time that a Process Designer user saves work, an unnamed snapshot is created on the Process Center server. Hundreds of unnamed snapshots quickly accumulate. If you have many projects under development in the Process Center, the Process Center database is likely to grow rapidly. Reduce database bloat by removing the unnamed snapshots. You might also want to delete unnamed snapshots if the Process Center server performance is slowly degrading.
Keep the following points in mind while you plan how to use this feature:
- Automatic deletion never removes named snapshots.
- Because automatic deletion randomly chooses which process applications and toolkits to work on, specify a duration that is long enough to process all the active projects in the Process Center.
- Automatic deletion removes unnamed snapshots in chunks of 100 to limit database contention. If the duration time expires before all the unnamed snapshots are removed, automatic deletion might not remove all the unnamed snapshots between two named snapshots.
- Automatic deletion runs only when the server is up. If the server is down when the configured start time occurs, automatic deletion will not run until the next time the deletion feature is configured to start.
The feature to automatically delete unnamed snapshots is controlled by a set of configuration options in the <server> section of 100Custom.xml. The section begins with the heading <unnamed-snapshots-cleanup-config>.
- To turn on the automated deletion feature, set <enabled> to true. The default setting is false.
- To set the time of day when you want the automated snapshot deletion to run, provide a value for <cleanup-start-time>. The time used is the local computer time. The default time is midnight: 23:59:59. The automatic snapshot deletion process makes intensive use of the database; therefore, run the process when other demands on the system are low. Running it during times of heavy use slows the response time for people using the system.
- Set <cleanup-duration-minutes> to the number of minutes that you want the process to run. The default duration is 5 minutes.
- To define which snapshots you want to delete, set <clean-after-number-named-snapshots>. Deleting snapshots removes some of the change history for your project; therefore, you probably want to keep the most recent snapshots. The default setting is 4, which means that only unnamed snapshots older than the four most recent named snapshots are deleted. With that setting, if the Process Center server has versions 0.1 to 0.6 on it, only unnamed snapshots that were created before the named snapshot for version 0.3 would be deleted.
Example
The relevant section in 100Custom.xml looks like this example, which uses default settings:
<unnamed-snapshots-cleanup-config>
   <enabled>true</enabled>
   <cleanup-start-time>23:59:59</cleanup-start-time>
   <cleanup-duration-minutes>5</cleanup-duration-minutes>
   <clean-after-number-named-snapshots>4</clean-after-number-named-snapshots>
</unnamed-snapshots-cleanup-config>
The easy way to manage the accumulation of unnamed snapshots on the Process Center server is to enable automated deletion. However, you can also delete specific unnamed snapshots or archived snapshots. See Delete unneeded snapshots from a Process Center server manually for details. To see the results from the automated deletion process, check the AppTarget cluster server log file.
![]()
1.7.11. Delete unneeded snapshots from a Process Center server manually
Every time that a Process Designer user saves work, an unnamed snapshot is created. Hundreds of unnamed snapshots quickly accumulate. Over time, you can also accumulate snapshots that were once active but are no longer used. Deleting the snapshots that are not used or needed is good practice for several reasons.
The easy way to manage the accumulation of unnamed snapshots on the Process Center server is to enable automated deletion. However, you can also delete specific unnamed snapshots or archived snapshots by following the steps that follow.
You must be a repository administrator to perform this task. You might want to delete unneeded snapshots to reduce the size of the Process Center database. If you have many projects in development in the Process Center, you are likely to find the Process Center database is growing rapidly. One action that you can take is to remove unnamed snapshots. Unnamed snapshots exist between named snapshots. Reduce database bloat by removing the unnamed snapshots. You can also delete archived snapshots for the same purpose.
You might also want to delete unnamed snapshots if the Process Center server performance is slowly degrading. Having hundreds or thousands of unnamed snapshots on the server could contribute to worsening performance. Delete snapshots that are not used or needed.
Use the wsadmin command BPMSnapshotCleanup to delete unnamed and archived snapshots for a process. See the command reference topic for a complete list of parameters for this command.
In many situations, it is a good idea to purge unneeded snapshots on a regular schedule. To avoid performance degradation or timeouts in Process Designer run the BPMSnapshotCleanup command when no operations are running on the Process Center and no connections are open between the Process Designer and the Process Center.
- Run the wsadmin BPMListProcessApplication command on the Process Center server to show all process application snapshots on that server.
- Archive named snapshots if they are no longer needed and you want to delete them. You can delete named snapshots from the Process Center server only if they are archived. Run BPMShowSnapshot to see information about a specific snapshot.
- Run the wsadmin BPMShowProcessApplication command to show details about the process application, including the process application acronym. You need the acronym to run the BPMSnapshotCleanup command.
- Set the containerAcronym parameter to identify the process application that contains the snapshots to be deleted.
- Set optional parameters. You must set at least one optional parameter as a filter for determining which unnamed snapshots are deleted. You can also use one of the optional parameters, deleteArchivedSnapshot,
to delete archived snapshots in addition to unnamed snapshots. See the BPMSnapshotCleanup command reference for a complete list of parameters for that command.
- Run the BPMSnapshotCleanup command to delete all unnamed snapshots that fit within the parameters that you have defined. The command does not delete the first snapshot of each branch, even if it is unnamed or archived. The first snapshot is needed because it contains the information that shows in the Revision
History window in Process Designer.
If you are using a SOAP connection, the command can take longer to complete than the specified SOAP timeout value. Although the command continues to run until it is finished, you might see the exception "java.net.SocketTimeoutException: Read timed out." To prevent this exception, set a higher value for the property...
- com.ibm.SOAP.requestTimeout
...in the profile_root/properties/soap.client.props file.
Applying governance to a process application
You can apply a governance process that provides a control over the installation of process applications or notifies people when a snapshot is installed or changes status. When an Installation Requested governance process is applied to a process application, requests made from IBM Process Center to install a snapshot of that process application trigger a governance process. When a Snapshot Status Change governance process is applied, all changes to the status of a snapshot are reported.
With governance applied to a process application, requests to install a snapshot of the process application from Process Center are referred to a governance process. You can use a governance process to install to a connected server or to generate an installation package for an offline server. Beginning in Version 8.5.0, the governance process is also started by the installation of snapshots using the BPMInstall wsadmin command and the creation of offline packages using the BPMCreateOfflinePackage wsadmin command.
An installation governance process is a process application in the Process Center that is active and uses the Install Snapshot service defined in the System Governance toolkit. The governance process is not installed on a process server. To install a process application snapshot for a process server that depends on the governance toolkit, delete all application artifacts that depend on anything from the governance toolkit.
The following steps explain how governance is applied to the installation of a process application, referred to as MortgageApp in this explanation.
- An administrator or developer creates a process application to be used for governance and sets a dependency on the System Governance toolkit.
- A business analyst or developer creates a new business BPD using the Installation Requested template. The dialog for a new BPD contains an option to use the Installation Requested template in the System Governance toolkit to create a BPD that implements an installation governance process. The template ensures compatibility between the BPD and the specific governance event.
- When the governance BPD has been created, the developer can use Process Designer to add email notifications and other activities that customize the governance process. The developer can then connect the activities, take a snapshot of the process application, and set the status to "Released".
- When the governance process is released, it is ready to be applied to a process application. The developer tells an administrator the name of the governance BPD or applies a governance tag to the BPD so the administrator can easily find it.
- Typically, the administrator would now remove the developer's access to the governance process application so it is now only available to administrators.
- An administrator can now open the MortgageApp process application, select the Governance tab, and change to the new governance process from the default BPD, which associates no activities with installation. (The governance option is exposed only to users who have administrative authority for the process application.) Once the new governance process has been selected, it is instantly active on Process Center. As long as this governance process is applied to the MortgageApp process application, snapshots of MortgageApp cannot be installed on any process server until the conditions set in the governance process have been completed.
- Subsequently, whenever a developer selects a target process server and completes an installation request to install a snapshot of MortgageApp on a server, the installation request starts the registered governance process.
- If status messages have been enabled, the status in Process Center changes as the approval process progresses, using default states or status messages customized and set in the governance process. The status messages change when the installation service is called, but Set Installation Status can still be used to alter the value. Once installation is complete, the status looks just the same as if governance was not used.
When the governance BPD from a released snapshot is in use for governance, users cannot change the status of the snapshot of the governance process until one of the following conditions is met:
- An administrator changes the association to the default governance process from System Governance toolkit.
- An administrator changes the association to a different released snapshot of the same governance process.
- An administrator changes the association to a released snapshot of a different governance process application.
When an administrator changes the association of any governance BPD, process instances already running continue to run, unless an administrator terminates the instance.
The person who creates a process application has administrative authority to change the governance process being used on that process application. Take this authority into consideration when establishing governance practices. In most cases, the prudent practice is to limit the number of people who process applications.
- Applying a governance BPD to a process application or snapshot If you have administrative authority for a process application, you can apply a governance process to it. Your governance process might notify selected people that a new snapshot is being installed or it might ensure that a new snapshot cannot be installed on a server until certain approvals have been secured or it might send out notifications of snapshot status changes.
- Migrate a governance process from V8.0.0 The governance process was redesigned for BPM V8.0.1. As a result, governance processes that were developed in V8.0.0 cannot be reused; they must be revised to fit the V8.0.1 design.
- Create a governance process for installing a process application Before governance can be applied to a process application, someone must design and create the governance process. The governance process defines the steps required before the process application snapshot can be installed on a process server.
- Create a governance process for the status of a snapshot You can create a governance process that reacts to the status change of a snapshot.
- Create a governance BPD that installs a snapshot when the status changes You can call the Install Snapshot service from a governance process based on the Snapshot Status Change template. You can make use of that ability to create a custom governance process that installs a snapshot on a server when someone changes the status of the snapshot or creates a snapshot.
- Change a governance application You can create a governance process to replace the default governance for a snapshot.
- Testing a governance process Testing a governance process is similar to testing other process applications.
- Export and importing a process application that uses customized governance If you export a snapshot of a process application that is under governance, the governance process is not included in the export package. The association to the governance process is exported with the process application, but the governance process itself is not exported. To create export the governance process as well, you need to do that action separately.
- Recovering if a process application under governance fails to install If the installation of a process application fails while under governance, a number of remedies are available for administrators.
- Governance services The System Governance toolkit provides templates and services that you can use in Process Designer to create or customize a governance process.
- Remove governance to install a snapshot on Process Server To install a process application snapshot for BPM (BPM) Process Server that depends on the governance toolkit, delete all application artifacts that depend on anything from the governance toolkit.
Create a governance process for the status of a snapshot
Applying a governance BPD to a process application or snapshot
If you have administrative authority for a process application, you can apply a governance process to it. Your governance process might notify selected people that a new snapshot is being installed or it might ensure that a new snapshot cannot be installed on a server until certain approvals have been secured or it might send out notifications of snapshot status changes.
Read Applying governance to understand the overall context for this task.
You need administrative authority for a process application before you can apply governance to it. Version 8.0.1 provides new function in the System Governance toolkit (TWSYSG), which contains the machinery required to build a governance process. Governance processes designed for Version 8.0.0 will not run in later versions.
By default, when anyone tries to install a snapshot of a process application, an instance of the default Installation Requested BPD from the System Governance toolkit is started. That default BPD just allows the installation to proceed. To create apply governance to that process application, you need to replace that default BPD with a governance process that is customized to your requirements.
Also by default, when a snapshot changes status, an instance of the default Snapshot Status Change BPD from the System Governance toolkit is started. To create apply governance to the process application, you need to replace that default BPD with a governance process that places notifications or controls around status changes.
You can restore the system default BPD at any time or change the governance process to a new version or process.
Follow these steps to apply governance to a process application:
- Before you apply governance to a process application, you need to have a governance process in place on the Process Center server. The governance process must have a snapshot in released status.
See the related links for instructions about how to create a new governance
process for installing process application snapshots.
- On the Governance page for the process application, click the Change link beside the current governance process and select another governance process to replace it. Unless you already have another governance process in place, you are replacing the system default Installation Requested BPD or the system default Snapshot Status Change BPD. When your new installation governance process has been selected, any attempt to install a snapshot of that process application to a server will start the governance process. If your new process deals with changes to snapshot status, every new snapshot or status change in a snapshot will trigger the governance event to provide notifications the change has happened.
The newly applied process will run the next time a snapshot is installed or a snapshot status is changed.
Related tasks:
Migrate a governance process from V8.0.0
Create a governance process for installing a process application
Create a governance process for the status of a snapshot
Create a governance BPD that installs a snapshot when the status changes
Change a governance application
Export and importing a process application that uses customized governance
Recovering if a process application under governance fails to install
Remove governance to install a snapshot on Process Server
Related reference:
Create a governance process for the status of a snapshot
Migrate a governance process from V8.0.0
The governance process was redesigned for BPM V8.0.1. As a result, governance processes that were developed in V8.0.0 cannot be reused; they must be revised to fit the V8.0.1 design. In IBM Business Process Manager V8.0.0, you cannot configure governance to use a specific governance process snapshot. Instead, in V8.0.0, Process Center always runs the configured governance process from the tip version. In versions later than V8.0.0, you can configure governance with a specific governance process snapshot. This redesign has been accompanied by a number of other modifications. As a result, governance processes developed in BPM V8.0.0 cannot be migrated automatically to newer versions of BPM.
- In V8.0.0, only two governance processes ran in the Process Center, one for installation and one for snapshot status. In V8.0.1 and later, you can have many governance processes.
- In V8.0.0, governance was applied to one process application or toolkit at a time. In V8.0.1 and later, governance is always running and there is a system-wide default process in the System Governance toolkit. However, you can still configure a custom governance process for one process application or toolkit at a time.
- In V8.0.0, there were services in the System Governance toolkit the governance processes used. In V8.0.1 and later, many of those services are still used, with the same interface as they had in V8.0.0.
- The GOV prefix was used on business object names in V8.0.0. The prefix is no longer used in V8.0.1.
- In V8.0.0, a governance process was started by a message start event bound to an undercover agent (UCA). In V8.0.1 and later, no UCA is used; an associated governance process instance is started directly.
- In V8.0.0, a governance process was constructed just like any other business BPD. In V8.0.1 and later, the governance process developer must use one of two governance templates to create the BPD.
Because of these design changes, you must make a number of manual changes to a V8.0.0 governance process before you can use it in later versions of BPM. You cannot migrate a process instance.
To migrate governance process from V8.0.0:
- Export the governance process application to reuse from BPM V8.0.0. Because the process application has a dependency on the System Governance toolkit, that toolkit is also exported.
- Import the governance process into BPM V8.0.1 or later.
- In Process Designer, change the dependency on your process application to use the System Governance toolkit and the System Data toolkit for your current version. When the toolkit dependency is upgraded from V8.0.0 to a later version, bindings are revised to reflect the new business object names. The API that displays the custom governance processes that are available for use shows only processes that have a dependency on the current System Governance toolkit.
- Create a BPD. In the New Business Process Definition window, give the BPD a name that will be meaningful to potential users, and then click Select. Choose the Installation Requested template or the Snapshot Status Change template. Click Finish.
You can select the governance templates for use with a process application only when a dependency on the System Governance toolkit has been established. After you save the BPD, you cannot change the input and output variables that have been set by the template.
- In your new BPD, delete the start and end events and the system lane.
- Re-create the private variables from the original BPD in the new BPD. The ProcessAppInstallationRequest variable and the SnapshotStatusRequest variable are generated by the templates, and they cannot be changed or removed.
- Select all lanes from the original BPD and copy and paste them into the new BPD. If you were using a process to govern the installation of a snapshot that used Approve or Cancel actions, those actions are still supported.
- Change the implementation type of the start event to none.
- Under the start event, add a post assignment that puts
the value of the input variable into the private variable that was used previously for the request, or change the BPD activities to use the input variable directly.
- Verify the implementation of gateways and redo them if necessary.
Save the process application.
- Take a snapshot of the process application and change status to Released.
Related tasks:
Applying a governance BPD to a process application or snapshot
Create a governance process for installing a process application
Create a governance process for the status of a snapshot
Create a governance BPD that installs a snapshot when the status changes
Change a governance application
Export and importing a process application that uses customized governance
Recovering if a process application under governance fails to install
Remove governance to install a snapshot on Process Server
Related reference:
Create a governance process for installing a process application
Before governance can be applied to a process application, someone must design and create the governance process. The governance process defines the steps required before the process application snapshot can be installed on a process server. IBM Business Process Manager includes the System Governance toolkit, which supplies the templates, services, and business objects that you need to create a governance process. This topic describes creating a process relating to the installation of a process application snapshot. You can also create a governance process relating to changing the status of a snapshot for a process application or a toolkit.
By default, when anyone tries to install a snapshot of a process application, an instance of the default Installation Requested BPD from the System Governance toolkit is started. That default business process definition just allows the installation to proceed. To create apply governance to that process application, you need to replace that default BPD with a governance process that is customized to your requirements. You can use the governance process to notify people of the installation or you can set approvals in place so that no one can install it from IBM Process Center on a process server until those approvals have been completed. Governance can provide a way to ensure that proper testing is done and approvals are secured before a snapshot of a process application is installed.
A governance process created in BPM V8.0.0 cannot be used in this version. You must use a governance process from V8.0.1 or later. You must use the process described here to create a governance process. You must build your governance BPD using a template from the System Governance toolkit.
- In IBM Process Center, create a process application to use for governance. This process application will contain the installation governance process. (You cannot create a governance process in a toolkit. Only process applications can be used to create governance processes.)
- In Process Designer, add a dependency on the System Governance toolkit to your process application. The process application must have a direct dependency on the System Governance toolkit snapshot to be able to create governance processes. Indirect dependencies are not supported.
- Create a BPD. In the New Business Process Definition window, give the BPD a name that will be meaningful to potential users, and click the Select button to open a window where you can choose which governance template you want to use. For this governance process, choose the Installation Requested template. Click Finish.
The governance templates are only available for use with a process application when a dependency on the System Governance toolkit has been established. Once you save the BPD after making the governance template selection, the input variable, ProcessAppInstallationRequest, that has been set by the template cannot be changed.
- Use the template as a base, develop a BPD to meet your organization's requirements. Add activities and email to customize the BPD to fit your governance requirements. See Enable email for Process Portal notifications for some information about email.
When the governance process is complete, take a snapshot of the process application, label it, and set the status of the snapshot to "Released." Only a released snapshot can be applied to a process application by an administrator.
Apply the new BPD as the governance process for process applications to govern. See the related link to instructions for that task.
When the governance BPD from a released snapshot is in use for governance, users cannot change the status of the snapshot of the governance process until one of the following conditions is met:
- An administrator changes the association to the default governance process from System Governance toolkit.
- An administrator changes the association to a different released snapshot of the same governance process.
- An administrator changes the association to a released snapshot of a different governance process application.
When an administrator changes the association of any governance BPD, process instances already running continue to run, unless an administrator terminates the instance.
Related tasks:
Applying a governance BPD to a process application or snapshot
Migrate a governance process from V8.0.0
Create a governance process for the status of a snapshot
Create a governance BPD that installs a snapshot when the status changes
Change a governance application
Export and importing a process application that uses customized governance
Recovering if a process application under governance fails to install
Remove governance to install a snapshot on Process Server
Related reference:
Create a governance process for the status of a snapshot
You can create a governance process that reacts to the status change of a snapshot. The System Governance toolkit (TWSYSG) contains the machinery required to build a governance process. The toolkit has integration services for installation and snapshot status, templates for business process definitions, and governance business objects.
When you create a snapshot or change status, an instance of the default Snapshot Status Change BPD from the System Governance toolkit is started. When a new snapshot of a process application or toolkit is created or when the status of a snapshot changes, a message event is triggered. If you have created a governance process and bound to the snapshot event for the process application, you can use the governance process to track status changes and issue notifications.
- Create a new process application. This process application will contain your snapshot governance process. (You cannot create a governance process in a toolkit. Only process applications can be used to create governance processes.)
- In Process Designer, add a dependency to the System Governance toolkit. You can see the System Governance toolkit in your list of available toolkits when you click the plus sign to add a dependency.
- Create a BPD. In the New Business Process Definition window, give the BPD a name that will be meaningful to potential users, and click the Select button to open a window where you can choose which governance template you want to use. For this governance process, choose the Snapshot Status Change template. Click Finish.
The governance templates are only available for use with a process application when a dependency on the System Governance toolkit has been established. Once you save the BPD after making the governance template selection, the input variable, SnapshotStatusRequest, that has been set by the template cannot be changed.
- Use the template as a base, develop a BPD to meet your organization's requirements. Add activities and email to customize the BPD to fit your governance requirements. See Enable email for Process Portal notifications for information about email.
When the governance process is complete, take a snapshot of the process application, label it, and set the status of the snapshot to "Released." Only a released snapshot of the governance process can be applied to a process application by an administrator.
Apply the new BPD as the governance process for process applications to govern. See the related link to instructions for that task. A new BPD instance of your governance process starts whenever a new snapshot is created or the status of the snapshot is changed.
When the governance BPD from a released snapshot is in use for governance, users cannot change the status of the snapshot of the governance process until one of the following conditions is met:
- An administrator changes the association to the default governance process from System Governance toolkit.
- An administrator changes the association to a different released snapshot of the same governance process.
- An administrator changes the association to a released snapshot of a different governance process application.
When an administrator changes the association of any governance BPD, process instances already running continue to run, unless an administrator terminates the instance.
Related tasks:
Applying a governance BPD to a process application or snapshot
Migrate a governance process from V8.0.0
Create a governance process for installing a process application
Create a governance BPD that installs a snapshot when the status changes
Change a governance application
Export and importing a process application that uses customized governance
Recovering if a process application under governance fails to install
Remove governance to install a snapshot on Process Server
Related reference:
Create a governance process for installing a process application
Create a governance BPD that installs a snapshot when the status changes
You can call the Install Snapshot service from a governance process based on the Snapshot Status Change template. You can make use of that ability to create a custom governance process that installs a snapshot on a server when someone changes the status of the snapshot or creates a snapshot. The System Governance toolkit (TWSYSG) contains the resources that you need to build a governance process. The toolkit has integration services for installation and snapshot status changes, templates that provide business process definitions for installation and snapshot status changes, and governance business objects.
When you create a snapshot or change its status, an instance of the default Snapshot Status Change BPD from the System Governance toolkit is started. You can create a custom governance process to replace the default process. Bind the custom process to the snapshot event for the process application and add a call to the Install Snapshot service. You can then use the governance process to install a snapshot on a server whenever someone changes the status. For example, you can set up a governance process that installs snapshots to a test server as soon as the status is changed to Test. This implementation contributes to continuous integration.
In its simplest form, this custom governance process has a start event, an end event, and three activities. The first activity provides a list of available servers for the process application that is under this governance. The second activity initializes the required data in the ProcessAppInstallation object since the Installation Service expects this object. The third activity starts the installation request. However, this is a governance process, so make sure the governance goals are met. If your process installs a snapshot on a production server, you probably want an approval process as part of this snapshot governance process, so that it goes through proper review and approval before it is automatically installed.
- In IBM Process Center, create a process application to use for governance. This process application contains the installation governance process.
You cannot create a governance process in a toolkit. Use process applications to create governance processes.
- In Process Designer, add a dependency on the System Governance toolkit to your process application. The process application must have a direct dependency on the System Governance toolkit snapshot to function as a governance process. Indirect dependencies are not supported.
- Create a BPD in the New Business Process Definition window using the Snapshot Status Change template. Click Finish.
The governance templates are available only when a dependency exists on the System Governance toolkit. After you save the BPD, the input variable, SnapshotStatusRequest, that was set by the template cannot be changed.
The governance process must be created using the template definition. You cannot manually create a variable of type SnapshotStatus and have your BPD work as a governance process.
- Use the template as a base, develop the BPD to meet your organization's requirements. The following steps provide some suggestions.
- Create an activity that calls the Get All process Servers service from the System Governance toolkit. This service provides a list of the servers that can be used to install a snapshot of that process application.
- Create an activity that calls the Install Snapshot service from the System Governance toolkit. This service takes a ProcessAppInstallation object for input.
- Provide process application and snapshot parameters from the SnapshotStatusRequest process input object. For the server parameter, use a server object that is in the list of servers from the Get All Process Servers call.
- Optional: For the migrationInstructions parameter, create an empty migration instruction in this form: tw.object.listOf.MigrationInstructions(). For running instances, leave the data and migrate it later using the Process Inspector. You can leave the initiatedBy and dateInitiated parameters empty.
- When the governance process is complete, take a snapshot of the process application, label it, and set the status of the snapshot to "Released". Only a released snapshot of the governance process can be applied to a process application.
- Apply the new BPD as the Snapshot Status Change governance process for process applications to govern. See the related link to instructions for that task.
A new BPD instance of your governance process now starts whenever a new snapshot is created or the status of the snapshot is changed.
If a governance process is used to install a snapshot, process the InstallResponse returned by the Install Snapshot service to make sure installation is successful. If the installation is not successful, use the Cancel Snapshot Installation service to cancel the previous installation request. This method of cancellation is required if the installation is triggered through a governance process which is associated with Snapshot Status Change event. Changing the Snapshot Status Change governance assignment to the default does not reset the status of failed installations.
Related tasks:
Applying a governance BPD to a process application or snapshot
Migrate a governance process from V8.0.0
Create a governance process for installing a process application
Create a governance process for the status of a snapshot
Change a governance application
Export and importing a process application that uses customized governance
Recovering if a process application under governance fails to install
Remove governance to install a snapshot on Process Server
Related reference:
Change a governance application
You can create a governance process to replace the default governance for a snapshot. In IBM Business Process Manager, governance is always enabled, but the default implementations impose no constraints on installation or status change. You can provide a governance process to require notifications or approvals when a snapshot is installed on a server or when a snapshot changes status. To put this new process into use, replace the existing governance process with your new one. For information about how to create governance processes, see the related links.
When a governance process snapshot is being used for governance by a process application, you cannot change the status of the governance process snapshot until one of the following conditions is met:
- An administrator changes the association to the default governance process from System Governance toolkit.
- An administrator changes the association to a different released snapshot of the same governance process.
- An administrator changes the association to a released snapshot of a different governance process application.
When an administrator changes the association of a governance business BPD, process instances already running continue to run unless an administrator terminates the instance. For that reason, terminate or complete the running instances before changing a governance assignment.
- Terminate or complete the running instances of the snapshot that is under governance by the process that you are going to change.
- Log in to Process Center using an ID that has administrative authority for the process application for which you want to provide governance.
- Open the process application for which you want to apply governance. If you are applying governance for status changes to a snapshot, you can open a process application or a toolkit.
- Choose the governance process to replace and click the Change link beside it. A window opens where you can choose the governance process to use as a replacement. You can see a list of governance processes available for use. The list includes only released processes with a dependency on the System Governance toolkit for the current version. You can sort the list of governance processes by name or creation date.
- Choose the governance process to use and click OK.
In Process Center, click the History tab. You will see a new event that indicates the change was made.
Related tasks:
Applying a governance BPD to a process application or snapshot
Migrate a governance process from V8.0.0
Create a governance process for installing a process application
Create a governance process for the status of a snapshot
Create a governance BPD that installs a snapshot when the status changes
Export and importing a process application that uses customized governance
Recovering if a process application under governance fails to install
Remove governance to install a snapshot on Process Server
Related reference:
Testing a governance process
Testing a governance process is similar to testing other process applications.
Before you use a governance process with process applications in a production environment, test your governance process with a test scenario.
- Create a snapshot of the governance process that you are testing and set it to "Released". It is immediately available for use. You do not need to notify people that it is released.
- Optional: Create dummy offline process servers to test governance processes that involve installation. You can also use a test process server to verify your governance processes.
- In IBM Process Center, create a dummy process application to use for testing.
- Select the dummy process application. On the Governance page for the process application, click the Change link beside the current governance process and select the governance process to test.
- Test your changed governance process by making installation requests or status change requests on the dummy process application.
- If you encounter an installation failure while testing,
follow these steps to recover:
- Fix the problems with the governance process that you are testing.
- Create a new snapshot, or to use the same snapshot for testing, reset the governance association to the default governance process in the dummy test process application. This latter action should clear the "Installation terminated" status messages if there are any.
- Repeat the test.
- Keep the previous governance process until you are sure it is not needed.
- Optional: Delete the dummy offline server and dummy test application.
- Let the process administrator know the new process is available for use.
- Before changing the governance association to a new governance process, make sure that any existing governance process instances are either completed or stopped.
If you encounter a difficulty after putting a governance application into service, the recovery process is straightforward. Stop or complete the running instances of the governance process. Then replace the faulty governance process with a proven governance process or with the default process until you fix the governance process that caused the problems.
Related tasks:
Applying a governance BPD to a process application or snapshot
Migrate a governance process from V8.0.0
Create a governance process for installing a process application
Create a governance process for the status of a snapshot
Create a governance BPD that installs a snapshot when the status changes
Change a governance application
Export and importing a process application that uses customized governance
Recovering if a process application under governance fails to install
Remove governance to install a snapshot on Process Server
Related reference:
Export and importing a process application that uses customized governance
If you export a snapshot of a process application that is under governance, the governance process is not included in the export package. The association to the governance process is exported with the process application, but the governance process itself is not exported. To create export the governance process as well, you need to do that action separately.
If you have a snapshot of a process application under governance, you might want to export it for use in another IBM Process Center. In that new context, you might want to use the same governance process, or you might want to apply a new or different governance process. Follow these steps to achieve those goals.
- Export a snapshot of the process application that is under governance as a .twx file. The governance process selection is also exported in the .twx file.
- To use the current governance process on the new server, export a snapshot of the governance process as well. Import a snapshot of the governance process. Mark it as "Released". If you import a snapshot of the governance process first, the dependency is restored when the process application is imported. If a released snapshot of the governance process identified in the process application dependency is not present in the target Process Center, the governance selection changes to the default governance process.
- Import the snapshot of the process application to the new server.
- If you are applying a new governance process instead of using one that was previously imported, associate a snapshot of the new governance process with the process application. The snapshots of the governance process and the process application must be in the same Process Center.
You have now imported a snapshot of the process application into the target Process Center. Later, if you import a new snapshot of the same process application, the dependency that has been established in the target Process Center determines the resulting implementation:
- If the process application in the target Process Center has a dependency on a governance process that is not the default process, the new snapshot uses that dependency. The imported dependency is ignored.
- If the process application in the target Process Center has a dependency on a default governance process, the new snapshot adopts an imported dependency if a released snapshot of the governance process identified in the .twx file is available in the Process Center.
Related tasks:
Applying a governance BPD to a process application or snapshot
Migrate a governance process from V8.0.0
Create a governance process for installing a process application
Create a governance process for the status of a snapshot
Create a governance BPD that installs a snapshot when the status changes
Change a governance application
Recovering if a process application under governance fails to install
Remove governance to install a snapshot on Process Server
Related reference:
Recovering if a process application under governance fails to install
If the installation of a process application fails while under governance, a number of remedies are available for administrators. If an error occurs when you try to install a snapshot, the installation service returns an InstallErrorDetails object within the InstallResponse object. The InstallErrorDetails object provides an error code, a recoverable flag, an error message, a suggested action, and supporting details. You can include this object in a governance process to email an error report to an administrator. The recoverable flag is set to true only when the connection failed because the server is down or unreachable. Here are the error codes that might be returned:
- -15 Invalid input
- The input to the installation service is not valid. For example, the migrationInstructions list in the ProcessAppInstallation object might be missing.
- -14. Installation not fully complete
- Some parts of the installation did not succeed. For more information about this problem, see Troubleshooting snapshot installations.
- -13. Multiple installation requests were found
- Multiple requests exist to install the same snapshot to the same server, which causes the installation service call to fail.
- -10. Not authorized
- The user ID that was used to call the governance service does not have the authority to install a snapshot to a server. This error might happen when governance services are run outside the system lane and a user without the necessary authority accepts the task.
- -9. Insufficient capabilities
- Possible causes include a request was made to install an advanced application to a standard server.
- -8. Error updating the installation record
- Installation probably succeeded, but there was a failure when marking the installation record as complete.
- -7. Connection failed
- Verify the connection and try again.
- -6. Snapshot export failed
- Installation failed when Process Center tried to export the snapshot package to be installed on the Process Server.
- -5. Internal error
- A failure occurred that is related to the installation state machine.
- -4. Unsupported application
- A request was made to install an advanced application to a standard server. This error is similar to error -9 but happens at a different stage in the code path.
- -3. Snapshot already on the server
- The Process Server already has a snapshot with the same ID as the one in the installation request.
- -2. Dmgr unavailable
The deployment manager was not available for a network deployment Process Server environment.
- -1 Installation failed
- This message applies to errors that are not covered by the more specific codes.
- If a customized governance process is faulty, change to the default governance process, fix your customized governance process, and then change back to your process from the default process.
- If the server stopped, the server administrator must fix the problem.
- If the connection to the server fails during installation of a snapshot, bring the server back online and reinstall the snapshot.
- If the installation failed because the process application snapshot is invalid, it can never be installed. Create a new snapshot.
- If the administrator can determine the cause of the failure, the administrator should fix the problem and then try again to install the process application.
- If a governance process is used to install a snapshot, process the InstallResponse returned by the Install Snapshot service to make sure installation is successful. If the installation is not successful, use the Cancel Snapshot Installation service to cancel the previous installation request. This method of cancellation is required if the installation is triggered through a governance process which is associated with Snapshot Status Change event. Changing the Snapshot Status Change governance assignment to the default does not reset the status of failed installations.
Related concepts:
Troubleshooting snapshot installations
Related tasks:
Applying a governance BPD to a process application or snapshot
Migrate a governance process from V8.0.0
Create a governance process for installing a process application
Create a governance process for the status of a snapshot
Create a governance BPD that installs a snapshot when the status changes
Change a governance application
Export and importing a process application that uses customized governance
Remove governance to install a snapshot on Process Server
Related reference:
1.8.10. Governance services
The System Governance toolkit provides templates and services that you can use in Process Designer to create or customize a governance process.
Introduction
During IBM Business Process Manager installation, the System Governance toolkit (TWSYSG) is imported into the Process Center repository. Each governance process that you create must include a dependency on the System Governance toolkit. The toolkit provides the machinery required to build a governance process. The toolkit has integration services for installing process application snapshots and setting snapshot status.
You cannot edit or change the artifacts in the System Governance toolkit, but you can open the toolkit and view the artifacts within it.
Templates
The System Governance toolkit provides two templates, the Installation Requested template and the Snapshot Status Change template. Each of these templates is a business BPD that you can adapt to the needs of your particular organization. Each of these templates is associated with a corresponding governance event. Your governance processes in Process Center must be built from one of these templates to take advantage of the governance services.
- Installation Requested template
- Use this template as a base to create a customized governance process that will replace the default Installation Requested BPD, which merely calls the installation service from the toolkit. The Installation Requested template has the ProcessAppInstallationRequest variable (of type ProcessAppInstallation).
- Snapshot Status Change template
- Use this template as a base to create a customized governance process that will replace the default Snapshot Status Change BPD, which has no activities. The Snapshot status change template has the SnapshotStatusRequest variable (of type SnapshotStatus).
Installation services
The System Governance toolkit supplies the following integration services for installation governance, all of which only run locally on Process Center. If you are using these services to install a snapshot, cancel an installation, or set installation status, the installation request must be initiated in the Process Center. See the sections that follow for more details.
- Install Snapshot
- Installs the snapshot on the specified process server.
- Cancel Snapshot Installation
- Cancels the installation request that is in progress (that is, waiting for approval). After the installation has started, the cancel request is ignored.
- Get All Process Servers
- Returns an array of process servers registered with Process Center.
- Set Installation Status
- Sets the installation status during long-running installations. Define the installation status messages to use in the governance process.
- Get Installation Status
- Gets the installation status during long-running installations.
If an installation attempt fails, call the Cancel Snapshot Installation service to clear the status in Process Center. The only other way to clear the failure is to reset the governance process for the process application to the system default process. The governance business BPD that called the Install Snapshot service should have all the data that is available from the failure already and can send that information in an email or log it. For failures that occurred because of an error in the process application, you might want to leave that status as a failure so no one tries to install that version again.
Install Snapshot
- Input: processAppInstallation
- Input: processAppInstallationRequest is used in the default Installation Requested BPD.
- Output: installResponse, which is used to determine if the installation succeeded and if a failure is recoverable.
- Implementation: Calls Java API for installation.
This service can fail to install a snapshot for a number of reasons. The installation request produces a return value that indicates if an error occurred and if the error is recoverable.
Cancel Snapshot Installation
- Input: installRequest (processAppInstallation)
- Implementation: Calls Java API for installation.
This service can fail under the following circumstances:
- The Cancel Snapshot Installation service takes the processAppInstallation object as an input and uses various IDs set on processAppInstallation during processing. Those IDs must not be null or zero length and must be the same IDs that were received by the processAppInstallation object when the snapshot installation request was made.
- If cancel is called after installation has started, the cancel request is ignored.
- If cancel is called multiple times for the same installation request, all calls after the first call are ignored, because the installation request is already canceled.
- If cancel is called against a process application for which governance is not enabled, the cancel request is ignored.
- If there is not an active installation request for the snapshot and process server combination, the cancel request cannot succeed.
- If the snapshot or process server is not properly identified, it cannot be found in Process Center.
Get All Process Servers
- Output: processServers (processServers) provides a list of available process servers.
- Implementation: Calls Java API for the list.
Set Installation Status
Use this service to update the installation status while an installation request is waiting for approval. When this service is called, the status updates immediately, without waiting for the current status or the installation to complete.
This service takes the following inputs:
- processServerID (String)
- snapshotID (String)
- status (String) must be between 1 and 64 characters.
- description (String) is optional; the length must be between 0 and 250 characters.
Implementation: Calls Java API to set the installation status.
This service can fail under the following circumstances:
- If governance is not enabled, you cannot use this service.
- If no installation request for that snapshot and process server combination exists, no status can be provided. That is, an installation request must be open and active.
- The Set Installation Status service cannot be called after the Install Snapshot service has completed. The Install Snapshot request changes the status, and when the installation is complete, all status values disappear.
- If the installation fails before this service is called, no status is provided.
- If the snapshot or process server is not properly identified, it cannot be found in Process Center.
Get Installation Status
- Input: processServerID (String)
- Input: snapshotID (String)
- Output: status (String) provides predefined status messages if custom messages are not provided through Set Installation Status.
- Implementation: Calls Java API to set the installation status.
Snapshot status services
The System Governance toolkit supplies the following integration services for tracking snapshot status, all of which only run locally on Process Center. You can use the next three services with both process applications and toolkits. You can use snapshot status services with the governance process or independently of the governance process. The snapshot status events are always active, whether they are being used or not.
- Get snapshot status
- Returns the status of a snapshot.
- Get snapshot statuses
- Returns a list of strings containing the statuses that are used for snapshots. The list contains default values defined in the product and any custom values that were added through the governance process and are currently being used in the snapshot.
- Set snapshot status
- Sets the snapshot to the specified status. If the status string specified does not already exist, the API creates a new status value using that string.
Get Snapshot Status
- Input: snapshotID (String)
- Output: status (String)
- Implementation: Calls Java API for the status.
Get Snapshot Statuses
- Output: statuses (String) (List)
- Implementation: Calls Java API for the list of statuses.
Set Snapshot Status
- Input: status (String) Extension of string. Length must be between 1 and 50 characters.
- Input: snapshotID (String)
- Implementation: Calls Java API for setting the status.
Related tasks:
Applying a governance BPD to a process application or snapshot
Migrate a governance process from V8.0.0
Create a governance process for installing a process application
Create a governance process for the status of a snapshot
Create a governance BPD that installs a snapshot when the status changes
Change a governance application
Export and importing a process application that uses customized governance
Recovering if a process application under governance fails to install
Remove governance to install a snapshot on Process Server
1.8.11. Remove governance to install a snapshot on Process Server
To install a process application snapshot for BPM (BPM) Process Server that depends on the governance toolkit, delete all application artifacts that depend on anything from the governance toolkit. You cannot install a process application that contains a governance process on a Process Server. Governance processes are supported in Process Center only. Therefore, when you create a snapshot of a process application that depends on the governance toolkit, the entire process application cannot be installed on a Process Server.
Furthermore, you cannot update the process application so that it can be installed on a Process Server. Removing the system governance toolkit dependency does not resolve this issue.
To resolve this issue:
- Verify that processes in the process application do not directly depend on the system governance toolkit. If there are dependencies, delete all application artifacts that depend on anything from the governance toolkit.
- Set the IS_GOVERNANCE flag to F in the LSW_PROJECT table in Process Center.
- Attempt to reinstall the process application.
Related tasks:
Applying a governance BPD to a process application or snapshot
Migrate a governance process from V8.0.0
Create a governance process for installing a process application
Create a governance process for the status of a snapshot
Create a governance BPD that installs a snapshot when the status changes
Change a governance application
Export and importing a process application that uses customized governance
Recovering if a process application under governance fails to install
Related reference:
Manage access to the Process Center repository
Administrators can manage user access to the Process Center repository from the Process Center console.
The Process Center console displays users and groups from the following sources:
- BPM internal security provider.
- Any external security provider that was configured for use with BPM during installation.
The best way to manage access to the Process Center and its repository is by using groups. For example, the easiest way to manage access to the Process Center repository is to add preexisting groups of users from your external provider to tw_authors, which is an BPM group whose members have access to the repository by default. Then, when changes are required, you can add or remove individual users from the groups that exist in your external security provider. This practice ensures the security maintenance that you complete in your external provider does not require more work in BPM.
The same is true for administrative access to the Process Center repository. You can add preexisting groups of users from your external provider to tw_admins, which is an BPM group whose members have administrative access to the repository by default.
Before you complete any of the following tasks, start Process Designer and open the Process Center console or use a browser to open the Process Center console.
- Grant administrative access to the Process Center repository By default, IBM Business Process Manager includes the user in the DeAdmin role, which provides administrative access to the Process Center repository. This default administrator can grant administrative access to other users.
- Add users and groups You can provide users and groups with access to Process Designer and Process Center repository so they can create new process applications and toolkits.
- Manage access to process applications and toolkits You can provide users and groups with permission to access individual process applications and toolkits.
- Set Process Center import permissions To import process applications and toolkits to IBM Process Center, you must modify permission settings for the temporary directory that your operating system uses.
- Remove users and groups You can remove users and groups so they no longer have access to the Process Center repository.
Grant administrative access to the Process Center repository
By default, IBM Business Process Manager includes the user in the DeAdmin role, which provides administrative access to the Process Center repository. This default administrator can grant administrative access to other users.
To grant administrative access to the Process Center repository:
- In the Process Center console, click the Admin option.
- Select the Manage Users option.
- Find the user or group to which you want to grant administrative access, and then enable the Admin option for that user or group. Groups and users who are designated as Admin in this window can manage user access to the entire Process Center repository.
Add users and groups
You can provide users and groups with access to Process Designer and Process Center repository so they can create new process applications and toolkits.
To manage user access to the Process Center repository, you must have administrative access to the repository.
Restriction: A user name cannot have more than 64 characters.
Restriction: Specify unique user IDs for every user in the following groups:
- WAS Virtual Member Manager (VMM) user repository security groups
- LDAP user repository security groups
- Internal IBM Business Process Manager custom user registries
You cannot create a new user using the Process Admin Console if a user was created in the past with the same user name. Once a user has been created using the Process Admin Console, it is kept in the BPM system. Even if the user is subsequently deleted, the user entry is not removed from the BPM DB and the internal authorization system.
To add users and groups:
- In the Process Center console, click the Admin option.
- Select the Manage Users option, and then click Add Users or Add Groups.
- In the window, enter the name of the user or group that to add in the Search for Name field. You can enter part of the name and all accounts that match are displayed.
- Click the check box next to the users and groups that to add, and click Add Selected.
You must restart the server for Process Designer to recognize any new Websphere Application Server Virtual Member Manager (VMM) User repository security groups or LDAP User repository security groups. After you restart the server, click Add Group to see the new groups.
The added users and groups now have access to Process Designer and Process Center repository, which gives them the ability to create new process applications and toolkits. When you create a process application or toolkit, you have the ability to grant access to other users. Administrators can also grant access to specific process applications and toolkits.
Groups and users who are designated as Admin are able to manage user access to the entire Process Center repository as outlined in the preceding steps.
Manage access to process applications and toolkits
You can provide users and groups with permission to access individual process applications and toolkits. To manage access to individual process applications and toolkits, you must have administrative access to the process application or toolkit, or you must be the user who created the process application or toolkit.
To manage access to process applications and toolkits, complete the following steps:
- Select the Process Apps or Toolkits tab.
- Select the process application or toolkit for which you want to manage user access.
- Select the Manage option.
- To remove access for a user or group, click the Remove icon under Manage Access to Process Library.
- To give access to a user or group.
- Under Manage Access to Process Library, click Add Users or Add Groups.
- In the window, enter the name of the user or group that to add in the Search for Name field. You can enter part of the name and all accounts that match the name are displayed.
- Select the check box next to the users and groups that to add, and then click Add Selected.
- After you add the users and groups that you want, select the Read, Write, or Admin option for each. The following table describes each permission level.
Permissions for users and groups
Access Level Description Read Users with Read permission can perform the following actions: - View the process application or toolkit in the Process Center console or Process Designer
- View all library items included in the process application or toolkit in Process Designer
- Open the process application or toolkit in Process Designer
- By default, install snapshots to process servers in development environments
Write Users with Write permission can perform all of the actions that are associated with Read permission, plus the following additional tasks: - Create, edit, or delete library items in the process application or toolkit in Process Designer
- Create process application or toolkit snapshots and edit snapshot properties in the Process Center console or Process Designer
- By default, install snapshots to process servers in any non-production environment
Admin Users with Admin permission can perform all the tasks that are associated with Read and Write permission, plus the following additional tasks: - Edit process application or toolkit settings in the Process Center console
- Create, edit, or archive tracks in the Process Center console
- Archive snapshots in the Process Center console
- Modify user access to the process application or toolkit
- By default, install snapshots to process servers in production environments
Related tasks:
Import process applications and toolkits from the Process Center repository
Restrict installation access to runtime servers
Transferring and installing an installation package
Set Process Center import permissions
To import process applications and toolkits to IBM Process Center, you must modify permission settings for the temporary directory that your operating system uses. To import process applications and toolkits to IBM Process Center, you must set permission for the server to write to the temp directory that your operating system uses during importing. The procedure to set server permissions depends on whether your operating system is Windows Vista, Windows 7, AIX, Linux, or Solaris.
This task is required when you are running Process Center as a service.
If you have administrator access for your operating system, you can access all directories, and this task is not required.
- Set write permissions for Windows Vista or Windows 7 temporary directories To import process applications and toolkits to IBM Process Center, you must modify permission settings for the temporary directory that Windows Vista or Windows 7 uses.
- Set write permissions for AIX, Linux, or Solaris temporary directories To import process applications and toolkits to IBM Process Center, you must modify permission settings for the temporary directory that AIX, Linux, or Solaris uses.
Set write permissions for Windows Vista or Windows 7 temporary directories
To import process applications and toolkits to IBM Process Center, you must modify permission settings for the temporary directory that Windows Vista or Windows 7 uses. This task is required when you are running Process Center as a service.
If you have administrator access for your operating system, you can access all directories, and this task is not required.
To set permissions to write to the temp directory on a Windows Vista or Windows 7 server:
- In the Control Panel, click Administrative Tools > Services.
- Select the properties for the Process Center service.
- Click the Log On tab.
- Browse for a service that has permission to write to the temp directory.
Log in as that service user ID.
- Enter the appropriate password.
- Apply your changes and restart the service.
Related tasks:
Set write permissions for AIX, Linux, or Solaris temporary directories
Set write permissions for AIX, Linux, or Solaris temporary directories
To import process applications and toolkits to IBM Process Center, you must modify permission settings for the temporary directory that AIX, Linux, or Solaris uses. This task is required when you are running Process Center as a service.
If you have administrator access for your operating system, you can access all directories, and this task is not required.
To set permissions to write to the temp directory on an AIX, Linux, or Solaris server, use one of the following commands:
- chown 777 /tmp
- chown a+rwx /tmp
Some servers use a security policy that requires you to periodically change the password. If you change the password, the procedures for either type of operating system can cause problems with your service during server startup.
Related tasks:
Set write permissions for Windows Vista or Windows 7 temporary directories
Remove users and groups
You can remove users and groups so they no longer have access to the Process Center repository.
To manage user access to the Process Center repository, you must have administrative access to the repository.
To remove users and groups:
- In the Process Center console, click the Admin option.
- Select the Manage Users option.
- Click the remove icon for each user or group to deny access.
Users and groups who are removed here are automatically removed from any process applications or toolkits to which they have been granted access.
Manage IBM Business Process Manager servers
From the Process Center console, repository administrators can manage the BPM servers in their environment.
An offline server is a runtime process server that is not connected to a Process Center. You can still use offline servers when you deploy snapshots of process applications. However, the method for deploying process application snapshots to an offline process server differs from the method for deploying process application snapshots to an online process server.
Online process servers configured during BPM installation are automatically discovered and displayed in the web-based Process Center console. Any offline servers that have been added are also displayed in the Process Center console.
From the Process Center console, repository administrators can monitor the snapshots of process applications installed on each connected process server in the BPM environment. For example, administrators can monitor all snapshots installed on connected test and production servers. The Process Admin Console enables you to complete configuration and administrative tasks for each connected process server.
Use the Performance Admin Console to manage the Business Performance Data Warehouses in the environment. You can start the Performance Admin Console using the Windows start menu or desktop shortcuts, or you can open a web browser to the following location: http://[host_name]:[port]/PerformanceAdmin .
The following figure shows a sample server configuration for BPM where all process servers are connected to the Process Center:
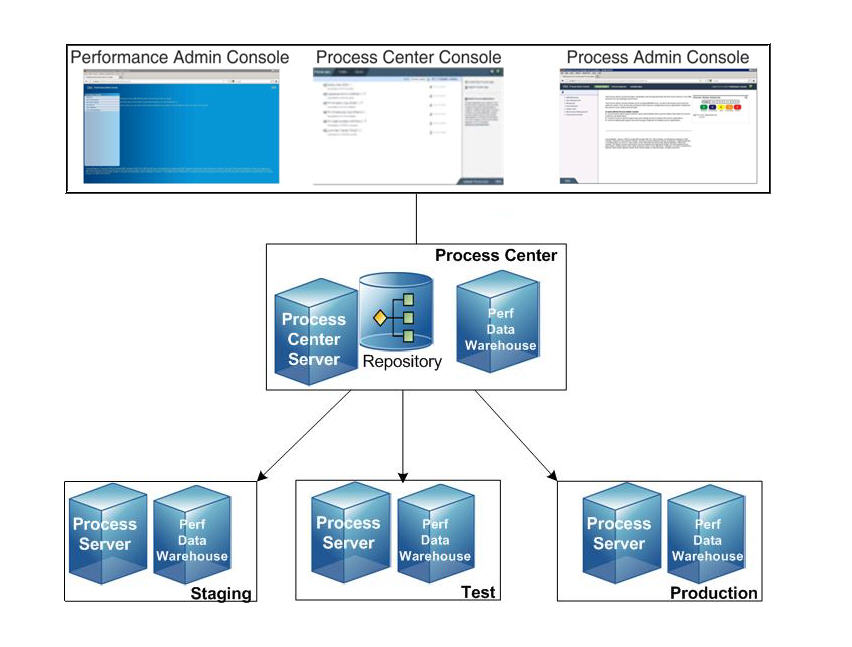 Before performing any of the following tasks, start Process Designer and open the Process Center console.
- Monitor installed snapshots on each Process Server from the Process Center console You can monitor snapshots installed on process servers from the Process Center console.
- Access Process Servers from the Process Center console You can access the Process Admin Console for process servers from the Process Center console. For example, you can manage caches or perform task cleanup for the process servers.
- Add offline servers to the Process Center console You can install snapshots of process applications to process servers that are not connected to the Process Center server. To do so, you must first add an offline server.
- Remove offline servers from the Process Center console If an offline server has been removed from your IBM Business Process Manager configuration, you can remove it from the Process Center console.
- Taking process servers offline If a runtime process server is connected to the Process Center and is currently online, you can take the server offline.
- Bringing process servers back online To bring a server back online, remove the offline server from the Process Center console and then edit the configuration files for the server.
Monitor installed snapshots on each Process Server from the Process Center console
You can monitor snapshots installed on process servers from the Process Center console.
Only users who have administrative access to the Process Center repository can monitor all installed snapshots. Other users can monitor only those installed snapshots of process applications to which they have access.
To monitor installed snapshots.
- Click the Servers tab in the Process Center console and select the process server to monitor.
If you select a process server that is connected to the Process Center, you can see the installed snapshots and the number of instances (for exposed business process definitions) currently running on the server. If you select an offline process server that has been added, you can see the snapshots for which an installation package has been created. The snapshots are organized per process application.
- For each snapshot, you can click the Open in Designer option to open the selected snapshot of the process application in the Designer view. Doing so enables you to see the state of each library item as it existed when it was installed. The Designer view is not available if you are using a browser to access the Process Center console.
Access Process Servers from the Process Center console
You can access the Process Admin Console for process servers from the Process Center console. For example, you can manage caches or perform task cleanup for the process servers.
Verify the process servers are configured to connect to a Process Center. See Modify Process Server connection properties. To configure all options for Process Server, you must be an BPM administrator. Other users can configure the parts of the server that affect the implementations they develop in the Designer in Process Designer. For example, members of the tw_authors group can configure the Event Manager.
To access Process Servers from the Process Center console:
- Click the Servers tab in the Process Center console and then select the process server to configure.
- Click the Configure option. The Process Admin Console for the process server opens.
The configure option is not available for offline servers.
- For the selected server, click BPM Admin and select Manage Caches or Task Cleanup or some other feature.
Add offline servers to the Process Center console
You can install snapshots of process applications to process servers that are not connected to the Process Center server. To do so, you must first add an offline server.
You must have administrative access to the Process Center repository to add, edit, or remove offline servers. See Grant administrative access to the Process Center repository for more information.
To add offline servers to the Process Center console:
- Click the Servers tab in the Process Center console.
- Click Add a New Offline Server.
- In the Create New Server window, name the sever, choose the server type from the drop-down list, provide an optional description, and then click Create. Server names must be unique. Also, be sure to choose the appropriate server type so the migration options made available during deployment are appropriate.
The new server and its type are displayed in the Servers tab. You can change the name, server type, and description at any time by clicking Edit.
Remove offline servers from the Process Center console
If an offline server has been removed from your IBM Business Process Manager configuration, you can remove it from the Process Center console.
You must have administrative access to the Process Center repository to add or remove offline servers. See Grant administrative access to the Process Center repository for more information.
When you remove an offline server, all installation packages previously created for that server are also deleted. You cannot retrieve an offline server or the installation packages for that server after removing it.
- Click the Servers tab in the Process Center console.
- Click Remove Offline Server.
- When prompted, confirm to remove the server.
Taking process servers offline
If a runtime process server is connected to the Process Center and is currently online, you can take the server offline.
You must have administrative access to the Process Center repository to take servers offline. See Grant administrative access to the Process Center repository for more information.
Taking a server offline removes the connection to the Process Center. When the server is offline, you cannot install process applications on the server from the Process Center console.
- Click the Servers tab in the Process Center console.
- For the server to take offline, click Take Server Offline.
- When prompted for confirmation, click Yes.
Bringing process servers back online
To bring a server back online, remove the offline server from the Process Center console and then edit the configuration files for the server.
You must have administrative access to the Process Center repository to remove offline servers. See Grant administrative access to the Process Center repository for more information.
- Click the Servers tab in the Process Center console.
- For the server to bring online, click Remove Offline Server.
- When prompted, confirm to remove the server.
- Stop the process server to bring back online.
- Edit the process server configuration files as described in Modify Process Server connection properties.
If you do not specify users for the ProcessServerUser and ProcessCenterUser roles during installation and configuration, the authentication aliases for these roles are defaulted to the authentication alias that is assigned to the username specified for the deployment environment administrative account. For information on the ProcessServerUser and ProcessCenterUser roles, see IBM Business Process Manager security roles.
- Start the process server and then open the Process Center console to ensure the server displays properly in the Servers tab.
Manage library items in the Designer view
The Designer view offers several tools to ensure that you can quickly and easily access items that you work with on a regular basis. With the Designer, you can move or copy items between existing or new process applications and toolkits. You can also revert to previous versions of individual library items using snapshots.
Before performing any of the following tasks, start Process Designer and access the Designer view.
- Navigating the library The Designer view in Process Designer displays information about process applications, toolkits, and smart folders.
- Create favorites You can mark library items as favorites for quick and easy access.
- Tagging library items Use tags or tag groups to quickly sort library items. By default, you can sort library items by name or by type.
- Organizing library items in smart folders You can arrange library items in smart folders for quick and easy access. The Designer includes several default smart folders such as the Changed today folder, which includes all library items in the current process application that were changed on the current day. The Changed today and Changed this week smart folders include library items changed by all users who have access to the current process application.
- Copying or moving library items You can copy or move existing library items to a new or existing process application or toolkit in the Designer view.
- Reverting to a previous version of a library item You can revert to a previous version of a library item in the Designer view.
- Copying an asset from a snapshot In the library in the Designer view, you can copy an asset from an older snapshot to the current version of your process application. For example, if a service was developed and then deleted, you can go back to a snapshot where the service was still present and copy it to the current working version of your process application.
- Understanding concurrent editing Multiple users can simultaneously access and make changes to the library items in the Designer view. With concurrent editing, you can collaborate with other team members to build the library items that you need for your project. For example, you can communicate about your ideas and edits using instant messaging and see the results in the Designer view as they happen.
Navigating the library
The Designer view in Process Designer displays information about process applications, toolkits, and smart folders.
When you open the Designer view, the library is displayed. You can perform the following actions in the library:
- Click the indicator to see the categories of library items in the current process application.
- Click a category to see the individual items stored in the library. For example, click Processes to see a list of the business process definitions (BPDs) included in the process application. When viewing the list of individual library items, you can right-click an item to perform actions such as tagging or deleting items.
- Move the mouse cursor over a category, and then click the plus sign that is displayed next to the category to add a new library item.
For example, if you click the plus sign next to Processes,
you can add several types of library items, including BPDs and participant groups.
When creating new library items, do not name those items toolkit. Doing so can cause issues when using JavaScript to refer to variables and other BPM objects residing in the toolkit namespace.
- Click the plus sign next to Blueworks Live Processes to access Blueworks Live processes from the Designer. See Subscribing to Blueworks Live processes for more information.
- Move the mouse cursor over the Toolkits category and then click the plus sign to create a dependency on a toolkit.
- Manage favorites, tagged items, and your custom smart folders in the Smart Folders category.
Create favorites
You can mark library items as favorites for quick and easy access.
To mark a library item as a favorite:
- Click a category to see the individual items stored in the library. For example, click Processes and then click Business Process Definitions to see a list of the BPDs included in the current process application or toolkit.
- Move your cursor to the left of a BPD and click the star icon to highlight it.
Go to the Smart Folders area, click Favorites,
and then click a category to see all items marked as favorites.
To remove a favorite, click the star icon next to the item in the Favorites list.
Tagging library items
Use tags or tag groups to quickly sort library items. By default, you can sort library items by name or by type.
To attach a tag or tag group to library items:
- To see the individual items stored in the library, select a category. For example, to see a list of the business process definitions (BPD) that are included in the current process application or toolkit, click Processes and then click Business Process Definitions.
- Right-click a library item and select Tags. From the list, select the tag that you want. To apply a tag group, select the group and a particular value within it. To choose multiple library items in a category, press and hold the Ctrl key and then click each item.
- To create a tag or tag group, select New. The New Tag or Tag Group dialog opens. Enter a name for the new tag. Select Check if this is a Tag group to create a tag group. Enter a new tag value under the tag group and click OK.
- To view tagged items, click a category in the library and then use the drop-down list to switch to the Tag option.
- You can use the Public tag for assets that can be accessed across a toolkit and its dependencies. To add a public tag to the library item, right-click the item and click Public.
To view all the assets from the current library and the dependencies that are tagged as public, expand Smart Folders > Public .
To view the assets under the Public smart folder, ensure that you update the System Toolkit to System Toolkit 8.0 for the BPM V8.0. Also, to view all the tags created in BPM V8.0, such as the Public tag, ensure that you update the System Toolkit to System Toolkit 8.0. Under Smart Folders, you can see the library items that are tagged as Public.
- To remove a tag from a library item, right-click the library item and select Tags > [Tag_name]. The selected tag is then no longer associated with the library item.
- To remove a tag group from a library item, right-click the library item and select Tags > [Tag_group] > [Tag_value]. The selected tag group and its value are then no longer associated with the library item.
- The names of the tags that have been applied to a library item are displayed in parentheses after the library item name. If there are more applied tags than can be displayed in the parentheses, hover the mouse pointer over the library item to display all of the applied tags in a tooltip. To view the tag groups that have been applied to the library item, right-click the library item and select Tags. The names of the tag groups are appended to the bottom of the menu list.
Related tasks:
Reusing assets from Process Centers
Searching for Process Center assets
Organizing library items in smart folders
You can arrange library items in smart folders for quick and easy access. The Designer includes several default smart folders such as the Changed today folder, which includes all library items in the current process application that were changed on the current day. The Changed today and Changed this week smart folders include library items changed by all users who have access to the current process application.
In addition to the default smart folders, you can create custom smart folders as described in the following procedure. Custom smart folders can be private or shared.
- Click the plus sign next to Smart Folders in the Library.
- In the Create new smart folder window, enter the name of the new folder.
- Select from the available menus to establish rules to determine which library items to include. You can include library items based on the presence of a particular tag, creation date, item type, and so on.
- Click the plus sign to add another rule. You can continue adding rules using the plus sign. When you click the plus sign next to a particular rule, the new rule is added immediately after the current rule. You can use the minus sign to remove unwanted
rules.
The Designer evaluates the rules from top to bottom. If no rules match existing library items, the smart folder is empty.
- You can optionally enable the following check boxes:
Check box Description Show number of items in this smart folder Enable this option causes the Designer to display the number of library items in the folder when you move your mouse pointer over or select the folder. Make this a shared smart folder If you enable this option, anyone who has access to the current process application or toolkit can view this smart folder and its contents but cannot edit the rules for the folder. Include items in toolkits If you enable this option, library items within the toolkits that this process application depends upon are also included in the smart folder. - Click Finish to save the smart folder settings.
Copying or moving library items
You can copy or move existing library items to a new or existing process application or toolkit in the Designer view. In the library in the Designer view, you can copy or move existing library items to a new or existing process application or toolkit.
To move or copy items, you must have write access to the target process application or toolkit.
The following table describes how copy and move operations are different:
| Action | Description |
|---|---|
| Copy a library item | Creates a new library item that is a duplicate of the original item. The newly created item is not associated with the original item from which it was copied. |
| Move a library item | Relocates the original item to a new or different process application or toolkit. |
When you choose one or more items to move, Process Designer displays all dependencies for the selected items. For example, if you choose a BPD to move and that BPD depends upon several participant groups, services, and business objects for its implementations, Process Designer displays all the items the BPD depends upon so that you can easily see all items to be included in the move operation. You also have the option of choosing the specific items to include in the operation. Moving related items together ensures that you have a functional implementation in the destination process application or toolkit.
The list of dependencies includes library items that share the same XSD or WSDL file as the moving item. For example, say there two otherwise unrelated business objects, BO1 and BO2, defined in the same XSD file. If you choose to move BO1, Process Designer includes BO2 in the list of dependencies even though BO1 and BO2 do not have a dependency relationship with each other.
When you copy library items, any references to those items in the source process application or toolkit are unaffected because the original items remain and are still referenced.
When you move library items, those changes can affect existing implementations and other references in the source process application or toolkit. For example, if the implementation for an activity is a nested process and you move the nested process without moving the BPD that contains the activity, whether the activity's implementation (reference to the nested process) is good or is broken depends upon where you move the nested process as described in the following table:
| If you move the nested process to... | The reference... |
|---|---|
| A new toolkit | Is good because Process Designer automatically creates a new dependency on the new toolkit. |
| An existing toolkit the source process application is not currently using | Is good because Process Designer automatically creates a new dependency on the existing toolkit. |
| An existing toolkit the source process application is currently using | If there have been no changes to the destination toolkit since the most recent snapshot was created, the reference is good because Process Designer automatically creates a new snapshot of the toolkit and updates the existing toolkit dependency to the new snapshot. If there have been changes to the destination toolkit since the most recent snapshot was created, the reference is broken until you update the existing toolkit dependency to the new snapshot of the toolkit that Process Designer automatically creates. |
| A new or existing process application | Is broken because process applications cannot depend upon each other. When moving library items to process applications, be sure to move all related items to avoid broken references. BPM automatically resolves broken references when related items are not moved simultaneously. |
By default, Process Designer moves all related items. If you analyze dependent items and choose to move only some of them, ensure that you understand all relationships before completing such an operation. When copying items, Process Designer copies only the items that you select and does not display dependent items. To ensure that you have moved or copied all items required for a particular implementation, you should check both the source and destination process application or toolkit for validation errors.
To move or copy library items, follow these steps:
- Select the library item to move or copy. To choose multiple items in a category, press and hold the Ctrl key and then click each item.
- Right-click and select Copy item to or Move item to.
- Select the option that you want from the pop-up menu. The top of the list displays the process applications and toolkits most recently created by the current user. The other options include the following:
Option Description Other Process App... When you select this option, the Designer displays all existing process applications to which you have write access. Other Toolkit... When you select this option, the Designer displays all existing toolkits to which you have write access. New Process Application... When prompted, enter a name and an acronym for the new process application and click OK. The acronym for the new process application must be unique and cannot exceed seven characters. Acronyms cannot start with a number and cannot include special characters, spaces, or JavaScript reserved words. New Toolkit... When prompted, enter a name and an acronym for the new toolkit and click OK. The acronym for the new toolkit must be unique and cannot exceed seven characters. Acronyms cannot start with a number and cannot include special characters, spaces, or JavaScript reserved words. - If moving items, review the dependencies of the selected items. Reviewing dependencies is especially important when refactoring
imported or migrated library items.
- To understand the dependencies for a particular item, click the item to highlight it. The Designer highlights all items that call or reference the highlighted item.
- Clear the check box for an item to exclude it from the pending operation. If you exclude an item that another item requires, the Designer displays an icon (exclamation point) so that you are aware of the validation error for the included item. The list of dependent items to be moved includes items that are dependent because of the underlying implementation file. You cannot clear these items.
- If the dependent items to be moved are called or referenced by items in addition to the ones that you have selected to move, Process Designer displays those items in a section called Other items that depend
on items being moved. To move these other items, click the arrow next to each item to include. Clicking
the arrow moves each item to the Items to be moved portion
of the window to show that those items are included in the move operation.
Leaving these other items out of a move operation can cause errors in the source process application or toolkit because services, participant groups, or other items required for their implementation are being moved. When moved to a toolkit, the references can be updated and the errors resolved. However, when moved to a process application, the references are no longer valid because you cannot have dependencies on process applications.
- When you are satisfied with the list of items to be included in the pending operation, click the Copy or Move button at the bottom of the window.
The Designer moves or copies the selected library items to the designated process application or toolkit. If you copy or move library items with the same name as items in the destination process application or toolkit, the Designer appends a number to the end of the moved or copied items. The original items in the destination have no numbers and the copied or moved item names are followed by the number 2. If the destination for the duplicate items is a toolkit, the Designer creates a new snapshot of that toolkit so that you can choose whether to update the existing dependency to the toolkit.
If you do not like the results of a move, you can undo it immediately. If you perform any other action other than undo, the move is permanent. The undo completely reverses the move except that any process applications or toolkits created due to the move remain but do not have any content. You can archive these process applications or toolkits.
Reverting to a previous version of a library item
You can revert to a previous version of a library item in the Designer view. In the library in the Designer view, you can revert to a previous version of a library item. For example, if you realize that a service you created in a previous snapshot is closer to the implementation that you need than the current version, you can revert to the previous version of the service.
Before reverting a library item, open the item and check the Where Used tab at the bottom of the Designer. If the item is being used in multiple processes or services, check with the other developers on your team before making changes. If a single item is being implemented across a process application, it is best to create a toolkit, add the item to the toolkit, and then create a dependency on the toolkit.
To revert to a previous version of a library item, follow these steps:
- Go to Revision History in the Designer.
- Open the snapshot where the previous version of the library item that you want resides by clicking the indicator next to the snapshot.
The Designer displays a message in the toolbar to indicate that it is showing all items in the process application as they existed when the snapshot was created.
- Find the item that you want, right-click it, and select Revert.
The current version of the same library item in your process application is replaced with this snapshot version.
As soon as the revert operation is complete, the Designer returns to the current working version of your process application. All library items are current. The item you selected in this task has been replaced by its previous version.
Copying an asset from a snapshot
In the library in the Designer view, you can copy an asset from an older snapshot to the current version of your process application. For example, if a service was developed and then deleted, you can go back to a snapshot where the service was still present and copy it to the current working version of your process application.
To copy an asset from a previous snapshot, follow these steps:
- Go to Revision History in the Designer.
- Open the snapshot where the asset that you want resides by clicking the indicator next to the snapshot.
The Designer displays a message in the toolbar to indicate that it is showing all items in the process application as they existed when the snapshot was created.
- Find the item that you want, right-click, and select Copy to Tip.
The selected asset is now available in the current working version of your process application. If you copy an old item with the same name as a current item, the Designer appends a number to the end of the older copied item.
Understanding concurrent editing
Multiple users can simultaneously access and make changes to the library items in the Designer view. With concurrent editing, you can collaborate with other team members to build the library items that you need for your project. For example, you can communicate about your ideas and edits using instant messaging and see the results in the Designer view as they happen.
Each user must be connected to the same Process Center and each user must have write access to the process application or toolkit where the library items reside. When editing concurrently with other users, ensure your connection status is good.
When working in the Designer view, you can see when other users are working in the same process application and library item, as shown in the following image:

When multiple users are working on the same library item, such as a BPD, each user can see the changes as edits are saved. To ensure that all users are aware of the library items that are open and the changes being made, the Designer provides the following notifications:
- If you open a BPD or library item that is already opened by other users, the Designer notifies you.
- If another user starts to edit a BPD or other library item that you have open, the Designer notifies you the edits are taking place and who is making the changes.
- If you attempt to edit a library item that another user is currently editing, the Designer notifies you that you cannot make changes by displaying Read Only next to the item name.
- If multiple users start to edit a library item at the same time, the Designer displays a warning icon to notify each user and then enables them to either immediately save their changes or discard them.
Subscribing to Blueworks Live processes
If members of your team discover and develop processes in Blueworks Live™, you can access those processes and work with them in Process Designer.
By subscribing to Blueworks Live processes, you can manage the information from Blueworks Live processes and bring that information into IBM Business Process Manager to work with it in business process definitions (BPDs). Blueworks Live processes that you subscribe to are displayed in the Blueworks Live Processes category in the library. When you subscribe to a Blueworks Live process, all associated library items (including timing intervals and tracking groups) are created in your process application.
Before you begin working with Blueworks Live processes in Process Designer, make sure the following tasks are completed:
- The administrator must import the Blueworks Live signer certificates into the BPM server truststore. See
 Add a signer certificate to the default signers keystore.
- The Blueworks Live administrator must configure Blueworks live to work with BPM.
To learn more about Blueworks
Live, see http://www.blueworkslive.com.
- Before you complete any of the following tasks, start Process Designer and open the Designer view.
Restriction: Consider the following information about details in Blueworks Live that are imported into BPD processes:
- Policies and attachments associated with Blueworks Live processes are not imported into BPM.
- Only Blueworks Live processes with a snapshot can be imported.
- Only Blueworks Live processes with a diagram can be imported.
Import BPMN 2.0 models is another way to get Blueworks Live information into IBM Business Process Manager. See Import BPMN 2.0 artifacts into an existing process application.
- Subscribing to Blueworks Live processes in Process Designer To create access one or more Blueworks Live processes from Process Designer, create a subscription.
- Manage changes for Blueworks Live processes If you subscribe to Blueworks Live processes, and the processes change in Blueworks Live, you can update your subscriptions in Process Designer.
- Remove Blueworks Live subscriptions from Process Designer You can remove existing subscriptions to Blueworks Live processes from Process Designer.
Subscribing to Blueworks Live processes in Process Designer
To create access one or more Blueworks Live™ processes from Process Designer, create a subscription. When you subscribe to Blueworks Live processes, consider the following information:
- To subscribe to Blueworks
Live processes, you need a Blueworks Live account. See http://www.blueworkslive.com.
- The Blueworks Live administrator must configure Blueworks live to work with BPM.
- To enable IBM Business Process Manager to work with Blueworks Live so that you can create subscriptions, the administrator must import the Blueworks Live signer certificates into the BPM server truststore. See Add a signer certificate to the default signers keystore.
- You cannot subscribe to Blueworks
Live processes from a toolkit in Process Designer. Blueworks Live subscriptions are available only from existing process applications.
- You can subscribe to multiple Blueworks Live processes from one process application.
- Linked processes are included as separate subscriptions.
-
You can set the Blueworks Live server URL and email address in the preferences for Process Designer. Select File > Preferences from the main menu, expand the BPM entry, and then click the Blueworks Live option. Enter the server URL and the email address to use for the Blueworks Live integration. To log in to Blueworks Live with a different email address, or at a different URL, change the preferences.
-
Restriction: Consider the following information about details in Blueworks Live that are imported into BPD processes:
- Policies and attachments associated with Blueworks Live processes are not imported into BPM.
- Only Blueworks Live processes with a snapshot can be imported.
- Only Blueworks Live processes with a diagram can be imported.
- Before you complete the following procedure, start Process Designer and open the Designer view.
To create a subscription to Blueworks Live processes:
- Click the plus sign next to Blueworks Live Processes in the library in the Designer view.
- If needed, type the email address and password that you use to log in to Blueworks Live.
- Select the check box next to the processes to which you want to subscribe.
To preview the Blueworks Live process in a web browser, click the preview icon next to the process name.
Any process to work with in Process Designer must be associated with a diagram.
- On the Summary page, verify the list of Blueworks Live processes shown. To have the subscription name that is displayed in Process Designer to be different from the Blueworks Live process name, type a new name in the BPD name field.
Blueworks Live processes that you subscribe to are displayed in the Blueworks Live Processes category in the library. The Blueworks Live process names that are longer than 64 characters are truncated in the list. If you go to the All category and click to see all library items in the current process application, Blueworks Live items are marked with a Blueworks Live tag. When you subscribe to a Blueworks Live process, all associated library items (such as timing intervals and tracking groups) are created automatically.
If you subscribe to Blueworks Live processes and must change those processes later, you can open the processes in Blueworks Live directly from Process Designer. You can make the required changes in both Blueworks Live and in Process Designer, and then reset the subscription date so that you know your process application is in sync with Blueworks Live. Make sure to subscribe to only those Blueworks Live processes that you want included in the process application.
Manage changes for Blueworks Live processes
If you subscribe to Blueworks Live™ processes, and the processes change in Blueworks Live, you can update your subscriptions in Process Designer. When you subscribe to Blueworks Live processes, consider the following information:
- To update Blueworks
Live processes, you need a Blueworks Live account. See www.blueworkslive.com.
- The Blueworks Live administrator must configure Blueworks live to work with BPM.
- To enable IBM Business Process Manager to work with Blueworks Live so that you can create subscriptions, the administrator must import the Blueworks Live signer certificates into the BPM server truststore. See Add a signer certificate to the default signers keystore.
- Changes to Blueworks
Live processes are flagged in Blueworks Live subscriptions in Process Designer, and you can update your processes manually in Process Designer.
Changes to processes in Process Designer are not automatically flagged in Blueworks
Live.
To change Blueworks Live processes, you must log in to Blueworks Live.
-
To log in to Blueworks Live with a different email address, or at a different URL, change the preferences by clicking File > Preferences in Process Designer and changing the Blueworks Live preferences.
- Before you complete the following procedure, start Process Designer and open the Designer view.
To update Blueworks Live process subscriptions:
- In the Blueworks Live Processes category in the library, open the subscription.
- Check for any changes by clicking Check for New Version. You are notified of a new version if a revision was manually created in Blueworks Live.
- If a new version of the Blueworks Live process is available, manually update your BPD to synchronize it with the Blueworks Live process.
- Click Reset Subscription Date to set the last subscription date to today.
Create a snapshot of the changes so that you have a record of the updates.
If Blueworks Live users change the process after you update, you must check for a new version again and update the BPD in Process Designer.
Remove Blueworks Live subscriptions from Process Designer
You can remove existing subscriptions to Blueworks Live™ processes from Process Designer. When you remove subscriptions, consider the following information:
- To remove a Blueworks
Live processes, you need a Blueworks Live account. See www.blueworkslive.com.
- The Blueworks Live administrator must configure Blueworks live to work with BPM.
- To enable IBM Business Process Manager to work with Blueworks Live so that you can create subscriptions, the administrator must import the Blueworks Live signer certificates into the BPM server truststore. See Add a signer certificate to the default signers keystore.
- When you delete a subscription, historical snapshots in the Designer view in Process Designer retain their subscription details and library items.
- If you delete a subscription, you can no longer check for updates. You have the choice of designating the artifacts that you imported with the subscription should be deleted from your process application.
- Before you complete the following procedure, start Process Designer and open the Designer view.
To remove existing subscriptions to Blueworks Live processes:
- In the Blueworks Live Processes category in the library, right-click the subscription to remove and select Delete.
- When prompted, confirm to remove the subscription.
Select the check box to remove artifacts that were imported into the process application when you subscribed to the Blueworks Live process. If the check box is cleared, the artifacts will remain in your process application, but they will no longer be linked to the subscription.
Manage external files
External files are images, style sheets, JAR files, or other assets that are part of an IBM Business Process Manager implementation but that are developed outside of Process Designer. You can add these external files to your process application or toolkit in the Designer view so that all project assets are included in the Process Center repository.
Add these files to your process application ensures that all required assets are available and installed when your project is ready for testing or production.
You can add image files (.png, .gif, and .jpg) to the Process Designer projects. In addition, you can add the following content and stylesheet file types: .html, .css, .js, .zip, and .xsl.
Before adding managed files, be aware of the following requirements:
- You must have write access to the current process application or toolkit to add external files as assets.
- The files that you add must be 100 MB or less.
- The file name must not be longer than 64 alphanumeric characters.
- Add managed files You can add external assets such as JAR or JS files for use in an IBM Business Process Manager implementation. You can also add files for use with Process Designer Coaches or to override the transform XSL for one or more Heritage Coaches.
- Add managed files by dragging You can add files to the Process Designer by dragging them from the file system and dropping them in the Files category of the Process Designer.
- Update managed files You can update external files that you are using in Process Designer. You first update the files and then drag them into the Files category of the Process Designer.
- Replacing a managed file You can replace a file that you are currently using in Process Designer with a new file.
- Use managed files When you add external assets to be managed as part of your IBM Business Process Manager project, you can easily use those files in your Coaches and other implementations for activities, such as services. For example, when you add a JavaScript (.js) file to be managed as part of your project, you can use the functions and variables within the JS file in the scripts and scriptlets that you develop throughout the BPM project. JS files that are included as managed files are able to access both dynamic library JAR files and any JAR files within the managed files themselves.
- Delete managed files You can delete a file that you previously added to Process Designer if you no longer need the file.
Add managed files
You can add external assets such as JAR or JS files for use in an IBM Business Process Manager implementation. You can also add files for use with Process Designer Coaches or to override the transform XSL for one or more Heritage Coaches.
To add external files to your process application or toolkit:
- Click the plus sign next to Files in the library in the Designer view and select Web File, Server File, or Design File.
- Select Web File to add images, .css files, or other assets to use in the Process Designer Coaches.
- Select Server File to add JAR or JS files or some other type of asset to use in an IBM Business Process Manager implementation.
- Select Design File to add .xsl files (content type text/xml or application/xslt+xml) to override the transform XSL for one or more Heritage Coaches.
- In the New File window, click the Browse button to search for the file that you want.
- Select the file, and then click the Finish button.
You can also drag files or folders from your file system directly to the Files category.
The external file is now displayed in the Designer view in the Files category. The name of the file is the same as the original.
Add managed files by dragging
You can add files to the Process Designer by dragging them from the file system and dropping them in the Files category of the Process Designer.
To drag external files to your process application or toolkit:
- Browse your file system and find the files or folder that to add to the Process Designer project.
- Click the files or folders and then drag them to the Files category in the Designer. When you add folders, all the files within the folder are added as individual assets. All files retain their original names.
You can also drag an image file from your file system and place it directly on a Coach that you are creating to simultaneously add the file as a managed file and design your Coach.
The external files are now displayed in the Designer view in the Files category, and the files can be used throughout your current process application or toolkit.
Update managed files
You can update external files that you are using in Process Designer. You first update the files and then drag them into the Files category of the Process Designer.
To update managed files:
- Change the files as needed using the appropriate application, and then save the files.
- Drag the updated files (or the folder in which the files reside) from your file system to the Files category in the Designer in Process Designer. For original managed files that have the same name as the updated files, the Designer replaces all existing files with the updated versions.
All current implementations of the files throughout your project are also automatically updated.
To replace a current file with a new file, open the file in the Designer, click the Browse button, select the new or changed file, and click Open.
Replacing a managed file
You can replace a file that you are currently using in Process Designer with a new file.
To replace a current file with a new file:
- Click the Files category in the library in the Designer view in Process Designer.
- Double-click the managed file to open it.
- In the File editor, click the Browse button.
- Find the file that you want in your file system, click to select it, and then click the Open button.
The selected file is now the managed file in your IBM Business Process Manager project.
Use managed files
When you add external assets to be managed as part of your IBM Business Process Manager project, you can easily use those files in your Coaches and other implementations for activities, such as services. For example, when you add a JavaScript (.js) file to be managed as part of your project, you can use the functions and variables within the JS file in the scripts and scriptlets that you develop throughout the BPM project. JS files that are included as managed files are able to access both dynamic library JAR files and any JAR files within the managed files themselves.
The Image and File Attachment Coach controls enable you to use managed files. When developing a Human service, you can drag an Image or File Attachment control onto your Coach and then select the managed file that you want from the presentation properties. Plus, for images, you can simply drag image files from the library in the Designer directly onto your Coach form. When you do, the image appears when you preview your Coach and the Coach control is automatically added. If you update or replace a managed file, that updated file is automatically used in your Coach.
Managed files are also included in the list of options that you can select for:
- A custom CSS when customizing the style of a particular Coach or Coach component.
- The default CSS or the default XSL for all Coaches in a process application or toolkit.
- The implementation of various business BPD components, where appropriate. For example, when using the Java™ Integration component in an Integration service, you can select a JAR file that was previously added as a managed file.
Delete managed files
You can delete a file that you previously added to Process Designer if you no longer need the file.
You must have write access to the current process application or toolkit to remove managed files.
If you delete a file used as the implementation for a service or other component, the implementation will be broken. To ensure that you do not delete necessary files, open the file and check the Where Used tab before deleting the file.
To remove managed files:
- Click the Files category in the library in the Designer view in Process Designer.
- Right click the managed file to remove, and select Delete.
Import files from Teamworks 6
You can import files from Teamworks 6 using the Process Center console. When you import files from Teamworks 6, be aware of the following:
- You can import Teamworks 6 export files with any extension such as .zip, .export, and so on.
- You must import the files using the Process Center console, as described in the following procedure. Command-line import is not supported.
- Teamworks 6.2 (and earlier) exports can be imported.
- All library items within a single export file are placed into a new process application, as described in the following procedure.
- Each imported library item is tagged with the folder name in which it was stored in Teamworks 6. The tags enable you to find library items by clicking a category in the library and then using the drop-down menu to switch to the Tag option.
- Before importing large export files, ensure the log level for the Process Designer is set to error and not debug. By default, the log level is set to error. You can change the log level in the SystemOut.log file. Use the WebSphere Application Server administrative console to modify the log file settings (as described in "Log and trace settings").
- If you experience problems importing large exports from Teamworks 6 and the error log file contains Out Of Memory error messages, switching from a 32-bit JVM to 64-bit JVM can resolve this problem. Contact IBM Customer Support for further assistance.
To import files from Teamworks 6:
- In the Process Center console, select the Process Apps tab.
- Click Import Process App.
- In the Import Process App window, click the Browse button to locate the export file to import.
- Click the Next button to continue. The Process Center console requests the information required to create the new process application to contain the imported assets.
- Enter a name and an acronym for the new process application.
The acronym for a process application must be unique and is limited to seven characters. The acronym is used as an identifier for this process application and the library items that it contains. For example, when manipulating the items within the process application using the BPM JavaScript API, you can use the acronym to specify the namespace of the items.
Providing a description is optional. When you enter a description, you can view it in the Process Center console by clicking the question mark next to the process application name.
- Click the Import button to import the selected file.
When the import completes, you can see the new process application listed in the Process Apps tab. You can grant access to other users by managing access to process applications and toolkits as described in Manage access to the Process Center repository.
Administrators can see a log of all imports by clicking the Admin option at the upper right of the Process Center console and then clicking Import and Export Log.
- Click the Open in Designer option to view and edit the imported assets.
When you import files from Teamworks 6, all library items are placed into a single process application. For larger imports, examine the resulting process application and move groups of related items to other process applications and toolkits, according to an organization that makes sense for the development efforts. For example, if the imported file includes multiple library items to be shared across projects, move those library items to a toolkit, following the directions provided in Copying or moving library items..
When you are finished organizing library items in individual process applications and toolkits, verify the implementation and data mappings of activities and services to ensure that all required implementations have been properly updated to reflect their new location.
Add logging and tracing to your application
Import and exporting BPMN models
BPM supports importing and exporting of models in the BPMN 2.0 format. You can import BPMN models into the IBM Process Center, for example BPMN models that have been exported from IBM WebSphere Business Modeler, WebSphere Business Compass, Blueworks Live™, or IBM Rational Software Architect. You can also export your process applications from the IBM Process Center to a BPMN 2.0 file archive (.zip).
- To import BPMN models into the IBM Process Center complete the following steps:
- Start the Process Designer from your Windows desktop or using the URL for the Process Center in a browser. The first time you start the Process Designer it opens to the Process Center console.
You can trigger the import of the models in two ways. You can either click Import Process App (on the Process App tab), or Import Toolkit (on the Toolkit tab). Either of these actions will result in an import window .
- Click Import Process App. The Import Process App window displays.
- Click Browse to select the BPMN 2.0 archive (.zip) file that you exported from the WebSphere Business Compass or IBM WebSphere Business Modeler and click Next.
- In the Import Process App window, a name and acronym have been specified based on information in the file you selected.
You can edit the name and acronym and add a description. If you are using BPM Advanced, you will see radio buttons that you can use to choose what will be generated for unimplemented services. Select either Advanced Integration Services or Integration Services and then click Next.
Advanced integration services are only available for unimplemented services. Integration services are always generated for implemented services. Both radio buttons display only in BPM Advanced. See
Building an Integration service and Building an Advanced Integration service.
A Summary of the import results pane opens containing any generated error, warning and information messages. A new process application or a toolkit is created, containing the content from the BPMN 2.0 archive.
It will include integration services if the model contained web service bindings and advanced integration services if the model contained unimplemented advanced integration services. All Blueworks Live artifacts will also be integrated with a BPMN import if Blueworks Live phases and other BPMN 2 extensions were in the model.
A snapshot of the process application is automatically created in the Process Center, for your use as a baseline, in the future, if necessary.
- You can filter the messages by clicking Errors or Warnings. Click Save and specify a location to save the messages. All the messages will be saved as a text file even if a filter has been applied. Click Close.
- Start the Process Designer from your Windows desktop or using the URL for the Process Center in a browser. The first time you start the Process Designer it opens to the Process Center console.
- To export your process applications from the IBM Process Center to a BPMN 2.0 file archive (.zip):
- Select the Process Apps tab.
- In the list of process applications, click the application to export.
- Find the snapshot to export. If a snapshot does not exist, create one by clicking Create New Snapshot.
- Click the Export option for the snapshot.
- Select BPMN 2.0 export (.zip).
- Locate the directory to which you want to save the export file, name the file, and then save it.
The BPMN 2.0 export will include any business process that is referenced in a toolkit. No data artifacts such as business objects or services such as Advanced Integration Services will be included in BPMN 2.0 exports. The exported file can be imported into any Process Center repository.
- Import BPMN 2.0 artifacts into an existing process application If you do not want to create a process application that is based on a BPMN model, import the BPMN files into an existing process application.
- Mapping BPMN 2.0 constructs to IBM Business Process Manager You can import elements from the IBM WebSphere Business Modeler into IBM Business Process Manager, using the Business Process Model and Notation (BPMN) Version 2.0 file format.
- Mapping IBM WebSphere Business Modeler elements to IBM Business Process Manager constructs You can import elements from the IBM WebSphere Business Modeler into IBM Business Process Manager, using the Business Process Model and Notation (BPMN) Version 2.0 file format.
- Next steps after importing BPMN Models You have now imported the BPMN models successfully into the Process Center. The following procedure helps you identify the step-by-step actions you will take after a successful import. However these steps will vary depending on the contents of your model and how you intend to make use of these models in the future. If you had seen warning messages at the end of your import it is likely that you may need to take some remedial action. Warnings usually indicate an unsupported construct or invalid input model. For each warning, examine the contents of what was generated and take additional action as required.
- Export process applications to BPMN 2.0 You can export your process applications from the IBM Process Center to a Business Process Model and Notation (BPMN) version 2.0 file format, which can be used with products that support the BPMN 2.0 import.
Import BPMN 2.0 artifacts into an existing process application
If you do not want to create a process application that is based on a BPMN model, import the BPMN files into an existing process application. You can import BPMN 2.0 files that you exported from Blueworks Live™ or from another product. Note that if you import the same BPMN artifacts multiple times, those actions result in multiple copies of the generated BPM artifacts. Each import is self-contained and does not overwrite the results of prior imports.
- Start Process Designer.
- Open a process application.
- Click File > Import. The Import BPMN 2.0 File window opens.
- Click Browse and select the BPMN 2.0 file to use, and then click OK.
The Import Results window opens showing generated error, warning, and information messages. All the artifacts are imported into the existing process application.
In the library, all artifacts that are imported from the BPMN 2.0 file are marked with an Imported tag.
Related tasks:
Next steps after importing BPMN Models
Related reference:
Mapping BPMN 2.0 constructs to IBM Business Process Manager
Mapping IBM WebSphere Business Modeler elements to IBM Business Process Manager constructs
Export process applications to BPMN 2.0
Mapping BPMN 2.0 constructs to IBM Business Process Manager
You can import elements from the IBM WebSphere Business Modeler into IBM Business Process Manager, using the Business Process Model and Notation (BPMN) Version 2.0 file format.
The following table shows the mapping between elements in the Business Process Model and Notation (BPMN) Version 2.0 file format and their equivalent IBM Business Process Manager objects or properties, after import. If an element is not included in the table, the element is not imported. The top-level library elements are in boldface type. The elements not in boldface type and are listed under a top-level library element, are subordinate elements within them.
| BPMN construct | IBM Business Process Manager element | Comments |
|---|---|---|
| Item definition | Business object | |
| Message that does not refer to an item definition | Business object - without a structure | |
| Resource | Team | Before version 8.5 the BPM team element was known as "participant group". |
| Global task | Integration service or Advanced Integration service | Element selection depends on your choice in the procedure described in Moving business processes from WebSphere Business Modeler to Process Designer or Importing BPMN models. |
| Global user task | Human service | |
| Global rule task | Decision service | |
| Interface - with or without a backing WSDL | Integration service or Advanced Integration service | A service is generated for each operation in the interface. Element selection depends on your choice in the procedure described in Moving business processes from WebSphere Business Modeler to Process Designer or Importing BPMN models. |
| Process | Business process diagram | |
| Task | Activity | The following rules apply:
|
| Human task | User task with a reference to a human service | |
| Business rules task | Decision task with a reference to a decision service | |
| Service task - To an operation with or without a backing WSDL | Activity with a system task implementation and a reference to an integration service | |
| Receive task | Intermediate message event | |
| Script task | Activity with a Javascript implementation | |
| All other task types | Activity | |
| Subprocess | Activity with a subprocess type | Only a single none start event is allowed. Other start event types are collapsed into the single none start event. |
| Event subprocess | Activity with an event subprocess type | Only a single error, timer, or message start event is allowed. If there is more than one, only the first is used. Other start event types are converted to an error start event. |
| Call activity with a reference to a process | Activity | The activity has a reference to a business process diagram. |
| Call activity with a reference to a global task | Activity with a service (task) implementation and a reference to an integration service | The activity has a reference to a service. |
| Exclusive gateway | Exclusive gateway | |
| Inclusive gateway | Inclusive gateway | |
| Parallel gateway | Parallel gateway | |
| Event-based gateway | Activity with message boundary events | The message catch events that followed the event-based gateway are converted to message boundary events attached to the activity. |
| None start event | Start event | Only a single none start event is allowed. If there is more than one, only one will be created. |
| Message start event | Message start event | |
| Timer start event | Timer start event | |
| Error start event | Error start event | |
| All other start event types | Start event | |
| End event | End event | |
| Error end event | Error end event | |
| Message end event | Message end event | |
| Terminate end event | Terminate end event | |
| All other end event types | Activity followed by an end event | |
| Intermediate catch message event | Intermediate message event (receiving) | |
| Intermediate catch timer event | Intermediate timer event | |
| Intermediate catch link event | Sequence flow | |
| All other intermediate catch events | Activity | |
| Intermediate throw message event | Intermediate message event (sending) | |
| Intermediate throw events | Activity | |
| Boundary error event | Error event attached to an activity | |
| Boundary message event | Message event attached to an activity | |
| Boundary timer event | Timer event attached to an activity | |
| Sequence flow | Sequence flow | |
| Text annotation | Note | |
| Data object | Private process variable | |
| Process data input | Process input | |
| Process data output | Process output | |
| Input data association | Data mapping inside an activity | From a process variable or input to a service input or process input. |
| Output data association | Data mapping inside an activity | From a service output or process output to a process variable or output. |
Related tasks:
Import BPMN 2.0 artifacts into an existing process application
Next steps after importing BPMN Models
Related reference:
Mapping IBM WebSphere Business Modeler elements to IBM Business Process Manager constructs
Export process applications to BPMN 2.0
Mapping IBM WebSphere Business Modeler elements to IBM Business Process Manager constructs
You can import elements from the IBM WebSphere Business Modeler into IBM Business Process Manager, using the Business Process Model and Notation (BPMN) Version 2.0 file format.
The following table shows the mapping between elements in the IBM WebSphere Business Modeler and their equivalent IBM Business Process Manager object or property, after import. If an element is not included in the table, the element is not imported. The top-level library elements are in boldface type. The elements not in boldface type and listed under a top-level library element are subordinate elements within them.
The process elements in boldface type are the ones that you can select in the project tree. The elements not in boldface type are subordinate elements contained within the parent element.
| WebSphere Business Modeler element | IBM Business Process Manager element | Comments |
|---|---|---|
| Global human task | Human service | |
| Global business rules task | Decision service | |
| Service | Integration service or Advanced Integration service | Element selection depends on your choice in the procedure described in Moving business processes from WebSphere Business Modeler to Process Designer or Import and exporting BPMN models. |
| Business service (WSDL-based) | Integration Service containing a Web Service Integration or Advanced Integration Service | The Web Service Integration is only added when the WSDL has a binding (it is an implemented service).
Element selection depends on your choice in the procedure described in Moving business processes from WebSphere Business Modeler to Process Designer or Import and exporting BPMN models. |
| Business service object (XSD-based) | Business object | |
| Business item | Business object | |
| Business item template | Business object | |
| Role | Team | Before version 8.5 the BPM team element was known as "participant group". |
| Process | Business process diagram | |
| Task | Activity | The following applies:
|
| Human task | User task that refers to a human service | |
| Business rules task | Decision task that refers to a decision service | |
| Receive task | Intermediate message event (receiving) | |
| Map | Activity with a Script type | |
| Subprocess | Activity with a Subprocess type | |
| Global subprocess | Linked process that refers to a separate business process diagram | The linked process refers to a separate business process diagram containing the contents of the referenced global subprocess. |
| While loop | Subprocess with simple loop settings | The subprocess with simple loop settings refers to a separate business process diagram containing the contents of the loop. |
| Do while loop | Subprocess with simple loop settings | The do while semantics are dropped and the activity behaves like a while loop. |
| For loop | Subprocess with simple loop settings | The subprocess with simple loop settings refers to a separate business process diagram containing the contents of the loop. |
| Exclusive decision | Exclusive gateway | |
| Inclusive decision | Inclusive gateway | |
| Merge | XOR gateway | |
| Fork | Parallel gateway | |
| Join | Parallel gateway | |
| Start node | Start event | |
| End node | End event | |
| Terminate node | End event | |
| Compensation end event | End event | The compensation semantics are dropped. |
| Notification broadcaster | Activity | The ability to broadcast a notification is lost. |
| Notification receiver | Activity | The ability to receive a notification is lost. |
| Timer | Intermediate timer event | |
| Observer | Activity | The ability to react to a condition is lost. |
| Global repository | Private process variable | The ability to store data outside of a process is lost. |
| Local repository | Private process variable | |
| Annotation | Note | |
| Connection | Sequence flow | If the connection has data associated with it, then the related data mappings are generated on the connected activities. |
Related tasks:
Import BPMN 2.0 artifacts into an existing process application
Next steps after importing BPMN Models
Related reference:
Mapping BPMN 2.0 constructs to IBM Business Process Manager
Export process applications to BPMN 2.0
Next steps after importing BPMN Models
You have now imported the BPMN models successfully into the Process Center. The following procedure helps you identify the step-by-step actions you will take after a successful import. However these steps will vary depending on the contents of your model and how you intend to make use of these models in the future. If you had seen warning messages at the end of your import it is likely that you may need to take some remedial action. Warnings usually indicate an unsupported construct or invalid input model. For each warning, examine the contents of what was generated and take additional action as required.
- Open the process application or the toolkit that you created.
- Open every generated artifact and ensure that its contents appear as expected.
- Replace any of the default generated logic with the intended logic wherever necessary.
- Complete the service flow details.
- Human services: Customize the default generated coach
- Rule services: Complete the rule details
- Private Variables: Provide default values for any variables not initialized.
- Exclusive Gateway and IOR Gateway: Complete the conditional logic.
- Javascript Activities: Complete the javascript logic.
- Adjust the process layout to minimize connection crossing.
- Set the team members.
- Check for validation messages and fix them as necessary.
Related tasks:
Import BPMN 2.0 artifacts into an existing process application
Related reference:
Mapping BPMN 2.0 constructs to IBM Business Process Manager
Mapping IBM WebSphere Business Modeler elements to IBM Business Process Manager constructs
Export process applications to BPMN 2.0
Export process applications to BPMN 2.0
You can export your process applications from the IBM Process Center to a Business Process Model and Notation (BPMN) version 2.0 file format, which can be used with products that support the BPMN 2.0 import.
The export to the BPMN 2.0 file format offers only a high-level view of the exported process flow. Data artifacts and semantic details, such as swimlanes, variables, and properties of the exported processes, are not included in the BPMN 2.0 exports.
For complete exports, use the BPM export (.twx) file format. See the Import and exporting process applications from the Process Center console topic in the related tasks section.
The following table shows the mapping between IBM Business Process Manager objects and their equivalent elements in the BPMN 2.0 file format, after export. If an object is not included in the table, the object is not exported. All the elements include the name and the description text. The description is included in a Documentation element.
| IBM Business Process Manager object | BPMN element | Comments |
|---|---|---|
| Business Process Diagram | Process | |
| Activity with a Linked Process implementation | Call Activity | Refers to the called process. |
| Activity with a Decision Task implementation | Business Rule Task | |
| Activity with a System Task implementation | Service Task | |
| Activity with a Script implementation | Script Task | |
| Activity with a User Task implementation | User Task | |
| Activity with a Subprocess implementation | Subprocess | Contents are included. |
| Activity with an Event Subprocess type | Subprocess | Marked as triggered by an event. Contents are included. |
| Activity with a None implementation | Task | |
| Event Gateway | Event-based Gateway | |
| Exclusive Gateway | Exclusive Gateway | |
| Inclusive Gateway | Inclusive Gateway | |
| Parallel Gateway | Parallel Gateway | |
| Start Event | Start Event | |
| Message Start Event | Message Start Event | |
| Timer Start Event | Timer Start Event | |
| Error Start Event | Error Start Event | An Error element with an error code is also created if there is an error code for the event. |
| AdHoc Start Event | Start Event | |
| None End Event | End Event | |
| Error End Event | Error End Event | An Error element with an error code is also created if there is an error code for the event. |
| Message End Event | Message End Event | |
| Terminate End Event | Terminate End Event | |
| Message Intermediate Event (Receiving) | Message Intermediate Catch Event | |
| Message Intermediate Event (Sending) | Message Intermediate Throw Event | |
| Timer Intermediate Event | Timer Intermediate Catch Event | |
| Tracking Intermediate Event | Intermediate Catch Event | |
| Error Event attached to an Activity | Error Boundary Event | An Error element with an error code is also created if there is an error code for the event. |
| Message Event attached to an Activity | Message Boundary Event | |
| Timer Event attached to an Activity | Timer Boundary Event | |
| Sequence Flow | Sequence Flow | |
| Note | Text Annotation |
Related tasks:
Import BPMN 2.0 artifacts into an existing process application
Next steps after importing BPMN Models
Import and exporting process applications from the Process Center console
Related reference:
Mapping BPMN 2.0 constructs to IBM Business Process Manager
Mapping IBM WebSphere Business Modeler elements to IBM Business Process Manager constructs
SAP Solution Manager integration
To bridge the flexible modeling of IBM Business Process Manager and the repository capabilities of SAP Solution Manager, the SAP Solution Manager integration offers you a way to import business blueprints from SAP Solution Manager into IBM Process Center, edit, customize, and model them using Process Designer, and then export the completed blueprints back to the SAP Solution Manager to be configured.
SAP Solution Manager is a strategic application management platform from SAP AG used to implement and upgrade SAP solutions and scenarios.
The key concept of the integration is an SAP solution called a business blueprint. A business blueprint is defined in SAP Solution Manager based on SAP processes and is refined through a number of iterations. The blueprint structure is a business process hierarchy that consists of business scenarios, business processes, and process steps from the SAP Solution Manager business process repository. The business blueprint defines the scope of the SAP solution to be implemented. Implementation content such as documentation, transactions, and training material, can be associated with individual structure elements in the business process hierarchy.
You can import business blueprints from SAP Solution Manager into Process Center, and edit and customize them using Process Designer to provide accurate business scenarios for specified projects. You can use import and export operations to make the business blueprints complete and to synchronize the business data between SAP Solution Manager and BPM. The SAP Solution Manager integration provides the following advantages:
- Content reuse
- You can model business blueprint content by using the tool that you are familiar with, and the content can be reused to develop, configure, and customize business models more quickly.
- Collaborative modeling
- Other SAP Solution Manager users can access, add, and customize business blueprints. Their additions contribute to a reference library that can be used to develop and extend further business scenarios.
The following image illustrates the high-level integration of SAP Solution Manager with Process Center and Process Designer:
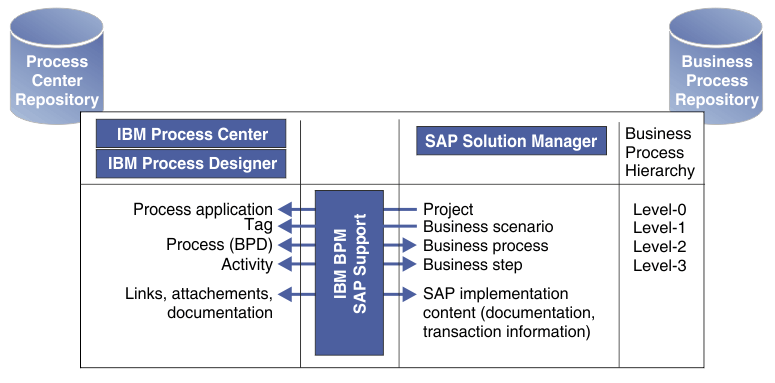
The business data stored in repositories is exchanged between SAP Solution Manager and Process Designer and Process Center through import and export operations. The element mapping of these exchanges is also specified in the image.
Requirements
To prepare for SAP Solution Manager integration activities, review the requirements and ensure they are met.
Hardware requirements
There are no additional hardware requirements for the SAP Solution Manager integration. For the most current requirements for BPM, see Requirements.
Software requirements
Ensure that use the required software at the specified levels for the SAP Solution Manager integration:
- BPM V8.5.0.1
- SAP Solution Manager V7.1 or later
- One of the following web browsers at a level specified in the BPM and SAP Solution Manager system requirements:
- Microsoft Internet Explorer
- Mozilla Firefox
- Google Chrome
- Apple Safari
For the IBM system requirements, see Requirements.
For information about SAP Solution Manager, refer to the documentation on the SAP
Solution Manager service website.
Related tasks:
Troubleshooting the SAP Solution Manager integration
Configure SAP Solution Manager
To configure SAP Solution Manager, ensure the prerequisites are met and create the required endpoints in SAP Solution Manager.
Ensure the following prerequisites are met:
- SAP Solution Manager V7.1 is installed with Solution Composer installed as an add-on.
- The SAP_BC_WEBSERVICE_ADMIN, SAP_BC_WEBSERVICE_ADMIN_TEC, and SAP_BC_WEBSERVICE_CONFIGURATOR user roles are created.
- Your system has the following configuration:
- Microsoft Windows XP, Microsoft Windows Vista, or Microsoft Windows 7 operating system
- Microsoft Internet Explorer 7 and later
- 32-bit version of JRE 6 and later, or 32-bit version of JDK 6 and later
- The HTTP port is configured and active.
To create and configure the required endpoints in SAP Solution Manager, complete the following procedures.
Create the SSI4BPMBsiProjDirectroyInterface endpoint
Procedure
- On the first screen of the SAP Easy Access wizard, run the SOAMANAGER transaction.
- In the Certificate Error: Navigation Blocked window, select Continue to this website (not recommended).
- Click Log On.
- Enter the SAP Solution Manager user name and password.
- In the SOA Management window, click Service Administration.
- On the Service Administration tab, click Web Service Configuration.
- In the Web Service Configuration window, in the Search by list, select Service Definition. For the search pattern, type *BSI*, and then click Go.
- In the Search Results table, select the row that contains the BsiProjectDirectroyInterface external name and click Apply Selection.
- Under Details of Service Definition, on the Configuration tab, click Create.
- In the SOA Management window, provide the following information:
- In the Service Name field, type SSI4BPMBSIPROJDIRECTROYINTERFACE.
- In the Description field, describe the service, for example The SSI4BPM Service for Service Definition 'BSIPROJECTDIRECTROYINTERFACE'.
- In the New Binding Name field, type SSI4BPMBSIPROJDIRECTROYINTERFACE.
- Click Apply Settings.
- In the Configuration of Web Service window, on the Provider Security tab, under Communication Security, select None (HTTP).
- Under Transport Channel Authentication, select User ID/Password, and then click Save.
- Under Details of Service Definition, ensure that Active is selected as the state of the service definition.
Create the SSI4BPMBsiSmsyInterface endpoint
Procedure
- On the first screen of the SAP Easy Access wizard, run the SOAMANAGER transaction.
- In the Certificate Error: Navigation Blocked window, select Continue to this website (not recommended).
- Click Log On.
- Enter the SAP Solution Manager user name and password.
- In the SOA Management window, click Service Administration.
- On the Service Administration tab, click Web Service Configuration.
- In the Web Service Configuration window, in the Search by list, select Service Definition. For the search pattern, type *BSI*, and then click Go.
- In the Search Results table, select the row that contains the BsiSmsyInterface external name and click Apply Selection.
- Under Details of Service Definition, on the Configuration tab, click Create.
- In the SOA Management window, provide the following information:
- In the Service Name field, type SSI4BPMBSISMSYINTERFACE.
- In the Description field, describe the service, for example SSI4BPM Service for Service Definition 'BSISMSYINTERFACE'.
- In the New Binding Name field, type SSI4BPMBSISMSYINTERFACE.
- Click Apply Settings.
- In the Configuration of Web Service window, on the Provider Security tab, under Communication Security, select None (HTTP).
- Under Transport Channel Authentication, select User ID/Password, and then click Save.
- Under Details of Service Definition, ensure that Active is selected as the state of the service definition.
Connect to SAP Solution Manager
The first time you set up the SAP Solution Manager integration, establish a connection between SAP Solution Manager and IBM Process Center. This connection ensures a secure exchange of business data between the two components.
Before you set up the connection, you must obtain an account in the SAP Solution Manager environment. Use the SAP Solution Manager location and your user name and password for this account to access the SAP models in SAP Solution Manager. Without an account, you cannot access SAP Solution Manager because account sharing is prohibited by the SAP Solution Manager licensing policies. To import business blueprints into Process Center, modify them, get updates from SAP Solution Manager, and export completed work back to SAP Solution Manager, you must have a connection between the remote SAP Solution Manager and Process Center. After the connection is set up, you can log in to SAP Solution Manager as required.
To connect SAP Solution Manager and Process Center:
In Process Center, click Import Process App and complete the wizard. If you select Remember my password, your user name and password for the connection are saved so the next time you access SAP Solution Manager using this account you will directly access the project list in SAP Solution Manager.
Both the HTTP and HTTPS protocols are supported for the connection.
When the connection is successful, the project list is displayed in SAP Solution Manager.
Related tasks:
Import projects from SAP Solution Manager
Export process updates to SAP Solution Manager
Troubleshooting the SAP Solution Manager integration
Import projects from SAP Solution Manager
Rather than updating the SAP projects in SAP Solution Manager or developing SAP business models from scratch, you can import SAP projects from SAP Solution Manager into Process Center.
Before you proceed with the SAP projects import, ensure that a connection between SAP Solution Manager and Process Center is set up. See the Connect to SAP Solution Manager topic in the related tasks. The following actions occur during the import of the SAP project into BPM:
- Each SAP Solution Manager project, which can contain one or more SAP processes, is imported as a process application.
- When you select to generate a guided workflow, an SAP guided workflow is generated for each imported process application, and each logical component of the SAP project is imported as a SAP server. See Use guided workflows.
- Each SAP process within the SAP project is imported as a business BPD.
You can use the following procedure to import both new SAP projects, which are unknown to Process Center, and updates to SAP projects that were previously imported.
To import SAP projects from SAP Solution Manager into Process Center:
In Process Center, click Import Process App and complete the wizard. If the password for the connection to SAP Solution Manager is saved as described in the Connect to SAP Solution Manager procedure and the connection is successful, the list of projects that can be imported from SAP Solution Manager is displayed.
If you select to import an SAP project that was previously imported, select Create a snapshot for the corresponding process app in case you ever want to revert the changes.
The selected SAP project and its business processes are imported into Process Center to be edited and customized in Process Designer.
- Element mapping between SAP Solution Manager and IBM Business Process Manager When SAP projects and their business blueprints are imported from SAP Solution Manager into BPM, their elements are mapped to BPM elements.
Related tasks:
Connect to SAP Solution Manager
Element mapping between SAP Solution Manager and IBM Business Process Manager
When SAP projects and their business blueprints are imported from SAP Solution Manager into BPM, their elements are mapped to BPM elements.
The following table shows the mapping between elements in SAP Solution Manager and the corresponding BPM objects after import. If an element is not included in the table, the element is not imported.
| SAP Solution Manager element | IBM Business Process Manager element |
|---|---|
| SAP project | Business application |
| Business process | Business BPD |
| Business scenario | Tag |
| Business step | Activity |
| Transactions | Transactions |
| Proj. Documentation | Project Documentation |
| Gen. Documentation | General Documentation |
Unlike the previous synchronization model that provided support only for transactions of type Transaction, the latest synchronization model provides additional support for the import and export of various other transaction types, such as Program, BSP Application, SAP CRM People-Centric UI Application, CRM WebClient Application, Predefined URLs from directory, Web address or file, Web Dynpro Application, and Java Web Dynpro.
Migrate a process application to a different SAP project
The process application created when a SAP blueprint project is imported into BPM can be disconnected from its SAP project and migrated to a different SAP project.
The Import Process App wizard provides a new option called Migrate an existing process application to the selected SAP project that you can use to migrate a selected process application to another SAP project.
- In Process Center, click Import Process App.
- In the Import Process App wizard,
select Migrate an existing process application to the selected SAP project, then click Next.
- On the Select the process application to migrate page, select the process application to migrate.
- On the next page, select the name of the SAP process to migrate the processes application to, and then click Migrate.
Export process updates to SAP Solution Manager
You can export updates to process applications and business process definitions that are made in BPM back to SAP Solution Manager to be configured.
Ensure the process application is imported from SAP Solution Manager. After you change the process application, take a snapshot before you export the process application. After you finished editing the process application and customizing its business models in Process Designer, you can load the updates from Process Center to SAP Solution Manager:
- Business process definitions (BPD) are exported as SAP processes.
- If the process application contains new business process definitions, corresponding SAP business processes, steps, and transactions are created.
- If some business process definitions were updated, the corresponding SAP business processes, steps, and transactions are also updated.
- If it does not exist, a document for the SAP process is created in SAP Solution Manager, which provides a URL that points back to the BPM process.
To export updated BPDs from Process Center to SAP Solution Manager:
- In Process Center, on the Process App tab, select the application snapshot that contains the updates to export, and then click Export Process App.
- In the Export Process App window, select SAP Solution Manager for the export type, and then click OK.
- Complete the wizard. If the password for the connection to SAP Solution Manager is saved as described in the Connect to SAP Solution Manager procedure and the connection is active, the processes that can be exported are listed.
All the changes made to the BPD in BPM after the first export are listed for comparison on the Display Changes page, and are automatically exported back to SAP Solution Manager through subsequent exports.
When the export is complete, you can see the business processes are updated in SAP Solution Manager.
Related tasks:
Connect to SAP Solution Manager
Create snapshots in the Designer view
![]()
Use guided workflows
Guided workflows facilitate the way business processes that include SAP steps can be implemented in BPM (BPM) with minimal programming skills, and align business users without requiring an extensive understanding of the underlying SAP process documentation.
Because SAP runtime systems are not process driven and little or no visibility of throughput and backlog is available, process issues can be difficult to detect and correct. Therefore the users must be trained to understand and comply with the SAP process documentation to complete their business activities. However, using the SAP guided workflows in BPM, you can enable an information flow between the SAP transactions and BPM, prioritize process tasks dynamically, sequence tasks in the correct order, customize and refine business processes. To support this functionality, BPM V8.5.0.1 provides an SAP Guided Workflow toolkit that uses the SAP WebGUI technology.
You can generate SAP guided workflows either automatically for SAP business projects that are imported from SAP Solution Manager or manually for business process definitions (BPD) that are defined in BPM. After you generate the SAP guided workflow, you can use it to enable the information flow between the SAP transactions and BPM, or you can customize it to update the implementation of various steps in your business flow in Process Portal.
- Generating guided workflows You can generate SAP guided workflows either automatically for SAP business projects that are imported from SAP Solution Manager or manually for business process definitions (BPD) that are defined in BPM.
- Enable the information flow between the SAP transactions and BPM After you generate the SAP guided workflow for your BPD, you can use it to enable the information flow between the SAP transactions and BPM.
- Customizing guided workflows for reuse You can use the generated guided workflow to update the implementation of a selected transaction in your business flow in Process Portal. You can update some elements or the entire implementation of the transaction, including the layout, variables, code, and data mapping.
Generating guided workflows
You can generate SAP guided workflows either automatically for SAP business projects that are imported from SAP Solution Manager or manually for business process definitions (BPD) that are defined in BPM.
Review the Requirements to ensure that your software is at the required levels for the SAP Guided Workflow toolkit.
Generating guided workflows automatically
About this task
You can automatically generate a guided workflow for a SAP business project that you import from SAP Solution Manager. The SAP business project is imported into BPM as a process application with an SAP Guided Workflow toolkit attached to it. In the guided workflow, an SAP server is created for each logical component of the imported SAP project for which you can define transactions and to which you can add business objects that enable the bidirectional information flow between the SAP transactions and BPM.To automatically generate a guided workflow for an imported SAP business project:
Procedure
- Ensure that a connection between SAP Solution Manager and BPM is set up. If this is the first time set up the SAP Solution Manager integration, see Connect to SAP Solution Manager.
- In IBM Process Center, click Import Process App, select SAP Solution Manager, and complete the Import Process App wizard to import the SAP business project from SAP Solution Manager into BPM. The SAP project is imported as a process application, and the business processes in the SAP project are imported as business process definitions (BPD). For each logical component of the SAP project,
a SAP server is created in the process application.
- Select Remember my password to save your user name and password so the next time you access SAP Solution Manager using this account you will directly access the project list in SAP Solution Manager.
- For the process that you selected to import, select Generate a Guided Workflow to automatically generate the default guided workflow for the BPD.
- Select Remember my password to save your user name and password so the next time you access SAP Solution Manager using this account you will directly access the project list in SAP Solution Manager.
- In the BPD diagram, select a step in the process flow and, under Properties, open the Custom view. The Transaction table lists the transactions for the selected step. If there is no standard transaction, set an existing transaction as standard or create a standard transaction.
- Click Process App Settings and, on the Servers tab, review the list of SAP servers for the process application. Each SAP server represents a logical component in the imported SAP project.
- Configure the SAP server on the Servers tab:
- In the Servers list, select a SAP server. If none exists, add a new server of type SAP Server.
- Under SAP Location, enter the information for the SAP server the transactions will run on.
- Click Save.
- Run the generated SAP guided workflow in Process Portal:
- Launch Process Portal.
- Click the name of the BPD that has the generated guided workflow to run the human task from the WebSphere Portal Server. If you log in to the target SAP system for the first time, enter your SAP user name and password; subsequent login sessions will reuse the specified SAP credentials.
Generating guided workflows manually
About this task
If you do not import SAP business processes from SAP Solution Manager, you can manually generate a guided workflow for a business process with SAP steps defined as a business BPD in Process Designer.To manually generate a guided workflow for a BPD:
Procedure
- Open your process application in Process Designer.
- Attach the SAP Guided Workflow toolkit to the process application.
- Click Processes > Business Process Definitions and select the name of the BPD to work with.
- In Process Designer, in the Diagram view, select a business object and, on the Properties tab, in the Implementation view, click Default SAP Transaction Human Service.
- In the Custom view, review the transaction in the Transaction table. If no standard transaction is available, set an existing transaction as standard or create a standard transaction. If the Transaction table is not displayed, open the Data Mapping view, specify a transaction value for the input that is named defaultTransaction, and create a system value for the input that is named defaultServerInfo.
- Click Process App Settings and, on the Servers tab, see the list of servers for your process application. Each server represents a logical component in the BPD.
- Configure the SAP server on the Servers tab:
- In the Servers list, select a SAP server. If none exists, add a new server of type SAP Server.
- Under SAP Location, enter the information for the SAP server the transactions will run on.
- Click Save.
- Run the generated SAP guided workflow in Process Portal:
- Launch Process Portal.
- Click the name of the BPD that has the generated guided workflow to run the human task from the WebSphere Portal Server. If you log in to the target SAP system for the first time, enter your SAP user name and password; subsequent login sessions will reuse the specified SAP credentials.
Enable the information flow between the SAP transactions and BPM
After you generate the SAP guided workflow for your BPD, you can use it to enable the information flow between the SAP transactions and BPM.
You can either set up the guided workflow to automatically accept input and output transaction parameters from an external source, such as a predefined parameter definition file (unidirectional flow), or manually add and configure input and output parameters for each transaction in your business flow (bidirectional flow).
Enable a unidirectional information flow
About this task
You can configure a unidirectional information flow only for a BPD that has SAP information. When you are setting up a unidirectional flow, you can select a predefined file from your local file repository or from the SAP Guided Workflow toolkit repository to be the data definition file, which has a .tpar file extension in the following example.To enable a unidirectional information flow:
Procedure
- In Process Designer, select a BPD with an implemented guided workflow and, on the diagram, select a transaction in the process flow.
- In the Custom view for the selected transaction, click Add Business Object.
- In the Edit Parameters wizard, select File on local disk and specify the name and the location of the predefined .tpar file that contains the parameters to use for the selected transaction. A sample .tpar file, called Transactions_DEMO.tpar, is provided in the SAP Guided Workflow toolkit. You can download this file and change it according to your transaction information.
- Select Create a private variable to add a private variable, and complete the wizard to create the business object with the parameters specified in the data definition file.
- On the Data Mapping view, assign the input, output, and private variables to the corresponding variables of the implemented human service.
- Click Save.
- Add the required variables to the remaining steps in your business flow by repeating steps 2-6.
- Click Save.
- Log in to Process Portal, and click the name of the BPD that has the generated guided workflow.
- In the My Tasks portlet, select each task in your BPD flow and verify on the Guided Workflow page the customer fields are populated with the required information.
- Click Complete to save your changes.
Enable a bidirectional information flow
About this task
In a business object, you can use the parameter documentation to define how a bidirectional information flow can be set up between the SAP transaction in the SAP HTML user interface and the process instance in BPM.Restriction: The bidirectional information flow is supported only on Mozilla Firefox.
You can specify the following parameters manually in the documentation of each parameter:
- selector - A mandatory CSS selector that specifies the location of the HTML element. For example, selector = span[id=’helloworld’].
- input - A boolean parameter that specifies whether the parameter is of input or output type. Valid values are true and false. Default is false. For example, input=true.
- readonly - When this parameter is set to true, the located HTML element cannot be manually modified. Valid values are true and false. Default is false. For example, readonly=true.
- required - When this parameter is set to true, the value cannot be empty; otherwise, the SAP transaction cannot be completed. For example, required=true.
- extractregex - A regular expression that illustrates the mechanism of selecting the required part from the innerText of the located HTML element. The extractregex parameter applies to output parameters only.
- format - A regular expression that illustrates the rule to validate the parameter value. The format parameter applies to output parameters only.
The following example illustrates how the parameter documentation can be configured for the CreateOrder business object:
| Business Object: CreateOrder | |
|---|---|
| Parameter | Documentation |
| orgUnit |
selector=span[id=’helloworld’] input=true readonly=true required=true |
| orderId |
selector=span[id=‘messagebar’] input=false required=true extractregex=\d+ format=\d+</p> |
Customizing guided workflows for reuse
You can use the generated guided workflow to update the implementation of a selected transaction in your business flow in Process Portal. You can update some elements or the entire implementation of the transaction, including the layout, variables, code, and data mapping.
The following example shows you how to update the layout of a selected step by customizing and reusing an existing guided workflow.
- In Process Designer, in the Diagram view, select a transaction in the BPD flow.
- In the Implementation view, click Toolkits > SAP Guided Workflow > User Interface > Human Service, right-click Default SAP Transaction Human Service and select Copy item to > Other Process App. Then, select the name of the process application that to add the human service to.
- In the Process App Settings for the application, click User Interface > Human Service, right-click Default SAP Transaction Human Service and select Rename to specify a new name for the human service, for example, Customized SAP Transaction Human Service. Click OK to save the name.
- Click User Interface > Human Service > Customized SAP Transaction Human Service.
- In the Diagram view, select the process to customize and use the Coaches on the palette to customize the selected process. For example, you can customize the layout of a form by adding a check box to it or by renaming an existing button.
- On the Variables tab, add the output and private variables required for each business object used in the customization and bind the business objects to their output variables.
- In the Data Mapping view, under Input mapping, assign the private variable to the selected transaction.
- Click Save.
- Log in to Process Portal, and select the name of the BPD that has the generated guided workflow.
- In the My Tasks portlet, select the task corresponding to the customized transaction in your BPD flow and verify the layout of the Guided Workflow form is customized as you specified.
- Click Complete to save your changes.
Troubleshooting the SAP Solution Manager integration
To troubleshoot SAP Solution Manager integration problems, verify that requirements are met, and check the log files for error messages.
To assess the problem.
- Verify that requirements are met:
- Verify the SAP connection information, including the IP address, system number, client number, user name, and password.
- Ensure that IBM Process Center can access SAP Solution Manager.
- Check the log files for error messages and additional information that is relevant for the troubleshooting. The following log files contain diagnostic information for the SAP Solution Manager integration.
log files that contain diagnostic information for the SAP Solution Manager integration." cellpadding=10 border="1">
Log file locations
Log files Description Location SystemOut.log Contains diagnostic information for the SAP Solution Manager integration <installation_root>/profiles/profile_name/logs/<server_name> SolMan4BPM_import_server_info.log Contains diagnostic information for blueprint imports into Process Center <installation_root>/profiles/profile_name/logs/SolMan4BPM_logs SolMan4BPM_export_server_info.log Contains diagnostic information for business process updates exported back to SAP Solution Manager <installation_root>/profiles/profile_name/logs/SolMan4BPM_logs
- Log files Certain log files contain troubleshooting information for the SAP Solution Manager integration.
- Problems and limitations Learn about some of the known problems and limitations with the SAP Solution Manager integration.
Related tasks:
Connect to SAP Solution Manager
Related reference:
Log files
Certain log files contain troubleshooting information for the SAP Solution Manager integration.
By default, the SAP Solution Manager integration-related log information is prefixed with SolMan4BPM or SolManager and appended to the IBM SystemOut.log file, which is located in the <installation_root>/profiles/profile_name/logs/<server_name> directory.
If the information is generated by the integration functions, the prefix is SolMan4BPM. If the information is generated by SAP Solution Manager and caught by integration-related logs, the prefix is SolManager.
- For general information, the log type is I.
- For exception information, the log type is E.
Runtime information for the most recent SAP Solution Manager integration operations is logged to the following files, which are located in the <installation_root>/profiles/profile_name/logs/SolMan4BPM_logs directory:
- SolMan4BPM_import_remote.xml
- When a project is imported from SAP Solution Manager, this file stores the SAP model read from the SAP server.
- SolMan4BPM_import_server_info.log
- When the import is complete, this file stores the response message from SAP Solution Manager.
- SolMan4BPM_export_server_info.log
- When an export is complete, this file stores the response message from SAP Solution Manager.
- SolMan4BPM_export_local.xml
- When the local SAP model from IBM Process Center is exported to SAP Solution Manager, this file stores the snapshot of the local SAP model.
- SolMan4BPM_export_remote.xml
- When the SAP model is exported to SAP Solution Manager, this file stores the remote SAP model from SAP Solution Manager. The remote SAP model from SAP Solution Manager is compared with the local SAP model from Process Center to identify the updates made in Process Center.
- SolMan4BPM_export_tip_before.xml
- After the export, updates to the tip process application are required. This file stores the tip SAP model before the updates.
- SolMan4BPM_export_tip_after.xml
- After the export, updates to the tip process application are required. This file stores the tip SAP model after the updates.
Problems and limitations
Learn about some of the known problems and limitations with the SAP Solution Manager integration.
- SAP project name truncated to seven characters during first-time import into Process Center
- Inconsistencies in SAP project updates are not imported into the process application
- Export process application snapshots to SAP Solution Manager
- Export a BPD that is being edited by other users
- New activity nodes that are exported to SAP Solution Manager are appended to the end of existing SAP steps
- Failed export is partially successful
SAP project name truncated to seven characters during first-time import into Process Center
Symptoms
The name of the process application created when you import an SAP project from SAP Solution Manager into IBM Process Center for the first time is a seven-character acronym.
Causes
When an SAP project is imported from SAP Solution Manager into Process Center for the first time, the name of the SAP project is automatically truncated to an acronym whose length cannot exceed seven characters. The seven-character acronym is automatically assigned to the process application created in Process Designer.
Resolve the problem
No workaround is available.
Inconsistencies in SAP project updates are not imported into the process application
Symptoms
Some updates that are made to an SAP project in SAP Solution Manager might not be imported into the process application in Process Designer.
Causes
The import of updates to an SAP project in SAP Solution Manager is done according to the SAP blueprint project. If an inconsistency that is related to an element in the change record is detected, the inconsistency is not processed and, therefore, is not imported through the Import Process App operation.
Resolve the problem
No workaround is available.
Export process application snapshots to SAP Solution Manager
Symptoms
When a process application snapshot is exported from Process Designer to SAP Solution Manager, changes to some SAP elements are not exported.
Causes
Changes are made to the SAP blueprint project according to the changes in the record. SAP elements not in the change record are not changed.
The changes that are made can be classified into the following types:
- Changes to add an object
- Changes to delete an existing object
- Changes to the attribute of an existing object
Resolve the problem
When unexpected data loss or errors occur in the SAP project model in the process application, validation errors are displayed in the Validation Errors view. Click Recover in the SAP Solution Manager view to fix these errors. Snapshots that contain validation errors cannot be exported to SAP Solution Manager.
When a conflict occurs, changes made in BPM take precedence, as presented in the following table.
| Change in BPM | Change in SAP Solution Manager | Export results |
|---|---|---|
| Delete element A | Change attribute of element A | Element A is deleted. |
Change attribute AttrBPM of element A
| Change attribute AttrSAP of element A
| If the same attribute is changed
|
| Change element A | Delete element A | Element A is created. |
Export a BPD that is being edited by other users
Symptoms
When you export a business BPD that is being edited by other users from Process Designer to SAP Solution Manager, the export succeeds, but the update to the change record in the process fails if the process editors select to overwrite the other users' changes with their own changes.
Causes
A change history in the BPD records the changes that are made in Process Designer. This change record is used to merge the process changes in SAP Solution Manager without overwriting the SAP process. After the export, the change record in the tip application process is updated. When you export a process that is being edited by other users who choose to overwrite other users' changes with their own, the changes that are exported cannot be removed from the change record.
Resolve the problem
This is a known limitation for which no workaround is available. To avoid data from being lost and not recorded in the change record of the process, you might want to stop editing the BPD before you initiate the snapshot export.
New activity nodes that are exported to SAP Solution Manager are appended to the end of existing SAP steps
Symptoms
When a business BPD snapshot is exported from Process Designer to SAP Solution Manager, the exported new activity nodes are appended to the end of the existing SAP steps in the structure list, instead of ordering them by following the connection path in the BPD. The following examples describe this behavior in clearer terms.
- Example 1
- If activity nodes in a BPD are created in the order A-B-C and are connected from last to first as C-B-A, when exported to SAP Solution Manager, the nodes are ordered as A-B-C.
- Example 2
- Insert a new activity node between nodes B and C of the BPD, and connect it as B2, for example. When you export the BPD to SAP Solution Manager, the activity B2 is shown at the end of the list, as A-B-C-B2.
Causes
The SAP blueprint project in SAP Solution Manager does not support a complex flow logic that is represented by connections, gateways, and events in the BPD. Also, the Enterprise Services of SAP Solution Manager do not provide an API for updating edges in SAP processes. Consequently, the connectivity information that defines the activity sequence in the BPD is ignored during the snapshot export to SAP Solution Manager. The following actions occur:
- The order of exported activities is not changed in SAP Solution Manager, even though the precedence relationships are changed in the corresponding BPD.
- When new activities that are added to the BPD are exported to SAP Solution Manager, they are appended at the end of the SAP activity list in SAP Solution Manager.
Resolve the problem
To change the step order in the business blueprint transaction of SAP Solution Manager, you can move an SAP step up or down on the Structure tab. To update the flow logic in the SAP process, you can add or remove edges on the Graphic tab.
Failed export is partially successful
Symptoms
When you export a number of business process changes to SAP Solution Manager, an export might fail although the error log files for the export report that only the last step in a series of export steps failed, while all the preceding steps were successful.
Causes
The web service API for SAP Solution Manager does not support multiple-operation transactions, and the export is not an atomic function.
Resolve the problem
This is a known limitation in SAP Solution Manager for which there is no workaround. The transaction changes that were exported and committed successfully cannot be reversed with a rollback.
Registering Process Centers and sharing toolkits
When you register two Process Centers with each other, you can share toolkits with other users, or subscribe to toolkits that other users share.
You can share toolkits with other users, even if those users are working in a different Process Center. You no longer need to first export the toolkits from one Process Center and then import them into another Process Center.
To share toolkits between the two Process Centers, the various participants complete the following tasks:
- An administrator enables both Process Centers for sharing.
- An administrator registers the Process Center that accesses the shared toolkit.
- The author of the toolkit that will be shared selects a snapshot of that toolkit and releases it.
- The author of the toolkit that will be shared selects that toolkit and shares it with other Process Centers, enabling that toolkit to be shared with any Process Center that is registered to the sharing Process Center.
Restriction: The shared toolkit is downloaded to the subscribing Process Center as a read-only copy. The subscriber cannot modify or share the subscribed toolkit.
After a toolkit is shared, events are synchronized and snapshots are released automatically once every 24 hours. The sharing Process Center is notified when a shared toolkit is being used on the a registered Process Center. The subscribing Process Center is notified of new released snapshots as well as the state of the shared toolkits.
- Registering a Process Center To share a toolkit, you register a Process Center with another Process Center. You can also implement security and revoke your registration.
- Revoking a Process Center registration You can revoke a Process Center registration when you are no longer sharing toolkits.
- Sharing toolkits The toolkit author can share the toolkit with another business developer on a Process Center that is enabled for sharing.
- Stop toolkit sharing You can stop a toolkit from being shared.
- Subscribing to a toolkit If you are a user on a registered Process Center, you can search for and subscribe to shared toolkits on other registered Process Centers.
- Manage subscriptions and monitoring toolkits You can manage subscriptions and monitor all shared toolkits.
- Rules for sharing and archiving toolkits There are specific rules that you must consider when you either share or archive a toolkit.
Registering a Process Center
To share a toolkit, you register a Process Center with another Process Center. You can also implement security and revoke your registration.
To share toolkits between two Process Center, administrators enable the Process Centers to be registered with each other. The supported protocols are HTTPS (HTTP over secure socket layer) and HTTP. Before specifying the HTTPS protocol, you must set up security between the participating Process Centers.
Before you specify the HTTPS protocol or register a Process Center with another Process Center that is in a different cell or a different security domain within the same cell, you must set up a security trust between the participating Process Centers. See the Configuring cross-cell security for IBM Process Center topic in the related links section.
When you specify the HTTP protocol, the user name and password must be identical on both process centers.
To register a Process Center:
- In the Process Center, select the Admin tab, and then click Registration.
- On the Registration page, select Enable Registration and Sharing, and then enter a unique name for the Process Center.
- Click Create Registration.
- In the Register a content source field, select Remote Process Center.
You can select either of the following options to register a remote source:
- Remote Process Center - Register a remote Process Center.
- Remote Content Source - Register an external source of assets, such an IBM Rational Team Concert.
- In the Remote Process Center URL field, enter the remote Process Center URL. The Process Center URL must be in the form of http://servername:port, or https://servername:port. Before you specify the HTTPS protocol,
you must set up a security trust between the participating Process Centers.
See the Configuring cross-cell security for IBM Process Center topic in the related links section.
If you use a proxy server, you must specify the proxy server URL. This restriction applies only to a clustered environment.
You can disable the Process Center registration by first revoking all registrations to remote Process Centers and then clearing Enable Registration and Sharing.
Related tasks:
Revoking a Process Center registration
Manage subscriptions and monitoring toolkits
Configure cross-cell security for IBM Process Center
Related reference:
Rules for sharing and archiving toolkits
Revoking a Process Center registration
You can revoke a Process Center registration when you are no longer sharing toolkits.
Before you revoke a Process Center registration, consider the following points:
- After a registration has been revoked, you cannot share new toolkits with that Process Center. Toolkits the Process Center previously shared and subscribed to become local to that Process Center. If new snapshots of a toolkit the Process Center subscribed to are released, they are not available to that Process Center.
- When you re-create a registration after revoking it, all the links to the shared toolkit are reestablished. The Process Center with the reinstated registration can again see changes that have been made to the subscribed toolkit.
When you revoke a registration, toolkits can no longer be shared with that Process Center. The Process Center with a revoked registration is removed from the list of registered Process Centers.
To revoke a Process Center registration:
- In the Process Center, select the Admin tab and click Process Center Registration.
- Next to the Process Center name, click Revoke.
The Process Center with a revoked registration is removed from the list of registered Process Centers.
Related tasks:
Manage subscriptions and monitoring toolkits
Related reference:
Rules for sharing and archiving toolkits
Sharing toolkits
The toolkit author can share the toolkit with another business developer on a Process Center that is enabled for sharing.
Ensure the Process Centers are registered to each other and enabled for sharing. See Registering a Process Center.
When both Process Centers are registered, the toolkit author can release a toolkit snapshot to be shared. The toolkit author can also see which subscribers are using the toolkit, and which versions they are using. When the toolkit author updates a toolkit and releases the changes in a new snapshot, the subscriber can view the changes. The subscriber can then decide to update the dependency with the new snapshot.
To share a toolkit:
- In the Process Center, select the Toolkits tab to display the list of toolkits.
- Click the drop-down menu on the toolkit to share and select Status. The Set Snapshot Status window opens.
- Click Released and then click OK.
- To open the management page for the toolkit that you just released, click Manage.
- Click Share Toolkit with other Process Centers.
The toolkit is available to the registered Process Centers.
Related tasks:
Revoking a Process Center registration
Manage subscriptions and monitoring toolkits
Related reference:
Rules for sharing and archiving toolkits
Stop toolkit sharing
You can stop a toolkit from being shared.
When you stop a toolkit from being shared, the toolkit subscribers can continue to use the toolkit but can no longer receive updates for it.
To stop sharing a toolkit:
- In the Process Center, select the Toolkits tab to display the list of toolkits.
- Select the toolkit you want to stop sharing.
- To open the management page for the toolkit that you selected, click Manage.
- Click Stop sharing with other Process Centers.
Related tasks:
Revoking a Process Center registration
Manage subscriptions and monitoring toolkits
Related reference:
Rules for sharing and archiving toolkits
Subscribing to a toolkit
If you are a user on a registered Process Center, you can search for and subscribe to shared toolkits on other registered Process Centers.
To subscribe to a toolkit:
- In the Process Center, select the Admin tab, and then Process Center Registration to display a list of registered Process Centers.
- Optionally, enter a term into the Search field.
- In the Location section, select the remote Process Center.
- Select the toolkit and click Subscribe.
Related tasks:
Revoking a Process Center registration
Manage subscriptions and monitoring toolkits
Related reference:
Rules for sharing and archiving toolkits
Subscribing to imported toolkits
When you subscribe to an already imported toolkit, the imported toolkit is converted to a subscription. The subscription to the toolkit fails if modifications were made to the imported toolkit that is in the subscribing Process Center before the toolkit was subscribed to.
Restrictions
The following restrictions apply:
- A subscribed toolkit is read-only.
- A toolkit that has been subscribed to from another Process Center cannot be shared from the subscribing Process Center.
Manage subscriptions and monitoring toolkits
You can manage subscriptions and monitor all shared toolkits.
Ensure each toolkit to manage and monitor is shared with other Process Centers.
As a toolkit subscriber, you can manage your subscriptions by checking for updates to the toolkit that you are subscribed to. To check for updates to your subscriptions:
- In the Process Center, select the Toolkits tab to display the list of toolkits.
- Click Snapshots.
In the same view as the snapshot, you see the Where used information, which lists the local and remote projects that use the shared toolkit and the snapshot.
Related tasks:
Revoking a Process Center registration
Related reference:
Rules for sharing and archiving toolkits
Monitor toolkits
Procedure
You can view information about a toolkit that you share with other Process Centers. For example, you can determine the number of applications or toolkits that use the toolkit and which Process Centers are using the toolkit. To monitor toolkits:
- In the Process Center, select the Toolkits tab to display the list of toolkits.
- Select Snapshots > Check for updates.
Rules for sharing and archiving toolkits
There are specific rules that you must consider when you either share or archive a toolkit.
| Action | Rule |
|---|---|
| Sharing a toolkit |
|
| Stop sharing a toolkit |
|
| Sharing a toolkit when the snapshot status is set to Released
For information about setting the snapshot status, see Set status for snapshots. |
|
| Sharing a toolkit when the snapshot status is changed from Released to another status For information about setting the snapshot status, see Set status for snapshots. |
|
| Archive a toolkit or a snapshot | |
| Archive a toolkit | The toolkit must not be marked for sharing. If the toolkit is shared, sharing must be stopped before you can archive the toolkit. |
| Archive a snapshot | The snapshot must not be set to Released. If the snapshot is set to Released, the status must be changed before you can archive the snapshot. |
Related tasks:
Revoking a Process Center registration
Manage subscriptions and monitoring toolkits
Use remote assets
When working with Process Applications or Toolkits, you might need to provide a link to related information that is available outside of the BPM environment. For example, you might want to link to a website or a wiki page. You can also reference a change request stored in a change management system or a test case in a quality management system. These kind of links can be used to achieve traceability or provide details about the fixes and features that went into a new asset.
IBM Business Process Manager uses the Open Services for Lifecycle Collaboration (OSLC) standard, which enables linking across products for the purposes of lifecycle management and traceability. For more information about the standard, see OSLC
Standard
- Registering a remote content source To link to a remote asset outside of an IBM Business Process Manager environment, you must register the remote content source.
- Revoking a remote content source registration You can remove a remote content source registration when you no longer need to create new links to that content source.
Registering a remote content source
To link to a remote asset outside of an IBM Business Process Manager environment, you must register the remote content source.
Before you register a remote content source, the administrator must import the content source provider signer certificate into the BPM server truststore. See Add a signer certificate to a keystore.
To register a remote content source:
- In the Process Center, select the Admin tab, and then click Registration.
- If you are enabling registration for the first time on the Process Center, select Enable Registration and Sharing, and then enter a unique name for the Process Center. You can skip this step if the Process Center has already been enabled for registration.
- Click Create Registration.
- In the Register a content source field, select Remote Content Source.
- In the URL field, enter a URL for remote content source. Provide a user ID and password that has access to the remote content source. The URL must begin with https://.
Click Next.
To determine the URL to use, contact the administrator for the remote content source. For IBM Rational sources, the URL typically takes the form of https://servername:port/.../rootservices.
The supported list of providers are:
- IBM Rational Team Concert V3.0.1.1 and future fix packs
- IBM Rational Quality Manager V3.0.1.1 and future fix packs
- IBM Rational Requirements Composer V3.0.1.1 and future fix packs
- IBM Design Management V3.0.1 and future fix packs
- Select a project from the list. Specify a registration name. The registration name defaults to the project name. You can edit the name, if required. Click Register.
You can link to external information and provide links to the information available through the registered content source. For more information about providing or linking to external information from a remote content source, see Linking to external information.
Revoking a remote content source registration
You can remove a remote content source registration when you no longer need to create new links to that content source.
To revoke a remote content source registration:
- In the Process Center, select the Admin tab and click Registration.
- Locate the remote content registration to remove, and click Revoke next to it.
The links created earlier using the remote content source continue to function correctly. But, you can no longer create new links to the revoked source.
The Process Center with a revoked registration is removed from the list of registered Process Centers.
Copying changed assets from one track to another
After you work in isolation on separate features that are related to a process application or toolkit, creating or updating assets, you need to copy those changes from a snapshot to the tip of a track, usually the main track. You can copy the asset only to tracks of the same process application or toolkit. The revised assets overwrite the assets that are already on the destination track and new assets are added. The dependencies of each asset are also copied from one track, which is the source, to the tip of another track, which is the destination.
For advanced content, assets that are created in Process Designer are defined as top-down assets, while assets created in IBM Integration Designer are defined as bottom up assets.
Because the copied modules and libraries and their contents are replaced in the target branch, remember the following considerations regarding advanced content:
- If the asset is defined in Process Designer, do not update the default module and library in IBM Integration Designer. This is a top-down asset.
- If the asset is defined in IBM Integration Designer, do not place the assets in the default library or module. This is a bottom-up asset. Instead, define these assets as part of their own modules and libraries.
- Do not use Process Designer to update assets that are defined in IBM Integration Designer.
To copy assets from a source snapshot to the tip of a destination track:
- In Process Center, select a process application or a toolkit.
- Select the track to copy from. You see the snapshots for the track you selected.
- Select the snapshot to copy changes from. The snapshot opens in the Process Documentation view. You can see the categories of the assets.
- Click Copy.
If an asset with the same name as the source snapshot is present in the target snapshot, the asset name is changed to a different name after the snapshot copy is complete. The Snapshot Copy window opens.
- Select the track where you want to copy the revisions to.
Assets that are not supported in Process Documentation are listed under the Other and Advanced Content categories.
If you expand the twistie, you can see comparisons of the assets that are marked Updated or Conflict and the updated and original assets side by side. For assets that are not supported in Process Documentation, you cannot see a side-by-side comparison, but copy the updated asset to the tip of the selected track. When you expand the twistie for a New asset, you can view only the new asset on the left or other side. To see a detailed view of either the original or updated supported asset, click View. To go back to the side-by-side view, click the breadcrumb at the top or beginning of the view.
- Select the assets to copy, and then click Copy from <source> to <destination>, where the source is the snapshot of the revised track and the destination is another track, usually the main track. A confirmation window opens.
- By default, all the dependencies that exist in the source snapshot are included in the copy. Optionally, you can clear dependencies that you do not want to include in the copy.
- States of assets when copying from one track to another Before they are copied from one track to another, assets are in the New, Updated, Conflict, or No Change state as compared to the assets that are available in the destination track.
- Import toolkits and process applications in IBM Process Center You can import toolkits or process applications that were created in Process Center into a new track or an existing track, which is the main track.
Work with the Process Center repository
States of assets when copying from one track to another
Before they are copied from one track to another, assets are in the New, Updated, Conflict, or No Change state as compared to the assets that are available in the destination track.
The following table shows the conditions of each state.
| States | Conditions |
|---|---|
| New |
|
| Updated |
|
| Conflict |
|
| No Change |
. |
When copying an object identified as New from a source track to a destination track, an error may occur with a message stating that an object with that name already exists in the target. In this case, the objects have the same name, but are in fact different objects. In order to proceed with the copy operation, one of the objects can be renamed, or the object in the tip, which is the current working version of the process application, can be deleted.
Import toolkits and process applications in IBM Process Center
You can import toolkits or process applications that were created in Process Center into a new track or an existing track, which is the main track.
Ensure the administrator provides access for the user who is logged to create tracks for process applications or toolkits.
When two people work in isolation on separate features that are related to the same process application or toolkit, you can import the process application or toolkit in the core development environment and copy the changes over.
- In Process Center, under Process Applications tab or Toolkits tab, click Import Process App or Import Toolkit.
Remember: When dependent toolkits that are part of a Process Application are imported in a destination Process Center, they are imported to the track they belonged to before the export from the source. You cannot select the target track for such dependent toolkits. To have the toolkits to be imported after selecting the destination track, export the dependent toolkit from the source Process Center, and then import it into the destination Process Center. Using this method, you can select the track where you want to import the dependent toolkit to. Now, when you import the Process Application with the dependent toolkit, the toolkit is not imported as a dependency. For any dependent toolkit the you want to import separately, import it before importing the Process Application with the dependent toolkit.
- Click Browse, select the file to import, and click OK.
- Select one of the following options:
- To import the toolkit or process application to the main track, select Existing Track (Main) and click OK.
- To import the toolkit or process application to a new track, select New Track, name and describe the track, and then click OK.
The toolkit or process application is copied to the tip of the track.
Searching for Process Center assets
You can find assets, such as toolkits, process applications, services, or business objects faster using specific syntax or tags.
The search looks for the text that is entered in the asset name, description or documentation, type, and tags. To identify reusable assets, you can use the Public tag. See Tagging library items in the related tasks section.
When the asset is found, you can read the documentation for it or open it using the appropriate tool. Then you can reuse these assets on a local or registered Process Center.
| Search syntax | Description | Example |
|---|---|---|
| [field name]: <search text> | Search for text in a specific asset field: displayName, name, description, tags,
and type.
The display names and names of process applications and toolkits are not identical. For process applications and toolkits the displayName is the name of the asset and the name is an acronym. |
The search is performed for the text that directly precedes the field name entered. Therefore, unless the terms are surrounded by double quotation marks, when you search for name:Do it right, the search returns results that include Do in the name field. The rest of the text is matched with other default fields and results are returned accordingly. |
| <search text>AND<search text> | The Boolean AND operator matches assets that have both terms anywhere in the searchable fields. By default, when two terms are entered in the search field, the AND criteria is included. Instead of the word AND, you can use the & symbol. | To search for assets that contain the terms business and process, use the "business AND process" or "business process" search query. |
| <search text>OR<search text> | The Boolean OR operator links two terms and finds matching results if either of the terms exists. Instead of the word OR, you can use the || symbol. | To search for assets that contain the terms business or process, use the "business OR process" search query. |
| <search text>NOT<search text> | The Boolean NOT operator excludes assets that are after the NOT operator. Instead of the word NOT, you can use the exclamation mark (!). | To search for assets that contain the terms business process but not accounting practice, use the "business process" NOT "accounting practice" search query. |
| ( ) | Use parentheses to create a group query that can form complex Boolean logic-based sub queries. | (business OR accounting) AND practice |
| <search text> containing * or ? characters | Use the asterisk (*) or question mark (?) wildcard characters in words in a search string to match arbitrary characters. To perform a single-character wildcard search, use the ? character. To perform a multiple-character search, use the * character. The wildcard characters can be at the beginning, middle, or end of a word. | To search for assets that end in practice_ followed by only one character, use "*practice_?". |
- Reusing assets from Process Centers From the search results, you can navigate to the asset that you searched for, read its documentation, open it in the appropriate tool, and subscribe to the toolkit or process application that contains the asset to use.
Related tasks:
Reusing assets from Process Centers
From the search results, you can navigate to the asset that you searched for, read its documentation, open it in the appropriate tool, and subscribe to the toolkit or process application that contains the asset to use.
The search looks for the text entered in the asset name, description or documentation, type, and tags. If you register other Process Centers, you can run a search for assets that are part of the registered Process Center. After the search results are returned, you can subscribe to the toolkit or process application to use.
To reuse assets that are on remote Process Centers, ensure that both Process Centers are registered with each other and enabled for sharing. See Registering a process center. Then click the arrow in the Search field and select the registered Process Center to search for assets.
To reuse assets from Process Centers:
- From the search results, select the asset, click Open in Designer or Open in workspace.
- Click Subscribe. The Open in Designer or the Open in workspace option becomes available for the associated assets that you subscribed to.
Related tasks: