Example HCL Portal v8 implementation
The following is an example implementation plan for a configuration of HCL Portal (nee WebSphere Portal) at fictional myco.com. The environment integrates with IBM HTTP Server (IHS), Tivoli Directory Server, IBM DB2, and ESB gateways. Although software version is obsolete, the broader perspective offered still provides utility for those tasked with enterprise software implementation in general.
Pre-Install
| Task | Resource | DEV | STG | TEST | PRD | AUTH | PRDHA | Notes |
|---|---|---|---|---|---|---|---|---|
| Architecture design | Security | Comp | Comp | Comp | Comp | Comp | Comp | |
| Create wasadmin service account | Security | Comp | Comp | Comp | Comp | Comp | Comp | |
| Create filesystems | UNIX | Comp | Comp | Comp | Comp | Comp | Comp | |
| Install gtk libraries | UNIX | Comp | Comp | Comp | Comp | Comp | Comp | rpm -qa |
| Create user accounts with sudo access | UNIX | Comp | Comp | Comp | Comp | Comp | Comp | user3, user1, user2 |
| Mount /media drive | UNIX | Comp | Comp | Comp | Comp | Comp | Comp | 40+ GB |
| Set ulimit -n 10024 | UNIX | Comp | Comp | Comp | Comp | Comp | Comp | |
| Virtual Portal hostnames in DNS | Middleware | Comp | Comp | Comp | Comp | Comp | Comp | |
Install WAS v8.5.5 and Portal v8.0.0.1
| Task | Resource | DEV | STG | TEST | PRD | AUTH | PRDHA | Notes |
|---|---|---|---|---|---|---|---|---|
| Install Installation Manager | Middleware | Comp | Comp | Comp | Comp | Comp | Comp | |
| Install WAS for dmgr | Middleware | Comp | Comp | Comp | Comp | Comp | Comp | |
| Install WAS for portal | Middleware | Comp | Comp | Comp | Comp | Comp | Comp | |
| Upgrade to WAS FP1 | Middleware | Comp | Comp | Comp | Comp | Comp | Comp | |
| Install portal on primary node | Middleware | Comp | Comp | Comp | Comp | Comp | Comp | |
| Apply FP1 | Middleware | Comp | Comp | Comp | Comp | Comp | Comp | |
| Apply CF09 | Middleware | Comp | Comp | Comp | Comp | Comp | Comp | Note that CF10 has been released. |
| Install portal on secondary nodes | Middleware | Comp | Comp | Comp | | |||
| Apply FP1 | Middleware | Comp | Comp | Comp | | |||
| Apply CF09 | Middleware | Comp | Comp | Comp | | |||
| Create Dmgr01 profile | Middleware | Comp | Comp | Comp | Comp | Comp | Comp | |
| Configure authoring portlet | Middleware | Comp | Comp | Comp | Comp | Comp | Comp | |
| Disable managed pages | Middleware | Comp | Comp | Comp | Comp | Comp | Comp | |
| Create profile template | Middleware | Comp | Comp | Comp | Comp | Comp | Comp | |
| Configure portal to use DB2 | Middleware | Comp | Comp | Comp | Comp | Comp | Comp | |
| Configure Dmgr | Middleware | Comp | Comp | Comp | Comp | Comp | Comp | |
| Federate primary node | Middleware | Comp | Comp | Comp | Comp | Comp | Comp | |
| Create static cluster | Middleware | Comp | Comp | Comp | Comp | Comp | Comp | |
| Configure LDAP on primary node | Middleware | Comp | Comp | Comp | Comp | Comp | Comp | |
| Add ha servers for LDAP | Middleware | | | Comp | Comp | Comp | Comp | |
| Install IHS | Middleware | Comp | Comp | Comp | Comp | Comp | Comp | |
| Configure web server plug-in | Middleware | Comp | Comp | Comp | Comp | Comp | Comp | |
Deploy MyCo
| Task | Resource | DEV | STG | TEST | PRD | AUTH | PRDHA | Notes |
|---|---|---|---|---|---|---|---|---|
| Configure default realm | Middleware | Comp | Comp | Comp | Comp | Comp | Comp | |
| Configure myAdminRealm | Middleware | Comp | Comp | Comp | Comp | Comp | Comp | |
| MyCo shared libraries | Middleware | Comp | Comp | Comp | Comp | Comp | Comp | |
| Web container updates | Middleware | Comp | Comp | Comp | Comp | Comp | Comp | |
| Mail session | Middleware | Comp | Comp | Comp | Comp | Comp | Comp | |
| Configure object cache instances | Middleware | Comp | Comp | Comp | Comp | Comp | Comp | |
| Configure object pool | Middleware | Comp | Comp | Comp | Comp | Comp | Comp | |
| Global security updates | Middleware | Comp | Comp | Comp | Comp | Comp | Comp | |
| Expression Language | Middleware | Comp | Comp | Comp | Comp | Comp | Comp | |
| Deploy war | Middleware | Comp | Comp | Comp | Comp | Comp | Comp | |
| Map portlets to shared libraries | Middleware | Comp | Comp | Comp | Comp | Comp | Comp | |
| Install global filters | Middleware | Comp | Comp | Comp | Comp | Comp | Comp | |
| Install Tealeaf processor | Middleware | Comp | Comp | Comp | Comp | Comp | Comp | |
| Resource Environment Provider | Middleware | Comp | Comp | Comp | Comp | Comp | Comp | |
| Install theme | Middleware | Comp | Comp | Comp | Comp | Comp | Comp | |
| Custom security configuration | Middleware | Comp | Comp | Comp | Comp | Comp | Comp | |
| Create virtual portal | Middleware | Comp | Comp | Comp | Comp | Comp | Comp | |
| Install multilingual system | Middleware | Comp | Comp | Comp | Comp | Comp | Comp | |
| Syndicate | Middleware | Comp | Comp | Comp | Comp | Comp | Comp | |
| Export/Import WCM libs | Middleware | Comp | Comp | Comp | Comp | Comp | Comp | Optional. Alternative to syndication. |
| Set web content permissions | Middleware | Comp | Comp | Comp | Comp | Comp | Comp | |
| Export/Import pages | Middleware | Comp | Comp | Comp | Comp | Comp | Comp | |
| Error 404: There is no content available | Middleware | Comp | Comp | Comp | Comp | Comp | Comp | Deploy MyShop.war |
| Disallow direct servlet access | Middleware | Comp | Comp | Comp | Comp | Comp | Comp | |
| Create profiles on secondary nodes | Middleware | Comp | Comp | | Comp | | ||
| chown -R wasadmin filesystems | Middleware | Comp | Comp | Comp | Comp | Comp | Comp | Stop as root. Start as wasadmin. |
| Customize IHS config | Middleware | Comp | Comp | Comp | Comp | Comp | Comp | |
| Web service client configuration | Middleware | Comp | Comp | Comp | Comp | Comp | Comp | esbgateway issue |
| Web Content Viewer preferences | Middleware | Comp | Comp | Comp | Comp | Comp | Comp | |
Post-Install tasks
| Task | Resource | DEV | STG | TEST | PRD | AUTH | PRDHA | Notes |
|---|---|---|---|---|---|---|---|---|
| ibm-allGroups | Middleware | Comp | Comp | Comp | Comp | Comp | Comp | |
| Persist serverIOTimeoutRetry | Middleware | Comp | Comp | Comp | Comp | Comp | Comp | Set to 5 |
| Max of historical log files | Middleware | | | | Comp | Comp | Comp | Change from 3 to 6 |
| Performance testing | Middleware | | | | Comp | Comp | Comp | |
See also
Overview
The following is an example of how to install WebSphere Portal v8, and then how to deploy the fictional MyCo's Prodline1 and Prodline2 branded applications and artifacts to their respective virtual hosts.
Note that the example is based on a specific deployment, and includes steps that you, in all likelihood, will not have to follow. These steps, revolving around setup of custom portal applications, are included for illustrative purposes.
Create /opt/IBM/Portal and /media filesystems
Create /opt/IBM/Portal and /media filesystems. Size of /opt/IBM/Portal should be at least 50 GB for lower level environments, and preferably 100 GB. /media is a shared directory containing WebSphere install images. Make sure /tmp has at least 3.5 GB free.
For example, on STG host...
stage ->df -g
Filesystem      GB blocks      Free %Used    Iused %Iused Mounted on
/dev/hd4             3.00      2.81    7%    11409     2% /
/dev/hd2            11.00      7.32   34%    59730     4% /usr
/dev/hd9var          4.00      3.62   10%     8988     2% /var
/dev/hd3             4.00      3.94    2%       96     1% /tmp
/dev/hd1             3.00      2.96    2%       79     1% /home
/dev/hd11admin       3.00      3.00    1%        9     1% /admin
/proc                   -         -    -         -     -  /proc
/dev/hd10opt         4.00      3.73    7%     8177     1% /opt
/dev/livedump        0.25      0.25    1%        4     1% /var/adm/ras/livedump
/dev/lvportalwps    90.00     89.63    1%        4     1% /opt/IBM/Portal
/dev/lvrafrepo      20.00     19.92    1%        4     1% /rafrepo
/dev/lvmedia        50.00     14.17   72%    33264     1% /media
Install and run Installation Manager
- On your local computer, download, install, and run XMing X server
- In putty, enable X11 forwarding...
-
Connection | SSH | X11 | Enable X11 forwarding
...and compression...
-
Connection | SSH | Enable compression
...and set cipher order...
-
Blowfish
-- warn below here --
3DES
DES
AES - Log on to target host as user root and configure X11. For example...
-
username@hostname /home/username ->xauth list
hostname/unix:11 MIT-MAGIC-COOKIE-1 0c723ae2ccd7660271b1bafc01b5d55f
hostname/unix:10 MIT-MAGIC-COOKIE-1 d15b40a439806573a57f10099fa9cfaf
username@hostname /home/username ->sudo su -
root@hostname / ->xauth add hostname/unix:10 MIT-MAGIC-COOKIE-1 d15b40a439806573a57f10099fa9cfaf
root@hostname / ->DISPLAY=localhost:10.0
root@hostname / ->export DISPLAY
root@hostname / ->xclockIf xclock does not work, we might need to enable X11 in sshd...
- vi /etc/ssh/sshd_config
- Set X11Forwarding yes
- stopsrc -s sshd
- startsrc -s sshd
- Log out of the putty session
- Log back in
If we are logging into target host from AIX jumpbox, use syntax...
-
ssh -X -Y -C username@hostname
- Install Installation Manager
-
cd /media/installmgr
./installc -acceptLicense
cd /opt/IBM/InstallationManager/eclipse
For more information, see: Installation Manager 1.6.2
Install WAS v8.5.5 for dmgr
On hosts where dmgr is co-located with portal, we install WAS into /opt/IBM/Portal/WebSphere on the portal host. On hosts where dmgr is on its own host, we install into /opt/IBM/Portal/WebsphereMB on the dmgr host.
- On your local computer, start XMing X server
- Log on to target host as user root
- Verify ulimit for number of files and file blocks
-
ulimit -n 20480
ulimit -f unlimitedTo get current ulimit: ulimit -a
To set, edit /etc/security/limits
- Set umask 022 in .profile
- Add WAS v8.5.5 to repository using Installation Manager
Console mode:
- Run...
-
cd /opt/IBM/InstallationManager/eclipse/tools
./imcl -c...select...
-
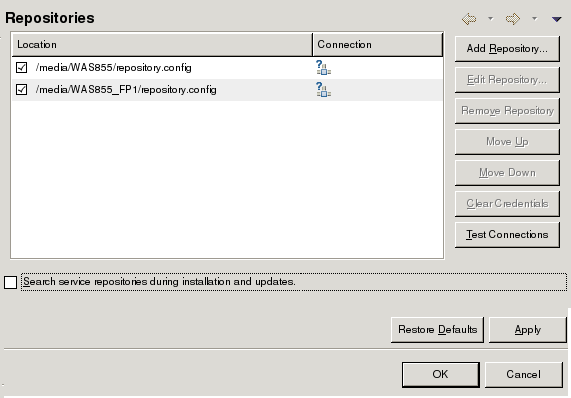
P. Preferences | 1. Repositories | D. Add Repository
- Set...
-
/media/WAS855/repository.config
- Add repository for WAS 8.5.5 FP 1
-
/media/WAS855_FP1/repository.config
- Select "Search service repositories during installation and updates" to remove the check mark.
=====> IBM Installation Manager> Preferences> Repositories

Repositories:
     1. [X] /media/WAS855/repository.config

Other Options:
     D. Add Repository

     S. [ ] Search service repositories during installation and updates

     R. Restore Defaults
     A. Apply Changes and Return to Preferences Menu
     P. Temporarily Keep Changes and Return to Preferences Menu
To add using GUI...
- Go to...
-
cd /opt/IBM/InstallationManager/eclipse
./IBMIM - Select...
-
File | Preferences | Repositories | Add Respository

- Add WAS v8.5.5 repository...
-
/media/WAS855/repository.config

- Click Apply
- Uncheck: "Search service repositories during installation and updates"
- Add repository for WAS 8.5.5 FP 1
-
/media/WAS855_FP1/repository.config
- Run...
- Install WAS v8.5.5 binaries for use by dmgr profile
- Command-line method for dmgr that is not co-located with portal...
### Install WAS 8.5.5 only
mkdir /opt/IBM/Portal/IMShared
cd /opt/IBM/InstallationManager/eclipse/tools
./imcl install com.ibm.websphere.ND.v85_8.5.5000.20130514_1044 \
       -repositories /media/WAS855/repository.config  \
       -installationDirectory /opt/IBM/Portal/WAS1/AppServer  \
       -sharedResourcesDirectory /opt/IBM/Portal/IMShared  \
       -log /tmp/imcl.log  \
       -showProgress \
       -acceptLicense
The version number can be found in the repository.xml file. For example
-
<offering ... version='8.5.0.20110617_2222
...or by using listAvailablePackages. For example...
-
./imcl listAvailablePackages -repositories /media/WAS855_FP1/repository.config
- GUI method...
- Start Installation Manager
-
cd /opt/IBM/InstallationManager/eclipse
./IBMIM...and go to...
-
File | Preferences | Repositories | Add Respository
- Add WAS v8.5.5 repository...
-
/media/WAS855/repository.config
...and then click Apply
- On IIM main page, click Install, select the WAS ND package, then click Next...

- Accept the license terms, then click Next
- Set location of Shared Resources Directory
-
/opt/IBM/Portal/IMShared

- Set WAS home
For Test, PRD, and Auth envs...
-
/opt/IBM/Portal/WebSphere/AppServer
For TST, PRD Primary, and PRD HA envs, where Prodline2 dmgr is co-located on same LPAR as Prodline1...
-
/opt/IBM/Portal/WAS1/AppServer

- Select default features

- Accept summary information

After install completes, select None, and then exit Installation Manager

- Start Installation Manager
- Command-line method for dmgr that is not co-located with portal...
Install WAS v8.5.5 binaries for use by portal profile
- Start Installation Manager in GUI mode
-
cd /opt/IBM/InstallationManager/eclipse
./IBMIM - On main Installation Manager panel, select Install.
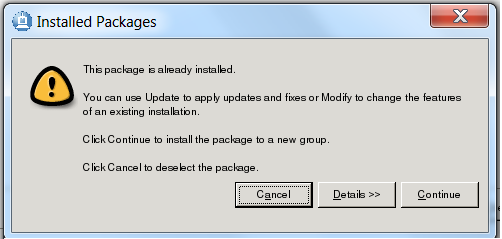
If dmgr is co-located on this host, you may get pop-up saying package is already installed. Select Continue in Installed Packages pop-up panel.
- Select IBM WAS ND v8.5.5.1 to install

- On next panel, accept license agreement

- For Shared Resources Directory, set...
-
/opt/IBM/Portal/IMShared

- On the Install Packages screen, select...
-
Create a new package group
...and for Installation Directory select...
-
/opt/IBM/Portal/WAS1/AppServer

- Keep English as the only default language.

- Select features to install. We can keep the defaults.

- Review the summary information, then select Install

- On last screen, select None, then Finish

Upgrade WAS to v8.5.5 FP 1
Do this for WAS binaries on both the Dmgr host and on portal nodes.
Note that if included WAS FP1 in the repository when doing WAS install, this should already be done. To verify...
# cd opt/IBM/Portal/WebSphere/AppServer/bin
# ./versionInfo.sh
--------------------------------------------------------------------------------
IBM WebSphere Product Installation Status Report
--------------------------------------------------------------------------------

Report at date and time May 19, 2014 6:45:30 PM EDT

Installation
--------------------------------------------------------------------------------
Product Directory        /opt/IBM/Portal/WebSphere/AppServer
Version Directory        /opt/IBM/Portal/WebSphere/AppServer/properties/version
DTD Directory            /opt/IBM/Portal/WebSphere/AppServer/properties/version/dtd
Log Directory            /var/ibm/InstallationManager/logs

Product List --------------------------------------------------------------------------------
ND                       installed

Installed Product
--------------------------------------------------------------------------------
Name                  IBM WebSphere Application Server Network Deployment
Version               8.5.5.1
ID                    ND
Build Level           cf011341.03
Build Date            10/18/13
Package               com.ibm.websphere.ND.v85_8.5.5001.20131018_2242
Architecture          PPC64
Installed Features    IBM 64-bit WebSphere SDK for Java
                      WebSphere Application Server Full Profile
                      EJBDeploy tool for pre-EJB 3.0 modules
                      Embeddable EJB container
                      Stand-alone thin clients and resource adapters


# cd /opt/IBM/Portal/WAS1/AppServer/bin
# ./versionInfo.sh
--------------------------------------------------------------------------------
IBM WebSphere Product Installation Status Report
--------------------------------------------------------------------------------

Report at date and time May 19, 2014 6:47:14 PM EDT

Installation
--------------------------------------------------------------------------------
Product Directory        /opt/IBM/Portal/WAS1/AppServer
Version Directory        /opt/IBM/Portal/WAS1/AppServer/properties/version
DTD Directory            /opt/IBM/Portal/WAS1/AppServer/properties/version/dtd
Log Directory            /var/ibm/InstallationManager/logs

Product List --------------------------------------------------------------------------------
ND                       installed

Installed Product
--------------------------------------------------------------------------------
Name                  IBM WebSphere Application Server Network Deployment
Version               8.5.5.1
ID                    ND
Build Level           cf011341.03
Build Date            10/18/13
Package               com.ibm.websphere.ND.v85_8.5.5001.20131018_2242
Architecture          PPC64
Installed Features    IBM 64-bit WebSphere SDK for Java
                      WebSphere Application Server Full Profile
                      EJBDeploy tool for pre-EJB 3.0 modules
                      Embeddable EJB container
                      Stand-alone thin clients and resource adapters
Before installing, make a backup of WAS file system.
To install silently using command-line, as user root...
cd /opt/IBM/InstallationManager/eclipse/tools
./imcl install com.ibm.websphere.ND.v85_8.5.5001.20131018_2242 \
       -repositories /media/WAS855_FP1/repository.config  \
       -installationDirectory /opt/IBM/Portal/WAS1/AppServer  \
       -sharedResourcesDirectory /opt/IBM/Portal/IMShared  \
       -log /tmp/imcl.log  \
       -showProgress \
       -acceptLicense
To install using Installation Manager GUI...
- On the main IIM page, select Update
- On the "Select a package group to find updates for", select first package group

- On the panel, "Select updates to install", verify V8.5.5.1 is selected
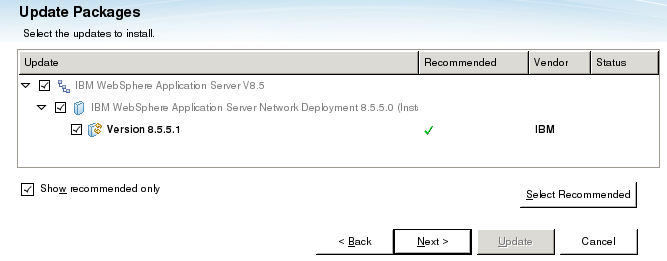
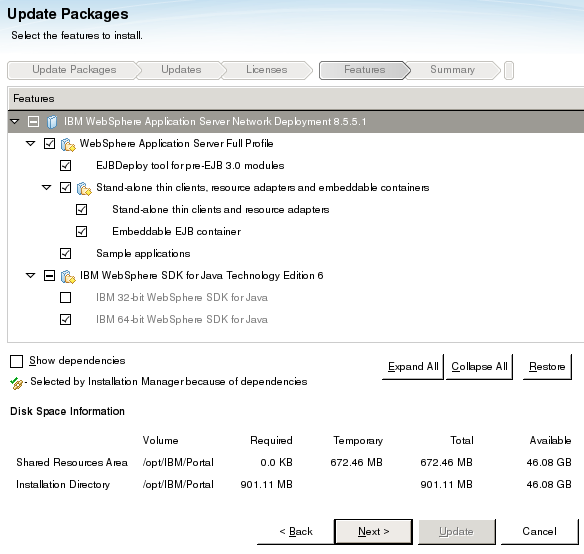
- On the panel, "Select the features to install", keep defaults, then select Next
- On the Summary panel, select Update
- After it finishes, do the same for the second package group
Install Portal on primary node
- Configure portal repository
Using console mode
- Run...
-
cd /opt/IBM/InstallationManager/eclipse/tools
./imcl -c - Select...
-
P. Preferences | 1. Repositories | D. Add Repository
- Add repository...
-
/media/Portal8/Setup/eimage/repository.config
- Select "Search service repositories during installation and updates" to remove the check mark.
=====> IBM Installation Manager> Preferences> Repositories

Repositories:
     1. [X] /media/Portal8/Setup/eimage/repository.config

Other Options:
     D. Add Repository

     S. [ ] Search service repositories during installation and updates

     R. Restore Defaults
     A. Apply Changes and Return to Preferences Menu
     P. Temporarily Keep Changes and Return to Preferences Menu
Using GUI...
- Run
-
cd /opt/IBM/InstallationManager/eclipse
./IBMIM - Add repository...
-
/media/Portal8/Setup/eimage/repository.config

- Run...
- Install Portal
- First, set up X11 like we did for installing WAS.
If we cannot log on directly to host, for example, to get to PRD HA hosts we have to go through jump server, set up X11 forwarding. Basically you log on to the jump box, and then ssh to the target host using syntax...
-
ssh -X -Y -C username@hostname
- Run IBMIM and then select Install

- On Install Packages panel, select IBM WebSphere Portal Server

- Accept license agreement
- Select "Create a new package group" and set Installation Directory to...
-
/opt/IBM/Portal/WAS1/PortalServer

- For features, if this is a primary node, select...
- Config Engine
- Portal Server Binary
- Portal Server Profile

If this is a secondary node, do not select Portal Server Profile. See Installing addtional portal nodes
- On the next screen, select "Existing WebSphere Application Server Root Directory"
-
/opt/IBM/Portal/WAS1/AppServer

- For Profile Template Type, select "Base"
- Set node and cell name...
Cell p1cellP Node PrdNode01 For username and password set...
- wasadmin
- password
We will change password later when we configure LDAP

The cell and node name for the portal MUST be different than the cell and node names for the dmgr cell.
The cluster setup steps in this guide assume we use the same IDs for portal and dmgr. If you do NOT use the same ID, you may see unexpected problems when creating the cluster related to the user IDs..
- On the Summary page, click install...

- First, set up X11 like we did for installing WAS.
Additional portal nodes
Overview
This section covers adding the additional node to the Deployment Manager cell and adding a new WebSphere_Portal server as a horizontal dynamic cluster member to the previously created dynamic cluster. Once this section is completed, you will have a functional two-node horizontal dynamic cluster using the federated LDAP security.
- Install Installation Manager
- Add WAS v8.5.5 and WAS FP1 to Installation Manager repository...
- Run...
-
cd /opt/IBM/InstallationManager/eclipse/tools
./imcl -c...select...
-
P. Preferences | 1. Repositories | D. Add Repository
- Set...
-
/opt/IBM/Portal/media/WAS855/repository.config
- Add repository for WAS 8.5.5 FP 1
-
/opt/IBM/Portal/media/WAS855_FP1/repository.config
- Select "Search service repositories during installation and updates" to remove the check mark.
=====> IBM Installation Manager> Preferences> Repositories

Repositories:
     1. [X] /opt/IBM/Portal/media/WAS855/repository.config

Other Options:
     D. Add Repository

     S. [ ] Search service repositories during installation and updates

     R. Restore Defaults
     A. Apply Changes and Return to Preferences Menu
     P. Temporarily Keep Changes and Return to Preferences Menu
- Run...
- Install WAS v8.5.5 binaries
- Start Installation Manager GUI...
-
cd /opt/IBM/InstallationManager/eclipse
./IBMIM - Select Install, then select Continue in pop-up panel.
- On the Install Packages screen, select...
-
Create a new package group
...and for Installation Directory select...
-
/opt/IBM/Portal/WAS1/AppServer
- Select defaults for remainder of panels, then on summary page, select Install
- On last screen, select None, then Finish
- Start Installation Manager GUI...
- Install Fixes
- Add repository for WAS 8.5.5 FP 1
-
/opt/IBM/Portal/media/WAS855_FP1/repository.config
MyCo has WCM license, which is different from WCM Standard Edition (fewer entitlements). We install...
-
8.0.0-WP-Server-FP001
8.0.0-WP-WCM-FP001Uncheck: "Search service repositories during installation and updates"
- On the main IIM page, select Update
- On the "Select a package group to find updates for", select first package group
- On the panel, "Select updates to install", verify V8.5.5.1 is selected
- On the panel, "Select the features to install", keep defaults, then select Next
- On the Summary panel, select Update
- Add repository for WAS 8.5.5 FP 1
- Install Portal v8.0
- Add repository...
-
/opt/IBM/Portal/media/Portal8/Setup/eimage/repository.config
- On Install Packages panel, select IBM WebSphere Portal Server
- Select "Create a new package group" and set Installation Directory to...
-
/opt/IBM/Portal/WAS1/PortalServer
- For features, select only...
- Config Engine
- Portal Server Binary

- On the next screen, select "Existing WebSphere Application Server Root Directory"
-
/opt/IBM/Portal/WAS1/AppServer
- On the Summary page, click install...

- Once the installation completes, click the radio button for None and click Finish to exit the installer.
- Add repository...
- Upgrade Portal v8 with FP1
- Review: Update Portal v8 with FP1
- Add FP1 to Installation Manager repository
/opt/IBM/Portal/media/Portal8_FP1/repository.config
- From Installation Manager select "Update"
- If you have more than one fix in your repository, it will try to install them all. To install just FP1, de-select "Show recommended only", then select only "v8.0.0.1"

- Ignore warnings about needing to update wps.properties. Unlike primary node, we did a binary only install of portal on this host, so don't need to update wps.properties
- After upgrade finishes, make tarball backup
- Upgrade Portal v8 with CF09
- Download CF09
- Add CF09 to Installation Manager repository
- Change class loader from parent first to parent last.
- Stop all WebSphere processes
- Because no profile has been created yet, we do not need to update wps.properties to include profile name and location
- Add CF09 to repository
- Use Installation Manager to install
To install manually..
- Determine offering ID...
-
$ cd /opt/IBM/InstallationManager/eclipse/tools
$ ./imcl listAvailablePackages -repositories /opt/IBM/Portal/media/CF09/repository.config
com.ibm.websphere.PORTAL.SERVER.v80_8.0.1.20131217_0755 - Install
./imcl install \
       com.ibm.websphere.PORTAL.SERVER.v80_8.0.1.20131217_0755 \
       -repositories /opt/IBM/Portal/media/CF09/repository.config \
       -installationDirectory /opt/IBM/Portal/WAS1/PortalServer \
       -sharedResourcesDirectory /opt/IBM/IMShared \
       -log /tmp/imcl.log  \
       -acceptLicense
- Determine offering ID...
- Start Portal
- Make tarball backup
- Create profiles on secondary nodes
Do this step only after configuring the portal primary node with DB2 and LDAP
- From primary node, copy profileTemplates.zip to secondary nodes. For example...
-
cd /opt/IBM/Portal/WAS1/PortalServer/profileTemplates
scp profileTemplates.zip user1@prdhost2.myco.com:/tmp
scp profileTemplates.zip user1@prdhost3.myco.com:/tmp
scp profileTemplates.zip user1@prdhost4.myco.com:/tmp - On target node, unzip profileTemplates.zip
-
cd /opt/IBM/Portal/WAS1/PortalServer/profileTemplates
mv /tmp/profileTemplates.zip .
unzip profileTemplates.zip - Update permissions...
-
cd /opt/IBM/Portal/WAS1/PortalServer/
find profileTemplates -name \* -exec chmod 755 {} \; - Execute...
-
cd /opt/IBM/Portal/WAS1/PortalServer/profileTemplates
./installPortalTemplates.sh /opt/IBM/Portal/WAS1/AppServer - On each WebSphere Portal additional node...
cd /opt/IBM/Portal/WAS1/AppServer/bin/
./manageprofiles.sh -create  \
                    -templatePath /opt/IBM/Portal/WAS1/PortalServer/profileTemplates/managed.portal  \
                    -profileName wp_profile  \
                    -profilePath /opt/IBM/Portal/WAS1/wp_profile \
                    -cellName P1Cell02 \
                    -nodeName P1Node02 \
                    -hostName prdhost2.myco.com

cd /opt/IBM/Portal/WAS1/AppServer/bin/
./manageprofiles.sh -create  \
                    -templatePath /opt/IBM/Portal/WAS1/PortalServer/profileTemplates/managed.portal  \
                    -profileName wp_profile  \
                    -profilePath /opt/IBM/Portal/WAS1/wp_profile \
                    -cellName P1Cell03 \
                    -nodeName P1Node03 \
                    -hostName prdhost3.myco.com

cd /opt/IBM/Portal/WAS1/AppServer/bin/
./manageprofiles.sh -create  \
                    -templatePath /opt/IBM/Portal/WAS1/PortalServer/profileTemplates/managed.portal  \
                    -profileName wp_profile  \
                    -profilePath /opt/IBM/Portal/WAS1/wp_profile \
                    -cellName P1Cell04 \
                    -nodeName P1Node04 \
                    -hostName prdhost4.myco.com

...etc...
Do NOT use the same node name as your primary node or any other node that may already be part of the DMGR cell. You will be unable to add this node to the DMGR cell if the node names are identical. Do NOT use the same cell name as the DMGR cell. Do NOT use the manageprofiles option to Federate the profile now. This results in an unusable Portal profile. A WebSphere_Portal server will NOT be created during the profile creation. The WebSphere_Portal server will be created after the node is added to the existing cluster.
- After creating the profile, edit...
-
/opt/IBM/Portal/WAS1/PortalServer/wps.properties
...and verify the following is set...
-
ProfileName=wp_profile
ProfileDirectory=/opt/IBM/Portal/WAS1/wp_profile
- Copy and configure DB2 client jars
- From primary node...
-
cd /opt/IBM/Portal/WAS1/PortalServer
scp -r db2drivers user1@prdhost2.myco.com:/tmp
scp -r db2drivers user1@prdhost3.myco.com:/tmp
scp -r db2drivers user1@prdhost4.myco.com:/tmpFrom secondary node
-
cd /opt/IBM/Portal/WAS1/PortalServer
cp -r /tmp/db2drivers . - Edit...
-
/opt/IBM/Portal/WAS1/wp_profile/ConfigEngine/properties/wkplc_dbtype.properties
...and set...
-
db2.DbLibrary=/opt/IBM/Portal/WAS1/PortalServer/db2drivers/db2jcc4.jar:/opt/IBM/Portal/WAS1/PortalServer/db2drivers/db2jcc_license_cu.jar
- From primary node...
- On remote dmgr host, ensure the Deployment Manager is started...
-
cd /opt/IBM/Portal/WebSphere/AppServer/profiles/Dmgr01/bin
./startManager.sh - Ensure that the time on the Deployment Manager server and the time on the additional Portal node server are no more than 5 minutes apart.
- Create backup of all nodes and dmgr
- Log on to each secondary host in turn, and add the node...
-
cd /opt/IBM/Portal/WAS1/wp_profile/bin
./addNode.sh prd2dmgr.myco.com 9879 -username wasadmin -password mypassword**Example output...
-
ADMU0003I: Node P1Node02 has been successfully federated.
- Edit...
-
/opt/IBM/Portal/WAS1/wp_profile/ConfigEngine/properties/wkplc.properties
...and set...
-
WasUserid=uid=wasadmin,cn=users,ou=admins,dc=myco,dc=com
WasPassword=mypassword**
PortalAdminId=uid=wpsadmin,cn=users,ou=admins,dc=myco,dc=com
PortalAdminPwd=mypassword**
PortalAdminGroupId=cn=wpsadmins,cn=groups,ou=admins,dc=myco,dc=com
WasRemoteHostName=prd2dmgr.myco.com
WasSOAPPort=9879
PrimaryNode=false
ClusterName=P1Cluster - Edit...
-
/opt/IBM/Portal/WAS1/wp_profile/ConfigEngine/properties/wkplc_dbdomain.properties
...and ensure that the database password values are all set correctly.
Note that this file should be pre-populated with your database information from running the 'enable-profiles' script on the primary node earlier.
- Review settings in...
-
/opt/IBM/Portal/WAS1/wp_profile/ConfigEngine/properties/wkplc_dbtype.properties
- Confirm the database properties are set up correctly on this node
-
cd /opt/IBM/Portal/WAS1/wp_profile/ConfigEngine
./ConfigEngine.sh validate-database -DWasPassword=mypassword**Example output:
-
Wed Feb 26 15:24:28 EST 2014
BUILD SUCCESSFUL - Edit...
-
/opt/IBM/Portal/WAS1/wp_profile/PortalServer/jcr/lib/com/ibm/icm/icm.properties
...and set...
-
jcr.textsearch.enabled = false
- In the same file, set...
-
jcr.admin.uniqueName=uid=wpsadmin,cn=users,ou=admins,dc=myco,dc=com
- Start the nodeagent
-
cd /opt/IBM/Portal/WAS1/wp_profile/bin
./startNode.sh - Add node to cluster
-
./ConfigEngine.sh cluster-node-config-cluster-setup-additional -DWasPassword=mypassword**
- Execute appserver specific steps for setting up the following...
- Restart appserver and verify no errors in logs
- Verify we can access the new cluster member in a web browser using the port we identified earlier:
MemberNotFound Issue
Secondary portal site not rendering. Error in log...
-
MemberNotFoundException: EJPSG0002E: Requested Member does not exist.uid=wpsadmin,o=defaultWIMFileBasedRealm
We do not want to re-add file registry because that would break short name logon.
Startup errors...
E INI8504E: One or more initialization step failed.
javax.jcr.RepositoryException: RT7508E: Unable to initialize RepositoryFactory due to exception of type: com.ibm.wps.ac.PrincipalNotFoundException with message:
EJPSB0005E: Exception occurred during creation of the principal with Name uid=wasadmin,o=defaultWIMFileBasedRealm and Principal Type USER..
Fix: Edit...
-
/opt/IBM/Portal/WAS1/wp_profile/PortalServer/jcr/lib/com/ibm/icm/icm.properties
...and set...
-
jcr.admin.uniqueName=uid=wpsadmin,cn=users,ou=admins,dc=myco,dc=com
Upgrade Portal v8 with FP1 and CF09
- Review Update Portal v8 with FP1
- If this is the primary node, verify...
-
/opt/IBM/Portal/WAS1/PortalServer/wps.properties
...has profile name and profile home set...
-
ProfileName=wp_profile
ProfileDirectory=/opt/IBM/Portal/WAS1/wp_profileIf this is not the primary node, do not include any profile information in wps.properties.
- Stop all WebSphere processes
-
cd /opt/IBM/Portal/WAS1/wp_profile/bin
./stopServer.sh WebSphere_Portal -username wasadmin -password password - Make a backup
- Start Installation Manager console mode
-
cd /opt/IBM/InstallationManager/eclipse/tools
./imcl -c...and add FP1 to Installation Manager repository
/media/Portal8_FP1/repository.config
Uncheck: "Search service repositories during installation and updates"
- Install Portal FP1
To install from command-line...
-
cd /opt/IBM/Portal
./installFP1.shTo monitor progress...
-
tail -f /opt/IBM/Portal/WAS1/wp_profile/ConfigEngine/log/ConfigTrace.log
When complete, you should see something like...
**********************************************************************************
* Configuration Engine finished at: 02/15/2014 09:45:028
**********************************************************************************

BUIUD SUCCESSFUL
Total time: 26 minutes 2 seconds
root@tstwps1 /opt/IBM/InstallationManager/eclipse ->
To install with GUI, from Installation Manager select "Update".
If there is more than one fix in the repository, IM will try to install them all. To install just FP1, de-select "Show recommended only", then select only "v8.0.0.1"
- Install Portal CF09
- Download CF09
- Add CF09 to Installation Manager repository
-
/media/CF09/repository.config
- Change class loader from "parent first" to "parent last".
This should not be necessary for a newly-installed portal, as "parent last" is the default setting.
- Stop all WebSphere processes
- Edit...
...and verify the following is set...
-
ProfileName=wp_profile
ProfileDirectory=/opt/IBM/Portal/WAS1/wp_profile - Determine offering ID...
-
$ cd /opt/IBM/InstallationManager/eclipse/tools
$ ./imcl listAvailablePackages -repositories /media/CF09/repository.configOffering ID: com.ibm.websphere.PORTAL.SERVER.v80_8.0.1.20131217_0755
- Install CF09 fixes
./imcl install \ com.ibm.websphere.PORTAL.SERVER.v80_8.0.1.20131217_0755 \ -repositories /media/CF09/repository.config \ -installationDirectory /opt/IBM/Portal/WAS1/PortalServer \ -sharedResourcesDirectory /opt/IBM/Portal/IMShared \ -log /tmp/imcl.log \ -acceptLicense - Monitor logs for success message
 /opt/IBM/Portal/WAS1/wp_profile/ConfigEngine/log/ConfigTrace.log

**********************************************************************************
* Configuration Engine finished at: 02/16/2014 11:43:031
**********************************************************************************
BUIUD SUCCESSFUL
Total time: 21 minutes 5 seconds
- Verify version information...
root@prdhost2 -> cd /opt/IBM/Portal/WAS1/PortalServer/bin
root@prdhost2 -> ./WPVersionInfo.sh
--------------------------------------------------------------------------------
IBM WebSphere Portal Product Installation Status Report
--------------------------------------------------------------------------------

Report at date and time 2014-05-01T11:56:19-04:00


Installation
--------------------------------------------------------------------------------
Product Directory   /opt/IBM/Portal/WAS1/PortalServer
Version Directory   /opt/IBM/Portal/WAS1/PortalServer/version
DTD Directory       /opt/IBM/Portal/WAS1/PortalServer/version/dtd
Log Directory       /opt/IBM/Portal/WAS1/PortalServer/version/logs

Technology List --------------------------------------------------------------------------------
MP             installed
WCM            installed
CFGFW          installed

Installed Product
--------------------------------------------------------------------------------
Name           IBM WebSphere Portal MultiPlatform
Version        8.0.0.1
ID             MP
Build Level    wp8001CF09_001_27 2013-12-17
Build Date     12/17/2013

Package
id             com.ibm.websphere.PORTAL.SERVER.v80
name           IBM WebSphere Portal Server
kind           offering
version        8.0.1.20131217_0755
Installed Features     Config Engine Installed Features     Portal Server Binary

Installed Product
--------------------------------------------------------------------------------
Name           IBM Web Content Manager
Version        8.0.0.1
ID             WCM
Build Level    wp8001CF09_001_27 (8001.CF09.6)
Build Date     12/17/2013

Installed Product
--------------------------------------------------------------------------------
Name           IBM WebSphere Portal Configuration Framework
Version        8.0.0.1
ID             CFGFW
Build Level    wp8001CF09_001_27 2013-12-16
Build Date     12/16/2013

--------------------------------------------------------------------------------
End Installation Status Report
--------------------------------------------------------------------------------
- After success, make backup
Make tarball backup
Use the following script to back up file systems, Installation Manager configuration, and portal DB configuration.
Before starting, verify there is enough space...
-
cd /opt/IBM/Portal
du -gs WebSphere
du -gs WAS1
df -g
Backup script...
### backup.sh
###
### If you get an EOF file message when running tar,
### you may need to increase file size limits.

### Backup file system
cd /opt/IBM/Portal

cd /opt/IBM/Portal/WAS1/wp_profile/bin
./stopServer.sh WebSphere_Portal -username wasadmin -password password
cd /opt/IBM/Portal/WAS1/AppServer/bin
./stopNode.sh -username wasadmin -password password
cd /opt/IBM/Portal/WebSphere/AppServer/bin
./stopManager.sh -username wasadmin -password password

cd /opt/IBM/Portal

tar cvf WebSphere.tar WebSphere
gzip WebSphere.tar

tar cvf WAS1.tar WAS1
gzip WAS1.tar


### Backup Installation Manager Configuration
###
### Only need to execute before applying fixes
###

#tar cvf InstallationManager.tar /var/ibm/InstallationManager
#gzip InstallationManager.tar
#tar cvf IMShared.tar IMShared
#gzip IMShared.tar


cd /opt/IBM/Portal/WebSphere/AppServer/bin
./startManager.sh
cd /opt/IBM/Portal/WAS1/AppServer/bin
./startNode.sh
cd /opt/IBM/Portal/WAS1/wp_profile/bin
./startServer.sh WebSphere_Portal


### Backup Portal DB configuration
###
### Only need to execute before portal DB changes
###

cd /opt/IBM/Portal/WAS1/wp_profile/PortalServer/bin

### Backup base portal
./xmlaccess.sh -user wasadmin \
               -password password \
               -url http://tstwps1.myco.com:10039/wps/config \
               -in /opt/IBM/Portal/WAS1/PortalServer/doc/xml-samples/Export.xml  \
               -out /opt/IBM/Portal/SMExportBase.xml

### Backup virtual portal
./xmlaccess.sh -user wasadmin \
               -password password \
               -url http://tstwps1.myco.com:10039/wps/config/prd-vp  \
               -in /opt/IBM/Portal/WAS1/PortalServer/doc/xml-samples/Export.xml \
               -out /opt/IBM/Portal/SMExportVP.xml
Create Dmgr01 profile
- Create Dmgr01 profile with standard ports
Dmgr01 should have exclusive use of a host
- Create Dmgr01 profile using command-line
For example, for DEV, where dmgr is co-located on same host as Portal
cd /opt/IBM/Portal/WebSphere/AppServer/bin
./manageprofiles.sh -create \
                    -profileName Dmgr01 \
                    -adminUserName wasadmin \
                    -adminPassword password \
                    -enableAdminSecurity true \
                    -cellName p1cell \
                    -nodeName P1Node01 \
                    -profilePath /opt/IBM/Portal/WebSphere/AppServer/profiles/Dmgr01 \
                    -enableService false \
                    -hostName test.myco.com \
                    -templatePath /opt/IBM/Portal/WebSphere/AppServer/profileTemplates/management
You should get message...
-
INP1CONFSUCCESS: Success: Profile Dmgr01 now exists. Please consult /opt/IBM/Portal/WAS1/AppServer/profiles/Dmgr01/logs/AboutThisProfile.txt for more information about this profile.
For password, use the same password used by the LDAP for user wasadmin. Having identical passwords will facilitate integrating LDAP later.
- Create Dmgr01 profile using GUI
- Launch...
-
cd /opt/IBM/Portal/WAS1/AppServer/bin/ProfileManagement
./pmt.sh - Select Create and then select "Management Profile"

- Select Deployment Manager

- Select Advanced profile creation

- Select "Deploy the administrative console"

- For profile name and path, set...
- Dmgr01
- /opt/IBM/Portal/WebSphere/AppServer/profiles/Dmgr01

- Enter the following for cell and node
Prodline1 Prodline2 Node name P1Node01 P2Node01 Cell name p1cell P2Cell Do NOT use the same cell name or node name that will be used for the Portal node/cell. If you do, you will be unable to federate the Portal node the DMGR cell and must recreate the DMGR profile with unique values for Node and Cell name.
- Select defaults for certificates
- Select defaults for Port Values Assignment

- On summary screen, click Create
- Launch...
- Create Dmgr01 profile with non-standard ports
In this scenario Dmgr01 shares host with another deployment manager, so we need custom unique ports...
- Determine which ports to use. One method is to just add 1000 to each standard port.
Endpoint Prd port Prd2 port CELL_DISCOVERY_ADDRESS 7277 8277 BOOTP1RAP_ADDRESS 9809 10809 IPC_CONNECTOR_ADDRESS 9632 10632 SOAP_CONNECTOR_ADDRESS 8879 9879 ORB_LISTENER_ADDRESS 9100 10100 SAS_SSL_SERVERAUTH_LISTENER_ADDRESS 9401 10401 CSIV2_SSL_MUTUALAUTH_LISTENER_ADDRESS 9402 10402 CSIV2_SSL_SERVERAUTH_LISTENER_ADDRESS 9403 10403 WC_adminhost 9060 10060 WC_adminhost_secure 9043 10043 DCS_UNICAP2_ADDRESS 9352 10352 XDAGENT_PORT 7060 8060 OVERLAY_UDP_LISTENER_ADDRESS 11005 12005 OVERLAY_TCP_LISTENER_ADDRESS 11006 12006 P1ATUS_LISTENER_ADDRESS 9420 10420 DataPowerMgr_inbound_secure 5555 6555
- Create Dmgr01 profile using command-line
Start the Prodline2 dmgr, then run...
netstat -a | grep -E "8277|10809|10632|9879|10100|10401|10402|10403|10060|10043|10352|8060|12005|12006|10420|6555"
-
/opt/IBM/Portal/WAS1/AppServer/properties/portdef.props
...and set...
-
CELL_DISCOVERY_ADDRESS=8277
BOOTP1RAP_ADDRESS=10809
IPC_CONNECTOR_ADDRESS=10632
SOAP_CONNECTOR_ADDRESS=9879
ORB_LISTENER_ADDRESS=10100
SAS_SSL_SERVERAUTH_LISTENER_ADDRESS=10401
CSIV2_SSL_MUTUALAUTH_LISTENER_ADDRESS=10402
CSIV2_SSL_SERVERAUTH_LISTENER_ADDRESS=10403
WC_adminhost=10060
WC_adminhost_secure=10043
DCS_UNICAP2_ADDRESS=10352
XDAGENT_PORT=8060
OVERLAY_UDP_LISTENER_ADDRESS=12005
OVERLAY_TCP_LISTENER_ADDRESS=12006
P1ATUS_LISTENER_ADDRESS=10420
DataPowerMgr_inbound_secure=6555
cd /opt/IBM/Portal/WAS1/AppServer/bin
./manageprofiles.sh -create \
                    -profileName Dmgr01 \
                    -adminUserName wasadmin \
                    -adminPassword foo \
                    -enableAdminSecurity true \
                    -cellName p1cell \
                    -nodeName P1Node01 \
                    -portsFile /opt/IBM/Portal/WAS1/AppServer/properties/portdef.props \
                    -profilePath /opt/IBM/Portal/WAS1/AppServer/profiles/Dmgr01 \
                    -enableService false \
                    -hostName prd2dmgr.myco.com \
                    -templatePath /opt/IBM/Portal/WAS1/AppServer/profileTemplates/management
You should get message...
-
INP1CONFSUCCESS: Success: Profile Dmgr01 now exists. Please consult /opt/IBM/Portal/WAS1/AppServer/profiles/Dmgr01/logs/AboutThisProfile.txt for more information about this profile.
For password, use the same password used by the LDAP for user wasadmin. Having identical passwords will facilitate integrating LDAP later.
To verify, start dmgr server...
-
cd /opt/IBM/Portal/WebSphere/AppServer/profiles/Dmgr01/bin
./startManager.sh
...then pull up Dmgr console. For example, for PRD HA...
For Test
Configure the WCM authoring portlet
- From primary node, edit...
-
/opt/IBM/Portal/WAS1/wp_profile/ConfigEngine/properties/wkplc.properties
...and set...
-
WasPassword=YourPwd
PortalAdminPwd=YourPwd
PWordDelete=false - Run task to configure WCM authoring...
-
cd /opt/IBM/Portal/WAS1/wp_profile/ConfigEngine
./ConfigEngine.sh configure-wcm-authoring -DPortalAdminPwd=password -DWasUserid=wasadmin -DWasPassword=password - Log on to portal and verify existence of authoring portlet
Configure portal to use DB2
- Back up system
- Verify DB2 passwords are non-expiring
- Have DB2 administrator increase number of transaction logs to 200, and double default size of transaction logs.
- Log on to the primary node and stop portal...
-
cd /opt/IBM/Portal/WAS1/wp_profile/bin
./stopServer.sh -username wasadmin -password password - Copy DB2 client jar files into place on each portal node...
-
cd /opt/IBM/Portal/WAS1/PortalServer
scp -r wasadmin@tstwps1.myco.com:/opt/IBM/Portal/WAS1/PortalServer/db2drivers .Note that if DB2 is upgraded, copy client jars from the DB2 server.
- Backup original properties files
-
cd /opt/IBM/Portal/WAS1/wp_profile/ConfigEngine/properties
cp wkplc.properties wkplc.properties.orig
cp wkplc_comp.properties wkplc_comp.properties.orig
cp wkplc_dbdomain.properties wkplc_dbdomain.properties.orig
cp wkplc_dbtype.properties wkplc_dbtype.properties.orig
cp wkplc_sourceDb.properties wkplc_sourceDb.properties.orig - Edit wkplc.properties and set...
-
WasPassword=MyPassword
PortalAdminPwd=MyPassword
PWordDelete=false - Edit wkplc_dbtype.properties and set
-
db2.DbDriver=com.ibm.db2.jcc.DB2Driver
db2.DbLibrary=/opt/IBM/Portal/WAS1/PortalServer/db2drivers/db2jcc4.jar:/opt/IBM/Portal/WAS1/PortalServer/db2drivers/db2jcc_license_cu.jar - Edit wkplc_dbdomain.properties and set...
- Test
-
feedback.DbUrl=jdbc:db2://tstdb1.myco.com:60000/FDBKDB:returnAlias=0;
likeminds.DbUrl=jdbc:db2://tstdb1.myco.com:60000/LMDB:returnAlias=0;
release.DbUrl=jdbc:db2://tstdb1.myco.com:60000/RELDB:returnAlias=0;
community.DbUrl=jdbc:db2://tstdb1.myco.com:60000/COMDB:returnAlias=0;
customization.DbUrl=jdbc:db2://tstdb1.myco.com:60000/CUSDB:returnAlias=0;
jcr.DbUrl=jdbc:db2://tstdb1.myco.com:60000/JCRDB:returnAlias=0;
feedback.DbName=FDBKDB
likeminds.DbName=LMDB
release.DbName=RELDB
community.DbName=COMDB
customization.DbName=CUSDB
jcr.DbName=JCRDB
feedback.DbType=db2
likeminds.DbType=db2
release.DbType=db2
community.DbType=db2
customization.DbType=db2
jcr.DbType=db2
feedback.DataSourceName=wpdbDS_feedback
likeminds.DataSourceName=wpdbDS_likeminds
release.DataSourceName=wpdbDS_release
community.DataSourceName=wpdbDS_community
customization.DataSourceName=wpdbDS_customization
jcr.DataSourceName=wpdbDS_jcr
feedback.DbSchema=FEEDBACK
likeminds.DbSchema=likeminds
release.DbSchema=release
community.DbSchema=community
customization.DbSchema=customization
jcr.DbSchema=jcr
feedback.DbUser=db2inst
likeminds.DbUser=db2inst
release.DbUser=db2inst
community.DbUser=db2inst
customization.DbUser=db2inst
jcr.DbUser=db2inst
feedback.DbPassword=password
likeminds.DbPassword=password
release.DbPassword=password
community.DbPassword=password
customization.DbPassword=password
jcr.DbPassword=password - Production
-
feedback.DbUrl=jdbc:db2://pdb1.myco.com:60000/FDBKDB:returnAlias=0;
likeminds.DbUrl=jdbc:db2://pdb1.myco.com:60000/LMDB:returnAlias=0;
release.DbUrl=jdbc:db2://pdb1.myco.com:60000/RELDB:returnAlias=0;
community.DbUrl=jdbc:db2://pdb1.myco.com:60000/COMDB:returnAlias=0;
customization.DbUrl=jdbc:db2://pdb1.myco.com:60000/CUSDB:returnAlias=0;
jcr.DbUrl=jdbc:db2://pdb1.myco.com:60000/JCRDB:returnAlias=0;
feedback.DbName=FDBKDB
likeminds.DbName=LMDB
release.DbName=RELDB
community.DbName=COMDB
customization.DbName=CUSDB
jcr.DbName=JCRDB
feedback.DbType=db2
likeminds.DbType=db2
release.DbType=db2
community.DbType=db2
customization.DbType=db2
jcr.DbType=db2
feedback.DataSourceName=wpdbDS_feedback
likeminds.DataSourceName=wpdbDS_likeminds
release.DataSourceName=wpdbDS_release
community.DataSourceName=wpdbDS_community
customization.DataSourceName=wpdbDS_customization
jcr.DataSourceName=wpdbDS_jcr
feedback.DbSchema=FEEDBACK
likeminds.DbSchema=likeminds
release.DbSchema=release
community.DbSchema=community
customization.DbSchema=customization
jcr.DbSchema=jcr
feedback.DbUser=db2inst
likeminds.DbUser=db2inst
release.DbUser=db2inst
community.DbUser=db2inst
customization.DbUser=db2inst
jcr.DbUser=db2inst
feedback.DbPassword=foo
likeminds.DbPassword=foo
release.DbPassword=foo
community.DbPassword=foo
customization.DbPassword=foo
jcr.DbPassword=foo
feedback.DbRuntimeUser=db2inst
likeminds.DbRuntimeUser=db2inst
release.DbRuntimeUser=db2inst
community.DbRuntimeUser=db2inst
customization.DbRuntimeUser=db2inst
jcr.DbRuntimeUser=db2inst
feedback.DbRuntimeUser=foo
likeminds.DbRuntimeUser=foo
release.DbRuntimeUser=foo
community.DbRuntimeUser=foo
customization.DbRuntimeUser=foo
jcr.DbRuntimeUser=foo - Production ha
-
feedback.DbUrl=jdbc:db2://prdaltdb1.myco.com:60000/FDBKDB:returnAlias=0;
likeminds.DbUrl=jdbc:db2://prdaltdb1.myco.com:60000/LMDB:returnAlias=0;
release.DbUrl=jdbc:db2://prdaltdb1.myco.com:60000/RELDB:returnAlias=0;
community.DbUrl=jdbc:db2://prdaltdb1.myco.com:60000/COMDB:returnAlias=0;
customization.DbUrl=jdbc:db2://prdaltdb1.myco.com:60000/CUSDB:returnAlias=0;
jcr.DbUrl=jdbc:db2://prdaltdb1.myco.com:60000/JCRDB:returnAlias=0;
feedback.DbName=FDBKDB
likeminds.DbName=LMDB
release.DbName=RELDB
community.DbName=COMDB
customization.DbName=CUSDB
jcr.DbName=JCRDB
feedback.DbType=db2
likeminds.DbType=db2
release.DbType=db2
community.DbType=db2
customization.DbType=db2
jcr.DbType=db2
feedback.DataSourceName=wpdbDS_feedback
likeminds.DataSourceName=wpdbDS_likeminds
release.DataSourceName=wpdbDS_release
community.DataSourceName=wpdbDS_community
customization.DataSourceName=wpdbDS_customization
jcr.DataSourceName=wpdbDS_jcr
feedback.DbSchema=FEEDBACK
likeminds.DbSchema=likeminds
release.DbSchema=release
community.DbSchema=community
customization.DbSchema=customization
jcr.DbSchema=jcr
feedback.DbUser=db2inst
likeminds.DbUser=db2inst
release.DbUser=db2inst
community.DbUser=db2inst
customization.DbUser=db2inst
jcr.DbUser=db2inst
feedback.DbPassword=foo
likeminds.DbPassword=foo
release.DbPassword=foo
community.DbPassword=foo
customization.DbPassword=foo
jcr.DbPassword=foo
feedback.DbRuntimeUser=db2inst
likeminds.DbRuntimeUser=db2inst
release.DbRuntimeUser=db2inst
community.DbRuntimeUser=db2inst
customization.DbRuntimeUser=db2inst
jcr.DbRuntimeUser=db2inst
feedback.DbRuntimeUser=foo
likeminds.DbRuntimeUser=foo
release.DbRuntimeUser=foo
community.DbRuntimeUser=foo
customization.DbRuntimeUser=foo
jcr.DbRuntimeUser=foo
- Test
- Verify settings in wkplc_dbdomain.properties...
-
cd /opt/IBM/Portal/WAS1/wp_profile/ConfigEngine/properties/
for i in `echo feedback.DbUrl likeminds.DbUrl release.DbUrl community.DbUrl customization.DbUrl jcr.DbUrl feedback.DbName likeminds.DbName release.DbName community.DbName customization.DbName jcr.DbName feedback.DbType likeminds.DbType release.DbType community.DbType customization.DbType jcr.DbType feedback.DataSourceName likeminds.DataSourceName release.DataSourceName community.DataSourceName customization.DataSourceName jcr.DataSourceName feedback.DbSchema likeminds.DbSchema release.DbSchema community.DbSchema customization.DbSchema jcr.DbSchema feedback.DbUser likeminds.DbUser release.DbUser community.DbUser customization.DbUser jcr.DbUser feedback.DbPassword likeminds.DbPassword release.DbPassword community.DbPassword customization.DbPassword jcr.DbPassword feedback.DbRuntimeUser likeminds.DbRuntimeUser release.DbRuntimeUser community.DbRuntimeUser customization.DbRuntimeUser jcr.DbRuntimeUser feedback.DbRuntimeUser likeminds.DbRuntimeUser release.DbRuntimeUser community.DbRuntimeUser customization.DbRuntimeUser jcr.DbRuntimeUser`
do
grep ^${i} wkplc_dbdomain.properties | grep -v Zos
done - Verify there are no trailing spaces
-
grep " $" wkplc_dbdomain.properties
- Validate database configuration properties...
-
cd /opt/IBM/Portal/WAS1/wp_profile/ConfigEngine
./ConfigEngine.sh validate-database -DWasPassword=password - Stop the WebSphere_Portal server:
-
cd /opt/IBM/Portal/WAS1/wp_profile/bin
./stopServer.sh WebSphere_Portal -username wasadmin -password password - Transfer the database:
Do not execute the database-transfer task as a background process. This might cause the task to stall.
-
cd /opt/IBM/Portal/WAS1/wp_profile/ConfigEngine
./ConfigEngine.sh database-transfer -DWasPassword=passwordWhen complete, you should get success message...
-
BUIUD SUCCESSFUL
Tue May 13 23:02:21 EDT 2014If task fails, review log output...
- /opt/IBM/Portal/WAS1/wp_profile/ConfigEngine/log/ConfigTrace.log
...verify the values are correct in wkplc.properties, wkplc_dbdomain.properties, and wkplc_dbtype.properties files, then repeat this step.
If task fails with error...
DB2 SQL Error: SQLCODE=-204, SQLP1ATE=42704, SQLERRMC=ICMSFQ04
...run...
-
./ConfigEngine.sh setup-database
...then try the database-transfer task again.
- Start the WebSphere Portal server.
-
cd /opt/IBM/Portal/WAS1/wp_profile/bin
./startServer.sh WebSphere_Portal - If node is part of a cluster, and if icm.properties is not identical between nodes, copy icm.properties from primary node to each secondary node.
- Stop the portal server on the secondary nodes.
- From the primary node...
-
cd /opt/IBM/Portal/WAS1/wp_profile/PortalServer/jcr/lib/com/ibm/icm/
scp icm.properties wasadmin@secondary_node:/opt/IBM/Portal/WAS1/wp_profile/PortalServer/jcr/lib/com/ibm/icm/ - Start the portal server on the secondary nodes.
- Stop the portal server on the secondary nodes.
Create profile template
- On the primary node, start the WebSphere_Portal server...
-
cd /opt/IBM/Portal/WAS1/wp_profile/bin
./startServer.sh WebSphere_Portal - Log in to the WebSphere Portal server
-
http://myenv.myco.com:10039/wps/config
...and go to...
-
Administration | Search Administration | Manage Search | Search Collections
- Click the Delete icon (trash can) for each search collection listed here.
- Log out of WebSphere Portal
- Stop the WebSphere_Portal server
-
cd /opt/IBM/Portal/WAS1/wp_profile/bin
./stopServer.sh WebSphere_Portal -user wasadmin -password password - Edit...
-
/opt/IBM/Portal/WAS1/wp_profile/PortalServer/jcr/lib/com/ibm/icm/icm.properties
...and change...
-
jcr.textsearch.enabled=true
...to...
-
jcr.textsearch.enabled=false
- Save icm.properties.
- From primary node, run...
-
cd /opt/IBM/Portal/WAS1/wp_profile/ConfigEngine
./ConfigEngine.sh enable-profiles -DWasPassword=mypasswordThis script will create a backup of the wp_profile configuration named Portal.car and save it to the following directory:
-
/opt/IBM/Portal/WAS1/PortalServer/profileTemplates/default.portal/configArchives/Portal.car
- Package profile templates into a single zip file:
-
./ConfigEngine.sh package-profiles -DWasPassword=mypassword
The following file is created...
-
/opt/IBM/Portal/WAS1/PortalServer/profileTemplates/profileTemplates.zip
Configure dmgr
- From the primary Portal node, copy fileForDmgr to dmgr host...
-
cd /opt/IBM/Portal/WAS1/PortalServer/
scp -r filesForDmgr user1@prd2dmgr.myco.com:/tmp - Important: Stop the dmgr server
-
cd /opt/IBM/Portal/WebSphere/AppServer/profiles/Dmgr01/bin
./stopManager.sh -user wasadmin -password foo - From the dmgr host, extract filesForDmgr.zip and copy files into place...
-
cd /tmp/filesForDmgr
unzip filesForDmgr.zip
mkdir /opt/IBM/Portal/WebSphere/AppServer/bin/ProfileManagement/plugins
cp -r bin/ProfileManagement/plugins/com.ibm.wp.dmgr.pmt_7.0.5 /opt/IBM/Portal/WebSphere/AppServer/bin/ProfileManagement/plugins
cp lib/wkplc.comp.registry.jar /opt/IBM/Portal/WebSphere/AppServer/lib
cp lib/wp.wire.jar /opt/IBM/Portal/WebSphere/AppServer/lib
cp plugins/com.ibm.patch.was.plugin.jar /opt/IBM/Portal/WebSphere/AppServer/plugins
cp plugins/com.ibm.wp.was.plugin.jar /opt/IBM/Portal/WebSphere/AppServer/plugins
cp -r profileTemplates/management.portal.augment /opt/IBM/Portal/WebSphere/AppServer/profileTemplates
cp profiles/Dmgr01/config/.repository/metadata_wkplc.xml /opt/IBM/Portal/WebSphere/AppServer/profiles/Dmgr01/config/.repository - On dmgr host, augment dmgr profile.
cd /opt/IBM/Portal/WebSphere/AppServer/bin
./manageprofiles.sh -augment \
                    -templatePath /opt/IBM/Portal/WebSphere/AppServer/profileTemplates/management.portal.augment \
                    -profileName Dmgr01
Augmenting the dmgr profile...
- Increases the HTTP connection timeouts for the DMGR server
- Increases the SOAP connector timeout for JMX in the DMGR server
- Increases the JVM Maximum Heap size for the DMGR server
- Enables Application Security
- Creates a 'wasadmins' group in the default file repository
- Adds the administrative user to the 'wasadmins' group.
- Increases the soap timeout in soap.client.props.
- Start Dmgr
-
cd /opt/IBM/Portal/WebSphere/AppServer/profiles/Dmgr01/bin
./startManager.sh - Open dmgr console in browser. For example, PRD HA...
- To help prevent user ID conflicts when we add the federated LDAP later, go to...
-
Security | Global Security | User Account Repository | Available realm definitions | Configure
..and in the 'Primary administrative user name' field, change value to the fully distinguished name of the user...
-
uid=wasadmin,o=defaultWIMFileBasedRealm

- Click Apply, enter passwords in the next panel, then click OK and Save.
- Restart the deployment manager for the changes to take effect.
Federate primary node
- Ensure the time on the primary node is within 5 minutes of the time on the DMGR. Failure to do so will cause the addNode process to fail.
- Start the DMGR
-
cd /opt/IBM/Portal/WebSphere/AppServer/profiles/Dmgr01/bin
./startManager.sh - Stop WebSphere_Portal on the primary node...
-
cd /opt/IBM/Portal/WAS1/wp_profile/bin
./stopServer.sh WebSphere_Portal -user wasadmin -password password - Add the Portal node.
-
cd /opt/IBM/Portal/WAS1/wp_profile/bin
./addNode.sh prd2dmgr.myco.com 8879 -username wasadmin -password mypassword -includeappsTo get SOAP port, from dmgr console...
-
System Administration | Deployment Manager | Ports
If the addNode script fails for any reason before running again:
- Remove the node from the DMGR cell in case AddNode successfully completed that step before failing.
- Login to the DMGR and do the following (these may not exist, depending on where the failure occurred):
- Remove all Enterprise applications
- Remove the WebSphere_Portal server definition
- Remove the JDBC Provider information for WebSphere_Portal
- Restart the deployment manager
-
cd /opt/IBM/Portal/WebSphere/AppServer/profiles/Dmgr01/bin
./stopManager.sh -user wasadmin -password mypassword
./startManager.sh
At this point, the WebSphere Portal server has been federated to the Deployment Manager. It is not yet in a cluster. It has also inherited the Deployment Manager's security configuration. Running Portal in a federated-only environment is not officially supported by IBM, so next we must build a cluster.
Create static cluster
- Log on to primary node and stop the WebSphere_Portal server
- Verify dmgr and node agent are running
-
./serverStatus.sh dmgr -user wasadmin -password password
./serverStatus.sh nodeagent -user wasadmin -password password - Set environment-specific values in...
-
/opt/IBM/Portal/WAS1/wp_profile/ConfigEngine/properties/wkplc.properties
WasUserid uid=wasadmin,o=defaultWIMFileBasedRealm WasPassword password WasSOAPPort Port used to connect remotely to the dmgr. Default 8879 is used for DEV, STG, and PRD. For P1 TEST and PRD use 9879. To discover, from dmgr console: -
System Administration > Deployment manager > Ports
WasRemoteHostName For example, prd2dmgr.myco.com PortalAdminPwd password ClusterName P1Cluster PrimaryNode true - Verify database user IDs and passwords are set in...
-
/opt/IBM/Portal/WAS1/wp_profile/ConfigEngine/properties/wkplc_dbdomain.properties
- Update the deployment manager configuration for the new WebSphere Portal server
-
cd /opt/IBM/Portal/WAS1/wp_profile/ConfigEngine
./ConfigEngine.sh cluster-node-config-post-federation -DWasPassword=password - Create the cluster definition and add the WebSphere_Portal server as a cluster member
-
./ConfigEngine.sh cluster-node-config-cluster-setup -DWasPassword=password
- Verify ports for new cluster member...
-
Servers | Server Types | WebSphere Application Servers | new_cluster_member | Ports
Note value WC_defaulthost which should be 10039.
- Make tarball backup
Install IHS
- Log on web server host(s)
For example, for PRD HA...
- webserver1
- webserver2
- Install Installation Manager
-
cd /media/installmgr
./installc -acceptLicense
cd /opt/IBM/InstallationManager/eclipse - Add IHS to repository
- Start Installation Manager in console mode...
-
cd /opt/IBM/InstallationManager/eclipse/tools
./imcl -c - Select...
-
P. Preferences | 1. Repositories | D. Add Repository
- For repository location...
-
/media/WAS855_supp/repository.config
- Save changes and exit...
-
A. Apply changes | R. Return to main menu | X. Exit Installation Manager
- Confirm repository is available...
-
cd /opt/IBM/InstallationManager/eclipse/tools
./imcl listAvailablePackages -repositories /media/WAS855_supp/repository.config
com.ibm.websphere.APPCLIENT.v85_8.5.5000.20130514_1044
com.ibm.websphere.IHS.v85_8.5.5000.20130514_1044
com.ibm.websphere.PLG.v85_8.5.5000.20130514_1044
com.ibm.websphere.PLUGCLIENT.v85_8.5.5000.20130514_1044
com.ibm.websphere.WCT.v85_8.5.5000.20130514_1044
- Start Installation Manager in console mode...
- Install IHS
./imcl install com.ibm.websphere.IHS.v85_8.5.5000.20130514_1044 \ -repositories /media/WAS855_supp/repository.config \ -installationDirectory /opt/IBM/Portal/IHS \ -sharedResourcesDirectory /opt/IBM/Portal/IMShared \ -log /tmp/imcl.log \ -acceptLicense \ -properties user.ihs.httpPort=7001 - Edit...
-
/opt/IBM/Portal/IHS/conf/admin.conf
...and set...
-
Listen 8008
User wasadmin
Group staff
ServerName myserver:8008 - Edit...
-
/opt/IBM/Portal/IHS/conf/httpd.conf
...and for TST, PRD Primary, and PRD HA, set...
-
Listen 7001
ServerName myserverFor Test, set....
-
Listen 80
ServerName myserverFor all envs except DEV, we start IHS (apachectl start), as user wasadmin. For Test, we start IHS as user root, even though User in httpd.conf is wasadmin
- Verify IHS version info
-
/opt/IBM/Portal/IHS/bin/versionInfo.sh
- Install plugins
cd /opt/IBM/InstallationManager/eclipse/tools
./imcl install com.ibm.websphere.PLG.v85_8.5.5000.20130514_1044 \
       -repositories  /media/WAS855_supp/repository.config \
       -installationDirectory /opt/IBM/Portal/Plugins \
       -sharedResourcesDirectory /opt/IBM/Portal/IMShared \
       -log /tmp/imcl.log  \
       -acceptLicense
To uninstall...
-
imcl uninstallAll -installationDirectory /opt/IBM/Portal/IHS/Plugins
- Verify plugins version info
-
/opt/IBM/Portal/Plugins/bin/versionInfo.sh
- Update both IHS and Plugin to v8.5.5.1
- Add the following to the Installation Manager repository
-
/media/WAS855_supp_FP1/repository.config
/media/WAS855_supp_WCT_FP1/repository.config - Unselect...
-
S. [ ] Search service repositories during installation and updates
- Start GUI Installation Manager
-
cd /opt/IBM/InstallationManager/eclipse/
./IBMIM - Select Update, select IBM HTTP Server V8.5, then execute upgrade.
- Do the same for Web Server Plug-ins for IBM WebSphere Application Server V8.5
- Add the following to the Installation Manager repository
- Start web and admin servers
-
/opt/IBM/Portal/IHS/bin/apachectl start
/opt/IBM/Portal/IHS/bin/adminctl start
ps -ef | grep httpYou should see...
    root  9633990        1   0 09:14:09      -  0:00 /opt/IBM/Portal/IHS/bin/httpd -f /opt/IBM/Portal/IHS/conf/admin.conf
  nobody 10420432 17563778   0 09:12:37      -  0:00 /opt/IBM/Portal/IHS/bin/httpd -d /opt/IBM/Portal/IHS -k start
wasadmin 13697222  9633990   0 09:14:09      -  0:00 /opt/IBM/Portal/IHS/bin/httpd -f /opt/IBM/Portal/IHS/conf/admin.conf
    root 14876862  9633990   0 09:14:09      -  0:00 /opt/IBM/Portal/IHS/bin/httpd -f /opt/IBM/Portal/IHS/conf/admin.conf
    root 17563778        1   0 09:12:36      -  0:00 /opt/IBM/Portal/IHS/bin/httpd -d /opt/IBM/Portal/IHS -k start
  nobody 19398842 17563778   0 09:12:37      -  0:00 /opt/IBM/Portal/IHS/bin/httpd -d /opt/IBM/Portal/IHS -k start
  nobody 21430478 17563778   0 09:12:37      -  0:00 /opt/IBM/Portal/IHS/bin/httpd -d /opt/IBM/Portal/IHS -k start
Configure web server plugin
- Get version ID of WebSphere Customization Toolbox (WCT)
-
cd /opt/IBM/InstallationManager/eclipse/tools
./imcl listAvailablePackages -repositories /media/WAS855_supp/repository.config
com.ibm.websphere.APPCLIENT.v85_8.5.5000.20130514_1044
com.ibm.websphere.IHS.v85_8.5.5000.20130514_1044
com.ibm.websphere.PLG.v85_8.5.5000.20130514_1044
com.ibm.websphere.PLUGCLIENT.v85_8.5.5000.20130514_1044
com.ibm.websphere.WCT.v85_8.5.5000.20130514_1044 - Install WCT
cd /opt/IBM/InstallationManager/eclipse/tools ./imcl install com.ibm.websphere.WCT.v85_8.5.5000.20130514_1044 \ -repositories /media/WAS855_supp/repository.config \ -installationDirectory /opt/IBM/Portal/Toolbox \ -sharedResourcesDirectory /opt/IBM/Portal/IMShared \ -log /tmp/imcl.log \ -acceptLicense - Start web server and admin server
-
cd /opt/IBM/Portal/IHS/bin
./apachectl start
./adminctl start - Run the WCT GUI...
-
cd /opt/IBM/Portal/Toolbox/WCT
./wct.sh - Select and launch "Web Server Plug-ins Configuration Tool"
- Select "Add" to add a web server plug-ins location

- Add plug-in
-
Name: Plugin01
Location: /opt/IBM/Portal/PluginsIncrement number based on node. For node2, name is Plugin02

- In the Web Server Plug-in Configurations panel, select "Create"

- Select IBM HTTP Server v8.5

- Select 64 bit architecture

- Specify httpd.conf location and port 7001.

- Set port, user ID, and password for IBM HTTP Server Administration

Be sure to scroll down if you do not see password confirmation field.
- On the admistrator name and group panel, enter wasadmin and system.
- Enter a Web Server Definition name, for example, PRDweb1...
- Choose either local or remote install. If remote to a cluster, use host name of the dmgr.

For remote install, use name of dmgr host, such as testdmgr.myco.com
- Review summary info then click Configure.

- You should get a success message
- Edit httpd.conf, and verify existence of plugin-in directives...
-
LoadModule was_aPRD22_module /opt/IBM/Portal/Plugins/bin/64bits/mod_was_aPRD22_http.so
WebSpherePluginConfig /opt/IBM/Portal/Plugins/config/webserver2/plugin-cfg.xml - Copy web server definition script to target dmgr
-
scp /opt/IBM/Portal/Plugins/bin/configurePRDweb1.sh wasadmin@prd2dmgr.myco.com:/tmp
- Log on to dmgr host and create web server definition...
-
cd /opt/IBM/Portal/WAS1/AppServer/profiles/Dmgr01/bin
cp /tmp/configurePRDweb1.sh .
./configurePRDweb1.sh -user wasadmin -password passwordTypical output...
root@prd2dmgr /opt/IBM/Portal/WAS1/AppServer/profiles/Dmgr01/bin ->./configurePRDweb1.sh -user wasadmin -password Wps>

Input parameters:

   Web server name             - PRDweb1
   Web server type             - IHS
   Web server install location - /opt/IBM/Portal/IHS
   Web server config location  - /opt/IBM/Portal/IHS/conf/httpd.conf
   Web server port             - 7001
   Map Applications            - MAP_ALL
   Plugin install location     - /opt/IBM/Portal/Plugins
   Web server node type        - unmanaged
   Web server node name        - ihsnode1
   Web server host name        - webserver1.myco.com
   Web server operating system - aix
   IHS Admin port              - 8008
   IHS Admin user ID           - wasadmin
   IHS Admin password          - foo**
   IHS service name            - ""
- Log on to dmgr console and verify web server definition was created.

- Synchronize nodes
- From dmgr console, generate plugin-cfg.xml files.
- Copy new plugin-cfg.xml files to respective web server hosts
-
DMGR=/opt/IBM/Portal/WAS1/AppServer/profiles/Dmgr01
scp $DMGR/config/cells/p1cell/nodes/ihsnode1/servers/PRDweb1/plugin-cfg.xml wasadmin@webserver1:/opt/IBM/Portal/Plugins/config/PRDweb1 - Restart IHS
-
cd /opt/IBM/Portal/IHS/bin
./apachectl restart - Verify the following host aliases are defined
-
Virtual Hosts | default_host | Host Aliases
Host Name Port * 9080 * 80 * 9443 * 5060 * 5061 * 443 * 10000 * 10002 * 10032 * 10039 * 10029 * 6005
Configure portal to use LDAP
These tasks only need to be run on the primary node.
- Create tarball of portal and dmgr filesystems
- Add the wpsadmin user as an administrative user on WAS.
From dmgr console, go select...
-
Users and Groups | Manage Users | Create
On the Manage Users panel, create wpsadmin user. Click the Group Membership button and assign Administration user role to wpsadmins
- Enable distinguished name logins.
-
cd /opt/IBM/Portal/WAS1/wp_profile/ConfigEngine
./ConfigEngine.sh wp-modify-realm-enable-dn-login -DWasPassword=passwordThis allows us to logon with the fully distinguished name...
-
uid=wasadmin,o=defaultWIMFileBasedRealm
We enable fully distinguished name logins because the short name of our administrator, wasadmin, is in both the file and LDAP registries, and a short name search would not resolve correctly.
- Optional. If file registry password for wasadmin or wpsadmin is different than LDAP pass, change passwords in file based registry to match LDAP versions
- Log on to primary node and copy the parent properties into place...
-
cd /opt/IBM/Portal/WAS1/wp_profile/ConfigEngine/properties
cp /opt/IBM/Portal/WAS1/wp_profile/ConfigEngine/config/helpers/wp_add_federated_ids.properties . - Edit wp_add_federated_ids.properties file and set properties.
Here are settings for PRD HA...
-
federated.ldap.id=MyCo_LDAP1
federated.ldap.host=prdtds1.myco.com
federated.ldap.port=389
federated.ldap.bindDN=cn=root
federated.ldap.bindPassword=password
federated.ldap.ldapServerType=IDS
federated.ldap.baseDN=dc=myco,dc=com
federated.ldap.gc.name=ibm-allGroupsHere is copy of Portal v7 PRD Primary wkplc.properties to use as template
- prdtds1.myco.com 636 (PRD Primary)
- prdtds2.myco.com 636 (PRD Primary)
- prdtds1.myco.com 636 (PRD HA)
- prdtds2.myco.com 636 (PRD HA)
IBM Tivoli Directory Server supports the optional membership attribute...
-
federated.ldap.gc.name=ibm-allGroups
...that offers a significant performance enhancement.
- Validate the properties:
cd /opt/IBM/Portal/WAS1/wp_profile/ConfigEngine
./ConfigEngine.sh validate-federated-ldap  \
                  -DparentProperties=/opt/IBM/Portal/WAS1/wp_profile/ConfigEngine/properties/wp_add_federated_ids.properties  \
                  -DSaveParentProperties=true  \
                  -DWasPassword=password
Running with -DSaveParentProperties=true adds the new wp_add_federated_ids.properties to wkplc.properties.
- Add the federated LDAP to the cluster security configuration:
-
./ConfigEngine.sh wp-create-ldap -DWasPassword=password
The wp-create-ldap tasks adds the LDAP to the WAS security configuration. It does not remove the out-of-the-box file user registry. Both are in use.
In the future, when we update LDAP properties, we run...
-
./ConfigEngine.sh wp-update-federated-ldap -DWasPassword=password
- Enable distinguished logins again (for luck)
-
./ConfigEngine.sh wp-modify-realm-enable-dn-login -DWasPassword=password
- Restart the dmgr, nodeagent, and WebSphere_Portal servers.
-
cd /opt/IBM/Portal/WAS1/wp_profile/bin
./stopServer.sh WebSphere_Portal -username uid=wasadmin,o=defaultWIMFileBasedRealm -password password
./stopNode.sh -username uid=wasadmin,o=defaultWIMFileBasedRealm -password passwordcd /opt/IBM/Portal/WebSphere/AppServer/profiles/Dmgr01/bin
./stopManager.sh -username uid=wasadmin,o=defaultWIMFileBasedRealm -password password
sleep 5
./startManager.shcd /opt/IBM/Portal/WAS1/wp_profile/bin
./startNode.sh
./startServer.sh WebSphere_Portal - After restart, verify credentials are correct by logging on to WAS console and Portal.
We will be unable to login to Portal using the short name. This will only be temporary and will be corrected at the end of these steps. To log on to console, use fully qualified id:
-
uid=wasadmin,o=defaultWIMFileBasedRealm
If logon fails, to revert...
- Turn off security...
-
cd /opt/IBM/Portal/WAS1/AppServer/profiles/Dmgr01/bin
./wsadmin.sh -conntype NONE
WASX7357I: By request, this scripting client is not connected to any server process. Certain configuration and application operations will be available in local mode.
WASX7029I: For help, enter: "$Help help"
wsadmin>securityoff
LOCAL OS security is off now but you need to restart server1 to make it affected.
wsadmin>$AdminConfig save
wsadmin>exitAnother way to disable security is to edit...
-
/opt/IBM/Portal/WAS1/AppServer/profiles/Dmgr01/config/cells/p1cell/security.xml
...and for element...
-
<security:Security
...set attribute...
-
enabled="false"
- Get the dmgr PID...
-
ps -ef | grep dmgr
...and kill the dmgr process...
-
kill PID
Give it a minutes to finish. If regular kill does not work, run the sure kill...
-
kill -9 PID
- Log on to the portal nodes, get the nodeagent and WebSphere_Portal processes...
-
ps -ef | grep WebSphere_Portal
ps -ef | grep nodeagent...then kill those...
-
kill PID
- Synchronize nodes...
-
./syncNode.sh testdmgr.myco.com 9879 -user wasadmin -password password
...then restart
- Run startManager.sh
- Log on to dmgr console and go to...
-
Security | Global security | Federated repositories | Manage repositories
- We can either try to fix the problem, or we can remove the LDAP realm
- Restart portal processes
- Turn off security...
- Verify all defined attributes are available in the newly added ldap:
-
./ConfigEngine.sh wp-validate-federated-ldap-attribute-config -DWasPassword=foo
- Reassign the WAS Administrator ID from the file registry to a user in the LDAP:
./ConfigEngine.sh wp-change-was-admin-user \
                  -DWasPassword=password \
                  -DnewAdminId=uid=wasadmin,cn=users,ou=admins,dc=myco,dc=com \
                  -DnewAdminPw=password
For newAdminPw, use the password assigned to this user in the LDAP.
- Restart the dmgr, nodeagent and WebSphere_Portal servers...
### On Portal primary node
cd /opt/IBM/Portal/WAS1/wp_profile/bin
./stopServer.sh WebSphere_Portal -username uid=wasadmin,o=defaultWIMFileBasedRealm -password password
./stopNode.sh -username uid=wasadmin,o=defaultWIMFileBasedRealm -password password### On Dmgr
cd /opt/IBM/Portal/WebSphere/AppServer/profiles/Dmgr01/bin
./stopManager.sh -username uid=wasadmin,o=defaultWIMFileBasedRealm -password password
sleep 5
./startManager.sh### On Portal primary node
cd /opt/IBM/Portal/WAS1/wp_profile/bin
./startNode.sh
./startServer.sh WebSphere_PortalBecause we ran wp-modify-realm-enable-dn-login earlier, we use the fully distinguished name of the original file registry WAS admin user. The new LDAP-based WAS admin user will take effect after the servers have been restarted.
- Log on to Dmgr console and verify new credentials are working...
-
User ID: uid=wasadmin,cn=users,ou=admins,dc=myco,dc=com
Password: password - In wkplc.properties, if value for WasPassword= was removed, re-add using our new password.
- Reassign the WebSphere Portal Administrator ID and Group ID to a user and group within the LDAP:
./ConfigEngine.sh wp-change-portal-admin-user \
                  -DWasPassword=password \
                  -DnewAdminId=uid=wpsadmin,cn=users,ou=admins,dc=myco,dc=com \
                  -DnewAdminPw=password \
                  -DnewAdminGroupId=cn=wpsadmins,cn=groups,ou=admins,dc=myco,dc=com
For newAdminPw, use the password assigned to this user in the LDAP.
This task updates PortalAdminId in wkplc.properties to reflect the ID value specified for 'newAdminId' and the PortalAdminGroupId value will be automatically updated to reflect the 'newAdminGroupId'.
- Review wkplc.properties and verify that PortalAdminPwd is set to foo**
- Restart the Deployment Manager, nodeagent, and WebSphere_Portal server on the primary node
### On Portal primary node cd /opt/IBM/Portal/WAS1/wp_profile/bin ./stopServer.sh WebSphere_Portal \ -username uid=wasadmin,cn=users,ou=admins,dc=myco,dc=com \ -password password ./stopNode.sh -username uid=wasadmin,cn=users,ou=admins,dc=myco,dc=com -password password ### On Dmgr cd /opt/IBM/Portal/WebSphere/AppServer/profiles/Dmgr01/bin ./stopManager.sh -username uid=wasadmin,cn=users,ou=admins,dc=myco,dc=com \ -password password ./startManager.sh ### On Portal primary node cd /opt/IBM/Portal/WAS1/wp_profile/bin ./startNode.sh ./startServer.sh WebSphere_Portal - List the current user repositories:
-
./ConfigEngine.sh wp-query-repository -DWasPassword=password
For example, here is LDAP for STG...
cell="p1cellD" engineinstalllocation="/opt/IBM/Portal/WAS1/wp_profile/ConfigEngine" enginerootdir="/opt/IBM/Portal/WAS1/ConfigEngine" pathseparator=":" osarch="ppc64" Existing Federated Repositories Repository Name : {BasicInformation} : {Details} *************************************** MyCo_LDAP1 : { repositoryType=LDAP, specificRepositoryType=IDS, host=devtds.myco.com}, ldapServerType=IDS, supportTransactions=false, supportExternalName=false, supportChangeLog=native, searchTimeLimit=120000, certificateMapMode=EXACT_DN, sslConfiguration=, translateRDN=false, certificateFilter=, supportAsyncMode=false, adapterClassName=com.ibm.ws.wim.adapter.ldap.LdapAdapter, searchCountLimit=500, primaryServerQueryTimeInterval=15, supportSorting=false, returnToPrimaryServer=true, supportPaging=false, id=MyCo_LDAP1, loginProperties=[uid, mail], ) - Set entity types.
Edit wkplc.properties and set...
-
personAccountParent=cn=users,ou=admins,dc=myco,dc=com
groupParent=cn=groups,ou=admins,dc=myco,dc=com
personAccountRdnProperties=uid
groupRdnProperties=cn...then run...
-
./ConfigEngine.sh wp-set-entitytypes -DWasPassword=password
- Remove the default file user registry.
Option for lower-level envs. Required for production environments.
In wkplc.properties set...
-
federated.delete.baseentry=o=defaultWIMFileBasedRealm
federated.delete.id=InternalFileRepository...then run...
-
./ConfigEngine.sh wp-delete-repository -DWasPassword=password
- Disable fully distinguished name logins and re-enable short name logins...
-
./ConfigEngine.sh wp-modify-realm-disable-dn-login -DWasPassword=password
- Stop the dmgr, nodeagent, and WebSphere_Portal...
### On Portal primary node cd /opt/IBM/Portal/WAS1/wp_profile/bin ./stopServer.sh WebSphere_Portal \ -username uid=wasadmin,cn=users,ou=admins,dc=myco,dc=com \ -password password ./stopNode.sh -username uid=wasadmin,cn=users,ou=admins,dc=myco,dc=com \ -password password ### On Dmgr cd /opt/IBM/Portal/WebSphere/AppServer/profiles/Dmgr01/bin ./stopManager.sh -username uid=wasadmin,cn=users,ou=admins,dc=myco,dc=com \ -password password ./startManager.sh ### On Portal primary node cd /opt/IBM/Portal/WAS1/wp_profile/bin ./startNode.sh ./startServer.sh WebSphere_Portal - Verify we can log on to dmgr and portal using
- Login: wasadmin
- Password: password
- Stop processes and make backup
### On Portal primary node cd /opt/IBM/Portal/WAS1/wp_profile/bin ./stopServer.sh WebSphere_Portal \ -username wasadmin \ -password password ./stopNode.sh -username wasadmin -password password ### On Dmgr cd /opt/IBM/Portal/WebSphere/AppServer/profiles/Dmgr01/bin ./stopManager.sh -username wasadmin \ -password password ./startManager.sh ### On Portal primary node cd /opt/IBM/Portal/WAS1/wp_profile/bin ./startNode.sh ./startServer.sh WebSphere_Portal - Optional. Change poolTimeOut from 0 to 180 in...
-
/opt/IBM/Portal/WAS1/wp_profile/config/cells/p1cell/wim/config/wimconfig.xml
/opt/IBM/Portal/WebSphere/AppServer/profiles/Dmgr01/config/cells/p1cell/wim/config/wimconfig.xml
Add ha servers for LDAP
To manually add ha LDAP servers, from WAS Admin Console go to...
-
Security | Global security | Federated repositories | MyCo_LDAP1 | Failover server used when primary is not available:
...and add additional LDAP server names and ports. For example, for PRD HA
- prdtds1.myco.com 389
- prdtds2.myco.com 389
At this point, you have completed building a single node cluster using a remote database and federated LDAP server.
If you see blank entries, or have users who can no longer view resources to which they previously had access, you may need to...
- On secondary nodes, update wkplc.properties with latest values
- Run update-jcr-admin on secondary nodes.
-
cd /opt/IBM/Portal/WAS1/wp_profile/ConfigEngine
./ConfigEngine.sh update-jcr-admin
See Fix Portal Access Control settings if user/group external identifiers have changed.
Set wasadmins permissions
- Log into the ISC and go to Users and Groups
- Pick Administrative group Role
- Add a group and search for wasadmins
- Select all the roles
- And then save.
Set ibm-allGroups
If you did not set up ibm-allGroups membership attribute when configuring LDAP, we can do it after the fact by logging on to the console and going to...
-
Global security > Federated repositories > MyCo_LDAP1 > Group attribute definition

Verify that...
-
Global security > Federated repositories > MyCo_LDAP1 > Group attribute definition > Member attributes
...has uniqueMember set...

Enable SSL for LDAP
- Add LDAP signer certificate to the WAS installation
- Select...
-
Security | SSL certificate and key management | SSL configurations | CellDefaultSSLSettings | Key stores and certificates | CellDefaultTrustStore | Signer certificates | Retrieve from port
- Set LDAP host name, SSL port (default 636), and alias of your choice
- Click "Retrieve signer information".
This should pull the certificate directly from the LDAP server.
- Save the changes to the master configuration.

- Restart dmgr
- On primary node, perform syncNode...
./syncNode.sh prd2dmgr.myco.com 9879 \ -user wasadmin \ -password password - Restart WebSphere_Portal and node agent
- Select...
- Update wkplc.properties and add...
-
federated.ldap.sslEnabled=true
federated.ldap.sslConfiguration=CellDefaultSSLSettings - Update federated repository
-
./ConfigEngine.sh wp-update-ldap -DWasPassword=password
Configure default realm
We add base entries using portal tools. We could also have them manually through dmgr console.- Edit wkplc.properties and set...
-
id=MyCo_LDAP1
baseDN=ou=admins,dc=myco,dc=com
nameInRepository=ou=admins,dc=myco,dc=com...then execute...
-
./ConfigEngine.sh wp-create-base-entry
- Set
-
id=MyCo_LDAP1
baseDN=ou=PRD,ou=users,dc=myco,dc=com
nameInRepository=ou=PRD,ou=users,dc=myco,dc=com...then execute...
-
./ConfigEngine.sh wp-create-base-entry
- Remove original (full repository) Base Entry
-
id=MyCo_LDAP1
baseDN=dc=myco,dc=com
nameInRepository=dc=myco,dc=com...then execute...
-
./ConfigEngine.sh wp-delete-base-entry
- Synchronize nodes and restart Cluster
Configure myAdminRealm
- Log on to primary node
- Edit wkplc.properties and set...
-
realmNamemyAdminRealm
addBaseEntry=ou=admins,dc=myco,dc=com
securityUse=active
delimiter=/Create myAdminRealm
-
./ConfigEngine.sh wp-create-realm
[wplc-create-realm] Realm myAdminRealm was created successfully.
[wplc-create-realm] Status = Complete

action-post-config:
Tue Jan 28 15:56:38 CST 2014

BUIUD SUCCESSFUL
Total time: 10 seconds
We run this on primary node only
- Add base entry to myAdminRealm
Edit wkplc.properties, and set...
-
realmName=myAdminRealm
addBaseEntry=ou=STG,ou=stageusers,dc=myco,dc=com...then execute...
-
./ConfigEngine.sh wp-add-realm-baseentry
[wplc-add-realm-baseentry] Create base entry result: [CWWIM5028I  The configuration is saved in a temporary workspace.
[wplc-add-realm-baseentry] Base entry ou=STG,ou=stageusers,dc=myco,dc=com was added successfully.
[wplc-add-realm-baseentry] Status = Complete

action-post-config:
Tue Jan 28 16:15:30 CST 2014

BUIUD SUCCESSFUL
Total time: 11 seconds
- Stop WebSphere_Portal, nodeagent, run syncNode, then restart
Shared Libraries
- Copy deployment.tar.gz to each target portal node...
-
scp deployment.tar.gz wasadmin@targethost:/tmp
- Log on to each portal node and unarchive deployment.tar.gz...
-
cd /tmp
gunzip deployment.tar.gz
tar xvf deployment.tar - Copy library files to portal file system...
-
cp -r deployment/myco_*_lib /opt/IBM/Portal/WAS1/wp_profile
- In Dmgr console, create shared library resources
-
Environment | Shared Libraries
Cluster scope
Name Description Classpath PortletLib Portlet shared classes ${USER_INSTALL_ROOT}/myco_portlet_lib ServerLib Cluster Level Shared Library for Server loaded class paths ${USER_INSTALL_ROOT}/myco_server_lib ServicesLib Services classes to map to Application class paths ${USER_INSTALL_ROOT}/myco_services_lib 
- In Dmgr console, map ServerLib to Server Classloader
-
Application servers | WebSphere_Portal[N] | Java and Process Management | Class loader | Classloader_[uid] | Library Reference | Add | ServerLib

- Synchronize nodes
- Restart portal servers
- Monitor portal logs...
-
/opt/IBM/Portal/WAS1/wp_profile/logs/WebSphere_Portal/SystemOut.log
Web container updates
For ALL Portal appservers, go to...
-
Application Servers | WebSphere Portal[N] | Web Container | Custom Properties
...and add...
-
Name: com.ibm.ws.webcontainer.httpOnlyCookies
Value: *
Mail session
Go to...
-
Resources | Mail | Mail providers | Built-In Mail Provider (Cluster Scope) | Mail Sessions
...and add...
| Name | Prodline2 Mail Session |
| JNDI Name | mail/Prodline2Session |
| Server | smtp.myco.com |
Configure object cache instances
Go to...
-
Resources | Cache Instances | Object cache instances | New
...and on cluster scope, create...
| Name | JNDI name | Cache size |
|---|---|---|
| Catalog_User_Cache | services/cache/Catalog/usercache | 2000 |
| WEB_EN_Scripts_Cache | services/cache/Catalog/WEB/EN/scripts_cache | 5000 |
| WEB_ES_Scripts_Cache | services/cache/Catalog/WEB/ES/scripts_cache | 5000 |
Use defaults for other values.
Configure Object Pools
- Resources | Object pool managers
Cell scope
Name My Http Connection Pool Manager JNDI name opm/Catalog/HTTPPoolManager Description My Connection Pool for Prodline1 Custom object pools Pool class name com.myco.portal.net.http.PoolableConnection Pool implementation class name com.myco.portal.net.http.ConnectionPool Name TeaHttpPoolManager JNDI name opm/nuLeefHttpPoolManager Description Provides IUD service check based on destination phone number Custom object pools Pool class name com.myco.portal.net.http.PoolableConnection Pool implementation class name com.myco.portal.net.http.ConnectionPool - Object pool managers > My Http Connection Pool Manager > Custom object pools > com.myco.portal.net.http.PoolableConnection > Custom properties
PRD Primary, PRD HA, and TST...
closeOnReturn true connectionTimeout 10000 host esbgateway.myco.com (PRD Primary)
haesbgateway.myco.com (PRD HA)
tstesbgateway.myco.com (TST)port 80 timeout 100000 uri /facade?xmldoc=
DEV and STG...
| closeOnReturn | true |
| connectionTimeout | 10000 |
| host | stage.myco.com |
| port | 7001 |
| timeout | 100000 |
| uri | /facade?xmldoc= |
Global security updates
Add "mail" as login property
-
Security | Global security | Federated repositories | Configure | MyCo_LDAP1 | Federated repository properties for login
...and set...
-
uid;mail

Disallow direct servlet access
By default, users can access servlets by their class name instead of an alias. For example, to call the servlet defined in the com.ibm.itso.MyServlet, specify a URI, such as...
-
/servlet/com.ibm.itso.MyServlet
We want to disable this feature. Even if servlet URLs are secured, a malicious attacker might be able to bypass the normal URL-based security.
To disallow direct access to servlets, go to...
-
Servers | Server Types | WebSphere appservers | server | Web Container Settings | Web container | Additional Properties | Custom Properties | New
...and set to true...
| Name | Default |
|---|---|
| com.ibm.ws.webcontainer.disallowserveservletsbyclassname | false |
Web Services
- Log on to dmgr console and go to...
-
Services | Policy sets | Application policy sets | New
- For name, enter...
-
MyCo SOAP Services Policy
...for the name and click Apply
- Click Add and select HTTP Transport
- Set the connection timeout to 30 seconds.

- Accept the default values for all other properties and click OK
- Click Add and select WS-Security
- Click Save

- Expand...
-
Services | Policy Sets | General client policy set bindings | New
- Specify MyCo SOAP Binding as the name
- Click Add and select HTTP transport
- Enter the following values and click OK
- DEV
Host devesbgateway.myco.com Port 80 - STG
Host stage-soa3.myco.com Port 9001 - TST
Host tstesbgateway.myco.com Port 80 - PRD HA
Host esbgateway.myco.com Port 80 - PRD HA
Host haesbgateway.myco.com Port 80
Username and password for all of the above...
User name weblogic Password password 
- DEV
- Verify connectivity to gateway. For example...
-
$ telnet esbgateway.myco.com 80
Trying 10.11.11.24...
Connected to esbgateway.myco.com.
Escape character is '^]'. - Click Add then select WS-Security
-
WS-Security | Authentication and protection | Authentication tokens | New Token | Token Generator
- Enter the following properties...
Name UsernameToken1 Token type Username Token v1.0 - Accept all other default values and click Apply

- Click the Callback handler link and enter...
User name weblogic Password password - From dmgr console, go to...
-
Application policy sets | MyCo SOAP Services Policy | WS-Security | Main policy | Request token policies
...and add
Token type UserName Username token name auth_token WS-Security version WS-Security 1.0 
Select OK and then Save
- Go to...
-
Application policy sets | MyCo SOAP Services Policy | WS-Security | Main Policy
...and deselect the Message level protection.
Select OK and SAVE

- Synchronize nodes, then restart dmgr and portal appservers.
- Install MyCoServices.ear file
Note that this file needs to be customized for each environment.
- Log on to dmgr console and run...
-
Applications | New Application | New Enterprise Application | Local file system | Choose File | MyCoServices.ear | Detailed | Show all installation options | Next
- Accept defaults for...
-
Select installation options
- Accept defaults for...
-
Map modules to servers
- On panel...
-
Map shared libraries
- Select the checkbox next to MyCoServicesEAR
- Click button...
-
Reference shared libraries
- Scroll down to MyCoServicesLib, select, then move to Selected column
- On the panel...
-
Provide JNDI names for beans
...for each bean, set target resource JNDI name to...
ejb/BeanName
For example, for myCustomService, the name should be...
-
ejb/myCustomService
- Accept the default values for the rest of the panels, then click Finish.
- Log on to dmgr console and run...
- Select...
-
Applications | Application Types | WebSphere Enterprise Applications | MyCoServicesEAR | Service client policy sets and bindings
- Select all checkboxes, then click...
-
Attach Client Policy Set | MyCo SOAP Services Policy
- Select all checkboxes, then click...
- Assign Binding | MyCo SOAP Binding
- Click Save
- Restart the application

Web Content View preferences
Define portlet preferences defined in the WCM Viewer portlet.
- Log in to the WebSphere Portal server
-
http://myenv.myco.com:10039/wps/config
...and go to...
-
Administration | Portlet Management | Portlets
- Search for "web content viewer" and then click the Configure portlet icon

- The Configure portlet panel appears...

- Set the following preferences...
meta.tag.content.element.6 meta.og.description meta.tag.content.element.9 meta.og.image meta.tag.content.text.2 Prodline2 meta.tag.content.text.3 INDEX,FOLLOW meta.tag.content.text.7 Prodline2 meta.tag.name.0 title meta.tag.name.1 description meta.tag.name.2 author meta.tag.name.3 robots meta.tag.name.4 keywords meta.tag.name.5 og:title meta.tag.name.6 og:description meta.tag.name.7 og:site_name meta.tag.name.9 og:image
Expression Language
Apply EL string checking bypass
- Go to...
-
Servers | Server Types | WebSphere Application Servers | server-name | Java and Process Management | Process Definition | Java Virtual Machine | Custom Properties.
- Create a new custom property definition by clicking New and setting...
org.apache.el.parser.SKIP_IDENTIFIER_CHECK true The absence of the custom property definition is the same as setting Value to false.)
- Click OK.
- Save changes and synchronized with cell nodes
- Restart appservers
Deploy war
Execute these tasks from primary node only.
- Upload deployment.tar.gz to the target primary node.
- Log on to primary node and unarchive files
-
cd /tmp
gunzip deployment.tar.gz
tar xvf deployment.tar - Deploy MyCo portlets...
cd /opt/IBM/Portal/WAS1/PortalServer/bin ./xmlaccess.sh -in /tmp/deployment/portlets/DeployMyCoPortlets.xml \ -user wasadmin \ -password mypassword \ -url http://prdhost1.myco.com:10039/wps/config \ -out /tmp/deployment/portlets/DeployMyCoPortlets_out.xml - Log on to Portal Administration and verify roles "All Authenticated Portal Users" and "Anonymous Portal User" are assigned to MyCo portlets.

Map Portlets to Shared Libraries
Log on to deployment manager host and run...
-
cd /opt/IBM/Portal/WebSphere/AppServer/bin
./wsadmin.sh -lang jython -f /tmp/edit_app_libraries.py -username wasadmin -password mypassword
Restart portal processes after executing this script.
Verify the following have property library mappings and portal security...
- SettingsPortlets.war
- CancellationOrderPortlet.war
- LocationPortlet.war
- ProtectionPortlets.war
- Upgrade.war
- UnsubscribePortlet
- PA_Marketing
- MyCoMyAccountPortlet.war
- MyCoAccountSummaryPortlet
For example...

Resource Environment Providers
Go to...
-
Resources | Resource Environment | Resource Environment Providers
...and add custom properties. Cluster scope. Use source environment as a reference for resource environment entries and corresponding custom properties
- WP_AuthenticationService | Custom Properties
Install TeaLeaf application before setting these properties. Changing the following may affect logon and logout, so if we are having issues authenticating to portal pages, for example, if My Account button leads to blank page, you may need to change these back to the default settings...
Name Default value logout.explicit.filterchain com.ibm.wps.auth.impersonation.impl.ImpersonationLogoutFilter
| Description | MyCo value |
|---|---|
| sessionvalidation.filterchain | com.myco.portal.LocaleParamFilter;com.myco.portal.SSLSessionValidator;com.myco.portal.TeaLeafCookieFilter |
| logout.implicit.filterchain | com.myco.portal.filters.logout.TNSCookieInvalidatorLogoutFilter;com.myco.portal.filters.logout.CacheInvalidatingLogoutFilter |
| logout.explicit.filterchain | com.myco.portal.filters.logout.TNSCookieInvalidatorLogoutFilter;com.myco.portal.filters.logout.CacheInvalidatingLogoutFilter |
| filterchain.properties.com.myco.portal.SSLSessionValidator.sslRequiredProperty | SSLRequired |
| filterchain.properties.com.myco.portal.SSLSessionValidator.secureCookiePath | / |
| filterchain.properties.com.myco.portal.SSLSessionValidator.secureCookieName | com.myco.SSL |
| timeout.resume.session | false |
| host.port.https | |
| host.port.http | |
| uri.home.substitution | true |
| com.ibm.wps.resolver.servlet.AbstractServlet.enableGZIP | false |
| public.session | true |
| preprocessors | com.ibm.wps.state.preprocessors.locale.CookieSupportedLanguagePreProcessor, com.ibm.wps.state.preprocessors.urlmapping.URLMappingPreProcessor, com.ibm.wps.resolver.friendly.preprocessors.FriendlyPreProcessor, com.ibm.wps.resolver.portal.ResolvedPreprocessor, com.ibm.wps.state.preprocessors.selection.StandardPortalSelectionImpl, com.ibm.wps.state.preprocessors.selection.FragmentSelectionImpl, com.ibm.wps.state.preprocessors.selection.ResourceSelectionImpl, com.ibm.wps.state.preprocessors.eclipse.ExtensionPreProcessor, com.ibm.wps.state.preprocessors.portlet.RequestParameterMerger |
| com.ibm.wps.state.preprocessors.locale.CookieSupportedLanguagePreProcessor.cookie.maxage | -1 |
| Factory Class Name | com.myco.portal.portlet.rep.MyCoSiteDetailsProvider |
| Class Name | com.myco.portal.portlet.rep.MyCoSiteDetailsProvider |
| Name | JNDI name | Scope | Provider |
|---|---|---|---|
| stage.myco.com
test.myco.com auth.myco.com dev.myco.com prod.myco.com prodha.myco.com www.myco.com | rep/site/details/stage.myco.com
rep/site/details/test.myco.com rep/site/details/auth.myco.com rep/site/details/dev.myco.com rep/site/details/prod.myco.com rep/site/details/prodha.myco.com rep/site/details/www.myco.com | Cluster=P1Cluster | SiteDetailsProvider |
| all_sites | rep/site/details/all_sites | Cluster=P1Cluster | SiteDetailsProvider |
Create one entry based on the current environment. Before production cutover, after internal DNS change, add entry for www.myco.com
We set false for production, true for all other environments.
| Name | Value |
|---|---|
| STAGING_ENABLED | false |
| SCRIPT_STAGING | false |
Setting false for STAGING_ENABLED and SCRIPT_STAGING here and below turns off the "Enable/Disable Staging Mode" option on the home page...

| Name | Value |
|---|---|
| PARENT_BASE_DN_OVERRIDE | ou=users,dc=myco,dc=com |
| WCM_BRAND_NAME | PRD |
| TNS_BASE_URL | https://stg.tns.myco.com/index.html (STG)
https://tst.tns.myco.com/index.html (DEV and TST) https://tns.myco.com/index.html (PRD) |
| SUPPORTED_LOCALES | EN,ES |
| SOURCE_SYSTEM | WEB |
| SHOW_EMPTY_SCRIPT_IDS | false |
| SCRIPT_STAGING_IMG_PATH | /wps/contenthandler/dav/fs-type1/themes/CatalogTheme/css/images/plus.gif |
| SCRIPT_STAGING_COOKIE_NAME | staging_mode |
| SCRIPT_STAGING | false |
| GLOBAL_SCRIPT_VALUES | company_name=;company_website=www.myco.com;toll_free_number=1-877-867-5309; |
| FLOW_NAMES | PURCHASE=PURCHASE;PURCHASE_ERROR_FLOW=P1PURCHASE;PORT_IN=PORT_IN;UPGRADE=P1_UPGRADE;MIN_AND_PIN_REFILL=P1_REDEMPTION;ADD_NOW=ADD_NOW;ADD_TO_QUEUE=ADD_TO_QUEUE;BUY_SERVICE_PLAN=BUY_SERVICE_PLAN;ENROLL_IN_AUTO_REFILL=ENROLL_IN_AUTO_REFILL;ADD_SERVICE_PLAN_NOW=ADD_SERVICE_PLAN_NOW;PURCHASE_ONE_P2EP=PURCHASE_ONE_P2EP;BALANCE_INQUIRY=BALANCE_INQUIRY;POINT=P1_POINT;MOBILE_WEB=P1_ACCESSORIES;FORGOT_USERNAME=FORGOT_USERNAME;REDEMPTION=P1_REDEMPTION;BUY_IUD_PLAN=BUY_IUD_PLAN |
| DEFAULT_LOCALE | EN |
| My_POOL_JNDI | opm/Catalog/HTTPPoolManager |
| AGENT | My |
| BRAND_NAME | Catalog |
| TNS_COOKIE_NAME | TNS_XWebObjid |
| TNS_RESPONSE_ENCODING | URLBASE64 |
| TNS_COOKIE_DOMAIN | myco.com |
| TNS_COOKIE_MAX_AGE | 1800 |
| TNS_VENDOR_ID | DBG |
| TNS_APP_ID | TNS |
| TNS_ENCRYPT_METHOD | PGP |
| TNS_ENCRYPT_P2D | PGPSTD |
| Factory class name | Class name |
|---|---|
| com.myco.portal.portlet.rep.MyCoSiteDetailsProvider | com.myco.portal.portlet.rep.MyCoSiteDetailsProvider |
| Name | JNDI name | Scope | Provider |
|---|---|---|---|
| stage.myco.com
test.myco.com auth.myco.com dev.myco.com prod.myco.com www.myco.com prodha.myco.com | rep/mapquest/details/stage.myco.com
rep/mapquest/details/test.myco.com rep/mapquest/details/auth.myco.com rep/mapquest/details/dev.myco.com rep/mapquest/details/prod.myco.com rep/mapquest/details/www.myco.com rep/mapquest/details/prodha.myco.com | Cluster=P1Cluster | MapQuestDetailsProvider |
Create one entry based on the current environment. Before production cutover, after internal DNS change, add entry for www.myco.com
| Name | Value |
|---|---|
| MQ_SPATIAL_SERVER_PORT | 80 |
| MQ_SPATIAL_SERVER_PATH | mq |
| MQ_SPATIAL_SERVER_PASSWORD | MyPassword |
| MQ_SPATIAL_SERVER_NAME | spatial.access.mapquest.com |
| MQ_SPATIAL_SERVER_CLIENT_ID | 37706 |
| MQ_ROUTE_SERVER_PORT | 80 |
| MQ_ROUTE_SERVER_PATH | mq |
| MQ_ROUTE_SERVER_PASSWORD | MyPassword |
| MQ_ROUTE_SERVER_NAME | route.access.mapquest.com |
| MQ_ROUTE_SERVER_CLIENT_ID | 37706 |
| MQ_MAP_SERVER_PORT | 80 |
| MQ_MAP_SERVER_PATH | mq |
| MQ_MAP_SERVER_PASSWORD | MyPassword |
| MQ_MAP_SERVER_NAME | map.access.mapquest.com |
| MQ_MAP_SERVER_CLIENT_ID | 37706 |
| MQ_GEOCODE_SERVER_PORT | 80 |
| MQ_GEOCODE_SERVER_PATH | mq |
| MQ_GEOCODE_SERVER_PASSWORD | MyPassword |
| MQ_GEOCODE_SERVER_NAME | geocode.access.mapquest.com |
| MQ_GEOCODE_SERVER_CLIENT_ID | 37706 |
| MQA.MQ_37706_SM2 | false |
| OBSOLETE? MQ_DATABASE_POOL_NAME | MQA.MQ_37706_SM2 |
Restart WebSphere processes after setting these values.
Configure PRD Theme
- Configure resource providers before installing theme
- Install PRD theme war.
We can also export theme as EAR, and then install EAR in new environment.
- From dmgr console, select...
-
New Enterprise Application | Path to the new application | Local File System | ModularTheme.war

- On panel Select installation options set name to ModularTheme
- On panel Map modules to servers select both cluster and web server

- On panel JSP reloading options for Web modules keep defaults.
- On panel Map shared libraries keep defaults.
- On panel Map shared library relationships keep defaults.
- On panel Map virtual hosts for Web modules keep defaults.
- On panel Map context roots for Web modules set...
-
/wps/ModularTheme
- On panel Map JASPI provider keep defaults.
- On panel Display module build Ids keep defaults.
- Review summary info, then select Finish

- Synchronize nodes...

- From dmgr console, select...
- Import theme data to WebDAV folders
cd /opt/IBM/Portal/WAS1/wp_profile/ConfigEngine ./ConfigEngine.sh webdav-deploy-zip-file \ -DTargetURI=dav:fs-type1/themes/CatalogTheme/ \ -DZipFilePath=/tmp/deployment/themes/ModularTheme-bin.zip \ -DUpdateMode=merge - Migrate theme
Note that we are getting theme from a Portal v7 environment, and then importing into a Portal v8 environment.
- Export theme xml from source portal...
cd /opt/IBM/Portal/WAS1/PortalServer/bin
./xmlaccess.sh -in /tmp/deployment/themes/ExportThemesAndSkins.xml  \
               -user wasadmin  \
               -password foo \
               -url http://pwps1.myco.com:10039/wps/config \
               -out /tmp/deployment/themes/theme_output.xml
- Copy output file to:
-
target_host:/home/wasadmin/deployment/themes
- Edit output file and remove references to unwanted skins and themes.
- Change...
-
xmlns:xsi="http://www.w3.org/2001/XMLSchema-instance"
xsi:noNamespaceSchemaLocation="PortalConfig_7.0.0.xsd"...to...
-
xmlns:xsi="http://www.w3.org/2001/XMLSchema-instance"
xsi:noNamespaceSchemaLocation="PortalConfig_8.0.0.xsd" - Import theme to target Portal v8 dmgr
cd /opt/IBM/Portal/WAS1/PortalServer/bin
 ./xmlaccess.sh -in /tmp/deployment/themes/theme_output.xml  \
                -user wasadmin  \
                -password mypassword \
                -url http://prdhost1.myco.com:10039/wps/config \
                -out /tmp/deployment/themes/import_theme_log.xml
- Export theme xml from source portal...
- From dmgr console, go to...
-
Enterprise Applications | ModularTheme | Class loading and update detection
...and verify Class loader order is set to...
-
Classes loaded with parent class loader first

- Go to the Enterprise Applications panel, then select and start the ModularTheme...

- Go to the Portal administration page...
-
http://test.myco.com/wps/myportal/Administration
...and select...
-
Portal User Interface | Themes and Skins | MyTheme | Edit theme


- Fix hard-coded reference to 7002theme
- Restart portal appserver
Install global filters
Use WAS console to install MyCoGlobalFilters-1.0.war
Map module to cluster only.
Context root: /globalportalfilters
Install Tealeaf processor
Use WAS console to install MyCoTealeafProcessor.warContext root: /tealeaf
Map to cluster and web server
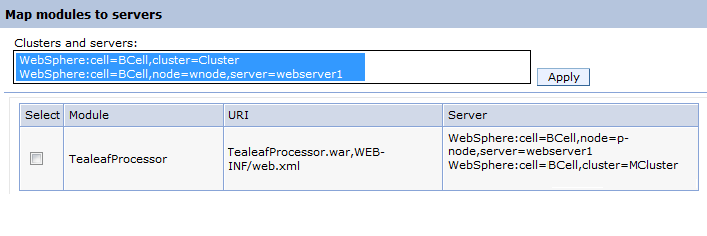
Customize IHS config
- From WebSphere Console, go to the Web servers panel, and regenerate plugin-xml files.
- Copy new plugin-cfg.xml files to the web server hosts.
Firewall rules prevent us from propagating, or using scp, to copy regenerated plugin-cfg.xml files to their respective web servers. To accomplish, we perform the task below.
- On dmgr host, copy new plugin-xml files to /tmp and set perms...
-
cp $DMGR_PROFILE/config/cells/p1cell/nodes/ihsnode1/servers/webserver1/plugin-cfg.xml /tmp/plugin-cfg1.xml
cp $DMGR_PROFILE/config/cells/p1cell/nodes/ihsnode2/servers/webserver2/plugin-cfg.xml /tmp/plugin-cfg2.xml
chmod 666 /tmp/plugin-cfg1.xml
chmod 666 /tmp/plugin-cfg2.xml - Download files to your client PC...
-
scp user1@prd2dmgr.myco.com:/tmp/plugin-cfg1.xml plugin-cfg1.xml
scp user1@prd2dmgr.myco.com:/tmp/plugin-cfg2.xml plugin2-cfg.xml - Copy files up to web servers...
-
scp plugin-cfg1.xml user1@webserver1.myco.com:/tmp/plugin-cfg.xml
scp plugin-cfg2.xml user1@webserver2.myco.com:/tmp/plugin-cfg.xmlFrom webserver1 host, change perms and copy into place...
-
chmod 666 /tmp/plugin-cfg.xml
cd /opt/IBM/Portal/Plugins/config/webserver1
cp /tmp/plugin-cfg.xml .From webserver2 host, change perms and copy into place...
-
chmod 666 /tmp/plugin-cfg.xml
cd /opt/IBM/Portal/Plugins/config/webserver2
cp /tmp/plugin-cfg.xml .
- On dmgr host, copy new plugin-xml files to /tmp and set perms...
- On web server hosts, modify httpd.conf to include MyCo directives.
Create PRD Virtual Portal
-
Go to...
-
Portal Administration | Manage Virtual Portals
...and create...
Virtual portal title Prodline1_Virtual_Portal URL Context prd-vp Virtual portal hostname myhost.myco.com User realm myAdminRealm Initial admin user group wpsadmins - Enter the virtual portal by clicking the URL Context link
If VIP, DNS, DataPower, or IHS are not configured for routing success, to access the new virtual portal via the hostname, set up an alias on your client PC. Edit...
-
c:/windows/system32/drivers/etc/hosts
...and set hostname to...
-
10.22.40.111 portal_primary_node
For example, for PRD...
-
10.22.40.111 prod.myco.com
You should now be able to get to the virtual portal by going to the Manage Virtual Portals page and clicking on the hostname for the virtual portal.
- From the virtual portal, set Administration label name...
-
Administration | Portal Settings | URL Mapping | New Context | Administration | OK
Click the Edit Mapping icon map label and map to the Administration page.
Note that if we are unable to get to the virtual portal administration page to set up the friendly URL, we can copy and paste the URL from another site. For example, the following URL takes you to the TST Administration page...
-
http://test.myco.com/wps/myportal/!ut/p/a1/04_Sj9CPykssy0xPLMnMz0vMAfGjzOKd3R09TMx9DAwsjF2NDDzNA52Mw4w9Ddz9TfXD9aPwKzEjpMAEqsAAB3A00C_Izg4CAPyxWkA!/
Use the part of the link after myportal/
Syndication
To set up a syndication relationship...
- Install multilingual
Do this before BEFORE syndicating or importing WCM libraries.
- Ensure both the subscriber and syndicator are running, and that they can access each other over a network. For example...
-
telnet test.myco.com 10039
- On the subscriber server, log in to IBM WebSphere Portal.
- Create a shared credential vault slot to allow us to access the syndicator
-
Administration | Access | Credential Vault

ID and password should be a valid ID and password for accessing the syndicator portal. For example: wasadmin / foo
- Go to...
-
Administration | Portal Content | Subscribers | Subscribe Now
- Enter the syndicator URL. For example...
- http://test.myco.com:10039/wps/wcm

- Set the syndicator name.
- Set the subscriber.
- Select the credential vault slot created earlier.
- Click Next
- Select the libraries to subscribe to. For example...
For PRD, select...
- Prodline1 Design
- Prodline1 EN
- Prodline1 ES
- Prodline2 Design
- Prodline2
- Prodline2 ES
- ImageRendering
- Units
- ML_Configuration7
- Click Finish.
- To begin syndication, click either Update Subscriber or Rebuild Subscriber button.

During the syndication you will see a Status of Active along with Last Update

Avoid stopping the Portal server while the syndication is running. Wait for Complete status. Clicking on Last Update will render a progressa.

Monitor Portal JVM logs on both syndicator and subscriber...
-
tail -f /opt/IBM/Portal/WAS1/wp_profile/logs/WebSphere_Portal
To add additional WCM libraries after creating the syndication relationship, go to the syndication portal and click the Edit icon...

Export/Import WCM libs
Note that this step is an alternative to syndication.
With this step we export the contents of a web content library in source portal, and import this data into target web content server. This procedure is only suitable for populating new items. For ongoing updates, deletes and moves, we will use syndication.
Note: If you have not yet run the multilingual deploy tasks, do NOT copy over any multilingual-related libraries. Run the mls deploy tasks first.
- Install multilingual
This must be done before BEFORE importing WCM libs
- From source portal server, as user wasadmin, export all WCM libraries...
cd /opt/IBM/Portal/WAS1/wp_profile/ConfigEngine
./ConfigEngine.sh export-wcm-data \
                  -Dexport.allLibraries=true  \
                  -DWasPassword=password \
                  -DPortalAdminPwd=password
Note that we can optionally specify a virtual portal: -DVirtualPortalHostName
We can tail logs during export...
-
tail -f /opt/IBM/Portal/WAS1/wp_profile/logs/WebSphere_Portal/SystemOut.log
- On target host, as user wasadmin, create import directory...
-
mkdir /opt/IBM/Portal/WAS1/wp_profile/PortalServer/wcm/ilwwcm/system/import
- Copy output file to target portal server
-
cd /opt/IBM/Portal/WAS1/wp_profile/PortalServer/wcm/ilwwcm/system/export
scp -r dirname wasadmin@remotehost:/opt/IBM/Portal/WAS1/wp_profile/PortalServer/wcm/ilwwcm/system/import - Increase total transaction lifetime timeout and maximum transaction timeout to 360 seconds in...
-
Servers | Server Types | WebSphere appservers | portal_server | Container Services | Transaction Service
- Log on to target portal server and import WCM libraries...
-
cd /opt/IBM/Portal/WAS1/wp_profile/ConfigEngine
./ConfigEngine.sh import-wcm-data -DWasPassword=password -DPortalAdminPwd=password
Set permissions for web content
- Log on to the portal and go to...
-
Administration | Portal Content | Web Content Libraries | Set Access on Root

- Edit the User role

- Add members "All Authenticated Portal Users" and "Anonymous Portal User" to User role.

Export/Import pages
For this step we export pages from source portal A, and then import those pages to target portal B. For the export to work, enable support for JavaScript and disable pop-up blocking in the browser settings. I have had success using out-of-the box Firefox as the browser.
- Backup target portal
- Log on to source virtual portal administration page as user wasadmin.
For example...
- Click the "Administration" link on the bottom left of the page.
- Go to...
-
Administration | Manage Pages | Content Root
...and click the Export button for the Welcome to Prodline1 page...

Output is written by default to pageExport.xml.
- If we are migrating v7 pages to a v8 portal...
- Review pageExport.xml, and verify object IDs for noskin and theme match those in the theme import file.
- Review custom portlets in pageExport.xml, and compare their object IDs to those found in...
-
Portal | Administration | Portal Settings | Custom Unique Names | Portlets
- Edit pageExport.xml
- Remove references to the following skins and themes. For example...
<skin action="locate" domain="rel" objectid="ZK_CGAH47L008LG50IAHUR9Q330S4" uniquename="ibm.portal.skin.IBM"/>
<skin action="locate" domain="rel" objectid="ZK_CGAH47L008LG50IAHUR9Q330S2" uniquename="wps.skin.thinSkin"/>
<skin action="locate" domain="rel" objectid="ZK_CGAH47L008LG50IAHUR9Q330S6" uniquename="wps.skin.noSkin"/>
<skin action="locate" domain="rel" objectid="ZK_B8LUIVAH2REB10IL4GGE622OE6"/>
<theme action="locate" domain="rel" objectid="ZJ_D0JM3QAH2B7H30IJRMH0GP3007" uniquename="com.myco.portal.P2_BlankTheme"/>
- Change references to cloned Web Content Viewers...
-
Web Content Viewer (JSR 286).$cloned.Z3_D0JM3QAH2379F0I310AG6720O4
Web Content Viewer (JSR 286).$cloned.Z3_D0JM3QAH2379F0I310AG6720O6...to original Web Content Viewer...
-
portlet Z3_CGAH47L00OJ790IAH1AFAN1G56 name=Web Content Viewer (JSR 286)
- Remove the following undefined skin component
<component action="update"
           active="true"
           deletable="undefined"
           domain="rel"
           modifiable="true"
           objectid="Z7_D0JM3QAH2RH750IPHCSG7N0OF3"
           ordinal="3400"
           orientation="H"
           skinref="undefined"
           type="container"
           width="undefined">
- Remove references to the following skins and themes. For example...
- From target virtual portal, go to...
-
Administration | Import XML
...and select the virtual portal export file created earlier.
- Import the pages.
Custom Security Configuration
LDAP Custom Attribute Configuration
Configuration supports the "mycoPerson" custom class and "contObjid" custom attribute.
- Log on to primary node and Install WIMSYSTEM application...
- TST and PRD
-
cd /opt/IBM/Portal/WAS1/wp_profile/ConfigEngine
./ConfigEngine.sh wp-la-install-ear -DServerName=dmgr -DNodeName=P1Node01 - PRD
-
cd /opt/IBM/Portal/WAS1/wp_profile/ConfigEngine
./ConfigEngine.sh wp-la-install-ear -DServerName=dmgr -DNodeName=DmgrNode
To get dmgr node name, go to...
-
System Administration | Deployment manager | Runtime

In the WAS console, target host and node should be the deployment manager
Enterprise Applications | WIMSYSTEM | Target specific application status

- TST and PRD
- Restart dmgr, appserver, and node agent
- Update wkplc.properties for custom attribute.
- PRD HA
-
la.providerURL=corbaloc:iiop:prd2dmgr:10809
la.propertyName=contObjid
la.entityTypes=PersonAccount
la.dataType=P1RING
la.multiValued=false
repositoryId= - PRD Primary
-
la.providerURL=corbaloc:iiop:prddmgr:10809
la.propertyName=contObjid
la.entityTypes=PersonAccount
la.dataType=P1RING
la.multiValued=false
repositoryId= - TST
-
la.providerURL=corbaloc:iiop:testdmgr:10809
la.propertyName=contObjid
la.entityTypes=PersonAccount
la.dataType=P1RING
la.multiValued=false
repositoryId= - PRD
-
la.providerURL=corbaloc:iiop:stage:9809
la.propertyName=contObjid
la.entityTypes=PersonAccount
la.dataType=P1RING
la.multiValued=false
repositoryId=
la.providerURL uses the Bootstrap Address port of the dmgr...
-
System administration | Deployment manager | Ports
- PRD HA
- Add attribute:
-
./ConfigEngine.sh wp-add-property
** Note this will prompt for credentials
- Update wkplc.properties for attribute mapping:
-
user.attributes.required=sn,ibm-primaryEmail
federated.ldap.attributes.mapping.ldapName=contObjid,mail,userPassword
federated.ldap.attributes.mapping.portalName=contObjid,ibm-primaryEmail,password
...
federated.ldap.attributes.mapping.entityTypes=PersonAccount - Map new attributes:
-
./ConfigEngine.sh wp-update-federated-ldap-attribute-config
- Restart
- On secondary nodes...
- On secondary nodes, update wkplc.properties with latest values
- Run update-jcr-admin on secondary nodes.
-
cd /opt/IBM/Portal/WAS1/wp_profile/ConfigEngine
./ConfigEngine.sh update-jcr-admin
- Update wkplc.properties for custom person class:
-
federated.ldap.et.personaccount.objectClasses=inetOrgPerson;Person;mycoPerson
federated.ldap.et.personaccount.objectClassesForCreate=inetOrgPerson;mycoPerson
federated.ldap.loginProperties=uid;mail - Update the objectClasses
-
./ConfigEngine.sh wp-update-federated-ldap -DWasPassword=mypassword
- Update wkplc.properties for the following values:
- PRD HA
-
et.ldap.id=MyCo_LDAP1
et.entityTypeName=PersonAccount
et.objectClass=inetOrgPerson;Person;mycoPerson
et.searchFilter=
et.objectClassesForCreate=mycoPerson
et.searchBases=
et.ldap.host=prdtds1.myco.com - PRD Primary
-
et.ldap.id=MyCo_LDAP1
et.entityTypeName=PersonAccount
et.objectClass=inetOrgPerson;Person;mycoPerson
et.searchFilter=
et.objectClassesForCreate=mycoPerson
et.searchBases=
et.ldap.host=prdtds1.myco.com - TST
-
et.ldap.id=MyCo_LDAP1
et.entityTypeName=PersonAccount
et.objectClass=inetOrgPerson;Person;mycoPerson
et.searchFilter=
et.objectClassesForCreate=mycoPerson
et.searchBases=
et.ldap.host=testtds1.myco.com - PRD
-
et.ldap.id=MyCo_LDAP1
et.entityTypeName=PersonAccount
et.objectClass=inetOrgPerson;Person;mycoPerson
et.searchFilter=
et.objectClassesForCreate=mycoPerson
et.searchBases=
et.ldap.host=ldaphost.myco.com
- PRD HA
- Delete PersonAccount entity type
-
./ConfigEngine.sh wp-delete-ldap-entitytype
- Recreate PersonAccount entity type
-
./ConfigEngine.sh wp-create-ldap-entitytype
- Restart
- On secondary nodes...
- On secondary nodes, update wkplc.properties with latest values
- Run update-jcr-admin on secondary nodes.
-
cd /opt/IBM/Portal/WAS1/wp_profile/ConfigEngine
./ConfigEngine.sh update-jcr-admin
Multilingual system
Important: Do not syndicate or import any WCM libraries before configuring MLS. Configure MLS first.
To enable multilingual, on each portal node in the cluster, run...
- Set WasPassword and PortalAdminPwd in wkplc.properties
- Run...
-
cd /opt/IBM/Portal/WAS1/wp_profile/ConfigEngine
./ConfigEngine.sh register-wcm-mls
./ConfigEngine.sh deploy-wcm-mls
./ConfigEngine.sh import-wcm-mls-data -DVirtualPortalContext=prd-vp - To have the home page render in Espanol, log on to the virtual portal, then select...
-
Administration | Manage Pages | Content Root | Welcome to Prodline1 | Edit Page Layout | Web Content Viewer portlet | Edit Shared Settings | Advanced Options | Plug-ins | Context Processors | com.ibm.workplace.wcm.ml.contextprocessor.MLContextProcessor

- Click OK and restart portal cluster.
For more information, see: Multilingual deployment, installation, and configuration
Architecture summary


There is Primary data center instance (PRD), and a secondary data center instance (PRDHA). Both share the above topology.
Appendix - Databases
| Env | Host | Port | User | Pass | DBs |
|---|---|---|---|---|---|
| DEV | devdb2 | 60004 | db2admin | foo | FDBKDB COMDB JCRDB RELDB LMDB CUSDB |
| STG | stgdb2 | 60004 | db2adm2 | foo | FDBKDB COMDB JCRDB RELDB LMDB CUSDB |
| TST | tstdb1 | 60000 | db2inst | foo | FDBKDB COMDB JCRDB RELDB LMDB CUSDB |
| PRD Primary Prodline1 | prddb1 | 60000 | db2inst | foo | FDBKDB COMDB JCRDB RELDB LMDB CUSDB |
| PRD Primary Prodline2 | prd2db1 | 60000 | db2inst | foo | FDBKDB COMDB JCRDB RELDB LMDB CUSDB |
| PRD HA Prodline1 | prdaltdb1 | 60000 | db2inst | foo | FDBKDB COMDB JCRDB RELDB LMDB CUSDB |
| PRD HA Prodline2 | prd2altdb1 | 60000 | db2inst | foo | FDBKDB COMDB JCRDB RELDB LMDB CUSDB |
Version: DB2 v9.7 FP 6.
DB backups to...
- /db2data/db2backups
- /db2data/archived_logs
- /db2data/old_archive_file
Verify password aging is disabled for DB2 service accounts
Verify db2adm1 and db2adm2 passwords are non-expiring, with password aging disabled. If passwords expire, portal instances will not start.
Change dmgr cellname to p1cell
To change a dmgr cell name...
- Stop the Deployment Manager:
-
cd /opt/IBM/Portal/WebSphere/AppServer/profiles/Dmgr01/bin
./stopManager.sh -user wasadmin -password fooStart the WSADMIN environment...
-
./wsadmin.sh -conntype NONE -lang jython
- From the WSADMIN prompt run...
-
AdminTask.renameCell('[-newCellName p1cell -regenCerts false]')
AdminConfig.save()
exit - Edit setupCmdLine.sh script and update the WAS_CELL parameter.
- Start the Deployment Manager and check the SystemOut.log file for any errors.
Restart WebSphere_Portal, nodeagent, and sync
DEV and PRD restart...
-
cd /opt/IBM/Portal/WAS1/wp_profile/bin
./stopServer.sh WebSphere_Portal -username wasadmin -password password
./stopNode.sh -username wasadmin -password password
cd /opt/IBM/Portal/WebSphere/AppServer/profiles/Dmgr01/bin
./stopManager.sh -username wasadmin -password password
./startManager.sh
cd /opt/IBM/Portal/WAS1/wp_profile/bin
./startNode.sh
./startServer.sh WebSphere_Portal
TST restart
- On primary node
-
cd /opt/IBM/Portal/WAS1/wp_profile/bin
./stopServer.sh WebSphere_Portal -username wasadmin -password foo
./stopNode.sh -username wasadmin -password foo - On secondary node
-
cd /opt/IBM/Portal/WAS1/wp_profile/bin
./stopServer.sh WebSphere_Portal_P1Node02 -username wasadmin -password foo
./stopNode.sh -username wasadmin -password foo - On Dmgr
-
cd /opt/IBM/Portal/WAS1/AppServer/bin
./stopManager.sh -username wasadmin -password foo
./startManager.sh - On primary node
-
cd /opt/IBM/Portal/WAS1/wp_profile/bin
./syncNode.sh testdmgr.myco.com 9879 -user wasadmin -password foo
./startNode.sh
./startServer.sh WebSphere_Portal - On secondary node
-
cd /opt/IBM/Portal/WAS1/wp_profile/bin
./syncNode.sh testdmgr.myco.com 9879 -user wasadmin -password foo
./startNode.sh
./startServer.sh WebSphere_Portal_P1Node02
Configure DB2 for large files in WCM
This is optional and is not currently configured in any MyCo environments
For WCM, we update the database configuration to support large files...
-
cd /opt/IBM/Portal/WAS1/wp_profile/ConfigEngine
./ConfigEngine.sh datasource-enable-fully-materialize-lob-data -DWasPassword=foo
Web server authentication
This is not part of portal install. This is to add a documentation site to web server, and to add authentication to the site.
- Log on to server hosting IHS, and sudo to root
- Edit...
-
/opt/IBM/Portal/IHS/conf/httpd.conf
..and add stanza...
<Directory /opt/IBM/Portal/IHS/htdocs/install> AuthType Basic AuthName "Portal v8 install documentation" AuthUserFile "/opt/IBM/Portal/IHS/htdocs/install/auth" Require valid-user Order allow,deny Allow from all </Directory> - Create password file and add wasadmin user
-
cd /opt/IBM/Portal/IHS/htdocs/install
../../bin/htpasswd -c /opt/IBM/Portal/IHS/htdocs/install/auth wasadminTo add user to existing password file...
-
../../bin/htpasswd /opt/IBM/Portal/IHS/htdocs/install/auth username
- Make password file readable by httpd daemon
-
chmod 666 /opt/IBM/Portal/IHS/htdocs/install/auth
- Restart web server...
-
/opt/IBM/Portal/IHS/bin/apachectl restart
Script to install Portal FP1
### installFP1.sh
###
### Update Portal v8 with FP1. Before running, in wkplc.properties, set...
###
###  - Set PortalAdminPwd and WasPassword
###  - Set PWordDelete=false
###
###  To generate encrypted password used below...
###
###     ./IBMIM -silent -noSplash encryptString mypassword

### Stop WebSphere processes
cd /opt/IBM/Portal
cd /opt/IBM/Portal/WAS1/wp_profile/bin
./stopServer.sh WebSphere_Portal -username wasadmin -password foo
cd /opt/IBM/Portal/WAS1/AppServer/bin
./stopNode.sh -username wasadmin -password foo
cd /opt/IBM/Portal/WebSphere/AppServer/bin
./stopManager.sh -username wasadmin -password foo

### Backup file system
cd /opt/IBM/Portal
tar cvf WebSpherePostPortal.tar WebSphere
gzip WebSpherePostPortal.tar
tar cvf WAS1PostPortal.tar WAS1
gzip WAS1PostPortal.tar

### Backup Installation Manager
tar cvf InstallationManagerPostPortal.tar /var/ibm/InstallationManager
gzip InstallationManagerPostPortal.tar
tar cvf IMSharedPostPortal.tar /usr/IBM/IMShared
gzip IMSharedPostPortal.tar

### Install FP
cd /opt/IBM/InstallationManager/eclipse/tools
./imcl install com.ibm.websphere.PORTAL.SERVER.v80  \
      -repositories /media/Portal8_FP1/repository.config  \
      -properties user.wp.portal.userid,,com.ibm.websphere.PORTAL.SERVER.v80=wasadmin,user.wp.portal.password,,com.ibm.websphere.PORTAL.SERVER.v80=zvgGAF0Fb/j9MaftrK1Uww==,user.wp.was.userid,,com.ibm.websphere.PORTAL.SERVER.v80=wasadmin   \
      -installationDirectory /opt/IBM/Portal/WAS1/PortalServer  \
      -acceptLicense

### Start WebSphere processes
cd /opt/IBM/Portal/WebSphere/AppServer/bin
./startManager.sh
cd /opt/IBM/Portal/WAS1/AppServer/bin
./startNode.sh
cd /opt/IBM/Portal/WAS1/wp_profile/bin
./startServer.sh WebSphere_Portal
Set up IHS SSL
- Create DB for keys
mkdir /opt/IBM/Portal/IHS/keys cd /opt/IBM/Portal/IHS/keys /path/to/gsk7cmd -keydb \ -create \ -db myKeys.kdb \ -pw password \ -type cms \ -expire 360 \ -stashCreate certificate and store in key database. /path/to/gsk7cmd -cert \ -create \ -db myKeys.kdb \ -pw password \ -size 1024 \ -dn "CN=hostname,O=MyCo,OU=IHS,ST=CO,C=US" \ -label IHS \ -default_cert yes \ -expire 360
- Edit httpd.conf and set...
LoadModule ibm_ssl_module modules/mod_ibm_ssl.so Listen 443 <VirtualHost *:443> SSLEnable SSLProtocolDisable SSLv2 </VirtualHost> KeyFile /opt/IBM/Portal/IHS/key/myKeys.kdb SSLDisable - Restart IHS
Example documentation entry page
Prodline1 Links
- Dmgr
- Primary
- VP admin (alt)
- stage.myco.com
Authoring | DEV | STG |
TEST | PRD Primary | PRD HA |
Prodline2 Links
Authoring | DEV | STG |
TEST | PRD Primary | PRD HA |