Manage and administer Portal Search
To manage Portal Search, from the portal menu click...
-
Administration | Manage Search
Fields marked with a red asterisk (*) are mandatory.
Search Services
Each search collection is associated with a search service. Search services allow distribution of search load over several nodes. The default search service is the Portal Search Service, which searches...
- Portal pages
- WCM content
- Indexed web pages
For clusters environment set up a remote search service.
The HTTP crawler of the Portal Search Service does not support JavaScript. Text by JavaScript might not be available for search.
If you delete a search service, the portal does not delete associated search collections or the Search Center related to the search service. Use the Manage Search administration portlet to delete search collections. For Search Centers, remove from the page using the Manage Pages administration portlet.
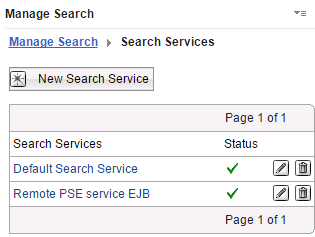
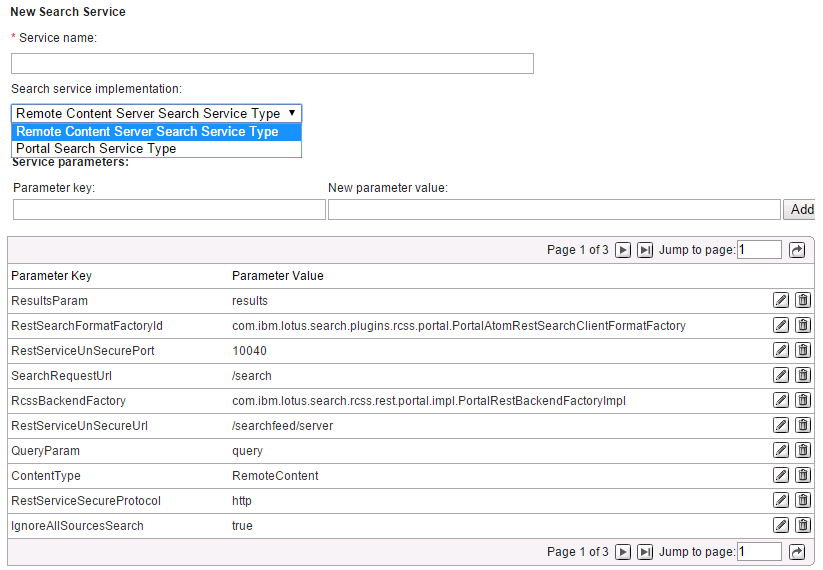
Create a new search service
To create a new search service, click the New Search Service button. Manage Search displays the New Search Service page.
Options...
| Service name | Must be unique within the current portal or virtual portal. Mandatory. |
| Search service implementation | Select from drop-down menu. |
| Service parameters | Add or edit service parameters |
| Delete a service parameter | Locate the parameter in the list and click the Delete icon. |
After completing the data entry and selection of options, click OK to save the new search service. To return without saving, click Cancel.
Manage the collections of a search service
To manage the collections of a search service, click the name on that search service in the services list. We can also select Search Collections from the main Manage Search portlet panel. Manage Search displays the Search Collections page. It lists the search collections of the selected search service. We can now manage these search collections and their content sources.
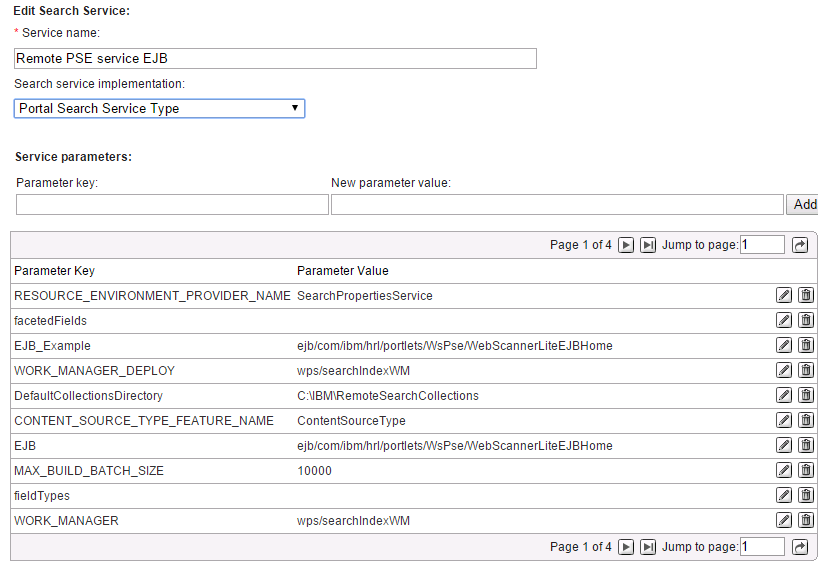
Edit a search service
To edit a search service, locate that search service in the list and click the Edit icon. Manage Search displays the Edit Search Service page.
Delete a search service
To delete a search service, locate that search service in the list and click the Delete icon. When the confirmation prompt shows, confirm by clicking OK, or click Cancel to return without deleting the search service.
Search Collections and content sources
We can build search collections of web content, WCM content, and portal content, and the related search collections. Users can then search these collections using the portal Search Center.
A search collection can have one or more content sources with content such as web pages, WCM content, or portal pages and portlets.
The default search collection combines two content sources and their related crawlers:
| Portal Content Source | Search pages and portlets. |
| WCM Content Source | Search for web content. |
During the search collection build process, content is retrieved for indexing through a crawler (robot) from the content sources. The search collection stores keywords and metadata, and maps them to their original source.
Searchable resources can be stored on the local portal server or on remote content sources. Any content accessible through the HTTP protocol can be processed by the crawlers, including...
- Portal pages
- WCM content
- Documents, including text files, office suite documents, such as Microsoft and OpenOffice, or PDF files.
- Content hosted by web servers
Manage Search Collections
To manage search collections and their content sources, click Search Collections. Manage Search shows the Search Collections page.
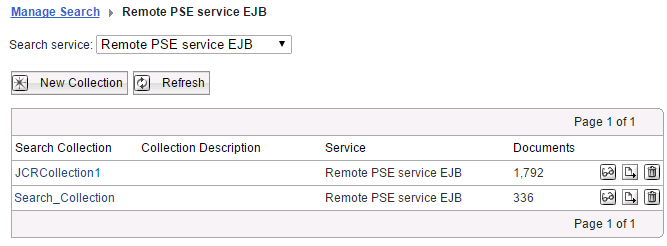
- Name of the search collection
- Description of the search collection, if available
- Search service by which the collection is indexed and searched
- Number of documents in the collection
- Icons for performing tasks on the search collection.
From the Search Collections panel, select the following options or icons and perform the following tasks on search collections:
- Search Service
If you clicked Search Collections from the main Manage Search panel, the Search Collections panel lists all the search collections in the portal. To restrict the list to search collections of one search service, select that search service from the search services pull-down list. If you entered the search Collections panel by clicking a search service name in the list of search services, the list shows only the collections for that service. To view other collections, select the search service as required from the pull-down list.
- New collection
- Refresh
Updates the information and the available option icons for the collections. Examples:
- If a crawl is running or was completed, the number of documents is updated.
- If a crawl was completed on a collection since the last refresh, option icons can appear, such as Search and Browse the Collection.
- If another administrator also worked on search collections at the same time, the information is updated accordingly.
- Arrow icons
To go to a different page in the list of search collections, click the required arrow icon, or enter a page number in the page number entry field and click the Go icon. Both options are available in the search collections list.
- Click one of the links or icons for a specific search collection and perform one of the following tasks.
The icons for some tasks are only available if the current user can perform the specific task on the search collection.
- Click the collection name to view the status of the search collection and manage the content sources of the search collection.
- Search and Browse the Collection.
Click this icon to search and browse a search collection and to work with the documents of the selected collection. We can perform the following administrative tasks:
- Browse the documents of the selected collection.
- Search the documents of the selected collection.
- Edit the fields of the documents in the selected collection.
- Delete documents from the selected collection.
- Import or Export Collection
Import or export the document and index data of the search collection. (Portal Search uses an internal XML interface for this.) The export and import operations can be useful for migrating your search collections between different versions of WebSphere Portal.
- Delete Collection.
- Click the collection name to view the status of the search collection and manage the content sources of the search collection.
Create a search collection
The parameters selected here when you create the search collection cannot be changed later. Therefore plan well ahead and apply special care when you create a new search collection. To change parameters for a search collection, create a new search collection and select the required parameters for it. We can then export the data from the old collection and import it into the new collection.
- Click New Collection. Manage Search displays the Create Collection panel.
The parameters selected here when you create the search collection cannot be changed later. To change parameters for a search collection, create a new search collection and select the required parameters for it. We can then export the data from the old collection and import it into the new collection.
- Location of Collection.
Use this entry field to type the directory path where you want the new search collection to be created and the related data to be saved. This field is mandatary as indicated by the red asterisk ( * ). The location of a collection is the directory in which the collection data is stored. It can be a full path or a path relative to the Collections Locations search service parameter. Depending on what you type, the search collection is created in the following location:
- The location for the new search collection is combined from the default directory for search locations and the name. For example, if name is my_collection, the new search collection is created under the directory...
-
wp_root/collections/my_collection
- To create the search collection in a location that is different from the default search collection location, type the full directory location as required. The new search collection will be created under the directory location specified.
- The location for the new search collection is combined from the default directory for search locations and the name. For example, if name is my_collection, the new search collection is created under the directory...
- Name of Collection.
Set the name to give to the new search collection. The name entered here will show for the search collection in the search collection list and in the hierarchy tree of available content sources when we select locations for scopes. If you do not enter a name, the location that you entered in the previous field is used as a name for the search collection.
- Description of Collection.
Use this entry field to type a description for the new search collection. The description entered here will show for the search collection in the search collection list.
- Specify Collection Language.
Use this pull-down selection list to select the required language for the search collection. The search collection and its index is optimized for this language. This feature enhances the quality of search results for users, as it allows them to use spelling variants, including plurals and inflections, for the search keyword. Portal search uses this language for indexing if there is no language defined for the document.
This setting is not overwritten when you import a search collection, for example, during the migration of a search collection. If you create the search collection for the purpose of migrating an existing search collection, fill this in to match the setting in the source collection to migrate.
- Select Summarizer.
Use this pull-down selection list to select the required summarizer for the search collection. Possible values are:
None No summary is generated for documents. If we select this option, the Search Center uses the description metadata from the document, if the document has one. Automatic An automatic summarizer is used - Manage Search returns to the previous panel.
If you clicked OK, the Search Collection list shows the new search collection by the name specified. If you did not specify a name, the list shows the directory path location specified.
View the status of a search collection
To view the status of the search collection, click the collection name in the list of search collections. Manage Search shows the Content Sources and the Search collection status information of the selected search collection. The status fields show the following data that changes over the lifetime of the search collection:
| Search collection name | Name of the selected search collection. If you did not enter a name for the Search collection, the collection location is shown here instead. |
| Search collection location | Location of the selected search collection in the file system. This is the full path where all data and related information of the search collection is stored. |
| Collection description | Description of the selected search collection, if available. |
| Search collection language | Language for which the search collection and its index is optimized. The index uses this language to analyze the documents when indexing, if no other language is specified for the document. This feature enhances the quality of search results for users, as it allows them to use spelling variants, including plurals and inflections, for the search keyword. |
| Summarizer used | Whether a static summarizer is enabled for this search collection. |
| Last update completed | Date when a content source defined for the search collection was last updated by a scheduled crawl and indexed. The timeout that we might have set under Stop collecting after (minutes): works as a approximate time limit. It might be exceeded by some percentage, as indexing the documents after the crawl takes additional time. Therefore allow some tolerance. |
| Next update scheduled | When the next update of the content source for the search collection is scheduledthat is when the content source will be crawled again. |
| Number of active documents | Number of active documents in the search collections that is, all documents available for search by users. |
To view updated status information about the search collection, click the Refresh button of the browser.
On the same panel we can also manage the content sources of the search collection.
If you have a faulty search collection in the portal, the portlet shows a line that takes you to that faulty collection.
Search and browsing a Search Collection
To browse a search collection proceed as follows:
- Locate the search collection which to browse.
- Click the Search and Browse Collection icon for that collection. The Browse Documents panel is displayed.
From the Browse Documents panel we can browse through the entire search collection. We can view documents and their metadata. We can also delete documents. Use the Search feature to perform a search on the collection. To return to the list of collections, click the appropriate link in the bread crumb trail.
Migrate search collections
When you upgrade to a higher version of WebSphere Portal, the data storage format is not necessarily compatible with the older version. To prevent loss of data, export all data of search collections to XML files before upgrading. After the upgrade you create a new search collection and use the previously exported data to import the search collection data back into the upgraded portal.
- If you do not perform these steps, the search collections are lost after you upgrade the WebSphere Portal.
- When you create the search collection on the upgraded portal, type data and make selections as follows:
- Fill the location, the name, and the description of the new collection in as required. We can match the old settings or type new ones.
- You do not need to select a summarizer. These settings are overwritten by the settings when importing the data from the source search collection.
- Fill the location, the name, and the description of the new collection in as required. We can match the old settings or type new ones.
- We cannot migrate a portal site collection between different versions of WebSphere Portal.
If you upgrade the portal from one version to another, you need to re-create the portal site collection. Proceed as follows:
- Document the configuration data of the portal site content source.
- Delete the existing portal content source.
- Upgrade the portal.
- On the upgraded portal create a new portal site content source.
Use the documented configuration data as required.
- Execute the new portal content source.
- Document the configuration data of the portal site content source.
Portlets that were crawled in the portal before the upgrade, but do not exist in the upgraded portal, are not returned by a search.
Export a search collection
To export a search collection and its data:
- Verify the portal application process has write access to the target directory.
- Make sure that the target directory is empty or contains no file that you still need, as the export can overwrite files is that directory.
- Locate the search collection to export.
- Click the Import or Export Collection icon next to the search collection in the list.
Manage Search displays the Import and Export Search Collection panel.
- In the entry field...
-
Specify Location (full path with XML extension):
...type the full directory path and XML file name to which to export the search collection and its data. Document the names of the collections and the directory locations and target file names to which you export the collections for the import that follows.
When we specify the target directory location for the export, be aware that the export can overwrite files is that directory.
- Click Export to export the search collection data.
Manage Search writes the complete search collection data to an XML file and stores it in the directory location specified. We can use this file later as the source of an import operation to import the search collection into another portal.
- To return to the previous panel without exporting the search collection, click the appropriate link in the bread crumb trail.
Import a search collection
To import the data of a search collection:
- Before importing the collection data, create the empty shell for the search collection by creating a search collection with only the mandatary data entry field Location of Collection filled out.
Do not add content sources or documents, as that will be completed by the import.
- On the search collection list locate the search collection into which to import the search collection data.
- Click the Import or Export icon next to the search collection in the list. Manage Search displays the Import and Export Search Collection panel.
- In the entry field...
-
Specify Location (full path with XML extension):
...type the full directory path and XML file name of the search collection data which to import into the selected search collection.
- Click Import to import the search collection data. Manage Search imports the complete search collection data from the specified XML file into the selected search collection.
- To return to the previous panel without importing a search collection, click the appropriate link in the bread crumb trail.
- If required, we can now add content sources and documents to the search collection.
When importing a collection, be aware of the following:
- Import collection data only into an empty collection.
Do not import collection data into a target collection that has content sources or documents already.
- When you import collection data into a collection, all collection settings are overwritten by possibly imported settings.
For example, the language setting is overwritten, or a summarizer is added, if it was specified for the imported search collection.
- When you import a collection, a background process fetches, crawls, and indexes all documents that are listed by URL in the previously exported file.
This process is asynchronous. It can therefore take considerable time until the documents become available.
- When you import a collection containing a portal site content source created in a previous version of WebSphere Portal, you need to regather the portal content by deleting the existing portal site content source, creating a new portal site content source, and starting a crawl on it.
Refresh collection data
Refreshing search collection data updates the collection by renewed crawling of all associated content sources.
To refresh a search collection, click the icon...
-
Regather documents from Content Source
Manage Search performs complete new crawls over all its content sources. To verify progress and completion of the regathering, click the collection and view the Collection Status information.
This might require a considerable amount of system resources, as all content sources of the search collection are crawled at the same time.
Delete a search collection
To delete a search collection:
- Click the Delete icon for the search collection which to delete.
- Confirto delete the search collection by clicking OK. Manage Search deletes the search collection and removes it from the list. If you do not want to delete the collection, click Cancel.
If you delete the search collection before an upgrade to a higher version of WebSphere Portal, make sure you export the search collection for later import before you delete it.
Manage the content sources of a search collection
To work with the content sources of a search collection, click the collection name in the list of search collections. Manage Search lists the Content Sources and the Search collection status information of the selected search collection.
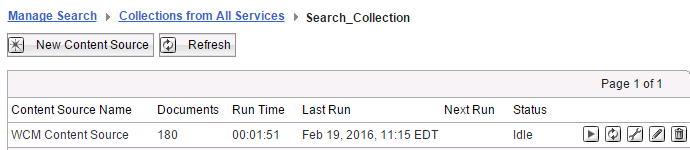
A search collection can be configured to cover more than one content source. The list shows the following information for the listed content sources:
- The name of the content source
- Status information for the content source
- The icons for performing tasks on the content sources.
From the Content Sources panel, we can select the following options or icons and perform the following tasks on content sources:
- Search collection
- New Content Source
- Refresh.
- View the status information for the content source:
Documents The number of documents in the content source. If you click the Refresh button during a crawl, this shows how many documents the crawler has fetched so far from the content source. Run Time The Run Time of the last crawler run on the content sources. If you click the Refresh button during a crawl, this shows how much time the crawler has used so far to crawl the content source. Last Run The date and time when the Last Run started by which the content source was crawled. Next Run The date and time of the Next Run by which the content source will be crawled, if scheduled. Status The Status of the content sources that is, whether the content source is idle or a crawl is currently Running on the content source. - Select one of the icons for a specific content source and perform one of the following tasks:
- View Content Source Schedulers.
This icon is displayed only if we defined scheduled crawls for this content source. If you click this icon, the portlet lists the scheduled crawls, together with the following information:
- Start Date
- Start Time
- Repeat Interval
- Next Run Date
- Next Run Time
- Status. This can be disabled or enabled. We can click the link to toggle between enabling and disabling the scheduler.
- Start Crawler.
Click this icon to start a crawl on the content source. This updates the contents of the content source by a new run of the crawler. While a crawl on the content source is running, the icon changes to Stop Crawler. Click this icon to stop the crawl. Portal Search refreshes different content sources as follows:
- For website content sources, documents that were indexed before and still exist in the content source are updated. Documents that were indexed before, but no longer exist in the content source are retained in the search collection. Documents that are new in the content source are indexed and added to the collection.
- For WebSphere Portal sites, the crawl adds all pages and portlets of the portal to the content source. It deletes portlets and static pages from the content source that were removed from the portal. The crawl works similarly to the option...'
-
Regather documents from Content Source
- For IBM Web Content Manager sites , Portal Search uses an incremental crawling method. Additionally to added and updated content, the Seedlist explicitly specifies deleted content. In contrast, clicking...
-
Regather documents from Content Source
...starts a full crawl; it does not continue from the last session, and it is therefore not incremental.
- For content sources created with the Seedlist provider option, a crawl on a remote system that supports incremental crawling, such as IBM Connections, behaves like a crawl on a Web Content Manager site.
- For website content sources, documents that were indexed before and still exist in the content source are updated. Documents that were indexed before, but no longer exist in the content source are retained in the search collection. Documents that are new in the content source are indexed and added to the collection.
- Regather documents from Content Source.
Deletes all existing documents in the content source from previous crawls and then starts a full crawl on the content source. Documents that were indexed before and still exist in the content source are updated. Documents that were indexed before, but no longer exist in the content source are removed from the collection. Documents that are new in the content source are indexed and added to the collection.
- Verify Address of Content Source.
Click this icon to verify the URL of the content source is still live and available. Manage Search returns a message about the status of the content source.
- Edit Content Source.
Click this icon to make changes to a content source. This includes configuring parameters, schedules, and filters for the selected content source.
- It is of benefit to define a dedicated crawler user ID. The pre-configured default portal site search uses the default administrator user ID wpsadmin with the default password on that user ID for the crawler. If you changed the default administrator user ID during the portal installation, the crawler user that default user ID. If you have made changes to the user ID or password for the admin user ID and still want to use that user ID for the Portal Search crawler, you need to adapt the settings here accordingly.
To define a crawler user ID, select the Security tab, and update the user ID and password. Click Save to save the updates.
- If you modify a content source that belongs to a search scope, update the scope manually to verify the scope still covers that content source. Especially if you changed the name of the content source, edit the scope and make sure that it is still listed there. If not, add it again.
- It is of benefit to define a dedicated crawler user ID. The pre-configured default portal site search uses the default administrator user ID wpsadmin with the default password on that user ID for the crawler. If you changed the default administrator user ID during the portal installation, the crawler user that default user ID. If you have made changes to the user ID or password for the admin user ID and still want to use that user ID for the Portal Search crawler, you need to adapt the settings here accordingly.
- Delete Content Source. Click this icon to delete the selected content source.
If you delete a content source, the documents collected from the content source will remain available for search by users under all scopes which included the content source before it was deleted. These documents will be available until their expiration time ends. We can specify this expiration time under Links expire after (days): under General Parameters when you create the content source.
- View Content Source Schedulers.
On the same panel we can also view the status of the search collection.
Add a new content source
When creating a new content source for a search collections that content source will be crawled, and the search collection will be populated with documents from that content source. We can determine where the index will crawl and what kind of information it will fetch.
- Click New Content Source in the Content Sources panel.
Manage Search displays the panel named Create a New Content Source. The title bar also shows the search collection for which you create the content source.
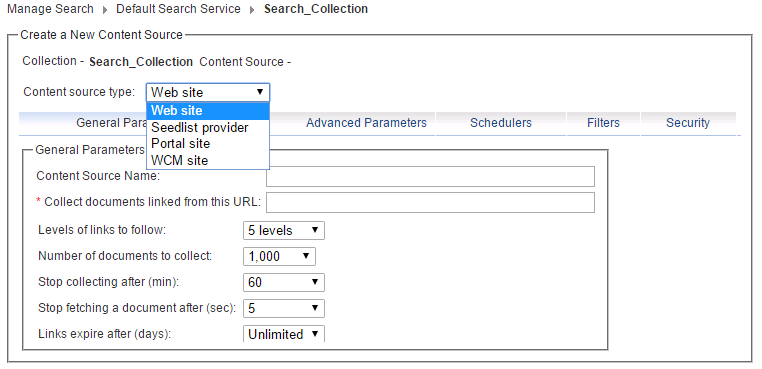
- Select the type of the content source to create from the pull-down list:
Web site Use for all remote sites. This includes websites and remote portal sites. Note that only anonymous pages can be indexed and searched on remote portal sites. Seedlist provider Use if the crawler will use a seedlist as the content source for the collection. Portal site Use if the content source is the local portal site. WCM site Create content in the authoring portlet. Make it searchable and specify the search collection to which it belongs. When Managed Web Content site is complete, it will be listed among the content sources for the search collection specified. Your selection determines some of the entry fields and options available for creating the content source.
For example, the option Obey Robots.txt under the tab Advanced Parameters is available only if we select Website as the content source type.
- Select the tabs to configure various types of parameters of the content source:
- Set the General Parameters
- Set the Advanced Parameters
- Configure the Scheduler
- Configure the Filters
- Configure Security
- After setting all required parameters, click Create to create the new content source with the parameters you have selected.
Click Cancel if you do not want to create a new content source and save the updates.
- Manage Search takes you back to the main panel. If you clicked Create, it displays the new content source in the content source list. It shows the content source under the name that you gave the content source, or, if you specified no name, under its URL.
Set the general parameters for a content source
To set the general parameters for the content source, proceed by filling in the entry fields and making the selections in the Create a New Content Source box. The available fields and options differ, depending on the type of content source that we select. They are listed in the following. Data entry fields marked with a red asterisk ( * ) are mandatary.
- Click the General Parameters tab.
- Content Source Name:
Enter the name for the content source.
- Collect documents linked from this URL:
Type the required web URL or portal URL in this entry field. This determines the root URL from which the crawler starts. This field is mandatary. For portal content sources, the value for this field is filled in by Manage Search.
- For websites, type the full name including http://.
For example: http://www.cnn.com. Typing only www.cnn.com will result in an error.
- A crawler failure can be caused by URL redirection problems. If this occurs, try by editing this field accordingly, for example, by changing the URL to the redirected URL.
- For websites, type the full name including http://.
- Make the selection from the following options by selecting from the drop-down lists. The available fields and options differ, depending on the type of content source selected.
- Levels of links to follow:
- For crawling websites: This determines the crawling depththat is the maximum number of levels of nested links which the crawler will follow from the root URL while crawling.
- Number of linked documents to collect:
- For crawling websites: This determines the maximum number of documents that will be indexed by the crawler during each crawling session. The number of indexed documents includes documents that are re-indexed as their content has changed.
- Stop collecting after (minutes):
- This sets the maximum number of minutes the crawler may run in a single session for websites.
The timeout set here works as a approximate time limit. It might be exceeded by some percentage. Therefore allow some tolerance.
- Stop fetching document after (seconds):
- This indicates the time that the crawler spends trying to fetch a document. This sets the maximum time limit in seconds for completing the initial phase of the HTTP connections that is for receiving the HTTP headers. This time limit must be finite as it is used to prevent the crawler from getting stuck infinitely on a bad connection. However, it allows the crawler to fetch large files which take a long time to fetch, for example ZIP files.
- Click the next tab to set more parameters for the content source.
Set the advanced parameters for a content source
To set the advanced parameters for the content source in the Create a New Content Source box:
- Click the Advanced Parameters tab.
- Make the selection from the following options by selecting from the drop-down lists, marking the check boxes, or entering data as required:
- Number of parallel processes:
- This determines the number of threads the crawler uses in a crawling session.
- Default character encoding:
- This sets the default character sethat the crawler uses if it cannot determine the character set of a document. The entry field for the Default character encoding contains the initial default value windows-1252, regardless of the setting for the Default Portal Language under...
-
Administration > Portal Settings > Global Settings
Enter the required default character encoding, depending on the portal language. Otherwise documents might be displayed incorrectly under Browse Documents.
- Always use default character encoding:
- If you check this option, the crawler always uses the default character set, regardless of the document character set. If you do not check this option, the crawler tries to determine the character sets of the documents.
- Obey Robots.txt
- If we select this option, the crawler observes the restrictions specified in the file robots.txt when accessing URLs for documents. This option is only available for content sources of type website. This option is not available with Portal site, or Seedlist provider.
- Proxy server: and Port:
- The HTTP proxy server and port used by the crawler. If you leave this value empty, the crawler does not use a proxy server.
- Click the next tab to set more parameters for the content source.
Configure the Scheduler
To configure the schedule, click the Scheduler tab. The Scheduler shows two boxes:
- Define Schedule. Use this box to add a new schedule.
- Scheduled Updates. This box shows a schedule at which crawls are performed.
We can perform the following tasks with the Scheduler:
- Add the scheduler
- If the scheduler has not been defined yet, we can add it. To add the scheduler in the Define
Schedule box:
- From the From: and At: drop-down menus, select the date and time when you want the crawler to run.
- Under Update every: specify the interval at which you want the crawler to run.
Type the number of time units and select the type of time unit, for example 2 and week(s) for a bi-weekly schedule.
- Click the Create icon in the Define Schedule box.
The scheduler shows the newly created schedule in the Scheduled Updates box.
The time interval between the crawler runs must be more than the maximum crawler execution time. The reason is that a crawler cannot be executed if it is currently running. If a crawler job is started while the crawler is running, this execution is ignored, and the crawler is only executed at the next scheduled time, provided that it is not running already.
- From the From: and At: drop-down menus, select the date and time when you want the crawler to run.
- Delete the scheduler
- To delete a schedule:
- Select the schedule which to delete from the Scheduled Updates box.
- Click Delete. The Scheduler prompts you to confirm the deletion.
- Confirto delete the schedule by clicking OK.
The Scheduler removes the schedule from the list.
- Select the schedule which to delete from the Scheduled Updates box.
After you have configured the scheduler, click the next tab to set more parameters for the content source.
Configure the Filters
The crawler filters control the crawler progress and the type of documents that are indexed and cataloged. To configure filters, click the Filters tab. We can define new filters in the Define Filter Rules box. The defined filters are listed in the Filtering Rules box.
Crawler filters are divided into the following two types:
- URL filters
- They control which documents are crawled and indexed, based on the URL where the documents are found.
- Type filters
- They control which documents are crawled and indexed, based on the document type.
If we define no filters at all, all documents from a content source will be fetched and crawled. If we define include filters, only those documents which pass the include filters are crawled and indexed. If we define exclude filters, they override the include filters, or, if we define no include filters, they limit the number of documents that are crawled and indexed. More specifically, if a document passes one of the include filters, but also passes one of the exclude filters, it is not crawled, indexed, or cataloged.
We can perform the following tasks with the Filters box:
- Create a filter
- To add a new filter:
- Enter the filter name in the entry field Rule name:.
- Make the required selection from the following radio button options:
- Apply rule while: Collecting
documents or Adding documents to index
- Rule type: Include or Exclude
- Rule basis: URL text or File Type.
- Apply rule while: Collecting
documents or Adding documents to index
- This step depends on the selection for the rule basis in the previous step:
- If we selected URL text as filter body type, enter the URL filter, for example */hr/*.
- If we selected File Type as filter body type, select the required document type from the pull-down list.
When we use the option Apply rule while Collecting documents with Rule type: Include, verify the URL in the field Collect documents linked from this URL: fits the specified rule; otherwise no documents will be collected. For instance, crawling the URL http://www.ibm.com/products with the URL filter */products/* will not give any results, because the rule has a trailing slash, but the URL does not. But either crawling http://www.ibm.com/products/ with the URL filter */products/* (both with trailing slash) or crawling http://www.ibm.com/products with the URL filter */products* (no trailing slash) will work.
- If we selected URL text as filter body type, enter the URL filter, for example */hr/*.
- Click the Create icon in the Define Filter
Rules box. The new filter appears in the appropriate list of filters.
The filters are listed in separate boxes, depending on whether the filter was created as an include or exclude filter, and whether it was defined for crawling or indexing.
- Continue adding the filterm that you need.
- To delete a filter from the list, select that filter, and click Delete.
After you have configured the filters, click the next tab to set more parameters for the content source.
- Enter the filter name in the entry field Rule name:.
- Delete a filter
- To delete a filter from the list:
- Select the filter which to delete from the list.
- Click Delete. You get a prompt to confirm
the deletion.
- Confirto delete the filter by clicking OK. The filter is removed from the list.
- Select the filter which to delete from the list.
After you have configured the filters, click the next tab to set more parameters for the content source.
Configure security for a content source
Configure the security for indexing secured content sources and repositories that require authentication. To configure the security for a content source, click the Security tab. Manage Search shows two boxes:
- Define Security Realm. Use this box to add new secured content sources.
- Security realms. This box shows a list of existing security realms.
In the Define Security Realm box enter the following data entry fields:
- User Name. Enter the user ID with by which the crawler can access the secured content source or repository.
- Password. Enter the password for the user ID that you filled in under User Name.
- Host name. Enter the name of the server.
For Portal sites and Seedlist providers this is not required. If you leave it blank, the host name is inferred from the provided root URL.
- Realm. Enter the realm of the secured content source or repository.
After you have filled in all required data, click the Create icon in the Define Security Realm box. The list in the Security Realms box now shows the security realm which you configured for the content source.
After you have configured security, click another tab to set more parameters for the content source. If you have set all required parameters and made all required updates, click Create to create the new content source with the parameters you have selected.
Complete the creation of a content source
- After setting all required parameters and made all required updates, click Create in the Manage Search portlet. This creates the new content source with the parameters you have selected. Click Cancel if you do not want to create a new content source and save the updates.
- Manage Search takes you back to the main panel. If you clicked Create, it displays the new content source in the content source list. It shows the content source under the name that you gave the content source, or, if you specified no name, under its URL.
Edit a content source
To edit a content source...
- Click Edit Content Source for the content source to edit. Manage Search opens the Edit Content Source Configuration box. It looks just like the Create a New Content Source box, but shows the configuration data that you entered when creating the content source.
- Update the parameter options as required.
- When you have made all the updates, click Save.
Manage Search returns to the previous panel. All updates you made are now enabled.
- To return without saving the updates, click Cancel.
If you modify a content source that belongs to a search scope, update the scope manually to verify the scope still coverthat content source. Especially if you changed the name of the content source, edit the scope and make sure that it is still listed there. If not, add it again.
Delete a content source
To delete a content source...
- Click Delete Content Source for the content source to delete. You get a prompt to confirm the deletion.
- Confirto delete the content source by clicking OK. The content source is removed from the content source list.
Documents that were collected from this content source will remain available for search by users under all scopes which included the content source before it was deleted.
Start to collect documents from a content source
We can start an update from a content source manually. To do this...
- Click Start Crawler for the content source for which to start the update. This updates the contents of the content source by a new run of the crawler. It fetches the documents from this content source. If they are new or modified, they are updated in the search collection. While a crawl on the content source is running, the icon changes to Stop Crawler.
Click this icon to stop the crawl. Portal Search refreshes different content sources as follows:
- For website content sources, documents that were indexed before and still exist in the content source are updated. Documents that were indexed before, but no longer exist in the content source are retained in the search collection. Documents that are new in the content source are indexed and added to the collection.
- For WebSphere Portal sites , the crawl adds all pages and portlets of the portal to the content source. It deletes portlets and static pages from the content source that were removed from the portal. The crawl works similarly to the option...
-
Regather documents from Content Source
- For IBM Web Content Manager sites, Portal Search uses an incremental crawling method. Additionally to added and updated content, the Seedlist explicitly specifies deleted content. In contrast, clicking Regather documents from Content Source starts a full crawl; it does not continue from the last session, and it is therefore not incremental.
- For content sources created with the Seedlist provider option, a crawl on a remote system that supports incremental crawling, such as IBM Connections, behaves like a crawl on a Web Content Manager site.
- To view the updated status information about the progress of the crawl process, click Refresh. The following status information is updated:
- Documents
- Shows how many documents the crawler has fetched so far from the selected content source.
- Run time
- Shows how much time the crawler has used so far to crawl the content source.
- Status
- Shows whether the crawler for the content source is running or idle.
To update the status information, click the Refresh icon.
We can also stop a running update of a content source manually. To do this...
- Locate the content source for which to stop the update from the content sources list. Make sure we select a content source for which the status information shows Running.
- Click Stop Collecting for that content source. This stops the crawl.
Verify the address of a content source
Use the option Verify Address to verify the URL address of a selected content source.
Locate the content source which to verify and click Verify Address for that content source. If the web content source is available and not blocked by a robots.txt file, Manage Search returns the message Content Source is OK. If the content source is invalid, inaccessible, or blocked, Manage Search returns an error message.
When creating a new content source, Manage Search invokes the Verify Address feature.
Search Scopes and Custom Links
Search Scopes allows us to view and manage search scopes and custom links. The search scopes are displayed to users as search options in the drop-down list of the search box in the banner and in the Search Center portlet. Users can select the scope relevant for their search queries. Configure scopes by one of the following:
- One or more search locations (content sources).
- Document features or characteristics, such as the document type.
WebSphere Portal is shipped with these scopes:
- All Sources
- This includes documents with all features from all content sources in the search by a user.
- Managed Web Content
- This restricts the search to sites created by WCM.
We can add our own custom search scopes. We can add an icon to each scope. Users will see this icon for the scope in the pull-down selection list of scopes.
We can also add new custom links to search locations. This includes links to external web locations, such as Google or Yahoo. The Search Center global search lists the custom links for users in the selection menu of search options.
Manage Search Scopes and Custom Links
To manage search scopes and custom links, click Search Scopes. Manage Search shows the Search Scopes and Custom Links panel. It lists the search scopes and custom links and related information:
- For search scopes:
- The name of the search scope
- The description of the search scope
- The status of the search scope, for example, whether it is active and available to users for selection
- The icons for performing tasks on the scopes.
- For custom links:
- The name of the custom link
- The URL for the custom link
- The status of the custom link, for example, whether it is active and available to users for their searches
- The icons for performing tasks on the custom links.
Select the following options or icons and perform the following tasks on search scopes and custom links:
- New Scope. Click this option to create a new search scope.
- Refresh.
Refresh the list of search scopes. updates the information for the scopes, for example, the status of scopes, or updates that another administrator might have made on scopes.
- Move Down and Move Up arrows.
Click these arrows in the list to move search scopes up and down in the list. This determines the sequence by which the scopes are listed in the drop-down menu from which users select search options for their searches with the Search Center portlet.
- Edit Search Scope.
- Delete Search Scope.
- New Custom Link. Click this option to add a new custom link.
- Edit Custom Link. Click this icon to work with a custom link or modify it.
- Delete Custom Link.
Users have to clear their browser cache for the changes to take effect, for example for a new scope to be available, or for the new default scope to be shown in the correct position.
Create a new search scope
To create a new search scope, click the New Scope button. Manage Search displays the New Search Scope page. Enter the required data in the fields and select from the available options:
- Scope Name:
- Name must be unique within the current portal or virtual portal. Mandatory.
- Description:
- If required, enter a description for the search scope.
- Custom Icon URL:
- Enter the URL location where the portal can locate the scope icon to display with the search options for users. If the icon file exists in the default icon directory wps/images/icons, you only need to type the icon file name. If the icon file is located in a different directory path, type the absolute file path with the file name. Click Check icon path to ensure that the icon is available at the URL you specified.
- Status:
- Set the status of the search scope as you require. To make the scope available to users, set the status to Active.
- Visible to anonymous users:
- Select Yes to make the search scope available to users who use the portal without logging in. Select No to make the scope available to authenticated users only.
- Query text (optional):
- Enter a query text. This query text will be invisibly appended to all searches in this scope. Search by users will return results that match both the user search and the query text that you enter in this field. Both sets of results will be weighted with the same relevance in the result list. The query text that you enter must conform to the syntax rules of entering a query in the Search Center. For more details about these query syntax rules refer to the Search Center portlet help.
- Select Features
-
- Click this button to select document features. Manage Search displays the Add Feature page.
- Select the feature(s) as required. These features will be applied as additional filters when users select this scope for their search.
- After completing selecting features, click OK to save these features to the new search scope. To return without saving, click Cancel.
- Click this button to select document features. Manage Search displays the Add Feature page.
- Select Locations
-
- Click this button to select document locations. Manage Search displays the Add Locations page.
- Select the location(s) as required. Only documents from these search locations or content sources will be searched when users select this scope for their search.
- After completing selecting locations, click OK to save them to the new search scope. To return without saving, click Cancel.
The location tree will also show content sources that have been deleted if they still contain documents in the collection. After a deleted content source has no documents, the cleanup daemon will remove it from the location tree.
- Click this button to select document locations. Manage Search displays the Add Locations page.
To set names and descriptions for the search scope create and save the scope first. Then locate the scope on the scopes list, and edit the scope by clicking the Edit ion. The option for setting names and descriptions in other locales is available only on the Edit Search Scope page.
If you modify a content source that belongs to a search scope, update the scope manually to verify the scope still coverthat content source. Especially if you changed the name of the content source, edit the scope and make sure that it is still listed there. If not, add it again.
Edit a search scope
To edit a search scope, locate that scope in the list and click the Edit icon for that scope. Manage Search displays the Edit Search Scope page. Update the scope data and select from the available options as required:
- Scope name
- Update the name for the search scope. The name must be unique within the current portal or virtual portal.
- I want to set names and descriptions.
- Click this link to set names and descriptions for other locales.
For the other data entry fields and options, proceed as described under Create a new search scope.
Delete a search scope
To delete a search scope, locate that scope in the list and click the Delete icon for that scope. When the confirmation prompt appears, confirm by clicking OK, or click Cancel to return without deleting the search scope.
Add a new custom link
We can add Custom Links to allow users to do direct searches to popular web search engines, such as Google or Yahoo. To add a new custom link, click the button New Custom Link. Manage Search displays the New Custom Link page. Enter the required data in the fields and select from the available options:
- Status
- Set the status of the custom link as required. To make the link available to users, set the status to active.
- Custom link name:
- Name must be unique within the current portal or virtual portal. Mandatary.
- Link URL:
- Enter the URL to the target web search engine for the new custom link. This field is mandatary. Be careful to use the correct format for the URL, as the user queries are appended to the URL. For the correct web interface syntax refer to the help documentation of the target search engine. In some cases it might be possible to determine the web interface syntax as follows:
- Perform a search with some distinctive search text on the target search engine, for example, an unusual name.
- Review the browser URL field and locate the search string. The part of the URL that precedes the search string is likely to be the Link URL for the target search engine.
- If the search string is not at the end of the URL, it might be helpful to edit the URL and experiment with different versions with a search string added.
Examples for web interface syntax are:
- For Google: http://www.google.com/search?&q=
- For Yahoo: http://search.yahoo.com/search?p=
- Perform a search with some distinctive search text on the target search engine, for example, an unusual name.
- Custom icon URL:
- Enter the URL location where the portal can find the icon to display with the new custom link. Click Check icon path to ensure that the icon is available at the URL you specified.
After completing the data entry and selected the options as required, click OK to save the new custom link. To return without saving, click Cancel.
To set names and descriptions for the custom link create and save the link first. Then locate the custom link on the list, and edit the link by clicking the Edit icon. The option for setting names and descriptions in other locales is available only on the Edit Custom Link page.
Edit a custom link
To edit a custom link, locate that custom link in the list and click the Edit icon. Manage Search displays the Edit Custom Link page. Update the custom link data and select from the available options as required. To set names for other locales, click I want to set names.
Delete a custom link
To delete a custom link, locate that link in the list and click the Delete icon. When the confirmation prompt appears, confirm by clicking OK, or click Cancel to return without deleting the link.
OmniFind
If when creating crawler in OmniFind for IBM WCM, you get error...
-
FFQD5310E. An error occurred while downloading portal seed list url . Explanation: The crawler could not download the seed list using the specified URL.
Make sure ESRemotePAC servlet is available
-
https://portal_server:port/ESRemotePAC/RemotePACServlet
Parent: Work with the search portlets
Related:
Search Center