WebSphere Lombardi Edition 7.2 > Manage the Process Center repository
Manage process applications
The following topics describe how to create, clone, import, and perform other maintenance tasks for process applications.
Before performing any of the following tasks, you should:
- Start Lombardi Authoring Environment and open the appropriate view as explained in Start Lombardi Authoring Environment.
- To create and import process applications, you must have access to the Process Center repository. See Manage access to the Process Center repository for more information.
Create new process applications in the Process Center Console
- Select the Process Apps tab.
-
Click the Create New Process App option shown in the following image:

-
In the Create New Process App dialog, enter a name and an acronym for your process application.
The acronym for a process application must be unique and is limited to seven characters. Lombardi uses the acronym as an identifier for this process application and the library items that it contains. For example, when manipulating the items within the process application using the Lombardi JavaScript API, you can use the acronym to specify the namespace of the items.
Providing a description is optional. When you enter a description, you can view it in the Process Center Console by clicking the question mark next to the process application name.
-
To create library items in the process application or perform other edits, click the Open in Designer option shown in the following image:

To take advantage of workspaces in this process application,
Cloning process applications in the Process Center Console
- Select the Process Apps tab.
- In the list of process applications, click on the process application that you want to clone.
-
Click the Clone option next to the snapshot that you want to use as the basis for your new process application as shown in the following image:
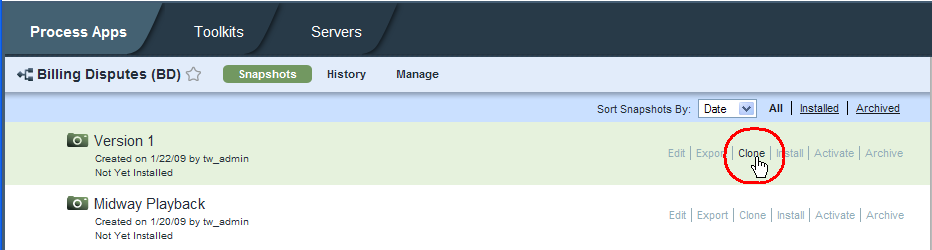
The Process Center Console opens the Process Apps tab and displays the cloned application with COPY added to the end of the original name and the number 2 added to the end of the original acronym.
To change the name and acronym of the cloned application, click the application to open it, click the Manage option, and then edit the text in the appropriate fields.
To create library items in the process application or perform other edits, click the Open in Designer option.
To take advantage of workspaces in this process application.
Copying or moving library items from one process application to another in the Designer view
You can copy or move library items to an existing or new process application
Archiving process applications in the Process Center Console
If a process application is no longer used, you can archive it. When
you archive a process application, it no longer appears in the list of all
process applications in the Process Center Console and you must restore it
before you can open it in the Designer view.
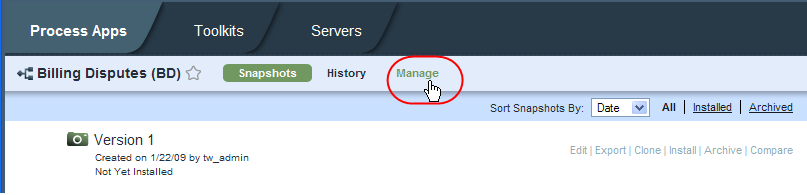
- Select the Process Apps tab.
- In the list of process applications, click on the process application that you want to archive.
-
Click the Manage option shown in the following image:
-
Click the Archive Process App option as shown in the following image:

- When prompted, click the Archive button to confirm that you want to archive this process application.
-
To view or restore archived process applications, click the Archived filter in the Process Apps tab as shown in the following image:

Import and export process applications from the Process Center Console
You can import process applications from other Process Center repositories and you can also export process applications.
To import process applications:
- Select the Process Apps tab.
-
Click the Import Process App option shown in the following image:

-
In the Import Process App dialog, click the Browse button to locate the Lombardi export (.twx) file that you want to import.
Process applications that you import should have unique acronyms. If an acronym is not unique, import completes with a warning, but attempts to install snapshots of the process application on test and productions servers will fail with an error.
-
Click the Next button to import the selected .twx file.
In the Import Process App dialog, click to expand the sections that show the snapshots that will be imported and the snapshots that are already available (and will not be imported).
-
Click the Import button.
When the import is complete, the imported process application is included in the list in the Process Apps tab. You can grant access to other users
Repository administrators can see a log of all imports by clicking the Admin option at the top-right of the Process Center Console and then clicking Import and Export Log.
To export process applications:
- Select the Process Apps tab.
- In the list of process applications, click on the application that you want to export.
-
Find the snapshot that you want to export.
If a snapshot does not exist, create one by clicking Create New Snapshot as shown in the following image:

-
Click the Export option for the snapshot as shown in the following image:

-
Locate the directory to which you want to save the export (.twx) file, name the file, and then save it.
The exported file can be imported into any Process Center repository.
Repository administrators can see a log of all exports by clicking the Admin option at the top-right of the Process Center Console and then clicking Import and Export Log.
Parent topic: Manage the Process Center repository