WebSphere Lombardi Edition 7.2 > Modeling processes > Advanced modeling tasks > Build services
Build a Rule service
Build a Rule service when the actions that should take place in your process depend upon one or more conditions. A Rule service enables you to make variable assignments based on potential values of other variables. For example, if an employee holds the position of Director and submits a meal expense for more than $250, then you could set a variable such as approvalRequired to true. With a Rule service, you can set several variables to different values when conditions that you express as rules are met. The actions that take place when a condition evaluates to true are defined using a JavaScript expression, which provides a great deal of flexibility in your implementation.
Rules services are often lower-level, nested services that handle the background tasks necessary to the successful completion of the overall process.
When building Rule services, be aware of the following:
- Each row in the Rule Conditions table represents a Boolean condition that will evaluate to true or false at run time. The condition is only evaluated true if the values of all the associated variables produce matches with the provided values.
- The – value in a variable field indicates that any variable value is considered a match.
- When a rule evaluates to true, the JavaScript expression that you provide as the action is executed. This expression may contain any valid JavaScript.
- A rule only executes the JavaScript expression once per a rule, using the JavaScript expression associated with the first condition that evaluates to true.
When building Rule services, you should:
- Build your rule hierarchy so that rule conditions are ordered from most complex to least complex.
- Create a final condition that is a catch-all rule. Doing so is necessary if you cannot guarantee that the variable that you want to modify in the rule will be set prior to the running process triggering the Rule service.
- Consider encapsulating rules in a single-function Rule service, allowing the service to be available to any other part of the process application that needs the same rule logic.
IBM WebSphere Lombardi Edition integrates with IBM WebSphere ILOG JRules by providing a JRules Decision Service component. This rule component enables you to use rule applications available on a JRules Rule Execution Server for your Lombardi implementations. See Use JRules decision services for more information.
The following steps describe how to build a sample Rule service. The
service in the sample is used to determine whether approval is required for
certain employee expenses and it is a single-function Rule that can be called
from any other service.
- Open the process application that contains the BPD that you created by following the steps in Basic modeling tasks.
- Create the appropriate service type
- Drag a Rule Script component from the palette to the service diagram.
- Click the Variables tab.
- Click the Add Input button so that the service can receive the variables to act upon. (In this sample, we input the private variable, request, originally created in Add process variables to a BPD.)
- Replace Untitled1 in the Name field with request.
-
Click the Select button next to Variable Type and select the EmployeeReimbursement type from the list of types displayed. (The EmployeeReimbursement variable type is available only if you first implement the steps in Add process variables to a BPD.)
If you use the Activity Wizard to create a Rule service, you can choose existing variables to add as input and output. You should use the Activity Wizard when you start with an existing activity and want to quickly create a service to implement the activity. To access the wizard, right-click an activity and select Activity Wizard from the list of options.
- Click the Add Private button.
- Replace Untitled1 in the Name field with approvalRequired.
- Click the Select button next to Variable Type and select the Boolean type from the list of types displayed. (The Boolean variable type is included in the Lombardi System Data toolkit. The System Data toolkit is included in each process application by default.)
-
Click the Rules tab to open the rules editor as shown in the following image:
- In the rules editor, click the plus sign to add a variable (column) to the first rule (row).
- From the variables displayed, pick the amount variable from the request structure.
- Type >250 as the value.
- In the rules editor, click the plus sign again. Make sure the first rule (row) is selected because you want to add another variable (column) to this rule.
- From the variables displayed, pick the type variable from the request structure.
- Type "director" as the value.
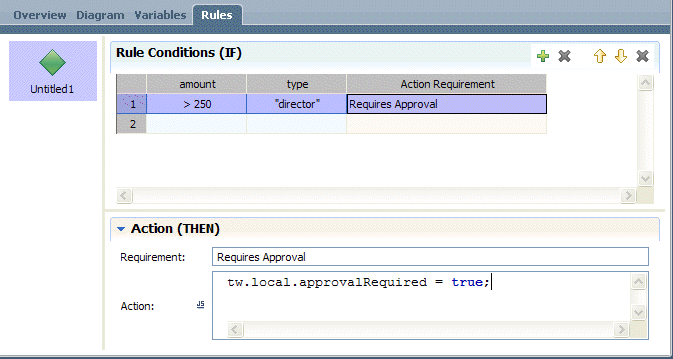
- In the Action Requirement field for the first rule (row), type Requires Approval.
- In the rules editor, click the Action section to expand it.
-
For the Requires Approval requirement, enter the following JavaScript for the Action:
tw.local.approvalRequired = true;
The rules editor should include the rule shown in the following image:
- In the rules editor, click the second row to select it. Create a new rule so that expenses above $60 for employees requires approval.
-
In the rules editor, click the third row to select it. Create your catch-all condition by typing - for both the amount and type.
The - value in a variable field indicates that any variable value is considered a match.
- In the Action Requirement field for the third rule (row), type Auto Approval.
-
In the Action section, enter the following JavaScript for the Auto Approval action:
tw.local.approvalRequired = false;
The rules editor should include the rules shown in the following image:
- Click the Diagram tab.
- Use the Sequence Flow tool to connect the Rule Script component and the Start and End events.
- Name the Rule Script component and save your work.


You can now nest this Rule service in any other service within your process application that requires this logic. Be sure to adjust the input and output variables as required for each implementation. See Declaring and passing variables for more information.
Use the rules editor
The toolbar options in the rules editor perform the following functions:

| Add a new variable (column) or remove the selected variable (column) from the rule. |

| Move the selected rule (row) up or down in the rules table or remove the selected rule (row) from the table. |
Specify variable values in the rules editor
The following samples demonstrate how to specify the value of a variable when using the rules editor:
| Sample | Description |
|---|---|
| “ok” | Matches the exact string ok (no quotes) |
| 1.4 | Matches the exact number 1.4 |
| {“A”, “B”} | Matches either of the strings A or B |
| !{“A”, “B”} | Matches anything except the strings A or B |
| 1..5 | Matches any number between 1 and 5 (inclusive) |
| >3 | Matches any number greater than 3 |
| <3 | Matches any number less than 3 |
| >=3 | Matches any number greater than or equal to 3 |
| <=3 | Matches any number less than or equal to 3 |
| {1,3,5} | Matches 1, 3, or 5 |
| {1,3,5..10} | Matches 1, 3, or any number between 5 and 10 (inclusive) |
| !{1,3,5..10} | Matches any number except 1, 3, or a number between 5 and 10 (inclusive) |
| true | Matches the Boolean value true |
| false | Matches the Boolean value false |
Use JRules decision services
When building a Rules service in Lombardi Authoring Environment, you can include decision services available on an ILOG JRules Rule Execution Server in your implementation. The following procedure describes how to use the JRules Decision Service component to connect to a Rule Execution Server and invoke the rule applications and rule sets available on that server as decision services.
Before using the JRules Decision Service component in your Rules
service, you should be aware of the following requirements:
- Use environment variables to provide the URL of an ILOG Rule Execution Server.
-
For a secure connection to a Rule Execution Server running on WebSphere Application Server, you must provide the SOAP port and, if necessary, the user name and password for the Rule Execution Server. This secure connection enables you to choose the applications and sets that you want from lists of those available on that Rule Execution Server.
If security is enabled for the WebSphere Application Server on which the ILOG JRules Rule Execution Server that you want to access is running, you must configure the Lombardi Process Server. See: Configure access to a secure WebSphere Application Server in the Lombardi Administration Guide.
- If you connect to a Rule Execution Server that is running on WebSphere Application Server, but the Rule Execution Server is not properly configured for security or you are not able to provide the SOAP port, user name, and password, you cannot list the rule applications and rule sets available on that Rule Execution Server. In this case, you can enter the names of the rule applications and rule sets that you want. If the names that you provide are accurate, you can successfully generate types.
- If you connect to a Rule Execution Server that is running on an application server other than WebSphere, you cannot list the rule applications and rule sets available on that Rule Execution Server. In this case, you can enter the names of the rule applications and rule sets that you want. If the names that you provide are accurate, you can successfully generate types.
The following steps describe how to build a Rule service that includes
a JRules Decision Service component:
- Create a Rule service
- Drag a JRules Decision Service component from the palette to the service diagram.
- While the JRules Decision Service component is selected, click the Implementation option in the properties.
-
In the Discovery section, enter the following information to connect to a Rule Execution Server that contains deployed rule applications (Rule Apps) that you want to use.
Server Select the server that you want from the list of environment variables of type ILOG Rules Server. (See Set environment variables for more information.) Soap Port Port for the Simple Object Access Protocol (SOAP) connection if the Rule Execution Server is running on an IBM WebSphere Application Server. User Name User name to use, if necessary, for a secure connection. Password Password to use, if necessary, for a secure connection The SOAP port, user name, and password fields accept embedded JavaScript expressions, so variables can be used to provide those values.
- Click the Connect button.
-
In the Rule section, select the Rule App that you want from the drop-down list and then select the version that you want to use.
Also select the Rule Set that you want and its version.
If a secure connection to the Rule Execution Server has not been established, the drop-down lists are not populated. In this case, enter the name and version of the Rule App and Rule Set that you want. The names must be accurate for the following step to work.
- Click the Generate Types button.
-
In the Generating Types dialog, ensure the Generate request/response wrapper types option is not enabled. (Enabling this option can lead to errors.)
Click the Next button to continue.
- Click the Finish button when type generation is complete.
- Click the Data Mapping option in the properties.
-
Click the auto-map icon in upper right corner of the Input Mapping section.
The Create variables for auto-mapping dialog box opens, showing the private variable(s) needed for input parameters from the selected Rule App.
Click to enable the check box for each variable that you want to create in your Rule service and then click OK.
-
Click the auto-map icon in upper right corner of the Output Mapping section.
The Create variables for auto-mapping dialog box opens, showing the private variable(s) needed for output parameters from the selected Rule App.
Click to enable the check box for each variable that you want to create in your Rule service and then click OK.
- Use sequence lines to connect the JRules Decision Service component to the Start and End Events.
- Save the new Rule service.
You can nest this Rule service in any other service within your process application that requires the same logic. Be sure to adjust the input and output variables as required for each implementation. See Declaring and passing variables for more information.
Parent topic: Build services