WebSphere Lombardi Edition 7.2 > Modeling processes > Advanced modeling tasks > Manage and mapping variables
Declaring and passing variables
Variables for a Business Process Definition (BPD) or service are local variables and as such are only available to the currently executing process
instance or service. Because of this fact, BPD-level variables are not affected
by the services and sub-processes that implement the activities in a BPD unless
you properly declare and then pass the required variables. In general, to
properly declare variables and manipulate variable values throughout the steps
of an entire BPD you need to:
- Declare variables at the BPD level
- Pass those variables as inputs to the sub-processes and services that require them for their implementation
- Pass the variables from sub-process and services back up to the main BPD as outputs when you want the main BPD to be aware of changes made to the variables in the sub-process or services
When passing variables as inputs and outputs, you should:
-
For each sub-process and service, declare variables using the same name (or a similar one) and variable type as the variables that are required from the main BPD.
Because variables are unique to an individual BPD or service, you can use a variable of the same name in a nested BPD or service and there are no conflicts at run time.
This enables the sub-process or service to display and manipulate the values that it receives from or pushes out to the main BPD.
-
Use the Data Mapping tab to set the input and output mapping for each activity in a BPD diagram.
This ensures that the values received and generated by the sub-processes and services that implement the activities map to the variables from the main BPD.
When you use the Activity Wizard to create a service to implement an activity, you can pick the variables from the main BPD to use as input and output. When you do, the Activity Wizard automatically declares the variables for the resulting service and completes the data mapping for the activity. You can use the Activity Wizard to create Human, Rule, and General System services.
The following sections provide instructions for defining basic variables
for a BPD and then passing those variables to a service that implements an
activity in the BPD:
- Declaring variables for a BPD
- Declaring variables for a service
- Mapping input and output data for an activity
- Testing declared variables and data mapping
In addition to the considerations covered by the sections in the preceding list, you also need to be aware of how Lombardi passes a variable.
Passing variables by value or by reference
Whether Lombardi passes a variable by value or by reference is determined by several factors
| From | To | Pass by |
|---|---|---|
| BPD activity | Nested BPD | Value, if simple variable type |
| BPD activity | Nested BPD | Reference, if complex variable type |
| BPD activity | Service | Value |
| Service | Nested service | Value, if simple variable type |
| Service | Nested service | Reference, if complex variable type |
Also, when passing variables, you should be aware of the following:
- If a variable is passed by value, the BPD or service that receives the value can manipulate it and the change does not affect the original value unless the receiving BPD or service returns the variable as an output.
- If a variable is passed by reference, the changes made by the BPD or service that receives the reference do affect the original value, even if the receiving BPD or service does not return the variable as an output.
Because of the way Lombardi handles variables, you should follow these
guidelines:
- If the variable is a simple type, declare the variable as an input and an output in nested BPDs, services, and nested services.
- If the variable is a complex type, you must declare the variable as an input. And, although the output declaration is not required (because complex types are passed by reference), it is a good idea to also declare the variable as an output. This ensures that other developers will be aware that the nested BPD, service, or nested service returns a complex variable.
- Always use an identical name and data type for a set of input and output variables for data that is passed in, processed, and then passed back.
Declaring variables for a BPD
For each BPD that you create, you need to declare variables to capture the business data that is passed from step to step in your process. You can add the following variables to your BPDs:
| Variable | Description |
|---|---|
| Private | Private variables are local variables that are only used within the process. |
| Input | Input variables are mapped to values that you can pass into the current process. |
| Output | Output variables are mapped to values that you can pass out from the current process to a parent process. |
Exposed process values (EPVs) are a special type of variable that you can create to enable end users to set or alter values while instances of a process are running. EPVs allow end users to adjust specific variable values as constants, thereby affecting the flow of running process instances, task assignments, and so on. If EPVs have been created, you can link them to multiple processes and services from the Variables tab in the Designer.
The following steps describe how to declare private variables for a BPD. The variables are basic so that you can easily see how to pass them to a service that implements an activity in the BPD.
- In Lombardi Authoring Environment, create a BPD
- Click the Variables tab in the Designer.
- Click the Add Private button.
-
In the details for the variable, enter employeeId in the Name field.
All variable names should start with a lowercase letter, with subsequent words capitalized like so: myVar. Do not use underscores or spaces in variable names. Variable names are case sensitive.
- In the Documentation text box, you can type a description of the variable.
-
By default, the Is List check box is disabled. For the employeeId variable, leave the check box disabled.
You should enable this check box only when a variable can accept list values (arrays).
-
Click the Select button next to Variable Type and select the Integer type from the list.
Variable types from the System Data Toolkit are listed as well as any custom variable types that you have created or to which you have access via a toolkit. See Create custom variable types for more information.
-
Leave the Has Default check box disabled for the employeeId variable.
In some cases, you should enable this check box and provide a default value. For example, if your process includes logic where a null value for the variable in question is not a valid input at run time. You might also want to establish a default temporarily so that you can test your process and the data flow.
-
Leave the Available in Search check box disabled for the employeeId variable.
Enable this option when you want to include a variable in the business data that end users can view in Lombardi Process Portal. Provide an alias for the data represented by this variable in the Search Alias text box. The alias is the name that is visible to Process Portal users.
If a variable is used in parent and nested processes, use the same search alias if you want search results to include all related processes.
-
Leave the Performance Tracking check box disabled for the employeeId variable.
Enable this option to include the values for this variable in the data that is collected and used for Lombardi reports. For more information, see Tracking Lombardi performance data.
- Repeat steps 3 through 7 to create an additional private variable named employeeTitle of type String.
- Click Save in the main toolbar.
- See the following section to learn how to declare these variables for a service that implements an activity in the BPD.
Declaring variables for a service
Declaring the variables for a service enables the service to display and manipulate the values that it receives from (input) and then pushes back up (output) to the main BPD.
If you use the Activity Wizard to create a service to implement an activity, you can pick the variables from the main BPD to use as input and output. When you do, the Activity Wizard automatically declares the variables for the resulting service and the steps outlined in this section are not necessary. See Build a Human service for an example. You can use the Activity Wizard to create Human, Rule, and General System services.
The following procedure describes how to declare both input and output
variables for a service as a complete example. Depending on the logic of your
BPD, a service may only require input or output variables and not both. And a
service can include private variables for processing that occurs only within
the service and does not involve any other activities in a process.
- In Lombardi Authoring Environment, open the BPD for which you declared variables in the preceding section.
- Drag an activity from the palette to the Participant lane in the BPD diagram.
- While the activity is still selected in the diagram, click the Implementation option in the properties.
-
Click the New button and in the New Human Service dialog, type MyService in the Name text box and then click the Finish button.
The Designer opens the service diagram for the new service.
- Drag a Coach component from the service palette to the diagram and then connect it to the Start and End events using the Sequence Flow tool.
- Click the Variables tab in the Designer.
- Click the Add Input button.
-
In the details for the variable, enter employeeId in the Name field.
-
Click the Select button next to Variable Type and select the Integer type from the list.
- Click the Add Input button.
-
In the details for the variable, enter employeeTitle in the Name field.
- Leave the variable type set to String, the default.
- Click the Add Output button.
-
In the details for the variable, enter employeeId in the Name field.
Click the Select button next to Variable Type and select the Integer type from the list.
- Click the Add Output button.
-
In the details for the variable, enter employeeTitle in the Name field.
Leave the variable type set to String, the default.
- Click Save in the main toolbar.
- Click the Coaches tab and notice that the variables you added are now available in the palette, which enables you to drag them to the Coach to automatically create related controls. (See Build Coaches for more information.)
- See the following section to learn how to map these variables as inputs and outputs to the activity that is implemented by this service.
Mapping input and output data for an activity
The following steps describe how to use the Data Mapping tab to set the input and output data mapping for an activity in a BPD diagram. When developing processes in Lombardi, you must set the input and output mapping for each activity included in a BPD so that the variable values received and generated by the sub-processes and services that implement the activities map to the variables from the main BPD. The following procedure assumes that you are working with the same BPD, activity, and service that you created by following the instructions in the preceding two sections.
If you use the Activity Wizard to create a service to implement an activity, you can pick the variables from the main BPD to use as input and output. When you do, the Activity Wizard automatically maps the input and output data for the resulting service and the steps outlined in this section are not necessary. See Build a Human service for an example. You can use the Activity Wizard to create Human, Rule, and General System services.
The following procedure describes how to map both input and output
data for an activity as a complete example. Depending on the logic of your BPD,
an activity may only require input or output data and not both.
- In Lombardi Authoring Environment, open the BPD that includes the service for which you declared variables in the preceding section.
- Click on the activity in the BPD diagram and then click the Data Mapping tab in the properties.
-
Because you have already declared the variables for the service that implements this activity, the Data Mapping tab displays the variables that are available.
To complete the data mapping, click the auto-map icon in both the Input Mapping and Output mapping sections :
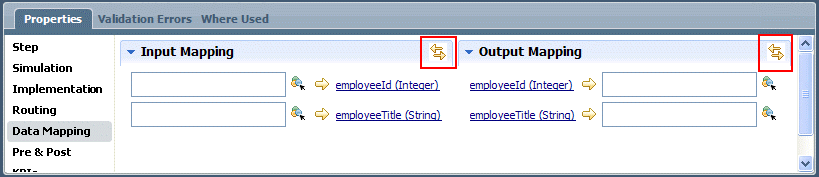
This completes the required data mapping for the activity.
Auto-mapping works only when variable names and types match exactly. As discussed previously, you should always use an identical name and data type for a set of input and output variables that are passed in, processed, and then passed back.
When the mapping is complete, you can see that the input data mapping for this activity is set as follows:
BPD variable Maps to service variable (service that implements activity) tw.local.employeeId employeeID tw.local.employeeTitle employeeTitle And you can see that the output data mapping for this activity is set as follows:
Service variable (service that implements activity) Maps to BPD variable employeeID tw.local.employeeId employeeTitle tw.local.employeeTitle - Save your work.
- See the following section to learn how to test the variables and the mappings you've established.
Testing declared variables and data mapping
To test the variables and data mapping established in the preceding
sections, follow these steps:
- In Lombardi Authoring Environment, open the BPD that includes the activity for which you established data mapping in the preceding section.
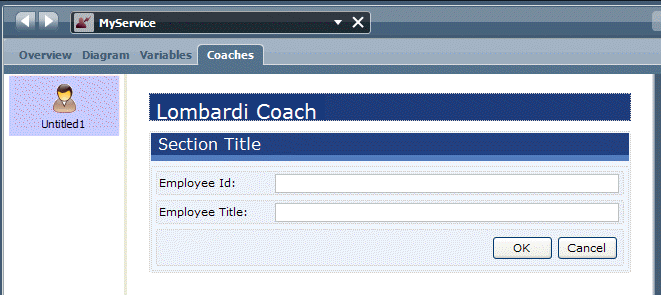
- Open the service named MyService.
- Click the Coaches tab and then click the only Coach listed to display its controls.
- Remove the default controls.
-
Drag the input variables, employeeId and employeeTitle to the Coach form to automatically create controls :
- Open the BPD diagram, drag another activity from the palette to the Participant lane, and place it after the original activity.
- While the new activity is still selected in the diagram, click the Implementation option in the properties.
-
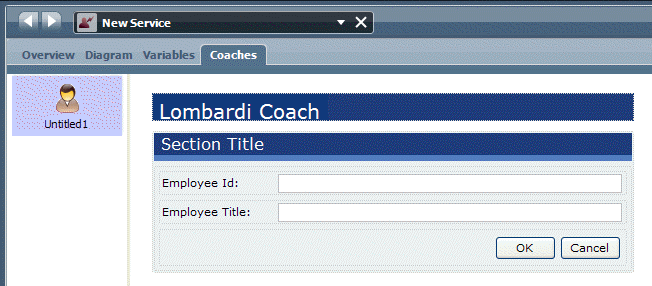
Click the New button and in the New Human Service dialog, type NewService in the Name text box and then click the Finish button.
- Click the Variables tab and add two input variables: employeeId of type Integer and employeeTitle of type String.
- Click the Diagram tab.
- Drag a Coach component from the service palette to the diagram and then connect it to the Start and End events using the Sequence Flow tool.
- Click the Coaches tab and then click the only Coach listed to display its controls.
- Remove the default controls.
-
Drag the input variables, employeeId and employeeTitle to the Coach form to automatically create controls :
- Open the BPD diagram.
- Click the new activity and select the Data Mapping option in the properties.
- Use the auto-map icon to map the BPD variables to the input variables that you declared for NewService (service that implements this activity).
- Select the Sequence Flow tool from the BPD palette and establish the flow from the Start event through the activities and then to the End event.
- Save your work.
-
Click the Run icon in the upper right to run the BPD in the Inspector.
If prompted to switch to the Inspector, click the Yes button.
-
In the Process Instances tab in the Inspector, click the new task and then click the Run task icon :

- When prompted, select the user account that you want to use to run the task. (By default, activities in the Participant lane are assigned to the All Users group, which is why you are prompted to select a user account.)
- When the coach for the first activity in the BPD opens in a browser, type an integer for the Employee ID and a string for the Employee Title and then click the OK button.
-
Click the Refresh icon in the Inspector toolbar as shown in the following image:

The task generated by the second activity is displayed as shown in the preceding image.
- In the Process Instances tab, click the newly received task and then click the Run task icon.
- When prompted, select the user account that you want to use to run the task. (By default, activities in the Participant lane are assigned to the All Users group, which is why you are prompted to select a user account.)
- When the Coach for the second activity in the BPD opens in a browser, verify that the data that you entered into the first coach is displayed and then click the OK button.
-
Click the Refresh icon in the toolbar and you can see that this process instance completed in the Process Instances tab in the Inspector.
By successfully running the BPD, you have verified that the data is passed from the first activity to the second activity, enabling the process to complete.
Parent topic: Manage and mapping variables