VPC: Controlling traffic with ACLs, security groups, and network policies
![]() This information is specific to VPC clusters. For network policy information for classic clusters, see Classic: Controlling traffic with network policies.
This information is specific to VPC clusters. For network policy information for classic clusters, see Classic: Controlling traffic with network policies.
Control traffic to and from the cluster and traffic between pods in the cluster by creating network rules and policies.
Overview
Control traffic to and from the cluster with VPC access control lists (ACLs) and VPC security groups, and control traffic between pods in the cluster with Kubernetes network policies.Comparison of network security options
The following table describes the basic characteristics of each network security option that we can use for the VPC cluster in Red Hat OpenShift on IBM Cloud.| Policy type | Application level | Default behavior | Use case | Limitations |
|---|---|---|---|---|
| VPC security groups | Worker node | VPC Gen 2, version 4.5 and later: The default security groups for the cluster allow incoming traffic requests to the 30000 - 32767 port range on the worker nodes. VPC Gen 2, version 4.4 and earlier: The default security group for your VPC denies all incoming traffic requests to your worker nodes. |
Control inbound and outbound traffic to and from your worker nodes. Rules allow or deny traffic to or from an IP range with specified protocols and ports. | We can add rules to the default security group that is applied to your worker nodes. However, because your worker nodes exist in a service account and are not listed in the VPC infrastructure dashboard, we cannot add more security groups and apply them to your worker nodes. |
| VPC access control lists (ACLs) | VPC subnet | The default ACL for the VPC, allow-all-network-acl-<VPC_ID>, allows all traffic to and from your subnets. | Control inbound and outbound traffic to and from the cluster subnet that you attach the ACL to. Rules allow or deny traffic to or from an IP range with specified protocols and ports. | Cannot be used to control traffic between the clusters that share the same VPC subnets. Instead, we can create Calico policies to isolate the clusters on the private network. |
| Kubernetes network policies | Worker node host endpoint | None | Control traffic within the cluster at the pod level by using pod and namespace labels. Protect pods from internal network traffic, such as isolating app microservices from each other within a namespace or across namespaces. | None |
Do I use ACLs or security groups?
Although we can use either VPC ACLs or VPC security groups to control inbound traffic to and outbound traffic from the cluster, we can simplify your security setup by adding rules to only the default security group for the cluster, and leaving the default ACL for the VPC as-is.Review the following advantages of security groups over ACLs:
- As opposed to ACLs, security group rules are stateful. When you create a rule to allow traffic in one direction, reverse traffic in response to allowed traffic is automatically permitted without the need for another rule. Fewer rules are required to set up your security group than to set up an ACL.
- An ACL must be created for each subnet that the cluster is attached to, but only one security group must be modified for all worker nodes in the cluster.
- ACLs are applied at the level of the VPC subnet. If one cluster uses multiple subnets, rules are required to ensure that the subnets can communicate with each other. If you create multiple clusters that use the same subnets in one VPC, you cannot use ACLs to control traffic between the clusters because they share the same subnets.
Regardless of which security option you choose, be sure to follow the instructions for security groups or ACLs to allow the subnets and ports that are required for necessary traffic to reach the cluster.
To simplify your VPC security setup, configure inbound and outbound rules either only at the security group level or only at the ACL level. If you configure rules in both ACLs for the subnets and in the default security group for the worker nodes, we might inadvertently block the subnets and ports that are required for necessary traffic to reach the cluster.
Controlling traffic with the default security group
Control inbound and outbound traffic to your worker nodes by modifying a VPC security group.Level of application: Worker node
Default behavior: VPC security groups are applied to the network interface of a single virtual server to filter traffic at the hypervisor level. Security group rules are not applied in a particular order. However, requests to your worker nodes are only permitted if the request matches one of the rules that you specify. When you allow traffic in one direction by creating an inbound or outbound rule, responses are also permitted in the opposite direction. Security groups are additive, meaning that if your worker nodes are attached to more than one security group, all rules included in the security groups are applied to the worker nodes.
The default rules of the security group for the cluster differs with the cluster's version.
 VPC Gen 2 clusters that run OpenShift version 4.5 or later:
- The default security group for the VPC is applied to your worker nodes. This security group allows incoming ICMP packets (pings) and incoming traffic from other worker nodes in the cluster.
- Additionally, a unique security group that is named in the format kube-<cluster_ID> is automatically created and applied to the worker nodes for that cluster. This security group allows incoming traffic requests to the 30000 - 32767 port range on the worker nodes, and ensures that all inbound and outbound traffic to the pod subnet is permitted so that worker nodes can communicate with each other across subnets.
- VPC Gen 2 clusters that run OpenShift version 4.4 or earlier: The default security group for the VPC is applied to your
worker nodes. This security group denies all incoming traffic requests to your worker nodes.
Use case: Add inbound and outbound rules to a security group to manage the inbound and outbound traffic to your VPC cluster. The way that you modify the security group differs with the cluster version.
- VPC Gen 2 clusters that run OpenShift version 4.5 or later:
- Modify the default security group that is applied to the entire VPC (not unique to the cluster).
- Do not modify or delete the unique kube-<cluster_ID> security group that is automatically created for the cluster.
- VPC Gen 2 clusters that run OpenShift version 4.4 or earlier: Modify the default security group that is applied to the
entire VPC (not unique to the cluster). You must modify the default security group to allow inbound traffic to the 30000 - 32767 node port range to allow any incoming requests to apps that run on the worker
nodes.
Limitations: Because the worker nodes of our VPC cluster exist in a service account and are not listed in the VPC infrastructure dashboard, we cannot create a security group and apply it to your worker node instances. You can only modify the existing security group that is created for you.
For more information, see the VPC documentation.
Creating security group rules in the console
Use the IBM Cloud console to add inbound and outbound rules to the default security group for the cluster.- From the Virtual private cloud dashboard, click the name of the Default Security Group for the VPC that the cluster is in.
- Click the Rules tab.
- VPC Gen 2 clusters that run OpenShift version 4.4 or earlier only: Add a rule to allow incoming traffic requests through the 30000 - 32767 node port range on the worker nodes.
- In the Inbound rules section, click Create.
- Choose the TCP protocol, enter 30000 for the Port min and 32767 for the Port max, and leave the Any source enter selected.
- Click Save.
- If you require VPC VPN access or classic infrastructure access into this cluster, repeat these steps to add a rule that uses the UDP protocol, 30000 for the Port min, 32767 for the Port max, and the Any source type.
- To create new rules to control inbound traffic to your worker nodes, in the Inbound rules section, click Create. Keep in mind that in addition to any rules that you create, the rules in the following table
are required to allow necessary inbound traffic to the cluster.
Rule purpose Protocol Port or Value Source type Allow all worker nodes in this cluster to communicate with each other. ALL - Security group <SG_name> Allow incoming ICMP packets (pings). ICMP Type 8 Any VPC Gen 2 clusters < 4.5 and VPC Gen 1 clusters: Allow incoming traffic requests to apps that run on the worker nodes. TCP 30000 - 32767 Any VPC Gen 2 clusters < 4.5 and VPC Gen 1 clusters: If you require VPC VPN access or classic infrastructure access into this cluster, allow incoming traffic requests to apps that run on the worker nodes. UDP 30000 - 32767 Any - To create new rules to control outbound traffic to your worker nodes, in the Outbound rules section, delete the default rule that allows all outbound traffic.
- In the Outbound rules section, click Create. Keep in mind that in addition to any rules that you create, the rules in the following table are required to allow necessary outbound traffic from the cluster.
Rule purpose Protocol Port or Value Destination type Allow worker nodes to be created in the cluster. ALL - CIDR block 161.26.0.0/16 Allow worker nodes to communicate with the cluster master through the private service endpoint and with other IBM Cloud services that support private service endpoints. ALL - CIDR block 166.8.0.0/14
If you create specific rules to block incoming traffic to the IP addresses of Ingress routers, we must allow inbound access from Cloudflare's IPv4 IPs on port 80 and the 166.8.0.0/14 OpenShift control plane to the IP addresses of our routers so they can be health checked.
To simplify your VPC security setup, leave your default ACL for the VPC as-is. If you configure rules in both ACLs for the subnets and in the default security group for the worker nodes, we might inadvertently block the subnets and ports that are required for necessary traffic to reach the cluster.
Creating security group rules from the CLI
Use the IBM Cloud CLI to add inbound and outbound rules to the default security group for the cluster.Before beginning:
-
Install the infrastructure-service plug-in. The prefix for running commands is ibmcloud is.
ibmcloud plugin install infrastructure-service
-
Target the region that your VPC is in.
ibmcloud target -r <region>
-
Target the VPC generation for the cluster.
ibmcloud is target --gen 2
-
Get the cluster's ID.
ibmcloud oc cluster get -c <cluster_name>
To create rules in your default security group:
-
List your security groups and note the ID of the default security group for the VPC. Note that the default security group uses a randomly generated name, and does not use the name in the format kube-<cluster_ID>.
ibmcloud is sgs
Example output with the default security group for the VPC of a randomly generated name, chamomile-dislodge-showier-unfilled:
ID                                          Name                                       Rules   Network interfaces   VPC          Resource group
1a111a1a-a111-11a1-a111-111111111111        chamomile-dislodge-showier-unfilled        5       2                    events-vpc   default
2b222b2b-b222-22b2-b222-222222222222        kube-df253b6025d64744ab99ed63bb4567b6      5       3                    gen2-vpn     default
-
Store the security group ID as an environment variable.
sg=<security_group_ID>
-
Optional: Check out the default rules for the security group.
ibmcloud is sg $sg
-
VPC Gen 2 clusters that run OpenShift version 4.4 or earlier only: Allow incoming traffic requests through the 30000 - 32767 node port range.
- Add a rule to allow inbound TCP traffic on ports 30000-32767.
ibmcloud is security-group-rule-add $sg inbound tcp --port-min 30000 --port-max 32767
- If you require VPC VPN access or classic infrastructure access into this cluster, add a rule to allow inbound UDP traffic on ports 30000-32767.
ibmcloud is security-group-rule-add $sg inbound udp --port-min 30000 --port-max 32767
- Add a rule to allow inbound TCP traffic on ports 30000-32767.
-
To create new rules to control inbound traffic to your worker nodes, use the ibmcloud is security-group-rule-add command.
ibmcloud is security-group-rule-add $sg inbound <protocol> [--remote <remote_address> | <CIDR_block> | <security_group_ID>] [--icmp-type <icmp_type> [--icmp-code <icmp_code>]] [--port-min <port_min>] [--port-max <port_max>]
Keep in mind that in addition to any rules that you create, the rules in the following table are required to allow necessary inbound traffic to the cluster.
Rule purpose Protocol Port or Value Source type Allow all worker nodes in this cluster to communicate with each other. ALL - Security group kube-<cluster_ID> Allow incoming ICMP packets (pings). ICMP Type 8 Any VPC Gen 2 clusters < 4.5 and VPC Gen 1 clusters: Allow incoming traffic requests to apps that run on the worker nodes. TCP 30000 - 32767 Any VPC Gen 2 clusters < 4.5 and VPC Gen 1 clusters: If you require VPC VPN access or classic infrastructure access into this cluster, allow incoming traffic requests to apps that run on the worker nodes. UDP 30000 - 32767 Any -
To create new rules to control outbound traffic to your worker nodes, get the ID of the default rule that allows all outbound traffic.
ibmcloud is sg $sg
In this example output, the outbound rule that allows all outbound traffic to all destinations (0.0.0.0/0) is r010-93ae3092-cce1-4b89-894c-204e628cf8f3.
 ...
 Rules
 ID                                          Direction   IP version   Protocol                        Remote
 r010-93ae3092-cce1-4b89-894c-204e628cf8f3   outbound    ipv4         all                             0.0.0.0/0
 r010-e3a34cbb-d5e8-4713-a57e-3e35a7458272   inbound     ipv4         all                             freeload-flavored-surging-repaying
 r010-036c3a13-1c16-4425-9667-a4ec34b1702b   inbound     ipv4         icmp Type=8                     0.0.0.0/0
 r010-15591636-6976-493f-a94f-70721702860a   inbound     ipv4         tcp Ports:Min=22,Max=22         0.0.0.0/0
 r010-5547cb84-4829-475c-8bdf-be1a39d7936d   inbound     ipv4         tcp Ports:Min=30000,Max=32767   0.0.0.0/0
 ...
-
Delete the default rule that allows all outbound traffic.
ibmcloud is security-group-rule-delete $sg <rule_ID>
-
Create new rules to control outbound traffic from your worker nodes.
ibmcloud is security-group-rule-add $sg outbound <protocol> [--remote <remote_address> | <CIDR_block> | <security_group_ID>] [--icmp-type <icmp_type> [--icmp-code <icmp_code>]] [--port-min <port_min>] [--port-max <port_max>]
Keep in mind that in addition to any rules that you create, the rules in the following table are required to allow necessary outbound traffic from the cluster.
Rule purpose Protocol Port or Value Destination type Allow worker nodes to be created in the cluster. ALL - CIDR block 161.26.0.0/16 Allow worker nodes to communicate with the cluster master through the private service endpoint and with other IBM Cloud services that support private service endpoints. ALL - CIDR block 166.8.0.0/14 -
Verify that your security group rules are created and that all required rules exist in your security group.
ibmcloud is sg $sg
If you create specific rules to block incoming traffic to the IP addresses of Ingress routers, we must allow inbound access from Cloudflare's IPv4 IPs on port 80 and the 166.8.0.0/14 OpenShift control plane to the IP addresses of our routers so they can be health checked.
To simplify your VPC security setup, leave your default ACL for the VPC as-is. If you configure rules in both ACLs for the subnets and in the default security group for the worker nodes, we might inadvertently block the subnets and ports that are required for necessary traffic to reach the cluster.
Controlling traffic with ACLs
Control inbound and outbound traffic to the cluster by creating and applying access control lists (ACLs) to each subnet that the cluster is attached to.Looking for a simpler security setup? Leave the default ACL for the VPC as-is, and modify the default security group instead.
Level of application: VPC subnet
Default behavior: When you create a VPC, a default ACL is created in the format allow-all-network-acl-<VPC_ID> for the VPC. The ACL includes an inbound rule and an outbound rule that allow all traffic to and from your subnets. Any subnet that you create in the VPC is attached to this ACL by default. ACL rules are applied in a particular order. When you allow traffic in one direction by creating an inbound or outbound rule, we must also create a rule for responses in the opposite direction because responses are not automatically permitted.
Use case: To specify which traffic is permitted to the worker nodes on your VPC subnets, we can create a custom ACL for each subnet in the VPC. For example, we can create the following set of ACL rules to block most inbound and outbound network traffic of a cluster, while allowing communication that is necessary for the cluster to function.
Limitations: If you create multiple clusters that use the same subnets in one VPC, we cannot use ACLs to control traffic between the clusters because they share the same subnets. We can use Calico network policies to isolate the clusters on the private network.
When you use the following steps to create custom ACLs, only network traffic that is specified in the ACL rules is permitted to and from your VPC subnets. All other traffic that is not specified in the ACLs is blocked for the subnets, such as cluster integrations with third party services. If we must allow other traffic to or from your worker nodes, be sure to specify those rules where noted in the following steps.
For more information, see the VPC documentation.
Creating ACLs in the console
For each subnet that the cluster is attached to, use the IBM Cloud VPC console to create a custom ACL with rules that limit inbound and outbound network traffic to only communication that is necessary for the cluster to function.Looking for a simpler security setup? Leave the default ACL for the VPC as-is, and modify the default security group instead.
- Multizone clusters only: In the Subnets for VPC dashboard, note the IP Range of each subnet that the cluster is attached to.
- In the Access control lists for VPC dashboard, click New access control list.
- Give your ACL a name and choose the VPC and resource group that your subnets are in.
- In the Rules section, delete the default inbound rule and outbound rule that allow all inbound and outbound traffic.
-
In the Inbound rules section, create the following rules by clicking Create.
ACL rules are applied to traffic in a specific order. If we must create custom rules to allow other traffic to or from your worker nodes on this subnet, be sure to set the custom rules' Priority before final the rule that denies all traffic. If you add a rule after the deny rule, your rule is ignored, because the packet matches the deny rule and is blocked and removed before it can reach your rule.
Scroll for moreScroll for moreRule purpose Allow/Deny Protocol Source Type Source IP or CIDR Source Port min Source Port max Destination Type Destination IP or CIDR Destination Port min Destination Port max Priority Allow worker nodes to be created in the cluster. Allow ALL IP or CIDR 161.26.0.0/16 - - Any - - - Set to top Allow worker nodes to communicate with the cluster master through the private service endpoint and with other IBM Cloud services that support private service endpoints. Allow ALL IP or CIDR 166.8.0.0/14 - - Any - - - After 1 Multizone clusters: Allow worker nodes in one subnet to communicate with the worker nodes in other subnets within the cluster. Create one rule for each subnet that we want to connect to. Allow ALL IP or CIDR Other subnet's CIDR - - Any - - - After 2 To expose apps by using load balancers or Ingress, allow traffic through VPC load balancers on port 56501. Allow TCP Any - - - Any - 56501 56501 After 3 To expose apps by using load balancers or Ingress, allow traffic through VPC load balancers on port 443. Allow TCP Any - 443 443 Any - - - After 4 To expose apps by using load balancers or Ingress, allow traffic through VPC load balancers on port 8834. Allow TCP Any - 8834 8834 Any - - - After 5 To expose apps by using load balancers or Ingress, allow traffic through VPC load balancers on port 10514. Allow TCP Any - 10514 10514 Any - - - After 6 To access the OpenShift web console, allow traffic to port 443. To further restrict access to this port, we can optionally specify the source IP addresses that we can connect to the web console in the Source IP or CIDR field. Allow TCP Any - - - Any - 443 443 After 7 Deny all other traffic that does not match the previous rules. Deny ALL Any - - - Any - - - Set to bottom -
In the Outbound rules section, create the following rules by clicking Create.
ACL rules are applied to traffic in a specific order. If we must create custom rules to allow other traffic to or from your worker nodes on this subnet, be sure to set the custom rules' Priority before final the rule that denies all traffic. If you add a rule after the deny rule, your rule is ignored, because the packet matches the deny rule and is blocked and removed before it can reach your rule.
Scroll for moreScroll for moreRule purpose Allow/Deny Protocol Source Type Source IP or CIDR Source Port min Source Port max Destination Type Destination IP or CIDR Destination Port min Destination Port max Priority Allow worker nodes to be created in the cluster. Allow ALL IP or CIDR Any - - 161.26.0.0/16 - - - Set to top Allow worker nodes to communicate with the cluster master through the private service endpoint and to communicate with other IBM Cloud services that support private service endpoints, such as IBM Cloud Container Registry. Allow ALL IP or CIDR Any - - 166.8.0.0/14 - - - After 1 Multizone clusters: Allow worker nodes in one subnet to communicate with the worker nodes in all other subnets within the cluster. Create one rule for each subnet that we want to connect to. Allow ALL IP or CIDR Any - - Other subnet's CIDR - - - After 2 To expose apps by using load balancers or Ingress, allow traffic through VPC load balancers on port 56501. Allow TCP Any - 56501 56501 Any - - - After 3 To expose apps by using load balancers or Ingress, allow traffic through VPC load balancers on port 443. Allow TCP Any - - - Any - 443 443 After 4 To expose apps by using load balancers or Ingress, allow traffic through VPC load balancers on port 8834. Allow TCP Any - - - Any - 8834 8834 After 5 To expose apps by using load balancers or Ingress, allow traffic through VPC load balancers on port 10514. Allow TCP Any - - - Any - 10514 10514 After 6 To access the OpenShift web console, allow traffic from port 443. To further restrict access to this port, we can optionally specify the IP addresses that we can connect to the web console in the Destination IP or CIDR field. Allow TCP Any - 443 443 Any - - - After 7 Deny all other traffic that does not match the previous rules. Deny ALL Any - - - Any - - - Set to bottom -
In the Attach subnets section, choose the name of the subnet for which you created this ACL.
-
Click Create access control list.
-
Multizone clusters: Repeat steps 2 - 8 to create an ACL for each subnet that the cluster is attached to.
If you create specific rules to block incoming traffic to the IP addresses of Ingress routers, we must allow inbound access from Cloudflare's IPv4 IPs on port 80 and the 166.8.0.0/14 OpenShift control plane to the IP addresses of our routers so they can be health checked.
Creating ACLs from the CLI
For each subnet that the cluster is attached to, use the IBM Cloud CLI to create a custom ACL with rules that limit inbound and outbound network traffic to only communication that is necessary for the cluster to function.Looking for a simpler security setup? Leave the default ACL for the VPC as-is, and modify the default security group instead.
Before beginning:
-
Install the infrastructure-service plug-in. The prefix for running commands is ibmcloud is.
ibmcloud plugin install infrastructure-service
-
Target the region that your VPC is in.
ibmcloud target -r <region>
-
Target the VPC generation for the cluster.
ibmcloud is target --gen 2
To create an ACL for each subnet that the cluster is attached to:
-
List your VPC subnets. For each subnet that the cluster is attached to, get the ID and Subnet CIDR.
If we can't remember which subnets the cluster is attached to, we can run ibmcloud oc worker get -c <cluster_name_or_ID> -w <worker_node_ID> for one worker node in each zone of the cluster, and get the ID and CIDR of the subnet that the worker is attached to.
ibmcloud is subnets
Example output:
ID                                          Name          Status      Subnet CIDR        Addresses   ACL                                                  Public Gateway                            VPC       Zone         Resource group
0717-2224d664-d435-425e-b5ec-f324af2df445   mysubnet1     available   10.240.0.0/28      11/16       armored-never-chitchat-gangly-skylight-prototype     -                                  myvpc     us-south-1   default
0717-1eff410a-a47e-4bc2-b4a3-5f742f320008   mysubnet2     available   10.240.1.0/24      251/256     armored-never-chitchat-gangly-skylight-prototype     pgw-ed8f6970-9b71-11ea-b94a-956de1af1ccd        myvpc     us-south-2   default
-
Create an ACL. After creating the ACL, we can add rules to your ACL and apply the ACL to one subnet. Because the rules that you add to your ACL are specific to one subnet, consider naming the ACL in the format <cluster>-<subnet>-acl, such as mycluster-mysubnet1-acl, for easy identification. When you create the ACL, two rules are automatically created that allow all inbound and all outbound network traffic. In the output, note the ACL ID and the IDs of the two default rules.
ibmcloud is network-acl-create <cluster>-<subnet>-acl
Example output:
Creating network ACL mycluster-mysubnet1-acl under account Account as user user@email.com...

ID        740b07cb-4e69-4ef2-b667-42ed27d8b29e
Name      mycluster-mysubnet1-acl
Created   2019-09-18T15:09:45-05:00

Rules

inbound
ID                                     Name                                                          Action   IPv*   Protocol   Source      Destination   Created
e3caad9c-68b7-4a4a-8188-d239fbc724df   allow-all-inbound-rule-740b07cb-4e69-4ef2-b667-42ed27d8b29e   allow    ipv4   all        0.0.0.0/0   0.0.0.0/0     2019-09-18T15:09:45-05:00

outbound
ID                                     Name                                                           Action   IPv*   Protocol   Source      Destination   Created
7043ac95-cc4e-42e9-a490-22177237f083   allow-all-outbound-rule-740b07cb-4e69-4ef2-b667-42ed27d8b29e   allow    ipv4   all        0.0.0.0/0   0.0.0.0/0     2019-09-18T15:09:45-05:00
-
Export the ACL ID as an environment variable.
export ACL_ID=<acl_id>
-
Delete the default rules that allow all inbound and outbound traffic. After, your ACL still exists, but does not contain any networking rules.
ibmcloud is network-acl-rule-delete $acl_id <default_inbound_rule_ID> -f
ibmcloud is network-acl-rule-delete $acl_id <default_outbound_rule_ID> -f
-
Multizone clusters: Add rules to your ACL to allow worker nodes in one subnet to communicate with the worker nodes in all other subnets within the cluster. The subnet for which you create the ACL rule is defined as 0.0.0.0/0 and you use the CIDRs of the other subnets as your destination CIDR. Make sure to create one inbound and one outbound rule for each of the subnets that we want to connect to.
ibmcloud is network-acl-rule-add $acl_id allow outbound all 0.0.0.0/0 <other_zone_subnet_CIDR> --name allow-workers-outbound
ibmcloud is network-acl-rule-add $acl_id allow inbound all <other_zone_subnet_CIDR> 0.0.0.0/0 --name allow-workers-inbound
-
Create rules to allow inbound traffic from and outbound traffic to the 161.26.0.0/16 and 166.8.0.0/14 IBM Cloud private subnets. The 161.26.0.0/16 rules allow us to create worker nodes in the cluster. The 166.8.0.0/14 rules allow worker nodes to communicate with the cluster master through the private service endpoint and to communicate with other IBM Cloud services that support private service endpoints, such as IBM Cloud Container Registry.
Need to connect your worker nodes to IBM Cloud services that support only public service endpoints? Attach a public gateway to the subnet
 so that worker nodes can connect to a public endpoint outside of the cluster. Then, create inbound and outbound rules to allow ingress from and egress to the services' public service endpoints.
ibmcloud is network-acl-rule-add $acl_id allow outbound all 0.0.0.0/0 161.26.0.0/16 --name allow-ibm-private-network-outbound1
ibmcloud is network-acl-rule-add $acl_id allow outbound all 0.0.0.0/0 166.8.0.0/14 --name allow-ibm-private-network-outbound2
ibmcloud is network-acl-rule-add $acl_id allow inbound all 161.26.0.0/16 0.0.0.0/0 --name allow-ibm-private-network-inbound1
ibmcloud is network-acl-rule-add $acl_id allow inbound all 166.8.0.0/14 0.0.0.0/0 --name allow-ibm-private-network-inbound2
-
Optional: If we plan to expose apps by using load balancers or Ingress, create rules to allow inbound and outbound traffic through TCP ports 56501, 443, 8834, and 10514.
ibmcloud is network-acl-rule-add $acl_id allow outbound tcp 0.0.0.0/0 0.0.0.0/0 --name allow-lb-outbound1 --source-port-min 56501 --source-port-max 56501
ibmcloud is network-acl-rule-add $acl_id allow outbound tcp 0.0.0.0/0 0.0.0.0/0 --name allow-lb-outbound2 --destination-port-min 443 --destination-port-max 443
ibmcloud is network-acl-rule-add $acl_id allow outbound tcp 0.0.0.0/0 0.0.0.0/0 --name allow-lb-outbound3 --destination-port-min 8834 --destination-port-max 8834
ibmcloud is network-acl-rule-add $acl_id allow outbound tcp 0.0.0.0/0 0.0.0.0/0 --name allow-lb-outbound4 --destination-port-min 10514 --destination-port-max 10514
ibmcloud is network-acl-rule-add $acl_id allow inbound tcp 0.0.0.0/0 0.0.0.0/0 --name allow-lb-inbound1 --destination-port-min 56501 --destination-port-max 56501
ibmcloud is network-acl-rule-add $acl_id allow inbound tcp 0.0.0.0/0 0.0.0.0/0 --name allow-lb-inbound2 --source-port-min 443 --source-port-max 443
ibmcloud is network-acl-rule-add $acl_id allow inbound tcp 0.0.0.0/0 0.0.0.0/0 --name allow-lb-inbound3 --source-port-min 8834 --source-port-max 8834
ibmcloud is network-acl-rule-add $acl_id allow inbound tcp 0.0.0.0/0 0.0.0.0/0 --name allow-lb-inbound4 --source-port-min 10514 --source-port-max 10514
-
Optional: If we must allow other traffic to or from your worker nodes on this subnet, add rules for that traffic.
When you refer to the VPC subnet that your worker nodes are on, we must use 0.0.0.0/0. For more tips on how to create your rule, see the VPC CLI reference documentation.
ibmcloud is network-acl-rule-add $acl_id <allow|deny> <inbound|outbound> <protocol> <source_CIDR> <destination_CIDR> --name <new_rule_name>
For example, say that we want your worker nodes to communicate with a subnet in your organization's network, 207.42.8.0/24. Your worker nodes must be able to both send and receive information from devices or services on this subnet. We can create an outbound rule for traffic to and an inbound rule for traffic from your organization's subnet:
ibmcloud is network-acl-rule-add $acl_id allow outbound all 0.0.0.0/0 207.42.8.0/24 --name corporate-network-outbound
ibmcloud is network-acl-rule-add $acl_id allow inbound all 207.42.8.0/24 0.0.0.0/0 --name corporate-network-inbound
-
Create rules to deny all other egress from and ingress to worker nodes that is not permitted by the previous rules that you created. Because these rules are created last in the chain of rules, they deny an incoming or outgoing connection only if the connection does not match any other rule that is earlier in the rule chain.
ibmcloud is network-acl-rule-add $acl_id deny outbound all 0.0.0.0/0 0.0.0.0/0 --name deny-all-outbound
ibmcloud is network-acl-rule-add $acl_id deny inbound all 0.0.0.0/0 0.0.0.0/0 --name deny-all-inbound
-
Apply this ACL to the subnet. When you apply this ACL, the rules that you defined are immediately applied to the worker nodes on the subnet.
ibmcloud is subnet-update <subnet_ID> --network-acl-id $acl_id
Example output:
ID                  a1b2c3d4-f560-471b-b6ce-20067ac93439
Name                mysubnet1
IPv*                ipv4
IPv4 CIDR           10.240.0.0/24
IPv6 CIDR           -
Address Available   244
Address Total       256
ACL                 mycluster-mysubnet1-acl(b664769d-514c-407f-a9f3-d44d72706121)
Gateway             pgw-18a3ebb0-b539-11e9-9838-f3f4efa02374(f8b95e43-a408-4dc8-a489-ed649fc4cfec)
Created             2019-08-02T10:20:17-05:00
Status              available
Zone                us-south-1
VPC                 myvpc(ff537d43-a5a4-4b65-9627-17eddfa5237b)
-
Repeat steps 2 - 10 for each subnet that you found in step 1.
ACL rules are applied to traffic in a specific order. To add a rule after you complete these steps, ensure that you add the rule before the deny-all-inbound or deny-all-outbound rule. If you add a rule after these rules, your rule is ignored, because the packet matches the deny-all-inbound and deny-all-outbound rules and is blocked and removed before it can reach your rule. Create your rule in the proper order by including the --before-rule-name deny-all-(inbound|outbound) flag.
If you create specific rules to block incoming traffic to the IP addresses of Ingress routers, we must allow inbound access from Cloudflare's IPv4 IPs on port 80 and the 166.8.0.0/14 OpenShift control plane to the IP addresses of our routers so they can be health checked.
Controlling traffic between pods with Kubernetes policies
We can use Kubernetes policies to control network traffic between pods in the cluster and to isolate app microservices from each other within a namespace or across namespaces.Level of application: Worker node host endpoint
Default behavior: No Kubernetes network policies exist by default in the cluster.
Use case: Kubernetes network policies specify how pods can communicate with other pods and with external endpoints. Both incoming and outgoing network traffic can be allowed or blocked based on protocol, port, and source or destination IP addresses. Traffic can also be filtered based on pod and namespace labels. When Kubernetes network policies are applied, they are automatically converted into Calico network policies. The Calico network plug-in in the cluster enforces these policies by setting up Linux Iptables rules on the worker nodes. Iptables rules serve as a firewall for the worker node to define the characteristics that the network traffic must meet to be forwarded to the targeted resource.
For more information about how Kubernetes network policies control pod-to-pod traffic and for more example policies, see the Kubernetes documentation.
Isolate app services within a namespace
The following scenario demonstrates how to manage traffic between app microservices within one namespace.
An Accounts team deploys multiple app services in one namespace, but they need isolation to permit only necessary communication between the microservices over the public network. For the app Srv1, the team has front end, back end, and database services. They label each service with the app: Srv1 label and the tier: frontend, tier: backend, or tier: db label.
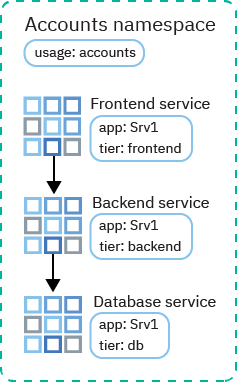
The Accounts team wants to allow traffic from the front end to the back end, and from the back end to the database. They use labels in their network policies to designate which traffic flows are permitted between microservices.
First, they create a Kubernetes network policy that allows traffic from the front end to the back end:
kind: NetworkPolicy
apiVersion: networking.k8s.io/v1
metadata:
  name: backend-allow
spec:
  podSelector:
    matchLabels:
      app: Srv1
      tier: backend
  ingress:
  - from:
    - podSelector:
        matchLabels:
 app: Srv1
 Tier: frontend
The spec.podSelector.matchLabels section lists the labels for the Srv1 back-end service so that the policy applies only to those pods. The spec.ingress.from.podSelector.matchLabels section lists the labels for the Srv1 front-end service so that ingress is permitted only from those pods.
Then, they create a similar Kubernetes network policy that allows traffic from the back end to the database:
kind: NetworkPolicy
apiVersion: networking.k8s.io/v1
metadata:
  name: db-allow
spec:
  podSelector:
    matchLabels:
      app: Srv1
      tier: db
  ingress:
  - from:
    - podSelector:
        matchLabels:
 app: Srv1
 Tier: backend
The spec.podSelector.matchLabels section lists the labels for the Srv1 database service so that the policy applies only to those pods. The spec.ingress.from.podSelector.matchLabels section lists the labels for the Srv1 back-end service so that ingress is permitted only from those pods.
Traffic can now flow from the front end to the back end, and from the back end to the database. The database can respond to the back end, and the back end can respond to the front end, but no reverse traffic connections can be established.
Isolate app services between namespaces
The following scenario demonstrates how to manage traffic between app microservices across multiple namespaces.
Services that are owned by different subteams need to communicate, but the services are deployed in different namespaces within the same cluster. The Accounts team deploys front end, back end, and database services for the app Srv1 in the accounts namespace. The Finance team deploys front end, back end, and database services for the app Srv2 in the finance namespace. Both teams label each service with the app: Srv1 or app: Srv2 label and the tier: frontend, tier: backend, or tier: db label. They also label the namespaces with the usage: accounts or usage: finance label.
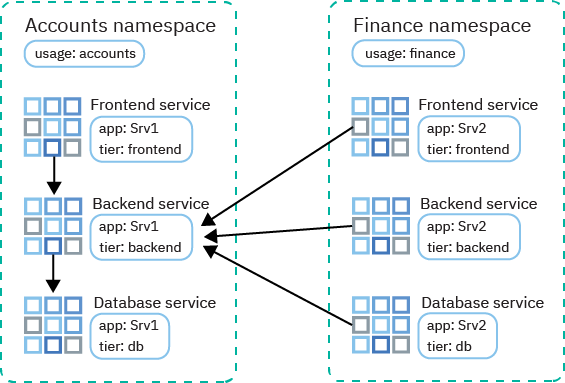
The Finance team's Srv2 needs to call information from the Accounts team's Srv1 back end. So the Accounts team creates a Kubernetes network policy that uses labels to allow all traffic from the finance namespace to the Srv1 back end in the accounts namespace. The team also specifies the port 3111 to isolate access through that port only.
kind: NetworkPolicy
apiVersion: networking.k8s.io/v1
metadata:
  Namespace: accounts
  name: accounts-allow
spec:
  podSelector:
    matchLabels:
      app: Srv1
      Tier: backend
  ingress:
  - from:
    - NamespaceSelector:
        matchLabels:
 usage: finance
      ports:
        port: 3111
The spec.podSelector.matchLabels section lists the labels for the Srv1 back-end service so that the policy applies only to those pods. The spec.ingress.from.NamespaceSelector.matchLabels section lists the label for the finance namespace so that ingress is permitted only from services in that namespace.
Traffic can now flow from finance microservices to the accounts Srv1 back end. The accounts Srv1 back end can respond to finance microservices, but can't establish a reverse traffic connection.
In this example, all traffic from all microservices in the finance namespace is permitted. We can't allow traffic from specific app pods in another namespace because podSelector and namespaceSelector can't be combined.