Adding worker nodes and zones to clusters
To increase the availability of our apps, we can add worker nodes to an existing zone or multiple existing zones in the cluster. To help protect our apps from zone failures, we can add zones to the cluster.
When you create a cluster, the worker nodes are provisioned in a worker pool. After cluster creation, we can add more worker nodes to a pool by resizing it or by adding more worker pools. By default, the worker pool exists in one zone. Clusters that have a worker pool in only one zone are called single zone clusters. When you add more zones to the cluster, the worker pool exists across the zones. Clusters that have a worker pool that is spread across more than one zone are called multizone clusters.
If we have a multizone cluster, keep its worker node resources balanced. Make sure that all the worker pools are spread across the same zones, and add or remove workers by resizing the pools instead of adding individual nodes.
After you
set up your worker pool, we can set up the cluster autoscaler to automatically add or remove worker nodes from your worker pools based on the workload resource requests.
Adding worker nodes by resizing an existing worker pool
We can add or reduce the number of worker nodes in the cluster by resizing an existing worker pool, regardless of whether the worker pool is in one zone or spread across multiple zones.For example, consider a cluster with one worker pool that has three worker nodes per zone.
- If the cluster is single zone and exists in dal10, then the worker pool has three worker nodes in dal10. The cluster has a total of three worker nodes.
- If the cluster is multizone and exists in dal10 and dal12, then the worker pool has three worker nodes in dal10 and three worker nodes in dal12. The cluster has a total of six worker nodes.
For bare metal worker pools, keep in mind that billing is monthly. If you resize up or down, it impacts your costs for the month.
Before beginning, make sure that we have the Operator or Administrator IBM Cloud IAM platform role.
To resize the worker pool, change the number of worker nodes that the worker pool deploys in each zone:
-
Get the name of the worker pool that we want to resize.
ibmcloud oc worker-pool ls --cluster <cluster_name_or_ID>
-
Resize the worker pool by designating the number of worker nodes that we want to deploy in each zone. The minimum value is 2. For more information, see What is the smallest size cluster that I can make?.
ibmcloud oc worker-pool resize --cluster <cluster_name_or_ID> --worker-pool <pool_name> --size-per-zone <number_of_workers_per_zone>
-
Verify that the worker pool is resized.
ibmcloud oc worker ls --cluster <cluster_name_or_ID> --worker-pool <pool_name>
Example output for a worker pool that is in two zones, dal10 and dal12, and is resized to two worker nodes per zone:
 ID                                                 Public IP        Private IP      Machine Type      State    Status  Zone    Version
 kube-dal10-crb20b637238ea471f8d4a8b881aae4962-w7   169.xx.xxx.xxx   10.xxx.xx.xxx   b3c.4x16          normal   Ready   dal10   1.18.9
 kube-dal10-crb20b637238ea471f8d4a8b881aae4962-w8   169.xx.xxx.xxx   10.xxx.xx.xxx   b3c.4x16          normal   Ready   dal10   1.18.9
 kube-dal12-crb20b637238ea471f8d4a8b881aae4962-w9   169.xx.xxx.xxx   10.xxx.xx.xxx   b3c.4x16          normal   Ready   dal12   1.18.9
 kube-dal12-crb20b637238ea471f8d4a8b881aae4962-w10  169.xx.xxx.xxx   10.xxx.xx.xxx   b3c.4x16          normal   Ready   dal12   1.18.9
Adding worker nodes in VPC clusters
Creating a new worker pool
Before beginning, make sure that we have the Operator or Administrator IBM Cloud IAM platform role.
-
Retrieve the VPC ID and Worker Zones of the cluster and choose the zone where we want to deploy the worker nodes in your worker pool. We can choose any of the existing Worker Zones of the cluster, or add one of the multizone metro locations for the region that the cluster is in. We can list available zones by running ibmcloud oc zone ls --provider vpc-classic for Generation 1 compute or ibmcloud oc zone ls --provider vpc-gen2 for Generation 2 compute.
ibmcloud oc cluster get --cluster <cluster_name_or_ID>
Example output:
...
VPC ID:        <VPC_ID>
...
Worker Zones: us-south-1, us-south-2, us-south-3
-
For each zone, note the ID of VPC subnet that we want to use for the worker pool. If you do not have a VPC subnet in the zone, create a VPC subnet. VPC subnets provide IP addresses for the worker nodes and load balancer services in the cluster, so create a VPC subnet with enough IP addresses, such as 256.
ibmcloud oc subnets --zone <zone> --provider >vpc-gen2 --vpc-id <VPC_ID>
-
For each zone, review the available flavors for worker nodes.
ibmcloud oc flavors --zone <zone> --provider vpc-gen2
-
Create a worker pool. Include the --label option to automatically label worker nodes that are in the pool with the label key=value. Include the --vpc-id option if the worker pool is the first in the cluster. For more options, see the CLI documentation.
ibmcloud oc worker-pool create vpc-gen2 --name <name> --cluster <cluster_name_or_ID> --flavor <flavor> --size-per-zone <number_of_worker_nodes_min_2> [--label <key>=<value>] [--vpc-id]
-
Verify that the worker pool is created.
ibmcloud oc worker-pool ls --cluster <cluster_name_or_ID>
-
By default, adding a worker pool creates a pool with no zones. To deploy worker nodes in a zone, we must add the zones that you previously retrieved to the worker pool. To spread your worker nodes across multiple zones, repeat this command for each zone.
ibmcloud oc zone add vpc-gen2 --zone <zone> --subnet-id <subnet_id> --cluster <cluster_name_or_ID> --worker-pool <worker_pool_name>
-
Verify that worker nodes provision in the zone that you added. Your worker nodes are ready when the State changes from provisioning to normal.
ibmcloud oc worker ls --cluster <cluster_name_or_ID> --worker-pool <pool_name>
Example output:
ID                                                     Primary IP     Flavor   State          Status                                        Zone       Version
kube-<ID_string>-<cluster_name>-<pool_name>-00000002   10.xxx.xx.xxx   c2.2x4   provisioning   Infrastructure instance status is 'pending'   us-south-1   -
kube-<ID_string>-<cluster_name>-<pool_name>-00000003   10.xxx.xx.xxx   c2.2x4   normal   Ready   us-south-1   1.18.9_1511
Adding a zone to a worker pool
When you add a zone to a worker pool, the worker nodes that are defined in your worker pool are provisioned in the new zone and considered for future workload scheduling. Red Hat OpenShift on IBM Cloud automatically adds the failure-domain.beta.kubernetes.io/region label for the region and the failure-domain.beta.kubernetes.io/zone label for the zone to each worker node. The Kubernetes scheduler uses these labels to spread pods across zones within the same region.
If we have multiple worker pools in the cluster, add the zone to all of them so that worker nodes are spread evenly across the cluster.
Before beginning, make sure that we have the Operator or Administrator IBM Cloud IAM platform role.
-
Get the Location of the cluster, and note the existing Worker Zones and VPC ID.
ibmcloud oc cluster get --cluster <cluster_name_or_ID>
Example output:
...
VPC ID:        <VPC_ID>
Workers:       3
Worker Zones:  us-south-1
...
Location:      Dallas
-
List available zones for the cluster's location to see what other zones we can add.
ibmcloud oc zone ls --provider vpc-gen2 | grep <location>
-
List available VPC subnets for each zone that we want to add. If you do not have a VPC subnet in the zone, create a VPC subnet. VPC subnets provide IP addresses for the worker nodes and load balancer services in the cluster, so create a VPC subnet with enough IP addresses, such as 256. We cannot change the number of IPs that a VPC subnet has later.
ibmcloud oc subnets --zone <zone> --provider vpc-gen2 --vpc-id <VPC_ID>
-
List the worker pools in the cluster and note their names.
ibmcloud oc worker-pool ls --cluster <cluster_name_or_ID>
-
Add the zone to your worker pool. Repeat this step for each zone that we want to add to your worker pool. If we have multiple worker pools, add the zone to all your worker pools so that the cluster is balanced in all zones. Include the --worker-pool flag for each worker pool.
To use different VPC subnets for different worker pools, repeat this command for each subnet and its corresponding worker pools. Any new worker nodes are added to the VPC subnets that you specify, but the VPC subnets for any existing worker nodes are not changed.
ibmcloud oc zone add vpc-gen2 --zone <zone> --subnet-id <subnet_id> --cluster <cluster_name_or_ID> --worker-pool <worker_pool_name>
-
Verify that the zone is added to the cluster. Look for the added zone in the Worker Zones field of the output. Note that the total number of workers in the Workers field has increased as new worker nodes are provisioned in the added zone.
ibmcloud oc cluster get --cluster <cluster_name_or_ID>
Example output:
Workers:       9
Worker Zones:  us-south-1, us-south-2, us-south-3
-
To expose apps with Ingress, we must update the VPC load balancer that exposes the router to include the subnet for the new zone in the cluster.
Adding worker nodes in classic clusters
Creating a new worker pool
Before beginning, make sure that we have the Operator or Administrator IBM Cloud IAM platform role.
-
Retrieve the Worker Zones of the cluster and choose the zone where we want to deploy the worker nodes in your worker pool. If we have a single zone cluster, we must use the zone that you see in the Worker Zones field. For multizone clusters, we can choose any of the existing Worker Zones of the cluster, or add one of the multizone metro locations for the region that the cluster is in. We can list available zones by running ibmcloud oc zone ls.
ibmcloud oc cluster get --cluster <cluster_name_or_ID>
Example output:
...
Worker Zones: dal10, dal12, dal13
-
For each zone, list available private and public VLANs. Note the private and the public VLAN that we want to use. If you do not have a private or a public VLAN, the VLAN is automatically created for you when you add a zone to your worker pool.
ibmcloud oc vlan ls --zone <zone>
-
For each zone, review the available flavors for worker nodes.
ibmcloud oc flavors --zone <zone>
-
Create a worker pool. For more options, see the CLI documentation.
- The minimum number of worker nodes per zone is 2. For more information, see What is the smallest size cluster that I can make?.
- Include the --label option to automatically label worker nodes that are in the pool with the label key=value.
- If you provision a bare metal or dedicated VM worker pool, specify --hardware dedicated.
ibmcloud oc worker-pool create classic --name <pool_name> --cluster <cluster_name_or_ID> --flavor <flavor> --size-per-zone <number_of_workers_per_zone_min_2> [--label key=value]
-
Verify that the worker pool is created.
ibmcloud oc worker-pool ls --cluster <cluster_name_or_ID>
-
By default, adding a worker pool creates a pool with no zones. To deploy worker nodes in a zone, we must add the zones that you previously retrieved to the worker pool. To spread your worker nodes across multiple zones, repeat this command for each zone.
ibmcloud oc zone add classic --zone <zone> --cluster <cluster_name_or_ID> --worker-pool <pool_name> --private-vlan <private_VLAN_ID> --public-vlan <public_VLAN_ID>
-
Verify that worker nodes provision in the zone that you added. Your worker nodes are ready when the status changes from provision_pending to normal.
ibmcloud oc worker ls --cluster <cluster_name_or_ID> --worker-pool <pool_name>
Example output:
ID                                                 Public IP        Private IP      Machine Type      State    Status  Zone    Version
kube-dal10-crb20b637238ea471f8d4a8b881aae4962-w7   169.xx.xxx.xxx   10.xxx.xx.xxx   b3c.4x16          provision_pending   Ready   dal10   1.18.9
kube-dal10-crb20b637238ea471f8d4a8b881aae4962-w8   169.xx.xxx.xxx   10.xxx.xx.xxx   b3c.4x16          provision_pending   Ready   dal10   1.18.9
Adding a zone to a worker pool
When you add a zone to a worker pool, the worker nodes that are defined in your worker pool are provisioned in the new zone and considered for future workload scheduling. Red Hat OpenShift on IBM Cloud automatically adds the failure-domain.beta.kubernetes.io/region label for the region and the failure-domain.beta.kubernetes.io/zone label for the zone to each worker node. The Kubernetes scheduler uses these labels to spread pods across zones within the same region.
If we have multiple worker pools in the cluster, add the zone to all of them so that worker nodes are spread evenly across the cluster.
Before beginning:
- To add a zone to your worker pool, your worker pool must be in a multizone-capable zone. If your worker pool is not in a multizone-capable zone, consider creating a new worker pool.
- Make sure that we have the Operator or Administrator IBM Cloud IAM platform role.
- In classic clusters, if we have multiple VLANs for the cluster, multiple subnets on the same VLAN, or a multizone classic cluster, we must enable a Virtual Router Function (VRF) for the IBM Cloud infrastructure account so your worker nodes can communicate with each other on the private network. To enable VRF, contact your IBM Cloud infrastructure account representative. To check whether a VRF is already enabled, use the ibmcloud account show command. If we cannot or do not want to enable VRF, enable VLAN spanning. To perform this action, we need the Network > Manage Network VLAN Spanning infrastructure permission, or we can request the account owner to enable it. To check whether VLAN spanning is already enabled, use the ibmcloud oc vlan spanning get --region <region> command.
To add a zone with worker nodes to your worker pool:
-
List available zones and pick the zone that we want to add to your worker pool. The zone that you choose must be a multizone-capable zone.
ibmcloud oc zone ls
-
List available VLANs in that zone. If you do not have a private or a public VLAN, the VLAN is automatically created for you when you add a zone to your worker pool.
ibmcloud oc vlan ls --zone <zone>
-
List the worker pools in the cluster and note their names.
ibmcloud oc worker-pool ls --cluster <cluster_name_or_ID>
-
Add the zone to your worker pool. If we have multiple worker pools, add the zone to all your worker pools so that the cluster is balanced in all zones.
A private and a public VLAN must exist before we can add a zone to multiple worker pools. If you do not have a private and a public VLAN in that zone, add the zone to one worker pool first so that a private and a public VLAN is created for you. Then, we can add the zone to other worker pools by specifying the private and the public VLAN that was created for you.
To use different VLANs for different worker pools, repeat this command for each VLAN and its corresponding worker pools. Any new worker nodes are added to the VLANs that you specify, but the VLANs for any existing worker nodes are not changed.
ibmcloud oc zone add classic --zone <zone> --cluster <cluster_name_or_ID> -w <pool_name> [-w <pool2_name>] --private-vlan <private_VLAN_ID> --public-vlan <public_VLAN_ID>
-
Verify that the zone is added to the cluster. Look for the added zone in the Worker zones field of the output. Note that the total number of workers in the Workers field has increased as new worker nodes are provisioned in the added zone.
ibmcloud oc cluster get --cluster <cluster_name_or_ID>
Example output:
Name:                           mycluster
ID:                             df253b6025d64944ab99ed63bb4567b6
State:                          normal
Status:                         healthy cluster
Created:                        2018-09-28T15:43:15+0000
Location:                       dal10
Pod Subnet:                     172.30.0.0/16
Service Subnet:                 172.21.0.0/16
Master URL:                     https://c3.<region>.containers.cloud.ibm.com:30426
Public Service Endpoint URL:    https://c3.<region>.containers.cloud.ibm.com:30426
Private Service Endpoint URL:   https://c3-private.<region>.containers.cloud.ibm.com:31140
Master Location:                Dallas
Master Status:                  Ready (21 hours ago)
Ingress Subdomain:              mycluster-<hash>-0000.us-south.containers.appdomain.cloud
Ingress Secret:                 mycluster-<hash>-0000
Workers:                        6
Worker Zones:                   dal10, dal12
Version:                        1.18.9_1524
Owner:                          owner@email.com
Resource Group ID:              a8a12accd63b437bbd6d58fb6a462ca7
Resource Group Name:            Default
Deprecated: Adding stand-alone worker nodes
If we have a cluster that was created before worker pools were introduced, we can use the deprecated commands to add stand-alone worker nodes.
If we have a cluster that was created after worker pools were introduced, we cannot add stand-alone worker nodes. Instead, we can create a worker pool, resize an existing worker pool, or add a zone to a worker pool to add worker nodes to the cluster.
-
List available zones and pick the zone where we want to add worker nodes.
ibmcloud oc zone ls
-
List available VLANs in that zone and note their ID.
ibmcloud oc vlan ls --zone <zone>
-
List available flavors in that zone.
ibmcloud oc flavors --zone <zone>
-
Add stand-alone worker nodes to the cluster. For bare metal flavors, specify dedicated.
ibmcloud oc worker add --cluster <cluster_name_or_ID> --workers <number_of_worker_nodes> --public-vlan <public_VLAN_ID> --private-vlan <private_VLAN_ID> --flavor <flavor> --hardware <shared_or_dedicated>
-
Verify that the worker nodes are created.
ibmcloud oc worker ls --cluster <cluster_name_or_ID>
Installing SGX drivers and platform software on SGX-capable worker nodes
Intel Software Guard Extensions (SGX) is a technology that can protect data-in-use through hardware-based server security. With Intel SGX, we can protect select code and data from disclosure or modification. Through the use of trusted execution environments (TEE), known as enclaves, we can encrypt the pieces of the app memory that contain sensitive data while the data or code is being used. To use Intel SGX, we must install the SGX drivers and platform software on SGX-capable worker nodes. Then, design the app to run in an SGX environment.
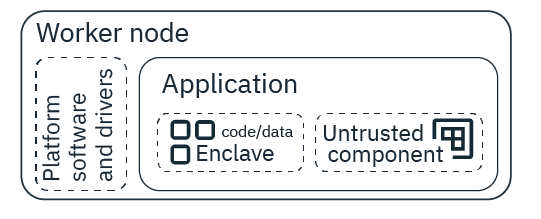
When you develop a confidential computing application, we must design it in a way that we can segment the information that needs to be encrypted. At runtime, the segmented information is kept confidential through a process that is known as attestation. When a request for information from the segmented code or app data is received, the enclave verifies that the request comes from the part of the application that exists outside of the enclave within the same application before sharing any information. Through the attestation process, information is kept confidential and data leakage is prevented.
Don't have an app that's configured to use Intel SGX but you still want to take advantage of the technology? Try using IBM Cloud Data Shield.
Installing with a script
Before beginning, create a worker pool with SGX-capable worker nodes. To work with Intel SGX, we must use one of the following machine types: mb3c.4x32 and ms3c.4x32.1.9tb.ssd. To see the options, we must filter to the Ubuntu 16 operating system.
-
Create an sgx-admin project with a privileged security context constraint that is added to the project service account so that the drivers and platform software can pull and run the required images.
curl -fssl https://raw.githubusercontent.com/ibm-cloud-security/data-shield-reference-apps/master/scripts/sgx-driver-psw/config_openshift/create_openshift_config.sh | bash
-
Create a daemon set to install the drivers and platform software on your SGX-capable worker nodes.
oc create -f https://raw.githubusercontent.com/ibm-cloud-security/data-shield-reference-apps/master/scripts/sgx-driver-psw/install_sgx/deployment_install_sgx_openshift.yaml
-
Verify that the drivers and platform software were installed by running the following command to check for a pod that begins with sgx-installer.
oc get pods
-
Get the logs for the sgx-installer pod to verify that you see the messages SGX driver installed and PSW installed.
oc logs <name_of_SGX_installer_pod>
-
Now that the drivers and platform software are installed, remove the daemon set.
oc delete daemonset sgx-installer
-
Delete the security context and service account that you created.
oc delete scc sgx-admin
oc delete serviceaccount sgx-admin
Now, we can develop your confidential computing app to use the enclave for sensitive data.
To uninstall the drivers and platform software, we can follow the same steps, but with the following installation command: oc create -f https://raw.githubusercontent.com/ibm-cloud-security/data-shield-reference-apps/master/scripts/sgx-driver-psw/uninstall_sgx/deployment_uninstall_sgx_openshift.yaml
Adding labels to existing worker pools
We can assign a worker pool a label when you create the worker pool, or later by following these steps. After a worker pool is labeled, all existing and subsequent worker nodes get this label. We might use labels to deploy specific workloads only to worker nodes in the worker pool, such as edge nodes for load balancer network traffic.Do not include personal information in your labels. Learn more about securing your personal information when you work with Kubernetes resources.
Before beginning: Access the OpenShift cluster.
- List the worker pools in the cluster.
ibmcloud oc worker-pool ls --cluster <cluster_name_or_ID>
-
To label the worker pool with a key=value label, use the POST worker pool labels API. When you set a worker pool label, all the existing custom labels are replaced. Format the body of the request as in the following JSON example.
Example to set <key>: <value> as the only custom label in the worker pool.
{
  "labels": {"<key>":"<value>"},
  "state": "labels"
}
Example to set <key>: <value> as a new custom label in a worker pool with existing labels team: DevOps and app: test.
{ "labels": {"<key>":"<value>","team":"DevOps","app":"test"}, "state": "labels" } -
Optional: To remove a label from a worker pool, use the POST worker pool labels API again with the label's key field included but the value field empty. Remember that when you set a label, all existing custom labels are replaced. To keep existing custom labels, include these labels in the body.
Example to remove a label. All other custom labels are also removed.
{
  "labels": {"<key>":""},
  "state": "labels"
}
Example to remove a <key> label but keep other custom labels team: DevOps and app: test.
{ "labels": {"<key>":"","team":"DevOps","app":"test"}, "state": "labels" } -
Verify that the worker pool and worker node have the key=value label that you assigned.
- To check worker pools:
ibmcloud oc worker-pool get --cluster <cluster_name_or_ID> --worker-pool <worker_pool_name_or_ID>
-
To check worker nodes:
- List the worker nodes in the worker pool and note the Private IP.
ibmcloud oc worker ls --cluster <cluster_name_or_ID> --worker-pool <worker_pool_name_or_ID>
-
Review the Labels field of the output.
oc describe node <worker_node_private_IP>
Example output for an added label (app=test):
Labels:   app=test
 arch=amd64
 ...
Example output for a removed label (the app=test label is gone):
Labels:   arch=amd64
 ...
- List the worker nodes in the worker pool and note the Private IP.
- To check worker pools:
After you label your worker pool, we can use the label in the app deployments so that the workloads run on only these worker nodes, or taints to prevent deployments from running on these worker nodes.