Lotus Connects v2.5 system requirements
Overview
See: Detailed system requirements for LC.
If using a 32-bit OS, enable PAE to access more than 4GB of RAM.
- For Windows, see Physical Address Extension
- For UNIX, check your documentation. All that is required might be running...
- yum install kernel-PAE
..and then set default in grub.
Keep co-dependent features together.
Do not use the advanced standalone option, ever.
Cluster using co-resident dmgr and node from day one. Get into the clustered administration mindset before habits are set.
Often a well configured, well-specified single node WAS environment will be sufficent. Do not get pushed into complex infrastructures for small/simple environments.
DB2 should be default RDBMS. Ease of support and bundled license trump any lack of DB2 skills.
Topology options...
- Install all features into a single cluster on a single node
- Simplest deployment. Limited flexibility. Does not allow individual features to be scaled up. Adding additional nodes requires all features in the cluster to run on all nodes.
- Install a subset of features into separate clusters
- Partition features according to your usage and expectations. For instance, you might anticipate higher loads for the Profiles feature and install it into its own cluster, while other features could be installed together into a different cluster. This allows you to maximize the use of available hardware and system resources to suit your needs.
- Install each feature into its own cluster
- An IBM best practice. 1 cluster / component
Allows individual component scaling vs scaling all five components. More granular control
Requires more system resources. Eight features times two nodes equals a minimum of 16 nodes
In most cases, you should install the News and Home page features into the same cluster.
- Install all features into a single cluster with multiple nodes
- Requires a minimum of two nodes.
For multi-node clusters, configure network share directories for...
- content stores
- message stores
- search indexes
On UNIX systems, use NFS V4, which has the file locking controls required for SIB and Search components.
On Windows systems, you can use Samba with with UNC style naming...
-
\\server\share
Set up the autoexport on Dmgr and automount on the managed nodes.
For more information about deployment scenarios, see the Lotus Connections wiki.
WAS ND and shared file systems
To allow any server within a cluster to access required content, a shared file system must be used for numerous items in an ND deployment. Top level directories must be created to cover the following items:
| Blogs | Blogs attachments |
| Bookmarks | Bookmark favorite icons |
| Files | File content |
| Service Integration Bus | |
| Activities | File attachements |
| Search | Full text search index |
| Wikis | Wiki content |
Disk space
The Activities and Files applications usually consume the most disk space, with Files typically fastest to grow.
Use logical volumes if possible. Many LV Managers allow expansion live without taking down the file system.
These numbers should get you well into your deployment but require monitoring and potential expansion:
| Activities | 50G |
| Files | 200G |
| Wikis | 50G |
| Blogs | 15G |
| Search Indexes | 10G |
| SIB | 2G |
| Bookmarks | 1G |
For SIB, minimum is 150MB x #_of_clusters. Won't grow unless you add clusters
Install WebSphere dmgr
- Use the Cell environment option when choosing what to install.
- Set up Global Security and configure LTPA SSO settings
- Edit file soap.client.properties and set:
- com.ibm.SOAP.requestTimeout=0
- Increase the size of the JVM heap on the deployment manager to at least 512 MB.
- Install both Application Server and SDK fixpacks
Install WebSphere Application Server
- On each managed Node, install WAS.
Use the "Application Server" environment option when choosing what to install.
- Connect to the WebSphere Admin Console installed on server1 and enable Administrative Security.
You do not need to configure Global Security (LDAP).
- Install Application Server and SDK fixpacks.
- Install the RDBMS
- Create new database instances. Use names that make sense, for example:
- db2instA
- activitiesdb
- Copy the Lotus Connections "wizard" archive to the RDBMS machine and extract the contents.
- Run the DB Wizard, once for each component.
Each time you specify the component you want to create the database for, and the database instance connection paramters.
- Copy the JDBC driver jar to each appserver node and record the location for future reference.
Populate the Profiles Database
Use Tivoli Directory Integrator (TDI) to create "users" in the Profiles database
This can be as simple as pointing to corporate LDAP and pulling a few attributes, or as complex as connecting to multiple sources and mapping attributes to Profiles.
An assembly line is made up of components...
- connectors
- flow controls
- loops
- branches
..that collect data from your source repositories and reformat it into the Profiles database.
Supports two-way synchronization on LDAP attributes.
Assembly line hooks available for scripting.
Install Lotus Connections Applications
- On the first "managed" node, extract and run the installation.
- Choose Network Deployment, First Node
- Each Application should be installed on its won Server, except you can combine...
- Homepage and News
- Mobile and Search
- Use descriptive Server and Cluster names
- Activities_Cluster
- Blogs_Cluster
- Bookmark_Cluster
- Communities_Cluster
- Files_Cluster
- Home_Cluster
- Mobile_Search_Cluster
- Profiles_Cluster
- Wikis_Cluster
- Use the shared Data directories earlier, specifying the local mount point.
Pilot deployment
Stand-alone deployment
Install a network deployment
Related reference
Lotus Connections detailed system requirements
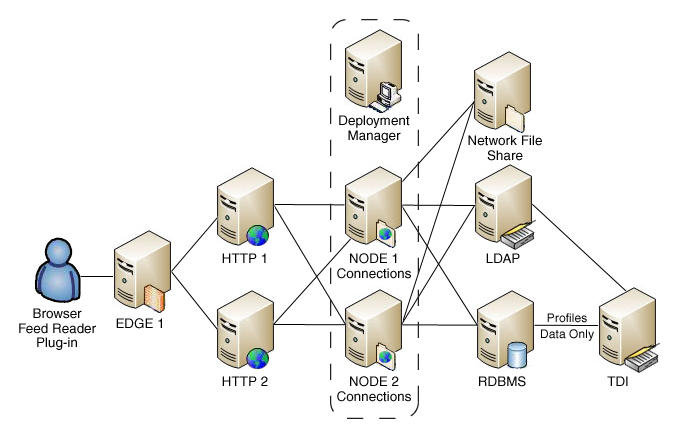
One possible computer server architecture
| pserver | Profiles and Communities |
| iserver | Homepage, News, Search and Mobile |
| aserver | Activities, Blogs and Dogear (Bookmarks) |
| fserver | Files and Wikis |
Another possible computer server architecture


| LC deployment option | JVM | Proxy | Cluster topology |
|---|---|---|---|
| Pilot | Single | No | (Not applicable) |
| Stand-alone | Single | No | (Not applicable) |
| Advanced stand-alone | Multiple (individually managed) | Optional | (Not applicable) |
| Network deployment | Multiple (centrally managed) | Recommended | One cluster per feature. Each cluster contains at least 1 JVM. |
In a network deployment, you can assign various combinations of features to clusters in many different ways, depending on your usage and expectations. For more information, see the Network deployment topic and go to the Lotus Connections wiki to read articles about deployment.
The number of JVMs that you need for each cluster depends on the user population and workload. For failover, have two JVMs per feature, scaled horizontally. Horizontal scaling refers to having multiple JVMs per feature with each JVM running on a WebSphere Application Server instance. Vertical scaling refers to running multiple JVMs for the same feature on a single WebSphere Application Server instance. Vertical scaling is not officially supported yet in Lotus Connections. However, it is usually not needed unless your server has a large number of CPUs.
Advanced stand-alone: You can create a stand-alone deployment with multiple WebSphere Application Servers Base but this is a complex deployment that requires considerable post-installation effort to link the different application servers. If you choose this deployment, your administration load could be excessive. You can save time and effort by choosing the network deployment option instead.
Choose from the following deployment options:
Related tasks
- Directory path conventions
- Deployment options
- Secure LC
- Pilot deployment
- Install a pilot deployment
- Stand-alone deployment
- Network deployment
- Install LC
- Migration strategies
- Update databases
- Install IBM WebSphere Application Server
- Install a stand-alone deployment
- Configure Tivoli Directory Integrator
- Install in silent mode
- Prepare LC for maintenance
- Migrate to LC 2.5
- Migrate a stand-alone deployment
- Migrate a network deployment