Schedule overview
Overview
A schedule is the "engine" that runs a test. A schedule can be as simple as one virtual user running one test, or as complicated as hundreds of virtual users in different groups, each running different tests at different times.
Schedules can control tests in the following ways:
- Group tests under user groups, for example, browsers vs. buyers.
- Set the order in which tests run:
- sequentially
- randomly
- weighted order
- Set the number of times that each test runs
- Run tests at a certain rate
- Run tests for a certain time, and increase or decrease virtual users during the run
When you first create a schedule, it is displayed with one user group.

You add user groups, tests, and other items to the schedule to emulate a workload.
When you add items to a schedule, they appear in italic type...
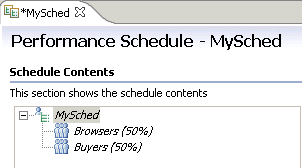
The italic type changes to regular type after you save the schedule.
To resize the schedule window, do one of the following:
- Click Ctrl+Alt+> or Ctrl+Alt+< to enlarge or reduce the window.
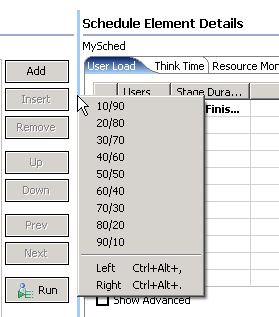
- Hover at the left side of the Schedule Element Details area. When you see a vertical blue line, right click the line and select a size ratio from the menu.
The new size remains the next time you open the window.
Performance Schedule Memory
If you get out-of-memory errors during execution, you can take steps to maximize the throughput. Here are some sample parameters you can set for short duration runs of 10 minutes:
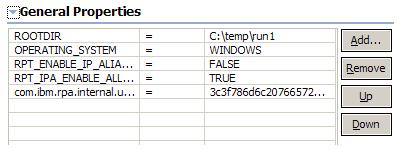
- Set the memory argument to -Xmx1024m. For the remote agent, this can done via the GUI. Select the Location...

...and add the variable under the General Properties
Alternatively, you can set in the eclipse.ini file.
- Keep the default think time, which is set to the recorded time.
- Set the statistics tab to "Primary actions" and the interval rate to 30 seconds
- Keep the default test log setting
- Set the problem determination log to ALL
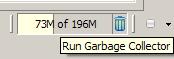
- Set the workbench preferences so that you can view the workbench heap
-
Window | Preferences | General | Show workbench heap
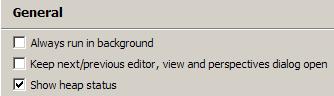
The heap monitor appears at the bottom right of the screen.
Related
- User group overview
- Create a schedule
- Set the user load
- Add a test to a schedule
- Define performance requirements in schedules
- Repeat tests in a schedule
- Delay virtual users or actions
- Run tests at a set rate
- Run tests in random order
- Add a transaction to a schedule
- Synchronize users
- Emulate network traffic from multiple hosts