Repeat tests in a schedule
Overview
By adding a loop to a schedule, you can repeat a test for a number of iterations and set the rate for running a test. If the loop contains a synchronization point, the synchronization point is released after the first iteration of the loop and stays released for all further iterations.A schedule containing only user groups and tests runs each test in a user group sequentially. Loops provide more sophisticated control than running a simple sequence of consecutive tests.
You can set a loop within a schedule or a test...
| Loop location | Results |
|---|---|
| Schedule | Closes the server connection at the end of each iteration and reopens it at the beginning of the next, modeling the behavior of a user closing and reopening a browser.
Use this method to run a test at a set rate. |
| Test | Loops in tests can be more granular, and thus provide a higher level of control.
Loops in tests reuse the server connection during each loop iteration. Use this method, with loops that have high iteration counts, to stress test a server. |
Add a loop to a schedule
- In the Test Navigator, browse to the schedule and double-click it.
- Click the item to be the parent of the loop, and then click...
-
Add | Loop
- In the Schedule Element Details area, set the number of iterations for the loop to repeat.

Option Description Count-based Run for the number of iterations that you select. Time-based Run at least for the time that you specify. The loop always finishes the iteration. For example, if you select a time of 1 second and a loop takes 10 seconds to run, the loop finishes one iteration, and then checks the time.
Infinite Run until the schedule duration ends. Use this option to gather performance data over time: set an infinite loop, and then set the schedule to stop after a specific time. - To maintain a set transaction rate for all schedule items that are children of this loop:
- Select Control the rate of iterations.
- In the Iteration rate field, type a number, and select a time unit. This sets the actual rate.
- Select or clear the checkbox...
-
Randomly vary the delay between iterations
Selecting this check box causes the delay to vary slightly. This option models users more accurately, because the iterations are spread out randomly over a certain period of time.
This option sets delay amounts at random from a negative exponential distribution with the same mean as the fixed delay value. The negative exponential distribution has a long "tail," which means that a very small number of delays will have very large values. Therefore, make sure that the application you are testing is not negatively affected by long periods of inactivity (such as a timeout that disconnects the user).
- Select or clear the check box...
-
Delay before the first iteration of the loop check box
Selecting this check box staggers the first delay in each iteration so that you get a realistic mix at the first iteration.
Example
The following schedule contains two loops. Note that the Browse and Bid tests, which are controlled by the loop, must be children of the loop.

Home, login, and logout included where low-volume transactions occur
The nature of the application and business transactions that they represent may sometimes be low volume, but still have a significant impact on server performance. Because of this impact, it is often deemed important that these low-volume transactions still be included in the workload.
Session timeouts are one of the first considerations.
For example, if we wanted to execute two transactions an hour, each taking 5 minutes, we would have on average 25 minutes of think time to achieve the correct pacing. If server session timeouts occur after 10 minutes it becomes important to log out and back in within the test's business transaction loop. If not, there might not be an active session for future transactions. In the real world, when a user is presented with session timeouts, he would navigate back to the home page and then log in again. We must do the same within the test.
Verify that timeout value is high enough for very long response times
Because of the tremendous amount of back-end process that may occur for some of the business transactions and queries, it is important that RPT can accommodate long response times. Although production-level response times might be good, while recording tests against a test environment/partition you might have transactions that would take many minutes to complete.
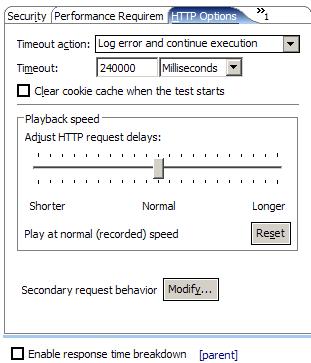
To accommodate large test response times, increase the timeout value was incremented on the HTTP Options tab of the Test Element Details section. For example, increase the timeout value was incremented from 240000 milliseconds (4 minutes) to 1800000 milliseconds (30 minutes).
Related