Set up a single server
This scenario is suited to people investigating WebSphere Portal features and capabilities (proof-on-cencept), demonstrating the features to interested third-parties, or developers setting us a development environment. This installation path is intended to provide a simple configuration with all the needed components on one server. The instructions for this single-server configuration are Windows specific.
The configuration uses a local DB2 database, so you will transfer data from the default database to DB2. However, for test, proof-of-concept environments, and development environments, you can use the out-of-box database. Security is configured as the default federated repository with a built-in file repository.
Prerequisites
- Technotes for installation and configuration issues
The topology below illustrates the single-server configuration that will result from following the instructions in this scenario.
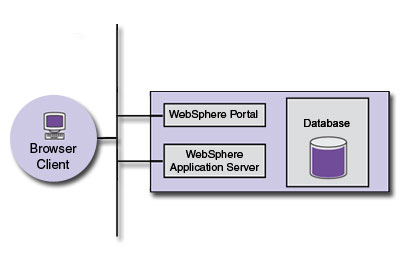
 Even for a single-server configuration, you should tune the servers in the portal environment in order to achieve better performance. The Base Portal Tuning scenarios in the WebSphere Portal and Lotus Web Content Management 6.1.x Performance Tuning Guide provides information about tuning the WAS, WebSphere Portal services, databases, directory servers and more.
- Prepare the Windows operating system
View information on setting up your operating system for WebSphere Portal. Other components might require additional steps; see the product documentation for the specific components you want to install.
- Installing WebSphere Portal on Windows
WebSphere Portal is installed as a single component, complete with an integrated database for storing information. This allows you to get WebSphere Portal up and running quickly for a proof of concept phase where you can immediately begin building and working with it. You can also expand your environment to include high availability failover, a more robust database, and LDAP-based authentication.
- Changing to developer mode
Developer mode allows you to develop portals and portlets within an environment that has improved start up performance.
- Installing DB2 on the same server as WebSphere Portal
View information on installing DB2 for use with WebSphere Portal.
- Configure JCR collation support
View the steps to set up JCR collation to work with your IBM DB2 Universal Database™ Enterprise Server Edition database. JCR collation is recommended when the language locales of your users do not natively collate correctly in the DB2 database and when language locale correct ordering is important.
- Modifying database properties
Learn how to modify the wkplc.properties, wkplc_comp.properties, and wkplc_dbtype.properties files to work with your database. Modify these property files before running tasks to create databases, create users, or transfer data. Create a backup copy of each properties file before modifying it.
- Set up databases
This section provides information on using ConfigEngine tasks to create databases and users.
- Optional: Assigning custom table spaces
The repository of WebSphere Portal consists of many tables and indices that are created in default table spaces. When using an existing set of table spaces for the objects of the repository, specify this when executing the database transfer to the target database system.
- Configure WebSphere Portal to use DB2
View information on manually transferring data to the DB2 database you have installed and set up. Follow these steps to transfer WebSphere Portal, and Java Content Repository databases to DB2. As an alternative to the manual database transfer procedure described here, you can use the configuration wizard to complete the database transfer task.
- Configure DB2 for large file handling in Web Content Management
For Web Content Management, update the database configuration to support large files. Do this by setting the fullyMaterializeLobData property in the administrative console.
- Verify databases
After you configure WebSphere Portal to work with your database, test the database connection to ensure that it operates correctly. Then verify that all database transactions work properly within the WebSphere Portal environment.
For example, all portal pages should display without HTTP 404 errors, and there should be no database layer-related exceptions in the SystemOut.log and SystemErr.log files.
Parent topic:
Installing WebSphere PortalRelated concepts
Understand cross-cell deployment scenarios