RAD v75 - Additional material
The additional material is a Web download of the sample code for this book. This appendix describes how to download, unpack, describe the contents, and import the project interchange file. In some cases the chapters also require database setup; however, if needed, the instructions will be provided in the chapter in which they are needed.
The Web material associated with this book is available in softcopy on the Internet from the IBM Redbooks Web server. Enter the following URL in a Web browser, and then download the two ZIP files from:
ftp://www.redbooks.ibm.com/redbooks/SG247672
Alternatively, you can go to the IBM Redbooks Web site at:
http://www.ibm.com/redbooks
Retrive:
Unpacking the sample code
After you have downloaded the two ZIP files, unpack the files to your local file system using WinZip, PKZip, or similar software. For example, we unpacked the 7672code.zip and 7672codesolution.zip files to the C:\ drive, which creates C:\7672code. Throughout the samples, we reference the sample code as if you have unpacked the files to the C drive.
Description of the sample code
Interchange files with final code
- jsf/RAD75JSF.zip
- webservice/RAD75WebService.zip
- portal/RAD75PortletEventAjax.zip
- portal/RAD75PortletEvent.zip
- webapp/RAD75BankBasicWeb.zip
- junit/RAD75JUnitWebTest.zip
- junit/RAD75JUnit.zip
- struts/RAD75Struts.zip
- struts/RAD75Struts-Tiles.zip
- jca/RAD75JCASAP.zip
- jca/RAD75JCACICS.zip
- jca/RAD75JCACICSChannel.zip
- java/RAD75Java.zip
- 7672code/webservice/RAD75WebServiceStart.zip
- 7672code/portal/RAD75PortletEventStart.zip
- 7672code/portal/RAD75PortletEventAjaxStart.zip
- 7672code/web20/RAD75Web20-Dojo-Initial.zip
- 7672code/web20/RAD75Web20-Ajax-Initial.zip
- 7672code/patterns/RAD75Patterns-Ahmed.zip
- 7672code/patterns/RAD75PatternsFacade.zip
- 7672code/patterns/RAD75PatternsFacade-Ahmed.zip
- 7672code/patterns/RAD75Patterns.zip
- ant/RAD75Ant.zip
- web20/RAD75Web20-Dojo.zip
- web20/RAD75Web20-Ajax.zip
- appclient/RAD75AppClient.zip
- xml/RAD75XML.zip
- patterns/RAD75Patterns.zip
- ejb/RAD75EJBWeb.zip
- ejb/RAD75EJB.zip
- jpa/RAD75JPA.zip
- jython/RAD75Jython.zip
Import sample code from a project interchange file
This section describes how to import the Redbooks publication sample code project interchange zip files into RAD v7.5.
To import a project interchange file...
- From the Workbench, select...
-
File | Import
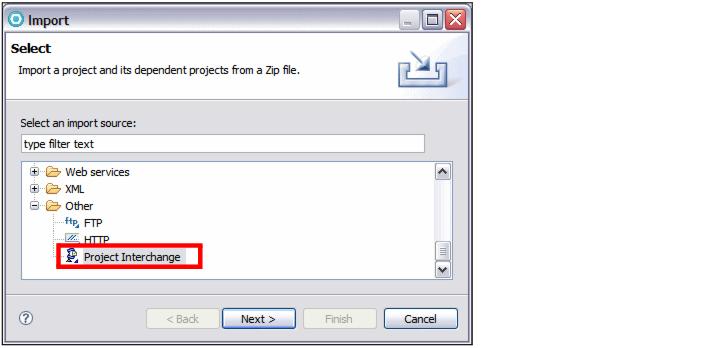
- From the Import dialog, select...
-
Other | Project Interchange | Next

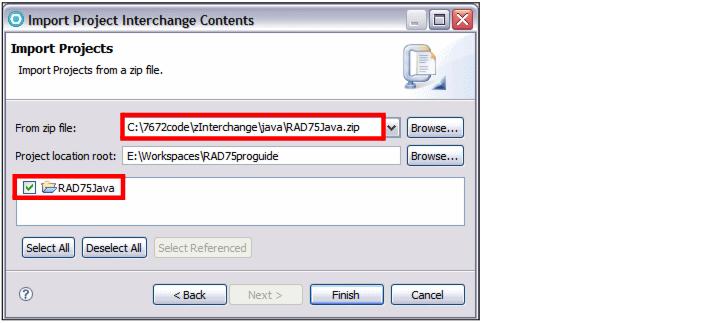
- When prompted for the path and file name, enter the following:
From zip file: Click Browse and locate the path and the zip file. For example... Project location root: Leave the default workspace location. - After locating the zip file, the projects contained in the interchange file are listed. Select the project(s) that you want to import, and click Finish.
For example, we select RAD75Java and clicked Finish.

Note that for the RAD75EJBWeb.zip project, after importing, deploy the code again. Right-click the RAD75EJBWeb.zip project and select...
-
Prepare for Deployment
Setting up the ITSOBANK database
We provide two implementations of the ITSOBANK database, Derby and DB2. You can choose to implement either or both databases and then set up the enterprise applications to use one of the databases. The Derby database system is shipped with the WebSphere Application Server. We tested the application on DB2 Version 8.2, but it should work on DB2 v9.1 as well.
Derby
Command files to define and load the ITSOBANK database in Derby are provided in the folder...
-
C:\7672code\database\derby
The DerbyCreate.bat, DerbyLoad.bat and DerbyList.bat files assume that you installed Application Developer in...
-
C:\IBM\SDP75\
Edit these files to point to your Application Developer installation directory if you installed the product in a different folder.
After edits, run...
-
cd C:\IBM\RADSample\7672code\database\derby
DerbyCreate.bat
DerbyLoad.bat
DerbyList.bat
These command files use the SQL statements and helper files provided in:
| itsobank.ddl | Database and table definition |
| itsobank.sql | SQL statements to load sample data |
| itsobanklist.sql | SQL statement to list the sample data |
| tables.bat | Command file to execute itsobank.ddl statements |
| load.bat | Command file to execute itsobank.sql statements |
| list.bat | Command file to execute itsobanklist.sql statements |
The Derby ITSOBANK database is created under:
C:\7672code\database\derby\ITSOBANK
DB2
DB2 command files to define and load the ITSOBANK database are provided in...
-
C:\7672code\database\db2
| createbank.bat | Define the database and table. |
| loadbank.bat | Delete the existing data and add records. |
| listbank.bat | List the contents of the database. |
These command files use the SQL statements provided in:
| itsobank.ddl | Database and table definition |
| itsobank.sql | SQL statements to load sample data |
| itsobanklist.sql | SQL statement to list the sample data |
Starting the WebSphere Application Server
If you are using a stand-alone WebSphere Application Server v7.0, enter the following commands in a command window:
cd \IBM\WebSphere\AppServer\profiles\AppSrv01\bin startServer.bat server1
If you are using the WebSphere Application Server v7.0 test environment shipped with RAD v7.5, in the Servers view, right-click WebSphere Application Server v7.0 at localhost and select Start.
Configure the environment variables
Prior to configuring the data source, ensure that the environment variables are defined for the desired database server type. This step does not apply to Derby because we are using the embedded Derby, which already has the variables defined. For example, if you choose to use DB2 Universal Database, verify the path of the driver for DB2 Universal Database.
Launch the WebSphere administrative console:
If you are using the WebSphere Application Server v7.0 test environment shipped with RAD v7.5, you can simply right-click WebSphere Application Server v7.0 and select...
-
Administration | Run administrative console
For a stand-alone server, type the following URL in a Web browser:
-
http://localhost:9062/ibm/console
You might have to specify a port other than 9062. The administrative console port was chosen during the installation of the server profile.
- Click Log in. If you installed WebSphere with administrative security enabled, use the user ID and password chose at installation time (for example, admin/admin).
- Expand...
-
Environment | WebSphere Variables
- Scroll down the page and click the desired variable and update the path accordingly for your installation.
For Derby
-
DERBY_JDBC_DRIVER_PATH
By default this variable is already configured because Derby is installed with WebSphere Application Server:
${WAS_INSTALL_ROOT}/derby/lib
For DB2:
-
DB2UNIVERSAL_JDBC_DRIVER_PATH
Edit the value and provide the DB2 installation directory, for example, C:\IBM\SQLLIB\java, or C:\SQLLIB\java.
- Click Save (at the top).
Configuring J2C authentication data
This section describes how to configure the J2C authentication data (database login and password) for WebSphere Application Server from the WebSphere administrative console. This step is required for DB2 UDB and optional for Derby.
If using DB2 UDB, configure the J2C authentication data (database login and password) for WebSphere Application Server from the Administrative Console:
- Select...
-
Security | Global security | Authentication properties | Java Authentication and Authorization Service | J2C Authentication data | New
- Enter the Alias, User ID, and Password in the JAAS J2C Authentication data page. For example, create an alias called db2user with the user ID and password used when installing DB2.
- Click Save.
Configuring the JDBC provider
This section describes how to configure the JDBC provider for the selected database type. The following procedure demonstrates how to configure the JDBC provider for Derby, with notes on how to do the equivalent for DB2 UDB.
To configure the JDBC provider from the WebSphere administrative console, do these steps:
- Select...
-
Resources | JDBC | JDBC Providers
- Select the server scope from the drop-down menu. In our case, we select...
Node=<machine>NodeXX, Server=server1
- Click New.
- From the New JDBC Providers page, do these steps and then click Next:
Derby...
Database Type: Derby JDBC Provider: Derby JDBC Provider. DB2...
DB2 UDB: DB2 Implementation type: XA data source DB2 UDB: DB2 Universal JDBC Driver Provider - Click Next.
- Click Finish.
Creating the data source
To create the data source for Derby, do these steps:
- Select the Derby JDBC Provider (XA).
- Under Additional Properties, select Data sources.
- Click New.
- Type ITSOBANKderby as Data source name, and jdbc/itsobank as JNDI name. Click Next.
- Type C:\7672code\database\derby\ITSOBANK as the Database name. Clear Use this data source in container managed persistence (CMP), because JPA does not use CMP. Click Next.
- Skip the Setup security aliases page. Click Next.
- Click Finish and then click Save.
- Verify the connection by selecting ITSOBANKderby (the check box) and then click Test connection. You should get the message:
The test connection operation for data source ITSOBANKderby on server server1 at node xxxxxNodexx was successful with 1 warning(s).
If you are using DB2, create a data source for JDBC Providers | DB2 Universal JDBC Provider Driver (XA):
- Select...
-
Data sources | New
- Type ITSOBANKdb2 as Data source name, and jdbc/itsobankdb2 as JNDI name.
- Type ITSOBANK as Database name and localhost as Server name. Leave 4 as Driver type and 50000 as Port number. Clear Use this data source in container managed persistence (CMP).
- Select the db2user alias for Authentication alias for XA recovery and for Component-managed authentication alias.
- Click Next, then Finish and then Save.
- Verify the connection by selecting ITSOBANKdb2 (the check box) and then click Test connection. You should get the successful message.
If you always want to use DB2 for the ITSOBANK database, set the JNDI name for the DB2 data source to jdbc/itsobank and for Derby to jdbc/itsobankderby. The sample application uses jdbc/itsobank to access the database, and it can be Derby or DB2.