Custom configuration of resource synchronization
The Synchronize view provides the ability to create custom synchronization sets for the purpose of synchronizing only identified resources that a developer might be working on. This allows the developer to focus on changes that are part of their scope of work and ensure they are aware of the changes that occur without worrying about changes to other areas.
The developer can make changes to the other areas or someone else might check-in changes to these parts, but only the resources in the defined set are synchronized.
This is handy if the changes being worked on are localized and other areas of the code are changing in ways not important for the work at hand. On the other hand, problems can occur with this mode of operation as well. Developers have to be careful that important changes to the non-synchronized parts are not ignored for long periods of time.
|
Important: Custom synchronization is most effective when an application is designed with defined interfaces, where the partitioning of work is clear. However, even in this scenario, it should be used with caution because it can introduce additional work in the development cycle for final product integration. Procedures have to be documented and enforced to ensure that integration is incorporated as part of the work pattern for this scenario. |
The example scenario (again using the RAD75CVSGuide project) demonstrates custom synchronization, through two procedures:

| 
| 
| Full synchronization of the project RAD75CVSGuide |

| 
| 
| Partial synchronization of the ServletA.java |
To perform the example, complete the following for the cvsuser1 workspace:

| Open the Team Synchronizing perspective. |

| Click the Synchronize button  at the top the Synchronize view and click Synchronize to add a new synchronization definition. at the top the Synchronize view and click Synchronize to add a new synchronization definition.
|

| In the Synchronize dialog, select CVS and click Next. |

| Expand the Workspace tree to view the contents and note that all resources in the workspace are selected. Accept the defaults for the Synchronize CVS dialog, and click Finish. |
|
Note: When using Application Developer v7.5, the list of resources shows a Workspace and a Java Workspace folder. If a customized resource set is required, it can be selected from either folder with the same final result. |
If there are no changes, then a dialog box opens, saying Synchronizing: No changes found, and in the Synchronize view a message of No changes in 'CVS (Workspace)'. Click OK in the dialog box.

| To preserve this synchronization, click Pin Current Synchronization  . .
|

| Add a new synchronization by clicking the Synchronize icon  at the top of the Synchronize view. at the top of the Synchronize view.
|

| In the Synchronize dialog, select CVS and click Next. |

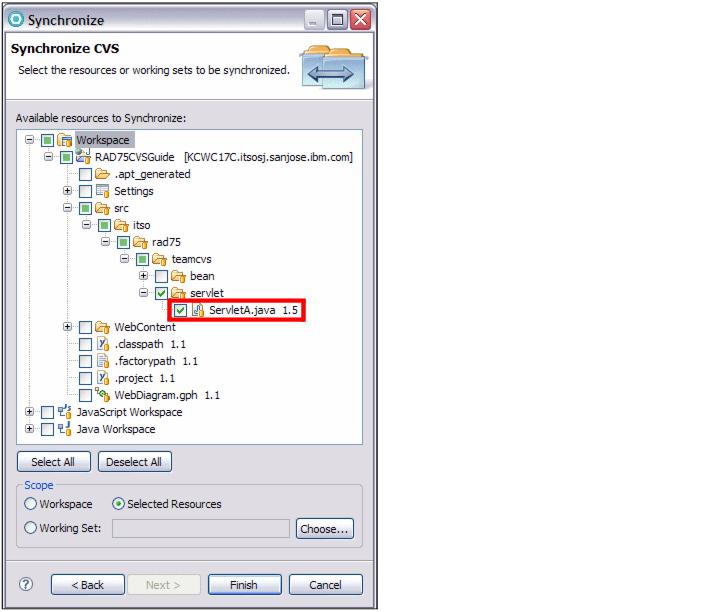
| Expand the project tree under JavaSource to view the contents, click Deselect All to deselect all the resources, and select only ServletA.java. |
The Synchronize CVS dialog appears as shown in Figure | 8-46.

Figure 28-46 Selecting ServletA.java for synchronization

| Click Finish. |

| If there are no changes, then a dialog box opens, saying Synchronizing: No changes found, and in the Synchronize view a message of No changes in 'CVS (Workspace)'. Click OK in the dialog box. |

| To preserve this synchronization, click Pin Current Synchronization  . .
|

| Click the  icon at the top of the Synchronize view. There are now two CVS Synchronizations in the list (Figure | 8-47). icon at the top of the Synchronize view. There are now two CVS Synchronizations in the list (Figure | 8-47).
|

Figure 28-47 List of synchronizations created
|
ibm.com/redbooks |