Creating the J2C bean
Next we create the J2C bean:

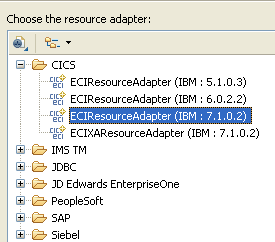
| Select File Æ New Æ Other Æ J2C Æ J2C Bean, and click Next.
|

Figure 20-5 Selection of the resource adapter
This action imports the file:
<RAD_Install>/ResourceAdapters/cics15/cicseci7102.rar

| In the Connector Import dialog:
|

 Connector file: <RAD_HOME>\ResourceAdapters\cics15\cicseci7102.rar
|

 Target Server: WebSphere Application Server 7.0
|

 Click Next.
|

 Clear Managed Connection.
|

 Select Non-Managed Connection.
|

 Enter the connection details provided by your CICS administrator, typically: Connection URL, Server name, Port number, User name, Password
|

 Click Next.
|

Figure 20-6 Connection Properties

| In the J2C Java Bean Output Properties dialog, enter:
|

 Project Name: Taderc99
|

 Package name: sample.cics
|

 Interface name: Customer
|

 Implementation Name: CustomerImpl (automatically filled)
|

 Click Next.
|

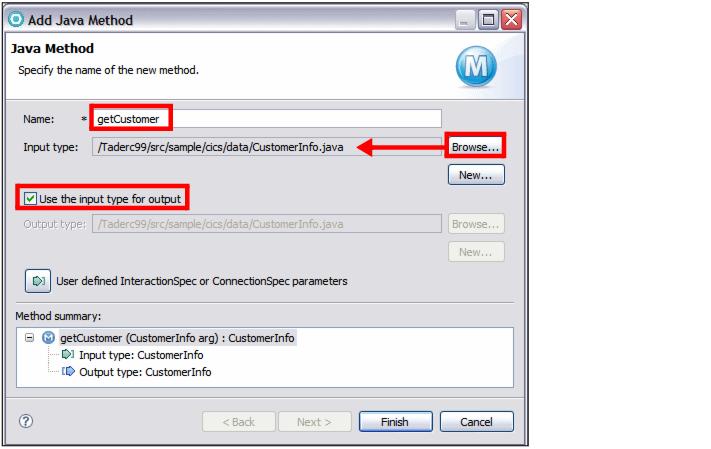
| In the Java Methods dialog, click Add to open the Java Method dialog.
|

 Name: getCustomer
|

 Input type: Click Browse and type cust to locate the CustomerInfo class in the sample.cics.data package. The value becomes:
|
/Taderc99/src/sample/cics/data/CustomerInfo.java

 Select Use the input type for output.
|

 Click Finish.
|

Figure 20-7 Adding a new Java Method to a J2C Java Bean

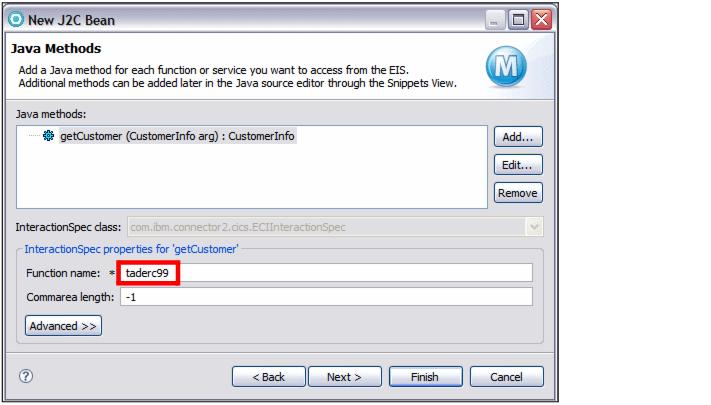
| Back in the Java Methods dialog (Figure | 0-8), you can see that the method getCustomer is listed. In the InteractionSpec properties, specify the Function name as taderc99 (this must match the name of the CICS program).
|

Figure 20-8 InteractionSpec properties
This action generates a Customer interface and a CustomerImpl class into the Taderc99 project. In addition the cicseci7102 project is created, containing a plug-in (j2c_plugin.xml) and a CICS resource adapter XML file (ra.xml).


 Connector file: <RAD_HOME>\ResourceAdapters\cics15\cicseci7102.rar

 Connector project: cicseci7102

 Target Server: WebSphere Application Server 7.0

 Click Next.


 Clear Managed Connection.

 Select Non-Managed Connection.

 Enter the connection details provided by your CICS administrator, typically: Connection URL, Server name, Port number, User name, Password

 Click Next.


 Project Name: Taderc99

 Package name: sample.cics

 Interface name: Customer

 Implementation Name: CustomerImpl (automatically filled)

 Click Next.


 Name: getCustomer

 Input type: Click Browse and type cust to locate the CustomerInfo class in the sample.cics.data package. The value becomes:

 Select Use the input type for output.

 Click Finish.


