Creating the Web project
The first step is to create a Web project in the workspace.
|
Note: Before this, it might be a good idea to check that Web capabilities are enabled. Select Windows Æ Preferences and expand General Æ Capabilities make sure that Web Developer options (including basic, typical and advanced) are selected. |
There are two types of Web projects available in RAD v7.5, namely, static and dynamic. Static Web projects contain static HTML resources and no Java code, and thus are comparatively simple. In order to demonstrate as many features of Application Developer as possible, and because the RedBank application contains both static and dynamic content, a Dynamic Web project is used for this example.
In RAD v7.5, perform the following steps:

| Open the Web perspective by selecting Window Æ Open Perspective Æ Web. |

| To create a new Web Project, select File Æ New Æ Dynamic Web Project. |

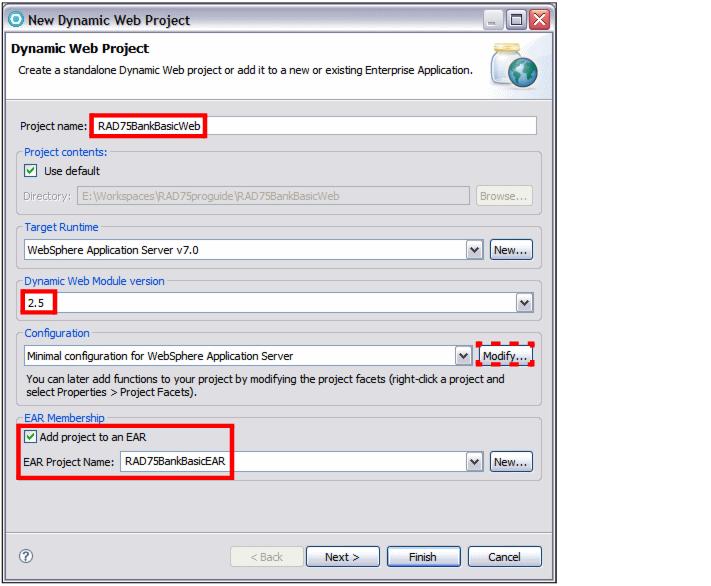
| In the New Dynamic Web Project dialog, enter the following items (Figure | 3-11): |

 Type RAD75BankBasicWeb in the name field.
|

 For Project contents, select Use Default (default). This specifies where the project files should be placed on the file system. The default option of leaving them in the workspace is usually fine.
|

 Target Runtime: Select WebSphere Application Server v7.0 (default). This option will display the supported test environments that have been installed. Use WebSphere Application Server V7.0 Test Environment.
|

 Dynamic Web Module version: Select 2.5.
|

 Configuration: We define the configuration as the last item.
|

 EAR Membership: Select Add module to an EAR (default). Dynamic Web Projects, such as the one we are creating, run exclusively within an enterprise application. For this reason, you have to either create a new EAR project or select an existing project.
|

 EAR Project Name: RAD75BankBasicEAR (overtype the default). Because we selected Add module to an EAR project, the wizard will create a new EAR project.
|

Figure 13-11 New Dynamic Web Project

| For Configuration, click Modify to open the Project Facets dialog: |
Select the additional features Default Style Sheet, JSTL, and Web Site Navigation (Figure | 3-12). Click OK and the configuration changes to <custom>.

Figure 13-12 Dynamic Web Project Facets
|
Notes:
|

| Click Next. |

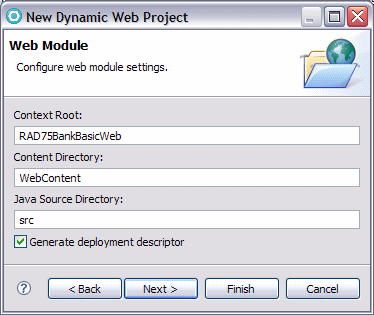
| In the Web Module page, accept the default options (Figure | 3-13). |

Figure 13-13 New Dynamic Web Project, Web Module settings
The settings here are as follows:

 Context Root: RAD75BankBasicWeb
|
The context root defines the base of the URL for the Web application.
The context root is the root part of the URI under which all the application resources are going to be placed, and by which they will are referenced later. It is also the top level directory for your Web application when it is deployed to an application server.

 Content Directory: WebContent
|
This specifies the directory where the files intended for the WAR file are created. All the contents of the WEB-INF directory, HTML, JSPs, images and any other files that are deployed with the application are contained under this directory. Usually the folder WebContent is sufficient.

 Java Source Directory: src
|
This specifies the directory where any Java source code used by the Web application is stored. Again, the default value of src should be sufficient for most cases.

 Select Generate deployment descriptor to create the web.xml file and IBM extensions.
|
Click Next to accept the default values.

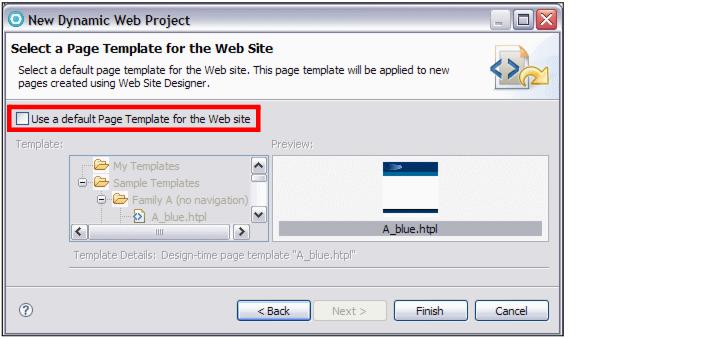
| In the Select a Page template for the Web Site dialog (Figure | 3-14), leave Use a default Page template for the Web Site cleared. This dialog allows you to select from page templates supplied with RAD v7.5. |

Figure 13-14 New Dynamic Web Project, Page Templates

| Click Finish and the Dynamic Web Project is created. |
The Technology Quickstart opens. You can browse features help topics. When done, close the Technology Quickstart.
The Web project directory structure for the newly created RAD75BankBasicWeb project and its associated RAD75BankBasicEAR project (enterprise application) is displayed in Figure | 3-15.
The main folders shown under the Web project are as follows:

| Deployment Descriptor-This folder shows an abstracted view of the contents of the projects web.xml. It includes sub folders for the main pieces which make up a Web project configuration, including servlets and servlet mappings, filters and filter mappings, listeners, security roles, and references. |

| Web Site Navigation-Clicking this folder starts up the tool for editing the page navigation structure. |

| Java Resources: src-This folder contains the Java source code for regular classes, JavaBeans, and servlets. When resources are added to a Web project, they are automatically compiled, and the generated class files are added to the WebContent\WEB-INF\classes folder. |

| WebContent-This folder holds the contents of the WAR file that is deployed to the server. It contains all the Web resources, including compiled Java classes and servlets, HTML files, JSPs, and graphics needed for the application. |

Figure 13-15 Web project directory structure
|
Important: Files that are not under WebContent are not deployed when the Web project is published. Typically this would include Java source and SQL files. Make sure that you place everything that should be published under the WebContent folder. |
|
ibm.com/redbooks |