Create a WebSocket channel
A WebSocket action must be linked to a WebSocket channel to be replayed. A WebSocket channel is linked to an HTTP server: WebSocket is an upgrade of an HTTP request. A WebSocket channel can be created from the ground up, or recorded using an existing client as described in Record a WebSocket request.
In the Design section, a right-click on a Container or page tree item gives access to:
- Insert after > WebSocket Channel
- Insert as child > WebSocket Channel
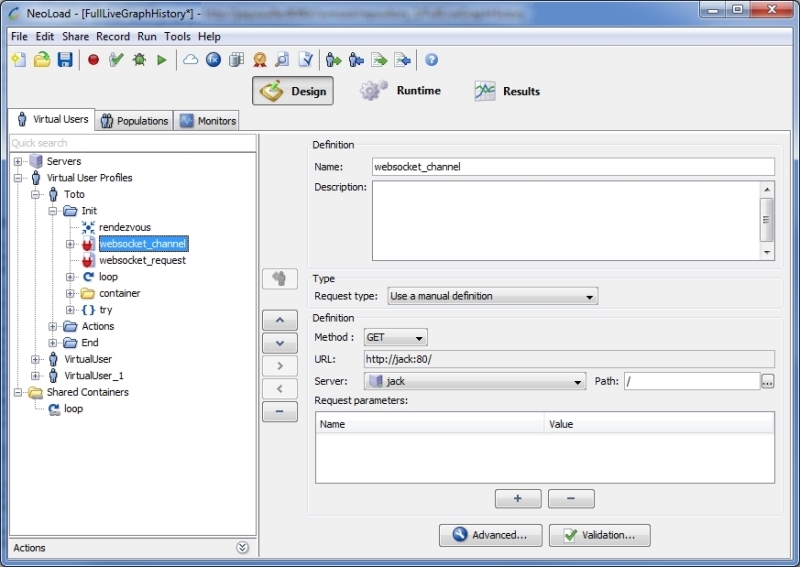
A WebSocket channel is created with a default websocket_channel incremented name.

The WebSocket channel properties panel contains information about the channel and the HTTP request.
Name: enter a label to uniquely identify the WebSocket channel in NeoLoad.
Description: if needed, enter a description of the WebSocket channel.
The HTTP request depends on the selected type of request. The Request type drop-down list makes it possible to select a type of request and updates the Definition group box. The request type can be defined in four ways:
- Use a manual definition. Manually define the request. Allows entering the URL and set the parameters to be used for the request. See Use a manual definition.
- Follow a redirect of the previous request. The present request is the target of an HTTP redirect in the response to the preceding request. See Follow the redirect of the previous request.
- Follow a link from the previous request. Extracts and follows a link matching a dynamic definition. This option is useful when a scenario includes a click on a dynamically-generated link. The link is dynamically extracted from the results of the preceding request (referrer) and follows the link. See Follow a link from the previous request.
- Submit a form from the previous request. Extracts and submits a form from a form in the previous request. This option is useful when a scenario includes the submission of a form containing a dynamic hidden field. The form is dynamically extracted from the results of the preceding request (referrer), allowing the dynamically-extracted values to be submitted. See Submit a form from the previous request.
The Advanced button gives access to further parameters and information about the channel. See Advanced parameters.
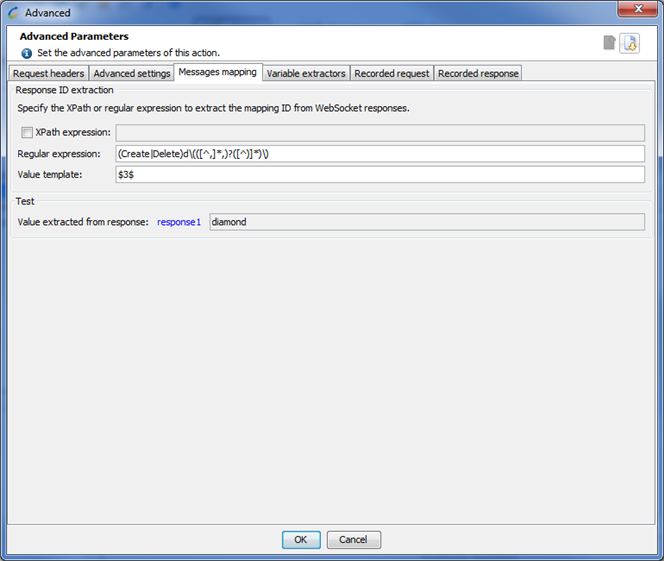
The Advanced screen contains the Messages mapping tab to specify the XPath or regular expression to extract the mapping ID from the WebSocket responses.

The expressions will be applied on all messages received on the channel in order to extract a mapping ID. If a mapping ID matches the one of a synchronous WebSocket request, then it is considered as the response of this request. A WebSocket channel can define only one way to extract the mapping ID from the response, so the XPath or regular expression has to be generic enough to handle all responses.
No SLA can be applied to a WebSocket channel.
- To create a WebSocket channel
- In the Design section, select a scenario.
- Right-click a Container (Transaction, Loop, etc.) and choose:
- Insert after > WebSocket Channel, or
- Insert as child > WebSocket Channel.
The WebSocket channel is created.
- In Request type, select the type of the channel request.
- In the Definition group box, configure the channel request.
- Click Advanced to configure the channel further.