Migrate > Take the first steps after WebSphere Commerce migration > Migrating Management Center > ... from v7 Feature Pack x to v7 Feature Pack y
|
| |
|
|
Migrate customized Management Center files to WebSphere Commerce v7 Feature Pack y
If you made customizations to a previous level of the Management Center feature and you have enabled the latest Management feature, review the following information for merging the customizations to the latest version of WebSphere Commerce.
Before you begin
Ensure you have completed the following steps:
- Maintenance and migration considerations for the Management Center
- Overview: Migrating Management Center
- Identify customizations on Management Center v7 Feature Pack x
- The Eclipse compare editor does not display line numbers by default.
The line numbers assist you in determining what location within the
file has changed.
To ensure that line numbers are shown in the compare editor view...
- Start
WebSphere Commerce Developer.
- Click Window > Preferences.
- Expand General and select Compare
/ Patch.
- Select Show additional compare information in the status line.
- Start
WebSphere Commerce Developer.
Procedure
- Start
WebSphere Commerce Developer.
- Start the OpenLaszlo Migration Results view
by completing these steps:
- Open the Enterprise Explorer view.
- Right click LOBTools and select OpenLaszlo Migration > Compare Customizations.
Tip: The compare customizations window opens in the top right corner.
To view the contents more , hold and drag the title bar and move it to the bottom window.
- Open the Enterprise Explorer view.
- Open the Feature Pack x comparison report.
- Click the Delta to display icon
 .
.
- Click Delta between WebSphere Commerce v7 FEPx base and WebSphere Commerce v7 FEPx customized.

- Click the Delta to display icon
- Double-click one of the files that has a status Not
Migrated. The number of changes, for each file, is listed
in the status column. The Rational Application Developer compare editor
runs and highlights changes between the Feature Pack base and any
customizations you made to the file.
- Right-click the same file name and click Edit
current edition. The OpenLaszlo editor opens the current
version of the file.
Tip: To assist you in reviewing the file changes, click and hold the current file and move the file into the current editor window. This action automatically splits the view and shows the compare editor and the OpenLaszlo editor side by side.
- In the OpenLaszlo migration results, expand
a file name to see detailed changes. Listed below the file name is
one or more line items represented as:
Line #nn:version
Where:
- nn is the line number where a change is detected
- version is the feature pack version of the changed file
Tip: To expand all files, click the
 icon
located in the top right corner of the
icon
located in the top right corner of the  OpenLaszlo Migration Results
window. Click the
OpenLaszlo Migration Results
window. Click the  icon to collapse all file changes.
- nn is the line number where a change is detected
- To view details, double-click on a delta and
a Delta Details window opens. The details include the line number,
change type, and what attribute or element is affected. Follow these
guidelines to assist you in merging the customization to the current
v7 Feature Pack y file:
- The Delta details dialog shows the parent name. Use this parent
value and locate the parent element in the OpenLaszlo editor.
- The Delta details dialog shows the change type. Use this information to make changes to the current v7 Feature Pack y file.
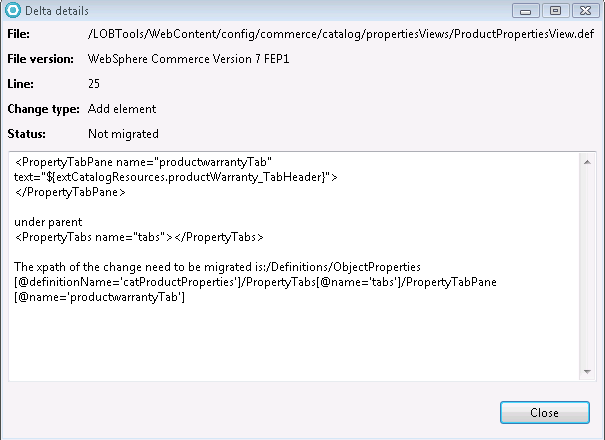
In some cases, the delta details dialog shows:
- Migration of the customization is not required.
- Apply the customization to the following xpath: XPath,
file: file.
- A mapping displays. For example the customization in Feature Pack x under parent X needs to be applied to Feature Pack y under parent Y.
After migration, you might see validator errors similar to the following example in the development environment:
The unique ID for GridText is the same as one of its siblings. Update the value(s)
 of attribute(s) {name=null} to be unique.
Correct these warnings. Add an attribute called "name" to the element with a unique value (amongst its siblings). In the example below, name="myUniqueID" is added to the GridText element:
<GridText name="myUniqueID" objectPath="CatalogEntryExtraProperties" propertyName="xprop_manufacturer" text="${catalogResources.productmanufacturer_ColumnHeader}" visible="true" width="200"/>
<GridText objectPath="CatalogEntryDescription" propertyName="keyword" text="${catalogResources.productKeyword_ColumnHeader}" visible="false" width="90"/>
If you add a name or the element already has a name attribute, review the unique identifier information in Identify customizations on Management Center v7 Feature Pack x. Each ready to use element has its own predefined unique identifier.
Tip: Review the OpenLaszlo file changes information in Overview: Migrating Management Center.
- The Delta details dialog shows the parent name. Use this parent
value and locate the parent element in the OpenLaszlo editor.
- Repeat steps 4 to 7 for each file that has not been
migrated.
- Review the report Delta between Feature Pack
x base and Feature Pack x customized and ensure that all Not
Migrated status entries have been resolved. Click the
refresh icon
 to update the reports. Ensure that all delta is in Migrated status.
If a unique identifier conflict is reported, the Feature Pack x version report shows a status of Migrated. After you correct the unique identifier error, the Feature Pack x version report shows a Not Migrated status. The Feature Pack y report shows a New element has been added.
- Click Delta between WebSphere Commerce Version
7 FEPy base and WebSphere Commerce v7 FEPy current.
In this view, you can see the customization on FEPy.
This comparison view displays the following columns:
- Filename
- The name of the file altered by the WebSphere Commerce version
7 installation. Listed below the filename is one or more lines items
represented in this format:
Line #nn:version
Where:
- nn is the line number which contains a change
- version is the feature pack version of the changed file
- nn is the line number which contains a change
- Status
- A status of the file.
Status filter v7 results All Displays all customizations related to the Management Center enablement. Migrated Displays customizations that have been migrated to the v7 FEPy level. Not Migrated Displays customizations that have not been migrated to the v7 FEPy level. New Displays new customizations made to the Version 7 FEPy level. - Change type
- The type of change or customization on the base v7 FEPy
file. Examples of change types are
- Add, Modify, or Remove attribute
- Add file. This change type indicates a new file you have created
in the v7 Feature Pack x environment. There
is no further action required on any Add file entry. If you
delete any of these files from the workspace and run the comparison
report again, the deleted file is removed from both the v7
and Feature Pack version reports.
- Add or Delete element
- Reorder element
A right click on a file, except a file with a change type of Add file, shows the following option:
- Compare changes between WebSphere Commerce Version 7 FEPx and WebSphere Commerce v7 FEPy
- Add, Modify, or Remove attribute
 If you just migrated Management Center
from either v7 or v7 Feature Pack 1 to v7 Feature
Pack 2, perform manual steps to convert some customizations. When the Management Center feature is enabled, customizations
to methods, handlers and some constraints in OpenLaszlo (.lzx) files
cannot be converted to definition (.def) files automatically. You
can check the log under WC_installer/logs/PortUtility.timestamp.log to
see a detaiedl list of customizations that could not be migrated.
If you just migrated Management Center
from either v7 or v7 Feature Pack 1 to v7 Feature
Pack 2, perform manual steps to convert some customizations. When the Management Center feature is enabled, customizations
to methods, handlers and some constraints in OpenLaszlo (.lzx) files
cannot be converted to definition (.def) files automatically. You
can check the log under WC_installer/logs/PortUtility.timestamp.log to
see a detaiedl list of customizations that could not be migrated.
- To recover constraints customizations, see Troubleshoot: Constraints not supported while migrating Management Center.
- To recover method and handler customizations, see Troubleshoot: Custom methods and handlers not supported while migrating Management Center.
- To recover constraints customizations, see Troubleshoot: Constraints not supported while migrating Management Center.
- Compile the project:
- Open the Enterprise Explorer view.
- Right-click LOBTools > Build OpenLaszlo Project.
- Open the Enterprise Explorer view.
- Start the server:
- Click the Servers tab.
- Right-click WebSphere Commerce Test Server.
- Click Start.
- Click the Servers tab.
- Complete the publish action:
- Right-click WebSphere Commerce Test Server.
- Click Publish. The publish process takes
several minutes to complete.
- Restart the test server.
- Right-click WebSphere Commerce Test Server.
- Test the modified LOBTools project. Complete any other
necessary modifications.
- Prepare the LOBTools project for deployment. See Package Management Center files for deployment.
What to do next