Update the Web server configuration
We use the Network Deployment Manager administration console to verify and to update the Web server configuration.
- Open the Network Deployment Manager administration console in your browser and navigate to Servers Ć Web servers Ć webserver1 to display the Web server configuration panel, as shown in Figure 10-2.

- On the Web server configuration panel for webserver1, make sure that the configuration file name contains the httpd.conf file under a directory named httpconf, which is again under the configuration directory that was specified during instance creation:
WC_Install_Dir/instances/Instance_Name/httpconf/httpd.conf
If you need to change the path and file name, make sure to click Apply after making your changes.
- Click Plug-in properties on the right to show the configuration part for the IBM HTTP Server Plug-in for webserver1.
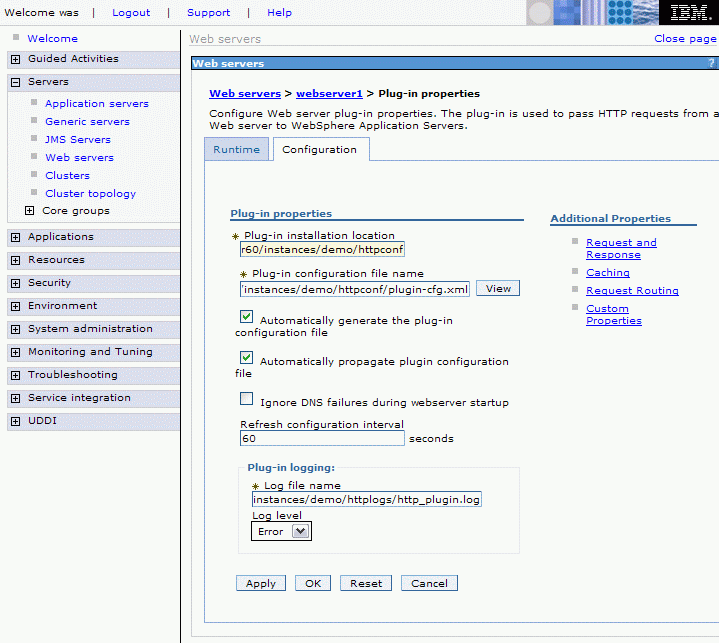
- The field label Plug-in installation location is misleading. The field does not need to point to the actual installation directory for the IBM HTTP Server Plug-in (Plugin_Install_Dir), but can point to any existing directory on the Web server. IBM recommends again using the httpconf directory under the directory specified during instance creation.
If Plug-in configuration file name does not contain an absolute path (for example, not starting with /), the actual location for the configuration file, plugin-cfg.xml (which is generated by Network Deployment Manager) is assembled as follows:
PLUGIN_HOME/config/Web_server_name/Plug-in_config_file
For example, in our case, if we used the plug-in installation location as shown in Figure 10-3, and put just plugin-cfg.xml as plug-in configuration file name, the resulting path would be:
WC_Install_Dir/instances/demo/httpconf/config/webserver1/plugin-cfg.xml
If you use an absolute path, clicking the View button (on the right side of the Plug-in configuration file name field) displays an empty configuration file. If you want to use this feature, you need to specify a relative name and create the corresponding directory structure on your Web server. In the latter case, IBM recommends using just plugin-cfg.xml as the file name and creating the config/webserver1 directory under the directory specified in the Plug-in installation location field.
In the IBM HTTP Server Plug-in configuration file, two files used for SSL connections...
- plugin-key.kdb
- plugin-key.sth
...are referenced using the following paths...
PLUGIN_HOME/etc/plugin-key.kdb
PLUGIN_HOME/etc/plugin-key.sthWebSphere Commerce puts the file plugin-cfg.xml into the httpconf subdirectory of the configuration directory specified on the Web server panel of the instance creation wizard.
As IBM recommends using...
WC_Install_Dir/instances/Instance_Name
...we also recommend using the following field values on the Plug-in properties panel:
- Plug-in installation location
WC_Install_Dir/instances/Instance_Name/httpconf
- Plug-in configuration file name
WC_Install_Dir/instances/Instance_Name/httpconf/plugin-cfg.xml
WebSphere Commerce also creates the httplogs directory under the configuration directory on the Web server for IBM HTTP Server and IBM HTTP Server Plug-in logs, so IBM recommends as field value for the Plug-in log file:
Plug-in logging > Log file name:
WC_Install_Dir/instances/Instance_Name/httplogs/http_plugin.log
If you needed to make any changes on the Plug-in properties panel, click Apply after making your changes.
- You can save your changes now, or continue following the instructions. In the next section, Activate remote Web server management, further changes are made using the Network Deployment Manager administration console before configuration is saved. If you decide to save now, follow steps 4 and 5 to save the configuration.
- Log on to Web server node 1 as wasuser.
- On the Web server, go to the directory that you specified as the plug-in installation location in step 4 above and make sure that there is an etc subdirectory, for example:
WC_Install_Dir/instances/Instance_Name/httpconf/etc
Create the directory if necessary.
- Copy all plugin-key.* files from their original location, which is the etc directory under the actual IBM HTTP Server Plug-in installation directory (Plugin_Install_Dir/etc), to the new etc directory just created.
If you choose to use the actual IBM HTTP Server Plug-in installation directory as the plug-in installation location in step 4 above, you do not need to copy the files. However, IBM recommends using a dedicated configuration directory for the WebSphere Commerce instance. In a production environment you should then replace the default self-signed SSL certificates by production certificates. This applies both to the Web server certificates (keyfile.*) and to the plug-in certificates (plugin-key.*)