11.2.4 Configure the IBM HTTP Server Plug-in
In order for WebSphere Application Server to handle requests to the Load Balancer cluster, the IBM HTTP Server Plug-in has to be configured on all Web servers such that it accepts the Load Balancer cluster host name on the load-balanced ports.
All we have to do to change the plug-in configuration on all Web servers is to add the virtual host aliases to the relevant virtual hosts. In our scenario, only store access is load balanced, so the only virtual host that needs new aliases for the Load Balancer cluster is VH_<Instance_Name>.
We use the Network Deployment Manager administrative console to add the following host aliases to VH_<Instance_Name>:
- *:80
- *:443
Again, we use * as a shortcut. When using *, all other host aliases for the actual port may be removed. Of course, you may also add the two new host aliases using the your explicit Load Balancer cluster host name, without removing the existing ones.
To add the host names, use your browser and go to the Network Deployment Manager administrative console to perform the following steps:
1.xxxx
In the main navigation on the left, select Environment Æ Virtual Hosts.
2.xxxx
Click the VH_<Instance_Name> virtual host.
3.xxxx
Click Host Aliases to show all aliases for VH_<Instance_Name>.
4.xxxx
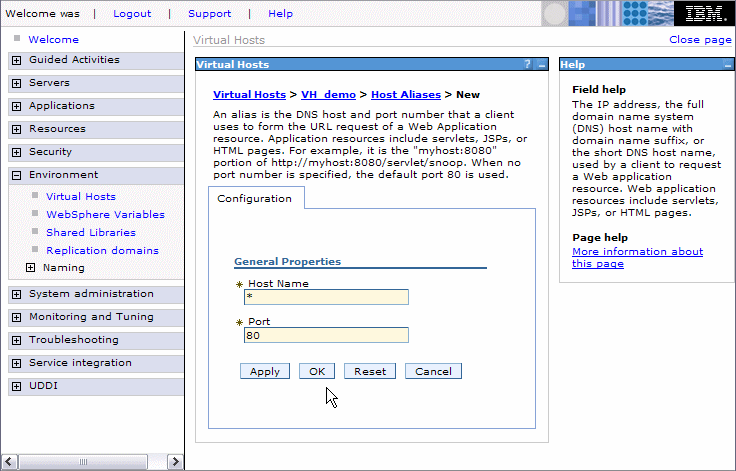
Click New and enter the new host alias for port 80, using * or the Load Balancer cluster host name, as shown in Figure 11-41, for instance name demo.

Figure 11-41 Adding a virtual host alias in Network Deployment Manager administrative console
5.xxxx
Click Save (Figure 11-42).

Figure 11-42 Going to the Save workspace changes dialog
6.xxxx
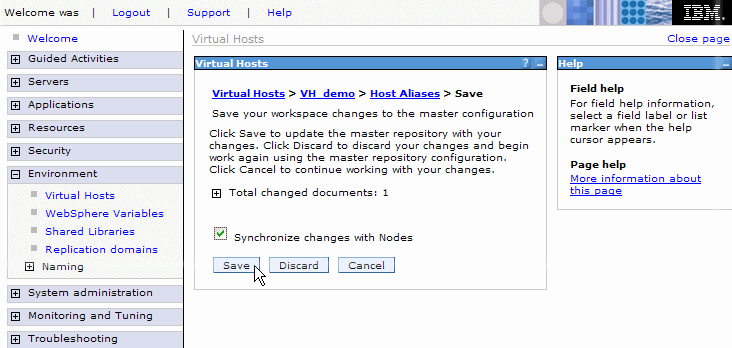
In the Save workspace changes dialog, check Synchronize changes with Nodes and click Save (Figure 11-43).

Figure 11-43 Save workspace changes dialog
7.xxxx
If automatic generation and propagation of the IBM HTTP Server Plug-in configuration, as well as remote Web server management, are enabled (see Figure 10-3 and Activate remote Web server management (optional)), the plug-in configuration is automatically updated on all Web servers. If automatic propagation is not activated for a Web server, the plug-in has to be manually propagated to that Web server by performing the following steps:
a.xxxx  Navigate to Servers Æ Web servers (Figure 11-44). Navigate to Servers Æ Web servers (Figure 11-44).
Figure 11-44 Propagating the Plug-in configuration
|
