Configure work factors in multiple tier configurations
Compute and configure work factors for a multiple tier configuration.
- Install the product.
- Install applications that are operational under a workload.
A work factor exists for every combination of transaction class, target web module, and processing tier. The work factor describes how heavily a request of the given transaction class loads the processing tier. We can define work factors at varying levels of granularity. The autonomic request flow manager (ARFM) uses work factors at the level of...
- service class
- target deployment target
- processing tier
We can define work factors at a variety of levels for any processing tier that is not a target tier or is not the one and only processing tier in the target module.
In a configuration that has multiple tiers, the work profiler automatically computes work factors for the target tier, which communicates directly with the on demand router (ODR). For any tiers that are deeper than the target tier, we must define work factors. If our deployment target contains both a target tier and a non-target tier, configure the work factors for both tiers because the work profiler cannot automatically compute work factors in that situation. We can compute the work factor by dividing the average processor utilization by the average number of executing requests per second. This task describes how to find these values and configure the work factor for our multiple tier configuration.
Tasks
- Generate traffic for a transaction class and module pair. We can generate traffic using an application client or a stress tool.
- Monitor processor utilization in the configuration.
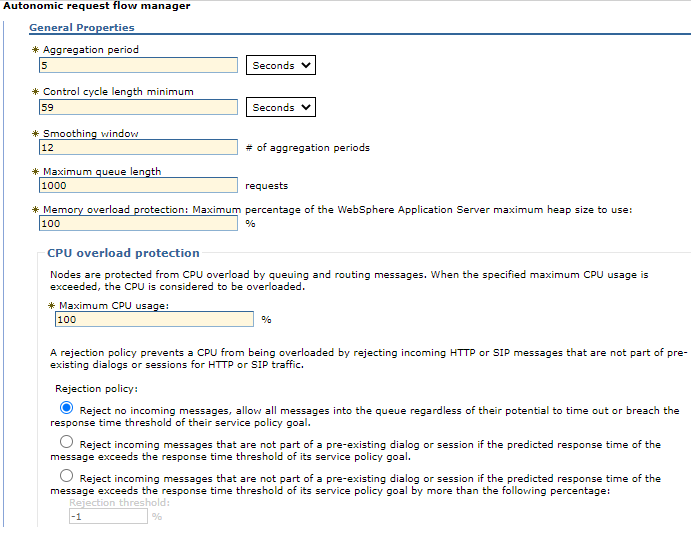
Determine an average processor utilization. We need the processor utilization of all the machines involved in serving your traffic, and all machines that have performance interactions with them, to be at the configured limit defined with the Maximum CPU utilization property on the panel...
-
Operational policies | Autonomic managers | Autonomic request flow manager

Disable all the autonomic managers so that we can ensure the system does not make changes while you take the processor utilization measurement.
- The application placement controller:
Disable the application placement controller by putting it in manual mode.
-
Operational policies | Autonomic managers | Application placement controller | Enable check box

- The autonomic request flow manager:
We can set the arfmManageCpu custom property to false at the cell level to disable the ARFM.
- Dynamic workload management:
Disable dynamic workload management for each dynamic cluster.
-
Servers | Dynamic clusters | dynamic_cluster_name | Dynamic WLM | Dynamic WLM check box
If we disable the autonomic managers, we can add processor load through background tasks. Use an external monitoring tool for your hardware.
- The application placement controller:
- Using the runtime charting in the administrative console, monitor the number of requests per second (throughput).
-
Runtime operations > Runtime topology
We can view the number of requests per second.
- Compute the work factor for the deployment target.
Use the following equation to calculate the work factor:
- work factor = (normalized CPU speed) * (CPU utilization) /
(number of requests per second, measured at entry and exit of the target tier)
- Configure the work factor in the administrative console.
You set the custom property on the deployment target, for example, a cluster of servers, or a stand-alone application server. For more information about the overrides that we can create with the workFactorOverrideSpec custom property, read about autonomic request flow manager advanced custom properties.
- Define a case for each tier in the deployment target.
Each case is separated by a comma, and contains a pattern set to a value that is equal to the work factor that you calculated. The pattern defines the set of service classes, transaction classes, applications, or modules that we can override for the particular tier...
- service-class:transaction-class:application:module:[tier, optional]=value
We can specify a wild card for any of the service class, transaction class, application, or module by entering a * symbol. Each pattern can include at most one application, at most one module, at most one service class, and at most one transaction class. The tier is optional, and represents the deployment target name and relative tier name. Set the value to a work factor override number or to none to define no override.
In the following examples, work factor override values are set for two-tier configurations:
- Set an override value to 100 for the one
and only processing tier in the target cluster:
- *:*:*:*100
- Set an override value to none for the first tier of the MyDynamicCluster cluster.
Set an override value to 100 for the second tier of the MyDynamicCluster cluster in the default cell:
- *:*:*:*=none,*:*:*:*:MyDynamicCluster+2=100
- Set an override value to none for the first
tier. Set an override value to 0.7 for the CICS+1 tier
in the DbCel cell:
- *:*:*:*=none,*:*:*:*:../DbCel/CICS=0.7
- Set an override value to 100 for the one
and only processing tier in the target cluster:
- Create the custom property in the administrative console. Click...
-
Servers > Dynamic clusters > dynamic_cluster_name > Custom properties > New
Set the name of the property to workFactorOverrideSpec. Set the value of the property to the string we created in the previous step.
- Save the configuration.
- Define a case for each tier in the deployment target.
Work factors are configured to override the work factor values created by the work profiler and support performance management of more than one tier.
What to do next
Repeat these steps for each transaction class module and non-target tier node pair. Also configure the node.speed for each external node. For more information about configuring the node, see configuring node computing power.
Subtopics
Related: