Plan to install Web server plug-ins
Overview
- Remote stand-alone appserver environments
- Local stand-alone appserver environments
- Remote distributed environments (cells)
- Local distributed environments (cells)
Remote stand-alone appserver environments
The remote installation installs the Web server plug-in on the Web server machine when the appserver is on a separate machine...
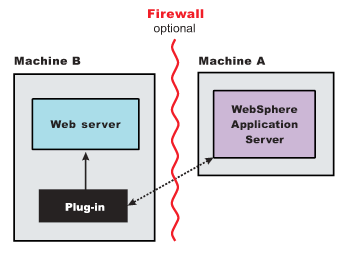
Remote installation scenario
| Step | Machine | Task |
|---|---|---|
| 1 | A | Install ND and create an appserver profile. |
| 2 | B |
Install IBM HTTP Server or another supported Web server. |
| 3 | B | Install the binary plug-in module using the Plug-ins installation wizard.
The script for creating and configuring the Web server is created under... plugins_root/bin |
| 4 | B | Copy "configurewebserver" script to Machine A. If one machine is running under an operating system such as AIX or Linux and the other machine is running under Windows, copy the script from the directory...
plugins_root/bin/crossPlatformScripts |
| 5 | A | Paste the "configurewebserver" script from Machine B to...
app_server_root/bin ...on Machine A. |
| 6 | A | Run the script from a command line. |
| 7 | A | Verify that the appserver is running. Open the console and save the changed configuration. |
| 8 | B |
plugins_root/setupPluginCfg.sh ... for a Domino Web Server before starting a Domino Web server. Otherwise, start the Web server. |
| 9 | B | Run the Snoop servlet.
To verify with your own application, regenerate and propagate the plugin-cfg.xml file after installing the application. |
![[AIX]](../../aixlogo.gif)
![[HP-UX]](../../hpux.gif)
![[Linux]](../../linux.gif)
![[Solaris]](../../solaris.gif) Run...
Run...
Regeneration of the plugin-cfg.xml file
During the installation of the plug-ins, the temporary plugin-cfg.xml file is installed on Machine B in...
plugins_root/config/webserver
The Web server plug-in configuration service regenerates the plugin-cfg.xml file automatically.
To use the real plugin-cfg.xml file from the appserver, propagate the plugin-cfg.xml file as described in the next section.
Propagation of the plugin-cfg.xml file
The Web server plug-in configuration service propagates the plugin-cfg.xml file automatically for IBM HTTP Server only.
For all other Web servers, propagate the plug-in configuration file manually. Copy the plugin-cfg.xml file from the directory...
profile_root/config/cells/cell/nodes/WebServerNode/servers/webserver
...on Machine A. Paste the file into the plugins_root/ config/ webserver directory on Machine B.
Local stand-alone appserver environments
A local installation includes the Web server plug-in, the Web server, and the appserver on the same machine:
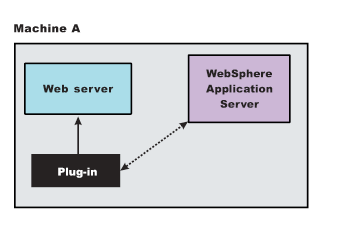
Local installation scenario
| Step | Machine | Task |
|---|---|---|
| 1 | A | Install the ND product and create an appserver profile. |
| 2 | A |
Install IBM HTTP Server or another supported Web server. |
| 3 | A | Install the binary plug-in module using the Plug-ins installation wizard.
The Web server definition is automatically created and configured during the installation of the plug-ins. |
| 4 | A | Verify that the appserver is running. Open the console and save the changed configuration. |
| 5 | B |
plugins_root/setupPluginCfg.sh ... for a Domino Web Server before starting a Domino Web server. Otherwise, start the Web server. |
| 6 | B | Run the Snoop servlet.
To verify with your own application, regenerate and propagate the plugin-cfg.xml file after installing the application. |
Regeneration of the plugin-cfg.xml file
The Web server plug-in configuration service regenerates the plugin-cfg.xml file automatically.
The plugin-cfg.xml file is generated in...
profile_root/config/cells/cell/nodes/WebServerNode/servers/webserver
The generation occurs when the Web server definition is created.
Propagation of the plugin-cfg.xml file
The local file does not require propagation.
Remote distributed environments (cells)
Install the Web server plug-in on the Web server machine when the appserver is on a separate machine...
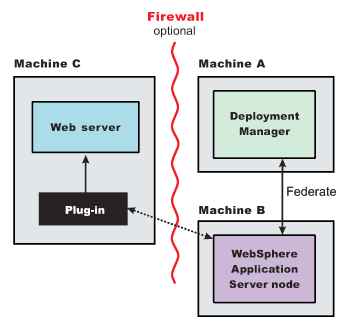
Remote installation scenario
| Step | Machine | Task |
|---|---|---|
| 1 | A | Install WAS ND and create a deployment manager profile. |
| 2 | A | Start the deployment manager...
profile_root/bin/startManager.sh |
| 3 | B | Install WAS ND and create an appserver profile. |
| 4 | B | Federate the node...
profile_root/bin/addNode.sh dmgrhost 8879 -includeapps |
| 5 | C |
Install IBM HTTP Server or another supported Web server. |
| 6 | C | Install the binary plug-in module using the Plug-ins installation wizard.
The script for creating and configuring the Web server is created under... plugins_root/bin |
| 7 | C | Copy the "configurewebserver" script to Machine A.
If one machine is running under an operating system such as AIX or Linux and the other machine is running under Windows, copy the script from the directory... plugins_root/bin/crossPlatformScripts |
| 8 | A | Paste the configurewebserver script from Machine C to...
app_server_root/bin ...on Machine A. |
| 9 | A | Run the script from a command line after verifying that the deployment manager is running.
If you have enabled security or changed the default JMX connector type, edit the script and include the appropriate parameters on the wsadmin command. |
| 10 | A/B | Use the console of the deployment manager on Machine A to start the appserver on Machine B. Wait for synchronization to occur and save the new configuration. |
| 11 | C |
plugins_root/setupPluginCfg.sh ... for a Domino Web Server before starting a Domino Web server. Otherwise, start the Web server. |
| 12 | C | Run the Snoop servlet.
To verify with your own application, regenerate and propagate the plugin-cfg.xml file after installing the application. |
Regeneration of the plugin-cfg.xml file
During the installation of the plug-ins, the temporary plugin-cfg.xml file is installed on Machine C in the plugins_root/ config/ webserver directory.
The Web server plug-in configuration service regenerates the plugin-cfg.xml file automatically.
To use the real plugin-cfg.xml file from the appserver, propagate the plugin-cfg.xml file as described in the next section.
Propagation of the plugin-cfg.xml file
The Web server plug-in configuration service propagates the plugin-cfg.xml file automatically for IBM HTTP Server only.
For all other Web servers, propagate the plug-in configuration file, by manually copying the plugin-cfg.xml file from the directory...
profile_root/config/cells/cell/nodes/node/servers/webserver
...on Machine A to...
plugins_root/config/webserver
...on Machine C.
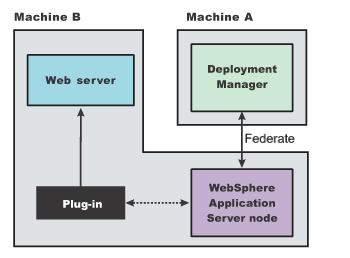
Local distributed environments (cells)
A local distributed installation includes the Web server plug-in, the Web server, and the managed appserver on the same machine:
Local distributed installation scenario
| Step | Machine | Task |
|---|---|---|
| 1 | A | Install WAS ND and create a deployment manager profile. |
| 2 | A | Start the deployment manager...
profile_root/bin/startManager.sh |
| 3 | B | Install WAS ND and create an appserver profile. |
| 4 | B | Federate the node...
profile_root/bin/addNode.sh dmgrhost 8879 -includeapps |
| 5 | B |
Install IBM HTTP Server or another supported Web server. |
| 6 | Bˋ | Install the binary plug-in module using the Plug-ins installation wizard.
The script for creating and configuring the Web server is created in... plugins_root/bin |
| 7 | B | After verifying that the deployment manager is running on Machine A, run...
app_server_root/bin/configurewebserver ...on Machine B. If you have enabled security or changed the default JMX connector type, edit the script and include the appropriate parameters. |
| 8 | A/B | Use the console of the deployment manager on Machine A to start the appserver on Machine B. Wait for synchronization to occur and save the new configuration. |
| 9 | B |
plugins_root/setupPluginCfg.sh ... for a Domino Web Server before starting a Domino Web server. Otherwise, start the Web server. |
| 10 | B | Run the Snoop servlet. |
Regeneration of the plugin-cfg.xml file
The Web server plug-in configuration service regenerates the plugin-cfg.xml file automatically.
The plugin-cfg.xml file is generated at the location...
profile_root/config/cells/cell/nodes/node/servers/webserver...when the Web server definition is created.
Regenerate the plugin-cfg.xml file in the Web server definition in the appserver whenever the configuration changes. The Web server has immediate access to the file whenever it is regenerated.
When the Web server plug-in configuration service (an administration service) is enabled on Machine A, the plugin-cfg.xml file is automatically generated for all Web servers.
Propagation of the plugin-cfg.xml file
Node synchronization is used to propagate the plugin-cfg.xml file from Machine A to Machine B.
When the Web server plug-in configuration service (an administration service) is enabled on Machine A, the plugin-cfg.xml file is automatically propagated for all Web servers.
Alternate configuration
This procedure describes installing the plug-ins on two machines. However, you can perform this procedure on a single machine as shown in the following graphic. A local distributed installation also includes the Web server plug-in, the Web server, the Application Server, and the deployment manager on the same machine:

Results
You can set up a remote or local Web server by installing Application Server, the Web server, and then the Web server plug-ins.
What to do next
- Web server configuration
- Plug-ins configuration
- Edit Web server configuration files
- Installing Web server plug-ins
Related concepts
Web server plug-ins
Related tasks
Install Web server plug-ins
Related Reference
Web server plug-in properties