Portal v5.1 Search
Overview
- Before you start
- Configure the Portal Search portlets:
- Configure the Manage Search Collections portlet
- Configure the Taxonomy Manager portlet
- Configure the Pending Search Collection Items portlet
- Configure the Search Center portlet
- Configure the Search and Browse portlet for users
- Configure for local search service
- Using remote search service
- Change between local and remote search services
- Configure search in a cluster environment
- Crawling and indexing a portal site
- Configure a custom portal theme to include the search box
- Migrating your search collections from WebSphere Portal V5.0 to V5.1
- Predefined static taxonomy and categorizer
- Create and configure search collections:
- Hints and tips for using Portal Search
- Changes for Portal Search from WebSphere Portal V5.0 to V5.1
- Key features of Portal Search that existed before V5.1
- Portal search capabilities
- Portlets for working with Search
- Summarizer
Before you start working with Portal Search
The following portlets are all installed and deployed as part of the default portal installation:
If you want to use the other search related portlets in your portal, you have to install them and configure them according to your requirements: The administration portlet Pending Search Collection Items is installed, but deploy it. The end user portlet Search and Browse is installed, but deploy it. The administrative portlets Taxonomy Manager and Taxonomy Viewer are not installed as part of the portal installation. You need to install and deploy it.
Here is an overview of the Portal Search portlets:
Administration portlets Installation status Manage Search Collections Installed and deployed Manage Search and Browse Installed and deployed as part of Manage Search Collections Pending Search Collection Items Installed and deployed as part of Manage Search Collections Taxonomy Manager Not installed and not deployed Taxonomy Viewer Not installed and not deployed
User portlets Installation status Search and Browse Installed, but not deployed Search Center Installed and deployed
To enhance your possibilities of working with search, you can install additional portlets related to Portal Search and apply special configurations.
Search on Portal Search collections and other content sources
Portal search collections are portal resources. You can therefore secure them through Portal Access Control. Consequently, users can only access and search collections to which they have access permission.
The Search Center portlet checks for access permissions of the searching users. It allows users only to use those search collections for search to which the users have access permission. For example, in the Search Center users see only the tabs for the search collections to which they have access.
The Search and Browse portlet also returns documents based on the access permissions that users have to the search collections.
Apply special care when giving users access through the search portlets to sensitive information such as Web pages that have been collected from a secured Web site. Ideally, give only those users access permission for a search collection who have also access to the corresponding Web site that is being indexed and searched. Otherwise a user might see part of the information via the document summary although the user cannot actually access the document when clicking on the respective link or URL.
Search on secured portal sites and pages
For search on secured portal sites WebSphere Portal provides a preconfigured search collection. If you want to set up your own search collection for searching portal sites, apply special security considerations. You create a dedicated crawler user ID and give that user ID access permission to the portlets and portal pages that you want to be available for search by users. This is the sum of all the access permissions to all the portal resources combined that the users have who will search the portal site.
- When a user searches a secured portal, the portal pages returned from the search are filtered based on that user's access permissions. This security mechanism works only applied to search on portal sites. It does not work for documents from Lotus Workplace Web Content Management or Web sites. The portal cannot filter the resulting documents by portal security for these types of content source.
- You can crawl, index, and search secured portal pages only on your local portal installation. For security reasons, you cannot crawl secured pages of one portal site from another portal site.
Encrypting sensitive data
When you create a new content source using the Manage Search Collections portlet, some content sources require that you enter sensitive data, such as the user ID and password of the crawler user. For example, this applies to secured WebSphere Portal sites or HTTP sites that require a user ID and password. This sensitive data is stored on the hard drive. In order to ensure that such sensitive data is encrypted on disk, perform the following procedure after portal installation:
- Edit...
wp_root/bin/searchsecret.xml
- Replace the string CHANGE TO YOUR SECRET KEY with a random string.
- Run the updated file searchsecret.xml using the XML configuration interface:
- Specify the file name using the -in option.
- Specify a result file using the -out option.
- Check the result file to verify the XML request was executed successfully.
- Delete the file searchsecret.xml.
Configure the Portal Search portlets
The following sections describe how you can prepare and configure the portlets that are related to Portal Search.
Configure the Manage Search Collections portlet
Manage Search Collections is the main search administration portlet. It is installed by default as part of your portal installation. It is available under...
Administration | Portal Settings | Search Administration
You need to change the configuration of this portlet only if you want to do one of the following:
- Change the behavior as to how search collections are registered with the Search Center
- Set up a remote search service.
- Set up search in a cluster.
The following two sub-portlets are integrated as part of the Manage Search Collections portlet:
- Pending Search Collection Items
If you want to delegate the approval of pending search collection items to other administrative users, you can install additional instances of this portlet.
- Manage Search and Browse
This is similar to the user portlet Search and Browse, but provides additional administrative functions for editing and deleting search items.
Configure the Taxonomy Manager portlet
If you want to edit the predefined taxonomy, install and deploy the Taxonomy Manager portlet.
wp_root\installableApps\TaxonomyEditor.war
After you have installed this file, you can deploy the Taxonomy Editor portlet. For example, you can create a page named Manage Search Index page and deploy the file there. To deploy the portlet, use the Manage Portlets portlet on the Portlets page under Portal administration.
Configure the Pending Search Collection Items portlet
If you want specific users to handle accepting and rejecting of documents that are returned by a crawl separately for search collections, install the Pending Search Collection Items portlet for each of those search collections.
You can install this Pending Search Collection Items portlet as a standalone portlet for a specific collection. You can then give specific administrative users access permission to that portlet and thereby assign to them the tasks of approving, modifying, and rejecting incoming documents or content.
To configure an instance of the Pending Search Collection Items portlet for a search collection, proceed as follows:
- Deploy an instance of the portlet on a page.
- Edit the configuration parameter PendingItemsIndexName of the portlet instance to point to a search collection.
Note: For documents returned from a crawl to be moved to the Pending Documents portlet, disable the option Add all documents to collection automatically for the affected content source in the Manage Search Collections portlet.
Configure the Search Center portlet
The Search Center is installed and ready to use in a default portal installation. It is available to users through the search box in the portal theme header action bar. Users can use the Search Center for basic searches.
For details about how to include a document library for search by the Search Center, refer to Searching document libraries.
The Search Center provides tabs for users to select different sources for the search. For search collections provided by Portal Search you can configure the tabs in the two following ways:
- Each individual search collection is available through its own separate tab. In this case search collections that are separate but have the same name are combined under a single tab with that name.
- All search collections are available through one common tab.
You configure this option under...
Portal Administration | Portlet Management | Portlets
Select the Manage Search Collections portlet and click the Configure (wrench) icon. Configure the RegisterPrivateTab parameter:
- Specify the value On if you want separate tabs for your individual search collections. In this case each tab shows the name that you specified when creating the related search collection. The description you specified is displayed when users hover over the tab with their mouse.
- Specify the value Off if you want a common tab for all your search collections. In this case the tab shows the name specified in the property file pseAdminManageIndexes.properties under the property manage.index.catalog.tab.title = Search Collection .
Note: With the option for separate tabs you can still group selected search collections into one federated collection under only one tab. To do this, you give all of those collections the same name. They will then be represented by a single tab of that name in the Search Center. However, be aware that once you created a federated collection under the same name and tab you cannot change this behavior and separate the individual search collections. This is because once you create a search collection, you cannot edit the collection.
Configure the Search and Browse portlet for users
If you want users to be able to perform advanced searches, you can Search and Browse portlet. You do this after you have built the search collection and the associated index. Users can then use the portlet to perform searches and browse the search collection.
Note: The Search and Browse portlet can perform search operations only on one document collection. If you want your users to be able to search different document collections, create a copy of the portlet for each document collection and configure it for that collection.
The search portlet WAR file can be found at...
wp_root/installableApps/SearchandBrowse.war
Configure the view mode for opening a search result list item
You can configure different view modes for opening an item from the search result list by the Search and Browse portlet. Determines how a document or page is opened for the user when the user clicks on that document or page in the search results list. You configure the view mode by opening the Configure mode for the Search and Browse portlet and specifying the value for the parameter OpenResultMode . You can configure three different view modes, depending on the type of search collection and its content source(s):
- new
- This setting opens the selected result document on which the user clicked in a new browser window. This is the default. Use this setting if the Search and Browse portlet searches documents on a Web site.
- same
- This setting shows the selected target source from the search result list in the same browser window. Use this setting if the Search and Browse portlet searches a portal site.
- wcm
- This setting opens the selected search result list item in a IBM Lotus Workplace Web Content Management viewer portlet. Use this setting if the Search and Browse portlet searches a Lotus Workplace Web Content Management site. In this case it is convenient to have both the Search and Browse portlet and the Lotus Workplace Web Content Management portlet placed on the same page.
As the Search and Browse portlet relates to only one document collection, you can install and configure separate Search and Browse portlets for each of the content sources mentioned above.
Using the Search and Browse portlet on anonymous pages
Note that anonymous users cannot search when the Search Center portlet is deployed on a public page. This fix extends this functionality to unauthenticated users. To fix, download PK09511.
- Enable public sessions.
The Search and Browse portlet needs a valid session for its run time, and by default, sessions are not enabled on anonymous pages in the portal. By default, sessions are only created when a user authenticates and logs in to the portal. To put the Search and Browse portlet on an anonymous page, enable public sessions by editing...
wp_root/shared/app/config/services/NavigatorService.properties
... and setting the public.session parameter to true.
- Edit...
wp_root/instance/PortalServer51/shared/app/config/services/ConfigService.properties
...and set...
uri.home.substitution=true
- When creating the Content Source for the collection, specify user "anonymous" with no password.
Note that you cannot change the user id of an existing Content Source. You need to delete the content source and recreate with user anonymous.
- Restart both WebSphere Application Server and WebSphere Portal to enable changes.
Configure for local search service
Set the IndexName parameter of the search portlet to the name of the search collection that you created. Each search portlet can be configured to use one search index only. Each search portlet can be configured for searching one search collection only. If you have more than one search collection built and maintained, create a new copy of the search portlet for each additional collection, and update its configuration parameters accordingly. To copy a portlet, use the Manage Portlets portlet on the Portlets page under Portal administration.
Using remote search service
You can configure the search portlets for local operation, or you can configure them for remote search service. Depending on your configuration, remote search service might have performance benefits by offloading and balancing system load.
You can provide the remote search service either as an EJB or as a Web service via SOAP. Search on portal sites requires security to be enabled, which is provided by EJB only. Therefore, if you want your users to be able to search portal sites, use EJB.
Preparing for remote search service
In order to enable the remote search service, perform the following steps on the machine where you want to install the remote service:
- Copy the files WebScannerSoap.ear and WebScannerEjbEar.ear to the installableApps directory on your portal server. These files are located on the third WebSphere Portal CD under the directory search.
- Depending on whether you want to include portal site search or not, install one of the two applications WebScannerEJbEar.ear or WebScannerSOAP.ear on a server server1 . Both files are located in the InstallableApps directory.
- If you use EJB, proceed by the following substeps. If you use SOAP, omit these substeps and proceed with the next main step.
- Create a directory with the name extract .
- Extract the content of WebScannerEJbEar.ear or WebScannerSOAP.ear into the directory extract that you created in the previous step.
- Open the WAS administration console.
- Under Environment > Manage WebSphere Variables, create a new variable named PSE and set the value to extract/lib where extract is the directory into which you extracted the EAR file.
- In the WAS administration console, under Environment > Shared Libraries, create a new shared library named PSE
with classpath as follows:
$(PSE) $(PSE)/taeDescriptors $(PSE)/eureka $(PSE)/sumIt $(PSE)/taxonomy $(PSE)/theme $(PSE)/uima $(PSE)/WEB-INF/lib/Export.jar $(PSE)/WEB-INF/lib/es.oss.jar $(PSE)/WEB-INF/lib/convertors.jar - In the WAS Administration console, under Servers > Application Servers, click server1 .
- Under Additional Properties, click Classloaders.
- Click New and then Apply.
- Under Additional Properties, click Libraries, then click Add.
- Select the Library Name PSE and click OK.
- Save your changes to the configuration.
- On the WAS Administrative Console, determine the required values for configuring the portlet parameters,
depending on whether you are using EJB or Web service via SOAP:
- For EJB: Determine the value for the port under...
Servers | Application Servers | YourAppServer | End Points | BOOTSTRAP_ADDRESS
- For SOAP:
Determine the value for the port number for the SOAP URL parameter. The appropriate port number for the SOAP URL parameter is the port on which the appserver runs, in other words, the HTTP transport on which Server1 is configured to run.
Make sure that the port number that is set in...
was_root/installedApps/node/WebScannerEar.ear/WebScannerSOAP.war/wsdl/com/ibm/hrl/portlets/WsPSE/WebScannerLiteImpSOAPService.wsdl
...matches this portEdit the file and look for the port given in the value for the SOAP address location. Example:
<soap: address location="http://localhost:9080/WebScannerSoap/servlet/rpcrouter"/> .
In the example the port is 9080.
- For EJB: Determine the value for the port under...
- In the WAS Administration console, under Resources > Work Manager, create a new Work Manager named PSEWorkManager with the following attributes:
Name: PSEWorkManager JNDI Name: wps/searchIndexWM Minimum Number of Threads: 20 Maximum number of Threads: 60 Growable = True Service Names: Application Profiling Service, WorkArea, Security, Internationalization - Restart the appserver.
Configure the remote search service
To configure the search portlets for remote search service, proceed as follows:
- In your WebSphere Portal click Administration > Portlet Management > Portlets.
- Select the search portlet that you want to configure for remote search service.
Depending on your configuration and which portlets you use, this can be one or more of the following portlets:
- The administration portlet Manage Search Collections
- The administration portlet Manage Search and Browse
- The administration portlet Pending Search Collection Items
- The end user portlet Search and Browse.
- Click the Configure portlet (wrench) icon.
- Depending on whether you are using EJB or Web service via SOAP, select the following steps and proceed as appropriate:
- For EJB: To configure for remote search service via EJB, make the following modifications:
- Modify the parameter IIOP_URL of the portlet. Set the value to iiop://your_ejb_search_server.your.domain.com:port
where your_ejb_search_server.your.domain.com is the name of the remote search server and port is the port number that you obtained in the step to determine the port for EJB under Preparing for remote search service. For example, this can be iiop://ejb_server.your_company.com:2809 .
- Modify the parameter EJB of the portlet. Set it to the following value: ejb/com/ibm/hrl/portlets/WsPse/WebScannerLiteEJBHome . This is the default JNDI name. If you have modified the EJB parameter to a JNDI name of your own choice, use that name instead.
- Modify the parameter IIOP_URL of the portlet. Set the value to iiop://your_ejb_search_server.your.domain.com:port
- For SOAP: To configure for remote search service as a Web service via SOAP, modify the parameter SOAP_URL of the portlet.
Set the value to http://your_soap_search_server.your.domain.com:port/WebScannerSOAP/servlet/rpcrouter
where your_soap_search_server.your.domain.com is the name of the remote search server and port is the port number that you obtained in the step to determine the SOAP port under Preparing for remote search service. For example, this can be http://soap_server.your_company.com:8880/WebScannerSOAP/servlet/rpcrouter.
- For EJB: To configure for remote search service via EJB, make the following modifications:
- Click OK.
- Log out and log back in to the portal for the settings to take effect.
Change between local and remote search services
You can configure and use the embedded search component in two ways, either accessing a locally installed search service or using a remote search service via EJB or through the SOAP (Web services) interface. Once you have configured one of the search portlets for access local search service or remote search service, you cannot change its configuration to the other type of service. If you try to do this, the portlet does not work any more. This applies to both the administrative portlet Manage Search Collections and the end user portlet Search and Browse.
If you want to switch to the other type of service (for example, from local to remote), do so manually. Create another copy of the portlet and configure it for the required service type. To configure for local access, leave the SOAP_URL parameter empty; to configure for remote access, specify a SOAP URL.
Configure search in a cluster environment
In order to support search in a clustered environment, install and configure the search service remotely. To do this, perform the following tasks:
- Install and configure the search service to work remotely, that is on a remote WAS node which is not part of the WebSphere Portal cluster. You can provide the remote search service either as an EJB or as a Web service via SOAP. Deploy the appropriate EJB or SOAP EAR file on the remote WAS node. For details about how to do this refer to the WAS documentation.
- Configure the search portlets for remote search service so that they access the remote machine accordingly.
Note: The portal site default search collection is created only once at the first time when an administrator selects the search administration portlet Manage Search Collections. If this occurred before you configure the portlet for remote search, then the default portal site search collection is only available on the primary node of the cluster. In this case proceed as follows:
- Delete the default portal site search collection. You do this by selecting the PortalCollection and clicking Delete collection.
- Configure the Manage Search Collections portlet with the parameter PortalCollectionForceCreate set to true. To do this, select Administration > Portlet Management > Portlets. Select the Manage Search Collections portlet and click the Configure portlet (wrench) icon. Configure the parameter PortalCollectionForceCreate and set it to true.
The default portal collection will be created again when you select the Manage Search Collections portlet. The collection will then be available for search on all nodes of the cluster.
Crawling and indexing a portal site
You can crawl, index, and search a portal site in the following ways:
- Using the Portal Search. Portal Search can access two types of portal pages:
- Public or anonymous portal pages.
Pages that users can view without authentication by user ID and password. The crawler can crawl public pages on the portal site on which it resides, or on a remote portal.
- Secured portal pages.
Pages that users can only view if they authenticate themselves to the portal by logging in to the portal with a user ID and password.
Note: You can crawl, index, and search secured portal pages only on your local portal installation. For security reasons, you cannot crawl secured pages of one portal site from another portal site.
- Public or anonymous portal pages.
- Using external search software. This works for public or anonymous portal pages only.
Only the main panels of the portlets on the portal pages are indexed and can be searched. The crawler does not follow links that are specified within a portlet.
Items in the result lists from portal site searches provide no summary information. If you want to have the summary information added, configure the portlet with the summary parameter enabled as follows:
PortalCollectionSummarizer=on
Using Portal Search to search public portal pages
To have Portal Search crawl and index a public portal site, click the Web site radio button and enter the portal URL when you create the new content source using the Manage Search Collections portlet.
To have public pages of a portal crawled, disable HTTP sessions for that portal.
Configure search on a secured portal site
For search on secured portal sites WebSphere Portal provides a preconfigured default setup. Use that setup as is, or you can modify it as required. You can also set up your own search collection for search on portal sites. The following sections describe all of these options.
Security notes:
- For enabling search on secured portal sites enter sensitive data, such as a user ID and password for the crawler. To ensure encryption of this sensitive data when it is stored, update and run the file searchsecret.xml using the XML configuration interface before enabling search on the secured portal site.
- You can crawl, index, and search secured portal pages only on your local portal installation. For security reasons, you cannot crawl secured pages of one portal site from another portal site.
- When a user searches a secured portal, the resulting portal pages are filtered based on that user's access permissions. This security mechanism works only applied to search on portal sites. It does not work for documents from Lotus Workplace Web Content Management or Web sites. The portal cannot filter the resulting documents by portal security for these types of content source.
Enable search on a secured portal site with the default configuration
In order for you to use Portal Search for searching your portal site, WebSphere Portal has already prepared a search collection and a content source during the portal installation. To enable the portal site search collection for search by users, activate it by starting the crawl and indexing process. Proceed by the following steps:
- To ensure encryption of the user ID and password for the crawler, update and run the file searchsecret.xml using the XML configuration interface.
- Click on Administration > Portal settings > Search Administration . This opens the Manage Search Collections portlet.
- From the Search Collections box select the search collection PortalCollection.
- From the Content Sources in Collection box select the content source for the portal collection. The name of the content source is the URL of your portal. For example, it can be http://your_server.ibm.com:9081/wps/portal .
- The preconfigured default portal site search uses the default administrator user ID wpsadmin with the default password of that user ID for the crawler.
If you want the crawler to use the user ID wpsadmin and its default password, omit the following substeps and proceed with the next main step.
If you have changed that password for the user ID wpsadmin, proceed as follows:
- Click the Edit content source (pencil) icon.
- If you changed the password for the user ID wpsadmin, type the correct password in the entry field Portal user password.
- Click Save to save your changes.
- Click the Start Collecting (flash) icon to start the crawl. The crawler starts collecting and indexing portal pages. By default, the crawl is scheduled to run for one hour.
- You can change the length of the crawl schedule, depending on the size of your portal installation. To do this, proceed by the following steps:
- Select the content source and click the Edit Content Source (pencil) icon.
- From the Stop collecting after (minutes): pulldown list select the required value.
- Click Save to save your changes.
Notes:
- When you start the crawling process, be aware of the Time required and availability of documents during a crawl.
- If a user tried to use the Search Center by entering a search string in the portal search box in the theme and clicking search before an administrator enabled the portal site search collection, the user has to log out of the portal and log back in again in order to be able to search the portal search collection. This includes the administrator who enabled the portal search collection.
Configure your own configuration for search on a secured portal site
If you want to set up your own search collection for searching a secured portal sites, proceed by the following steps:
- Plan and determine which portlets and portal pages you want to be accessed by the crawler and made available for search. This must be the sum of all of the portal resources that you want to be available for search by all users that you want to be able to search those resources.
- Make a conscious decision about the user ID that you use when configuring crawling and indexing, and which access permissions that user ID should have.
- To ensure encryption of sensitive data that is stored, such as the crawler user ID and password, update and run the file searchsecret.xml using the XML configuration interface.
- Create a dedicated crawler user with a user ID and password in the portal.
- Give the crawler user ID the required access permissions to the portal resources as determined by the planning step above:
- Access to all portlets and pages that should be indexed and thus be made available for search by users.
- Access to the crawler user specific main entry point page that hosts the Seed List portlet. This is a hidden page. It is located under the content root and its name is wp.search.seedlist.
For details about how to assign access permissions refer to Enable security and Security Concepts .
- Click on...
Administration | Portal settings | Search Administration
This opens the Manage Search Collections portlet.
- Create a search collection.
- Create the content source.
The root URL for the portal is already filled in. Fill in the user ID and password for the crawler user that you created. Fill in the other fields and select the options as required.
- To enable search on the portal site for users, click Start Collecting.
Notes:
- Under normal circumstances, exclude all administrative portlets and all portlets that represent highly dynamic content from being accessible to the crawler user. This includes such portlets which contain action links with Delete actions. Otherwise the Delete action can be invoked through the crawler.
- Instead of creating a new search collection and content source for the portal site search you can also use the collection and content source of the default portal site search setup. In this case you only need to change the prefilled user ID and password in the Edit Content Source Configuration panel to the one you want to use.
Using external search software to index a portal site
To have external search services such as Google or Yahoo! crawl and index a portal site, indicate the URL of your portal that you want to make available for search to that search service. This works for public pages only, that is for pages that users can access without a user ID and password.
In order for this to work, enable public sessions for your portal. By default, sessions are only created when a user authenticates and logs in to the portal.
You can enable public sessions by editing...
wp_root/shared/app/config/services/NavigatorService.properties
...and setting the public.session parameter to true.
Restart both WAS and WebSphere Portal for your changes to take effect.
Use the URL Mapping portlet to map the portal page URLs to short and user-friendly names. Otherwise the external search service might not index those pages.
Configure your custom portal themes to include the search box
The Portal Search box is included as part of the themes of a portal installation. If you use your own custom themes with your portal and want your users to be able to use the Search Center, verify your custom themes include the Portal Search box.
Migrating your search collections from WebSphere Portal V5.0 to V5.1
Before you start working with Portal Search and the Manage Search Collections portlet of WebSphere Portal V5.1, be aware that the index structure of Portal Search is not backward compatible between WebSphere Portal V5.0 and V5.1. If you want to continue using your search collections for Portal Search, export and import them when migrating to WebSphere Portal.
To preserve your search collections when migrating to WebSphere Portal V5.1, export your search collections before you migrate to WebSphere Portal. After the export, delete the search collections from your existing portal using the Manage Search Collections portlet. After you have completed the migration, import your search collections back into the portal.
Use the Import or Export option of the Manage Search Collections portlet for both exporting and importing. For more details about how to use this option, refer to the Manage Search Collections portlet help.
When you import a collection, be aware of the Time required and availability of documents during a crawl.
Predefined static taxonomy and categorizer
The WebSphere Portal Categorization Facility allows high-accuracy categorization of documents in any of over 2,300 subjects. These subjects are grouped in the following main business category areas:
- Architecture, Construction, and Real Estate
- Computers
- Entertainment, Media, and News
- Environment, Energy and Mining
- Finance
- Food and Beverage
- General Business
- Hospitality and Travel
- Military, Aerospace, and Security
- Other Industries
- Operations, Marketing, and Advertising
- Telecommunications and Consumer Electronics
- Transportation.
Portal users can use the Categorization Facility to build applications that automatically determine the subject of documents which fall within any of these areas. The portal Categorization Facility is ready to use as supplied. It can also be customized to your business. It can evaluate and categorize documents in the languages English, French, Italian, and German.
The portal Categorization Facility consists of two major components, a Categorizer and a Taxonomy Manager. Each of these is described in detail in the following.
You can customize the portal model based Categorizer which is normally used for static pre-defined categories, by creating additional categories that reflect your own company's products or other key terms. You can do this in two ways:
- By creating product name categories
- By creating synonyms for the categories supplied with WebSphere Portal or for your own product name categories.
Methods for creating each of these are described below as part of the WebSphere Portal Taxonomy Manager. In both cases, the categorizer looks for an exact match, including capitalization.
Product Name Categories
For a product name category you can choose any word or phrase, but you would most commonly use the names of your company's products or services. You create one category for each product or group of products. For example, you can create a new category named "WebSphere Portal" using the WebSphere Portal Taxonomy Manager. By default this creates a model for that category consisting of the phrase "WebSphere Portal". The categorizer then looks for occurrences of that phrase in all documents, and counts the number of such occurrences. The categorizer multiplies the number of occurrences with the weight you assigned to that phrase to compute a score. If the calculated score is greater than or equal to the current value of MinUserCatScore as described in the list of parameters below, then the categorizer reports that the document belongs to that category. A given document can belong to more than one Product Name Category.
Synonyms
You can assign any number of synonyms to the standard set of categories shipped with WebSphere Portal or your product name categories. You can also assign synonyms to interior nodes of the taxonomy. Each synonym is used to help the categorizer identify other instances of that category. Common synonyms can be other spellings or capitalization patterns. They can also just be other phrases that signify a particular category. For example, if the documents you categorize often use the name of a product in all capital letter spelling, you create a synonym such as WEBSPHERE PORTAL.
The best way to decide whether you need a synonym is to examine your documents to see what forms of the category name are used in practice. At the time you create the synonym, you are prompted to assign a weight to it. The categorizer multiplies the number of occurrences of a synonym in a particular document with that weight to calculate a score, and adds it to the score for that category.
Example: A document is to be categorized. The categorizer reports the two top categories as "Drinking Water Protection" and "Drinking Water Treatment" with scores of 0.24 and 0.25, respectively. You assign "watershed protection" with a weight of 0.05 as a synonym to "Drinking Water Protection". If this new synonym is found once in this document, this alters the scores to 0.29 and 0.25, respectively. Consequently, the "best" answer from the categorizer is now "Drinking Water Protection."
If you find that a category does not find all desired documents on a particular topic, add synonyms. You can assign the desired weight to each synonym. However, in general you may find it best to use a weight of no more than 50% of the MinUserCatScore for synonyms to product name categories, and no more than 50% of the MinCatCos for synonyms to the standard WebSphere Portal categories. This ensures that a document must contain at least two mentions of a synonym to be categorized as belonging to that category.
Categorizer Parameters
The categorizer has a number of adjustable parameters. They can be set to achieve various results. The parameters are controlled by entries in ModelCategorizer.properties found in...
wp_root/shared/app/eureka/resources/LL/CategorizerModel-yyyy-mmm-dd-LL-wps.zip
...where LL indicates the language code, such as fr, en, it, or de. For example...
CategorizerModel-2003-Jul-10-en-wps.zip
The settings in the file supplied with the portal are configured with values for the best general usage. However, advanced administrators may decide to modify them. If you want to modify the properties file, extract it from the ZIP file and modify it. Then leave the properties file in the same directory where the ZIP file is. You do not need to replace the properties file in the ZIP file with the new one.
The default settings for the parameters in the properties file are as follows:
- Super category threshold
- MinSuperCatCos = 0.05
- Category threshold
- MinCatCos = 0.24
- Value by which the 2nd and 3rd cosines must be in order to remain part of the result set
- SuperCatProximity = 0.04
- Minimum score allowed for user categories in the ProperName Categorizer
- MinUserCatScore = 0.20
The parameters and their settings are explained in the following:
- MinSuperCatCos
- This is the super category threshold. The MinSuperCatCos value is a number between 0 and 1. Typical values are between 0.05 and 0.15. The higher the value, the more stringent the categorizer is in determining the super category, or collection of categories, to which the document belongs. For shorter documents or for less professionally written documents, use a value closer to 0.05; for longer and more professional documents, use a higher value. Web pages often tend toward the shorter and less professional side; for those a setting of 0.05 is recommended. In any case, the value should be substantially lower than MinCatCos.
- MinCatCos
- This is the category threshold. The MinCatCos value is a number between 0 and 1. Typical values are between 0.15 and 0.27. The higher the value is, the more stringent the categorizer is in determining the category to which the document belongs. Typical Web pages categorize best with a value of 0.24; however, short documents may categorize well with a lower value. Values slightly above 0.24 may be appropriate for single-topic documents that are professionally authored and of significant length, that is several hundred words.
- SuperCatProximity
- This is the value by which the second and third cosines must be in order to remain part of the result set. The SuperCatProximity value is a number between 0 and 1. Typical values are in the range of 0.01 to 0.08. The higher the value is, the more likely the categorizer is to consider a broader set of super categories. Generally, this should be left at the default setting of 0.04.
- MinUserCatScore
- This is the minimum score allowed for user categories in the ProperName Categorizer. The MinUserCatScore applies to the user created model data as described in the Customization section above. It can have a value between zero ( 0 ) and infinity. The higher the value is, the more stringent the categorizer is in determining the product name category to which the document belongs. A document is assigned to a product name category when the product name score for that category is at or above the MinProperNameEurekaScore. As the default score for each newly created product name category entry is 0.1, the default threshold of 0.2 implies that the Product Name Category must occur at least twice in the document for the document to be scored as belonging to that Product Name Category.
WebSphere Portal Taxonomy Manager
The WebSphere Portal Taxonomy Manager portlet helps you manage the pre-defined static taxonomy. Use it to perform a wide range of administrative tasks on the categories that constitute the taxonomy, including the following:
- Viewing part or all of the taxonomy
- Adding new categories (nodes)
- Collapsing branches of the tree that are not of interest
- Copying nodes or branches
- Renaming categories
- Searching the taxonomy.
- Delete nodes
More than one user can use the Taxonomy Manager at a time. However, only one user at a time should use it to change the taxonomy; other users should utilize it only to view the taxonomy. Therefore it is recommended that the portal administrator assigns the editor role for the taxonomy manager to only one user.
Taxonomy Manager Portlet panels
The WebSphere Portal Taxonomy Manager portlet consists of a set of view panels. Each of the panels displays a different view of your taxonomy.
- Taxonomy Tree panel
- This is the most important one of the panels. It displays the current view of your taxonomy. Each node of the taxonomy is displayed on a single line.
The line consists of the name of the category displayed as a Web link. By clicking on the link you can display all of the subcategories, if any, of that category.
For example, clicking on "Operations, Marketing, and Advertising Industries" displays the subcategories "Advertising," "Marketing" and "Operations."
In front of each node in the taxonomy is a colored dot:
- A green dot means that the node is active, that is all categories of the node are being used.
- A yellow dot means that the node is collapsed, that is categories under this node are not displayed.
- A red dot means that the node has been deleted.
Clicking on a node also selects that node for editing tasks as described in the following.
- Taxonomy Search Page panel
- Use this panel to search for a particular word or phrase in any part of the taxonomy. You can also search for a category by its category ID. Use this search feature if indexing gives you too few or too many documents with a certain keyword, you can look up where that keyword occurs in the taxonomy.
- Proper Name panel
- Use this panel to display and change the proper names and synonyms associated with each category. It is normally visible by default. It can also be invoked using the Edit Proper Name task.
Typical Usage of the Taxonomy portlet
As with other WebSphere Portal portlets, you first log in to the portal. You can then launch the Taxonomy Manager portlets. The exact details of this vary, depending upon how your company has installed the portlet.
Normally you first load the current taxonomy. Depending on how your portal administrator has set up the portlet, it probably loads your company taxonomy by default. However, if you want to load a different taxonomy, you can do so with the Load Taxonomy action. This displays your taxonomy in the Taxonomy Tree portlet.
Set the Default Taxonomy
The administrator can change the default taxonomy by changing the name in the portal.xml file distributed with the taxonomy manager.
Giving Edit or Read-Only Permissions
The administrator can control which users can edit the taxonomy by giving edit users access to the Taxonomy Manager portlet and read-only users access to the Taxonomy Viewer portlet.
Categorizer Parameters
As an administrator, consult the documentation for the Model-based Categorizer to determine how best to set the categorizer parameters. In particular, the settings for some parameters might affect how the user-assigned Weights affect the categorizer results.
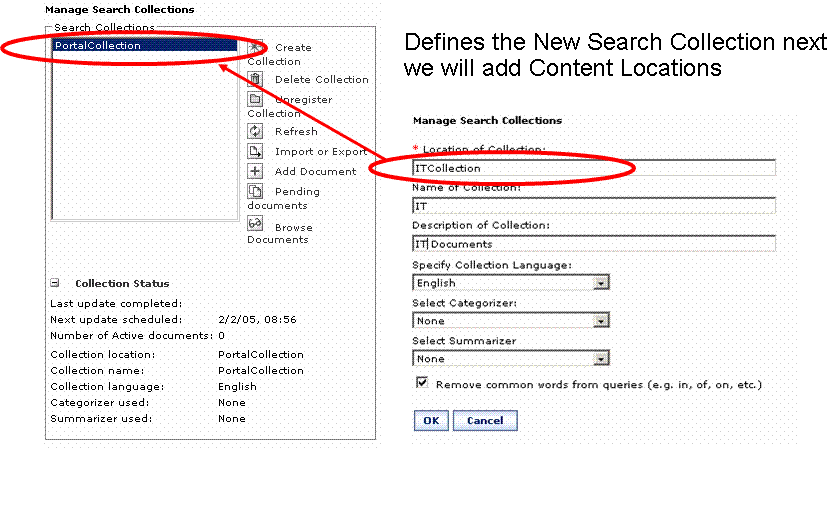
Create and configure search collections
To administer search collections, use the Search Administration portlet Manage Search Collections. This includes creating, updating, and removing search collections, and other administrative tasks on search collections. The necessary procedures are described in the portlet help.
To get to the portlet, click Administration, then Portal Settings, then the search administration portlet Manage Search Collections. The following sections give an overview of the task which you can perform with that portlet.
Managing search collections
When you select the Manage Search Collections portlet, it displays two boxes:
Search Collections Lists the search collections and related information, and it allows you to perform tasks on the search collections. Content Sources in Collection Lists the content sources for the selected search collection, shows related information, and lets you perform tasks on the individual content sources.
In the Search Collections box, you can select the following options and perform the following tasks:
- Create collection. Select this option to create a new search collection.
Note: When you create a search collection, the language selection pulldown list does not provide the option CJK for Chinese, Japanese, and Korean, as mentioned by the portlet help. Instead, select the actual language for which you want the search collection and index to be optimized.
- Select a collection and perform one of the following tasks:
Delete Collection Delete the selected search collection. Register Collection Register the selected search collection for search by the Search Center portlet. Once you have registered the search collection, the option changes to Unregister Collection. You can click the option to withdraw the search collection from search by the Search Center portlet. Refresh Manually refresh the selected search collection. The index performs a complete re-crawl on all the content sources of the search collection. Import or export Import or export the selected search collection by using the Portal Search XML interface. The export and import operations can be of benefit when you upgrade to software levels which are not necessarily compatible with the data storage format of older versions of the software. To prevent loss of data, you export all data of search collections to XML files before upgrading the software. Then after upgrading the software level, you can use the previously exported files to return the search collection data back into the new software level. Note: When you import a collection, be aware of the Time required and availability of documents during a crawl.
Add Document Manually add a new document to a collection. Pending Documents The documents returned by a crawl of the selected search collection are sent to the Pending Documents box if you disable the option for adding them to the collection automatically. Use the Pending Documents panel to accept or reject these documents. By accepting document you make them available for search by users. When you accept a document, you can also edit its metadata. You disable the option Add all documents to collection automatically for a content source in the Manage Search Collections portlet. If you do this, documents that result from a crawl are moved to the Pending Documents box.
Category Tree If you are using a rule based taxonomy for the selected search collection, use this option to manage that taxonomy, that is to work with categories and filter rules. Browse Documents Work with the documents of the selected collection. You can perform the following administrative tasks: - Browse the documents of the selected collection.
- Search the documents of the selected collection.
- Edit the fields of the documents in the selected collection.
- Delete documents from the selected collection.
The panel design of the Browse Documents page is similar to that of the Search and Browse portlet that users use to search documents.
Reorganize Click this option to remove all documents that have been marked for deletion from the search collection. This clears storage space on your hard drive occupied by unused documents. - View the Collection Status information of the selected search collection.
The status fields show the following data that changes over the lifetime of the search collection:
- Last update completed:
- Shows the date when a content source defined for the search collection was last updated by a scheduled update.
- Next update scheduled:
- Shows the date when the next update of a content source defined for the search collection is scheduled.
- Number of active documents:
- Shows the number of active documents in the search collection, that is, all documents that are available for search by users.
- Collection Location:
- Shows the location of the selected search collection in the file system. This is the full path where all data and related information of the search collection is stored.
- Collection Name:
- Shows the name of the selected search collection.
- Collection Description:
- Shows the description of the selected search collection.
- Collection Language:
- Shows the language for which the search collection and its index is optimized. The index uses this language to analyze the documents when indexing, if no other language is specified for the document. This feature enhances the quality of search results for users, as it allows them to use spelling variants, including plurals and inflections, for the search keyword.
- Categorizer used:
- Shows the categorizer that is used by the search collection.
- Summarizer used:
- Shows whether a static summarizer is enabled for this search collection.
You can click the minus ( - ) and plus ( + ) icons to collapse or expand the Collection Status section.
To update the status information, click the refresh button of the browser or the collapse and expand icons.
In order to make documents available for search by users do all of the following:
- With regards to adding documents collected by a crawl, do either of the following:
- Select global acceptance of documents returned by a crawl: When adding a new content source to a collection, enable the option Add all documents to collection automatically.
- Accept documents individually after a crawl: Click Pending documents and accept the desired documents from the document list resulting from the crawl.
- Install the Search and Browse user portlet.
Managing the content sources of a search collection
In the Content Sources in collection box, you can work with content sources which belong to the search collection you selected from the Search Collections box. A search collection can be configured to cover more than one content source. Content Sources in Collection allows you to do the following in relation to the search collection which you selected from the Search Collections list:
- Add Content Source.
Select this option to create a new content source for the search collection you selected from the Search Collections list.
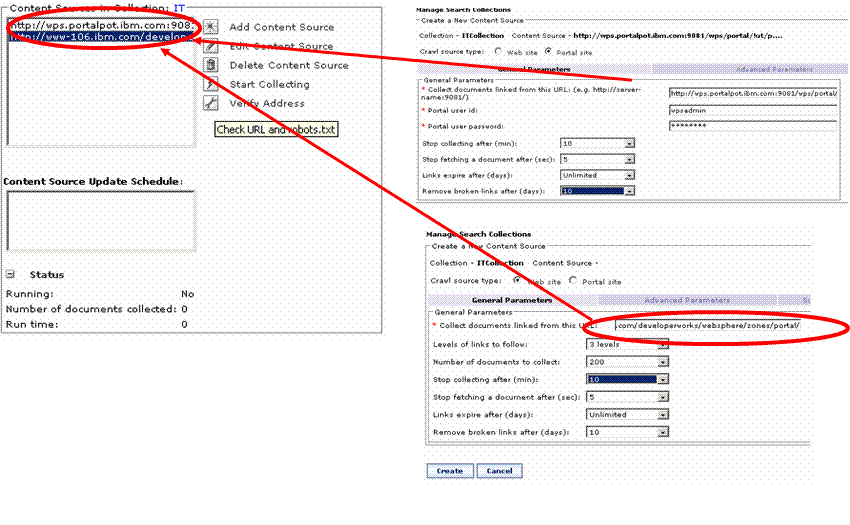
- The selectable options and data entry fields displayed under the different configuration tabs depend on which type of content source you select.
If you select the radio button for Portal site, the appropriate data for your portal site are already filled in.
For some content sources you might need to enter sensitive data, such as a user ID and password. For example, this applies to secured WebSphere Portal sites or HTTP sites that require a user ID and password. To ensure encryption of this sensitive data when it is stored, update and run the file searchsecret.xml using the XML configuration interface before creating the content source.
- Under the Advanced Parameter tab, the entry field for the Default Character Encoding contains the initial and default value windows-1252, regardless of the setting for the Default Portal Language under...
Administration | Portal Settings | Global Settings
Enter the required default character encoding, depending on your portal language. Otherwise documents might be displayed incorrectly under Browse Documents.
- Select a content source to perform one of the following tasks:
- Edit Content Source, that is configure parameters, schedules, categories, and filters for the selected content source.
- Delete Content Source.
- Start or Stop Collecting the crawling of a content source.
Use this option to start an update of a content source by a new run of the crawler, or stop such an update.
The timeout that you set under the Advanced Parameters for a content source works as a fuzzy time limit. It might be exceeded by some percentage. Therefore allow some tolerance.
- Verify Address.
Click this icon to verify that the URL of the content source is still live and available. Manage Search Collections returns a message about the status of the content source.
- Content Source Update Schedule.
This allows you to select one of several schedules by which a content source is updated, and activate or deactivate that schedule.
- View the following information about Content Source Status and configuration:
- Run:
- Shows whether the crawler for the selected content source is active or not. When it is running, this shows as yes. Once it has finished, it changes to no.
- Number of documents collected:
- Shows how many documents the crawler has fetched so far from the selected content source.
- Run time:
- Shows how much time the crawler has used so far to crawl the content source.
You can click the minus ( - ) and plus ( + ) icons to collapse or expand the Content Source Status section.
To update the status information, click the refresh button of the browser or the collapse and expand icons.
Hints and tips for using Portal Search
Using the Search Center with remote search services with different languages
In order to use remote search services such as Google and Yahoo! with an English search keyword, a URL such as the sample URL mentioned in the Search Center portlet help for configuring the portlet works fine as is: http://www.google.com/search?q= . However, consult the documentation of the remote search service that you use to ensure that the Web interface is set up and used appropriately for the language that you use for your search. This can avoid problems with the displayed results, depending on the combination of languages set for your portal, your browser, and the search.
Time required and availability of documents during import and crawl
The following search administration tasks can require extended periods of time:
- Importing a search collection. When you import data to a collection, it can take some time until the content sources for the collection are shown in the Content Sources in Collection box and the documents of the imported collection are available for crawling.
- Crawling a content source. During the crawl documents might not be not immediately available for searching or browsing.
The time required for these tasks is influenced by the following factors:
- The number of documents in the content source that is being crawled
- The size of the documents in the content source that is being crawled
- Speed and availability of your processors, hard drive storage systems, and network connection.
- The value that you selected from the Stop collecting after (min): pulldown menu when you created or edited the content source.
This applies, for example, to the following scenarios:
- When you start a crawl by selecting a content source in the Content Sources in Collection box and clicking Start collecting.
- When you import a search collection and when you start a crawl on the imported a search collection.
- When portal installation is complete and you initialize the preconfigured portal site collection by selecting the portal site content source and clicking Start collecting.
Uninstalling the portal does not delete search collections
When you uninstall WebSphere Portal, the directories and files for the search collections are not deleted. You need to delete these files and directories from the hard drive manually.
HTTP crawler does not support Java script
The HTTP crawler of Portal Search does not support Java script.
Changes for Portal Search from WebSphere Portal V5.0 to V5.1
Portal Search has been significantly enhanced with new features for V5.1. The new features of the WebSphere Portal V5.1 Search are highlighted in the following sections.
General enhancements to Portal Search
Portal Search has been enhanced with the following new features in WebSphere Portal V5.1:
- Additional content sources:
Administrators can now make the following content sources available for search by users:
- A company intranet
- WebSphere Portal sites
- Content published by Lotus Workplace Web Content Management . Use the Web crawler for indexing.
- Portal Search Box and Search Center:
New sample themes provided by WebSphere Portal V5.1 allow presenting a search box on every portal page. When users enter a search string and click Search, the portal takes them to the new Search Center portlet and applies the search to a preconfigurable default tab. Users can then easily apply the same search to another source by clicking other related tabs. The portal then performs the same search to that tab.
- Extended search capabilities:
Administrators can now tie external search resources in with Portal Search. These can be internal or external Web sites, or IBM Lotus Extended Search. Such content sources can be made available for search by the Search Center portlet.
- Searching a Portal site:
Portal Search now allows crawling and indexing portal pages. The crawler can fetch and index all pages with portlets to which it has access rights. This way you can enable users to search those pages. You can define which portlets on which pages you want to make searchable. You can do this by granting the required access permissions to the crawler user.
- Only the main panels of portlets are available for indexing and search.
- You can crawl and search anonymous pages both locally or on remote portals.
- You can crawl, index, and search secured portal pages only on your local portal installation. For security reasons, you cannot crawl secured pages of one portal site from another portal site.
- WebSphere Portal provides a preconfigured default search collection for the search on the secured pages of its own portal site.
- Security:
Portal search has been enhanced by including the following new security features:
- Search collections are now protected by portal security. The individual search collections are separate portal resources. You can give users access permissions on them and thereby make different search sources available to different users or user groups. This means that users see only the tabs for search collections for which they have access. This applies to all search collections, for example as represented by the tabs in the Search Center.
- Result lists of Portal Search collections are returned considering user access rights. This has the following consequences, depending on the use case:
- A search by a user on a portal document library returns only documents to which the user has access permission.
- A search by a user on a portal site returns only portal resources to which the user has access permission.
- Personalization:
Portal search results are displayed to the user within the context of the portlet as personalized for that user. This can be, for example, presenting a document that results from a search in the theme and skin selected by the user in the preference settings.
- Search as a remote service:
The Portal Search service can now reside on a separate machine. The remote search service can be utilized either via SOAP protocol or via EJB.
- Search in a portal cluster:
Portal search now supports portal clusters. You implement this solution by configuring Portal Search as a remote service either through Web services or EJB interface.
- You can now configure three different view modes for the Search and Browse portlet, depending on the type of search collection and its content source(s).
New Search Center portlet
WebSphere Portal has a new Search Center portlet. Users can use the Search Center for search. The Search Center provides a central starting point to all searchable content sources made available to the Portal. The Search Center provides the following features:
- The Search Center supports integrated indexing and search of various content sources. The content sources are organized via tabs.
Such sources can be, for example:
- Search collections that you administer using the Portal Search administration portlet Manage Search Collections.
- Portal Document Management libraries.
- IBM Lotus Extended Search resources, if they are available, as specified by an administrator. These resources can be configured on the Extended Search server.
- Internet search sites, such as Google or Yahoo!.
- WebSphere Portal sites. The main panels of the portlets that are available on portal sites can be indexed and searched. These can be on secured pages of the local portal, or on anonymous pages of both the local portal or remote portals.
- The Search Center provides tabs for users to select different sources for the search. The tabs can be configured as follows:
- For search collections provided by the Manage Search Collections portlet you have two options:
- Each individual search collection is available through its own separate tab. In this case search collections that are separate but have the same name are combined under a single tab with that name.
- All search collections are available through one common tab.
- Document Libraries are always combined under a single tab.
- Each tab is associated with one or more search indexes and represents a logical group of searchable sources.
- You can configure special tabs to access remote search services, for example, Google or Yahoo! for Internet search. Use the configuration mode of the Search Center portlet to configure the tabs for such services. The Search center shows the search results that are returned by the external search service.
- The first tab is the default tab when users use the Search Box. You can determine in which order the tabs are displayed for users by default, and you can change that order if required.
- For search collections provided by the Manage Search Collections portlet you have two options:
Users can use the Portal Search Box and the Search Center for general searches. If you make the Search and Browse portlet available to your users, they can perform advanced searches on content sources collected by Portal Search.
The Search Center does not have to be deployed on a portal page to be available to users. Users are taken to the Search Center when they enter a search query into the search box.
Manage Search Collections
The administration portlet Manage Search Collections has been enhanced with the following new features:
- A new tabbed interface has been introduced to gain faster access to the various functions.
- A new option to Register Collection for the Search Center has been added to the portlet. Use this option to include the collection for search by the new Search Center portlet.
- A new option Add Document has been added to allow manual upload of files to the system or entering a single Web page by providing its URL.
- The Create content source and Edit Content Source panels have been redesigned. For better overview, they now have tabs for different groups of parameters.
- New parameters have been added to the Create Collection and Create Content Source panels. For example, you can now specify the type of the content source that you are indexing: Web site or Portal site.
- Name and Description parameters have been added to the Create Search Collection panels. If you have configured your Search Center with separate tabs for the different search collections and you register the collection for search by the Search Center, the name that you enter for the collection will be shown on the tab in the Search Center. The description that you enter will show when a user moves the mouse over the corresponding tab in the Search Center.
- A new security form has been added for secured content sources and repositories that require basic HTTP authentication. Use this form to configure the security for indexing those secured content sources. You can enter values for the URL, user name, password, and realm parameters for the content source.
For more details about how to use the Manage Search Collections portlet refer to the Manage Search Collections portlet help.
Pending Search Collection Items
The Pending Documents option that is provided with Manage Search Collections for handling pending search items can now also be accessed from a separate administration portlet Pending Search Collection Items. Use this portlet to handle documents that resulted from a crawl. You can decide for each document whether you want to accept it for search by users or reject it. You can also edit the metadata for documents that you accept. Documents that result from a crawl are moved to Pending Search Collection Items if you disable the option Add all documents to collection automatically for the content source in the Manage Search Collections portlet.
You can install this Pending Search Collection Items portlet as a standalone portlet for a specific collection. You can then give specific administrative users access permission to that portlet and thereby assign to them the tasks of approving, modifying, and rejecting incoming documents or metadata. Thereby the new portlet allows for finer granularity of access control per user role to the search collections.
Note: Documents resulting from a crawl are only moved to Pending Search Collection Items if you disable the option Add all documents to collection automatically for the content source in the Manage Search Collections portlet.
For more detail about how to use the Manage Search Collections portlet refer to the portlet help.
Search and Browse
The end user portlet Search and Browse has been enhanced with the following new features:
- The portlet now has a main action bar with the two options Search Results and Browse Documents. If you select Search Results, Search and Browse displays a table with the resulting documents and the following information:
- Document information. This shows the title and the URL of the document. If users switch to the detailed view, the author, keywords, description, summary, and category are added if available.
- The relevance. It shows the relevance of the document to the given query as a percentage.
- The date. It shows the last date at which the document was modified. The date for the document is derived from the HTTP header sent for the GET request for the document or Web page.
A secondary action bar above and below the search results list gives users the following options:
- Toggling between Sort by Date and Sort by relevance.
- Toggling between Descending and Ascending order of the documents that were found.
- Toggling between the options Show details and the Hide details.
- Clear Search.
- Edit mode. If you click the Edit icon, the portlet displays its Edit panel.
It can have two tabs, one each for users and administrators:
- Users can select their preferred defaults for such options as the sort criteria, the order, and the number of resulting documents that are displayed per page.
- The Administration properties tab is only available to administrators. An administrator can set the defaults for several options for all users. For example, this can be the selection of sources from which users can view results.
- The Advanced Search has been enhanced by an Add conditions option for additional search conditions. Clicking Add conditions displays an additional pair of Search in: pulldown menu and Search for: entry field. This allows users to add additional search constraints such as Company_division = North America. Users can add more than one additional search condition.
For more detail about how to use the Search and Browse portlet, refer to the Search and Browse portlet help.
Key features of Portal Search that existed before V5.1
These are some of the key features of Portal Search that the portal provided before WebSphere Portal V5.1:
- Overall Portal Search capabilities:
- Enable browsing of collections
- Supply enriched result page view including summaries and other relevant metadata. For example, this can be the author, description, and keywords of the document, if available.
- Allow for categorization of incoming documents using either a predefined static taxonomy, or a simple rules based taxonomy which can be defined by the user.
- Apply filter rules for the crawler to determine what pages are to be fetched and indexed.
- Optionally approve documents before they are added to the collection and the index.
- Allow editing of document metadata.
- Collect documents from multiple content sources into a single collection.
- Configure periodic crawls per content source.
- Start and stop crawls manually.
- Monitoring of the search collection process.
- Support of all national languages that are supported by the portal.
- Specification of socks and proxy server with the port number for indexing external content sources in the portlet.
- Summarizer.
- Predefined static taxonomy and categorizer.
In order to enable the search services in the portal perform administrative tasks such as the following:
- Define the content that you want to make available for search
- Define the properties of the full text index which allows for fast and efficient searches.
In order to make documents available for search by users do the following:
- With regards to adding documents collected by a crawl, do either of the following:
- Select global acceptance of documents returned by a crawl: When adding a new content source to a collection, enable the option Add all documents to collection automatically.
- Accept documents individually after a crawl: Click the Pending Documents option and accept the desired documents from the document list resulting from the crawl.
- Install the Search and Browse user portlet.
The features of Portal Search are described in detail in the following sections.
Portal search capabilities
Administrators can control the search collection process. They can thereby enhance the user's search experience. The following features are available:
- Ability to crawl multiple Web sites or sub-domains
- As an administrator you can choose to specify more than one starting point per search collection. This allows you to collect information either from multiple Web sites or from distinct sub-domains within an Intranet.
- Internet style search capabilities
- You can search for free text and use internet style plus ( + ) and minus ( - ) symbols.
You can explicitly search for phrases by enclosing keywords in double-quotes ( " ).
You can also specify a trailing asterisk ( * ) as a wild card character in keywords.
Note: If such a masked keyword results in more than 50 words, the list is truncated.
- Enriched result page view
- The search results page has been improved. It now includes additional document specific information such as a summary, the original URL, category information, the dates when the listed documents were created and modified, as well as author and description for the document if such attributes exist in the collected document.
- Browse documents
- It is now possible to browse a collection in addition to searching for information. If the collection is associated with a user-defined taxonomy, you can navigate the category tree, viewing only documents in the selected category.
- Categorization
- During the indexing process, incoming documents may be categorized into either a predefined static taxonomy or into a user-defined rule based taxonomy.
The predefined taxonomy is packaged with a model-based categorizer that categorizes incoming documents.
For a user-defined taxonomy the administrator creates rules that are used by a rules based categorizer to categorize document into the user-defined taxonomy.
- Filter rules for the crawler
- As an administrator you can use these to control the type of information that is retrieved from content sources. Documents or pages that are retrieved have to comply to a set of given rules in order to be inserted into the collection and made available for search via the search portlet.
- Monitoring of the crawling process
- Administrators can now view up-to-date information about the status of each crawl process. This includes:
- Whether the crawl process is currently running
- How long the crawl process has been running
- How many documents have been collected.
- Approval of documents before they are inserted into the collection
- Use this function to selectively approve which crawled documents you want to include in the collection. If this option is selected when defining the collection, documents are stored in a list of pending search collection items until they are approved.
- Editing document metadata
- Administrators can edit the metadata associated with a document including the title, author, description, date, and categories.
- Configure periodic crawls
- Administrators can choose to automatically refresh an index by scheduling automatic crawls, for example, "every night at 2 am".
- Start and stop crawls manually
- If required, administrators can manually stop an index build or refresh. They can also manually start an index update process.
- National language support
- Use this feature to increase the quality of search results. You can allow users to search for the keyword as entered, including spelling variants, such as plurals and inflections.
If you want to have external Web sites crawled, they can specify proxy and socks servers for the Manage Search Collections portlet. When you create or edit a content source, you can specify the proxy and socks servers under the Advanced Parameters tab.
Portlets for working with Search
The portal provides the following portlets related to Search:
- Search administration portlet Taxonomy Manager
- Search administration portlet Manage Search Collections
- Search administration portlet Manage Search and Browse
- Search administration portlet Pending Search Collection Items
- Search and Browse portlet for search by users
- Search Center portlet for search by users.
They are briefly described in the following.
For more details about enhancements to the search portlets for WebSphere Portal V5.1 refer to Changes for Portal Search from WebSphere Portal V5.0 to V5.1.
Search administration portlet Taxonomy Manager
The WebSphere Portal Taxonomy Manager portlet helps you manage the search taxonomy. Use it to perform a wide range of administrative tasks on the categories that constitute the taxonomy.
If you want to edit the predefined taxonomy, install and deploy the Taxonomy Manager portlet. Install the TaxonomyEditor.war file.
Search administration portlet Manage Search Collections
Use the Manage Search Collections portlet to do the following:
- Manage search collections
- Manage the content sources of search collections
- Perform administrative tasks required as preparatory steps for the search feature, such as indexing.
Search administration portlet Manage Search and Browse
The administration portlet Manage Search and Browse is displayed as part of the Manage Search Collections portlet. This portlet looks just like the Search and Browse portlet for search by users. Additional to this it has Edit and Delete icons in the document list. Administrators can use this portlet for all of the following:
- Search and browse the search collection just like users do with the user portlet Search and Browse. This way administrators do not have to change to the user portlet Search and Browse.
- Edit the metadata for documents from the list of documents.
- Delete documents from the list of documents.
Search administration portlet Pending Search Collection Items
Use Pending Search Collection Items to edit and accept, or reject documents that resulted from a crawl.
On a default portal installation, as an administrator you can use the option Pending Documents from the Manage Search Collections portlet to perform this same task. Therefore, if you plan to accept and reject documents globally or not at all for your portal, you do not need to install the Pending Search Collection Items portlet separately.
If you want to have a separate document approval process for one or more individual search collections, you can install the Pending Search Collection Items portlet separately for each search collection. You can give specific administrative users access permission to these portlets and thereby assign to them the tasks of approving, modifying, and rejecting incoming documents or content for specific search collections.
Search Center portlet for search by users
The Search Center provides a central starting point to all searchable content sources made available to the Portal. Users can use the Portal Search Center portlet to search documents and content. The available search collections are organized by tabs.
The Search Center is installed as part of the default portal installation. Note that it is deployed and placed on a hidden portal page. The portal takes users to the Search Center when they enter a search using the portal Search Box.
Search and Browse portlet for search by users
Portal users can use the Search and Browse portlet for more advanced searches. Each separate search collection requires a separate copy of the Search and Browse portlet.
Before portal users can use the Search and Browse portlet, perform the following tasks for preparation:
- Prepare search collections as desired. To do this, use the Manage Search Collections portlet.
- Prepare the taxonomy and categories for documents if desired. To do this, use the Taxonomy Manager portlet, or for the user-defined taxonomy use the Category Tree icon.
- Copy and deploy the Search and Browse portlet for users
How the user portlets Search Center and Search and Browse relate to each other
The Search Center provides the starting point for basic search by users.
Users can use the Search and Browse portlet for more advanced searches. For example, they can refine their search by restricting it to specific document types, or by searching in the document fields.
Summarizer
The summarizer is a facility for summarizing Web pages and other types of documents. The summarizer used by Portal Search returns a summary for documents which have a certain narrative quality, that is, they are coherent, and above a certain, 'telegraphic', length. The summary consists of the three most salient sentences of the original document. You can set the number of sentences which the summarizer returns in the summary.
The summarizer can produce summaries for those languages for which it has access to a stemmer program. Currently these are the following languages:
- Danish
- Dutch
- English
- French
- German
- Italian
- Norwegian
- Portuguese
- Russian
- Spanish
- Swedish
This summarizer uses stems as the base forms for words, as opposed to the lemma forms used by summarizers which have dictionaries.
In addition the summarizer technology is provided also as a separate component for use in portlet application development. This can be, for example, when developing an integrated search service based on the provided portlet search services. You can configure the summarizer for creation of different types of summaries.
Portal Content Search can index content stored in different languages and make it available for search. It uses the unicode setting of the source content to crawl and index content for search. It supplies a choice of tokenizers selectable by administrators: N-gram indexing and Linguistic indexing. N-grams are sequences of n consecutive characters in a document. N-grams are generated from a document by sliding a "window" across the text of the document, moving it by one character at a time. N-grams have several advantages over words for use in indexing. First, they are language independent, therefore mixed text can be indexed easily. They are useful for Asian languages in which word tokenization is more difficult, for example Chinese, Japanese, Korean, and Thai. Linguist indexing is based on a morphological analyzer that reduces terms to their base. It can be usefully applied in most situations when indexing sources with both English and non-English content.
See also
- Administering your portal
- Portal Administration portlets
- Enable security
- Security Concepts
- Searching document libraries
- Install a portlet and adding it to a page
- Customization
- Writing portlets
Home |
Workplace Web Content Management is a trademark of the IBM Corporation in the United States, other countries, or both.
WebSphere is a trademark of the IBM Corporation in the United States, other countries, or both.
IBM is a trademark of the IBM Corporation in the United States, other countries, or both.