Advanced Middleware Configuration
- Overview
- Onboard an application
- Advanced Middleware Configuration
- Get started
- Concepts and terminology
- User interfaces
- Create and manage configurations
- Common administrative tasks
- Install WebSphere products using Advanced Middleware Configuration
- Onboarding an application
- Generate a VSP from a template
- Promoting a release by using a template
- Create and delete a configuration definition by using a VSP and template
- Add database-as-a-service credentials to a VSP
- Source control and asset management
- Measuring drift from a standard configuration
- External resources
- Administer the framework server
- Manage user IDs and passwords
- User IDs and user groups
- Passing wsadmin credentials through the soap.client.props file
- Limitations of using a domain user as target system OS user on Windows
- Overriding the target OS user, password, and group defined in the configuration properties file
- Configure password or public key authentication for target systems
- Password management files
- Run with multiple users
- File permissions
- Sudo support
- Change the file creation mask
- Administer product properties
- Run actions to manage configurations
- Overview of actions
- Action types
- Import mode overview
- Import mode examples
- Execute mode overview
- Execute mode examples
- Compare mode overview
- Compare mode examples
- Promote mode overview
- Basic rules for using promote mode
- Apply a promoted configuration to WebSphere
- Use and creation of a promote.properties file
- Promote a properties file by running action to promote .properties file
- Command options supported by promote mode
- Promote mode examples
- Augment mode overview
- Rules for augment file usage
- Augment file creation and format
- Create an augment file from a sample data file
- Create an augment file by importing the latest configuration
- Command options supported by augment mode
- Augment mode examples
- Model actions
- Update a property value in the cell definition
- Special usage information for actions
- Considerations for installing WAS with AMC
- Service integration bus configurations
- Support for installing 32-bit installation media on a 64-bit operating system
- Manual setup required to configure Oracle JDBC drivers on target systems
- Post-installation actions required to federate IBM HTTP Servers
- Run actions by using the rafw command
- General procedure for running an installation action
- General procedure for running a configuration action
- Define initial configuration data with the WebSphere administrative console
- Edit sample XML configuration files
- Use was_common_deploy_install_app for Java EE deployment
- View results in the action log files
- Run libraries as web client projects
- Preview option for configuration libraries
- General procedure for running libraries
- Run composite actions in a single wsadmin process
- Run automation plans to manage configurations
- Run automations from the Eclipse client
- Manage automation plans and libraries
- Create an automation plan
- Add actions to automation plans or libraries
- Add libraries to automation plans and libraries
- Clone an automation plan
- Delete an automation plan
- Create an automation library
- Clone an automation library
- Delete an automation library
- Create an automation context
- Clone automation variables
- Delete automation variables
- Manage automation plan execution
- Executing an automation plan
- Quick start an automation plan
- View job details
- Run an automation plan in the console
- Overview of response file templates
- Get started with configuration definitions
- Manage configuration definitions
- Create or editing a configuration definition
- Create a configuration definition in the console
- Reading an existing configuration in the console
- Reading a WAS cell managed by an administrative agent
- Run the rafwEnvBuild command to create a configuration definition
- Recreation of an existing configuration definition
- Manage configuration templates
- Configuration template overview
- Automatically creating a configuration template
- Tokens and tokenization
- Rules for token replacement
- Generate configuration definitions
- Objects that the configuration generator creates
- The RAFW_Global automation context
- Configuration in the Eclipse client
- Exploring managed configurations
- Run actions from the Eclipse client
- Comparing configurations
- Searching for configuration file content
- Edit configuration files
- Edit .properties files
- Use snippets
- Manage user security
- Advanced Middleware Configuration and Rational Team Concert
- Placing a configuration under source control
- Properties in the scmdefaults.properties file
- Add a stored configuration to a VSP
- Install a stored application on a virtual machine
- Advanced Middleware Configuration and Rational Asset Manager
- Placing a configuration under asset management
- Add support for other products
- Create custom actions
- Anatomy of an action
- Procedure for creating custom actions
- Documenting custom actions
- Reference for selecting Ant build files
- Structure of Ant build file for custom actions
- Element reference for rafwaction
- Example: Creating a custom action
- Example: Using an action as a model for creating your custom action
- Example: Passing an option to a custom action
- Dynamic loading of Java programs for use by custom actions
- Example: Running a Java program as an Ant task
- Example: Running a Java program from a Jython program
- Dynamic loading of Jython programs for use by custom actions
- Example: Running a Jython program from an Ant target
- Example: Running a Jython program executed by the wsadmin client
- Example: Running a Jython program that includes a reusable Jython module
- Configuration references
- Configuration reference for an existing configuration
- Configuration reference for a new configuration definition
- Configuration reference for a new Liberty profile configuration
- Configuration reference for stored configurations
- Configuration reference for a stand-alone configuration
- Configuration reference for the deployment manager node
- Configuration reference for managed nodes
- Configuration reference for clusters
- Cluster server diagram
- Configuration reference for WebSphere Portal nodes
- Configuration reference for IBM HTTP Server nodes
- Configuration reference for WebSphere Process Server and WebSphere Enterprise Service Bus
- Configuration reference WebSphere Service Registry and Repository
- Configuration reference for WebSphere Virtual Enterprise
- Configuration reference for advanced questions
- Command reference for Advanced Middleware Configuration
- Command reference for rafw
- Command reference for rafwEnvBuild
- Command reference for integrateToBF
- Command reference for manageBFLibs
- UI references for AMC
- Context variable properties
Overview
This section contains information about migrating existing WebSphere applications to a new virtual system pattern. Advanced Middleware Configuration is useful for applications that:
- Cannot be run as virtual applications
- Do not have existing automation to deploy and configure the application.
These applications might have partial automation or manual instructions (in documents, a wiki, and so on) for installing and configuring the application.
If you have applications that already have existing automation in place, create a script package to execute the existing automation. Use AMC in cases where existing automation does not exist. Otherwise, use the provided automation capabilities.
Onboard an application
Onboarding is the process of capturing an application running on either a physical server or a virtual server outside the cloud and running that application on a virtual system inside the cloud. The standard configuration, sometimes called the Golden Configuration, refers to a configuration, or in this case a template, used as a model for the virtual machines created in the cloud.
- In the Advanced Middleware Configuration console, in the configuration editor, click the icon...
-
Read existing configuration
Specify the name of an external host where the application is located, along with any other requested data.
- When you finish editing the new configuration definition, click Generate.
The generator builds the configuration definition on the framework server and creates three automation plans.
- In the top menu, click...
-
Automation | Plans and libraries | Plans tab | RAFW_env_config_import | Run
This plan copies the resources and applications from the target system where the application is located.
- On the Configuration page of the Eclipse client, create a template that is based on the new configuration definition.
This template is your standard configuration, the model for the virtual machines in the cloud.
- Drag the new configuration definition to the Configuration Workspace.
If the definition is already in the workspace, to pick up latest changes, select...
Definition (right-click) | Team | Synchronize
- Right click the definition and click...
-
New | Configuration Template
- Complete the requested information.
During this step, you can exclude resources and applications that you do not want to re-create on the virtual server. The target application is included by default in the template.
- Drag the new configuration definition to the Configuration Workspace.
- Save the new template to the server.
- Generate a virtual system pattern (VSP) from the template:
- Expand the Configuration Templates folder in the Configuration Explorer.
- Right-click a template and click Generate VSP.
- Complete the requested information.
- After you verify the requested information, create the VSP by clicking Generate.
A VSP is created in PureApplication System and a script package is created based on the questions file for the template.
- In PureApplication System, go to...
-
Patterns | Virtual Systems | new pattern
- Verify that the RAF_template_name_Import and the RAF_template_name_Integration script packages are included in the pattern.
- Click Deploy.
The RAF_template_name_Integration script package includes all the questions that you need to create an instance of the VSP, including the target application, in the cloud.
Over time, you might need to make updates to the instances in the cloud. You cannot currently make a change to the template and have that change automatically propagated to all the instances of the template. Instead, complete the following steps:
- Import configuration changes from a live configuration to your configuration definition.
- Use the Eclipse client to update your template.
- Update the configuration definition in the Configuration Workspace by right-clicking the definition and clicking...
-
Team | Get Changes from Server
- Right click the configuration definition and click...
-
New | Update Configuration Template
- Complete the steps to update the template.
Those steps require the same information as creating a template.
- Update the configuration definition in the Configuration Workspace by right-clicking the definition and clicking...
- Delete existing instances and replace them with updated instances based on the revised template.
Introduction to Advanced Middleware Configuration
Advanced Middleware Configuration (AMC) for PureApplication System is delivered as a workload that you can use to automate the deployment of existing applications to the cloud (onboarding). You can also use it to automate the configuration and deployment of virtual system patterns (VSPs).
AMC Version 1.1 introduces a new console, a new environment generation process, new configuration templates, and other improvements.
Terminology and concepts
The following terms are new to this release:
- Configuration definition
- A collection of files on the framework server that represents a WebSphere cell or other configuration. This term replaces the awkward "administrative domain" and the WebSphere centric "cell."
- Configuration properties file
- A set of name-value pairs used in generating a configuration definition. This file was previously referred to as the env-cell.properties file.
- Automation context
- A set of variables that ties an automation plan to a specific configuration. This term replaces "set of automation variables."
- Context variable
- A variable within an automation context. This term replaces "automation variable."
New console
This release contains a new web-based user interface, referred to as the Advanced Middleware Configuration console. Because the existing web client includes some features that are not currently available in the new console, the existing web client is still in use.
New environment generation process
The web-based Environment Generation wizard has been replaced with a full-featured configuration editor in the new console. When you select Create Configuration Environment in the Eclipse client, the console is loaded.
Configuration generation is now a more flexible process. You create or edit your configuration properties file, then generate the configuration definition as a separate step.
The command line version of the Environment Generation wizard is still available through the rafwEnvBuild command. more...
New process to create user templates for configuration definitions
You can now create a custom configuration template from any configuration definition. The basic process is automatic and handled by the Eclipse client. You can then further customize the template by adding custom properties to one or more promote.properties files.
The new templates bring the following benefits:
- When you create a configuration definition through the console, configuration-specific questions are displayed automatically in the configuration editor.
- You can move a new version of an application through the various stages of the software development lifecycle by using a template. This method is simpler than the older method involving promote mode.
If you use PureApplication System, you get the following additional benefits:
- If you use a database as a service (DBaaS) on the cloud, you can now use a template to generate a Virtual System Pattern that includes a custom script package that asks for database information.
- The onboarding process is simplified.
- Before this release, you had to use the same topology, paths, and passwords when VSP instances used the same configuration definition. Now you can have multiple instances based on a template, and specify different passwords, number of nodes, and so on for each instance.
more...
New Virtual System Pattern creation process
Virtual system patterns (VSPs), which are used in integrations with PureApplication System, are no longer created through the environment generation process. Instead, there is a dedicated VSP generation process in the Eclipse client. This process uses a template rather than a configuration definition as its starting point. more...
New location for configuration properties file
The former location of the configuration properties file (env-config.properties) was the following directory:
RAFW_HOME/work
Beginning with AMC Version 1.0.0.1, a second copy of the file was placed in the following directory:
RAFW_HOME/user/preserve/envgen
Beginning with Version 1.1, only one copy of the configuration properties file is supported. That copy is the one located in the RAFW_HOME/user/preserve/envgen directory. more...
New method for DBaaS
Previously, you had to add database information to the integration script package to associate a database with a Virtual System Pattern. In the current release, you use a template to generate both a VSP and a custom script package that requests database connection information. more...
Use soap.client.props for wsadmin credentials
For increased security, you can pass credentials to the wsadmin scripting client through the soap.client.props file.
Multiple servers for standalone node
AMC now supports multiple standalone servers in a WAS cell that is managed by an administrative agent.
Increase password security on command line
Passwords entered through the command line interface for the integrateToBF or the rafwEnvBuild command no longer echo the password on the command line. These passwords are no longer displayed in plain text.
Overview of Advanced Middleware Configuration (AMC) for PureApplication System
Advanced Middleware Configuration (AMC) for PureApplication System is application release automation software that you can use to automate product installation, configuration, and application deployment.
You can use AMC to do the following tasks:
- Deploy application releases onto supported products across the software lifecycle
- Read configuration data from installed applications and set them up to be managed
- Manage products directly through a command-line interface
- Automate installation, maintenance, and update operations for multiple installations of a product simultaneously
- Track and audit changes made to the definitions of administrative tasks
- Integrate actions with other products, such as PureApplication System
In general, once AMC has been installed on the framework server and the target systems have been set up for management, users of the system perform the following roles:
- Configuration: Performing administrative tasks such as installing, configuring, or updating supported software products.
- Run automations: Performing operational tasks to manage products. The tasks are defined in the framework server in automation plans, which perform actions on the specified target systems.
AMC for PureApplication System manages products through configuration information. Configuration data on target systems is stored in a representation on the framework server.
AMC has two major components:
| framework server | Central point from which products are managed. |
| One or more target systems | Run supported middleware products such as IBM WAS. A target system can be a physical system (a running host), a virtual system, or a system instance in the cloud. |
Types of target system

You can use a target system in the following ways:
- As a destination for configuration information.
For example, you can update a target system from a configuration environment on the framework server.
- As a source for configuration information.
For example, the framework server can read configuration data on an existing system to create or update a configuration environment on the framework server.
- As both a source and a destination

Configuration information
Configuration data typically defines product behavior. This data is represented on the framework server in a configuration repository. The configuration information on the framework server for the product is called the configuration environment.
The framework server maintains representations of target systems in logical hierarchies. Each level of this hierarchy is a scope, and each scope corresponds to a product-specific level of organization. For example, target systems that run WebSphere products might have a structure that is similar to the following structure:
production [framework server]
   was70_existing [configuration environment]
      Cell01 [configuration definition]
         Clusters [directory]
            Cluster01 [cluster scope]
               Servers [directory]
                  Server01 [server scope]
                  Server02 [server scope]
         Nodes [directory]
            Node01 [node scope]
               Servers [directory]
                  Server03 [server scope]
In this example, the Clusters directory contains a single object (Cluster01) at the cluster scope. The Servers directory contains two objects at the server scope.
Configuration actions
Actions perform a unit of work, typically one or more of the following tasks:
- Compare the configuration environment on the framework server with the live configuration data on the target system
- Update the configuration environment from the live configuration data
- Update the live configuration data from changes you make to the configuration environment
- Create a configuration environment from live configuration data
- Create a new product installation and its configuration data from a configuration environment that you create
- Install and patch products on target systems
- Install and update applications on target systems.
A large number of predefined actions are provided for the products that AMC can manage. You can also create custom actions for those products or for other products or applications to manage.
You can run actions individually from the Eclipse client and from the command line. They can also be part of an automation. For products that have structured configuration data, an action can be run on a particular scope of the configuration.
Actions typically consist of management commands for the product running on the target system, for example wsadmin commands for WebSphere. They can also call scripts, executable programs, or other actions.
An action is implemented as an element within an Apache Ant build file, identified by a <target> tag.
Automations
An automation is defined in an automation plan as a set of steps. Each step performs an action. An automation plan runs as a batch job and can be monitored and controlled through the web client as it runs. Automations can also be scheduled to run at regular times. Example: an automation can run that compares a patch level for a product as it is defined on the framework server to the patch level on a target system. If the patch level does not match on a target system, actions run to halt the product on the target system, update the patch level, and restart the product.
Technical overview
On UNIX or Linux systems, permissions and process owners are crucial to trouble-free operations.
The following tables shows the main processes involved when you use AMC. Other columns show the user who owns the process, the work that the process performs, and the system that the process runs on. The order of the table rows reflects the order in which the processes run. This information is highly technical, and is provided for system administrators and other users with a strong knowledge of WebSphere and operating systems.
In many cases the shorthand terms used in the tables (such as "server auth user" or "the user defined as 'Run As User'") refer to a single user name. For example, in a typical AMC installation, the server auth user, the run as user, and the automation agent process owner might all refer to rafwuser.
The first table shows the main processes for typical actions in augment, compare, execute, or import modes.
| Process | Process owner | Purpose | System |
|---|---|---|---|
| Apache Tomcat | The user defined as "Run As User" during installation of AMC. This user is not the same as the "Run As User" defined in the configuration editor. | Provides application server | Framework server |
| Automation agent | The automation agent service is used to run rafw.sh as server auth user1 | Launches rafw.sh to begin an action | Framework server |
| rafw.sh (JVM) | Server auth user1 | Performs all framework-server-side logic such as configuration generation, or reading files and then initiating a connection to target system | Framework server |
| Transfer client (JVM) | OS_USER2 | Identifies a set of files on a target system so that modified files can be transferred | Target system |
| Transfer (framework server) | Server auth user1 | Framework server | |
| Transfer (target system) | OS_USER2 | Target system | |
| Ant3 | Server auth user1 | Transfers media files to the target system from the framework server. Effectively runs as server auth user when reading files on the framework server and OS_USER when writing files to the target system. | Framework server |
| Ant | OS_USER2 or RUN_AS_USER based on configuration | Performs remote actions | Target system |
| Reverse transfer (framework server) | Server auth user1 | Framework server | |
| Reverse transfer (target system) | OS_USER2 | Target system | |
|
| |||
- One of the following users:
- Server auth user when launched by the automation agent
- The user that is currently logged in if run via the command line
- The user name you enter in the configuration editor in response to the "OS user name" prompt
- Runs only where the media transfer flag (-transferMedia) is set.
The second table shows the main processes involved in carrying out tasks on the framework server in either of two special cases:
- Actions that you run in promote mode
- Actions with the -local flag set so that they run on the framework server
| Process | Process owner | Purpose | System |
|---|---|---|---|
| Apache Tomcat | The user defined as "Run As User" during installation of AMC | Provides application server | Framework server |
| Automation agent | The automation agent service is used to run rafw.sh as server auth user1 | Launches rafw.sh to begin an action | Framework server |
| rafw.sh (JVM) | Server auth user1 | Performs all framework-server-side logic such as configuration generation, or reading files. No connection needed with promote mode or the -local flag. | Framework server |
| Ant | Server auth user1 | Performs local actions | Framework server |
One of the following users:
- Server auth user when launched by the automation agent
- The user that is currently logged in if run via the command line
AMC FAQ
What is AMC?
Use AMC to automate product installation, configuration, and application deployment. AMC has two major components:
- A framework server, which holds the product software, a configuration repository, a media tree, and actions to support installation, configuration, and deployment
- One or more remote target systems, which run supported middleware products such as WAS
When do I use Advanced Middle Configuration?
Use AMC to automate the installation or configuration of your applications that cannot be run as applications and do not have existing turnkey automation. For those applications that have existing automation in place, simply create a script package to execute the existing automation.
Will my application work with AMC?
The following limitations apply to applications that work with AMC:
- AMC does not currently support SIBus security.
- AMC cannot create proxy servers. If your application requires specific capabilities of proxy servers that cannot be carried out by web servers, it will not work with AMC.
- WAS must manage any external property or configuration files. AMC cannot manage these files.
- AMC does not handle services configuration within the application server.
- AMC does not support federated security.
Once I have my application working with AMC, are there limits to the changes I can make for ongoing deployments?
You cannot change the following values in a pattern when you redeploy using AMC:
- WAS and SSH passwords
- Number of nodes
- Cell names and node names
You cannot change the passwords on any resources that you use in the deployment.
Get started with Advanced Middleware Configuration
The first steps are learning basic concepts and understanding the available interfaces.
Concepts and terminology
Understanding the specific terminology used in AMC is key to using the product.
A number of common words, such as environment and configuration, have highly specific meanings in AMC. Terms that sound similar can have different meanings; for example, "configuration" refers to the live installation of a middleware product on a target system, while "configuration definition" refers to a representation of that installation on the framework server.
The framework server is the server where AMC is installed; the target system is the server that AMC manages.
If you read through the following definitions before you move on to other sections, the documentation will be easier to understand.
What is an action?
Actions carry out low-level, highly specific tasks. They are combined into automation plans and libraries.
Technically, an action is an element within an Apache Ant build file, identified by a <target> tag. Actions can call scripts, executable programs, or other actions. You can run an action dynamically or as part of a larger aggregate like an automation library or automation plan.
AMC provides over 1200 actions. You can also create your own custom actions and write custom action help for them;
An action name typically has the following structure:
- a product acronym, such as WAS for WAS
- a version number with no decimal points
- one of the following categories:
- configure
- deploy
- install
- a description of one or more words
Underscores are used in place of spaces, as in the following example:
- was_85_install_with_all_patches
What is an automation context?
An automation context is a set of variables that ties an automation plan to a specific configuration.
The generator creates a context for each automation plan it creates. The default name for the context is RAFW_env_config. Context variables include the configuration name, configuration type, number of nodes, number of clusters, and other variables. Variables are replaced with appropriate values when you run an action at a particular scope.
What is an automation plan?
An automation plan combines actions and automation libraries in ordered steps to accomplish a specific task.
Automation libraries can include actions and other libraries, but cannot be run independently.
Some automation plans are created automatically when you generate a configuration definition. The names of these plans begin with the letters "RAFW_".
You can create or edit plans in the AMC console or the Eclipse client.
What is a configuration definition?
A configuration definition is a collection of files on the framework server that represents a WebSphere cell or other configuration.
Typical files in a configuration definition include:
- Resource XML files
- Properties files
- Build XML files
- Binary resources such as application EAR and JAR files, Java EE resource adapters, OSGI bundles, and DB2 shared libraries
What is a configuration?
A configuration represents an installation of a middleware product and its associated topology and settings.
A configuration consists of one or more servers running a middleware product such as IBM WAS. The topology of the servers depends on the installed product. For example, in most WebSphere products, a configuration is equivalent to a cell, whose servers are managed by nodes; the nodes may also be clustered.
What is an environment?
An environment is a container for configuration definitions, corresponding to a directory on the framework server.
The word "environment" can mean different things in different contexts:
- In the web client, it can refer to a collection of automation variables
- It can refer to the name of a directory on the framework server
- In common usage, it can refer to a platform where applications run, or, in a larger sense, an entire lab setup
In AMC, unless otherwise indicated, assume that "environment" refers to a configuration environment. A configuration environment is container for configuration definitions. The configuration environment corresponds to a directory in the RAFW_HOME/user/environments directory on the framework server.
What is onboarding?
Onboarding is a migration process that transfers the functionality of an existing application to a virtual server in the cloud.
You can use AMC to associate complete configuration information, including EAR files, with a VSP.
What is RAFW_HOME?
RAFW_HOME is a convention used in the documentation to indicate the full path to the directory where AMC is installed on the framework server.
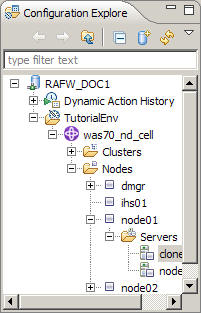
What is a scope?
Scope refers both to a directory in a file system and to the hierarchy of objects in a configuration definition.
For example, a typical WebSphere cell contains a number of nodes and each node contains one or more servers. Servers may also be organized into clusters. You can carry out many AMC actions at the cell scope, node scope, cluster scope, or server scope, meaning the actions will affect only those servers at the specified scope.
The RAFW_HOME/user/environments directory on the framework server reflects this structure, as shown in the following example:
environments
   myEnv
      cells
         WAS80_ND
            nodes                Node1
                  servers                      Clone1
                     Clone2
               Node2
                  servers                      Clone3
                     Clone4
User interfaces
You can use a number of user interfaces to access AMC capabilities.
The following interfaces are available:
- Console
- A web-based graphical interface similar to the WAS console and other IBM product interfaces. The interface is designed for both new and advanced users of the product. You can currently use this client for limited configuration and automation tasks.
- Eclipse client
- A graphical user interface for new and advanced users that is based on the Eclipse integrated development environment. The Eclipse client supports the following two perspectives:
- Configuration: The Configuration perspective allows you to view and edit configuration environments graphically. You can also compare the configuration environment data on the framework server with the configuration data on the corresponding target system and run actions to synchronize or update the data in either location.
- Automation:
- Command line
- Available when you use SSH to connect to the framework server. Advanced users typically use this interface for scripted activities.
- Automation engine web client
- The automation engine performs a number of housekeeping duties behind the scenes. You can access a web interface to this engine by entering the host name of your framework server, followed by "/bfui", into a browser. Because the engine uses different terminology than AMC, this interface can be confusing for new users.
In addition, you can call the configuration editor from the console or Eclipse client. You can use this editor to create configuration definitions. A similar function is available through the command line Environment Generation wizard.
The Advanced Middleware Configuration console
Enter the URL of your framework server to display the web-based console for AMC.
The console requires a user ID and password. For new installations, use the root user and root password that you set up for the automation engine during the installation. After you log in as root, best practice is to create one or more dedicated non-root users to run the console. You can then control the permissions and track the activities of these users. Create and manage these passwords and permissions by clicking Administration on the top menu bar of the console. To see the default data in the console, you must be a member of the group that owns that data. When you first load the console, that data is owned by the Build Engineer group.
After you set up at least one console user, log in as that user. You can then use the console to complete two general categories of work:
- In the Configuration process, you create or manage the configuration definitions that represent your live data on the framework server. All actions, and therefore all automation libraries and automation plans, operate on configuration definitions. Therefore, you must create one or more configuration definitions before you can begin working with automations.
- The Automation process creates or manages automation plans, libraries, and contexts. Libraries are ordered groups of actions or libraries that you can reuse in different automation plans. Contexts are groups of automation variables that tie an automation plan to a specific configuration definition. Because the configuration-specific information is in contexts that are separate from the libraries, you can reuse automation libraries within a product type.
The configuration page in the console
The configuration page contains a list of available configuration definitions on the left of the page and an editor pane on the right.
Configuration definition list
Two important controls are displayed at the head of the list:
- Create
- This icon is shaped like a green plus sign. When you click this icon, you are prompted for certain basic information about the configuration definition, after which a new definition is opened in the editor. Complete the required information and then click Generate.
- Read existing configuration
- This icon is shaped like a blue arrow and box. When you click this icon, you are prompted for information about an existing live configuration on the target system. When you click Generate configuration, the editor captures the topology of the existing configuration and uses that information to populate a new configuration properties file.
The left side of the page lists all of the available configuration definitions. Click a name to display the configuration definition in the editor pane. One of the following status conditions is displayed for each configuration definition:
- Draft
- A configuration properties file (env-config.properties)
exists, but you have not run the generator, meaning that the following objects have not been created:
- A set of directories on the framework server that represent the topology of the live configuration
- One or more automation plans
- A set of automation variables, called a context, that links automation plans to a configuration definition
- Generated
- A configuration properties file exists and the generator was run.
To change the state of a draft configuration definition, click the name to load it in the editor pane and then click Generate.
The editor pane
The editor pane displays the contents of a configuration properties file in editable form. The prompts that are displayed in the editor pane depend on the options you choose. If you are creating a configuration, see Configuration reference for a new configuration definition. If you are capturing an existing topology, see Reading an existing configuration in the console.
The following options are available for configuration definitions in the Draft state:
- Refresh
- Redisplay the configuration definition, showing any changes that you made during the editing session.
- Save
- Save the current state of the configuration definition without running the generator.
- Generate
- Build the configuration topology on the framework server and create the generation objects.
- Delete
- Remove the configuration properties file from the framework server. This deletion cannot be undone.
The following options are available for configuration definitions in the Generated state:
- Refresh
- Redisplay the configuration definition, showing any changes that you made during the editing session.
- Edit
- Change the configuration properties file. After you click Edit, the following options are available:
- Refresh
- Redisplay the configuration definition in Edit mode, showing any changes.
- Save & Generate
- After you generate from a configuration properties file, you must run the generator again when you change that file so that all of the files remain in sync.
- Exit
- Close the editing session and abandon any changes that you made to the file.
- Delete
- Remove the configuration properties file from the framework server. This deletion cannot be undone.
The automation pages in the console
The automation pages display details about automation plans, libraries, and contexts. An additional page displays the results of automation jobs.
Automation plans and libraries
Actions are like atoms, libraries are like simple molecules, and plans are like compounds.
In the top menu, click...
-
Automation | Plans and libraries
The following two tabs are displayed:
- Plans
- Automation plans combine actions and automation libraries in ordered steps to accomplish a specific task. Some automation plans are created automatically when you generate a configuration definition. The names of these plans begin with the letters "RAFW_".
- Libraries
- Libraries combine actions and automation libraries in smaller, reusable sets that complete specific subtasks. A number of standard libraries are included with AMC.
Click the name of a plan or library in the left pane to display information about it, including its steps, in the editor pane. When an automation plan is displayed in the editor pane, you can complete any of the following tasks:
- Click Run.
- Click Automation variables to display a list of variables that are associated with the current plan.
- Click Steps to display or modify a list of steps that the plan includes.
- Click Results to display a list of completed jobs based on the current plan.
You do not run a plan directly. When you click Run, a job is created in the automation engine that runs the steps from the plan. Click Automation > Results to display a list of completed jobs, with the most recent job listed first.
You can filter the jobs by name, context, state, or date and time.
Click a job name to display the duration and status of each step. Click the step name to display the logs for the step.Three logs are available. For the Detailed log, a list of keywords is displayed at the bottom of the window. All are selected by default. Clear the associated check box to filter out the lines that contain those keywords.
You can also expand Results for a selected plan on the Plans page to see the jobs for that plan only.
Automation contexts
Contexts are groups of variables that identify a specific configuration definition on which an automation plan operates. Click Automation > Contexts to display a list of available contexts. The contexts for a configuration definition are created automatically when you generate that configuration definition.
Click a context in the left pane to display that context in the editor. Expand Variables to display a list of the associated variables. Click a variable name in the list to change its name, its value, the way it is used by the automation engine (action), or its mode.
Run an automation plan in the console
You can use the AMC console to edit an automation plan, library, or context, and to run an automation plan.
Actions are the basic units of work in AMC. Automation plans consist of actions and libraries that are arranged in ordered steps; libraries consist of actions and other libraries that are arranged in ordered steps. You cannot run libraries independently of an automation plan. Use automation plans for the recurring work that you perform in installing, configuring, and deploying middleware products and custom applications.
Some automation plans are created automatically when you generate a configuration definition. The names of these plans begin with the letters "RAFW_".
- In the console, click...
-
Automation > Plans and libraries. Click the Plans tab.
- On the Plans page, click the name of a plan in the left column. The plan is displayed in the editor pane.
- If necessary, expand Steps to display the individual steps in the plan. All of the steps are selected by default. To temporarily disable a step, clear the check box at the beginning of the line.
- In the border of the edit pane, click Run. You cannot run an automation plan directly. A job is created based on the automation plan, and that job is run in the automation engine.
- In the Run plan window, change the values for any of the displayed automation variables, if necessary. If you want the variables to retain the new values, select Update original content. Otherwise, if the check box is clear, the values are retained for the current job only.
- In the Run plan window, click Run. A job window is displayed. As each step is run, the step name, status, and duration are displayed. Click the step name to see the logs for that step.
- Close the job window to return to the edit pane. Expand Results to see the results, including the logs, for any job.
Use the Eclipse client
Connect to the framework server to begin using the Eclipse-based graphical user interface.
AMC uses a framework server, where the AMC product is installed, as well as one or more target servers.
After you have established the connection, you can use the Eclipse client to perform two general categories of work:
- Use the Configuration perspective to work with configuration data on the target servers.
- Use the Automation perspective to work with automation contexts, plans and libraries.
Manage framework server connections
Set up your framework server connection is the first step in using AMC. Locate one of the following views:
- Configuration Explorer in the Configuration perspective
- Plan Explorer in the Automation perspective
The framework server is the server where you installed AMC. You can manage server connections from the Automation or the Configuration perspective of the Eclipse client. From there you can add, edit, or delete the connection information for a framework server.
- To add a server connection:
- Click the Add Server icon in the border of the view
 . The Framework Server Connection window
is displayed.
. The Framework Server Connection window
is displayed.
- Enter the following information for the General page:
Prompt Description Label A short, free-form description to identify the server, such as "Server01". Hostname The fully qualified domain name for the server, such as "raf_server.example.com". Username The user name for the connection. Password The password for the specified user name. Domain If you have LDAP domains defined in the database, complete the following steps: - Make sure that you have specified a valid host name and credentials in this window.
- Click List Domains.
- The Domain list is populated with all available domains. Select the domain to connect to. If no domains are available, leave the information blank.
Remember Password Select this option if you do not want to enter your password each time you connect to the server. - Enter the following information for the Advanced page:
Prompt Description Automation API Port If you do not use the default port to connect to the automation API, enter the number of an alternate port. The default port for non-secure connections is 3966; the default port for SSL connections is 49150. Leave this information blank to use the appropriate default value.
This prompt corresponds to the BF_PORT property in the RAFW_HOME/buildforge.properties file.
Services Port If you do not use the default port for the AMC service, enter an alternate port number here. This service provides the server-side component for the Eclipse client. The default port for non-secure connections is 8080; the default port for SSL connections is 8443. Leave this information blank to use the default value.
This prompt corresponds to the BF_WEBAPP_PORT property in the RAFW_HOME/buildforge.properties file.
Use secure connection? Enter one of the following options: - Yes
- If you want to create SSL connections to the automation and services ports. If you do not use the default ports for these services, specify the SSL ports for your server in response to the Automation API Port and Services Port prompts.
- No
- If you do not use secure connections.
- When you have entered the information for the server, click Test Connection. You should see a notification that the connection succeeded. If not, correct the server information in the previous step.
- Click Finish.
- Click the Add Server icon in the border of the view
- To edit a server connection, right-click the connection name in the Explorer view and then click Edit Server Properties. The Connection window is displayed.
- To delete a framework server connection, right-click the connection name in the Explorer view and then click Delete Server. When asked to confirm the deletion, click OK.
- To refresh a server connection, right-click the connection name in the Explorer view and then click Refresh Server. The Explorer view is updated with the latest information from the server.
Configuration perspective
The Configuration perspective contains views that you can use to manage configuration information for your servers and other resources.
Purpose
Perspectives and views are basic components of the Eclipse client.
The Configuration perspective shows metadata on the framework server. A framework server is a location where you installed the AMC product. The displayed metadata represents the configuration of managed target systems running supported middleware products such as WAS.
Views
By default, the Configuration perspective contains the following views:
- Configuration Explorer
- Expand the framework server to see the environments, configuration definitions, and scopes that the product manages. This is the view of the configuration information on the framework server.
From this view you can perform the following tasks:
- Add and delete configuration information
- Run actions
- Move data to the Configuration Workspace
- Configuration Workspace
- Expand the displayed configuration environments to see the configuration information on your local workspace. Drag a configuration definition from the Configuration Explorer view to add it to this view. From
this view you can perform the following tasks:
- Compare files and directory structures
- Edit configuration information
- Update the framework server with your changes

- (Editor)
- Edit a file or display run actions in this large central area.

- Properties
- Click a file or directory in the Configuration Workspace to display the values for each of the properties for the element.
- Synchronize
- Right-click a file in the Configuration Workspace and select Team > Synchronize with Server to refresh the Synchronize view. Right-click elements in this view to save changed files to the framework server or to overwrite
local changes. You can customize this view for other functions, including synchronizing the entire workspace.

When a file is open in the editor, the following additional views are available:
- Outline
- Click an element in this view to move the cursor to that element in the editor.
- Snippets
- Use these boilerplate lines of code in the editor.
- Data Palette
- Drag a variable from this list to a plan design.
- Dynamic Action Help
- Use this view to read about the behavior of the action, the data it requires, the scopes where it is supported, and more. This information is available only when an action is selected in the Dynamic Action Editor.
Automation perspective
The Automation perspective contains views that you can use to create, delete, or change the plans, libraries, and variables that you use to automate managed systems. You can also run plans and track their history.
Perspectives and views are basic components of the Eclipse client.
By default, the Automation perspective contains the following views:
- Plan Explorer
- Expand each of the following categories for each server:
- Automation Libraries
- Include these standard scenarios in custom plans.
- Automation Plans
- Edit or run these custom lists of actions.
- Automation Contexts
- Modify the variables that describe the environment where the actions are to be run.
- Right-click an element in any category for a menu of options.
- (Editor)
- Double-click a library, plan, or environment in the Plan Explorer to edit it in this large central area.
- Job Details Editor
- View information about the jobs in a completed plan.
- Jobs Summary
- View the results of all jobs run for the selected plan or plans.
- Action Palette
- Drag an action from this view to the list of actions in the Editor.
- Library Palette
- Drag a library from this view to the list of actions in the Editor.
- Data Palette
- Drag an element from this view onto a value prompt in the plan.
Download the Eclipse client
Download the Eclipse client from the AMC Hypervisor image. Be sure that the AMC server is running.
This procedure describes how to download an archive file containing the Eclipse client for AMC, then install it in an Eclipse instance. The Eclipse client provides a richer experience in using AMC.
- Download the Eclipse client.
- Log in to AMC
- Expand the Virtual Machines section.
- Open the running AMC virtual system:
- Select your system from the list under Instances. Details of the virtual system instance are displayed.
- Expand the Virtual Machines section.
- Locate Network interface 0 and copy the host name.
- Paste the host name in a new browser window and append /clients to the URL. Two links are shown, one for each version of the client (Windows and Linux).
- Go to the URL. Click Go or press Enter according to your browser.
- Click the AMC Eclipse Client link for your operating system, Windows or Linux. Save the file to a temporary area on your machine.
- Extract the downloaded file to the current directory.
- Install the client into your Eclipse instance.
- In a command window, go to the directory where you extracted the download file.
- Install the client.
- amcui
Create and manage configurations
Use AMC to create and manage your configurations, such as IBM WAS cells.
Begin by setting up the configuration definitions. After the setup is complete, use the available installation, configuration, and deployment actions to automate the management of a configuration definition.
This is the typical AMC workflow:
- Install AMC.
- Create configuration definitions to represent WebSphere cells and other configurations.
- Use actions and automation plans for ongoing maintenance of configurations.
Install WebSphere products using Advanced Middleware Configuration
For most WebSphere products, the installation process involves running the new configuration option of the configuration editor and then running the automation plan that the generator creates.
In addition to running the editor and the automation plan, the installation process for the following products requires some manual tasks:
- WebSphere Portal
- WebSphere Service Registry and Repository
Install WAS Liberty profile using Advanced Middleware Configuration
IBM WAS Liberty profile has a number of differences from a full installation of WAS.
WAS Liberty profile is available in two ways:
- As part of WAS
- As a standalone application
The Liberty profile software has the same version number as the WAS software that it ships with.
Be aware of the following differences:
- Unlike other WebSphere products, Liberty profile does not have cells. Each installation of Liberty profile is called a profile. A profile, which is similar to both a cell and a node, can contain one or more servers.
- When you run a Liberty profile action, the only available scopes are profile and server.
- When you create a Liberty profile by using the configuration editor, you must specify a version of Liberty profile as the Product to be installed.
- When you use the rafw or rafwEnvBuild command in connection with a Liberty profile, you must specify the -product option with a value of liberty.
Restriction:
The following features are not currently supported for Liberty profile:
- Reading an existing Liberty profile with the configuration editor
- Create a Liberty profile in the configuration editor by using a custom template
- Displaying a Liberty profile in the list of preserved environments in the configuration editor
- Work with Liberty profiles in the Eclipse client
- Use the RAF Integration Script Package in PureApplication System with Liberty profiles
To install Liberty profile without installing the full version of WAS:
- Obtain the archive file containing the Liberty profile software from your usual IBM source.
- Copy the archive file to the following location in the media tree:
RAFW_HOME/media/os_dir/liberty/version/install_image
- Run the configuration editor using the new configuration option. Select a Liberty profile version from the Product list. Complete all required information and click Generate.
- Run the RAFW_env_profile automation plan that the generator created. This plan runs the liberty_version_install_profile action to install the Liberty profile software on the target system.
Install WebSphere Portal using Advanced Middleware Configuration
A few manual steps are required to complete the installation of IBM WebSphere Portal. For an extended discussion of this process, see the white paper titled Install a WebSphere Portal network deployment environment by using Rational Automation Framework.
- Run the configuration editor, new configuration option, to define the topology for the new WebSphere Portal configuration that is to be installed. Complete all required information and click Generate.
- Install the database client for your target database on each of the WebSphere Portal node servers.
- Update the config_wp_db.properties file for each node so that the properties defined for each target database are correct for your database configuration. This file is in the following directory:
RAFW_HOME/user/environments/env-name/cells/cell-name/nodes/node-name
Install WebSphere Service Registry and Repository using Advanced Middleware Configuration
A few manual steps are required to complete the installation of IBM WebSphere Service Registry and Repository.
- Run the configuration editor, new configuration option, to define the topology for the new WebSphere Service Registry and Repository configuration that is to be installed. Complete all required information and click Generate.
- Install the database client for your target database on each of the WebSphere Service Registry and Repository node servers.
- Update the config_wsrr.properties file for your cell so that the properties defined for each target database are correct for your database configuration. This file is in the following directory:
RAFW_HOME/user/environments/env-name/cells/cell-name
- Copy the database client JDBC archive files into the following directory:
RAFW_HOME/user/environments/env-name/cells/cell-name/dbdrivers
- Open the automation plan that the generator created to install WebSphere Service Registry
and Repository in the AMC web client and clear all the check boxes
for the steps that pertain to WebSphere Service Registry
and Repository. Clear the following steps:
- Install WSRR Dmgr
- RAFW_WSRR_Common_Database_Helper_Library
- Deploy WSRR and load default configuration profile
You want to perform only the base WAS installation and configuration at this time.
- Run the automation plan.
- Log in to the WAS administrative console and update the WebSphere variable DB2UNIVERSAL_JDBC_DRIVER_PATH to point to the JDBC archive files for your database client.
- Open the automation plan that the generator created to install WebSphere Service Registry
and Repository in the web client again. Clear the steps related to uninstallation of WAS.
Only the WebSphere Service Registry and Repository job steps that you cleared in step 5 are selected now.
- Run the automation plan again.
When the automation plan completes, the WebSphere Service Registry and Repository installation is complete.
Generate a Virtual System Pattern from a template
Use the Eclipse client to generate a VSP from a configuration template. You must have a user-created configuration template for this procedure. These templates are displayed in the Configuration Templates folder in the Eclipse client Configuration Explorer. If no templates are displayed, you can create one.
- In the Eclipse client, expand the Configuration Templates folder in the Configuration Explorer. Right-click a template and click Generate VSP.
- In the Generate Virtual System Pattern window, Cloud Settings section, enter the following information:
- Pattern Name
- A name of your choice for the new pattern.
- Cloud Hostname
- The name of the server that runs the cloud host software, such as PureApplication System.
- Cloud Username
- The name that you use to log in to the cloud host software.
- Cloud Password
- The password that corresponds to the cloud user name.
- Platform
- Select the correct platform type for the deployment console.
- Overwrite?
- Select this option if the pattern name exists on the host and you want to overwrite the existing information.
- To specify a user other than the current user for the pattern, change the values in the Framework Connection Details section.
- After entering all of the appropriate information, click Verify. If the verification is successful, the Generate button becomes available. Create the VSP by clicking Generate. If the verification does not complete, verify that the information you entered is correct.
Promoting a release by using a template
You can move a new version of an application through the various stages of the software development lifecycle by using a template.
This task assumes that you have set up configuration definitions that represent the stages of the software development lifecycle such as development, quality assurance, beta release, and general release. All of these configuration definitions must be based on the same configuration template. To update a custom application for a particular stage, you can regenerate the configuration definition with an updated version of the template.
You can accomplish the same task by using promote mode, but the steps are more complex.
In some development environments, development and testing is done in the cloud, but production uses physical hardware. You can accomplish this "offboarding" by using this same promotion scenario.
- Update the template with the latest version of your custom application. For example, the template name might be HR_APP_TEMPLATE. Do this update only once for each release of the software.
- In the AMC console, open the configuration properties file for stage of the lifecycle to update.
- If you have custom questions for this template, answer those questions in the configuration editor.
- If you use a versioning method (Rational Team Concert or Rational Asset Manager), enter the appropriate information to store the configuration definition.
- Click Generate. The generator re-creates the topology for the configuration definition, including any .ear and resource XML files. When the generator finishes, the configuration definition is displayed again.
- In the new display, expand Plans and click the green arrow next to the execute automation plan that the generator created. This plan copies the updates to the live configuration. In the current example, RAFW_lifecycle-qa_execute is the name of the plan. When the plan finishes, the latest version of the HR application is installed on the target system.
Create and delete a configuration definition by using a VSP and template
Create or deleting an instance of virtual system pattern can also create or delete a configuration definition.
When you generate a VSP from a template rather than from a configuration definition, you can avoid a number of limitations. When you deploy instances from a VSP that is linked to a configuration definition, all instances must use the same topology, passwords, and paths. By generating a VSP from a template, you can tokenize the nodes, passwords, host names, and other instance-specific information in the template. Tokenized information is noted in the script package that is generated at the same time as the VSP. This script package prompts for the instance-specific information at deployment time.
Create a configuration definition from a VSP and template
- Generate a VSP from a template:
- Expand the Configuration Templates folder in the Configuration Explorer.
- Right-click a template and click Generate VSP.
- Complete the requested information.
- After you verify the requested information, click Generate to create the VSP.
- In PureApplication System, click Patterns > Virtual Systems and select the new pattern.
- Click Deploy. The script package that was created at the same time as the VSP includes all the questions that you need to create an instance of the VSP in the cloud. In addition to the virtual system, the script package also creates a configuration definition on the framework server. This configuration definition is based on the selected template and the answers that you gave to prompts in the script package.
Delete a configuration definition in PureApplication System
Procedure
- In PureApplication System, click Instances > Virtual Systems.
- Select the instance to be deleted and click Delete. The instance is deleted, and so is the associated configuration definition.
Add database-as-a-service credentials to a VSP
Use a template to generate a VSP and a custom script package that prompts for database connection information.
This task assumes that you have a fully populated configuration definition to work with. You either create a promote.properties file or add to an existing promote.properties file. This file is used to store configuration-specific information that is not already tokenized in one of the default properties files. In this task, you store the credentials for a database server.
- In the Eclipse client, expand an environment folder in the Configuration Workspace. Locate the directory (such as a cell name or node name) that represents the scope that contains the JDBC data source. If that directory contains a Promote Properties file, double-click the file to open it. If the directory does not contain a Promote Properties file, right-click the directory name and click New > Promote Properties File. The promote.properties file opens in the editor pane.
- Add the following properties to the file. For each property,
specify an appropriate value.
DB_HOSTNAME=value
DB_USERNAME=value
DB_PASSWORD=value
DB_PORT=value
- Save and close the file.
- Right-click the directory at the configuration scope. This directory might be the same as the one in the previous step. Click New > Configuration Template.
- Specify a template name and an existing template source for the questions file. Save the new template. The new template is created, and a representation of the template is displayed.
- Save the template by clicking File > Save or pressing Ctrl-S. The Save Template window is displayed.
- In the Refine User Defined Questions section, at the configuration scope (usually displayed as cell scope), click Modify Questions in the Modify Questions column. The User Defined Questions window is displayed, showing the properties that you added to the promote.properties file.
- Edit the Display Name value to change the prompts for any of the displayed properties. Click OK to close this window and the Save Template window, then close the Define Configuration Template window.
- In the Template Workspace view, save your changes to the server.
- In the Configuration Templates folder of the Configuration Explorer view, right-click the new template and click Generate VSP.
- Complete all of the required information in the Generate Virtual System Pattern window, click Verify and then Generate. A unique script package is created for this template. The script package prompts for the database connection information when the VSP is deployed.
Source control and asset management in Advanced Middleware Configuration
Integrate AMC with Rational Team Concert to store configurations in source control and with Rational Asset Manager to manage configurations as assets.
Measuring drift from a standard configuration
Configuration drift is the accumulation of minor differences between the live configuration on the target system and the configuration definition on the framework server. The term can also refer to accumulated changes between a standard ("golden") configuration template and an instance in production. You must have set up a standard configuration template.
For example, configuration drift can occur:
- When you debug an issue on the production server
- When changes occur between data centers in different time zones
You can use AMC to document the changes between your standard configuration and an instance of that standard configuration. The standard configuration is a template, and the instance can be a live configuration on a physical machine or on a virtual machine (VM) in the cloud.
AMC does not currently support comparisons with a template. Therefore, you must create an instance from the template to use in the comparison.
- In the console, create a configuration definition based on the standard template. Best practice is to give the definition a name that includes "standard configuration."
- In the Eclipse client, copy the new standard configuration definition to the Configuration Workspace. Make sure the configuration definition you want to compare it to is also copied to the Configuration Workspace.
- Click the standard configuration definition. Hold down the Ctrl key and click the other configuration definition. Both should be highlighted. Right click either definition and click Compare With > Each Other. The Results display lists the differences under the heading "Differences are:". You can export the results to an editor to search, copy, or edit the information.
External resources for getting started
The following resources give you an easy way to learn the basics of AMC.
YouTube videos
These videos refer to the standalone version of Advanced Middleware Configuraiton, which is named Rational Automation Framework. The basic concepts are the same.
Rational Automation Framework has a playlist on YouTube:
http://www.youtube.com/playlist?list=PLE8567660C2893817
The playlist includes the following videos:
Administer the framework server
User IDs and user groups on the target system
The table lists the user IDs that you must create on the framework server and target system so that you, and Advanced Middleware Configuration, can log in and perform basic functions.
| User ID | Default value | Description |
|---|---|---|
| Web client user | None | Use this user name and associated password to log in to the web client. |
| AMC application server user | rafwuser | On UNIX and Linux systems, this user is specified during the installation as the AMC Server Owner. This default user runs the AMC application server on the framework server, and is also the user that runs the console, including the configuration editor. You must create this user on the framework server. The user must have permission to write to RAFW_HOME/work. This user must be the same as the server auth user for the framework server that you specify when you run the integrateToBF createAll command. |
| Automation engine API user | None | AMC uses this ID to log in to the automation engine, where it runs commands from the automation API. If you change the password for this user in the web client, be sure to also change it in the buildforge.properties file, where the ID and password are saved in the BF_USERNAME and BF_PASSWORD properties. |
| The server auth user for the framework server | None | The automation agent uses this ID to execute rafw commands on the framework server. You must create this operating system user on the framework server. This user must have write access to the RAFW_HOME directory and its subdirectories and files. This user must be the same as the AMC application server user. You are prompted to specify this user when you run the integrateToBF createAll command. |
| Target operating system user | None | AMC uses this ID to run rafw commands on the target system and to run WAS. You specify the values for the user in the configuration properties file when you are prompted to specify a target operating system username (OS_USER), password (OS_PASSWORD), and group (OS_GROUP) for the cell definition. These three properties are stored in the configure.properties file at the cell scope and in the install.properties file at lower scopes. This user name and password must already exist on the target system. The configuration generator cannot create these credentials. |
| WAS user on the target system | None | AMC connects to WAS on the target system using the values of the WAS_USERNAME and WAS_PASSWORD properties in the install.properties file at the node scope on the framework server. |
| Framework services user | rafservices | AMC creates this user and generates a random password for it. This user communicates with the automation engine. If your internal policies require you to change this password, you must change it in both of the following places:
|
The following diagram shows the user IDs used by the product.
User IDs used by the product...

- Web client user
- AMC application server user
- Automation engine API user
- Server auth user
- Target operating system user
- WAS user
- Framework services user
The OS_GROUP user group
To allow different user IDs to access the same set of files, assign them to a single group. This group is identified as the OS_GROUP in the configuration editor and stored as the OS_GROUP property in the configure.properties file at the cell scope and install.properties file at lower scopes. Some users name this group rafwadms.
The OS_GROUP user group must include at least the following user IDs:
- AMC application server user
- Server auth user for the framework server
Passing wsadmin credentials through the soap.client.props file
For increased security, you can pass credentials to the wsadmin scripting client through the soap.client.props file.
By default, credentials for the wsadmin scripting client are stored in the configuration properties file as WAS_USERNAME and WAS_PASSWORD. When you set the USE_SOAP_CLIENT_PROP_FILE property to true, the wsadmin client uses the soap.client.props for authorization information.
The file is located in the following directory on the target system:
/profile_root/profile_name/properties
For example, on a UNIX system, the file might be found in the following directory:
/opt/IBM/WebSphere/AppServer/Profiles/DefaultAppSrv01/properties/
- In the configuration properties file (env-config.properties),
add the following property:
- USE_SOAP_CLIENT_PROP_FILE=true
- Set the following properties in the soap.client.props file:
- com.ibm.SOAP.securityEnabled=true
com.ibm.SOAP.loginUserid=user_ID
com.ibm.SOAP.loginPassword=password - Optional: Run a local command such as PropFilePasswordEncoder to encrypt the password.
Limitations of using a domain user as target system OS user on Windows
When the configuration editor prompts you to specify a target system OS user name, specify the user name without the domain name.
For example, the following domain user account formats are not valid: domain\user_name or domain@user_name.
If you want to use a Windows domain user account, comply with these additional requirements:
- The Windows target system must be configured to access the domain.
- A duplicate name matching the domain user must not exist on the local operating system or on any other domains that the Windows target system is configured to access. Duplicate user names causes RXA to fail to authenticate the domain user.
Overriding the target OS user, password, and group defined in the configuration properties file
The configuration properties file sets the target OS user, password, and group based on values that you supply.
In the configuration definition, the configuration editor sets these values in the configuration-scope configure.properties file.
| Property | Description |
|---|---|
| OS_USER | The target OS user name that the product uses to connect and run commands on the target system. The OS user name must already be defined on the target system; configuration generator does not create it. |
| OS_PASSWORD | The target OS password for the OS user name. The OS password must already exist and be valid. |
| OS_GROUP | The OS user group for the OS password and user name. The OS user name must be a member of the OS user group. |
Reasons to override the configuration definition
You can override configuration-scope values for the OS user, password, and group if you need to use a different OS user account to run a specific action on a target system node, for example:
- Install and run IBM HTTP Server V6.0 as a root user and run the WAS nodes in the cell as a non-root user.
- Install WAS and IBM HTTP Server on the same host machine, but run them as different users.
Editing properties at the node scope
To override the configuration-scope target OS user and password, do the following:
- In the configuration definition, open the install.properties file for the node whose OS user name and password must be unique, as in the following example:
- RAFW_HOME/user/environments/PROD01/nodes/ihs01/install.properties
- Enter new values for the OS_USER and OS_PASSWORD properties. You must specify both.
- If necessary, you can also enter a new value for the OS_GROUP property.
If you have multiple nodes on the same host, specify the same OS Group for all nodes.
- Test the connection to the target system by running the rafw command on the target system, as shown in the example. Do not specify an action to test the connection.
- rafw.sh -env PROD -cell PRODO1 -node IHS01
The rafw command connects to the target system using the OS user name and password in install.properties, encrypts the password, and performs an initial transfer of shared product files.
The connection attempt fails if the OS user name and password do not exist on the target system.
Repeat this procedure for all target system nodes that require an OS user name, password, or group that is different than the configuration-scope default.
Configure password or public key authentication for target systems
You can choose to configure password authentication or public key authentication for UNIX or Linux target systems. For Windows systems, password authentication is supported.
Configure password authentication for UNIX, Linux, or Windows target systems
Procedure
The configuration generator creates the cell-scope OS User ID and password based on the OS user account information that you provide. The cell-scope user ID and password are used for all the nodes in the cell.
To override the cell-scope user ID and password for a node, see Overriding the target OS user, password, and group defined in the configuration properties file<
- On the target system, create an OS user ID and password to be used as the cell-scope user account.
- Run the configuration editor. At the OS username and OS password prompts, enter the target system OS user ID and password that you created. The configuration editor encrypts the password.
- Complete all required information and click Generate.
- Test the connection to the target system ... from the framework server; do not specify an action.
rafw.sh -e env_name -c cell_name -n node_name
Configure public key authentication for UNIX and Linux target systems
Procedure
The configuration generator creates a cell-scope OS user ID based on the user ID you provide and uses the passphrase generated by the ssh-keygen utility. The cell-scope user ID and passphrase are used for all the nodes in the cell.
- On the target system, create an OS user ID and password to be used as the cell-scope user account.
- On the framework server, use the ssh-keygen utility
to create public-private key pairs. configuration editor supports
empty passphrases.
- Save keys to one or more of the following locations:
Locations to store public-private key pairs
Scope of keys Location All configurations on all target systems RAFW_HOME/user/keys/ssh_id Cell User/environments/env_name/cells/cell_name/.ssh_id
Node User/environments/env_name/cells/cell_name/nodes/node_name/.ssh_id
Precedence of keys: Cells and clusters are concepts, so when you specify an action at cell or cluster scope, that action must have a physical node to run on. Standalone cells have only a single node; for managed systems, the dmgr node is used. If you store a key at the dmgr node level, all actions at the cell or cluster scope will use that key.
In AMC, the lowest scope has the highest precedence. Thus, a key stored at node scope has precedence over a key stored at cell scope. A key stored at cell scope has precedence over a global key stored in RAFW_HOME/user/keys/ssh_id.
Example of a global private key:
-
ssh-keygen -t rsa -f RAFW_HOME/user/keys/ssh_id
Generating public/private rsa key pair.
user/keys/ssh_id already exists.
Overwrite (y/n)? y
Enter passphrase (empty for no passphrase):
Enter same passphrase again:
Your identification has been saved in user/keys/ssh_id.
Your public key has been saved in user/keys/ssh_id.pub.A public key (ssh_id.pub) and the corresponding private key (ssh_id) are created in RAFW_HOME/user/keys.
- Save keys to one or more of the following locations:
- Copy the contents of the public key from ssh_id.pub, or its equivalent, to the authorized_keys file of the OS user ID on the target system. For example: /home/os_user/.ssh/authorized_keys.
- Run the configuration editor.
- At the OS user name prompt, enter the target system OS user ID that you created.
- At the OS password prompt, supply the passphrase or empty passphrase generated by ssh-keygen.
The configuration editor encrypts the passphrase.
- Complete all required information and click Generate.
- Test the connection to the target system ... from the framework server. Do not specify an action.
- rafw.sh -e env_name -c cell_name -n node_name
Update a password for an existing configuration definition
Procedure
Passwords must be periodically changed. To update a password created for an existing configuration definition:
- Update the password for the target OS user account.
- To encrypt and save the new password in the cell definition,
run the rafw command without an action:
- rafw.sh -e env_name -c cell_name -n node_name
- Test the connection to the target system with the new password by using the following command. Do not specify an action.
- rafw.sh -e env_name -c cell_name -n node_name
Update a passphrase for an existing configuration definition
Procedure
Passphrases must be periodically changed. To update a passphrase created for an existing cell definition:
- Complete the procedure described in Configuring password authentication for UNIX, Linux, or Windows target systems.
- To encrypt and save a new passphrase to the configuration definition, run the rafw command without an action:
- rafw.sh -e env_name -c cell_name -n node_name
- Test the connection to the target system with the new passphrase
by using the following command. Do not specify an action.
- rafw.sh -e env_name -c cell_name -n node_name
Password management files
To change passwords, you might need to change or manually invoke one of the password management files.
The buildforge.properties file contains the BF_USERNAME and BF_PASSWORD properties, which store the username and password that you use to run the web client on the target system. If you change this password in the web client, you must also change the value of the BF_PASSWORD property in the buildforge.properties file. This value is encrypted automatically the next time you run the configuration editor, the configuration generator, or the integrateToBF command. Alternatively, you can run the following command to encrypt the password:
- integrateToBF.sh recoverUUIDs
The bfclient.conf and bfpwcrypt.conf files contain critical information needed to encrypt and decrypt passwords when you use the rafw command.
Do not modify or delete these files, which are located in the RAFW_HOME directory on the framework server.
Plan to back up the password management files as a part of backing up your file system or save them to a source control system.
If these files are accidentally deleted, you must recreate the password keys stored in the bfpwcrypt.conf file. For assistance, contact IBM Software Support.
Multiple user file permissions
Multiple users on the same target system must be able to change the same set of files.
The following situations provide examples of multiple users that access a single target system:
- Use sudo to install as root and run programs as a normal user.
- Use different administrator IDs for different products installed on a single target system, such as wasadmin for IBM WAS and portaladmin for IBM WebSphere Portal.
Problems can arise when one user owns a set of files and a second user attempts to change those files. To avoid these problems, ensure that all users belong to the same group and that all files on the target system are owned by this group.
Example
You use the configuration editor to import the topology for an existing IBM WebSphere Portal cell. You specified portaladmin as the OS User and portalgroup as the OS Group in the editor. You then attempt to import the topology for an existing IBM WAS cell, specifying wasadmin as the OS User and wasgroup as the OS Group in the editor. When the generator attempts to rewrite files that were created on the target system during the previous run, the process fails because those files are owned by portaladmin:portalgroup.
The solution is to make wasadmin and portaladmin members of a single group, such as admingrp, then use the chgrp command after the first run of the generator to set the owner of all files to admingrp.
Sudo support
You can temporarily assume the privileges of a different user, such as root. You can use those privileges to run specific tasks in UNIX or Linux, or you can use them to run all tasks for a configuration definition or scope that AMC manages.
The product supports the sudo command in UNIX and Linux through several "run-as" options. You can use these options when you need to temporarily change your privileges but do not want to log out and log in to the target system as root. The following examples illustrate the supported uses for this feature:
- IBM HTTP Server is typically run by the root user. See "Example 1" in this topic.
- Many products must be installed by the root user. See "Example 2" in this topic.
- For audit reasons, the user who runs WAS is not allowed to connect to the system through ssh. See "Example 3" in this topic.
Limitations
Sudo support is available on UNIX and Linux systems only:
- Attempts to use this feature on Windows result are ignored with a warning message.
- Attempts to use this feature on z/OS result in an error.
Sudo supports the three previously mentioned uses only:
- Run IBM HTTP Server as root; run all other processes as another user
- Install as root; run as another user
- Connect as one user; run as another
Any other uses might not be supported, especially when those uses involve changing permissions for WebSphere products.
Sudo support requires a secure (SSH) connection. For this reason, if the target system hostname is the same as the framework server hostname, only a local connection is available and sudo is not supported.
Methods of changing privileges
You can use one of the two following alternatives for changing privileges:
- You can change the property files at either of the following scopes:
- At the configuration definition scope, you can change the configure.properties file.
- At a lower scope, you can change the install.properties file.
Add the following properties to one of these properties files:
- RUN_AS_USER
- A user ID such as root.
- RUN_AS_PASSWORD
- A password for the user ID, if required. If you do not supply a value for this property, the value of OS_PASSWORD is used instead.
- Use the -opt command-line argument, or the Options list in the Run Actions window, to set the run-as options:
- runAsUser
- A user ID such as root.
- runAsPassword
- A password for the user ID, if required. If you do not specify this option, the value of OS_PASSWORD is used instead.
If the run-as password is not encrypted, the system encrypts it using the same method it uses to encrypt the value of OS_PASSWORD.
How it works
If you specified a run-as user ID, the product completes the following steps:
- Connects to the target system as OS_USER, as usual
- Transfers required files
- If the run-as user ID is root, runs the specified action by using the sudo command to invoke Java., as in the following example:
- sudo remote_rafw_home/java/platform/bin/java java_args
- remote_rafw_home
- The RAFW_HOME directory on the target system
- platform
- The platform component of the path to the Java executable on the target system
- java_args
- The arguments to call the Ant process
The sudoers file on the target system must give the root user permission to run the specified version of Java (not a symbolic link to it).
- If the run-as user ID is not root, runs the specified action by using the sudo command to invoke Java, as in the following example:
- sudo -u user remote_rafw_home/java/platform/bin/java java_args
- User
- The run-as user ID
- remote_rafw_home
- The RAFW_HOME directory on the target system
- platform
- The platform component of the path to the Java executable on the target system
- java_args
- The arguments to call the Ant process
The sudoers file on the target system must give the specified user permission to run the specified version of Java (not a symbolic link to it).
- If the run-as user ID is root, the product runs an Ant process
to change the owner back to OS_USER for all files created on the target system during the run. This change includes any files that were installed on the target system as well as logs, files in the work directory,
and files in the configuration definition. For a specific example, see "Example 1" in this topic.
Best practice is to use the root user ID for installation actions only, and then only when necessary. Most actions should be run using your normal user ID.
- If the run-as user ID is not root, the files on the target system that are created while running an action are owned by the run-as user.
- After processing is complete, changed files on the target system are transferred back to the framework server by the OS_USER. If sudo fails, the user receives a BUILD FAILED message and a non-zero return code. If the Ant processing fails, the behavior is the same as it would be if you were not using a run-as ID.
Required setup
If the run-as user is root, file permissions are not an issue. The root user can read all files, and can change the owner of any changed files on the target system to the OS_USER.
If the run-as user is not root, errors result if any of the following conditions apply:
- The run-as user cannot read a file on the target system.
- The OS_USER cannot transfer files owned by the run-as user back to the framework server.
The following rules apply to file permissions:
- All files in the RAFW_HOME directory tree on the target system must be readable by the run-as user.
- Files in the configuration definition are readable and writable by both the run-as user and the OS_USER.
- The work and log directories are readable and writable by both the run-as user and the OS_USER.
- All files in the RAFW_HOME directory tree on the target system must be writable by the OS_USER.
The following steps provide one way to satisfy the file permission rules:
- The OS_USER and the run-as user must be set up in the same group on the target system. This group does not have to be the default group for either user.
- The GUID bit for all directories in the RAFW_HOME directory on the target system must be set so that files created in that directory are owned by OS_GROUP. This setting is not required if OS_GROUP is the default group for all users.
All directories created automatically on the target system have the GUID bit set. However, if you create the RAFW_HOME directory yourself rather than letting the product create it, remember to set the bit manually.
- All directories on the target system must be writable by OS_GROUP.
- All files on the target system must be readable and writable by OS_GROUP, regardless of which user owns the files. File permissions on the framework server do not affect permissions on the target system except for the execute bit for user, group, and world.
- The umask for OS_USER on the target system must match what is configured in the /etc/sudoers file. This value must be at least 007. User and group are both read/write and both can be execute; world permissions can be restricted.
- The sudo umask on the target system must be set by using the visudo command in /etc/sudoers. The sudo umask must match the umask in the transfer.properites file, and must be at least 007.
- OS_USER must have permission to execute commands as sudo as defined in /etc/sudoers. The only command required is the version of java located in the RAFW_HOME directory on the target system, as described in steps 3 and 4 of "How it works," earlier in this topic.
Example 1: Running IBM HTTP Server as root and all other processes as rafadm
If you are creating a new configuration definition:
- Start the configuration editor and click Create configuration.
- While answering the IBM HTTP Server questions, enter root as the run-as user. Set the OS_USER as rafadm. If the password for OS_USER is different from the password required for sudo, enter a run-as password. In most cases, you can leave the run-as password information blank.
- Generate the new configuration definition. All connections and actions on the target system are run as OS_USER except actions run
on the IBM HTTP Server nodes.
For the IBM HTTP Server nodes, the RUN_AS_USER property is set to root in the following file:
- RAFW_HOME/user/environments/environment_name/cells/cell_name/nodes/ihs_node/install.properties
If the configuration definition already exists, edit the following file for all nodes whose processes you want to be owned by another user:
- RAFW_HOME/user/environments/environment_name/cells/cell_name/nodes/ihs_node/install.properties
- Set the RUN_AS_USER property to root.
- Unless your sudo configuration requires a different password than the value of OS_PASSWORD, leave the RUN_AS_PASSWORD information blank.
Run actions on IBM HTTP Server nodes produces the following behavior:
- All connections to target systems are made as OS_USER.
- All files are transferred to the target system and owned by OS_USER.
- All Ant actions on the target system, and therefore all processes started by Ant actions, run as root.
Example 2: Running all processes as wasadm when logging in as rafadm
If you are creating a new configuration definition:
- Start the configuration editor and click Create configuration[???].
- While answering the node questions, enter wasadm as the run-as user. Set the OS_USER as rafadm. If the password for OS_USER is different from the password required for sudo, enter a run-as password. In most cases, you can leave the run-as password information blank.
- Specify a run-as user, and password if necessary, for all scopes
that represent target systems whose processes you want to be owned
by a user other than OS_USER:
- dmgr
- Nodes
- IBM HTTP Server nodes
- Generate the new configuration definition. All node scope install.properties files,
such as the following file, have the RUN_AS_USER property set to wasadm:
- RAFW_HOME/user/environments/environment_name/cells/cell_name/nodes/ihs_node/install.properties
If the configuration already exists, you have two options:
- Edit the configure.properties file for the configuration definition and set the RUN_AS_USER property for all scopes within the definition.
- Edit the install.properties file for all individual nodes whose processes you want to be owned by a user other than OS_USER.
- Set the RUN_AS_USER property to wasadm.
- Unless your sudo configuration requires a different password than the value of OS_PASSWORD, leave the RUN_AS_PASSWORD information blank.
When you run actions that set a run-as user, the following behavior results:
- All connections to target systems are made as OS_USER (rafadm).
- All files are transferred to the target system and owned by OS_USER (rafadm).
- All Ant actions on the target system, and therefore all processes started by Ant actions, run as wasadm.
Example 3: Using -opt runAsUser to install as root
To install IBM WebSphere Portal 6.0 as root but run it as rafadm, complete the following steps:
- Run the configuration editor and click Create configuration[???]. Set the OS_USER as rafadm.
- Install WebSphere Portal by
running the following command:
- rafw.sh -e environment_name -c config_name -n portal_node_name -t wp_60_install_wp -opt "runAsUser=root"
- After installation is complete, the installation directory owner is changed to OS_USER (rafadm). Any parts of the RAFW_HOME directory tree on the target system not already owned by OS_USER are also changed to have OS_USER as owner.
- You can now run any WebSphere Portal actions as OS_USER.
Change the file creation mask
Change your umask to change the default permissions on files you create on the target system.
The umask command sets the file permissions for files that the current user creates. This becomes important when multiple users in the same group share a single installation of AMC on the target system.
- Open the transfer.properties file located in the RAFW_HOME/product/conf directory on the framework server. This file contains the default umask for all files that you create on a target system.
- Change the value of the fileperms.umask property. This is a standard UNIX three-digit umask, with digits for user, group, and world permissions. See the first example later in this topic.
- If you use sudo support, the value of the fileperms.umask property for OS_USER on the target system must match what is configured in the /etc/sudoers file. This value must be at least 007. User and group are both read/write and both can be execute; world permissions can be restricted. This situation is complicated by the fact that sudo, by default, uses the logical combination (AND) of the user's mask and the mask specified as default in the /etc/sudoers file. This means that, by default, you cannot set a permission level for sudo that is more lenient than existing permissions. To override this, add the umask_override option to the /etc/sudoers file. See the second example later in this topic.
- If multiple users have the same RAFW_HOME directory on the same target system, the default umask must allow group read, write, and execute permissions.
Examples
- The following default umask in the transfer.properties file is set to allow read, write, and execute permissions for user and group, with restricted permissions for world:
- fileperms.umask=007
- Use the visudo command to edit the /etc/sudoers file.
The visudo command might not be on your path; you can use the whereis visudo command to locate it. Add a line in the Defaults specification section, as in the following example:
- # Defaults specification
Defaults umask=0002You might need to disregard the user's mask and rely solely on the default specified in the /etc/sudoers file. To do that, add the following line to the file:
- Defaults umask_override
You can also set the default for a single user only. The following example sets the default for rafwuser, which is the OS user for the server, and specifies that the default is to be used instead of the logical combination of the default and the existing rafwuser mask:
- # Defaults specification
Defaults:rafwuser umask=0002
Defaults:rafwuser umask_override - The following example shows how to verify that the umask is set correctly. In this example, rafwuser is the OS user for the server and root is the runAs user:
- Log in to the target system as rafwuser.
- Run the following command:
- sudo -u root touch myFile
- Run the following command:
- ls -l myFile
Verify that the file permissions support user and group read and write with one of the following results:
- rw- rw- --- myFile
- rw- rw- r-- myFile
Set global property values
Set required and optional values in the configure.properties file.
The product configure.properties file is located on the framework server in the path RAFW_HOME.
Open configure.properties in a text editor to view or edit values. Most properties have a default value used if you do not provide a value. You can override some global properties.
| Property and default value | Description |
|---|---|
| RAFW_HOST=DNS_host_name |
During installation, this value is set to the fully-qualified host name of the framework server. To update this value, follow these guidelines for setting this value: Specify the fully-qualified domain name server (DNS) host name, such as xmachine.manhattan.ibm.com or the default short DNS host name, such as xmachine. Do not specify a numeric IP address. Do not use the generic identifier, localhost, for this value. For UNIX and Linux, add a matching entry for this host name in /etc/hosts. For Windows, add a matching entry for this host name in C:\Windows\system32\drivers\etc\hosts. This is required if the host name is not resolved by the DNS. If the hostname or hostname -a command returns the correct host name, then no entry is required in /etc/hosts.
|
| AIX_RAFW_HOME=/opt/RAFW
LINUX_RAFW_HOME=/opt/RAFW SOLARIS_RAFW_HOME=/opt/RAFW HPUX_RAFW_HOME=/opt/RAFW WINDOWS_RAFW_HOME=C:/RAFW | The shared components of the framework server, plus the media
and environment directories, are copied to the OS_RAFW_HOME directory on target systems.
To create OS_RAFW_HOME, use one of the following methods:
If you have more than one framework server (excluding any failover setup), you must use different OS_RAFW_HOME directories for any remote systems that will be managed by the framework servers. Ensure that the OS_RAFW_HOME directory is separate from the WAS_HOME or WAS_PROFILE_HOME directories. IBM WAS must not be installed under RAFW_HOME and RAFW_HOME must not point to an existing WAS installation.
|
| AIX_MEDIA_ROOT=/opt/RAFW/media
LINUX_MEDIA_ROOT=/opt/RAFW/media SOLARIS_MEDIA_ROOT=/opt/RAFW/media HPUX_MEDIA_ROOT=/opt/RAFW/media WINDOWS_MEDIA_ROOT=C:/RAFW/media | On target systems, OS_MEDIA_ROOT is the media directory path. The installation media for the target is copied to OS_MEDIA_ROOT for later
installation.
To create OS_MEDIA_ROOT on targets, use one of the following methods:
|
| RAFW_MEDIA_ROOT=RAFW_HOME/media | On the framework server, RAFW_MEDIA_ROOT is the media directory path.
For shared file systems, RAFW_MEDIA_ROOT points to the media directory on the shared file system.
|
| EXTERNAL_DIFF=<diff> ${FILE_1} ${FILE_2} | For WebSphere Portal actions only, you can use this property to configure an external comparison
tool to display compare results.
If configured, compare mode Uses the external comparison tool to display configuration differences in WebSphere and in the environment tree. The compare (-r) and graphical display (-g) options of the rafw command are required. If not configured, compare mode reports if there are configuration differences it does not list or display differences. The compare (-r) option of the rafw command is required. To configure your external comparison tool, substitute the diff variable with the full path to the comparison tool on the framework server, for example: C:/MyCompareTool.exe. You must install the comparison tool application on the framework server.
|
Properties in the install.properties file
Properties in the install.properties file affect the node scope only.
Purpose
The file contains properties that affect the installation of applications on target systems. If a related property exists in the configure.properties file at the configuration definition scope, the value in install.properties takes precedence.
The install.properties file is located in the following directory:
- RAFW_HOME/user/environments/env/cells/cell/nodes/node/
You can edit the install.properties file in the Eclipse client;
The properties that are meaningful in the install.properties file depend on the applications that you are installing.
Properties
The following properties affect installations of IBM WAS:
| Property | Description | Example |
|---|---|---|
| OS_GROUP | Overrides the value of OS_GROUP in configure.properties | OS_GROUP=rafwadm |
| OS_PASSWORD | Overrides the value of OS_PASSWORD in configure.properties.
If you want to override OS user and password at the node scope, you must specify both OS_USER and OS_PASSWORD. | |
| OS_USER | Overrides the value of OS_USER in configure.properties | OS_USER=rafwuser |
| REMOTE_MEDIA_HOME | Overrides the value of OS_MEDIA_ROOT in configure.properties | REMOTE_MEDIA_HOME=/share/media/ |
| REMOTE_RAFW_HOME | Overrides the value of OS_RAFW_HOME in configure.properties | REMOTE_RAFW_HOME=C:/RAFW |
| RUN_AS_PASSWORD | Overrides the run-as password specified in the configuration editor. | |
| RUN_AS_USER | Overrides the run-as user specified in the configuration editor. | RUN_AS_USER=root |
| USE_ALT_BYTE_WIDTH | Overrides default behavior to install a 32-bit WebSphere application on a 64-bit OS. | USE_ALT_BYTE_WIDTH=TRUE |
| WAS_PATCHES | Overrides the patch numbers hardcoded into was_version_install_with_all_patches. | WAS_PATCHES=fp11 |
The following properties override hardcoded patch numbers for the installation of other applications:
| Property | Application | Example |
|---|---|---|
| PKS_POST_version | IBM WebSphere Portal | PKS_POST_61=PM10281 |
| WPSversion_PATCHES | IBM WebSphere Process Server | WPS62_PATCHES=IC62237 |
| WESBversion_PATCHES | IBM WebSphere Enterprise Service Bus | WESB62_PATCHES=IC63433 |
Overriding global properties
For individual target system nodes, you can override the default global properties for OS_RAFW_HOME and OS_MEDIA_HOME. By default, the global settings apply to all configuration definitions that the generator creates.
| Global property | Description |
|---|---|
| OS_RAFW_HOME | On target systems, OS_RAFW_HOME is the installation directory path. The shared components of the framework server, the media directory, and the environment directory are installed in OS_RAFW_HOME. |
| OS_MEDIA_ROOT | On target systems, OS_MEDIA_ROOT is the media directory path. The installation media for the target system is installed in OS_MEDIA_ROOT. |
Overriding the default global setting for OS_RAFW_HOME
The OS_RAFW_HOME value is set to a global default according to operating system type. The global default applies to all configuration definitions that the generator creates.
To support different OS_RAFW_HOME directories on different host machines, you can add the REMOTE_RAFW_HOME property to a node-scope install.properties file.
| Host machine name | Directory location | Property setting |
|---|---|---|
| aix-was-1 | /opt/RAFW | In RAFW_HOME/configure.properties, set AIX_RAFW_HOME=/opt/RAFW |
| aix-was-2 | /mnt/disk2/RAFW | In node_path/install.properties, set REMOTE_RAFW_HOME=/mnt/disk2/RAFW |
- For a cell definition, identify which target system nodes require a value other than the global default. In the following example, the node name is aixtest2.
- /opt/IBM/RAFServer/rafw/user/environments/TEST/nodes/aixtest2/install.properties
- For each of the identified nodes, open the install.properties file, add the REMOTE_RAFW_HOME property, and set the property
to the full path of the product installation directory on the target system, for example:
- REMOTE_RAFW_HOME=/mnt/disk2/RAFW
Overriding the default global setting for OS_MEDIA_ROOT
The OS_MEDIA_ROOT value is set to a global default according to operating system type. The global default applies to all configuration definitions that the generator creates.
For a shared media setup, you might want to support unique mount points for individual target system nodes due to disk space constraints or other resource considerations.
To support different OS_MEDIA_ROOT directories for individual target system nodes, you can add the REMOTE_MEDIA_HOME property to a node-scope install.properties file.
| Host machine | Directory location | Property setting |
|---|---|---|
| aix-was-1 | /net/nas0/was/media | In RAFW_HOME/configure.properties, set AIX_MEDIA_ROOT=/net/nas0/was/media |
| aix-was-2 | /mnt/devices/nas0/was/media | In node_path/install.properties, set REMOTE_MEDIA_HOME=/mnt/devices/nas0/was/media |
- For a cell definition, identify which target system nodes require a value other than the global default. In the example, the node name is aixtest2.
- /opt/IBM/RAFServer/rafw/user/environments/TEST/nodes/aixtest2/install.properties
- For each of the identified nodes, open the install.properties file, add the REMOTE_MEDIA_HOME property, and set the property
to the media directory mount point for the target system node, for example:
- REMOTE_MEDIA_HOME=/mnt/devices/nas0/was/media
Run actions to manage configurations
After setup is complete, you can use actions to manage your live configurations on target systems and your configuration definitions on the framework server.
You can run one or more of these action types for supported automation targets:
- Installation and patching
- Configuration change management
- Enterprise application deployment
You can run an action in any of the following ways:
- From the command line
- In the Eclipse client
- As part of an automation plan in the Eclipse client or the console
- As a project in the automation engine web client
Overview of actions
Use actions to automate the management of your configuration definitions.
Actions are the fundamental particles of AMC. They carry out low-level, highly specific tasks. You can run them individually or combine them into automation plans and libraries.
Technically, an action is an element within an Apache Ant build file that is identified by a <target> tag. Actions can call scripts, executable programs, or other actions.
You can run an action in any of the following ways:
- From the command line.
- In the Eclipse client.
- As part of an automation plan in the Eclipse client or the console.
- As a project in the automation engine web client.
Actions have an assigned scope. A particular action might affect all servers in a configuration, in a cluster, or might affect only a single node or single server. An action that is available at one scope might not be available at another.
Actions have an assigned mode. The mode determines where the action takes place and how the action behaves.
In addition, you can run an action in help mode to display the help for the action.
You can create your own custom actions.
Choosing the action that you need
Action names consist of components that define the behavior of that action:
product_version_type_description
- product
- An acronym for the middleware product that the action manages. For example, "was" represents IBM WAS,
- version
- The version number of the middleware product, or the word "common" to indicate that the action manages all versions of the product. Version numbers in action names do not include decimal points, so version 8.5 is represented by "85".
- type
- One of the following four types of actions:
- install
- Actions that install, uninstall, or update the middleware product.
- configure
- Actions that change configuration information about the framework server or on the live configuration on the target system.
- deploy
- Actions that install or modify custom applications on the target system.
- miscellaneous
- Actions that manage AMC itself.
- description
- Typically one to three words that explain what the action does.
For a complete list of provided actions, see Action names by scope and supported version. The list is organized by product, scope, version, and action name, in that order.
Composite actions
Composite actions call other actions. The following table shows examples:
| Composite action | Actions that are called by the composite action: |
|---|---|
| wp_common_deploy_update_wps_ear
Update the wps.ear file |
wp_common_deploy_expand_wps_ear wp_common_deploy_update_expanded_ear wp_common_deploy_collapse_wps_ear |
| was_61_install_with_all_patches
Install WAS and all fix packs |
was_61_install_was was_61_install_fp23 was_61_install_jdk_sr9 |
It is common for an action to call other actions.
Action help
For help with individual actions, see Introduction to action commands. If you use the Eclipse client, action help is displayed in the workspace when you display an action in the editor pane.
You can create custom help for the custom actions that you create.
Action types
An action type, which is part of the action name, describes the work that the action performs.
AMC includes four types of actions.
Installation actions
Installation actions install middleware products on a target system. The first two components of the action name provide the name and version number of the product. For example, the was_85_install_was action installs WAS version 8.5.
Installation actions include uninstallation actions (such as was_85_install_uninstall_was) and update actions (such as was_85_install_fixpack).
Configuration actions
Configuration actions can manage either the live configuration on the target system or the configuration definition on the framework server, depending on the mode of the action. Most configuration actions are designed to work in the following way:
- In compare mode, the action compares some aspect of the live configuration to the configuration definition on the framework server.
- In import mode, the action changes information in the configuration definition on the framework server to match the information in the live configuration.
- In execute mode, the action changes information in the live configuration to match the configuration definition on the framework server.
You might perform the following typical tasks with a configuration action:
- Change the topology by adding or removing a node, creating a cluster, and other actions
- Start or stop a server, cluster, or other entity
- Manage federated security
Deployment actions
Deployment actions work with applications other than supported middleware products. These applications are typically custom applications. Use deployment actions to install, uninstall, update, start, and stop these applications.
Miscellaneous actions
These actions are also called model actions. These actions manage AMC itself. The action names begin with the acronym "rafw" and do not include a version or type component. An example of a miscellaneous action is rafw_encode_password.
Import mode overview
In import mode, actions are used to extract configuration data from a live configuration on the target system and place that data in the associated configuration definition on the framework server.
Imported configuration data is stored in a normalized XML format on the framework server. This configuration data can be version controlled so that you can apply change management in the same way you would to source code. As in WAS, where many resource types are stored in a single XML file, AMC stores related resources in individual XML files. Resources for some products are stored at an even higher granularity than the resources for WAS. For example, data sources, JDBC providers, and was40 data sources are all stored in the jdbc.xml file. Additionally, a jdbc.xml file is created at each scope where an import mode command is run.
Import mode examples
Examples describe how to use import mode to update the framework server with data from a live configuration.
Example: Update the configuration definition after you install WAS
Objective:
Synchronize the configuration definition on the framework server to match changes in the live data on the target system.
- Use the configuration editor to create an IBM WAS cell definition on the framework server.
- Run the automation plan that the generator created to set up the new cell on the target system and install WAS.
- Run the was_common_configure_server_all action in import mode. This action creates and updates the XML files in the cell definition on the framework server with information about the WAS installation.
Execute mode overview
In execute mode, actions are used to apply configuration data from a framework server configuration definition to a live configuration on the target system.
After you capture configuration information in import mode, you can play back the data by running the same configuration action in execute mode. Execute mode first deletes all of the configuration elements of the specified type and then re-creates them based on the information that is stored in the AMC configuration definitions.
Execute mode examples
Examples describe how to use execute mode to apply changes on the framework server to live configurations on the target system.
Example 1: Update the live cell with changes from the framework serverWAS
Objective:
Synchronize the configuration definition on the target system to match
changes on the framework server.
- Use the Eclipse client, drag a cell definition to the Configuration Workspace.
- Expand the cell definition to display the configuration data.
- Open one of the XML files, such as Server Settings, in the editor.
- Change one of the values.
- Save your changes to the server.
- Run the was_common_configure_server_all action in execute mode. This action copies your change to the live cell on the target system.
Example 2: Use information in one configuration definition to update a different live cell
Objectives:
- Copy a change from one production environment to another.
- Keep the cell definitions in sync with production.
- Assume that you have changed the Java Virtual Machine on a live server called ProductionServer1.
- Run the was_common_configure_server_java_def action in import mode. This action copies the change to the configuration definition on the framework server.
- Promote the change to the configuration definition that corresponds to a second live server, ProductionServer2.
- Run the was_common_configure_server_java_def action in execute mode. This action copies the change to ProductionServer2.
Compare mode overview
In compare mode, actions are used to report the differences between the data in a framework server configuration definition and that in a live configuration.
Over time, differences can accumulate between the live configuration and the configuration definition. This situation is called "configuration drift." For example, a change might be introduced to a production environment that is not duplicated in the staging environment. This situation might occur when you debug an issue in production. Alternatively, a difference might occur between your geographically dispersed data centers.
In compare mode, differences are logged between the configuration definition on the framework server and the corresponding configuration in the live cell. Using the automation engine, you can schedule these comparisons during off-peak hours and run them regularly. If a change is caught early, it is much easier to make an informed decision about whether to accept the change, rather than trying to recall weeks or months later why a particular change was made.
If you run an action in compare mode and find a difference, you have two choices:
- Update the configuration definition with the value from the live server by running the same action in import mode.
- Reapply the configuration definition to the live server by running the same action in execute mode.
Compare mode examples
Examples describe how to use compare mode to detect differences between a configuration definition on the framework server and a live configuration.
Example: Update the configuration definition after you install WAS
Objective:
Compare the configuration definition on the framework server with the data on the target system.
- In the Configuration Explorer view of the Eclipse client, expand was70_nd_cell, and then expand Nodes, node01, and Servers. Right click clone1 and click Run Action. The Dynamic Action editor is displayed.
- Run the automation plan that the generator created to set up the new cell on the target system and install WAS.
- Run the was_common_configure_server_all action in import mode. This action creates and updates the XML files in the cell definition on the framework server with information about the WAS installation.
Promote mode overview
Promote mode allows you to leverage configuration changes and testing completed in one environment and reuse those changes in another environment.
Promote mode copies configuration data files from one scope to another in the environment tree. Replacement is not selective, all values are replaced. Values can be changed to scope-specific values if you specify them in a promote.properties file.
You can copy a working configuration from a source scope to any target scope. The target scope can be anywhere in the environment tree: in the same cell definition in the same environment or in a cell definition in a different environment.
After promoting configuration changes, you must run the action in execute mode to apply the newly promoted configuration to a WebSphere target cell.
Promote mode supports configuration and deployment actions for WAS, IBM HTTP Server, and WebSphere Portal.
The following diagram shows the workflow for promote mode:
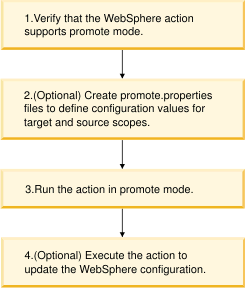
Basic rules for using promote mode
Understand the basic rules for using promote mode.
- Actions use data files to perform work. Promote mode copies data files used by actions from one scope to another in the environment tree.
A data file can be an XML file, a .properties file, or an augment XML file.
- Promote copies data files from any source to any target scope as long as the target is a supported scope for the action being promoted.
- Promote mode updates or replaces configuration data. Replacement
is not selective, all the values in the data file are replaced.
Values can be changed to scope-specific values if you specify them in a promote.properties file.
- To define unique scope values in the promote.properties file, use keyword-value pairs or XPath expressions.
- At runtime, promote mode pulls configuration data from the source
scope to the target scope:
- Target path: Use standard scope options, for example -env, -cell, -node, -server, -cluster.
- Source path: Use the -opt "source.scope=scope_name" options.
rafw.sh -env QA01 -cell CELL01 -promote was_common_configure_variables -opt "source.env=DEV01" -opt "source.cell=CELL01"
- To add to a configuration instead of replacing one, you can promote
an augment XML file. This file specifies the configuration data to be added.
Use the option -opt "augmentDir=directory_name" to specify the directory location of the augment file.
rafw.sh -env QA01 -cell CELL01 -promote was_common_configure_jdbc_datasources -opt "source.env=DEV01" -opt "source.cell=CELL01" -opt "augmentDir=augment"
Apply a promoted configuration to WebSphere
After you promote a configuration data file to a target scope, run the action in compare mode to verify configuration changes before using execute mode to apply them.
- Run an action in promote mode to promote a data file from a source to a target scope.
- At the target scope, run the action in compare mode.
Compare mode displays the differences that exist between the configuration in the environment tree and the configuration in WebSphere.
- Evaluate the differences reported by running compare mode, and make any necessary changes to the data file in the environment tree.
- Run the action in execute mode to apply the changes in the promoted data file to the WebSphere runtime configuration.
Use and creation of a promote.properties file
To prevent scope-specific values from being overwritten during a promote action, create a promote.properties file.
How promote mode uses the promote.properties file
- If a promote.properties file does not exist, promote copies the data file for the action from the source to the target scope and replaces the contents of the target data file with the contents of the source data file.
- If a promote.properties file exists, promote copies the source data file to the target, and replaces values in the target data file with the values in the source data file. Values can be changed to target-specific values if you specify them in the target promote.properties file.
Usage scenario for promote.properties files
In your software development environment, use the promote.properties files to specify unique configuration values across DEV, QA, STAGING, and PROD environments.
The promote.properties file contains values that are unique to a source or target scope.
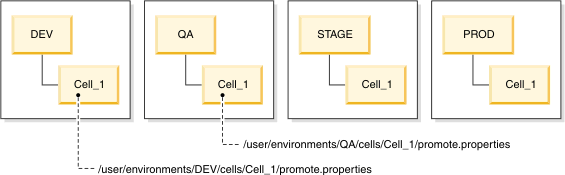
Rules for using promote.properties files
Review general rules for creating and using promote.properties files.
- The promote.properties file is a text file.
- You can create and save the promote.properties file at any scope
in the cell definition.
- /user/environments/DEV/cells/Cell_1
/user/environments/DEV/cells/Cell_1/nodes/Node_1
/user/environments/DEV/cells/Cell_1/clusters/Cluster_1
/user/environments/DEV/cells/Cell_1/nodes/node1/servers/Server_1 - At runtime, the promote.properties files for the source and the target scopes inherit values from any promote.properties file at the execution scope and higher.
- A promote.properties files in the cell definition is available to any action that you run in promote mode.
- A promote action does not add values from a promote.properties file to a data file unless the value already exists in the data file.
- If you use keyword-value pairs in promote.properties, a promote.properties file is required at source and target scopes.
- If you use XPath expressions in promote.properties, a promote.properties file is required only at the target scope.
Options for defining values in a promote.properties file
To define values in a promote.properties file, you can use keyword-value pairs and XPath expressions.
- Keyword-value pairs
- Use keyword-value pairs to define the value that must be retained during a promote action. Only the value is evaluated, its variable name is not used to match values.
- List keyword-values in both the source and target promote.properties files.
- Do not use keyword-value pairs to define a standard value, like true or false, which might be assigned to many variable names.
- Keyword-value pair syntax
- The syntax for a keyword-value pair is:
- variable_name=value
- Use a variable name to reference a configuration value that satisfies
the following requirements:
- Do not use a variable name that ends in .xpath or .value; these file extensions are reserved for used XPath configuration.
- Use the same variable name to reference the same configuration value in all promote.properties files.
For example, if you use dbHostName as the variable name in one promote.properties and db.host.name in another, the variable substitution fails.
- Examples of keyword-value entries in promote.properties files
-
- ## global replace (list keys in source and target promote.properties files)
dbHostName=QA.db.domain.com
releaseDbUrl=jdbc:db2://dbhost.ibm.com:60004/reldb:returnAlias=0;- ## global replace (list keys in source and target promote.properties files)
dbHostName=DEV.db.domain.com
releaseDbUrl=jdbc:db2j:wpsdb;create=true
- XPath expression
- An XPath expression locates and assigns the specified value to all instances of the value in the data file that have the location specified by the XPath expression.
- XPath expressions work for values that
- are not unique within the data file, for example, the values true and false might be assigned to several variables
- cannot be replaced everywhere in the data file with the same value
- For information about XPath expressions, see the XML Path Language (XPath) Version 1.0 produced by the World Wide Web Consortium (WC3).
- XPath expression syntax
- The syntax of a generic XPath expression is as follows:
- value_name.value
value_name.xpath=/XmlNode/Child[@attrName="value"]/XmlNode/@matchAttrNameThe table provides descriptions of the XPath expression elements and are provided as a guide to create a basic XPath expression.
See the WC3 documentation on XPath language: World Wide Web Consortium (WC3).
XPath expression element Description value_name.value Assigns a value_name to the value to locate in a data file. value_name.xpath Assigns the same value_name to the XPath expression. .xpath Query to locate that attribute whose value is to be replaced by value_name /XmlNode/ Selects an element node named XmlNode in the XML data file. /XmlNode/Child Selects an element node named Child with a parent named XmlNode. /XmlNode[@attrName="value"] Selects an element node of type XmlNode with an attribute of attrName that has a specific value. - Rules for XPath expressions used in promote.properties files
-
- Do not select an element node with your XPath query.
- The XPath expression must point to an attribute that you want to update, not to an element node in the XML file.
- XPath queries should always end with /@attrName to target an attribute and not the node element.
- When you configure datasources, do not use absolute paths. Specify paths that are relative to container nodes.
- Example of XPath expressions in promote.properties files
-
The following is an example of an XPath expression that locates and updates a value in the jdbc.xml data file.
The example XPath expression looks for a DataSource with the name widgetDB and updates the J2EEResourceProperty attribute to 50000 where the name attribute is portNumber.
- dbport.value=50000
dbport.xpath=//DataSource[@name='widgetDB']/J2EEResourcePropertySet/J2EEResourceProperty
[@name='portNumber']/@valueThe XML data file in the following example shows an excerpt from the jdbc.xml file with the updated port number value.
<jdbc> <RAFW_JDBCDataSources> <DataSource name="widgetDB" > <J2EEResourcePropertySet WASKey="propertySet" > <J2EEResourceProperty WASKey="resourceProperties" name="portNumber" required="false" type="java.lang.Integer" value="50000" > </J2EEResourceProperty> </J2EEResourcePropertySet> </DataSource> </RAFW_JDBCDataSources> </jdbc> - Example of relative paths to datasources in XPath expressions
-
When you run the action was_common_configure_jdbc_datasources in promote mode, the starting point for the XPath expression must be the relative path to the container node. You must therefore omit the absolute path declarations /jdbc/RAFW_JDBCDataSources from the expression and start with /DataSource. For example,
<DataSource
  name="widgetDB"
        >
<J2EEResourcePropertySet
  WASKey="propertySet"
	>
	<J2EEResourceProperty
    WASKey="resourceProperties"
    name="portNumber"
    required="false"
	  type="java.lang.Integer"
	  value="50000"
   >
	</J2EEResourceProperty>
	</J2EEResourcePropertySet>
</DataSource>
Inheritance rules for multiple promote.properties files
At runtime, the values in promote.properties files at the action execution scope and higher are used to create runtime promote.properties files for the source and target scopes. Values in promote.properties files at lower scopes are not inherited.
If multiple promote.properties files exist in the scope hierarchy, the following rules describe how values are combined at runtime.
| promote.properties at scope_home | Rules |
|---|---|
| cell scope
valueA=cellValue valueB=cellValue | If the action is run at the cell scope, the promote.properties file contains the values in the cell scope promote.properties file.
valueA=cellValue valueB=cellValue |
| node scope
valueB=nodeValue valueC=nodeValue | If the action is run at the node scope, the promote.properties file includes values from the node and cell scopes. Node variables override
cell values.
valueA=cellValue valueB=nodeValue valueC=nodeValue |
| server scope
valueC=serverValue valueD=serverValue | If the action is run at the server scope, the promote.properties file includes values from the node, cell, and server scopes. Server variables override node variables and node variables override cell values.
valueA=cellValue valueB=nodeValue valueC=serverValue valueD=serverValue |
| cluster scope
valueB=clusterValue valueE=clusterValue | If the action is run at the cluster scope, the promote.properties file includes values from the cell scope only.
valueA=cellValue valueB=clusterValue valueE=clusterValue |
Promote a properties file by running action to promote .properties file
Use the rafw_model_promote_property_file action to promote any .properties file from one scope to another in a cell definition.
Action description
Promote a properties file from a source scope to a target scope in the environment tree. The rafw_model_promote_property_file action is useful because not all properties files can be manipulated or updated by running actions in promote mode.
For example, as a part of post-install configuration of WebSphere Portal, you might:
- Modify the database URL value in the config_wp_db.properties file for the QA environment
- Use the rafw_model_promote_property_file action to promote the config_wp_db.properties file to the DEV environment.
Usage rules
Rules for using the action rafw_model_promote_property_file are as follows:
- Use the rafw_model_promote_property_file action to promote any properties file.
- Your properties files can be copied to a target scope in the same cell definition or to a target scope in a cell definition in another environment.
- The rafw_model_promote_property_file action only promotes files, it does not support other mode types.
Syntax and examples
The command syntax for the action rafw_model_promote_property_file is the same as other actions run in promote mode, except you use the option opt file=file_name to specify the file name to be copied.
| Option | Description |
|---|---|
| opt "file=<file_name>" | Name of the properties file to be promoted or copied from the source to the target scope. |
To specify the target path, use standard scope options as shown in the example. Use the -opt "source.scope=scope_name" option to specify the source path.
rafw.sh -e DEV -c base -n standalone01 -s portal01 -promote rafw_model_promote_property_file -opt "file=configure.properties" -opt "source.env=QA" -opt "source.cell=base" -opt "source.node=standalone01" -opt "source.server=portal01"
Command options supported by promote mode
Describes rafw command options supported by promote mode.
Syntax for promote mode command options
The syntax for promote mode adheres to the standard syntax for the rafw command.
In addition, promote mode supports -opt options that are unique to promote mode. The -preview option is enhanced to support promote.properties files.
- {rafw.bat | rafw.sh} <SCOPE_PATH> -promote action_name <OPT SOURCE SCOPE> -preview
- <OPT SOURCE SCOPE> Promote mode scope path for source
-opt "source.scope=scope_name"
- <BEHAVIOR OPTIONS> Options that modify command behavior
-preview
| Option | Description |
|---|---|
| -opt "source.scope=scope_name" | Use this option to build the scope path for the source scope.
The action run at the target scope determines which source data file is promoted.
The scope variable is the scope: env, cell, node, cluster, or server. The scope_name is the user-defined scope name. The following examples use the -opt options to build the source scope path. Quote the -opt scope variable and value, as shown in the examples: rafw.sh -env QA -cell CELL01 -promote was_common_configure_variables -opt "source.env=DEV" -opt "source.cell=CELL01" rafw.sh -env QA -cell CELL01 -cluster WASCLUSTER01 -promote was_common_configure_variables -opt source.env=DEV -opt "source.cell=BASE01" -opt "source.node=BASENODE01" -opt "source.server=SERVER1" |
| Option | Description |
|---|---|
| -preview | For actions run in promote mode, preview reports the number of substitutions for each of the values in the promote.properties
file.
For example if the data file is jdbc.xml and the promote.properties file contains a keyword=value pair for the db.host, preview displays the number of matches in the jdbc.xml file for the db.host. If thejdbc.xml and promote.properties file contains an XPath expression that identifies a single instance of the db.host to be replaced, preview displays the number of matches found in the jdbc.xml for the XPath expression. |
Promote mode examples
Examples describe how to use promote mode and promote mode options.
Example 1: Promote a JDBC data source configuration by using a promote.properties file with keyword value substitution
Objectives:
- Use the action was_common_configure_jdbc_datasources to promote the latest, working configuration of jdbc.xml from development (DEV) to quality assurance (QA).
- Create a promote.properties file to define unique values and control variable substitution.
- Identify unique values to be defined in promote.properties.
Open the data file jdbc.xml file and locate unique values. The code example displays a portion of the jdbc.xml file that shows a data source configuration and an entry for the DEV database host name.
<J2EEResourceProperty WASKey="resourceProperties" description="" name="serverName" required="false" type="java.lang.String" value="DEV.db.domain.com"> - Create a promote.properties file for both
the source (DEV) and target (QA) environments, add unique values to the file, and save the promote.properties file at the execution scope.
In RAFW_HOME/user/environments/DEV/cells/CELL01 create a promote.properties file that contains the following value:
dbHostName=DEV.db.domain.com
In RAFW_HOME/user/environments/QA/cells/CELL01 create a promote.properties file that contains the following value:
dbHostName=QA.db.domain.com
- Run the action was_common_configure_jdbc_datasources in promote mode.
rafw.sh -env QA -cell CELL01 -promote was_common_configure_jdbc_datasources -opt "source.env=DEV" -opt "source.cell=CELL01"
Step results:- Copies the data source configuration in the jdbc.xml file from the source (DEV) to the target (QA).
- The QA database host name (QA.db.domain.com) specified in the target promote.properties file is not replaced with the DEV hostname (DEV.db.domain.com).
- Run the was_common_configure_jdbc_datasources action in execute mode to apply the promoted configuration.
Run the action in compare mode before executing the action and applying changes to a WebSphere target system.
Example 2: Promote a JDBC data source configuration by using an augment XML file
Use an augment XML file to selectively specify the data source configurations to be added to the data file.
Objectives:
- Use an augment XML file to selectively add data source definitions to the target jdbc.xml file.
- Create a jdbc_augment.xml file that contains the data source configurations to be added. Save the augment XML file to the augment directory in the source environment.
- Create promote.properties files for the source and target with unique values. In this example, the promote.properties files for the source (DEV) and target (QA) environment are identical to those created in Example 1.
- The source jdbc_augment.xml file contains a single data source configuration to be added to the target data source configuration (jdbc.xml file).
<J2EEResourceProperty WASKey="resourceProperties" description="" name="serverName" required="false" type="java.lang.String" value="DEV.db.domain.com"> - Run the was_common_configure_jdbc_datasources action in promote
mode and use the -opt augmentDir option to specify the directory location of the augment jdbc_augment.xml file.
rafw.sh -env QA -cell CELLO1 -promote was_common_configure_jdbc_datasources -opt "source.env=DEV" -opt "source.cell=CELL01" -opt "augmentDir=augment"
Step results:- Copies the single data source configuration in the jdbc_augment.xml file from the source (DEV) to the target (QA) instead of copying the entire jdbc.xml file.
- The QA database host name (QA.db.domain.com) specified in the target promote.properties file is not replaced with the DEV hostname (DEV.db.domain.com).
- Run the was_common_configure_jdbc_datasources action in augment mode to apply the promoted configuration.
Example 3: Promote a JDBC data source configuration by using a promote.properties file with an XPath expression
Objectives:
- Use the was_common_configure_jdbc_datasources action to promote the configuration of jdbc.xml from production (PROD) to development (DEV) for debugging.
- Create a promote.properties file to specify scope-specific values. Use an XPath expression to locate and update a variable value.
- Change the value defined in the promote.properties for the target scope.
Open the data file jdbc.xml file in the source and target cell definitions. Locate the diagnoseConnectionUsage property.
Production jdbc.xml (source) Development jdbc.xml (target) <?xml version="1.0"?> <jdbc> <RAFW_JDBCDataSources> <DataSource jndiName= 'db2/datasource/jndiName' diagnoseConnectionUsage="false"> <J2EEResourceProperty WASKey="resourceProperties" name="portNumber" type="java.lang.Integer" value="50000" > </DataSource> </RAFW_JDBCDataSources> </jdbc>
<?xml version="1.0"?>
<jdbc>
<RAFW_JDBCDataSources>
<DataSource jndiName=
'db2/datasource/jndiName'
diagnoseConnectionUsage="true">
<J2EEResourceProperty
 WASKey="resourceProperties"
 name="portNumber"
 type="java.lang.Integer"
 value="50000"
 >
</DataSource>
</RAFW_JDBCDataSources>
</jdbc>
- Create a promote.properties file for the target (DEV) environment, add the XPath expression and value to the file, and save the promote.properties file.
In RAFW_HOME/user/environments/DEV/cells/CELL01 create a promote.properties file that contains the following XPath expression:
diagnoseConnectionUsage.xpath=/DataSource[@jndiName=" db2/datasource/jndiName"]/@diagnoseConnectionUsage diagnoseConnectionUsage.value=true - Run the was_common_configure_jdbc_datasources action in promote
mode:
rafw.sh -env DEV -cell CELL01 -promote was_common_configure_jdbc_datasources -opt "source.env=PROD" -opt "source.cell=CELL01"
Step results:- Copies the data source configuration in the jdbc.xml file from the source (PROD) to the target (DEV).
- Uses the XPath expression in the promote.properties file for the target (DEV) to change the value of diagnoseConnectionUsage to true.
- Run the was_common_configure_jdbc_datasources action in execute mode to apply the promoted configuration.
Run the action in compare mode before executing the action and applying changes to a WebSphere target system.
Example 4: Promote WebSphere variables configuration from the server scope in one environment to the cluster scope in another environment
Objective: Promote the WebSphere variables configuration in variables.xml from a stand-alone server in the development environment (DEV) to a network deployment cluster in the quality assurance (QA)
environment.
Use the was_common_configure_variables action to promote the latest, working configuration of variables.xml from DEV to QA. A promote.properties file is not used in this example.
Run the action from the QA environment (target) to pull the configuration from the DEV environment (source).
rafw.sh -env QA -cell cell -cluster was_cluster -promote was_common_configure_variables -opt "source.env=DEV" -opt "source.cell=standalone" -opt "source.node=standalone" -opt "source.server=server1"
In the source DEV environment, the variables.xml file to be promoted is located at:
RAFW_HOME/user/environments/DEV/cells/standalone/nodes/standalone/servers/server1
After you run the was_common_configure_variables action in promote mode, the variables.xml file is copied to the target QA environment at:
RAFW_HOME/user/environments/QA/cells/nd/cluster/cluster01
Run the was_common_configure_variables action in execute mode to apply the promoted configuration. A best practice is to run the action in compare mode before executing the action and applying changes to a WebSphere target system.
Example 5: Promote a portlet application from one portal server to another
Objective: Deploy the latest
version of a portlet application from a stand-alone development (DEV)
to a stand-alone quality assurance (QA) environment.
Use the wp_common_deploy_release_dif action to copy the release_dif.xml file from DEV to QA. A promote.properties file is not used in this example.
The release_dif.xml file is created using the xmlaccess command in WebSphere Portal and must be imported to the cell definition by executing wp_common_deploy_release_dif in import mode.
Run the action from the QA environment (target) to pull the portlet XML data file from the DEV environment (source).
rafw.sh -e QA -c base -n standalone01 -s WebSphere_Portal -promote wp_common_deploy_release_dif -opt "source.env=DEV" -opt "source.cell=base" -opt "source.node=standalone01" -opt "source.server=WebSpherePortal"
In the source DEV environment, the release_dif.xml file to be promoted is located at:
RAFW_HOME/user/environments/DEV/cells/base/nodes/standalone01/servers/WebSpherePortal
After you run the wp_common_deploy_release_dif action in promote mode, the release_dif.xml file is copied to the target QA environment at:
RAFW_HOME/user/environments/QA/cells/base/nodes/standalone01/servers/WebSpherePortal
In the source DEV environment, the portlet.war modules to be promoted are located at: RAFW_HOME/user/environments/DEV/cells/base/nodes/standalone01/servers/WebSpherePortal/portlets/media
After you run the wp_common_deploy_release_dif action in promote mode, the portlet.war files are copied to the target QA environment at: RAFW_HOME/user/environments/QA/cells/base/nodes/standalone01/servers/WebSpherePortal/portlets/media
Run the wp_common_deploy_release_dif action in execute mode to apply the promoted configuration.
Example 6: Promote an enterprise application from one application server to another
Objective: Promote
the latest application.properties file and the EAR file for the application from the development (DEV) to quality
assurance (QA) environment. The application.properties file and the PlantsByWebSphere.ear file are required to deploy the PlantsByWebSphere application.
Use the was_common_deploy_install_app action to copy the application.properties file and the EAR file from DEV to QA. A promote.properties file is not used in this example.
The application.properties file contains the deployment options required to deploy an enterprise application. You create the application.properties file using the WebSphere adminstrative console.
Run the action from the QA environment (target) to pull the application.properties file from the DEV environment (source).
rafw.sh -env QA -cell CELL01 -promote was_common_deploy_install_app -app PlantsByWebSphere -opt "source.env=DEV" -opt "source.cell=CELL01"
In the source DEV environment, the PlantsByWebSphere.properties file to be promoted is located at:
RAFW_HOME/user/environments/DEV/cells/cell/apps/properties
The PlantsByWebSphere.EAR file for the application is located at:
RAFW_HOME/user/environments/DEV/cells/cell/apps/media
After you run the was_common_deploy_install_app action in promote mode, the PlantsByWebSphere.properties file is copied to the target QA environment at:
RAFW_HOME/user/environments/QA/cells/cell/apps/properties
The PlantsByWebSphere.EAR file for the application is located at:
RAFW_HOME/user/environments/QA/cells/cell/apps/media
Run the was_common_deploy_install_app action in execute mode to apply the promoted configuration.
Augment mode overview
Use augment mode to add new data to an existing configuration in WebSphere, for example, add a JDBC data source for a new application.
Execute mode updates configurations by deleting and replacing existing configurations in WebSphere. To add new configuration data to an existing configuration, augment mode has advantages over execute mode:
- Allows you to add to a configuration without replacing the working configuration.
- Does not update configuration data that already exists; you cannot accidentally overwrite or replace configuration data.
- Allows you to add to an existing configuration without knowing what configuration data it contains.
- Does not require you to edit complex data files.
The following diagram shows the workflow for augment mode:

Rules for augment file usage
Augment mode requires an augment file.
Understand how the product uses, stores, and names augment files.
- Augment mode does not update values of variables that are already configured in WebSphere. To update, you must run the action in import or execute mode.
- Augment files use the following naming convention: configuration_file_augment. For example, jdbc_augment.xml or jaas_augment.xml.
- An augment directory exists at every scope in the cell definition in environment tree. Save augment files in the augment directory.
In the following example, the jdbc_augment.xml file has been created and saved to the augment directory at different scopes.
RAFW_HOME/user/environments/env_name/cells/cell_name/augment/jdbc_augment.xml
RAFW_HOME/user/environments/env_name/cells/cell_name/nodes/node_name/augment/jdbc_augment.xml
RAFW_HOME/user/environments/env_name/cells/cell_name/clusters/cluster_name/augment/jdbc_augment.xml
RAFW_HOME/user/environments/env_name/cells/cell_name/nodes/node_name/servers/server_name/augment.xml
- You can save the augment file to a different directory. Use the -opt
augmentDir=directory_name option to specify the alternate directory name.
Support for multiple augment directories means that you can create and save multiple augment files.
Augment file creation and format
To create an augment file, you can use a sample configuration file or an actual configuration file as a model.
Augment files that you create use the format of the configuration file for the action. For example, if you run the was_common_configure_jaas action in augment mode, the jaas_augment.xml file uses the format of the jaas.xml configuration file.
Augment files specify the configuration data to add to a WebSphere configuration, as shown in the following example jaas_augment.xml file:
<?xml version="1.0"?>
<jaas>
<RAFW_jaas>
<JAASAuthData
 alias="dmgr/JAAS - J2C - alias"
 description="description"
 password="{bfcrypt:8b98fbd50c421000e74c000001f05076}dMumIG/hCPFnki1oTZZQnqQVN+
 CsYhc12J/PPU38rdg="
 userId="userId"
>
</JAASAuthData>
</RAFW_jaas>
</jaas>
To create an augment file, use a configuration file as a model:
- Create an augment file from a sample configuration file.
Sample configuration files are stored in the samples directory:
RAFW_HOME/samples/xml/was/version/configuration_file.xml
- Import the configuration file by running the action in import mode.
Create an augment file from a sample data file
Sample templates for data files are in the samples directory: RAFW_HOME/samples.
- In the RAFW_HOME/samples directory,
locate the data file used by the action.
- To create the augment file, use the sample data file and do the following:
- Save the sample data file with the _augment suffix. If the data file is variables.xml, the augment file name is variables_augment.xml.
- Save the augment file to the augment directory:
RAFW_HOME\user\environments\ENV01\cells\CELL01\nodes\NODE01\augment\variables_augment.xml
- Save the augment file to the execution scope in the cell definition.
For example, to run the action at the node scope, save the augment file to the augment directory at the node scope:
RAFW_HOME\user\environments\cells\CELL01\nodes\NODE01\augment\variables_augment.xml
- Modify the augment file so that it contains only the configuration data to add.
For example to add a new WebSphere variable, delete everything in the variables_augment.xml file except for the new <VariableSubstitutionEntry> element node and its parent element node.
Example:
<?xml version="1.0" encoding="UTF-8"?>
<Variables>
<RAFW_variables>
<VariableSubstitutionEntry description=
"Variable created via augment mode in RAFW" symbolicName="AUGMENT_VAR" value="test">
</VariableSubstitutionEntry>
</RAFW_variables>
</Variables>
- Save the augment file.
- Run the action in augment mode.
Create an augment file by importing the latest configuration
Import the latest configuration data from a WebSphere cell and use it to create the augment file. If a WebSphere configuration in one environment already has the configuration data that you want to add to another environment, you can import the configuration to create the augment XML file.
- In WebSphere,
update your cell configuration by using the WebSphere administrative console or other WebSphere management tool.
For example, create a new data source for an application.
- From the framework server, run the configuration action in import mode to update the data file for the WebSphere cell definition.
For example, run the was_common_configure_jdbc_datasources action in import mode to add the new data source to the jdbc.xml data file.
- From the framework server, use the updated data file to create the augment file and save it to the augment directory. The updated file is located in the scope in which you performed the import action.
For example, save the jdbc.xml file as jdbc_augment.xml in the augment directory at the cell scope.
- From the framework server, edit the augment file so that it contains only the configuration values to add to the target environment.
For example to add a JDBC Data Source, delete everything in the jdbc.xml file except the new data source for the application.
To augment this data source, the Data Provider Derby JDBC Provider must already be configured in the WebSphere cell.
<?xml version="1.0"?> <jdbc> <RAFW_JDBCDataSources> <DataSource authMechanismPreference="BASIC_PASSWORD" datasourceHelperClassname="com.ibm.websphere.rsadapter.DerbyDataStoreHelper" description="One very fine datasource" diagnoseConnectionUsage="false" jndiName="DefaultDatasource" logMissingTransactionContext="true" manageCachedHandles="false" name="My New Datasource" properties="" providerType="Derby JDBC Provider" statementCacheSize="10" > <ConnectionPool WASKey="connectionPool" agedTimeout="0" connectionTimeout="180" freePoolDistributionTableSize="0" maxConnections="10" minConnections="1" numberOfFreePoolPartitions="0" numberOfSharedPoolPartitions="0" numberOfUnsharedPoolPartitions="0" properties="" purgePolicy="EntirePool" reapTime="180" stuckThreshold="0" stuckTime="0" stuckTimerTime="0" surgeCreationInterval="0" surgeThreshold="-1" testConnection="false" testConnectionInterval="0" unusedTimeout="1800" > </ConnectionPool> <J2EEResourcePropertySet WASKey="propertySet" > <J2EEResourceProperty WASKey="resourceProperties" name="databaseName" required="false" type="java.lang.String" value="${APP_INSTALL_ROOT}/${CELL}/DefaultApplication.ear/DefaultDB" > </J2EEResourceProperty> <J2EEResourceProperty WASKey="resourceProperties" name="shutdownDatabase" required="false" type="java.lang.String" value="" > </J2EEResourceProperty> <J2EEResourceProperty WASKey="resourceProperties" name="dataSourceName" required="false" type="java.lang.String" value="" > </J2EEResourceProperty> <J2EEResourceProperty WASKey="resourceProperties" name="description" required="false" type="java.lang.String" value="" > </J2EEResourceProperty> <J2EEResourceProperty WASKey="resourceProperties" name="connectionAttributes" required="false" type="java.lang.String" value="upgrade=true" > </J2EEResourceProperty> <JDBCProvider RAFW_TYPE="reference" name="Derby JDBC Provider" > </JDBCProvider> <J2EEResourceProperty WASKey="resourceProperties" name="createDatabase" required="false" type="java.lang.String" value="" > </J2EEResourceProperty> </J2EEResourcePropertySet> </RAFW_JDBCDataSources> </jdbc> - Save the augment file.
- Run the action in augment mode. In this example, run the was_common_configure_jdbc_datasources action in augment mode.
Command options supported by augment mode
Describes rafw command options supported by augment mode.
Syntax for augment mode command options
The syntax for augment mode adheres to the standard syntax for the rafw command.
In addition, augment mode supports options for -opt that are unique to augment mode.
{rafw.bat | rafw.sh} <SCOPE> -augment action_name <OPT_ARGUMENTS>
<OPT ARGUMENTS> Optional arguments for augment mode
-opt "augmentDir=<directory_name>"
-opt "importAfterAugment=true"
| Option | Description |
|---|---|
| -opt "augmentDir=directory_name" | Saves the augment file to a directory other than the default directory named augment.
Specify the alternate directory name when you run an action in augment mode. In the example, the augment file is saved to the application directory instead of the augment directory. rafw.sh -e ENV -c CELL -augment was_common_configure_variables -opt "augmentDir=application" |
| -opt "importAfterAugment=true" | Synchronizes the configuration in the cell definition with the updated WebSphere runtime
configuration after augment mode runs.
In the following example, the variables.xml data file in the environment tree is updated with the newly augmented configuration in WebSphere. rafw.sh -e ENV -c CELL -augment was_common-configure_variables -opt "importAfterAugment=true" |
Augment mode examples
Examples describe how to use augment mode and augment mode options.
Example 1: Saving multiple variables in an augment file
Objective: Save multiple variables in an augment
file. On execution, variables in the augment file that already exist
in the WebSphere configuration are not added.
- Create the variables_augment.xml file.
<?xml version="1.0"?> <Variables> <RAFW_variables> <VariableSubstitutionEntry symbolicName=" MKT_SHARED_LIB_HOME" value="cell" > </VariableSubstitutionEntry> </RAFW_variables> </Variables> - Save the variables_augment.xml file to augment directory at the Cell01 scope.
RAFW_HOME/user/environments/dev/cells/Cell01/augment/variables_augment.xml
- Run the action was_common_configure_variables in augment mode:
rafw.sh -e env -c cell .augment was_common_configure_variables
Step result: The rafw command creates the custom variable MKT_SHARED_LIB_HOME, assigns it a value of /opt/ibm/sharedLibs/marketing, and adds it to the WebSphere cell configuration. - Edit the variables_augment.xml file. Add a new custom variable called APP_NAME and assign it a value of "myApp".
<Variables> <RAFW_variables> <VariableSubstitutionEntry symbolicName="MKT_SHARED_LIB_HOME" value="/opt/ibm/sharedLibs/marketing" > </VariableSubstitutionEntry> <VariableSubstitutionEntry symbolicName="APP_NAME" value="myApp" > </VariableSubstitutionEntry></RAFW_variables> </Variables> - Run the was_common_configure_variables action in augment mode:
rafw.sh -e env -c cell -augment was_common_configure_variables
Step result: The rafw command creates the new variable APP_NAME, assigns it a value of "myApp", and adds it to the WebSphere cell configuration.Because MKT_SHARED_LIB_HOME variable already exists, it is not added to the configuration.
Example 2: Saving the augment file to an alternate directory
Objective: Save the augment file to a directory name other than augment, if you need to create multiple augment files at the same scope.
- Create the variables_augment.xml file.
<?xml version="1.0"?> <Variables> <RAFW_variables> <VariableSubstitutionEntry symbolicName="IO_DIR" value="/opt/ibm/drivers" > </VariableSubstitutionEntry> </RAFW_variables> </Variables> - Save the variables_augment.xml file to the application directory at the Cell01 scope:
RAFW_HOME/user/environments/dev/cells/Cell01/application/variables_augment.xml
- Run the was_common_configure_variables action in augment mode and specify the option: -opt "augmentDir=application".
rafw.sh -e env -c cell .augment was_common_configure_variables -opt "augmentDir=application"
Step result: Using the application/variables_augment.xml file, the rafw command adds the custom variable IO_DIR, assigns it a value of /opt/ibm/drivers, and adds it to the WebSphere cell configuration.
Example 3: Use a single command to augment and synchronize configurations
Objective: Synchronize the cell definition in the environment tree to match the newly augmented configuration in WebSphere. Use this option as an alternative to running import as a separate command to synchronize the cell definition.
- Create the variables_augment.xml file.
<?xml version="1.0"?> <Variables> <RAFW_variables> <VariableSubstitutionEntry symbolicName="APP_TEMP_DIR" value="/opt/ibm/tmp" > </VariableSubstitutionEntry> </RAFW_variables> </Variables> - Save the variables_augment.xml file to the augment directory at the Cell01 scope:
RAFW_HOME/user/environments/dev/cells/Cell01/augment/variables_augment.xml
- Run the was_common_configure_variables action in augment mode and specify the -opt "importAfterAugment" option.
rafw.sh -e dev -c cell -augment was_common_configure_variables -opt "importAfterAugment=true"
Step result: The rafw command:- Creates the custom variable APP_TEMP_DIR, assigns it a value of /opt/ibm/tmp, and adds it to the WebSphere cell configuration.
- Adds the APP_TEMP_DIR with a value of /opt/ibm/tmp to the variables.xml file in the cell definition.
Example 4: Using a WebSphere data file as a model for creating the augment file
Objective:
Create the augment file by using a WebSphere data file that already contains the correct configuration data as a starting
point.
In this example, the jdbc_augment.xml file is created using the jdbc.xml file as a model.
- Use the WebSphere administrative console to create a new data source configuration for Cell01 in the Integration environment.
Step result: The new data source configuration is added to the jdbc.xml file. - Use the was_common_configure_jdbc_datasources action to import (delete and replace) the data source configuration in the environment tree.
rafw.sh -e integration -c Cell01 -import was_common_configure_datasources
Step result:RAFW_HOME/user/environments/integration/cells/Cell01/jdbc.xml
- Create the augment file by copying the jdbc.xml from the Integration environment to the Production environment.
Save the jdbc.xml file as jdbc_augment.xml.
RAFW_HOME/user/environments/production/cells/Cell01/augment/jdbc_augment.xml
- Edit the jdbc_augment.xml file, deleting
all the data source configurations except the new one to be added to Cell01 in the Production environment.
<?xml version="1.0"?> <jdbc> <RAFW_JDBCDataSources> <DataSource authDataAlias="dmgr/JAAS - J2C - alias" authMechanismPreference="BASIC_PASSWORD" datasourceHelperClassname="com.ibm.websphere.rsadapter.Oracle10gDataStoreHelper" description="New JDBC Datasource" diagnoseConnectionUsage="false" jndiName="data/jndiName" logMissingTransactionContext="true" manageCachedHandles="false" name="DataSource - Oracle JDBC Driver XA DataSource" properties="" providerType="Oracle JDBC Driver (XA)" statementCacheSize="10" xaRecoveryAuthAlias="dmgr/JAAS - J2C - alias" > Additional XML Nodes Requires for DataSource definition have been removed for brevity </DataSource> </RAFW_JDBCDataSources> </jdbc> - From Cell01 in the production environment, run the action was_common_configure_jdbc_datasources
in augment mode.
rafw.sh -e production -c Cell01 -augment was_common_configure_datasources
Step result:The rafw command adds the new data source in jdbc_augment.xml to the Production environment and assigns it a value of data/jndiName.
Mapping of actions to WAS administrative tasks
See which actions in Advanced Middleware Configuration (AMC) for PureApplication System correspond to tasks in the IBM WAS admin console.
The actions specified here apply to all supported versions of WAS, unless specified otherwise.
| WAS Admin Console task (menu path) | AMC action |
|---|---|
| Server Types > WASs |
was_common_configure_create_server |
| Server Types > WASs > Templates |
was_common_configure_create_server_template |
| Server Types > Web servers |
was_common_configure_web_server |
| WAS Clusters |
was_common_configure_create_cluster |
| Core Groups |
was_common_configure_core_groups |
| Applications > New Application |
was_common_deploy_install_app |
| Application Types > WebSphere Enterprise Applications |
was_common_deploy_install_app |
| Application Types > Business-level Applications |
was_70_deploy_create_empty_bla These actions apply only to WAS Version 7.0 and later. |
| Application Types > Assets |
was_70_deploy_delete_asset These actions apply only to WAS Version 7.0 and later. |
| JMS > Providers | was_common_configure_jms_providers |
| JMS > Connection factories | was_common_configure_jms_conn_factories |
| JMS > Queue connection factories | was_common_configure_jms_conn_factories |
| JMS > Topic connection factories | was_common_configure_jms_conn_factories |
| JMS > Queues | was_common_configure_jms_destinations |
| JMS > Topics | was_common_configure_jms_destinations |
| JMS > Activation specifications | was_common_configure_jms_activation_specifications |
| JDBC > JDBC Providers | was_common_configure_jdbc_providers |
| JDBC > Data sources | was_common_configure_jdbc_datasources |
| JDBC > Data sources WAS V4 | was_common_configure_jdbc_was40_datasources |
| Resource Adapters > Resource Adapters | was_common_configure_j2c_resource_adapters |
| Resource Adapters > J2C connection factories | was_common_configure_j2c_conn_factories |
| Resource Adapters > J2C activation specifications | was_common_configure_jms_activation_specifications |
| Resource Adapters > J2C administered objects | was_common_configure_jms_destinations |
| Cache instances > Object cache instances | was_common_configure_cache_instances |
| Cache instances > Servlet cache instances | was_common_configure_cache_instances |
| Mail > Mail providers | was_common_configure_mail_providers |
| Mail > Mail sessions | was_common_configure_mail_providers |
| URL > URL providers | was_common_configure_url_providers |
| Resource environment > Resource environment providers | was_common_configure_resource_environment_providers |
| Resource environment > Resource environment entries | was_common_configure_resource_environment_entries |
| Security > Global security | was_common_configure_security_global |
| Security > SSL certificate and key management |
was_common_configure_security_ssl |
| Environment > Virtual hosts | was_common_configure_vhosts |
| Environment > Update global Web server plug-in configuratio |
was_common_configure_gen_plugin |
| Environment > WebSphere variables | was_common_configure_variables |
| Environment > Shared libraries | was_common_configure_sharedlibs |
| Environment > OSGi bundle repositories > External bundle repositories | was_common_configure_osgi_external_repositories |
| Environment > OSGi bundle repositories > Internal bundle repositories | was_common_configure_osgi_internal_repositories |
| Naming > Namespace bindings | was_common_configure_name_space_bindings |
| System administration > Deployment manager |
was_common_configure_start_dmgr |
| System administration > Nodes |
was_common_configure_add_node |
| System administration > Node agents |
was_common_configure_stop_nodeagent |
| Users and Groups > Administrative user roles | was_common_configure_console_members |
| Users and Groups > Administrative group roles | was_common_configure_console_members |
| Users and Groups > Manage Users | was_common_configure_file_registry_users |
| Users and Groups > Manage Groups | was_common_configure_file_registry_groups |
| Monitor and Tuning > Performance Monitoring Infrastructure (PMI) |
was_common_configure_pmi_request_metrics |
| Service integration > Buses |
was_common_configure_sibus_all |
Model actions
The product supplies a set of actions used to manage functions that are either required by the product or required to set up or run other actions.
Update a property value in the cell definition
Use the action rafw_model_update_property_value to set a property in a .properties file in a cell definition.
Action description
The rafw_model_update_property_value action allows you to modify a value in a .properties file after the cell definition has been generated.
You might want to modify a value for a single cell definition only. Or, you might want to modify a value in one cell and then promote the properties file to other cell definitions by using the rafw_model_promote_property_file action.
In addition, the capability to set a property value by running an action means that you can create a step to run this action in an automation plan. For example, add the step to a plan that generates a WebSphere cell to simultaneously create and customize a WebSphere cell.
Usage rules
Rules for using the rafw_model_update_property_value action are as follows:
- Set one property name and value; rerun the rafw command for each property value to be modified.
- Specify the -local option to run the action on the framework server.
- Specify the property name for -opt "name=property_name" exactly as it appears in the .properties file.
- Specify a property value using -opt "value=property_value" that is valid for the property.
- In the .properties file, you specify a custom property in the format of name=value.
- The rafw_model_update_property_value action only supports execute mode.
Syntax and examples
The command syntax for the rafw_model_update_property_value action includes the following opt flag options; the options are required for this action.
rafw.sh -env DEV01 -cell CELL01 -execute rafw_model_update_property_value -local -opt "file=configure.properties" -opt "name=HOSTNAME" -opt "value=host.domain.com"
| Option | Description |
|---|---|
| -opt "file=file_name" | Name of the properties file to be updated with a new property value. Quote the file name, as follows:
-opt "file=configure.properties" |
| -opt "name=property_name" | Name of the property to be changed. Quote the property name, as follows:
-opt "name=HOSTNAME" |
| -opt "value=property_value" | Specifies the value of the property. Quote the property value, as follows:
-opt "value=host.domain.com" |
Special usage information for actions
Describes special usage information for individual actions or action categories. Special usage encompasses restrictions, prerequisites, general recommendations, or other action usage considerations.
Considerations for installing WAS with AMC
Special considerations apply to the installation of version 8.0 and later of WAS
IBM Installation Manager
WAS version 8 is installed using IBM Installation Manager. AMC always performs a non-adminisrator installation of IBM Installation Manager before WAS version 8 is installed.
IM_HOME and IM_CACHE properties
To use IBM Installation Manager to install more than one product on the same target system, you must provide the same values every time you complete the following information in the configuration editor:
- Installation Manager Home (IM_HOME)
- Installation Manager Cache Directory (IM_CACHE)
Each node in the editor requests this information, even if all of the nodes are located in the same logical server.
If the values are not the same for all instances of IM_HOME or for all instances of IM_CACHE, the following problems may result:
- The installation of IBM Installation Manager might fail for the products that contain non-standard values.
- Multiple instances of IBM Installation Manager might be installed with different product meta data associated with each instance.
Service integration bus configurations
The actions available for configuring specific aspects of service integration bus are listed in this topic.
Purpose
A service integration bus (SIBus) supports applications that use message-based and service-oriented architectures. A bus is a group of one or more interconnected servers or server clusters that have been added as members of the bus. Applications connect to a bus at one of the messaging engines associated with its bus members.
AMC supports SIBus configuration through a number of related actions.
SIBus configuration actions
The following table lists the available SIBus configuration actions. All actions support import, compare, execute, augment, promote, and preview modes.
| Action | Description |
|---|---|
| was_common_configure_sibus_all | Manages the complete SIBus configuration. Use this action to configure one or more SIBus components (buses, bus members, messaging engines, destinations, mediations, and foreign bus connections) at the same time. |
| was_common_configure_sibus_buses | Configures service integration buses. Use this action to manage buses and custom properties for buses. |
| was_common_configure_sibus_bootstrapmembers | Configures bootstrap members for an SIBus. |
| was_common_ configure_sibus_busmembers | Configures bus members for an SIBus. |
| was_common_configure_sibus_messagingengines | Configures messaging engines for an SIBus. Use this action to configure message store types (FileStore or DataStore), custom properties, Service Integration Bus (SIB) links and WebSphere MQ links for messaging engines. |
| was_common_configure_sibus_destinations | Configures destinations for an SIBus. |
| was_common_configure_sibus_destinations | Configures destinations for an SIBus. |
| was_common_configure_sibus_foreign_bus | Configures foreign bus connections for an SIBus. |
| was_common_configure_sibus_mediations | Configures mediations for an SIBus. |
| was_common_configure_sibus_security | Manages access roles on an SIBus for |
Support for installing 32-bit installation media on a 64-bit operating system
For installation and patch actions, you can override the default behavior for media selection by using the USE_ALT_BYTE_WIDTH property.
The default behavior of installation and patch actions is to install 32-bit WebSphere installation media on a 32-bit operating system (OS) and to install WebSphere 64-bit WebSphere installation media on a 64-bit OS.
Most 64-bit operating systems support installation of 32-bit installation media. For example, you can install the 32-bit version of WAS V7.0 on Red Hat Enterprise Linux 5.0 (PPC64).
To install a 32-bit WebSphere application on 64-bit OS by using installation or patch actions, manually set the USE_ALT_BYTE_WIDTH property in install.properties, as follows:
- Copy the 32-bit installation media to the media tree.
- Create the configuration definition for the 64-bit OS target system.
- In the cell definition, open the install.properties file located at the node scope. Set USE_ALT_BYTE_WIDTH=true. Close the file and save your changes.
- Run the installation or patch action for the 64-bit OS target system.
The USE_ALT_BYTE_WIDTH property is not supported for the following operating systems:
- Solaris on Intel EM64T or AMD Opteron (Solaris is only supported for 64-bit on Intel EM64T or AMD Opteron (X64))
- HP-UX (HP-UX support is only available in 32-bit on PA-RISC (PaRISC) or 64-bit Itanium (IA64))
Manual setup required to configure Oracle JDBC drivers on target systems
If you are using Oracle JDBC drivers to connect to an Oracle database from a target system, you must copy the Oracle driver to the cell definition and then edit the configure.properties file for the cell.
This manual setup is required to configure Oracle JDBC drivers for use with WebSphere Portal, WebSphere Enterprise Service Bus, and WebSphere Process Server target systems.
Complete the following configuration steps:
- In the environment cell definition, copy the Oracle JDBC driver
to the dbdrivers directory in the cell definition:
RAFW_HOME/user/environments/env_name/cells/cell_name/dbdrivers
- In the configure.properties file at the cell definition, locate
the DB_DRIVER_HOME directory. Set the value to the location of the Oracle JDBC driver on the target system, for example:
DB_DRIVER_HOME=/opt/ibm/websphere/ojdbc4.jar
- Run the was_common_configure_copy_dbdrivers action to copy the Oracle JDBC driver to the target system. You can manually run this action or run an automation plan that includes the action.
Post-installation actions required to federate IBM HTTP Servers
The installation library for WAS does not include actions to federate IBM HTTP Server nodes.
To federate an IBM HTTP Server node in your WebSphere network deployment cell, run these actions after you run the installation library for WAS.
The installation library for WAS is included in the automation plan that the generator creates.
The installation library installs IBM HTTP Server and installs the IBM HTTP Server Plug-in, but it does not federate IBM HTTP Server nodes.
Run the following actions manually:
- At the node scope of the cell definition, run the ihs_common_install_copy_webserver_def_script action for each of the IBM HTTP Server nodes in the cell to be federated.
- At the cell scope of the cell definition, run the was_common_configure_federate_ihs_server action.
Run actions by using the rafw command
You can run actions from the framework server by issuing rafw commands from a command prompt. This topic describes the general procedure for running the different action types from the command line.
General procedure for running an installation action
This topic describes the general procedure for running installation actions from the AMC for PureApplication System command line.
To run installation actions from the command line:
- Set up the media tree. The media tree must contain the IBM WAS installation media to be installed on target computers.
- Create a configuration definition in the environment tree
for the configuration to create.
The definition represents a stand-alone node or a network deployment node.
Use the configuration editor to create the cell definition.
- After the configuration definition is created, use the -l option of the rafw command to display the installation actions that you can run. All installation actions are run at the node scope. The list option displays installation actions that are valid for the cell type.
RAFW_HOME/bin/rafw.sh -e env_name -c cell_name -n node_name -l
RAFW_HOME/bin/rafw.sh -e env_name -c cell_name -n dmgr_node_name -l
- Run installation actions. For example, if you created a configuration definition for a WAS 6.1
deployment manager node, you might run one of the following actions:
- was_61_install_was
- was_61_install_with_all_patches
- Create a profile for the type of configuration that you created: a stand-alone profile, a managed profile, or a deployment manager profile. Use the - l option of the rafw command at the node scope to display the create profile actions valid for the cell type. The following actions create profiles:
- was_common_install_create_standalone_profile
- was_common_install_create_dmgr_profile
- was_common_install_create_managed_profile
- For stand-alone cells, an application server is created in WebSphere when you create the cell definition for the stand-alone node.
For network deployment cells, run a create cluster action to create one or more clusters to group your servers. Running a create cluster action also creates application servers in WebSphere.
Use the - l option of the rafw command at the cluster scope to display create cluster actions.
RAFW_HOME/bin/rafw.sh -e env_name -c cell_name -u cluster_name -l
General procedure for running a configuration action
You can run configuration actions from the AMC for PureApplication System command line.
The configuration definition that you create by using the configuration editor and generator provides the basic topology of a configuration such as a WebSphere cell.
To define initial data for the configuration, node, cluster, or server, use one of the following approaches. After configuration data is defined, you can promote changes from one configuration to another.
- Use the WAS administrative console to define configuration data.
- Use the sample XML configuration files as a starting point to define configuration data.
Define initial configuration data with the WebSphere administrative console
Use the WebSphere administrative console to define initial configuration data for a new cell definition, and then use import actions to pull configuration data from WebSphere to the cell definition.
Use the WebSphere administrative console to define initial configuration data and use import actions to pull configuration data from WebSphere to the cell definition.
- Create an initial configuration using the options in the WebSphere administrative console.
- Import configuration data from WebSphere to the cell definition using import mode. The following are examples of actions that import configuration data from WebSphere to a cell definition in the DEV environment.
rafw.sh -e DEV -c cell_name -u cluster_name -i was_common_configure_server_java_def
rafw.sh -e DEV -c cell_name -n node_name -i wp_common_deploy_content_node
rafw.sh -e DEV -c cell_name -i was_common_configure_jdbc_providers
- Copy configuration files from the DEV cell_name environment to the QA cell_name environment, as shown in the following example:
Copy from the DEV environment: Copy to the QA environment: user/environments/DEV/cells/cell_name/server.xml user/environments/QA/cells/cell_name/server.xml user/environments/DEV/cells/cell_name/nodes/node_name/content_node.xml user/environments/QA/cells/cell_name/nodes/node_name/content_node.xml user/environments/DEV/cells/cell_name/jdbc.xml user/environments/QA/cells/cell_name/jdbc.xml
Edit sample XML configuration files
You can add to or modify configuration data in sample XML configuration files. The XML configuration files are located in the RAFW_HOME/samples/xml directory. In the xml directory configuration files are organized by product and product version.
- Copy the XML configuration file from the RAFW_HOME/samples/xml/product/product_version directory to the correct scope in the cell definition.
Do not change the configuration file name.
- In the cell definition, edit the XML configuration file that you copied to the cell definition so that it contains the required configuration properties.
- Use execute mode to push configuration updates to WebSphere. For example, if you edited the jdbc.xml file, run the configuration action in execute mode to updated the configuration in WebSphere. For example, to update the JDBC
data sources at the cell scope:
rafw.sh -e env_name -c cell_name -t was_common_configure_jdbc_datasources
Use was_common_deploy_install_app for Java EE deployment
Use was_common_deploy_install_app in import mode and then in execute mode for custom Java EE application deployment to your target system. To deploy a custom Java EE application, carry out the following steps:
- Import the application into the configuration definition that you manage.
- Deploy the application to your application server.
- Use the WebSphere administrative console to install the custom application.
- Run the was_common_deploy_install_app action in import mode at the appropriate scope. You can run the action by
using any of three interfaces:
- The Eclipse client
- The web client
- The command line
The action creates two files:
- app_name.ear. The location of this file depends on the scope at which you ran the action. For example, if you deploy the application to a cluster, the directory path might be:
RAFW_HOME/user/environments/env_name/cells/cell_name/clusters/cluster_name
 /apps/media/app_name.ear
- appName.properties. The location of this file depends on the scope at which you ran the action.
For example, if you deploy the application to a cluster, the directory path might be:
RAFW_HOME/user/environments/env_name/cells/cell_name/clusters/cluster_name
 /apps/properties/app_name.properties
The appName.properties file contains installation information for the application. The following example shows the format of the file:
options.createMBeansForResources=true
options.distributeApp=true
options.useMetaDataFromBinary=false
Use this file to update or promote the application, as described in the "What to do next" section of this topic.
Restriction: The appName.properties file cannot contain parentheses. In practical terms, this means you cannot specify names of modules within the application that contain parentheses. Also, running the action in import mode may import parentheses into the properties file. If you cannot change the module names to eliminate parentheses, you might be able to work around this limitation by using wild card characters in place of a file name extension, such as my_application.module.*.
What to do next
Once you have created the appName.properties file, you can use that file to complete the following tasks:- To update the application, replace the app_name.ear file with a more recent version and then run the was_common_deploy_install_app action in execute mode.
- To copy the appName.properties and the app_name.ear files to a different configuration definition, run the was_common_deploy_install_app action in promote mode.
View results in the action log files
Logs provide a record of the actions that you run on WebSphere target systems.
When an action runs on a target system, action logs are transferred back to the framework server and saved to the logs directory: RAFW_HOME/logs.
If you want to save logs, you have the option to back them up to a source control application.
To reclaim space on the framework server, you can delete logs in the logs directory.
Run libraries as web client projects
This section summarizes the steps for running integration libraries as projects in the web client.
Preview option for configuration libraries
You can use the -preview option to preview processing output before you run a configuration library.
The -preview option runs an action or library without making any changes so that you can preview processing output.
The following table lists the modes that accept the -preview option if you are running a configuration library.
The installation libraries support execute mode only and will ignore the -preview option if it is specified or selected.
| MODE environment variable setting: | Command line representation |
|---|---|
| Preview Execute | rafw.sh scope_path -preview -execute action_name |
| Preview Augment | rafw.sh scope_path -preview -augment action_name |
| Preview Import | rafw.sh scope_path -preview -import action_name |
| Preview Compare | rafw.sh scope_path -preview -compare action_name |
| Preview Promote | rafw.sh scope_path -preview - promote action_name |
General procedure for running libraries
This topic describes the required setup and task flow for running a web client project that includes a library. The steps describe the tasks that you need to complete before running a project that includes one of the libraries added to the database.
- Run integrateToBF createAll.
The integrateToBF createAll command creates the following objects in the database:
- A server object for the framework server. The automation agent requires a server object to run commands.
- Installation libraries and configuration libraries.
- The RAFW_Global automation context.
- Run the configuration editor and generator to create a configuration definition. The configuration definition stores information about the configuration to be managed. The generator creates the following objects in the database for the configuration definition:
- For new configurations, a project named RAFW_env_config is added to Projects containing installation actions.
- For existing configurations, three separate projects are created for comparing, executing, and importing configuration information.
- In the web client, evaluate the steps in the library to determine which steps to include when you run the project.
If you are running an installation action, you must set up the media tree and populated it with installation media.
- In the web client, run the installation or configuration project.
Before running the project, check the settings of the environment variables in the RAFW_Global automation context.
RAFW_Global environment variable Description MODE Select the mode to use to run libraries to install a WebSphere cell or run libraries to import configuration data from an existing WebSphere cell. For installation libraries, the only valid mode is Execute. Execute is the default mode for all libraries.
For configuration libraries the default mode is Execute. Other modes are valid for configuration libraries.
Default: Execute
START_STOP An environment variable used by restart libraries, which contain actions to start and stop servers. Specify stop to run actions to stop servers or specify start to run actions to start servers. Default: stop.
SOURCE_REVISION An environment variable designed for use with source control application libraries; source control libraries are not provided by the product. If you are copying user configuration data from RAFW_HOME/user/environments to source control, you have the option to specify the version of configuration files to retrieve from source control.
Default: None.
MEDIA_TRANSFER Select the media setup type if you are running an installation library.
Use Shared Media : If you have a shared media setup, select this option. For shared media setups, target systems access media directly from the shared file system. No media is transferred from the framework server to the target system to run an action.rafw.sh -env demo-dev2 -cell devCell -node node01 -execute was70_install_with_all_patches
Transfer Media: If you are using a framework server media setup, select this option. For framework server media setups, media is stored on the framework server and must be transferred to target systems.rafw.sh -env demo-dev2 -cell devCell -node node01 -execute was70_install_with_all_patches -transferMedia
Default: Use Shared Media
Run composite actions in a single wsadmin process
You can increase efficiency when you run complex composite actions using the useLongRunningWsadmin option.
Before using the useLongRunningWsadmin option, the necessary files must be in place on the framework server. Creating a configuration definition for an existing configuration puts those files where they need to be. If you have not run the configuration generator for an existing cell, use the was_common_configure_setup_lr_wsadmin action to copy the necessary files to the framework server.
Use the useLongRunningWsadmin option when running actions on products that run on IBM WAS only. The option is not available for WAS version 6.0.
- If you have not run the configuration generator for an existing cell in the current installation, run the was_common_configure_setup_lr_wsadmin action, using the -local option. You need to run this action only once for each installation of AMC or each update of the installation.
- When you run a composite action (an action that calls other actions), set the useLongRunningWsadmin option to true, as in the following example:
rafw -env was61_env -cell was61_cell -execute was_common_configure_all -opt useLongRunningWsadmin=true
The option runs all the subsidiary actions in a single wsadmin process, which is much more efficient than running each action in a separate process.
Run automations from the Eclipse client
The Eclipse client for AMC for PureApplication System provides interactive access to automation variables and automation plans and libraries.
Manage automation plans and libraries
Use automation plans and automation libraries to define a repeatable set of automation actions that you can run against a managed system.
Create an automation plan
Use an automation plan to define a set of actions and libraries to be run against a managed system. To create an automation plan, select the required actions and libraries and associate the plan with the automation context that describes the managed system. If you want to run the automation plan on a different system, you can change the context at any time. Set up your managed systems and the automation context that describes the managed systems. contexts
- In the Eclipse client, open the Automation perspective.
- Right-click...
-
Automation Plans, and click Create Plan.
- Enter the name of the automation plan.
- Select the automation context to associate with the plan. Click Finish.
- In the Plan Explorer, right-click the plan that you created and click Edit.
- Add actions to the plan, and specify the input and execution control for the action.
- Add automation libraries to the plan, and specify the execution control for the library.
- Click Save.
What to do next
You can now run the automation plan with the selected automation context. To start the automation plan without changing the selected context, select the Quick Start option. To change the context variables before you start the automation plan, select the Execute Plan option.Add actions to automation plans or libraries
Add actions as steps to an automation plan or an automation library. For each action, specify the control and input. For a list of available actions to add, you must map the automation plan to an automation context, which is a set of automation variables. Add and configure actions when you create an automation plan or library, or when you edit an existing automation plan or library. You can add new actions, remove existing actions, and modify the input and control for actions.
Use the control parameters to manage the execution flow of actions.
Use the input to specify the mode, options, parameters, and scope for the action.
- In the Eclipse client, open the Automation perspective.
- Open an automation plan or an automation library. To open, right-click the Automation plan or Automation Library, and click Edit.
- To add an action as a step in the plan or library, use either of the following options:
- In the Overview section, click Add. Expand Actions, and select an action to add. Click OK.
- From the Action Palette, drag an action to the Overview section in the plan designer. Use the filter option to filter the list of available actions.
To remove an action, select the action from the Overview section in the plan designer and click Remove. This removes the action from the automation plan or automation library, and does not delete the action.
- In the Details section, select an action, and specify the following details:
- Optional: Enter an alternative name for the action step in the automation plan or library. By default, the action step name is call <Action name>.
- In the Control section, select the type of control.
- Select Regular to execute the action at every instance, without any exceptions.
- Select Conditional to run the library only if a specified
condition is satisfied. Define the condition by selecting the function,
for example, True, and entering the parameters, for example, Text
Equals WAS_70.
You can drag the automation variables, literal values and available scopes from the Data Palette.
- Select While to run a step in a loop each time a specified
condition is satisfied. Define the condition by selecting the function and entering the parameters.
You can drag the automation variables, literal values and available scopes from the Data Palette.
- In the Action Input section, define the scope, mode, parameters, and options for the action.
- Select the server scope at which you want to run the action, for example, Cell.
- Select the mode in which you want to run the action, for example, Import.
- In the Scope Settings, specify the name of the environment and the selected scope for the action. For example, if you selected Cell as the scope, enter the cell name. To enter the values, click the Value cell, and enter the values, or drag the data from the Data Palette.
- For the Drill prompt, specify the values for the .drill command. Use the .drill command to loop over a command, executing the command once for each member of a series of values. Enter the values, or drag the data from the Data Palette.
- In the Parameters section, enter the parameters for the action. For help with the relevant parameters for the action, refer to the action command help in the Action help window.
- In the Options, specify the options for the action. For help with the relevant options for the action, refer to the action command help in the Action help window.
- In the Command Text section, the syntax for the action command is constructed based on the action input you specified. Review the action command, and make changes to the action inputs if required.
- Save the automation plan or library.
Add libraries to automation plans and libraries
Add libraries as steps to an automation plan or an automation library. Also specify the control parameters for running the library when the containing plan or library is executed. Add and configure libraries when you create an automation plan or library, or when you edit an existing automation plan or library. You can add new libraries, remove existing libraries, and modify the control parameters for running the library.
- In the Eclipse client, open the Automation perspective.
- Open an automation plan or an automation library. To open, right-click the Automation plan or Automation Library, and click Edit.
- To add a library, use either of the following options:
- In the Overview section, click Add. Expand Libraries, and select a library to add. Click OK.
- From the Library Palette, drag a library to the Overview section in the plan designer. Use the filter option to filter the list of available libraries.
To remove a library, select the library from the Overview section in the plan designer and click Remove. This removes the library from the automation plan or automation library, and does not delete the library.
- In the Details section, select a library, and specify the following details:
- Optional: Enter an alternative name for the library step in the automation plan or library. By default, the library step name is call <Library name>.
- In the Control section, select the type of control for running the library.
- Select Regular to run the library at every instance, without any exceptions.
- Select Conditional to run the library only if a specified
condition is satisfied. Define the condition by selecting the function,
for example, True, and entering the parameters, for example, Text
Equals WAS_70.
You can drag the automation variables, literal values and available scopes from the Data Palette.
- Select While to run a step in a loop each time a specified
condition is satisfied. Define the condition by selecting the function and entering the parameters.
You can drag the automation variables, literal values and available scopes from the Data Palette.
- In the Command Text section, the syntax for the action command is constructed based on the action input you specified. Review the action command, and make changes to the action inputs if required.
- Save the automation plan or library.
Clone an automation plan
Clone an existing automation plan to create a copy of the plan or to use the copy as a base to create a different automation plan.
- In the Eclipse client, open the Automation perspective.
- In the Plan Explorer, expand Automation Plans. Right-click the automation plan to clone, and click Clone.
- Enter a name for the plan. Click OK.
What to do next
If required, edit the cloned automation plan to define a new automation plan.Delete an automation plan
When an automation plan is no longer required, or is obsolete, you can delete it. If there are any job summaries and results for the plan, then deleting the plan will also delete the associated job summaries and results.
- In the Eclipse client, open the Automation perspective.
- In the Plan Explorer, expand Automation Plans. Right-click the automation plan to delete, and click Delete.
- Click Yes to confirm the deletion.
Create an automation library
An automation library is a reusable set of steps. Use automation libraries to define a set of logical steps that can be reused within one or more automation plans. A library can contain actions and other libraries. To create a library, select actions and libraries as steps in the library, and associate it to a target managed system. You can change the target system setting for the library at any time. You can also add the library to an automation plan. Before you create an automation library, set up your managed systems and the automation variables that describe those managed systems.
- In the Eclipse client, open the Automation perspective.
- Right-click...
-
Automation Libraries,
and click Create Library.
- Enter the name of the automation library.
- Select the automation variables to associate the library with.
- Add actions to the library, and specify the input and execution control for the action.
- Add automation libraries to the library, and specify the execution control for the library.
- Click Save.
What to do next
You can now reuse the automation library within another automation library or an automation plan. You can also clone or delete the automation library.Clone an automation library
Clone an existing automation library to create a copy of the library or to use the copy as a base to create a modified automation library.
- In the Eclipse client, open the Automation perspective.
- In the Plan Explorer, expand Automation Libraries. Right-click the automation library to clone, and click Clone.
- Enter a name for the library. Click OK.
What to do next
If required, edit the cloned automation library to define a new automation library.Delete an automation library
When an automation library is deprecated or obsolete, you can delete it. You cannot delete a library that is being used in an automation plan.
- In the Eclipse client, open the Automation perspective.
- In the Plan Explorer, expand Automation Libraries. Right-click the automation library to delete, and click Delete.
- Click Yes to confirm the deletion.
Create an automation context
Create an automation context to describe a configuration definition to which you can map your automation plans and libraries. To create an automation context, add and configure the variables that make up the configuration properties file.
- In the Eclipse client, open the Automation perspective.
- In the Plan Explorer, right-click...
-
Automation
Contexts, and click Create Automation Context.
- Enter the name for the automation context, and click OK. The automation context is created and added to the list.
- Define the individual variables for the context.
- Right-click the automation context that you created, and click Edit.
- In the Automation Context Editor, click Add. A row is added for the variable.
- Define the properties for the variable. Click each cell in the row, and enter the following information:
- Name: Enter the name of the variable, for example, NODE.
- Type: Click the Browse button, and select Standard, Include, or Pulldown from the list. If you select Pulldown, define the pulldown
list options:
- Click Create to create a pulldown option.
- Click Option name and enter the name of the option. Click Option Value and enter the option value.
- Repeat the steps to add all the pulldown options that you require.
- Select the default action from the list.
- Click OK.
- Value: Enter the value for the variable, for example, if you are defining a node variable, enter the node name as the value.
- Action: Select from Set, Unset. Append, Prepend, Clear, Set if not set, Hidden
- On Project: Select from Normal, Must change, Read only, Required, Suppress Display.
- Click Save.
What to do next
You can now map this automation context as a target for your automation plans and libraries.Clone automation variables
Clone existing automation variables to create a copy of the variables or to use the copy as a base to create modified automation variables.
- In the Eclipse client, open the Automation perspective.
- In the Plan Explorer, expand Automation Variables. Right-click the automation variables to clone, and click Clone.
- Enter a name for the variables. Click OK.
What to do next
If required, edit the cloned automation variables to define a new automation context.Delete automation variables
When an automation context (a set of automation variables) is not used or is not a target for an automation plan or library, you can delete it. If a context is used by an automation plan or library, you cannot delete it.
- In the Eclipse client, open the Automation perspective.
- In the Plan Explorer, expand Automation Variables. Right-click the automation variables to delete, and click Delete.
- Click Yes to confirm the deletion.
Manage automation plan execution
Execute an automation plan to run the actions and libraries in the plan against a target managed system. Each instance of plan execution is saved as a job. For each job that is executed, you can view the results and summary.
You have the following options to start plan execution:
- Use the Execute Plan option to review the automation plan and enter missing or required values for one or more automation variables before you execute the plan. After you review the plan details, and supply the required information, start the plan execution.
- Use the Quick Start Plan option to start the plan execution without reviewing the details of the plan. The job is created, and plan execution begins as soon as you select the option. Use this option for plans where the required values for all automation variables are already specified and available.
The details and results of the plan execution, such as time taken and execution results, are saved in log files and displayed when the plan execution ends. You can also view the summary and details of earlier plan execution instances from the available log files.
Executing an automation plan
Use the Execute Plan option to review the plan details, or to supply missing or required values for one or more context variables before you start the plan execution. When you select the Execute Plan option, a job is created, and the plan details, and previous job summaries and results are displayed. You can review the plan details and enter the missing context variable values, if any, and then start the plan execution. Create the automation plan, and select a target automation environment for the execution.
- In the Eclipse client, open the Automation perspective.
- In the Plan Explorer, expand Automation Plans. Right-click the automation plan to execute, and click Execute Plan.
- Review the automation plan, and supply the required values:
- In the Summary tab, view the details of the automation plan, such as job execution trends, automation environment name, and the actions within the plan.
- Click the Context Variables tab and enter
any missing or required values for the context variables:
- If a variable has a 'Must Change' property, enter the changed value.
- If a variables has a 'Required' property, and the value is not specified, enter the value.
- In the Jobs Summary window, view the results of previous jobs for the selected automation plans. The current job is shown in the list with the State as 'Incomplete' and Results as 'None'.
- To create a job, and start the plan execution, click the Execute Plan icon.
The job is executed, and the results are displayed in the Job Results and Jobs Summary windows.
Quick start an automation plan
Use the quick start option to execute an automation plan instantly, without reviewing the details of the automation plans. The job is created and executed as soon as you select the option. You can quick start plans where the required values for all automation variables is available. Create the automation plan, and select the automation variables to execute the plan against. To quick start an automation plan, the required values for all automation variables must be specified. If the values are not specified, and you select the quick start option, you are prompted to enter the required values for the variables. After specifying the values, you must start the plan execution.
- In the Eclipse client, open the Automation perspective.
- In the Plan Explorer, expand Automation Plans.
Right-click the automation plan to start, and click Quick
Start. In the Jobs Summary window, a job is added.
- If the values for all automation variables is available, the plan execution starts.
- If the values for one or more environment variables is not available and needs to be specified, you are prompted to enter the values. If a variable has a 'Must Change' property, enter the changed value. If a variables has a 'Required' property, and the value is not specified, enter the value. Click OK.
- In the Jobs Summary window, double-click the added job to start the execution. When the job is in progress, the job State is displayed as 'Incomplete' and the Results as 'None'. After the job is complete, the details of the job such as time taken, and the job result, such as Passed or Failed, is updated in the Jobs Summary window.
View job details
When you execute an automation plan, each instance of the plan execution is saved as a job. You can select any or all automation plans to view a summary of the jobs for the plan. From the summary, you can select a job to view the detailed job results. From the job results, you can select an action to view the detailed action results. You can also export the action results to a text file.
- In the Eclipse client, open the Automation perspective.
- In the Plan Explorer, expand Automation Plans.
- To view the jobs summary for a particular automation plan, right-click the automation plan, and click Show Job Results.
- To view the jobs summary for all automation plans, right-click...
-
Automation Plans | Show Job Results
In the Jobs Summary window, a summary of all jobs for a plan is displayed, including information such as the State (for example, Incomplete or Complete), Result (for example, Passed or Failed), Start Date, Runtime, and Owner.
- To view the results of a particular job, in the Jobs Summary window, double-click the job. The Job Results window opens.
- In the Job Results, Summary tab, view the detailed job results, general information about the job, and the action results summary. To view the automation environment variables for the job, click the Environment tab.
- To view the detailed results of an action, in the Summary tab,
Action Results box, double-click the action. The detailed action results
are displayed in the Console window. In the Console window:
- To filter the action results, click the Filter icon
 and select the data type you want to hide. Click OK.
- To export the action results to a text file, in the Console window, click the Export to Editor icon
 . To save the file, select FileSave as,
and provide a file name. Click OK.
. To save the file, select FileSave as,
and provide a file name. Click OK.
- To filter the action results, click the Filter icon
Overview of response file templates
Installation actions use response file templates to generate the silent installation response files. The response files are used for supplying parameters for the installation or upgrade of a product. Response templates supplied with the product contain the default parameters for installation of a particular product. To modify the installation parameters in the default templates, you must copy the templates to a user templates location and modify them.
Response file templates supplied with the product are located in the RAFW_HOME/product/templates/install/<product>/<version> directory. For example, the response template was60_install_response.template for silent installation of IBM WAS 6.0 is located in the RAFW_HOME/product/templates/install/was/60 directory.
You can override the values in the default templates by copying the default templates from the product templates directory at RAFW_HOME/product/templates/install/<product>/<version> to the user templates directory at RAFW_HOME/user/templates/install/<product>/<version> and modifying the templates. When you run an action that uses a template, a user-provided template takes precedence over the product template.
If you modify the templates in the product/templates directory, your changes are overwritten the next time you perform an update or installation.
To determine which template a particular action uses, run the action and specify the help mode option (-d), for example:
rafw.sh -e env_name -c cell_name -n node_name -d was_61_install_fep_ejb3
In the help file, the following information indicates that the was_61_install_fep_ejb3 action uses the was61_install_ejb3_response.template file.
This action creates a response file for silent installation using a product template in the templates directory:
RAFW_HOME/product/templates/install/was/61/was61_install_ejb3_response.template
Modify a response file template
You can override the default response file templates supplied with the product by copying the default templates from the product template directory to the user templates directory and making the required changes. When you run an installation action that uses the template, the template in the user templates directory takes precedence over the template in the product directory.
- Locate the name of the response file template that the installation or patch action uses by running the installation or patch action in the help mode (-d | -manual). In the help, find the name and location of the response file that the action uses.
- Copy the response file from the product templates location at RAFW_HOME/product/templates/install/<product>/<version>/ to the user templates location at RAFW_HOME/user/templates/install/<product>/<version>/.
Create any missing product or version directories in the RAFW_HOME/user/templates/install location.
Do not rename the file when you copy it.
- Open the response file template from the RAFW_HOME user/templates/install/<product>/<version>/ directory and provide any specific parameters required for your installation or patching action.
- Save the response file.
When you run the installation or patching action that uses the template, the modified template in the user templates directory is used instead of the product template.
Example
Modify the response file template used by the was_61_install_fep_ejb3
installation action
In this example, see how to modify the response file template used by the was_61_install_fep_ejb3 action to install Feature Pack for Enterprise JavaBeans 3.0 (EJB3).
In the response file template, the value of the parameter -OPT fepFixpackLocation must be specified to provide the path for the feature pack media.
To modify the response file template:
- Run the action was_61_install_fep_ejb3 in the help mode by typing
the following command:
./rafw.sh -e env_name -c cell_name -n node_name -d was_61_install_fep_ejb3
The help text is displayed with the name of the response file template as shown below:This action creates a response file for silent install using a product template in the templates directory: RAFW_HOME/product/templates/install/was/61/was61_install_ejb3_response.template
- Copy the was61_install_ejb3_response.template file from the RAFW_HOME/product/templates/install/was/61/ directory to the RAFW_HOME/user/templates/install/was/61/ directory.
If the was/61 directory path does not exist in the RAFW_HOME/user/templates/install location, create the required directories.
- Open the file from the RAFW_HOME/user/templates/install/was/61/ directory.
- In the file, modify the value for the -OPT fepFixpackLocation parameter to the fix pack media, for example,
-OPT fepFixpackLocation=@MEDIA_HOME@/feature_packs/ejb3/patches/ejb3_fp23/6.1.0-WS-WASEJB3-LinuxX32-FP0000023.pak
- Save the file.
Mapping of installation actions to response file templates
This topic maps installation actions to their respective response file templates.
| Installation action name | Response file templates (located at RAFW_HOME/product/templates/install...) |
|---|---|
|
For IBM HTTP Server 6.0 | |
| ihs_60_install_ihs | ihs/60/ihs60_install_response.template |
| ihs_60_install_plugin_install | ihs/60/plugin60_install_response.template |
|
For IBM HTTP Server 6.1 | |
| ihs_61_install_ihs | ihs/61/ihs61_install_response.template |
| ihs_61_install_updateinstaller | ihs/61/ihs61_install_updi_response.template |
| ihs_61_install_plugin_install | ihs/61/plugin61_install_response.template |
|
For IBM HTTP Server 7.0 | |
| ihs_70_install_ihs | ihs/70/ihs70_install_response.template |
| ihs_70_install_updateinstaller | ihs/70/ihs70_install_updi_response.template |
| ihs_70_install_plugin_install | ihs/70/plugin70_install_response.template |
|
For IBM HTTP Server 8.0 | |
| ihs_80_install_ihs | ihs/80/ihs80_install_response.template |
| ihs_80_install_fixpack | ihs/80/ihs80_install_response.template |
| ihs_80_install_plugin_install | ihs/80/plugin80_install_response.template |
| ihs_80_install_plugin_fixpack | ihs/80/plugin80_install_response.template |
| ihs_80_install_toolbox_install | ihs/80/toolbox80_install_response.template |
| ihs_80_install_toolbox_fixpack | ihs/80/toolbox80_install_response.template |
| ihs_common_install_generate_webserver_def_script | ihs/80/wct80_configure_response.template |
|
For IBM HTTP Server 8.5 | |
| ihs_85_install_ihs | ihs/85/ihs85_install_response.template |
| ihs_85_install_fixpack | ihs/85/ihs85_install_response.template |
| ihs_85_install_plugin_install | ihs/85/plugin85_install_response.template |
| ihs_85_install_plugin_fixpack | ihs/85/plugin85_install_response.template |
| ihs_85_install_toolbox_install | ihs/85/toolbox85_install_response.template |
| ihs_85_install_toolbox_fixpack | ihs/85/toolbox85_install_response.template |
| ihs_common_install_generate_webserver_def_script | ihs/85/wct85_configure_response.template |
| For IBM Installation Manager 1.4.3 | |
| im_common_install_im | im/143/im143_install_user-silent-install_ini_response.template
im/143/im143_install_xml_response.template |
| For IBM Installation Manager 1.4.4 | |
| im_common_install_im | im/144/im144_install_user-silent-install_ini_response.template
im/144/im144_install_xml_response.template |
| For IBM Installation Manager 1.5.0 | |
| im_common_install_im | im/150/im150_install_user-silent-install_ini_response.template
im/150/im150_install_xml_response.template |
| For IBM Installation Manager 1.5.1 | |
| im_common_install_im | im/151/im151_install_user-silent-install_ini_response.template
im/151/im151_install_xml_response.template |
| For IBM Installation Manager 1.5.2 | |
| im_common_install_im | im/152/im152_install_user-silent-install_ini_response.template
im/152/im152_install_xml_response.template |
| For IBM Installation Manager Latest | |
| im_common_install_im | im/Latest/imLatest_install_user-silent-install_ini_response.template
im/Latest/imLatest_install_xml_response.template |
| For IBM WAS 6.0 | |
| was_60_install_was | was/60/was60_install_response.template |
| was_602_install_fep_web20 | was/60/was60_install_web20_response.template |
| For IBM WAS 6.1 | |
| was_61_install_fep_ejb3 | was/61/was61_install_ejb3_response.template |
| was_61_install_was | was/61/was61_install_response.template |
| was_61_install_updateinstaller | was/61/was61_install_updi_response.template |
| was_61_install_fep_web20 | was/61/was61_install_web20_response.template |
| was_61_install_fep_websv | was/61/was61_install_websv_response.template |
| For IBM WAS 7.0 | |
| was_70_install_fep_ariesjpa20 | was/70/was70_install_fep.ariesjpa20.template |
| was_70_install_fep_cea | was/70/was70_install_fep.cea.template |
| was_70_install_fep_sca_1010 | was/70/was70_install_fep.sca1010.template |
| was_70_install_fep_xml | was/70/was70_install_fep.xml.template |
| was_70_install_was | was/70/was70_install_response.template |
| was_70_install_fep_sca | was/70/was70_install_sca_response.template |
| was_70_install_updateinstaller | was/70/was70_install_updi_response.template |
| was_70_install_fep_web20 | was/70/was70_install_web20_response.template |
| was_70_install_uninstall_fep_ariesjpa20 | was/70/was70_uninstall_fep.ariesjpa20.template |
| was_70_install_uninstall_fep_cea | was/70/was70_uninstall_fep.cea.template |
| was_70_install_uninstall_fep_sca_1010 | was/70/was70_uninstall_fep.sca1010.template |
| was_70_install_uninstall_fep_xml | was/70/was70_uninstall_fep.xml.template |
| was_70_install_fep_cea_install_fp_1001
was_70_install_fep_cea_install_fp_1003 was_70_install_fep_cea_install_fp_1005 was_70_install_fep_cea_install_fp_1007 was_70_install_fep_cea_install_fp_1009 | was/70/was70_update_fep.cea.template |
| was_70_install_fep_sca_install_fp_1011
was_70_install_fep_sca_install_fp_1013 was_70_install_fep_sca_install_fp_1015 was_70_install_fep_sca_install_fp_1017 was_70_install_fep_sca_install_fp_1019 | was/70/was70_update_fep.sca.template |
| was_70_install_fep_sca_install_fp_1011_
with_sdo was_70_install_fep_sca_install_fp_1013_ with_sdo was_70_install_fep_sca_install_fp_1015_ with_sdo was_70_install_fep_sca_install_fp_1017_ with_sdo | was/70/was70_update_fep.sca_sdo.template |
| was_70_install_fep_xml_install_fp_1001
was_70_install_fep_xml_install_fp_1003 was_70_install_fep_xml_install_fp_1005 was_70_install_fep_xml_install_fp_1007 | was/70/was70_update_fep.xml.template |
| For IBM WAS 8.0 | |
| was_80_install_was | was/80/was80_install_response.template |
| was_80_install_fixpack | was/80/was80_install_response.template |
| was_80_install_fep_web20 | was/80/was80_install_fep.web20.template |
| was_80_install_uninstall_fep_web20 | was/80/was80_uninstall_fep.web20.template |
| For IBM WAS 8.5 | |
| was_85_install_was | was/85/was85_install_response.template |
| was_85_install_fixpack | was/85/was85_install_response.template |
| For IBM WebSphere Enterprise Service Bus 6.2 | |
| was_70_install_updateinstaller
wesb_62_install_fp3 | wesb/62/was70_install_updi_response.template |
| wesb_62_install_feature_pack | wesb/62/wesb62_feature_pack_install_response.template |
| wesb_62_install_wesb | wesb/62/wesb62_install_response.template |
| For IBM WebSphere Portal 6.0 | |
| wp_60_install_wp | wp/60/wp60_installresponse.template |
| wp_60_install_uninstall_wp | wp/60/wp60_uninstallresponse.template |
| For IBM WebSphere Portal 6.1/6.1.5 | |
| wp_61_install_wp | wp/61/wp61_installresponse.template |
| wp_61_install_uninstall_wp | wp/61/wp61_uninstallresponse.template |
| wp_615_install_wp | wp/615/wp615_installresponse.template |
| For IBM WebSphere Portal 7.0 | |
| wp_70_install_wp | wp/70/wp70_installresponse.template |
| wp_70_install_uninstall_wp | wp/70/wp70_uninstallresponse.template |
| For IBM WebSphere Process Server 6.2 | |
| was_70_install_updateinstaller
wps_62_install_fp3 | wps/62/was70_install_updi_response.template |
| wps_62_install_feature_pack | wps/62/wps62_feature_pack_install_response.template |
| wps_62_install_wps | wps/62/wps62_install_response.template |
| For IBM WebSphere Service Registry and Repository 6.2 | |
| was_70_install_updateinstaller | wsrr/62/was70_install_updi_response.template |
| wsrr_62_install_wsrr
wsrr_62_install_fp1 wsrr_62_install_fp2 wsrr_62_install_fp3 wsrr_62_install_fp4 | wsrr/62/wsrr62_install_response.template |
| For IBM WebSphere Service Registry and Repository 6.3 | |
| was_70_install_updateinstaller | wsrr/63/was70_install_updi_response.template |
| wsrr_63_install_wsrr
wsrr_63_install_fp1 wsrr_63_install_fp2 wsrr_63_install_fp3 | wsrr/63/wsrr63_install_response.template |
| For IBM WebSphere Virtual Enterprise 6.1 | |
| wve_61_install_wve | wve/61/wve61_install_response.template |
| For IBM WebSphere Virtual Enterprise 7.0 | |
| wve_70_install_wve | wve/70/wve70_install_response.template |
Get started with configuration definitions
A configuration definition is a collection of files on the framework server that represents a WebSphere cell or other configuration. the building blocks of AMC. To generate a configuration definition, you need two things:
- A configuration properties file
- A configuration template
Do not confuse a configuration topology with a configuration definition. The term topology is used in AMC to refer to an empty directory structure. A configuration definition, in contrast, includes both the topology and the data files located within the directory structure.
The following examples list some of the name-value pairs used in generation:
- Number of nodes in cell
- OS user name
- Deployment Manager profile name
- Node names
- Node types
The configuration properties file
A configuration properties file consists of a set of name-value pairs used in generating a configuration definition.
File location
The file is in the RAFW_HOME/user/preserve/envgen/ directory and is named env-config.properties, where env represents the name of the configuration environment and config represents the name of the configuration. On Linux systems, the file path might look like the following example:
/opt/IBM/RAFServer/rafw/user/preserve/envgen/TestEnv-was70_nd.properties
Configuration properties file contents
In most cases, there is a direct correspondence between a property in the file and a prompt in the configuration editor. The following table lists a few examples:
| Property | Section of editor | Question |
|---|---|---|
| CELL_NAME | Existing configuration or new configuration main page | Cell name |
| ENVIRONMENT | Existing configuration or new configuration main page | Environment Name |
| NODEn_HOST_NAME | New multinode configuration | Node Host Name |
In a few cases, such as ENVIRONMENT_CREATION_DATE and INSTALL_STATE, the configuration generator determines the value for the property from internal data rather than from your response to a question.
Many different properties might appear in the configuration properties file. It is not possible to create a definitive list here. To determine the properties that result from a particular combination of responses to the editor, run the editor, enter those responses, and generate the configuration definition. The properties are displayed at the end of generation, or you can review them in the configuration properties file after the generator completes.
File creation
You can create the configuration properties file in any of the following ways:
- By using the configuration editor in the AMC console
- By using the same configuration editor through the Eclipse client
- By running the Environment Generation wizard from the command line (the rafwEnvBuild command)
- By using PureApplication System to deploy a virtual system pattern that is based on a template.
If you are using the configuration editor, you can then edit the individual elements in the file. If you use the command-line wizard, a set of prompts are displayed sequentially for you to complete.
The prompts that you see depend on the contents of the configuration, including the following factors:
- The product and version that the configuration defines
- Whether the configuration definition is stand-alone or represents a network deployment
- Whether the definition is stored in a source control or asset management system
- Whether you use clustered servers
- Whether you use advanced connection and security settings
Prerequisites for creating a configuration definition
Before you run the configuration editor or the command line Environment Generation wizard for the first time, complete prerequisite tasks.
- Run the integrateToBF command, if you have not already done so. The command creates the required objects and libraries in the database so that you can use the automation engine.
This command is typically run during installation. To determine whether you need to run the command, look for the RAWF_Global group in either of two places:
- In the console, click...
-
Automation | Contexts
- In the Automation perspective of the Eclipse client, expand Automation Variables
If the RAFW_Global group exists, you do not need to run the integrateToBF command.
- In the console, click...
- Set the properties in the RAFW_HOME/buildforge.properties file to the correct values for your installation.
- If you are generating a cell definition for an existing configuration, check the value of the OS_RAFW_HOME property in the RAFW_HOME/configure.properties file. The OS_RAFW_HOME path is the product installation directory on the target system. To enable the configuration generator to use the credentials of the target system OS user on the target system, the OS_RAFW_HOME directory must exist on the target system and must be writable by the target system OS user. If the directory does not exist and the target system OS user has the required OS permissions, the directory can be created during generation by means of the OS user.s credentials.
Plan a new configuration definition
Create a configuration definition requires the same sort of planning as building a new cell in your WebSphere environment.
In planning a configuration definition, complete these tasks:
- Determine the topology to create:
- stand-alone cell
- network deployment cell
- other configuration
- Decide on a naming convention for administration objects such as environments, configurations, nodes, profiles, servers, and clusters. For example, configuration names often specify a product, version, and topological type, such as WAS85_nd.
- For a network deployment cell, decide how many nodes to establish on each host server. For each node, determine how many servers or cluster members to install to run Java EE applications.
- Determine how many IBM HTTP Server nodes to set up for application servers and whether IBM HTTP Server nodes are local or remote.
Workflows for generating configuration definitions
You can generate configuration definitions for new and existing configurations.
The generation process produces a number of objects used to manage your configurations; for more information. The workflows are different for new configurations than for definitions based on an existing configuration.
Workflow for an existing configuration
To create configuration objects for an existing configuration:
- Complete tasks to integrate the product with the automation database.
- Use the existing configuration checklist to gather the information you need to run the configuration editor.
- Start the application server or deployment manager process on the existing configuration. If a portal server is installed, start the portal server process.
- Run the configuration editor in existing configuration mode to capture the topology of the live configuration.
- Run the generation process to create the configuration definition.
- Verify that the correct objects were created.
- Run the RAFW_env_config_import automation plan created by the generator to import configuration data from the existing configuration.
Workflow for a new configuration
To create environment objects for a new configuration:
- Complete tasks to integrate the product with the automation engine.
- Populate the media tree with the required installation media for creating the live configuration.
- Use the new configuration checklist to gather information you need to run the configuration editor.
- Run the configuration editor in new configuration mode to enter information about the configuration you want to create on the target server.
- Run the generation process to create the configuration definition.
- Verify that the correct objects were created.
- Run the RAFW_env_config automation plan to install media and create the live configuration (typically a WebSphere cell).
Create a configuration definition in the console
Use the configuration editor to create or change a configuration properties file, or to generate a configuration definition.
These instructions describe the creation or editing of a configuration properties file.
You can start the configuration editor from the AMC console or from the Eclipse client. The editor first collects information about the configuration definition. Then it uses the information to provide a choice of templates as a starting point for generating a configuration definition.
You provide the names of an environment and a configuration (usually a WebSphere cell), which the editor uses to name the configuration properties file.
Then, based on the information you enter, the editor displays the appropriate configuration-specific information for the configuration, with the options to change this data. The following factors, among others, can affect what you see in the editor:
- The product and version that the configuration defines
- Whether the configuration definition is stand-alone or represents a network deployment
- Whether the definition is stored in a source control or asset management system
- Whether you use clustered servers
- Whether you use advanced connection and security settings
When you are satisfied with the displayed data, you generate the configuration definition.
To create a configuration definition:
- Open the configuration editor.
- Click the Create configuration definition icon (a green plus sign) at the head of the list of available configuration definitions.
- In the Create configuration definition window, select the Product that the configuration definition represents.
- For Environment name, enter a name for the logical container for the configuration.
- For Configuration name, enter a name for the configuration definition.
Warning: If you enter the name of an existing environment and configuration, the existing environment and configuration will be overwritten by the generation process.
- For Version, select the appropriate version number for the product in step 3 The version numbers that are displayed depend on the selected product.
- For Configuration template, select either a product or a user template from the list.
- Click Create Configuration. The new configuration properties file is displayed in the editor pane.
- Enter the information necessary to generate your new configuration definition. Reference topics are available for the various products and options you might see in the configuration editor.
To save the configuration properties file, you must complete the minimum information necessary to generate the file. Click Save at any time to highlight any required prompts that are incomplete.
Reading an existing configuration in the console
The console can read an existing configuration on a target system as the basis for a new configuration properties file.
These instructions describe how to use an existing configuration as the basis for a configuration definition. If you want to create a configuration definition interactively
- Open the configuration editor.
- Click the Read existing configuration icon (a blue box and arrow) at the head of the list of available configuration definitions. A new window is displayed with a set of questions to gather the following information:
- The configuration definition to be created. This information includes the name of the installed product and an environment name.
- The live configuration whose topology you want to capture. This information includes the host name, credentials for the target server, and other information.
- Use the descriptions in Configuration reference for an existing configuration to complete the prompts in the window.
- When you complete all of the required information except Configuration template, click Read configuration topology. This action captures the directory structure of the existing configuration and saves it in the configuration properties file.
- After you capture the topology, specify a Configuration template and then click Generate configuration. The generator builds the directory structure in the RAFW_HOME/user/environments/ directory and creates several objects.
Reading a WAS cell managed by an administrative agent
The existing configuration option of the configuration editor can read the topology of a WAS cell whose application servers are managed by an administrative agent rather than a deployment manager. This task requires WAS Version 7.0.0.17 or later. Some installations of WAS have nodes that are managed by an administrative agent. Each node can include multiple standalone servers (JVMs).
- In the console, click Read existing configuration and provide product and connection information
- For Profile Root Directory, enter
the administrative agent profile root directory. For example, on UNIX the path might look like the following:
/opt/IBM/WebSphere/AppServer/profiles/AdminAgent The generation process determines that you are defining a cell with an administrative agent and reads all the required information. The configuration properties file is created with a number of properties specific to this kind of topology:
- Properties that define the administrative agent. These properties begin with ADMIN_AGENT_, and include information such as the host name, number of servers, and SOAP port.
- Properties that define each of the nodes. These properties begin with ADMIN_MANAGED_NODEn and include information such as the host name, cell name, and node name.
- Properties that define each of the servers. These properties begin with ADMIN_MANAGED_NODEn_SERVERn and include the server name, type, and template.
You can edit this information in the configuration editor and regenerate the configuration definition.
Load balancing servers managed by an administrative agent
About this task
Simple load balancing distributes HTTP requests across multiple application server instances. Also, you can configure simple load balancing to provide failover of an application state that is maintained in an HTTP session.
Each cell that is managed by an administrative agent includes a single IBM HTTP Server instance. During installation, the was_common_configure_gen_plugin action is run, which creates a separate plugin-cfg.xml file for each server. The was_common_configure_propogate_web_server_plugin action, run at the server scope, copies the contents of the local file to the IBM HTTP Server so that HTTP requests can be sent to the application server. At that point, any previous application server information is lost.
You can use the pluginCfgMerge utility to merge selected plugin-cfg.xml files, so that IBM HTTP Server can send requests to any server in the merged file.
To initiate load balancing, you add properties to two .properties files and then run an action that uses the information in those properties to run the pluginCfgMerge utility.
Procedure
- Edit the configure.properties file located on a node that the administrative agent manages.
- Add the LOAD_BALANCE_SERVERS_ON_NODE property and specify a list of application servers whose plugin-cfg.xml files are to merged, as in the following example:
LOAD_BALANCE_SERVERS_ON_NODE=server01,server09,server15
- Edit the install.properties file at the IBM HTTP Server node scope.
- Add the LOAD_BALANCE_NODES property and specify a list of nodes whose configure.properties files will be checked for the LOAD_BALANCE_SERVERS_ON_NODE property, as in the following example:
LOAD_BALANCE_NODEs=node01,node03,node06
- Run the was_common_configure_generate_plugin_config_xml action at the node scope. This action uses the information in the LOAD_BALANCE_SERVERS_ON_NODE property and generates the plugin-cfg.xml file in the node profile directory.
- Run the ihs_common_configure_merge_plugin_config_xml action at the IBM HTTP Server node scope. This action uses the information in the LOAD_BALANCE_NODES property and uses the pluginCfgMerge utility to generate the merged plugin-cfg.xml file in the IBM HTTP Server profile directory.
Run the rafwEnvBuild command to create a configuration definition
You can generate a configuration definition from the command line by using the Environment Generation wizard.
For interactive generation of a configuration definition, use the configuration editor;
- List the property names and the values you want to assign to them for the new configuration.
- From the command line, enter the following command:
rafwEnvBuild -silent -opt "var1=value1" -opt "var2=value2"...
- var1, var2
- Property names from the configuration properties file
- value1, value1
- Values to be assigned to the corresponding properties
The Environment Generation wizard
About this task
You might have a situation where you cannot use a web browser to create a configuration definition. For example, because of firewall issues you might not have access to the port that handles web traffic on your framework server. In such cases, you can use the rafwEnvBuild command in interactive mode on the command line.
This mode starts the Environment Generation wizard, which asks, in sequential order, the same questions that are displayed in the configuration editor;
Procedure
- From the command line, enter the following command:
rafwEnvBuild -interactive
- Respond to the following question from the wizard:
Read an Existing Cell Configuration
- Y
- If you want to read an existing configuration as a basis for a new configuration definition.
- N
- If you want to create a configuration definition based on information you enter in this wizard. For the initial set of questions
Subsequent questions depend on the product you choose in the initial set of questions.
Recreation of an existing configuration definition
Use the configuration generator or the rafwEnvBuild command to recreate an existing configuration definition.
To use the configuration generator, open a configuration properties file in the configuration editor and click Generate.
When you recreate the configuration definition, the existing definition is updated with the new information. Files, directories, and context variables that are no longer a part of the topology are removed.
In AMC versions earlier than Version 3.0, when a configuration definition is recreated, the existing definition is removed and recreated, rather than being updated. Also, the automation context is not updated.
When you recreate a configuration definition, the following changes are made:
- The configuration definition is updated with the new information. Files that do not correspond to those in the assigned template are left as is in the current definition. For example, default templates do not contain resource XML files. If you add resource XML files to a custom template, regenerating overwrites those files. If you add resource XML files to a configuration definition and do not use a custom template, the files are not overwritten.
- If you add or remove a node, server, or cluster, the properties in the configuration file, such as SERVERS_ON_NODE, NODES, or CLUSTERS, which store data about the topology, are updated.
- All .xml and .property configuration files, and any directories in AMC that are no longer a part of the topology, are removed. For example, if you decrease the number of nodes from three to two, the node configuration files and the nodes/node_3 directory are removed.
- The automation context is updated. However, the automation plan is not modified.
- Context variables that no longer represent a part of the topology are removed. For example, if you decrease the number of nodes from three to two, the NODE3_NODE_NAME entry is removed.
- If you customized an automation context by adding your own variables, those variables are also deleted unless they are included in the current automation context in another configuration definition.
Removal of a configuration definition before recreation
If you want to remove the existing configuration definition before recreating it, use either of the following options:
- If you use the configuration generator, update the information in the configuration editor and click Save & Generate. In the Generate configuration window, select Remove the existing configuration definition before generating the new configuration definition.
- If you use the command line interface, run the rafwEnvBuild command with the -clean option.
If you use PureApplication System, remember that recreating a configuration definition does not recreate any VSPs based on the configuration. You must use PureApplication System to manually delete the VSP, then generate a new VSP by using the Eclipse client.
Configuration template overview
Configuration templates simplify and standardize the process of generating configuration definitions. the building blocks of AMC. To generate a configuration definition, you need two things:
- A configuration properties file
- A configuration template
After you edit these files, run the generator to build the configuration definition.
You can customize this process to a lesser or greater extent:
- In the simplest scenario, you can use the default templates and respond to a series of product-based prompts to create a configuration properties file through the configuration editor.
- In a more complex scenario, you have environment-specific values that are related to processes that go beyond basic WebSphere activities. These processes might involve LDAP security, database management, messaging, or other activities. In this scenario, you can create a custom template, identify environment-specific values in one or more promote.properties files, and create custom questions for the configuration editor.
The configuration template
A configuration template is a set of files that constitute a configuration definition where configuration-specific values are replaced with tokens. A number of default configuration templates are available in the following locations.
- User configuration templates: RAFW_HOME/user/templates/environments/
- Default configuration templates: RAFW_HOME/product/templates/environments/
Do not change any information in the default template directory. However, you can copy a template from the default directory to the user directory, rename it, and change it there.
Tokens are strings that begin and end with an At sign (@), such as "@SERVER_DS_JNDI_NAME@". During the generation of the configuration definition, the tokens are replaced with values from the configuration properties file.
In the default templates, configuration-specific values are already replaced with tokens. In addition, you can convert any existing configuration definition to a template by using the New > Configuration Template option in the Eclipse client. By creating a custom template, you can streamline the generation process and ensure that all the files that you need, and only those files, are created.
The questions file
The questions file is part of the template, and was added to AMC with version 1.1. The file is named tpl_questions.xml and is located at the top level of the template directory. The file contains any configuration-specific questions required for the configuration editor when you use a custom template. For example, if you create a dbHostName token in the promote.properties file, the configuration editor must prompt for the database host name. More information about the promote.properties file is covered later in this topic.
The questions file also contains a representation of the template topology, including number of clusters, number of nodes, and the relationships between these objects. Questions that pertain to a certain object, such as a cluster, are grouped with that object.
When you create a template from a configuration definition, you must specify the template whose questions file is to be used as a starting point.
The scope file
Each scope in the template contains a scope.properties file that identifies the data types for that scope. These data types ensure that the generator can accurately build a configuration definition on the framework server from a specified template scope. Scope files were added to AMC with version 1.1 and are required when templates are automatically created from a configuration definition.
Most templates have standard scopes such as cell, cluster, node, and server. One exception is WAS Liberty profile, which uses a profile scope rather than a cell scope. You can create custom scopes in the configuration editor. The information is saved in scope.properties files.
The role of the promote.properties file
Use one or more promote.properties files when you have a complex configuration scenario that involves configuration-specific values that are not covered by the standard set of questions in the configuration editor. For example, you might have to specify the location of a database, user IDs and passwords for added security, or other such values.
A promote.properties file is valid for the scope where you place the file and is inherited by all scopes lower in the hierarchy than that one. Create a separate promote.properties file to override the inherited promote.properties file from a higher scope.
Generating the configuration definition
After you edit the configuration properties file, you have the blueprint for a new configuration definition on the framework server. The next step is to generate that definition from a template and the configuration properties file. Generate the definition by clicking the Generate button in the editor.
Automatically creating a configuration template
If you want to create a configuration template from a configuration definition that was created earlier than AMC version 1.1, you must regenerate the configuration definition by opening the configuration properties file (env-config.properties) in the configuration editor and clicking Generate.
The configuration definition must be regenerated because a set of scope files, each named scope.properties, was added with version 1.1. These files contain data types for each scope in the configuration definition and are required when you use templates.
You can convert any existing configuration definition to a configuration template by using the New > Configuration Template option in the Eclipse client. The process consists of changing configuration-specific information such as host names and passwords into tokens.
- Start the AMC Eclipse client.
- Drag the configuration to convert to a template to the Configuration Workspace, if it is not already there.
- Right click the configuration name (not the environment name) and click New > Configuration Template.
- In the Configuration Template window, enter the following information:
- For Configuration Template Name, enter a name for the template. Template names are typically in uppercase letters and include a product acronym and version. User-created templates typically include a few characters to distinguish them from the system-supplied templates. For example, you might give the name "WAS_70_CUSTOM" to a template for WAS version 7.0.
- For Use Template Meta-Data from Template, select an existing template as a basis for any additional questions or topology data you need during the configuration edit process.
- Click OK.
A list of the files in the template is displayed in the editor pane.
- Save the template by clicking File > Save or pressing Ctrl-S. The Save Template window is displayed. If you created a promote.properties file, a Modify Questions link is displayed in the Modify Questions column.
- Click Modify Questions. The User Defined Questions window is displayed, with modifiable values for each property in the promote.properties file.
- For each property, enter a prompt as the Display Name value. The contents are displayed as a prompt in the configuration editor when you create a configuration definition that is based on this template. If you use PureApplication System, the prompts are included in a custom script package when you generate a VSP based on this template.
- After you enter all prompts, close the User Defined Questions window by clicking OK and then close the Save Template window by clicking OK again.
- In the Define Configuration Template window, expand any of the objects in the Scope Type column. Clear the check box for any objects to remove from the template. You cannot clear the check box for a required file.
- After you complete your changes, close the Define Configuration Template window.
- Open the Template Workspace view. By default, the tab for this view is next to the Configuration Workspace tab. The new template is displayed in the list. It is shown in blue to indicate that it is not yet saved.
- Right-click the new template name and click Team > Save Changes to Server. The new template is displayed in the Configuration Templates folder in the Configuration Explorer view. You can now specify this template when you create a configuration definition.
Tokens and tokenization
Tokens identify those elements in your configuration data files whose values are specific to a configuration definition.
You can convert any configuration definition into a template. Remember that a template is not a single file, but a collection of files. The conversion process consists of replacing explicit references to information such as host names and passwords with tokens that can be easily replaced with values during the generation process. Although it is possible to manually tokenize the files in a template, it is faster and more reliable to automate the process by using the Eclipse client.
Automatic tokenization
The following steps are part of automatic template creation:
- The Eclipse client reads the files from an existing configuration into memory
- The Eclipse client replaces configuration-specific values with tokens
- The Eclipse client writes the tokenized files to a work area
- The user reviews the files in the work area, eliminating unwanted files, editing the topology, and adding custom properties to the promote.properties file, if needed.
- The user refreshes the display if necessary, which causes the Eclipse client to tokenize the files again.
- When the user saves the template, the Eclipse client copies the files from the work area to the designated template location and deletes the files from the work area.
To create these tokens, the Eclipse client reads the following files:
- install.properties at the node scope
- configure.properties at any scope
- promote.properties at any scope (for custom properties)
- cluster.properties at the cluster scope
The client then searches all the other .xml or .properties files (with certain exceptions) in the new template directories for any values it finds in designated .properties files and replaces those values with tokens. The install.properties, configure.properties, promote.properties, and cluster.properties files are included in this tokenization. The following files are excluded:
- build.xml
- build_local.xml
- scope.properties
Tokenization example
Assume that the Eclipse client finds the following line in a promote.properties file:
dbHostName=DEV.db.domain.com
The client then searches for the assigned value of DEV.db.domain.com in the other files in the source configuration. In this example, the client finds the value in two places:
- The original occurrence, in the promote.properties file:
dbHostName=DEV.db.domain.com
- A second occurrence, in the jdbc.xml file:
<J2EEResourceProperty
    WASKey="resourceProperties"
    description=""
    name="serverName"
    required="false"
    type="java.lang.String"
    value="DEV.db.domain.com">
In both cases, the assigned value is changed to a token:
- In the new copy of the configure.properties file:
dbHostName=@dbHostName@
- In the new copy of the jdbc.xml file:
<J2EEResourceProperty
    WASKey="resourceProperties"
    description=""
    name="serverName"
    required="false"
    type="java.lang.String"
    value="@dbHostName@">
The process is repeated for all the other values in the designated .properties files. Tokens are then replaced automatically during generation with a value from the configuration properties file.
Tokens and generation
Tokens begin and end with an At sign (@), as shown in the following example from a promote.properties file:
myApp.database.jndi = @SERVER_DS_JNDI_NAME@
During the configuration generation process, the generator reads all eligible files in the template directory and the scoped subdirectories. It copies the template files into a new structure in the RAFW_HOME/user directory. When the generator encounters a token, it uses a set of rules to replace the token with a value from the configuration properties file.
There are naming conventions for the following directories:
- The templates themselves
- The placeholder directory names within the template for cells and nodes
Include a product name and version number in your template names for ease of recognition when they are displayed in the configuration editor.
Placeholder directory names function as implicit tokens, and the generator replaces them as it creates the file structure for the new configuration definition. Include the same product name and version number as the template name in these placeholder names, plus either a "_CELL" or a "_NODE " suffix. For example, a template for WAS version 8.5 might have the following directory structure:
RAFW_HOME/user/templates/environments/MY_WAS85_TEMPLATE/cells/WAS85_CELL/nodes/WAS85_NODE/
As it builds out the configuration definition, the generator replaces "WAS85_CELL" with the value from the CELL_NAME property of the configuration properties file, and replaces "WAS85_NODE" with the value of the appropriate NODEn_NODE_NAME property.
Tokens and virtual systems
You can use templates with PureApplication System. During the template creation process in the Eclipse client, you can generate a VSP. The VSP generation process creates a script package that you can access when you deploy the VSP in PureApplication System. This script package contains the questions from the questions file that must be answered during deployment, and topological information used in creating the instance of the pattern.
Rules for token replacement
Tokens are replaced according to a set of nested rules.
- Simple tokens are matched as is; for example, @CELL_NAME@ is replaced by the value for CELL_NAME from the configuration properties file.
- If the property name begins with CLUSTER, NODE, IHS_NODE, or SERVER,
a designation for a specific cluster, node, IHS node, or server is prefixed to the token name to create a match. In the case of server names, the node name is included. The token name does not have to begin with CLUSTER, NODE, IHS_NODE, or SERVER. The following examples
illustrate this rule:
- @CLUSTER_PLANTS_DS_JNDI_NAME@ is replaced by the value of CLUSTER1_CLUSTER_PLANTS_DS_JNDI_NAME for the first cluster, CLUSTER2_CLUSTER_PLANTS_DS_JNDI_NAME for the second cluster, and so on.
- @SERVER_DS_JNDI_NAME@ is replaced by the value of NODE1_SERVER1_SERVER_DS_JNDI_NAME for the first server on the first node, NODE1_SERVER2_SERVER_DS_JNDI_NAME for the second server on the first node, NODE2_SERVER1_SERVER_DS_JNDI_NAME for the first server on the second node, and so on.
- @STARTING_POINT@ is replaced by the value of NODE1_STARTING_POINT for the first node, and so on.
- If no special match is found, then the value without the prefix is used. For example, if the configuration properties file does not contain a property named IHS_NODE1_IHS_NODE_NAME, but does contain a property named IHS_NODE_NAME, then the wizard will replace the @IHS_NODE_NAME@ token with the value of the IHS_NODE_NAME property.
Generate configuration definitions
Configuration generation is the process that creates the following objects:
- A configuration definition, which is a set of files in the user tree. The user tree is the RAFW_HOME/user/environment directory.
- A set of automation plans and an automation context (set of automation variables).
The following files are used as a source for generation:
- The configuration properties file.
- A configuration template.
The configuration template contains tokens that represent configuration-specific values. As the generator reads the template files and copies them into the user tree, it replaces tokens with values from the configuration properties file.
Once you generate a configuration definition, you can run actions or automation plans that affect the configuration definition:
- Install middleware products such as WAS.
- Configure existing configurations. Typically this involves changing the topology by creating or deleting nodes, clusters, servers, and so on.
- Deploy or update custom applications on your target systems.
To invoke the generator, open a configuration definition in the configuration editor and click Generate. The results of the generation process are displayed on the screen.
Objects that the configuration generator creates
The configuration generator creates a configuration definition and objects that you can use to manage that definition.
The configuration definition in user/environments
A configuration definition is a logical representation of a configuration. The generator creates this representation on the framework server in the RAFW_HOME/user/environments directory, preserving the topology of the live configuration. For example, the following directory structure represents a WAS cell:
RAFW_HOME/user/environments/env_name/cells/cell_name/nodes/node_name/servers/server_name
Automation plans
Automation plans are sequences of actions that you use to manage configurations. The automation plans that the generator creates depend on whether you requested a new configuration or read an existing configuration.
- New configuration
- The generator creates and then runs an automation plan to create the cell definition in the user/environments directory. You can run the RAFW_env_config plan to create the live configuration on the target system.
- Existing configuration
- For existing configurations, the generator creates three automation plans:
- RAFW_env_config_compare
- RAFW_env_config_execute
- RAFW_env_config_import
- If you specify in the editor to place the configuration under source control or asset management, additional automation plans
are created. One set is used to check in and check out configuration definitions from Rational Team Concert:
- RAFW_env_config_scm_get
- RAFW_env_config_scm_put
- A second set is used to check in and check out configuration definitions from Rational Asset Manager:
- RAFW_env_config_am_get
- RAFW_env_config_am_put
These automation plans are visible in the console and in the Eclipse client:
- In the console, click...
-
Automation | Plans and Libraries | Plans.
- In the Eclipse client, Automation perspective, Plan Explorer, expand the framework server, then expand Automation Plans.
Automation context
The generator creates an automation context (set of automation variables) for the plan. The default name for the context is RAFW_env_config. Automation variables include the configuration name, configuration type, number of nodes, number of clusters, and other variables. Variables are replaced with appropriate values when you run an action at a particular scope.
The generator also includes a reference to the RAFW_Global automation context, making it visible to all actions for the configuration definition.
Automation contexts are visible in the following ways:
- In the console, click...
-
Automation | Contexts
- In the Eclipse client, Automation perspective, Plan Explorer, expand the framework server, then expand Automation Variables Double-click the set of variables to edit the individual variables.
The RAFW_Global automation context
The variables in the RAFW_Global automation context apply to all actions for a configuration definition.
The integrateToBF utility creates the RAFW_Global automation context, typically as a part of AMC installation. These variables are included whenever you generate a configuration definition. They are included by reference, so any change to these variables affects all configuration definitions on the framework server.
RAFW_Global contains the following context variables:
| RAFW_Global context variable | Description |
|---|---|
| MODE | Select the mode for running libraries to install a WebSphere cell or run libraries to import configuration data from another WebSphere cell.
For installation libraries, the only valid mode is Execute. The execute mode is the default mode for all libraries. For configuration libraries the default mode is Execute. Other modes are valid for configuration libraries. Default: Execute |
| START_STOP | A context variable used by restart libraries, which contain actions to start and stop servers. Specify stop to run actions to stop servers or specify start to run actions to start servers.
Default: stop |
| SOURCE_REVISION | An environment variable that is designed for use with source
control application libraries; the product does not provide source
control libraries.
If you are copying user configuration data from the RAFW_HOME/user/environments directory to source control, you can specify the version of configuration files to retrieve from source control. Default: None |
| MEDIA_TRANSFER | If you are running an installation library, select the media
setup type.
Select Use Shared Media if you have a shared media setup, select this option. For shared media setups, target systems access media directly from the shared file system. No media is transferred from the framework server to the target system to run an action. rafw.sh -env ENV01 -cell CELL01 -node NODE01 -execute was70_install_with_all_patches Select Transfer Media if you are using a framework server media setup. For framework server media setups, media is stored on the framework server and must be transferred to target systems. rafw.sh -env ENV01 -cell CELL01 -node NODE01 -execute was70_install_with_all_patches -transferMedia Default: Use Shared Media |
2.10. Configuration in the Eclipse client
The Eclipse user interface for AMC provides interactive access to configuration environments and configuration data.
2.10.1. Exploring managed configurations
Use the Configuration Explorer to display the directory structures for the target systems you manage, to create and delete configuration data for configuration definitions, and to run configuration actions at various scopes within those structures. The Configuration Explorer view is located by default in the upper left corner of the workbench.
- Make sure that you are in the Configuration perspective.
- If the Configuration Explorer view is not visible, click Window > Show View > Other. Expand Advanced Middleware Configuration and click Configuration Explorer.
- Expand the directory structures for a framework server. Configuration information is displayed according to the following hierarchy:
- Configuration environment
- A logical container that holds one or more configuration definitions. A configuration environment typically corresponds to a business unit, a lifecycle stage, or some combination of the two.
- Configuration definition
- A container for managed systems, nodes, applications, or other managed resources. For example, in WAS, a configuration definition is equivalent to a cell.
- Scope
- A set of configuration data that you can apply an action to. For example, a configuration definition in WAS might include the following scopes:
- Node
- Cluster
- Server
- To create a configuration environment or configuration data for a configuration definition, right click the framework server name and then click Create Configuration Environment. The configuration editor is launched in the editor pane.
- To remove the configuration data for a configuration environment or a configuration definition, right-click a configuration definition and then click Delete Configuration. If the configuration environment contains no other configuration definitions, the environment is also deleted.
2.10.2. Run actions from the Eclipse client
Run configuration, installation and deployment actions against a selected scope in a configuration environment. Select a scope, and then select an action to run from the available actions for the selected scope. You must select the action mode, enter the values for the action parameters and options, and then execute the action. To run actions, you must have execute privileges for the selected configuration environment.
- In the Eclipse client, open the Configuration perspective.
- In the Configuration Explorer, expand a configuration environment, and select a scope to run an action against. Click Run Action.
- From the Action Selection list, select an action to run.
- In the Action Input section, specify the details of the action, including the mode, parameters and options. The scope settings
for the action are displayed based on the scope that you selected to run the action against, and cannot be modified.
For help with the supported modes, and the parameters and options for the action, refer to the action command help in the Action help window.
- Select the mode to run the action in, for example, Import. Only the supported modes for the action are displayed for selection.
- Enter the value for the parameters, if any. If a parameter is mandatory, it is indicated with a red check mark, and you must enter a value.
You can drag values from the Variables, Literals, and Scopes tabs in the Data Palette.
- To apply an option for the action, select the check box for the action, and enter the value for the option.
You can drag values from the Variables, Literals, and Scopes tabs in the Data Palette.
- In the Command Text section, review the syntax for the action command that is constructed based on the action input that you specified. You cannot edit the text in the Command Text section. To change the action command, make changes in the action input section.
- To run the action, click the Run action icon
 .
.
The action execution instance is saved as a job, and added to the Jobs Summary window. You can track the job results and status in the Jobs Summary window.
What to do next
To view the job details and the action results, in the Jobs Summary window, double-click the job.2.10.3. Comparing configurations
You can compare a target server configuration to the equivalent configuration on the framework server, or you can compare files on the framework server. You can make three kinds of comparisons:
- Snapshot comparison
- Compare the current configuration from the target managed system to the equivalent configuration on the framework server. Because this action takes place on the framework server, you initiate it in the Configuration Explorer view. You can also perform this action using the command line interface.
- Resource comparison
- Compare two or more files in the configuration workspace.
- Topological comparison
- Compare two or more directory trees.
- To make a snapshot comparison:
- In the Configuration Explorer view, right-click a configuration and click Run Action. A list of available actions is displayed.
- In the Action Editor, select a configuration action.
- Expand the Action Inputs tree.
- In the Mode field, select Compare from the list.
- Click the green arrow in the upper right corner of the window to run the action.
- To make a resource comparison:
- The files you want to compare must be visible in the Configuration Workspace view. If not, drag the configuration that contains them from the Configuration Explorer view to the configuration workspace.
- Hold down the Ctrl key and click the names of the files you want to compare. When all the file names are highlighted, continue to hold down the Ctrl key and right click one of the names.
- Click Compare With > Each Other.
- If you selected more than two files, choose one of them as the basis for comparison (common ancestor). The files open in the comparison editor with differences highlighted.
- To make a topological comparison:
- The directories you want to compare must be visible in the Configuration Workspace view. If not, drag the configuration that contains them from the Configuration Explorer view to the configuration workspace.
- Hold down the Ctrl key and click the names of the directories you want to compare. When all the directories names are highlighted, continue to hold down the Ctrl key and right click one of the names.
- Click Compare With > Each Other.
- If you selected more than two directories, choose one of them as the basis for comparison (common ancestor). A point by point comparison is made for every directory in the tree.
2.10.4. Searching for configuration file content
Use the workbench Search capability to locate character strings inside configuration files. You can use wildcard characters in the text you are searching for or in the names of the files to be searched. You can limit the search to one or more specific configuration environments in the workspace.
- Click Search > File in the top menu bar. The Search window is displayed.
- For the Containing text value, enter
the character string that you are searching for. The following wildcard characters are available:
- An asterisk matches any string of characters.
- A question mark matches any single character.
- A backslash acts as an escape character.
- Select Case sensitive if you want the search to discriminate between uppercase and lowercase letters.
- Select Regular expression if you want to use more complex regular expressions for the search text. Enter Ctrl+Space as the value for a list of available expressions.
- For the File name patterns value, enter characters to limit the names of the files to be searched. The same wildcard characters are available as in the previous step. Click Choose for a list of common file extensions; you can select multiple file types. Ignore the Consider derived resources check box, which refers to files derived from builds and does not apply here.
- For the Scope value, select one of the following:
Option Description Workspace To search all configuration files in the Configuration Workspace view, subject to the limitations in the previous step. Selected resources To search only the files or directories that you have highlighted in the Configuration Workspace view, subject to the limitations in the previous step. Work set To search a group of configuration files that you have assigned a name to. - Click Choose to display the Select Working Sets window. The Select Working Sets window displays all existing working sets.
- Select one or more working sets for the search, or click New to create a set.
- If you click New:
- In the Select a Working Set Type window, select one of the displayed types and click Next.
- Enter a name for the working set.
- Expand the displayed directory trees. Select all files or directories to be searched as part of this working set.
- If you are creating a Java. working set, use the buttons to move files from the Workspace content area to the Working set content area. For other working sets, select the check boxes of the resources or breakpoints to add to the set.
- Click Finish when you have finished.
- Click one of the following buttons:
- Replace
- If you want to substitute another character string for the target.
The Replace Text Matches window is displayed, showing the target text and the number of occurrences. Enter the substitute
text as the With value, then click one of the following buttons:
- Preview
- If you want to open the original and refactored source files in a comparison window. Click OK to accept the displayed changes, click Back to return to the previous screen, or click Cancel to cancel the substitution.
- OK
- If you want to accept the changes without previewing.
- Cancel
- If you do not want to replace the target string.
- Search
- If you want to display a list of all the places where the target string can be found.
- Cancel
- If you want to cancel the search.
Related tasks
Related reference
2.10.5. Edit configuration files
An editor with a unique name is available in the Eclipse client for each type of XML configuration file.
Each of these editors is a customized version of the IBM Web Deployment Descriptor Editor. By default, editors occupy the center of the client display.
Each editor has two pages:
- Design
- A graphical interface that organizes and simplifies the contents of the file.
- Source
- The XML source code.
Changes you make to one page are reflected on the other.
The Overview section of the editor displays elements contained in the file as a document tree, organized by type. You can use the Filter value to narrow the display of elements.
The Details section presents the selected element in a visual editor.
The Actions section includes links to actions that you can use to add content. This section effectively replaces the Add button in the Overview section, which is disabled.
The content that you can add comes from snippets, small sections of reusable code that are automatically available to you in the Configuration Workspace.
- To edit configuration files in Source mode, click the Source tab and make changes directly to the file contents.
- To edit specific elements in Design mode, complete the following steps:
- Click the Design tab.
- Expand an element from the Overview section.
- From the list for that element, select a section of editable code.
- Make changes to the information in the Details section.
- To add new code to the file, complete the following steps:
- Select an element in the Overview section where you want to make the addition.
- Click the link in the Actions section that specifies the code you want to add.
- Choose the raw materials for the new code. Typically this is a snippet, but other sources might also be required.
2.10.6. Edit .properties files
You can use the Eclipse client to edit any of the .properties files in the environment tree on the framework server.
AMC uses numerous .properties files. Only those files in the environment tree (RAFW_HOME/user/environments) can be edited in the Eclipse UI. Those files include, among many others:
- configure.properties
- install.properties
- promote.properties
You might also have application-specific .properties files or .properties files that you have renamed from templates.
- In the Configuration Workspace, locate and double-click the file you want to edit. The contents of the file are displayed as plain text in the editor area.
The editor uses ISO-8859-1 encoding by default when it opens files. AMC changes this encoding to UTF-8 for the known .properties files. For custom .properties files that use international characters, manually set the encoding to UTF-8.
- If you must reset the encoding for the file, complete the following steps:
- Right-click the file in the Configuration Workspace and click Properties. The Properties window is displayed.
- In the Properties window, in the Text file encoding section, click Other and select UTF-8 from the list.
- Click Apply and then click OK.
- When you have finished changing the file, press Ctrl-S to save it and click the X next to the file name to close it.
- To copy your changes from the workspace to the framework server, right-click the file name in the Configuration Workspace and then click Team > Save Changes to Server.
2.10.7. Use snippets
Use snippets to add new content to configuration files.
Snippets are small sections of reusable code. Snippets are currently available through configuration file editors only. The following editors use snippets:
- J2C Resources
- JDBC Resources
- JMS Resources
When you add a configuration definition with eligible resources to the Configuration Workspace, the appropriate snippets are also added automatically.
Add snippet code
Procedure
- In the Configuration Workspace view, locate an eligible resource file (J2C, JDBC, or JMS) and double-click the file to load it in the editor.
- In the Overview section of the editor, select an element for which you want to add new code, such as JDBC Data Source Configuration.
- Expand the Actions section and click the link to add new code, such as Create Data Source. A window is displayed that requests a source snippet.
- To make changes to the snippet code before you add it to your file, click Edit Snippets. A list of all available snippets is displayed. Select a snippet to display the associated code in the editing pane, where you can make changes to that code. When you have finished editing snippets, click OK.
- Select a source snippet from the list. If further input is required, click Next. When you have supplied all necessary input, click Finish. The new code is added to the file.
Related tasks
Saving code as a snippet
Procedure
- In the Overview section of the editor, select a section of code.
- In the Actions section, click Add as snippet.
- The section of code is saved automatically.
2.10.8. Manage user security
Security for the Eclipse client is enabled through manual edits to the securitymappings.xml file.
The securitymappings.xml file controls access to configuration definitions within the Configuration perspective of the Eclipse client. Changes made to the file have no effect on actions run in the web client or through the product command line.
Access can be controlled for the automation users and the groups that you set up through the web client. If a group or user does not appear in the securitymappings.xml file, that group or user has no access to artifacts in the Eclipse client. Additional conditions apply;
The default version of the file allows complete access for any member of any of the standard automation access groups. The following groups are standard:
- Build Engineer
- Developer
- Guest
- Operator
- Security
- System Manager
In addition, complete access is also extended to the root user.
You can create custom groups through the web client and add them to the securitymappings.xml file.
File structure
The file contains three child elements of the root <security> tag, which must appear in the following order in the file:
- environment
- A configuration environment for which you want to define security permissions. Each <environment> tag must specify either a pattern attribute or a name attribute:
- pattern
- A range of configuration environments to which group or user permissions apply. Use Java-style regular expressions. For example, to include all configuration definitions, use pattern=".+" rather than pattern="*".
- You cannot specify two patterns that can match the same configuration environment name. For example, you cannot specify both pattern=".+" and pattern="was_env.+". However, you can specify both pattern="was_env.+" and pattern="wps_env.+".
- name
- A specific configuration environment that is an exception to a pattern. The search results in a match from most specific (the name attribute) to least specific (the pattern attribute), and stops searching once a match is found.
- Within the <environment> element, you must include one or more <configuration> tags, each of which also requires either a pattern attribute or a name attribute that corresponds to a configuration definition on the framework server.
- snippet
- A list of groups or users or both for which you want to limit access to snippets. "WebSphere" is the only valid value for the name attribute; the pattern attribute is not used.
- configurationAdministrators
- A list of groups or users or both for which you want to define access to the console (including the configuration editor). The name and pattern attributes are not used.
Get access
For a user named UserA to use the Eclipse client to view or change artifacts in a configuration environment named myEnv and a WebSphere cell named Cell01, the following conditions must be met:
- In the securitymappings.xml file, myEnv must match a name or a pattern for an <environment> tag.
- Within that <environment> tag, Cell01 must match a name or a pattern for a <configuration> tag.
- Within these matching tags, UserA must be explicitly given access permission in a <user> tag or must be a member of a group that is given access permission in a <group> tag.
- myEnv/Cell01 must match a WebSphere cell in the AMC environments tree.
- You must have an automation context named RAFW_myEnv_Cell01.
- The automation group that owns the RAFW_myEnv_Cell01 environment must include UserA.
If any of these conditions is not met, access will fail for UserA.
- Permissions in the securitymappings.xml file are inclusive rather than exclusive.
- If a user has read permission but does not have write permission for a file, the read-only flag for that file is set before the file is opened. Any changes that user makes to the file will be lost when the file is closed.
- To delete a configuration definition, a user must:
- Have write permission for that directory
- Be in the <configurationAdministrators> list, either as a user or as a group member.
- By default, the configuration generator creates a matching environment and project in the web client for each configuration definition that you create by using the configuration editor. These environment names have the following form:
RAFW_environmentName_configurationName
- The generator associates the web client environment and project with the automation access group defined in the RAFW_BF_GROUP property in the RAFW_HOME/buildforge.properties file. By default, the RAFW_BF_GROUP property is set to Build Engineer.
Editing the file
Be careful when editing the securitymappings.xml file. The server-side component of the Eclipse client checks the last-modified date for the file each time it processes a request, and if the file is newer than the one in memory, the file is reloaded. Make sure that the file is in a usable state each time you save it, or edit a copy and replace the original when you are finished with your edits.
The order of elements is critical for the file to be validated properly:
- The three top-level elements must be placed in the same order as in the default file:
- All <environment> elements
- The <snippet> element
- The <configurationAdministrators> element
- All <group> elements must precede any <user> elements.
The names of the permissions in the file appear to be the same as on UNIX (read, write, and execute), but the meanings of these permissions are specific to this file. See the definitions later in this section.
Within each <configuration>, <snippet>, or <configurationAdministrators> tag, define one or more <group> or <user> tags.
Each user or group in the <configurationAdministrators> list is granted permission to run the console and to delete configuration definitions. The read, write, and execute attributes are ignored.
The following table shows the attributes that are meaningful for the <group> or <user> tags within the <configuration>, <snippet>, or <configurationAdministrators> elements.
| Attribute | Meaningful within these elements | Values | Meaning |
|---|---|---|---|
| name |
<configuration> | The name of one of the following entities:
| |
| read |
<configuration> | true | The user or group member specified in the name attribute can see all available information. A user listed within a <configuration> tag can see all the information for the configuration definition. A user listed within a <snippet> tag can see all available snippets. |
| false | The user or group member specified in the name attribute has no access at all through the Eclipse client. | ||
| write |
<configuration> | true | The user or group member specified in the name attribute can write edited information to the target server. |
| false | The user or group member specified in the name attribute cannot save changes through the Eclipse client.
A user with read permission but not write permission can edit files or snippets, and is offered the option to save the edited information to the target server. However, without write permission, the save operation fails. | ||
| execute | <configuration> | true | The user or group member specified in the name attribute can use the dynamic run action feature. |
| false | The user or group member specified in the name attribute cannot use the dynamic run action feature. |
Examples
-
The following example shows how permissions are inclusive rather than exclusive in the securitymappings.xml file:
<environment name="myEnv">
      <configuration name="Cell01">
         <group name="Build Engineer" read="true"  write="true"  execute="true" />
         <group name="Guest"          read="false" write="false" execute="false" />
      </configuration>
</environment>
UserA is a member of both the Build Engineer and Guest groups. Because she has permission as a Build Engineer, she has access to the configuration artifacts for the specified configuration environment and cell, even though the Guest group is excluded. This is true even if you add the following line:
<user name="UserA" read="false" write="false" execute="false" />
Her membership in the Build Engineer group is more significant than her exclusion as a user.
-
The following example shows a default setting that gives full permission to all users in the standard groups. The opening <security> tag is copied from the default securitymappings.xml file:
<security xmlns="http://services.raf.rational.ibm.com/security"
   xmlns:xsi="http://www.w3.org/2001/XMLSchema-instance"
   xsi:schemaLocation="http://services.raf.rational.ibm.com/security SecuritySchema.xsd ">

   <environment pattern=".+">
      <configuration pattern=".+">
         <group name="Build Engineer" read="true" write="true" execute="true" />
         <group name="Security"       read="true" write="true" execute="true" />
         <group name="System Manager" read="true" write="true" execute="true" />
         <group name="Developer"      read="true" write="true" execute="true" />
         <group name="Operator"       read="true" write="true" execute="true" />
         <group name="Guest"          read="true" write="true" execute="true" />
         <user  name="root"           read="true" write="true" execute="true" />
      </configuration>
</environment>
The next entry in the file overrides the default in the case of the production environment, where only the custom Web Developer group is allowed write and execute permission. Among other requirements for this case, the owner of the RAFW_production_prodCell environment in the web client must be the Web Developer group.
   <environment name="production">
      <configuration pattern="prodCell">
         <group name="Web Developer" read="true" write="true" execute="true" />
      </configuration>
</environment>
A member of the Operator group cannot save files in the production environment because that group is not explicitly included in the list for the production environment.
The next entry gives full permission to edit, save, and run actions associated with snippets for all of the standard groups:
   <snippet name="WebSphere">
      <group name="Build Engineer" read="true" write="true" execute="true" />
      <group name="Security"       read="true" write="true" execute="true" />
      <group name="System Manager" read="true" write="true" execute="true" />
      <group name="Developer"      read="true" write="true" execute="true" />
      <group name="Operator"       read="true" write="true" execute="true" />
      <group name="Guest"          read="true" write="true" execute="true" />
      <user  name="root"           read="true" write="true" execute="true" />
   </snippet>
In the default file, the <configurationAdministrators> element gives permission to the same standard groups as shown in the preceding <snippet> element. In the following example, this element has been modified so that only the root user and members of the Build Engineer group have permission to run the console. Remember that the <group> element must come before the <user> element:
   <configurationAdministrators>
      <group name="Build Engineer" />
      <user  name="root" />
   </configurationAdministrators>
</security>
2.11. AMC and Rational Team Concert
You can place a configuration definition under source control management in IBM Rational Team Concert.
Use Rational Team Concert to store a configuration definition if you use source control management features such as version control. These features are useful when more than one person works on the cell definition before it is placed on a production server.
You can also use Rational Asset Manager to store a configuration definition if you track the lifecycle state of the definition from draft to reviewed to approved, and so on. Such tracking is useful after the cell definition goes into production.
When you use AMC with PureApplication System, you can use the AMC SCM Script Package to associate a VSP with a configuration definition stored in Rational Team Concert or in Rational Asset Manager.
Information flow
The following diagram shows the flow of information in the configuration storage scenarios. The configuration generator creates four automation plans. The "put" plans place a configuration definition in storage; the "get" plans retrieve the configuration from storage. A VSP can also use the "get" plans to retrieve a configuration.

2.11.1. Placing a configuration under source control
The configuration generator creates a set of automation plans that you can use to check configuration definitions in and out of Rational Team Concert.
If you want to use source control with Rational Team Concert, complete the following setup tasks:
- Run the IntegrateToBF command with the createAll or the createIntegrationArtifacts rtc option. This command creates two adaptors in the automation engine that handle the detailed work of checking configuration definitions in and out of source control:
- RAFW_SCM_CHECKIN_ADAPTOR
- RAFW_SCM_CHECKOUT_ADAPTOR
- Use IBM Installation Manager to install the Rational Team Concert command-line tool on the framework server.
- For version 4.0 and later, you can install the scm command-line tool only.
- For versions earlier than version 4.0, install the full client.
- In Rational Team Concert, create a user ID and password used only by AMC. Use this ID and password for the SCM_USERID and SCM_PASSWORD properties in the scmdefaults.properties file, discussed later, or for the SCM System Username and SCM System Password prompts in the configuration editor.
- Specify default values for the Source Control or Resource Management
Questions page of the configuration editor. When you install AMC, an scmdefaults.properties file is created in the RAFW_HOME/user/conf/scm directory.
By specifying values for the properties in this file, you do not need to enter them each time to create a configuration definition in source control or asset management.
You can specify some of these properties in the configuration editor, but you must edit the scmdefaults.properties file to provide a value for the following property:
- SCM_COMMAND
When you enter source control information in the configuration editor, the following automation plans are included in the output of the generation process:
| Automation plan | Description |
|---|---|
| RAFW_env_cell_scm_get | Uses the RAFW_SCM_CHECKOUT_ADAPTOR adaptor to check out the configuration definition from Rational Team Concert source control. |
| RAFW_env_cell_scm_put | Uses the RAFW_SCM_CHECKIN_ADAPTOR adaptor to check in the configuration definition to Rational Team Concert source control. |
You can call these automation plans directly to manage your configuration definitions.
- Verify that the scmdefaults.properties contains a correct value for the SCM_COMMAND property. You can also specify or update default values for the other prompts.
- Use the configuration editor to create a configuration definition. You can choose either the new configuration or the existing configuration option.
- At the end of the main set of questions, the wizard displays the following question:
Place this environment into a source control or asset management system?
Click yes to display the specific questions for source control. The output from the generator includes the automation plans described in "About this task." - Run the RAFW_env_cell_scm_put automation plan. This plan places the configuration definition under source control. Until you complete this step, you have the necessary structures and variables available, but have not stored the configuration.
2.11.2. Properties in the scmdefaults.properties file
Properties in the scmdefaults.properties file determine how to access Rational Team Concert or Rational Asset Manager from AMC.
Properties
See the Rational Team Concert documentation for more information on its concepts, such as repository, workspace, and component.
See the Rational Asset Manager documentation for more information on its concepts, such as repository and work directory.
The scmdefaults.properties is located in the following directory.
RAFW_HOME/user/conf/scm
The default values in scmdefaults.properties are used to populate values in the in the configuration editor if you answer yes to the question Place this environment into a source control or asset management system?.
| Property | Description |
|---|---|
| SCM_COMMAND | Fully qualified path to the SCM executable. |
| SCM_CONNECTION_NICKNAME | Name used by the put and get automation plans to refer to the SCM connection. |
| SCM_USERID | User ID used to access the Rational Team Concert server. This must be a user ID used only by AMC. |
| SCM_PASSWORD | Password for SCM_USERID. |
| SCM_REPOSITORY_URI | The URI for the repository to use on the Rational Team Concert server. |
| SCM_COMPONENT | Component in the repository to use. |
| SCM_WORKSPACE | Workspace in the repository to use. |
| SCM_WORKITEM | The ID of the work item that you use to check your configuration definition in to source control. |
| SCM_CHANGESET_COMMENT | A comment that is applied to the change set when you check your configuration definition in to source control. |
| AM_CELL_DEF_GUID | GUID for the cell definition asset in Rational Asset Manager. |
| AM_APPLICATION_GUID | GUID for the application asset in Rational Asset Manager. |
| AM_ANT_COMMAND | The fully qualified path to the ant executable. You can find this information in the Rational Asset Manager information center. |
| AM_ANT_LIBS | Full path to the directory where the ant libraries for Rational Asset Manager are located. You can find this information in the Rational Asset Manager information center. |
| AM_REPOSITORY_URI | The URI for the repository to use with Rational Asset Manager. Enter in the form http://hostname. If you use a port other than port 80, you must also include the port number: http://hostname:port. |
| AM_USERID | User ID used to log in to the Rational Asset Manager sever. |
| AM_PASSWORD | Password for AM_USERID. |
| AM_WORK_DIR | Temporary directory used for download assets. A unique subdirectory is created under this directory, so that multiple users can access the same asset simultaneously. |
2.11.3. Add a stored configuration to a virtual system pattern
You can deploy a VSP in the cloud by using a stored configuration definition.
You must have one of the following products installed:
- Rational Asset Manager
- Rational Team Concert
For Rational Asset Manager, complete the following steps:
- Run the IntegrateToBF command with either the createAll or the createIntegrationArtifacts ram option to create the adaptors necessary for using source control or asset management.
- Place a configuration definition into asset management;. Alternatively, you can place an application into asset management;
For Rational Team Concert, complete the following steps:
- Run the IntegrateToBF command with either the createAll or the addIntegrationArtifacts rtc option to create the adaptors necessary for using source control or asset management.
- Place a configuration definition into source control;
The AMC Integration script package adds configuration information from a specified environment and configuration to the new virtual server instance that PureApplication System creates. Add the AMC SCM Script Package to the VSP to read this configuration information from either Rational Team Concert or Rational Asset Manager. You can also install an application on the new instance by specifying an asset from Rational Asset Manager.
The AMC SCM Script Package is a part of the larger IBM SmartCloud Continuous Delivery solution.
- In PureApplication System, attach the AMC SCM Script Package to a virtual system pattern. This script package must be run before the Integration script package.
- Complete the information in the SCM script package, as shown in the following table:
Variables in the SCM script package
Variable Default Description SCM_WORKSPACE "N/A" One of the following kinds of identifiers for the Rational Team Concert workspace that contains the cell definition: - Workspace name
- Workspace alias
- Workspace UUID
SCM_SNAPSHOT "N/A" The identifier for the snapshot that contains the cell definition. SCM_BUILD_TYPE Regular One of the following build types: - Regular
- Personal
AM_CELL_DEF_VERSION "N/A" The version number you assigned to the configuration definition you stored in Rational Asset Manager. AM_APPLICATION_VERSION "N/A" The version number you assigned to the application you stored in Rational Asset Manager. You can optionally specify an application to be installed on the new instance at the same time that you specify a configuration definition to be read from storage.
- Optional: To create an entirely new environment and configuration definition when you deploy this VSP, enter a new environment name in the Integration script package before you deploy. If that environment does not exist on the framework server, a new environment and configuration definition is set up as part of the deployment process. That process uses information that it discovered in the new instance.
- Deploy the VSP. The configuration definition is written to the RAFW_HOME/user/environment directory with a new environment name composed of the old environment name, an underscore, and the ID of the new virtual system instance. If the original environment name is MyEnv and the ID of the instance is 1234,
the new environment is found in the following directory:
RAFW_HOME/user/environment/MyEnv_1234
2.11.4. Install a stored application on a virtual machine
When you deploy a virtual system pattern in PureApplication System, you can install an application on the new instance from Rational Asset Manager.
Store an archived application file as an Implementation asset in Rational Asset Manager. For information on storing assets, refer to the Rational Asset Manager documentation. Note the globally unique identifier (GUID) and the version number of the asset, both of which you will need later.
One common use for this capability is an onboarding scenario. Assume the following conditions:
- A physical server (not in the cloud) named Server1.
- An application, App1, running on Server1.
- An instance of Rational Asset Manager where App1 is stored.
Your goal is to move the work that Server1 does into the cloud:
- Run the configuration editor, existing configuration option, to capture the topology of Server1. Include the GUID for App1 in the asset management information. Complete all required information and click Generate.
- Run the Import automation plan to capture configuration information in the new cell definition.
- Create a template in the Eclipse client that represents your standard configuration.
- In the Eclipse client, create a VSP, VSP1, that is based on the template. VSP1 contains the topology of Server1.
- Attach the AMC SCM Script Package to VSP1 and specify the version number of App1.
- Deploy VSP1 to a new virtual server instance, Virt1. App1 is automatically installed on Virt1.
Virt1 can now assume the production duties of Server1.
You can place the configuration definition that contains the topology of Server1 under version control, or store it as an asset in Rational Asset Manager.
To install a stored application:
- Open the configuration editor and click Read an existing configuration. Answer yes to Place this environment into a source control or asset management system?
- Complete the asset management information, including the Asset Management Application GUID value.
- Complete all other required information and click Generate.
- Run the Import automation plan to capture configuration information in the definition you just created.
- In the Eclipse client, create a create a template that is based on the new configuration definition.
- Also in the Eclipse client, create a VSP from the new template.
- In PureApplication System, attach the AMC SCM Script Package to the new VSP. This script package must be run before the Integration script package.
- Provide the version number for the application asset in the AM_APPLICATION_VERSION value of the SCM script package. You are not required to complete any other information in the script package to install the stored application.
- Deploy the VSP. The specified application is automatically installed on the new instance.
2.12. AMC and Rational Asset Manager
You can manage a configuration definition as an asset by using IBM Rational Asset Manager, or install an application that is stored as an asset in Rational Asset Manager.
Use Rational Asset Manager to store a configuration definition if you track the lifecycle state of the definition from draft to reviewed to approved, and so on. Such tracking is useful after the cell definition goes into production.
You can also use Rational Team Concert to store a configuration definition if you use source control management features such as version control. These features are useful when more than one person works on the cell definition before it is placed on a production server.
When you use Advanced Middleware Configuration with PureApplication System, you can use the AMC SCM Script Package to associate a VSP with a configuration definition stored in Rational Team Concert or in Rational Asset Manager.
You can use AMC to install an application that is stored as an asset in Rational Asset Manager.
Information flow
The following diagram shows the flow of information in the configuration storage scenarios. The configuration generator creates four automation plans. The "put" plans place a configuration definition in storage; the "get" plans retrieve the configuration from storage. A VSP can also use the "get" plans to retrieve a configuration.
2.12.1. Placing a configuration under asset management
The configuration generator creates a set of automation plans that you can use to check configuration definitions in and out of Rational Asset Manager.
If you want to use asset management with Rational Asset Manager, complete the following setup tasks:
- Run the IntegrateToBF command with the createAll or the createIntegrationArtifacts ram option. This command creates two libraries in the automation engine that handle the detailed work of checking configuration definitions in and out of source control:
- RAFW_AM_CHECKOUT_LIBRARY
- RAFW_AM_CHECKIN_LIBRARY
- Install the Rational Asset Manager client on the framework server by using IBM Installation Manager.
- Ensure that Apache Ant 1.7.1 is installed on the framework server.
- Connect the Rational Asset Manager client to IBM Rational Build Forge, following instructions in the Rational Asset Manager Information Center.
- Specify default values for the Source Control or Resource Management
Questions page of the configuration editor. When you install AMC, an scmdefaults.properties file is created in the RAFW_HOME/user/conf/scm directory.
By specifying values for the properties in this file, you do not need to enter them each time to create a configuration definition in source control or asset management.
You can specify some of these properties in the configuration editor, but you must edit the scmdefaults.properties file to provide values for the following properties:
- AM_ANT_COMMAND
- AM_ANT_LIBS
When you enter asset management information in the configuration editor, the following automation plans are included in the output of the generation process:
| Automation plan | Description |
|---|---|
| RAFW_env_cell_am_get | Uses the RAFW_AM_CHECKOUT_LIBRARY library to check out the configuration definition from Rational Asset Manager asset management. |
| RAFW_env_cell_am_put | Uses the RAFW_AM_CHECKIN_LIBRARY library to check in the configuration definition to Rational Asset Manager asset management. |
You can call these automation plans directly to manage your configuration definitions.
- Verify that the scmdefaults.properties contains correct values for the AM_ANT_COMMAND and AM_ANT_LIBS properties. You can also specify or update default values for the other prompts.
- Use the configuration editor to create a configuration definition. You can choose either the new configuration or the existing configuration option.
- At the end of the main set of questions, the wizard displays the following question:
Place this environment into a source control or asset management system?
Click yes to display the specific questions for asset management. The output from the generator includes the automation plans described in "About this task." - Run the RAFW_env_cell_am_put automation plan. This plan places the configuration definition under asset management. Until you complete this step, you have the necessary structures and variables available, but have not stored the configuration.
2.13. Add support for other products
Modules expand the range of configuration definitions that you can create and manage.
Through the use of modules, AMC can deal with products that do not use the standard WebSphere directory structure of cells, nodes, clusters, and servers. A module provides a way to parse a non-standard command line, as in WAS Liberty profile, which has only "profile" and "server" scopes.
Modules are available automatically through the configuration editor. Any available modules are displayed in the list of templates, and are used to determine the questions you answer in the editor.
On the rafw or rafwEnvBuild command line, use the -product option to specify a module name.
IBM business partner MidVision provides extensions to AMC by using modules.
Advanced users of AMC can create their own modules. Define a module by supplying the configuration in a .XML file located at RAFW_HOME/product/conf/modules. The required classes must be included in a .jar file along with any additional .jar files required by the module. The .jar file must be located in the pathRAFW_HOME/modules/module_name/lib/.
2.14. Create custom actions
Provides reference information for users who want to create custom actions.
You can create a custom action for any repeatable process to automate, for example:
- Create a custom action for a process unique to your business.
- Modify an existing action so that it behaves differently.
- Create a custom action for an unsupported automation target.
2.14.1. Anatomy of an action
An action performs a unit of work that is part of a larger automation process.
Some actions are self-contained, but most call other actions to complete a process. For example, deploying an application, installing a product, or configuring a product.
The following are some basic action characteristics that apply to product actions and to custom actions:
- Actions can define different behaviors for up to five modes: execute, augment, import, compare, and promote. The same action behaves differently when run in a different mode.
- Actions are divided into four categories: install, configure, deploy, and model.
- Actions are implemented in Ant and typically run on a target system. Actions that have been marked for local execution, like model actions, run on the framework server. Most model actions affect the environment cell definition.
The illustration shows the other actions called by the composite action was_70_install_with_all_patches, which installs and patches WAS V7.0:
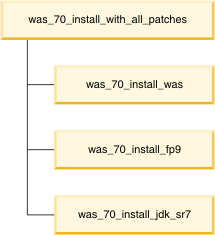
2.14.2. Procedure for creating custom actions
This topic describes the procedure for creating a custom action.
Workflow diagram for creating a custom action
The workflow diagram shows the main tasks.

Workflow description for creating a custom action
- Create the custom action.
Decide what you want to automate. You can create an action for any repeatable process. A script or program that you are already using can be the basis for a custom action. Another option is creating a custom action by modifying the function of an existing action.
- Save your custom action to the correct build file in the user tree.
To select the build file for your custom action, use the following criteria. The user tree build files are listed in Reference for selecting Ant build files.
- Action category. Select the action category: install, configure,
deploy, or model.
The default execution location for actions is the remote target system. To change the execution location, target system or framework server, use the location attribute of the <rafwaction> task element.
- Product. Select one of the following products:
- IHS
- If the custom action applies to IBM HTTP Server only.
- WAS
- If the custom action applies to WAS only.
- WESB
- If the custom action applies to WebSphere Enterprise Service Bus only.
- WP
- If the custom action applies to WebSphere Portal only.
- WPS
- If the custom action applies to WebSphere Process Server only.
- WSRR
- If the custom action applies to WebSphere Service Registry and Repository only.
- WVE
- If the custom action applies to WebSphere Virtual Enterprise only.
- Product version. Select a specific product version or select common (all product versions).
- Scope. Select one of the following scopes for the action:
- Cell
- The action can be run at the cell scope. If you use managed nodes, the action runs on the deployment manager node.
- Cluster
- The action can be run on any server in the cluster
- Node
- The action can be run on any node in the cell.
- Server
- The action can be run on any server in the node.
- Action category. Select the action category: install, configure,
deploy, or model.
- Modify the elements for the custom action in the build file.
The standard elements in the build file that you modify or create for your custom action are: <rafwaction> and <target>.
Use the name attribute to specify the custom action name. Prefix the custom action name with user _ to distinguish it from other actions.
- Test the custom action.
Run the rafw command with the -list option to verify that the custom action is listed as an available action.
Run the action and specify the -preview option to verify the Ant syntax and order of operations.
- Run the custom action on a target system or on the local framework server.
2.14.3. Documenting custom actions
You can write help documentation for any custom actions you create.
You create an action help topic as a plain text (.txt) file that has the same base name as the action you created. For example, if you create an action named my_new_action, name the help file my_new_action.txt.
The first time you open the associated action in the AMC Eclipse client, the client converts the help file to HTML. If you use certain recognized headers, the conversion program formats those headers as bold text. See the following instructions for a list of recognized headers. If you update the text version of a custom action help file, you must delete the existing HTML file to get an updated HTML version.
- Select an existing topic to use as a model for your help file. You can display the help topic
for an action in either of these two ways:
- In the Eclipse client, right-click a scope in the Configuration Explorer and click Run Action. Select an action. The help is displayed in the Dynamic Action Help view.
- From the command line, run the following command:
rafw -manual action_name
- Create a help file in the RAFW_HOME/user/help directory. Alternatively, you can copy an existing file into the RAFW_HOME/user/help directory and change the file name. Text file versions of the action help files supplied by AMC are located in the RAFW_HOME/product/help directory, grouped by product. For example, the was_70_install_fp17.txt file is located in the RAFW_HOME/product/help/was/70 directory.
- Add or modify the text in the file and save the file. See Step 1 for instructions on how to display the content.
Only the following headings are recognized by the program that converts your text file to HTML:
- Target:
- Description:
- Required Data:
- Optional Data:
- Supported Modes:
- Restrictions:
- Notes:
- Related Actions:
- Required Media:
- Action:
- Summary:
- Details:
- Usage Examples:
- Supported Scopes:
- You can delete individual files from the customactionhelp directory,
or delete the entire directory. The location of the directory depends
on the application server that the automation engine uses:
- If you use Apache Tomcat, look in the following location on the framework server:
tomcat_installation_directory/webapps/rafservices/customactionhelp
- If you use WAS, look in the following location on the framework server:
node_profile_root/installedApps/cell/rafservices_war.ear/rafservices.war/customactionhelp
A typical value for node_profile_root is /opt/IBM/WebSphere/AppServer/profiles/node01. Delete the files for each node in the WebSphere installation.
- If you use Apache Tomcat, look in the following location on the framework server:
2.14.4. Reference for selecting Ant build files
Custom actions are saved to Ant build files in the user tree. In the user tree, you can find build files at RAFW_HOME/users/actions.
Like other actions, custom actions are created for a specific action category, product, product version, and scope.
The following tables group build files by product and by action type: configure, install, deploy, and model.
Build files for WAS: configure, deploy, install, and model actions
Configure action build files for WAS
| User tree path (RAFW_HOME/users/actions) | Build file name | Scope |
|---|---|---|
| configure/was/60/base | custom_configure_was60_base.xml | node |
| configure/was/60/base | custom_configure_was60_base_dmgr.xml | node, deployment manager node |
| configure/was/60/base/server | custom_configure_was60_base_server.xml | server |
| configure/was/60/base/server | custom_configure_was60_base_proxy_server.xml | proxy server |
| configure/was/60/nd | custom_configure_was60_nd.xml | cell |
| configure/was/60/nd | custom_configure_was60_nd_managed.xml | cell |
| configure/was/60/nd/cluster | custom_configure_was60_nd_cluster.xml | cluster |
| configure/was/61/base | custom_configure_was61_base.xml | node |
| configure/was/61/base | custom_configure_was61_base_dmgr.xml | node, deployment manager node |
| configure/was/61/base/server | custom_configure_was61_base_server.xml | server |
| configure/was/61/nd | custom_configure_was61_nd.xml | cell |
| configure/was/61/nd | custom_configure_was61_nd_managed.xml | cell |
| configure/was/61/nd/cluster | custom_configure_was61_nd_cluster.xml | cluster |
| configure/was/70/base | custom_configure_was70_base.xml | node |
| configure/was/70/base | custom_configure_was70_base_dmgr.xml | node, deployment manager node |
| configure/was70/base/server | custom_configure_was70_base_server.xml | server |
| configure/was70/base/server | custom_configure_was70_base_proxy_server.xml | proxy server |
| configure/was/70/nd | custom_configure_was70_nd.xml | cell |
| configure/was/70/nd | custom_configure_was70_nd_managed.xml | cell |
| configure/was/70/nd/cluster | custom_configure_was70_nd_cluster.xml | cluster |
| configure/was/80/base | custom_configure_was80_base.xml | node |
| configure/was/80/base | custom_configure_was80_base_dmgr.xml | node, deployment manager node |
| configure/was/80/base/server | custom_configure_was80_base_server.xml | server |
| configure/was/80/base/server | custom_configure_was80_base_proxy_server.xml | proxy server |
| configure/was/80/nd | custom_configure_was80_nd.xml | cell |
| configure/was/80/nd | custom_configure_was80_nd_managed.xml | cell |
| configure/was/80/nd/cluster | custom_configure_was80_nd_cluster.xml | cluster |
| configure/was/85/base | custom_configure_was85_base.xml | node |
| configure/was/85/base | custom_configure_was85_base_dmgr.xml | node, deployment manager node |
| configure/was/85/base/server | custom_configure_was85_base_server.xml | server |
| configure/was/85/base/server | custom_configure_was85_base_proxy_server.xml | proxy server |
| configure/was/85/nd | custom_configure_was85_nd.xml | cell |
| configure/was/85/nd | custom_configure_was85_nd_managed.xml | cell |
| configure/was/85/nd/cluster | custom_configure_was85_nd_cluster.xml | cluster |
| configure/was/common | custom_configure_was_common.xml | cell, node, deployment manager node, cluster, server |
| configure/was/common/base | custom_configure_was_common_base.xml | node |
| configure/was/common/base | custom_configure_was_common_base_dmgr.xml | node, deployment manager node |
| configure/was/common/base | incubator_configure_was_common_base_dmgr.xml | node, deployment manager node |
| configure/was/common/base/server | custom_configure_was_common_base_server.xml | server |
| configure/was/common/base/server | custom_configure_was_common_base_proxy_server.xml | proxy server |
| configure/was/common/nd | custom_configure_was_common_nd.xml | cell |
| configure/was/common/nd/cluster | custom_configure_was_common_nd_cluster.xml | cluster |
Deploy action build files for WAS
| User tree path (RAFW_HOME/users/actions) | Build file name | Scope |
|---|---|---|
| deploy/was/60/base | custom_deploy_was60_base.xml | node |
| deploy/was/60/nd/cluster | custom_deploy_was60_nd_cluster.xml | cluster |
| deploy/was/60/base/server | custom_deploy_was60_base_server.xml | server |
| deploy/was/60/nd | custom_deploy_was60_nd.xml | cell |
| deploy/was/61/base | custom_deploy_was61_base.xml | node |
| deploy/was/61/nd | custom_deploy_was61_nd.xml | cell |
| deploy/was/61/base/server | custom_deploy_was61_base_server.xml | server |
| deploy/was/61/nd/cluster | custom_deploy_was61_nd_cluster.xml | cluster |
| deploy/was/70/base | custom_deploy_was70_base.xml | node |
| deploy/was/70/nd | custom_deploy_was70_nd.xml | cell |
| deploy/was/70/base/server | custom_deploy_was70_base_server.xml | server |
| deploy/was/70/nd/cluster | custom_deploy_was70_nd_cluster.xml | cluster |
| deploy/was/80/base | custom_deploy_was80_base.xml | node |
| deploy/was/80/nd | custom_deploy_was80_nd.xml | cell |
| deploy/was/80/base/server | custom_deploy_was80_base_server.xml | server |
| deploy/was/80/nd/cluster | custom_deploy_was80_nd_cluster.xml | cluster |
| deploy/was/85/base | custom_deploy_was85_base.xml | node |
| deploy/was/85/nd | custom_deploy_was85_nd.xml | cell |
| deploy/was/85/base/server | custom_deploy_was85_base_server.xml | server |
| deploy/was/85/nd/cluster | custom_deploy_was85_nd_cluster.xml | cluster |
| deploy/common/base/server | custom_deploy_was_common_base.xml | server |
| deploy/common/nd/cluster | custom_deploy_was_common_nd_cluster.xml | cluster |
Install action build files for WAS
| User tree path (RAFW_HOME/users/actions) | Build file name | Scope |
|---|---|---|
| install/was/60 | custom_install_was60.xml | node |
| install/was/61 | custom_install_was61.xml | node |
| install/was/70 | custom_install_was70.xml | node |
| install/was/80 | custom_install_was80.xml | node |
| install/was/85 | custom_install_was85.xml | node |
| install/was/common | custom_install_was_common.xml | node |
Model action build files for WAS
| User tree path (RAFW_HOME/users/actions) | Build file name | Scope |
|---|---|---|
| model/was/60/base | custom_model_was60_base.xml | node |
| model/was/60/base | custom_model_was60_base_dmgr.xml | node, deployment manager node |
| model/was/60/base/server | custom_model_was60_base_server.xml | server |
| model/was/60/nd | custom_model_was60_nd.xml | cell |
| model/was/60/nd/cluster | custom_model_was60_nd_cluster.xml | cluster |
| model/was/61/base | custom_model_was61_base.xml | node |
| model/was/61/base | custom_model_was61_base_dmgr.xml | node, deployment manager node |
| model/was/61/base/server | custom_model_was61_base_server.xml | server |
| model/was/61/nd | custom_model_was61_nd.xml | cell |
| model/was/61/nd/cluster | custom_model_was61_nd_cluster.xml | cluster |
| model/was/70/base | custom_model_was70_base.xml | node |
| model/was/70/base | custom_model_was70_base_dmgr.xml | node, deployment manager node |
| model/was/70/base/server | custom_model_was70_base_server.xml | server |
| model/was/70/nd | custom_model_was70_nd.xml | cell |
| model/was/70/nd/cluster | custom_model_was70_nd_cluster.xml | cluster |
| model/was/80/base | custom_model_was80_base.xml | node |
| model/was/80/base | custom_model_was80_base_dmgr.xml | node, deployment manager node |
| model/was/80/base/server | custom_model_was80_base_server.xml | server |
| model/was/80/nd | custom_model_was80_nd.xml | cell |
| model/was/80/nd/cluster | custom_model_was80_nd_cluster.xml | cluster |
| model/was/85/base | custom_model_was85_base.xml | node |
| model/was/85/base | custom_model_was85_base_dmgr.xml | node, deployment manager node |
| model/was/85/base/server | custom_model_was85_base_server.xml | server |
| model/was/85/nd | custom_model_was85_nd.xml | cell |
| model/was/85/nd/cluster | custom_model_was85_nd_cluster.xml | cluster |
| model/was/common | custom_model_was_common.xml | cell, node, deployment manager node, cluster, server |
| model/was/common/base | custom_model_was_common_base.xml | node |
| model/was/common/base/server | custom_model_was_common_base_server.xml | server |
| model/was/common/nd | custom_model_was_common_nd.xml | cell |
| model/was/common/nd/cluster | custom_model_was_common_nd_cluster | cluster |
Build files for IBM HTTP Server: configure and install actions
Configure action build files for IBM HTTP Server
| User tree path (RAFW_HOME/users/actions) | Build file name | Scope |
|---|---|---|
| configure/ihs/60 | custom_config_ihs60.xml | IHS node |
| configure/ihs/61 | custom_config_ihs61.xml | IHS node |
| configure/ihs/70 | custom_config_ihs70.xml | IHS node |
| configure/ihs/80 | custom_config_ihs80.xml | IHS node |
| configure/ihs/85 | custom_config_ihs85.xml | IHS node |
| configure/ihs/common | custom_config_ihs_common.xml | IHS node |
Install action build files for IBM HTTP Server
| User tree path (RAFW_HOME/users/actions) | Build file name | Scope |
|---|---|---|
| install/ihs/60 | custom_install_ihs60.xml | IHS node |
| install/ihs/61 | custom_install_ihs61.xml | IHS node |
| install/ihs/70 | custom_install_ihs70.xml | IHS node |
| install/ihs/80 | custom_install_ihs80.xml | IHS node |
| install/ihs/85 | custom_install_ihs85.xml | IHS node |
| install/ihs/common | custom_install_ihs_common.xml | IHS node |
Build files for WebSphere Portal: configure, deploy, and install actions
Configure action build files for WebSphere Portal
| User tree path (RAFW_HOME/users/actions) | Build file name | Scope |
|---|---|---|
| configure/wp/60 | custom_configure_wp60.xml | node |
| configure/wp/61 | custom_configure_wp61.xml | node |
| configure/wp/70 | custom_configure_wp70.xml | node |
| configure/wp/common | custom_configure_wp6x_common.xml
custom_configure_wp51_and_wp60_common.xml custom_configure_wp_common.xml | node |
Deploy action build files for WebSphere Portal
| User tree path (RAFW_HOME/users/actions) | Build file name | Scope |
|---|---|---|
| deploy/wp/60 | custom_deploy_wp60.xml | node |
| deploy/wp/61 | custom_deploy_wp61.xml | node |
| deploy/wp/70 | custom_deploy_wp70.xml | node |
| deploy/wp/common | custom_deploy_wp_common.xml | node |
Install action build files for WebSphere Portal
| User tree path (RAFW_HOME/users/actions) | Build file name | Scope |
|---|---|---|
| install/wp/60 | custom_install_wp60.xml | node |
| install/wp/61 | custom_install_wp61.xml | node |
| install/wp/70 | custom_install_wp70.xml | node |
Build files for WebSphere Process Server: configure actions
Configure action build files for WebSphere Process Server
| User tree path (RAFW_HOME/users/actions) | Build file name | Scope |
|---|---|---|
| configure/wps/common/base | custom_configure_wps_common_base.xml | node |
| configure/wps/common/base | custom_configure_wps_common_base_dmgr.xml | deployment manager node |
| configure/wps/common/nd | custom_configure_wps_common_nd.xml | cell |
| configure/wps/common/nd/cluster | custom_configure_wps_common_nd_cluster.xml | cluster |
| configure/wps/common/base/server | custom_configure_wps_common_base_server.xml | server |
| configure/wps/common | custom_configure_wps_common.xml | cell, node, deployment manager node, cluster, server |
| configure/wps/70/base | custom_configure_wps70_base.xml | node |
| configure/wps/70/nd | custom_configure_wps70_nd.xml | cell |
| configure/wps/70/nd/cluster | custom_configure_wps70_nd_cluster.xml | cluster |
| configure/wps/70/base/server | custom_configure_wps70_base_server.xml | server |
| configure/wps/62/base | custom_configure_wps62_base.xml | node |
| configure/wps/62/nd | custom_configure_wps62_nd.xml | cell |
| configure/wps/62/nd/cluster | custom_configure_wps62_nd_cluster.xml | cluster |
| configure/wps/62/base/server | custom_configure_wps62_base_server.xml | server |
Build files for WebSphere Enterprise Service Bus: configure actions
Configure action build files for WebSphere Enterprise Service Bus
| User tree path (RAFW_HOME/users/actions) | Build file name | Scope |
|---|---|---|
| configure/wesb/common/base | custom_configure_wesb_common_base.xml | node |
| configure/wesb/common/base | custom_configure_wesb_common_base_dmgr.xml | deployment manager node |
| configure/wesb/common/nd | custom_configure_wesb_common_nd.xml | cell |
| configure/wesb/common/nd/cluster | custom_configure_wesb_common_nd_cluster.xml | cluster |
| configure/wesb/common/base/server | custom_configure_wesb_common_base_server.xml | server |
| configure/wesb/common | custom_configure_wesb_common.xml | node, deployment manager node, cell, cluster, server |
| configure/wesb/62/base/ | custom_configure_wesb62_base.xml | node |
| configure/wesb/62/nd/ | custom_configure_wesb62_nd.xml | cell |
| configure/wesb/62/nd/cluster/ | custom_configure_wesb62_nd_cluster.xml | cluster |
| configure/wesb/62/base/server/ | custom_configure_wesb62_base_server.xml | server |
Build files for WebSphere Virtual Enterprise: configure, deploy, and install actions
Configure action build files for WebSphere Virtual Enterprise
| User tree path (RAFW_HOME/users/actions) | Build file name | Scope |
|---|---|---|
| configure/wve/common/base/ | custom_configure_wve_common_base.xml | node |
| configure/wve/common/nd/ | custom_configure_wve_common_nd.xml | cell |
| configure/wve/common/base/server/ | custom_configure_wve_common_base_server.xml | server |
| configure/wve/common/nd/cluster/ | custom_configure_wve_common_nd_cluster.xml | cluster |
| configure/wve/common/ | custom_configure_wve_common.xml | node, deployment manager node, cell, cluster, server |
| configure/wve/61/base/ | custom_configure_wve61_base.xml | node |
| configure/wve/61/nd/ | custom_configure_wve61_nd.xml | cell |
| configure/wve/61/nd/cluster/ | custom_configure_wve61_nd_cluster.xml | cluster |
| configure/wve/61/base/server/ | custom_configure_wve61_base_server.xml | server |
| configure/wve/70/base/ | custom_configure_wve70_base.xml | node |
| configure/wve/70/nd/ | custom_configure_wve70_nd.xml | cell |
| configure/wve/70/nd/cluster/ | custom_configure_wve70_nd_cluster.xml | cluster |
| configure/wve/70/base/server/ | custom_configure_wve70_base_server.xml | server |
Deploy action build files for WebSphere Virtual Enterprise
| User tree path (RAFW_HOME/users/actions) | Build file name | Scope |
|---|---|---|
| deploy/wve/common/ | custom_deploy_wve_common.xml | cell, cluster |
Install action build files for WebSphere Virtual Enterprise
| User tree path (RAFW_HOME/users/actions) | Build file name | Scope |
|---|---|---|
| install/wve/common/ | custom_install_wve_common.xml | node |
| install/wve/61/ | custom_install_wve61.xml | node |
| install/wve/70/ | custom_install_wve70.xml | node |
Build files for WebSphere Service Registry and Repository: configure and install actions
Configure action build files for WebSphere Service Registry and Repository
| User tree path (RAFW_HOME/users/actions) | Build file name | Scope |
|---|---|---|
| configure/wsrr/common/base/ | custom_configure_wsrr_common_base.xml | node |
| configure/wsrr/common/nd/ | custom_configure_wsrr_common_nd.xml | cell |
| configure/wsrr/common/base/server/ | custom_configure_wsrr_common_base_server.xml | server |
| configure/wsrr/common/nd/cluster | custom_configure_wsrr_common_nd_cluster.xml | cluster |
| configure/wsrr/common/ | custom_configure_wsrr_common.xml | node, deployment manager node, cell, cluster, server |
| configure/wsrr/62/base/ | custom_configure_wsrr62_base.xml | node |
| configure/wsrr/63/base/ | custom_configure_wsrr63_base.xml | node |
| configure/wsrr/62/nd/ | custom_configure_wsrr62_nd.xml | cell |
| configure/wsrr/63/nd/ | custom_configure_wsrr63_nd.xml | cell |
| configure/wsrr/62/nd/cluster/ | custom_configure_wsrr62_nd_cluster.xml | cluster |
| configure/wsrr/63/nd/cluster/ | custom_configure_wsrr63_nd_cluster.xml | cluster |
| configure/wsrr/62/base/server/ | custom_configure_wsrr62_base_server.xml | server |
| configure/wsrr/63/base/server/ | custom_configure_wsrr63_base_server.xml | server |
Install action build files for WebSphere Service Registry and Repository
| User tree path (RAFW_HOME/users/actions) | Build file name | Scope |
|---|---|---|
| install/wsrr/common/ | custom_install_wsrr_common.xml | node |
| install/wsrr/62/ | custom_install_wsrr62.xml | node |
| install/wsrr/63/ | custom_install_wsrr63.xml | node |
2.14.5. Structure of Ant build file for custom actions
The Ant build XML files in the user tree can be modified to include your custom actions.
You can add actions to the build files located in RAFW_HOME/user/actions. The XML files follow a standard structure. Example sections are optional and are only necessary if required by your custom actions.
Examples that describe build file modifications for custom actions are provided.
<project default="default" basedir=".">
	<description>
		a brief description of this file 	</description>

	<!-- Any taskdefs for custom tasks in Ant -->
	<taskdef resource="net/sf/antcontrib/antlib.xml" />

	<!-- Import declarations for any actions/targets that are shared across many
       products/scopes/versions -->
	<import file="${RAFW_HOME}/user/lib/ant_utils.xml" />

  <!-- Import any global properties defined in a .properties file -->
	<property file="${RAFW_HOME}/user/actions/configure/was/common/
                              user_was_common.properties" />

	<!-- Define the meta data about which modes and locations your custom        action supports -->
	<rafwaction name="user_custom_action"
	            executemode="true"
	            augmentmode="true"
	            comparemode="true"
	            importmode="true"
	            promotemode="true" />
	 <!-- Define your custom action -->
	<target name="user_custom_action" description="Your custom action">
	</target>

	<!-- repeat for as many actions as are necessary -->
</project>
2.14.6. Element reference for rafwaction
Use the parameters for the <rafwaction> element to define metadata for your custom actions.
Description
<rafwaction> is an Ant datatype, and is used to define metadata for Advanced Middleware Configuration for PureApplication System actions.
When no metadata is defined, the action supports execute, import, and compare modes. By default, the preview flag is supported. When the action is run in any mode with the preview flag, the action displays messages without changing the configuration.
Example:
<rafwaction name="was_common_configure_sharedlibs"
                 augmentmode="true"
                 comparemode="true"
                 importmode="true"
                 promotemode="true" />
<target name="was_common_configure_sharedlibs"
             description="Manages sharedlibs">
	Implementation of the target </target>
Parameters
The following table describes the parameters for <rafwaction>.
| Attribute | Description | Type | Required |
|---|---|---|---|
| unsupportedplatforms | A comma separated list of platforms on which this action is not supported to run. An empty string (the default) indicates that all platforms are supported | String | No
Default value "" |
| name | The name of the action to which the metadata applies | String | Yes |
| location | Used to indicate where the action will be run.
Use a comma separated list to specify more than one location. The options are:
| String | No
Default value "remote" |
| global | Used to indicate the scope of actions to which the metadata applies. Set to 'true' if the metadata applies to all actions in the framework. This parameter is included only if the file which contains the metadata is included in the Ant project. | Boolean | No
Default value "false" |
| modes | Alternative method to set modes on the action by specifying a comma separated list of modes. Invalid modes in the list result in an error. Use specific mode attributes or nested mode type to specify modes. The following modes are supported:
| String | No
Default value "execute" |
| previewmode | Set to "true" by default. When set, displays preview messages without changing the configuration. | Boolean | No
Default value "true" |
| executemode | Set to "true" if execute mode is supported. | Boolean | No
Default value "true" |
| promotemode | Set to "true" if promote mode is supported | Boolean | No
Default value "false" |
| importmode | Set to "true" if import mode is supported. | Boolean | No
Default value "false" |
| augmentmode | Set to "true" if augment mode is supported. | Boolean | No
Default value "false" |
| comparemode | Set to "true" if compare mode is supported. | Boolean | No
Default value "false" |
Nested parameters
You can also use the following nested parameters with <rafwaction>.
- <inherit>
- This parameter is used to indicate that an action inherits metadata
from another action. Modes, locations, unsupported platforms, options and parameters can be inherited.
<rafwaction name="an_action">
	<inherit name="another_action"/>
</rafwaction>
Attribute Description Type Required name Used to specify the name of the action whose metadata will be inherited. String Yes - <option>
- Adds an option to the set of -opt fields available for the action.
<rafwaction name="some_action">
 <option name="augmentDir" required="false" modes="augment,promote"/>
</rafwaction>
Attribute Description Type Required name The name of the -opt option. String Yes valuerequired Set to "true" if the option requires a value Boolean No Default value "true"
modes Set modes on the option by using a comma separated list of modes. Invalid modes in the list result in an error. If the option is used by a specific mode only, indicate the mode. String No Default value "augment,execute,import,compare,promote" (all modes)
required Indicates if this -opt is required for the action to execute correctly. boolean No Default value "false"
- <parameter>
- Adds a parameter to the set of parameters available for the action.
<rafwaction name="some_action">
 <parameter name="app" required="false" valuerequired="true"/>
</rafwaction>
Attribute Description Type Required name The name of the parameter. String Yes valuerequired Set to "true" if the option requires a value Boolean No Default value "true"
modes Set modes on the parameter by using a comma separated list of modes. Invalid modes in the list result in an error. If the parameter is used by a specific mode only, indicate the mode. String No Default value "augment,execute,import,compare,promote" (all modes)
required Set to true if the parameter is required for the action to run. Boolean No Default value "false"
2.14.7. Example: Creating a custom action
This example creates a custom configuration action to support application deployment.
Your company uses an in-house script to automate part of your application deployment process. The script executes application server configuration required for application deployment.
- Create the script to be run by your custom action.
In the example, the deploy.sh script is an executable script that was created by one of your WebSphere administrators.
- Select the Ant build file for the custom action. Use the following criteria to select a build file from the build file tables listed
in Reference for selecting Ant build files.
- Select the action category: configure
- Select the product: WAS
- Select the product version: common (all versions)
- Select the action scope: node
Based on the answers listed, you selected the custom_configure_was_common_base.xml build file.
- Open the XML build file located at:
RAFW_HOME/user/actions/configure/was/common/base/custom_configure_was_common_base.xml.
<project default="default" basedir="."> <description> Contains custom configuration tasks for WAS common at the node scope </description> </project> - Add <rafwaction> and <target> elements.
In <rafwaction> enter a name for the action. Prefix custom actions with user_ to easily identify custom actions.
In <rafwaction>, you can enter additional metadata to support additional action modes (the default is execute) or to support local action execution (the default is remote).
In <target>, enter a description for the action.
<project default="default" basedir="."> <description> Contains custom configuration tasks for WAS common at the node scope </description> <rafwaction name="user_was_common_configure_run_deploy_sh"/> <target name="user_was_common_configure_run_deploy_sh" description="Runs the deploy.sh script"> </target> </project> - Add an <antcall> task to invoke a task from the product library
to execute the deploy.sh script. The product
library is: RAFW_HOME/product/lib.
The deploy.sh script does not require any external arguments. To pass external arguments to <antcall target=.execute.>, use the ARGS <param>.
<project default="default" basedir="."> <description> Contains custom configuration tasks for WAS common at the node scope </description> <rafwaction name="user_was_common_configure_run_deploy_sh"/> <target name="user_was_common_configure_run_deploy_sh" description="Runs the deploy.sh script"> <antcall target="execute"> <param name="EXECUTABLE" value="${RAFW_HOME}/user/actions/configure/ was/common/base/scripts/deploy.sh" /> </antcall> </target> </project> - Place deploy.sh in RAFW_HOME/user/actions/configure/was/common/base/scripts.
If the scripts directory does not exist, create it.
The deploy.sh script is an executable script and its permissions are retained when the file is transferred to the target system.
- Test the user_was_common_configure_run_deploy_sh action.
- List the actions available at the node scope to confirm that the custom action is available:
rafw.sh -e env_name -c cell_name -n node_name -l
- Run the action in the execute mode with the -preview option.
Preview runs the action but does not execute the deploy.sh script on the target system.
rafw.sh -e env_name -c cell_name -n node_name -preview
-t user_was_common_configure_run_deploy_sh
- List the actions available at the node scope to confirm that the custom action is available:
- Run the user_was_common_configure_run_deploy_sh action on the target system.
rafw.sh -e env_name -c cell_name -n node_name
-t user_was_common_configure_run_deploy_sh
2.14.8. Example: Using an action as a model for creating your custom action
This example shows how to use the was_70_install_fp1 action as a model for creating a custom action.
Your WebSphere administrators need to install a patch, Fix Pack 21, which has just been released and is not yet supported by the framework. This example shows you how to create a custom action based on the was_70_install_fp1 action and modify the patch that the action installs.
- Because AMC actions are part of the product, they might be updated the next time you install a new release. Use a customizable
Ant build file for custom actions. Use the following steps to select a build file from the build file tables listed in Reference for selecting Ant build files.
- Select the action category: install
- Select the product: WAS
- Select the product version: 70 (Version 7.0)
- Select the action scope: node
Based on the answers listed, you selected the custom_install_was70.xml build file. The build file is located at RAFW_HOME/user/actions/install/was/70/custom_install_was70.xml.
- You chose was_70_install_fp1 as a similar action to use as a model
for your new action. Use the print flag to copy the contents of the action to the terminal.
rafw.sh -env env_name -cell cell_name -node node_name -print was_70_install_fp1
- Copy the following elements of was_70_install_fp1 from the terminal:
<rafwaction location="remote,transfer" name="was_70_install_fp1"/> <target description="Install WAS 7.0 Fix Pack 1" name="was_70_install_fp1"> <antcall target="was_install_patch_was_to_level"> <param name="PATCH_NAME" value="was70_fp1"/> </antcall> </target> - Open custom_install_was70.xml for editing,
and locate the following lines:
<project default="default" basedir="."> <description> Contains custom install tasks for WAS 70 Base </description> - Paste the code from was_70_install_fp1 after the closing </description> tag. Make sure the closing </project> tag is located after the lines you added.
- Change the new code to refer to Fix Pack 21 instead of Fix Pack 1 and update the PATCH_NAME value to match the name of the patch to install. Your code should now look
like the following example:
<project default="default" basedir="."> <description> Contains custom install tasks for WAS 70 Base </description> <rafwaction location="remote,transfer" name="user_was_70_install_fp21"/> <target name="user_was_70_install_fp21" description="Install WAS 7.0 Fix Pack 21"> <antcall target="was_install_patch_was_to_level"> <param name="PATCH_NAME" value="was70_fp21"/> </antcall> </target> </project> - Save and close the custom_install_was70.xml file.
- Test your custom action.
- List the actions available at the cell scope to verify that the custom action is available:
rafw.sh -env env_name -cell cell_name -node node_name -list
- Run the action in execute mode with the -preview option. Preview runs the action but does not make any configuration changes on the target system.
- List the actions available at the cell scope to verify that the custom action is available:
- Run the user_was_70_install_fp21 action in execute mode to install
the fix pack:
rafw.sh -env env_name -cell cell_name -node node_name -execute user_was_70_install_fp21
2.14.9. Example: Passing an option to a custom action
You can use the -opt flag to pass options to a custom AMC action.
You cannot create parameters for a custom action, but you can create options, which accomplish the same purpose. You supply a name-value pair for each option by using the -opt flag on the command line or the Options display in the Eclipse client.
The example in this topic illustrates the following activities:
- Include option tags within the rafwaction tag to notify the Eclipse client of available options to display in the Options section when the action is run. This metadata does not affect the behavior of the action itself, but affects how the other components of AMC respond to the action.
- Use the required attribute of the option tag to designate whether a particular option is required.
- Use the assertpropertyset tag to display an error message if a specified required option is not set.
- Use the isset tag to determine whether a non-required option has been set, and supply default values if it has not.
- Reference the -opt value for an option named xxx in Apache Ant as ${opt.xxx}.
Example code
The following example Ant file defines an action named custom_action. The example takes two -opt options:
- file
- outputFile
<rafwaction name="custom_action"
            executemode="true"
            importmode="true"
            comparemode="true"
            promotemode="true">
   <option name="outputFile" required="false" />
   <option name="file" required="true" />
</rafwaction>
<target name="custom_action"
        description="custom_action supports execute, import, compare and promote modes.">
   <assertpropertyset property="opt.file" message="You must specify a file" />
   <!--opt outputFile is optional, so set the default if it is not set -->
   <if>
      <not>
         <isset property="opt.outputFile" />
      </not>
      <then>
         <var name="opt.outputFile" value="${opt.file}.out" />
         <echo message="opt.outputFile was not specified, defaulting to ${opt.outputFile}"/>
      </then>
      <else>
         <echo message="you specified -opt outputFile as ${opt.outputFile}"/>
      </else>
   </if>
   <echo message="you specified -opt file as ${opt.file}"/>
</target>
To run this action from the command line, use a command similar to the following example:
rafw -e was_70_ny -c was_70_cell -t custom_action -opt "file=myFile" -opt "outputFile=/tmp/myOutput"where myFile is the path to a file that is assigned to the file option and /tmp/myOutput is the path to a file that is assigned to the outputFile option.
To run this action from the Eclipse client, expand the Options section and specify values for the file and outputFile options.
2.15. Dynamic loading of Java programs for use by custom actions
Dynamic classpath support for Java. allows users writing custom actions to easily incorporate reusable Java code in custom actions.
To include a Java program in a custom action, you copy the JAR file to the correct library directory in the user tree. Your compiled Java program files must be in JAR files.
- RAFW_HOME/user/lib/java
- Save JAR files to this directory if the Java program is only intended to be referenced as an Ant task and executed by Ant.
- JAR files saved to the java directory cannot be accessed by the wsadmin scripting client.
- RAFW_HOME/user/lib/java/wsadmin_lib
- Save JAR files to this directory if the Java program is called from a Jython program that is executed by the wsadmin scripting client.
- JAR files saved to the wsadmin_lib directory can also be accessed by Ant.
- JAR files in wsadmin_lib must be compiled
to use the earliest JDK version and Java runtime
environment (JRE) of target system in which they will be run.
For example, to be executed by wsadmin scripting client on a WebSphere V6.0 target system, the Java program must be compiled using JDK V1.4. A later JDK, for example JDK V1.6 and its JRE, can execute a Java program compiled using an earlier JDK.
2.15.1. Example: Running a Java program as an Ant task
This example creates a custom action with a single Ant task that invokes a Java. program to print .Hello World..
The custom action is available at the cell scope for a network deployment WAS cell.
The custom action is saved to the build file: custom_configure_was_common_nd.xml.
- Copy the JAR file that contains the compiled Java program files to RAFW_HOME/user/lib/java/hello-world.jar.
- Open the Ant build file for the custom action. The custom_configure_was_common_nd.xml file is located at:
RAFW_HOME/user/actions/configure/was/common/nd.
- Add the Ant task definition to the Ant build file.
<taskdef name="hello"
   classname="com.ibm.rational.rafw.ant.tasks.HelloWorldTask"/>
- Add the Ant target to the Ant build file.
<target name="user_say_hello" description="Use Java to say hello">
   <hello who="World"/>
</target>
The custom_configure_was_common_nd.xml build file includes the new custom action:
<?xml version="1.0" encoding="UTF-8"?> <project default="default" basedir="."> <description> Contains custom configuration tasks for WAS 61 ND </description> <taskdef name="hello" classname="com.ibm.rational.rafw.ant.tasks.HelloWorldTask"/> <target name="user_say_hello" description=.Use Java to say hello"> <hello who="World"/> </target> </project> - Test your custom action.
List the actions available at the cell scope to confirm that the custom action user_say_hello is available:
rafw.sh -e <env> -c <cell> -list
- Run the action on the target system.
rafw.sh -e <env> -c <cell> -t user_say_hello
2.15.2. Example: Running a Java program from a Jython program
This example creates a custom action that uses a Java. program to print .Hello World.. The Java program is called from a Jython program that is executed by the wsadmin scripting client.
In this example, the Java class file HelloWorld was compiled with a no-args constructor and contains a method called sayHello. The Java class file is contained in a Java package called hello that is saved to a JAR file called hello-world.jar.
The custom action is available at the cell scope for a network deployment WAS cell.
The custom action is saved to the build file: custom_configure_was_common_nd.xml.
- Copy the JAR file that contains the compiled Java program files to RAFW_HOME/user/lib/java/wsadmin_lib/hello-world.jar.
The hello-world.jar file is compiled using the JDK V1.4 so that it can be executed by the wsadmin client on a WebSphere V6.0 target system.
- Create a Jython program that invokes the Java sayHello method. Save the Jython program to hello.py: RAFW_HOME/user/actions/configure/was/common/nd/scripts/hello.py.
import hello.HelloWorld as HelloWorld

## parse any arguments from wsadmin and say hello
optDict, args = SystemUtils.getopt(sys.argv, 'who:')
recv= optDict['who']

talker = HelloWorld()
talker.sayHello(recv)
- Add the Ant target to the custom_configure_was_common_nd.xml build file located in RAFW_HOME/user/actions/configure/was/common/nd.
<target name="user_say_hello" description="Use wsadmin to say hello"> <antcall target="call_wsadmin"> <param name="TASK" value="user_say_hello"/> <param name="SCRIPT_NAME" value="${RAFW_HOME}/user/actions/configure/ was/common/nd/scripts/hello.py"/> <param name="ARGS" value="-who World"/> </antcall> </target> - Test your custom action.
- List the actions available at the cell scope to confirm that the custom action user_say_hello is available:
rafw.sh -e env_name -c cell_name -list
- Run the action in execute mode with the -preview option. Preview runs the action but does not make any changes on the target system.
- List the actions available at the cell scope to confirm that the custom action user_say_hello is available:
- Run the action on the target system.
rafw.sh -e env_name -c cell_name -t user_say_hello
2.16. Dynamic loading of Jython programs for use by custom actions
Dynamic classpath support for Jython allows users writing custom actions to easily incorporate reusable Jython code in custom actions.
To include a Jython program in a custom action, copy the source to the correct library directory in the user tree.
- RAFW_HOME/user/lib/jython
- Save files to this directory if the Jython program is only intended to be referenced from an Ant target.
- Jython files saved to the jython directory cannot be accessed by the wsadmin scripting client.
- RAFW_HOME/user/lib/jython/wsadmin_lib
- Save files to this directory if the Jython program is to be executed by the wsadmin scripting client.
- Jython files saved to the wsadmin_lib directory can also be accessed by Ant.
2.16.1. Example: Running a Jython program from an Ant target
This example creates a custom action with a single Ant task that invokes a Jython program to print .Hello World..
The custom action is available at the cell scope for a network deployment WAS cell.
The custom action is saved to the build file: custom_configure_was_common_nd.xml.
- Create the Jython script and place it in the hello.py file in user/lib/jython/hello.py.
 # hello.py
 def sayHello(recv):
  print "Hello " + recv
 #endDef
- Open the Ant build file for the custom action. The build file is located at: RAFW_HOME/user/actions/configure/was/common/nd.
- Add the Ant target to the Ant build file.
<target name="user_say_hello" description="Use Jython to say hello">
  	<jython file="${RAFW_HOME}/user/lib/jython/hello.py"
   	function="sayHello"
   	args="'World'" />
</target>
The custom_configure_was_common_nd.xml build file includes the new custom action.
<?xml version="1.0" encoding="UTF-8"?> <project default="default" basedir="."> <description> Contains custom configuration tasks for WAS 61 ND </description> <target name="user_say_hello" description="Use Jython to say hello"> <jython file="${RAFW_HOME}/user/lib/jython/hello.py" function="sayHello" args="World" /> </target> </project> - Test your custom action.
List the actions available at the cell scope to confirm that the custom action user_say_hello is available:
rafw.sh -e env_name -c cell_name -list
- Run the action on the target system.
rafw.sh -e env_name -c cell_name -t user_say_hello
2.16.2. Example: Running a Jython program executed by the wsadmin client
This example creates a custom action that uses the wsadmin scripting client to execute a Jython program that prints .Hello World..
The custom action is available at the cell scope for a network deployment WAS cell.
The custom action is saved to the build file: custom_configure_was_common_nd.xml.
- Create the Jython program and place it in the hello.py file in user/actions/configure/was/common/nd/scripts/hello.py.
# hello.py
def sayHello(recv):
   print "Hello " + recv
#endDef

## parse any arguments from wsadmin and say hello
optDict, args = SystemUtils.getopt(sys.argv, 'who:')
recv= optDict['who']

sayHello(recv)
- Add the Ant target to the build file: custom_configure_was_common_nd.xml file, which is located at RAFW_HOME/user/actions/configure/was/common/nd.
<target name="user_say_hello" description="Use wsadmin to say hello">
		<antcall target="call_wsadmin">
			<param name="TASK" value="user_say_hello"/>
			<param name="SCRIPT_NAME" value="${RAFW_HOME}/user/actions/configure/
                                      was/common/nd/scripts/hello.py">
			<param name="ARGS" value="-who World"/>
		</antcall>
	</target>
The custom_configure_was_common_nd.xml build file includes the new custom action.
<?xml version="1.0" encoding="UTF-8"?> <project default="default" basedir="."> <description> Contains custom configuration tasks for WAS 61 ND </description> <target name="user_say_hello" description="Use wsadmin to say hello"> <antcall target="call_wsadmin"> <param name="TASK" value="user_say_hello"/> <param name="SCRIPT_NAME" value="${RAFW_HOME}/user/actions/configure/ was/common/nd/scripts/hello.py"> <param name="ARGS" value="-who World"/> </antcall> </target> </project> - Test your custom action.
- List the actions available at the cell scope to confirm that the custom action user_say_hello is available:
rafw.sh -e env_name -c cell_name -list
- Run the action in execute mode with the preview flag. Preview runs the action but does not make any changes on the target system.
- List the actions available at the cell scope to confirm that the custom action user_say_hello is available:
- Run the action on the target system.
rafw.sh -e env_name -c cell_name -t user_say_hello
2.16.3. Example: Running a Jython program that includes a reusable Jython module
This example creates a custom action that uses the wsadmin scripting client to execute a Jython program that includes a reusable Jython module.
The module is used to print .Hello World.. Saving the module to wsadmin_lib makes it accessible and reusable by any Jython program.
The custom action is available at the cell scope. It is saved to the Ant build file for a WAS network deployment cell: custom_configure_was_common_nd.xml.
- Create the Jython module and place it in the HelloModule.py file in RAFW_HOME/user/lib/jython/wsadmin_lib.
class HelloModule:
	def sayHello(self, who):
		print "Hello " + who
	#endDef
#endClass
- Create the Jython program and place it in the hello.py file in RAFW_HOME/user/actions/configure/was/common/nd/scripts/hello.py.
# hello.py
from HelloModule import *

## parse any arguments from wsadmin and say hello
optDict, args = SystemUtils.getopt(sys.argv, 'who:')
recv= optDict['who']

talker = HelloModule()
talker.sayHello(recv)
- Add the Ant target to the build file: custom_configure_was_common_nd.xml,
which is located at RAFW_HOME/user/actions/configure/was/common/nd.
<target name="user_say_hello" description="Use wsadmin to say hello">
		<antcall target="call_wsadmin">
			<param name="TASK" value="user_say_hello"/>
			<param name="SCRIPT_NAME" value="${RAFW_HOME}/user/actions/configure/
                                        was/common/nd/scripts/hello.py"/>
			<param name="ARGS" value="-who World"/>
		</antcall>
	</target>
The custom_configure_was_common_nd.xml build file includes the new custom action.
<?xml version="1.0" encoding="UTF-8"?> <project default="default" basedir="."> <description> Contains custom configuration tasks for WAS 61 ND </description> <target name="user_say_hello" description="Use wsadmin to say hello"> <antcall target="call_wsadmin"> <param name="TASK" value="user_say_hello"/> <param name="SCRIPT_NAME" value="${RAFW_HOME}/user/actions/configure/ was/common/nd/scripts/hello.py"/> <param name="ARGS" value="-who World"/> </antcall> </target> </project> - Test your custom action.
- List the actions available at the cell scope to confirm that the custom action user_say_hello is available:
rafw.sh -e env_name -c cell_name -list
- Run the action in execute mode with the -preview option. Preview runs the action but does not make any changes on the target system.
- List the actions available at the cell scope to confirm that the custom action user_say_hello is available:
- Run the action on the target system.
rafw.sh -e env_name -c cell_name -t user_say_hello
2.17. Configuration references
Configuration references list the standard questions that are asked when creating a configuration properties file.
The same questions are asked in either interface:
- The configuration editor in the console
- The interactive command line wizard
The specific questions that are displayed depend on the details of the configuration that you enter.
2.17.1. Configuration reference for an existing configuration
These prompts are displayed in the configuration editor and in the command line Environment Generation wizard when you choose to create a new configuration definition based on an existing configuration.
Read the table before you begin editing or run the command line wizard. Use the descriptions to gather all the necessary information to fill out the required information.
You must pass several validation tests before you can generate a new configuration definition.
There are limitations to the configuration data that the wizard can read from a stand-alone configuration.
| Prompt | Description |
|---|---|
| Product | Select a middleware product name, such as WebSphere Application server, from the list. |
| Environment name | Enter the name of a configuration environment that the wizard
will create to hold the configuration definition. The environment name is a logical name and does not need to match any names in the WebSphere cell topology.
In the following example topology, the environment name is DEV01:RAFW_HOME/user/environments/DEV01/cells/CELL01 You do not need to enter a configuration name, as the editor reads this information from the existing configuration. Warning: If you enter the name of an existing environment and configuration, the existing environment and configuration will be overwritten by the generation process. |
| Existing server host name | Enter the host name of the target system on which the WebSphere stand-alone or network deployment cell is installed.
The host name can be the domain system name (DNS) name (short or long) or the IP address. The editor tests the connection to the remote target system using the host name of the target system and the OS user name, password, and user group. |
| OS username | Enter the target OS user name that the framework server uses to connect and to run commands on the target system. This OS user name must already exist on the target system.
The editor tests the connection to the remote target system using the host name of the target system and the OS user name, password, and user group. |
| OS password | Enter the target OS password for the OS user name. The OS
password must already exist and be valid.
The editor tests the connection to the remote target system using the host name of the target system and the OS user name, password, and user group. |
| SSH port (Optional for UNIX and Linux servers only) | Enter a port number if your UNIX and Linux servers use a port other than the default port of 22.
The framework server uses SSH to access UNIX and Linux target systems in your WebSphere network and uses standard SSH port 22 to do so, unless you specify a different port here. |
| Test connection | Validates the ability of the editor to connect to the target system using the operating system credentials provided for the target OS user.
If the target connection fails, you must supply a valid OS user name and password for the editor to complete. |
| OS group | Enter the OS user group for the OS password and user name.
The OS user name must be a member of the OS user group.
If you have multiple cells on the same host, specify the same OS user group for all cells. The editor tests the connection to the remote target system using the host name of the target system and the OS user name, password, and user group. |
| Profile root directory | One of the following three directories:
Enter the full directory path on the target system to the application server or deployment manager profile. The profile root directory is was_home/profiles/profile_name.
|
| Validate directory | Verifies that the profile root directory exists and that it contains bin/wsadmin.sh | bat. |
| Use soap.client.props for Authentication? | For increased security, you can pass credentials to the wsadmin scripting client through the soap.client.props file. |
| WebSphere administrator user name | If security is enabled, the product requires a valid WebSphere administrator user name to authenticate to the deployment manager or stand-alone server on the target system.
This name identifies a user that can log on to administrative tools such as the WebSphere administrative console or the wsadmin command. If security is not enabled, this user name is not used; you can enter any value and continue. If you plan to enable security after exiting the editor, enter the WebSphere administrator user name and password at the prompts. |
| WebSphere administrator password | Enter the password for the WebSphere administrator user name. |
| SOAP Port | Enter a SOAP port to override the default SOAP port in the wsadmin.properties file.
The editor uses the SOAP port in the com.ibm.ws.scripting.port property as the default. The wsadmin.properties file is in profile_root/properties/wsadmin.properties. Enter a different SOAP port if you know that the SOAP port in the server runtime configuration is different from the SOAP port configured in profile_root/properties/wsadmin.properties. If you are reading an existing IBM WebSphere Portal stand-alone cell, version 6.0, 6.1 or 7.0, enter the SOAP Port used by the WebSphere Portal server run time and not that used by the WAS run time. |
| Read configuration topology | Click to begin the process of reading the configuration on the target system and creating the configuration properties file based on the results. |
| Configuration template | Select a template from the displayed list. The displayed templates correspond to the version of the product discovered. After you select a template, you can begin the generation process. |
If you are using the command line, generation begins automatically. If you are using the console, click Generate configuration.
After generation completes, you might be required to provide additional information. AMC cannot determine information about IBM Installation Manager or the WebSphere Customization Toolbox from reading the existing configuration. To run installation actions such as was_85_install_fixpack, complete the following steps:
- In the console, open the configuration properties file in the configuration editor.
- Provide values for the following properties:
Prompt Description IM_HOME If you previously selected WAS version 7.0 or later, specify the home directory for IBM Installation Manager. If the program does not exist at that location, AMC installs it for you. If an earlier version exists, AMC updates it to the specified version. IM_CACHE_HOME If you previously selected WAS version 7.0 or later, specify a location where Installation Manager can store large quantities of cached data. IM_VERSION If you selected WAS version 7.0 or later as your cell type, you must specify one of the following versions of IBM Installation Manager that AMC will use to install WAS: 143, 144, 150, 151, 152, or Latest. TOOLBOX_HOME Enter the directory where WebSphere Customization Toolbox is installed. - Click Save & Generate. The required objects are regenerated.
If you do not need to run install actions for this configuration, you do not need to edit the configuration properties file and generate again.
2.17.2. Configuration reference for a new configuration definition
When you create a configuration definition, the first questions cover basic product and topology information.
The key prompt in the editor is Product, where you select the name of a middleware product to install in the new configuration. You also need an environment name and configuration name to identify the configuration definition, and a version number for the selected product. The remaining questions you see are determined by the product and version you select.
| Prompt | Description |
|---|---|
| Product | Select a middleware product name, such as WebSphere Application server, from the list. |
| Environment name | Enter a name for the configuration environment that contains the cell. A configuration environment can contain multiple cells.
The configuration generator creates the environment name in the cell definition: RAFW_HOME/user/environments/env_name. The environment name does not correspond to an administration object in WebSphere products. Default: None. Warning: If you enter the name of an existing environment and configuration, the existing environment and configuration will be overwritten by the generation process. |
| Configuration name | Enter the configuration name for the stand-alone or network deployment configuration.
The configuration generator uses this name in the configuration definition directory structure: RAFW_HOME/user/environments/env_name/cells/config_name In WebSphere products, the configuration name is an administration object and must be unique in the cell configuration repository. For naming guidelines, see the WebSphere product documentation. Default: None. |
| Version | Select a version number for the product you chose earlier.
The product and version affect the questions you are asked later on this page:
|
| Configuration template | Select a template from the displayed list.
If you are using the configuration editor, click Create configuration after selecting the template. The new configuration properties file opens in the editor. |
| OS user name | Enter the target operating system (OS) user name that the product uses to connect and run commands on the target system. The OS user name must already be defined on the target system.
Default: None. |
| OS password | Enter the target OS password for the OS user name. The OS
password must already exist and be valid.
Default: None. |
| OS group | Enter the OS user group for the OS password and user name.
The OS user name must be a member of the OS user group.
The configuration editor tests the connection to the remote target system by using the host name of the target system and the OS user name, password, and user group. If you have multiple cells on the same host, specify the same OS user group for all cells. Default: None. |
| Run as OS user name | For UNIX and Linux target systems only: If you wish to temporarily assume the privileges of another user, enter the name of that user here. |
| Run as OS password | Enter an optional password for the ID in the previous prompt. If you do not specify one, the OS password is used. |
| SSH Port |
Enter an SSH port number only if your UNIX and Linux target systems are not using SSH port 22. The framework server uses SSH port 22 to access the UNIX and Linux target systems in the WebSphere cell unless you specify a different port number. This prompt does not apply to Windows target systems. Default: 22. |
| Include IBM HTTP Server | Select Yes to create one or more IBM HTTP Server nodes for the cell.
Default: No. |
| WAS version | For all WebSphere products except WAS (for
which you already entered a version number), select the version of WAS to be installed on the nodes in the cell. WAS is prerequisite software for all WebSphere cell types.
Default: None. |
| Environment type | For WebSphere Process Server and WebSphere Enterprise Service Bus cells only, select an environment type. deploymentEnvironment is currently the only option available. |
| Topology type | For WebSphere Process Server and WebSphere Enterprise Service Bus cells only, select a single-, two-, or three-cluster topology. |
| Stand-alone | For WebSphere Portal and WAS cells
only, select Stand-alone or Network
Deployment as the cell configuration type.
Default: None. |
| Administrative Agent | This prompt is available for standalone WAS cells
only. Enter one of the following choices:
|
| IBM Installation Manager version | If you selected WAS version 7.0 or later as your cell type, you must specify one of the following versions of IBM Installation Manager that AMC will use to install WAS:
If you selected WAS version 8.5 as your cell type, you must specify version 152 or later of IBM Installation Manager. Later, you will specify a location for Installation Manager for each node in the cell. If the specified version does not exist at that location, AMC installs it for you. If an earlier version exists, AMC updates it to the specified version. Default: 152. |
| WebSphere Portal license entitlement | For WebSphere Portal version 7.0 only, select the license type (such as IBM WebSphere Portal Enable) to which you are entitled.
Default: IBM WebSphere Portal Server |
| Are you using DB2 |
Select yes if application servers in the cell host Java. applications based on the JDBC Type 2 driver. The JDBC Type 2 driver uses the IBM DB2 client to connect to the DB2 server. |
| DB2 client home | Enter the DB2 client home path on the WAS host computer.
You must install the DB2 client application that Java applications use to connect to the DB2 server on the WAS host computer. Windows example: C:\Program Files\IBM\SQLLIB Linux example: /opt/ibm/db2/V9.1/SQLLIB |
2.17.3. Configuration reference for a new Liberty profile configuration
This reference details the questions and responses for a AMC Liberty profile that you create by using the configuration editor.
Select WebSphere Liberty Profile as the Product, then provide an environment and configuration name and OS user information. The configuration name you enter is used as the profile name.
The following table shows the unique prompts on the first page of Liberty profile questions.
Main page of Liberty profile questions
| Prompt | Description |
|---|---|
| Liberty Host Name | Enter the name or IP address of the target server on which the Liberty profile software is to be installed. |
| Liberty Profile Home | Enter the full path to the target server directory in which the software is to be installed. |
| Define WebSphere Liberty Server | For the console, click Add or Copy current for each server.
For the command line wizard, the wizard loops through the Liberty Server Name question for the number of servers you specify here. |
| Liberty Server Name | Enter the name that corresponds to the displayed server number. |
2.17.4. Configuration reference for stored configurations
Provide specific information when you store a configuration definition in a source control or asset management system.
If you answered yes to the Place this environment into a source control or asset management system? question, the configuration information is placed in Rational Team Concert or in Rational Asset Manager or in both. Respond to the following prompts to provide the required information.
| Prompt | Description |
|---|---|
| SCM Repository URI | The URI of the repository in which to store the configuration definitions. |
| SCM System Username | The ID used by the framework server to log in to Rational Team Concert. |
| SCM System Password | The password used by the framework server to log in to Rational Team Concert. |
| SCM System Workspace Name | The name of the repository workspace in which to store the configuration definition. |
| SCM System Component Name | The name of the component in which to store the configuration definition. |
| Asset Management Repository URI | The URI of the repository in which to store the configuration definitions. Enter in the form http://hostname. If you use a port other than port 80, you must also include the port number: http://hostname:port. |
| Asset Management System Username | The ID used by the framework server to log in to Rational Asset Manager. |
| Asset Management System Password | The password used by the framework server to log in to Rational Asset Manager. |
| Asset Management Work Directory Name | The full path to the repository directory in which to store the configuration definition. |
| Asset Management Cell Definition GUID | The identifier for the managed asset that will contain the configuration definition you are generating. |
| Asset Management Application GUID | The identifier for the managed asset that contains an archived application. This archived application can be installed on instances of a VSP. |
| Validate Connection to your SCM system | Click the Validate button to verify that the editor can connect to the specified source control or asset management system. |
2.17.5. Configuration reference for a stand-alone configuration
If you selected stand-alone as the configuration type, you must provide the following information.
| Prompt | Description |
|---|---|
| Node Name |
Enter the name of the application server node. In a stand-alone configuration, you can define only one node. The generator creates the node for the configuration definition: RAFW_HOME/user/environments/env_name/cells/cell_name/nodes/node_name In WebSphere products, the node name is used for administration and must be unique within the cell. For naming guidelines, see WebSphere product documentation. Default node name: AppServer |
| Profile Name | Enter the application server profile name. The profile name is a directory and defines a runtime environment for a deployment manager or application server. The profile name is appended to the was_install_home installation directory as shown in these examples.
Windows example: C:/Program Files/IBM/WebSphere/AppServer/profiles/AppServer Linux example: /opt/IBM/WebSphere/AppServer/profiles/AppServer In the cell definition, the configuration generator defines the profile name in the install.properties entry. Default profile name: AppServer |
| Application Server Host Name |
Enter the host name of the target system on which the application server is to be installed. The host name of the target system can be the domain system name (DNS) name (short or long) or the IP address. Default host name: None |
| z/OS Support | Select Yes if you plan to install
the application server on a target system running the IBM z/OS operating system.
Default value: No |
| Application Server Installation Path |
Enter the installation root directory on the target system where IBM WAS core product files are to be installed. Windows example: C:\Program Files\IBM\WebSphere\AppServer UNIX or Linux example: /opt/IBM/WebSphere/AppServer Default installation path: None |
| Profile Parent Directory | Enter the path to the profiles directory on the target system.
The profile for the application server is created in this directory.
In WebSphere products, the profiles directory contains a subdirectory for each application server runtime environment that the cell manages. Windows example: C:\Program Files\IBM\WebSphere\AppServer/profiles UNIX or Linux example: /opt/IBM/WebSphere/AppServer/profiles Default profiles directory: was_install_root/profiles |
| Standalone application server starting port number | During installation, a set of ports is assigned for use by
the application server processes.
To override this behavior, you can specify a starting port number for the set of ports for the application server processes to use. This port is used as the base, or starting port, for assigning port values. |
| Enable Security | Choose whether to enable administrative security during the installation process.
If security is enabled, use an administrator user ID to log on to the administrative console and to issue commands. Default setting: None |
| WebSphere Administrator User Name | Enter the administrator user ID. Record the user name and password. You cannot log in to the administrative console or issue
commands without it.
Default: None |
| WebSphere Administrator Password | Enter the password for the administrator user ID. Record
the user name and password. You cannot log in to the administrative console or issue commands without it.
Default: None |
| Installation Manager Home | If you previously selected WAS version 7.0 or later, specify the home directory for IBM Installation Manager.
If the program does not exist at that location, AMC installs it for you. If an earlier version exists, AMC updates it to the specified version.
Default: /opt/IBM/InstallationManager |
| Installation Manager Cache Directory | If you previously selected WAS version 7.0 or later, specify a location where Installation
Manager can store large quantities of cached data.
Default: /opt/IBM/SDP70Shared |
| Advanced Connection and Security Settings | You can use these six settings to override information you entered at the cell scope. These settings apply to UNIX and Linux only. |
2.17.6. Configuration reference for the deployment manager node
If you selected network deployment as the configuration type, you must provide the following information.
If you enter this information by using the console, click Add to create a deployment manager node. You can create multiple nodes in the console, but you only need one.
| Prompt | Description |
|---|---|
| Node name | Enter the name of the deployment manager node. In a network deployment configuration, this node can manage multiple network nodes.
The generator creates the deployment manager node in the following location: RAFW_HOME/user/environments/env_name/cells/cell_name/nodes/node_name In WebSphere products, the node name is used for administration and must be unique within the cell. For naming guidelines, see WebSphere product documentation. Default node name: dmgr |
| Profile name | Enter the deployment manager profile name. The profile name is a directory and defines a runtime environment for a deployment manager or application server. The profile name is appended to the was_install_home installation directory as shown in the following examples.
Windows example: C:/Program Files/IBM/WebSphere/AppServer/profiles/dmgr UNIX or Linux example: /opt/IBM/WebSphere/AppServer/profiles/dmgr Default profile name: dmgr |
| Node host name |
Enter the host name of the target system on which the deployment manager server is to be installed. The host name of the target system can be the domain system name (DNS) name (short or long) or the IP address. Default: None |
| z/OS Support | Select Yes if you plan to install
the deployment manager server on a target system running z/OS.
Default: No. |
| WebSphere installation directory | Enter the installation root directory on the target system where WAS Network Deployment core product files are to be installed.
Windows example: C:\Program Files\IBM\WebSphere\AppServer Linux example: /opt/IBM/WebSphere/AppServer Default installation path: None |
| Profile parent directory | Enter the path to the profiles directory on the target system.
The profile for the deployment manager server is created in this directory.
In WebSphere products, the profiles directory contains a subdirectory for each application server runtime environment that is managed by the cell. Windows example: C:\Program Files\IBM\WebSphere\AppServer\profiles UNIX or Linux example: /opt/IBM/WebSphere/AppServer/profiles Default: dmgr_install_root/profiles |
| SOAP Port | Enter a SOAP port if the SOAP port in the server runtime configuration is different from the displayed default SOAP port that is configured in profile_root/properties/wsadmin.properties. |
| Start port number | During installation, a set of ports is assigned for use by
the deployment manager server processes.
To override this behavior, you can specify a starting port number for the set of ports for the deployment manager server processes to use. This port is used as the base or starting port for assigning your port values. |
| Enable security | Choose whether to enable administrative security during the profile creation process.
If security is enabled, use an administrator user ID to log on to the administrative console and to issue commands. Default: None |
| WebSphere Administrator user name | Enter the administrator user ID. Record the user name and password. You cannot log in to the administrative console or issue
commands without it.
Default: None |
| WebSphere administrator password | Enter the password for the administrative user ID. Record
the user name and password. You cannot log in to the administrative console or issue commands without it.
Default: None |
| Installation Manager Home | If you previously selected WAS version 7.0 or later, specify the home directory for IBM Installation Manager.
If the program does not exist at that location, AMC installs it for you. If an earlier version exists, AMC updates it to the specified version.
Default: /opt/IBM/InstallationManager |
| Installation Manager Cache Directory | If you previously selected WAS version 7.0 or later, specify a location where Installation
Manager can store large quantities of cached data.
Default: /opt/IBM/SDP70Shared |
| Advanced Connection and Security Settings | You can use these six settings to override information you entered at the cell scope. These settings apply to UNIX and Linux only. |
2.17.7. Configuration reference for managed nodes
If you specified multiple nodes, enter the following information.
If you enter this information by using the console, click Add for each managed node in the network, or click Copy current to create a node with the same values as the current node.
If you enter this information by using the command line wizard, the wizard loops through all the questions for the number of nodes you specified in Define the managed nodes.
| Prompt | Description |
|---|---|
| Node name |
Enter the name of the application or portal server node. The node name must be unique within the cell. The generator creates the node for the cell definition: RAFW_HOME/user/environments/env_name/cells/cell_name/nodes/node_name In WebSphere products, the node name is used for administration and must be unique within the cell. For naming guidelines, see WebSphere product documentation. Default node name: node01 |
| Profile name | Enter the name of profile. The profile name is a directory that defines a runtime environment for an application or portal server.
The directory is appended to the was_install_home installation directory as shown in these examples.
Windows example: C:/Program Files/IBM/WebSphere/AppServer/profiles/node01 Linux example: /opt/IBM/WebSphere/AppServer/profiles/node01 Default profile name: node01 |
| Node host name |
Enter the host name of the target system on which the application server or portal server is to be installed. The host name of the target system can be the domain system name (DNS) name (short or long) or the IP address. Multiple nodes that are installed on a single host computer have the same host name. Default host name: None |
| z/OS Support | Select Yes if you plan to install
the application server or portal server on a target system running the z/OS operating system.
Default value: No |
| WebSphere installation directory |
Enter the installation root directory on the target system where WAS core product files are to be installed. Windows example: C:\Program Files\IBM\WebSphere\AppServer Linux example: /opt/IBM/WebSphere/AppServer Default installation path: None |
| Profile parent directory | Enter the path to the profiles directory on the target system.
The profile for the application or portal server is created in this directory.
In WebSphere products, the profiles directory contains a subdirectory for each application or portal server runtime environment that is managed by the cell. Windows example: C:\Program Files\IBM\WebSphere\AppServer/profiles UNIX or Linux example: /opt/IBM/WebSphere/AppServer/profiles Default profiles directory: was_install_root/profiles |
| Node Type | Select the node type: WAS or WebSphere Portal.
Select WAS if WAS is the only product installed on the node. Select WebSphere Portal if WebSphere Portal and WAS are installed on the node. WebSphere Portal runs on top of WAS as an application. For supported product configurations, see WebSphere product documentation. Default node type: None |
| Installation Manager Home | If you previously selected WAS version 7.0 or later, specify the home directory for IBM Installation Manager.
If the program does not exist at that location, AMC installs it for you. If an earlier version exists, AMC updates it to the specified version.
Default: /opt/IBM/InstallationManager |
| Installation Manager Cache Directory | If you previously selected WAS version 7.0 or later, specify a location where Installation
Manager can store large quantities of cached data.
Default: /opt/IBM/SDP70Shared |
| Questions for Stand-alone Server | For the command line, specify the number of servers on this node that are not included in a cluster.
For the console, click Add or Copy current for each standalone server. For each server, specify the following information:
|
| Advanced Connection and Security Settings | You can use these six settings to override information you entered at the cell scope. These settings apply to UNIX and Linux only. |
2.17.8. Configuration reference for clusters
To define one more clusters for the configuration, provide required information about the clusters and cluster members.
If you enter this information by using the console, click Add for each new cluster, or click Copy current to create a cluster with the same values as the current cluster.
If you enter this information by using the command line wizard, the wizard loops through all the questions for the number of clusters you specified in Define clusters.
| Prompt | Description |
|---|---|
| Cluster Name |
Enter the name of the cluster for the network deployment configuration. The cluster name must be unique within the configuration. The configuration generator creates the cluster for the configuration definition: RAFW_HOME/user/environments/env_name/cells/cell_name/clusters/cluster_name In WebSphere products, the cluster name is used for administration and must be unique within the cell. For naming guidelines, see WebSphere product documentation. Default cluster name: cluster1 |
| Cluster nodes | For the console, available nodes are displayed in the Excluded list.
Select one or more nodes to include (hold down the Ctrl key for multiple selection) and click Include. Alternatively,
you can click Include all without making a selection.
For the command line, available nodes are displayed in a numbered list. Enter a comma-separated list of the element numbers you want to include. Selecting one node defines a vertical scaling topology; selecting more than one node creates a horizontal scaling topology. |
| Number of vertical cluster members | Enter the number of cluster members (application servers)
per node.
The number of cluster nodes multiplied by the number of vertical cluster members equals the total number of cluster members. If you selected one cluster node, you create a vertical cluster. If you accept the default value of 1 vertical cluster member, the total number of cluster members is 1. If you selected two nodes, you create a horizontal cluster of two nodes. If you selected three vertical cluster members, the total number of cluster members is six. Default value: 1 |
| Cluster member name prefix | Enter a standard prefix to be used as a name for each cluster
member. Sequential numbers are appended to this name. For example, if the prefix is clone, the cluster member
names are clone1, clone2,
and so on.
Default prefix: None |
| Cluster member starting port number | During installation, a set of ports is assigned for the first cluster member processes to use.
To override this behavior, specify a starting port number for the set of ports that the first cluster member processes use. This port is used as the base, or starting port, for assigning port values. |
| Incrementor value for each vertical cluster member | If you specify more than one vertical cluster member, specify an incremental value. This value is used to create the starting port number for the other cluster members.
If you specify a value of 50 as an incremental value and a value of 20 as the starting port number for the first cluster member, the starting ports are assigned as follows:
|
2.17.8.1. Cluster server diagram
This diagram shows an example of a two-node cell with a single cluster that contains four application server cluster members.
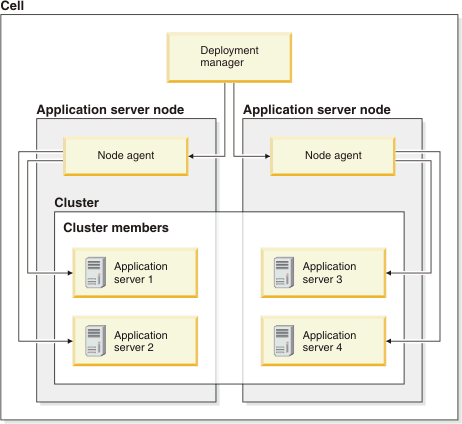
2.17.9. Configuration reference for WebSphere Portal nodes
If you are creating one or more IBM WebSphere Portal nodes, enter the required information to create each node.
The following sections describe prompts that are unique to WebSphere Portal.
WebSphere Portal managed nodes
For the console, click Add or Copy current for each node that WebSphere Portal manages.
For the command line, the wizard loops through all questions for the number of nodes that you specify at the Portal Managed node prompt.
| Prompt | Description |
|---|---|
| Node name |
Enter the name of the WebSphere Portal managed node. The node name must be unique within the cell. Default node name: none |
| Profile name | Enter the name of profile. The profile name is a directory that defines a runtime environment for a WebSphere Portal managed node.
Default profile name: none |
| Node host name |
Enter the host name of the target system on which the application server or portal server is to be installed. The host name of the target system can be the domain system name (DNS) name (short or long) or the IP address. Multiple nodes that are installed on a single host computer have the same host name. Default host name: None |
| z/OS Support | Select Yes if you plan to install
the application server or portal server on a target system running the z/OS operating system.
Default value: No |
| WebSphere installation directory |
Enter the installation root directory on the target system where WAS core product files are to be installed. Windows example: C:\Program Files\IBM\WebSphere\AppServer Linux example: /opt/IBM/WebSphere/AppServer Default installation path: None |
| WebSphere Portal home directory |
Enter the installation root directory on the target system where the WebSphere Portal core product files are to be installed. Windows example: C:\IBM\WebSphere\PortalServer Linux example: /opt/IBM/WebSphere/PortalServer Default: None |
| WebSphere Portal profile home | Enter the home directory for the runtime environment. |
| Node Agent starting port number | During installation, a set of ports is assigned for the node agent processes to use.
To override this behavior, specify a starting port number for the set of ports for the node agent processes to use. This port is used as the base, or starting port, for assigning port values. |
| WebSphere Portal Server starting port number | During installation, a set of ports is assigned for the portal
server processes to use.
To override this behavior, specify a starting port number for the set of ports for the portal server processes to use. This port is used as the base, or starting port, for assigning port values. |
| Install type (full portal vs. base portal) | Select one of the following installation types:
Default: None |
| WebSphere Portal Primary Node | Select the node that is the primary portal node in the network deployment cell. In a clustered environment, applications that are installed on the portal primary node are shared by the cluster members.
Default value: None If you use the command line interface, each node is displayed with the question Is this the primary Portal Node? Enter yes or no accordingly; yes is the default. |
| Configure WCM for this WebSphere Portal Cell | Select yes to install IBM Lotus Web Content Management and to enable and configure the Web Content Management module for web content authoring and delivery.
Default: None |
WebSphere Portal primary node
For the console, click Add to enter primary node information. There is only one primary node.
For the command line, enter 1 at the WebSphere Portal primary node prompt.
| Prompt | Description |
|---|---|
| WebSphere Portal Primary Node | Select the node that is the primary portal node in the network deployment cell. In a clustered environment, applications that are installed on the portal primary node are shared by the cluster members.
Default value: None |
| Configure WCM for this WebSphere Portal Cell | Select yes to install IBM Lotus Web Content Management and to enable and configure the Web Content Management module for web content authoring and delivery.
Default: None |
2.17.10. Configuration reference for IBM HTTP Server nodes
To define one or more IBM HTTP Server nodes for the cell, provide required information about the IBM HTTP Server nodes.
If you enter this information by using the console, click Add for each IBM HTTP Server node, or click Copy current to create a node with the same values as the current node.
If you enter this information by using the command line wizard, the wizard loops through all the questions for the number of IBM HTTP Server nodes you specified in Number of IBM HTTP server nodes in cell.
| Prompt | Description |
|---|---|
| Host name | Enter the host name of the target system on which IBM HTTP Server is to be installed.
The host name can be the domain system name (DNS) name (short or long) or the IP address. IBM HTTP Server can be installed on the same host computer as an application server or on a remote host computer. Default: None |
| Node name | Enter the name of the IBM HTTP Server node.
The node name must be unique within the configuration.
The generator creates the node for the configuration definition: RAFW_HOME/user/environments/env_name/cells/cell_name/nodes/node_name In WebSphere, the node name is used for administration and must be unique within the cell. For naming guidelines, see WebSphere product documentation. Default node name: ihs01, ihs02, and so on. During generation, the IBM HTTP Server directories are named using the format ihs_<node_name>_<web_server_name>. This ensures that the directory names are unique even when multiple web servers are deployed on the same node. |
| Profile name | Enter the profile name associated with the IBM HTTP Server node. |
| z/OS support | Select Yes if you plan to install
the IBM HTTP Server on a target system that runs IBM z/OS operating system.
Default value: No |
| Web Server definition name | Specify a name for the web server definition. In WebSphere, the web server definition is an object used for web server administration and is saved to the configuration repository.
Default: None |
| IBM HTTP Server installation directory | Enter the installation root directory on the target system whereIBM HTTP Server is to be installed.
In WebSphere, the standard installation directory varies for root and non-root installations. For guidance, see your WebSphere product documentation. For root installations, the standard installation directories are: Windows: C:\Program Files\IBM\HTTPServer HP-UX, Linux, and Solaris: /opt/IBM/HTTPServer AIX: /usr/IBM/HTTP Server Default installation path: None |
| IBM HTTP Server Plug-in home directory | Enter the installation directory on the target system for the IBM HTTP Server plug-in
configuration file.
In WebSphere, the default plug-in directory is in the IBM HTTP Server installation directory: ihs_install_root/Plugins. Default installation path: None |
| WebSphere Customization Toolbox Home | Enter the directory where WebSphere Customization Toolbox is installed. This location defaults to was_install_root/Toolbox. |
| IBM HTTP Server HTTP port | Specify a unique port value if the default port is already in use by another application.
Default IBM HTTP Server port: 80 |
| IBM HTTP Server administration port | Specify a unique port value if the default port is already in use by another application.
Default IBM HTTP Server administration server port: 8080 |
| Allow non-root installation | Select Yes if a non-administrator
(non-root) user ID must be used to install IBM HTTP Server on the specified host computer.
Select No (the default) to install the IBM HTTP Server as the root user. The typical way to install IBM HTTP Server is to run the installation program using an administrator or root user ID. |
| Create an account for administration server authentication | If you chose to allow non-root installation, select yes to create a user ID and password to authenticate to the IBM HTTP Server administration server using the WAS administrative console. |
| Administration server user name | If you chose to create a non-root authentication account, enter the user ID for that account. |
| Administration server password | Enter the password for the account in the previous prompt. |
| Installation Manager Home | If you previously selected WAS version 7.0 or later, specify the home directory for IBM Installation Manager.
If the program does not exist at that location, AMC installs it for you. If an earlier version exists, AMC updates it to the specified version.
Default: /opt/IBM/InstallationManager |
| Installation Manager Cache Directory | If you previously selected WAS version 7.0 or later, specify a location where Installation
Manager can store large quantities of cached data.
Default: /opt/IBM/SDP70Shared |
| Advanced Connection and Security Settings | You can use these six settings to override information you entered at the cell scope. These settings apply to UNIX and Linux only. |
2.17.11. Configuration reference for WebSphere Process Server and WebSphere Enterprise Service Bus
The generator creates an IBM WebSphere Process Server or WebSphere Enterprise Service Bus network deployment cell by using the information that you provide.
The following table lists the database information that is unique to WebSphere Process Server and WebSphere Enterprise Service Bus.
| Prompt | Description |
|---|---|
| Database type | Specify the process server database type. Valid choices: DB2 and Oracle.
Default type: DB2 |
| Database OS | Specify the database server operating system. Valid operating systems are UNIX and Windows.
Default operating system: UNIX |
| Database version | Specify the version of the database server for the database server type. Valid versions for DB2 are 7.1, 8.1,
and 9.1.
Default version: 9.1 For Oracle, values are 10g and 11g. |
| JDBC driver path | The path to the Type 4 Java. Database Connectivity (JDBC) driver directory.
Enter the directory path; do not enter a file name. Default path: /opt/IBM/WebSphere/AppServer/universalDriver_wbi/lib |
| Database name | Specify the name of the database.
Default name: wprcsdb |
| Database server | Specify the name of the database server host.
Example: myserver.mydomain |
| Database port | Specify the database server port number.
Default value: 50000 |
| COMMON database user name | Enter the database user ID, which is used to connect from process server to the database (JDBC).
Default value: rafwuser. |
| COMMON database password | Enter the database user password. |
| Common schema | Specify alternate names for any of the following default schema names:
|
| User ID for CEI JMS connection | Enter the user ID for the event infrastructure
bus.
Default ID value: wasadmin |
| Password for CEI JMS connection | Enter the user password for the event infrastructure bus. |
| Group ID for CEI JMS connection | Optional: Enter the group ID for event infrastructure bus. |
| User ID for BPC JMS connection | Enter the user ID for the business
process choreographer bus.
Default ID: wasadmin |
| Password for BPC JMS connection | Enter the user password for the business process choreographer bus. |
| Group ID for BPC JMS connection | Optional: Enter the group ID for the business process choreographer bus. |
2.17.12. Configuration reference WebSphere Service Registry and Repository
The generator creates an IBM WebSphere Service Registry and Repository network deployment cell by using the information that you provide.
The following database information is unique to IBM WebSphere Service Registry and Repository.
| Prompt | Description |
|---|---|
| WSRR home directory | Specify the installation root directory on the target system where WebSphere Service Registry
and Repository product
files are to be installed.
Default directory: /opt/IBM/WebSphere/wsrr |
| WSRR JMS user name | Specify the user ID to use to connect to the registry and repository service integration bus in WAS.
Default ID: WAS_USER |
| WSRR JMS password | Specify the password for the JMS user.
Default password: WAS_PASSWORD |
| WSRR administrator | Specify the user to add to the administrator J2EE role. The user must already be created. You can specify these groups to map
authenticated users to the role: NONE, EVERYONE, ALL_AUTHENTICATED,
or any-valid-group-name.
Default user: ALL_AUTHENTICATED |
| WSRR administrator group | Specify the group to add to the administrator J2EE role.
The group must already be created. You can specify these groups to map authenticated users to the administrator role: NONE, EVERYONE, ALL_AUTHENTICATED,
or any-valid-group-name.
Default group: ALL_AUTHENTICATED |
| WSRR user | Specify the user to add to the J2EE user role. The user must already be created. You can specify these groups to map authenticated
users to the J2EE user role: NONE, EVERYONE, ALL_AUTHENTICATED,
or any-valid-group-name.
Default group: ALL_AUTHENTICATED |
| WSRR user group | Specify the group to add to the J2EE user role. The group must already be created. You can specify these groups to map authenticated
users to the role: NONE, EVERYONE, ALL_AUTHENTICATED,
or any-valid-group-name .
Default group: ALL_AUTHENTICATED |
| WSRR DB type | Specify the type of database in use. Valid type values are db2v9, db2v8, sqlserver, oracle, cloudscape, db2v8zos,
and db2v9zos.
Default: None |
| WSRR database hostname | Specify the host name of the database server that holds the registry and repository database, for example, localhost.
Default: None |
| WSRR database port | Specify the database instance port number. For example, specify port 50000 for IBM DB2 database or port 1521 for Oracle.
Default: None |
| WSRR database name | Specify the name of the database to use for WebSphere Service Registry and Repository.
If you are using DB2 version 8 or version 9 on Windows or UNIX, then the database name cannot be the same as the local computer name. This is a DB2 database restriction. Default: None |
| WSRR database user name | Specify the user ID to access the registry and repository
database. The user ID must already be created. The deployment script configures the appropriate privileges for the user. On Oracle, this user must be set to system.
Default: None |
| WSRR database password | Provide the password for the user ID used to access the registry and repository database.
Default: None |
| JDBC driver path | Specify the path on the target system where database driver
files are to be copied. The source folder location on the framework server is CELL_HOME/dbdrivers.
Enter a directory path; do not provide a file name. Default path: /opt/IBM/WebSphere/AppServer/dbdriver_wsrr |
| WSRR DB2 home | Specify the DB2 installation directory path.
Default: /opt/IBM/db2/V9.11 |
| WSRR DB2 instance name | Provide the DB2 database instance name. This prompt is displayed for UNIX only.
Default name: db2inst1. |
| WSRR DB2 tablespace directory | Specify the DB2 tablespace
directory path .
Default directory: /home/db2inst1/tsdir |
| WSRR SIBus DB name | Specify the database name to use for the SIBus.
If you are using DB2 version 8 or 9 on Windows or UNIX, then the database name cannot be the same as the local computer name. This is a DB2 database restriction. Default: None |
| WSRR SIBus database user name | Specify the user ID to use to access the SIBus database.
The user ID must already be created. The deployment script configures
the appropriate privileges for that user. On Oracle, this user must be set to system.
Default: None |
| WSRR SIBus database password | Specify the password for the SIBus database user.
Default: None |
| WSRR SIBus DB schema name | Provide the schema name to use for the registry and repository
SIBus tables.
Default: WSRRSIB |
| WSRR Activity Logging database name | Specify the name of the database to use for activity logging.
If you are using DB2 version 8 or version 9 on Windows or UNIX, then the database name cannot be the same as the local computer name. This is a DB2 database restriction. Default: None |
| WSRR Activity Logging DB user name | Specify the user ID to use to access the activity logging
database. The user ID must already be created. The deployment script configures the appropriate privileges for the user. On Oracle, this user must be set to system.
Default: None |
| WSRR Activity Logging DB password | Enter the password for the activity logging database user.
Default: None |
2.17.13. Configuration reference for WebSphere Virtual Enterprise
The generator creates an IBM WebSphere Virtual Enterprise network deployment cell definition by using the information that you provide.
The following prompts are unique to WebSphere Virtual Enterprise.
| Prompt | Description |
|---|---|
| On Demand Router cluster | From the console, leave this section blank if you do not want to add an on-demand router (ODR) cluster to the virtual enterprise server cell.
From the command line, enter 0 if you do not want to add an ODR cluster to the virtual enterprise server cell. To add an ODR cluster, complete the required information for a cluster described in Configuration reference for clusters. In addition, provide the ODR cluster template path as described in the next prompt. |
| ODR cluster template path | If you are adding an ODR cluster, specify the server template that best fits your requirements for the ODR cluster. Valid templates
are http_sip_odr_server, sip_odr_ser,
and odr.
Default template: odr |
| Dynamic clusters | From the console, click Add or Copy current for each new cluster.
From the command line, specify the number of dynamic clusters to add to the cell. Default value: 1 |
| Cluster Name | Specify the name of each dynamic cluster to be added.
Default name: dyncluster1 |
| Cluster membership policy | Specify the membership policy that the virtual enterprise cell uses to dynamically create servers for this cluster. |
2.17.14. Configuration reference for advanced questions
When creating a new node, you can override several options you set at the configuration scope.
| Prompt | Description |
|---|---|
| Advanced Connection and Security Settings |
The following six settings apply to UNIX and Linux only. |
| OS user name | If an OS user name and password are required for the target system, enter that user name here. |
| OS password | Enter the password that matches the OS user name in the previous prompt. |
| OS group | Enter the name of the OS group to which the OS user belongs. |
| Run as OS user name | If you wish to temporarily assume the privileges of another user, enter the name of that user here. For the specific situations in which "run-as" users are supported, see the examples in Sudo support. |
| Run as OS password | Enter a password for the ID in the previous prompt. |
| SSH port |
Enter an SSH port number only if your UNIX and Linux target systems are not using SSH port 22. The framework server uses SSH port 22 to access the UNIX and Linux target systems in the WebSphere cell unless you specify a different port number. This information does not apply to Windows target systems. Default value: 22. |
2.18. Command reference for AMC
This section describes the product commands. Use commands to run actions on WebSphere target systems or complete product configuration, for example, to add components to the web client or to set up the environment tree to manage a WebSphere target system.
2.18.1. Command reference for rafw
Use the rafw command to run actions and manage your target systems.
Description
The rafw command supports several operation modes:
- -execute
- Run actions on target systems
- -import
- Import configuration data from supported middleware products
- -compare
- Compare configurations
- -augment
- Add to existing configurations
- -promote
- Copy working configurations from one configuration environment to another
- -manual
- Display help
Prerequisites
You can run the rafw command from the RAFW_HOME/bin directory on the framework server or add the rafw command to an automation plan.
Syntax
Command options are case sensitive. When you enter command options, use lowercase letters as shown in the syntax statement.
Use either the long or short version of the command option. Note that newer command options do not support a short version.
{rafw.bat | rafw.sh} scope [action | -l] actionArguments behaviorOptions
scope Options that specify scope
{-env | -e} 	environment_name
{-cell | -c} cell_name
{-node | -n} node_name
{-server | -s} server_name
{-cluster | -u} cluster_name
-profile profile_name
action Options that specify mode and action
{-execute | -t} action_name
{-import | -i} action_name
{-compare | -r} action_name
-augment action_name
-promote action_name
{-manual | -d} action_name
actionArguments Options that are arguments for specific actions
{-app | -a} app_name
{-virtualPortal | -v} virtual_portal
{-portalWarModule | -w} portal_war_module
-opt "var1=value1" -opt "var2=value2"...
behaviorOptions Options that modify command behavior
{-list | -l}
{-transferMedia | -m}
{-visualCompare | -g}
{-preview | -z}
-local
{-help | -h}
-product
Option descriptions for scope
Actions are run at a specific scope in the environment tree. Use scope options to build a fully-qualified scope path for the action. For example, you could build the following execution scope: RAFW_HOME\user\environments\DEV01\cells\CELL01\nodes\NODE01 by specifying the following command:
rafw.bat .env DEV01 .cell CELL01 -node NODE01 -execute action_name
| Option {-long_option | -short_option} | Description |
|---|---|
| {-env | -e} environment_name | The name of the environment. The environment scope allows you define a logical grouping of cells.
In the environment tree, environments are saved to the environments directory: user\environments\env_name You cannot run actions at the environment scope; the environment scope is not a WebSphere scope. |
| {-cell | -c} cell_name | The name of the cell. A cell is a collection of nodes.
In the environment tree, cells are saved to the cells directory for an environment: user\environments\env_name\cells\cell_name Actions run at the cell scope apply to all of the nodes in a cell. |
| {-node | -n} node_name | The name of the node. A node is made up of one or more servers.
In the environment tree, nodes are saved to the nodes directory for a cell:user\environments\env_name\cells\cell_name\nodes\node_name Actions run at the node scope apply to a single node or to all of the servers defined for the node. |
| {-server | -s} server_name | The name of the server on the node. One or more servers can be defined for a node.
In the environment tree, servers are saved to the servers directory for a node: user\environments\env_name\cells\cell_name \nodes\node_name\servers\server_name Actions run at the server scope apply to a single server. |
| {-cluster | -u} cluster_name | The name of the cluster for a group of one or more servers.
A cluster can contain servers on different nodes.
In the environment tree, clusters are saved to the clusters directory for a cell: user\environments\env_name\cells\cell_name\clusters\cluster_name Actions run at the cluster scope apply to all the servers in a cluster. |
| -profile profile_name | Used in WAS Liberty profile only. Liberty profile has only a profile and a server scope. |
Option descriptions for action
Actions require a mode following the action name. All actions support execute mode and help mode. Configuration actions support only compare and import modes.
The help page lists supported modes for each action.
| Option {-long_option | -short_option} | Description |
|---|---|
| {-execute | -t }action_name | Enables execution mode for the action.
Executes the action and updates the WebSphere configuration by deleting the existing configuration in WebSphere and replacing it with the configuration stored in the environment tree. |
| {-import | -i} action_name | Enables import mode for the action.
Imports the existing configuration from WebSphere and saves it to the environment tree. |
| {-compare | -r} action_name | Enables compare mode for the action.
Displays the existing configuration in WebSphere and displays the same configuration in the environment tree. |
| -augment action_name | Enables augment mode for the action.
Adds configuration values to an existing configuration in WebSphere. You use an augment configuration file to specify variables and values to be added. Augment mode does not:
|
| -promote action_name | Enables promote mode for the action.
Promotes a working configuration from a source environment, such as development, to a target environment, such as production. You run the action from the target environment; the working configuration is pulled from the source environment to the target. You use a promote.properties file to specify environment-dependent values, for example, the host name. |
| {-manual | -d} action_name | Displays the help page (man page) that documents the action. |
Option descriptions for actionArguments
Some actions accept special arguments that change action behavior. For example, the was_common_deploy_install_apps supports the -app option.
| Option {-long_option | -short_option} | Description |
|---|---|
| {-app | -a} app_name | The name of the application properties file. Specify one or more application.properties files as argument for the -app option. |
| {-virtualPortal | -v} virtual_portal | The name of the virtual portal that is the target of the action. Applies to WebSphere Portal actions only. |
| {-portalWarModule war | -w} portal_war_module | The name of the portal WAR module to perform the action upon. |
| -opt "var1=value1" -opt "var2=value2"... | An option that you use to pass one or more custom properties
to an action in the form of a name-value pair.
Quote variables and values: "VAR1=VALUE". To pass multiple properties to an action, specify an -opt flag for each property: rafw.bat .env env_name .cell cell_name -node node_name -execute action_name -opt "VAR1=VALUE1" -opt "VAR2=VALUE2" On all platforms, variable names are case sensitive: ${opt.VAR1} is not equivalent to ${opt.var1}. In actions, reference variable values using the -opt argument as follows: ${opt.VAR1}, ${opt.VAR2}, and so on. For example, ${opt.veg3} in the action resolves to "potato" if -opt "veg3=potato" is on the command line. |
Option descriptions for behaviorOptions
The rafw command accepts options that affect default command behavior. Some options require actions; others do not. For example, -list and -help do not require actions.
| Option {-long_option | -short_option} | Description |
|---|---|
| {-list | -l} | Lists the actions available at the specified scope on the target system.
The -list option does not require an action. |
| {-listByMode} mode_name | Lists the actions available at the specified scope on the target system that support the specified mode.
The -listByMode option does not require an action. |
| {-transferMedia | -m} action_name
{-transferMedia | -m} action_name -opt onlyTransfer {-transferMedia | -m} action_name -opt forceTransfer | Transfers the media for the action that you specify. The -transferMedia option requires an action name to determine what media to transfer. If media
already exists on the target system, the default behavior of the -transferMedia option is to not transfer media again.
To transfer media for an action, without running the action, use the -opt onlyTransfer flag with the -transferMedia option and an action name. The -opt onlyTransfer flag also transfers media to the target again even it already exists on the target system. To force media transfer, even if media has been transferred previously, use the -opt forceTransfer flag with the -transferMedia option and an action name. |
| {-visualCompare | -g} | Enables using an external comparison tool that supports a graphical mode. This option applies to:
To configure your comparison tool, use the EXTERNAL_DIFF property in the configure.properties file. |
| {-preview | -z} | Enables preview for the action. Runs the action in debug mode, displaying processing output and error messages, so that you can fix errors before running the action against a WebSphere target system. |
| -local | Executes the action on the framework server for actions that require local execution. To list the actions that run locally, use the -list option with the -local option. The command output lists the actions that require you to specify the -local option. |
| {-help | -h} | Displays syntax help for the rafw command. The -help option does not require an action. |
| -product | Use this option to specify the module to use for the command. The default module is based on the standard WebSphere directory structure of cells, nodes, clusters, and servers. In practice, you only need this option when you specify liberty for WAS Liberty profile. |
Examples
The -list option lists all of the available actions for the specified scope. The following command lists the actions for cell CELL01:
- rafw.bat -env ENV_DEV -cell CELL01 -list
The -listByMode option lists all of the available actions for the specified scope and mode. The following command lists the augment actions for cell CELL01:
- rafw.bat -env ENV_DEV -cell CELL01 -listByMode augment
The -manual option displays the help file page for an action. The following command displays the help file for was_common_deploy_install_app.
- rafw.bat -env ENV01 -cell CELL01 -manual was_common_deploy_install_app
The -list option together with the -local option lists the actions at the cell scope that run locally on the framework server.
- rafw.bat -env ENV01 -cell CELL01 -list -local
To transfer media and execute an action, use the -transferMedia and -t options of the rafw command and specify the action name. If media already exists on the target system, the -transferMedia option does not transfer it again unless you specify the -opt forceTransfer option.
- rafw.sh -e ENV01 -c CELL01 -n NODE01 -transferMedia -t was_70_install_was
Specify the -opt forceTransfer option to transfer media even if it already exists on the target system. By default, the -transferMedia | mediaTransfer option does not transfer media that has already been transferred.
- rafw.sh -e ENV01 -c CELL01 -n NODE01 -transferMedia -t was_70_install_was -opt forceTransfer
To transfer the media without running the action, use the -transferMedia option of the rafw command with the -opt onlyTransfer flag and specify the action name. The -opt onlyTransfer flag transfers media even if it already exists on the target system.
rafw.sh -e ENV01 -c CELL01 -n NODE01 -transferMedia -t was_70_install_was -opt onlyTransfer
2.18.2. Command reference for rafwEnvBuild
Run the rafwEnvBuild command to generate cell environment objects to represent a WebSphere cell. The objects are used to manage your WebSphere cells.
Description
The rafwEnvBuild command runs in multiple modes:
- In -batch mode, the rafwEnvBuild command uses the .properties file generated by the -interactive or -silent modes to generate environment objects. Use the behavior options to control which objects are created.
- In -silent mode, the rafwEnvBuild command creates a .properties file using the -opt variables and values that you supply on the command line. Use the behavior options to control which objects are created.
- In -interactive mode, the rafwEnvBuild command generates one or more objects: a .properties file for the cell, a cell definition in the environment tree, a VSP, and an automation plan and context. Use the behavior options to control which objects are created.
If you use the rafwEnvBuild command to recreate an environment, the existing cell definition is updated with the new configuration. Files, directories, and environment entries that are no longer a part of the topology are removed.
Prerequisites
You can run the rafwEnvBuild command from the RAFW_HOME/bin directory on the framework server or add the rafwEnvBuild command to an automation plan.
Syntax
Command options are case sensitive. When you enter command options, use lowercase letters as shown in the syntax statement.
You can use either the long or short (single letter) version of the command option, for example, -batch (long) or -b (short). Note that new options do not support the short version.
rafwEnvBuild.bat | rafwEnvBuild.sh mode type behaviorOptions
mode Options that specify the operation mode for the command
{-batch | -b} properties_file
{-interactive | -i}
-silent
{-help | -h}
type Options that specify the cell type for interactive and silent modes
-new
-existing
behaviorOptions Options that modify command behavior
{-genPropsFile | -n}
-genBFProject
-genRAFWEnv
-genCloudPattern
-opt "var1=value1" -opt "var2=value2"...
-product
Option descriptions for mode
The rafwEnvBuild command accepts multiple mode options. If you do not specify a mode, the -help mode is the default.
| Option {-long_option | -short_option} | Description |
|---|---|
| -batch | -b configuraton_definition_file | Runs the configuration properties file that you specify in batch mode.
A configuration properties file can be created by running the rafwEnvBuild command in interactive mode, silent mode, or by running the configuration editor for a new configuration. The configuration properties file is saved to the RAFW_HOME/user/preserve/envgen directory and uses the default naming convention: env-config.properties. Specify a complete path to this file. |
| -interactive | -i | Runs the rafwEnvBuild command interactively,
displaying questions that you answer to generate configuration objects.
Optionally, use behavior options to control which objects are created. |
| -silent | Runs the rafwEnvBuild command in silent
mode and creates the configuration objects using information that you specify using the -opt option.
works only with -existing. Does not work with -new. The following -opt parameters are required and case-sensitive:
The following -opt parameters are optional and case-sensitive:
Optionally, use behavior options to control which objects are created. |
| -help | -h | Displays help for the rafwEnvBuild command syntax. Help is the default mode. |
Option Descriptions for type
The rafwEnvBuild command accepts options that define the configuration type: new or existing. If you do not specify a type, new is used. The types apply to the interactive and silent modes only.
| Option | Description |
|---|---|
| -new | If specified with the interactive mode, creates a configuration properties file and other objects for a new WebSphere cell.
If specified with the silent mode, creates a configuration properties file that can be used as input to the batch mode.
|
| -existing | If specified with the interactive mode, creates a configuration properties file and other objects for an existing configuration.
If specified with the silent mode, creates a configuration properties file that can be used as input to the batch mode. |
Option Descriptions for behaviorOptions
The rafw command accepts options that affect default command behavior for silent and interactive modes.
For example, the -genPropsFile, -genBFProject, and -genRAFWEnv options affect the default command behavior, allowing you to select which cell environment objects are generated. The default behavior is to generate all of the environment objects for the cell:
- The env-cell.properties file in the RAFW_HOME/user/preserve/envgen directory
- The cell definition in the environment tree
- The RAFW_env_cell automation plan and RAFW_env_cell automation variables
| Option {-long_option | -short_option} | Description |
|---|---|
| -genPropsFile | -n | For interactive and silent mode, this option generates the configuration properties file and writes it to the RAFW_HOME/user/preserve/envgen directory as env-cell.properties.
This option does not:
|
| -genBFProject | For interactive and silent mode, this option generates the automation plan and automation context and writes the configuration properties file to the RAFW_HOME/user/preserve/envgen directory. This option does not generate the configuration definition in the environment tree or generate a VSP. |
| -genRAFWEnv | For interactive and silent mode, this option generates the cell definition in the environment tree and writes the configuration properties file to the RAFW_HOME/user/preserve/envgen directory. This option does not generate the automation plan and automation context or generate a VSP. |
| -genCloudPattern | For interactive and silent mode, this option generates a VSP that you can use in PureApplication System.
You must provide the necessary parameters for VSP creation in the properties file you specify.
If you do not specify the genCloudPattern option, a VSP is not created. |
| -opt "var1=value1" -opt "var2=value2"... | For silent mode, this option allows you to pass variables and values that rafwEnvBuild uses to generate cell environment objects.
The variables are defined in the environmentGenerationBatchFile.vm template, which is located in product/templates/velocity/environmentGenerationBatchFile.vm. The environmentGenerationBatchFile.vm template is a product template and should not be modified. Variables are case-sensitive and must match the case used in the template. Variables and values must be quoted, for example: -opt "ENVIRONMENT=dev01" -opt "HOST_NAME=your.host.name" |
| -clean | If you are recreating a configuration, use this option to delete the current configuration before the new one is generated.
When -clean is specified, the current topology directories, including the configuration files, are deleted before the configuration is regenerated. However, the VSP and the automation plan and automation context are not removed. If -clean is not specified, files that do not correspond to those in the assigned template are left as is in the current definition. For example, any .xml configuration file that is not in the environment template is left as is, with the same configuration data. |
| -verbose
Command alias -v | Use this option to display information about each file that is copied during configuration generation. |
| -product | Use this option to specify the module to use during environment generation. The default module is based on the standard WebSphere directory structure of cells, nodes, clusters, and servers. In practice, you only need this option when you specify liberty for WAS Liberty profile. |
Examples
To create environment objects using the values in the .properties file, run the command in batch mode (-batch) and specify the full path to the .properties file:
rafwEnvBuild.sh -batch RAFW_HOME/user/preserve/envgen/env-cell.properties
The following commands are equivalent. Both run the rafwEnvBuild command in interactive mode (-interactive) and generate all the environment objects for a new cell. Because the default cell type is new, specifying the -new option is not required.
rafwEnvBuild.sh -interactive -new
rafwEnvBuild.sh -interactive
The following command runs the rafwEnvBuild command in interactive mode (-interactive) and generates all the environment objects for an existing cell.
rafwEnvBuild.sh -interactive -existing
The following command runs the rafwEnvBuild command in interactive mode (-interactive) and generates only the .properties file (-genPropsFile) for a new cell (-new).
rafwEnvBuild.sh -interactive -new -genPropsFile
The following command runs the rafwEnvBuild command in interactive mode (-interactive) and generates the automation plan and automation context for an existing cell (-existing). It also generates the .properties file and writes it to the RAFW_HOME/user/preserve/envgen directory.
rafwEnvBuild.sh -interactive -existing -genBFProject
The following command runs the rafwEnvBuild command in interactive mode (-interactive), generates the automation plan and automation context for an existing cell (-existing), and creates a VSP. It also generates the .properties file and writes it to the RAFW_HOME/user/preserve/envgen directory.
rafwEnvBuild.sh -interactive -existing -genBFProject -genCloudPattern
The following command runs the rafwEnvBuild command in interactive mode (-interactive) and generates the cell definition in the environment tree for a new cell (-new). It also generates the .properties file and writes it to the RAFW_HOME/user/preserve/envgen directory.
rafwEnvBuild.sh -interactive -genRAFWEnv
The following command generates the automation plan and automation context without affecting the cell definition in the environment tree:
rafwEnvBuild.sh -batch RAFW_HOME/user/preserve/envgen/env-cell.properties -genBFProject
To remove an environment before you recreate it, run the command with the -clean option. This command removes the existing env/cells/cell directory before recreating it. The existing automation plan is left unchanged. The env-cell.properties file is updated to reflect the new environment properties.
rafwEnvBuild.sh -batch RAFW_HOME/user/preserve/envgen/env-cell.properties -clean
To display the file path and name of each file that is copied when an environment is generated, run the command with the -verbose option.
rafwEnvBuild.sh -batch RAFW_HOME/user/preserve/envgen/env-cell.properties -verbose
2.18.3. Command reference for integrateToBF
Use the integrateToBF command to integrate the product with the automation engine. To automatically create all objects in a single command execution, use the createAll option.
Description
The integrateToBF createAll command adds or removes the following objects from the database:
- The libraries to install and build new configurations or to import configurations from existing cells.
- The server object and its associated objects in the database: a server environment, a server auth, and a selector.
Specifying the createAll or the createLibraries option runs the integrateToBF command in interactive mode. In interactive mode, you can create all objects or libraries, or you can individually specify which objects and libraries to create by responding to prompts.
Delete components during uninstallation only if you do not plan to reinstall.
Prerequisites
Run the integrateToBF command from the RAFW_HOME/bin directory.
Syntax
Command options are case sensitive. When you enter command options, use lowercase letters as shown in the syntax statement.
{integrateToBF.bat | integrateToBF.sh} behaviorOptions
<BEHAVIOR OPTIONS> Options that modify command behavior
{createAll | removeAll |
createLibraries | removeLibraries |
createUITab | removeUITab |
createServer | removeServer |
createIntegrationArtifacts product | removeIntegrationArtifacts product |
recoverUUIDs}
Options
The integrateToBF command accepts one of the following options.
| Option | Description |
|---|---|
| createUITab | Adds the Env Gen tab to the web client. |
| removeUITab | Deletes the Env Gen tab from the web client. |
| createLibraries | Adds the integration libraries for automation targets. Libraries are added to the Libraries module in the web client. |
| removeLibraries | Deletes the integration libraries for automation targets.
Integration libraries added by the integrateToBF command are removed from the Libraries module in the web client.
This option also removes integration libraries from projects that are added as inline steps. Libraries inlined as steps are removed from projects that are created by the configuration generator and from user-created projects. Removing inline step libraries from projects can cause the project to fail. |
| createServer | Creates the server object and its associated objects in the database: a server environment, a server auth, and selector. |
| removeServer | Deletes the server object and its associated objects in the database: a server environment, a server auth, and selector. |
| createAll | Adds the Env Gen tab and the integration libraries for automation targets to the web client.
The createAll option does not add integration artifacts for PureApplication System |
| removeAll | Deletes the RAFW tab for the configuration editor and removes the integration libraries for automation targets from the web client. |
| createIntegrationArtifacts product | Creates integration objects to support integration for the products that you specify.
The supported products are: ram: Rational Asset Manager rtc: Rational Team Concert wp: WebSphere Portal wve: WebSphere Virtual Enterprise wsrr: WebSphere Service Registry and Repository wps: WebSphere Process Server wesb: WebSphere Enterprise Service Bus |
| removeIntegrationArtifacts product | Deletes integration objects to remove integration support for the products you specify.
The supported products are: rtc: Rational Team Concert wp: WebSphere Portal wve: WebSphere Virtual Enterprise wsrr: WebSphere Service Registry and Repository wps: WebSphere Process Server wesb: WebSphere Enterprise Service Bus |
| recoverUUIDs | Recovers UUIDs if the buildforge.properties file is accidentally deleted or becomes corrupted.
The configuration generator adds UUIDs to the buildforge.properties file for the objects that it creates and adds to the database. This option recovers the UUIDs for the default libraries added to the Libraries module and the UUIDs for the RAFW filter, the RAFW_Global environment variable, and the RAFW selector. |
Interactive mode
In interactive mode, the integrateToBF command displays the following questions:
-
Would you like to enter interactive mode to select the library groups you wish to create? [y, n]
Enter one of the following responses:
- y
- To enter interactive mode and select the libraries to be created.
- n
- To automatically create all libraries.
-
Would you like to create libraries in library group 'group' ? [y, n]
Where group is one of the following groups:
- RTC
- RAM
- WP
- WVE
- WSRR
- WPS
- WESB
- LIBERTY
For each prompt, enter one of the following responses:
- y
- To create the automation libraries for the displayed group. For example, for the WP group, the RAFW_WP_70_Base_Install_Library as well as the other WebSphere Portal libraries are created.
- The RTC group is required for source control,
and enables the creation of the following adaptors:
- RAFW_SCM_CHECKIN_ADAPTOR
- RAFW_SCM_CHECKOUT_ADAPTOR
- The RAM group is required for asset management,
and enables the creation of the following libraries:
- RAFW_AM_CHECKIN_LIBRARY
- RAFW_AM_CHECKOUT_LIBRARY
- n
- To not create the displayed group of libraries. If you later attempt to generate a configuration definition for that product, the generator will not be able to locate the libraries for the automation plans it is creating and generation will fail.
- If you do not have a default build class specified in the automation engine, the following prompt is displayed:
Choose a Default Build Class for RAF Automation Plans
The options displayed depend on the build classes you have available in the automation engine. Build classes define purge policies for completed builds. Enter the number corresponding to the class you want to select as default.
This prompt is not typically displayed on English-language installations.
- If you do not have a default access group specified in the automation engine, the following prompt is displayed:
Choose a Default Access Group for RAF Automation Plans
The options displayed depend on the access groups you have available in the automation engine. Access groups determine permissions for users of the automation engine. Enter the number corresponding to the group you want to select as default. All plans created by the configuration editor are owned by this group by default.
This prompt is not typically displayed on English-language installations.
Examples
The following example uses a single command and the createAll option to add libraries and objects to the database.
- RAFW_HOME/bin/integrateToBF.sh createAll
The following example uses a single command and the createLibraries option to add libraries to the database. The createLibraries option causes the integrateToBF command to start in interactive mode and prompts you to select which libraries are to be installed.
- RAFW_HOME/bin/integrateToBF.sh createLibraries
The following example uses a single command and the createIntegrationArtifacts option to add libraries to the database. This example installs the libraries specified for WebSphere Portal, WebSphere Process Server, and WebSphere Enterprise Service Bus. It also installs the prerequisite libraries for WAS.
- RAFW_HOME/bin/integrateToBF.sh createIntegrationArtifacts wp wesb wps
2.18.4. Command reference for manageBFLibs
Use the manageBFLibs command to add and delete libraries and other objects in the database. A predefined class is required for this command.
Description
Actions are added to the database as libraries so that they can be added to projects.
The manageBFLibs command accepts a predefined class as an argument. The class defines the set of libraries that are added or deleted.
After the libraries in a class are added to the database, you can add them to a project.
Prerequisites
A predefined class is required. Guided activities include a predefined class for the actions included in a guided activity.
Run the manageBFLibs command from the RAFW_HOME\bin directory. The following examples use the default directory for RAFW_HOME.
| Operating system | Example path and command |
|---|---|
| Windows | C:\IBM\RAFServer\rafw\bin\manageBFLibs.bat |
| UNIX/Linux | RAFW_HOME/bin/manageBFLibs.sh |
Syntax
Command options are case sensitive. When you enter command options, use lowercase letters as shown in the syntax statement.
{manageBFLibs.sh | manageBFLibs.bat} class_name createLibraries | deleteLibraries
Arguments
- A predefined class name is required. Guided activities include a predefined class for the actions included in a guided activity.
- The manageBFLibs command accepts a single class as an argument.
- Enter the manageBFLibs command and its arguments and options on one line.
The product provides these classes:
- com.ibm.rational.bfw.framework.integration.StopStartAllLibraryCreationWizard
- Adds actions for starting and stopping all processes in a managed cell and starting and stopping all processes in a standalone cell.
For z/OS target systems, the configuration generator adds this library to the project that it creates for the z/OS WebSphere cell definition.
- RAFW_stop_cell
- Stops all processes in a managed cell, intended for use only with managed cells.
- RAFW_start_cell
- Starts all processes in a managed cell, intended for use only with managed cells.
- RAFW_stop_servers
- Stops all server processes in a standalone cell.
- This library can also be used to stop all server processes in a managed cell, excluding node agents and the deployment manager process.
- RAFW_start_servers
- Starts all processes in a standalone cell.
- This library can be used to start all server processes in a managed cell, excluding node agents and the deployment manager process.
- com.ibm.rational.bfw.framework.integration.ExistingCellLibraryCreationUtility
-
Adds the following objects to the database:
- New libraries to the Libraries module. All libraries that are available for your product version are added.
- New mode options are added for the MODE environment variable of the RAFW_Global environment.
An alternative method to create these objects is to run the integrateToBF command with the createAll or createLibraries option.
Options
The manageBFLibs command accepts two options: createLibraries or deleteLibraries.
| Option | Description |
|---|---|
| createLibraries | Add the actions defined by the class argument to the web client. |
| deleteLibraries | Delete the actions defined by the class argument from the web client. |
Examples
Remember to enter the manageBFLibs command and its arguments and options on one line.
[rafwadm@rafw bin]$ ./manageBFLibs.sh
com.ibm.rational.bfw.framework.integration.StopStartAllLibraryCreationWizard
createLibraries
C:\IBM\RAFServer\rafw\bin\manageBFLibs.bat
com.ibm.rational.bfw.framework.integration.ExistingCellLibraryCreationUtility
createLibraries
2.19. UI references for AMC
References include environment variable properties.
2.19.1. Context variable properties
Use the automation context editor to define the properties for your context variables.
- Name
- The name for the context variable, for example, Node.
- Type
- Standard: This is the default option. You can assign a value and action to this variable type.
- Include: Select this type to include another context. Enter the value as the name of the context to include. When you include a context, all variables in the context are included.
- Pulldown: Select this option to provide a set of pulldown list options that users can choose from. Define the list options by providing the option name and option value, and also specify the default option. If you do not select a default option, the first option in the list is used. The value for the variable is the value of the default option.
- Value
- The value for the variable. For example, to define a node variable, enter the node name as the value, and to define am Include variable, enter the name of the context to include as the value. If you are defining a Pulldown variable, the value is, by default, the value of the default pulldown option, and cannot be changed.
- Action
- Set: The default option. The specified value is assigned to the variable. The variable is created if it does not exist.
- Set if not set: This action assigns the value to the variable only if the variable does not already have a value.
- Append: The value is appended to the current value for the variable. The OS-specific PATH delimiter is added between the values, semicolon (;) for Windows systems, and colon (:) for Unix or Linux systems.
- Prepend: The value is inserted in front of the current value. The OS-specific PATH delimiter is added between the values, semicolon (;) for Windows systems, and colon (:) for Unix or Linux systems.
- Clear: The value is set to an empty string. If the Value property contains a value, it is not used.
- Unset: The variable is deleted from the current applied environment. If the Value property contains a value, it is not used.
- Assign Hidden: The system assigns the variable, but hides the value in the logs, showing it as "*****". Use this option to hide the password from users who run the project.
- On Project
- Normal: The variable behaves normally when assigned to a project.
- Required: A value must exist for the variable. If a value is not defined, a job cannot be started.
- Read-Only: The value cannot be changed.
- Suppress Display: The variable is not displayed in the job details window. However, the variable exists and can be used in steps.
- Must Change: The variable value must be changed. If a new value is not entered, the job cannot be started.