Monitor events
In IBM Integration Designer, the event monitor, event definition generator, and event definition editor are the three tools that are solely designated for working with common base events and event definitions.
The following topics describe how to use these tools to work with events and event definitions in IBM Integration Designer.
Co-existence of monitor models
In WebSphere Integration Developer 7.0, you cannot use the IBM Business Monitor development toolkit to create version 6.0.2 monitor models. However, you can use existing 6.0.2 monitor models with the IBM Business Monitor development toolkit.
Integration modules (including mediation modules)
In WebSphere Integration Developer 7.0, if you open a version 6.0.2 monitor model in the Monitor Model editor of the IBM Business Monitor development toolkit, the 6.0.2 monitor model will automatically be migrated to the 7.0 format when you save it in the Monitor Model editor. However, the migrated monitor model is still configured to receive 6.0.2-style style events to be emitted at run time. (Note that 6.1, 6.2, and 7.0 formats are identical.)
Any WebSphere Integration Developer project that was created in version 6.0.2 and that emits events will continue to use the version 6.0.2 event format in later versions of WebSphere Integration Developer. (The one notable exception to this rule are mediation modules, which require user intervention as described in the "Mediation modules" section below.) As a result, you can edit, save, and deploy your WebSphere Integration Developer project and it will still work with a monitor model that you previously deployed. Similarly, you can edit, save, and deploy your monitor model and it will continue to work with 6.0.2-format events.
The Monitor Model editor allows you to add modules to a monitor model that was originally created in 6.0.2, regardless of whether the module emits events in the 6.0.2 format or the 7.0 format. Alternatively, you can create a new 7.0 module and configure it to use the 6.0.2 event format. You will still be able to generate event definitions for the business process, inline or stand-alone human task, SCA, and mediation components in the module and add them to an existing monitor model. However, you cannot create a new 6.0.2 monitor model in WebSphere Integration Developer 7.0.
In WebSphere Integration Developer 7.0, you do not require event definitions for 7.0 monitor models. However, to work with event definitions, you will find that existing event definitions are displayed in the Events folder that is nested under the module name in the Business Integration view. You can double-click these event definitions to open and edit them in the event definition editor. And you can still create new event definitions by right-clicking a module and selecting New > Other > Business Monitoring > Event definition.
When you change a version number for any single resource in a module, every other resource in the module will also be changed. Thus, you can change a 7.0 module to a 6.0.2 module, or change a 6.0.2 module to a 7.0 module, by selecting either 6.0.2 or 7.0 in the Global Event Settings page of the Event Monitor tab, which is found in the Properties view of many of the IBM Integration Designer component editors. The default selection is 7.0.
Mediation modules
For mediation flows in 7.0, explicitly choose the 6.0.2 format to emit 6.0.2 style events. In short, the version of events emitted from mediation flow emitters is dependent on the properties selected in the Global Event Settings page of the Event Monitor tab in the assembly editor. (To open this tab, you select the mediation flow in the assembly editor and click the Properties > Details tab, then expand the interfaces in the Details page and select your operation.) If you have selected the 6.0.2 event format, then this event format is read and used at run time. If you have not selected the 6.0.2 event format, then the 7.0 format is used by default for the mediation flow.
Depending on whether you previously selected SCA events for a 6.0.2 mediation module that you now want to import into WebSphere Integration Developer 7.0, the mediation module will exhibit one of the following two behaviors:
- If you previously selected SCA events for the 6.0.2 mediation module in the General page of the Event Monitor tab, then all of the events will be emitted in 6.0.2 format.
- If you did not previously select SCA events for the 6.0.2 mediation module in the General page of the Event Monitor tab, then all of the events will be emitted in the default 7.0 format.
As stated earlier, you can change the event format in the Global Event Settings page of the Event Monitor tab. (Note the Legacy hexBinary selection is not applicable for mediations.)
Monitor events
In IBM Integration Designer, you can use the event monitor to enable the generation and monitoring of Common Base Event events and have them managed by the services of the Common Event Infrastructure (CEI). You can generate events for business processes, inline and stand-alone human tasks, and other components and then use the IBM Business Monitor development toolkit to work with the monitor models that use these events.
In IBM Integration Designer, there is limited ability to emit an instance of an event type defined by one of the component tools. However, you can use the standard org.eclipse.hyades.logging APIs to build your own event emitter.
The following topics describe the generation and monitoring of events in IBM Integration Designer.
Event generation and monitoring
In IBM Integration Designer, you can enable 6.0.2 event generation or 7.0 monitor model generation for many of the business integration components produced by the editing tools, such as business processes and business rules. The primary tool for enabling event generation and monitoring in IBM Integration Designer is the event monitor.
In any editor where the event monitor resides, you can select one or more monitorable component elements and then use the event monitor to choose the events to generate and monitor for the selected elements. For example, in the business process editor, you could select a Receive activity in a business process and then use the event monitor to choose the Activity Started and Activity Stopped events for generation and monitoring. A complete list of monitorable components and elements is found in the topic "Monitorable components and elements in IBM Integration Designer."
Before you work with the event monitor, you should have a basic understanding of the following event-related concepts:
- Common Event Infrastructure
- Common Base Event
- Business events
These concepts are discussed in the following sections.
Common Event Infrastructure
In IBM Integration Designer and IBM Business Process Manager, the Common Event Infrastructure (CEI) is used to provide basic event management services, such as event generation, transmission, persistence, and consumption. CEI was developed to address industry-wide problems in exchanging events between incompatible systems, many of which employed different event infrastructures, event formats, and data stores. Using CEI, previously incompatible systems are now capable of sharing a single infrastructure and using a single API, which facilitates data exchange between applications written by the same vendors or different vendors.
Common Base Event
Although CEI provides an infrastructure for event management, it does not define the format of events. This is defined by the Common Base Event specification, which provides a standard XML-based format for business events, system events, and performance information. Application developers and administrators can use the Common Base Event specification for structuring and developing event types.
The key concept in the Common Base Event model is the situation, which is any occurrence that happens anywhere in the computing system, such as a user login or a scheduled server shutdown. The Common Base Event model defines a set of standard situation types, such as StartSituation and CreateSituation, that accommodate most of the situations that might arise.
In the Common Base Event model, an event is a structured notification that reports information related to a situation. An event reports three kinds of information:
- The situation that has occurred
- The identity of the affected component
- The identity of the component that is reporting the situation, which might be the same as the affected component.
The Common Base Event specification is part of the IBM Autonomic Computing Toolkit.
Business events
Business events capture information that is relevant to a business. This information can then be analyzed to evaluate whether different aspects of the business are effective. For example, a business event could reveal when the number of customer orders for a business product falls below a critical level in a specific time frame.
In IBM Integration Designer, a set of predefined business events is provided for each type of monitorable component, such as business processes, business rules, and other components. This means that you have a full set of business events at your command without necessarily needing to write a single line of event code. The predefined business events are all based on the Common Base Event specification and you can use the event monitor to select them for generation.
In all of the IBM Integration Designer editors that support event monitoring, any events that you select are by default generated in accordance with the Common Base Event specification and are transmitted over CEI and logged in the CEI data store.
However, in the business process editor and the human task editor, there are CEI and Audit Log check boxes that enable you to choose where to log the generated events. If you select the CEI check box, business events relating to business processes and inline and stand-alone human tasks will be generated into the CEI data store. If you select the Audit Log check box, the same business events will also be generated as audit events in the process choreographer database.
It is important to note that unlike audit events that are logged in the process choreographer database, CEI events are generally accessible to all components and event consumers. For this reason, unless you have a specific need to work with audit events, it is recommended that you enable the generation and monitoring of CEI events rather than audit events.
Monitorable components and elements in IBM Integration Designer
In IBM Integration Designer, you can use the event monitor to enable event generation and monitoring for a wide variety of business integration components and their elements.
The event monitor can be invoked from the Properties view of the assembly editor or from the Properties view of any of the following component editors:
- Assembly editor
- Business process editor
- Business state machine editor
- Business object map editor
- Business rule group editor
- Interface map editor
- Human task editor
- Mediation flow editor (explicit event emitter primitive only)
- Selector editor
To enable event monitoring at the SCA level, then you must open the event monitor in the assembly editor and select one or more component or import interface operations to monitor. See Enable SCA events to be emitted for information that describes how to set an SCA event to be emitted.
To enable event monitoring at the component level, then you can open the event monitor in one of the component editors (such as the business process editor) and select one or more component elements to monitor.
In the mediation flow editor, you can select an Event Emitter primitive from the palette to emit a monitor event at a specified location in the flow. See the topic Emitting common base events and its subtopics. Although the event monitor is not enabled in the mediation flow editor, you can open the event monitor in the assembly editor and then monitor interface operations for mediation flows in the same way as for other business integration components.
See the Mediation flows overview topic in the related links section for information about mediation flows.
In the business process editor, you can select one or more process activities or variables as monitorable elements. Or you can select the entire process as a monitorable element. If you select one or more activities or variables as monitorable elements, the event monitor is populated with the event types for those selected activities or variables. However, if you select the entire process as a monitorable element, the event monitor is populated with all of the event types for processes.
In the business process editor, you can select any combination of the activities, variables, and business process itself as monitorable elements. This gives you greater control over event generation properties. For example, if you select one or more activities or variables as monitorable elements but you do not select the entire process as a monitorable element, only events associated with the selected activities or variables will be generated. And if you select one or more activities or variables as monitorable elements and you also select the entire process as a monitorable element, events associated with the selected activities, variables, and entire process will be generated.
The monitorable elements for each editor are listed in the table below.
| Editor | Monitorable element |
|---|---|
| Assembly editor (CEI only) | Operation |
| Business process editor (CEI and Audit Log) | Assign, Compensate, Empty (Empty Action), Flow (Parallel Activities and Generalized Flow), ForEach, Invoke, Pick (Receive Choice), Process, Receive, Reply, Rethrow, Scope, Script (Snippet), Sequence, Human Task, Switch (Choice), Template (not shown), Terminate, Throw, Variable, Wait, While (While loop) |
| Business object map editor (CEI only) | Map, Transformation (all kinds) |
| Business rule group editor (CEI only) | Operation |
| Business state machine editor (CEI only) | Action, Entry, Exit, Guard, State, State Machine Definition (State Machine), Timer, Transition |
| Human task editor (CEI and Audit Log) | Escalation, Task, Task Template (not shown) |
| Interface map editor (CEI only) | Operation Binding, Parameter mediation (all kinds) |
| Selector editor (CEI only) | Operation |
Default events for business processes in IBM Integration Designer
In IBM Integration Designer, there are default events for certain activities in business processes.
These activities and their associated default events are listed in the following table:
| Activity | Default Event Name |
|---|---|
| Invoke | Completion forced, Entry, Exit, Expired, Failed, Retry forced, Skipped, Stopped, Terminated |
| Pick | Entry, Escalated, Exit, Expired, Failed, Skipped, Terminated, Work item created, Work item deleted, Work item refreshed, Work item transferred |
| Process | Compensated, Compensating, Compensation failed, Correlation, Deleted, Entry, Event handler escalated, Event received, Exit, Failed, Failing, Partner changed, Restarted, Resumed, Suspended, Terminated, Terminating, Work item created, Work item deleted, Work item transferred |
| Receive | Entry, Escalated, Exit, Skipped, Terminated, Work item created, Work item deleted, Work item refreshed, Work item transferred |
| Reply | Entry, Exit, Failed, Skipped |
| Scope | Compensated, Compensating, Compensation failed, Entry, Event handler escalated, Event received, Exit, Failed, Failing, Skipped, Terminated |
| Human Task | Assigned, Completion forced, Created, Deassigned, Escalated, Exit, Expired, Failed, Fault set, Output set, Retry forced, Skipped, Stopped, Terminated, Work item created, Work item deleted, Work item refreshed, Work item transferred |
| Template (not shown) | Deleted, Entry |
Business Process Choreographer and runtime events
This topic directs you to the appropriate topics on Business Process Choreographer events, including business process events and human task events. It also directs you to documentation on IBM Business Process Manager runtime events.
- Information on Business Process Choreographer business process events is found in Business process events.
- Information on Business Process Choreographer human task events is found in Human task events.
- Information on IBM Business Process Manager runtime events is found in Process server events.
Configure IBM Business Process Manager to support event monitoring in IBM Integration Designer
If you chose to install Process Server as the test environment when you installed IBM Integration Designer, then IBM Business Process Manager has been automatically configured to support CEI and audit event monitoring in IBM Integration Designer. However, to generate and monitor events for business processes and human tasks, you must manually enable CEI logging or audit logging in the business process container and human task container of IBM Business Process Manager.
To enable CEI or audit logging in the business process and human task containers.
- In IBM Integration Designer, right-click the server in the Servers view and select Start.
- When the server status changes to Started, right-click the server again and select Run Administrative Console. The IBM Business Process Manager administrative console opens.
- In the User ID and Password fields, specify the user ID and password and click Log In.
- In the left frame, expand Servers and click the Application servers link.
- In the right frame, click the server1 link.
- To enable the server to generate CEI and audit events for business processes:
- Under the Business Integration section, expand Business process choreographer.
- Click Business Flow Manager.
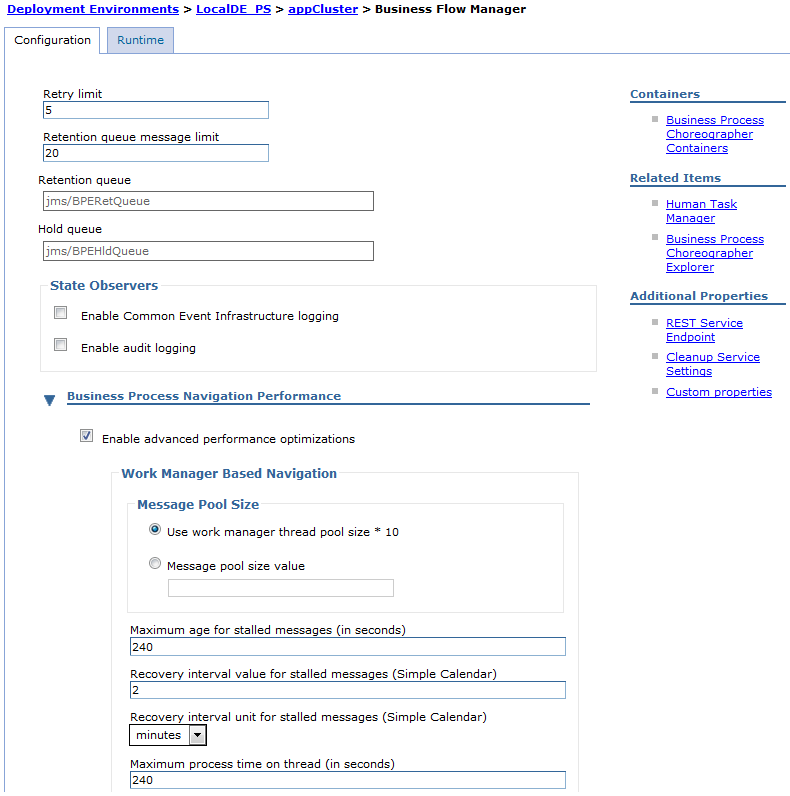
- Ensure the Enable Common Event Infrastructure logging check box is selected.
- Select the Enable audit logging check box and click OK.
- Click the Save link in the Messages area.
- Click the server1 link to return to the properties for the server.
- To enable the server to generate CEI and audit events for human task events:
- Under the Business Integration section, expand Business process choreographer.
- Click Human Task Manager.
- Ensure the Enable Common Event Infrastructure logging check box is selected.
- Select the Enable audit logging check box and click OK.
- Click the Save link in the Messages area.
- Click the Logout button and then close the administrative console.
When you have finished enabling CEI and audit logging in the business process and human task containers, you are ready to use the event monitor to enable event generation and monitoring.
Opening the event monitor
In IBM Integration Designer, you can use the event monitor to enable (or disable) event and monitor model generation and monitoring. The event monitor is accessible as a properties page in many of the IBM Integration Designer editors.
The method you use to open the event monitor differs depending on whether you want to enable event monitoring at the SCA level in the assembly editor or at the component level in one of the component editors.
To open the event monitor:
- To enable event monitoring at the SCA level, you must open the event monitor in the assembly editor and then select one or more component or import interface operations, as described in the following steps:
- Open your assembly diagram in the assembly editor and select the business integration import or component (such as a business process) that contains the interface operation to monitor for events.
- Click the Properties tab. The Properties view opens.
- In the Properties view, click the Details tab. The Details pane opens.
- In the Details pane, expand the list of interfaces and select the operation to monitor for events. The Event Monitor tab is displayed in the Details pane.
- Click the Event Monitor tab. The Event Monitor pane opens and the name of the monitorable element appears at the top of the Details pane.
- To enable event monitoring at the component level, you must open the event monitor in a component editor (such
as the business process editor) and then select one or more component elements to monitor, as described in the following steps:
- In the component editor, select the monitorable element in the business integration component to monitor for events. For example, in the business process editor, you could select a process activity in the process editor canvas or select the entire process in the process editor tray.
- Click the Properties tab. The Properties view opens.
- Click the Event Monitor tab.
The Event Monitor pane opens and the name of the monitorable element appears at the top of the pane, as shown in the figure below:

After you have opened the event monitor, you will probably want to specify event properties for individual component elements that you have selected in a component editor. Or you may want to globally specify event properties for all monitorable elements in a component.
These tasks are described in the topics "Specifying event properties for component elements" and "Specifying event properties for components."
Specifying event properties for component elements
In the event monitor, you can specify event properties for individual component elements that you have selected in a component editor. For example, you can choose whether to generate all events, or selected events, or no events for a component element. You can also specify other event properties for a selected component element, such as the content level and transaction behavior.
Before you begin to work with the event monitor, you should ensure that you have configured Process Server to support the monitoring and logging of business process and human task events. This is described in the topic "Configuring IBM Business Process Manager to support event monitoring in IBM Integration Designer." Also, you should ensure that you are familiar with the components and elements that can be monitored for events in IBM Integration Designer. A complete list of monitorable components and elements is found in the topic "Monitorable components and elements in IBM Integration Designer".
To specify event properties for component element perform the following steps.
- If you have opened the event monitor in the business process editor or the human task editor, complete one or both of the following steps:
- To generate CEI events into the CEI data store, ensure the CEI check box is selected. This is the default selection.
- To generate audit events into the process choreographer database, select the Audit Log check box. (If you also selected the CEI check box, these same audit events will also be generated as CEI events and they will be accessible to all components and event consumers. Unless you have a specific need to work with audit events in the process choreographer database, it is recommended that you only select the CEI check box.)
- Select one of the following radio buttons:
- Select None if you do not want to generate and monitor any events associated with the component element selected for monitoring. (Note that if you are in the event monitor for the business process editor and you select None, the default events will still be generated for the Process, Receive, Reply, Invoke, Scope, Human Task, and Pick elements if you have selected Enable Default Events in the Global Event Settings pane of the event monitor. Enabling and disabling default events for business process activities is described in the topic "Specifying event properties for components.")
- Select All to generate and monitor all events associated with the component element selected for monitoring.
- Select Selected to select, generate, and monitor individual events associated with the component element selected for monitoring.
- If you chose Selected, select the check boxes beside the individual events to generate and monitor for the selected element.
- If you selected All or Selected, then select one of the following Event Content levels beside All or beside the individual events that you selected:
- Select Full to show all business object fields in the event.
- Select Digest to show only the business object ID in the event.
- Select Empty to show no business object fields in the event.
If you have selected an individual event for a monitorable element that has no business object, Empty is the only option.
- If you have selected one or more events and you want to have the events generated at run time, then ensure that On is selected for each event. The events will be generated at run time with the appropriate level of information. (If On is not selected for a selected event, the event will continue to be registered with the monitor run time, but it will not be generated at run time.)
- To choose a transaction behavior to control rollbacks when an event fails, then select one of the following entries in the Transaction drop-down list:
- Select Existing to send the event in the current transaction. If the current transaction fails, the event will not be generated.
- Select New to send the event in a new transaction. If this new transaction fails, the event will not be generated.
- Select Default to use the default transaction value supported by the underlying event infrastructure. This value is either Existing or New.
- To add a specific comment on the event setting for a selected event, then type a comment in the Label field. The comment is only used for documentation purposes at development time. It will not be used at run time and it will not be written to the generated event.
- Repeat these steps for each element to monitor.
- Press Ctrl-S to save the event monitor settings. On the component elements that you selected to monitor, an event monitor symbol is displayed
 . A monitoring (.mon) file is also generated or regenerated in the Physical Resources view to store your event monitoring specifications.
The next time that you deploy and run your monitored component, events will be generated for each monitorable element that you chose to monitor in the component.
. A monitoring (.mon) file is also generated or regenerated in the Physical Resources view to store your event monitoring specifications.
The next time that you deploy and run your monitored component, events will be generated for each monitorable element that you chose to monitor in the component.
When you have finished specifying event properties for individual component elements, you might want to globally specify event properties for all your component elements, as described in the topic "Specifying
event properties for components."
Alternatively, you might want to use the event definition generator to generate event definitions for the events that you have selected in the event monitor. Event definitions are files that define the structure of emitted events that are based on the Common Base Event specification. Information about generating event definitions is found in the event definition generator topic "Generating event definitions." However, you must have the IBM Business Monitor development toolkit installed to work with event definitions. The toolkit enables you to associate your event definitions with a monitor model and then add business metrics to the event definitions in the monitor model editor. You can later deploy the monitor model and event definitions to an IBM Business Monitor server and monitor the events in the IBM Business Monitor dashboard. Information about using the toolkit to work with event definitions is found in the IBM Business Monitor development toolkit documentation.
Specifying event properties for components
In the event monitor, you can globally specify event properties for all monitorable elements in a component. For example, you can specify 6.0.2, 7.0, or hexBinary format for the generated events associated with all of your component elements. And if you are specifying event properties for a business process, you can enable or disable the default events for all of your business process activities.
To specify event properties for components.
- In your component editor, select a monitorable element in your component. (Alternatively, you can also select the entire component at the component-level. For example, to specify event properties for an entire business process, you would select the business process in the business process editor tray.) The Global Event Settings tab appears beneath the Event Monitor tab in the Properties view.
- Click the Global Event Settings tab. The Global Event Settings page opens.
- Select one of the following options:
- To generate your events in WebSphere Business Monitor 6.1, 6.2, or 7.0 XML format with schema support, ensure that WebSphere Business Monitor 6.1, 6.2 or 7.0 format (XML with schema support) is selected. This is the default selection. Events generated with a version 6.1, 6.2, or 7.0 XML business object format can be monitored using IBM Business Monitor. (If you select this option and the IBM Business Monitor development toolkit is installed, the Monitor Tools > Generate Monitor Model context menu item will be available for your module. However, the Generate Event Definition pop-up menu item will not be available for supported components in the module regardless of whether the toolkit is installed. Additional information is found in the "Generating event definitions" topic.)
- To generate your events in WebSphere Business Monitor 6.0.2 older version XML format, select WebSphere Business Monitor 6.0.2 format (older version XML). Events generated with a version 6.0.2 XML business object format can be monitored using IBM Business Monitor. (If you select this option, the Generate Event Definition context menu item is available for supported components in the module. However, the Generate Monitor Model pop-up menu item will not be available for your module regardless of whether the IBM Business Monitor development toolkit is installed. Additional information is found in the "Generating event definitions" topic.)
- To generate your events with a hexBinary business object format, select Legacy hexBinary. Events generated in hexBinary format are not compatible with IBM Business Monitor. They are only compatible with those custom tools that are capable of interpreting hexBinary events.
- If you have opened the event monitor in the business process editor, complete one of the following steps:
- To disable the default events for the Process, Pick, Receive, Reply, Invoke, Scope, and Human Task activities, ensure that Disable Default Events (recommended) is selected. This is the default selection.
- To enable the default events for the Process, Pick, Receive, Reply, Invoke, Scope, and Human Task activities, select Enable Default Events. (The default events for these activities are listed in the topic "Default events for business processes.")
- Press Ctrl-S to save the event monitor settings. A monitoring (.mon) file is generated or regenerated in the Physical Resources view to store your event monitoring specifications. The next time that you deploy and run your monitored component, events will be generated for each monitorable element that you have chosen to monitor in the component.
You may want to use the event definition generator to generate event definitions or monitor models for the events that you have selected in the event monitor. Event definitions are files that define the structure of emitted events that are based on the Common Base Event specification. Information about generating event definitions is found in the event definition generator topic "Generating event definitions." However, you must have the IBM Business Monitor development toolkit installed to work with event definitions. The toolkit enables you to associate your event definitions with a monitor model and then add business metrics to the event definitions in the monitor model editor. You can later deploy the monitor model and event definitions to an IBM Business Monitor server and monitor the events in the IBM Business Monitor dashboard. Information about using the toolkit to work with event definitions is found in the IBM Business Monitor development toolkit documentation.
Generating event definitions
If you have selected the WebSphere Business Monitor 6.0.2 event format in IBM Integration Designer, you can use the event definition generator to generate event definitions that define the structure of your emitted events. However, you must have the IBM Business Monitor development toolkit installed to actually work with the event definitions. The toolkit enables you to generate a monitor model for your event definitions and then add business metrics to the event definitions in the monitor model editor. You can then deploy the monitor model to an IBM Business Monitor server and monitor the events with the IBM Business Monitor dashboard. Note, however, that if you have chosen to accept the default WebSphere Business Monitor 6.2 event format, the event definition generator is not available for use.
Event definitions
The Common Base Event specification defines the content of those events that conform to the specification. Event definitions are files that enable you to define the structure of events that are based on the Common Base Event specification.
In the context of IBM Integration Designer, there are two kinds of events:
- Predefined events
- Custom events
Predefined events are events that have been defined in advance for IBM Integration Designer components and their elements, such as business processes and their activities. Custom events, by comparison, are user-defined events that you can emit from custom event emitters in certain components, such as mediation flows and visual snippets.
Use the event definition generator, you can generate or regenerate event definitions for existing predefined and custom events if you have selected the WebSphere Business Monitor 6.0.2 event generation format.
However, to work with the event definitions in a meaningful way, you need the IBM Business Monitor development toolkit. The toolkit enables you to generate a monitor model for your event definitions and then add business metrics to the event definitions in the monitor model editor. It also enables you to deploy the monitor model and event definitions to an IBM Business Monitor server and monitor the emitted events using the IBM Business Monitor dashboard.
Generate event definitions is merely one task in an end-to-end chain of event monitoring tasks that you can perform using the tools of IBM Integration Designer and the IBM Business Monitor development toolkit. The following figure shows how the generation of event definitions relates to the other event monitoring tasks:

In the figure, the following tasks are illustrated:
| Task | Description |
|---|---|
| 1 | Select predefined events |
| 2 | Add custom event emitters |
| 3 | Generate event definitions |
| 4 | Edit event definitions |
| 5 | Test event definitions |
| 6 | Generate monitor model |
| 7 | Add business metrics to event definitions |
| 8 | Deploy the modules to the server |
| 9 | Monitor the emitted events |
These tasks are briefly described in the following sections.
Selecting predefined events
In IBM Integration Designer, each kind of component consists of a number of elements that have predefined events. For example, a business process consists of activities and each type of activity has one or more events predefined for it. If you want your component elements to emit events at run time, you must first select the predefined events for the elements in the event monitor. Once you have selected the predefined events, you can also choose to generate event definitions for them using the event definition generator. Information about selecting predefined events is found in the event monitor topics "Specifying event properties for component elements" and "Specifying event properties for components."
Add custom event emitters
To emit custom events from a mediation flow or visual snippet, you can add custom event emitters to the mediation flow or visual snippet in their editors. After you have added a custom event emitter to a mediation flow, you can choose to generate event definitions for it. Information about adding custom event emitter primitives to mediation flows is found in the mediation flow editor topic "Emitting common base events." Before you can add a custom event emitter to a visual snippet, you must first create a custom event definition for the emitter in the event definition editor. Information about adding custom event emitter activities to visual snippets is found in the visual snippet editor topic "Configuring a custom event in a visual snippet."
Generating event definitions
After you have added custom event emitters to a mediation flow or you have selected predefined events for a component in the event monitor, you can select the mediation flow or component in the Business Integration view and then generate or regenerate event definitions for it. Note, however, that you cannot generate event definitions for custom events in visual snippets and you cannot regenerate event definitions that were created from scratch in the event definition editor.
Generated event definitions are automatically stored in the module that contains your component and they are visible in the Physical Resources view. If you have installed the IBM Business Monitor development toolkit, they are also visible in the Project Explorer view of the Business Monitoring perspective. Information about how to generate event definitions is found in the task topic "Generating event definitions."
Editing event definitions
If you have generated event definitions for predefined or custom events using the event definition generator, you can optionally edit the event definitions in the event definition editor. However, any changes made to the event definitions in the editor will be overwritten when you next regenerate the event definitions. For this reason, it is assumed that you will be deploying any edited event definitions before you regenerate them. Generally, editing generated event definitions is unnecessary and it is only recommended for advanced users. The following paragraphs describe some recommended practices for editing generated event definitions.
If you have generated event definitions for predefined events, you should only edit event definitions for those predefined events that are capable of carrying payload and for which you have specified an event content of Full in the event monitor. For example, the predefined business process event BPC.BFM.BASE does not carry payload even if you have selected an event content of Full. Thus, you should not attempt to edit it. By comparison, the predefined business process event BPC.BFM.VARIABLE.STATUS_XYZ#$%A123 can carry payload if you have specified an event content of Full. As a result, you can edit it and modify the extended data elements.
If you have generated event definitions for custom events in mediation flows, you can also optionally use the event definition editor to modify the extended data elements.
In general, you will typically need to edit generated event definitions whenever one or more elements of the payload have a type specified as schema type "any" or "anyType". When this occurs, the generated event definitions will specify "noValue" as the type, which means that explicitly add extended data elements as children of this element to be able to use the specified data in a monitor model. Information about working with extended data elements in the event definition editor is found in the event definition editor topic "Managing extended data elements."
Although you can use the event definition editor to edit generated event definitions, the primary purpose of the event definition editor is to create and edit custom event definitions. Information about using the event definition editor is found in the event definition editor topic "Creating custom event definitions."
Testing event definitions
After you have generated event definitions using the event definition generator, you can test the event definitions in the integration test client. The test client enables you to select an event definition and then emit an event to ensure the event definition is defining the structure of the emitted event correctly. If you are testing an event definition for a predefined event, you can use the event monitor to change the content specifications in the event definition and then repeat your testing in the test client. Information about testing event definitions in the test client is found in the test client topic "Testing event definitions."
Generating monitor models
If you have installed the IBM Business Monitor development toolkit, you can either generate event definitions or a monitor model, depending on whether you are working with a 6.0.2 or 6.2 module. Event definitions are automatically stored in the same 6.0.2 module that contains the component for which you generated the event definitions. The monitor model is automatically stored in the 6.2 business monitoring project. Information about generating monitor models is found in the IBM Business Monitor development toolkit documentation.
Add business metrics
If you have installed the IBM Business Monitor development toolkit, you can open a generated monitor model in the monitor model editor and add business metrics to the event definitions. If you later generate new event definitions that were not originally generated along with the monitor model, you can import the new event definitions into the monitor model using the monitor model editor. Information about using the monitor model editor is found in the IBM Business Monitor Development toolkit documentation.
Deploy the modules
Event definitions define events that are intended for monitoring by the IBM Business Monitor tools. For this reason, modules that contain event definitions must be deployed to an IBM Business Monitor server. When you deploy your module, any associated business monitoring projects, monitor models, and event definitions are automatically deployed as well.
Generally, deploying modules to an IBM Business Monitor server is similar in many respects to deploying modules to Process Server. Specific information on deploying modules to an IBM Business Monitor server is found in the IBM Business Monitor development toolkit documentation. General information on deploying modules to servers is found in the IBM Integration Designer topic "Deploying modules."
Monitor the emitted events
After you deploy your module to a running IBM Business Monitor server, you can right-click the server and select the WBM Web Dashboard menu item. This opens the IBM Business Monitor Web dashboard to enable you to monitor the emitted events. Information about using the dashboard to monitor emitted events is found in the IBM Business Monitor documentation.
Generating event definitions
In IBM Integration Designer, you can only use the event definition generator to generate or regenerate event definitions if you have selected the WebSphere Business Monitor 6.0.2 event generation format. If you have accepted the default WebSphere Business Monitor 7.0 event generation format, then the event definition generator is not available.
Before you can generate event definitions for predefined events, you must first select the predefined events in the event monitor as described in the event monitor topics "Specifying event properties for component elements" and "Specifying event properties for components." Similarly, to generate event definitions for custom events in a mediation flow, you must first add custom event emitters in your mediation flow as described in the mediation flow editor topic "Emitting common base events."
To generate event definitions:
- In the Business Integration view, expand your module and navigate to the component for which you want to generate event definitions. You can generate event definitions for the following four components:
- Business processes
- Human tasks
- Assembly diagrams
- Mediation flows
- Right-click the component and select Generate Event Definition. In the Physical Resources view of the Business Integration perspective, the event definitions are generated (or regenerated) into the events folder under your module. Note that if you have accepted the default option to have your events generated in WebSphere Business Monitor 6.2 format and you have installed the IBM Business Monitor development toolkit, you can alternatively right-click your module and select Generate Monitor Model. This will generate a monitor model into the Project Explorer view of the Business Monitoring perspective. Information about selecting an event generation format is found in the topic "Specifying event properties for components." Information about generating a monitor model is found in the IBM Business Monitor development toolkit documentation.
Note that if you have a business object with an attribute name that exceeds 64 characters in length, the generated event definition and the emitted event in the runtime environment will truncate the extended data element name to the first 64 characters. For example, in the following extended data element, any name that exceeds 64 characters in the name argument would be truncated to 64 characters:
<extendedDataElement maxOccurs="1" minOccurs="1" name="MyVeryLongAttributeName" type="string"/>
This behavior is defined by the Common Base Event specification.
After you have generated your event definitions, you can perform one or more of the following tasks:
- Edit the event definitions in the event definition editor, as described in the event definition editor topic "Editing event definitions."
- Test the event definitions in the integration test client, as described in the integration test client topic "Testing event definitions."
- Import the event definitions into a monitor model in the monitor model editor and add business metrics to the event definitions, as described in the IBM Business Monitor development toolkit documentation.
Create custom event definitions
Use the event definition editor, you can create custom event definitions to define the structure of your emitted events. However, you must have the IBM Business Monitor development toolkit installed to work with the event definitions. The toolkit enables you to import your event definitions into a monitor model in the monitor model editor and then add business metrics to the event definitions. You can then deploy the monitor model to an IBM Business Monitor server and monitor the emitted events with the IBM Business Monitor dashboard.
The following topics describe the key concepts associated with custom event definitions and explain how to use the event definition editor to work with event definitions.
- Custom event definitions The Common Base Event specification defines the content of those events that conform to the specification. Event definitions are files that enable you to define the structure of emitted events that are based on the Common Base Event specification. Custom event definitions are event definitions that have been created from scratch in the event definition editor rather than having been generated from existing events by the event definition generator.
- Event definition editor In IBM Integration Designer, the event definition editor is the designated tool for creating and editing custom event definitions. The event definition editor features a simple user interface that enables you to add and manage event definitions.
- Set preferences for the event definition editor By default, the user-definable preferences for the event definition editor are already optimized for working with event definitions. However, in the course of your event definition tasks, you may find to change some preferences.
- Create new event definitions Using the New Event Definition wizard, you can create a new event definition in a module, library, or business monitoring project and then edit the event definition in the event definition editor. Event definitions that have been created in the event definition editor can be used to create custom event emitter activities in the visual snippet editor.
- Opening existing event definitions In the event definition editor, you can open any existing event definition that was created using the New Event Definition wizard or that was generated using the event definition generator. However, if you open an event definition that was generated, a window will warn you that your updates will be overwritten the next time the event definition is regenerated.
- Add additional event definitions to an event definition file By default, the event definition editor enables you to create one event definition for each event definition file. Although it is generally considered a best practice to have only one event definition for each file, you can nonetheless set a preference that will enable you to add additional event definitions to a file in the event definition editor.
- Editing event definitions In the event definition editor, you can edit an event definition and customize its properties and extended data elements.
- Delete event definitions By default, the event definition editor displays one event definition for each event definition file. However, if you are working with an event definition file that contains multiple event definitions and you want to delete one or more of the event definitions, you can set a preference that will enable you to delete the event definitions in the event definition editor.
- Limitations for the event definition editor From time to time, you may encounter some limitations in using the event definition editor. In most situations, you can successfully work around these limitations.
Custom event definitions
The Common Base Event specification defines the content of those events that conform to the specification. Event definitions are files that enable you to define the structure of emitted events that are based on the Common Base Event specification. Custom event definitions are event definitions that have been created from scratch in the event definition editor rather than having been generated from existing events by the event definition generator.
An event definition file has a .cbe file extension and it can contain one or more event definitions. If an event definition file contains multiple event definitions, all of the event definitions in the file will be listed in the Business Integration view of the Business Integration perspective (and in the Project Explorer view of the Business Monitoring perspective if the IBM Business Monitor development toolkit is installed). If an event definition file only contains a single event definition, it will usually have the same name as the event definition that it contains. For this reason, you can generally consider event definition files and event definitions to be synonymous when reading the event definition editor documentation.
It is generally considered a best practice to have only one event definition in each event definition file. For this reason, the event definition editor lets you create or edit only one event definition in each file by default. If you need to edit an event definition file that contains multiple event definitions, or to add or delete event definitions in a file, you can set a preference that will enable you to display and work with all of the event definitions in the file simultaneously in the event definition editor.
Content of event definitions
An event definition consists of the following content:
- Name
- The name of the event definition.
- Parent
- The name of the parent event definition. Every event definition has a parent event definition from which it inherits properties and extended data elements. However, the one exception to this rule is the root event definition named WBI.MonitoringEvent. It is the top-level event definition from which all other event definitions are derived. As a result, it has no parent event definition.
- Properties
- Event definition properties convey system information and correlation data and store it as string values. An event definition can contain any number of properties or no properties at all.
- Extended data elements
- Extended data elements convey business information and store it as array or non-array primitive types or complex types. For an extended data element, you can specify any array or non-array data type. An event definition can contain any number of extended data elements or no extended data elements at all.
The event definition editor in context
Use the event definition editor, you can create or edit custom event definitions. However, to work with the event definitions in a meaningful way, you need the IBM Business Monitor development toolkit. The toolkit enables you to import your event definitions into a monitor model in the monitor model editor and then add business metrics to the event definitions. It also enables you to deploy the monitor model and event definitions to an IBM Business Monitor server and then monitor the emitted events using the IBM Business Monitor dashboard.
Creating and editing custom event definitions is merely one task in an end-to-end chain of event monitoring tasks that you can perform using the tools of IBM Integration Designer and the IBM Business Monitor development toolkit. The following figure shows how the creation of custom event definitions relates to the other event monitoring tasks:

In the figure, the following tasks are illustrated:
| Task | Description |
|---|---|
| 1 | Select predefined events |
| 2 | Add custom event emitters |
| 3 | Generate event definitions |
| 4 | Edit event definitions |
| 5 | Test event definitions |
| 6 | Generate monitor model |
| 7 | Add business metrics to event definitions |
| 8 | Deploy the modules to the server |
| 9 | Monitor the emitted events |
These tasks are briefly described in the following sections.
Selecting predefined events
In IBM Integration Designer, each kind of component consists of a number of elements that have predefined events. For example, a business process consists of activities and each type of activity has one or more events predefined for it. If you want your component elements to emit events at run time, you must first select the predefined events for the elements in the event monitor. Once you have selected the predefined events, you can also choose to generate event definitions for them using the event definition generator. Information about selecting predefined events is found in the event monitor topics "Specifying event properties for component elements" and "Specifying event properties for components."
Add custom event emitters
To emit custom events from a mediation flow or visual snippet, you can add custom event emitters to the mediation flow or visual snippet in their editors. After you have added a custom event emitter to a mediation flow, you can choose to generate event definitions for it. Information about adding custom event emitter primitives to mediation flows is found in the mediation flow editor topic "Emitting common base events." Before you can add a custom event emitter to a visual snippet, you must first create a custom event definition for the emitter in the event definition editor. Information about adding custom event emitter activities to visual snippets is found in the visual snippet editor topic "Configuring a custom event in a visual snippet."
Generating event definitions
In the context of IBM Integration Designer, there are two kinds of events. Predefined events are events that have been defined in advance for IBM Integration Designer components and their elements, such as business processes and their activities. Custom events, by comparison, are user-defined events that you can emit from custom event emitters in certain components, such as mediation flows and visual snippets.
After you have added custom event emitters to a mediation flow or you have selected predefined events for a component in the event monitor, you can select the mediation flow or component in the Business Integration view and then generate or regenerate event definitions for it. Note, however, that you cannot generate event definitions for custom events in visual snippets and you cannot regenerate event definitions that were created from scratch in the event definition editor.
Generated event definitions are automatically stored in the same module that contains your component and they are visible in the Physical Resources view. If you have installed the IBM Business Monitor development toolkit, they are also visible in the Project Explorer view of the Business Monitoring perspective. Information about how to generate event definitions is found in the event definition generator topic "Generating event definitions."
Editing event definitions
The event definition editor enables you to create custom event definitions from scratch and store them in either a module or a library that is referenced by the module. If you have generated event definitions for predefined or custom events using the event definition generator, you can optionally edit the event definitions in the event definition editor. However, any changes made to the event definitions in the editor will be overwritten when you next regenerate the event definitions. For this reason, it is assumed that you will be deploying any edited event definitions before you regenerate them. Generally, editing generated event definitions is unnecessary and it is only recommended for advanced users. Information about recommended practices for editing generated event definitions is found in the event definition generator topic "Event definitions."
Testing event definitions
After creating event definitions using the event definition editor, you can test the event definitions in the integration test client. The test client enables you to select an event definition and then emit an event to ensure the event definition is defining the structure of the emitted event correctly. Information about testing event definitions in the test client is found in the test client topic "Testing event definitions."
Generating monitor models
If you have installed the IBM Business Monitor development toolkit, you can generate event definitions and a monitor model to contain them. The event definitions are automatically stored in the same module that contains the component for which you generated the event definitions. The monitor model is automatically stored in the business monitoring project. Information about generating monitor models is found in the IBM Business Monitor development toolkit documentation.
Add business metrics
If you have installed the IBM Business Monitor development toolkit, you can import your event definitions into a monitor model in the monitor model editor and then add business metrics to the event definitions. Information about using the monitor model editor is found in the IBM Business Monitor development toolkit documentation.
Deploy the modules
Event definitions define events that are intended for monitoring by the IBM Business Monitor tools. For this reason, modules that contain event definitions must be deployed to an IBM Business Monitor server. When you deploy your module, any associated business monitoring projects, monitor models, and event definitions are automatically deployed as well.
Generally, deploying modules to an IBM Business Monitor server is similar in many respects to deploying modules to IBM Business Process Manager. Specific information on deploying modules to an IBM Business Monitor server is found in the IBM Business Monitor development toolkit documentation. General information on deploying modules to servers is found in the IBM Integration Designer topic "Deploying modules."
Monitor the emitted events
After you deploy your module to a running IBM Business Monitor server, you can right-click the server and select the WBM Web Dashboard menu item. This opens the IBM Business Monitor web dashboard to enable you to monitor the emitted events. Information about using the dashboard to monitor emitted events is found in the IBM Business Monitor documentation.
Event definition editor
In IBM Integration Designer, the event definition editor is the designated tool for creating and editing custom event definitions. The event definition editor features a simple user interface that enables you to add and manage event definitions.
You can open the event definition editor from within the Business Integration perspective (or from within the Business Monitoring perspective if the IBM Business Monitor development toolkit is installed). The event definition editor is shown in the following figure:

There are two main features of the event definition editor:
- 1 Event Definition area
- 2 Properties view
All of the tasks that you can perform in the event definition editor are either initiated or performed in the Event Definition area or the Properties view, which are described in the following sections.
Event Definition area
The Event Definition area contains all of the controls for working with your event definitions and it enables you to perform numerous actions, such as selecting a parent event definition and adding, editing, and removing properties and extended data elements in your event definitions. The Event Definition area is shown in the following figure:

There are four main features of the Event Definition area:
- 1 Event definition name
- 2 Event definition parent
- 3 Properties and controls
- 4 Extended data elements and controls
Properties view
The Properties view enables you to set or change values for properties and extended data elements that you have selected in the Event Definition area, as described in the following two subsections:
- The Properties view and properties
- The Properties view and extended data elements
The Properties view and properties
If you select a property in the Event Definition area, the Properties view displays a General page and a Details page.
The General page provides a read-only display of the name of the property and the XPath location path of the property. In the following figure, the name of the property is MyProperty1 and the XPath shows that MyProperty1 derives from the contextDataElements parent property:
The Details page enables you to specify values for the selected property, such as whether the property is required, the default value, and the minimum and maximum values or permitted values.
The Properties view and extended data elements
If you select an extended data element in the Event Definition area, the Properties view displays a Details page that enables you to edit values for the extended data element. The Details page differs depending on whether you are editing values for a non-array data type, or an array data type, or a noValue data type.
If you select an extended data element with a non-array data type, the Details page enable you to specify a default value for the extended data element.
By comparison, if you select an extended data element with an array data type, the Details page will also enable you to add or remove array elements.
Finally, if you select an extended data element with a noValue data type, the Details page will only enable to you specify the minimum and maximum number of occurrences.
Icons and symbols
In the event definition editor, icons are images that are used to invoke actions. Symbols, by comparison, are images that simply represent workbench elements and they are not used to invoke actions.
For example, you can add a property to an event definition by clicking the Add Property icon  . However, you cannot perform any action by clicking the parent property symbol
  .
.
The event definition editor icons and symbols are described in the following table:
| Icon or Symbol | Description |
|---|---|
 or or 
| Event definition file (symbol) |

| Adds an event definition (icon) |

| Removes an event definition (icon) |

| Opens a Select Event Definition window that enables you to select a parent event definition (icon) |
|
| Adds a property to an event definition (icon) |

| Opens a Select Contents window than enables you to select a property to override from a parent event definition (icon) |
|
| Property that is overridden from a parent event definition (symbol) |

| Removes a property from an event definition (icon) |

| Adds an extended data element to an event definition (icon) |

| Adds an extended data element as a nested child of the selected extended data element (icon) |

| Opens a Select Contents window that enables you to select an extended data element to override from a parent event definition (icon) |
|
| Extended data element that is overridden from a parent event definition (symbol) |

| Removes an extended data element from an event definition (icon) |
Keyboard shortcuts for the event definition editor
In the event definition editor, you can perform many of the available actions by using keyboard shortcuts.
Many of these keyboard shortcuts can be invoked from the menus, which you can open by pressing Shift+F10.
The shortcut keys for the event definition editor are described in the following table:
| Key combination | Function |
|---|---|
| (Ctrl+Alt)+A | Add an event definition |
| (Ctrl+Alt)+D | Delete an event definition |
| (Ctrl+Alt)+B | Browse for a parent event definition |
| F3 | Open the parent event definition in a new event definition editor window |
| (Ctrl+Alt)+F | Refactor an event definition name |
| (Ctrl+Alt)+Q | Add a property |
| (Ctrl+Alt)+N | Add a property from a parent event definition |
| (Ctrl+Alt)+W | Delete a property |
| (Ctrl+Alt)+1 | Move a property up one position |
| (Ctrl+Alt)+2 | Move a property down one position |
| (Ctrl+Alt)+E | Add an extended data element |
| (Ctrl+Alt)+C | Add an extended data element as a nested child |
| (Ctrl+Alt)+M | Add an extended data element from a parent event definition |
| (Ctrl+Alt)+R | Delete an extended data element |
| (Crtl+Alt)+3 | Move an extended data element up one position |
| (Crtl+Alt)+4 | Move an extended data element down one position |
| (Crtl+Alt)+5 | Move a nested child extended data element to the same level as the parent extended data element |
| (Crtl+Alt)+6 | Nest an extended data element as a child inside the next extended data element |
Set preferences for the event definition editor
By default, the user-definable preferences for the event definition editor are already optimized for working with event definitions. However, in the course of your event definition tasks, you may find to change some preferences.
Enable or disable incremental validation in the event definition editor
In the event definition editor, incremental validation is disabled by default. This means that validation rules are not enforced (and validation errors are not displayed) as you work with an event definition in the event definition editor. However, when you attempt to save the event definition, validation rules will be enforced regardless of whether incremental validation is disabled. A preference is provided that enables you to choose whether you want incremental validation enabled or disabled by default.
To enable or disable incremental validation:
- From the Window menu, select Preferences. The Preferences window opens.
- In the Preferences window, select Event Definition Editor. The Event Definition Editor page opens.
- If you want incremental validation enabled, ensure the Enable incremental validation check box is selected.
- To disable incremental validation, clear the Enable incremental validation check box.
- Click OK.
Enable multiple event definition capability in the event definition editor
By default, the event definition editor enables you to create or edit a single event definition for each event definition file. Although it is generally considered a best practice to have only one event definition for each file, you can nonetheless set a preference that will enable you to add or edit multiple event definitions in a single file from within the event definition editor. This might be necessary if you are working with older event definition files that contain multiple event definitions and you want to edit them simultaneously in the event definition editor and perhaps add or remove event definitions in the file.
To enable multiple event definition capability in the event definition editor:
- From the Window menu, select Preferences. The Preferences window opens.
- In the Preferences window, select Event Definition Editor. The Event Definition Editor page opens.
- Select the Allow multiple event definitions to be displayed in the editor check box
- Click OK.
The next time that you open an event definition file, the Add Event Definition and Remove Event Definition icons will appear at the top of the event definition editor. If the event definition file already contains multiple event definitions, all of the event definitions will be displayed in the editor simultaneously.
Information about opening an existing event definition file is found in the topic "Opening existing event definitions."
Disable prompts for generated event definitions in the event definition editor
When you open an event definition that was generated using the event definition generator rather than created using the event definition editor, you receive a prompt that warns you that any changes made to the event definition in the event definition editor will be overwritten the next time use the event definition generator to regenerate the event definition. However, you can set a preference to disable the prompt.
To disable prompts for generated event definitions:
- From the Window menu, select Preferences. The Preferences window opens.
- In the Preferences window, select Event Definition Editor. The Event Definition Editor page opens.
- Select the Do not prompt about generated files check box.
- Click OK.
Enable debug trace logging in the event definition editor
A debug trace log contains problem determination information that is helpful to IBM support personnel. By default, debug trace logging is not enabled when you are working with the event definition editor. However, you can set an event definition editor preference to enable debug trace logging.
To enable debug trace logging:
- From the Window menu, select Preferences. The Preferences window opens.
- In the Preferences window, select Event Definition Editor. The Event Definition Editor page opens.
- Select the Enable debug trace log check box
- Click OK. From this point on, the event definition editor debug trace will be logged in the .log file in the .metadata directory.
Create new event definitions
Use the New Event Definition wizard, you can create a new event definition in a module, library, or business monitoring project and then edit the event definition in the event definition editor. Event definitions that have been created in the event definition editor can be used to create custom event emitter activities in the visual snippet editor.
To create a new event definition:
- From the File menu, select New > Other. The New wizard opens.
- In the Wizards list, expand Business Monitoring and select Event Definition.
- Click Next. The New Event Definition wizard opens.
- Beside the Source folder field, click Browse. The Folder Selection window opens.
- In the Folder Selection window, select the module, library, or business monitoring project where you want to create the new event definition.
- Click OK.
- In the Name field, type the name to give to the event definition.
The event definition name must be unique within the project scope. If you are creating the event definition in a module, the project scope is the entire module plus any dependent libraries. If you are creating the event definition in a business monitoring project, the project scope is the project references listed in the project properties. If the project references contain a module, then the modules' dependent libraries are also in the same project scope as the business monitoring project.
- Click Finish. Depending on the perspective that you are currently working in, the new event definition is created in the Events folder or the Event Definitions folder under the selected module, library, or business monitoring project. The event definition editor automatically opens to enable you to edit the new event definition.
After creating a new event definition, you will probably want to edit it and possibly add one or more properties or extended data elements. Information about using the event definition editor to edit an event definition is found in the topic "Editing event definitions."
Opening existing event definitions
In the event definition editor, you can open any existing event definition that was created using the New Event Definition wizard or that was generated using the event definition generator. However, if you open an event definition that was generated, a window will warn you that your updates will be overwritten the next time the event definition is regenerated.
You can open an existing event definition from the Business Integration perspective or from the Business Monitoring perspective (if the IBM Business Monitor development toolkit is installed). To open an existing event definition:
- If you working in the Business Integration perspective:
- In the Business Integration view, expand the module or library that contains the Events folder.
- Expand the Events folder and double-click the event definition to open. The event definition opens in the event definition editor.
- In the Business Integration view, expand the module or library that contains the Events folder.
- If you are working in the Business Monitoring perspective:
- In the Project Explorer view, expand the module or business monitoring project that contains the Event Definitions folder.
- Expand the Event Definitions folder and double-click the event definition to open. If the Open Event Definition window is displayed (as a result of the underlying event definition file containing more than one event definition), select the event definition to open in the Available Event Definitions list and click OK. The event definition opens in the event definition editor.
- In the Project Explorer view, expand the module or business monitoring project that contains the Event Definitions folder.
After opening an existing event definition in the event definition editor, you will probably want to edit the event definition. Information about using the event definition editor to edit event definitions is found in the topic "Editing event definitions."
Add additional event definitions to an event definition file
By default, the event definition editor enables you to create one event definition for each event definition file. Although it is generally considered a best practice to have only one event definition for each file, you can nonetheless set a preference that will enable you to add additional event definitions to a file in the event definition editor.
Before you can add additional event definitions to an event definition file, you must first enable the preference as described in the topic "Enabling multiple event definition capability in the event definition editor."
To add additional event definitions to an event definition file:
- Open an existing event definition file as described in the topic "Opening existing event definitions."
- At the top of the event definition editor, click the Add Event Definition icon . A new event definition is added to the event definition editor.
- Repeat the previous step for each event definition that to add.
After adding one or more event definitions, you will probably want to edit them. Information about using the event definition editor to edit event definitions is found in the topic "Editing event definitions."
Editing event definitions
In the event definition editor, you can edit an event definition and customize its properties and extended data elements.
Renaming or refactoring event definition names
You can rename or refactor an event definition name in the event definition editor. If you rename an event definition, the event definition name is changed but the new name is not refactored in any other event definitions that reference your event definition. By comparison, if you refactor an event definition, the name is changed and the new name is refactored in any other event definitions that reference your event definition.
To rename or refactor an event definition name:
- To rename an event definition:
- In the event definition editor, insert your cursor in the Name field of the event definition to rename.
- Type in the new name to assign to the event definition.
The event definition name must be unique within the project scope. If you are creating the event definition in a module, the project scope is the entire module plus any dependent libraries. If you are creating the event definition in a business monitoring project, the project scope is the project references listed in the project properties. If the project references contain a module, then the modules' dependent libraries are also in the same project scope as the business monitoring project.
- Press Ctrl-S. If the underlying event definition file only contains this one event definition, then the event definition file name is automatically changed to reflect the new name of the event definition.
- To refactor an event definition name:
- Press Ctrl-S to save your most current changes.
- In the event definition editor, insert your cursor in the Name field of the event definition to rename.
- Right-click and select Refactor Event Definition Name. The Rename Artifact window opens.
- In the New Name field, type the new name of the event definition.
The event definition name must be unique within the project scope. If you are creating the event definition in a module, the project scope is the entire module plus any dependent libraries. If you are creating the event definition in a business monitoring project, the project scope is the project references listed in the project properties. If the project references contain a module, then the modules' dependent libraries are also in the same project scope as the business monitoring project.
- If you want your new event definition name to be refactored in all other event definitions that reference your event definition, ensure that Update references is selected.
- To change the name of the event definition file to match the new name of your event definition, ensure that Update the file name to match the new name is selected.
- Click OK.
Specifying parents for child event definitions in the event definition editor
All event definitions inherit directly or indirectly from a root event definition named WBI.MonitoringEvent. When you create a new event definition in the event definition editor, it is automatically defined as a child of the root event definition. However, if you do not want the root event definition to be the parent of your new event definition, you can specify a different event definition as the parent.
Note that if you do not want your event definition to inherit any properties or extended data elements other than those required by the Common Base Event specification, you should ensure that your parent event definition is the WBI.MonitoringEvent root event definition.
To specify a parent for a child event definition:
- Beside the Parent field of the child event definition to specify a parent for, click the Browse Parent Event icon . The Select Event Definition window opens.
- In the Select an event to open field, begin typing the name of the parent event definition. The Matching Events list is automatically updated to show one or more event definition names that match the characters that you have typed.
The event definitions listed in the Matching Events list all reside in the same project scope as your child event definition. You cannot select your child event definition as a parent of itself. Similarly, you cannot select a parent that has your child event definition as its parent.
- In the Matching Events list, ensure the correct parent event definition is selected.
- In the Files list, ensure the correct event definition file is selected that contains the parent event definition.
- Click Finish. The name of the selected parent event definition is displayed in the Parent field of the child event definition.
Opening parents from within child event definitions in the event definition editor
If you are editing an event definition, you can easily open the parent of the event definition from within the event definition editor. However, you cannot open the parent event definition if it is the WBI.MonitoringEvent root event definition.
To open a parent event definition from within a child event definition:
- In the event definition editor, insert your cursor in either the Name field or the Parent field.
- Right-click and select Open Parent Event Definition. The parent event definition opens in another event definition editor window.
Manage properties in event definitions
In event definitions, properties are used to store system information and correlation data as string values. You can use the event definition editor to customize any existing properties or you can add and customize new properties.
The following topics describe how to manage properties in event definitions:
- Add properties to event definitions Properties are used to store system information and correlation data as string values. An event definition can contain any number of properties or no properties at all. By default, an event definition inherits any properties of its parent event definition. However, using the event definition editor, you can add one or more new properties to an event definition that are independent of the properties of the parent.
- Renaming properties in event definitions In the event definition editor, you can rename any of the properties in an event definition. If you rename a property and it has the same name and path as a property in the parent event definition or in any higher-level parent in the same inheritance hierarchy, then the renamed property will override the property of the parent.
- Overriding properties of parent event definitions A child event definition automatically inherits any properties of its parent event definition. However, in the event definition editor, you can choose to have your child event definition override one or more properties of its immediate parent or any higher-level parents in the same inheritance hierarchy.
- Change property values in event definitions In the event definition editor, all values associated with event definition properties are displayed in the Properties view. You can use the Properties view to set or change the values of properties.
- Moving properties up or down in event definitions In the event definition editor, you can move properties up or down in your event definitions without needing to directly modify the underlying source code.
- Delete properties in event definitions In the event definition editor, you can delete one or more properties from an event definition.
Add properties to event definitions
Properties are used to store system information and correlation data as string values. An event definition can contain any number of properties or no properties at all. By default, an event definition inherits any properties of its parent event definition. However, using the event definition editor, you can add one or more new properties to an event definition that are independent of the properties of the parent.
To add properties to event definitions:
- Open the event definition editor.
- In the event definition editor, click the Add Property icon . A default property is added to the event definition.
Now that you have added a default property to the event definition, you will probably want to rename it to something more meaningful, as described in the topic "Renaming properties."
Renaming properties in event definitions
In the event definition editor, you can rename any of the properties in an event definition. If you rename a property and it has the same name and path as a property in the parent event definition or in any higher-level parent in the same inheritance hierarchy, then the renamed property will override the property of the parent.
To rename properties in event definitions:
- In the event definition editor, highlight the property to rename.
- Type in a new name for the property
After you have renamed a property, you may want to perform other property-related tasks, such as overriding some properties of the parent event definition or changing some property values. These tasks are described in the topics "Overriding properties of parent event definitions" and "Changing property values."
Overriding properties of parent event definitions
A child event definition automatically inherits any properties of its parent event definition. However, in the event definition editor, you can choose to have your child event definition override one or more properties of its immediate parent or any higher-level parents in the same inheritance hierarchy.
To override properties of parent event definitions:
- Open your child event definition in the event definition editor.
- In the event definition editor, click the Add Property from Parent icon . The Select Contents window opens. By default, the window shows the name of the immediate parent event definition and all of its properties that are not currently overridden in the child event definition.
- To show the names of all parent event definitions in the same inheritance hierarchy as well as all of their properties that are not currently overridden in the child event definition, select the Show all parent events check box.
- In the Select the contents to add list, select one or more properties of one or more parent event definitions to override in your child event definition.
- Click Finish. The overridden properties are added to the child event definition. The overridden properties are flagged with the This property is inherited from the parent event definition symbol .
Now that you have overridden some properties of one or more parent event definitions, you will probably want to change the values of the properties as described in the topic "Changing property values."
Change property values in event definitions
In the event definition editor, all values associated with event definition properties are displayed in the Properties view. You can use the Properties view to set or change the values of properties.
To change property values in an event definition:
- In the event definition, select the property for which you want to set or change values.
- Click the Properties tab to open the Properties view.
- Click the General tab to open the General page. As shown in the figure, the name and XPath of the property are displayed. However, the name and path cannot be changed on this page.
- Click the Details tab to open the Details page.
- To have the property to be required, select the Required check box. Note that if you are overriding a property from a parent event definition and the property has been specified as required in the parent, the Required check box will already be selected and you should not clear the check box.
- To specify a default value for the property, position your cursor in the Default value field and type in a string value. The default value represents the value that should be used during content completion for an event that is missing a required property. If you are overriding a property from a parent event definition and you do not specify a default value, the default value will be inherited from the parent event definition.
- To specify minimum and maximum permitted values for the property, select the radio button to the left of the Minimum value field and then type in string values in the Minimum value and Maximum value fields. If the event definition allows a range of values for a property, these fields define the lower and upper bounds of that range. If you specify only a minimum value, the permitted range has no upper bound. Similarly, if you specify only a maximum value, the permitted range has no lower bound. These fields are optional and cannot be specified if permitted values are specified. Note that if you are overriding a property from a parent event definition, you should consult the inheritance rules at the bottom of this topic before specifying any minimum and maximum values.
- To specify one or more permitted values for the property:
- Select Permitted values.
- Beside the Permitted values list box, click the Add button to add a default value to the Permitted values list box.
- In the Permitted values list box, highlight the default value (as shown in the figure) and then type in the actual string value to use.
- Repeat the previous two steps for each permitted value that to add. Permitted values are optional and they cannot be specified if minimum and maximum values are specified. Note that if you are overriding a property from a parent event definition, you should consult the inheritance rules at the bottom of this topic before specifying any permitted values.
Example
If you are overriding a property from a parent event definition, the following inheritance rules apply to minimum and maximum values and permitted values:
- If the parent event definition defines minimum and maximum values but the child event definition defines permitted values, the minimum and maximum values defined by the parent are ignored.
- If the parent event definition defines permitted values but the child event definition defines minimum and maximum values, the permitted values defined by the parent are ignored.
- If the parent event definition defines only a maximum value but the child event definition defines only a minimum value, the child inherits the maximum value defined by the parent.
- If the child event definition does not specify either minimum and maximum values or permitted values, the minimum and maximum values or the permitted values specified by the parent are inherited.
Moving properties up or down in event definitions
In the event definition editor, you can move properties up or down in your event definitions without needing to directly modify the underlying source code.
To move properties up or down in event definitions:
- In the event definition editor, select the property to move up or down.
- Complete one of the following steps:
- To move the property up one position, right-click the property and select Move Up. The property moves up one position in the list of properties.
- To move the property down one position, right-click the property and select Move Down. The property moves down one position in the list of properties.
Delete properties in event definitions
In the event definition editor, you can delete one or more properties from an event definition.
To delete properties in event definitions:
- In the event definition, select the property to delete
- Click the Remove Property icon . The property is deleted from the event definition.
Manage extended data elements in event definitions
In event definitions, extended data elements are used to express business information and you can specify array or non-array primitive types as values. You can use the event definition editor to customize any existing extended data elements or you can add and customize new extended data elements.
Add extended data elements to event definitions
Extended data elements are used to express business information and you can specify array or non-array primitive types as values. An event definition can contain any number of extended data elements or no extended data elements at all. By default, an event definition inherits any extended data elements of its parent event definition. However, using the event definition editor, you can add one or more new extended data elements to an event definition that are independent of the extended data elements of the parent.
To add extended data elements to event definitions:
- Open your event definition in the event definition editor.
- In the event definition editor, click the Add Extended Data icon . A default extended data element is added to the event definition.
Now that you have added a default extended data element to the event definition, you will probably want to rename it to something more meaningful, as described in the topic "Renaming extended data elements."
Add child extended data elements in event definitions
In event definitions, you can add extended data elements as nested children under existing extended data elements. This enables you to use extended data elements to convey business data that is stored in a hierarchal structure, such as typically found in a business object.
To add child extended data elements:
- Open your event definition in the event definition editor.
- In the event definition, ensure that a data type of noValue is specified for your intended parent extended data element. This is a requirement to add a child extended data element. Information about specifying the data type of an extended data element is found in the topic "Specifying data types of extended data elements."
- In the event definition, select the extended data element to which to add a nested child extended data element.
- Click the Add Extended Data as Nested Child icon . A default child extended data element is added under the parent extended data element. You can add as many child extended data elements as you want and nest them as deeply under the parent extended data element as you need.
Now that you have added a child extended data element to a parent extended data element, you will probably want to rename it to something more meaningful, as described in the topic "Renaming
extended data elements."
Renaming extended data elements in event definitions
In the event definition editor, you can rename any of the extended data elements in an event definition. If you rename an extended data element and it has the same name and data type as an extended data element in the parent event definition (or in any higher-level parent in the same inheritance hierarchy), then the renamed extended data element will override the extended data element of the parent.
To rename extended data elements in event definitions:
In the event definition editor, highlight the extended data element to rename.
After you have renamed an extended data element, you will probably want to specify a data type for it, as described in the topic "Specifying data types of extended data elements."
Specifying data types of extended data elements
In the event definition editor, you can specify the data type of extended data elements in an event definition.
If you are working with an extended data element that is overridden from the parent event definition (as opposed to an extended data element that you created new in the child event definition), the overridden extended data element will automatically inherit the data type from the parent and you should not attempt to change the inherited data type.
To specify data types of extended data elements:
- In the event definition editor, click the current data type of the extended data element. A list of primitive array and non-array data types opens.
- In the list of data types, select the new data type to use for the extended data element. The selected data type replaces the previous data type.
After you have changed the data type of an extended data element, you will probably want to change some other values, as described in the topic "Changing extended data element values."
Overriding extended data elements of parent event definitions
A child event definition automatically inherits the extended data elements of its parent event definition. However, in the event definition editor, you can choose to have your child event definition override one or more extended data elements of its immediate parent or any higher-level parents in the same inheritance hierarchy.
To override extended data elements of parent event definitions:
- Open your child event definition in the event definition editor.
- In the event definition editor, click the Add Extended Data from Parent icon . The Select Contents window opens. By default, the window box shows the name of the immediate parent event definition and all of its extended data elements that are not currently overridden in the child event definition.
- To show the names of all parent event definitions in the same inheritance hierarchy as well as all of their extended data elements that are not currently overridden in the child event definition, select the Show all parent events check box.
- In the Select the contents to add list, select one or more extended data elements of one or more parent event definitions to override in your child event definition. If you are overriding an extended data element that contains nested child extended data elements, you can only select the parent extended data element in the Select Contents window. Although both the parent and its child extended data elements will be added to your event definition, you can later remove any of the child extended data elements that you do not want and they will be transparently inherited from the parent event definition.
- Click Finish. The overridden extended data elements are added to the child event definition. The overridden extended data elements are flagged with the This extended data is inherited from the parent event definition symbol .
After you have overridden some extended data elements of one or more parent event definitions, you will probably want to change the values of the extended data elements as described in the topic "Changing extended data element values."
Change extended data element values in event definitions
In the event definition editor, the Properties view displays values associated with extended data elements. You can use the Properties view to set or change the values.
This topic describes how to change extended data element values that are accessible from the Properties view. To learn how to specify data types for extended data elements in the Viewer page, see "Specifying data types of extended data elements."
To change extended data element values:
- In the event definition, select the extended data element for which you want to set or change values.
- Click the Properties tab to open the Properties view.
- If the data type of the extended data element is not an array, then position your cursor in the Default value field and type in a default value. This field is optional. The default value will be used during content completion for an event that is missing a required extended data element. If you are overriding an extended data element from a parent event definition and you do not specify a default value, the default value will be inherited from the parent event definition.
- If the data type of the extended data element is an array, then optionally complete the following steps:
- Beside the Default values field, click the Add button to add a value variable to the Default values field for the first element in the array.
- In the Default values field, ensure the value variable is selected and then type in the default value to use for the first element in the array.
- Repeat the previous two steps for each element in the array. The default values will be used during content completion for an event that is missing a required extended data element. The Default values field is optional. If you are overriding an extended data element from a parent event definition and you do not specify a default value, the default value will be inherited from the parent event definition.
- If the extended data element has a data type of noValue, you can optionally specify minimum and maximum occurrences by completing one or both of the following steps:
- In the Minimum occurs field, type the minimum number of instances of the extended data element that must appear. This field is optional. The default value is 1.
- In the Maximum occurs field, type the maximum number of instances of the extended data element that can appear. To have the maximum number of instances to be unbounded, you can type unbounded in the field. This field is optional. The default value is 1.
If you are overriding an extended data element from the parent event definition, any values specified in the Minimum occurs or Maximum occurs fields will override the values specified in the parent event definition.
Moving extended data elements up or down in event definitions
In the event definition editor, you can move extended data elements up or down in your event definitions without needing to directly modify the underlying source code.
To move extended data elements up or down in event definitions:
- In the event definition editor, select the extended data element to move up or down.
- Complete one of the following steps:
- To move the extended data element up one position, right-click the extended data element and select Move Up. The extended data element moves up one position in the list of extended data elements.
- To move the extended data element down one position, right-click the extended data element and select Move Down. The extended data element moves down one position in the list of extended data elements.
Moving extended data elements inside or outside of other extended data elements
In the event definition editor, you can move extended data elements inside or outside of other extended data elements without needing to directly modify the underlying source code. When you move an extended data element inside of another extended data element, the extended data element that you are moving becomes a child of the extended data element that you are moving it into. When you move an extended data element outside of another extended data element, the extended data element that you are moving becomes a peer of the extended data element that you are moving it out of.
To move extended data elements inside or outside of other extended data elements:
- To move an extended data element inside another extended data element:
- In the event definition editor, highlight the extended data element to move inside another extended data element.
- Right-click the extended data element that you highlighted and then select Move Inside Next Element. The extended data element moves inside the next extended data element.
- To move an extended data element outside of another extended data element:
- In the event definition editor, highlight the extended data element to move outside another extended data element.
- Right-click the extended data element that you selected and then select Move Outside Nested Element.
The extended data element moves outside of the parent extended data element to a peer position located over the former parent.
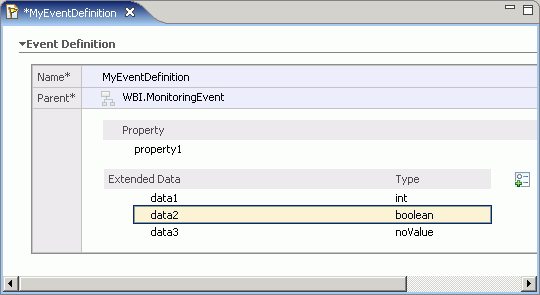
Delete extended data elements in event definitions
In the event definition editor, you can delete one or more extended data elements in an event definition.
To delete extended data elements in event definitions:
- In the event definition, select the extended data element to delete
- Click the Remove Extended Data icon . The extended data element is deleted from the event definition.
Delete event definitions
By default, the event definition editor displays one event definition for each event definition file. However, if you are working with an event definition file that contains multiple event definitions and you want to delete one or more of the event definitions, you can set a preference that will enable you to delete the event definitions in the event definition editor.
Before you can delete event definitions from an event definition file, you must first enable the preference as described in the topic "Enabling multiple event definition capability in the event definition editor."
To remove event definitions from an event definition file:
- Open an existing event definition file as described in the topic "Opening existing event definitions."
- In the event definition editor, click the left margin of the event definition to delete.
- At the top of the event definition editor, click the Remove Event Definition icon . The event definition is deleted.
Limitations for the event definition editor
From time to time, you may encounter some limitations in using the event definition editor. In most situations, you can successfully work around these limitations.
A known limitation is:
- Refactoring still occurs when you choose not to refactor references
This limitation is discussed in the following section.
Refactoring still occurs when you choose not to refactor references
In the event definition editor, you can rename and refactor event definitions using the Refactor Event Definition Name menu item and the Rename Artifact window.
If you clear the Update references check box in the Rename Artifact window, this should prevent any references to your event definition from being refactored. However, due to a limitation, any references to your event definition will still be refactored if you clear the check box.