Building mediation flows
Mediation flows provide ESB logic by intercepting and modifying messages that are passed between existing services (providers) and clients (requesters) that want to use those services. Mediation flows can be implemented in modules or mediation modules. Mediation modules and modules can be deployed to Process Server.
Mediation flows overview
Mediation flows intercept and modify messages that are passed between existing services (providers) and clients (requesters) that want to use those services. They are most commonly used for transforming data and accessing header information, such as JMS, MQ or SOAP headers.
Mediation modules can be deployed on the Process Server .
In service-oriented architecture (SOA), services represent business functions that can be reused and combined in an ad hoc manner to create responsive business systems. These services have loosely coupled connections, rather than being connected directly to each other.
Introducing mediation flows between services enables you to process the messages that are being passed between these services. A message is a communication sent from one application or service to another application or service. Mediation flows provide the logic that processes the messages. For example, mediation flows can be used to find services with specific characteristics that a requester is seeking and to resolve interface differences between requesters and providers. For complex interactions, mediation primitives can be linked sequentially. Typical mediations include:
- Transforming a message from one format to another so the receiving service can accept the message
- Conditionally routing a message to one or more target services based on the contents of the message
- Augment a message by adding data from a data source
Stock Quote example: building a mediation flow
To illustrate a mediation flow, we will use an example of a simple mediation flow that provides stock prices. A client application provides a query containing a stock symbol and customer ID to the mediation flow, which processes the query. The customer's subscription level is determined, and depending on the level of subscription, the query is routed to the appropriate service provider. The quote that is returned from the service provider is converted into the customer's preferred currency before it is returned to the client application.
We are using a mediation flow because we want to use different interfaces from two external service providers, and expose a single interface to the client application. We need to build the service quickly, with the ability to change the application on demand, and without modeling a business process. We also want the ability to change the service provider without disrupting the service.
The following picture shows the complete mediation:

- Mediation modules Mediation service applications are assembled and deployed as one or more mediation modules. Mediation modules are deployable units that contains mediation flows. They can be deployed on the BPM or the Process Server.
- Mediation flow components A mediation flow component provides a mediation service implemented using mediation flows. A mediation flow component in the assembly editor has the following parts
- Mediation flows A mediation flow consists of a sequence of processing steps that are run when an input message is received.
- Mediation primitives Mediation flows consist of a sequence of mediation primitives, which define processing steps.
- Service message objects A message is a communication sent from one application or service to another application or service. Messages in mediation flows are represented as service message objects (SMOs)
- XPath for mediation flows The XPath standard is well-suited for creating simple data-driven expressions. Most mediation primitives have properties specified with an XPath expression. For example, the root property takes an XPath 1.0 expression that specifies the part of the message that is available to the primitive for processing.
- Message Transformation When you are integrating services, you usually need to transform the data into a format the receiving service can process. Typically, interfaces and operations of disparate services are not identical, and the message from the source needs to be transformed into a format that can be accepted by the target.
Mediation modules
Mediation service applications are assembled and deployed as one or more mediation modules. Mediation modules are deployable units that contains mediation flows. They can be deployed on the BPM or the Process Server.
A mediation module can have the following parts:
- Mediation flow components
- Imports that identify service providers and their interfaces
- Exports that expose the mediation module to service requesters
- Java™ components
Related concepts:
Mediation flow components
A mediation flow component provides a mediation service implemented using mediation flows. A mediation flow component in the assembly editor has the following parts
- One or more interfaces that describe how to invoke this mediation flow. These interfaces have to match those of the exports that will be wired to this mediation flow.
The business objects specified in the data section of the interfaces must have a non-null namespace. If you use a null namespace you may encounter this type of error at run time.
[16/05/12 13:39:36:516 EDT] 00000066 WSDLMessageEC E   CWSXM2007E:
Error: multiple type or message definitions for
{http://Stockquote/GetQuote}SearchBy
CustomerIDMsg
If you print the service message object to the log, you can see the context and headers but the body is empty. - Zero or more named references that specify the interfaces of partners that this flow wants to invoke. The actual partners are not known by the flow, only their interfaces. These references are wired to actual partners, that are imports or Java™ components, with matching interfaces.
- Mediation flows, which define the implementation of the component.
Related concepts:
Mediation flows
A mediation flow consists of a sequence of processing steps that are run when an input message is received.
A mediation flow is created in the Mediation Flow editor by including a number of mediation primitives that define processing steps. Connections represent the flow of the message between the mediation primitives.
A mediation flow is defined for a source operation. A mediation flow always has a request flow, where you define the flow of the outgoing message from the source operation. Usually, the mediation flow invokes a target operation; this can be done either at the end of a request flow using a callout or inline within the flow by using the service invoke primitive. When a callout is used, the message that is returned by the target operation is defined in a response flow. Every mediation flow also has an error flow where you can capture unhandled errors that may occur in the mediation flow.
- A request flow begins with a single input node for the source operation, followed by one or more mediation primitives in sequence and optionally a callout node for each target operation, all wired together. If a message is to be returned to the source directly after processing, it can be wired to an input response node in the request flow. If fault messages are defined in the source operation, an input fault node is also created.
- A response flow begins with a callout response node for each target operation, followed by one or more mediation primitives in sequence and a single input response node representing the source operation, all wired together. If fault messages are defined in the source operation, an input fault node is also created. If fault messages are defined in the target operation, a callout fault node is also created. Errors that are returned by the operation but are not defined as fault messages are propagated to the fail terminal of the callout response node. Response flows for request-only operations consist of a callout response node that has a fail terminal to handle faults, and no output terminal.
- Within the request and response flows, you can invoke a service inline within the flow. This operation sends a message outside the flow and waits for its return before continuing. This is done through the Service Invoke primitive.
- An error flow begins with a single input node for the source operation, followed by one or more mediation primitives in sequence or a subflow and optionally an input response node that can be used to return the error message to the source. You can use an error flow to capture any unhandled exception.
When multiple targets return a response, the returning messages are processed into a single message, which is then returned to the source.
In a mediation flow, you can re-use logic that has been pre-configured as a mediation subflow.
Related concepts:
Mediation primitives
Mediation flows consist of a sequence of mediation primitives, which define processing steps.
A mediation primitive receives a message, processes it and propagates the processed message to the next primitive or node in the flow. For example, a Database Lookup primitive retrieves a value from a database, and sets it in the message. A ready-made set of mediation primitives is available from the Mediation Flow editor palette. If you need mediation capabilities not provided by this set of primitives, you can create custom mediation primitives to call your own Java™ implementation or an imported service. Mediation primitives have terminals which receive and propagate messages. For example, these are the terminals of a Message Logger:

- The input terminal on the left receives the message
- The output terminal (located in the upper right of the diagram) propagates the message on successful processing to the next primitive or node in the flow
- The fail terminal on the lower right propagates the message and failure information when a run failure occurs in the primitive.
See these topics:
- "Mediation Flow editor"
- "Building mediation flows"
Related concepts:
Service message objects
A message is a communication sent from one application or service to another application or service. Messages in mediation flows are represented as service message objects (SMOs)
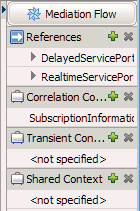
Service message objects are enhanced business objects that include the application data and header information related to the transport protocol used to invoke a service such as SOAP or JMS. A service message object is composed of a body that contains the application data (also known as the payload or operation message) in a business object, and headers containing additional context information. You can use XPath 1.0 expressions to access elements in a message. The following picture represents a service message object:
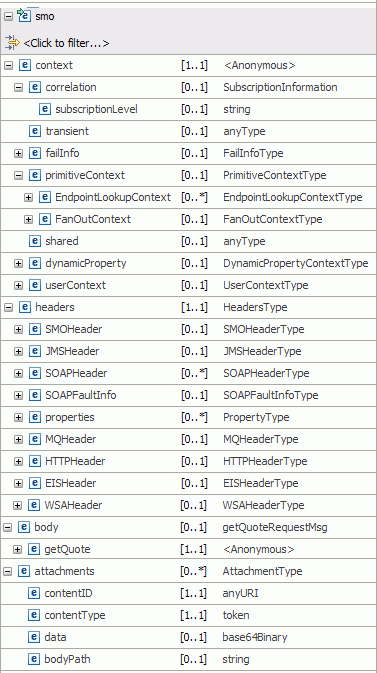
- context: is the message context where information that is unrelated to the payload is stored. The context has these elements.
- correlation
- makes the property persist throughout the duration of the request and response flows, and is used for passing values from the request flow to the response flow.
- transient
- makes the property available for the duration of the current flow (either the request flow or the response flow), and is used to pass values between mediation primitives in the same flow.
- shared
- makes the property available during aggregation operations using the Fan Out / Fan In combination. It is not intended for general data storage.
- failInfo
- contains exception information about execution failure in a mediation primitive; it contains the message exception chain, and identifies the primitive where the failure occurred. This information is propagated to the fail terminal.
- primitiveContext
- contains context information for primitives.
- EndpointLookupContext contains the result of a WebSphere Service Registry and Repository query.
- endpointReference contains the information needed to access the service endpoint.
- registryAnnotations contains information for the user-defined properties.
- EndpointLookupContext contains the result of a WebSphere Service Registry and Repository query.
- headers contain header information associated with the message. These are the elements in the headers section:
- SMOHeader
- contains information that defines the message; such as the unique message id, message version and message type. An SMO header is always present in a service message object.
- Target contains the dynamic endpoint used by the runtime if the Use dynamic endpoint property is set and there is a valid endpoint in the field.
- address the address of the target.
- Target contains the dynamic endpoint used by the runtime if the Use dynamic endpoint property is set and there is a valid endpoint in the field.
- JMSHeader
- contains JMS headers, when a JMS import or export binding is used.
- SOAPHeader
- contains SOAP header information when a web services import or export binding is used.
- SOAPFaultInfo
- contains information about SOAP faults such as fault code and fault string
- Properties[]
- properties put in the message header by the application
- MQHeader
- contains WebSphere MQ header information, when an MQ binding is used.
- HTTPHeader
- contains HTTP Headers, when a HTTP import or export binding is used.
- body contains the application data in a business object. Application data is also known as the payload, or operation message type.
- attachments contains SOAP attachments of various types. For more information , see SMO attachments.
In IBM Integration Designer, service message objects are used only within mediation flows. Other components consume and transmit business objects, which are transformed into service message objects when they enter a mediation flow component. On leaving the mediation flow component, the service message object is transformed back into business objects.
- See "Building XPath expressions" in the topic "Building mediation flows" for an example of the relationship between a business object in an interface and an XPath 1.0 condition.

XPath for mediation flows
The XPath standard is well-suited for creating simple data-driven expressions. Most mediation primitives have properties specified with an XPath expression. For example, the root property takes an XPath 1.0 expression that specifies the part of the message that is available to the primitive for processing.
You can also use an XPath 1.0 expression to identify one or more fields in a message and use these fields to filter or select by specifying a value.
You can use the XPath Expression Builder to visually create an expression, or you can write them manually.
Related concepts:
Related tasks:
 XML Path Language (XPath) Version 1.0 specification
Message Transformation
When you are integrating services, you usually need to transform the data into a format the receiving service can process. Typically, interfaces and operations of disparate services are not identical, and the message from the source needs to be transformed into a format that can be accepted by the target.
In the mediation flow there are a number of primitives available to perform transformations. These are: the Business Object Map primitive, Mapping primitive and Custom Mediation primitive.
To transform the message in the mediation flow editor using an XML map, define the scope of the message to be transformed with an XPath 1.0 expression. Then, map the source and target service message objects, using the XML map editor. This is done through a Mapping primitive. Custom Mediation can be used to transform a message through the use of Java™ code or snippets.
Create a mediation flow
A mediation flow consists of a sequence of processing steps that are run by mediation primitives when an input message is received. Mediation flows be contained in modules or in mediation modules.
To create a mediation flow, proceed as follows:
- Switch to the business integration perspective.
- From the menu, select File > New > Mediation Flow to open the New Mediation Flow wizard.
- Select a mediation module or a module to contain the mediation flow.
Consider the following to help you decide the type of module to select:
- To deploy your mediation flow on WebSphere Enterprise Service Bus, select a mediation module.
- To deploy on IBM Business Process Manager, you can select either a module or a mediation module.
- To wire your mediation flow component directly to a business process, select a module.
- Select a folder and enter a name for the new mediation flow, and click Next
- Optional: In the Select an Interface window, select your source and target interfaces. You can also add the interfaces later in the mediation flow editor.
- Click Finish.
The mediation flow editor opens. Next, choose the source operation and implement the mediation flow.
You can also choose to create a mediation flow component when you create a mediation module. See "Creating a mediation module"
for more information.
- Implementing a mediation flow The entry and exit points, or endpoints of the mediation flow component are defined by the source interfaces and target references. The first step in building a mediation flow is determining the source operation.
Implementing a mediation flow
The entry and exit points, or endpoints of the mediation flow component are defined by the source interfaces and target references. The first step in building a mediation flow is determining the source operation.
A mediation flow always has a source operation that receives a message. Typically, the source operation sends the message to one or more target operations. The message is usually processed by a sequence of mediation primitives before a target operation is invoked. However, you can also choose to return the message to the source operation directly after processing without calling a target operation.
- If the mediation flow does not have a source interface, click Add interface to add an interface.
- Click an operation in the source interface to open the request flow.
A request flow begins with an input node on the left, which represents the source operation. The flow proceeds sequentially from left to right.
- Next, determine the end point for the flow.
- To invoke a target operation at the end of the request flow, and process the returning message in a response flow, drop a Callout from the palette onto the request flow, and select a reference and operation from the list that is presented. A Callout appears on the canvas and a response node is created. The message sent by the target operation will be returned to the response flow.
- To invoke a target operation from within the request flow, drop a Service Invoke primitive from the palette onto the request flow, and select a reference and operation from the list that is presented. No response node is created. The message sent by the target operation will be returned to the request flow.
- To return the message to the source after processing, right click the canvas and select Show Input Response. An Input Response is created in the request flow.
- Drop mediation primitives from the palette onto the editor from left to right in the sequence that you want them to be invoked in the flow, between the input and callout or input response nodes.
- Wire the primitives together.
- Set the properties of each primitive to determine how the primitive will process the message. To edit a property, right click a primitive or node and select Show in Properties.
- If you used a callout, click the Response flow tab at the top of the editor. The Callout Response is the entry point of the response flow, and the Input Response returns the message to the source.
- Build a response flow in the same manner as you built the request flow.
- Build an error flow to capture unhandled exceptions. You can either use mediation primitives such as Message Logger or you can define your error handling logic in a reusable subflow. To return the error information to the source, wire the Input Response at the end of the error flow.
Example
WSDL FaultsIf you have WSDL faults defined in your operation, fault nodes will be created in the request and response flow. You can wire these nodes to create an error handling path in the flow.
Type propagation in mediation flows
Messages in mediation flows are represented as service message objects (SMOs). Service message objects are enhanced business objects that include the business objects which contain the application data or payload, in addition to header and contextual information. When mediation primitives are wired together in a flow, the message is propagated from one primitive to the next. The input and output terminals of mediation primitives in a flow are configured to accept messages of a certain type, based on the validation rules of the mediation flow editor.
When you change the message type (type of the message body, or payload) of a terminal, there are implications to the other terminals of the primitive, depending on the type of primitive:
- Primitives that propagate the input message to the output message without changing the message type. An example of such a primitive is the Message Logger. The message types of the all terminals of the primitive must be the same. If you change the message type of a terminal, all the other terminals are changed to the same type
- Primitives that allow the message type to be changed as part of the primitive's function, for example Mapping, Business Object Map and Database Lookup. For these primitives, the message type of the input terminal may be different from the message type of the output terminal.
- Regardless of the type of primitive, the input and fail terminals must be of the same type. If you change the type of one of these terminals, the other is changed to the same type
When you drop a primitive onto the editor, the terminals have no message type. When the terminal is wired, its message type is deduced by the mediation flow editor. Typically, it takes on the type of the terminal to which it is wired.
You can change a terminal type to Any message type, which means the terminal will accept all messages regardless of the type. This is useful in a generic error message flow, for example you can wire a number of fail primitives to a Fail primitive or a Message Logger that has an input terminal of Any message type.
In this case, Any refers to any wsdl message, not to xsd:any
You can also configure a terminal to a specific message type.
- Change the message type of a mediation primitive terminal The input and output terminals of mediation primitives in a flow are configured to accept messages of a certain type, based on the validation rules of the mediation flow editor. You can change the input or output message type of a mediation primitive.
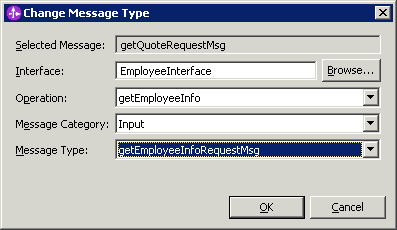
Change the message type of a mediation primitive terminal
The input and output terminals of mediation primitives in a flow are configured to accept messages of a certain type, based on the validation rules of the mediation flow editor. You can change the input or output message type of a mediation primitive.
You should have a good understanding of type propagation before you proceed with this task. See Type propagation in mediation flows.
To change the type of a primitive's input or output terminal:
- Hover over the terminal to view its type.
- Right click the terminal and select Change Message Type .
- The Change Message Type window appears, showing
the current message type of the terminal.

- Automatically determined message type
When you drop a primitive onto the editor, the terminals have no message type, and this is the default method of determining the terminal type. When the terminal is wired, its message type is deduced by the mediation flow editor. Typically, it takes on the type of the terminal to which it is wired.
- Any message type
You can change a terminal type to Any message type, which means the terminal will accept all messages regardless of the type. This is useful in a generic error message flow, for example you can wire a number of fail primitives to a Fail primitive or a Message Logger that has an input terminal of Any message type.
You can cast the any type to a concrete type later in the flow by using a Set Message Type or Type Filter mediation primitive.
In this case, Any refers to any wsdl message, not to xsd:any
- Specific message type
You can choose a specific message type from the list of available types.
- Automatically determined message type
Example
Tip: You can view all of the terminal types of a mediation primitive at once by hovering over the mediation primitive on the editor and clicking the
Reusing mediation logic
You can reuse mediation logic for common tasks by creating mediation subflows. A subflow can be reused by mediation flows in the same module. If a subflow is placed in a library, it can be reused by mediation flows in multiple modules.
A mediation subflow can exist in multiple mediation flows, or in multiple instances in the same mediation flow. For clarity, the documentation refers to the mediation subflow that exists independent of a mediation flow as a subflow implementation. A mediation subflow that exists within a parent mediation flow is referred to as a subflow instance.
- Mediation subflows A mediation subflow is a pre-configured set of mediation primitives that are wired together to realize a common pattern or use case. Mediation subflows are run in the context of a parent flow, and can be reused in mediation flows or in subflows.
- Create a new mediation subflow A mediation subflow can be used in multiple mediation flows. You create a mediation subflow implementation, and you can then use the subflow in a mediation flow by dropping the subflow implementation onto the mediation flow. This task describes how to create a mediation subflow implementation.
- Editing a mediation subflow To implement the logic of a mediation subflow by adding and configuring mediation primitives, use the Mediation Subflow editor.
- Copying part of a mediation flow into a subflow In the mediation flow editor, you can copy a portion of the mediation flow into a mediation subflow, which can then be re-used in other mediation flows or subflows.
- Add a mediation subflow in a mediation flow A mediation subflow is a preconfigured set of mediation primitives that are wired together to realize a common pattern or use case. Mediation subflows can be reused in mediation flows or in subflows.
- Promoting properties in a subflow Promoting the property of a mediation primitive in a mediation flow allows an administrator to change the value of the property at run time. When you promote a property in a subflow, it becomes a property of the subflow instance. You can then set the value of the property in the mediation flow, or further promote the property in the parent mediation flow.
- Change the input or output message type in a subflow When you create a mediation subflow, the message types of the input and output terminals are undefined, which implies the subflow can handle any kind of message. You can change the input or output message type to allow the subflow to only accept that particular message type.
- Use Service Invoke in a subflow You can call an intermediary service in a mediation subflow by using Service Invoke.
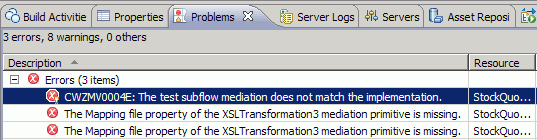
- Synchronizing a subflow instance and implementation When you change the implementation of a mediation subflow, you may see this error in the subflow instance in the parent mediation flow: "CWZMV0004E: The test subflow mediation does not match the implementation". Use the Quick fix action to synchronize the subflow instance with the implementation.
- Mediation subflow limitations Limitations of mediation subflows
Mediation subflows
A mediation subflow is a pre-configured set of mediation primitives that are wired together to realize a common pattern or use case. Mediation subflows are run in the context of a parent flow, and can be reused in mediation flows or in subflows.
Use mediation subflows to reuse common patterns in mediation flows, and also as a way to group primitives in the Mediation Flow editor.
A mediation subflow can be created in a module, mediation module, or library. A mediation subflow must be used within a mediation flow. It is good practice to store subflows in libraries so they can be easily shared between mediation flows in different modules.
A mediation subflow has one or more in nodes, one or more mediation primitives, and one more out nodes. Unlike mediation flows, the inputs and outputs of a subflow are not tied to specific interfaces. Instead, the in and out nodes represent the inputs and outputs of the subflow. In a wired mediation flow, these nodes have message types associated with them. The message types on these nodes are not defined when the subflow is created; they can be changed later. The subflow implementation is defined in the Subflow Editor.
Mediation subflows are executed in the context of a parent flow. Properties that are promoted in a subflow are propagated up to the mediation flow in which the subflow is used. A subflow instance in a mediation flow has these properties in the Properties view:
- The Details page lists the properties that have been promoted in the subflow editor. Here, you can change the value of a property.
- The References page lists the properties of Service Invoke primitives in the subflow.
- The Promotable Properties page lists the properties that have been promoted in the subflow. You can further promote these properties in the mediation flow.
You can create a Mediation Subflow from the File menu, or from the Mediation Flow editor. See topic "Creating Mediation Subflows" in related tasks for more information.
Related concepts:
Related tasks:
Create a new mediation subflow
Copying part of a mediation flow into a subflow
Add a mediation subflow in a mediation flow
Use Service Invoke in a subflow
Synchronizing a subflow instance and implementation
Promoting properties in a subflow
Change the input or output message type in a subflow
Create a new mediation subflow
A mediation subflow can be used in multiple mediation flows. You create a mediation subflow implementation, and you can then use the subflow in a mediation flow by dropping the subflow implementation onto the mediation flow. This task describes how to create a mediation subflow implementation.
To create a mediation subflow:
- Launch the New Mediation Subflow wizard in one of the following ways:
- In the Business Integration perspective, click File > New > Mediation subflow.
- In the Business Integration view, select a module, mediation module, or library. Right-click and select New > Mediation subflow.
- In the Mediation Flow editor, proceed as follows:
- Expand the Mediation Subflow folder in the palette, click the Subflow icon, and drop it onto the canvas.
- In the Subflow Selection wizard, click New to create a new mediation subflow.
- In the New Mediation Subflow wizard, choose the project that will contain the subflow, or click New to create a new project. A mediation subflow can be created in a module, mediation module or library. Create your subflow in a library to share the subflow among modules.
- Optional: Specify a folder for the new subflow.
- Provide a name for your subflow.
- Click Finish. The Mediation Subflow editor opens showing an in node that represents the input terminal of the subflow instance, and an out node that represents the output terminal of the subflow instance.
- Drag the mediation primitives from the palette onto the canvas and lay them out from left to right in processing sequence.
- Wire the primitives to the in and out terminals and to each other, and configure the primitives in the properties editor.
- Optional: Define the message types of the input terminal
of the in node and the output terminal of the out node.
Click the terminal to select it and right click > Change Message Type.
- Optional: Promote properties to be able to change at run time, or to set the value of the property in the parent mediation flow at development time. For more information, See Promoting properties in a subflow.
Save changes
Now, you can use the subflow in a mediation flow.
Related concepts:
Related tasks:
Copying part of a mediation flow into a subflow
Add a mediation subflow in a mediation flow
Use Service Invoke in a subflow
Synchronizing a subflow instance and implementation
Promoting properties in a subflow
Change the input or output message type in a subflow
Editing a mediation subflow
To implement the logic of a mediation subflow by adding and configuring mediation primitives, use the Mediation Subflow editor. To edit a mediation subflow, open it in the Mediation Subflow editor, either by double-clicking the subflow or by using the Open with action in the Business Integration view. You can perform these tasks in the Mediation Subflow editor.
- A mediation subflow can have one or more inputs and one or more outputs. To add inputs or outputs to the subflow, expand the Mediation Subflow folder in the palette.
- To add an input, drop the In icon
 onto the subflow canvas. The In node represents the input terminal of the subflow instance.
- To add an output, drop the Out icon
 onto the subflow canvas. The Out node represents the input terminal of the subflow instance,
- To add a subflow, drop the Subflow icon
 onto the subflow canvas.
- To add an input, drop the In icon
- The inputs and outputs of a subflow are of undefined type by default. You might need to change the message type in the subflow, for example, to do transformation in subflow. To change the message type of inputs or outputs, see Change the message type of a mediation primitive terminal.
- To add primitives to the subflow, expand a folder in the subflow palette, and drop the required primitive onto the canvas.
- To configure properties of a primitive, click the primitive on the canvas and work in the Properties view.
- To make a property available to the subflow instance in the mediation flow, promote the property by switching to the Properties view and click the Promotable Properties tab. See Promoting properties in a subflow.
- To invoke an intermediate service, see Use Service Invoke in a subflow.
- If the change you made in the Mediation Subflow editor affects the externals of the subflow, such as changes to in and out nodes, promoted properties, or references, you need to synchronize the subflow implementation and the subflow instances in the parent mediation flows. After you save your changes in the subflow implementation, you will see an error in the subflow instance in the parent mediation flow indicating the subflow mediation does not match the implementation. Use the Quick fix action in the Problems view to synchronize all the subflow instances and the subflow implementation. See Synchronizing a subflow instance and implementation.
Related concepts:
Related tasks:
Create a new mediation subflow
Copying part of a mediation flow into a subflow
Add a mediation subflow in a mediation flow
Use Service Invoke in a subflow
Synchronizing a subflow instance and implementation
Promoting properties in a subflow
Change the input or output message type in a subflow
Copying part of a mediation flow into a subflow
In the mediation flow editor, you can copy a portion of the mediation flow into a mediation subflow, which can then be re-used in other mediation flows or subflows.
Suppose you want to copy part of an existing flow into another flow, or make part of an existing flow into a reusable artifact. Or, your mediation flow is becoming cluttered, and you want to collapse parts of your mediation flow to get a high level view of the flow. You can simply select part of the mediation flow and extract it into a subflow:
- Open the mediation flow in the mediation flow editor.
- Select the mediation primitives to extract.
- Right click > Copy into New Mediation Subflow
- In the New Mediation Subflow wizard, choose the module or library that will contain the subflow. To share the subflow with other modules, put it in a library.
- In the New Mediation Subflow wizard, enter a name for the subflow.
- Click Finish
- Wire the in and out terminals of the subflow, and complete the wiring.
Example
- Nodes cannot be copied into subflows. If the selection includes nodes that reference operations (such as Input, InputResponse, Callout) the copy action will proceed but these nodes will not be copied. If the selection contains only these primitive, the copy option will not be available.
- In and Out nodes of a subflow may be copied to another subflow, but not to a mediation flow.
Now, you can reuse the subflow.
Related concepts:
Related tasks:
Create a new mediation subflow
Add a mediation subflow in a mediation flow
Use Service Invoke in a subflow
Synchronizing a subflow instance and implementation
Promoting properties in a subflow
Change the input or output message type in a subflow
Add a mediation subflow in a mediation flow
A mediation subflow is a preconfigured set of mediation primitives that are wired together to realize a common pattern or use case. Mediation subflows can be reused in mediation flows or in subflows.
A subflow must exist either in a dependent library, or in the same module as the mediation flow. You can add a library dependency in the Dependency Editor. Expand the module and click Dependencies to open the Dependency Editor, and click Add to select from the list of available libraries.
To add and configure a subflow instance in a mediation flow, follow these steps:
- Add the mediation subflow to the canvas of the mediation flow editor in one of the following ways:
- From the project tree in the Business Integration view:
- In the project that contains the subflow, expand the category Integration Logic > Mediation Subflows.
- Locate the subflow to use, and drag it onto the Mediation Flow editor canvas.
- In the project that contains the subflow, expand the category Integration Logic > Mediation Subflows.
- From the mediation flow editor palette:
- In the mediation flow editor, expand the Mediation Subflow category in the palette.
- Drag the Mediation Subflow icon
 onto the canvas.
- In the Subflow Selection window, choose the subflow that to add and click OK to add the subflow to the canvas.
- From the project tree in the Business Integration view:
- Wire the subflow instance. By default, a subflow has untyped in and out terminals. If you create a wire to an untyped input terminal, the terminal's type will change to match the type of the terminal to which it is connected. The same behavior occurs for an untyped output terminal. If the terminal type does not match, add a primitive to transform the message.
- Configure properties of the subflow instance in the Properties view:
-
- The Details tab lists the properties that have been promoted in the subflow implementation. To set the value of a property, select it in the list and clicking Edit.
- The References tab lists the references of the Service Invoke primitive in the subflow.
- The Promotable Properties tab lists the properties that have been promoted in the subflow implementation. Use this view to set the alias name or value of a property, or to to change the property at run time. See Promoting properties in a subflow
-
- Click the subflow instance to open the subflow implementation in the Subflow Editor.
Related concepts:
Related tasks:
Create a new mediation subflow
Copying part of a mediation flow into a subflow
Use Service Invoke in a subflow
Synchronizing a subflow instance and implementation
Promoting properties in a subflow
Change the input or output message type in a subflow
Promoting properties in a subflow
Promoting the property of a mediation primitive in a mediation flow allows an administrator to change the value of the property at run time. When you promote a property in a subflow, it becomes a property of the subflow instance. You can then set the value of the property in the mediation flow, or further promote the property in the parent mediation flow.
You might want to set the value of the property in the mediation flow at development time. Or, if you reuse the same subflow in multiple places in a flow, you might not want to use the same alias name for the property depending on the behavior you want.
To promote a property in the subflow implementation:
- Open the subflow in the Mediation Subflow editor.
- Click a primitive to select it, and switch to the Properties view.
- Click the Promotable Properties tab to view the properties that are available for promotion.
- Select the check box in the Promoted column for the property to promote.
- Change the Alias and Alias value of the property. In the subflow instance in the parent mediation flow, the Alias becomes the name of the property, and the alias value becomes the default value of the property.
- Press Ctrl-S to save your changes.
The property is now available in all the mediation flows that use this subflow.
- In the Mediation Flow editor, open a mediation flow that uses the subflow.
- Select the subflow and switch to the Properties view.
- Click the Promotable Properties tab.
- Select the check box in the Promoted column for the property to promote.
- Optional: Change the Alias or Alias value.
Related concepts:
Related tasks:
Create a new mediation subflow
Copying part of a mediation flow into a subflow
Add a mediation subflow in a mediation flow
Use Service Invoke in a subflow
Synchronizing a subflow instance and implementation
Change the input or output message type in a subflow
Change the input or output message type in a subflow
When you create a mediation subflow, the message types of the input and output terminals are undefined, which implies the subflow can handle any kind of message. You can change the input or output message type to allow the subflow to only accept that particular message type.
When you open a mediation subflow in the Mediation Subflow editor, you are working with the mediation flow implementation. You need to use the Quick fix action to propagate any change made to the externals of the subflow in the Mediation Subflow editor.
Within a mediation flow, you are working with the subflow instance. You can have many instances of a subflow implementation in the same mediation flow. Changes made to the properties of a subflow instance within the Mediation Flow editor apply only to that subflow instance.
Change the type within a subflow instance
You can change the terminal message type of a mediation subflow instance in one of the following ways.
- When you wire a mediation subflow instance in a mediation flow, an undefined terminal takes the type of the terminal to which it is wired.
- You can also change the terminal type explicitly by following these steps:
- Click the subflow to select it.
- Switch to the Properties view.
- Switch to the Terminal tab.
- Expand the terminal tree, and click the terminal whose type you want to change.
- In the Message Type field, click the Change button.
- Choose a type from the list of available message types and click OK.
Change the type within a subflow implementation
When you change the message type of an input or output of a subflow in the Subflow editor, you are changing the subflow implementation. You need to propagate the change to all subflow instances that use the subflow.
In the Subflow editor, the in nodes represent the inputs to the subflow, and the out nodes represent the output of the subflow. To change the message type of an in or out node, follow these steps:
- Click the node to select it.
- Switch to the Properties view.
- Switch to the Terminal tab.
- Expand the terminal tree, and select in or out terminal, depending on the node that you are changing.
The in node has an out terminal that propagates the message to the next primitive or node in the subflow. The out node has an in terminal that receives the message and sends it to the next primitive or node outside the subflow.
- In the Message Type field, click the Change button.
- Choose a type from the list of available message types and click OK.
- Press Ctrls-S to save your changes.
- Synchronize all the subflow instances by using the Quick fix action in the Problems view. See Synchronizing a subflow instance and implementation.
Related concepts:
Related tasks:
Create a new mediation subflow
Copying part of a mediation flow into a subflow
Add a mediation subflow in a mediation flow
Use Service Invoke in a subflow
Synchronizing a subflow instance and implementation
Promoting properties in a subflow
Use Service Invoke in a subflow
You can call an intermediary service in a mediation subflow by using Service Invoke.
Use Service Invoke to call a service within a subflow, and then return the results to the subflow.
- In the Mediation Subflow editor, drop a Service Invoke primitive onto the canvas.
- Select a reference from the list of available references in the Select Reference window, and select an operation. Click OK. You can also click New to create a new reference.
- Switch to the Details page of the Properties view. You will see the reference and operation that you just added. Configure properties in the Details and Retry pages as required.
- Switch to the Promotable Properties page, and promote the properties to make available to the subflow instance.
- Switch to the mediation flow editor, and select the subflow instance.
- Switch to the Properties view.
- Click the References tab.
You will see the reference of the service invoke that you added in the list of references for the subflow.

In the list of subflow references, Name is the name of the property and Value is the reference. Verify the Value column shows the correct reference. If necessary, click Edit to select the correct reference. You will also see an entry for the reference in the Operations Connections section at the top of the mediation flow editor.
Related concepts:
Related tasks:
Create a new mediation subflow
Copying part of a mediation flow into a subflow
Add a mediation subflow in a mediation flow
Synchronizing a subflow instance and implementation
Promoting properties in a subflow
Change the input or output message type in a subflow
Synchronizing a subflow instance and implementation
When you change the implementation of a mediation subflow, you may see this error in the subflow instance in the parent mediation flow: "CWZMV0004E: The test subflow mediation does not match the implementation". Use the Quick fix action to synchronize the subflow instance with the implementation.
To synchronize the subflow instance with the implementation:
- Switch to the Problems view.
- Select the error.
- Right-click, and select Quick fix.
- The Quick fix window opens, showing all the subflow instances that do not match the subflow implementation.
- Ensure that all the subflow instances are selected, and click Finish. This action will synchronize all of the subflow instances with the subflow implementation.
Related concepts:
Related tasks:
Create a new mediation subflow
Copying part of a mediation flow into a subflow
Add a mediation subflow in a mediation flow
Use Service Invoke in a subflow
Promoting properties in a subflow
Change the input or output message type in a subflow
Mediation subflow limitations
Limitations of mediation subflows
- You cannot use a Policy Resolution primitive in a subflow
- You cannot specify a context element within a subflow. Context elements that are available in the parent flow are also available to mediation primitives in the subflow.
- When you are debugging a subflow, be aware of these limitations:
- You cannot step into a subflow. You must set a breakpoint
in the subflow in order to view the subflow execution.
- You cannot step out of subflow. If you try to step over the last primitive in the subflow, the flow will run to completion. To workaround this limitation, set a breakpoint in the main flow after the subflow primitive.
- You cannot step into a subflow. You must set a breakpoint
in the subflow in order to view the subflow execution.
- If the subflow is contained within an aggregation block (an aggregation block is a group of mediation primitives that occur between a Fan Out mediation primitive and a Fan In mediation primitive) of the parent flow then a Service Invoke mediation primitive in the subflow will not be considered as part of this aggregation from an Asynchronous Deferred response invocation style. Read the following topic for a description on the invocation styles available: How to process mediations in parallel.
Related concepts:
Related tasks:
Create a new mediation subflow
Copying part of a mediation flow into a subflow
Add a mediation subflow in a mediation flow
Use Service Invoke in a subflow
Synchronizing a subflow instance and implementation
Promoting properties in a subflow
Change the input or output message type in a subflow
Transforming messages
When you are integrating services, you almost always need to transform the data into a format the receiving service can process. In mediation flows, you can use different mediation primitives to transform message formats. In the mediation flow you can map Business Objects using either business object maps or XSLT style sheets. Business object maps can be used with either the Business Object Map primitive or the Mapping primitive. XSL style sheets can be used with the Mapping primitive. The Business Object Map primitive uses the Business Object Map editor to create mappings. The Mapping primitive uses the XML Map editor to create XML mappings. You can choose to generate XSLT or business object maps from the XML maps.
If a message has weakly typed fields, ie fields of xsd:any, xsd:anyType, and xsd:anySimpleType, they must be converted to a strong type in order to effectively map them in the business object and XML map editors. You can use the setMessageType primitive to convert the weakly typed fields to strongly typed fields.
- XML maps versus business object maps
- Mapping interfaces in mediation flows You can easily map interfaces and their operations in a mediation flow by using a template in the mediation flow editor. The operation map template provides functionality similar to the deprecated interface maps created in the interface map editor.
- Mapping weakly typed elements using the set message type mediation primitive When you want to work with weakly typed elements such as xsd:any, xsd:anyType and xsd:anySimpleType, use the Set Message Type mediation primitive. You can also use the primitive to access elements in substitution groups, and to cast a concrete type to another concrete type as long as the types are related, such as from an int type to a double.
- Create Mapping transformations When the message types of source and target operations do not match, you need to transform the source message type so the target operation can receive it and you do this with the Mapping transformation primitive which uses a map file to map source and target message types.
- Use the Business Object Map primitive To enable data to exchange between differently structured business objects, you map those business objects in the business object map editor using the Business Object Map primitive.
XML maps versus business object maps
You can perform the same data transformations using either XML maps or business object maps. How do you decide which one to use? In general, use an XML map in a Mapping primitive. However, in some specific situations, you need to use a business object map.
Although both types of maps perform transformations, there are functional differences between them. When you use an XML map, standard XSL is generated and used at run time to perform the data transformation. When you use a business object map, you can set the order of the transforms within the business object map. You can use the result of one transform as input to another transform, and also override a transform.
In most situations, you should use XML maps because they provide industry standard XSLT and XPath transformations. IBM Integration Designer provides tools to iteratively test XML maps in the XML map editor. Use business objects maps only if you need the following specializations:
- Mapping of business graphs. For example, you have a business graph that needs its change summary updated.
- Custom transformations based on SDO data access.
- Strict ordering of transformation steps, for example:
- The use of temporary variables as collection points for data. In this case, the transform or set of transforms that populates the temporary variable must be executed before the resulting value of the temporary variable value is moved or transformed into the target field.
- A target field needs to be populated first, and the data of that field is then moved to another field.
- Move a complex type and then move a field within the complex type.
- If you need to maintain non-static relationships across the mapping, use a business object map in a business module.
- Static relationships with business object roles.
Mapping interfaces in mediation flows
You can easily map interfaces and their operations in a mediation flow by using a template in the mediation flow editor. The operation map template provides functionality similar to the deprecated interface maps created in the interface map editor.
Before you begin, you need to create a mediation flow with an interface that contains the operations to map.
To map operations using the template:
- In the overview page of the mediation flow editor, click the source operation to map.
- In the template selection window that appears, choose Operation Map.
- Select the target interface and operation, and click OK.
- A request flow opens, showing a wired flow that has an input node for the source operation, a callout for the target, and an XSLT mediation primitive to map between the two.
- Click the XSLT mediation primitive and click Finish in the New XML Map wizard.
- Map the source and target elements in the map editor and save your changes.
- If the source operation is a request response operation, a response flow is also created to process the message that is returned by the target operation. Complete the response flow using the procedure described in the previous steps.
Mapping weakly typed elements using the set message type mediation primitive
When you want to work with weakly typed elements such as xsd:any, xsd:anyType and xsd:anySimpleType, use the Set Message Type mediation primitive. You can also use the primitive to access elements in substitution groups, and to cast a concrete type to another concrete type as long as the types are related, such as from an int type to a double.
The payload of messages processed by mediation flows is defined as business objects, and is carried in the body of the service message object (SMO). The business object definitions describe the message structure in terms of the fields they contain, the type of each field, and the number of occurrences of each field. A field in a business object can be a strong type, which means its type and internal structure are known, or it can be a weak type, in which case the business object definition allows more than one type of data to occur in the field.
The Set Message Type primitive allows you to 'overlay' message fields in the SMO with type information that is different from the type described in the original business object definition. This is useful when the business object definition contains weakly-typed field definitions, but you know that content of a particular data type will be present in the instance message at run time.
You can manipulate strong-type fields more easily than weak-type because their structure and type is known. Using the Set Message Type you can cast a weakly-typed field to a strongly typed field. Primitives that are connected to the output terminal of Set Message Type can then access the elements to which the any type element was cast. For example, you can use the XML map editor or the business object map editor to view the fields with the type that was cast instead of xsd:any, xsd:anyType, or xsd:anySimpleType. You can then manipulate the content of these fields.
To use the Set Message Type primitive:
- In the mediation flow editor, under the Transformation group, click the Set Message Type primitive and drop it onto the canvas.
- Wire the input terminal to have access to the SMO structure.
- Right-click the primitive and select Show in Properties. In the Properties view, click Details.
- In the Details tab, click Add... and then click Edit... beside to the Weakly typed field text box, to select the field you want to refine.
- In the XPath Expression Builder window, navigate the SMO structure and click the field to add it to the expression. Click Finish.
- To see a list of types, click Browse next to the Actual field type text box. Select a type, click OK and then click Finish.
Create Mapping transformations
When the message types of source and target operations do not match, you need to transform the source message type so the target operation can receive it and you do this with the Mapping transformation primitive which uses a map file to map source and target message types.
In the Mediation Flow editor, you cannot connect primitives or nodes whose message types are different; you will see an error on the input terminal of the target node indicating the terminal types are incompatible. In this case, you need a Mapping transformation primitive, as shown in the following image:
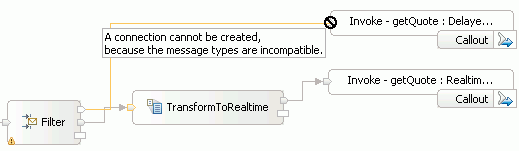
The Mapping transformation primitive uses a map file that contains the information required to map between two message types. You can select an existing map, and optionally edit it, or create a new one using the XML Map Editor. An XSL file is automatically generated for the map file and used at run time.
Note: If you create a map and set its input and output types, the types you have selected will be present at the input and output terminals of the primitive regardless of the wiring. The same applies when using a previously created map. To reset the input or output message type, right-click the terminal and select Reset Message Type. The map will have to be recreated because it is not refactored when the terminal type changes.
- Create an XML map in a Mapping transformation primitive Use the XML map editor to create an XML map between the input and output message. When the mapping has been created, an XSLstyle sheet will be generated to perform the transformation at run time. To create a new XML map for a Mapping transformation primitive but an XML map already exists, you can use the Properties view of the mediation flow editor to create the new XML map and simultaneously choose whether to have the existing XML map overridden, deleted, or retained.
- Use an existing XML map You can use an existing XML map and generate a style sheet from it.
- Migrate an XML Map In IBM Integration Designer 6.1 and the versions that follow, the Mapping transformation primitive has a new XML map editor. Before you can edit XML maps that were created in a prior version of IBM Integration Designer, you must migrate them to the new format.
- Troubleshooting: warning on Mapping transformation primitive Changing the correlation, transient or shared context results in a warning marker on a Mapping transformation primitive, and this type of warning message in the problems view: CWZMU0046E: The correlation context type on the in terminal of the Mapping1 primitive does not match the empty type.
Create an XML map in a Mapping transformation primitive
Use the XML map editor to create an XML map between the input and output message. When the mapping has been created, an XSLstyle sheet will be generated to perform the transformation at run time. To create a new XML map for a Mapping transformation primitive but an XML map already exists, you can use the Properties view of the mediation flow editor to create the new XML map and simultaneously choose whether to have the existing XML map overridden, deleted, or retained. When you create an XML map, you first need to decide the following:
- The part of the message to map, by setting the root property, which defines the part of the message that will be available for mapping in the XML map editor.
- / to transform the complete message. To map SOAP attachments, or to map anyType, use / as the root.
- /body to transform the message body
- /headers to transform the message headers
- /context to transform the message context
- The message type that is input to the map, and the message type that is output from the map. You can choose a specific message type, or a generic anyType, depending on your scenario. For example, to create a reusable subflow, use anyType as the input and output.
To quickly create an XML map with a specific input and output type, follow these steps:
- Drop a Mapping transformation primitive on to the canvas of the mediation flow editor.
- Wire the input and output terminals of the primitive
- Click the primitive to open the XML mapping wizard.
- Click Finish to accept the defaults.
An XML map created in this manner has a root of /body, and the input and output message types of the map are the same as those of the primitive. By default, a sample input file is created. You can use this file to test the map you create.
If you do not need to change the information in the headers or contexts sections of the service message object, use /body as the mapping starting point. When you select /, /headers or /context as the root, you need to explicitly map all of the service message object sections in the XML map editor using the Match Mapping option. Otherwise, you might get errors at run time.
- The XML map editor opens, with the source message on the left and the target on the right. Expand the message trees in the source and target sections of the map editor, until you reach the elements to map. Click an element in the Source section drag it to the matching element in the target section.
To quickly create an XML map with an input and output type of anyType, follow these steps:
- Drop a Mapping transformation primitive on to the canvas of the mediation flow editor.
- Optional: Wire the input and output terminals of the primitive.
- Click the primitive to open the XML mapping wizard.
- Click Next.
- For both the input and output messages, identify the part of the message that is available to the transformation by selecting an option in the Message Root list:
- / to transform the complete message. To map SOAP attachments, use / as the root.
- /body to transform the message body
- /headers to transform the message headers
- /context to transform the message context
- If your Mapping transformation primitive has both input and output terminals wired, the wizard shows the input and output message types that will be mapped. If you need to specify the message types, click Browse, then Browse again and select an interface from the list.
- Select an operation, the message category and finally the message type. Click OK to return to the New XML Mapping wizard
- Click Finish to launch the XML map editor.
- In the editor, the source message is on the left and the target on the right. Expand the message trees in the source and target sections of the map editor, until you reach the elements to map. Click an element in the Source section drag it to the matching element in the target section.
You can also use the Properties view to launch the New XML Map wizard and create a new XML map that uses either the default or modified settings described in the previous sections. However, the Properties view is especially useful to create a new XML map when an existing XML map already exists for your Mapping transformation primitive:
- Right-click your Mapping transformation primitive and select Show in Properties. The Properties view opens at the bottom of the mediation flow editor.
- In the Properties view, click the Details tab.
- Beside the Mapping file field, click New.
The New XML Map wizard opens.
- On the first page of the wizard, accept the default values and click Next.
- If a Manage the Existing Map page is displayed, an XML map already exists for your Mapping transformation primitive and you should select one of the following radio buttons to specify what you want to do with the existing map:
- Override the existing map Creates a new map with the same name as the existing map and replaces the existing map.
- Create a new map and delete the existing map Creates a new map with a different name than the existing map, but removes the existing map.
- Create a new map and keep the existing map Creates a new map with a different name than the existing map, but retains the existing map.
- Click Next.
- Either accept the default message types or modify them as described in the previous section, then click Finish.
Use an existing XML map
You can use an existing XML map and generate a style sheet from it.
- In the Properties view, select the Details tab and click Browse.
- All of the available XML maps (.map) and XSL style sheets
(.xsl) are listed in the Mapping File Selection window. Select the XML map
 and click OK. The XML map is now in the Mapping file field.
- To make changes to this file, click Edit which will open the XML Map editor.
- The style sheet will be regenerated when you save the XML map.
Migrate an XML Map
In IBM Integration Designer 6.1 and the versions that follow, the Mapping transformation primitive has a new XML map editor. Before you can edit XML maps that were created in a prior version of IBM Integration Designer, you must migrate them to the new format.
The new map files use a different extension than the previous versions. The *.xmx extension has been replaced by *.map. The XML map editor now supports custom mapping so that you can write or reuse custom XSL code already written. You can also use submaps to reuse mapping files as needed and inline maps to help with organizing and mapping more complex structures.
You can migrate the old maps in one of the following ways:
- When you view a Mapping transformation primitive in the Properties view, you will see a warning indicating the mapping file is in an old format. Click Migrate and the map will be automatically converted to the new format.
- When you load a mediation module or library that was created in a previous release into the workspace, you will see warning messages in the Problems view indicating that mapping files are in an old format.
- Right-click the warning message and select Quick Fix.
- Optional: Click Find Similar Problems to see a list of maps that need to be migrated. Choose the maps to migrate and click OK. Follow the instructions in the Migrate Old Mapping to New Format wizard.
- Click OK and the Migrate Old Mapping to New Format wizard opens. Follow the instructions in the wizard.
- You can click an old map file and it will open in the Mapping Migrator. Click Find All Old Mappings to display all of the old maps in your module. Select all of the maps to migrate to the new format and click Migrate.
Troubleshooting: warning on Mapping transformation primitive
Change the correlation, transient or shared context results in a warning marker on a Mapping transformation primitive, and this type of warning message in the problems view: CWZMU0046E: The correlation context type on the in terminal of the Mapping1 primitive does not match the empty type.
If the correlation, transient or shared context is changed in the Mediation Flow editor after the map for the Mapping transformation primitive has already been created, the map file will not reflect the changed context automatically, even if the root property of the map is set to root (or /). After saving the mediation flow, you see a warning marker on the Mapping transformation primitive in the Mediation Flow editor  . You will also see warnings
in the problems view, as shown in the examples in the following list:
. You will also see warnings
in the problems view, as shown in the examples in the following list:
- CWZMU0046E: The correlation context type on the in terminal of the Mapping1 primitive does not match the empty type used for the correlation context in the xslt/XSLTransformation1_req_2.map map. HelloWorldMediation.mfc HelloWorldMediation Unknown MFC Map Problem Marker
- CWZMU0046E: The shared context type on the in terminal of the Mapping1 primitive does not match the empty type used for the shared context in the xslt/XSLTransformation1_req_2.map map. HelloWorldMediation.mfc HelloWorldMediation Unknown MFC Map Problem Marker
- CWZMU0046E: The transient context type on the in terminal of the Mapping1 primitive does not match the empty type used for the transient context in the xslt/Mapping1_req_2.map map. HelloWorldMediation.mfc HelloWorldMediation Unknown MFC Map Problem Marker
To fix the map file, right-click the warning in the problems view and select Quick Fix. The context in the xml map will be updated to match the context in the Mediation Flow Editor.
Remember: If you already have mappings to or from the correlation, transient or shared context in your map, the map may contain errors after the quick fix is run. You must fix these errors manually.
Use the Business Object Map primitive
To enable data to exchange between differently structured business objects, you map those business objects in the business object map editor using the Business Object Map primitive.
To add the Business Object Map primitive to your mediation flow, select it from the Transformation category of the tool palette and drop it onto the canvas. Wire the primitive in the flow so the primitive has access to the service message objects. You now have the option to use an existing map or create a new map.
To use an existing map:
- Right-click the Business Object Map primitive and then click Show in properties.
- Click Details and then click Browse
- Select a map from the list and click OK.
Example
To create a new map follow these steps:
- Select the Business Object Map primitive, right click it and then click Show in properties.
- Click Details, and then click New. In the New BO Map wizard, name the map and, optionally, select a folder location by clicking Browse. If you do not select a folder location, the map will be placed in the default location. Click Next.
- On the Specify Message Types page of the wizard, first select the root which specifies at which level the mapping will start from the following options:
- / - map all fields of the message. Note that if you choose / as root, you will have to ensure that you map all fields, including headers, contexts and body.
- /headers - map only the headers of the message
- /context - map only the contexts (transient, correlation, shared)
- /body - map the fields found in the body of the message
- After selecting the root, look at the Input Message Body and Output
Message Body fields. These fields contain the names of the business object types that you will be mapping.
To change them, click Browse beside the one to change.
- In the Change Message Type window, click Browse to select an interface from the list and click OK.
- Select an operation from the drop down box, followed by the message category, either input or output.
- Finally, select the message type and click OK.
- When you have completed the wizard, click Finish.
The business object map editor opens with the input and output messages in place.

- To map fields, click the field in the business object on the left side and drag it to the field you want to map it to on the right side.

For information on the different transformations available see Transform types in the business object map editor.
Storing and using elements in the message context
Store an element in the message context so that it is available for use later in the mediation flow. First, add the element as an empty business object in the message context. Then, initialize it by using a mediation primitive such as Message Element Setter to add a value to the business object field.
You can use the context section of the message to store a property that mediation primitives can use later in the flow. The data to be contained in the context must be defined in a single business object. There are three context elements that can be used for passing properties in a flow:
- correlation
- makes the property persist throughout the duration of the request and response flows, and is used for passing values from the request flow to the response flow.
- transient
- makes the property available for the duration of the current flow (either the request flow or the response flow), and is used to pass values between mediation primitives in the same flow.
- shared
- element is available during aggregation operations using the Fan Out / Fan In combination. This context should not be used outside aggregation operations.
Follow these steps to set a property in the correlation or transient context of your flow:
- If you do not have an existing business object, create one in the business object editor, and add the element you want to persist as a field.
- Click the request flow tab, and then click the input node.
- In the Properties view, switch to the Details tab.
- In the Correlation context or Transient context field, click Browse.
- Select a business object in the data type selection window, and click OK. An empty business object is created in the message's context section. In the properties view, the business object now appears in the input node's context field, as shown below:

- Initialize the element later in the flow by using a mediation primitive such as Message Element Setter to store a value in the business object field.
Alternatively you can use the tray on the right side of the mediation flow editor to set the contexts.
 To use this, click the + button next to the context and select the business object from the list.
You can use an XPath 1.0 expression to access the element from any mediation primitive in the flow, except Fail and Stop. For example, to access the transient element oneWayStreet, use this XPath expression:
- /context/transient/oneWayStreet
You can then use the property in the following ways:
- Set a value for the element directly into the business object field by using a Message Element Setter or Database Lookup primitive.
- Use the element in an Endpoint Lookup primitive to query the WebSphere Service Registry Repository.
- Map the element between the context and the message body by using a Mapping primitive or a business object map primitive.
- Write your own custom mediation primitive to set or get the element.
Invoking a service
Invoke refers to the ability to call an operation of a referenced service in the mediation flow. This can be done either at the end of a request flow using a Callout primitive or inline using the Service Invoke primitive.
To be able to invoke an operation on a service reference you must:
- If you need to, create an interface and the operation.
- Click the operation to open its implementation.
- You now have two options:
- To invoke the service inline, add the Service Invoke primitive to the canvas.
- To use a callout invoke, add a callout to the canvas.
- Select the reference and operation to invoke.
- Wire the primitives as you normally would and set their properties.
- Invoking a service by using a callout Invoking or calling a service in a mediation flow by using a callout is discussed. In this case, the response is in a different transaction, in a response flow. The call is made at the end of a request flow.
- Invoking a service within a flow Use a Service Invoke mediation primitive to call an intermediate service as part of a normal mediation flow. The result of the call is returned in the same transaction.
- Retrying a failed service invocation Callout and Service Invoke primitives provide retry capabilities for failed service invocations.
Service Invoke mediation primitive
Invoking a service by using a callout
Invoke or calling a service in a mediation flow by using a callout is discussed. In this case, the response is in a different transaction, in a response flow. The call is made at the end of a request flow.
A callout is used to send a processed message to the operation. The callout can only be used at the end of the request flow and its returned message is caught by a Callout Response primitive in the response flow.
To invoke a service's operation using a callout, drop a callout from the palette onto the editor, and select the target reference and operation. A callout node appears in the mediation flow editor and it can be wired at the end of a flow. The node can be set to repeat calls to a service if the call fails as well as to try alternate endpoints. To do this:
- Right-click the node and select Show Properties. Then click Details and the view shows up.
Note the Reference Name and Operation Name which were selected when creating the callout node.
- The properties which can be changed are summarized in the table below.
Callout node property description
Property Description Possible Values Reference Name The reference of the service that is called by the callout Operation Name The name of the operation called by the callout Use dynamic endpoint if set in the message header Determines if the TargetAddress header should be used to override the endpoint if present. If set to True and if the TargetAddress header is populated, message is forwarded. Otherwise the message proceeds normally.
Default: true
Async Timeout Specifies time to wait for a responses when performing an asynchronous deferred response invocation. - -1 - infinite wait
- 0 - expects an immediate response
- 1+ - waits specified number of seconds for a response
If timeout occurs, the fail terminal is fired. This is treated as an unmodeled fault with regard to retry conditions.
Default: 5
Async Timeout is only effective when the invocation style used for a Callout is Async with deferred response.
Require mediation flow to wait for service response when the flow component is invoked asynchronously with callback Determines if the call should be forced to act in a synchronous manner. Boolean: true or false
Default: false
This option is only available with Async (Compatibility) and Default (Compatibility) invocation styles.
Invocation Style Determines whether the service is invoked synchronously or asynchronously. Sync, Async (deferred), Async (callback), Async one way, Default (Compatibility), Async (Compatibility), As target
Default: As target
Retry On Determines whether and how fault responses affect retry. - Never - operation call is never retried, no matter the type of fault
- Any fault - operation call is retried on both modeled and unmodeled faults
- Modeled fault - operation call is retried only when a modeled fault is received
- Unmodeled fault - operation call is retried only when an unmodeled fault is received
Default: Never
Retry Count Number of retry attempts following initial failure before a modeled fault, timeout or fail terminal is fired. The number must be an integer greater than or equal to 0.
Default: 0
Retry Delay Sets the delay between retry attempts, in seconds. Must be an integer greater than or equal to 0. If 0, there will be no delay between attempts meaning they will run as fast as the server can handle them.
Default: 0
Try Alternate Endpoints Determines if any alternate endpoints should be used on retries. - True - alternate endpoints found in the SMO headers will be used
- Otherwise they are not tried
This function is only available if 'Use dynamic endpoint' is also True.
Default: True
In certain situations, such as input error detected, you may want to return the message immediately without invoking the callout. In this case you can use the input response node. This will bypass the flow and return the message to the source.
Invoking a service within a flow
Use a Service Invoke mediation primitive to call an intermediate service as part of a normal mediation flow. The result of the call is returned in the same transaction.
Invoke a service within a mediation flow and not at its end is achieved through the use of the Service Invoke primitive. The primitive can be used in both a request and response flow and has properties similar to the callout node of the request flow.
- Create a mediation flow. Select Service Invoke from the Service Invocation category of the palette and drop it on the canvas.
- Complete the Select Reference Operation window as follows:
- Select the required service reference from the list.
- Select an operation on the interface of that reference.
- Select the Message Enrichment mode check box to enable the Message Enrichment mode. In this mode, a section of the input message, which is received by the in terminal
of the Service Invoke mediation primitive, is used for the service invocation. The output message that passes through the out terminal
is constructed by merging the response from the service with the original request message that was passed into the mediation primitive.
If this check box is clear, the default mode is assumed. In this mode, message enrichment does not occur, and the body and header sections of the response message from the service invocation are propagated to the output message.
- Click OK.
- If the reference has not yet been created:
- Click New in the Select Reference Operation window.
- In the Add Reference window, type a name for the reference, select an interface, and click OK.
The reference is then added to the list along with the operations in the interface.
- Select the operation you want to invoke and click OK.
The associated reference and operation names cannot be changed after you have selected them. You will have to create a new primitive in order to do that.
In Message Enrichment mode, the message type of the in and out terminals must match, but is initially not set. When the in terminal is wired, its message type is defined implicitly (by the input message) and is propagated to the out terminals. In default mode, the in and out terminals are set to the appropriate message types for the interface and operation with which the mediation primitive is associated.
- To view the settings available to you, right-click the primitive,
and click Show In > Properties View. You are presented with the following view:

- Set the properties of the primitive. The following table summarizes
the properties of the primitive.
The Parameter mappings table and the Propagate request headers to service being invoked and Propagate response headers from service being invoked check boxes are enabled only when working in Message Enrichment mode.
For detailed information, see Service Invoke mediation primitive.
| Property | Description | Possible values |
|---|---|---|
| Reference name | The reference of the service that is called by the callout. | |
| Operation name | The name of the operation called by the callout. | |
| Use dynamic endpoint if set in the message header | Determines if the TargetAddress header should be used to override the endpoint if present. |
If set to True and if the TargetAddress header is populated, the message is forwarded. Otherwise, the message proceeds normally. Default: true |
| Async timeout | Specifies the time to wait for a response when performing an asynchronous deferred response invocation. |
If timeout occurs, the fail terminal is fired. This is treated as an unmodeled fault with regard to retry conditions. Default: 5 |
| Require mediation flow to wait for service response when the flow component is invoked asynchronously with callback | Determines if the call should be forced to act in a synchronous manner. |
Boolean: true or false Default: false |
| Invocation style | Determines whether the service is invoked synchronously or asynchronously. |
Default, Sync, or Async Default: Default |
| Parameter | A preconfigured read-only value identifying whether the element to be transformed or updated forms part of the input, output, or fault message. | |
| Name | A preconfigured read-only name for the input, output, or fault parameter type. | |
| Type | The type of the element value in the message. | |
| Value | Specifies an XPath 1.0 expression that identifies the element to be transformed or updated. | Use the XPath Expression Builder to build a custom XPath expression. |
| Propagate request headers to service being invoked | Determines whether the request message, which is sent to the service, is populated with the header of the input message that is received at the in terminal. | |
| Propagate response headers from service being invoked | Determines whether the output message is populated with the response message header from the service being invoked. | |
| Retry on | Determines whether and how fault responses affect retry. |
Default: Never |
| Retry count | Number of retry attempts following initial failure before a modeled fault, timeout or fail terminal is fired. |
The number must be an integer greater than or equal to 0. Default: 0 |
| Retry delay | Sets the delay between retry attempts, in seconds. |
Must be an integer greater than or equal to 0. If 0, there will be no delay between attempts meaning they will run as fast as the server can handle them. Default: 0 |
| Try alternate endpoints | Determines if any alternate endpoints should be used on retries. |
This function is only available if 'Use dynamic endpoint' is also True. Default: True |
Retrying a failed service invocation
Callout and Service Invoke primitives provide retry capabilities for failed service invocations.
A number of properties need to be set in order to enable and configure the retry ability to your liking. To enable retries on either one of the primitives you must set the Retry On property to one of:
- Any fault
- Modeled fault
- Unmodeled fault
Note that for the purposes of retrying a service, an Asynchronous Timeout is treated as an unmodeled fault.
Once you've enabled retries and the primitive receives a fault response of the given type, the attempts will be performed as specified in the rest of the properties. They are summarized in the table following.
| Property Name | Description |
|---|---|
| Retry Count | Count of retry attempts made after the initial failure. If 0, no attempts are made. If Try alternate endpoints is false or if there are no alternate endpoints specified in the SMO headers, all attempts will retry the original service. |
| Retry Delay | The delay, in seconds, before each retry attempt is made. If 0, delay will be dictated by speed of server. |
| Try Alternate Endpoints
(requires Use Dynamic Endpoint to be set) | If the SMO Header contains alternate endpoints, retry calls will be made to them in the order they appear. |
| Async Timeout | If this timeout occurs and the Retry Count has not been reached, it is treated as an unmodeled fault and retry will be performed. The retry delay will take place following the Async
Timeout.
If the Retry Count has been reached, then the Timeout terminal of the Service Invoke primitive, or the fail terminal of the Callout Response node is fired. |
- Retrying the same service Occurs if the Try alternate endpoints property is false or if no alternate endpoints are provided in the SMO Header.
- Retrying a different service Occurs if alternate services are available to receive the retry. Only available through the Service Invoke primitive.
- Retrying alternate endpoints of the same service Finding alternate endpoints with the Endpoint Lookup primitive and retrying them with either the Service Invoke or Callout node primitive.
Retrying the same service
Occurs if the Try alternate endpoints property is false or if no alternate endpoints are provided in the SMO Header.
To retry the same service, ensure there are no alternate endpoints available in the header, or if there are, the Try alternate endpoints property is set to false. When either the Service Invoke primitive or the Callout node receives a fault (modeled or unmodeled), it will retry the service with the delays imposed. The properties which must be set, along with guidelines for their values are summarized below.
Note that for a Service Invoke primitive, nothing should be wired to its fault terminals.
| Property Name | Should be set to |
|---|---|
| Retry On | Any one of
|
| Retry Count | Any integer greater than 0. If set to 0, no retry attempts will be made. |
| Use dynamic endpoint & Try alternate endpoint | Both set to FALSE (unchecked). If TRUE (checked) and there are alternate endpoints defined in the SMO Header, other services will be invoked. |
Retrying a different service
Occurs if alternate services are available to receive the retry. Only available through the Service Invoke primitive.
Retrying a different service once a fault response is received is done by wiring the fault terminal(s) of the Service Invoke primitive to other primitives. A sample of this is shown in the figure below.
 As can be seen from the diagram:
- The primitive ServiceInvoke1 is used to invoke a service.
- Its output terminal is wired through an optional Mapping primitive, XSLT1, to transform the response into the form needed for the next primitive.
- The fault terminal is wired through XSLT2, which is again optional, to the input of a second Service Invoke primitive, ServiceInvoke2. When the initial invocation receives a fault response, the message will be propagated to this second Service Invoke primitive.
- The output terminal of ServiceInvoke2 is wired through an optional transform, XSLT3, to the next primitive, while its fault terminal is wired to a fail primitive which halts the mediation flow.
Retrying alternate endpoints of the same service
Finding alternate endpoints with the Endpoint Lookup primitive and retrying them with either the Service Invoke or Callout node primitive.
Retrying alternate endpoints is done with the help of the Endpoint Lookup primitive. This primitive is used to compile a list of endpoints using a given interface and to populate the EndpointLookupContext area of the primitiveContext in the SMO. The Target in the SMOHeader is also set with the first match and the AlternateTraget(s) are populated with the remaining matches.
To take advantage of this capability, the endpoint lookup primitive needs to be placed before the service invoke in the mediation flow. The steps you must take are:
- Create a mediation flow and add all necessary primitives
along with creating interfaces and references as needed. Then add the Endpoint Lookup primitive
 to the canvas and wire it to a Service Invoke or Callout.
- To enable retrying of alternate endpoints of the same service you have to set the properties of the Endpoint Lookup primitive as well as those of the Service Invoke primitive.
- For the Endpoint Lookup primitive:
- Right click it and select Show in Properties, then click Details. The details view is presented to you.
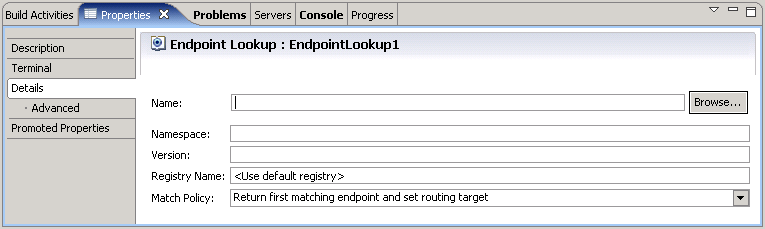
- To populate the Name and Namespace of the Port Type (also called interface) click Browse. In the Interface Selection window, choose an interface and click OK.
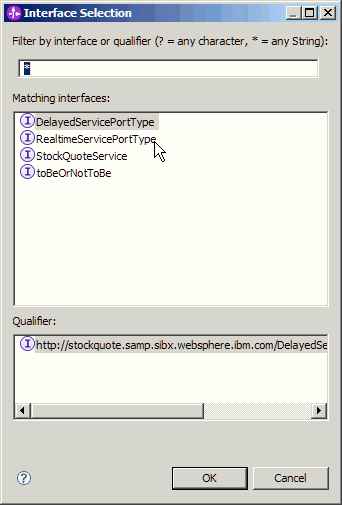
- Type in a registry name or leave <Use default registry> to use the default WSRR.
- The Match policy dictates the type of search to be done. Set it to "Return all matching endpoints" to try all alternate endpoints available.
- Right click it and select Show in Properties, then click Details. The details view is presented to you.
- For the Service Invoke:
- Set the Retry on property to "Any Fault."
- Set the Retry count property to any number greater than 0.
- If any fault is returned by the initial service request, the first endpoint in the list populated by the Endpoint Lookup primitive is used. Subsequent retry attempts use the other endpoints in the list, in the order they appear.
Aggregating and broadcasting messages
When you aggregate messages, you combine a number of response messages from the invocation of one or more services into a single message. When you broadcast messages you send notification to the service and do not expect a response.
The most common way to aggregate messages is to use Fan Out and Fan In primitives in combination. Another way to aggregate messages is to perform a chained aggregation using Service Invoke. You broadcast messages using the Fan Out primitive.
- Shared context Shared context is a thread-based memory location that is shared across all instances of the service message object running within the same thread for the request or response flow. The shared context is used during a Fan Out / Fan In aggregation to temporarily store service responses.
- Combining results from different services You can send one request to multiple services by using the Fan Out primitive, receive responses from those services and then use a Fan in primitive and a Mapping primitive to combine the responses into a new message.
- Broadcasting messages For broadcasting, use the Fan Out primitive in isolation to send a message one way such as when you want to send a notification and do not need a response.
- Performing chained aggregation You can invoke multiple services sequentially from a mediation flow using the Service Invoke primitive and aggregate the response from each service. This type of chained aggregation is achieved by using the Service Invoke primitive to invoke the first service, and then storing the service response in a placing the service response in the transient context by using a Mapping primitive. The message is then propagated to a second Service Invoke primitive.
- Example: Fan Out and Fan In This example shows how elements in an array of business objects are updated with the result of a service invocation response. This is achieved by using the Fan Out, Service Invoke, Mapping (using XSL Transformation) and Fan In primitives.
Service Invoke mediation primitive
Shared context
Shared context is a thread-based memory location that is shared across all instances of the service message object running within the same thread for the request or response flow. The shared context is used during a Fan Out / Fan In aggregation to temporarily store service responses.
The shared context area of the message is the point of aggregation. Much like the transient and correlation context, shared context is a user-provided business object that is set at the input node of a mediation flow. The shared context is where data is placed in a mediation flow for Fan In primitives to access during an aggregation.
Use shared context for Fan Out and Fan In aggregation and not for general data storage during a mediation flow. Use transient or correlation context for general data storage during a mediation flow.
Combining results from different services
You can send one request to multiple services by using the Fan Out primitive, receive responses from those services and then use a Fan in primitive and a Mapping primitive to combine the responses into a new message. You use the Fan Out primitive to either fire a single input message once or to iterate through the input message and fire each occurrence of a given element, producing multiple output messages.
The Fan In primitive is used as a decision point for continuing flow execution. The primitive will receive messages until the decision point is reached and will fire the output terminal at that point. The Fan In primitive makes decisions in one of three ways:
- Simple Count - fires the output terminal when a set number of messages are received. The operation does not stop Fan Out from sending messages which means the decision point may be reached, and the output terminal may be fired, more than once.
- XPath Decision - output will be fired if XPath evaluation of messages is true.
- Iterate - waits for all messages produced by the corresponding Fan out primitive then fires the output terminal.
For every Fan In primitive you use, you must have a related Fan Out primitive.
To stop the Fan In operation you can wire the Stop Input terminal. You can also specify a time period in which the operation must complete. If the decision point has not been met by this time, the Incomplete terminal will fire and the Fan Out and Fan In operation will stop.
The following figure shows a mediation flow that has a Fan Out and Fan In aggregation. The shared context temporarily stores service responses.

- The shared context business object is set in the input node. The Message Element Setter primitives, StoreReponse_A and StoreResponse_B will place responses from InvokeService_A and InvokeService_B in the shared context. The Fan In primitive will aggregate the contents of the shared context and will fire the output terminal.
- A Fan Out primitive is placed on the canvas and is configured to fire its output only once.
- When the Fan Out primitive fires, the message body and the transient and correlation contexts are copied into a new message created for each path coming from the output terminal. These messages still point to the same shared context.
- The message goes through the path to InvokeService_A first. A a Mapping primitive, CreateInput_A, creates the input message in the form that service A requires and propagates it to the Service Invoke primitive.
- The Message Element Setter primitive named StoreResponse_A adds the response from the service to the shared context after which the response is propagated to the Fan in primitive.
- Fan In has been configured to fire after it receives two messages and has only received one. The flow backtracks to where the message was split and then follows the path to InvokeService_B.
- Just like for InvokeService_A, a Mapping primitive creates the message for the service and a Message Element Setter primitive adds the response from the service to the shared context.
- When the path through service B completes, and the Fan In primitive receives the second message, the Fan In primitive fires its output terminal. The shared context now contains the responses from service A and B.
- The last a Mapping primitive, CreateNewMessage, maps the contents of the shared context to the body of the message as needed.
Because paths run one at a time, no matter how many there are, only one primitive at a time accesses the shared context.
Broadcasting messages
For broadcasting, use the Fan Out primitive in isolation to send a message one way such as when you want to send a notification and do not need a response.
The Fan Out primitive can perform a number of one way operations based on each occurrence of a repeating element in an input message.
Typically you broadcast a message in an order-processing flow, for example to send notifications to the warehouse for each item in an order. The following figure shows a sample wiring of the Fan Out primitive:

- FanOut1 is dropped on the canvas and configured in iterate mode. The XPath expressions is configured to point to the repeating
element of order items, in this case itemName. The FanOutContext is of the same type as the repeating element.

- XSLTransformation1 maps to the message type the callout requires by mapping the order item in the FanOutContext to the body of the target service message object.
- The output terminal of FanOut1 fires for each order item in the message, which invokes the callout for each item.
Performing chained aggregation
You can invoke multiple services sequentially from a mediation flow using the Service Invoke primitive and aggregate the response from each service. This type of chained aggregation is achieved by using the Service Invoke primitive to invoke the first service, and then storing the service response in a placing the service response in the transient context by using a Mapping primitive. The message is then propagated to a second Service Invoke primitive.
When you perform aggregation with the Service Invoke primitive, use the transient context. The response from an invocation is received in the body of the message and is placed in the transient context by a Mapping primitive. The following diagram shows a typical chained aggregation flow.
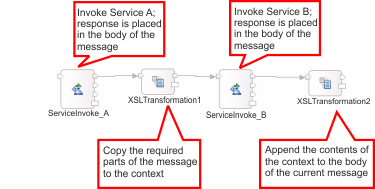 In the flow represented previously:
- ServiceInvoke_A calls Service A and populates the body of the message with its response.
- Use XSLTransformation1 you can extract and store parts or the whole message in the transient context.
- ServiceInvoke_B then calls Service B which repopulates the message body with its response.
- Finally, XSLTransformation2 aggregates the current body of the message (response from Service B) with the contents of the transient context (stored response from Service A).
Example: Fan Out and Fan In
This example shows how elements in an array of business objects are updated with the result of a service invocation response. This is achieved by using the Fan Out, Service Invoke, Mapping (using XSL Transformation) and Fan In primitives.
The payload of the input message into the mediation flow consists of an array, MyBoArray, which contains a list of MyBo business objects. MyBo has two fields:
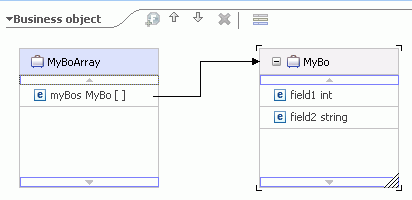
The service request that is input into the mediation flow contains data for field1. This data is passed to another service that populates field2 with data based on the value of field1. This is done iteratively for all data elements in the array, and the result is returned back to the service requester.
Lets assume there are two data elements (myBOs) in the array that is input into the mediation flow, as shown in the xml below:
<?xml version="1.0" encoding="UTF-8"?>
<ns0:inputArray xmlns:ns0="http://TestLib/ArrayInterface" xmlns:xsd="http://www.w3.org/2001/XMLSchema" xmlns:xsi="http://www.w3.org/2001/XMLSchema-instance">
  <myBos>
    <field1>049</field1>
    <field2></field2>
  </myBos>
  <myBos>
    <field1>077</field1>
    <field2></field2>
  </myBos>
</ns0:inputArray>

These are the steps in the mediation flow:
- The user sets MyBoArray to be the shared context in the properties page of the input node.
- The user sets the Fan Out primitive to fire the output operation for each element in the XPath expression /body/operation1/inputArray/myBos.
The Fan Out primitive performs the following actions:
- Populates the iteration count in the Fan Out primitive context with the element count of 2.
- Copies the first array element from the message body to the Fan Out context
- Fires the output terminal with the Fan Out context containing the first element, which has 049 as the value of field1
- The interface of the service invoked by the service invoke primitive
takes a business object, MyBo as input. In XSLT1, the user defines a map between the element from the Fan Out context to the elements of MyBo in the input message body.

- Service Invoke calls out to the service and puts the response in the output message body.
- In XSLT2, the user defines a mapping between the response from the output message body and the shared context business object that was set in step 1.
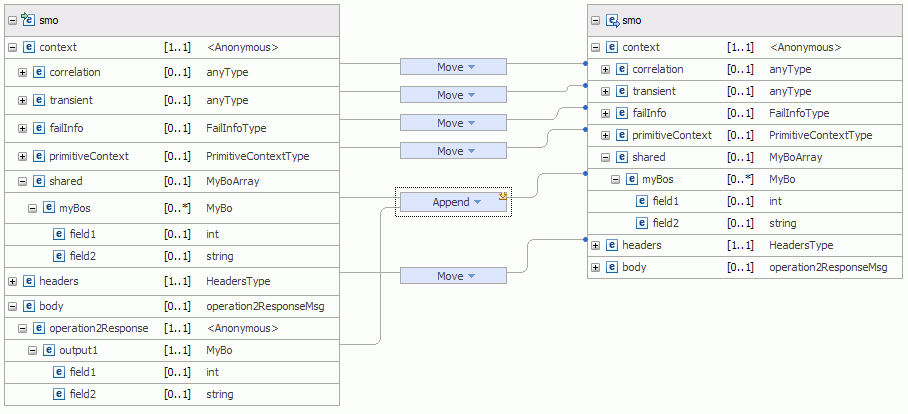
- The Fan in primitive is the decision point in the flow. Because the count of two has not been reached, the mediation flow tracks back to FanOut1.
- FanOut1 copies the second array element from the message body to the Fan Out context
- Fires the output terminal with the Fan Out context containing the second element, which has 077 as the value of field1
- Steps 3 - 6 are repeated. All the elements in the array are now populated with data in the shared context.
- Because the count of two has been reached, Fan In fires its output terminal.
- In XSLT3, the user defines a map between the elements of the shared context business object to the input message body.

Selecting endpoints dynamically
You can configure your mediation flow component to route messages to endpoints that are determined dynamically at run time. Since these service endpoints are not statically defined in the mediation flow, you can change service endpoints without the need to update and redeploy the mediation flow. An endpoint in a mediation module can be selected either statically by using an import's binding, or dynamically by using an endpoint address identified by a target address element in the message header. This endpoint address can be added to the target address element in the message header by mediation primitives within a mediation flow. The endpoint address could be updated with information from a registry, a database, or with information from the message itself.
In order for the runtime to implement dynamic routing on a request, the Use dynamic endpoint property of the callout node must be set. When this property is set, the callout will route the message using the endpoint address in element /headers/SMOHeader/Target/address in the message. If there is no endpoint address information in the message header, a service will be selected statically, if an import is wired to the associated reference of the callout in the mediation flow component. By default, the Use dynamic endpoint property is set, and therefore dynamic routing is enabled. For a summary of this behavior, see "Message routing when dynamic endpoint property is set" in the topic links below:
Dynamic endpoint support does not require you to wire a reference to an import. However, to provide default configuration settings for the dynamic endpoint, you can use a wired import. After a reference is wired to an import, the configuration settings of the import apply to all dynamic endpoints using that reference. For example, to influence whether a service is called synchronously or asynchronously, from the callout or Service Invoke primitive, you can specify the Preferred interactionstyle on the import; and wire the reference to this import. Similarly, you can configure the security settings for a web service dynamic endpoint, by using a wired import with web service binding.
- WebSphere Service Registry and Repository (WSRR) WebSphere Service Registry and Repository (WSRR) allows you to store, access, and manage information about services. You can use this information to select, invoke, and reuse services.
- Selecting endpoints dynamically from WSRR Use an Endpoint Lookup primitive to retrieve service endpoints by querying the WebSphere Service Registry and Repository (WSRR). The endpoints that are returned by the query are stored in the message, and can then be used to dynamically invoke a service.
- Selecting endpoints dynamically without using a registry You can choose which service is used at run time by looking up service endpoints from a database, or with information from the message itself.
- Dynamic endpoint example URIs When an endpoint is determined dynamically, the message is routed to the Universal Resource Indicator (URI) specified in the target address element of the SMOHeader, /headers/SMOHeader/Target/address. This topic lists the valid URI formats for the target types that are supported for dynamic endpoints in mediation flows.
- Message routing when dynamic endpoint property is set The URI that is invoked by a mediation flow at run time depends on the setting of the Use dynamic endpoint property of the callout node, the existence of a URI in the target address element or AlternateTarget address element in the SMOHeader, and the wiring of the callout node.
WebSphere Service Registry and Repository (WSRR)
WebSphere Service Registry and Repository (WSRR) allows you to store, access, and manage information about services. You can use this information to select, invoke, and reuse services.
You can use WSRR to store information about services in your systems, or in other systems, that you already use, that you plan to use, or to be aware of. For example, an application can check with WSRR just before it invokes a service to locate the most appropriate service that satisfies its functional and performance needs. This capability helps make the deployment more dynamic and more adaptable to changing business conditions.
You can access WSRR through the Endpoint Lookup primitive
within mediation flows. You can configure WSRR from the administrative console of the Process Server or the WebSphere Enterprise Service Bus. For information on WSRR, see the WSRR information center at http://publib.boulder.ibm.com/infocenter/sr/v7r0/topic/com.ibm.sr.doc/cwsr_overview_overview.html..
Selecting endpoints dynamically from WSRR
Use an Endpoint Lookup primitive to retrieve service endpoints by querying the WebSphere Service Registry and Repository (WSRR). The endpoints that are returned by the query are stored in the message, and can then be used to dynamically invoke a service. The Endpoint Lookup primitive queries the WSRR based on the properties specified in the details page of the properties view. The service information of each retrieved endpoint is placed in a primitiveContext/EndpointLookupContext element in the message context. Through the match policy you can:
- Return all matching endpoints To retrieve a number of service endpoints from the WebSphere Service Registry and Repository (WSRR) and do further processing to select a service to invoke, then set the Match Policy property to return all matching endpoints.
- Return first matching endpoint and set routing target To select a single service endpoint from the WebSphere Service Registry and Repository (WSRR) using only the Endpoint Lookup mediation primitive, then set the Match Policy property to return one matching endpoint.
- Return all matching endpoints and set routing targets The first match is used as the target and the rest are used as alternate targets. This is useful if you have multiple services which perform the same operation.
- Return endpoint matching latest compatible service version To route to a service retrieved from a WSRR registry based on the service version of an SCA module, choose a Match Policy of Return endpoint matching latest compatible service version.
- Runtime behavior of the Endpoint Lookup primitive A summary of the resulting endpoint invoked by the message flow, depending on various conditions, when an Endpoint Lookup primitive is used:
Return all matching endpoints
To retrieve a number of service endpoints from the WebSphere Service Registry and Repository (WSRR) and do further processing to select a service to invoke, then set the Match Policy property to return all matching endpoints. When a number of endpoints are retrieved from the registry, the list of endpoints is placed in the EndpointLookupContext in the message context. Another primitive is required to select an endpoint from the list and place it in the target address in the message header, and the message is then routed to the endpoint in the target address element. Follow these steps to create a mediation flow that uses an Endpoint Lookup primitive to retrieve a set of service endpoints from the WSRR and then uses a custom mediation primitive to select an endpoint.
- Create a mediation flow component, and add a source interface that contains the source operation.
- Click the source operation to open its implementation.
- Drop a callout or service invoke primitive onto the editor.
- Select the reference and operation to invoke.
- In order for the runtime to implement dynamic routing on a request, the callout node or service invoke primitive must be set to use the dynamic endpoint. Select it, and click the details page in the properties view. Ensure the Use dynamic endpoint check box is selected.
- Optional: Promote the Use dynamic endpoint property so the administrator can change it at run time. Click the Promoted properties page, and select the promoted check box for the property.
- Drop an Endpoint Lookup primitive onto the mediation flow canvas, and select the properties to use to query the WSRR registry. At run time, all the endpoints matching the query will be retrieved from the WSSR and placed in the context/primtiveContext/EndpointLookupContext element of the message, as shown below:

The message containing the retrieved endpoint information will be propagated through the output terminal of the Endpoint Lookup primitive.
- Wire the output terminal of the Endpoint Lookup to another mediation primitive such as a Message Element Setter or Custom Mediation primitive in order to select a single service endpoint from the t/endpointReference/Address
element of EndpointLookupContext, and place it in the target address element of the SMOHeader (/headers/SMOHeader/Target/address) shown below:

For valid URI formats for the supported target types, see Dynamic endpoint example URIs.
- You can then wire the output terminal of the Custom Mediation primitive to the callout node, or to another primitive to perform the next processing step of your flow.
- Optional: Promote the query properties of Endpoint Lookup such as User properties so that you can change the query to the registry at run time without re-deploying the mediation module. Click the Promoted properties page, and select the promoted check box for the property
- Optional: You can specify a default endpoint the runtime uses if it cannot find a dynamic endpoint. You specify a default endpoint by wiring an import to the mediation flow component.
- Optional: If there are no endpoints matching the search criteria in the WSRR, the message is propagated to the noMatch terminal of the Endpoint Lookup primitive. You can wire the noMatch terminal to a mediation primitive for notification, such as a Message Log or Event Emitter.
Example
Example: The following image shows an example mediation flow when match policy is return all matching endpoints.
Return first matching endpoint and set routing target
To select a single service endpoint from the WebSphere Service Registry and Repository (WSRR) using only the Endpoint Lookup mediation primitive, then set the Match Policy property to return one matching endpoint. When a single endpoint is retrieved from the registry, the endpoint information is placed in both the Endpoint Lookup context and in the target address element in the message header. If the Use dynamic endpoint property of the callout node or service invoke primitive is checked, the message will be routed to the endpoint in the target address element, and therefore no further processing is required to select the endpoint.
Note: When a single endpoint is retrieved you cannot control which endpoint that is. To choose a specific service, select the "Return all matching endpoints" policy and then select the service by using another primitive.
Follow these steps to create an example mediation flow that uses an Endpoint Lookup primitive to retrieve a service endpoint from the WSRR and routes the message to the retrieved endpoint.
- Create a mediation flow component, and add a source interface that contains the source operation.
- Click the source operation to open its implementation.
- Drop a callout or service invoke primitive onto the editor.
- Select the reference and operation to invoke.
- In order for the runtime to implement dynamic routing on a request, the callout node or service invoke primitive must be set to use the dynamic endpoint. Select the callout node, and click the details page in the properties view. Ensure the Use dynamic endpoint check box is selected.
- Optional: Promote the Use dynamic endpoint property so the administrator can change it at run time. Click the Promoted properties page, and select the promoted check box for the property.
- Drop an Endpoint Lookup primitive onto the mediation flow canvas, and select the properties to use to query the WSRR registry. At run time, a single endpoint that matches the query will be retrieved from the WSSR and placed in the target address element of the SMOHeader in the message (/headers/SMOHeader/Target/address),
and the message will be routed to the URI specified in the address element, shown in the image below:
For valid URI formats for the supported target types, see Dynamic endpoint example URIs.
- The message containing the retrieved endpoint information will be propagated through the output terminal of the Endpoint Lookup primitive, and no further mediation is required to select the endpoint. You can directly wire the output terminal of the Endpoint Lookup to the callout node or service invoke, or to another primitive to perform the next processing step of your flow.
- Optional: Promote the query properties of Endpoint Lookup, such as User properties, so that you can change the query to the registry at run time without redeploying the mediation module.
- Optional: You can specify a default endpoint the runtime uses if it cannot find a dynamic endpoint. For example:
- Wire an import to a reference in the mediation flow editor, and wire the noMatch terminal to the corresponding node in the mediation flow editor.
- Wire the noMatch terminal to another primitive (such as MessageSetter or Custom Mediation) which updates the /headers/smoHeaders/target/address element with the next location. Enable dynamic lookup on the callout node or service invoke primitive.
- Optional: If there are no endpoints matching the search criteria in the WSRR, the message is propagated to the noMatch terminal of the Endpoint Lookup primitive. You can wire the noMatch terminal to a mediation primitive for notification, such as an Event Emitter.
Example
Example: The following image shows an example mediation flow when match policy is return one matching endpoint and set routing target.
Return all matching endpoints and set routing targets
The first match is used as the target and the rest are used as alternate targets. This is useful if you have multiple services which perform the same operation.
When multiple endpoints are returned, the first match is set as the Target and the rest of the matches populate the AlternateTarget(s) in the SMOHeader. If a match is found the result of the lookup is put into the EndpointLookup Primitive Context.
If no matches are found, the noMatch terminal is fired and both the Target and AlternateTarget(s) are left unchanged.
Follow these steps to create a mediation flow which retrieves endpoints from the WSRR and routes the message to the retrieved endpoints.
- Create a mediation flow component, and add a source interface that contains the source operation.
- Click the source operation to open its implementation.
- Drop a callout or service invoke primitive onto the editor.
- Select the reference and operation to invoke.
- In order for the runtime to implement dynamic routing on a request, the callout node or service invoke primitive must be set to use the dynamic endpoint. Select the callout node or service invoke primitive, and click the details page in the properties view. Ensure the Use dynamic endpoint check box is selected.
- Drop an Endpoint Lookup primitive on the canvas and select the Return all matching endpoints and set alternate routing targets Match Policy in its Properties view.
- Wire the primitive to the rest of the mediation flow.
- Optional: Promote the Use dynamic endpoint property so the administrator can change it at run time. Click the Promoted properties page, and select the promoted check box for the property.
- Optional: Promote the query properties of Endpoint Lookup such as User properties so that you can change the query to the registry at run time without re-deploying the mediation module. Click the Promoted properties page, and select the promoted check box for the property
- Optional: You can specify a default endpoint the runtime uses if it cannot find a dynamic endpoint. You specify a default endpoint by wiring an import to the mediation flow component.
- Optional: If there are no endpoints matching the search criteria in the WSRR, the message is propagated to the noMatch terminal of the Endpoint Lookup primitive. You can wire the noMatch terminal to a mediation primitive for notification, such as a Message Log or Event Emitter.
Return endpoint matching latest compatible service version
To route to a service retrieved from a WSRR registry based on the service version of an SCA module, choose a Match Policy of Return endpoint matching latest compatible service version.
Service-version-aware routing makes use of endpoint information that is in an SCA module (not in a WSDL document). The SCA modules to retrieve from the registry must be versioned in IBM Integration Designer. See Create versioned modules. Follow these steps to create an example mediation flow that uses an Endpoint Lookup primitive to retrieve a service endpoint from the WSRR and routes the message to the retrieved endpoint.
- Create a mediation flow component, and add a source interface that contains the source operation.
- Click the source operation to open its implementation.
- Drop a callout or service invoke primitive onto the editor.
- Select the reference and operation to invoke.
- In order for the runtime to implement dynamic routing on a request, the callout node or service invoke primitive must be set to use the dynamic endpoint. Select the callout node, and click the details page in the properties view. Ensure the Use dynamic endpoint check box is selected.
- Optional: Promote the Use dynamic endpoint property so the administrator can change it at run time. Click the Promoted properties page, and select the promoted check box for the property.
- Drop an Endpoint Lookup primitive onto the mediation flow canvas, and select the properties to use to query the WSRR registry.
- Choose a Match Policy of Return endpoint matching latest compatible service version
- Set the Version property to be the version of the SCA module. The asterisk (*) wildcard character is supported for the version number ( 1.1.*).
- Set the Module property to the name of the module. This must be the original name of the module, without the version number.
- Set Export to the name of the export with SCA binding to invoke.
At run time, a single endpoint that matches the query will be retrieved from the WSSR and placed in the target address element of the SMOHeader in the message (/headers/SMOHeader/Target/address), and the message will be routed to the URI specified in the address element, shown in the image below:
For valid URI formats for the supported target types, see Dynamic endpoint example URIs.
- The message containing the retrieved endpoint information will be propagated through the output terminal of the Endpoint Lookup primitive, and no further mediation is required to select the endpoint. You can directly wire the output terminal of the Endpoint Lookup to the callout node or service invoke, or to another primitive to perform the next processing step of your flow.
- Optional: Promote the query properties of Endpoint Lookup, such as User properties, so that you can change the query to the registry at run time without redeploying the mediation module.
- Optional: You can specify a default endpoint the runtime uses if it cannot find a dynamic endpoint. For example:
- Wire an import to a reference in the mediation flow editor, and wire the noMatch terminal to the corresponding node in the mediation flow editor.
- Wire the noMatch terminal to another primitive (such as MessageSetter or Custom Mediation) which updates the /headers/smoHeaders/target/address element with the next location. Enable dynamic lookup on the callout node or service invoke primitive.
- Optional: If there are no endpoints matching the search criteria in the WSRR, the message is propagated to the noMatch terminal of the Endpoint Lookup primitive. You can wire the noMatch terminal to a mediation primitive for notification, such as an Event Emitter.
You can find more information in the Business Process Management documentation library at http://publib.boulder.ibm.com/infocenter/dmndhelp/v6r2mx/topic/com.ibm.websphere.wbpm.scenarios.esb1.620.doc/tasks/twesb_usecasedynamicrouting1.html.
Runtime behavior of the Endpoint Lookup primitive
A summary of the resulting endpoint invoked by the message flow, depending on various conditions, when an Endpoint Lookup primitive is used:
| Match policy | Match found | EndpointLookup context updated | output terminal | URI placed in /headers/SMOHeader/Target/address | Result |
|---|---|---|---|---|---|
| Retrieve one matching endpoint | Yes | Yes | Output | by endpoint lookup primitive | If the "Use dynamic endpoint" property is enabled, the URI in the target address element is invoked. |
| Retrieve one matching endpoint | No | No | No Match | No | Invoke the flow that is wired to the No Match terminal |
| Retrieve all matching endpoints | Yes | Yes | Output | by another primitive such as MessageElementSetter or Custom Mediation | If the "Use dynamic endpoint" property is enabled, the URI in the target address element is invoked. |
| Retrieve all matching endpoints | Yes | Yes | Output | not found | If an import is wired to the callout's reference, the service specified in the import will be invoked statically. Otherwise, a runtime error will occur. |
| Retrieve all matching endpoints | No | No | No Match | No | Invoke the flow that is wired to the No Match terminal |
Selecting endpoints dynamically without using a registry
You can choose which service is used at run time by looking up service endpoints from a database, or with information from the message itself.
Dynamic routing is enabled by the Use dynamic endpoint property in the callout node that sets the callout to be dynamic. When the dynamic callout is invoked, it checks the /headers/SMOHeader/Target/address element in the message header for a service endpoint address, and routes the message to the address of that endpoint. If no address exists in the target address element, a service will be selected statically, if an import is wired to the associated reference of the callout in the mediation flow component. By default, the Use dynamic endpoint is enabled.
The target address element in the message header can be updated in a number of ways. You can use a Database Lookup primitive to retrieve a service endpoint from a database, and place the retrieved URI directly into the target address element of the message. Or, you can use a Message Element Setter or Custom Mediation primitive to process the message and update the target address.
Follow these steps to create a mediation flow that uses a Database Lookup primitive to query a database, and set the target endpoint address in the message header. .
- Create a mediation flow component, and add a source interface that contains the source operation.
- Click the source operation to open its implementation.
- Drop a callout or service invoke primitive onto the editor.
- Select the reference and operation to invoke.
- Select the callout node, and click the details page in the properties view. Ensure the Use dynamic endpoint check box is selected.
- Optional: Promote the Use dynamic endpoint property so the administrator can change it at run time. Click the Promoted properties page, and select the promoted check box for the property.
- Drop a Database Lookup primitive onto the mediation flow canvas, and enter your query properties, as well as the column that contains the endpoint addresses. Set the Message element property to /headers/SMOHeader/Target/address in order to place the retrieved endpoint address into the dynamic callout target address. See the properties example at the end of this topic.
- Optional: Promote the key path and key column name properties of Database Lookup so that you can change your query at run time. Click the Promoted properties page, and select the promoted check box for the property.
- Optional: You can specify a default endpoint the runtime uses if it cannot find a dynamic endpoint. You specify a default endpoint by wiring an import to the mediation flow component.
- Optional: If there are no endpoints matching the search criteria in the database, the message is propagated to the keyNotFound terminal of the Database Lookup primitive. You can wire the keyNotFound terminal to a mediation primitive for notification, such as a Message Log or Event Emitter.
- Note: Fault, failure and time-out messages returned from a service invocation will retain the value of the original SMO's address field for use in additional routing or error handling.
Example
The following image shows an example mediation flow using the Database Lookup primitive.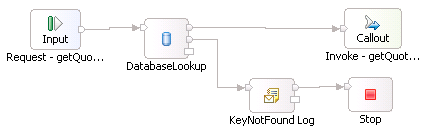
The following example shows the properties of the Database Lookup primitive: 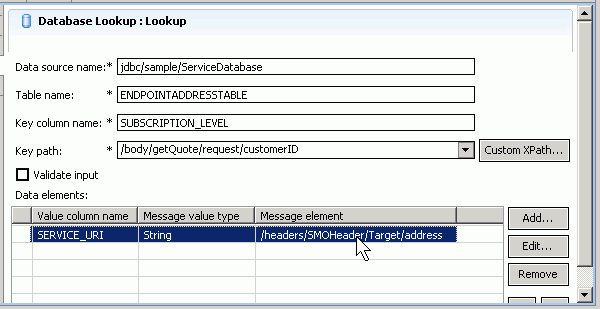
Dynamic endpoint example URIs
When an endpoint is determined dynamically, the message is routed to the Universal Resource Indicator (URI) specified in the target address element of the SMOHeader, /headers/SMOHeader/Target/address. This topic lists the valid URI formats for the target types that are supported for dynamic endpoints in mediation flows.
SOAP/HTTP
The URI format in the case of an export with a web service binding, is as follows:- http://host:port/moduleName/sca/exportName
The URI format in the general web service case, (when a web service is not implemented by an export with a web service binding), is as follows:
- http://host:port/service
SOAP/JMS
The URI format in the case of an export with a web service binding (soap/jms) is as follows:
The URI format in the case of an export with a web service binding, is as follows:
jms:/queue?destination=jms/WSjmsExport&connectionFactory=jms/WSjmsExportQCF&targetService=WS
The URI format in the general web service case, (when a web service is not implemented by an export with a web service binding), is as follows:
- jms:/queue?destination=<destName>&connectionFactory=<factory>&targetservice=<service>
SCA default binding example
The URI format in the case of an export with the default SCA binding, is as follows:
- sca://moduleName/exportName
For a detailed explanation of each target type, see Endpoint Lookup mediation primitive reference.
Message routing when dynamic endpoint property is set
The URI that is invoked by a mediation flow at run time depends on the setting of the Use dynamic endpoint property of the callout node, the existence of a URI in the target address element or AlternateTarget address element in the SMOHeader, and the wiring of the callout node.
The following table summarizes this behavior under various conditions:
| "Use dynamic endpoint" set on callout or service invoke | URI exists in /headers/SMOHeader/Target/address or in /headers/SMOHeader/AlternateTarget | Import is wired to callout's associated reference | Runtime behavior |
|---|---|---|---|
| Yes | Yes | Yes | message routed to URI in target address element |
| Yes | Yes | No | message routed to URI in target address element |
| Yes | No | Yes | message routed to static endpoint address of the import |
| Yes | No | No | unwired reference exception |
10. Logging messages during a mediation flow
You can use the Message Logger mediation primitive to store messages that you can process later. The logged messages can be used for various purposes. For example, you could use the logged messages for data mining or for auditing.
The Message Logger mediation primitive logs messages to a relational database using an IBM-defined database schema. It does not write to other storage mediums such as flat files. The Message Logger mediation primitive logs an XML transcoded copy of the service message object.
By default, the Message Logger logs the body section of the message. You can configure the Message Logger to log the entire message, or you can use an XPath expression to specify a part of the message to be logged.
By default, messages are logged to the Common database created during installation of the server. You can create your own database, and log your messages there. Or, when you install and configure the runtime product you can specify which physical database is used as the Common database. For example, you might define the Common database as being a DB2 database.
For more information on the Message Logger primitive, see the Message Logger mediation primitive topic in the Reference section.
For information on viewing logged messages, see the example topic in the Message Logger mediation primitive Reference.
Message Logger mediation primitive
11. Emitting common base events
You can emit a common base event at a significant point in a mediation flow by using an Event Emitter mediation primitive. You can also define the parts of the message that should be contained in the event. Common base events are emitted to the CEI server which can be accessed by many different applications that consume the events.
When you create an Event Emitter primitive in a mediation flow, you specify a label for the event, and the part of the message that should be included in the event. At run time, when the Event Emitter primitive runs the mediation flow, a common base event is emitted, and the event label and message information is included in the Extended Data Elements of the common base event.
Common base events and event definitions can be used in a number of ways and can be consumed by various IBM products. For a complete description of how you can use the emitted events, see Event definitions in the monitoring events topic.
After you define a custom event in an Event Emitter primitive, you can perform these tasks in IBM Integration Designer:
- The Common Event Infrastructure and Common Base Events (deprecated) The Common Event Infrastructure (CEI) is used to provide basic management services for events. The format of those events is defined by the Common Base Event specification
- Choose the event format This topic shows you how to choose between the two event formats available in IBM Integration Designer.
- Generating event definitions You can generate an event definition from an Event Emitter primitive. You can then test the event definitions in the integrated test client, or create a monitor model from the event definition.
- Generating a monitor model If you have installed the IBM Business Monitor development toolkit, you can generate a monitor model for your custom event from IBM Integration Designer.
- Choose properties of an event The name given in the Event Emitter primitive's Label property identifies the event to the event consumers; viewer and monitor applications. Use an event label that is meaningful and unique to that particular event, so that consumers of the event can process it effectively.
- Best Practices: When to use an Event Emitter The Event Emitter primitive provides a way to generate significant business events from within a mediation flow.
- When not to use an Event Emitter Consider where you place an Event Emitter in your flow, and what data you choose to be stored in the event. Avoid placing an Event Emitter in the normal run path of a flow as this could affect performance by causing a large number of events to be generated.
- Content of the Event Emitter primitive's event The Event Emitter primitive defines the application specific event data that is placed into the extendedDataElements section of the common base event. This topic summarizes the mapping between the properties defined in the Event Emitter primitive and the elements of the common base event.
The Common Event Infrastructure and Common Base Events (deprecated)
The Common Event Infrastructure (CEI) is used to provide basic management services for events. The format of those events is defined by the Common Base Event specification
The Common Event Infrastructure (CEI) is used to provide basic event management services, such as event generation, transmission, persistence, and consumption.
Although CEI provides an infrastructure for event management, it does not define the format of events. This is defined by the Common Base Event specification, which provides a standard XML-based format for business events, system events, and performance information.
Common base events are emitted in a mediation flow using an Event Emitter primitive. You can define the part of the message that should be contained in the Extended Data Elements of the common base event.
Choose the event format
This topic shows you how to choose between the two event formats available in IBM Integration Designer.
Events in IBM Integration Designer can be of two types:
- 6.1, 6.2, and 7.0 format
- 6.0.2 format
The 6.1, 6.2, and 7.0 format event contains the payload as an XML element into the xsd:any slot of a common base event. Since the payload is stored in the xsd:any slot, you can get it back as an XML instance and use existing XML technologies to process it in an efficient way. In a 6.0.2 format event the business payload data is shredded or serialized as a hexadecimal value into the common base event extended data elements.
Mediation modules
For mediation flows, explicitly choose the 6.0.2 format to emit 6.0.2 style events. In short, the version of events emitted from mediation flow emitters is dependent on the properties selected in the Global Event Settings page of the Event Monitor tab in the assembly editor. (To open this tab, you select the mediation flow in the assembly editor and click the Properties > Details tab, then expand the interfaces in the Details page and select your operation.) If you have selected the 6.0.2 event format, then this event format is read and used at run time. If you have not selected the 6.0.2 event format, then the 6.1, 6.2, and 7.0 format is used by default for the mediation flow.
Depending on whether you previously selected SCA events for a 6.0.2 mediation module that you now want to import into IBM Integration Designer, the mediation module will exhibit one of the following two behaviors:
- If you previously selected SCA events for the 6.0.2 mediation module in the General page of the Event Monitor tab, then all of the events will be emitted in 6.0.2 format.
- If you did not previously select SCA events for the 6.0.2 mediation module in the General page of the Event Monitor tab, then all of the events will be emitted in the default 6.1, 6.2, and 7.0 format.
As stated earlier, you can change the event format in the Global Event Settings page of the Event Monitor tab. (Note the Legacy hexBinary selection is not applicable for mediations.)
Generating event definitions
You can generate an event definition from an Event Emitter primitive. You can then test the event definitions in the integrated test client, or create a monitor model from the event definition.
In order to generate an event definition from a mediation flow, an Event Emitter primitive must exist in the flow.
To generate an event definition from an Event Emitter primitive, follow these steps.
- In the Business Integration view, select the mediation flow that contains an Event Emitter Primitive.
- Right click the mediation flow and select Monitor Tools -> Generate Event Definitions. An event definition is generated for each Event Emitter primitive in the mediation flow. The event is given the name of the Event Emitter's label property. In the Physical Resources view , the event definition is generated (or regenerated) into the events folder under your module.
After you have generated your event definitions, you can perform one of the following tasks:
- Test the event definitions in the integration test client, as described in the integration test client topic "Testing event definitions.
- Import the event definitions into a monitor model in the monitor model editor and add business metrics to the event definitions, as described in the IBM Business Monitor development toolkit documentation.
Generating a monitor model
If you have installed the IBM Business Monitor development toolkit, you can generate a monitor model for your custom event from IBM Integration Designer.
In order to generate an event definition from a mediation flow, an Event Emitter primitive must exist in the flow.
To generate a monitor model perform the following steps:
- Choose the event format by following the steps in Co-existence of monitor models
- In the Business Integration view, select the mediation flow that contains an Event Emitter Primitive.
- Right click the mediation flow and select Monitor Tools -> Generate Monitor Model This will generate your event definitions (as well as a monitor model to contain them) into the Project Explorer view of the Business Monitoring perspective.
Example
For information about generating a monitor model, see the IBM Business Monitor development toolkit documentation.
Choose properties of an event
The name given in the Event Emitter primitive's Label property identifies the event to the event consumers; viewer and monitor applications. Use an event label that is meaningful and unique to that particular event, so that consumers of the event can process it effectively.
At run time, common base events are generated when an Event Emitter primitive is encountered in the flow, and the Event Emitter's label property is used as the extension name of the common base event. The extension name as defined in the common base event indicates what data the event might contain. For example, if the extension name is MyOrder, you would expect it to contain extended data elements (or application specific data) pertaining to MyOrder. Although a label is generated by default, specify a meaningful label.
Common base events are emitted to the CEI server which can be accessed by many different applications that consume the events, and so the names of the events must be unique across the system to distinguish the different event types.
Note the label cannot be greater than 64 characters in length, because 64 is the maximum length the extension name can be set in the event. A MediationRuntimeException will be thrown for the property label if it is greater than 64 characters.
In addition, consider what data will be stored in the message, and configure the emitter to store only significant message data. Configuring the primitive to store the complete message will produce events of greater size compared to configuring the primitive to store just the most important information.
As an example, suppose your flow uses two Event Emitter primitives:
- The first primitive named OrderDatabaseFailureEvent contains information regarding a failure to log a message.
- The second primitive named LegacyOrderMessageEvent provides notification when a message is received from a customer who is using a service that will be discontinued.
The following image shows the flow.

The label properties of the Event Emitters are OrderDataBaseFailure and LegacyOrderMessage. In the event, only include message content that is specific to the defined event type. For example, in the OrderDatabaseFailureEvent, include only the context header that contains the failinfo element. In the LegacyOrderMessageEvent, include only the message body which contains the customer information.
When the administrator receives notification of an OrderDataBaseFailure event, she can begin investigating the problem by looking at the failure information contained in the message. When the inventory coordinator receives the LegacyOrderMessage, he can contact the customer to offer an alternative product.
If you want events to get to the CEI server even when the flow fails further down the line, you must set the transaction mode property to New. Note the transaction mode property only takes effect within a global transaction.
Best Practices: When to use an Event Emitter
The Event Emitter primitive provides a way to generate significant business events from within a mediation flow.
Think of an Event Emitter as a notification mechanism used to indicate an unusual event, such as a significant failure within a flow or an unusual path ran in the flow. Avoid placing an Event Emitter in the normal path of a flow as this could affect performance by causing a large number of events to be generated.
In the following flow, an Event Emitter is used when there is a failure in the message log, which is a significant failure in the flow.
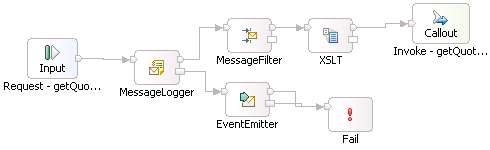
The following example shows an Event Emitter used to notify that an unusual path has run in a flow.

When not to use an Event Emitter
Consider where you place an Event Emitter in your flow, and what data you choose to be stored in the event. Avoid placing an Event Emitter in the normal run path of a flow as this could affect performance by causing a large number of events to be generated.
In the following example flow, two event emitter primitives are used in the main path of the flow. The first event emitter will always run to notify that a message has been logged. The second event emitter will frequently be run to notify the message has been routed to a service in the normal path of the flow. Both event emitters run in frequently used normal branch conditions of the flow.
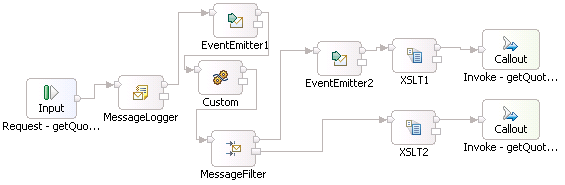
Content of the Event Emitter primitive's event
The Event Emitter primitive defines the application specific event data that is placed into the extendedDataElements section of the common base event. This topic summarizes the mapping between the properties defined in the Event Emitter primitive and the elements of the common base event.
Event Emitter properties displayed in a generated event definition
When you generate an event definition from a mediation flow that has an Event Emitter primitive, the generated event definition contains the primitive's properties in these locations:
- The label property of the primitive becomes the name of the generated event
- The mediation module name is the ModuleName of extendedDataElement
- The primitive name is the MediationName of extendedDataElement
- The primitive's root property, for example /body, is in the Root of extendedDataElemetn
- The value of the elements in the message is contained in the Message of extendedData
The relationship between the message schema, primitive properties and data elements of the generated event is illustrated below:

When no message data is included in the event
In 6.0.2 format, when no message data is included in the event, the Message element of the extendedDataElement is not present, and the Root element of extendedDataElement is empty.. The elements of the common base event using example data, are as follows:
| Event Emitter property | Event Emitter property value | Common base event element | Common base event element value |
|---|---|---|---|
| label | OrderReceived | extensionName | OrderReceived |
| Mediation module name | ReceiveOrderMediationModule | extendedDataElement/ModuleName | ReceiveOrderMediationModule |
| Event Emitter primitive name | OrderReceivedEvent | extendedDataElement/MediationName | OrderReceivedEvent |
| Root | exclude message content from event data | extendedDataElement/Root | none |
In a 6.1 format event, when no message data is included in the event, the applicationData child element of the event element is not present. The elements of the common base event using example data, are as follows:
| Event Emitter property | Event Emitter property value | Common base event element | Common base event element value |
|---|---|---|---|
| label | OrderReceived | extensionName or event/eventPointData/EventEmitterLabel | OrderReceived |
| Mediation module name | ReceiveOrderMediationModule | event/eventPointData/ModuleName | ReceiveOrderMediationModule |
| Event Emitter primitive name | OrderReceivedEvent | event/eventPointData/MediationName | OrderReceivedEvent |
| Root | exclude message content from event data | none | none |
When a single root element is included in the event
In a 6.0.2 format, when the root property of the Event Emitter primitive specifies a single leaf element, the Message element of the extendedDataElement contains the value of the leaf element. The elements of the common base event are as follows:
| Event Emitter primitive property | Event Emitter property value | Common base event element | Common base event element value |
|---|---|---|---|
| label | OrderReceived | extensionName | OrderReceived |
| Mediation module name | ReceiveOrderMediationModule | extendedDataElement/ModuleName | ReceiveOrderMediationModule |
| Event Emitter primitive name | OrderReceivedEvent | extendedDataElement/MediationName | OrderReceivedEvent |
| Root | /body/getOrderInfo/argAccount/region | extendedDataElement/Root | /body/getOrderInfo/argAccount/region |
| extendedDataElement/Message | Asia Pacific |
In a 6.1 format event, when the root property of the Event Emitter primitive specifies a single leaf element, the applicationData child element of the event element contains the value of the leaf element. The elements of the common base event are as follows:
| Event Emitter primitive property | Event Emitter property value | Common base event element | Common base event element value |
|---|---|---|---|
| label | OrderReceived | extensionName or event/eventPointData/EventEmitterLabel | OrderReceived |
| Mediation module name | ReceiveOrderMediationModule | event/eventPointData/ModuleName | ReceiveOrderMediationModule |
| Event Emitter primitive name | OrderReceivedEvent | event/eventPointData/MediationName | OrderReceivedEvent |
| Root | /body/getOrderInfo/argAccount/region | event/eventPointData/Root | /body/getOrderInfo/argAccount/region |
| event/applicationData/content/value | Asia Pacific |
When a complex root element is included in the event
In a 6.0.2 format event, when the root property of the Event Emitter primitive specifies a business object, a Message element is created in the extendedDataElement for to store the value for each contained element. For example, suppose the Event Emitter label property is OrderReceived, and the root specifies the location /body/getOrderInfo/argAccount.
The elements of the common base event are as follows:
| Event Emitter primitive property | Event Emitter property value | Common base event element | Common base event element value |
|---|---|---|---|
| label | OrderReceived | extensionName | OrderReceived |
| Mediation module name | ReceiveOrderMediationModule | extendedDataElement/ModuleName | ReceiveOrderMediationModule |
| Event Emitter primitive name | OrderReceivedEvent | extendedDataElement/MediationName | OrderReceivedEvent |
| Root | /body/getOrderInfo/argAccount | extendedDataElement/Root | /body/getOrderInfo/argAccount/ |
| extendedDataElement/Message/accountID | 049728 | ||
| extendedDataElement/Message/region | Asia Pacific | ||
| extendedDataElement/Message/termsDescription | 90 days | ||
| extendedDataElement/Message/companyName | Favourite Customer | ||
| extendedDataElement/Message/creditLimit | 50000 |
In a 6.1 format event, when the root property of the Event Emitter primitive specifies a business object, the applicationData child element of the event element stores the specified business object. For example, suppose the Event Emitter label property is OrderReceived, and the root specifies the location /body/getOrderInfo/argAccount. The elements of the common base event are as follows:
| Event Emitter primitive property | Event Emitter property value | Common base event element | Common base event element value |
|---|---|---|---|
| label | OrderReceived | extensionName or event/eventPointData/EventEmitterLabel | OrderReceived |
| Mediation module name | ReceiveOrderMediationModule | extendedDataElement/MediationName | ReceiveOrderMediationModule |
| Event Emitter primitive name | OrderReceivedEvent | event/eventPointData/MediationName | OrderReceivedEvent |
| Root | /body/getOrderInfo/argAccount | event/eventPointData/Root | /body/getOrderInfo/argAccount/ |
| event/applicationData/content/value/accountID | 049728 | ||
| event/applicationData/content/value/region | Asia Pacific | ||
| event/applicationData/content/value/termsDescription | 90 days | ||
| event/applicationData/content/value/companyName | Favourite Customer | ||
| event/applicationData/content/value/creditLimit | 50000 |
12. Implementing custom mediation logic
Custom mediation primitives allow you to implement your own mediation logic by using Java™ code.
By default, a custom mediation primitive has an input terminal, an output terminal, and a fail terminal. You can add more input and output terminals to the primitive. The input terminals are wired to accept a message and the output and fail terminals are wired to propagate the message. The input message is passed as an input parameter to the Java code. The code is responsible for propagating the output message to the output terminal. If an exception is encountered while executing the Java code, the original message is propagated to the fail terminal, together with any exception information.
- Create Java code in a custom mediation primitive Create your own mediation logic by embedding a Visual or Java snippet in a custom mediation primitive.
- Add terminals to a custom mediation primitive Add extra terminals to a custom mediation primitive. Multiple terminals allow you to branch the flow by redirecting messages depending on the custom logic you create.
- Defining your own properties in a custom mediation primitive Define your own properties in a custom mediation primitive. It useful to define your own properties since they are reusable and also promotable so you can configure them at run time.
- Controlling the terminal that gets fired Selecting the terminal to fire your message.
- Migrate a custom mediation primitive Follow these instructions to migrate your custom mediation primitive's implementation.
- Tips for creating Custom mediation primitives A custom mediation primitive allows you to implement your custom Java logic in a mediation flow.
Create Java code in a custom mediation primitive
Create your own mediation logic by embedding a Visual or Java™ snippet in a custom mediation primitive.
To create your own Java code:
- In the Mediation Flow editor, add the custom mediation primitive to the canvas, and wire the input and output terminals.
- Select the custom mediation primitive on the canvas to view its properties. In the properties view, click the Details tab.
- Choose Visual to create a visual snippet, or Java to create a Java snippet.
- Switching between a Java snippet and a visual snippet may cause the existing implementation to be lost.
- Do not edit the generated Java files, as they will be overwritten when the mediation flow is saved.
Add terminals to a custom mediation primitive
Add extra terminals to a custom mediation primitive. Multiple terminals allow you to branch the flow by redirecting messages depending on the custom logic you create.
Open the Mediation Flow editor and select the custom mediation primitive.
- Right-click the Custom Mediation primitive.
- Go to Add.
- Select either Add Input Terminal or Add Output Terminal to be added.
- In the New Dynamic Terminal wizard which appears, enter the name of the new terminal and (optionally) a description.
Defining your own properties in a custom mediation primitive
Define your own properties in a custom mediation primitive. It useful to define your own properties since they are reusable and also promotable so you can configure them at run time.
To define your own properties:
- Select the custom mediation primitive
- Right-click it and go to Show in properties
- In the properties view at the bottom of your window click User properties and then click Add.
- Type in the Name of your property and select its Type. You can also set the Value of your property and select whether validation is required.
You can now use the customized properties just as you would any of the built in ones.
Controlling the terminal that gets fired
Selecting the terminal to fire your message.
The selection is made through Java™ code or Visually in the snippet editor.
To use the Visual Editor:
- Right-click the primitive and then click Show in properties.
- In the properties window, click Details and make sure Visual is selected as an implementation.
- Under Variables on the right side, click the name of the output port you want to fire ( 'out1') and drop it onto the canvas.
- Under Inputs click the name of the input you want to fire ( 'smo') and drop it onto the canvas.
- Next click the Java... button, select Fire from the list and drop it onto the canvas.
- Wire the output terminal to the top terminal of the Fire control and the message to the bottom
Example
To use the Java editor, type out1.fire(smo); where:
- out1 is the output terminal you want to fire
- smo is the input message you want to fire through out1
Migrate a custom mediation primitive
Follow these instructions to migrate your custom mediation primitive's implementation.
In previous versions of IBM Integration Designer, mediation primitives that used custom Java™ code were created in a two stages. A service reference was created in the mediation flow component, and its mediate operation was used to invoke a Java component, which in turn invoked the custom Java code. Starting with IBM Integration Designer 6.0.2, this process is much simpler. Java code is now embedded directly in the custom mediation primitive, without the need for the intermediary service reference and Java component.
Custom mediation primitives created in prior versions will work in IBM Integration Designer 6.0.2, however the only change that you can make to the primitive's properties is to edit the Java or Visual snippet. To upgrade your custom mediation primitive, perform the following tasks:
- Convert your custom Java code to an embedded snippet.
- In the mediation flow editor, identify the service reference used by the old custom mediation primitive. If the service reference is no longer used in the mediation flow, delete it.
- In the assembly editor, remove the reference from the mediation flow component, if necessary, and delete the Java component.
Follow these steps to upgrade your custom mediation primitive.
- Select the custom mediation primitive on the canvas to view its properties. In the properties view, click the Details tab. The implementation is set to Java or Visual, and the custom code appears as a snippet in the embedded editor.
- Click the Convert to Embedded Snippet button to convert the Java or Visual
code to an embedded Java or Visual snippet. Save the changes.
- After conversion to a Java or Visual snippet, all the classes in the snippet need to be fully qualified. If you see errors in the Java snippet code indicating that an object cannot be resolved or is not a type, use code assist (ctrl-space) to add the package qualifier.
- In the top section of the mediation flow editor, delete the service reference used by the old custom mediation primitive, if the reference is no longer used in the mediation flow. Save changes.
- If you deleted the service reference in the mediation flow, you need to synchronize the references in mediation flow component. In the assembly editor, select the mediation flow component, right-click, and select Synchronize Interfaces and References > from Implementation.
- Delete the Java component, and save the changes in the assembly editor.
Tips for creating Custom mediation primitives
A custom mediation primitive allows you to implement your custom Java™ logic in a mediation flow.
Consider these tips when creating your custom mediation primitive.
Ready-made visual snippets
A custom mediation primitive must include code to access message information. Use the ready-made visual snippets to write this code. You can find the custom snippets in the SMO services folder in the Visual Snippet view, as shown below:

Set the message type in the Properties view
For most mediation primitives, the mediation flow editor detects the message types and only allows you to wire primitives that have compatible message types. However for custom mediation primitives, the message type is unknown to the editor. Before you wire your custom mediation primitive, specify its message type in the Terminals tab of the Properties view to ensure the primitive can be wired only to primitives of a compatible type:
To specify the message type in the Terminals tab view, select the terminal, and click Change,
as shown below:  .
.
13. Change the value of mediation flow properties at run time
When you develop a mediation flow, you can identify promoted properties, which are properties whose value the administrator can change at run time; without restarting the server or redeploying the mediation module. The changed value of the property will not be used for flows that already have been invoked when the change was made.
- Promoted properties A property that is marked promoted in the mediation flow editor is a property whose value the administrator can change at run time.
- Promoting a property in the mediation flow editor Properties that may be promotion are listed in the Properties view of the mediation flow editor. From this list, you can promote a property and enter its alias and value.
- Example: Promoting properties This example shows you how to use the properties promotion capability of the mediation flow editor.
- Choose alias names for promoted properties To easily identify a promoted property in the administrative console, you might want to change the default alias of the promoted property to an alias that has a meaningful name.
- Tips for deciding which properties to promote Before you decide which properties to promote, consider promoting those properties that can help you debug a problem at run time.
Promoted properties
A property that is marked promoted in the mediation flow editor is a property whose value the administrator can change at run time.
The values of promoted properties can be modified at run time in the administrative console or in mediation policies.
Each promoted property must have a unique name, which is called the alias of the property. An alias has a name, a type, and a value.
- name
- When you promote a property, the default name of the alias is created by concatenating the primitive and property names. For example, if you promote the Root property of a primitive named ErrorLog, the default name of the alias is ErrorLog.root. You can change the default name of the alias, and you can use the same alias name for multiple promoted properties as long as they are of the same type.
- type
- The type of the property, such as boolean for the validate input property, String for the table name property in the Database Lookup primitive, or XPath for the root property.
- value
- The value assigned to an alias. Promoted properties that use the same alias name will all use the same value as well. For example, suppose you have an Mapping Transformation named TransformMe and a Message Logger named ErrorLog. You promote the validate input property of both primitives and give it the alias name TurnValidateOn. By default, validate input is false. If you change the value of the alias TurnValidateOn to true, the value changes for the property of both primitives. After you promote a property, you can change its value only from the Promotable Properties page.
Only those properties that are identified as promotable by the mediation primitive developer are available for promotion in the Promotable Properties page.
Promoting a property in the mediation flow editor
Properties that may be promotion are listed in the Properties view of the mediation flow editor. From this list, you can promote a property and enter its alias and value.
Promoted properties page
You can view the Promoted properties page from the Operations connection section at the top of the mediation flow editor, or from the editor's canvas as well. You can filter and sort the list to control the list display. The list of properties that you see on this page depends on the context:
- If you click the canvas of the Operations connections section, all the promotable properties of all the wired operations in the mediation flow appear in the Promoted properties page.
- If you click the canvas of the request flow or response flow, all the promotable properties of all the primitives and nodes in the flow appear in the Promoted properties page.
- If you make a selection, such as an operation or primitive, the Promoted properties page will display all the promotable properties of that selection.
A property that is in a table (such as the Filters table in the Message Filter) will appear in this list only if it has a value.
Marking a property as promoted
To promote a property, and assign an alias and value to the promoted property, work in the Promoted properties page and follow these steps.
Procedure
- To promote a property that is in a table, such as the Pattern property in Message Filter, first add the property in the details page, and save your changes. The property will now appear in the Promoted Properties page.
- To view the property you want to promote, click the Promoted Properties page
- Select the Promoted check box for the property. A default alias is created. If the property already has a value, that value is assigned to the alias. Otherwise, the default value for the property is assigned to the alias.
- To change the alias, type a name in the Alias column, or choose a name from the list of alias names.
Table-based properties
Some primitives have table-based properties with multiple columns. You can promote one column in an individual row of the table and assign an alias name to the row.
For example, the message filter primitive has a table based property named Filter which has two columns: Pattern and Terminal name. Of the two properties, only Pattern is promotable. The following image shows the Promoted properties page of a Message Filter, showing that Pattern is promoted.
A table property is displayed in the promoted properties view only if it has a value.

Example: Promoting properties
This example shows you how to use the properties promotion capability of the mediation flow editor.
A financial services company provides an interactive web-based stock market service to its customers. The company uses two different stock quote services to receive stock prices; a delayed service and a real-time service. The following diagram shows the response to the stock quote request that is returned from each service. Each response message is transformed and then logged before it is returned to the client.

The Promoted properties view of the LogMessage primitive shows the Root property is promoted and its value is /body:
 After the service has been running for a while, the administrator notices there are problems with responses from the real-time service. To get more information, she decides to log the entire message rather than just the message body by changing the value of the alias LogLevel to / in the administrative console. The administrator saves the changed configuration, and the returned responses are now logged at the new level without her having need to restart the mediation module.
When a promoted property's value is changed at run time, the timeliness of the update might vary. In a cell environment, the change needs to be synchronized across all nodes. .
Choose alias names for promoted properties
To easily identify a promoted property in the administrative console, you might want to change the default alias of the promoted property to an alias that has a meaningful name.
The mediation flow editor does not enforce strict type checking for promoted properties. This means the editor will allow you to share the name of an alias for properties of the same native type, such as String or float. Sharing the name of an alias between promoted properties means the promoted properties will also share the value. When you assign a value to a property, all properties that have the same alias name will be assigned that value.
For example, in a Database Lookup primitive, you could have the same name for the alias of the Table name and Key column name properties because they are both of type String. However, when you change the value of Table name, the Key column name property will also change.
As often as possible, give your properties unique names for their aliases. To share the names of aliases, share only the names for the properties that are of the same primitive property type, such as; validate input.
To understand the potential consequences of sharing the names of aliases between promoted properties, view the promoted properties of the complete flow by clicking in the top section of the mediation flow editor.
Tips for deciding which properties to promote
Before you decide which properties to promote, consider promoting those properties that can help you debug a problem at run time.
For example, you might want to promote the validate input property, which enables message validation. A message validation ensures the message type at run time matches the message type definition. Because message validation can negatively impact performance, it is a good idea to disable the property; and promote it so that you can enable message validation at run time if you are trying to debug a problem and want to see if the message type is valid.
When you create ServiceInvoke and Callout mediation primitives, the retry properties (Retry on, Retry count and Retry delay) are automatically selected to be promoted.
14. Work with Microsoft ADO.NET services
ADO.Net clients and servers use diffgrams in their schemas to transfer and update data. Diffgrams are not compatible with the W3C XML 1.0 schema that IBM Integration Designer requires. Learn how to use mediation flows to create, manipulate and consume .NET messages that contain diffgrams, with no changes required to the original service WSDL.
Understanding ADO.NET schema
Diffgrams are XML constructs that contain information on the current and original state of data that has changed. When there is a change in the state of data, diffgrams are inserted into the schema. The information in the diffgram is used to update data on the client's web user interface, or to persist data on the server. Here is an example of a response from an ADO.NET service that contains diffgrams:

Figure 1. Example response from ADO.NET
As the previous schema shows, the payload does not match the embedded schema definition. There is an extra diffgram element, and there are also extra attributes that are not defined in the schema.
In order to handle this payload, it needs to be represented in a format that IBM Integration Designer can handle. This is achieved by generating helper schemas that convert the diffgram and extra attributes into xsd files. The next step is to get the payload information, which you can get by calling the service, or from the service provider as an xsd file. Once you have the xsd files, you can use the capability to work with xsd:any to read and write the data inside a diffgram.
Generate helper schema
Follow these steps to generate the helper schema:
- Import the original WSDL file from the Microsoft ADO.NET project into a mediation module or library.
- Add the line <s:element ref="s:schema" /> to the WSDL message element so that IBM Integration Designer can correctly handle the response from the ADO.NET service. For the example response shown in figure 1, the WSDL should be modified as follows:
<?xml version="1.0" encoding="utf-8"?> <wsdl:definitions xmlns:soap="http://schemas.xmlsoap.org/wsdl/soap/ xmlns:tm="http://microsoft.com/wsdl/mime/textMatching/" ... ... ... xmlns:wsdl="http://schemas.xmlsoap.org/wsdl/"> <wsdl:types> <s:schema elementFormDefault="qualified" targetNamespace="http://ibm.com/WID/DataSetTests/"> 1 <s:import namespace="http://www.w3.org/2001/XMLSchema" /> <s:element name="getProducts"> <s:complexType /> </s:element> <s:element name="getProductsResponse"> <s:complexType> <s:sequence> <s:element minOccurs="0" maxOccurs="1" name="getProductsResult"> <s:complexType> <s:sequence> 2 <s:element ref="s:schema" /> <s:any /> </s:sequence> </s:complexType> </s:element> </s:sequence> </s:complexType> </s:element> ... (more elements) </wsdl:types> </wsdl:definitions>- 1 Add import
- 2 Add <s:element ref="s:schema" />
- Generate the helper schema, in one of the following ways:
- Go to the Problems view, and locate the error message for the WSDL file. Right click the error message, and click Quick Fix to generate the helper schema.
-
Generate the helper schema from the Dependencies editor:
- Expand the module or library where the WSDL file is located, and click the dependency editor icon

- In the dependency editor, expand Predefined Resources and select Microsoft ADO .NET DataSet schema file. Save the changes.
Two helper schemas are created in your mediation module or library. You can view them in the Physical Resources view:
 The files created are diffgram.xsd,
which is the helper schema for diffgrams, and msdata.xsd,
which defines global attributes.
The files created are diffgram.xsd,
which is the helper schema for diffgrams, and msdata.xsd,
which defines global attributes.
- Expand the module or library where the WSDL file is located, and click the dependency editor icon
If you simply want to pass through to the .Net service without accessing the payload data, for example if you simply want to log the response from the service, you can now proceed to create your mediation flow. To create access and manipulate the payload data, see topics "Get the payload schema" and "Access the payload schema" below.
Get the payload schema
To create access the business data or payload in the response from the .NET service, you need to obtain the payload schema in one of the following ways:
- Your client or service provider may have given you the payload schema as an xsd file. In this case, import the file that into your library or mediation module.
- If you don't have the payload schema file, you can obtain it by using the test client to save the results from the service invocation as an xsd file, as follows:
- Create a Web Service Import to call the web service using the test client.
- In the test client, invoke the required operation
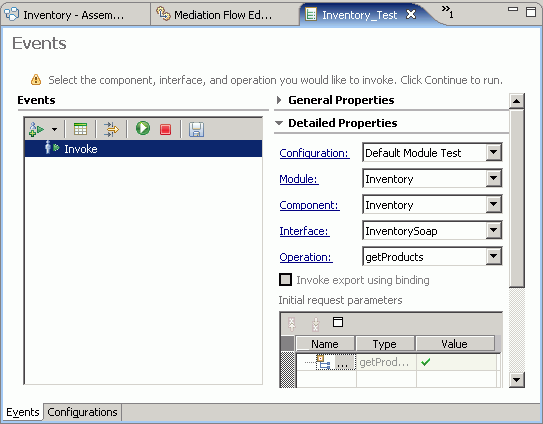
- When you get the response from the operation, display the results in the SDO view by clicking the icon Display the SDO style view
 in the Response Parameters table.
- In the SDO style view, right click, and choose Export to XML file.
Save the payload to an xsd file ( payload.xsd).
Modify the payload schema
To create diffgrams that perform insert, update and delete operations to a database on the .NET server, you need to modify the payload schema.
To modify the schema, edit the payload xsd file to include the <xsd:anyAttribute> in each complexType element corresponding to a database table on the server, as shown below:
<?xml version="1.0" encoding="UTF-8"?>
<xsd:schema id="NewDataSet" xmlns:xsd="http://www.w3.org/2001/XMLSchema" targetNamespace="http://InventoryLib">
  <xsd:element name="NewDataSet">
   <xsd:complexType>
    <xsd:choice maxOccurs="unbounded" minOccurs="0">
     <xsd:element name="Product_x0020_Table">      <xsd:complexType>
       <xsd:sequence>
        <xsd:element minOccurs="0" name="Product" type="xsd:string" />
        <xsd:element minOccurs="0" name="Quantity" type="xsd:int" />
       </xsd:sequence>
       <xsd:anyAttribute namespace="##any" processContents="lax" />
      </xsd:complexType>
     </xsd:element>
    </xsd:choice>
    </xsd:complexType>
  </xsd:element>
</xsd:schema>
Access the payload schema in a mediation flow
To access and manipulate the payload in a mediation flow, first generate the helper schema and obtain the payload schema. Then, in the mediation flow, drop a Set Message Type primitive to assert the actual type for the diffgram and the payload content. Now, you have full access to the structure of the diffgram message, for mapping or XPath access.
These are some use cases you can build in the mediation flow:
- Cast dynamic data content using the Set Message Type primitive.
- Read and write data in the diffgram block using the Message Element Setter, when used in conjunction with the Set Message Type primitive.
- Provide mapping for the diffgram payload in the Mapping primitive or the Business Object Map primitive, when used in conjunction with the Set Message Type primitive.
The examples in the following sections illustrate these scenarios.
Example: Log the message and pass through
In this example, you want to consume a response from a .NET service, and log the response. You do not need to access the response payload. The requester's interface is the same as that of the service provider, and so a transform is not required. Proceed as follows:
- Import the original wsdl file from the Microsoft ADO.NET project into a mediation module or library.
- Generate helper schema.
- Implement the mediation flow component.
- Connect the source and target operations
- In the request flow, wire the input node to the callout node

- In the response flow, wire a message logger primitive between the callout and input response nodes. In the logger's properties view, set the root property to specify the part of the message to log.

Example: Update diffgram content using XPath
In this example, you want to update an element in a diffgram block in the response message from a .NET service. In this situation, you don't have the payload schema, but you know the structure of the data. You can access the element by manually entering the XPath to the diffgram content, assuming that you know this location path.
- Import the original wsdl file from the Microsoft ADO.NET project into a mediation module or library.
- Generate helper schema.
- Implement the mediation flow component.
- Connect the source and target operations
- In the request flow, wire the input node to the callout node
- In the response flow, wire a Message Element Setter primitive
between the callout and input response nodes.

- In the properties view of Message Element Setter, add a message element. In the target field, specify the XPath expression for the location of the element to update, and enter a type and value.
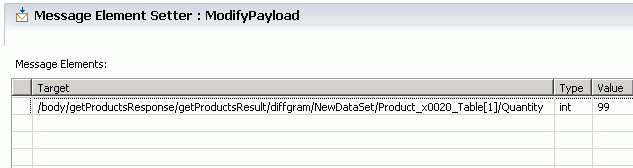
Example: Update diffgram content using payload schema
In this example, you want to update an element in a diffgram block in the response message from a .NET service. In this situation, you have the payload schema, so you can use Set Message Type together with Message Element Setter to update the element.
- Import the original wsdl file from the Microsoft ADO.NET project into a mediation module or library.
- Generate helper schema.
- Get the payload schema
- Implement the mediation flow component.
- Connect the source and target operations
- In the request flow, wire the input node to the callout node
- In the response flow, wire a Set Message Type primitive and a Message Element Setter primitive between the callout and input response nodes. We will use the Set Message Type primitive to cast the diffgram
any type to the business object that we need. We can then use Message Element Setter to update the required element.

- In the properties view of SetMessageType1 set the following:
- First, set the <xsd:any> to the diffgram business object.
- Then, set the <xsd:any> in the diffgram to the actual payload business object
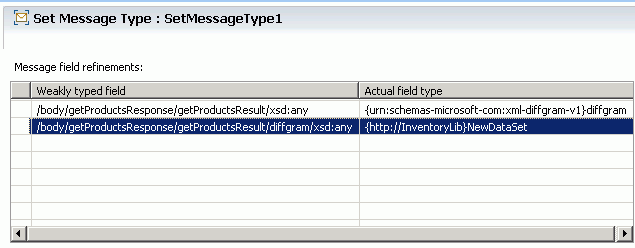 If you hover over the input and output terminals of the Set Message Type primitive, you will see the change in input and output message types. The input message type shown below does not show the message body.
 The output message type shown below has the business object that contains the element that we want to access.

- In the properties view of Message Element Setter, click Add, and then Edit to launch the XPath Expression Builder. You can now drill down the message to choose the target message element to update.
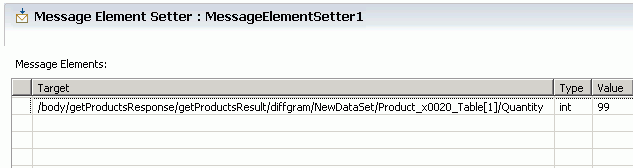
Example: Transform a response from a .Net service
In this example, you want to consume a response from a .NET service, and transform the response to the format expected by the service provider. Proceed as follows:
- Import the original wsdl file from the Microsoft ADO.NET project into a mediation module or library.
- Generate helper schema.
- Get the payload schema
- In the assembly editor, create the following:
- An export, with web service binding. When you import the service requester's wsdl file, an interface is created for each port type defined in the wsdl file. Give the export the appropriate interface
- A mediation flow component
- An import, with the interface of the service provider. Use a web service binding, with the address from the original wsdl file.
- Wire together the export, mediation flow component, and the import.

- Implement the mediation flow component.
- Connect the source and target operations
- In the request flow, wire the Mapping primitive between the input and callout.

- The response from the service is in the anyType format. In order to transform the message, you need to convert the anyType field into the elements you want. In the response flow, wire a Set Message Type primitive and a Mapping primitive between the callout and input response nodes. We will use the Set Message Type primitive to cast the diffgram
any type to the business object that we need. We can then use XSLT
Transformation primitive to perform the required mapping.
You can use the Business Object Map instead of the Mapping primitive.

- In the properties view of SetDiffgramAndPayloadType set the following properties in the message field refinements table.
- First, set the <xsd:any> to the diffgram business object:
- Weakly typed field
- /body/getProductsResponse/getProductsResult/xsd:any
- Actual field type
- {urn: schemas-microsoft-com:xml-diffgram-v1}diffgram
- Then, set the <xsd:any> in the diffgram to the actual payload business object:
- Weakly typed field
- /body/getProductsResponse/getProductsResult/diffgram/xsd:any
- Actual field type
- {null}NewDataSet
If you hover over the input and output terminals of the Set Message Type primitive, you will see the change in input and output message types. The input message type shown below does not show the message body.
The output message type shown below has the business object that contains the element that we want to access.

- First, set the <xsd:any> to the diffgram business object:
- In the properties view of MapPayload, create the mapping file.
First, map the NewDataSet to the corresponding element in the target, using an inline map transform.

- Next, map the elements within the inline map, using the move transform.

Example: Create a diffgram message
In this example, you want to create a diffgram message. For example, you may want to persist the data on a .NET server. Proceed as follows:
- Import the original wsdl file from the Microsoft ADO.NET project into a mediation module or library.
- Generate helper schema
- Get the payload schema
- Modify the payload schema.
- Implement the mediation flow component.
- Connect the source and target operations
- In the request flow, wire a Custom Mediation primitive between the input and callout nodes to create the diffgram.

- Implement Java™ code as either a Java snippet or a Visual snippet in the custom mediation to create a diffgram and set payload information and attributes:
-
Java snippet implementation
In the Java Imports page in the properties view, add these import statements:
import commonj.sdo.DataObject;
import com.ibm.websphere.sibx.smobo.ServiceMessageObjectFactory;
import com.ibm.websphere.bo.BOFactory;
import com.ibm.websphere.sca.ServiceManager;
import com.ibm.websphere.bo.BOXSDHelper;
import commonj.sdo.Property;
import com.ibm.websphere.bo.BOXMLSerializer;
import java.io.InputStream;
import java.math.BigInteger;
- In the Details properties page, add your Java code. See the example code below; details are provided in the comments in the code.
/** * GENERATED COMMENT - DO NOT MODIFY * Variables: for output terminals - out (com.ibm.wsspi.sibx.mediation.OutputTerminal) * for user properties - <No user properties defined> * Inputs: inputTerminal (com.ibm.wsspi.sibx.mediation.InputTerminal), smo (com.ibm.websphere.sibx.smobo.ServiceMessageObject) * Exceptions: com.ibm.wsspi.sibx.mediation.MediationConfigurationException, com.ibm.wsspi.sibx.mediation.MediationBusinessException */ // Step 1a: Create an SMO body DataObject newBody = (DataObject) ServiceMessageObjectFactory.eINSTANCE.createServiceMessageObject(new javax.xml.namespace.QName("http://ibm.com/WID/DataSetTests/", "addProductsSoapIn")).getBody(); // Step 1b: Create wrappers addProducts and products DataObject addProductsElement = newBody.createDataObject("addProducts"); DataObject productsElement = addProductsElement.createDataObject("products"); // Step 1c: Set the SMO body smo.set("body", newBody); // Step 2a: Create a BO from payload schema NewDataSet.xsd DataObject schemaBO = null; try { BOXMLSerializer boXMLSerializer = (BOXMLSerializer) ServiceManager.INSTANCE.locateService("com/ibm/websphere/bo/BOXMLSerializer"); InputStream inputStream = this.getClass().getClassLoader().getResourceAsStream("NewDataSet.xsd"); schemaBO = (DataObject) boXMLSerializer.readXMLDocument(inputStream).getDataObject();} catch(java.io.FileNotFoundException ex){} catch(java.io.IOException ex2){} // Step 2b: Add schema BO to SMO body wrapper DataObject dummy = productsElement.createDataObject("schema"); productsElement.setDataObject("schema", schemaBO); // Step 3a: Create diffgram BOFactory boFactory = (BOFactory) ServiceManager.INSTANCE.locateService("com/ibm/websphere/bo/BOFactory"); DataObject diffgram = boFactory.createByElement("urn:schemas-microsoft-com:xml-diffgram-v1","diffgram"); // Step 3b: Add diffgram to SMO body wrapper BOXSDHelper boXSDHelper = (BOXSDHelper) ServiceManager.INSTANCE.locateService("com/ibm/websphere/bo/BOXSDHelper"); // Get global property for diffgram Property diffgramProperty = boXSDHelper.getGlobalProperty("urn:schemas-microsoft-com:xml-diffgram-v1", "diffgram", true); // Set wildcard xsd:any with global element diffgram productsElement.getSequence().add(diffgramProperty, diffgram); // Step 4a: Create payload DataObject payload = boFactory.createByElement(null,"NewDataSet"); // Step 4b: Set payload DataObject Product_x0020_TableBO = payload.createDataObject("Product_x0020_Table"); Product_x0020_TableBO.set("Product", "chair"); Product_x0020_TableBO.set("Quantity", "40"); // Step 4c: Add payload to diffgram Property payloadProperty = boXSDHelper.getGlobalProperty(null, "NewDataSet", true); diffgram.getSequence().add(payloadProperty, payload); // Step 5: Set diffgram attributes "rowOrder" and "hasChanges" Property rowOrderProperty = boXSDHelper.getGlobalProperty("urn:schemas-microsoft-com:xml-msdata", "rowOrder", false); Product_x0020_TableBO.set(rowOrderProperty, new BigInteger("0")); Property hasChangesProperty = boXSDHelper.getGlobalProperty("urn:schemas-microsoft-com:xml-diffgram-v1", "hasChanges", false); Product_x0020_TableBO.set(hasChangesProperty, "inserted"); // propagate the service message object to the primitive that is wired to the 'out' terminal out.fire(smo); -
Visual snippet implementation
In the Details properties page, add a visual snippet, as shown below:
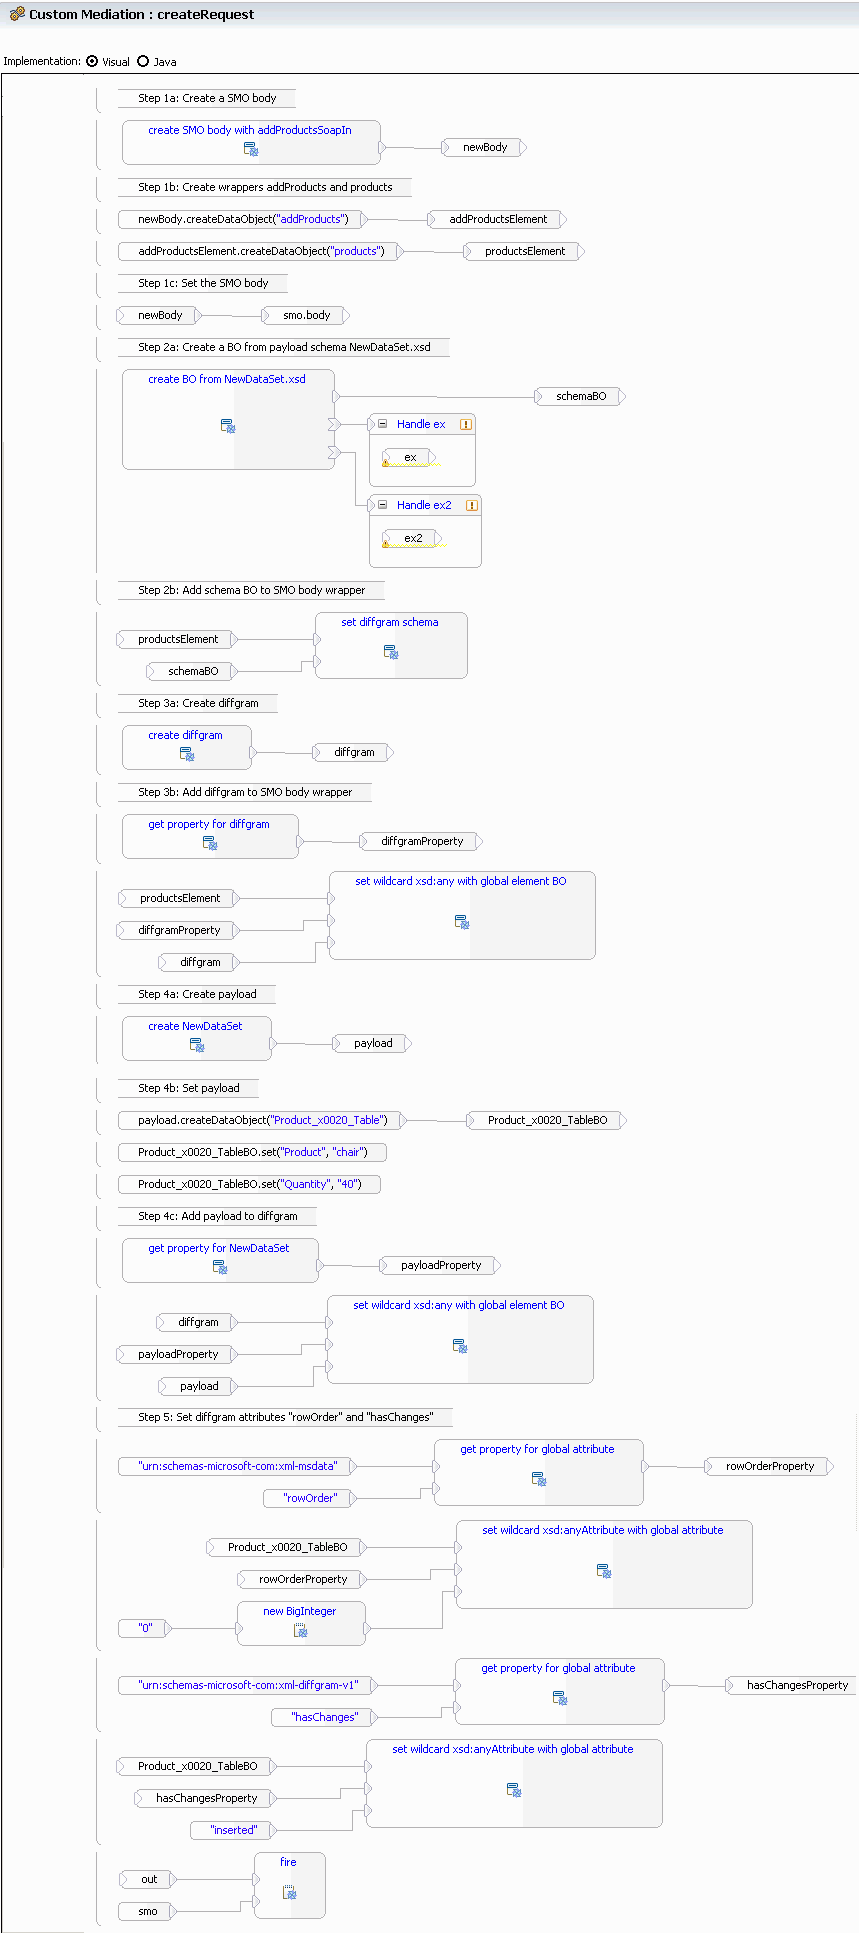
-
15. Change the format of mediation flows
You can save your mediation flows in an XML format that is easy to read, thus simplifying team development and compare and merge of the mediation flows. By default, new mediation flows are saved in the XML format. When you import a mediation flow that was created in a previous version of IBM Integration Designer, the old format is maintained. When you save the mediation flow, you are prompted to save the mediation flow in the new format.
You can also convert your mediation flows from the Business Integration view, by following these steps:
- Select the projects that contain the mediation flows to convert.
- Right-click and select Convert mediation flow format.
- If you saved your mediation flow in a single file (this is the default), it is saved in a file with a .mfc extension
- If you saved your mediation flow into multiple files to facilitate team development, in addition to an .mfc file, an .mfcflow file is created for each operation.
- For each mediation subflow, a file with the extension .subflow is created.
To view the XML format, right click the mediation flow, and select Open With > XML Editor
- Mediation flow schema reference Mediation flows have an XML schema format that is useful for developers who want to create patterns.
Mediation flow schema reference
Mediation flows have an XML schema format that is useful for developers who want to create patterns.
mediationFlow
This is the root element of a mediation flow document.
- Attributes of the mediationflow element
-
<mediationFlow xmlns="http://www.ibm.com/xmlns/prod/websphere/2010/MediationFlow"
               xmlns:HelloService="http://HelloService/HelloService"
               xmlns:HelloWorld="http://HelloWorldLibrary/HelloWorld"
               xmlns:XMLSchema="http://www.w3.org/2001/XMLSchema"
               xmlns:mfcex="http://www.ibm.com/xmlns/prod/websphere/2010/MediationFlowExtension" name="HelloWorldMediation"
                            targetNamespace="http://HelloWorldMediation/HelloWorldMediation">
Attributes of the mediationFlow element
Attribute Required Description xmlns Yes Default namespace "http://www.ibm.com/xmlns/prod/websphere/2010/MediationFlow" xmlns:xsi Yes XML schema instance namespace "http://www.w3.org/2001/XMLSchema-instance" xsi:type Yes Mediation Flow element name "mediationFlow" name Yes The name of the mediation flow document targetNamespace Yes The target namespace of the mediation flow document xmlns:XMLSchema No If anyType is used in the document, declare the XML schema namespace. xmln s:interfacePrefix=interfaceNamespace No Declares the namespace of the interface used in this document (where interfacePrefix is the name of the interface and interfaceNamespace is the namespace). - Child elements of mediationflow
-
Child elements of the mediationFlow element
>Child elements >Constraints >Description import minOccurs="0" maxOccurs="unbounded" Declares an import for an interface or business object to be used in this document. promotedProperty minOccurs="0" maxOccurs="unbounded" Declares a promoted property. reference minOccurs="0" maxOccurs="unbounded" Adds a reference interface to use in this mediation flow. interface minOccurs="0" maxOccurs="unbounded" Adds an interface to use in this mediation flow. requestFlow minOccurs="0" maxOccurs="unbounded" Only applicable when the mediation flow document is saved into multiple files. References the operation flow: <requestFlow ref="tns:callHello"/> responseFlow minOccurs="0" maxOccurs="unbounded" Only applicable when the mediation flow document is saved into multiple files. References the operation flow: <responseFlow ref="tns:callHello"/> subflow minOccurs="0" maxOccurs="1" Only applicable when the mediation flow document is saved as a mediation subflow (.mfcsubflow). errorFlow minOccurs="0" maxOccurs="1" Only applicable when the mediation flow document is saved into multiple files. References the operation flow: <errorFlow ref="tns:callHello"/>
import
- Attributes of the import element
-
- <import location="HelloWorld.wsdl" namespace="http://HelloWorldLibrary/HelloWorld"/>
Attributes of the import element
Attribute Required Description location Yes Location of an external document to be imported. The supported document types are .mfcflow, .wsdl, and .xsd. namespace No The namespace of the external document.
reference
- Attributes of the reference element
-
- <reference name="HelloServicePartner" portType="HelloService:HelloService"/>
Attributes of the reference element
Attribute Required Description name Yes The name of the partner reference. portType Yes The WSDL portType of the partner reference.
interface
- Attributes of the interface element
-
- <interface portType="HelloWorld:HelloWorld">
Attributes of the interface element
>Attribute >Required >Description name Yes The name of the interface portType Yes The WSDL portType that contains a set of operations. - Child elements of the interface element
-
Child elements of interface
>Child Element >Constraints >Description Operation minOccurs="0" maxOccurs="unbounded" The operation for which the mediation flow is being defined.
operation
- Attributes of the operation element
-
- <operation name="callHello">
Attributes of the operation element
Attribute Required Description name Yes The name of the operation - Child elements the operation element
-
Child elements of operation
>Child Element >Constraints >Description requestFlow minOccurs="1" maxOccurs="1" The request flow of the operation. responseFlow minOccurs="0" maxOccurs="1" The response flow of the operation errorFlow minOccurs="0" maxOccurs="1" The error flow of the operation.
requestFlow
- Attributes of the requestFlow element
-
- <requestFlow mfcex:showInputResponse="false" mfcex:showInputFault="false">
Attributes of the requestFlow element
>Attribute >Required >Description mfcex:showInputResponse No Show or hide the input response node in the mediation flow editor. mfcex:showInputFault No Show or hide the input fault node in the mediation flow editor. ref No Only applicable when the mediation flow is saved into multiple files. portType No Only applicable when the mediation flow is saved into multiple files. operation No Only applicable when the mediation flow is saved into multiple files. - Child elements of the requestFlow element
-
Child elements of requestFlow
>Child Element >Constraints >Description note minOccurs="0" maxOccurs="unbounded" An annotation on the request flow. node minOccurs="0" maxOccurs="unbounded" A mediation node or primitive in the request flow.
responseFlow
- Attributes of the responseFlow element
-
Attributes of the responseFlow element
>Attribute >Required >Description ref No Only applicable when the mediation flow is saved into multiple files. portType No Only applicable when the mediation flow is saved into multiple files. operation No Only applicable when the mediation flow is saved into multiple files. - Child elements of the responseFlow element
-
Child elements of responseFlow
>Child Element >Constraints >Description note minOccurs="0" maxOccurs="unbounded" An annotation on the request flow. node minOccurs="0" maxOccurs="unbounded" A mediation node or primitive in the request flow.
errorFlow
- Attributes of the errorFlow element
-
- <errorFlow mfcex:showInputResponse="false">
Attributes of errorFlow
Attribute Required Description name No The name that identifies the error flow to the main mediation flow. Only applicable when the mediation flow document is saved into multiple files. description No A description of the error flow. Only applicable when the mediation flow document is saved into multiple files. mfcex:showInputResponse No Show or hide the input response node in the mediation flow editor. ref No Only applicable when the mediation flow document is saved into multiple files. - Child elements of the errorFlow element
-
Child elements of errorFlow
>Child element >Constraints >Description note minOccurs="0" maxOccurs="unbounded" An annotation on the error flow. node minOccurs="0" maxOccurs="unbounded" A mediation node or primitive in the error flow.
subflow
<subflow>
    <node name="in" type="In">
      <outputTerminal type="XMLSchema:anyType">
        <wire targetNode="Fail1"/>
      </outputTerminal>
    </node>
    <node name="Fail1" type="Fail">
      <inputTerminal/>
    </node>
  </subflow>
- Attributes of the subflow element
-
Attributes of the subflow element
Attribute Required Description name No The name of the subflow. description No A description of the subflow. - Child elements of the subflow element
-
Child elements of subflow
>Child element >Constraints >Description note minOccurs="0" maxOccurs="unbounded" An annotation on the subflow. node minOccurs="0" maxOccurs="unbounded" A mediation node or primitive in the subflow.
note
- Attributes of the note element
-
- <note mfcex:x="64" mfcex:y="113">This is an annotation.</note>
Attributes of the note element
>Attribute >Required >Description mfcex:x No Optional x-coordinate of the note. Automatic layout is used if the attribute is not specified. mfcex:y No Optional y-coordinate of the note. Automatic layout is used if the attribute is not specified.
property
- Attributes of the property element
-
<property name="root" promotedPropertyGroup="HelloWorldMediation.HelloWorldMediation" promotedPropertyName="input_map.root" value="/body"/>
<property name="XSLTransform" value="xslt/input_map_req_1.xsl"/>
<property name="XMXMap" value="xslt/input_map_req_1.map"/>
<property name="validateInput" promotedPropertyGroup="HelloWorldMediation.HelloWorldMediation" promotedPropertyName="input_map.validateInput"/>
<property name="SMOVersion" value="SMO61"/>
Attributes of the property element
>Attribute >Required >Description name Yes The name of the property. description No The description of the property. value No The value of the property. promotedPropertyName No Promotes this property to the parent, and use the specified value as the name of the promoted property. promotedPropertyGroup No Optional attribute to help identify the promoted property name.
node
- Attributes of the node element
-
- <node displayName="callHello : HelloWorld" name="HelloWorld_callHello_InputResponse" type="InputResponse">
Attributes of the node element
Attribute Required Description name Required The name of the mediation node. type Required The mediation type. displayName No The name that will be displayed in the user interface. description No The description of the mediation node. mfcex:x No Optional x-coordinate of the node or primitive. Automatic layout is used if the attribute is not specified. mfcex:y No Optional y-coordinate of the node or primitive. Automatic layout is used if the attribute is not specified. - Child elements of the node element
-
Child elements of node
>Child Element >Constraints >Description note minOccurs="0" maxOccurs="unbounded" An annotation that attaches to the mediation node. property minOccurs="0" maxOccurs="unbounded" A property of the mediation node. inputTerminal minOccurs="0" maxOccurs="unbounded" An input terminal of the mediation node. outputTerminal minOccurs="0" maxOccurs="unbounded" An output terminal of the mediation node. failTerminal minOccurs="0" maxOccurs="1" A fail terminal of the mediation node.
inputTerminal
- Attributes of the inputTerminal element
-
- <inputTerminal type="HelloWorld:callHelloResponseMsg"/>
Attributes of the input terminal
Attribute Required Description name No The identifier of the input terminal. displayName No The name that will be displayed in the user interface. description No The description of the terminal. type No The message type of the input terminal. If not specified, the message type will be automatically deduced. - Child elements of the inputTerminal element
-
Child elements of inputTerminal
>Child element >Constraints >Description refinement minOccurs="0" maxOccurs="unbounded" A refinement of a weakly-typed field in the message type.
outputTerminal
<outputTerminal type="HelloService:getHelloRequestMsg">
            <wire targetNode="HelloServicePartner_getHello_Callout"/>
          </outputTerminal>
- Attributes of the outputTerminal element
-
Attributes of the output terminal
Attribute Required Description name No The identifier of the output terminal. displayName No The name that will be displayed in the user interface. description No The description of the terminal. type No The message type of the output terminal. If not specified, the message type will be automatically deduced. - Child elements of the outputTerminal element
-
Child elements of outputTerminal
>Child element >Constraints >Description refinement minOccurs="0" maxOccurs="unbounded" A refinement of a weakly-typed field in the message type. wire minOccurs="0" maxOccurs="unbounded" An outgoing connection to a mediation node or primitive.
failTerminal
- Attributes of the failTerminal element
-
Attributes of the failTerminal element
Attribute Required Description name No The identifier of the fail terminal. displayName No The name that will be displayed in the user interface. description No The description of the terminal. type No The message type of the fail terminal. If not specified, the message type will be automatically deduced. - Child elements of the failTerminal element
-
Child elements of failTerminal
>Child element >Constraints >Description refinement minOccurs="0" maxOccurs="unbounded" A refinement of a weakly-typed field in the message type. wire minOccurs="0" maxOccurs="unbounded" An outgoing connection to a mediation node or primitive.
refinement
- Attributes of the refinement element
-
Attributes of the refinement element
Attribute Required Description path Yes An XPath expression to a weakly-typed field. type Yes The data type to use for the refinement.
wire
- Attributes of the wire element
-
- <wire targetNode="HelloServicePartner_getHello_Callout"/>
Attributes of the wire element
Attribute Required Description targetNode Yes The name of the mediation node or primitive that this wire is connecting to. targetTerminal No The input terminal name of the mediation node or primitive that this wire is connecting to.
16. Optimizing a mediation flow for team development
If a team of developers want to work concurrently on a mediation flow component, you can choose to save the mediation flow as multiple files to make synchronizing changes easier. A file is generated for each operation that has a flow. If each developer is assigned to implement a distinct set of operations, then each developer is only responsible for synchronizing his own files. Chances of conflicting changes are reduced, and developers can easily synchronize their work daily.
You can save a mediation flow as multiple files either when you create the mediation flow, or later from the properties of the existing flow:
- In the Business Integration view, right click and select File > New > Mediation Flow.
- Choose a module or mediation module to contain the mediation flow.
- Enter a name for the mediation flow.
- Click Next
- Select the source interfaces and target references.
- Click Next
- Choose the option Save the mediation flow as multiple files. Click OK.
- In the mediation flow editor, click the canvas and switch to the Properties view. In the Description page, you can see the flow has been saved as a multiple file, and from there you can choose to save the flow as a single file.
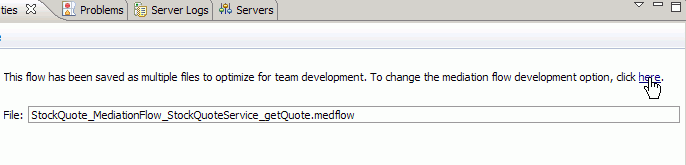
- Click the link shown previously to change the mediation flow development option. The Mediation Flow Development Option page appears.
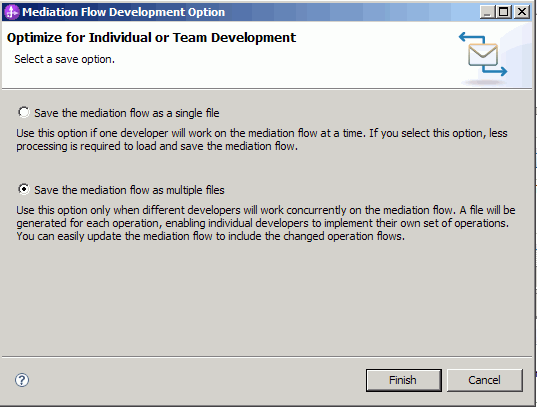
- Select Save the mediation flow as a single file.
- Click Finish.
Similarly, for flows that have been saved as single files, you can choose to save them as multiple files.
- Click the link shown previously to change the mediation flow development option. The Mediation Flow Development Option page appears.
- By default, new mediation flows are saved as single files.
You can optionally change the default in the preferences page:
- Go to Window > Preferences
- Under Business Integration, navigate to Mediation Flow Editor
- Select the check box Save new mediation flow as multiple files.
- Considerations for team development of mediation flows When you choose to save a mediation flow in multiple files, the mediation flow is split into several files to facilitate team development. A specific file with an extension of .mfcflow is created for each source operation, and a common file with an extension of .mfc is created for the mediation flow. Depending on the type of change you make, you may need to synchronize the common file in addition to updating the changes to the operation .mfcflow file.
- Example: Team development of mediation flows This topic provides an example scenario for a team of developers that work concurrently on the same mediation flow.
Considerations for team development of mediation flows
When you choose to save a mediation flow in multiple files, the mediation flow is split into several files to facilitate team development. A specific file with an extension of .mfcflow is created for each source operation, and a common file with an extension of .mfc is created for the mediation flow. Depending on the type of change you make, you may need to synchronize the common file in addition to updating the changes to the operation .mfcflow file.
When more than one developer is working concurrently on a mediation flow, it is a good practice for each developer to synchronize all of the files related to the mediation flow before making changes.
Important: Always synchronize at the project level, so that you can see the .mfcflow files of added and deleted operations.
- In the Physical Resources view, select the mediation flow project,
and synchronize.
- Update new, changed or deleted file from the repository.
- Make changes to your mediation flow.
- Synchronize the mediation flow project.
- You may now see changes that other developers may have made, in addition to your local changes
- Accept changes from the repository, and commit your own changes.
These are some of the situations where you may get conflicting changes if you do not synchronize before making a change:
- Add, deleting, or changing source interfaces, source operations, target interfaces or target operations results in changes to the .mfc file, which is shared among all the developers of the mediation flow.
- When a source operation is deleted, the corresponding .mfcflow file is also deleted. However, you will not know the operation has been deleted unless you synchronize at the project level.
- Promoting properties results in changes to the common .mfc file.
- Add, deleting or editing sticky notes results in changes to the common .mfcflow file.
Example: Team development of mediation flows
This topic provides an example scenario for a team of developers that work concurrently on the same mediation flow.
Suppose there are two developers working on the HelloWorldMediationFlow. Developer A and Developer B will work concurrently on different operations of the mediation flow. They decide that Developer A will create the mediation flow and check it into the team repository.
Developer A follows these steps:
- He creates a new mediation flow and chooses to save the mediation flow as multiple files.
- The source interface of the mediation flow has three operations. Developer A implements the flow for two of the operations, callHello and callBonjour and saves the mediation flow.
- He selects the mediation flow in the Business Integration view, right-clicks and selects Show Files. The Physical Resources view opens with the mediation flow files highlighted:
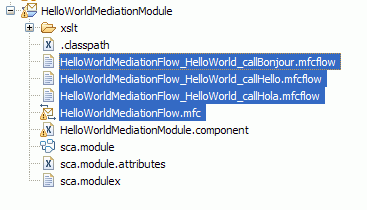 There are three operations in the source interface (callBonjour, callHello and callHola).
A .mfcflow file is created for each of these operations.
There are three operations in the source interface (callBonjour, callHello and callHola).
A .mfcflow file is created for each of these operations.
- Developer A checks the selected files into the team repository.
Developer B needs to implement the operation callHola. She follows these steps:
- Developer B checks the mediation flow files out of the repository.
- She implements operation callHola and saves the flow.
- She selects the mediation flow, right-clicks, and selects Show Files.
 The
.mfcflow file for the operation callHola and the file HelloWorldMediationFlow.mfc
have changed.
The
.mfcflow file for the operation callHola and the file HelloWorldMediationFlow.mfc
have changed.
- She synchronizes the HelloWorldMediationModule project with the repository, and checks in the changed files.

17. Error handling in the mediation flow
This topic provides information on various ways to deal with errors in the mediation flow, including ways to use the Stop and Fail mediation primitives, where to look for fail information in the message, and how to handle WSDL faults.
- Fail terminal
- Runtime failure in a mediation primitive
- Failure information in the message
- Stop mediation primitive
- Fail mediation primitive
- Example: Error handling mediation flow
- Fault nodes for WSDL fault messages
- Unmodeled faults
- Error Flows
Fail terminal
Mediation primitives that process messages have a fail terminal, which propagates exception information along with the input message when there is a failure in the mediation primitive. The exception information is stored in the failInfo element in the message context. You must wire the fail terminal of a mediation primitive to another primitive in order to access the failInfo. The fail terminal of a primitive only propagates failure information for failure within the logic of that primitive, and not for any downstream primitives.
If a primitive's fail terminal is not wired, the failure information is not stored in the failInfo element. In this case, the flow fails and only the exception information is seen in the server output logs.
Runtime failure in a mediation primitive
When an execution failure occurs in a mediation primitive, the fail terminal is fired. A runtime exception is thrown, and the flow is considered to have failed. If the mediation flow component is running under a global transaction, primitives that use resources and participate in the global transaction can choose to rollback.
We will use the example flow shown below to illustrate the rollback behavior when the mediation flow component is running under a global transaction.

In this flow assume that a global transaction is not configured, and a failure occurs in the Custom primitive. As the fail terminal has not been wired the flow fails. The work done by the Transform primitive is ignored as it does not persist information and does not interact with a resource external to the flow. The Log however, would still complete as the mediation flow component is not under a global transaction and therefore still logs to the database. This is because it interacts with an external resource.
In the same flow, if a global transaction is configured and a failure occurs again in the Custom primitive then the work done by the Transform primitive is ignored again. However, if the Log primitive has its transaction mode property set to same, the transaction will be rolled back and no entry will occur in the database. If the transaction mode property was set to new , then the transaction commits outside the global transaction so an entry will still occur in the database.
By default, a mediation flow component is not set with a global transaction qualifier. You can add a qualifier to run the mediation flow component under a global transaction. This is done by setting a qualifier on the mediation flow component in the assembly editor; in the implementation page of the properties view, add a Transaction qualifier with a property of global.
Failure information in the message
When there is a failure in a mediation primitive, the exception information is stored in the failInfo element of the message context. Here is an image of a message in the XPath Expression Builder, showing the failnfo:
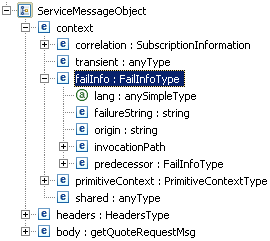
Stop mediation primitive
The Stop primitive has one input terminal and no output terminals. When a mediation primitive's fail or output terminal is wired to the Stop primitive, messages that go to that terminal are consumed by the Stop primitive, and that particular flow path is terminated.
The mediation flow editor generates warnings if a mediation primitive's output terminal is not wired. Use the Stop terminal to suppress these warnings. In the runtime, output terminals that are not wired are automatically propagated to Stop.
In the following example, the fail terminal of the Message Filter primitive is wired to a Message Logger in order to store the failed message. To indicate that no more actions are needed, the Message Logger is wired to a Stop primitive.

Fail mediation primitive
Use the Fail primitive to stop the flow and throw an exception. You can wire a primitive's output or fail terminal to the Fail primitive. If the mediation flow component is running under a global transaction, primitives that use resources and participate in the global transaction can choose to rollback.
Example: Error handling mediation flow
You can create special mediation flows for handling errors, and call these flows from another mediation flow. For example, suppose you have a mediation module called ErrorFlowModule that has a mediation flow component called ErrorFlow and an export called ErrorFlowExport. In the mediation flow component, you could have a Message Filter primitive that has a number of error codes defined as patterns that are associated to terminals. Depending on the error code, the message is routed to a different path in the flow.
In your mediation module called CreditCheckModule, create an import with SCA binding called ErrorFlow that has the same interface as the export of mediation module ErrorFlowModule. In the details page of the property view of the import, select the import interface, right click and select Wire (Advanced) . Select ErrorFlowModule and ErrorFlowExport as targets of this import.
In the mediation flow component CreditCheck, you have a Message Filter that sends its output message to the getAmount operation of the CreditLimitService interface. The fail terminal of the Message Filter is wired to a Mapping Primitive and then propagated to the ErrorFlowModule via the ErrorFlow import interface.
The following image shows the CreditCheck mediation flow component's request flow:
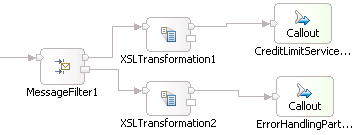
Fault nodes for WSDL fault messages
WSDL operations have three types of messages - input, output, and fault. WSDL faults are business error conditions (for example. StockSymbolNotFound, or NoSuchUser) that are defined in a WSDL operation. In the mediation flow diagram, WSDL faults are handled through input fault and callout fault nodes, which have a terminal for each unique fault message type. The input and callout fault nodes are created in the mediation flow editor when there is a WSDL fault defined in the source or target operation:
- An input fault node is created when a source operation has a WSDL fault message defined. The input fault node has an input terminal for each fault message type defined in the source operation. Any message propagated to an input fault node will result in a WSDL fault error message being returned from the source operation. Wiring to this node means the fault message is returned to the client. The input fault node is created in the request and response and error flows.
- A callout fault node is created in the response flow for each target operation that has a WSDL fault message defined. The callout fault node has an output terminal for each fault message type defined in the target operation. When a WSDL fault occurs, the callout fault node propagates the message to the primitive or node to which it is wired. Wiring from a callout node's output terminal identifies the flow that will take effect when the call to that operation results in that particular fault.
Let's use an example to illustrate how fault nodes are wired. Assume that you have a source interface StockQuoteService with an operation getQuote that requests a stock quote from a service provider's DelayedServicePortType interface.
- The StockQuoteService interface has an operation getQuote which has inputs named customerID and symbol, an output named value, and two faults; invalidCustomerID, and invalidSymbol.
- The DelayedServicePortType interface has an operation getQuote which has an input named stockSymbol, an output named stockValue, and a fault named invalidSymbol.
In the request flow, you could send the input message to a Database Lookup primitive that retrieves the customerID, and sets an isValid property in the message. You could then use a Message Filter primitive to route the message based on the value of isValid. If the customerID is valid, the message is sent to the target operation. If the customerID is not valid, the message is returned to the client via the input fault node. The following image shows this flow:

In the response flow, you could wire the callout fault node's invalid symbol terminal to the input fault node's invalid symbol terminal, with a Mapping Transformation primitive in between. The following image shows the response flow:

If a fault is not wired, the behavior at run time will be the same as if the fault were wired to the input response node.
Unmodeled faults
Those errors that are returned by a WSDL operation and are not defined as WSDL faults are called unmodeled faults. There is no input or callout fault node created for these types of faults in the mediation flow editor. In this case, the input message type is propagated to the callout response node's fail terminal. The failure information is captured in the failinfo element of the message context.
To handle an unmodeled fault, you can wire the fail terminal of a callout response node to a mediation primitive. For example, you could wire the callout response node's fail terminal to a message logger mediation primitive to log all unmodeled faults. You can set a property on the callout response node to determine whether the entire request message or just the message header information should be logged.
If a fail terminal is not wired and an unmodeled fault is received, a mediation runtime exception will occur.
Error Flows
A mediation flow has an error flow for each source operation. The error flow acts a catch all for unhandled errors.
By default, an error flow consists of:
- An error input node which has a catchAll terminal set to anyType. the error input node receives the service message object that contains the error information.
- An input response node for request response operations. You can use this node to return the error message to the source operation.
- An input fault node is created when a source operation has a WSDL fault message defined. The input fault node has an input terminal for each fault message type defined in the source operation. Any message propagated to an input fault node will result in a WSDL fault error message being returned from the source operation. Wiring to this node means the fault message is returned to the client.
You can wire primitives to the error input node to capture error information. For example, a Message Logger to log the service message object. You can also put your error handling logic in a reusable subflow.
You can use an error flow to audit and stop any unexpected errors that may occur in the operation request or response flows. For example, you can use a message logger to capture the service message object, and then wire the logger to a fail primitive. When an error occurs in an unwired fail terminal of a primitive in a request or response flow, the error flow will be executed.

You can also use an error flow to use the information available in the failInfo element of the service message object and return a modeled fault message. In the error flow, you simply map the failureString from the failInfo to the modeled fault message and wire to the input fault node. Then, when the WSDL fault occurs in a request or response flow, the fault message is returned to the client.
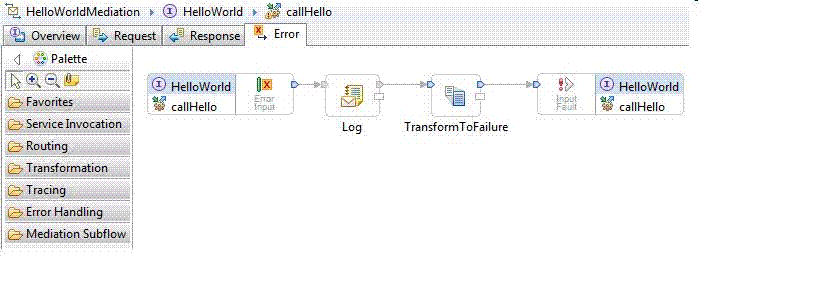
Common patterns of usage for error handling
18. Contributing your own mediation primitive plug-in
You can develop your own mediation primitives, and contribute them to the Mediation Flow editor palette. Integration developers can then use these mediation primitives in the same way that use the supplied mediation primitives, for example Message Filter.
The following topics briefly describe the actions that you have to perform to develop your own mediation primitive, contribute the primitive to the palette in the mediation flow editor, and deploy the primitives. We then use an example to show the steps required, and provide links to reference documentation.
- Create a plug-in project
- Generate the mediation metadata
- Author Java code
- Deploy the plug-in
- Deploy the primitives to the run time
- Example
- Elements of the properties xml file
- Mediation primitive property group schema definition
- References
These steps might change in future releases, and effort might be required to re-enable your contributions for future releases.
Create a plug-in project
Create a plug-in for your primitives in the eclipse plug-in development environment (PDE), with these definitions:
- Create a plug-in project.
- Create these extensions in the plugin.xml:
- com.ibm.wbit.sib.mediation.primitives.registry.mediationPrimitiveHandlers - defines the terminals of your primitive, and identifies the properties file where the properties of the primitive are defined, and the .mednode file that you will generate in topic "Generate the mediation metadata".
- com.ibm.wbit.sib.mediation.primitives.registry.mediationPrimitiveUIContribution - builds on medationPrimitiveHandler and adds information to contribute the medationPrimitiveHandler to the palette in the mediation flow editor.
- The typeName and typeNamespace of the medationPrimitiveHandler and the mediationPrimitiveUIContribution must be the same in order to allow the mediationPrimitiveUIContribution to be associated with the medationPrimitiveHandler .
- The typeNamespace must begin with mednode://mednodes, and end with FileName.mednode. A file of this name will be created when we generate the mediation metadata.
- Create a property group XML file, and define the properties of the mediation primitive in the XML file. For your reference, the schema for this file is attached in the References section at the bottom of this document.
Generate the mediation metadata
Generate the mediation metadata (.mednode file) for the mediation primitive by launching a runtime workbench, and then using the Mediation Development view in the runtime workbench. The .mednode file contains the runtime representation of the mediationPrimitiveHandlers and must be placed at the root of the Java™ project that you create in Step 3.
Author Java code
Create a Java project, and write the code to implement your mediation primitive.
- Create a Java project
- Add library WebSphere ESB Server v7.5 to the build path of the project.
- Copy the .mednode file from the plug-in project to the root of the Java project.
- Create a Java class that extends com.ibm.wsspi.sibx.mediation.esb.ESBMediationPrimitive,
and define a getter and a setter method for each property defined in the property group file.
Note: the getter and setter method names must correspond to the property names. For example, if a property name is value, the getter and setter methods must be named getValue() and setValue().
- Write your Java implementation code for the mediation primitive in the inherited mediate() method. The mediate method takes an InputTerminal and a DataObject. Use the InputTerminal only if you have multiple input terminals. The DataObject is your message. You can use the getters and setters in the DataObject interface to read and write the values in your messages, identified via an XPath expression. DataObject is part of the Service Data Object (SDO) emerging standard. This message parameter can also be cast to a ServiceMessageObject in the com.ibm.websphere.sibx.smobo package, part of the Service Message Object APIs. This interface is useful for accessing individual sections of the service message object, such as the body, context and headers. The example here will show you how to fire a message to an output terminal.DataObject See the Reference section at the bottom of this document for links to the Service Data Object and Service Message Object APIs.
Deploy the plug-in
Deploy your plug-in so that your mediation primitives appear in the Mediation Flow Editor palette:
- Set build properties for your plug-in project. Verify the Binary Build properties include the mednodes, propertygroups and icons folders.
- Import the icons for your primitive into the plug-in project.
- Export the plug-in project as Deployable plug-ins and fragments option to the directory IIDInstallDir
- Shut down IBM Integration Designer.
- RestartIBM Integration Designer using the -clean option.
- Open a mediation flow component in the Mediation Flow Editor. The icons for your primitive are in the palette.
- Drag the icon onto the canvas, and view the properties in the Properties view.
Deploy the primitives to the run time
To deploy your mediation primitives to the WebSphere Enterprise Service Bus or IBM Business Process Manager run time:
- Export the Java project as a jar, for example myPrimitives.jar. In the root folder, select .mednode only, but keep the Java class selected.
The .mednode files must be within the root of the deployed jar, not in a subdirectory.
- Select directory WAS_HOME/lib/ext where the WebSphere run time can access the classes at the right class loader scope.
Example
- Create a plug-in project
-
- Open the Plug-in Development perspective from Window > Open Perspective > Other and choose Plug-in Development from the list.
- Create a plug-in project from File > New > Plug-in Project.
- Enter com.ibm.websphere.esb.mediation.example.contribution as the project name. Keep the default options, and click Next.
- Clear the option to generate a Java class and click Finish.
- Edit plugin.xml
- In the Plug-ins view, open plugin.xml in the Plug-in Manifest
editor, and switch to the Extensions page.
- Click Add. In the New Extension wizard, clear Show only extension points from required plug-ins to view the list of plug-ins.
- Select com.ibm.wbit.sib.mediation.primitives.registry.mediationPrimitiveHandlers. Click Finish. When asked to add the plug-in to the list of plug-in dependencies click Yes. An entry appears in the All Extensions list, with a mediationPrimitiveHandler under it.
- If you do not see a mediationPrimitiveHandler, you need to create one. Right-click com.ibm.wbit.sib.mediation.primitives.registry.mediationPrimitiveHandlers and select New > medationPrimitiveHandler. A medationPrimitiveHandler is added for the extension.
- Select the handler and set its properties as shown in the table:
Extension Element Details for mediationPrimitiveHandler extension
Property name Value typeName CurrencyConverter typeNamespace mednode://mednodes/CurrencyConverter.mednode propertyDefinition propertygroups/CurrencyConverterPropertyGroup.xml implementationClass com.ibm.websphere.esb.mediation.example .logic.CurrencyConverterMediation This is the Java project and class created when you author the Java code.
isTerminalTypeDeducible true The Extension Element Details should look like the following image:
The namespace must begin with mednode://mednodes.
- Add short and long description and three terminal categories for the handler by selecting it, right-clicking it and selecting them from the New menu.
- Select the short description and enter a short description for the primitive in the Body Text field: Currency Converter
- Similarly, add the following text for the long description: This primitive converts a value from the input message into the currency that is selected from a pre-defined list of currencies.
- Select each terminal and in the Details section on the right,
set its type ( input, output and fail in this example). Enter a name for each terminal (in, out and fail in this example). Note the fail terminal must be named fail.
The All Extensions list should look like the following image:

- Add another extension to com.ibm.wbit.sib.mediation.primitives.registry.mediationPrimitiveUIContribution. An entry appears in the All Extensions list, with a medationPrimitiveUIContribution under it.
- If you do not see a medationPrimitiveUIContribution , you need to create one. Right-click com.ibm.wbit.sib.mediation.primitives.registry.mediationPrimitiveUIContribution and select New > medationPrimitiveUIContribution.
- Set the properties of medationPrimitiveUIContribution as shown in the following table and save.
Extension Element Details for mediationPrimitiveUIContribution extension
Property name Value mediationPrimitiveTypeName CurrencyConverter mediationPrimitiveTypeNamespace mednode://mednodes/CurrencyConverter.mednode paletteCategory My Primitives smallIcon icons/CurrencyConverterSmall.gif largeIcon icons/CurrencyConverterLarge.gif The properties under Extension Element Details should look like the following image:

Place the primitive in a specific category by setting the paletteCategory property. For example, to place a primitive in the My Primitives category, the property is set to My Primitives.
- Create required folders in the plug-in project
-
- Create a folder named icons in the plug-in project, and place your icons in it. The small icon (16x16) will appear on the palette. The large icon (24 x 24) will appear on the canvas.
- Create a folder named propertygroups in the plug-in contribution project, and create a property group XML file in this folder from File > New > Other > XML > XML File. Click Next.
- Ensure the propertygroups folder is selected as the parent folder. Name the file CurrencyConverterPropertyGroup.xml and click Next.
- Choose to create an XML file from an XML template. Click Finish.
- Add properties to the XML file
- In CurrencyConverterPropertyGroup.xml , we will describe the properties of this new primitive, so as to derive the UI for the properties view Details page in the Mediation Flow editor. The Java class must have getter and setter methods that correspond to each of these properties. See Elements of the properties xml file.
Add the required properties to CurrencyConverterPropertyGroup.xml by entering the following XML code:
<pg:BasePropertyGroups name="CacheReaderPropertyGroups" resourceBundle="ESBMediationExamples" xmlns:xsi="http://www.w3.org/2001/XMLSchema-instance" xmlns:pg="http://www.ibm.com/propertygroup/6.0.1">

 <propertyGroup name="CurrencyConverterPropertyGroup" xsi:type="pg:BasePropertyGroup" >

 <!-- currency path using XPathProperty -->
  <property name="currencyPath" displayName="Currency Path" defaultValue="/body" required="true" propertyType="String" id="com.ibm.propertygroup.ext.ui.XPathPropertyContentAssist" xsi:type="pg:ConstraintSingleValuedProperty">
   <qualifier name="propertyType" value="XPATH" xsi:type="pg:GenericPropertyQualifier" />
   <description>
    An XPath expression to the input currency value.
   </description>
  </property>

 <property name="currencyRatesTable" displayName="Currency Rates" xsi:type="pg:TableProperty">
   <description>
    Currency rates
   </description>
   <qualifier preferredHeight="100" xsi:type="pg:TableLayoutQualifier">
    <column name="currency" preferredWidth="300" xsi:type="pg:TableColumnQualifier"/>
    <column name="currencyRate" preferredWidth="200" xsi:type="pg:TableColumnQualifier"/>
   </qualifier>
   <column name="currency" validValuesEditable="false" required="true" displayName="Currency"  xsi:type="pg:ConstraintSingleValuedProperty">

    <description>
     List of currencies
    </description>
    <validValue value="USD" displayValue="United States Dollars(USD)"/>
   <validValue value="CAD" displayValue="Canadian Dollars(CAD)"/>
   <validValue value="EUR" displayValue="Euro(EUR)"/>
   <validValue value="JPY" displayValue="Japanese Yen(JPY)"/>
   <validValue value="CNY" displayValue="Chinese Yuan(CNY)"/>

   </column>
   <column name="currencyRate" required="true" validValuesEditable="false" displayName="Rate"  propertyType="float"  xsi:type="pg:ConstraintSingleValuedProperty">
   <qualifier name="promotable" xsi:type="pg:PropertyClassificationQualifier" />
    <description>
    Exchange rate     </description>
   </column>

  </property>
 </propertyGroup>

</pg:BasePropertyGroups>
Save and close the file. Save the project.
- Generate metadata
- Launch the runtime workbench from the PDE by following these steps:
- Create a new Eclipse application configuration and run it.
- From the main menu, select Run -> Run Configurations.
- In the Run Configurations page, right-click Eclipse Application and select New.
- Rename New_configuration to Runtime
Workbench.
- From the Runtime JRE drop down list select jdk. This ensures the runtime workbench is launched with the IBM Integration Designer 7.5 JRE that is installed in the Installation Directory\jdk (where Installation Directory is the directory in which IBM Integration Designer is installed).
- Click Apply, and then click Run. IBM Integration Designer launches a new IDE, which takes a few minutes.
- In the new IDE that is launched, click Window > Show View > Other > Mediation Development > Mediation Metadata Generation then click OK.
- The mediation primitives that you created are displayed here. Use this view to generate a .mednode file for your primitive. Select the primitives that you want and click Generate. A status of OK indicates the .mednode file was successfully generated. Close the IDE.
- A file named CurrencyConverter.mednode is created in the mednodes folder of the plug-in project. You might need to refresh your view to see this file.
- Create a new Eclipse application configuration and run it.
- Author the Java Code
-
- Create a Java project from File > New > Project > Java > Java Project. Click Next. Enter the project name, com.ibm.websphere.esb.mediation.example.logic, and click Next.
- Switch to the Libraries page, and click Add library. Select Server Runtime and click Next. Select WebSphere ESB Server v7.5 and click Finish.
- Click Finish to complete the New Java Project wizard.
- Switch to the Java perspective.
- Copy CurrencyConverter.mednode from the plug-in project to the root of the Java project.
- Select the Java project and click File > New > Class. Enter com.ibm.websphere.esb.mediation.example.logic as package name and CurrencyConverterMediation as class name. Click Finish. Replace the generated code in the class with the following code. Note there will be errors in the code at this point.
package com.ibm.websphere.esb.mediation.example.logic; import com.ibm.wsspi.sibx.mediation.InputTerminal; import com.ibm.wsspi.sibx.mediation.MediationBusinessException; import com.ibm.wsspi.sibx.mediation.MediationConfigurationException; import com.ibm.wsspi.sibx.mediation.OutputTerminal; import com.ibm.wsspi.sibx.mediation.esb.ESBMediationPrimitive; import commonj.sdo.DataObject; /** * This mediation converts from one currency value to another currency value. */ public class CurrencyConverterMediation extends ESBMediationPrimitive { private static final String OUTPUT_TERMINAL_NAME = "out"; private String currencyPath; private CurrencyRate[] currencyRatesTable; /** * Default constructor. */ public CurrencyConverterMediation() { super(); } /** * @return Returns the currencyPath. */ public String getCurrencyPath() { return currencyPath; } /** * @param currencyPath * The currencyPath to set. */ public void setCurrencyPath(String currencyPath) { this.currencyPath = currencyPath; } /** * @return Returns the currencyRates. */ public CurrencyRate[] getCurrencyRatesTable() { return this.currencyRatesTable; } /** * @param currencyRates The currencyRates to set. */ public void setCurrencyRatesTable(CurrencyRate[] currencyRates) { this.currencyRatesTable = currencyRates; } /* * (non-Javadoc) * * @see com.ibm.wsspi.sibx.mediation.Mediation#mediate(com.ibm.wsspi.sibx.mediation.InputTerminal, * commonj.sdo.DataObject) */ public void mediate(InputTerminal inputTerminal, DataObject message) throws MediationConfigurationException, MediationBusinessException { // retrieves the input currency value float inputCurrencyValue = message.getFloat(getCurrencyPath()); if (getCurrencyRatesTable() != null && getCurrencyRatesTable().length > 0) { // we only use the first available currency rate float currencyRate = getCurrencyRatesTable()[0].getCurrencyRate(); // converts to the new currency value float newCurrencyValue = inputCurrencyValue * currencyRate; // update the new currency value to the message message.setFloat(getCurrencyPath(), newCurrencyValue); } // gets the out terminal from the mediation services OutputTerminal outTerminal = getMediationServices().getOutputTerminal( OUTPUT_TERMINAL_NAME); if (outTerminal != null) { // fires the message to the out terminal outTerminal.fire(message); } } } - Create another class in the Java project.
Enter com.ibm.websphere.esb.mediation.example.logic as package name and CurrencyRate as class name.
Click Finish. Replace the generated code in the new class with the following code, after which all errors should go away.
package com.ibm.websphere.esb.mediation.example.logic;

/**
 * Data object for currency rates table property.
 */
public class CurrencyRate {

 private String currency;

 private float currencyRate;

 /**
  *
  */
 public CurrencyRate() {
  super();
 }

 /**
  * @return Returns the currency.
  */
 public String getCurrency() {
  return currency;
 }

 /**
  * @param currencyPath
  *            The currency to set.
  */
 public void setCurrency(String currency) {
  this.currency = currency;
 }
 /**
  * @return Returns the currencyRate.
  */
 public float getCurrencyRate() {
  return currencyRate;
 }

 /**
  * @param currencyRate
  *            The currencyRate to set.
  */
 public void setCurrencyRate(float currencyRate) {
  this.currencyRate = currencyRate;
 }}
- Deploy the plug-in
-
- Open the build.properties file of the plug-in project in the Build Properties Editor, and make sure the icons , mednodes and propertygroups folders are selected under Binary Build.
- Export the project as Deployable plug-ins and fragments.
Select to export as a directory structure and specify the destination directory IIDInstallDir.
When you export the plugin, a plugins directory will be created under the destination directory. Your plugin will be placed in IIDInstallDir\plugins
- Deploy the Java project to the UTE by exporting it as a jar to IIDInstallDir\runtimes\bi_v75\lib\ext, if you intend to test your primitive in a mediation flow.
- Shutdown IBM Integration Designer and start it using the -clean option.
- Open a mediation flow component in the Mediation Flow editor.
The icon for the CurrencyConverter mediation primitive is in the palette
 .
.
- Drag the icon for your primitive onto the canvas, and view the properties in the Properties view Details tab.

- Deploy to the run time
- Export the Java project as a jar, for example myPrimitives.jar. In the root folder, select .mednode only, but keep the Java class selected. Export the jar to WAS_HOME/lib/ext.
References
For information on the service message object and mediation flow APIs, see the Reference section in the WebSphere Enterprise Service Bus information.
For information on Service Data Object APIs, see http://help.eclipse.org/help32/topic/org.eclipse.emf.ecore.sdo.doc/references/javadoc/org/eclipse/emf/ecore/sdo/package-summary.html.
Elements of the properties xml file
Create a properties definition XML file to define the properties of your mediation primitive. This XML file must conform to the schema defined in Mediation primitive property group schema definition. The following are the typical steps to author the properties definition XML file.
- Defining propertyGroups:
Each properties definition XML file must contain one and only one propertyGroups element that contains a sequence of zero or more propertyGroup elements.
- <pg:BasePropertyGroups name="myGroups" resourceBundle="mypackage.myProperties">
Attributes of propertyGroups
Attribute Description name Name of the property group. This name will not be displayed in the Mediation Flow Editor. resourceBundle The resource bundle that will be loaded to interpret a string value. This is used for globalization. - Defining propertyGroups elements
Each propertyGroup element is represented as a horizontal tab page within the Details page of the Properties view. Each propertyGroup can contain multiple properties. A property can be a standard property or a custom property.
- <propertyGroup name="myGroup" xsi:type="pg:BasePropertyGroup">
Attributes of propertyGroup
Attribute Description name Name of the property group. If there is more than one propertyGroup, each propertyGroup element is rendered as tab page in the Details page. The name attribute becomes the name of the tab page. - Defining simple standard properties
IBM Integration Designer supports the following property types:
- ConstraintSingleValuedProperty - can have only one value with constraints defined (that is, passwordProperty must be at least 8 characters long and contain at least one number to be valid)
- ConstraintMultiValuedProperty - contains multiple values with some constraints defined (that is, logTypeProperty must be either INFO, DEBUG, WARNING, ERROR or any combination of the four to be valid)
- TableProperty - multiple columns each of which is a single valued property ConstraintSingleValuedProperty (that is, two-dimensional array each column being limited by constraints defined as for a ConstraintSingleValuedProperty type)
The following standard properties have been predefined in the propertygroups schema definition. Both properties have the same attributes.
Standard properties and their attributes
Property Attribute Description - ConstraintSingleValuedProperty - A single-valued property with various user input validation rules
- ConstraintMultiValuedProperty - Multi-valued property. All values share the same type
name / displayName Name is the identifier of a property. DisplayName is used as a label preceding the property input control. description Displayed as tooltip text propertyType Defines the value type (String / Boolean / Float / Integer) defaultValue The default value of the property hidden Defines whether the property is hidden or shown readOnly Defines whether the property is read only required Indicates the property requires a value sensitive If value type is String, this attribute determines whether it is case sensitive validValuesEditable Defines whether a user is allowed to enter a value which is different from values defined by validValues validValues A list of valid values pattern (optional) If the value type is String, the editor will do a pattern match to validate user input maxLength (optional) If the value type is String, the editor will limit the size that user can input minValue / maxValue (optional) If the value type is Integer or Float, the editor will perform a range check on user input. validValueGeneratorClass Points to a class which is responsible for dynamically generating valid values.. The class must implement the interface com.ibm.propertygroup.ext.api .IValidValuesGenerator - Defining a table property
Each table property can consist of multiple columns, each of which is a single-valued property, such as ConstraintSingleValuedProperty.
<property name="filters" displayName="%displayname" xsi:type="pg:TableProperty">
  <column name="pattern" required="true" .../>
  <column name="terminalName" required="true" .../>
 </property>
- Defining a custom property
The implementation class must implement com.ibm.propertygroup.ext.ICustomProperty
- <property name="myCustomProperty" class="MyCustomImpl" xsi:type="pg:CustomProperty">
- Defining properties to decide if cloning is necessary
Mediation primitives can provide information to the WebSphere ESB run time which allows it to decide whether a clone is necessary at various points in the flow, this information takes the form of mediation primitive parameters. These parameters are:
- sibxMayChangeMessage A mediation primitive parameter that indicates to the run time whether a primitive can modify the message during processing. If the message is not modified during processing (such as the Logger mediation primitive) then the WESB run time will not clone the message before invoking this primitive.
- sibxOnlyFireAtEnd A mediation primitive parameter that indicates to the run time whether a primitive will guarantee to only fire its output terminals at the completion of its work. This allows the run time to avoid a message clone on terminal fire.
- sibxNoChangeOnFailure A mediation primitive parameter that indicates to the run time that a primitive will leave the original SMO message unmodified should it have any failure. A good example of the use of this is in the Mapping primitive. This primitive works on a serialized version of the SMO right up until the end of its processing when it copies that serialized version over the original message. This means, the Mapping primitive can make use of the original SMO on failure since it has a copy of it for the full life of its processing, thus negating the need to the WebSphere ESB run time to do the same.
Usage examples:
<!--  private property which tells the engine if the mednode might change the message -->
<property name="sibxMayChangeMessage" hidden="true" defaultValue="false" propertyType="String" xsi:type="pg:ConstraintSingleValuedProperty"> </property>
<!--  private property which tells the engine if the mednode has finished updating the message by the time it fires its output terminal(s) -->
<property name="sibxOnlyFireAtEnd" hidden="true" defaultValue="true" propertyType="String" xsi:type="pg:ConstraintSingleValuedProperty"> </property>
- Add qualifiers to properties
The property model already described is neutral to any UI rendering mechanism or processing infrastructure. However, in certain scenarios, some UI or runtime-dependent information must be presented. For example, you might want to define the table layout for a table property. Or you might want to instruct the run time to perform special handling when processing certain properties. A qualifier is introduced to serve this purpose. You can attach as many qualifiers to a property as you want, provided they are valid for the UI and the run time. For example, you can attach a TableLayoutQualifier to a TableProperty.
<property name="filters" xsi:type="pg:TableProperty"> <qualifier preferredHeight="100" xsi:type="pg:TableLayoutQualifier"> <column name="pattern" preferredWidth="100" xsi:type="pg:TableColumnQualifier"/> <column name="terminalName" preferredWidth="200" xsi:type="pg:TableColumnQualifier"/> </qualifier> ... </property> - Add the properties promotion qualifier
To designate the property to be promotable, which means the value of the property value can be changed at run time, add this qualifier:
- <qualifier name="promotable" xsi:type="pg:PropertyClassificationQualifier" />
19. Mediation primitive property group schema definition
The property group schema definition. Use this schema when you are creating your own custom mediation primitives and contributing them to the mediation flow editor. The properties of your mediation primitives must conform to the schema defined here.
<schema xmlns="http://www.w3.org/2001/XMLSchema" xmlns:propertygroup="http://www.ibm.com/propertygroup/6.0.1" targetNamespace="http://www.ibm.com/propertygroup/6.0.1">

 <element name="propertyGroups" type="propertygroup:BasePropertyGroups"/>
 <element name="description" type="string"/>

 <complexType name="PersistentFormatter">
 </complexType>

 <complexType name="StringFormatter">
  <complexContent>
   <extension base="propertygroup:PersistentFormatter">
    <attribute name="escapeCharacter" type="token" use="optional"/>
   </extension>
  </complexContent>
 </complexType>

 <complexType name="StringListFormatter">
  <complexContent>
   <extension base="propertygroup:StringFormatter">
    <attribute name="separator" type="token" use="optional"/>
   </extension>
  </complexContent>
 </complexType>

 <complexType name="StringTableFormatter">
  <complexContent>
   <extension base="propertygroup:StringFormatter">
    <attribute name="rowSeparator" type="token" use="optional"/>
    <attribute name="columnSeparator" type="token" use="optional"/>
   </extension>
  </complexContent>
 </complexType>

 <complexType name="Qualifier">
 </complexType>

 <complexType name="TableColumnQualifier">
  <complexContent>
   <extension base="propertygroup:Qualifier">
    <attribute name="name" type="token" use="required"/>
    <attribute name="preferredWidth" type="token" use="required"/>
   </extension>
  </complexContent>
 </complexType>

 <complexType name="TableLayoutQualifier">
  <complexContent>
   <extension base="propertygroup:Qualifier">
    <choice>
     <element maxOccurs="unbounded" minOccurs="0" name="column" type="propertygroup:TableColumnQualifier"/>
    </choice>
    <attribute name="preferredHeight" type="token" use="required"/>
   </extension>
  </complexContent>
 </complexType>

 <complexType name="PropertyClassificationQualifier">
  <complexContent>
   <extension base="propertygroup:Qualifier">
    <attribute name="name" type="token" use="required"/>
   </extension>
  </complexContent>
 </complexType>

 <complexType name="PropertyDescriptor">
  <choice>
   <element ref="propertygroup:description" minOccurs="0"/>
   <element name="persistentFormatter" type="propertygroup:PersistentFormatter" minOccurs="0"/>
   <element maxOccurs="unbounded" minOccurs="0" name="qualifier" type="propertygroup:Qualifier"/>
  </choice>
  <attribute name="id" type="token" use="optional"/>
  <attribute name="name" type="token" use="required"/>
  <attribute name="displayName" type="token" use="optional"/>
 </complexType>

 <complexType name="BasePropertyDescriptor">
  <complexContent>
   <extension base="propertygroup:PropertyDescriptor">
   </extension>
  </complexContent>
 </complexType>

 <complexType name="BaseProperty">
  <complexContent>
   <extension base="propertygroup:BasePropertyDescriptor">
    <attribute name="validationMessage" type="token" use="optional"/>
   </extension>
  </complexContent>
 </complexType>

 <complexType name="BaseNodeProperty">
  <complexContent>
   <extension base="propertygroup:BaseProperty">
    <sequence>
     <element maxOccurs="0" minOccurs="0" name="children" type="propertygroup:BaseNodeProperty"/>
    </sequence>
   </extension>
  </complexContent>
 </complexType>

 <complexType name="ValidValue">
  <sequence>
   <element ref="propertygroup:description" minOccurs="0"/>
  </sequence>
  <attribute name="displayValue" type="token" use="optional"/>
  <attribute name="value" type="token" use="required"/>
 </complexType>

 <complexType name="BaseSingleTypedProperty">
  <complexContent>
   <extension base="propertygroup:BaseProperty">
    <sequence>
     <element maxOccurs="unbounded" minOccurs="0" name="validValue" type="propertygroup:ValidValue"/>
    </sequence>
    <attribute name="defaultValue" type="token" use="optional"/>
    <attribute name="propertyType" type="token" use="required"/>
    <attribute name="expert" type="boolean" use="optional"/>
    <attribute name="hidden" type="boolean" use="optional"/>
    <attribute name="readOnly" type="boolean" use="optional"/>
    <attribute name="required" type="boolean" use="optional"/>
    <attribute name="sensitive" type="boolean" use="optional"/>
    <attribute name="validValuesEditable" type="boolean" use="optional"/>
   </extension>
  </complexContent>
 </complexType>

 <complexType name="BaseMultiValuedProperty">
  <complexContent>
   <extension base="propertygroup:BaseSingleTypedProperty">
   </extension>
  </complexContent>
 </complexType>

 <complexType name="BaseBoundedMultiValuedProperty">
  <complexContent>
   <extension base="propertygroup:BaseMultiValuedProperty">
    <attribute name="boundedSize" type="token" use="optional"/>
   </extension>
  </complexContent>
 </complexType>

 <complexType name="File">
  <attribute name="extension" type="token" use="optional"/>
  <attribute name="pattern" type="token" use="optional"/>
 </complexType>

 <complexType name="MultiFileProperty">
  <complexContent>
   <extension base="propertygroup:BaseMultiValuedProperty">
    <sequence>
     <element maxOccurs="unbounded" minOccurs="0" name="fileExtension" type="propertygroup:File"/>
    </sequence>
   </extension>
  </complexContent>
 </complexType>

 <complexType name="MultiFolderProperty">
  <complexContent>
   <extension base="propertygroup:BaseMultiValuedProperty">
   </extension>
  </complexContent>
 </complexType>

 <complexType name="ConstraintMultiValuedProperty">
  <complexContent>
   <extension base="propertygroup:BaseBoundedMultiValuedProperty">
    <attribute name="pattern" type="token" use="optional"/>
    <attribute name="minValue" type="integer" use="optional"/>
    <attribute name="maxValue" type="integer" use="optional"/>
    <attribute name="maxLength" type="integer" use="optional"/>
   </extension>
  </complexContent>
 </complexType>

 <complexType name="BaseSingleValuedProperty">
  <complexContent>
   <extension base="propertygroup:BaseSingleTypedProperty">
   </extension>
  </complexContent>
 </complexType>

 <complexType name="FileProperty">
  <complexContent>
   <extension base="propertygroup:BaseSingleValuedProperty">
    <sequence>
     <element maxOccurs="unbounded" minOccurs="0" name="fileExtension" type="propertygroup:File"/>
    </sequence>
   </extension>
  </complexContent>
 </complexType>

 <complexType name="FolderProperty">
  <complexContent>
   <extension base="propertygroup:BaseSingleValuedProperty">
   </extension>
  </complexContent>
 </complexType>

 <complexType name="ConstraintSingleValuedProperty">
  <complexContent>
   <extension base="propertygroup:BaseSingleValuedProperty">
    <attribute name="pattern" type="token" use="optional"/>
    <attribute name="minValue" type="integer" use="optional"/>
    <attribute name="maxValue" type="integer" use="optional"/>
    <attribute name="maxLength" type="integer" use="optional"/>
    <attribute name="validValuesGeneratorClass" type="token" use="optional"/>
   </extension>
  </complexContent>
 </complexType>

 <complexType name="PropertyGroup">
  <complexContent>
   <extension base="propertygroup:BaseProperty">
   </extension>
  </complexContent>
 </complexType>

 <complexType name="BasePropertyGroup">
  <complexContent>
   <extension base="propertygroup:PropertyGroup">
    <sequence>
     <element maxOccurs="unbounded" minOccurs="0" name="property" type="propertygroup:PropertyDescriptor"/>
     <element maxOccurs="unbounded" minOccurs="0" name="customProperty" type="propertygroup:CustomProperty"/>
    </sequence>
   </extension>
  </complexContent>
 </complexType>

 <complexType name="CustomPropertyGroup">
  <complexContent>
   <extension base="propertygroup:PropertyGroup">
    <attribute name="class" type="token" use="optional"/>
   </extension>
  </complexContent>
 </complexType>

 <complexType name="BasePropertyGroups">
  <complexContent>
   <extension base="propertygroup:BaseProperty">
    <sequence>
     <element maxOccurs="unbounded" minOccurs="0" name="propertyGroup" type="propertygroup:PropertyGroup"/>
    </sequence>
    <attribute name="resourceBundle" type="token" use="optional"/>
   </extension>
  </complexContent>
 </complexType>

 <complexType name="BaseTreeProperty">
  <complexContent>
   <extension base="propertygroup:BaseProperty">
   </extension>
  </complexContent>
 </complexType>

 <complexType name="TableProperty">
  <complexContent>
   <extension base="propertygroup:PropertyDescriptor">
    <sequence>
     <element maxOccurs="unbounded" minOccurs="0" name="column" type="propertygroup:BaseSingleTypedProperty"/>
    </sequence>
   </extension>
  </complexContent>
 </complexType>

 <complexType name="TreeProperty">
  <complexContent>
   <extension base="propertygroup:PropertyDescriptor">
    <sequence>
     <element maxOccurs="1" minOccurs="0" name="root" type="propertygroup:BaseNodeProperty"/>
    </sequence>
   </extension>
  </complexContent>
 </complexType>

 <complexType name="CustomProperty">
  <attribute name="class" type="token" use="required"/>
 </complexType>

</schema>
20. Mediation primitives and nodes
Mediation primitives accept and process messages to let you change their format, content or the target service provider. Mediation primitives have properties that determine how a message will be processed. When you wire a flow in the Mediation Flow editor, you can modify the properties of nodes and mediation primitives.
Tip: Wire the input and output terminals of a mediation primitive before you set its properties. This will make your input and output message types known to the editor, and will save you time when setting the properties.
These topics describe the properties of mediation primitives and nodes. These topics do not discuss marking properties for promotion. For information on promoted properties, see Change the value of mediation flow properties at run time.
| Icon | Primitive or node | Description |
|---|---|---|
|
| Input | Propagates the message to the primitive or node to which it is wired. The properties to be stored in the message context are specified in the details page of the input node's properties view. These properties can be accessed by mediation primitives later in the flow. |
|
| Input Response | The input response node is an end point in the request and response flows. It returns the processed message as a response to the source operation. In a request flow, you can use the input response in certain conditional situations. For example if an input error detected, the message can return immediately to the source without invoking the callout. |
|
| Callout | Receives the message and invokes the requested service and operation. There is a callout node for each connected target operation in the mediation flow. |
|
| Callout response | A starting point for the response flow. It forwards the message received from the target operation into the response flow. |
|
| Input Fault | The input response node is an end point in the request and response flows. It returns a fault message as a response to the source operation. In a request flow, you can use the fault response in certain conditional situations. For example if an input error is detected, a fault message can be returned immediately to the source without invoking the callout. A fault response node has an input terminal for each fault defined on the operation. |
|
| Callout Fault | The callout fault node is an end point in the response flow. When a WSDL fault occurs in the invoked operation, the callout fault propagates the fault message to the primitive or node to which it is wired. The callout fault has an output terminal for each fault message type defined in the target operation. |
| Transformation | ||
|
| Custom Mediation primitive | Allows you to implement your own mediation logic using Java™ code. |
|
| Database Lookup mediation primitive | Searches values from a database, and stores them in the message. |
|
| Message Element Setter mediation primitive | Sets, copies or deletes the value of message elements as the message passes through a mediation flow. |
|
| Business Object Map mediation primitive | Allows you to map data between differently structured business objects. This allows services that use different business objects to communicate and exchange data. |
|
| Set Message Type mediation primitive | Allows you to overlay weakly-typed message fields with more complex structures and manipulate them easier. It can also be used to overlay strong-typed fields with a derived type. |
|
| MQ Header Setter mediation primitive | Creates, sets, copies or deletes MQ message headers. |
|
| SOAP Header Setter Mediation Primitive | Creates, sets, copies or deletes SOAP message headers. |
|
| HTTP Header Setter mediation primitive | Creates, sets, copies or deletes HTTP message headers. |
|
| JMS Header setter primitive | Creates, sets, copies or deletes JMS message headers. |
|
| Data Handler mediation primitive | Transforms a part of a message. It is used to convert an element of a message from a physical format to a logical structure or a logical structure to a physical format. For example, from a comma delimited string to a business object. |
|
| Mapping mediation primitive | Transforms messages, or changes message content according to an XSL style sheet that maps between the source and target message types. |
| Routing | ||
|
| Message Filter mediation primitive | Conditionally routes messages based on the results of pattern evaluation. A pattern is evaluated against the message, and if the result is true, the message is propagated to a terminal associated with the pattern. |
|
| Endpoint Lookup mediation primitive | Queries the WebSphere Service Registry Repository and retrieves service endpoints. The endpoints retrieved are based on user defined search criteria, and the retrieved endpoints are placed in the primitiveContext element in the message context. The retrieved endpoints can then be used to dynamically invoke a service, depending on the match policy specified. |
|
| Fan Out mediation primitive | Performs broadcasting and to aggregate service responses in conjunction with the Fan In mediation primtiive |
|
| Fan In mediation primitive | Combines multiple messages for aggregation. Fan In must be used in conjunction with the Fan Out mediation primitive. |
|
| Service Invoke mediation primitive | Call an intermediary service inline within a mediation flow. It can retry a failed call, as well as route it to another service or different endpoints of the service. |
|
| Type Filter mediation primitive | Allows you to direct messages down different paths of a mediation flow, based on the message type. |
|
| Policy Resolution mediation primitive | Allows the runtime administrator to dynamically configure the mediation flow by modifying a policy . |
| Tracing | ||
|
| Message Logger mediation primitive | Logs a copy of the message to a database for future retrieval or audit. |
|
| Event Emitter mediation primitive | Emits custom base events at a significant point in the message flow. |
| Error Handling | ||
|
| Fail mediation primitive | Throws an exception and stops the flow when there is a failure in a mediation primitive. |
|
| Stop mediation primitive | Silently stops the flow; this is an expected termination and is not caused by an exception. |
| Mediation Subflow | ||
|
| Subflow | A mediation subflow is a preconfigured set of mediation primitives, run in the context of a parent flow, that are wired together to realize a common pattern or use case. Mediation subflows can be shared among mediation flows. |


- Input The Input node is the entry point to the request flow. Input propagates the message to the primitive or node to which it is wired. The properties to be stored in the message context are specified in the details page of the input node's properties view. These context properties can be accessed by mediation primitives later in the flow.
- Callout The callout receives the message and invokes the requested service and operation. There is a callout node for each connected target operation in the mediation flow.
- Input Response The input response node is an end point in the request and response flows. It returns the processed message as a response to the source operation. In a request flow, you can use the input response in certain conditional situations. For example if an input error is detected, the message can return immediately to the source without invoking the callout.
- Callout response The callout response node is a starting point for the response flow. It forwards the message received from the target operation into the response flow.
- Callout Fault The callout fault node is an end point in the response flow. When a WSDL fault occurs in the invoked operation, the callout fault propagates the fault message to the primitive or node to which it is wired. The callout fault has an output terminal for each fault message type defined in the target operation.
- Input Fault The input fault node is an end point in the request and response flows. It returns a fault message as a response to the source operation. In a request flow, you can use the fault response in certain conditional situations. For example if an input error is detected, a fault message can be returned immediately to the source without invoking the callout. A fault response node has an input terminal for each fault defined on the operation.
- Example: Database Lookup mediation primitive The Database Lookup primitive searches values from a database, and stores them in the message. This example shows you how to use the Database Lookup primitive in the Mediation Flow editor.
Input
The Input node is the entry point to the request flow. Input propagates the message to the primitive or node to which it is wired. The properties to be stored in the message context are specified in the details page of the input node's properties view. These context properties can be accessed by mediation primitives later in the flow.

Here is an image of the input node's details page properties:

- Correlation context specifies the business object that is persisted through the duration of the request and response flows. The correlation context is specified in the input node in the request flow and is used for passing values from the request flow to the response flow. Click Browse to select a business object, or Reset to clear the field.
- Transient context specifies the business object that is available for the duration of the current flow (either the request flow or the response flow). The transient context is specified in the input node in the request flow, and is used to pass values between mediation primitives in the same flow. Click Browse to select a business object, or Reset to clear the field.
- Shared Context specifies the business object to be used during aggregation operations using the Fan Out / Fan In combination. It is specified in the input node of the request flow and is not intended for general data storage. Click Browse to select a business object, or Reset to clear the field.
See Storing and using elements in the message context
Callout
The callout receives the message and invokes the requested service and operation. There is a callout node for each connected target operation in the mediation flow.

Use dynamic endpoint if set in the message header
Dynamic routing is enabled by default. This means the callout will invoke the endpoint that is set in the target element of the SMOHeader in the message. If no endpoint exists in this location, the callout will invoke the endpoint defined in the import's binding. See Selecting endpoints dynamically
Invocation style
Determines whether the service is invoked synchronously or asynchronously. When the synchronousstyle is used, the service is performed under the same processing thread as the mediation flow. When the asynchronous style is used, a new processing thread is used when invoking the service. The asynchronousstyle allows the mediation flow to continue before a response is received from the service. The invocation style can affect the transactional scope that applies to the service invocation, and whether a timeout might occur if the service fails to respond.
Request-response operations
These are the invocation styles that are available for request-response operations:
- Sync
- Async with deferred response
- Async with callback
- As target
- Async (Compatibility)
- Default (Compatibility)
If set to Sync, the service invocation is performed synchronously. This setting can allow the service to be included in the transaction scope of the mediation flow when the service or binding supports this function.
Set the property to Async with deferred response means the service invocation is performed asynchronously, where the service requester calls an operation on the service provider, and then continues processing. At a later time, the service requester calls the service provider for a response. The service is outside the scope of the mediation flow transaction. The Async with deferred response setting can also allow an Async timeout timeout to be set for a deferred response.
Set the property to Async with callback means the service invocation is performed asynchronously, where the service requester calls an operation on the service provider and specifies a callback handler. The service requester continues processing. When the response is available, the SCA runtime returns the response to the requester by calling the callback handler. The service is outside the scope of the mediation flow transaction.
Set the property to As target means the invocation style is determined by the preferred interactionstyle of the target, or the invocation style used by the import that is invoked by the mediation flow. As target is the default invocation style.
Async with callback is not available in a subflow, error flow, or aggregation block. A runtime error occurs if this invocation style is required, as determined by the target.
| Property | Mediation flow component inbound request | Preferred interaction style of the target | Invocation style used for Callout |
|---|---|---|---|
| Sync | Sync | ||
| Async with deferred response | Async with deferred response | ||
| Async with callback | Async with callback | ||
| As target | Sync | Sync | |
| Async one way, Async with deferred response, Async with callback | SYNC | Sync | |
| ASYNC or ANY | Async with callback |
Compatibility options for request-response operations
The Async (Compatibility) and Default (Compatibility) invocationstyle options are for compatibility with earlier versions before version 8.0. These options provide a check box for an additional property which influences invocation style: Require mediation flow to wait for service response when the flow component is invoked asynchronously with callback. IBM recommends that use the non-compatibility invocation style options.
| Property | Mediation flow component inbound request | Preferred interaction style of the target | Force Sync (More information) | Invocation style used for Callout |
|---|---|---|---|---|
| Async (Compatibility) | Sync | Sync | ||
| Async with deferred response or Async one way | Async with deferred response | |||
| Async with callback | True | Async with deferred response | ||
| False | Async with callback | |||
| Default (Compatibility) | Sync, Async with deferred response or Async one way | SYNC or ANY | Sync | |
| ASYNC | Async with deferred response | |||
| Async with callback | SYNC or ANY | Sync | ||
| ASYNC | True | Async with deferred response | ||
| False | Async with callback |
One way operations
These are the invocationstyles that are available for one-way operations:
- Sync
- Async one way
- As target
If set to Sync, the service invocation is performed synchronously. This setting can allow the service to be included in the transaction scope of the mediation flow when the service or binding supports this function.
For one way operations, the invocation style Async one way is the same as the Async style in releases before version 8.0.
Set the property to As target means the invocation style is determined by the preferred interactionstyle of the target, or the invocation style used by the import that is invoked by the mediation flow. As target is the default invocation style.
| Property | Mediation flow component inbound request | Preferred interaction style of the target | Invocation style used for Callout |
|---|---|---|---|
| Sync | Sync | ||
| Async one way | Async one way | ||
| As target | Sync or Async one way, Async with deferred response, Async with callback | SYNC | Sync |
| ASYNC or ANY | Async one way |
Require mediation flow to wait for service response when the flow component is invoked asynchronously with callback
Set to true, (select the check box), to force a service call to act in a synchronous manner. If true, an asynchronous call causes a deferred response, rather than a callback. Set this property to true if the whole mediation flow is to run in a single transaction. If you set this property to false and the mediation primitive is involved in a FanOut/FanIn operation or is contained in a subflow, your setting will be overridden at run time and it will force the service call to act in a synchronous manner.This option is only available with the Async (Compatibility) and Default (Compatibility) invocation style options, which are provided are for compatibility with earlier versions before to version 8.0
Retry
The callout can be set to retry service invocations depending on the type of fault received.
Retry On
To enable retry, you must set the value of the Retry On property to: Any fault, Unmodeled fault or Modeled fault.
Modeled faults are those that are explicitly listed in a WSDL file, any other fault is an unmodeled fault. This property is only applicable to request-response operations.
Retry Count
How many times a service call should be retried before an output terminal is fired. The output terminal that is fired can be of the following types: modeled fault, timeout or fail. The value can be zero or a positive integer.
Retry Delay
The delay (in seconds) between retry attempts. The value can be zero or a positive integer.
Try Alternate Endpoints
Determines if any alternate endpoints in the SMO should be used on retries. Set to true, (select the check box), to try alternate endpoints. This functionality is only available if the Use Dynamic Endpoint is also specified. If any fault is returned by the initial service request, and the retry count is greater than zero, the first endpoint from the alternate endpoint list is used for the retry. If the retry returns a fault, and the next retry would not exceed the retry count, the next alternate endpoint is used. After the last endpoint in the alternate endpoints list is used, the initial endpoint is used again.
For example, suppose the first endpoint is ServiceA, and the alternate endpoints are ServiceB and ServiceC. If the retry count is 5, the sequence of service calls is as follows: ServiceA, ServiceB, ServiceC, ServiceA, ServiceB, ServiceC.
The node's properties are presented in the following table.
| Property | Description | Possible Values |
|---|---|---|
| Reference Name | The reference of the service that is called by the callout | |
| Operation Name | The name of the operation called by the callout | |
| Use dynamic endpoint if set in the message header | Determines if the TargetAddress header should be used to override the endpoint if present. |
If set to True and if the TargetAddress header is populated, message is forwarded. Otherwise the message proceeds normally. Default: true |
| Async Timeout | Specifies time to wait for a responses when performing an asynchronous deferred response invocation. |
If timeout occurs, the fail terminal is fired. This is treated as an unmodeled fault with regard to retry conditions. Default: 5 Async Timeout is only effective when the invocation style used for a Callout is Async with deferred response. |
| Require mediation flow to wait for service response when the flow component is invoked asynchronously with callback | Determines if the call should be forced to act in a synchronous manner. |
Boolean: true or false Default: false This option is only available with Async (Compatibility) and Default (Compatibility) invocation styles. |
| Invocation Style | Determines whether the service is invoked synchronously or asynchronously. |
Sync, Async (deferred), Async (callback), Async one way, Default (Compatibility), Async (Compatibility), As target Default: As target |
| Retry On | Determines whether and how fault responses affect retry. |
Default: Never |
| Retry Count | Number of retry attempts following initial failure before a modeled fault, timeout or fail terminal is fired. |
The number must be an integer greater than or equal to 0. Default: 0 |
| Retry Delay | Sets the delay between retry attempts, in seconds. |
Must be an integer greater than or equal to 0. If 0, there will be no delay between attempts meaning they will run as fast as the server can handle them. Default: 0 |
| Try Alternate Endpoints | Determines if any alternate endpoints should be used on retries. |
This function is only available if 'Use dynamic endpoint' is also True. Default: True |
Input Response
The input response node is an end point in the request and response flows. It returns the processed message as a response to the source operation. In a request flow, you can use the input response in certain conditional situations. For example if an input error is detected, the message can return immediately to the source without invoking the callout.
You can set properties for the Input Response node in the Details tab of the Properties view.
Properties
- Use dynamic endpoint if set in the message header
- When an export is configured with JAX-WS binding, the WS-Addressing support provided by this binding allows the response to be sent to a specified endpoint. This endpoint is normally the address contained in the WS-Addressing ReplyTo header that may be set in the WSAHeader in the request received by the export. The mediation flow can specify a different endpoint address to use, and this endpoint address is set in the SMOHeader of the Service Message Object passed to the Input Response node. This function is only available if dynamic routing is enabled for the Input Response node. Dynamic routing is disabled by default.
The node's properties are presented in the table below.
| Property | Description | Possible Values |
|---|---|---|
| Use dynamic endpoint if set in the message header | Determines if the address contained in the SMOHeader should be used to override the address contained in the WS-Addressing ReplyTo header, if present. | If set to True, and if the SMOHeader contains a Target address, and if the WS-Addressing ReplyTo header is present, the response message is redirected to the address contained in the SMOHeader.
Default: false |
Callout response
The callout response node is a starting point for the response flow. It forwards the message received from the target operation into the response flow.
There is one callout response node for each target operation. Errors that are not defined as WSDL fault messages are propagated to the fail terminal of the callout response node.

Select the check box to include the original request message to propagate the complete message to the fail terminal in the event of a failure. If you don't select the check box, the message information that is propagated includes the failure information (in the failinfo element) and some context information.
Callout Fault
The callout fault node is an end point in the response flow. When a WSDL fault occurs in the invoked operation, the callout fault propagates the fault message to the primitive or node to which it is wired. The callout fault has an output terminal for each fault message type defined in the target operation.

Input Fault
The input fault node is an end point in the request and response flows. It returns a fault message as a response to the source operation. In a request flow, you can use the fault response in certain conditional situations. For example if an input error is detected, a fault message can be returned immediately to the source without invoking the callout. A fault response node has an input terminal for each fault defined on the operation.

Example: Database Lookup mediation primitive
The Database Lookup primitive searches values from a database, and stores them in the message. This example shows you how to use the Database Lookup primitive in the Mediation Flow editor.
In the example, we want to retrieve an employee's salary from the employee database. Let's assume the following:
- The client application passes in the employee's serial number (049728) into serialNumber field of the message body.
- There is an employee record in the EmployeeDatabase with serialNumber = '049728' and salary = '$50,000'.
- We want to retrieve the employee's salary from the database, using the serialNumber field of the message to locate the record in the database.
- We then want to retrieve the value of the SALARY column for the employee's record from the database, and put it in the message body.
This is the corresponding SQL statement:
- select SALARY from EMPLOYEE_TABLE where SERIAL_NUMBER = '049728'
The result, '50000' of type long will be stored in the salary field in the message body.

Set these properties for the primitive in the Details page of the Properties view.
In the Data source field, enter the JNDI name of the data source. In the example, jdbc/sample/EmployeeDatabase
In the Table field, enter the name of the database table, including the schema name. In the example, myschema.EMPLOYEE_TABLE
In the Search column field, enter the name of the database column against which the search string is matched. In the example, this column is SERIAL_NUMBER
In the Search location field, enter the XPath location of a field in the message body. The value of this field is the search string. Click Edit to launch the XPath Expression Builder to build the required XPath expression. In this case that is the value of the serialNumber (049728) from the message body.
In the table, click Add to define the database column from which the value will be retrieved, the type of information it is, and the place in the message where the retrieved value is to be stored. Each data element has three properties:
- Column specifies the name of the database column from which to obtain the element value. In the example, this is SALARY.
- Type specifies the type of the element value. In the example, the type is int.
- Target location specifies an XPath 1.0 expression describing the path location of the message element where the database value is stored. The XPath expression must evaluate to a single element in the message. In the example, the salary value retrieved will be stored in the message body, in the salary field.
See Database Lookup primitive reference.
21. Delete primitives that use XSLT and Business object maps
If you choose to delete a Mapping primitive or a Business object map primitives in the mediation flow editor and the selected primitive is referenced by any mapping artifacts, a Confirm Delete window will enable you to delete the primitive as well as any directly associated mapping artifacts.
To delete Mapping primitives or Business Object Map primitives:
- In the mediation flow editor, select and right-click one or more Mapping primitives or Business Object Map primitives to delete, then select Delete.
- If a Mapping primitive or Business Object Map primitive to delete references a mapping artifact, a Confirm Delete window opens to allow you to also delete the mapping artifact. Complete one of the following steps to work with the window box:
- If you selected a single Mapping primitive or Business Object Map primitive and you want to delete the directly associated mapping artifact, select the check box and then click Yes. (Optionally, you can first click the here link to focus the References view and determine whether deleting the mapping artifact will break any other artifacts that refer to it.)
- If you selected more than one Mapping primitive or Business Object Map primitive, either select or clear the Also delete the <n> maps in the selected mediation primitives check box (where <n> is the number of maps that will be deleted), then click Yes.