Upgrading WebLogic Application Environments
Roadmap for Upgrading Your Application Environment
This section describes how to prepare for and perform an upgrade of your WebLogic application environments. Topics include:
- Plan the Upgrade
- Prepare to Upgrade
- Upgrade Your Application Environment
- Complete Post-Upgrade Procedure
- What to Do If the Upgrade Process Fails
If you are upgrading from WebLogic 9.x, see Upgrading WebLogic Server 9.x or 10.0 Application Environments to 10.3.
Plan the Upgrade
Planning how you will upgrade an application environment is an important step in the process. To ensure that your plan addresses all of the aspects of upgrading that are necessary for your environment, complete the following steps:
- Step 1: Inventory the Application Environment
- Step 2: Verify Supported Configuration Information
- Step 3: Review the Compatibility Information
- Step 4: Create an Upgrade Plan
Step 1: Inventory the Application Environment
Generate an inventory of the application environment, and identify the components defined in Table 2-1. You can view a sample application environment in Overview of the Upgrade Process.

Step 2: Verify Supported Configuration Information
Verify support for all the hardware and software components in the application environment. Table 2-2 lists the key components for which you need to verify support.
| To verify ... | See ... |
|---|---|
| OS and hardware support | “List of Supported Operating System Configurations” in WebLogic Server 10.3 Supported Configurations. |
| Database support | “Supported Database Configurations” in WebLogic Server 10.3 Supported Configurations.
Please note the following:
|
If you are using a pre-5.7 version of PointBase and you want to update your environment to use PointBase 5.7, complete the following tasks before you upgrade your domain:
- Update references to database names within configuration files.
- Update your applications to use PointBase 5.7. Note that the PointBase 5.7 database software is installed as part of the 10.3 installation. See Step 4: Install Required Oracle Products.
The WebLogic Type 4 JDBC Driver for Oracle (deprecated) and the Oracle Thin Driver are installed with WebLogic Server and are ready for use. For more information about using these drivers, see “The Oracle Driver” in Type 4 JDBC Drivers and “Third-Party JDBC Drivers Installed with WebLogic Server” in Configure WebLogic JDBC.
- If you are using an Oracle OCI database driver and want to change to use a Thin database driver, remove the server property (as illustrated below) from the generated JDBC module. For example:
<property>
<name>server</name>
<value>servername</value>
</property> - The Oracle 8.1.7 Oracle Thin driver (oracle.jdbc.driver.OracleDriver) is not supported in WebLogic Server 10.x. If your domain contains JDBCConnectionPools that are configured to use this driver, it is recommended that you reconfigure the connection pools to use another driver. Use of this driver will cause domain upgrade to fail during database upgrade.
Step 3: Review the Compatibility Information
Most existing WebLogic Server applications can be run without modification in the new WebLogic Server 10.3 application environment. However, you should review WebLogic Server 10.3 Compatibility with Previous Releases to determine whether any feature changes affect the applications in your environment.
Step 4: Create an Upgrade Plan
Using the information gathered in the preceding steps, create a plan for upgrading your application environment. Identify the scope and timing of the upgrade process, based on your business needs. Please note the following:
- Oracle does not recommend upgrading an application environment that is currently deployed in production. Instead, you should upgrade your application environment while it is under development or test and execute standard procedures for quality assurance and performance tuning before promoting the upgraded environment to production.
- If your application is complex, for example, if it includes multiple clustered domains and a large number of deployed applications, you may choose to upgrade the components of the application environment in stages.
- You may consider limiting the number of WebLogic Server versions used in any single application environment to minimize the diversity and cost of systems being administered.
- If you use transactional message-driven beans (MDBs) driven by non-WebLogic XA-enabled JMS providers, quiesce gracefully all pending transactions before shutting down and upgrading a server. Pending transactions cannot be recovered after an upgrade. For more information about message-driven beans, see “Message-Driven EJBs” in Programming WebLogic Enterprise JavaBeans.
- If you plan to use the RDBMS security store in a WebLogic domain, Oracle recommends that you create a new domain in which the RDBMS security store is configured. If you have an existing domain in which you want to use the RDBMS security store, you should create the new domain, then migrate your security realm to it. Oracle does not recommend “retrofitting” the RDBMS security store to an existing domain. For more information, see “Managing the RDBMS Security Store” in Securing WebLogic Server.
Prepare to Upgrade
Before you upgrade the application environment, perform the following steps:
- Step 1: Undeploy Your Applications
- Step 2: Shut Down Servers in the Application Environment
- Step 3: Back Up the Application Environment
- Step 4: Install Required Oracle Products
- Step 5: Prepare the Remote Managed Server Domain Directories
- Step 6: Set Up the Environment
Step 1: Undeploy Your Applications
WebLogic Server applications do not need to be undeployed before upgrading the domain. In most cases, WebLogic Server applications can be run without modifications in the new WebLogic Server 10.3 application environment. Review the compatibility information in WebLogic Server 10.3 Compatibility with Previous Releases to determine whether any features changes affect the applications in your environment. Note that if you use deprecated or removed APIs in the application, you might encounter warnings or exceptions at run time.
Step 2: Shut Down Servers in the Application Environment
Before you upgrade, shut down all servers in the application environment.
If you are upgrading a cluster from WebLogic Server 10.0 to 10.3, you do not need to shut down Managed Server instances all at once. Instead, you can perform a rolling upgrade, as described in WebLogic Server Rolling Upgrade.
Step 3: Back Up the Application Environment
You have the option of backing up the domain during the upgrade process, as described in Backup Domain. However, the wizard archives the domain directory only; it does not preserve file permissions.
Oracle recommends that before upgrading your application environment, you manually back up the components defined in Table 2-3. You should back up the relevant information on all machines in the domain.
Step 4: Install Required Oracle Products
Before upgrading your application environment, install the Oracle WebLogic products that you require on each machine in the domain. For more information about installing Oracle WebLogic products, see the Installation Guide.
If you are using Node Manager in your pre-10.0 installation, when installing the 10.3 product, you should set the Node Manager listen port to match the port number used in the pre-10.0 installation, if possible. The default value for the listen port for Node Manager is 5556.
Step 5: Prepare the Remote Managed Server Domain Directories
Some configurations include Managed Servers running on one or more machines that are remote from the Administration Server for the domain. If you have this type of configuration, upgrade the domain directories on each of the machines that host the remote Managed Servers.
To prepare the remote domain directories, copy the following files from the root directory of the pre-upgraded domain directory on the host machine for the Administration Server to the root directory of the host domain(s) of the remote Managed Servers:
- config.xml (configuration file)
- SerializedSystemIni.dat
If the database in your configuration is not compatible with WebLogic Server 10.3, the data must be upgraded to a database that is supported before it can be used in the new application environment. For more information, see Step 4: Create an Upgrade Plan.
Step 6: Set Up the Environment
To set up the environment for an upgrade:
- Open an MS-DOS command prompt window (on Windows) or a command shell (on UNIX).
- Add the WebLogic Server classes to the CLASSPATH environment variable and WL_HOME\server\bin to the PATH environment variable, where WL_HOME refers to the top-level installation directory for WebLogic Server 10.3.
You can perform this step by running the WL_HOME\server\bin\setWLSEnv script.
- If you use JMS JDBC stores:
- Make sure the JDBC driver classes are added to the CLASSPATH environment variable.
- Start the corresponding database.
Upgrade Your Application Environment
Figure 2-1 identifies the steps required to upgrade your application environment. Figure 2-1 Roadmap for Upgrading Your Application Environment
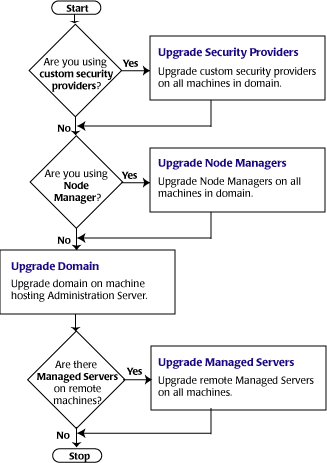
Table 2-4 summarizes the steps for updating an application environment. Some steps are mandatory, others are optional. Each step that is performed must be done on every machine in the domain.
- Upgrade Node Managers
- On all machines in the environment
- Before you start the servers in an upgraded WebLogic domain
- Upgrade WebLogic domain (Administration Server)
Oracle recommends that you upgrade the Administration Server for a domain before the Managed Servers.
- Upgrade WebLogic domain (remote Managed Servers)
Managed Servers that reside on the same machine as the Administration Server do not require additional upgrade steps.
Complete Post-Upgrade Procedure
Once you have used the WebLogic Upgrade Wizard to upgrade the application environment, you may need to perform the following steps:
- Step 1: Upgrade Your Application Infrastructure
- Step 2: Re-apply Customizations to Startup Scripts
- Step 3: Verify File Permissions
- Step 4: Enroll the Machine with Node Manager
- Step 5: Verify Remote Server Startup Options
- Step 6: Promote the Application Environment to Production
Not all of these steps are required for all situations. Review the sections to determine which, if any, of these steps are appropriate for your environment.
Step 1: Upgrade Your Application Infrastructure
Due to recent changes in the MBean hierarchy, Oracle does not guarantee that all existing configuration and administration scripts (such as WLST, wlconfig, weblogic.Admin, Ant, and so on) will run from all pre-9.2 environments. Oracle recommends that you update your scripts to take advantage of the new features introduced in WebLogic Server 9.2, 10.0, and 10.3. For more information about new WebLogic Server features and changes in the MBean hierarchy, see “What's New in WebLogic Server” in the Release Notes.
More information is provided in the following sections about scripting tools, custom configuration templates, and SNMP:
- Deprecated Scripting Tools
- Using the WebLogic Scripting Tool
- Upgrading Your Custom Configuration Templates
- Using SNMP to Monitor WebLogic Server
Deprecated Scripting Tools
The following configuration and administration tools are deprecated as of WebLogic Server 9.0:
- weblogic.Admin utility. For more information, see “weblogic.Server Command-Line Reference” in the WebLogic Server Command Reference.
If you are currently using one of these utilities, Oracle recommends that you use the Oracle WebLogic Scripting Tool, as described in the next section.
Using the WebLogic Scripting Tool
The WebLogic Scripting Tool (WLST) is a command-line scripting interface (built with Jython) that you can use to configure WebLogic domains. Using WLST, WebLogic Server administrators can perform administrative tasks and initiate WebLogic Server configuration changes interactively or by running an executable script.
Online and offline versions of WLST are delivered as a single tool. WLST fully supports the administrative and configuration features offered by 10.3. For more information about WLST, see WebLogic Scripting Tool.
WLST Online and Offline can be run on WebLogic Server 9.0, 9.1, 9.2, 10.0, and 10.3.
As with the other pre-9.2 tools, Oracle does not guarantee that existing pre-9.2 WLST scripts will run in 9.2 or 10.x due to recent changes in the MBean hierarchy. Oracle recommends that you update your scripts to take advantage of the new features provided with WebLogic Server 9.2, 10.0, and 10.3.
For more information about new WebLogic Server features and changes in the MBean hierarchy, see “What's New in WebLogic Server” in the Release Notes.
Upgrading Your Custom Configuration Templates
Table 2-5 summarizes the steps required to upgrade custom configuration templates created with the Template Builder.
| Step | More Information |
|---|---|
| Follow the steps described in Upgrade Your Application Environment. |
| See “What's New in WebLogic Server” in the Release Notes. |
| See: |
Using SNMP to Monitor WebLogic Server
If you use an SNMP manager to monitor WebLogic Server:
- Load the WebLogic Server 10.3 MIB into your SNMP manager.
The MIB is located at BEA_HOME/wlserver_10.3/server/lib/BEA-WEBLOGIC-MIB.asn1. WebLogic Server does not change object identifiers (OIDs) for existing managed objects; it only adds new OIDs for new managed objects.
- If you are generating traps for any deprecated managed objects, create new traps for the replacement objects.
For a list of deprecated managed objects, see “Deprecated MBeans” in WebLogic Server MBean Reference. The description of each deprecated MBean includes a pointer to the replacement MBean. (Each SNMP managed object corresponds to an MBean attribute.)
A number of runtime MBeans that are internal to Oracle have been removed from the MIB. These MBeans are not included in the deprecated MBeans list. For more information, see the WebLogic Server Known and Resolved Issues.
Step 2: Re-apply Customizations to Startup Scripts
To complete the upgrade of your application environment to 10.3, you may need to re-apply any customizations to startup scripts. The following sections describe how to customize the default startup scripts as well as any custom startup scripts.
Default Startup Scripts
The Upgrade Wizard does not carry forward any customizations that have been made to the default startup scripts, such as the setting of the JAVA_OPTIONS environment variable. After the upgrade process is complete, you will need to customize the default scripts again.
If you are upgrading your domain to 10.3 and you want to continue using a pre-5.7 version of PointBase, add the JAR files for the pre-5.7 version of the PointBase database to the beginning of the CLASSPATH environment variable definition. To do so, update the set CLASSPATH statement in your setDomainEnv files.
You can use the pre-5.7 version of PointBase only for WebLogic Server domains.
Custom Startup Scripts
If you have created custom startup scripts, you will need to update them manually, as follows:
- Set the JDK version to JDK 6.0.
- Update the CLASSPATH variable, as follows:
- Add WebLogic Server 10.3 classes to the beginning of the variable.
- Remove all unused pre-10.3 WebLogic classes.
- If you want to continue using your pre-5.7 version of PointBase, include the pre-5.7 versions of the PointBase database JARs at the beginning of the CLASSPATH environment variable definition.
Step 3: Verify File Permissions
Verify the file permissions, as follows:
- If you backed up the domain directory as part of the upgrade, you now need to make your backup files secure, as they may contain confidential information.
- During the upgrade process, file permissions are not preserved. If non-default file permissions were set on files, they need to be verified and reset.
- On a UNIX system, ownership and permissions for any new files created during the upgrade process are assigned to the user performing the upgrade. For example, if the upgrade is performed by root, then root is assigned ownership of any new files. As a result, any user who subsequently wants to update these files in the domain must have root privileges. You may want to review and/or modify the permissions on files created during the upgrade process.
Step 4: Enroll the Machine with Node Manager
If you upgrade Node Manager during the upgrade process, enroll the machine that is hosting the WebLogic domain with Node Manager. This can be accomplished using the nmEnroll command.
If the nodemanager.domains file resides on the machine where the Administration Server and Managed Server are configured to run and they share the same domain directory, you can manually edit the file to include an entry for the domain, in the following form: <domain-name>=<domain-directory>.
| Note: | This file is located in WL_HOME/common/nodemanager, by default (where WL_HOME refers to the top-level installation directory for WebLogic Server). |
| Note: | For more information, see “Configuring nodemanager.domains File” in “General Node Manager Configuration” in Node Manager Administrator's Guide. |
The nmEnroll command updates the nodemanager.domains file under the WL_HOME/common/nodemanager directory with information about the domain, where WL_HOME refers to the top-level installation directory for WebLogic Server. The nodemanager.domains file specifies the domains that a Node Manager instance controls. This file is necessary so that standalone clients do not need to specify the domain directory explicitly.
This command also downloads the following files from the Administration Server:
- nm_password.properties, the Node Manager secret file, which contains the encrypted username and password that is used for server authentication
- SerializedSystemIni.dat file
To enroll the machine with Node Manager using the nmEnroll command:
- Set up your environment, as described in “Setting Up Your Environment” in WebLogic Scripting Tool.
- Invoke WLST, as described in
“Invoking WLST” in WebLogic Scripting Tool.
As described in step 2, start a WebLogic Server instance and connect WLST to the server using the connect command.
- Once WLST is connected to the Administration Server, enter the
nmEnroll command to enroll the machine on which WLST is running with Node Manager.
You have the option of specifying:
- Path of the domain directory in which you want to save the Node Manager secret file (nm_password.properties) and SerializedSystemIni.dat file. By default, these files are saved in the directory in which WLST was started.
- Path of the Node Manager home directory. The nodemanager.domains file, containing the information about the domain, is written to this directory. By default, the directory used for this purpose is WL_HOME/common/nodemanager, where WL_HOME refers to the top-level installation directory for WebLogic Server.
For example, if the domain directory is specified as c:/bea/mydomain/common/nodemanager, and the default home directory for Node Manager, WL_HOME/common/nodemanager, is used, then you enroll the machine on which WLST is running with Node Manager by entering the following command:
wls:/mydomain/serverConfig> nmEnroll('c:/bea/mydomain/common/nodemanager')

Enrolling this machine with the domain directory at c:\bea\mydomain\common\nodemanager....

Successfully enrolled this machine with the domain directory at C:\bea\mydomain\common\nodemanager

wls:/mydomain/serverConfig>
For more information, see nmEnroll in WebLogic Scripting Tool.
Step 5: Verify Remote Server Startup Options
Once you start the Administration Server, verify the remote server start options, such as JAVA_HOME, BEA_HOME, and CLASSPATH, reference the WebLogic Server 10.3 installation on the target managed server. This can be accomplished using the Administration Console, as described in “Configure startup arguments for Managed Servers” in Administration Console Online Help.
WARNING: If the remote server startup options are not set correctly, when attempting to start a Managed Server using Node Manager, messages similar to the following may be written to the log file. Because these messages may be sent recursively, they may eventually consume all space available on the drive.
No config.xml was found.


Would you like the server to create a default configuration and boot? (y/n):

java.io.IOException: The handle is invalid

at COM.jrockit.io.FileNativeIO.read(III)I(Native Method)

at COM.jrockit.io.NativeIO.read(Ljava.io.FileDescriptor;II)I(Unknown Source)

at COM.jrockit.io.NativeIOInputStream.read(II)I(Unknown Source)

at COM.jrockit.io.NativeIOInputStream.read(I[BI)I(Unknown Source)

at COM.jrockit.io.NativeIOInputStream.read([BII)I(Unknown Source)

at java.io.FileInputStream.read([BII)I(Unknown Source)
Step 6: Promote the Application Environment to Production
Execute standard procedures for quality assurance and performance tuning before promoting an application environment to production. You should test the execution of your applications (including external client applications) in your test application environment. If your applications use APIs that have been deprecated or removed, then you may encounter warnings or exceptions at run time. If you do, you can make any required modifications before promoting your applications to production.
Once all test criteria have been met, you can promote the application environment to production, as outlined in your upgrade plan (defined previously in Step 4: Create an Upgrade Plan).
Once the new 10.3 application environment is deployed into production, you can start redirecting requests to the new environment from the existing environment. Gradually, you can quiesce the existing environment. This might be accomplished using a load balancer, for example.
What to Do If the Upgrade Process Fails
If any step in the upgrade process fails, the WebLogic Upgrade Wizard displays a message indicating the reason for the failure and terminates. To proceed, perform the following steps:
- Restore the application environment to its original state using the backup files created in Step 3: Back Up the Application Environment.
- Correct the failure reported by the WebLogic Upgrade Wizard.
- Continue with the upgrade process from the step at which the failure occurred, as described in Upgrade Your Application Environment.