Set up the target environment
Migrating to a new release of Portal requires setting up a target environment . This new target environment might be a separate system, remote migration, or reside on the same system where we are migrating from if you choose to perform a local migration. Independently from the migration path chosen, the target environment requires a fresh, binary only, Portal installation. Meaning setting up the target environment without creating any profiles.
Install only the binary files. This install does not create profiles or pre-deploys applications or start servers.
Install Portal v8 using IBM Installation Manager
- Review System requirements
- If you previously performed a full Portal installation, remove any profile created.
- Launch IBM Installation Manager.
- Follow the on-screen instructions to install WebSphere Portal binary files only.
While in the Features screen, unselect...
-
Create a new Portal Server Profile
Create a new dmgr Profile augmented with WebSphere Portal - Proceed with the remaining instructions to complete the binary installation.
When installing on z/OS, binary installation is the only available option
Install WAS v8.5.5
By default, Portal v8 is installed with WAS v8.0. We can configure Portal v8 with WAS v8.5.5 if you install WAS first, then install Portal v8 specifying "Using existing WAS installation".
The following procedure installs WAS ND v8.5.5 twice, once for a dmgr, once for portal
- On your notebook computer, download, install, and run XMing X server
- Log on to target host
- Install and run Installation Manager v1.6...
-
username@hostname /home/username ->xauth list
hostname/unix:11 MIT-MAGIC-COOKIE-1 0c723ae2ccd7660271b1bafc01b5d55f
hostname/unix:10 MIT-MAGIC-COOKIE-1 d15b40a439806573a57f10099fa9cfaf
username@hostname /home/username ->sudo su -
root@hostname / ->xauth add hostname/unix:10 MIT-MAGIC-COOKIE-1 d15b40a439806573a57f10099fa9cfaf
root@hostname / ->DISPLAY=localhost:10.0
root@hostname / ->export DISPLAY
root@hostname / ->xclock
root@hostname /cd /media/installmgr
root@hostname / ./installc -acceptLicense
root@hostname / cd /opt/IBM/InstallationManager/eclipse
root@hostname / ./IBMIM - Log on to target host as yourself
- Set ulimit
-
ulimit -n 10240
- Set up X windows and sudo to root...
-
username@hostname /home/username ->xauth list
hostname/unix:11 MIT-MAGIC-COOKIE-1 0c723ae2ccd7660271b1bafc01b5d55f
hostname/unix:10 MIT-MAGIC-COOKIE-1 d15b40a439806573a57f10099fa9cfaf
username@hostname /home/username ->sudo su -
root@hostname / ->xauth add hostname/unix:10 MIT-MAGIC-COOKIE-1 d15b40a439806573a57f10099fa9cfaf
root@hostname / ->DISPLAY=localhost:10.0
root@hostname / ->export DISPLAY
root@hostname / ->xclock - Start Installation Manager
-
/opt/IBM/InstallationManager/eclipse
./IBMIM...and go to...
-
File | Preferences | Repositories | Add Respository

- Add WAS v8.5.5 repository...
-
/media/WAS855/repository.config
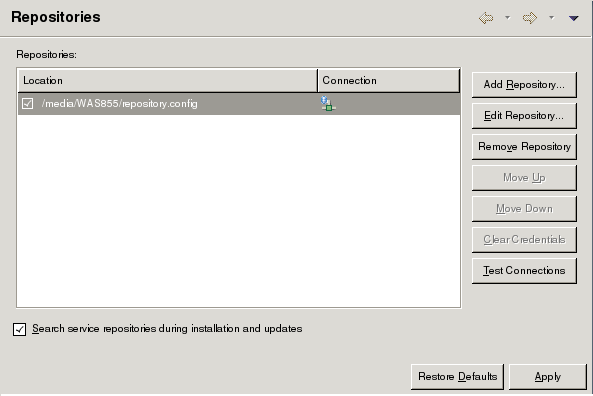
..and then click Apply
- On IIM main page, click Install, select the WAS ND package, then click Next...

- Accept the license terms, then click Next
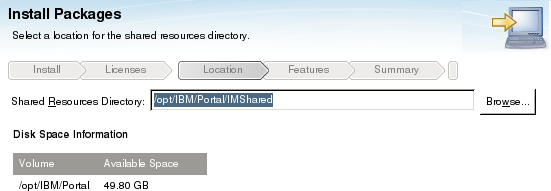
- Set location of Shared Resources Directory
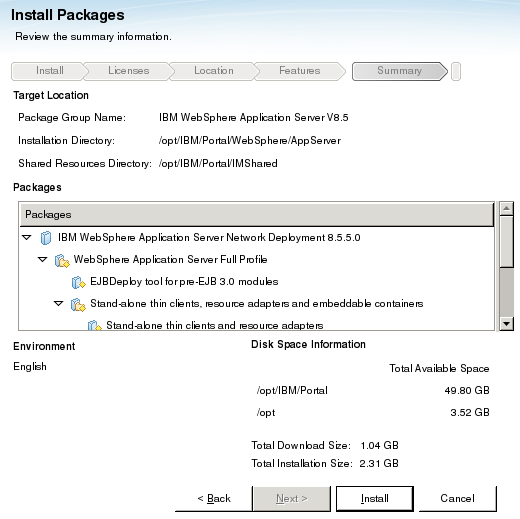
-
/opt/IBM/Portal/IMShared
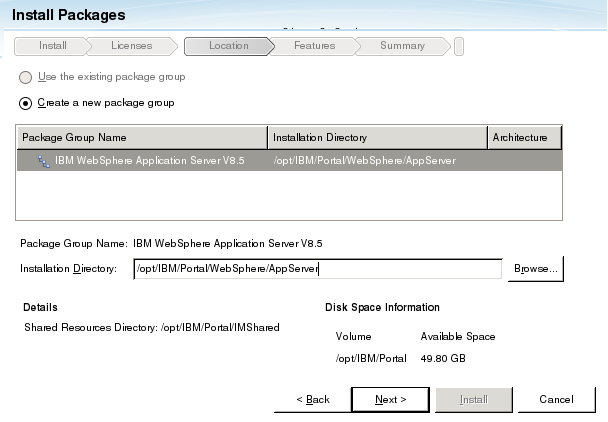
- Set WAS home
-
/opt/IBM/Portal/WebSphere/AppServer
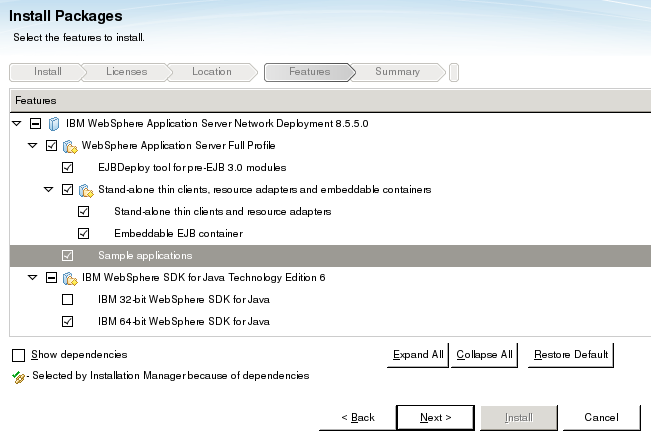
- Select default features
- Accept summary information
- On last screen, select None, then Finish

- Select Install again, the select Continue.
- On the Install Packages screen, select...
-
Create a new package group
...and for Installation Directory select...
-
/opt/IBM/Portal/WebSphere1/AppServer
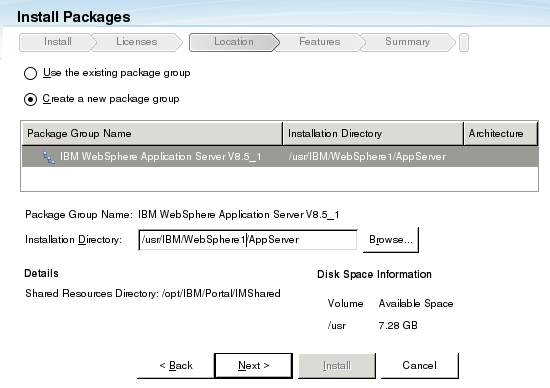
- Select defaults for remainder of panels, then on summary page, select Install
- On last screen, select None, then Finish
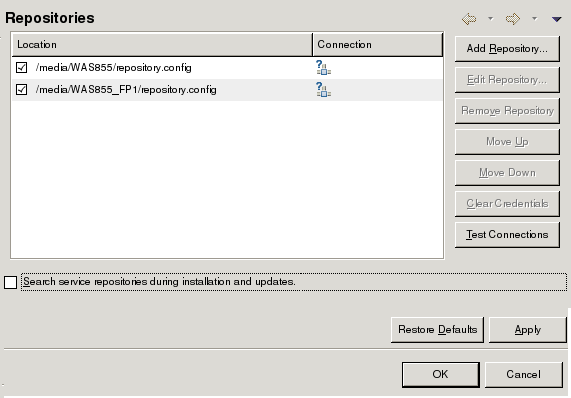
- Add repository for WAS 8.5.5 FP 1
-
/media/WAS855_FP1/repository.config
Uncheck: "Search service repositories during installation and updates"
- On the main IIM page, select Update
- On the "Select a package group to find updates for", select first package group

- On the panel, "Select updates to install", verify V8.5.5.1 is selected
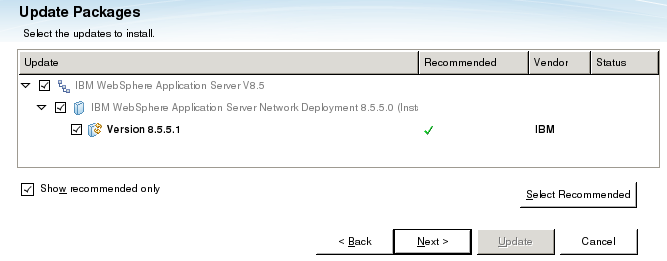
- On the panel, "Select the features to install", keep defaults, then select Next

- On the Summary panel, select Update
Install Portal
- Add repository...
-
/media/Portal8/Setup/eimage/repository.config

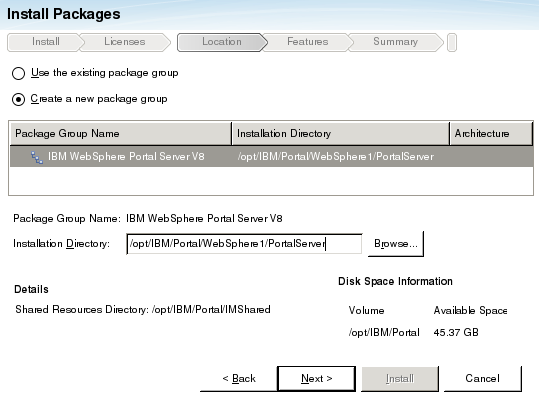
- On Install Packages panel, select IBM WebSphere Portal Server

- Select "Create a new package group" and set Installation Directory to...
-
/opt/IBM/Portal/WebSphere1/PortalServer
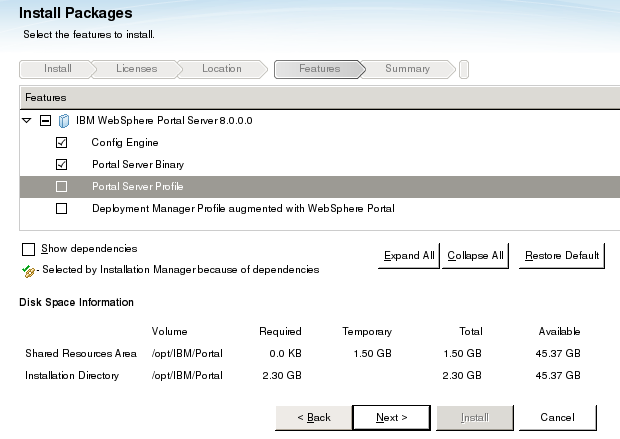
- For features, select only...
- Config Engine
- Portal Server Binary
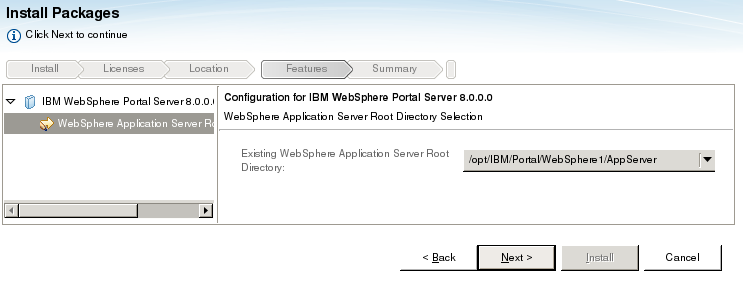
- On the next screen, select "Existing WebSphere Application Server Root Directory"
-
/opt/IBM/Portal/WebSphere1/AppServer
- On the Summary page, click install...

Parent: Migrate
See also:
Portal V6.1.x on application server V6.1: Install fixpacks
Install fixpacks - Portal v61
Install fixpacks - Portal v7
Related:
Migration overview
Migrate Portal on AIX IBM i Linux Solaris Windows
The installation methods
Post-migration activities
Install WAS v8.5.5
By default, Portal v8 is installed with WAS v8.0. We can configure Portal v8 with WAS v8.5.5 if you install WAS first, then install Portal v8 specifying "Using existing WAS installation".
The following procedure installs WAS ND v8.5.5 twice, once for a dmgr, once for portal
- On your notebook computer, download, install, and run XMing X server
- Log on to target host
- Install and run Installation Manager v1.6...
-
username@hostname /home/username ->xauth list
hostname/unix:11 MIT-MAGIC-COOKIE-1 0c723ae2ccd7660271b1bafc01b5d55f
hostname/unix:10 MIT-MAGIC-COOKIE-1 d15b40a439806573a57f10099fa9cfaf
username@hostname /home/username ->sudo su -
root@hostname / ->xauth add hostname/unix:10 MIT-MAGIC-COOKIE-1 d15b40a439806573a57f10099fa9cfaf
root@hostname / ->DISPLAY=localhost:10.0
root@hostname / ->export DISPLAY
root@hostname / ->xclock
root@hostname /cd /media/installmgr
root@hostname / ./installc -acceptLicense
root@hostname / cd /opt/IBM/InstallationManager/eclipse
root@hostname / ./IBMIM - Log on to target host as yourself
- Set ulimit
-
ulimit -n 10240
- Set up X windows and sudo to root...
-
username@hostname /home/username ->xauth list
hostname/unix:11 MIT-MAGIC-COOKIE-1 0c723ae2ccd7660271b1bafc01b5d55f
hostname/unix:10 MIT-MAGIC-COOKIE-1 d15b40a439806573a57f10099fa9cfaf
username@hostname /home/username ->sudo su -
root@hostname / ->xauth add hostname/unix:10 MIT-MAGIC-COOKIE-1 d15b40a439806573a57f10099fa9cfaf
root@hostname / ->DISPLAY=localhost:10.0
root@hostname / ->export DISPLAY
root@hostname / ->xclock - Start Installation Manager
-
/opt/IBM/InstallationManager/eclipse
./IBMIM...and go to...
-
File | Preferences | Repositories | Add Respository
- Add WAS v8.5.5 repository...
-
/media/WAS855/repository.config
..and then click Apply
- On IIM main page, click Install, select the WAS ND package, then click Next...
- Accept the license terms, then click Next
- Set location of Shared Resources Directory
-
/opt/IBM/Portal/IMShared
- Set WAS home
-
/opt/IBM/Portal/WebSphere/AppServer
- Select default features
- Accept summary information
- On last screen, select None, then Finish
- Select Install again, the select Continue.
- On the Install Packages screen, select...
-
Create a new package group
...and for Installation Directory select...
-
/opt/IBM/Portal/WebSphere1/AppServer
- Select defaults for remainder of panels, then on summary page, select Install
- On last screen, select None, then Finish
- Add repository for WAS 8.5.5 FP 1
-
/media/WAS855_FP1/repository.config
Uncheck: "Search service repositories during installation and updates"
- On the main IIM page, select Update
- On the "Select a package group to find updates for", select first package group
- On the panel, "Select updates to install", verify V8.5.5.1 is selected
- On the panel, "Select the features to install", keep defaults, then select Next
- On the Summary panel, select Update
Install Portal
- Add repository...
-
/media/Portal8/Setup/eimage/repository.config
- On Install Packages panel, select IBM WebSphere Portal Server
- Select "Create a new package group" and set Installation Directory to...
-
/opt/IBM/Portal/WebSphere1/PortalServer
- For features, select only...
- Config Engine
- Portal Server Binary
- On the next screen, select "Existing WebSphere Application Server Root Directory"
-
/opt/IBM/Portal/WebSphere1/AppServer
- On the Summary page, click install...
Parent: Migrate
See also:
Portal V6.1.x on application server V6.1: Install fixpacks
Install fixpacks - Portal v61
Install fixpacks - Portal v7
Related:
Migration overview
Migrate Portal on AIX IBM i Linux Solaris Windows
The installation methods
Post-migration activities