WebSphere Lombardi Edition 7.2 > Modeling processes > Advanced modeling tasks > Build services
Build a Human service
Build a Human service when you want a step in your BPD to create an interactive task that process participants can perform in a Web-based user interface. When you build Human services, you include Coaches, which are the web-based forms that provide process-related data to end users as well as collect input from those users. Coaches enable you to easily add standard fields and controls such as radio buttons, drop-down menus, and so on.
If you add an activity to a non-system lane in a BPD, the activity is initially implemented using the default human service. You can double-click an activity in a non-system lane to open the default human service. By examining the service components and running the default service in the Inspector, you can get an idea of how Human services work and how Coaches are used to display and collect data from process participants.
The following steps describe how to build a sample Human service. The service in the sample enables employees to enter expenses for the Expense Reimbursement BPD that you can create by following the tasks outlined in Basic modeling tasks.
In the following procedure, we use the Activity Wizard to create a
Human service. You can also create a Human service from scratch
-
Start with the Expense Reimbursement BPD, right-click the Enter Expenses activity and select Activity Wizard from the list of options.
-
In the Activity Wizard - Setup Activity dialog, make the following selections:
Service Type Human Service (Service with human interaction) Service Selection Create a New Service And then type a name for the new service in the New Service Name field. (The name for this sample service is Enter Expense.)
- In the Activity Wizard - Setup Activity dialog, click the Next button.
-
In the Activity Wizard - Parameters dialog, choose the existing process variables to use as input and output for this new service.
If you implemented the steps in Add process variables to a BPD, you can see the private variable named request. For this sample, click true in the Input field to change the setting to false and leave the Output field set to true. This enables us to collect the data for the expense using this new service and then output those values for the subsequent process steps to act upon.
Click the Finish button. The new service is created and attached to the activity. The new service includes a single Coach.
- Double-click the activity for which you created the new service using the Activity Wizard. (In this sample, the Enter Expenses activity.)
-
The new service opens in the Designer and you can see the diagram as shown in the following image:
-
Click the Coaches tab and then click the listed Coach component.
Because we used the Activity Wizard, the Coach includes a form element for each of the parameters in the request structure :
The Coach designer is where you customize the Coach layout and create or edit the bindings between inputs and outputs. Notice that when the Coach designer is open, the Palette view shows all the elements—Sections and Controls—that you can use in a Coach. (Hover over a control to view a brief description. See Build Coaches for more information about the Coach designer.)
-
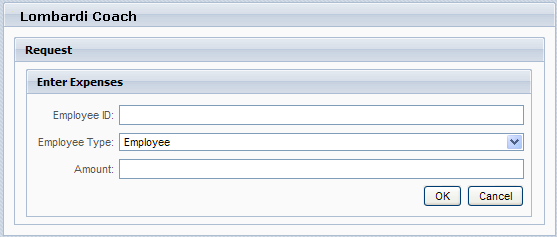
In the Coach designer, right-click the Status control (input text field) and select Delete from the list of options. The status of a request is not data that we need to collect from employees, but is a value set later after a request is further processed and so it can be removed.
-
In the Coach designer, click the Id control (input text field).
In the properties, you can see the label for the field is Id: to match the parameter in the request variable. Change the label to Employee ID: so that employees know exactly which ID to provide.
-
In the Coach designer, click the Type control (input text field).
In the properties, you can see the label for the field is Type: to match the parameter in the request variable. Change the label to Employee type:.
-
To enable employees to select from an existing list of employee types, in the properties for the Employee type control (input text field) click the drop-down list for Control Type and choose Single Select.
Select the Presentation option in the properties. In the Widget Style section, choose Drop Down List for the Widget Type option.
In the Manual Data section, click the Add button to add a value and associated display text for each option that you want in the drop-down list.
-
To add a Cancel button to the Coach, select the control that contains the Ok button in the Coach designer.
In the Presentation properties for the control, go to the Buttons section and click Add.
In the Button Details, enter Cancel for the label and click the Is Cancel checkbox.
- Click Save in the main toolbar.
-
Click the Preview tab at the bottom of the Coach designer to view the Coach. The Preview tab shows how the Coach will appear to end users when the BPD runs.
You can also click the Run icon in the upper right to view the Coach in a Web browser.


Parent topic: Build services