WebSphere Lombardi Edition 7.2 > Modeling processes > Advanced modeling tasks > Build Coaches
Customize Coaches
In a typical Lombardi deployment, Coaches are highly customized to render a particular look and feel. For example, you may want to customize Coaches to use corporate logos and colors. In many cases, you can meet your customization requirements by configuring the presentation and visibility properties available in the Designer interface. Read the following topics to learn more about customizing Coaches:
| To learn... | See... |
|---|---|
| How Coaches are rendered at run time | How Coaches work |
| Include corporate branding and other graphic customizations in Coaches | Add custom images to a Coach |
| Create a CSS override for either the label of a Coach control or for the control itself | Overriding CSS styles for selected controls and fields |
| Use your own Cascading Style Sheet (CSS) to customize the look and feel and of an entire Coach | Specify a custom CSS for a Coach |
| Use your own XSL to customize the rendered HTML for a Coach | Specify an XSL transform override for a Coach |
| Override CSS styles in a Coach control to set the maximum length (in pixels) for an Input Text control | Set the length of input text fields |
| Add custom attributes to Coach sections and controls to enhance the design of your interfaces | Use custom attributes |
How Coaches work
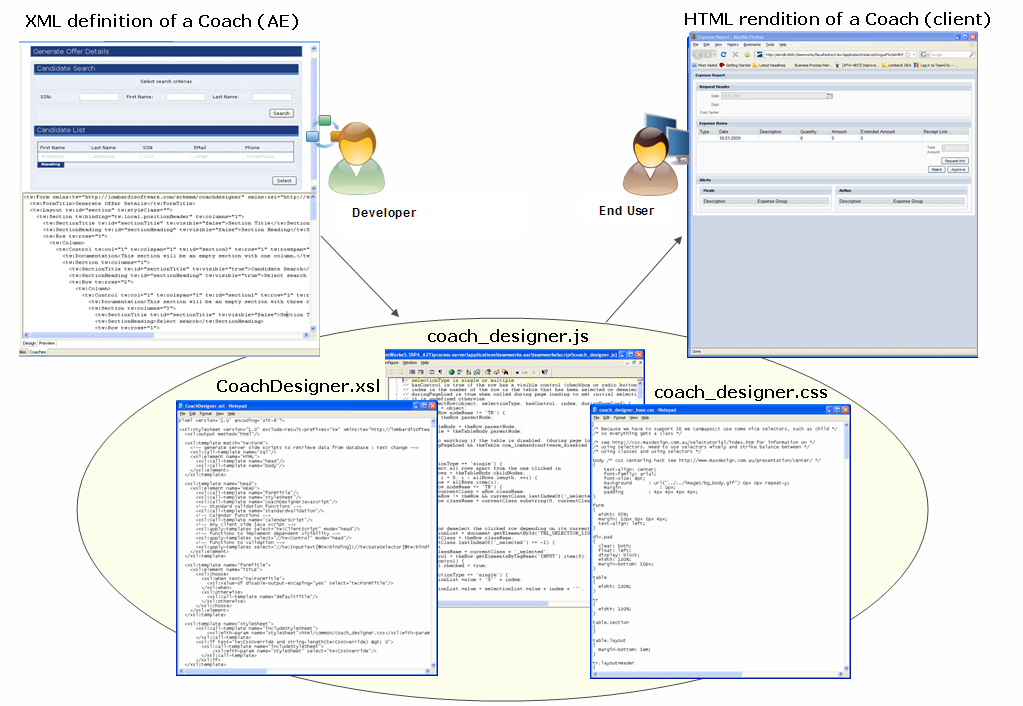
Before you customize Lombardi Coaches, you should have a good understanding of how they work to ensure that your customizations produce the desired results. The runtime rendering of a Coach involves the following key technologies:
| XML | The design of a Coach is in XML. As you drag sections and controls to a Coach, Lombardi automatically generates the XML definition of the Coach. You can view the XML while you're building a Coach by clicking the Code View icon in the toolbar |
| XSLT | The Extensible Stylesheet Language Transformation (XSLT) transforms the XML definition to the runtime HTML form. The XLS renders a server-side-scriptlet that is executed to generate the HTML. |
| HTML | The client (Web browser) renders the HTML that the Coach generates from its XML definition through XSLT processing. |
| CSS | The Cascading Style Sheet (coach_designer.css in the following image) instructs the client how to render the HTML output. |
| JavaScript | JavaScript provides the methods and functions that implement runtime Coach features, such as dynamically adding rows to a table or governing the visibility of Coach controls. JavaScript that is embedded in the XML definition of a Coach is evaluated by the runtime engine before it is rendered to HTML by the Web browser client. Both client-side and server-side JavaScript is used to render Coaches. |
The following image shows how Coaches are generated:
If you have the required technical expertise, you can use the
following methods to customize Lombardi Coaches:
- Override and customize Cascading Style Sheets (CSS)
- Edit the XML definition
- Edit the JavaScript files
- Edit the XSL transformation rules
The following topics describe some of the customization options most commonly used for Lombardi Coaches.
Add custom images to a Coach
Coaches can include corporate branding and other graphic customizations. When you need to add custom images, add the necessary files to your process application as managed assets. See Manage external files for more information. When you add an image as a managed file, you can simply drag the image from the library in the Designer to the design area of an open Coach. Using this method, your images are included when you install snapshots of process applications on servers in test, production, or other environments.
Overriding CSS styles for selected controls and fields
You can override Cascading Style Sheet (CSS) styles to customize the
appearance of a Coach. You can create a CSS override for either the label of a
Coach control or for the control itself
- Open the service that contains the Coach that you want to work with and then click the Coaches tab.
- In the design area, click to select the Coach control that you want to customize.
- Click the Customization option in the properties.
- Click the Add Class button.
-
Under Class Details, type a name in the Class Name text box.
By default, this field includes the name, class. You need to replace this text with the class name that you want.
-
To override the CSS styles for the label of the Coach control, click the Create label override button.
This creates a .class_name .twLabel { } CSS class, which is stored directly within the Coach and can be accessed
- In the design area, click on the top-level section of the Coach (named Lombardi Coach by default) and then click the CSS option in the properties.
-
In the CSS text box, type your CSS override settings. For example, the following CSS override changes the color of the label text to red and the typeface of the label text to bold:
.class_name .twLabel { color:red; font-weight:bold; }
-
To override the CSS styles for the Coach control itself, go back to the Customization properties for the selected control and click the Create control override button.
This creates a .class_name .twControl { } CSS class.
- In the design area, click on the top-level section of the Coach (named Lombardi Coach by default) and then click the CSS option in the properties.
-
In the CSS text box, type your CSS override settings. For example, the following CSS override changes the typeface of the text in the control to italic:
.class_name .twControl { font-style:italic; }
- Save the Coach and then run the service to test the CSS overrides.
Specify a custom CSS for a Coach
You can use your own Cascading Style Sheet (CSS) to customize the look and feel of an entire Coach. The following procedure describes how to specify a custom style sheet for a Coach.
When you initially create a Coach, it uses the Coach CSS setting for the process application or toolkit in which the Coach resides. The default Coach CSS for process applications and toolkits is the coach_designer.css file that is stored in the System Data toolkit. Administrators can change the Coach CSS setting for process applications and toolkits Edit process application settings and Edit toolkit settings.
- Add the CSS file that you want to use to your current project or to a referenced toolkit
- Open the service that contains the Coach that you want to work with and then click the Coaches tab.
- In the design area, click on the top-level section of the Coach (named Lombardi Coach by default) and then click the Coach option in the properties.
- For the CSS Override field, click the Select button and choose the CSS file that you added in step 1. (You can click the New button and add a new CSS file
- Save the Coach and then run the service to test the CSS overrides.
Specify an XSL transform override for a Coach
You can use your own .xsl file to customize the look and feel of an entire Coach. The following procedure describes how to specify a custom XSL transform for a Coach.
When you initially create a Coach, it uses the Coach XSL setting for the process application or toolkit in which the Coach resides. The default Coach XSL for process applications and toolkits is the CoachDesigner.xsl file that is stored in the System Data toolkit. Administrators can change the Coach XSL setting for process applications and toolkits
- Add the .xsl file that you want to use to your current project or to a referenced toolkit
- Open the service that contains the Coach that you want to work with and then click the Coaches tab.
- In the design area, click on the top-level section of the Coach (named Lombardi Coach by default) and then click the Coach option in the properties.
- For the XSL Transform Override field, click the Select button and choose the .xsl file that you added in step 1. (You can click the New button and add a new .xsl file
- Save the Coach and then run the service to test the XSL transform override.
Set the length of input text fields
Overriding CSS styles in a Coach control also enables you to set the
maximum length (in pixels) for an Input Text control. Setting the maximum
length for an Input Text control does not restrict the number of characters
that an end user can type into the text box.
- Open the service that contains the Coach that you want to work with and then click the Coaches tab.
- In the design area, click to select the Coach control that you want to customize.
- Click the Customization option in the properties.
- Click the Add Class button.
-
Under Class Details, type a name in the Class Name text box.
By default, this field includes the name, class. You need to replace this text with the class name that you want.
-
To override the CSS styles for the Coach control, click the Create control override button.
This creates a .class_name .twControl { } CSS class.
- In the design area, click on the top-level section of the Coach (named Lombardi Coach by default) and then click the CSS option in the properties.
-
In the CSS text box, type the CSS override settings to specify the maximum input length (in pixels) for the control's input text box. For example, the following CSS override sets the length to 110 pixels:
.class_name .twControl { width:110px; }
- Save the Coach and then run the service to test the CSS overrides.
Use custom attributes
You can add custom attributes to Coach sections and controls to
enhance the layout of the interfaces that you create for end users. For
example, you can add a custom attribute to enable end users to expand and
collapse a section in a Coach
- Open the service that contains the Coach that you want to work with and then click the Coaches tab.
-
In the design area, click to select the Coach section that you want to customize.
This example requires a Coach section with a visible title that is nested within another section.
- Click the Customization option in the properties.
- Click the Add Attribute button.
-
Type showHide in the Name text box.
By default, this field includes the name, key. You need to replace this text with the key name that you want.
-
To make the section collapsible, type true in the Value text box.
By default, this field includes the text, value. You need to replace this text with the value that you want.
To make the section collapsible and collapsed by default, type hidden in the Value text box.
- Save the Coach and then run the service to test the custom attribute.
The custom attributes that you add when building a Coach pass information to the XSL about how the page should be rendered. When you switch to the Coach XML view, you can see any name-value attributes in the XML. Lombardi provides the following attributes that you can use just as the showHide attribute is used in the preceding steps:
| Attribute | Description | Applies to | Example value |
|---|---|---|---|
| cssStyle | Overrides a CSS style | Input Text (or equivalent) | width: 100px |
| cssClass | Overrides a CSS class (be sure to include the standard CSS class if you want the default functionality as well) | Input Text (or equivalent) | inputText important |
| height | Enables scrollable tables and sections (the table or section will always be the given height, even when there is not enough data to fill it. The header of the table scrolls with the data.) | Table or Section | 200px |
| width | Sets the width of a table column | Cell | 75% |
| precision | Displays numbers with the specified number of digits after the decimal | InputText or Output Text | 2 |
| symbolPre | Displays the given symbol before a value | InputText | $ |
| symbolPost | Displays the given symbol after a value | InputText | % |
| position | Specifies the location of a label, such as on top (the label must be visible) | Label | top |
You can create completely new attributes and extend the capabilities of the Coach Designer by adding XML attributes directly to a Coach's XML. When you add attributes to a Coach's XML, you need to customize the Coach XSL to support the new attribute.
Parent topic: Build Coaches