WebSphere Lombardi Edition 7.2 > Modeling processes > Advanced modeling tasks > Integrate with other systems > Create inbound integrations
Build a sample inbound integration
To implement an inbound integration in Lombardi, build several components that work together. The following table lists the steps required to build a sample inbound integration.
You can build the required components in the order that works best for you, the steps below simply provide a suggested approach.
| Task | See.. |
|---|---|
| 1. Add a message event to a BPD | Add a message event to a BPD |
| 2. Create a service to pass information and a correlation ID to the BPD (handler service) | Create a handler service |
| 3. Create an event-based UCA to wrap the service from step 2 | Create a UCA |
| 4. Attach the UCA to the message event from step 1 | Attaching the UCA to the message event |
| 5. Create a service with appropriate inputs to call the UCA to send the event (caller service) | Create a caller service |
| 6. Create an inbound Web Service | Create an inbound Web Service |
| 7. Add the caller service from step 4 to the inbound Web Service | Create an inbound Web Service |
| 8. Test the completed inbound integration | Testing the integration |
The steps in the referenced sections in the preceding table describe how to create simple components so that you can easily follow along and also easily test your initial implementation. References to more detailed descriptions of the implementation options for each component are provided in the relevant sections.
Add a message event to a BPD
To build a sample inbound integration, you can start by adding a message event to a simple BPD.
-
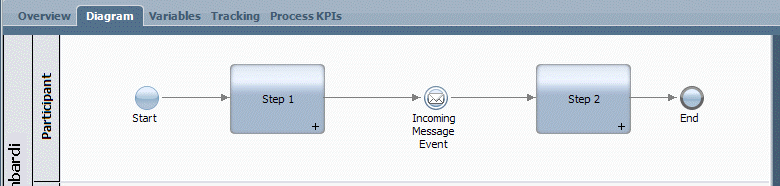
Create a simple BPD that contains two activities like the one shown in the following image.
- Drag an Intermediate Message Event component from the palette onto the BPD diagram so that it falls between the two activities.
-
Use the Sequence Flow tool to connect the BPD components as shown in the following example.
We'll come back to the message event to set its implementation properties after creating a handler service (for the required UCA) and the UCA.
- Save your work.
Create a handler service
The UCA that you attach to the message event needs a handler service to pass the parameter values from the run-time message to the BPD.
For intermediate message events like the one in this sample inbound
integration, even if no parameter values are being passed from the message
event to the BPD, you must map a UCA input variable to a local variable to
ensure that the correct running instance of the BPD resumes execution upon
receipt of the message event.
- Create a General System service and name it My UCA Handler or something similar. (If you need detailed instructions,
-
Use the Sequence Flow tool to connect the Start Event and End Event components in the service diagram.
Because this service is used to simply pass values, you do not need to add any service components to the diagram.
- Click the Variables tab.
- Click the Add Input button and replace Untitled in the Name field with someString.
- Leave the variable type for the input variable set to String.
- Click the Add Output button and replace Untitled in the Name field with someString.
- Leave the variable type for the output variable set to String.
- Save your work.
Create a UCA
After you create the handler service, you can create the UCA to wrap
that service. The UCA tells Lombardi what service to run when the message is
received. The message can be triggered by Lombardi itself or by an external
system as in this example.
- In the Designer view, click the plus sign next to Implementation and then select Undercover Agent from the list.
-
In the New Undercover Agent dialog, enter the following information and then click the Finish button.
Name Type My UCA or something similar for the name. Schedule Type Select On Event from the drop-down list. Attached Service Click the Select button and choose the handler service, My UCA Handler, that you created in the preceding procedure. - In the Details section, the queue for processing this UCA is set to Async Queue by default. This setting is fine for the sample integration.
- In the Parameter Mapping section, you can see that the UCA is automatically mapped to the someString variable from the attached service, My UCA Handler.
-
Save your work.
Now that the UCA is available, you can attach it to the message event
Attaching the UCA to the message event
After you create the UCA, you should go back to the message event in
the BPD and attach the UCA
- Open the BPD that includes the message event.
- Click the message event in the BPD to select it.
- Click the Implementation option in the properties.
- In the Message Trigger section, click the Select button next to the Attached UCA field and pick My UCA that you created in the preceding steps.
- Leave the Consume Message and Durable Subscription check boxes enabled.
-
Notice that the UCA Output Correlation is automatically set to the someString variable from the UCA.
In the field next to the variable, type tw.system.process.instanceId. This sets the value of the someString variable to the ID of the running instance, which enables you to test the implementation in the Inspector as instructed in Testing the integration.
- Save your work.
Create a caller service
The next step in completing this sample inbound integration is to
create an Integration service to call the UCA to send the event when the
inbound Web Service (that you create in the following section) is called.
- Create an Integration service and name it Inbound WS Handler or something similar.
-
Drag an Invoke UCA component from the palette and place it between the Start Event and End Event in the service diagram.
- Use the Sequence Flow tool to connect the service components on the diagram.
- Click the Invoke UCA component in the diagram and then select the Step option in the properties.
- Type My UCA in the Name field.
- Select the Implementation option in the properties.
- Click the Select button next to the Attached Undercover Agent field and pick the Undercover Agent that you created in the preceding procedure, My UCA.
- Select the Data Mapping option in the properties.
-
Notice that the Input Mapping is automatically set to the someString variable from the UCA.
In the field next to the variable, type tw.local.someString. This sets the input value of the UCA to the local value of the someString variable, which enables you to test the implementation in the Inspector as instructed in Testing the integration.
- Save your work.
Create an inbound Web Service
Now you need to provide a way for an external system or application to
call into Lombardi. The recommended method for accomplishing this is to create
and publish a Web Service so that external applications can initiate a
particular Lombardi service or set of services. By invoking a SOAP call,
external applications can call the Web Service.
- Select the plus sign next to the Implementation category and then select Web Service from the list.
- In the New Web Service dialog, type KickTheBPD in the Name field and then click the Finish button.
- In the Operations section, click the Add button and select the Inbound WS Handler Integration service that you created in the preceding procedure from the list.
- In the Operation Detail section, change Untitled in the Operation Name field to doKick or something similar.
- Notice the WSDL URI in the Behavior section. You can use this URI to test the sample integration as instructed in Testing the integration.
- Save your work.
Testing the integration
After you build and link the input and output of the required
components as instructed in the preceding procedures, you can test the
completed inbound integration using the Inspector in Lombardi Authoring
Environment and a utility such as soapUI.
- Open the simple BPD that you created per the instructions in Add a message event to a BPD.
- Click the Run icon in the upper right corner of the BPD diagram.
-
When Lombardi prompts you to change to the Inspector interface, click Yes.
Click the check box if you want Lombardi Authoring Environment to change interfaces without prompting for approval.
-
In the Process Instances tab, click the received task for Step 1 and then click the Run task icon :

- The coach for the activity, which is the default Human service, opens in a browser. Click the Done button in the Coach to complete the first step.
-
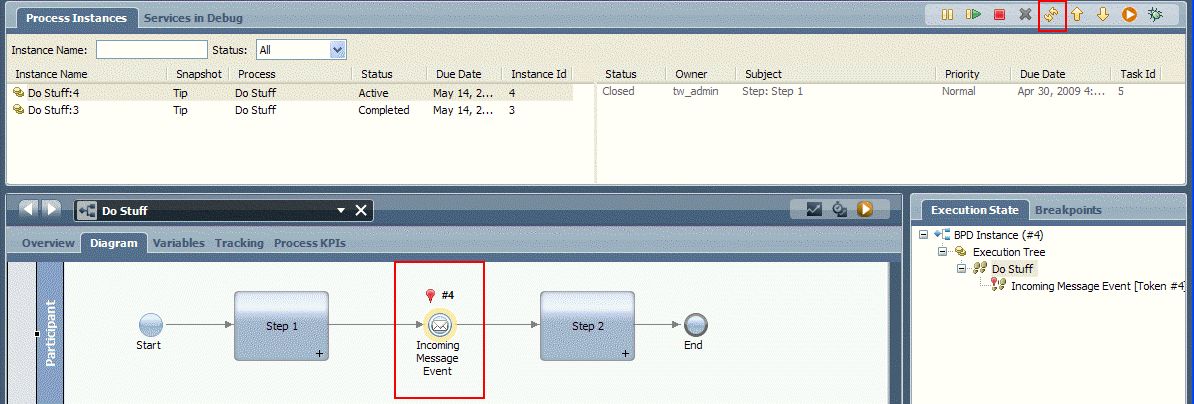
Click the Refresh icon in the toolbar as shown in the following image.
You can see that the process instance is waiting for the incoming message event:
- Use your SOAP utility, such as soapUI, point to the WSDL URI for the KickTheBPD inbound Web Service that you created per the instructions in Create an inbound Web Service.
- In your SOAP utility, initiate a request to the doKick method. In the someString parameter for the method, provide the Instance ID for the currently active instance, which you can see in the Process Instances tab in the Inspector. For example, in the preceding image, the instance ID of the active instance is 4.
- Click the Refresh icon in the Inspector toolbar. Now you can see that Step 2 has been received, meaning that the message event was successfully processed and the instance is able to move to the next step.
-
Click the Step 2 task to select it and then click the Run task icon :

- The coach for the activity, which is the default Human service, opens in a browser. Click the Done button in the Coach to complete the second step.
- Click the Refresh icon in the Inspector toolbar. You can see that the task for Step 2 is closed and the process instance has a status of Complete, indicating that the BPD instance has completed successfully.
Parent topic: Create inbound integrations