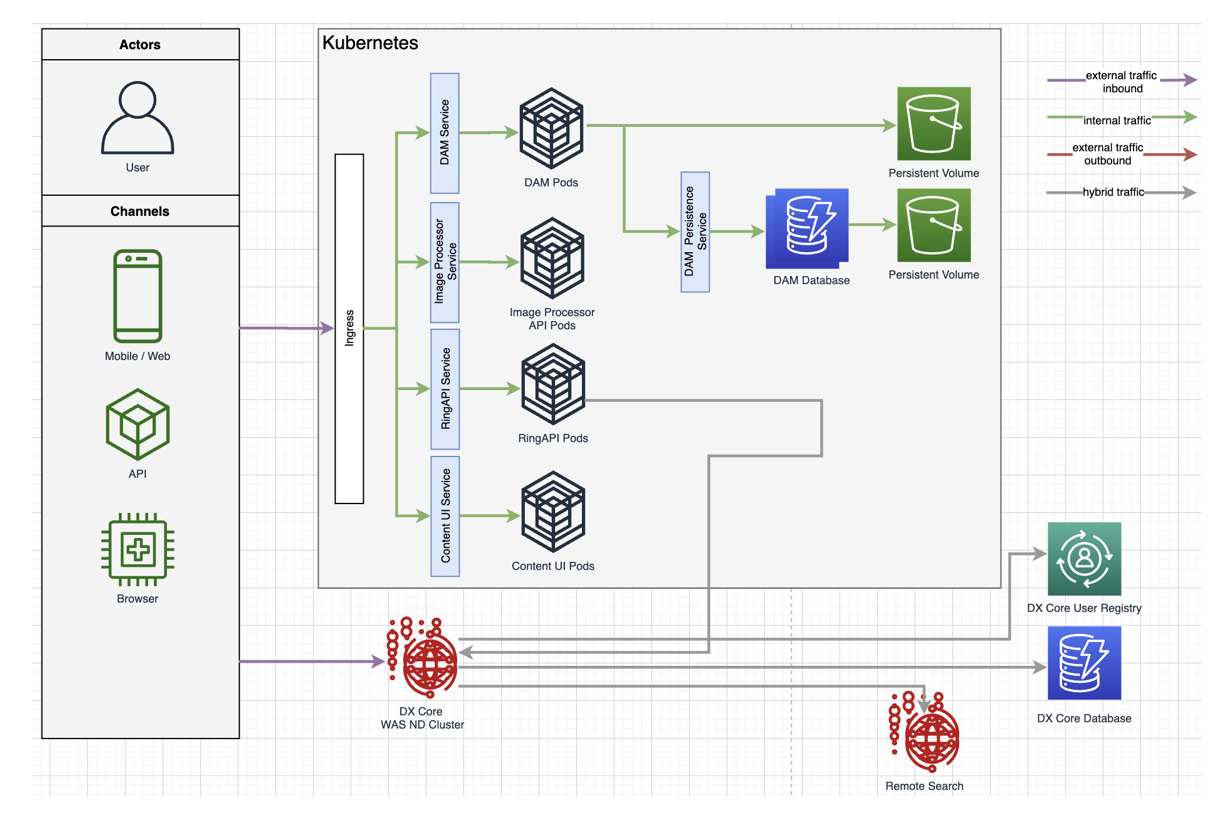
This section describes how to install HCL DX 9.5 Portal Server and
Web Content Manager services to on-premises platforms, operating with Digital Asset
Management, Content Composer, Experience API deployed to cloud-based Kubernetes and
OpenShift platforms.
Many organizations are using cloud and containerized deployments as part of their
overall systems environments. In parallel, organizations continue to operate
software applications and processes on-premises. The HCL WebSphere Portal 9.5
Hybrid deployment reference architecture and topics describe an approach to deploy
and manage HCL WebSphere Portal 9.5 core Portal Server and Web Content Manager
services on premises, and connect to cloud native components Digital Asset
Management, Content Composer, Experience API and related services in a production
environment. Notes:
The hybrid deployment of cloud-based components HCL Digital Asset
Management, Content Composer, and Experience API is supported on Red Hat
OpenShift with the HCL DX 9.5 CF19 release. It is not yet supported with
an on-premises clustered environment. The HCL DX hybrid deployment model
will be supported on additional Kubernetes platforms in later release
updates.
Virtual Portal support with Content Composer is not yet supported.
Support for this component in a virtual portal deployment model will be
available in later releases.
Practitioner Studio has been enabled in the Digital Experience 9.5 CF19
or higher installation. See the How to enable Practitioner Studio topic for instructions.
A common domain, using an SSL connection, is established for both the on
premise HCL DX 9.5 CF19 and higher on-premises environment, and the target Red Hat Open Shift platform deployment to contain cloud native
components HCL DX Experience API, Digital Asset Management and Content
Composer. For example, mytargetcloud.dx.com and
myonprem.dx.com would have the same domain:
dx.com.
Single sign-on must be enabled on HCL DX 9.5 CF19 or higher on-premises
environment. On DMGR or WAS Admin console under Security > Global Security > Web & SIP Security > Single Sign-On, Enabled is checked and
Domain name is set to common domain. For example,
dx.com.
A high-performance network connection is established between the HCL DX
9.5 CF19 and higher on-premises environment, and the target DX Red Hat
Open Shift platform deployment.
dxctl tool.
Volume Requirement : Requires an AccessMode of ReadWriteMany.
Reference the Storage Class and Volume topic for more information.
Ensure we have obtained a backup of the HCL DX 9.5 on-premises deployment. See
the Backup and Restore topic for additional
information.
Enabling Hybrid Deployment support in the HCL WebSphere Portal 9.5
on-premises environment
Follow the steps below to enable Hybrid deployment support in the HCL Digital Experience 9.5 on-premises environment.
Access the latest HCL DX 9.5 CF19 or higher release software from the HCL Software License
Portal.
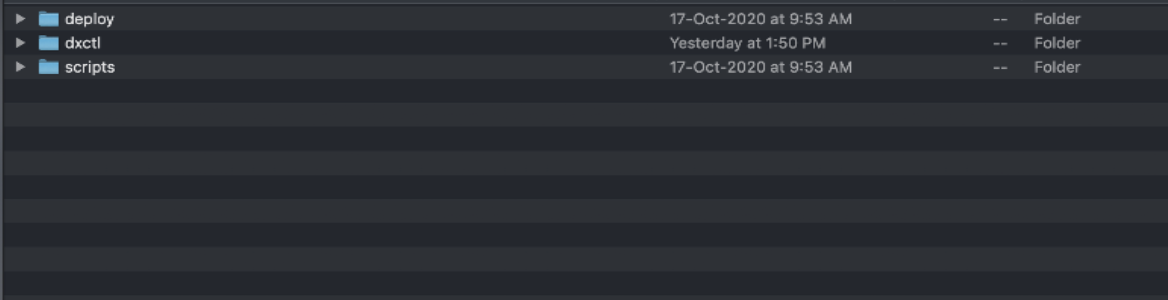
The package will include the file
hcl-dx-cloud-scripts, which should be
downloaded and extracted to your local system. This will present the following deploy, dxctl
and scripts directories as shown below:
Configure Properties of the dxctl tool.
Navigate to Āthe dxctl/properties Ādirectory and
open Āthe hybrid-deployment.properties Āfile in
your favorite editor.
Sample properties for deploying Digital Asset Management, Content
Composer, and the Experience API for use with an on-premise DX
environment are shown below. Use following example to modify the values
in the dxctl/properties/hybrid-deployment.properties
file to reflect the target Red Hat Open Shift environment to deploy the Content Composer, Digital Asset Management, and the Experience API
components.
Note: For a Hybrid deployment, the following items should be
enabled and/or not included in the deployment:
Enable
api.enabled(eAPI), composer.enabled(Content
Composer) and/or
dam.enabled(DAM) to true.
Not included
dx.tag
This is not required for a hybrid deployment as DX
Portal and WCM is installed on premises.
dx.database
This is not required for a hybrid deployment as it
is installed with DX Portal and WCM on
premises.
See the Reference list below for explanations of the file
items.
dx.namespace - ĀThe project or the namespace
to create or use for deployment.
dx.tag - Tag of the latest DX HCL DX 9.5
Portal and Web Content Manager image.
dx.database - By default, and initially,
this is Derby. HCL DX 9.5 supports Apache Derby, Oracle
Database, DB2, or Microsoft SQL Server. Acceptable
values are derby, oracle, db2, or msSql.
dx.config.cors - URL of the on-premises HCL
DX 9.5 CF19 or higher Portal and Web Content Manager
server.
hybrid.enabled - Boolean value to enable/disable.
hybrid.host - URL of On-premises DX 9.5
Portal and Web Content Manager server without port.
hybrd.port - Port of the on-premises HCL DX
9.5 CF19 or higher Portal and Web Content Manager
server.
api.enabled - Boolean value to enable/disable the Experience API.
api.tag - Tag of the your Experience API
image.
composer.enabled - Boolean value to enable/disable Content Composer.
composer.tag - Tag of the latest Content
Composer image.
dam.enabled - Boolean value to enable/disable Digital Asset Management.
dam.volume - Volume for Digital Asset
Management.
dam.stgclass - Storage class for Digital Asset Management.
dam.tag - Tag of your Digital Asset
Management image.
imgproc.tag - Tag of your Image-Processor
image.
override.ingress.host - Generated base URL
of the route.
dx.operator.tag - Tag of your hcldx-cloud-operator image.
dam.operator.tag - Tag of your Docker hcl-dam-operator tag.
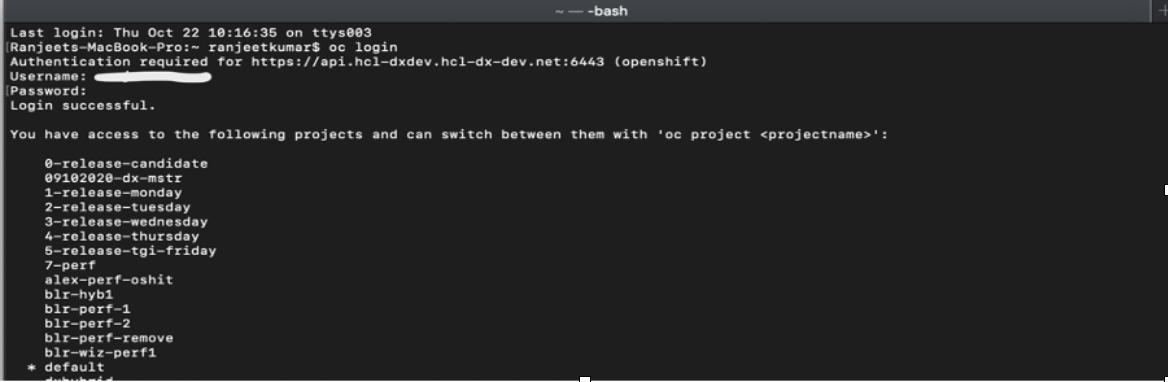
Deploy using the dxctl tool
Login to the Red Hat OpenShift platform using Kubectl.Log in to the target Red Hat OpenShift platform using the following OpenShift
command:
$ oc login
Enter the username and
password in response to system prompts. See the example below:
Deploy using dxctl.On your local workstation, navigate to Āthe
dxctl Āfolder:
$ cd ./hcl-dx-cloud-scripts/dxctl
Execute the below command to deploy from the local workstation to the target Red Hat
OpenShift platform to contain the HCL DX 9.5 CF19 and higher cloud
native components using the dxctl tool based on configured
properties:
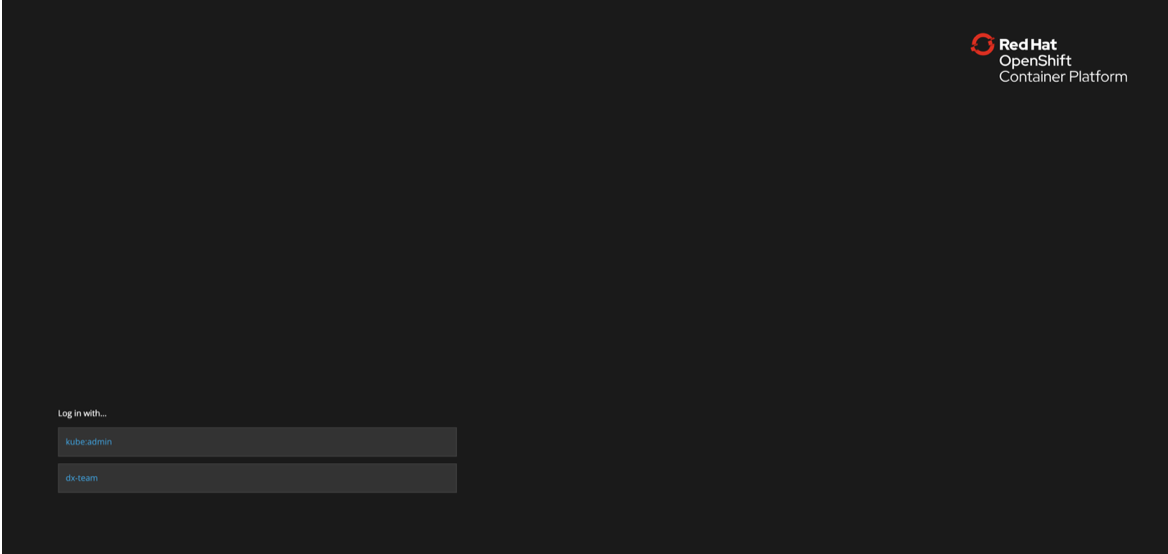
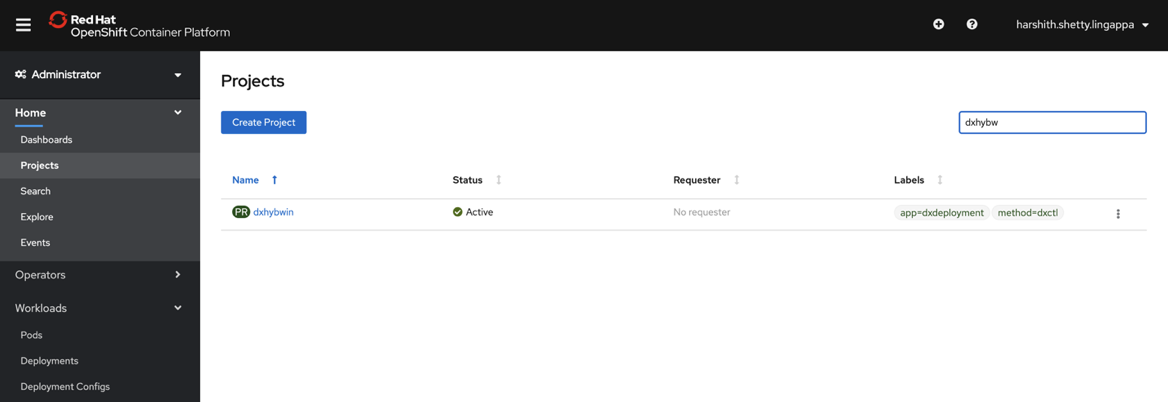
Login to the Red Hat OpenShift Console.Login to OpenShift
Dashboard Console with your credentials:
Once logged in, search for the HCL DX 9.5 project:
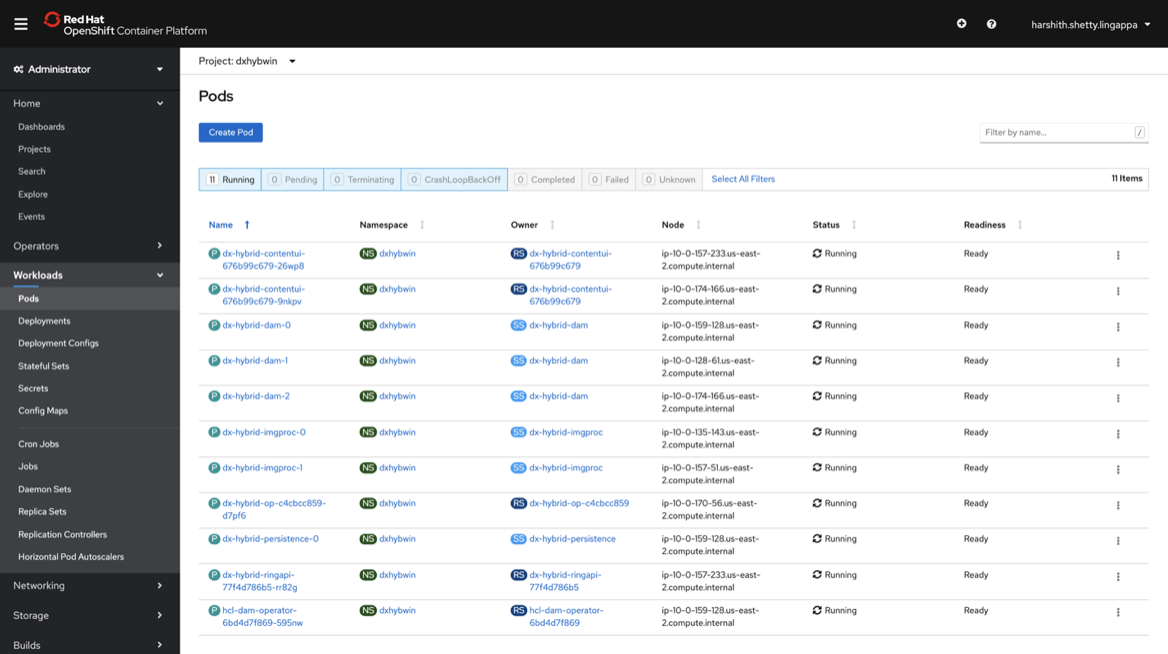
Ensure the deployment and pods are running and in a
ready state.
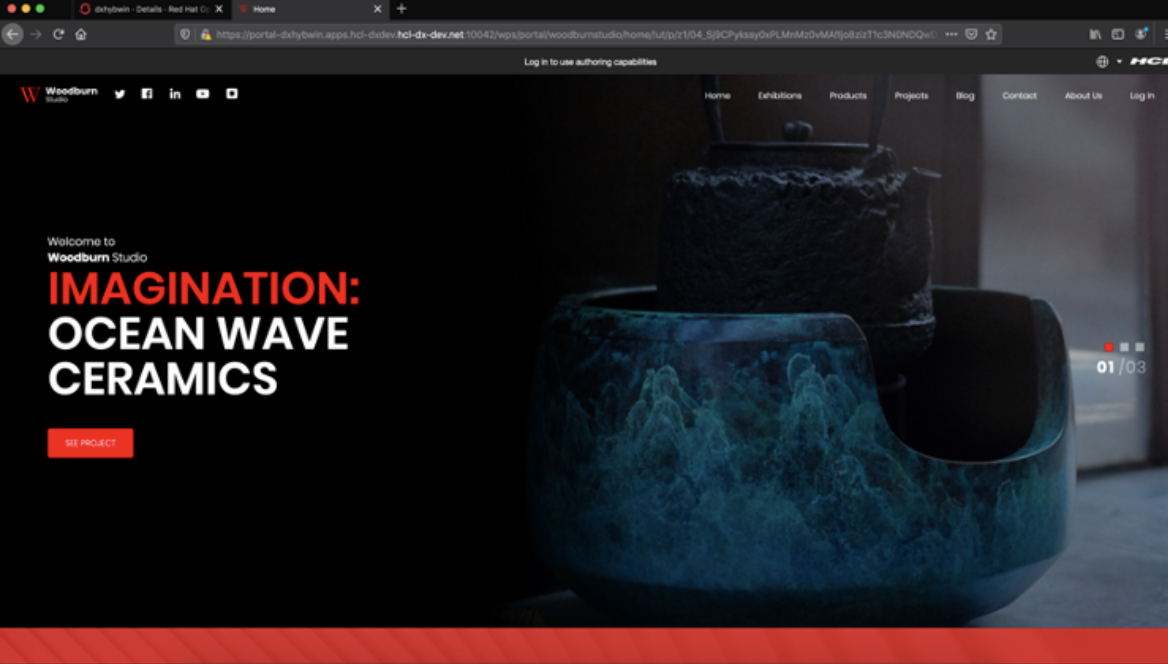
Access the HCL WebSphere Portal 9.5 on-premises server.
Access the host url of the HCL WebSphere Portal 9.5 on-premises deployment, which
is defined in the hybrid-deployment.properties file
and add the path below to the URL:
/wps/myportal.
Figure 2. Example -
https://hosturl:port/wps/myportal
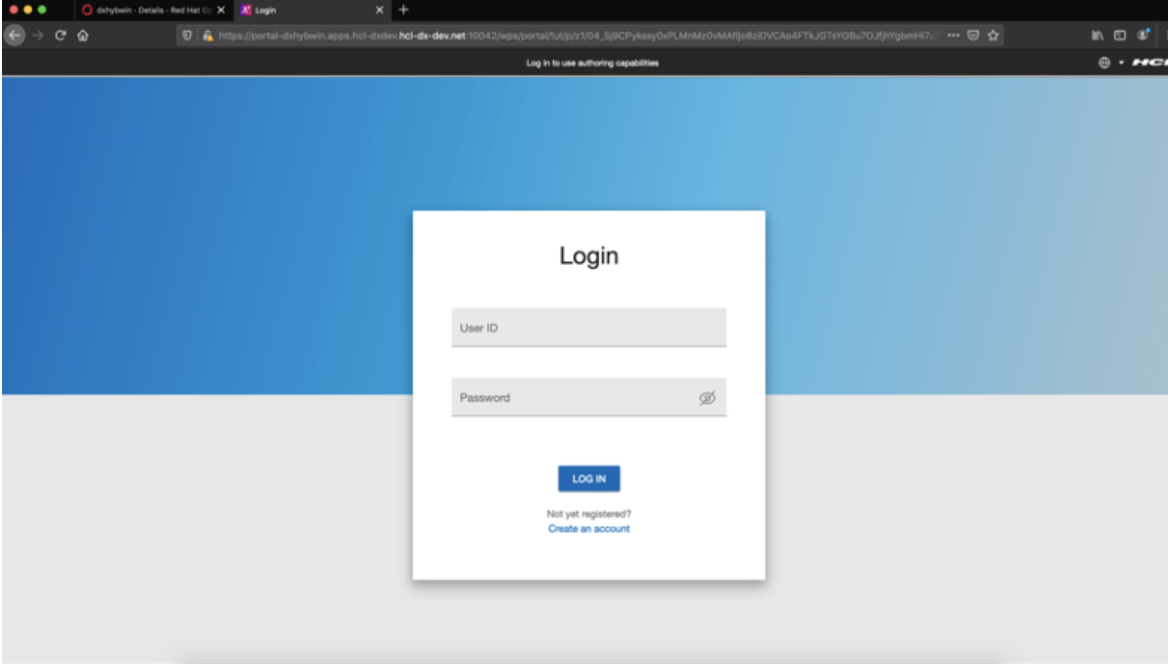
Login to the HCL DX 9.5 on-premises deployment using your appropriate
credentials.
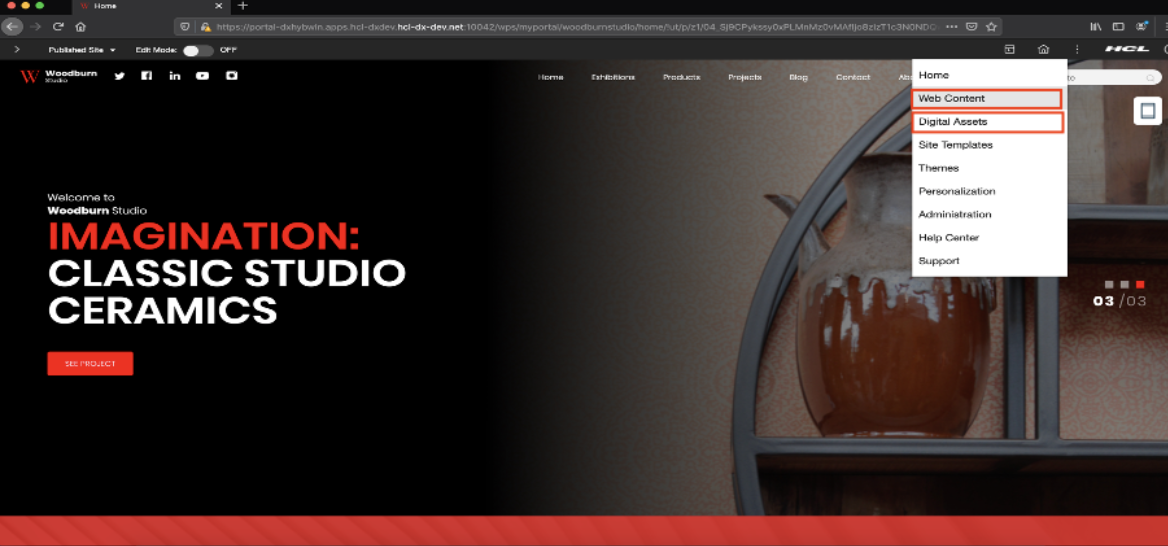
Once logged in, click the Open Applications
Menu in the right top corner.
If the Web Content and
Digital Assets menu items do not appear in
the menu selections, follow the steps below to enable Content Composer
and Digital Asset Management using the Configuration Engine.
Enable Content Composer and Digital Asset Management
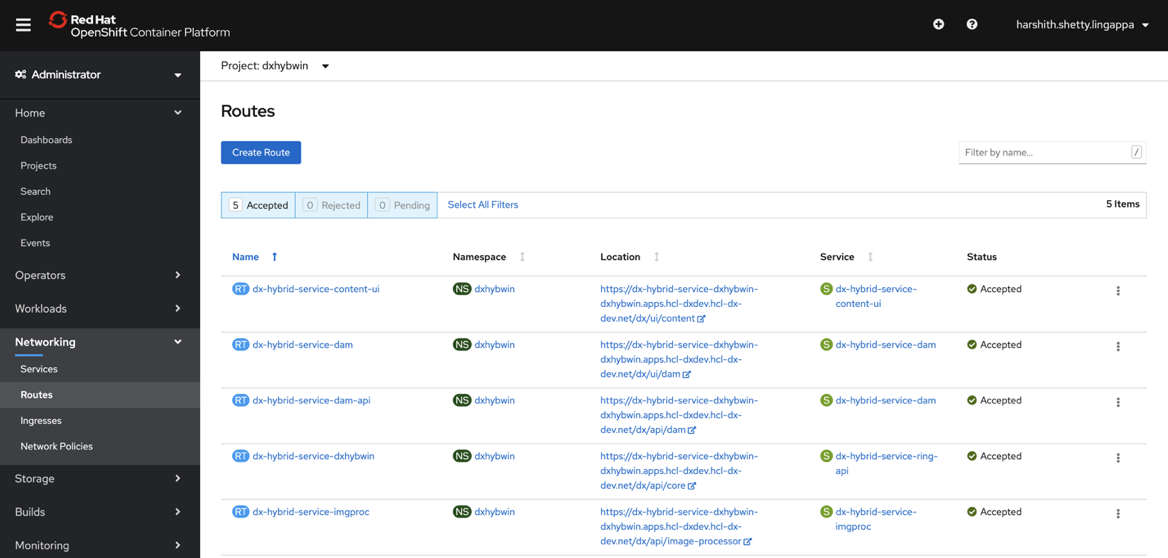
Locate the Content Composer and Digital Asset Management URLs.
The URLs will match the location values of the Red Hat OpenShift route of the component.
Copy the Content Composer and Digital Asset Management URL from the Red Hat OpenShift dashboard console and add the suffix/static as in
the example below:
Content Composer - Content UI URL Example :
https://dx-hybrid-service-dxhybwin-dxhybwin.apps.comp-dxdev.hcl-dx-dev.net/dx/ui/content/static
Digital Asset Management UI URL Example : https://dx-hybrid-service-dxhybwin-dxhybwin.apps.comp-dxdev.hcl-dx-dev.net/dx/ui/dam/static
Navigate to the ConfigEngine service.
Connect/login to the HCL DX 9.5 on-premises system and open a command
line prompt. Navigate to the following path on your deployment:
C:\> cd <path to wp_profile>\ConfigEngine
Enable Content Composer and Digital Asset Management to the Hybrid
deployment.If the on-premises HCL DX 9.5 Portal and Web Content
Manager deployment is installed to a Windows platform, execute:
Enable Content
Composer :
<Path to wp_profile>\ConfigEngine\ConfigEngine.bat enable-headless-content -Dstatic.ui.url=CONTENT_UI_URL -DWasPassword=... -DPortalAdminPwd=...
Note: In
the command above, the CONTENT_UI_URL=Route url is copied
from the RedHat Openshift dashboard with
/static.
Ā-DWasPassword=type is the IBM
WebSphere Application Server password
and Ā-DPortalAdminPwd=type is the DX
admin password.
Enable Digital Asset
Management :
<Path to wp_profile>\ConfigEngine\ConfigEngine.bat enable-media-library -Dstatic.ui.url=DAM_URL -DWasPassword=... -DPortalAdminPwd=...
Note: In
the command Āabove, the DAM_URL=Route
url is copied from the Red Hat Openshift dashboard with
/static.
-DWasPassword=type is the IBM WebSphere Application Server password
and Ā-DPortalAdminPwd=type is the DX
admin password.
If the on-premises HCL DX 9.5 Portal and Web Content Manager
deployment is installed to a Linux platform, execute:
Enable Content
Composer :
<Path to wp_profile>\ConfigEngine\ConfigEngine.sh enable-headless-content -Dstatic.ui.url=CONTENT_UI_URL -DWasPassword=... -DPortalAdminPwd=...
Note: In
the command above, the CONTENT_UI_URL=Route url is
copied from the RedHat Openshift dashboard with
/static.
Ā-DWasPassword=type is the IBM
WebSphere Application Server password
and Ā-DPortalAdminPwd=type is the DX
admin password.
Enable Digital Asset
Management :
<Path to wp_profile>\ConfigEngine\ConfigEngine.sh enable-media-library -Dstatic.ui.url=DAM_URL -DWasPassword=... -DPortalAdminPwd=...
Note: In
the command Āabove, the DAM_URL=Route url is copied
from the Red Hat Openshift dashboard with
/static.
-DWasPassword=type is the IBM
WebSphere Application Server password
and Ā-DPortalAdminPwd=type is the DX
admin password.
Once the above steps are completed, log in to the Digital Experience 9.5 deployment and validate the Web Content and
Digital Assets menu items appear.Example :